Embed Size (px)
Citation preview

This project is from The Sewing Directory - www.thesewingdirectory.co.uk
This project is part of the So Sew Simple series of projects for beginners written by Helen
Rhiannon and sponsored by Hantex.
Christmas Star Decoration
This Christmas decoration is So Sew simple!! The lovely thing about it is that you can use a
range of fabrics and only be using small amounts at any one time. Buttons and other trims
will really make these individual and you can make more than one and hang them from each
other or hang them on your tree.
They are perfect for decorating your home in time for Christmas!
What you need: -
I used four different fabrics for the star decoration so four fat quarters in total, but scraps can
be used also as the pieces are so small.

This project is from The Sewing Directory - www.thesewingdirectory.co.uk
Supplies
Fabric - 4 Fat Quarters if using four different fabrics or use charm packs.
I used Christmas fabrics kindly provided by Hantex.
Christmas printed tape or ribbon
Selection of buttons
Wadding
Fabric Scissors
Pins
Unpicker
Matching thread
Sewing Machine - Straight stitch length 2.5
Templates - Will open as a pdf, please print A4
Stage 1 - Cutting out your star decoration.
Lay fabric out with any patterns facing up. Lay your pattern pieces onto the fabric as
instructed. To save time when cutting the diamond pattern pieces, lay a few fabrics on top of
each other and pin the pattern piece through each layer. Cutting out will be much quicker for
you doing this!

This project is from The Sewing Directory - www.thesewingdirectory.co.uk
Stage 2 - Preparing your pattern pieces.
Iron your fabric pieces and lay them out flat on the table in the star shape with the RIGHT
side of the fabric facing up.
You will be working on one half at a time, so position your first half ready as shown in the
photo.

This project is from The Sewing Directory - www.thesewingdirectory.co.uk
Stage 3 – Sewing the diamond pattern pieces together.
With your bottom half laid out as shown in the photos, take the diamond on the right (Red
Holly) and place it face down on top of the middle diamond (Green Stars). The WRONG
side will be facing up at you.
Pin the top right hand edge of the diamonds together and sew a 1cm seam right from edge to
edge. Press the seam open and place back in position as shown in the photos.
Now take the diamond on the left (Red Snowmen) and place it face down on top of the
middle diamond (Green Stars). The WRONG side will be facing up at you.
Pin the top left hand edge of the diamonds together and sew a 1cm seam right from edge to
edge. Press the seam open and place back in position as shown in the photos.

This project is from The Sewing Directory - www.thesewingdirectory.co.uk
Repeat STEP 3 for the other half of the star.
If you are accurate when sewing, your seams should cross in the centre 1cm from the seam
edge but don’t worry if they don’t!
Stage 4 – Stitching the two halves of the star together.
Place the right sides together of both halves and pin together along the straight seam edge.
This project is from The Sewing Directory - www.thesewingdirectory.co.uk
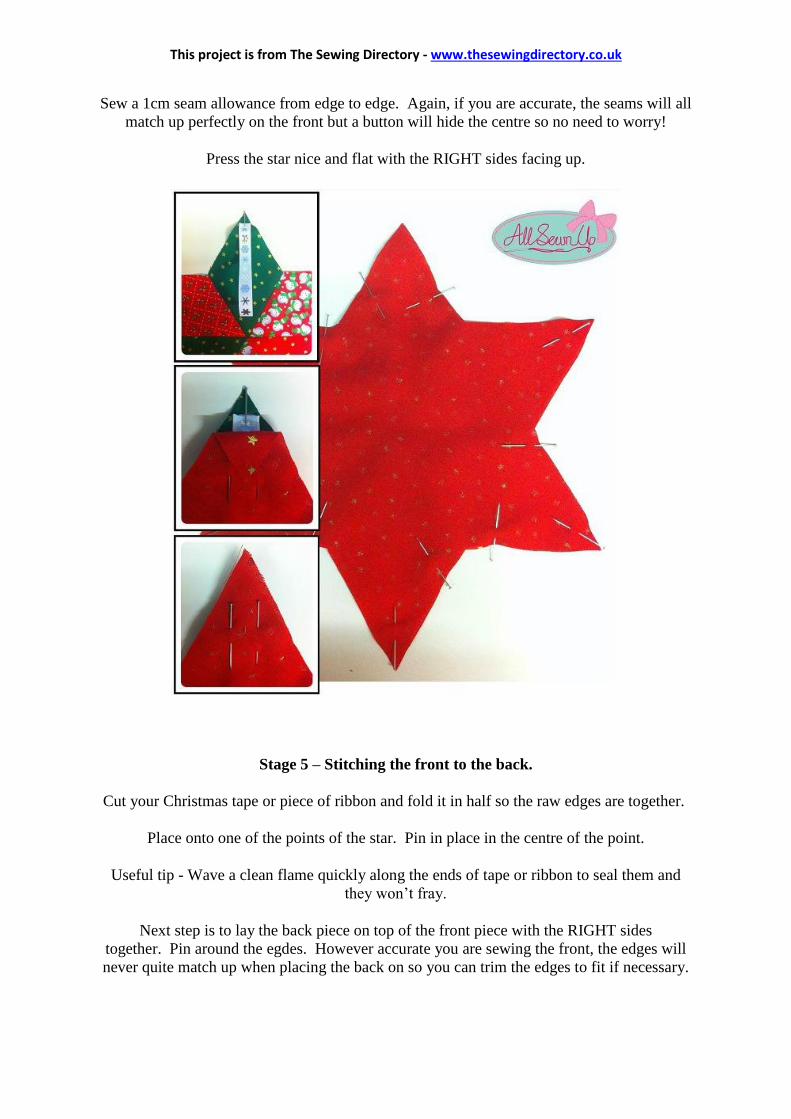
Sew a 1cm seam allowance from edge to edge. Again, if you are accurate, the seams will all
match up perfectly on the front but a button will hide the centre so no need to worry!
Press the star nice and flat with the RIGHT sides facing up.
Stage 5 – Stitching the front to the back.
Cut your Christmas tape or piece of ribbon and fold it in half so the raw edges are together.
Place onto one of the points of the star. Pin in place in the centre of the point.
Useful tip - Wave a clean flame quickly along the ends of tape or ribbon to seal them and
they won’t fray.
Next step is to lay the back piece on top of the front piece with the RIGHT sides
together. Pin around the egdes. However accurate you are sewing the front, the edges will
never quite match up when placing the back on so you can trim the edges to fit if necessary.

This project is from The Sewing Directory - www.thesewingdirectory.co.uk
Mark where the edges of the tape are with pins and make sure to square across the tape in a
straight line (see next photo on green diamond) rather than sew to a point as the finish will be
neater. Sew a 1cm seam allowance all the way around.
Remember to leave a gap on the straight edges to turn the star through. Make sure to sew
each point and leave the gap on a straight section.
Cut away excess fabric on the points. Using the tip of your scissors, snip into the seam
allowance at the corners, right up to the stitching but be careful not to cut the
stitching! Leave a 2mm gap.
This project is from The Sewing Directory - www.thesewingdirectory.co.uk
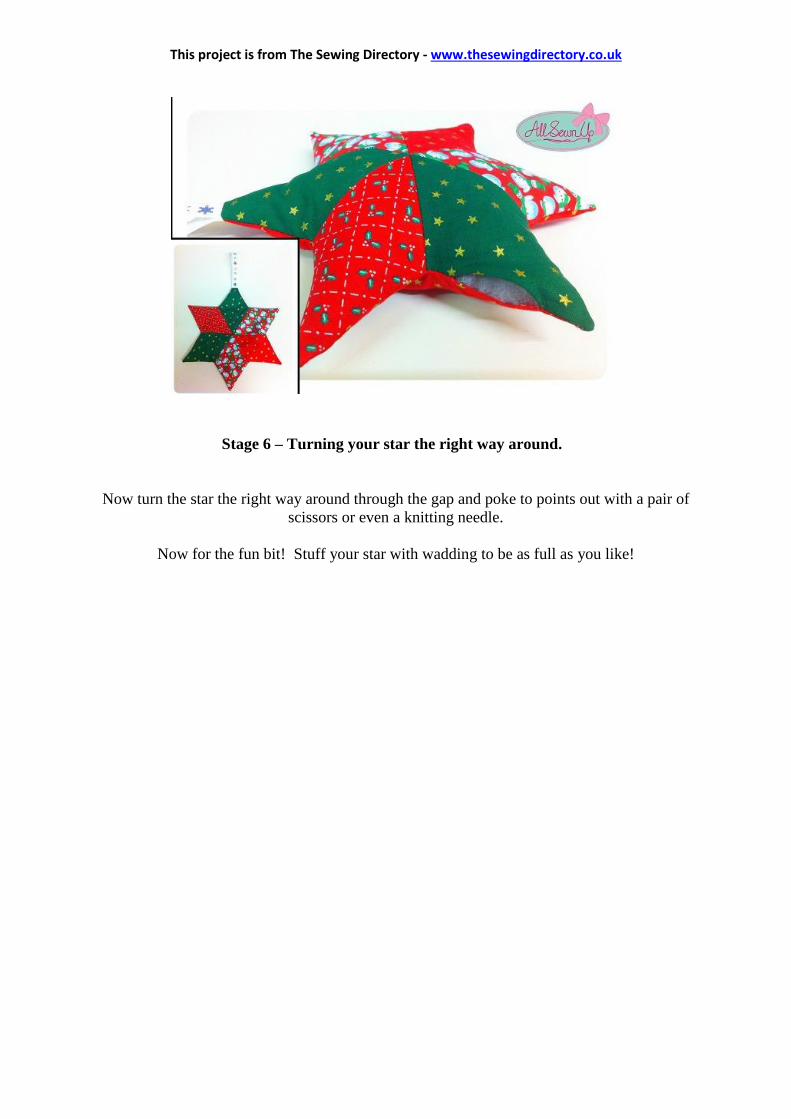
Stage 6 – Turning your star the right way around.
Now turn the star the right way around through the gap and poke to points out with a pair of
scissors or even a knitting needle.
Now for the fun bit! Stuff your star with wadding to be as full as you like!

This project is from The Sewing Directory - www.thesewingdirectory.co.uk
Stage 7 – Finishing your star decoration.
Hand stitch the gap up and then continue to hand stitch your button on in the middle. If you
sew through all of the layers and pull tight, the padded star really takes a lovely shape.
I chose to add a decorative bow at the top also. I handstitched it on with another button as a
decorative feature.
So, add as many buttons and trims as you like to make them as festive and as fantastic as you
can!

This project is from The Sewing Directory - www.thesewingdirectory.co.uk
Please let me know how you get on making your star decoration for Christmas and if you
have any questions, then please just get in touch!
Do share pictures on my facebook fanpage as I love to see what everyone makes.
Thanks and Happy Christmas! Helen@AllSewnUp