Embed Size (px)
Citation preview
Page 1
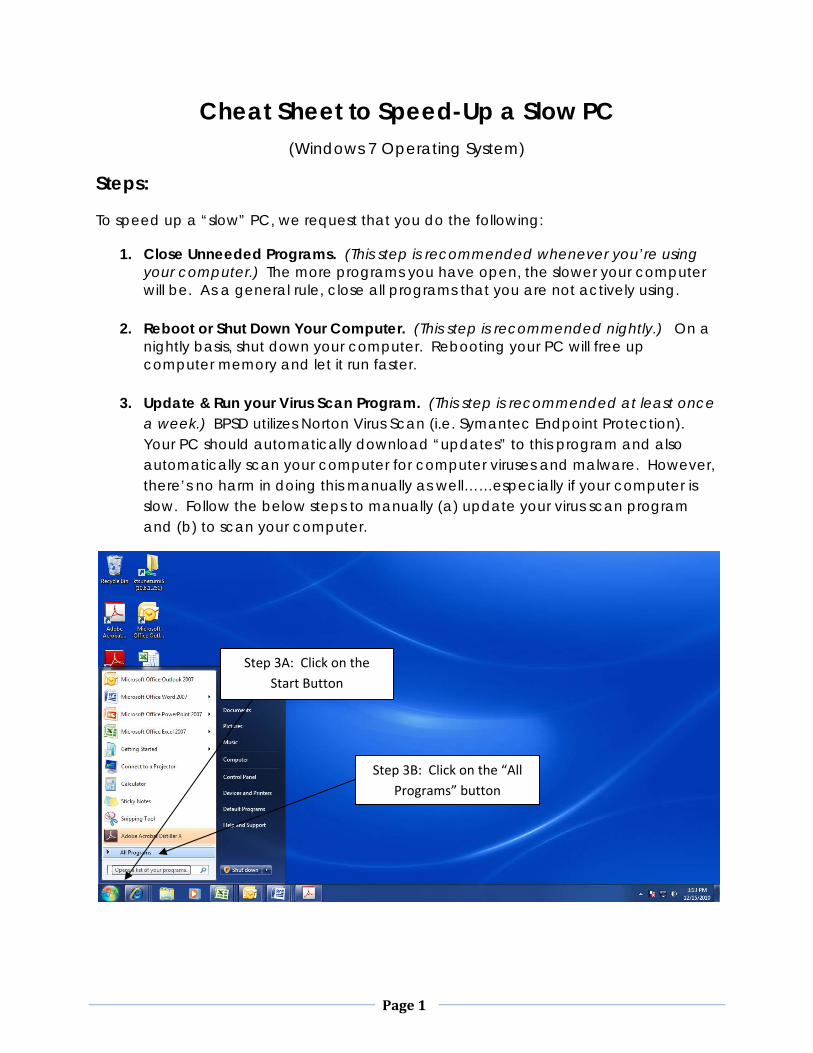
Cheat Sheet to Speed-Up a Slow PC (Windows 7 Operating System)
Steps:
To speed up a “slow” PC, we request that you do the following:
1. Close Unneeded Programs. (This step is recommended whenever you’re using your computer.) The more programs you have open, the slower your computer will be. As a general rule, close all programs that you are not actively using.
2. Reboot or Shut Down Your Computer. (This step is recommended nightly.) On a nightly basis, shut down your computer. Rebooting your PC will free up computer memory and let it run faster.
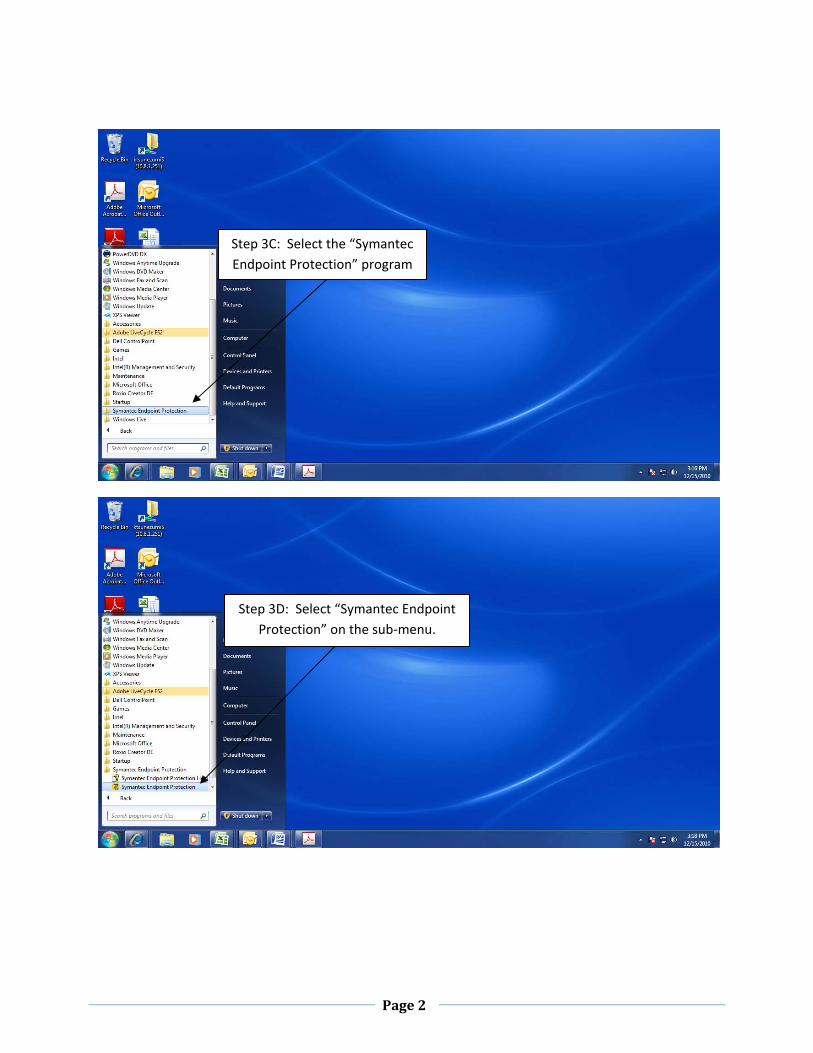
3. Update & Run your Virus Scan Program. (This step is recommended at least once a week.) BPSD utilizes Norton Virus Scan (i.e. Symantec Endpoint Protection). Your PC should automatically download “updates” to this program and also automatically scan your computer for computer viruses and malware. However, there’s no harm in doing this manually as well……especially if your computer is slow. Follow the below steps to manually (a) update your virus scan program and (b) to scan your computer.
Step 3A: Click on the
Start Button
Step 3B: Click on the “All
Programs” button
Page 2
Step 3C: Select the “Symantec
Endpoint Protection” program
Step 3D: Select “Symantec Endpoint
Protection” on the sub‐menu.

Page 3
Step 3F: Click on the “Live Update” button.
Note: A pop up window will automatically
appear to update Norton.
Step 3E: If this circle is green, skip
to Step 3H. If the circle is red or
yellow, continue on to Step 3F.
Step 3G: A pop‐up screen
will appear to update the
Virus scan software. Once
done, the pop‐up screen
will automatically close.
Page 4
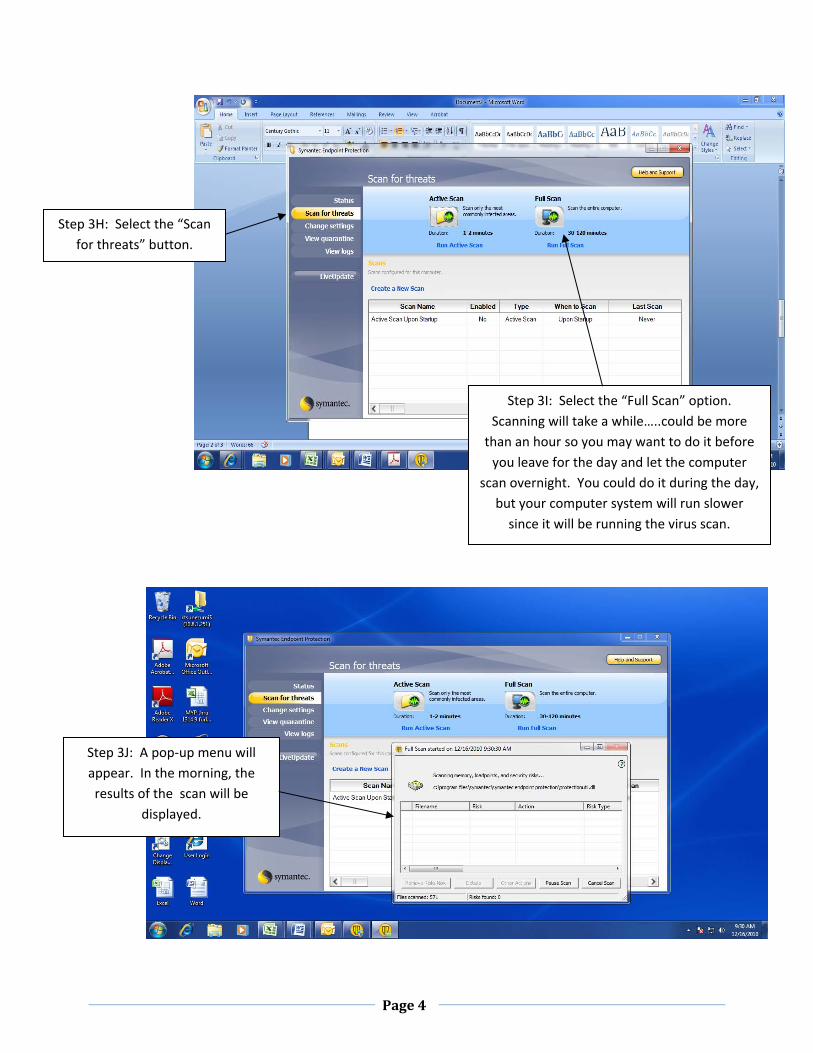
Step 3H: Select the “Scan
for threats” button.
Step 3I: Select the “Full Scan” option.
Scanning will take a while…..could be more
than an hour so you may want to do it before
you leave for the day and let the computer scan overnight. You could do it during the day,
but your computer system will run slower
since it will be running the virus scan.
Step 3J: A pop‐up menu will
appear. In the morning, the
results of the scan will be
displayed.

Page 5
Step 3K: Once the scan is complete,
your pop‐up window will display the
following. Notification that it’s
completed, the number of files that
was scanned, the number of risks
found and the action taken.
Step 3L: Click on the “Close”
button and you are done
with scanning your
computer.
Page 6
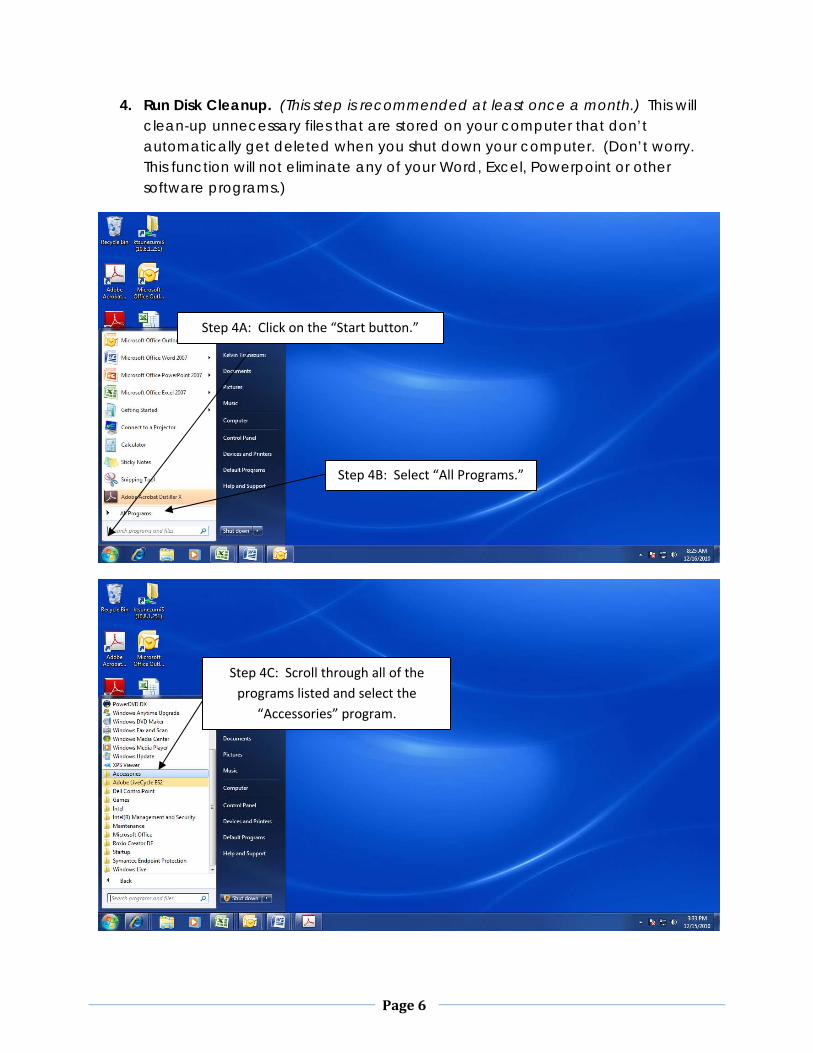
4. Run Disk Cleanup. (This step is recommended at least once a month.) This will clean-up unnecessary files that are stored on your computer that don’t automatically get deleted when you shut down your computer. (Don’t worry. This function will not eliminate any of your Word, Excel, Powerpoint or other software programs.)
Step 4A: Click on the “Start button.”
Step 4C: Scroll through all of the
programs listed and select the
“Accessories” program.
Step 4B: Select “All Programs.”
Page 7
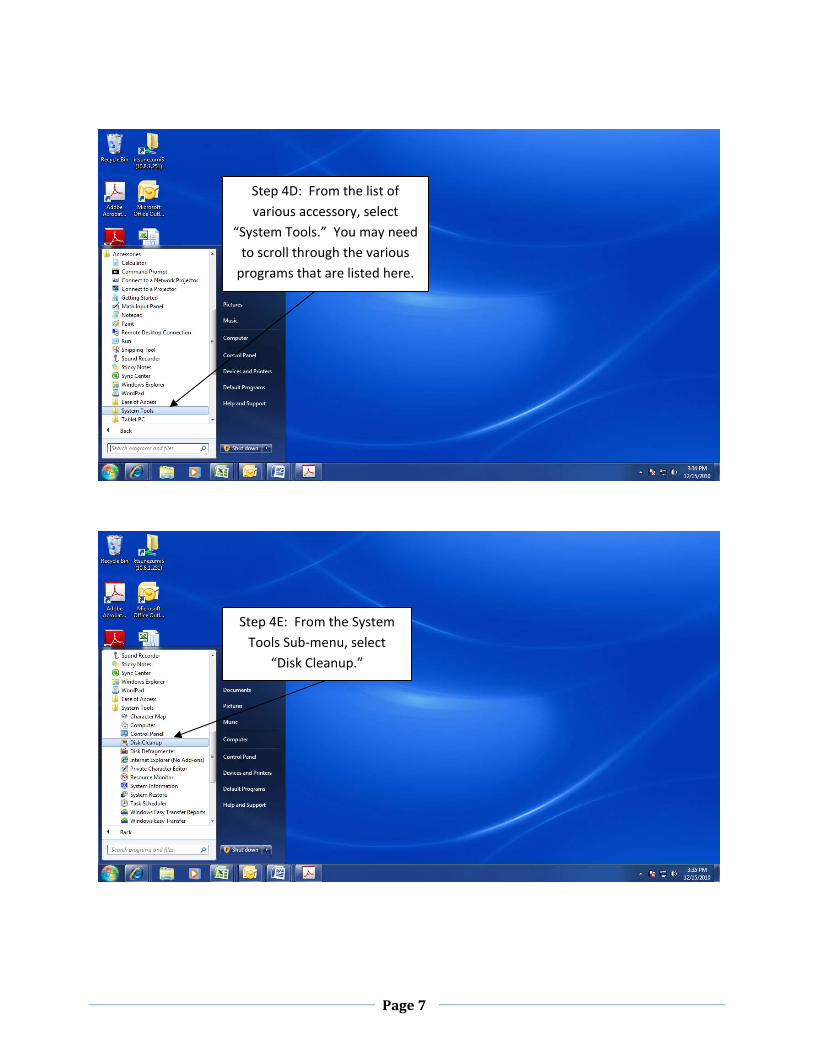
Step 4D: From the list of
various accessory, select
“System Tools.” You may need
to scroll through the various
programs that are listed here.
Step 4E: From the System
Tools Sub‐menu, select
“Disk Cleanup.”

Page 8
Step 4F: Disk
Cleanup will
automatically
start. Wait for
this pop‐up
menu to appear
and click “OK.”
Step 4G: When you click OK, this
2nd pop‐up screen will appear. Click
on the “Delete files” button.
Computer will run for a minute or
two to delete these unnecessary
files and then you are done.

Page 9
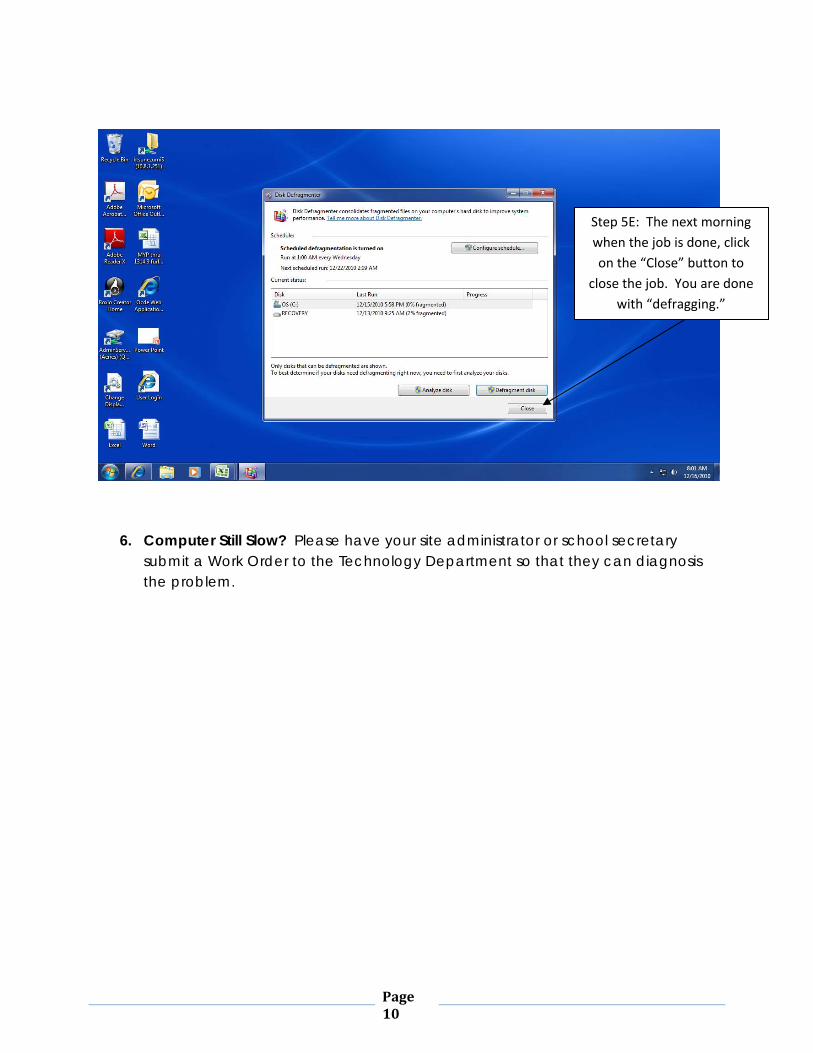
5. Run Disk Defragment. (This step is recommended once per month.) This will consolidate fragmented computer files so that your PC runs faster. This process takes several hours so run this program before you leave for the day and let it run overnight.
Step 5A: Repeat Steps 4A through 4C.
Step 5B: Select “Disk
Defragmenter.”
Step 5C: Select the
file called “OS (C)”
Step 5D: Select the
“Defragment disk” button.
This will take several hours for
the computer to “defrag.”
Page 10
6. Computer Still Slow? Please have your site administrator or school secretary submit a Work Order to the Technology Department so that they can diagnosis the problem.
Step 5E: The next morning
when the job is done, click
on the “Close” button to
close the job. You are done
with “defragging.”