Embed Size (px)
Citation preview

279
279
Chapter
Advanced Drawing Topics In Chapter 13, you gained some basic knowledge of Cocoa’s key drawing concepts,
such as using paths to describe shapes, copying images to the screen, and rendering
text. In this chapter, we’re going to expand upon this, getting you comfortable with a
few techniques that will bring your graphics to life. In the first section, we’ll show you
how to make a view respond to mouse events, letting users interact with your
customized views. In the second section, we’ll give you a brief introduction to Core
Animation, an exciting technology that lets you create smooth animations with just a few
lines of code.
Editing a Curve In chapter 13, we introduced you to the NSBezierPath class for drawing rounded
rectangles, ovals, straight lines, and points. If you’ve used a Bezier drawing tool in
Photoshop or other applications, you may have wondered what those shapes have to do
with Bezier curves at all! A Bezier curve is essentially a series of points describing a
path, and control points describing the curves between the points. As such, basically
any shape that can be drawn with a pen (in the real world, or virtually in a computer
graphics system) can be described as a Bezier curve, including straight lines and jagged
angles. However, as a layman’s term, Bezier curve usually means something more along
the lines of what you see here in Figure 14–1.
Here, the black curve is a Bezier curve, defined by two endpoints (the lower-left and
upper-right corners) and two control points, depicted here by rather gigantic circles at
the end of sticks. By dragging the control points around, the user can change the shape
of the curve. A view like this can be useful as a pacing control, determining the rate of
change of some value over time, such as the movement of object from one point to
another. Make the curve into a straight line to specify a perfectly linear transition, or
make a sort of S-shape to make a value start changing slowly, quickly ramp up halfway
through, and then slow down as it approaches the target value (sometimes known as an
“ease-in/ease-out” transition). This control is what we’re going to be implementing in
this section.
14

CHAPTER 14: Advanced Drawing Topics 280
Figure 14–1. A Bezier curve
Preparations Create a new Cocoa project in Xcode and name it CurveEdit. Do the usual steps for
turning on garbage collection. If you’re running on Snow Leopard or later, the new
project will contain a class called CurveEdit_AppDelegate. If you’re running on Leopard,
you’ll need to create the class, and add it to the MainMenu.xib file as usual.
The interesting part of this application will all be in the view object, but first let’s take
care of the infrastructure surrounding the view. We’re going to stick with the MVC
architecture for this project, which will help make sure that the view we create will be
usable as a standalone component. The text fields for displaying each control point’s x
and y values will be connected to our controller object with Cocoa Bindings, as will the
CurveView itself. The model in this app will just be a set of instance variables in our
controller class, but all the views could just as easily be bound to a real model object if
we chose to use or create one.
Make a new NSView subclass called CurveView, and leave its implementation as-is for
now. We’ll get back to it soon enough. Switch over to the app delegate class, and put
the following in its .h and .m files:
// CurveEdit_AppDelegate.h: #import <Cocoa/Cocoa.h> @interface CurveEdit_AppDelegate : NSObject { CGFloat cp1X; CGFloat cp1Y; CGFloat cp2X; CGFloat cp2Y;

CHAPTER 14: Advanced Drawing Topics 281
IBOutlet CurveView *curveView; } @property (assign) CGFloat cp1X; @property (assign) CGFloat cp1Y; @property (assign) CGFloat cp2X; @property (assign) CGFloat cp2Y; @end // CurveEdit_AppDelegate.m: #import "CurveView.h" #import "CurveEdit_AppDelegate.h" @implementation CurveEdit_AppDelegate @synthesize cp1X, cp1Y, cp2X, cp2Y; - (void)applicationDidFinishLaunching:(NSNotification *)aNotification { // make the CurveView notice my changes [curveView bind:@"cp1X" toObject:self withKeyPath:@"cp1X" options:nil]; [curveView bind:@"cp1Y" toObject:self withKeyPath:@"cp1Y" options:nil]; [curveView bind:@"cp2X" toObject:self withKeyPath:@"cp2X" options:nil]; [curveView bind:@"cp2Y" toObject:self withKeyPath:@"cp2Y" options:nil]; // make me notice the CurveView's changes [self bind:@"cp1X" toObject:curveView withKeyPath:@"cp1X" options:nil]; [self bind:@"cp1Y" toObject:curveView withKeyPath:@"cp1Y" options:nil]; [self bind:@"cp2X" toObject:curveView withKeyPath:@"cp2X" options:nil]; [self bind:@"cp2Y" toObject:curveView withKeyPath:@"cp2Y" options:nil]; // set initial values self.cp1X = 0.5; self.cp1Y = 0.0; self.cp2X = 0.5; self.cp2Y = 1.0; } @end
As you can see, our controller class is very simple. All it does is declare properties for
accessing the control points’ x and y values, establish some bindings on behalf of our
curveView (because we can’t do those in Interface Builder), and set some default
starting values for the control points.
Now open MainMenu.xib in Interface Builder. From the Library, drag out a Custom View,
and use the Identity Inspector to set its class to CurveView. Resize it to about 240x240.
Connect the app delegate’s curveView outlet to the new view. Because we’ve already
set up this object’s bindings in code, the CurveView instance is now all set (as far as our
nib is concerned).
Go back to the library and pull out an NSForm, dropping it below the CurveView. This is a
handy control that combines multiple text entry fields, each with its own label, into a
single view. This form will show us the x and y values for the first control point in a

CHAPTER 14: Advanced Drawing Topics 282
Bezier curve. Change its two labels to “X1:” and “Y1:”, and create bindings for each of
the cells in the form. For each, you want to bind its Value attribute to the
CurveEdit_AppDelegate object, using the model key paths cp1X and cp1Y, respectively.
Duplicate the NSForm and place it to the right of the first one. This form will show us the
values for the second control point, so rename its labels “X2:” and “Y2:”, and set up its
bindings similar to the previous form’s, but using cp2X and cp2Y as the key paths
instead.
Refer to Figure 14–1 to see what you’re shooting for, lay things out nicely, and resize the
window to match the content you’ve added. Save your work, go back to Xcode, and
Build & Run your project, just to make sure you haven’t made any errors at this point. The
resulting app won’t do anything but let you edit four text fields, but we’re about to
change that!
Bezier Plumbing Let’s get started with the CurveView class by establishing some infrastructure. CurveView
needs to keep track of two control points, which we’ll set up as four floats, each
accessible through a property, just like we did for the controller class. We also want to
use a technique similar to the one we used for MrSmiley in Chapter 13, so that the GUI
scales to match whatever size it’s rendered at. This time, we’re going to set up fixed
bounds so that we can always draw our curve in a square between (0,0) and (1,1) on the
plane, leaving a little extra surrounding space, so we’ll add some code that sets the
bounds to a square between (-0.1,-0.1) and (1.1,1.1), and maintain those bounds no
matter how our view is resized. Take care of all that by adding the bold lines shown
here:
// CurveView.h: #import <Cocoa/Cocoa.h> @interface CurveView : NSView { NSRect myBounds; CGFloat cp1X; CGFloat cp1Y; CGFloat cp2X; CGFloat cp2Y; } @property (assign) CGFloat cp1X; @property (assign) CGFloat cp1Y; @property (assign) CGFloat cp2X; @property (assign) CGFloat cp2Y; @end // CurveView.m: #import "CurveView.h" @implementation CurveView @synthesize cp1X, cp1Y, cp2X, cp2Y; - (void)setCp1X:(CGFloat)f { cp1X = MAX(MIN(f, 1.0), 0.0); [self setNeedsDisplay:YES]; }

CHAPTER 14: Advanced Drawing Topics 283
- (void)setCp1Y:(CGFloat)f { cp1Y = MAX(MIN(f, 1.0), 0.0); [self setNeedsDisplay:YES]; } - (void)setCp2X:(CGFloat)f { cp2X = MAX(MIN(f, 1.0), 0.0); [self setNeedsDisplay:YES]; } - (void)setCp2Y:(CGFloat)f { cp2Y = MAX(MIN(f, 1.0), 0.0); [self setNeedsDisplay:YES]; } - (id)initWithFrame:(NSRect)frame { self = [super initWithFrame:frame]; if (self) { // Initialization code here. myBounds = NSMakeRect(-0.1, -0.1, 1.2, 1.2); [self setBounds:myBounds]; } return self; } - (void)setFrameSize:(NSSize)newSize { [super setFrameSize:newSize]; [self setBounds:myBounds]; } - (void)drawRect:(NSRect)rect { // Drawing code here. } @end
Note that we don’t stop at just synthesizing the accessors for our properties. We
actually implement setters for each of our properties, and in each we enforce a limited
range on the input value, making it fit in the range from 0.0 to 1.0. We also mark the
window as “dirty,” forcing the system to redraw it whenever a property changes.
Drawing a Curve Now let’s move on to the fun part: drawing the curve itself. We’ll use preprocessor
#defines to establish values for colors and line widths, making it easier to spot them and
change them in order to tweak the appearance. Add these lines somewhere near the top
of CurveView.m:
#define CP_RADIUS 0.1 #define CP_DIAMETER (CP_RADIUS*2) #define BACKGROUND_COLOR [NSColor whiteColor] #define GRID_STROKE_COLOR [NSColor lightGrayColor] #define GRID_FILL_COLOR [NSColor colorWithCalibratedWhite:0.9 alpha:1.0] #define CURVE_COLOR [NSColor blackColor] #define LINE_TO_CP_COLOR [NSColor darkGrayColor] #define CP_GRADIENT_COLOR1 [NSColor lightGrayColor] #define CP_GRADIENT_COLOR2 [NSColor darkGrayColor]

CHAPTER 14: Advanced Drawing Topics 284
Now implement the drawControlPointAtX:y: and drawRect: methods as shown in the
following example. The code for drawing the control points demonstrates the use of the
NSGradient class, which can be used to fill the inside of a Bezier path instead of just a
solid color fill.
- (void)drawControlPointAtX:(CGFloat)x y:(CGFloat)y { NSBezierPath *cp = [NSBezierPath bezierPathWithOvalInRect: NSMakeRect(x - CP_RADIUS, y - CP_RADIUS, CP_DIAMETER, CP_DIAMETER)]; NSGradient *g; g = [[NSGradient alloc] initWithStartingColor:CP_GRADIENT_COLOR1 endingColor:CP_GRADIENT_COLOR2]; [g drawInBezierPath:cp relativeCenterPosition:NSMakePoint(0.0, 0.0)]; } - (void)drawRect:(NSRect)rect { [NSGraphicsContext saveGraphicsState]; // draw the background NSBezierPath *bg = [NSBezierPath bezierPathWithRoundedRect:myBounds xRadius:0.1 yRadius:0.1]; [BACKGROUND_COLOR set]; [bg fill]; // draw the grid NSBezierPath *grid1 = [NSBezierPath bezierPath]; [grid1 moveToPoint:NSMakePoint(0.0, 0.0)]; [grid1 lineToPoint:NSMakePoint(1.0, 0.0)]; [grid1 lineToPoint:NSMakePoint(1.0, 1.0)]; [grid1 lineToPoint:NSMakePoint(0.0, 1.0)]; [grid1 lineToPoint:NSMakePoint(0.0, 0.0)]; [grid1 moveToPoint:NSMakePoint(0.5, 0.0)]; [grid1 lineToPoint:NSMakePoint(0.5, 1.0)]; [grid1 moveToPoint:NSMakePoint(0.0, 0.5)]; [grid1 lineToPoint:NSMakePoint(1.0, 0.5)]; [GRID_FILL_COLOR set]; [grid1 fill]; [GRID_STROKE_COLOR set]; [grid1 setLineWidth:0.01]; [grid1 stroke]; // draw the lines leading to the control points NSBezierPath *cpLines = [NSBezierPath bezierPath]; [cpLines moveToPoint:NSMakePoint(0.0, 0.0)]; [cpLines lineToPoint:NSMakePoint(cp1X, cp1Y)]; [cpLines moveToPoint:NSMakePoint(1.0, 1.0)]; [cpLines lineToPoint:NSMakePoint(cp2X, cp2Y)]; [LINE_TO_CP_COLOR set]; [cpLines setLineWidth:0.01]; [cpLines stroke]; // draw the curve itself
CHAPTER 14: Advanced Drawing Topics 285
NSBezierPath *bp = [NSBezierPath bezierPath]; [bp moveToPoint:NSMakePoint(0.0, 0.0)]; [bp curveToPoint:NSMakePoint(1.0, 1.0) controlPoint1:NSMakePoint(cp1X, cp1Y) controlPoint2:NSMakePoint(cp2X, cp2Y)]; [CURVE_COLOR set]; [bp setLineWidth:0.01]; [bp stroke]; // draw the control points [self drawControlPointAtX:cp1X y:cp1Y]; [self drawControlPointAtX:cp2X y:cp2Y]; [NSGraphicsContext restoreGraphicsState]; }
This sort of drawing code can make for some pretty long methods, but it’s often pretty
straightforward, as in drawRect: shown previously. Not a single loop or if construct in
the whole method! Note that unlike the Mr Smiley code in chapter 13, this drawing code
doesn’t refer to our view’s bounds rect at all. Because we know that the bounds are
always adjusted to contain a square from (0,0) to (1,1), we make use of simple
hardcoded values to draw our graphics in and around this unit square.
Compile and run the app, and you should now see something like Figure 14–1. You
should be able to edit the values in the text fields (any values between 0.0 and 1.0 work
well), and see the control points and curve change accordingly.
Watching the Mouse But entering numeric values into text fields isn’t the point of this exercise, we want to
drag those control points around. As it turns out, this is pretty simple to do. NSView
contains methods that are automatically called whenever a user interacts with the view
by clicking, dragging, and so on. All we have to do is override a few methods, and we
can respond to every click, drag, and release of the mouse.
Let’s start by adding a pair of BOOL instance variables to our view, to keep track of
whether one of the control points is currently being dragged. Add the bold lines below to
the interface declaration in CurveView.h:
@interface CurveView : NSView { NSRect myBounds; CGFloat cp1X; CGFloat cp1Y; CGFloat cp2X; CGFloat cp2Y; BOOL draggingCp1; BOOL draggingCp2; }
Now let’s add some methods to the @implementation section of CurveView.m, in order to
start intercepting the mouse activity we want to watch. The first method, mouseDown:, will
be called whenever a user clicks in our view:

CHAPTER 14: Advanced Drawing Topics 286
- (void)mouseDown:(NSEvent *)theEvent { // get current mouse location, convert to our coordinate space // (the one expresed by our bounds) NSPoint mouseLocation = [theEvent locationInWindow]; NSPoint convertedLocation = [self convertPoint:mouseLocation fromView:nil]; // see if the click was on one of our control knobs NSPoint cp1 = NSMakePoint(cp1X, cp1Y); NSPoint cp2 = NSMakePoint(cp2X, cp2Y); if (pointsWithinDistance(cp1, convertedLocation, CP_RADIUS)) { draggingCp1 = YES; } else if (pointsWithinDistance(cp2, convertedLocation, CP_RADIUS)){ draggingCp2 = YES; } [self setNeedsDisplay:YES]; }
In the mouseDown: method, we first ask the window for the current mouse location, then
use a built-in NSView method to convert the coordinates from the window’s coordinate
system to our own. This means that a click in the upper right-hand corner of our unit
square, for instance, which starts off being the number of horizontal and vertical pixels
from the window’s lower left-hand corner, will end up being converted to (1,1) or
somewhere nearby. Then we do a pair of tests, to see if one of our control points is
being clicked on. This test is done using the following function, which you should add to
the top of CurveEdit.m, somewhere above the @implementation section:
static BOOL pointsWithinDistance(NSPoint p1, NSPoint p2, CGFloat d) { return pow((p1.x-p2.x), 2) + pow((p1.y - p2.y), 2) <= pow(d, 2); }
The pointsWithinDistance function makes use of the Pythagorean formula to determine
whether the distance between the two points (in our case, the center of a control point,
and the location of the mouse) is less than the distance we pass in (the control point
radius). Using this, we are able to check to see whether the user clicked on a control
point, and if so we set the corresponding flag (draggingCp1 or draggingCp2) to YES.
The next method to implement is mouseDragged:, which is called every time the mouse is
moved while the button is held down. Note that this method is called in every view the
mouse is dragged over. It’s always called in the view where the original mouse click
occurred; in a sense, whichever view receives the click “owns” all subsequent dragging.
In this method, we once again grab the mouse location from the event, transform it into
our view’s own coordinate system, and then update the coordinates for the control point
that’s currently being dragged. If none of them are currently being dragged, then nothing
happens.
- (void)mouseDragged:(NSEvent *)theEvent { NSPoint mouseLocation = [theEvent locationInWindow]; NSPoint convertedLocation = [self convertPoint:mouseLocation fromView:nil]; if (draggingCp1) {

CHAPTER 14: Advanced Drawing Topics 287
self.cp1X = convertedLocation.x; self.cp1Y = convertedLocation.y; } else if (draggingCp2) { self.cp2X = convertedLocation.x; self.cp2Y = convertedLocation.y; } [self setNeedsDisplay:YES]; }
The final method we need for dealing with the mouse is mouseUp:, which lets us handle
the release of the button. Like mouseDragged:, mouseUp: is always called on the view
which originated the drag, which means that after the user clicks in our view, no matter
where the user lets go of the mouse button, we will receive this message. All we do here
is simply set the flags to indicate that nothing is being dragged.
- (void)mouseUp:(NSEvent *)theEvent { draggingCp1 = NO; draggingCp2 = NO; }
With all that in place, Build & Run your app. You should now find that you can drag the
controls around, with the curve following every move, and the numbers in the text fields
changing as you drag.
A Little Polish That’s pretty cool, but as we’ve often noticed when toying around with a new GUI
design, some enhancements become self-evident with a little use. For one thing, we’re
always drawing the control points in the same order, so control point 2 is always on top,
even if we’re dragging control point 1 right over it. This feels pretty unnatural.
Fortunately, the fix for this is extremely simple, and this is the real, practical reason we
split out the control point drawing into two separate methods. At the end of the
drawRect: method, add the bold lines shown here:
// draw the control points if (draggingCp1) { [self drawControlPointAtX:cp2X y:cp2Y]; [self drawControlPointAtX:cp1X y:cp1Y]; } else { [self drawControlPointAtX:cp1X y:cp1Y]; [self drawControlPointAtX:cp2X y:cp2Y]; }
That’s it! Build & Run, and you’ll see that whenever you’re dragging the first control point,
it appears in front of the second.
It would also be nice to highlight the control point that’s currently being dragged, maybe
by drawing it with a different color. This is also a pretty easy change that gives the user

CHAPTER 14: Advanced Drawing Topics 288
some useful feedback. Start by defining some highlight colors for a new gradient, adding
these lines among the other #defines at the top of the file:
#define CP_GRADIENT_HIGHLIGHT_COLOR1 [NSColor whiteColor] #define CP_GRADIENT_HIGHLIGHT_COLOR2 [NSColor redColor]
Now, modify the drawControlPointAtX:y: methods, adding an additional parameter to
specify whether or not do draw the highlighted variant, and the bold lines shown here:
- (void)drawControlPointAtX:(CGFloat)x y:(CGFloat)y dragging:(BOOL)dragging { NSBezierPath *cp = [NSBezierPath bezierPathWithOvalInRect: NSMakeRect(x - CP_RADIUS, y - CP_RADIUS, CP_DIAMETER, CP_DIAMETER)]; NSGradient *g; if (dragging) { g = [[NSGradient alloc] initWithStartingColor:CP_GRADIENT_HIGHLIGHT_COLOR1 endingColor:CP_GRADIENT_HIGHLIGHT_COLOR2]; } else { g = [[NSGradient alloc] initWithStartingColor:CP_GRADIENT_COLOR1 endingColor:CP_GRADIENT_COLOR2]; } [g drawInBezierPath:cp relativeCenterPosition:NSMakePoint(0.0, 0.0)]; }
Because we added a parameter to the control-point drawing method, we need to also
change the way it's called at the end of drawRect, like this:
// draw the control points if (draggingCp1) { [self drawControlPointAtX:cp2X y:cp2Y dragging:draggingCp2]; [self drawControlPointAtX:cp1X y:cp1Y dragging:draggingCp1]; } else { [self drawControlPointAtX:cp1X y:cp1Y dragging:draggingCp1]; [self drawControlPointAtX:cp2X y:cp2Y dragging:draggingCp2]; }
Now Build & Run, and you'll see that the otherwise gray control points now light up red
while dragging, giving the user a nice visual cue.
Core Animation: A Primer One of the most exciting technologies Apple includes with Mac OS X is a graphics
system called Core Animation, which lets you easily create animated effects in your
applications. You can make your views slide, fade, rotate, and scale smoothly and
easily, often with just a few lines of code. In essence, Core Animation lets you specify a
change in an object—such as changing its location to a different spot in the window—in
such a way that, instead of the change happening instantaneously, it’s automatically
split up into several small movements that are rendered over time by Core Animation.
You can specify a transition’s length in seconds, as well as the timing or pacing of
the change. You can also group animations together, so that they all execute in
perfect synchrony.

CHAPTER 14: Advanced Drawing Topics 289
Core Animation Basics From a technical standpoint, the basic unit at the heart of all this is a class called
CALayer (a pre-release version of Core Animation was even called Layer Kit). Each
NSView can optionally have a CALayer attached to it, either by flicking a switch in
Interface Builder or setting it up in code. The process of assigning a layer to a view
actually begins a recursive process through all the view’s subviews, so that when a view
has a layer, all its subviews (and all their subviews, and so on) also acquire layers. Once
a layer is in place, you can start animating the view.
Under the hood, each CALayer is associated with some OpenGL structures for rendering
its graphics. OpenGL does a really great job of quickly drawing rectangles to the screen,
even rectangles that are resized, rotated, and the like, so using CALayer lets you have
views that do all sorts of on-screen tricks without slowing your application down. The
Core Animation APIs shield you completely from OpenGL itself, so it will work away
quietly without you having to think about it too much. The only thing to bear in mind
is that each layer uses some amount of the memory available to the computer’s
graphics hardware, so you’re better off using layers only for those parts of your
application where you actually want to do some animation, instead of applying them to
every view in every window.
Implicit Animations Any layer-backed view can be animated by using its animator proxy. This is a special
object that acts as a substitute for the view itself, setting up an animation corresponding
to the method it’s sent instead of making an immediate change. For instance, if you
want to animate the movement of a view, then instead of setting its frame like this:
[myView setFrame:newFrame];
you can set it like this:
[[myView animator] setFrame:newFrame];
To see this in action, create a new Cocoa project, and name it MovingButton. If you’re
on Snow Leopard, an app delegate class is created for you; but if not, do the usual
steps involved in creating a new NSObject class called MovingButton_AppDelegate and
adding it to your nib file. Now, populate the class’s .h and .m files as shown here:
// MovingButton_AppDelegate.h #import <Cocoa/Cocoa.h> @interface MovingButton_AppDelegate : NSObject {} - (IBAction)move:(id)sender; @end // MovingButton_AppDelegate.m #import "MovingButton_AppDelegate.h" @implementation MovingButton_AppDelegate - (IBAction)move:(id)sender { NSRect senderFrame = [sender frame]; NSRect superBounds = [[sender superview] bounds];

CHAPTER 14: Advanced Drawing Topics 290
senderFrame.origin.x = (superBounds.size.width - senderFrame.size.width) * drand48(); senderFrame.origin.y = (superBounds.size.height - senderFrame.size.height) * drand48(); [sender setFrame:senderFrame]; } @end
This simple action method just calculates a new random location for sender within its
superview and moves it there. Open MainMenu.xib in Interface Builder, put a button
called Move in the empty window, and connect it to the app delegate’s move: action.
Save your changes, Build & Run your project, and see that each time you click the Move
button it hops to another location in the window.
Now, let’s animate the movement. We just need to edit a single line, changing this:
[sender setFrame:senderFrame];
to this:
[[sender animator] setFrame:senderFrame];
Build & Run, click the Move button, and see what happens. Now, each time you click the
button, it slides smoothly into the new location instead of just switching instantaneously.
The object returned by the animator method is a proxy that responds to each of
NSView’s setter methods, and schedules animations to apply the change gradually.
Behind the scenes, Core Animation does all the work of modifying the relevant value bit
by bit until it reaches the target value specified in the call to the setter.
Each thread maintains an animation context, in the form of an instance of
NSAnimationContext, which among other things lets you set the length of time (in
seconds) that an implicit animation will take by first setting a value like this:
[[NSAnimationContext currentContext] setDuration:1.0];
If that’s all the control you need over your animations, then you can get pretty far using
implicit animations. If you need more fine-tuning, such as being able to ensure that
several animations occur in a synchronized manner, or trigger some activity when an
animation completes, then you’ll need something more, such as...
Explicit Animations Core Animation provides a technique for setting up animations explicitly in your code,
instead of using the “magic” of NSView’s animator method. Each animation you create
explicitly is framed by methods that start and stop a section of animation code, making
everything a little clearer. Combined with the added capabilities that explicit animations
have, it’s clear that this is the right approach for all but the simplest of animations.
In order to use Core Animation, you first have to add the QuartzCore framework to your
Xcode project. In Xcode, navigate to the Frameworks group, right-click on it, and
choose Add�Existing Frameworks... from the contextual menu that appears. Then, at the
top of MovingButton_AppDelegate.m, add the following line:

CHAPTER 14: Advanced Drawing Topics 291
#import <QuartzCore/QuartzCore.h>
Now you’re ready to refer to Core Animation classes in your own code. Let’s start by
modifying the previous example to use explicit animation instead of implicit. To do this,
we have to create an instance of a Core Animation class called CABasicAnimation, which
is capable of animating between values for any CALayer property which can be
animated. In our case, rather than animating the frame, we’ll animate the layer’s
position property. We explicitly set start and end locations for the position using the
animation’s toValue and fromValue properties. Note that these properties expect a
proper object, not just a struct like NSPoint, so we have to wrap each NSPoint value
inside an NSValue instance. After creating the animation we add it to the view’s layer,
along with a key. This key doesn’t have anything to do with the property we’re
animating, it’s only there to help us in case we later want to identify this animation.
Finally, we change the frame on the view object itself, since the animation only affects
the drawing of the view’s layer. We want the view to actually move as well, so we have
to set its target frame manually. Here’s the code to do all of this:
- (IBAction)move:(id)sender { NSRect senderFrame = [sender frame]; NSRect superBounds = [[sender superview] bounds]; CABasicAnimation *a = [CABasicAnimation animationWithKeyPath:@"position"]; a.fromValue = [NSValue valueWithPoint:senderFrame.origin]; senderFrame.origin.x = (superBounds.size.width - senderFrame.size.width)*drand48(); senderFrame.origin.y = (superBounds.size.height - senderFrame.size.height)*drand48(); a.toValue = [NSValue valueWithPoint:senderFrame.origin]; [[sender layer] addAnimation:a forKey:@"position"]; [[sender animator] setFrame:senderFrame]; [sender setFrame:senderFrame]; }
Note that we also removed the [[sender animator] setFrame:senderFrame]; line from
this method, because we don’t want to trigger an implicit animation this time. Before this
will work, we need to do one more step that the implicit animations took care of for us:
establishing layers for the views that need to be animated. Using the animator proxy
made this happen automatically, but now we have to turn it on ourselves, for any views
that are going to be animated, including the superview of any view that’s going to be
moving. In our case, this means that the button’s superview (the window’s content view)
needs to be given a layer, and it in turn will establish layers for its subview hierarchy,
which is just the button itself. The easiest way to do this is to go back to Interface
Builder, select the button in your GUI, and open the Effects Inspector (�2). At the top of
this inspector, you’ll see a section titled Wants Core Animation Layer, which shows a list
of view objects (see Figure 14–2).
CHAPTER 14: Advanced Drawing Topics 292
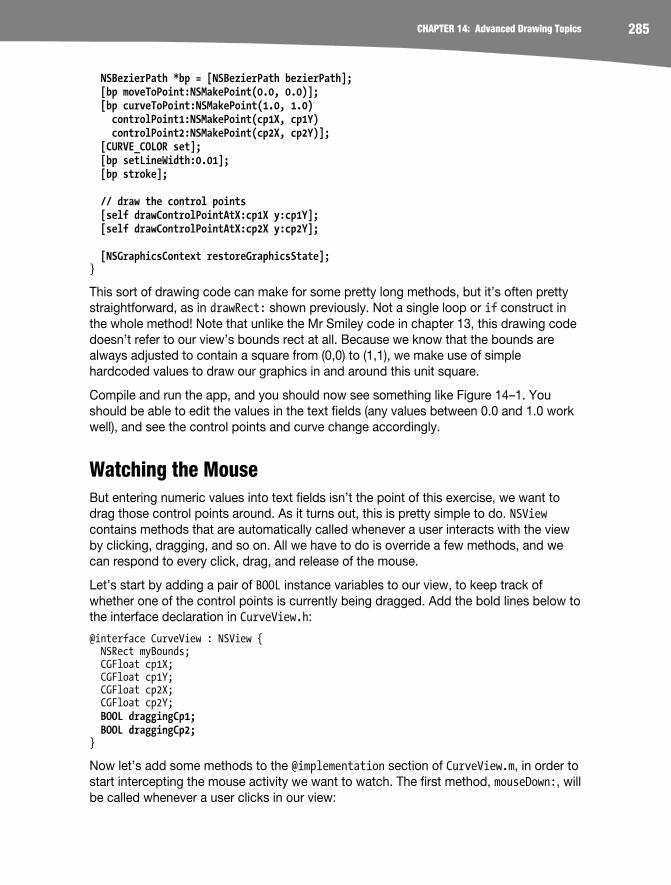
Figure 14–2. Establishing animation layers
The selected object (the button) is at the bottom, and all its superviews (in this case just
one view, the window’s content view) are stacked up above it. Click the checkbox to
turn on a layer for the content view. You can leave the checkbox for the button
unchecked, since the superview will establish a layer for it.
Now save everything, Build & Run your app, and you’ll see the exact same behavior as we
had before. So, this new version achieves the same result, at the expense of a few
additional lines of code. So far it doesn’t seem like much of a win here. But wait, there’s
more! Explicit animation via the animation classes, such as CABasicAnimation, lets us do
several more key things that we couldn’t do with implicit animation.
For starters, we can set the animation’s duration. Add the following line just before
adding the animation to the layer (with [[sender layer] addAnimation:a forKey:@"position"]) to make this animation run a little more slowly:
a.duration = 1.0;
Build & Run with that in place, and you’ll see that the button transitions more slowly. We
can also change the pacing of the animation, so that it doesn’t go from one point to the
next in a strictly linear fashion. Let’s set it to an “ease-in, ease-out” motion like this:
a.timingFunction = [CAMediaTimingFunction functionWithName: kCAMediaTimingFunctionEaseInEaseOut];
Build & Run now, and you’ll see that when you click the button, it starts moving slowly,
then gradually builds up steam and moves more quickly, only to taper off its speed as it
reaches its target. Under the hood, these timing functions work by providing a simple
mapping for a value shifting from 0.0 to 1.0, using a pair of control points to describe a
curve between the two. Does that ring a bell? This seems like the perfect use for the
curve editing control we implemented in the first half of this chapter! We can use the
curve editor to define the timing that will be applied to the button’s movement each time
we click it.
Start by adding the CurveView class files from the previous project. In the MovingButton
project, right-click on the Classes group, then select Add�Existing Files... from the context
menu. Navigate to the location of CurveView.h and CurveView.m, select them both, and
click the Add button. In the sheet that appears, click to turn on the Copy items into
destination group’s folder checkbox, and make sure the MovingButton target is checked
in the lower part of the sheet (see figure 14–3).

CHAPTER 14: Advanced Drawing Topics 293
Figure 14–3. Adding existing files to a project
This time, rather than setting up bindings to this control, let’s just add an outlet in our
controller definition so that we can access the CurveView we’re going to set up. Modify
MovingButton_AppDelegate.h, adding the bold lines here:
#import <Cocoa/Cocoa.h> @class CurveView @interface MovingButton_AppDelegate : NSObject { IBOutlet CurveView *curveView; } - (IBAction)move:(id)sender; @end
Now switch back to Interface Builder. We’re going to add a small NSPanel which will
work as a sort of inspector for our button animation. From the Library, drag out an
NSPanel, then drag a Custom View into the new panel. Resize the Custom View to
100�100, and change its class to CurveView. Your GUI in Interface Builder should now
look something like Figure 14–4.

CHAPTER 14: Advanced Drawing Topics 294
Figure 14–4. Adding a CurveView for configuring our animation
Now connect the app delegate’s curveView outlet to the CurveView instance you just
created, save your work, and switch back to Xcode. Import the CurveView header
somewhere at the top of the app delegate’s implementation file:
#import "CurveView.h"
Update the move: method as follows:
- (IBAction)move:(id)sender { NSRect senderFrame = [sender frame]; NSRect superBounds = [[sender superview] bounds]; CABasicAnimation *a = [CABasicAnimation animationWithKeyPath:@"position"]; a.fromValue = [NSValue valueWithPoint:senderFrame.origin]; senderFrame.origin.x = (superBounds.size.width - senderFrame.size.width)*drand48(); senderFrame.origin.y = (superBounds.size.height - senderFrame.size.height)*drand48(); a.toValue = [NSValue valueWithPoint:senderFrame.origin]; a.duration = 1.0; a.timingFunction = [CAMediaTimingFunction functionWithControlPoints:curveView.cp1X :curveView.cp1Y :curveView.cp2X :curveView.cp2Y]; // Add animation to layer; this also starts the animation [[sender layer] addAnimation:a forKey:@"position"]; [sender setFrame:senderFrame]; }
Now, every time the user clicks the Move button, the resulting animation’s timing
function will be determined by the values in the CurveView control. Save your work, Build

CHAPTER 14: Advanced Drawing Topics 295
& Run your app, and you should see this happening. Drag the handles around to create
different curve shapes, click the Move button, and see how it moves.
Grouping Animations You’ve now gotten a taste of how Core Animation works, but in the somewhat silly
context of randomly moving a button around the screen. Not really a GUI design that
we’d recommend! In the real world, Core Animation is most often used to animate
transitions between different views. Chances are, you’ve seen this used again and again
on the iPhone (the platform that Core Animation was really built for, before being
“backported” to Mac OS X). All the smooth slides, scales, and fades that occur
throughout the iPhone interface are implemented with Core Animation. In Mac OS X,
Core Animation isn’t quite so omnipresent, but it’s put to good use in places like the
“coverflow” view mode, which first appeared in iTunes and is now a part of Finder as
well. In this section, you’ll see how to implement some nice transitions yourself, by
grouping animations together so that they run simultaneously.
In Xcode, by create a new Cocoa project called FlipIt. As usual, turn on garbage
collection, and make sure you have a FlipIt_AppDelegate class both in the Xcode
project, and properly connected in MainMenu.xib. What we’re going to do is present a
GUI where the user can flip between several “pages,” and Core Animation will animate
nicely between them. We’ll use a box in the nib’s empty window to show the content
pages, which themselves will be held in an NSTabView. We won’t display the tab view
itself, we’re just using it as a handy container for our content pages.
Start by defining the interface for our controller class. It contains outlets for the two
views we need to manage: tabView, the object containing the views we’re going to
display, and box, the on-screen view where we’ll be displaying them. It also has instance
variables for pointing at the views that are actively transitioning in and out of focus, as
well as an array for holding all the available views, and an integer index to identify the
current focused view. Finally, our interface declares a pair of action methods that will be
used by a matching pair of buttons in the GUI to tell our controller to flip between views.
@interface FlipIt_AppDelegate : NSObject { IBOutlet NSBox *box; IBOutlet NSTabView *tabView; NSView *leftView; NSView *rightView; NSView *middleView; NSArray *items; NSInteger currentTabIndex; } - (IBAction)next:(id)sender; - (IBAction)previous:(id)sender; @end
Now open MainMenu.xib in Interface Builder, where we’ll define our views. Start off by
dragging a button from the Library to the bottom of your GUI’s empty window. Then
duplicate the button, and title the two buttons Previous and Next. Connect the buttons

CHAPTER 14: Advanced Drawing Topics 296
to the matching action methods in the app delegate, and place the two buttons side by
side at the lower center of the window (see Figure 14–5).
Figure 14–5. Preparing the window
Now find an NSBox in the Library and drag it to the empty window, placing it above the
buttons and resizing it to fill most of the screen. Use the Attributes Inspector to remove
the box’s title by setting the Title Pos popup to None (see Figure 14–6). Then connect
the app delegate’s box outlet to the NSBox, so that we can reach it from code.
Figure 14–6. The display window is now ready.

CHAPTER 14: Advanced Drawing Topics 297
Our next course of action is to set up a set of views for switching in and out of the main
view. We’ll use an NSTabView for this, simply because it’s a convenient way for us to
build a series of views in Interface Builder that can later be maintained as a list of off-
screen views when our application runs. Find an NSTabView in the Library, but drag it to
the main nib window instead of the GUI window you’ve been building. You’ll see that the
tab view appears as a top-level icon in the nib window, alongside the app delegate, the
window, and other items (see Figure 14–7).
Figure 14–7. It’s an unusual place to find a tab view, but there it is.
A tab view (or any other NSView subclass) placed at the top level of a nib file won’t be
displayed when the nib is loaded, but as long as we have an outlet pointing at it, we’ll be
able to access it and make use of it in any way we like, including putting it into a
window’s view hierarchy. In our case, we’ll never put the tab view itself on display, just
the content views it contains. Connect the app delegate’s tabView outlet to the tab view
so that we can access it later.
Double-click the tab view icon, and you’ll see a window appear containing just the tab
view. This window is just something Interface Builder uses to give you a structure to edit
the tab view in, and does not represent an actual NSWindow in your nib file. You can verify
this by clicking in the window’s title bar and observing the title bar of the Inspector window, which always tells you what it’s inspecting. In this case, selecting the tab view’s
window title bar will still show “Tab View” in the Inspector title bar, unlike normal
windows you edit which will change it to “Window.” One side effect of this is that the tab
view displayed in this way doesn’t have the resize controls on all four sides and all four
corners like it would in a normal window. Instead, you can use the resizing gadget at the
window’s lower-right corner to resize your view. Do that now, making it about the same
size as the NSBox you put into the window a little while ago.

CHAPTER 14: Advanced Drawing Topics 298
Now let’s put some content into this tab view, the “pages” that we’ll be able to flip
between. By default the tab view contains just a few content views, but feel free to
increase that number (using the Attributes Inspector) so that you have even more views
to switch between. The actual content isn’t that important, as long as something is
unique on each page so that you can easily see the content change from one page to
the next. A good start is just to grab a label from the Library, give it a nice big font, and
change its text to the word “One.” Then copy this label and paste it into each of the
other views (which you can switch between using the tabs at the top, just like
otherwise), changing the label accordingly each time. Just for fun, add some unique
items to each page as well (a table view here, a set of buttons there) so that when the
app is done, you’ll see a little more things in motion while flipping between pages. Save
your work, and go back to Xcode.
It’s time to start implementing our app delegate class in FlipIt_AppDelegate.m. This
class will have a number of methods for preparing a transition by setting up the next
view to be displayed, out to the side of the box; transitioning the new view into position;
and transitioning the current view out to the other side. Because we want to be able to
do transitions in two directions, depending on whether we’re flipping to the right or the
left, each of those methods exists in two forms, setting things up and executing a
rightward flip or leftward flip. In addition, we’ll implement our two action methods that
start up the transitions, and a startup method (applicationDidFinishLaunching:) that
sets up the initial view.
Let’s start by creating a preprocessor definition, ANIM_DURATION, to define the duration
(in seconds) of the animations we’re going to create. By putting this in one place, at the
top of the file, we can easily experiment, tweaking this setting until we find a speed we
like. Define it like this:
#define ANIM_DURATION 1.0
Now let’s move on to the applicationDidFinishLaunching: method. Here we grab the
list of views from the tabView, and set up currentTabIndex to point at the end of the
array so that the first item will be lined up (more on this later). Then we call the first of
our internal methods, prepareRightSide, which will set up the next view for display on
the right side of the box. Then we make use of the ANIM_DURATION value, using it to
specify the duration of any animations we create within the current animation context.
Then we call another internal method, transitionInFromRight, which will start up the
animations to move the next view into the right position. Finally we set currentTabIndex
to point at item zero (the first object in the items array).
- (void)applicationDidFinishLaunching:(NSNotification *)n { items = [tabView tabViewItems]; currentTabIndex = [items count]-1; [self prepareRightSide]; [[NSAnimationContext currentContext] setDuration:ANIM_DURATION]; [self transitionInFromRight]; currentTabIndex = 0; middleView = rightView; }

CHAPTER 14: Advanced Drawing Topics 299
Now let’s write the code for the two internal methods referenced here, prepareRightSide
and transitionInFromRight. We won’t bother putting these methods into a separate
protocol or anything. In Objective-C, code can freely call any other methods declared
higher up in the same @implementation block, even if those methods aren’t declared in
any @interface, so all we have to do is put these internal methods somewhere above
applicationDidFinishLaunching:, so that the code in there can call these methods. The
first of these, prepareRightSide, starts off by determining the index of the next view to
display, by adding one to currentTabIndex and then doing a simple bounds check on
the new index, resetting it to zero if it’s gotten too high. Then we use that index to grab
the next view, and set its frame to be the same size as box, shifted off to the right by
exactly the width of box so that it’s just out of sight. We set its alpha value to 0.0,
making it effectively invisible, and finally we add the view as a subview of box, so that it
will actually be displayed.
- (void)prepareRightSide { NSInteger nextTabIndex = currentTabIndex + 1; if (nextTabIndex >= [items count]) nextTabIndex = 0; rightView = [[items objectAtIndex:nextTabIndex] view]; NSRect viewFrame = [box bounds]; viewFrame.origin.x += viewFrame.size.width; [rightView setFrame:viewFrame]; [rightView setAlphaValue:0.0]; [box addSubview:rightView]; }
The next method, transitionInFromRight, takes rightView and slides it into place so
that it fits perfectly into the space provided by box. It also sets the alpha value to 1.0,
making it fully opaque. Note that unlike the previous method, this uses rightView’s
animator method to access the view’s animation proxy, so that setting these values
actually creates implicit animations for us.
- (void)transitionInFromRight { [[rightView animator] setFrame:[box bounds]]; [[rightView animator] setAlphaValue:1.0]; }
Before we go any further, let’s check our work by building and running our app. This
won’t quite work as-is, because we declared action methods in our header file but
haven’t defined them yet. Add the following methods to the .m file:
- (IBAction)next:(id)sender { } - (IBAction)previous:(id)sender { }
Now, you should be able to Build & Run your app, and see the first item from your tab
view slide into place and fade in from invisibility to full opacity at the same time, as
shown in Figure 14–8.

CHAPTER 14: Advanced Drawing Topics 300
Figure 14–8. The first “page” is sliding into view. Note the slightly grayed-out appearance of the objects in the box, which are all at about 50 percent opacity at this point.
That’s a start! Now let’s see how we move on to the next item in the list, by providing an
implementation for the next: method. Some of this code is similar to what we had in the
applicationDidFinishLaunching: method. We prepare the right side, start some
transitions (including a call to another new internal method, transitionOutToLeft, which
we’ll get to soon), and update an index (including another bounds check) and some
pointers at the end. The biggest difference here is that the methods that are going to do
animation are all sandwiched between calls to [NSAnimationContext beginGrouping]
and [NSAnimationContext endGrouping], which work together to form a sort of
transaction. Between those two calls, any animations that are added to the default
animation context, including all implicit animations, will be set up to run simultaneously.
This means that as we create implicit animations in our internal methods, they will all be
set up to fire off simultaneously. Without this step, the animations we create would all
start running in sequence, one after another as they’re created. Normally this won’t
make much of a difference, but it’s entirely possible that some unexpected event could
occur just as those animations are being created, such as another process suddenly
hogging the CPU, which could lead to these animations running in a slightly staggered
manner, starting and ending at different times. By wrapping them in a grouping as
shown here, that potential problem is eliminated.
- (IBAction)next:(id)sender { [self prepareRightSide]; [NSAnimationContext beginGrouping]; [[NSAnimationContext currentContext] setDuration:ANIM_DURATION]; [self transitionInFromRight]; [self transitionOutToLeft]; [NSAnimationContext endGrouping]; currentTabIndex++;

CHAPTER 14: Advanced Drawing Topics 301
if (currentTabIndex >= [items count]) currentTabIndex = 0; leftView = middleView; middleView = rightView; }
The next: method also calls another internal method, transitionOutToLeft, which will
take the current view and shuffle it off to the left. Its implementation looks like this:
- (void)transitionOutToLeft { NSRect newFrame = [middleView frame]; newFrame.origin.x -= newFrame.size.width; [[middleView animator] setFrame:newFrame]; [[middleView animator] setAlphaValue:0.0]; }
With that in place, you’re now ready to Build & Run once again. This time you’ll see that
not only does the initial view setup work, but now you can also hit the Next button to
transition to the next view! Smooth. See Figure 14–9.
Figure 14–9. View Three is on its way out, View Four is almost halfway in.
Now all that’s left is to implement matching methods for rightward transitions. These
methods are all pretty similar to the others, and are presented here without further
comment, except one: you may be tempted to copy and paste the existing methods and
make whatever you changes you can spot, but be careful! Some of the differences are
subtle but important.
- (void)prepareLeftSide { NSInteger previousTabIndex = currentTabIndex-1; if (previousTabIndex < 0) previousTabIndex = [items count]-1; leftView = [[items objectAtIndex:previousTabIndex] view];
CHAPTER 14: Advanced Drawing Topics 302
NSRect viewFrame = [box bounds]; viewFrame.origin.x -= viewFrame.size.width; [leftView setFrame:viewFrame]; [leftView setAlphaValue:0.0]; [box addSubview:leftView]; } - (void)transitionInFromLeft { [[leftView animator] setFrame:[box bounds]]; [[leftView animator] setAlphaValue:1.0]; } - (void)transitionOutToRight { NSRect newFrame = [middleView frame]; newFrame.origin.x += [box bounds].size.width; [[middleView animator] setFrame:newFrame]; [[middleView animator] setAlphaValue:0.0]; } - (IBAction)previous:(id)sender { [self prepareLeftSide]; [NSAnimationContext beginGrouping]; [[NSAnimationContext currentContext] setDuration:ANIM_DURATION]; [self transitionInFromLeft]; [self transitionOutToRight]; [NSAnimationContext endGrouping]; currentTabIndex--; if (currentTabIndex < 0) currentTabIndex = [items count]-1; rightView = middleView; middleView = leftView; }
Now Build & Run, and you should see that you can flip in both directions.
What Have We Done? Hopefully, the previous chapter and this one have given you a solid footing in a variety of
Cocoa drawing techniques, including a variety of uses of Bezier curves, making your
views interactive by using the mouse, and fairly painless animation with Core Animation.
The scope of this book doesn’t really allow us to delve any further into these topics,
especially considering that where graphics and animation are concerned, the only limits
are your own imagination! We’ve given you the basic tools. If you want to do more with
graphics, now it’s your turn to dig deeper into the areas that interest you most, and see
what you can do with the APIs that Cocoa gives you. That’s where the fun really begins!


![Printing Notes - Adobe · This drawing contains proprietary information and trade secrets of The Coleman Company, Inc. Unauthorized use or copying is prohibited. METRIC [INCH] CHECKING](https://img.pdfslide.us/doc/110x75/604026ae4ac9945957294062/printing-notes-adobe-this-drawing-contains-proprietary-information-and-trade-secrets.jpg)