Embed Size (px)
Citation preview

43-1Rodwork
RODWORKCHAPTER 43
43 RODWORK
Rodworkers, also known as reinforcing rodworkers, are responsible for installing reinforcing steel and other materials during construction of all types of concrete structures. This includes positioning and securing steel bars or wire mesh in concrete forms.
ToolsoftheTradeRodworkers use a variety of fasteners, rod-bending machines, blowtorches, and hand tools. This chapter provides an overview of hazards related to hand and power tools used by rodworkers and outlines safe work practices.
Because of the potential severity of tool-related injuries, it is important to make every effort to reduce them. Hand tools can cause eye injuries, puncture wounds, broken bones, contusions, and infections, as well as severed fingers, tendons, and arteries. The unsafe use of power tools can be even more dangerous.
Although some power tools have guards and other safety devices that provide a degree of protection, the best controls are hazard awareness, training, and common sense.
HazardsTypical causes of hand and power tool injuries for rodworkers include the following.
• Using the wrong tool for the job• Tools falling from overhead• Sharp tools carried in pockets• Using cheaters on tool handles• Excessive vibration• Using tools with mushroomed heads• Failure to support or clamp work in position• Carrying tools by hand up or down ladders• Using damaged electrical cords or end
connectors• Failure to use ground fault circuit interrupters
(GFCIs), especially outdoors or in damp or wet conditions.
The most versatile tools we have are our hands, and too often they are at risk of being injured by tool accidents. They can be caught in machines, crushed by objects, or cut by sharp-edged tools such as knives and saws. They can also be injured by being burned, fractured, or sprained. At some point, these injuries can prevent a worker from completing even the simplest tasks.
Eyes are highly susceptible to injury from tool use, but eye injuries are almost always preventable. Use the guards, protective eye wear, and other personal protective equipment each day so that it becomes part of your routine, rather than something to put on when the risk of eye injury seems likely.
Noise is unavoidable on some jobs, both from tools and from the working environment. Exposure to excessive noise levels greater that 85 dBa can impair hearing. Prolonged exposure can result in permanent hearing damage and eventually deafness.
Employers are responsible for assessing the risk of hearing damage to workers and providing strategies to reduce or eliminate that risk. Protection may include wearing hearing protection devices (HPDs) if that is the most appropriate control method. If HPDs must be worn, the employer must provided training and instruction on proper selection, care, and use.
SafeWorkPracticesBasic hazard awareness and common sense can prevent serious injuries caused by hand and power tools. As a general rule, follow the safe work practices listed below.
1) Dressrightforthejob.
Wear the clothing and equipment designed for use with the tools of the trade. Figure 43-1 shows some of the personal protective equipment (PPE) that is common to the trade. PPE for rodworkers includes:
• CSA Class E hard hat (Type II recommended)• CSA Grade 1 Safety Boots (Green Patch)• Gloves• Forearm Protectors• Face Shield• Respirators (Review the Safety Data Sheet
(SDS) for proper type of respirator. If in doubt, ask your supervisor.)
Alwaysweareyeprotection. When using hand and power tools, there is a constant risk of flying particles and dust. Appropriate eye protection is essential and must be worn not only by the user but also by others nearby.
CSA Class EHard hat
Eye Protection
Reel &Tie wire
Gloves
No cuffs
CSA Grade 1Safety Boots(Green Patch)
Side cutting pliers
Folding ruler
Scabbard
Marking devicesa. Pencilb. Crayonc. Soapstone
Figure43-1:RodworkerWearingPPEandReadytoPlaceReinforcingSteel

43-2 Construction Health and Safety Manual
RODWORK
2) Usetherighttoolforthejob.
Using a cheater bar or pipe on a wrench handle to get more leverage or using pliers as a hammer are examples of the mistakes which commonly lead to accidents and injuries.
3) Usetoolsasrecommendedbythemanufacturer.
For example, always use a proper wrench or hammer, not pliers. Misusing pliers will exert more force on the tool than it was designed for and cause wear, breakage, and injury.
4) Removedamagedorbrokentoolsfromservice.
Hammers with cracked or loose handles, wrenches with worn jaws, damaged hickey bars, damaged extension cords, and ungrounded tools are all unsafe and must be removed from service and be either repaired or destroyed.
5) Maintaintoolsinsafeoperatingcondition.
Pliers with worn teeth can cause personal injury if they slip while you’re tying wires.
Keephandlessecureandsafe.
Don’t rely on friction tape to secure split handles or to prevent handles from splitting. Check wedges and handles frequently. Be sure heads are wedged tightly on handles. Keep handles smooth and free of rough or jagged surfaces. Replace handles that are split, chipped, or that cannot be refitted securely.
Keepcuttingedgessharp.
Sharp tools make working easier, improve the accuracy of your work, save time, require less effort, and are safer than dull tools.
6) Neverclimbladderswithtoolsinyourhand.
Tool holders and pouches free the hands while you are climbing or working on ladders, scaffolding, and other areas where access may be difficult. To carry tools up and down between levels, put them in substantial bags or boxes and raise or lower them to the work position using strong ropes.
7) Usenon-ferrous,spark-resistanttoolswhenappropriate.
They are recommended where flammable materials or higher concentrations of explosive dusts or vapours might be present. These tools, such as brass or copper hammers or mallets, should always be used with caution. Remember —they may not guarantee safety in all explosive situations, such as the presence of gasoline vapours. It is always safer to eliminate the hazard by ensuring a safe atmosphere through isolation, ventilation, or purging.
8) Protectthecuttingedgesoftoolswhencarryingthem.
Carry them in such a way that they will not be a hazard to yourself and others. Carry pointed or sharp-edged tools in pouches or holsters.
9) Keephandtoolsclean.
Protect them against damage caused by corrosion. Wipe off accumulated dirt and grease. Dip the tools occasionally in cleaning fluids or solvents and wipe them clean.
10)Lubricateadjustableandothermovingparts.
This will prevent wear and misalignment.
11) Becarefulwhenswingingatool.
Make sure that no one else is within range or can come within range of the swing or be struck by flying material. When approaching a worker swinging a tool, make eye contact before passing through their work area.
12) Takestepstopreventtoolsfromfalling.
Falling tools are a dangerous hazard for workers below. Keep track of tools, especially when working at heights on scaffolds or other access equipment. An unnoticed file or chipping hammer, if accidentally kicked off the work platform, is a deadly missile, as well as a tripping hazard for you. Where practical, tie tools off when working at heights.
13) Protectyourhearing.
Noise is a hazard inherent in the construction industry—noise from your tools, from those nearby, and from the operating environment. Although power tools are only one of several possible noise sources, efforts should be made to provide the least noisy power tools which will still do the job.
The employer is responsible for assessing noise levels in the workplace and putting appropriate controls in place to protect worker's hearing. Always follow the health and safety rules set out by your employer and where any required PPE.
ToolTip
Young workers should learn about proper tool techniques from experienced workers. When using tools, more experienced workers generally use less energy and put less stress on their bodies than younger workers.

43-3Rodwork
RODWORK
InspectionandRepairTools should be inspected by a person qualified, through training and experience, to determine the safe condition of the tool. Worn or damaged tools should be tagged “DEFECTIVE–DONOTUSE”and returned to the shop for repair or replacement.
Regular inspection of all tools is necessary and should cover tool maintenance and service as specified in the operator’s manual. Observing the handling and storage of tools should also be a part of the inspection process. The supervisor is legally responsible for inspection. However, tools should be checked daily by those who use them.
Hand tools that get the heaviest use and abuse such as chisels, hammers, and wrenches should be inspected frequently and regularly.
Maintaining and repairing tools properly requires the right facilities and equipment. Only persons skilled in the repair of tools should be allowed to do so. Otherwise, tools should be sent out to a qualified repair depot.
SafeUseofToolsUnsafe use of hand tools is a common cause of injury in construction. In many cases, the injury results because it is assumed that everyone knows how to use most common hand tools. This is not the case, especially when dealing with young or new workers.
It is the responsibility of the supervisor and employer to ensure that workers are adequately trained in the safe and proper use of hand tools.
HammersandSledges
Hammers are made in various shapes and sizes for specific jobs. They should be selected and used only for the purpose intended. Hammers come in many types and styles, and although not a standard tool-belt item for rodworkers, they receive periodic use.
Follow the safety rules below.
• Always wear eye protection.• Make sure the handle is tight; never use a
hammer with a loose or damaged handle.• Always strike the work surface squarely with the
hammer face; avoid glancing blows.• Hold the hammer with wrist straight and hand
tightly wrapped around the handle.• Check behind and above before swinging the
hammer.• Never use a hammer to strike another hammer.• Discard any hammer with dents, cracks, chips or
mushrooming; redressing is not recommended. • When striking another tool (chisel, punch, wedge,
etc.), the striking face of the hammer should have a diameter at least 1/2 inch (1-1/4 cm) larger than the struck face of the tool.
• Never weld or reheat-treat a hammer.
Chipping hammers are designed for chipping slag off welds or burned edges. They can come in a variety of styles and handles. These hammers have long, slender or tapered points or edges, and can be resharpened many times.
CuttingHandTools
Rodandbarcutters
• Wear eye protection.• Keep fingers clear of jaws and hinges.• Cut ends can fly and cause injury; try wrapping
burlap or a rag around the jaws when cutting.
Boltcutters
Bolt cutters typically come in lengths of 18" to 36" with the larger ones able to cut mild-steel bolts and rods up to 1/2" diameter, as well as other materials such as wire rope (Figure 43-2).
• Keep jaws at right angles to material.• Don’t pry or twist—chips can break off and fly
dangerously, as well as damage the blade.
Figure43-2:BoltCutters
ManualRebarShears
These can be useful for cutting up to 15M (#6) bars or bigger (Figure 43-3).
Figure43-3:ManualRebarShears

43-4 Construction Health and Safety Manual
RODWORK
HoldingHandTools
Wrenches
There is a correct wrench for every job. If the wrench is too big, it may not grip securely. Slippage and damage of the wrench or fastener may result, or the thread may be stripped because of over-torquing. Where possible, use penetrating oil to loosen tight nuts and bolts.
Regardless of the type of wrench, there is always the hazard that the wrench may slip off the work, or that the work may suddenly turn free. The wrench or work may also break. Always brace yourself and adopt a work position that prevents you from losing your balance and being injured if the wrench breaks free.
Follow the safety rules below.
• Always inspect a wrench for flaws, damaged parts, or wear, which can cause it to slip and damage fasteners.
• Always grip the wrench so it will not cause injury if it slips.
• Use the correct jaw to avoid slippage. Box wrenches are safer than open-end wrenches since they are less likely to slip. Solid open-end wrenches of the correct size are generally more secure than an adjustable wrench, especially on hard-to-turn items.
• Discard any damaged box or open-end wrench. • Don’t attempt to repair a wrench with rounded
or damaged points on the box end, or worn or spread jaws on the open end.
• Face adjustable wrench forward and turn wrench so pressure is against the permanent jaw (Figure 43-4).
• Always pull on a wrench whenever possible. Do not push.
• Never overload a wrench by using a pipe extension on the handle or by striking the handle with a hammer. This can weaken the metal of the wrench and cause the tool to break.
Heavy-duty box wrenches with extra long handles and “hammer” or striking-face wrenches are available for these jobs. The striking-face wrenches with 12-point box openings are designed for striking with a ballpeen or sledge hammer. Both offset and straight styles are available (Figure 43-5) but the straight type should be used when possible.
Right Wrong
Figure43-4:AdjustableWrench
Offset
Straight
Figure43-5:OffsetandStraightHammerWrenches
Socketwrenches
Socket wrench sets offer a multitude of options in both the types and sizes of the sockets and the variety of drivers available, including ratchet, universal, speeder, and their many extensions and adapters. When using adapters and adapting down in size, be careful not to over-torque a smaller socket and fastener with a larger driver.
Always use the correct size of socket; make sure it fits snugly. An oversize or sloppy fit can cause slippage and possible injury, as well as causing wear to both the socket and the fastener.
Neveruse“hand”socketsonapowerdriveorimpactwrench. Hand sockets are normally brightly finished whereas power and impact sockets have a dull finish and usually thicker walls.
Pliers
Pliers, or specifically side-cutting pliers, are the rodworker’s traditional tool for tying reinforcing bars in place. The pliers used are usually 7-inch, 8-inch or 9-inch, although size is an individual preference (Figure 43-6).
Figure43-6:Side-CuttingandDiagonalSide-CuttingPliers
43-5Rodwork
RODWORK
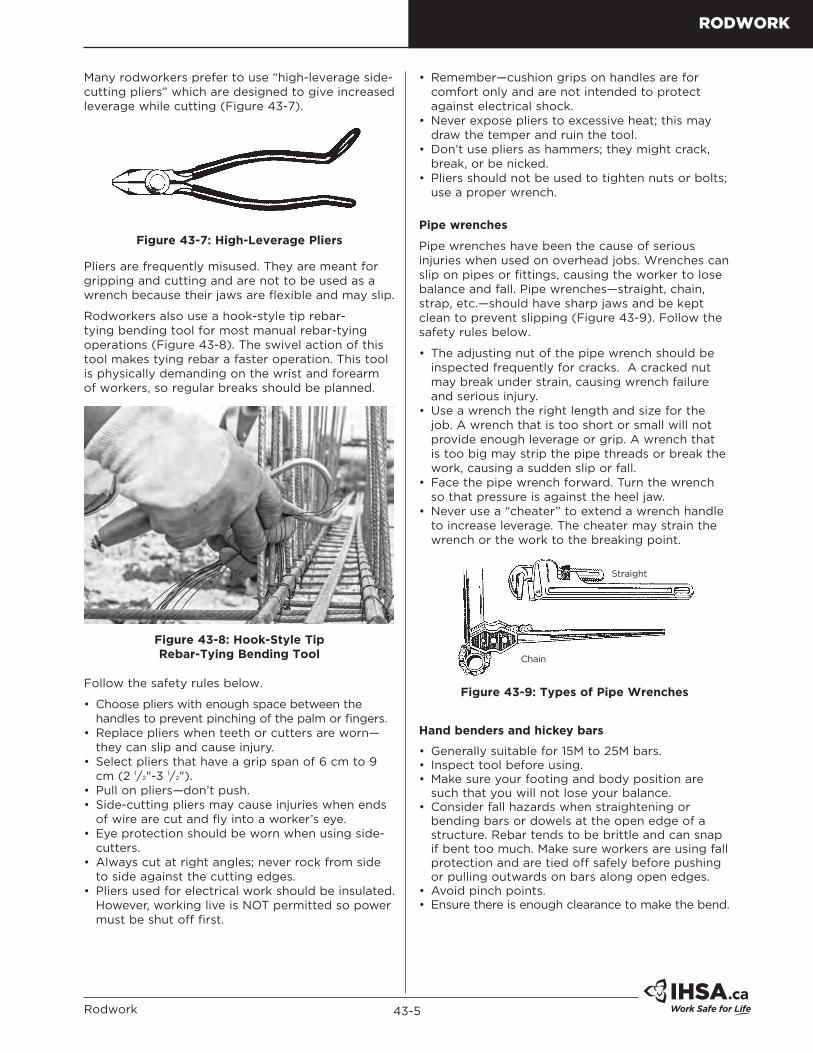
Many rodworkers prefer to use “high-leverage side-cutting pliers” which are designed to give increased leverage while cutting (Figure 43-7).
Figure43-7:High-LeveragePliers
Pliers are frequently misused. They are meant for gripping and cutting and are not to be used as a wrench because their jaws are flexible and may slip.
Rodworkers also use a hook-style tip rebar-tying bending tool for most manual rebar-tying operations (Figure 43-8). The swivel action of this tool makes tying rebar a faster operation. This tool is physically demanding on the wrist and forearm of workers, so regular breaks should be planned.
Figure43-8:Hook-StyleTipRebar-TyingBendingTool
Follow the safety rules below.
• Choose pliers with enough space between the handles to prevent pinching of the palm or fingers.
• Replace pliers when teeth or cutters are worn—they can slip and cause injury.
• Select pliers that have a grip span of 6 cm to 9 cm (2 1/2"-3 1/2").
• Pull on pliers—don’t push.• Side-cutting pliers may cause injuries when ends
of wire are cut and fly into a worker’s eye.• Eye protection should be worn when using side-
cutters.• Always cut at right angles; never rock from side
to side against the cutting edges.• Pliers used for electrical work should be insulated.
However, working live is NOT permitted so power must be shut off first.
• Remember—cushion grips on handles are for comfort only and are not intended to protect against electrical shock.
• Never expose pliers to excessive heat; this may draw the temper and ruin the tool.
• Don’t use pliers as hammers; they might crack, break, or be nicked.
• Pliers should not be used to tighten nuts or bolts; use a proper wrench.
Pipewrenches
Pipe wrenches have been the cause of serious injuries when used on overhead jobs. Wrenches can slip on pipes or fittings, causing the worker to lose balance and fall. Pipe wrenches—straight, chain, strap, etc.—should have sharp jaws and be kept clean to prevent slipping (Figure 43-9). Follow the safety rules below.
• The adjusting nut of the pipe wrench should be inspected frequently for cracks. A cracked nut may break under strain, causing wrench failure and serious injury.
• Use a wrench the right length and size for the job. A wrench that is too short or small will not provide enough leverage or grip. A wrench that is too big may strip the pipe threads or break the work, causing a sudden slip or fall.
• Face the pipe wrench forward. Turn the wrench so that pressure is against the heel jaw.
• Never use a “cheater” to extend a wrench handle to increase leverage. The cheater may strain the wrench or the work to the breaking point.
Straight
Chain
Figure43-9:TypesofPipeWrenches
Handbendersandhickeybars
• Generally suitable for 15M to 25M bars.• Inspect tool before using.• Make sure your footing and body position are
such that you will not lose your balance.• Consider fall hazards when straightening or
bending bars or dowels at the open edge of a structure. Rebar tends to be brittle and can snap if bent too much. Make sure workers are using fall protection and are tied off safely before pushing or pulling outwards on bars along open edges.
• Avoid pinch points.• Ensure there is enough clearance to make the bend.

43-6 Construction Health and Safety Manual
RODWORK
Rebar Bender
Rebar Hickeys
Figure43-10:HandBendersandHickeyBars
PoweredRebarFabricationTools
The majority of rebar fabrication is done in the shop but there may be times when field fabrication is required, especially on relatively remote worksites. A selection of such tools is shown in Figures 43-11 and 43-12.
Figure43-11:ElectricorElectric/HydraulicShearsandCutters
Figure43-12:Electric/HydraulicBendersandBender/Cutters
Follow the safety rules below.
• Be sure to wear eye protection.• Keep fingers clear of blade or grip areas.• Protect power supply lines from physical damage,
such as traffic and sharp edges.• For electric tools:
- Check that power supply matches equipment requirements.
- Use a ground fault circuit interrupter (GFCI). - Have damaged cables replaced.
• For hydraulic tools: - Replace damaged or worn hoses. - Make sure connections are clean and tight. - Make sure pump and tool are matched.
Rebar-TyingToolsorAutomaticRebar-TyingMiniMachine
The risk of work-related musculoskeletal disorders, such as low-back injury, from tying rebar with pliers is well documented. The high rate may be related to the frequency and repetition of two factors:
1) The static, awkward trunk posture when performing ground-level rebar tying
2) Exposure to forceful hand exertion when using pliers to tie rebar.
One way to improve posture and reduce back strain is to use an automatic rebar-tying machine. This is a battery-powered electric tool that can be applied where bars cross. When you press the trigger, the machine feeds the wire around the bars, twists it, and cuts it (Figure 43-13).

43-7Rodwork
RODWORK
Figure43-13:AutomaticRebar-TyingMachines
MusculoskeletalHazardsandControls:Rodworkers (W300)
Download this profile fromihsa.ca/products.It can help rodworkers identify MSD hazards in their job and learn how to control them.
Research conducted by IHSA's Rodworker Trade Labour-Management Health and Safety Committee has found that working with the rebar-tying machine can decrease repetitive forceful wrist activities such as the bending, twisting, and lateral bending associated with manual tying.
Furthermore, using the rebar-tying machine can decrease static bending of the trunk, which in turn can decrease the risk of low-back injury.
When using the rebar-tying machine, several issues should be considered.
• Choose a rebar-tying machine that allows tying steel rebar at a comfortable back posture.
• Select a rebar-tying machine that can tie various rebar sizes.
• For slab-on-grade rebar, tying rebar with the rebar-tying machine will require the use of a long steel hook to lift rebar off the ground (see Photo 1).
• Many rebar-tying machines require warm-up during cold weather. Proper tying tension of the tool must therefore be adjusted on cold days.
• On very hot summer days, let the machine cool down during regular breaks and lunch. This can be done by placing the machine in a cool shady area.
• Working with the rebar-tying machine is very productive for a crew of 4 to 5 workers per site.
• The rebar-tying machine can help workers with low-back or hand injuries return to work.
Occupational Health Risks: Rodworkers(W109)
Rodworkers can also be exposed to occupation health risks. Visit ihsa.ca/products and download IHSA’s four-page booklet with prevention information for workers and a diagnostic toolkit for physicians and primary health providers.
BodyBeltsandSaddlesforWorkPositioning
When installing reinforcing steel on a vertical surface consisting of horizontal steel bar, a scaffold must be provided if the working height is more than 12 feet (3.7 metres). Industry practice has shown that fewer injuries occur when scaffolds and elevated work platforms are used. If a scaffold cannot be erected, workers may wear body belts or saddles while performing rebar work. However, while the use of body belts is permitted by the regulations, it is being discouraged by the industry.
Body belts and saddles have a back support pad and a connecting hook at the front and are capable of supporting a worker who is standing on horizontal reinforcing steel while leaning backwards, causing the hook to be in tension.
Body belts and saddles allow both hands freedom of movement for work on a vertical wall. They are designed to secure the worker safely in position at the point of work but are not designed to arrest a free fall. Therefore a full-body harness with a secure anchorage system, such as an existing structural feature or temporary fixed support, must be used when a worker may fall more than 10 feet (3 metres) or onto hazardous objects or substances.
Body belts and saddles for work positioning must comply with CAN/CSA Z259.1-05: Body Belts and Saddles for Work Positioning and Travel Restraint.

43-8 Construction Health and Safety Manual
RODWORK
SitePreparationandStorage
WorkAreas
• Work areas for cutting or bending should be laid out in advance to ensure safe and efficient operation.
• When stockpiling standard-size reinforcing steel for onsite fabrication, ensure that a good solid base is provided for storage. If the rebar is to be piled high, use long sleepers to ensure a level and safe storage area (Figure 43-14).
• Keep work areas clear of clutter, debris, and scrap material.
• Keep a box or barrel close by for the disposal of scrap.
Floor under Construction
Direction of Carry
Completed Floor
Keep carry lanesclear between stockpiles
Figure43-14:StorageLayout
PreparingOnsiteStorageAreas
• The area where the material is to be stored should be as level as possible, dry, well-drained, and with good access.
• Avoid storing materials under powerlines, especially if hoisting equipment is being used to move it (O. Reg. 213/91, Section 37).
• Four by four sleepers should be used to keep the steel off the ground and to allow slings to pass freely under the load. Make sure there is adequate blocking available before reinforcing steel is delivered.
• Storage areas should be as close to the work area as possible, whether steel will be handled by crane or carried by rodworkers.
• The formwork contractor and general contractor should be consulted before setting up storage areas so that they are aware of potential weights to be stored in each area. Ensure that steel stored on floors does not overload the structure, and that reshoring is in place on newly poured slabs.
• To prevent spillover when they are unbanded, bundles must be stored at least 1.8 m (6 ft) away from all slab edges and openings (O. Reg. 213/91, s. 40(1)).
• Wherever practicable, storage areas should be well laid-out with clear and direct access to work areas.
• Store steel so that bars are free of mud, oil, grease, etc.
• In general, a clean work area is a safe work area. Store materials away from travelled walkways.
UnloadingandStoragePrecautions
• Post “DANGER” signs and cordon off unloading areas as required.
• Serious accidents can occur if banding or tie-downs for bundles are released without containment, and materials spill over.
• Be sure to communicate with the driver about unloading procedures.
• Land and block the load before unhooking and unslinging it. Lower loads onto adequate blocking to prevent damage to slings.
• Make sure identification tags are clearly visible in order to avoid extra handling.
• Space the bundles so that they can be picked up without having to move other bundles. If bundles must be stacked in layers, put sleepers between each layer.
• Immediately after cutting, dispose of banding material, waste wire, or any other garbage in proper containers so that it does not become a hazard.
• Near openings, arrange material so that it cannot roll or slide in the direction of the opening.
PositioningtheTruck
• Position the truck as close to the crane-unloading area as possible to avoid overreaching by the crane.
• The truck should be positioned on terrain that’s as level as possible.
• Keep the truck and crane away from overhead powerlines.
• Wherever possible, unloading areas should be designed so that trucks do not have to reverse when leaving.
• Any trucks that do have to back up must be directed by a competent signaller (Figure 43-15).
• Truck wheels should be blocked or chocked during unloading.
Figure43-15:HandSignalsforTrafficControl

43-9Rodwork
RODWORK
MountingandDismountingfromTruckBeds
Many incidents have occurred when rodworkers have fallen while getting on or off a flatbed truck. Individual situations will vary, but a common-sense approach should be followed.
• Before mounting the truck, scrape off your boot soles to avoid slips.
• Mount the truck platform in full view of the crane operator or signaller so that you will not be struck by the load or the crane hook.
• Climb up and down facing the truck, maintaining 3-point contact at all times (two hands and one foot, or two feet and one hand).
• If steps and handrails are provided, use them. Tires and hubs don’t provide good footing.
BarringOff
On occasion, reinforcing steel must be unloaded from flatbed trucks without the use of a crane. This is done by prying the load over the edge with a pry bar—a technique called barring off. Barring off should only be used when no other means of off-loading is available. If barring off must be done, exercise extreme caution and follow the safe practices below.
• The sleepers upon which the load is placed, usually 4 x 4 timbers, should be bolted or secured to the truck bed to prevent fly-up.
• Sleepers that are not secured to the truck can react violently when the load is released over the side of the truck. Sleepers have been known to jump 6 metres (20 feet) in the air. If sleepers are not bolted down, stand clear when the load is released.
• To avoid overexertion, use pry-bars strong enough and long enough to move the steel without causing undue stress on your body.
• Avoid standing on uneven surfaces when prying. For the best footing, stand on a clear, level area.
• Rodworkers should ensure that the drop area is clear of equipment, materials, and people.
UnloadingPrefabricatedRebar
• Prefabricated rebar refers to the prefabrication of reinforcement assemblies for elements such as footings, columns, or beams that takes place in a shop. These assemblies are placed on trailers at the shop and delivered to the site for off-loading and erection. Take special care when off-loading these assemblies.
• Identify proper lift or pick points. Request that these points be identified at the shop.
• Request that the shop leave the chokers or slings on the assemblies.
• Find out the weight of assemblies, if possible. They can seem lighter than they actually are.
• Use only appropriate off-loading equipment such as forklifts and cranes.
• Do not off-load assemblies by barring off.
RebarStorage
• Store near area of use.• Use wooden spacers to separate piles.• Check loading on floors.• Make sure reshoring is in place on newly poured
slabs.• Keep rebar off ground on dunnage (4 x 4 sleepers).• Make sure that the identification tags are clearly
visible to avoid extra handling.• Store so that bars are free of mud, oil, grease, etc.
MovingSteeltoPlacingArea
1.WorkRotationToReduceFatigue
Tasks should be rotated when and where possible to avoid fatigue and stress caused by working in an awkward posture for long periods. For example, take a rest from carrying by switching jobs with a rodworker tying rebar. A good rule of thumb is to change jobs at two-hour intervals.
2.AccessToWorkAreas
Carrying steel over rough terrain leads to accidents. Reasonably level and clear walkways should be provided and used. It is becoming more common for rodworkers to access their work areas using elevating work platforms (EWPs). Make sure workers are trained on the type of platform or lift they will be using.
• All planking used for trench crossings, ramps, and other walkways must conform to regulations.Grade: No. 1 spruce or betterThickness: 51 mm (2" full size)Width: 25.4 cm (10" full size)Span: maximum of 3 metres (10 feet)
• Planked walkways should be used on top of the thick slab reinforcing encountered in bridge, subway, and reactor work, and similar projects where the depth of the slab presents a hazard to any worker stepping through the mat.
• Provide walkways over openings or beam pockets in slab forms.
• Reinforcing bars or other objects are not allowed to be carried up or down ladders. It is safer and easier to pass bars from one level to the next.
• Bars should never be thrown or dropped into a lower area. If the distance is too far to pass bars by hand, use hoisting equipment.
• Storage areas should be organized so that carrying is kept to a minimum.
• Lay bundles parallel to walkways and out of the way of other activities.
• Organize layout so that you work towards the steel pile, not away from it.

43-10 Construction Health and Safety Manual
RODWORK
3.AdverseConditions
Take steps to minimize the hazards resulting from weather conditions—such as mud, snow, rain, ice and wind—as well as form oil.
• In extremely high winds, stop hoisting operations.• Clear icy areas before work proceeds.• Wet, muddy areas should be dried up or avoided
if possible.• Avoid walking on oily rebar.
4.WorkingBelowGrade
• Before starting to work below grade level, as in caissons, trenches, and excavations, ensure that embankments are properly sloped or shored.
• Excavation walls should have a clear space at the top at least 1-metre wide. Ensure that there is no loose material on top or clinging to the sides, which can fall into the work area. This could include rocks, stones, frozen clumps of earth, and building materials.
• Changing weather conditions, especially rain, can seriously alter working conditions. It is not enough to inspect excavation walls before starting work. Be sure to watch for hazards as the day progresses. Freeze/thaw cycles can cause banks to give way.
Below-GradeHazards
See the chapter on Trenching in this manual for the required safety controls for work in trenches and excavations.
Workers placing and fabricating steel below-grade must often work in areas where movement is restricted. They must be constantly aware of hazards underfoot and overhead. You need to take special care considering the rough terrain and the risk of debris, material, or equipment rolling into the workspace. We recommend having someone topside to pass down material and keep an eye out for hazards.
Excavations must be free of water (O. Reg. 213/91, s. 230). Excessive water must be removed. Water that reaches the toe of a work boot is considered excessive.
Water should be pumped out. Mud should be cleared off and replaced by compacted granular material in work areas and on surfaces where concrete will be placed. Mud presents a slipping hazard and can lead to inferior construction if not removed or replaced.
Formwork and reinforcing construction for footings and grade walls may begin before excavation in the area is complete. Trucks and excavating equipment put workers on foot at the risk of being struck down or run over.
Wherever possible, these operations should be roped off from other work, such as excavation or pile-driving (see Figure 43-16). We strongly recommend having separate access ramps for vehicles and workers. Stairs are an even better alternative for personnel on foot.
At the beginning of a project, develop a plan for storing material and equipment out of the way, disposing of scrap and debris, and ensuring safe, efficient access (see Figure 43-17). Because conditions are often cramped, and scrap builds up quickly, you need to clean up as work proceeds.
Figure43-16:RebarConstructionandFormworkRoped-OfffromOtherOperations
Figure43-17:Well-PlannedStorage,Access,andSetup
WallConstructionIt can be hazardous to construct walls which are built in place. Hazards can come from both the rebar and existing partial forms and include the following.
• Dowels sticking up from concrete slabs or footings
• Unstable work surfaces and access (poor planning)• Manual handling of heavy material• Slippery surfaces at and below grade, and on
steel• Inadequate design• Improper construction.

43-11Rodwork
RODWORK
Protection must be provided against protruding dowels and rebar, which can be a hazard. There are many types of protective caps available for rebar or dowels (Figure 43-18).
Select the type of cap that is appropriate for the protection you require. For example, if workers could fall on the rebar, make sure the caps are strong enough to prevent the rebar from punching through and impaling the worker.
Figure43-18:SquareRebarCapDesignedtoProtectAgainstImpalement
Section 36 of the Construction Projects regulation (O. Reg. 213/91) addresses “Protruding Hazards” and states that: “If a formwork tie, reinforcing steel, a nail or another object protruding from concrete or another surface may endanger a worker, the protrusion shall be removed, cut off at the surface or otherwise protected as soon as practicable.”
ProperTyingandStraighteningTying
• Before starting work, ensure that all openings and slab edges are protected by proper guardrails or protective covers that comply with the loading requirements of the construction regulation and are sturdy enough to prevent falls.
• 16-gauge wire is generally used for tying rebar unless a different size has been specified by the project engineer.
• The ends of tie wires should be bent over to prevent injury to workers rubbing or brushing against them.
• Never move backward when tying. Always advance to your work.
• When working on walls or columns use correct ties to prevent rebar from slipping.
Straightening
Often a rodworker will be assigned to straighten dowels projecting from a previous concrete pour. A hickey or pipe sleeve should be used to straighten bars larger than 15 m (49 ft). Mechanical help, such as a hydraulic jack, may be required to straighten bars over 30 m (98 ft).
CommonTies
There are various methods of hand-tying the intersections of bars (Figure 43-19). Some of the most common are the following:
A. Singletie is used normally to secure the bars in position against displacement.
B. Wrapandsingletie is normally used when tying wall reinforcement, holding the bars securely in position so that the horizontal bars do not shift during the construction progress or during concreting.
C. Saddletie is used for tying bars in beams, columns and walls in position.
D. Wrapandsaddletie is used to secure heavy bars that are pre-assembled into units to be lifted by crane. These ties are subjected to considerable strain.
E. Figure-eighttie is sometimes used in walls in place of the wrap and single tie.
Figure43-19:MethodsofHand-TyingtheIntersectionsofBars
Post-TensioningPre-stressing is a means of achieving shallow, long-span, and attractive structural elements in concrete. Post-tensioning is generally used for onsite pre-stressing as opposed to carrying out precasting operations in a yard.
Post-tensioning essentially involves pouring the concrete member. Forming holes running the length of the member— where the steel tendons are located—allow the concrete to cure, and tensioning the tendons to high stress against steel anchors compresses the concrete member. Tendons usually have one fixed and one movable or floating stressing end.
43-12 Construction Health and Safety Manual
RODWORK
Post-tensioning is not a common part of many rodworkers’ activities, but it is a practice that some companies and therefore some rodworkers carry out from time to time. This area of the rodworker trade has some unique hazards and problems which need to be addressed.
Instruction on post-tensioning should have been provided during trade training. However, the following section highlights hazards, precautions, and safe practices. All post-tensioning activities should be done under the supervision of a professional engineer.
TypesofPost-TensioningSystems
There are various proprietary systems, but they can generally be divided into three types with features as follows:
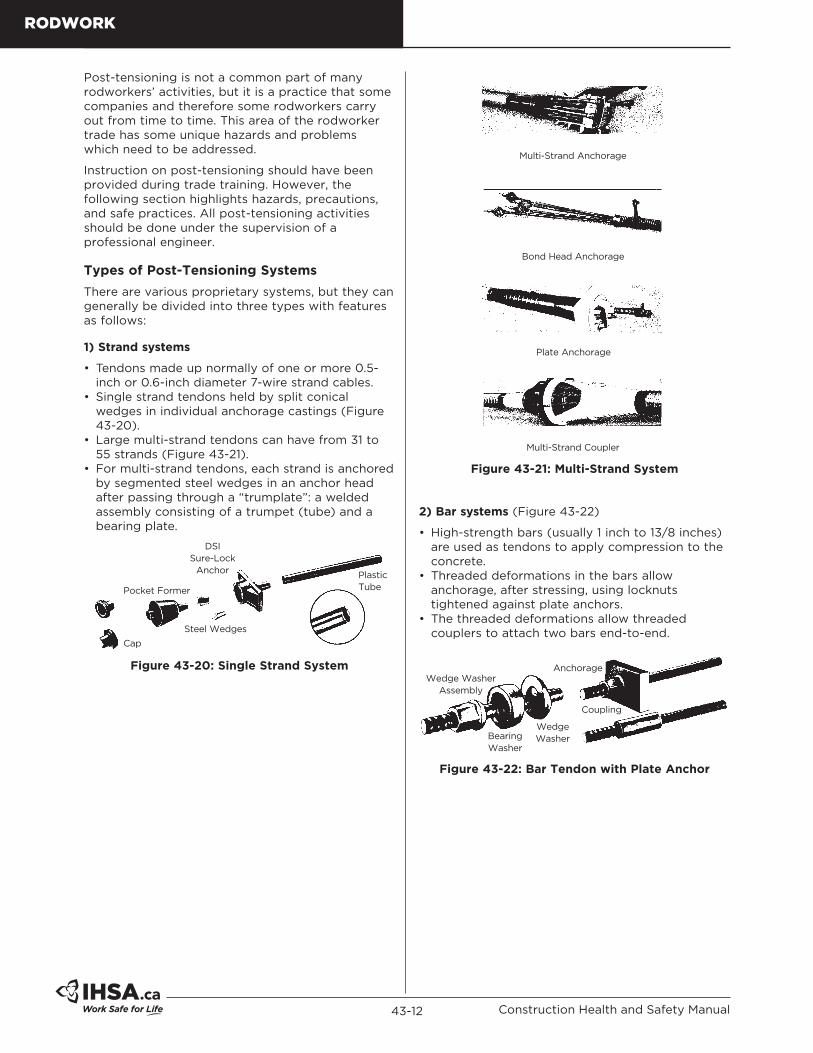
1)Strandsystems
• Tendons made up normally of one or more 0.5-inch or 0.6-inch diameter 7-wire strand cables.
• Single strand tendons held by split conical wedges in individual anchorage castings (Figure 43-20).
• Large multi-strand tendons can have from 31 to 55 strands (Figure 43-21).
• For multi-strand tendons, each strand is anchored by segmented steel wedges in an anchor head after passing through a “trumplate”: a welded assembly consisting of a trumpet (tube) and a bearing plate.
Pocket Former
DSISure-Lock
Anchor PlasticTube
Cap
Steel Wedges
Figure43-20:SingleStrandSystem
Plate Anchorage
Multi-Strand Coupler
Multi-Strand Anchorage
Bond Head Anchorage
Figure43-21:Multi-StrandSystem
2)Barsystems(Figure 43-22)
• High-strength bars (usually 1 inch to 13/8 inches) are used as tendons to apply compression to the concrete.
• Threaded deformations in the bars allow anchorage, after stressing, using locknuts tightened against plate anchors.
• The threaded deformations allow threaded couplers to attach two bars end-to-end.
Wedge WasherAssembly
Anchorage
BearingWasher
WedgeWasher
Coupling
Figure43-22:BarTendonwithPlateAnchor

43-13Rodwork
RODWORK
3)Wiresystems (Figure 43-23)
They have not been used in Canada since about 1980 but could be still be encountered in older retrofit buildings.
• Tendons made up of high tensile wires of 1/4 inch diameter.
• Can consist of 2 to 180 wires in a tendon, although commonly from 8 to 46 wires.
• Wires are frequently prefabricated with button heads and pass through a predrilled anchorage plate, especially at the fixed end.
• Wires are stressed and anchored at movable ends by shims or a locknut against a bearing plate or a trumplate.
Grease & Paper Wrapping
Bearing plate
ButtonheadAnchorHead
AnchorHead
Trumplate
Locknut
Funnel
Conduit Sheathing (bonded system)
Shim
1/4”0 wire
Figure43-23:WireTendonSystems
BondedversusUnbonded
The three systems described above can be divided into “bonded” and “unbonded” systems depending on whether the tendon ducts are filled with grout after stressing (bonded), or whether the tendons are greased and paper-wrapped or greased and plastic-covered (unbonded). Most systems are adaptable for bonded or unbonded construction. For “bonded” installations, the duct, or conduit, is often installed first and the tendons pushed or pulled through after the concrete is poured.
Although not restricted, unbonded systems are more likely to occur in floor-slab applications which contain a large number of small tendons. Bonded tendon systems tend to have some structural advantage and tend to be used in beams and large structural members which use a small number of relatively large tendons so that grouting costs are less.
Bondedsystems
• The tendons are encased in a flexible conduit or duct.• Conduit is placed and concrete is poured around
the conduit.• The tendons are placed (if not already in the
ducts), stressed, and anchored.• Finally, expanding grout is pumped in to fill the
void inside the duct or conduit.
Unbondedsystems
• The strand, wire, or bars are greased and paper-wrapped, or greased and plastic-covered.
• The concrete is poured for the member, beam, girder, etc.
• The post-tensioning steel is then stressed and anchored.
Unloading,Handling,andStorage
The unloading, handling, storage, and distribution of all types of tendons for post-tensioning systems requires rodworkers to use their knowledge of good, safe rigging practices at all times.
• All types of systems, both bonded and unbonded, need to be handled with care to protect them from damage. Post-tensioning wires, strands, and bars are made of high-carbon steel, which makes them very susceptible to mechanical damage. A nick or kink can cause failure when tensioned to the high stresses required.
• Extreme care with welding or welding equipment is required around post-tensioning materials. Strand failure can result from a single drop of molten weld metal on the strand. High temperature exposure before or during tensioning can cause failure of strands during tensioning.
• Post-tensioning stressing equipment is susceptible to damage and is expensive, so it must be stored in a secure, clean, and dry place.
• Coils or racks of tendons or individual tendons must be stored in a clean, dry area, at least four inches off the ground or work surface, protected from exposure to weather, etc.
Forstrandsystems:
• Strand post-tensioning is usually shipped to the jobsite in coils held by steel banding.
• The coils are usually about five feet in diameter and about four feet high. Each coil weighs about 1,500 to 2,000 lbs. and contains about 20 to 40 individual tendons.
• Nylon web slings are generally recommended for lifting strand tendon coils to avoid any damage to the wrapping.
• Place the coils, if possible, on the deck as close as possible to where they are to be used. The steel banding holding the coil together can be cut to allow the tendons to be separated.
• Individual tendons can then be hoisted from the coil and placed on dunnage at least four inches off the ground or work surface, adjacent to the beam form in which they will be used. Individual tendons can often be manually handled.

43-14 Construction Health and Safety Manual
RODWORK
Forbarsystems:
• Bar tendons are shipped to the site in pre-cut lengths and general handling practices are similar to those for other types of tendons. Since bar tendons are similar in appearance to rebar, take care to identify and separate them to avoid placing them as rebar by mistake (Figure 43-24).
Figure43-24:BundlesofBarTendonsStoredonDunnage
Forwiresystems:
• General handling practices for wire tendons are similar to those for strand tendons but there are differences.
• Wire tendons are normally larger in diameter and weigh much more than individual strand tendons.
• Wire tendons are usually shipped on stacked metal rotatable shipping racks with metal arms separating individual tendons. Shipping racks help protect coiled tendons and simplify handling and placement (Figure 43-25). Usually a number tendons, as many as eight to ten, are banded together with or without a rack.
• Individual wire tendons for use in slabs can usually be manually handled. Most individual beam wire tendons, however, weigh in excess of 200 lb. Hoisting equipment will be needed to lift them from the coil or shipping rack.
• Use nylon web slings to prevent damage to the sheathing.
• Take care when slinging wire tendon coils to balance the load with two or three slings and keep the coils level.
• Hazard. Do not attempt to cut the banding holding individual beam tendons in a coil. Each coiled wire tendon is like a large spring that, when released, will snap open and can cause serious injury. An uncoiling turntable must be used to control the uncoiling. Even though the spring forces may not be as high in wire tendons for use in slabs, take care when cutting banding.
Figure43-25:CoiledTendonsonShippingRacks
PlacingPre-Stressing
There are many proprietary types of post-tensioning systems and each system —in some cases each application—has its own specific directions. The placement of pre-stressing strands in the beams, slabs, etc. varies and the supplier’s or designer’s instructions must be followed precisely in order for the system to perform properly.
If something does not check out, let the foreperson know immediately. The supplier can be contacted for clarification and correction. Follow post-tensioning placing drawings carefully.
• Check that all tendons are accounted for and in the correct locations.
• Use extreme care to avoid damaging strands when they are being pulled into the bed with a tugger hoist or similar equipment.
• For bonded systems with ducts installed and strand-fed by a pusher or by pull-through, be sure to do the following: - Confirm that ducts are secure and continuously
connected between anchorages. - Cordon off area between pusher and strand cage
when in use. - Keep workers away from the front of the opposite
anchorage to which the strand is pushed.• Ensure that any added rebar needed to resist
local stressing forces has been placed.
Forstrandtendons:
• Uncoiling strand tendons should be done by at least two rodworkers—one holds the end, while the other uncoils tendon on the deck.
• The tendon profile in the forms is accomplished by correct placement of slab bolsters, high chairs, and support bars. It is recommended that support bars for slab post-tensioning tendons be placed flat on the deck first at the proper spacing. After the tendons are rolled out, the support bars should be lifted and the individual chairs placed.
• Check conduit, plastic or paper-wrap, for rips or tears. These must be repaired with the tape supplied by the post-tensioning manufacturer (Figure 43-26). If concrete leaks in, it can affect proper wedge seating or result in inaccurate stressing forces.
Figure43-26:TapingAroundCasting,Connector,andStrand

43-15Rodwork
RODWORK
Figure43-27:RodworkerAttachingAnchorageAssemblytoForms
Forwiretendons:
• Individual wire tendons for use in slabs can often be handled manually. Most individual beam wire tendons, however, weigh in excess of 200 lb. Hoisting equipment will be needed to lift them from the coil or shipping rack.
• Use nylon web slings to move wire tendons with hoisting equipment. This will prevent damage to the sheathing (Figure 43-28).
• Take care when slinging wire tendon coils to balance the load with two or three slings and keep the coils level.
Figure43-28:UsingNylonSlingstoLowerCoiledWireTendonontoUncoiler
• Even though the spring forces may not be as high in wire tendons for use in slabs, always take care when cutting banding. Cut the bands progressively as the tendon is pulled out—never together (Figure 43-29).
• Hazard.Do not attempt to cut the banding holding individual beam tendons in a coil.
• Always use extreme caution when cutting individual tendon coils. Each coiled wire tendon is like a large spring that, when released, will snap open and can cause serious injury. It’s best to use a “field tendon uncoiler” (Figure 43-30). A less-desirable choice is a field-fabricated, wooden-sided “explosion box”. This is usually made from 2 x 10 boards in a box configuration larger than the coil diameter.
• Always inspect and perform any necessary repairs to wire tendon sheathing to ensure that concrete cannot enter the void during the initial pour.
• As always, care must be taken to follow the placing drawings exactly and to make sure that the tendons conform to their specified profiles.
Figure43-29:CuttingBandsProgressively
Figure43-30:UsingtheUncoilingTurntable
PlacingConcrete
During concrete pouring and placing, any damage done to the sheathing must be repaired before proceeding. This is necessary to achieve full strength in the final concrete member. For example, during vibration of the concrete, any contact of the vibrator with the sheathing can quickly cause damage.
StressingOperations
After the concrete for the structural member (slab, beam, girder, etc.) is poured, it must be given sufficient time to cure and reach adequate strength to resist post-tensioning forces. A professional engineer will inspect the site and give their approval for post tensioning to begin. Normally the post-tensioning operation is done under the direction of a professional engineer or their designate. At this point, the tendons can be stressed.

43-16 Construction Health and Safety Manual
RODWORK
The force required to stress tendons comes from a hydraulic pump and jacks (or rams) and must be transferred through whatever anchoring devices the system uses.
• Visually inspect concrete around the anchor. It should be free of voids and honeycombing. Report any significant voids.
• Ensure that the jack is securely supported and that the operating axis of the jack and the tendon are aligned.
• Before starting tensioning, operate the jack pump to check that everything is working properly. Do not run the ram to the end of its stroke or close it down and continue to pump; damage can result.
• Ensure that no one stands at either end of the tendon or below the jack during the stressing operation. Never stand between the hoses.
The hydraulic pump and jack combinations come in a variety of types to suit each kind of proprietary post-tensioning system and application (Figure 43-31 and 43-32). Each has its own configuration for jacking against bearing plates or anchors on the end of the concrete member to apply tension to strand, wire, or bar tendons.
Figure43-31:HydraulicPumpandJackConfigurations
Switch
Pressure Hose
Sequence Block
PumpPressureGauge
Ram
Return Hose
Figure43-32:SingleStrandJackingSystem
Grouting(forbondedsystems)
• Inspect the grout machine and the hoses to ensure their proper operation. Look for items such as loose fittings and damaged hoses.
• Grout is corrosive. Always wear eye protection, face protection, and gloves when grouting.
• Rinse grout off skin with water as soon as possible to avoid skin irritation.
SafeWorkPractices
• Concrete quality and strength should be confirmed by a professional engineer before stressing strands.
• Wedge plates must be shipped clean. Holes must be free of any dirt or rust. Wedges must be free of dirt and rust.
• Always follow manufacturer’s instructions on jack handling and use.
• Internal jack parts must correspond to tendon size requirements.
• All hoses, hose connections, valves, and other components must be checked for defects before each use and any questionable items repaired or replaced to meet manufacturer’s requirements.
• Free-cycle the jack for an operation check and bleed any air in accordance with the manufacturer’s instructions.
• Unattended hydraulic pumps must be unplugged.• It is important that the grips and strands are
perfectly clean. A small piece of dirt between a wedge (jaw) and the steel case (barrel) can cause failure or slippage of the strand.
• Follow manufacturer’s directions for cutting strands. Cutting with a burning torch can result in failures. Cutting off ends of a finished member may be permissible but remember—using a burning torch or welding equipment in the area can be dangerous for stressing operations.
• Due to the heavy weight of jacks (50-ton jack with accessories weighs about 150 pounds, while a 200-ton jack weighs about 700 pounds), some rigging equipment will be needed to position and hold the jack for stressing operations.
• Use a crane if one is available. Another possible method of rigging the post-tensioning jacks is a rolling monorail system, such as is shown in Figure 43-33.
• Sometimes a job-built jig can be used. Figure 43-34 shows a rolling scaffold used as trolley with an I-beam and chainfall arrangement being used to hoist, lower, and position a 250-ton jack. Note that counterbalance weights are needed with a good factor of safety to provide a safe platform.

43-17Rodwork
RODWORK
Figure43-33:RollingMonorailSystem
Figure43-34:RigsforPositioningJack
PrecautionsforStressingPost-TensioningTendons
• Don’t stand behind the jack while pressure is being applied. If threads are not fully engaged, the rod can come out of the jack like an arrow. If the rod contacts a worker, it will cause serious injury or death.
• Keep fingers out from between the shims or locknut and the bearing plate or anchor head. Fingers can be crushed if hydraulic pressure is lost and the anchor head eases back toward the bearing plate.
• Before operating the pump make sure the rodworker operating the jack knows what you are doing and when. Communicate.
• Never stand on the concrete above or in front of the jack while pressure is being applied. If there is any honeycombing or poor concrete behind the bearing plate the jack can snap up.
• Don’t run the ram out to its fullest extension or close it all the way and continue to pump. This can cause jack damage and a high-pressure oil spray, which can cause serious injury.
• Don’t use pressure gauges that may be damaged or broken. They could result in inaccurate pressures, possible overstressing of tendons, and possible failures.