Embed Size (px)
Citation preview
Specimen Collection and Preservation 7
Specimens are used to provide supporting information lead-ing to the diagnosis of a cause of disease or death. A speci-men may be an intact carcass, tissues removed from carcasses,parasites, ingested food, feces, or environmental samples.The specimen should be as fresh and undamaged as pos-sible.
Choosing a SpecimenAn entire, fresh carcass is the best specimen to submit to
the laboratory for diagnosis. This allows the diagnosticianto assess all of the organ systems and to use appropriate or-gans for different diagnostic tests. Obtain the best specimenspossible for necropsy; decomposed or scavenged carcassesare usually of limited diagnostic value. A combination ofsick animals, animals that were euthanized after clinical signswere observed and recorded, and some of the freshest avail-able carcasses compose an ideal specimen collection. Themethod of euthanasia should not compromise the diagnosticvalue of the specimen (see Chapter 5, Euthanasia). More thanone disease may be affecting the population simultaneously,and the chances of detecting multiple diseases will be maxi-mized if both sick and dead animals are collected. Speci-mens submitted should be representative of the species in-volved. If more than one species is affected, collect severalspecimens of each species; try to obtain a minimum of fivespecimens per species.
Tissue CollectionThe primary consideration when collecting carcasses or
tissues for diagnosis should be personal safety. Some wild-life diseases are transmissible to humans, and every carcassshould be treated as a potential health hazard. Wear dispos-able rubber or plastic gloves, coveralls, and rubber boots. Ifgloves are not available, inverted plastic bags may be used(Fig. 2.1). Before leaving an area where carcasses are beingcollected, double-bag used gloves and coveralls, and disin-fect boots and the outside of plastic bags with a commercialdisinfectant or a 5 percent solution of household chlorinebleach. Also, double-bag specimens in plastic before remov-ing them from the area. These precautions will help protectthe people in the field and minimize transmission of diseaseto unaffected wildlife populations.
If it is impossible to submit an entire carcass for diagno-sis, appropriate organs must be removed from specimens. Ifpossible, do not dissect carcasses in the field without firstconsulting disease specialists about methods of dissectingand preserving tissues or parasites or both. Assistance canbe obtained from a variety of sources (Appendix B). It is
Chapter 2
Specimen Collection and Preservation
Figure 2.1 Use a plastic bag to protect hands from directcontact with animal tissues during the collection of specimensif plastic or other waterproof gloves are not available. (A) Graspbag at the bottom and (B) with other hand pull open end downover hand holding bag (C). Repeat for the “unbagged” hand.Reversing this process when handling small specimens willautomatically place specimens in the bag, which then needonly be sealed and put into a second bag for packaging andshipment.
A
B
C
8 Field Manual of Wildlife Diseases: Birds
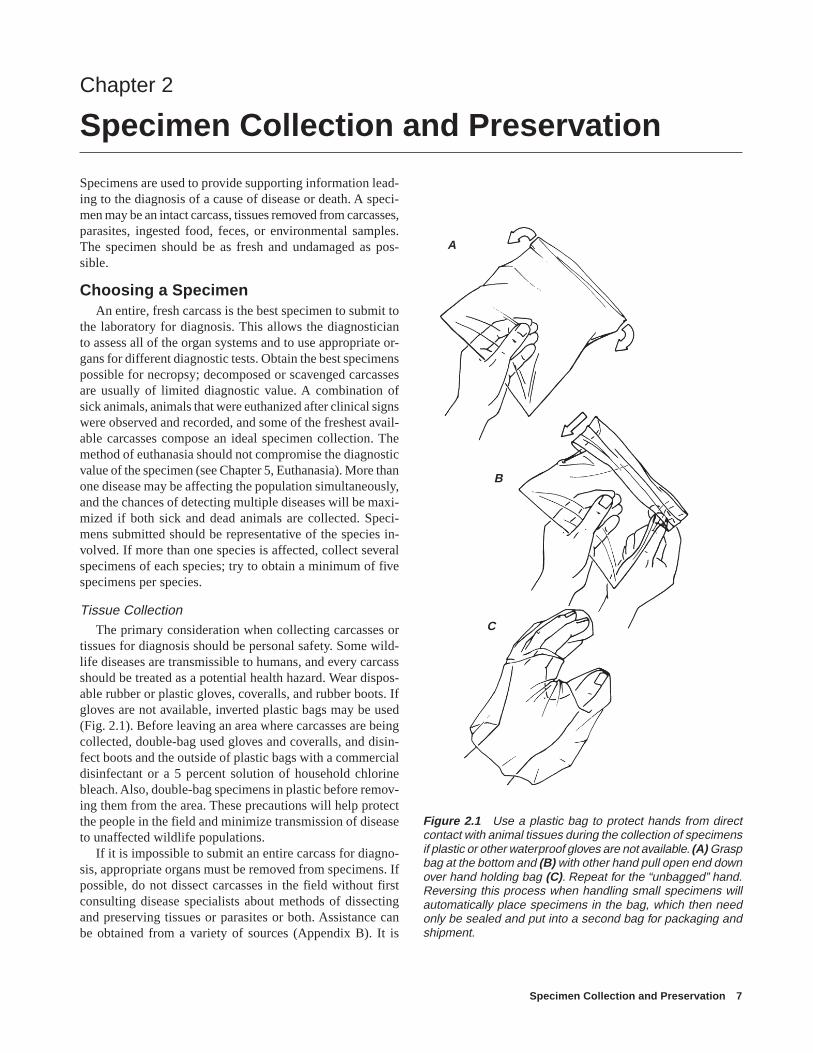
best to become familiar with these sources and their abilityto provide specific types of assistance before an emergencyarises. The basic supplies and equipment that should be in-cluded in a field kit for specimen collection will vary withthe species being sampled and the types of analyses that willbe conducted. Keep a small kit packed in a day pack for readyuse (Fig. 2.2). Sources of supplies used for collecting, pre-serving, labeling, and shipping specimens are listed inAppendix C.
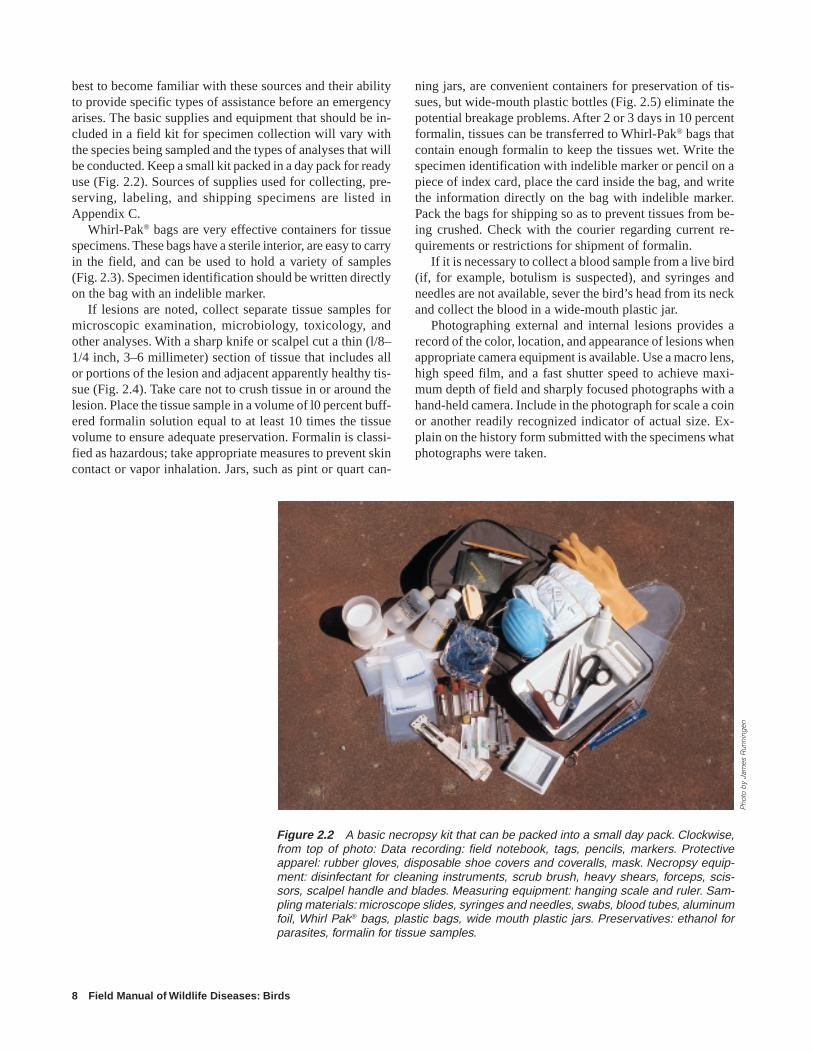
Whirl-Pak® bags are very effective containers for tissuespecimens. These bags have a sterile interior, are easy to carryin the field, and can be used to hold a variety of samples(Fig. 2.3). Specimen identification should be written directlyon the bag with an indelible marker.
If lesions are noted, collect separate tissue samples formicroscopic examination, microbiology, toxicology, andother analyses. With a sharp knife or scalpel cut a thin (l/8–1/4 inch, 3–6 millimeter) section of tissue that includes allor portions of the lesion and adjacent apparently healthy tis-sue (Fig. 2.4). Take care not to crush tissue in or around thelesion. Place the tissue sample in a volume of l0 percent buff-ered formalin solution equal to at least 10 times the tissuevolume to ensure adequate preservation. Formalin is classi-fied as hazardous; take appropriate measures to prevent skincontact or vapor inhalation. Jars, such as pint or quart can-
Figure 2.2 A basic necropsy kit that can be packed into a small day pack. Clockwise,from top of photo: Data recording: field notebook, tags, pencils, markers. Protectiveapparel: rubber gloves, disposable shoe covers and coveralls, mask. Necropsy equip-ment: disinfectant for cleaning instruments, scrub brush, heavy shears, forceps, scis-sors, scalpel handle and blades. Measuring equipment: hanging scale and ruler. Sam-pling materials: microscope slides, syringes and needles, swabs, blood tubes, aluminumfoil, Whirl Pak® bags, plastic bags, wide mouth plastic jars. Preservatives: ethanol forparasites, formalin for tissue samples.
ning jars, are convenient containers for preservation of tis-sues, but wide-mouth plastic bottles (Fig. 2.5) eliminate thepotential breakage problems. After 2 or 3 days in 10 percentformalin, tissues can be transferred to Whirl-Pak® bags thatcontain enough formalin to keep the tissues wet. Write thespecimen identification with indelible marker or pencil on apiece of index card, place the card inside the bag, and writethe information directly on the bag with indelible marker.Pack the bags for shipping so as to prevent tissues from be-ing crushed. Check with the courier regarding current re-quirements or restrictions for shipment of formalin.
If it is necessary to collect a blood sample from a live bird(if, for example, botulism is suspected), and syringes andneedles are not available, sever the bird’s head from its neckand collect the blood in a wide-mouth plastic jar.
Photographing external and internal lesions provides arecord of the color, location, and appearance of lesions whenappropriate camera equipment is available. Use a macro lens,high speed film, and a fast shutter speed to achieve maxi-mum depth of field and sharply focused photographs with ahand-held camera. Include in the photograph for scale a coinor another readily recognized indicator of actual size. Ex-plain on the history form submitted with the specimens whatphotographs were taken.
Pho
to b
y Ja
mes
Run
ning
en
Specimen Collection and Preservation 9
A
Figure 2.4 Tissue sample collection for microscopic exami-nation. (A) Tissue sample should include lesion, such as spotsin liver, plus some apparently healthy tissue. The sample mustbe no thicker than 1/4 inch to ensure adequate chemical fixa-tion by preservative. Use as sharp an instrument as possible(scalpel, knife, razor) for a clean cut. (B) Place tissue sampleinto container of 10 percent buffered formalin or other suitablefixative or preservative. The volume of formalin in the con-tainer should be about 10 times the amount of tissue sample.(C) Complete the process by securing the lid and properlylabeling the container.Figure 2.5 Plastic bottles used for tissue
specimens. Regardless of size or shape,specimen bottles should have a wide mouthand threaded caps for secure closure.
Figure 2.3 Using Whirl-Pak® bag for specimen collection.(A) Remove top at perforation. (B) Open bag by simultaneouslypushing the protruding wire-reinforced tabs toward the centerto insert the specimen and any appropriate preservative.(C) Close bag by pulling on tabs and then twirling bag whileholding tabs. (D) Secure the closure by folding tabs aroundbags and label bag with type of specimen, date, and any iden-tifying numbers.
B
C
D
A B
C

10 Field Manual of Wildlife Diseases: Birds
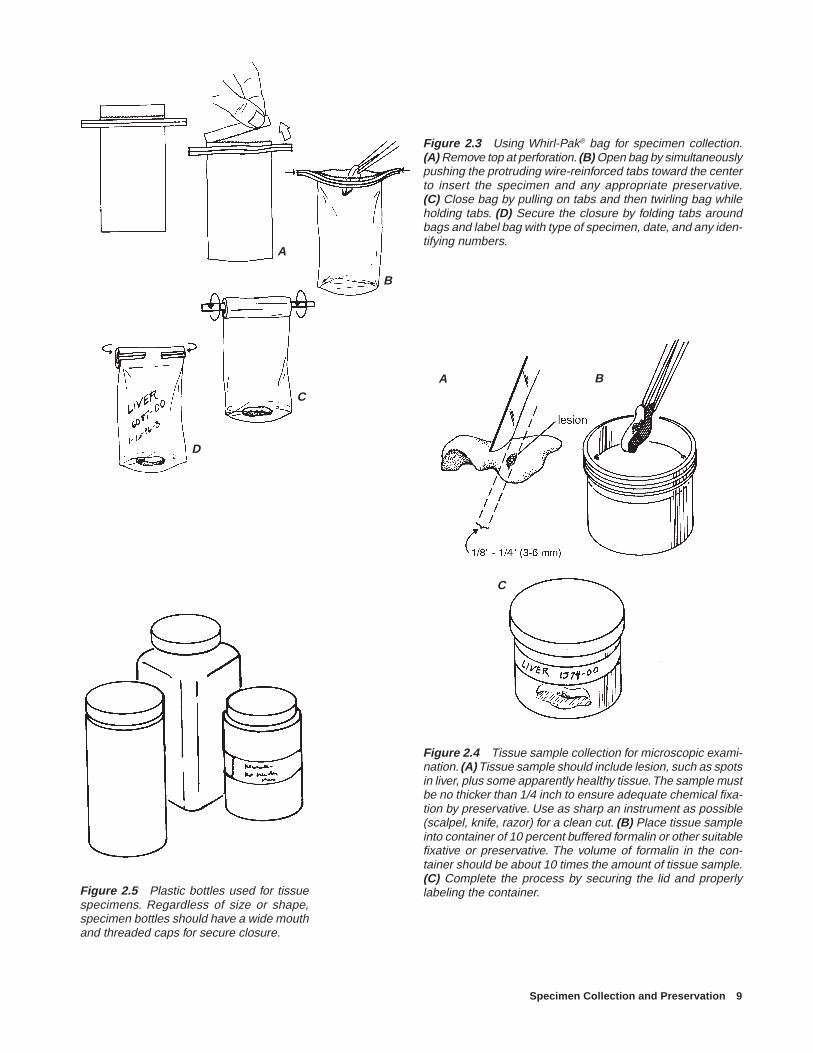
Figure 2.6 Dissecting a duck carcass: (A) incision line; (B) reflect the skin to expose the underlying anatomy; (C) make atransverse abdominal cut below the breast muscle; (D) extend cut through the ribs and wishbone; (E) remove breast plate; (F)dissect out heart; (G) remove liver; and (H) tie off and remove the gastrointestinal tract.
CAbdominaltransverse
cut
FRemove heart
GRemove liver
ERemove
breast plate
Trachea
Syrinx
Heart
Liver
Gizzard
BReflected
skin
DVent to bill
incision
Esophagus
AIncision
line
Specimen Collection and Preservation 11
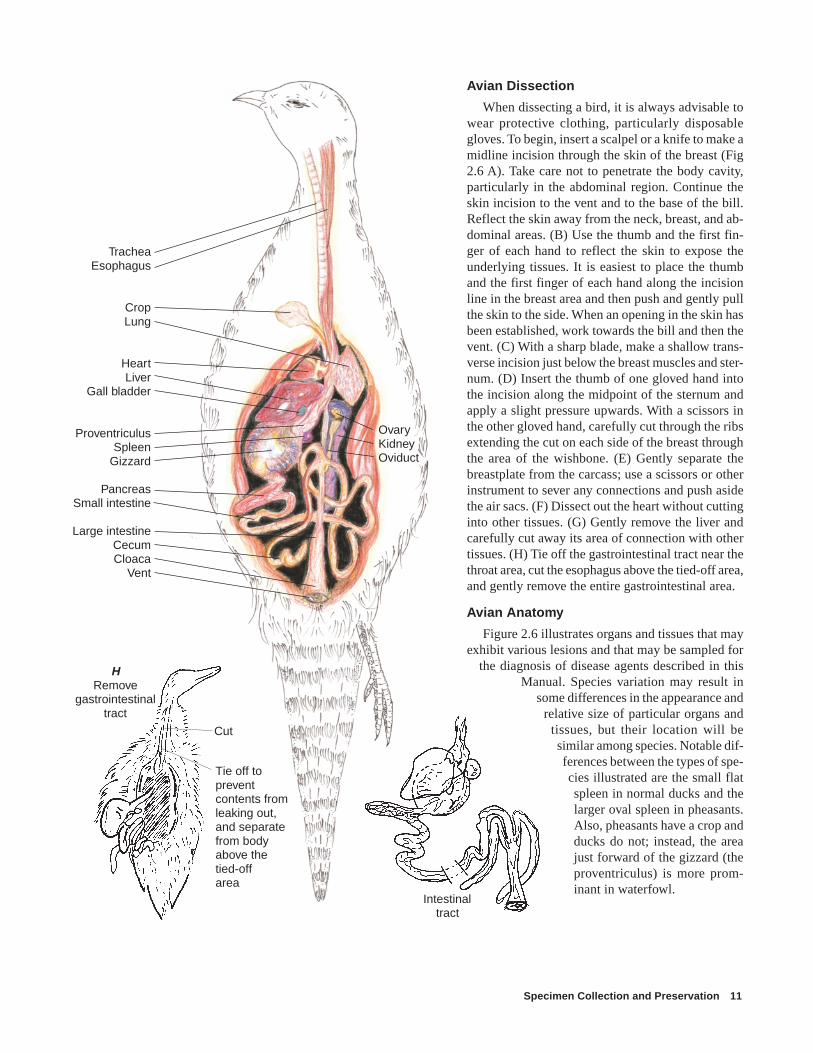
Avian Dissection
When dissecting a bird, it is always advisable towear protective clothing, particularly disposablegloves. To begin, insert a scalpel or a knife to make amidline incision through the skin of the breast (Fig2.6 A). Take care not to penetrate the body cavity,particularly in the abdominal region. Continue theskin incision to the vent and to the base of the bill.Reflect the skin away from the neck, breast, and ab-dominal areas. (B) Use the thumb and the first fin-ger of each hand to reflect the skin to expose theunderlying tissues. It is easiest to place the thumband the first finger of each hand along the incisionline in the breast area and then push and gently pullthe skin to the side. When an opening in the skin hasbeen established, work towards the bill and then thevent. (C) With a sharp blade, make a shallow trans-verse incision just below the breast muscles and ster-num. (D) Insert the thumb of one gloved hand intothe incision along the midpoint of the sternum andapply a slight pressure upwards. With a scissors inthe other gloved hand, carefully cut through the ribsextending the cut on each side of the breast throughthe area of the wishbone. (E) Gently separate thebreastplate from the carcass; use a scissors or otherinstrument to sever any connections and push asidethe air sacs. (F) Dissect out the heart without cuttinginto other tissues. (G) Gently remove the liver andcarefully cut away its area of connection with othertissues. (H) Tie off the gastrointestinal tract near thethroat area, cut the esophagus above the tied-off area,and gently remove the entire gastrointestinal area.
Avian Anatomy
Figure 2.6 illustrates organs and tissues that mayexhibit various lesions and that may be sampled for
the diagnosis of disease agents described in thisManual. Species variation may result in
some differences in the appearance andrelative size of particular organs and
tissues, but their location will besimilar among species. Notable dif-ferences between the types of spe-cies illustrated are the small flatspleen in normal ducks and thelarger oval spleen in pheasants.Also, pheasants have a crop andducks do not; instead, the areajust forward of the gizzard (theproventriculus) is more prom-inant in waterfowl.
HRemove
gastrointestinaltract
Intestinaltract
OvaryKidneyOviduct
TracheaEsophagus
CropLung
HeartLiver
Gall bladder
ProventriculusSpleen
Gizzard
PancreasSmall intestine
Large intestineCecumCloaca
Vent
Cut
Tie off topreventcontents fromleaking out,and separatefrom bodyabove thetied-offarea
12 Field Manual of Wildlife Diseases: Birds
Labeling SpecimensProper labeling, maintaining label readability, and pre-
venting label separation from specimens are as critical asproper specimen selection and preservation. The label shouldbe as close to the specimen as possible; for example, a labelshould be attached to a carcass, attached to a tube of blood,or placed within the vial of preservative with a parasite.Double labeling, or placing a label on the outside of a plasticbag holding the specimen whenever practical, is worth theeffort. The double labeling prevents confusion and potential
errors in specimen records at the diagnostic laboratory whenspecimens are received from multiple carcasses. Manila tagscan be used, but take care to prevent their exposure to largeamounts of fluids that may destroy the tag; tag destructioncan be reduced by using tags with high rag content or evenlinen tags. Use soft lead pencil or waterproof ink on thesetags; do not use ballpoint pen, nonpermanent ink, or hardlead pencil. The most durable tag is made of soft metal, suchas copper or aluminum, and can be inscribed with ballpointpen, pencil, or another instrument that leaves an impressionon the tag.
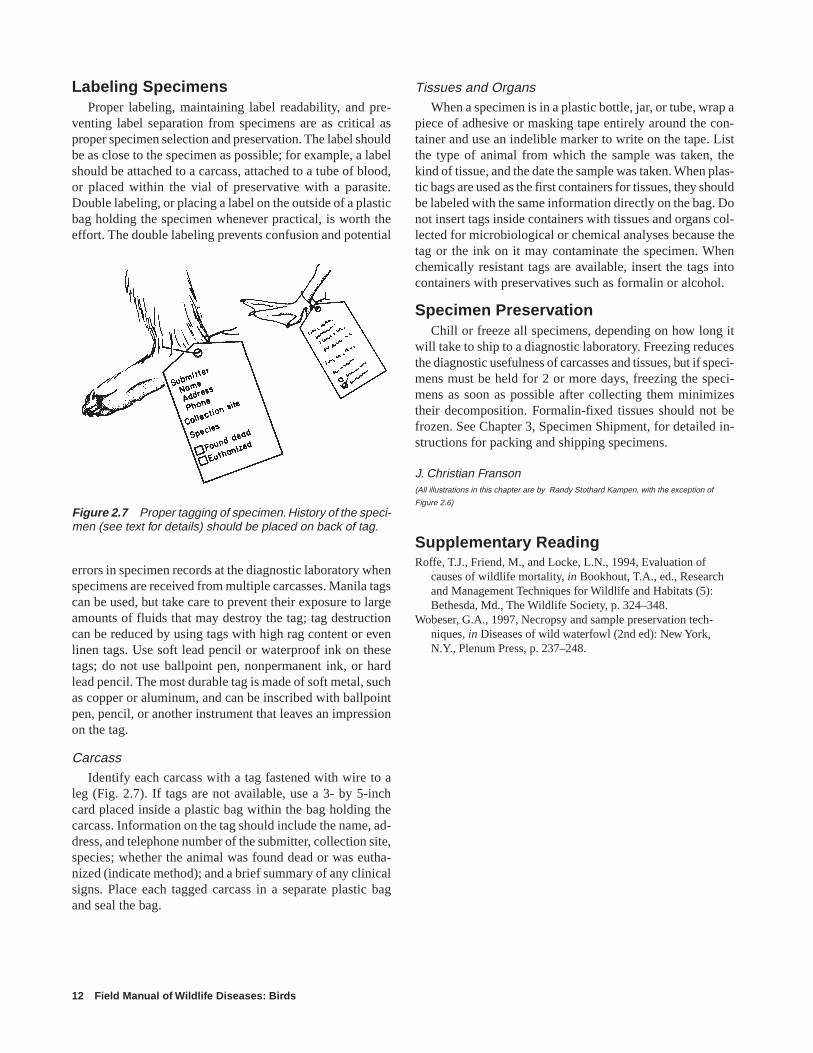
CarcassIdentify each carcass with a tag fastened with wire to a
leg (Fig. 2.7). If tags are not available, use a 3- by 5-inchcard placed inside a plastic bag within the bag holding thecarcass. Information on the tag should include the name, ad-dress, and telephone number of the submitter, collection site,species; whether the animal was found dead or was eutha-nized (indicate method); and a brief summary of any clinicalsigns. Place each tagged carcass in a separate plastic bagand seal the bag.
Tissues and OrgansWhen a specimen is in a plastic bottle, jar, or tube, wrap a
piece of adhesive or masking tape entirely around the con-tainer and use an indelible marker to write on the tape. Listthe type of animal from which the sample was taken, thekind of tissue, and the date the sample was taken. When plas-tic bags are used as the first containers for tissues, they shouldbe labeled with the same information directly on the bag. Donot insert tags inside containers with tissues and organs col-lected for microbiological or chemical analyses because thetag or the ink on it may contaminate the specimen. Whenchemically resistant tags are available, insert the tags intocontainers with preservatives such as formalin or alcohol.
Specimen PreservationChill or freeze all specimens, depending on how long it
will take to ship to a diagnostic laboratory. Freezing reducesthe diagnostic usefulness of carcasses and tissues, but if speci-mens must be held for 2 or more days, freezing the speci-mens as soon as possible after collecting them minimizestheir decomposition. Formalin-fixed tissues should not befrozen. See Chapter 3, Specimen Shipment, for detailed in-structions for packing and shipping specimens.
J. Christian Franson(All illustrations in this chapter are by Randy Stothard Kampen, with the exception of
Figure 2.6)
Supplementary ReadingRoffe, T.J., Friend, M., and Locke, L.N., 1994, Evaluation of
causes of wildlife mortality, in Bookhout, T.A., ed., Researchand Management Techniques for Wildlife and Habitats (5):Bethesda, Md., The Wildlife Society, p. 324–348.
Wobeser, G.A., 1997, Necropsy and sample preservation tech-niques, in Diseases of wild waterfowl (2nd ed): New York,N.Y., Plenum Press, p. 237–248.
Figure 2.7 Proper tagging of specimen. History of the speci-men (see text for details) should be placed on back of tag.