Embed Size (px)
Citation preview

Learning About Tax with Intuit Profile
Additional ResourcesThis document provides numerous resources to accounting professionals. Refer to these sites to explore additional training opportunities
Professional Accounting Software
Tax Preparation & efiling Return Software
Professional Tax Software Training
Chapter 2
Installation& Set UpLearning ObjectivesAt this chapter’s end students will understand:• How to install and activate ProFile• How to manage ProFile licenses• How to set up EFILE credentials• How to use ProFile’s Options menu
2021
1
Copyright Copyright 2021 Intuit, Inc. All rights reserved.
Intuit, Inc. 5100 Spectrum Way,
Mississauga, ON L4W 5S2 Trademarks ©2021 Intuit Inc. All rights reserved. Intuit, the Intuit logo, Intuit ProFile, ProAdvisor, and QuickBooks, among others, are trademarks or registered trademarks of Intuit, Inc. in Canada and other countries. Other parties’ marks are the property of their respective owners. Notice to Readers The publications distributed by Intuit Inc. are intended to assist educators by providing current and accurate information. However, no assurance is given that the information is comprehensive in its coverage or that it is suitable in dealing with a particular situation. Accordingly, the information provided should not be relied upon as a substitute for independent research. Intuit Inc. does not render any accounting, legal, or other professional advice nor does it have any responsibility for updating or revising any information presented herein. Intuit Inc. cannot warrant that the material contained herein will continue to be accurate or that it is completely free of errors when published. Readers should verify information before relying on them. The material in this publication is provided for informational purposes only. Laws, regulations, policy and procedures regarding this subject are continuously changing and the information and examples are intended as general guidelines only. This publication is sold with the understanding that neither the publisher nor the author are engaged in rendering professional advice and it is recommended that such advice be obtained before acting on any information herein. Users of this publication are responsible for their own actions and outcomes. The publishers and author therefore expressly disclaim all and any liability to any person in respect of anything and any consequence. Any examples in this book are factitious and any resemblances to actual people or circumstances are purely coincidental.

\Table of Contents
Introduction .............................................................................................................................................................. 3
Benefits of Using ProFile ......................................................................................................................................... 4
Chapter 2 Installation and Set-Up .......................................................................................................................... 5 Single-User Installation .............................................................................................................................................. 5 ProFile Workstation Installation .............................................................................................................................. 10 ProFile Flexible licensing......................................................................................................................................... 11
A Basic Setup .......................................................................................................................................................... 14
An Advanced Setup ................................................................................................................................................ 18
Saving your Settings ............................................................................................................................................... 31
Chapter 2 Quiz ....................................................................................................................................................... 34

3
Introduction Intuit ProFile Tax software is reliable and easy-to-use, and it offers sophisticated features that help tax preparers experience a more productive tax season. The following paragraphs summarize the key components of Intuit ProFile Professional Tax software
ProFile T1 imports and converts data created by competing software products. Whether you carry files forward individually or in batches, you will find the process quick and convenient. Using ProFile`s WYSIWYG (what you see is what you get) forms, you can view and edit federal T1 and Québec TP1 forms in either French or English. You can also print all tax forms in either language at the click of a button.
ProFile T2 is designed for professional preparation of corporate tax returns in all provinces and territories. ProFile T2 includes:
• Federal T2 returns, including T2 RSI (where applicable) and Corporation Internet Filing • Provincial corporate tax returns for Alberta (including AT1 RSI), for Ontario returns with taxation
years ending prior to January 1, 2009 (including CT23 disk filing) and for Quebec (CO-17). • Provincial capital tax returns for Manitoba, Saskatchewan and British Columbia
ProFile T3 prepares Trust income tax returns and supporting schedules, including T3 and T5 slips that the trust receives. Simply enter slip information on intuitive income-reporting screens and ProFile T3 automatically transfers the amounts to the appropriate forms. ProFile T3 also integrates business and rental income statements. In addition to T3 slips, the software allows you to prepare NR4 slips for non-resident taxpayers (including the NR4 summary). ProFile FX (Forms Expert) gives you more than 80 of the most commonly-used CRA forms which supplement the form-sets in Intuit`s other tax applications. Here are a few highlights of ProFile FX:
• Customizable options help you complete and file the forms you need. • Automatic form selection facilitates form printing. • Audit and review features help pinpoint potential errors • Forms flexibility lets you print facsimile forms on plain paper or directly onto pre-printed CRA forms.
ProFile FX also prepares magnetic media files for T4, T4A, T5, T5018 and NR4 slips, as well as for the RL1, RL2, RL3 and RL4.
• Import identification from an existing ProFile T1 or T2 data file minimizes potential data entry errors.
Benefits of Using ProFile ProFile is powerful, efficient and secure tax software that helps you get your work done fast and efficiently. Here’s how you benefit by using Profile:
• With phone, email or in-product live chat support, you have year-round access to knowledgeable Canadian technical experts
• With its comprehensive set of forms and schedules, ProFile lets you handle just about every tax scenario in any jurisdiction, including Québec
• With a built-in auditor that runs up to 2,800 diagnostic checks of your tax returns, ProFile has your back
• Flexible Licensing means you can install ProFile on more than one personal computer without having to pay additional licensing fees
• Work with QuickBooks? So does ProFile! There’s no need for manual data entry because you can now export data from QuickBooks directly into ProFile

5
Chapter 2 Installation and Set-Up
A Proper Setup With its multifaceted installation options and its depth of features, it is important to fully grasp the various ways you can install and set up ProFile. The options discussed in this chapter range from a set-up for a one-person tax office to a large-scale set-up for a team of tax preparers. No matter the scenario, the objective remains the same: maximizing efficiency and understanding the needs of the tax preparer(s) who will be using ProFile. Before diving into the various installation options, it is important to note the following specifications and system requirements:
ProFile Specifications • Internet connectivity is required for activation, licensing, auto-update and additional functionality such
as EFILE • Network/workstation install UNC path is not supported • .NET 4.5.2 installation & registration are required • Apple products are not supported
System Requirements • Processor: 1GHz or faster processor • OS: Windows 10TM (recommended), Windows 8.1 TM • Memory: 4 GB or higher • Hard Drive: 3 GB for installation • Printer: Windows compatible • Display: 1024 X 768 minimum resolution; 16 bit or higher colour • Internet: IE 11 or higher and high-speed connection • Other: eReview feature requires a MAPI email client and a PDF reader application (for example:
Adobe PDF Reader®), Microsoft .NET framework 4.5.2
SINGLE-USER INSTALLATION This sequence of instructions explains how to install ProFile on the local (C:\) drive of your personal computer:
• Start by visiting ProFile’s website (profile.intuit.ca) and download the gpsetup.exe file
• Double click gpsetup.exe and follow the installation prompts

• During installation, make sure that you choose the Program Files folder of your local drive (usually drive C:\) as the file destination
• Follow the prompts to complete the installation
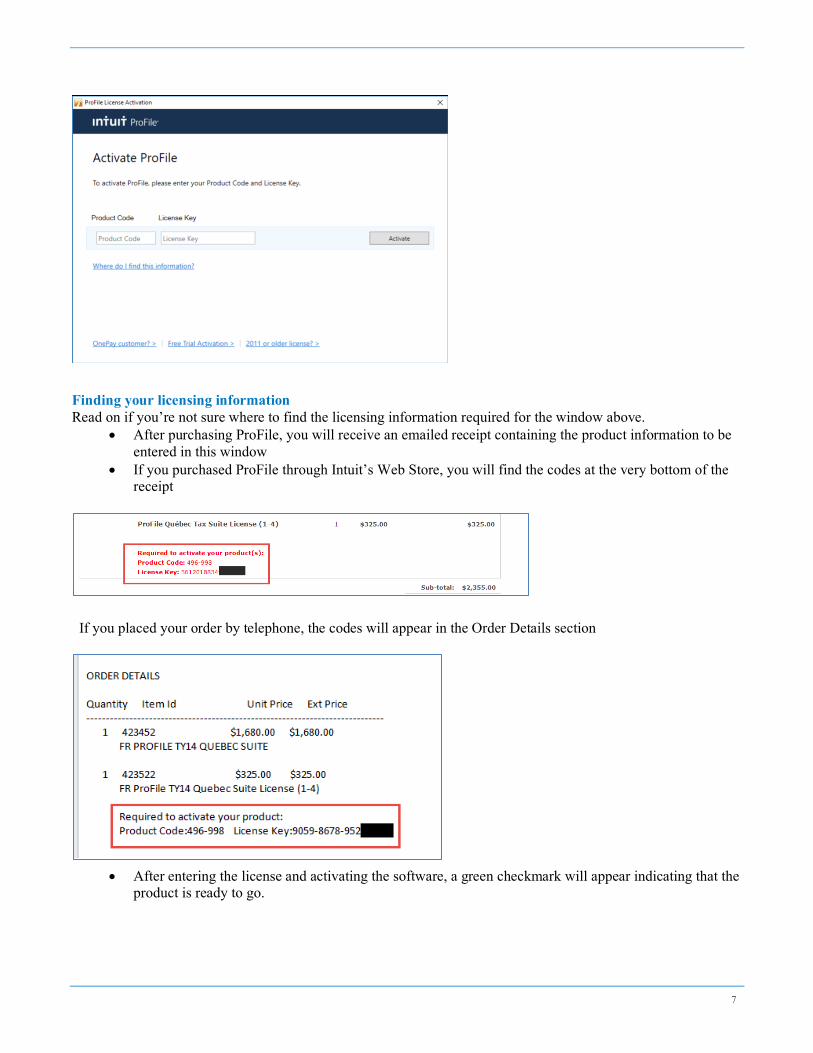
ProFile activation Once installed, activate ProFile by entering your license information.
• Launch ProFile • In the window that opens, enter your software Product Code and License Key
7
Finding your licensing information Read on if you’re not sure where to find the licensing information required for the window above.
• After purchasing ProFile, you will receive an emailed receipt containing the product information to be entered in this window
• If you purchased ProFile through Intuit’s Web Store, you will find the codes at the very bottom of the receipt
If you placed your order by telephone, the codes will appear in the Order Details section
• After entering the license and activating the software, a green checkmark will appear indicating that the
product is ready to go.
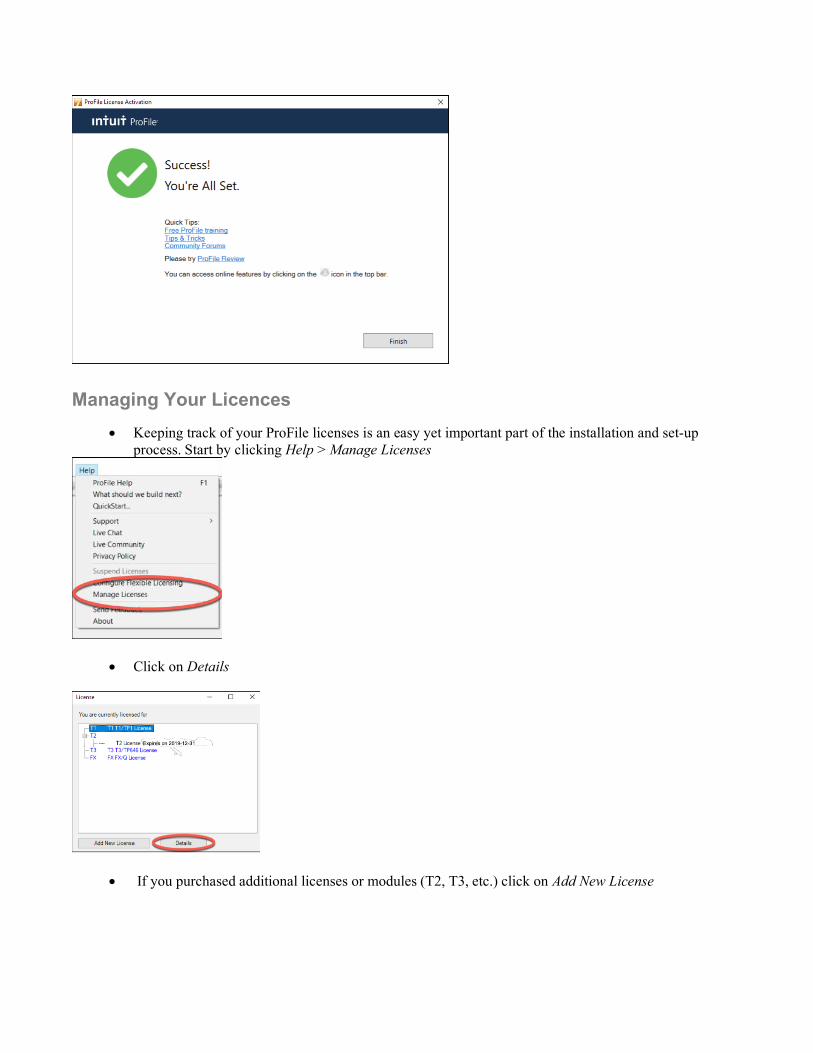
Managing Your Licences • Keeping track of your ProFile licenses is an easy yet important part of the installation and set-up
process. Start by clicking Help > Manage Licenses
• Click on Details
• If you purchased additional licenses or modules (T2, T3, etc.) click on Add New License

9
• Enter the new Product Code and License Key
• To remove licenses—those that are old or outdated, for example—return to the License window, select
the license to remove
• Click on Delete Selected License

PROFILE WORKSTATION INSTALLATION In a network environment, where an office has multiple tax preparers, you may not want to install ProFile on each individual computer. In other words, you’ll want a workstation installation. Here’s how to do it:
• Ensure that your network is properly setup and configured. You may require an IT professional or Network Administrator for guidance on how to best proceed with this setup
• Perform a full installation of ProFile on the server and restart the server • From the workstation, map the drive in which ProFile was installed by following these steps: • Click on Computer, then choose Map network drive
• Enter the address of the server by browsing to the target location (example: G:\my-server)
• In the mapped network folder where ProFile was installed, right-click on Workstation Install and select Run as administrator
• Follow the installation wizard • When completed, a ProFile Workstation icon will appear on the workstation’s desktop
Configuring Your Workstation Licenses There are two ways to configure workstation licenses. The first method is to configure the license codes for all users. Modify the startup.ini file that is installed on your network server where ProFile is installed. The startup.ini file has the following format:
• [License]

11
• ProductCode= • Code= • Name=
To have a common code used by all client computers, enter the ProFile product code after ProductCode= and enter the license key after Code=
• The second method is used when your system administrator wants to limit individual users to specific modules.
• Under this method every user has their own access code (instead of everyone using the same centralized code). It is recommended to leave the startup.init file in the location where ProFile is installed
• After you update the registry and complete the installation process, you are now configured to use ProFile. To run ProFile next time, double-click the ProFile icon that was created on your desktop or select ProFile from the Start menu.
PROFILE FLEXIBLE LICENSING If you have multiple computers and need to access ProFile from any one of them, then Flexible Licensing is for you. Flexible Licensing temporarily suspends a ProFile license on one computer and activates that same license on another computer. With Flexible Licensing, there’s no need to constantly delete the license on one machine and then enter it manually on another machine.
• To enable this feature, click the Help menu and then select Configure Flexible Licensing
• Click Enable flexible licensing on this computer then select the mode of your choice. You can choose a Manual mode that requires you to confirm you would like to suspend the license on a given computer, or you can choose an Automatic mode that will suspend and activate the licenses for you. We recommend choosing Automatic mode
• After choosing your option, click Save
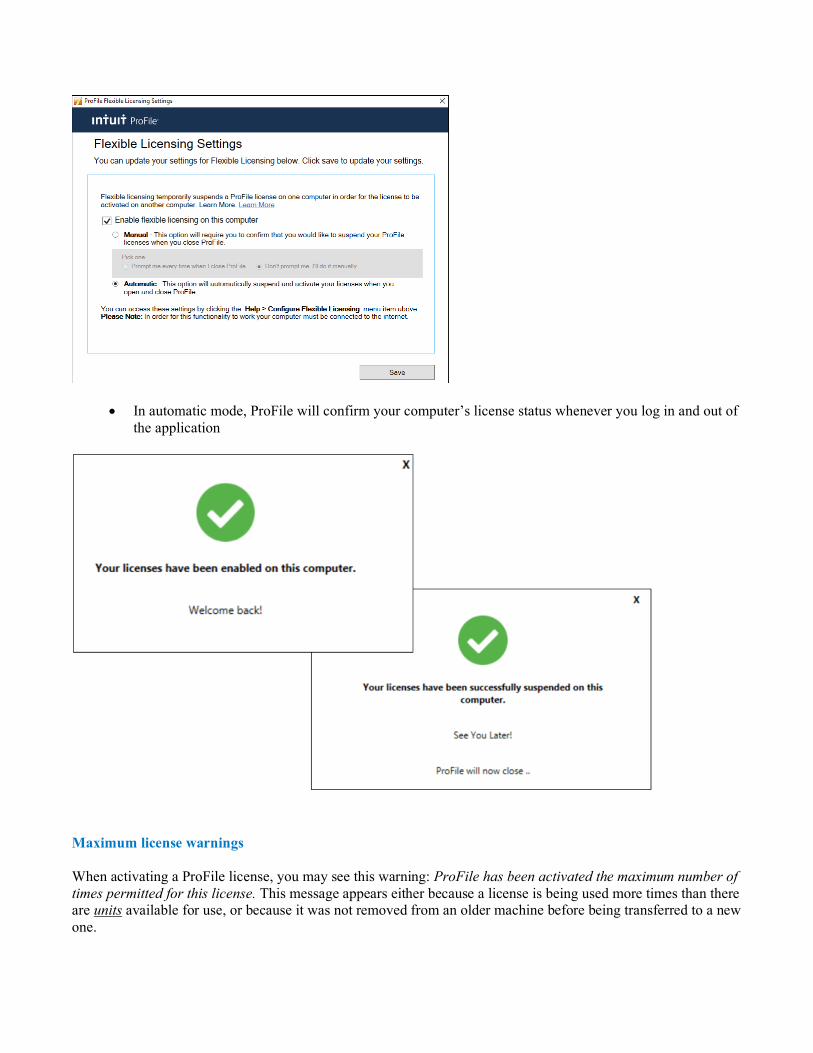
• In automatic mode, ProFile will confirm your computer’s license status whenever you log in and out of the application
Maximum license warnings When activating a ProFile license, you may see this warning: ProFile has been activated the maximum number of times permitted for this license. This message appears either because a license is being used more times than there are units available for use, or because it was not removed from an older machine before being transferred to a new one.
13
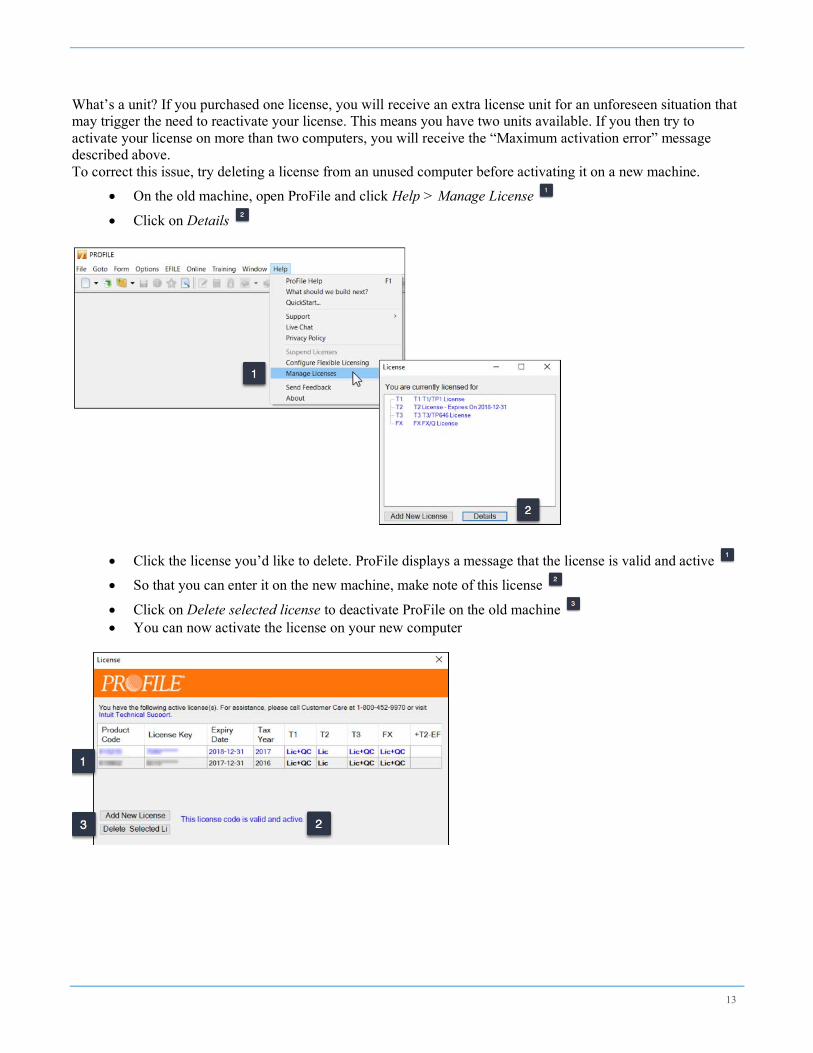
What’s a unit? If you purchased one license, you will receive an extra license unit for an unforeseen situation that may trigger the need to reactivate your license. This means you have two units available. If you then try to activate your license on more than two computers, you will receive the “Maximum activation error” message described above. To correct this issue, try deleting a license from an unused computer before activating it on a new machine.
• On the old machine, open ProFile and click Help > Manage License
• Click on Details
• Click the license you’d like to delete. ProFile displays a message that the license is valid and active
• So that you can enter it on the new machine, make note of this license
• Click on Delete selected license to deactivate ProFile on the old machine • You can now activate the license on your new computer
A Basic Setup In this section, you will learn how to quickly set up the minimum number of options that are required to get ProFile up and running. Once these options are enabled, you can immediately begin working in ProFile. Later in this chapter, we will describe how to delve into more advanced and more sophisticated options.
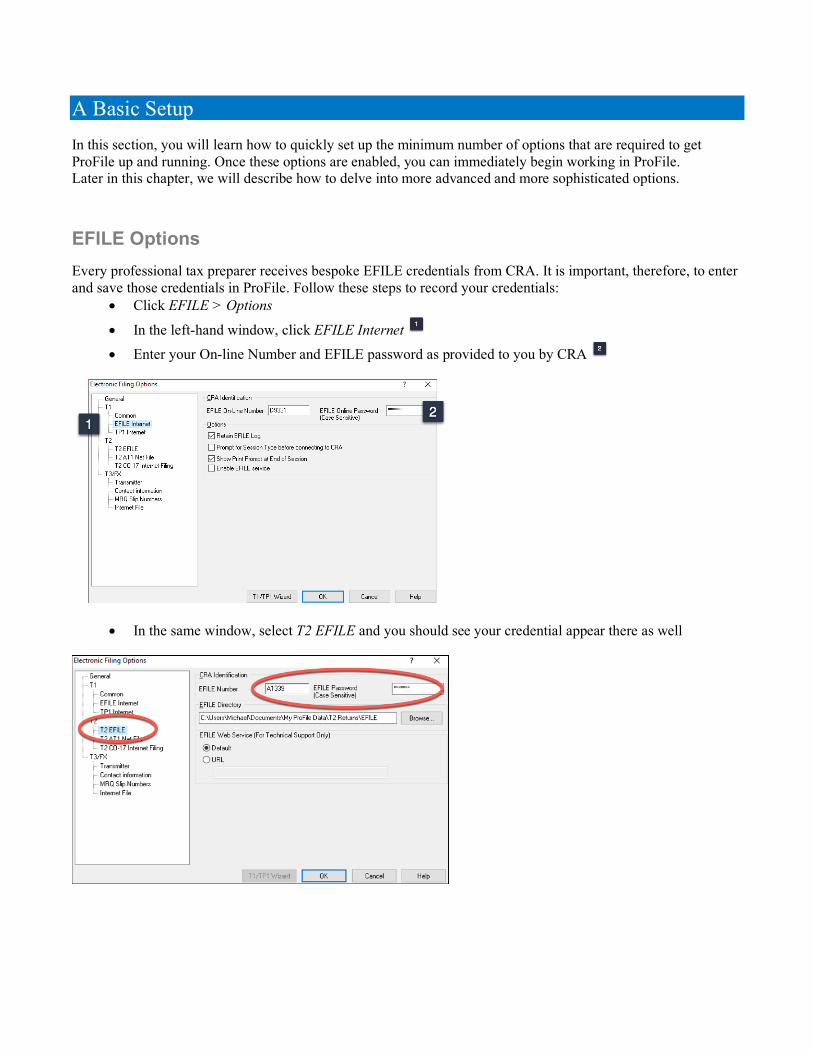
EFILE Options Every professional tax preparer receives bespoke EFILE credentials from CRA. It is important, therefore, to enter and save those credentials in ProFile. Follow these steps to record your credentials:
• Click EFILE > Options
• In the left-hand window, click EFILE Internet
• Enter your On-line Number and EFILE password as provided to you by CRA
• In the same window, select T2 EFILE and you should see your credential appear there as well
15
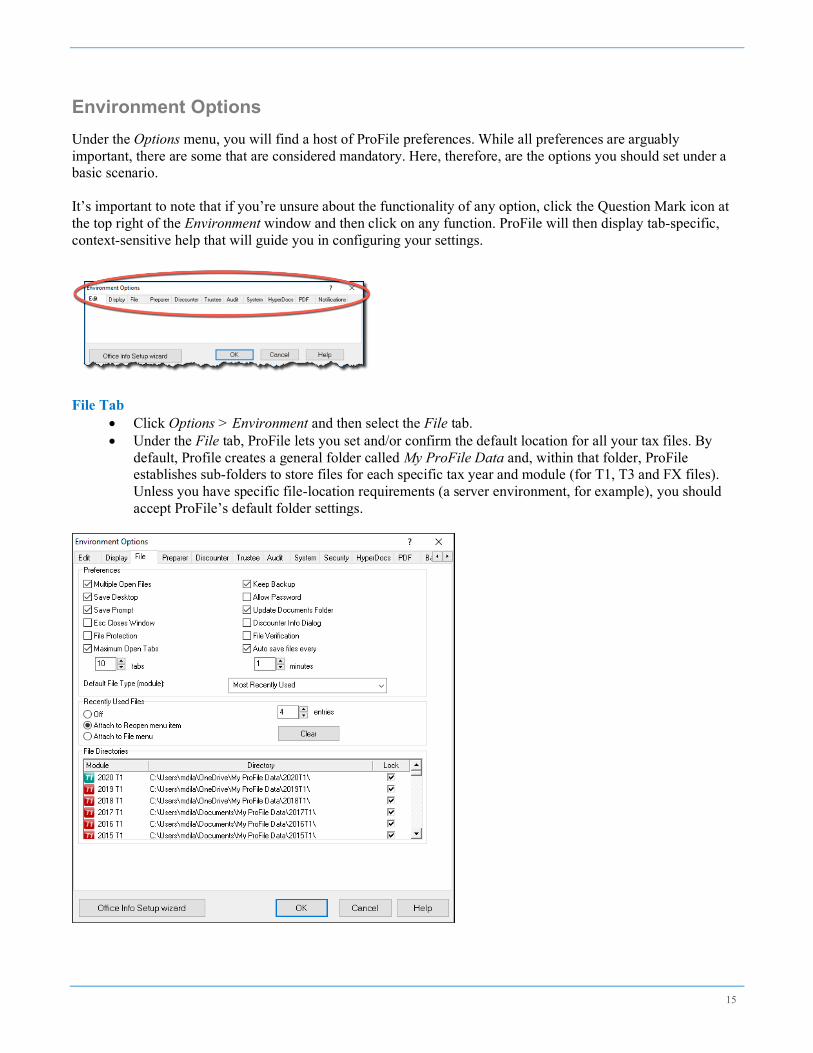
Environment Options Under the Options menu, you will find a host of ProFile preferences. While all preferences are arguably important, there are some that are considered mandatory. Here, therefore, are the options you should set under a basic scenario. It’s important to note that if you’re unsure about the functionality of any option, click the Question Mark icon at the top right of the Environment window and then click on any function. ProFile will then display tab-specific, context-sensitive help that will guide you in configuring your settings.
File Tab • Click Options > Environment and then select the File tab. • Under the File tab, ProFile lets you set and/or confirm the default location for all your tax files. By
default, Profile creates a general folder called My ProFile Data and, within that folder, ProFile establishes sub-folders to store files for each specific tax year and module (for T1, T3 and FX files). Unless you have specific file-location requirements (a server environment, for example), you should accept ProFile’s default folder settings.
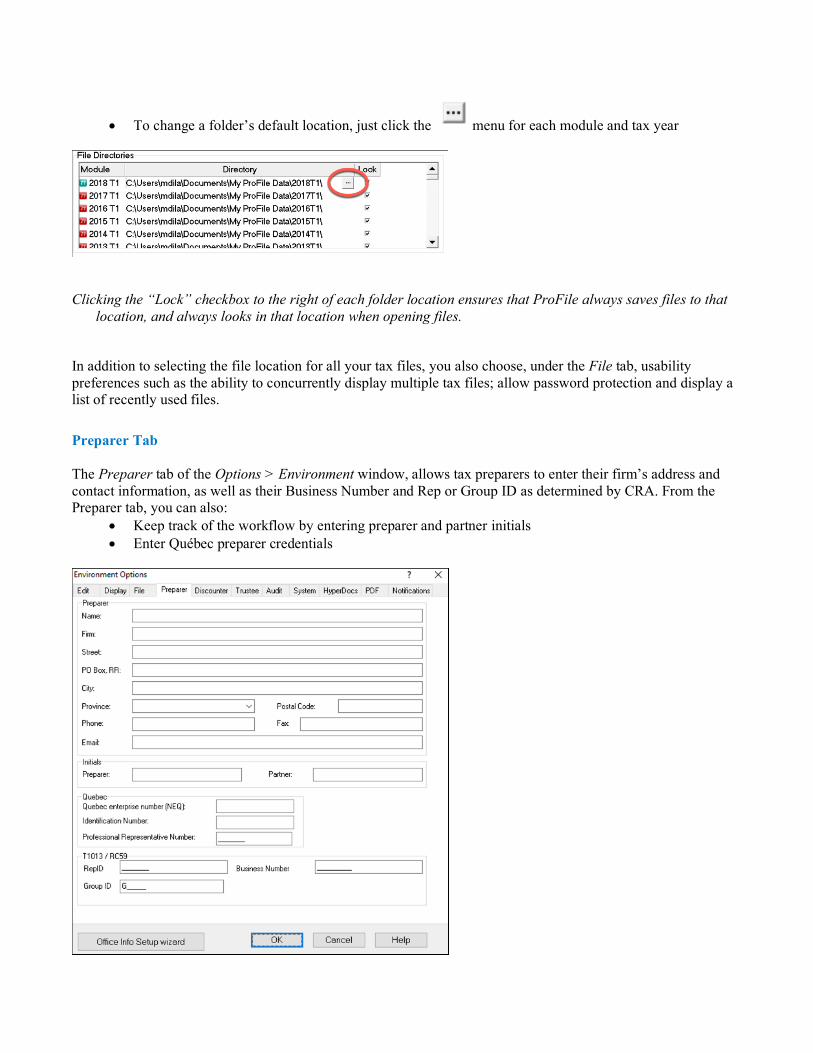
• To change a folder’s default location, just click the menu for each module and tax year
Clicking the “Lock” checkbox to the right of each folder location ensures that ProFile always saves files to that location, and always looks in that location when opening files.
In addition to selecting the file location for all your tax files, you also choose, under the File tab, usability preferences such as the ability to concurrently display multiple tax files; allow password protection and display a list of recently used files.
Preparer Tab The Preparer tab of the Options > Environment window, allows tax preparers to enter their firm’s address and contact information, as well as their Business Number and Rep or Group ID as determined by CRA. From the Preparer tab, you can also:
• Keep track of the workflow by entering preparer and partner initials • Enter Québec preparer credentials

17
Next steps After setting up the basic options just described, you can jump ahead to Chapter 3 and begin working in ProFile. A prudent tax preparer, though, might want to explore the more advanced preferences discussed in the next section.
An Advanced Setup This section describes the advanced features and preferences that let you personalize ProFile. These options will help you save time and streamline your workflow during a busy and hectic tax season. Note that the following preferences are all accessed via the Options > Environment menu.
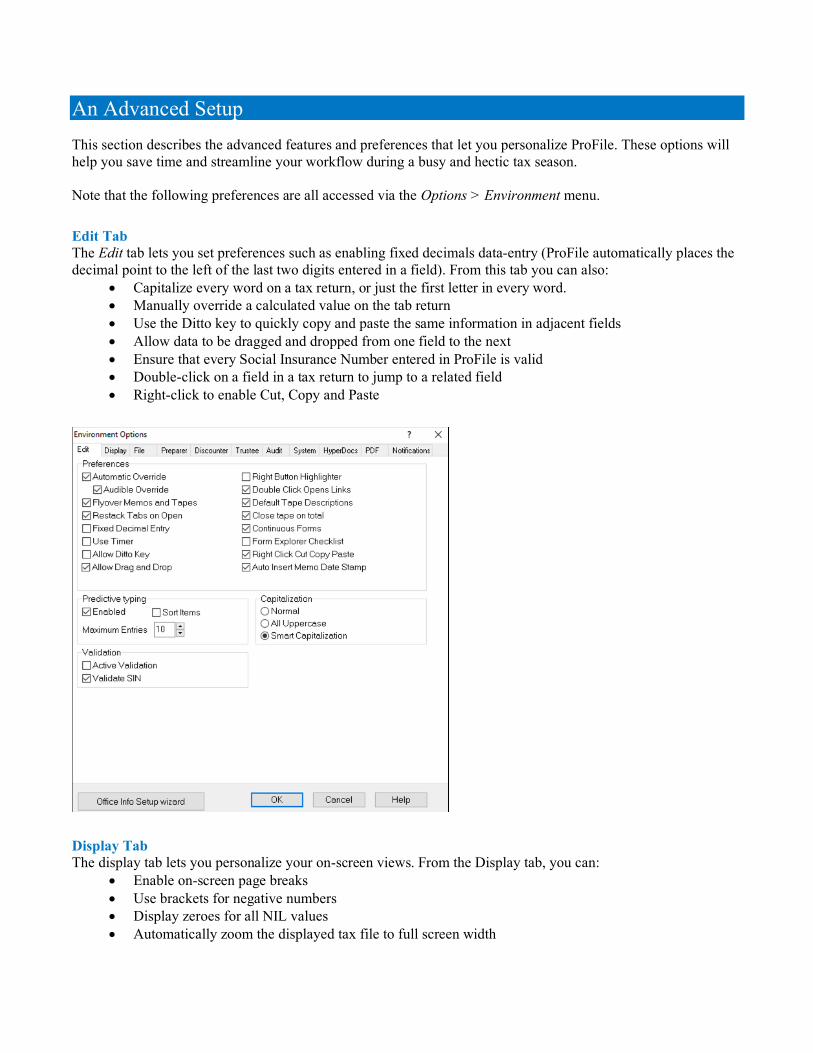
Edit Tab The Edit tab lets you set preferences such as enabling fixed decimals data-entry (ProFile automatically places the decimal point to the left of the last two digits entered in a field). From this tab you can also:
• Capitalize every word on a tax return, or just the first letter in every word. • Manually override a calculated value on the tab return • Use the Ditto key to quickly copy and paste the same information in adjacent fields • Allow data to be dragged and dropped from one field to the next • Ensure that every Social Insurance Number entered in ProFile is valid • Double-click on a field in a tax return to jump to a related field • Right-click to enable Cut, Copy and Paste
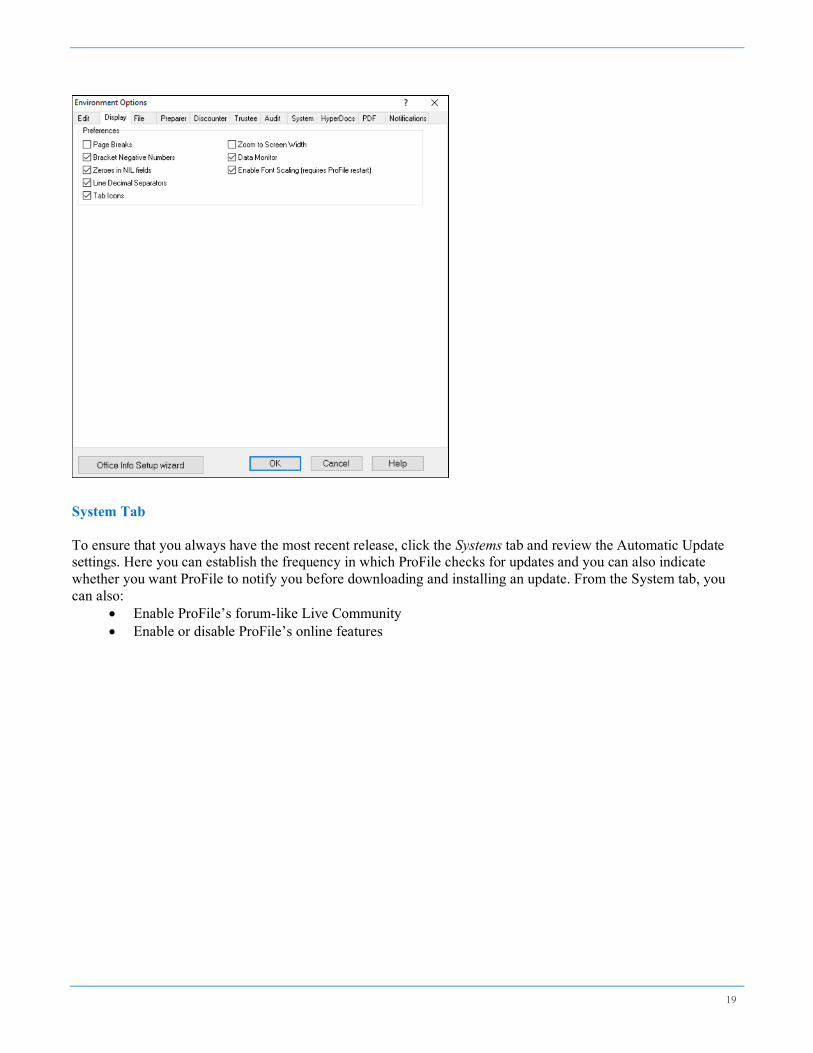
Display Tab The display tab lets you personalize your on-screen views. From the Display tab, you can:
• Enable on-screen page breaks • Use brackets for negative numbers • Display zeroes for all NIL values • Automatically zoom the displayed tax file to full screen width
19
System Tab To ensure that you always have the most recent release, click the Systems tab and review the Automatic Update settings. Here you can establish the frequency in which ProFile checks for updates and you can also indicate whether you want ProFile to notify you before downloading and installing an update. From the System tab, you can also:
• Enable ProFile’s forum-like Live Community • Enable or disable ProFile’s online features

PDF Tab Use the PDF tab of the Environment Options to personalize your client’s PDF files. Here, you can set file-naming conventions, as well as file location and password protection for all your PDF tax returns.

21
Other Environment Settings The Options->Environment window features other tabs including settings for establishing Discounter and Trustee credentials, and for enabling more advanced features such as Audit and HyperDocs settings. We will revisit some of these settings later.
Options>Module ProFile’s Module options let you fine-tune the way ProFile works with each individual tax year and module (T1, T2, T3 and FX). This granular level of detail lets you determine the tax settings that ProFile will choose on new files, and on files you are carrying forward from a previous year. In this window, you can also establish your language preference, and you can set variance thresholds for comparing a client’s current and previous year’s tax file. The paragraphs below describe the Module options you should immediately set.
General Tab Scroll down this window to set defaults for new and carried-forward file. These include CRA Authorization levels, pre and post-assessment review settings, and slip descriptions for carried-forward files. In this window, you can also:
• Carry forward Elections Canada and foreign property questions • Set defaults for language of correspondence and preparer information • Set client letter and invoice defaults • Establish naming conventions for your tax files • Choose form colours for client and spouse tax returns

Data Locking Tab This tab lets you enable a warning that prevents you from accidentally creating a tax file. You can also automatically lock a file once a Client and EFILE status is indicated. For example, if you click the Completed checkbox in the Client Status column, then ProFile will lock a tax file once a tax preparer indicates that the tax file has been completed.
Setting a client status • To set a file’s Client Status, open a tax file and go to File > Properties. • Click the Client Status dropdown and select the desired status

23
• Note the checkbox, to the right of the Client Status dropdown, that lets you toggle file locking on and off.
Disclaimer Tab A standard business disclaimer will alert readers about your involvement with that tax return. ProFile lets you set two different disclaimers.
• A general disclaimer, for the tax return as a whole, which will appear on the last page of the tax jacket • A business disclaimer that will appear on business-type forms such as the T2125 schedule for self-
employed individuals

Options > Templates ProFile includes pre-formatted letters that you can print as part of your client’s T1 package. Here is an excerpt of one such letter.
All of ProFile’s preformatted letters are saved in a templates subfolder within the My ProFile Data folder. To view and edit any template, follow these steps:
• Click on Options>Templates • Find and double-click the desired template, for example, Letter
The Letter template will open in a new window and it will display text in two different colours;
• Text appearing in blue signifies data that flows from ProFile data fields. This type of information is called a Field Code. Field codes can only be inserted or removed; they cannot be edited from within the template
• Black font represents free-form text that you can enter and edit

25
• To add text (black font), place your cursor in the desired area and begin typing
• To add Field Text, right-click the template at the desired input area • Click Insert Field
• Then, from the Insert Field list, choose the desired field and click Insert

• Click File > Save to save your changes • Select the location (letter template folder) and enter a file name
• Click Yes to confirm that you want to use this form as the default
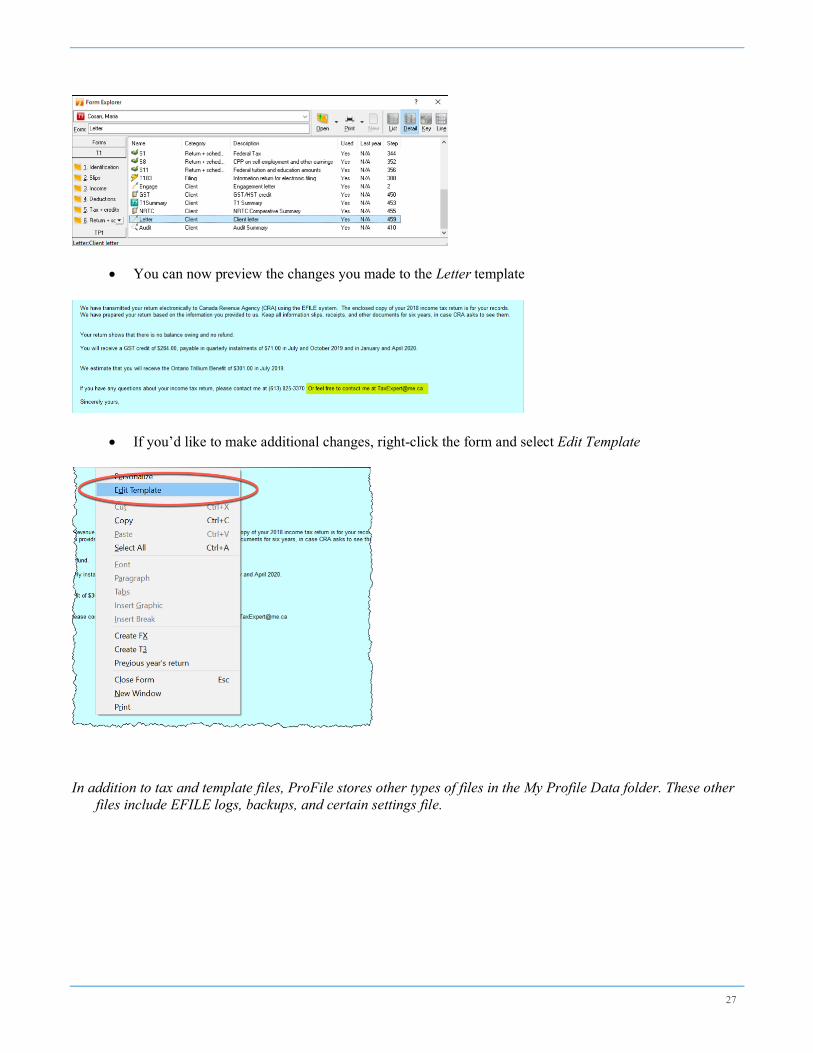
• To view the finished product, use the Form Explorer to find and open the client’s Letter
27
• You can now preview the changes you made to the Letter template
• If you’d like to make additional changes, right-click the form and select Edit Template
In addition to tax and template files, ProFile stores other types of files in the My Profile Data folder. These other files include EFILE logs, backups, and certain settings file.

Options>Form Selection ProFile has a powerful set of tools for personalizing your print settings. This feature lets you determine the tax forms to send to your clients. For example, rather than printing a complete tax return for each of your clients (which can run many pages) you might want to print a tax summary with just a few selected schedules. Here’s how to configure your print settings:
• From the Options > Form Selection menu, choose the module and tax year • Choose the print job for the type of the tax return you are preparing for your client—the most common
print job being T1 EFILE • After printing a return, ProFile lets you choose a default status. For example, once printed, you might
want to set the status of all tax returns to Completed. The window below displays the available types of
file status
• Under Form Selection Details, you can choose the specific print set you’d like to prepare. For example,
for each tax return, you can choose to print a copy for your files, your clients and for CRA. It’s here that you can also determine options such as duplex printing or four forms per page. You can also set
your PDF options here. • You can rename the prints sets, or add more print sets as well. To do either, just type the desired form
names under Print Set Names • Scroll through the Form window to select (or deselect) the forms you would like to save or send to
your clients
• Click Carry-forward to assign last year’s print settings to the current year

29
Options>Pricing Tax practitioners likely bill out their work by the hour or by the return. In either case, with its Pricing Schedules, ProFile lets you choose one method, or both. In the Pricing Schedule window below, you can:
• Record your GST Registration Number and tax rates and you can set your invoice numbering
sequence
• Indicate whether you want to provide a detail or summary invoice to your clients
• Choose whether to bill by tax schedule or by the hour
• Establish your per-schedule pricing
• Carry forward last year’s pricing to the current year
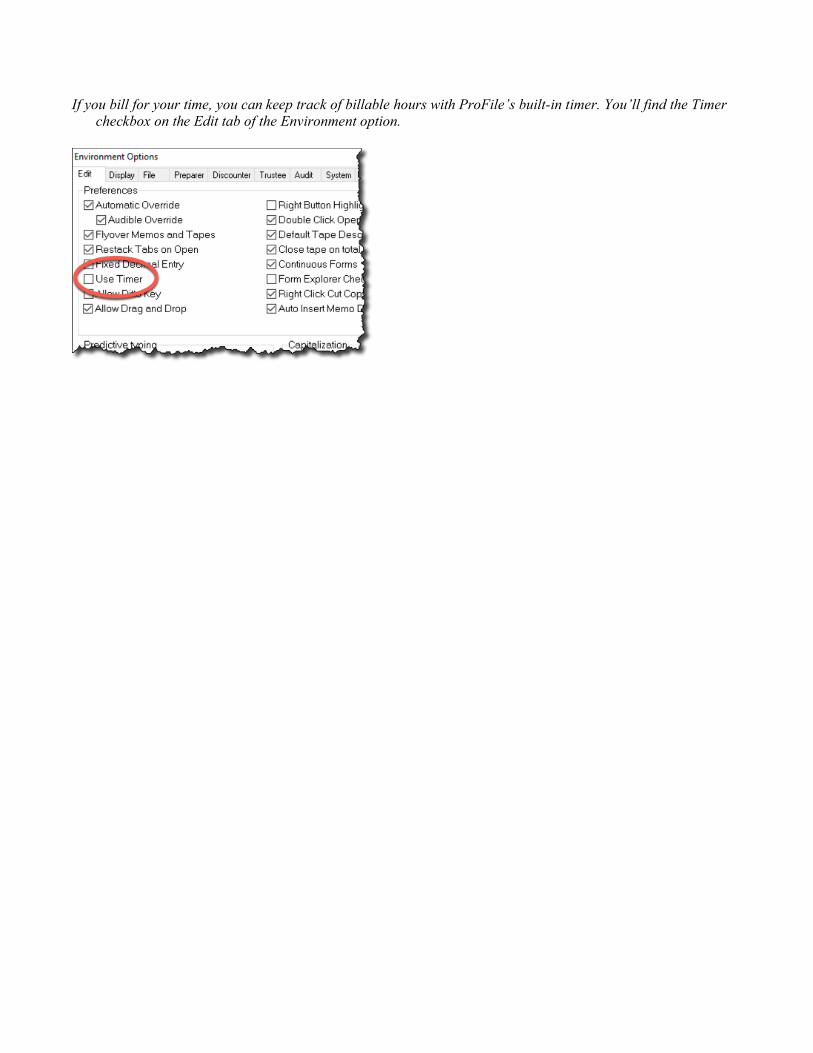
If you bill for your time, you can keep track of billable hours with ProFile’s built-in timer. You’ll find the Timer checkbox on the Edit tab of the Environment option.

31
Saving your Settings Personalizing all of ProFile’s options and settings might take hours. Which may lead you to ask the following questions:
• Do I need to do this on every computer in my office? • Do I have to repeat all these steps every time I install a new instance of ProFile? • Do I need to repeat these steps if I purchase a new computer? • How do I prevent someone from making changes to my own settings?
Fortunately, the answer to the first three questions is an emphatic “No,” and, in the next few paragraphs, you’ll learn how to save your settings for future ProFile installations or share them with other users in your office. First, though, let’s show you how you can prevent anyone from making unauthorized changes to your settings.
Options>Password • To protect your option settings, simply enter and confirm your options password.
It’s important to safely record and store your options password as the ProFile support team may not be successful in helping you retrieve it.
Options>Administration ProFile lets you save the global settings (those described just above) in a folder that’s separate from the program files. This means if you upgrade or replace your computer, or if you reinstall ProFile, you can easily re-establish your customized options. In addition, in a network environment, multiple users can point to one uniform options package that specifies settings such as file location and tax preparer information.
• To view where ProFile stores your global settings, click Options and select Options Administration. • The window below tells you your settings will be stored in an Options Package subfolder that’s located
within the My ProFile Data folder
• To save your customized settings in the Options Package subfolder, click New. Any new setting
will appear in the Options Package area

• After clicking New, enter a name for your customized settings, and click OK • Your settings are now saved in ProFile’s Options Package subfolder
Should you, in the future, need to reinstall ProFile, or if you add a new user or computer, return to Options>Administration and then:
• Select the applicable radio button (in this example, an office of a sole tax preparer)
• Highlight the Options Package
• Click Load, and ProFile will apply your settings
• Note that you can optionally click the Multiple Options checkbox to create more than one package

33

Chapter 2 Quiz
Question 1: True or False: You can install ProFile for a single-user or in a multi-user environment Question 2: ProFile’s Flexible licensing lets you:
A. Allow up to ten simultaneous ProFile users B. Keep ProFile running in the background C. Ensure that multiple users have access to their files D. Install ProFile on multiple computers for non-concurrent usage
Question 3: ProFile’s Environment options has features that include:
A. A file tab to indicate the location of saved tax files B. A tax preparer tab to record names, addresses and other contact information C. A systems tab to enable Live Community and other online features D. All of the above
Question 4: True or False: You can EFILE tax returns without setting any EFILE Options Question 5: True or False: There is an option to lock a tax file and thereby prevent further changes Question 6: What is the key difference between Environment and Module options?
A. Environment options are used by a tax preparer, Module by a systems administrator B. There is no key difference between the two options C. Unlike Environment options, Module options are module and year specific D. None of the above
Question 7: True or False: ProFile cannot create PDFs of a tax file.
35
Question 8: True or False: ProFile has an option that lets you invoice your clients Question 9: The ability to save all your option settings is found by clicking:
A. File > Save Tax Settings B. Settings > Options C. Options > Administration D. None of the above
Question 10: True or False: To prevent unauthorized changes to your settings, ProFile lets you create an options password.