Embed Size (px)
Citation preview
1CGDS - Substation Workbench Installation Guide
78-21154-01
CGDS - Substation Workbench Release 1.0 Installation Guide
Revised: April 5, 2013, 78-21154-01
This document contains instructions for installing the Cisco Connected Grid Design Suite - Substation Workbench product, Release 1.0, on severs and client computers.
78-21154-01
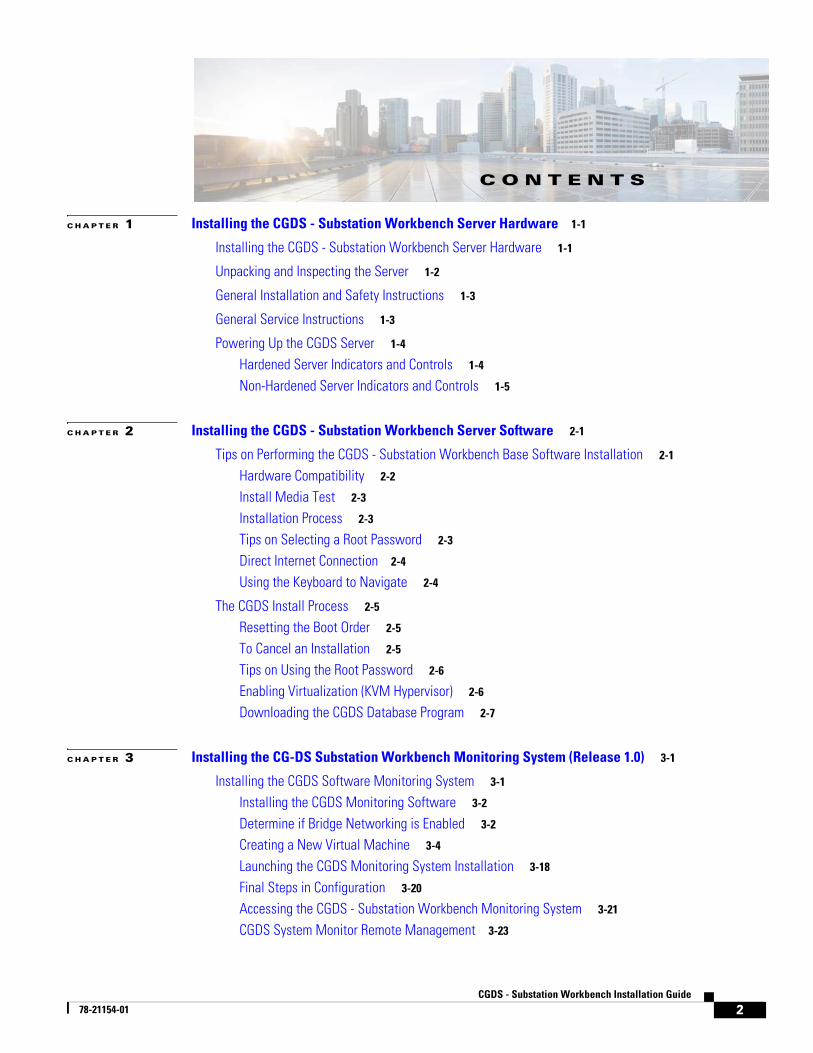
C O N T E N T S
C H A P T E R 1 Installing the CGDS - Substation Workbench Server Hardware 1-1
Installing the CGDS - Substation Workbench Server Hardware 1-1
Unpacking and Inspecting the Server 1-2
General Installation and Safety Instructions 1-3
General Service Instructions 1-3
Powering Up the CGDS Server 1-4
Hardened Server Indicators and Controls 1-4
Non-Hardened Server Indicators and Controls 1-5
C H A P T E R 2 Installing the CGDS - Substation Workbench Server Software 2-1
Tips on Performing the CGDS - Substation Workbench Base Software Installation 2-1
Hardware Compatibility 2-2
Install Media Test 2-3
Installation Process 2-3
Tips on Selecting a Root Password 2-3
Direct Internet Connection 2-4
Using the Keyboard to Navigate 2-4
The CGDS Install Process 2-5
Resetting the Boot Order 2-5
To Cancel an Installation 2-5
Tips on Using the Root Password 2-6
Enabling Virtualization (KVM Hypervisor) 2-6
Downloading the CGDS Database Program 2-7
C H A P T E R 3 Installing the CG-DS Substation Workbench Monitoring System (Release 1.0) 3-1
Installing the CGDS Software Monitoring System 3-1
Installing the CGDS Monitoring Software 3-2
Determine if Bridge Networking is Enabled 3-2
Creating a New Virtual Machine 3-4
Launching the CGDS Monitoring System Installation 3-18
Final Steps in Configuration 3-20
Accessing the CGDS - Substation Workbench Monitoring System 3-21
CGDS System Monitor Remote Management 3-23
2CGDS - Substation Workbench Installation Guide
Contents
C H A P T E R 4 Installing the CGDS - Substation Workbench Client Software (Substation Designer) 4-1
Installing the CGDS Substation Designer Client 4-1
Launching CGDS Substation Designer 4-2
Setting the CGDS - Substation Designer Installation Folder 4-4
Pre-Installation Summary 4-5
Installation Progress 4-6
Configuring the Client IP Address 4-7
Configuring CGDS Monitoring 4-9
3CGDS - Substation Workbench Installation Guide
78-21154-01
78-21154-01
C H A P T E R 1
Installing the CGDS - Substation Workbench Server HardwareRevised: April 15, 2013, 78-21154-01
Installing the CGDS - Substation Workbench Server HardwareCGDS – Substation Workbench Release 1.0 consists of software for a server and software for a client application. The server portion can run on any server that is validated for the CGDS application. At this time, Cisco has certified two server platforms that meet the sizing and performance requirements of the CGDS Substation Workbench server software.
The first server is manufactured by Advantech (UNO 4683) and is a hardened substation server platform. This means that its construction is optimized for harsh operating environments that are likely to exist within an electrical substation. This server has been certified to be both IEEE 1613 and IEC 61850 compliant.This server is cooled by the free flow of air around the circuitry.
The second server option is manufactured by Cisco (UCS C220) and does not carry the same hardening, such as IEEE 1613 or IEC 61850 compliance. This server platform is designed to perform reliably in an engineering office, data center, or may also be an option within temperature controlled substations.It offers flexibility and power that meet the demand of processing data that arrives from one or more remote substations,
• The Advantech UNO 4683 uses an Intel® 7 2.0 GHz processor.
• The Cisco UCS C220 M3 High-Density Rack Server (Small Form Factor Disk Drive Model) uses either one or two Intel® E5-2600 series CPUs, and an Intel® C600 series chipset.
Note More detail about the characteristics and performance of these two servers is available in the CGDS - Substation Workbench Data Sheet (Document part Number 78-21159-01).
1-1CGDS - Substation Workbench Installation Guide
Chapter 1 Installing the CGDS - Substation Workbench Server Hardware Unpacking and Inspecting the Server
Unpacking and Inspecting the ServerThis section provides some guidelines for successful installation of physical server hardware.
As soon as possible after delivery, and before applying power to the server, check the server for damage in shipping:
• Examine the chassis for signs of stress or bending.
• Look for scratches that may indicate careless handling.
• Compare the parts that come from the box with the packing list, and immediately report discrepancies.
• Finally, move the server rapidly while holding it above the table or workbench, and attempt to detect if anything has gone loose or has broken off internally during shipping.
Note Save the packing material and shipping crate in case you ever need to return the server to Cisco or the Cisco Partner which sold it to you.
If the chassis covers can be accessed, temporarily remove them and examine the server:
• Look for loose printed wiring assemblies (circuit boards), loose screws, or other items which have become unsecurely attached in transit.
• If the server has a fan, examine it for smooth operation. Verify that no wires within the chassis are within the path of moving fan blades.
Caution When handling internal server components, wear an ESD strap and handle modules by the carrier edges only.
• Record information about the server while it is easily accessible, and keep it in a secure place that is readily accessible. Among this information you should gather:
– Invoice number of manufacturer (see the packing slip)
– Invoice number of the shipper
– Server model and serial number
– Description of any damages encountered during the inspection
Replace all covers and secure them.
Note For further details about the exact composition of each server shipment, see the manual that comes with each the server.
1-2CGDS - Substation Workbench Installation Guide
78-21154-01
Chapter 1 Installing the CGDS - Substation Workbench Server Hardware General Installation and Safety Instructions
General Installation and Safety Instructions1. Read all instructions carefully. Remember to read the manuals that come with the server itself. Keep
manuals for later reference.
2. Put servers and equipment on reliable surfaces during installation. Dropping or letting equipment fall may cause damage.
3. Keep the server in a controlled environment or shelter. Protect the server from humidity, precipitation, and from extremes in temperature.
4. Disconnect the server from any AC outlet before cleaning. Do not spray liquids or cleaning aerosols on the server. Spray a cloth and wipe the server with it
5. Protect the equipment from overheating. Openings on the server enclosure are for air convection and cooling. Do not cover the openings.
6. Position the power cord and network cables so that people cannot step or trip on them. The electrical outlet should be located near the server, and should be visible and unobstructed. If a DC power source is used, install an approved circuit breaker in the power supply line to provide quick emergency disconnect.
7. Observe applicable local and international standards for electrical service, as well as for bonding and grounding (earthing).
8. If the equipment is not used for a long time, disconnect it from the power source to avoid damage by transient overvoltage.
9. Observe all cautions and warnings printed on the equipment.
Note Due to the sensitive nature of the equipment it must be stored and operated in a restricted access location, only accessible by qualified engineers.
General Service Instructions
Caution The equipment should be opened only by qualified service personnel.
If one of the following situations arises, get the equipment checked by service personnel:
• The power cord or plug is damaged.
• Liquid has penetrated into the equipment.
• The equipment has been exposed to moisture.
• The equipment does not work well, or you cannot get it to work according to the user's manual.
• The equipment has been dropped and damaged.
• The equipment has obvious signs of breakage.
• Use approved anti-static measures while servicing this equipment.
1-3CGDS - Substation Workbench Installation Guide
78-21154-01
Chapter 1 Installing the CGDS - Substation Workbench Server Hardware Powering Up the CGDS Server
To avoid electrical shock, always disconnect the power from the server before you work on it.
Don't touch any components on the CPU card or other cards while the server is on.
Always replace batteries with the same of equivalent type recommended by the manufacturer. Use the procedures outlined in the server manual. Discard used batteries in an environmentally approved manner.
Note Disconnect power before making any configuration changes. The sudden rush of power as you connect a jumper or install a card may damage sensitive electronic components unless the component or module is specifically designed for “hot push /hot pull” operations.
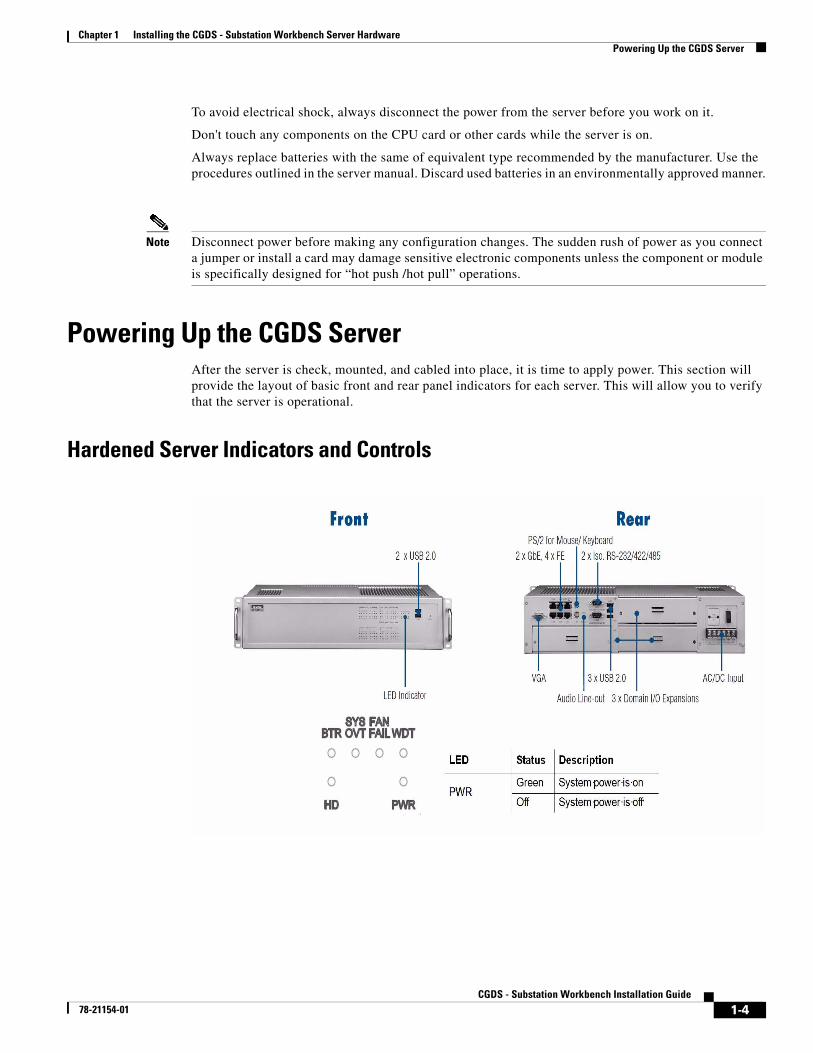
Powering Up the CGDS ServerAfter the server is check, mounted, and cabled into place, it is time to apply power. This section will provide the layout of basic front and rear panel indicators for each server. This will allow you to verify that the server is operational.
Hardened Server Indicators and Controls
1-4CGDS - Substation Workbench Installation Guide
78-21154-01
Chapter 1 Installing the CGDS - Substation Workbench Server Hardware Powering Up the CGDS Server
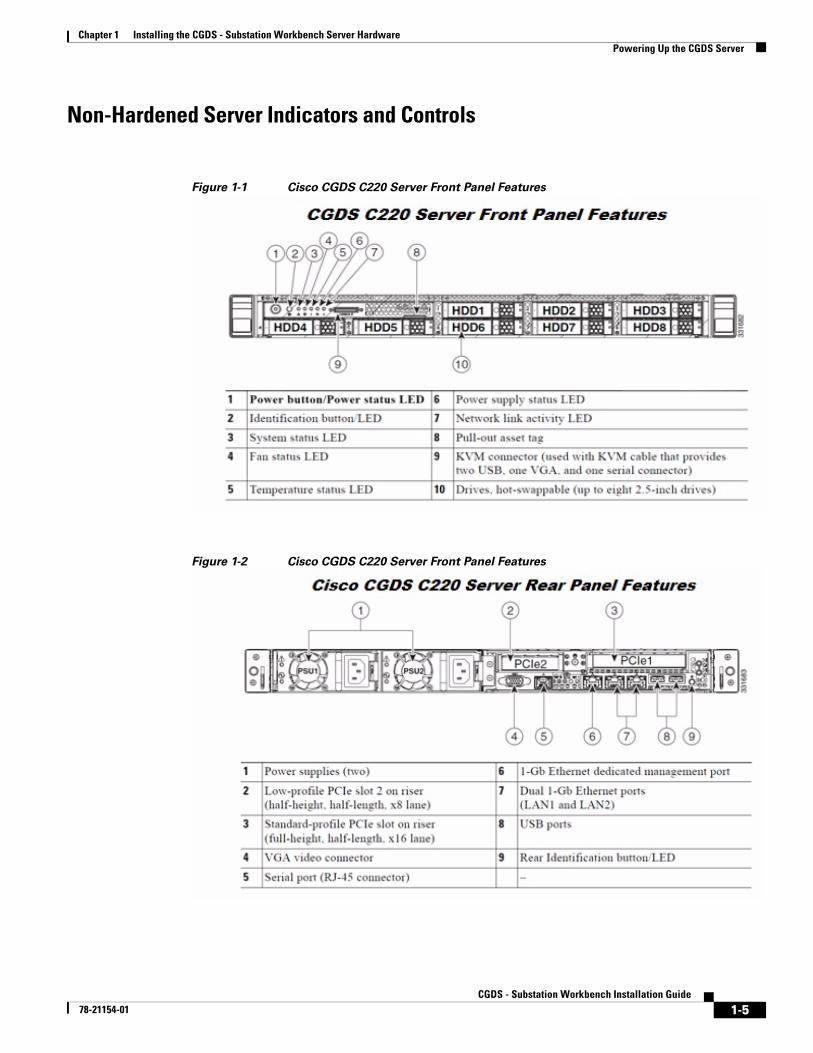
Non-Hardened Server Indicators and Controls
Figure 1-1 Cisco CGDS C220 Server Front Panel Features
Figure 1-2 Cisco CGDS C220 Server Front Panel Features
1-5CGDS - Substation Workbench Installation Guide
78-21154-01
78-21154-01
C H A P T E R 2
Installing the CGDS - Substation Workbench Server SoftwareRevised: April 15, 2013, 78-21154-01
Tips on Performing the CGDS - Substation Workbench Base Software Installation
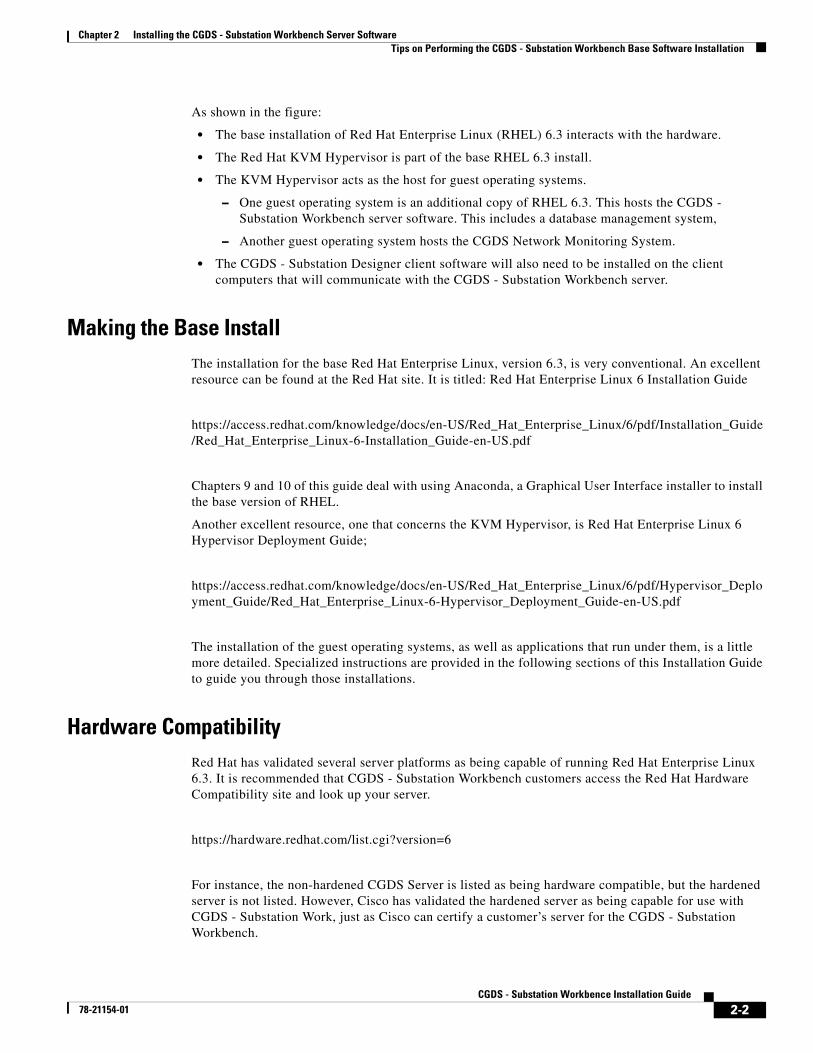
This section will cover how to install the server software, repair an installation, or make an installation on a server platform not yet validated or certified by Cisco. The arrangement of software in the CGDS - Substation Server Software Stack is shown here:
Figure 2-1 CGDS - Substation Server Software Stack
2-1CGDS - Substation Workbence Installation Guide
Chapter 2 Installing the CGDS - Substation Workbench Server Software Tips on Performing the CGDS - Substation Workbench Base Software Installation
As shown in the figure:
• The base installation of Red Hat Enterprise Linux (RHEL) 6.3 interacts with the hardware.
• The Red Hat KVM Hypervisor is part of the base RHEL 6.3 install.
• The KVM Hypervisor acts as the host for guest operating systems.
– One guest operating system is an additional copy of RHEL 6.3. This hosts the CGDS - Substation Workbench server software. This includes a database management system,
– Another guest operating system hosts the CGDS Network Monitoring System.
• The CGDS - Substation Designer client software will also need to be installed on the client computers that will communicate with the CGDS - Substation Workbench server.
Making the Base InstallThe installation for the base Red Hat Enterprise Linux, version 6.3, is very conventional. An excellent resource can be found at the Red Hat site. It is titled: Red Hat Enterprise Linux 6 Installation Guide
https://access.redhat.com/knowledge/docs/en-US/Red_Hat_Enterprise_Linux/6/pdf/Installation_Guide/Red_Hat_Enterprise_Linux-6-Installation_Guide-en-US.pdf
Chapters 9 and 10 of this guide deal with using Anaconda, a Graphical User Interface installer to install the base version of RHEL.
Another excellent resource, one that concerns the KVM Hypervisor, is Red Hat Enterprise Linux 6 Hypervisor Deployment Guide;
https://access.redhat.com/knowledge/docs/en-US/Red_Hat_Enterprise_Linux/6/pdf/Hypervisor_Deployment_Guide/Red_Hat_Enterprise_Linux-6-Hypervisor_Deployment_Guide-en-US.pdf
The installation of the guest operating systems, as well as applications that run under them, is a little more detailed. Specialized instructions are provided in the following sections of this Installation Guide to guide you through those installations.
Hardware CompatibilityRed Hat has validated several server platforms as being capable of running Red Hat Enterprise Linux 6.3. It is recommended that CGDS - Substation Workbench customers access the Red Hat Hardware Compatibility site and look up your server.
https://hardware.redhat.com/list.cgi?version=6
For instance, the non-hardened CGDS Server is listed as being hardware compatible, but the hardened server is not listed. However, Cisco has validated the hardened server as being capable for use with CGDS - Substation Work, just as Cisco can certify a customer’s server for the CGDS - Substation Workbench.
2-2CGDS - Substation Workbence Installation Guide
78-21154-01
Chapter 2 Installing the CGDS - Substation Workbench Server Software Tips on Performing the CGDS - Substation Workbench Base Software Installation
Install Media TestThe recommended installation method is to use Anaconda, a graphical user interface that allows the user to insert needed installation questions without having to result to the command line. Anaconda typically makes Linux installations very simple.
Anaconda also has the ability to test the integrity of the installation media. Anaconda can examine DVDs, hard drive ISO, and NFS ISO installation methods. Test all installation media before starting the installation process. To use this utility, type this command at the boot prompt:
linux mediacheck
Installation ProcessInformation to gather before you start your installation:
• The make and model numbers of the network adapters on your system.
• IP, DHCP, and BOOT IP addresses
• Netmask
• Gateway IP address
• One or more name server IP addresses (DNS)
Note By default, anaconda uses DHCP to provide network settings automatically for IPv4 and automatic neighbor discovery to provide network settings for IPv6. If you choose to configure T CP/IP manually, anaconda will prompt you to provide the details in the Manual T CP/IP Configuration dialog
Note If any of these networking requirements or terms are unfamiliar to you, contact your network administrator for assistance.
Tips on Selecting a Root PasswordSetting up a root account and password is one of the most important steps during your installation. The root account is used to install packages, upgrade RPMs, and perform most system maintenance. Logging in as root gives the user complete control over the system.
You should make the root password something you can remember, but not something that is easy for someone else to guess. Your name, your phone number, qwerty, password, root, 123456, and anteater are all examples of bad passwords. Good passwords mix numerals with upper and lower case letters and do not contain dictionary words: Aard387vark or 420BMttNT, for example. The root password must be at least six characters long; the password you type is not echoed to the screen. You must enter the password twice; if the two passwords do not match, the installation program asks you to enter them again.
Remember that the password is case-sensitive. If you write down your password, keep it in a secure place. However, it is recommended that you do not write down this or any password you create.
2-3CGDS - Substation Workbence Installation Guide
78-21154-01
Chapter 2 Installing the CGDS - Substation Workbench Server Software Tips on Performing the CGDS - Substation Workbench Base Software Installation
Note It is normally best practice to avoid using passwords that appear in printed materials that come with software or hardware. However, in the first installation, Cisco recommends that you use any default passwords that appear in printed materials and guides. In production installations, always use passwords that conform to rules as above.
Direct Internet Connection
If your Red Hat Enterprise Linux system is connected directly to the Internet, you must pay attention toadditional considerations to avoid service interruptions or risk action by your upstream service provider. A full discussion of these issues is beyond the scope of this document.
Using the Keyboard to Navigate
Navigation through the installation dialogs is performed through a simple set of keystrokes.
• To move the cursor, use the Left, Right, Up, and Down arrow keys.
• Use Tab, and Shift-Tab to cycle forward or backward through each widget on the screen. Along the bottom, most screens display a summary of available cursor positioning keys.
• The + and - keys expand and collapse lists,
• You can use the Alt+X key command combination as a way of clicking on buttons or making other screen selections, where X is replaced with any underlined letter appearing within that screen.
• To "press" a button, position the cursor over the button (using Tab, for example) and press Space or Enter.
• To select an item from a list of items, move the cursor to the item you wish to select and press Enter.
• To select an item with a checkbox, move the cursor to the checkbox and press Space to select an item.
• To deselect, press Space a second time.
•
• Pressing F12 accepts the current values and proceeds to the next dialog; it is equivalent to pressing the OK button.
•
Note Unless a dialog box is waiting for your input, do not press any keys during the installation process (doing so may result in unpredictable behavior).
2-4CGDS - Substation Workbence Installation Guide
78-21154-01

Chapter 2 Installing the CGDS - Substation Workbench Server Software The CGDS Install Process
The CGDS Install ProcessTo start the installation program from the CGDS Linux DVD, follow this procedure:
Step 1 Disconnect any external FireWire or USB disks that you do not need for installation. These are subject to auto-discovery by the Anaconda installer, and may not report correctly during the registration process.
Step 2 2. Power on your computer system.
Step 3 3. Insert the media in your computer.
Step 4 4. Power off your computer with the boot media still inside.
Step 5 5. Power on your computer system.
Resetting the Boot OrderYou might need to press a specific key or combination of keys to boot from the CGDS installation DVD. On most computers, a message appears briefly on the screen very soon after you turn on the computer. Typically, it is worded something like Press F10 to select boot device, although the specific wording and the key that you must press varies widely from computer to computer. Consult the documentation for your computer or motherboard, or seek support from the hardware manufacturer or vendor.
If your server does not allow you to select a boot device as it starts up, you might need to configure the system's Basic Input/Output System (BIOS) to boot from the media. To change your BIOS settings on an x86, AMD64, or Intel 64 system, watch the instructions provided on your display when your computer first boots. A line of text appears, telling you which key to press to enter the BIOS settings.
Once you have entered your BIOS setup program, find the section where you can alter your boot sequence. The default is often drive C, A or A, C (depending on whether you boot from your hard drive [C] or a diskette drive [A]). Change this sequence so that the DVD is first in your boot order and that C or A (whichever is your typical boot default) follows. This instructs the computer to first look at the DVD drive for bootable media.
To Cancel an InstallationT o stop an installation, either press Ctrl +Alt+Del or power off your computer with the power switch. You may abort the installation process without consequence at any time prior to selecting Write changes to disk on the Write partitioning to disk screen. Red Hat Enterprise Linux makes no permanent changes to your computer until that point. Please be aware that stopping the installation after partitioning has begun can leave your computer unusable.
Note To stop the installation process at this time, reboot your machine and then eject the boot media. You can safely cancel the installation at any point before the Write changes to disk screen.
2-5CGDS - Substation Workbence Installation Guide
78-21154-01
Chapter 2 Installing the CGDS - Substation Workbench Server Software The CGDS Install Process
Note If the DVD drive is found and the driver loaded, the installer will present you with the option to perform a media check on the DVD. This will take some time, and you may opt to skip over this step. Earlier in this procedure is was suggested that should reboot and perform the media check before beginning the installation.
Tips on Using the Root PasswordThe root user (also known as the superuser) has complete access to the entire system; for this reason, logging in as the root user is best done only to perform system maintenance or administration.
Use the root account only for system administration. Create a non-root account for your general use and use the su command to change to root only when you need to perform tasks that require superuser authorization. These basic rules minimize the chances of a typo or an incorrect command doing damage to your system.
Note T o become root, type su - at the shell prompt in a terminal window and then press Enter. Then,enter the root password and press Enter.
The installation program will prompt you to set a root password for your system. You cannot proceed to the next stage of the installation process without entering a root password.
To change your root password after you have completed the installation, use the Root Password Tool.Type the system -config-users command in a shell prompt to launch the User Manager, a powerful user management and configuration tool. If you are not root, it prompts you for the root password to continue.
Enter the root password into the Root Password field. Red Hat Enterprise Linux displays the characters as asterisks for security. Type the same password int
o the Confirm field to ensure it is set correctly. After you set the root password, select Next to proceed.
Enabling Virtualization (KVM Hypervisor)In order for the RHEL 6.3 base install to host guest operating systems, the KVM Hypervisor must be enabled. This requires adding packages to your list of Red Hat Network entitlements. You need these entitlements enabled to install and update the virtualization packages on Red Hat Enterprise Linux. You will require a valid Red Hat Network account in order to install virtualization packages on Red Hat Enterprise Linux.
• If you do not have a valid Red Hat subscription, visit the Red Hat online store.
• In addition, your server must be registered with RHN. To register an unregistered installation of Red Hat Enterprise Linux, run the rhn_register command and follow the prompts.
2-6CGDS - Substation Workbence Installation Guide
78-21154-01
Chapter 2 Installing the CGDS - Substation Workbench Server Software The CGDS Install Process
Once you have a valid registration, follow these steps to add virtualization:
Step 1 Log in to RHN using your RHN username and password.
Step 2 Select the system on which you want to install virtualization.
Step 3 In the System Properties section the present systems entitlements are listed next to the Entitlements header. Use the (Edit These Properties) link to change your entitlements.
Step 4 Select the Virtualization checkbox.
Your system is now entitled to receive the virtualization packages. For actual installation procedures, please refer to the Red Hat Virtualization Library family of documents.
https://access.redhat.com/knowledge/docs/Red_Hat_Enterprise_Virtualization/
The actual virtualization software packages to be installed include the following:
1. python-virtinst
Provides the virt-install command for creating virtual machines.
2. libvirt
The libvirt package provides the server and host side libraries for interacting with hypervisors and host systems. The libvirt package provides the libvirtd daemon that handles the library calls, manages virtualizes guests and controls the hypervisor.
3. libvirt-python
The libvirt-python package contains a module that permits applications written in the Python programming language to use the interface supplied by the libvirt API.
4. virt-manager
virt-manager, also known as Virtual Machine Manager, provides a graphical tool for administering virtual machines. It uses libvirt-client library as the management API.
5. libvirt-client
The libvirt-client package provides the client-side APIs and libraries for accessing libvirt servers. The libvirt-client package includes the virsh command line tool to manage and control virtualized guests and hypervisors from the command line or a special virtualization shell.
Downloading the CGDS Database ProgramAt some point in the installation, it will be necessary to download and install a a copy of the database management system used within CGDS - Substation Workbench. For CGDS - Substation Workbench 1.0, this will be Oracle 11g, Standard Edition, which is available on line. It is expected that this will be installed by your IT staff. The installation instructions are beyond scope of this CGDS Installation Guide.
2-7CGDS - Substation Workbence Installation Guide
78-21154-01
78-21154-01
C H A P T E R 3
Installing the CG-DS Substation Workbench Monitoring System (Release 1.0)Revised: April 13, 2013, 78-21154-01
Installing the CGDS Software Monitoring SystemThis section presents instructions for configuring the monitoring function of the CGDS - Substation Workbench.
Note This section is applicable only if Customers has opted for the CGDS - Full Life Cycle version, or if customers has opted for CGDS Monitoring along with CGDS Base software
Modern utilities derive a great deal of information about the status of various switch yard components by monitoring data streams produced by these components. Generally, this involves connecting a component to an associated Intelligent Electronic Device (IED), which acts as a transducer, converting the performance and status measurements of the component into a digital data stream. The resulting data streams use one of several formats, DNP3 and IEC 61850 being the most popular.
This data must be transmitted and processed in a timely manner. This requires an effective design. Substation engineers can evaluate their designs by passing real or simulated data through a substation model.
Monitoring the data within CGDS - Substation Workbench requires the installation and activation of the CGDS Network Monitoring capability. Not all implementations of CGDS - Substation Workbench include this capability. This feature is only applicable if the customers has opted for CGDS - Substation Workbench Full Life Cycle version, or if customers has opted for CGDS Monitoring along with CGDS Base software.
3-1CGDS - Substation Workbench Installation Guide
Chapter 3 Installing the CG-DS Substation Workbench Monitoring System (Release 1.0) Installing the CGDS Software Monitoring System
Installing the CGDS Monitoring SoftwareThe first step in installing the CGDS Monitoring Software is to locate the distribution disk that has the title: This is available as a CGDS DVD with title: CGDS - Packet Capture, Analysis, and Monitoring. Normally, this disk will be separate from either the CGDS - Substation Workbence Server Software disk, or from the CGDS Client disks, as not all implementations of CGDS - Substation Workbench require it.
Note If you believe that your purchase of CGDS - Substation Workbench should have included the monitoring software but you cannot locate it, please contact the Cisco representative or Cisco Partner that sold it to you.
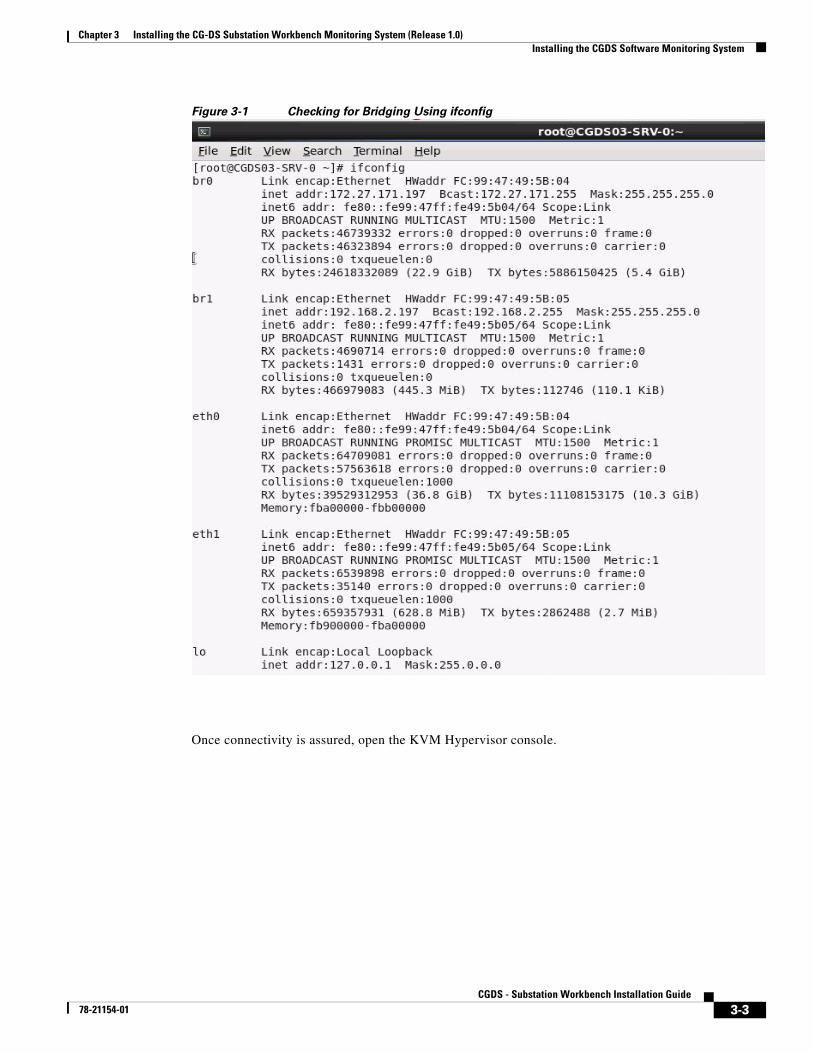
Determine if Bridge Networking is EnabledIt is important at this point to determine if bridge networking is running in the CGDS server. Bridge networking is the means by which virtual servers and operating systems can connect to the non-virtual (real world) network ports that connect to the outer world.
To determine it bridge networking has been established on a guest server or virtual machine, log in as the root user (administrator) to the virtual machine. Then run the ifconfig command. The resulting display should resemble Figure 1-1. The information shown for interfaces br0 and br1 indicates that bridge networking is operational.
3-2CGDS - Substation Workbench Installation Guide
78-21154-01
Chapter 3 Installing the CG-DS Substation Workbench Monitoring System (Release 1.0) Installing the CGDS Software Monitoring System
Figure 3-1 Checking for Bridging Using ifconfig
Once connectivity is assured, open the KVM Hypervisor console.
3-3CGDS - Substation Workbench Installation Guide
78-21154-01
Chapter 3 Installing the CG-DS Substation Workbench Monitoring System (Release 1.0) Installing the CGDS Software Monitoring System
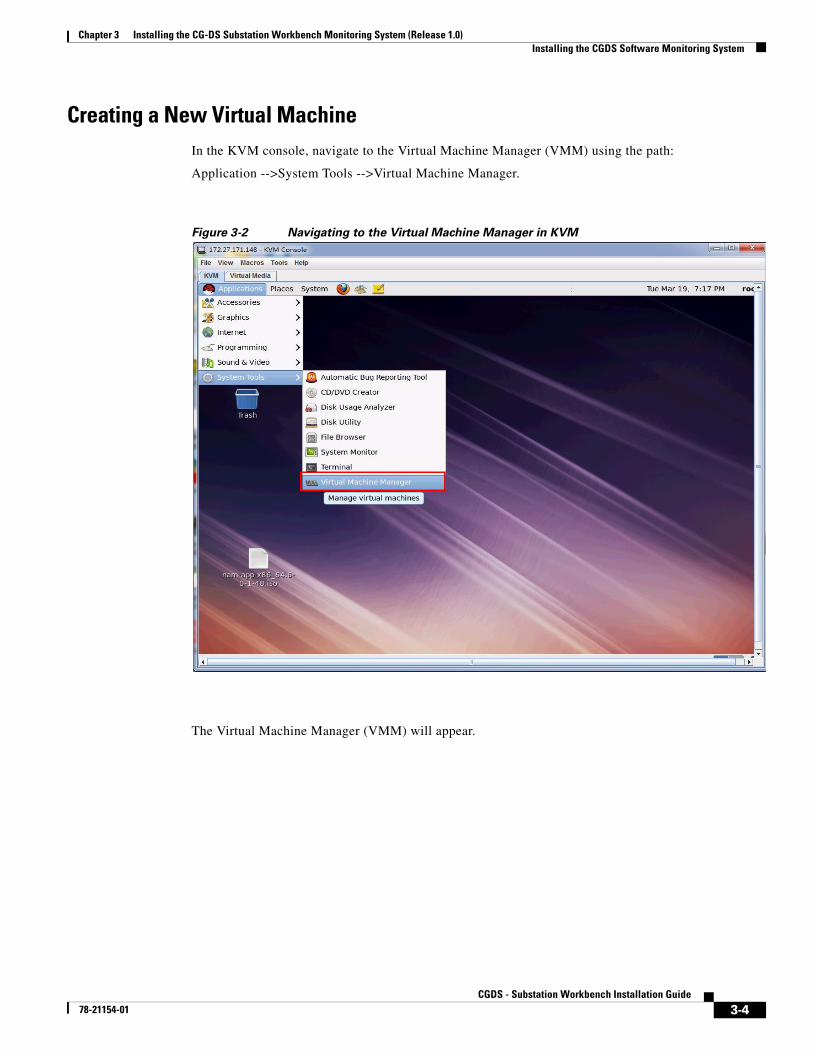
Creating a New Virtual MachineIn the KVM console, navigate to the Virtual Machine Manager (VMM) using the path:
Application -->System Tools -->Virtual Machine Manager.
Figure 3-2 Navigating to the Virtual Machine Manager in KVM
The Virtual Machine Manager (VMM) will appear.
3-4CGDS - Substation Workbench Installation Guide
78-21154-01
Chapter 3 Installing the CG-DS Substation Workbench Monitoring System (Release 1.0) Installing the CGDS Software Monitoring System
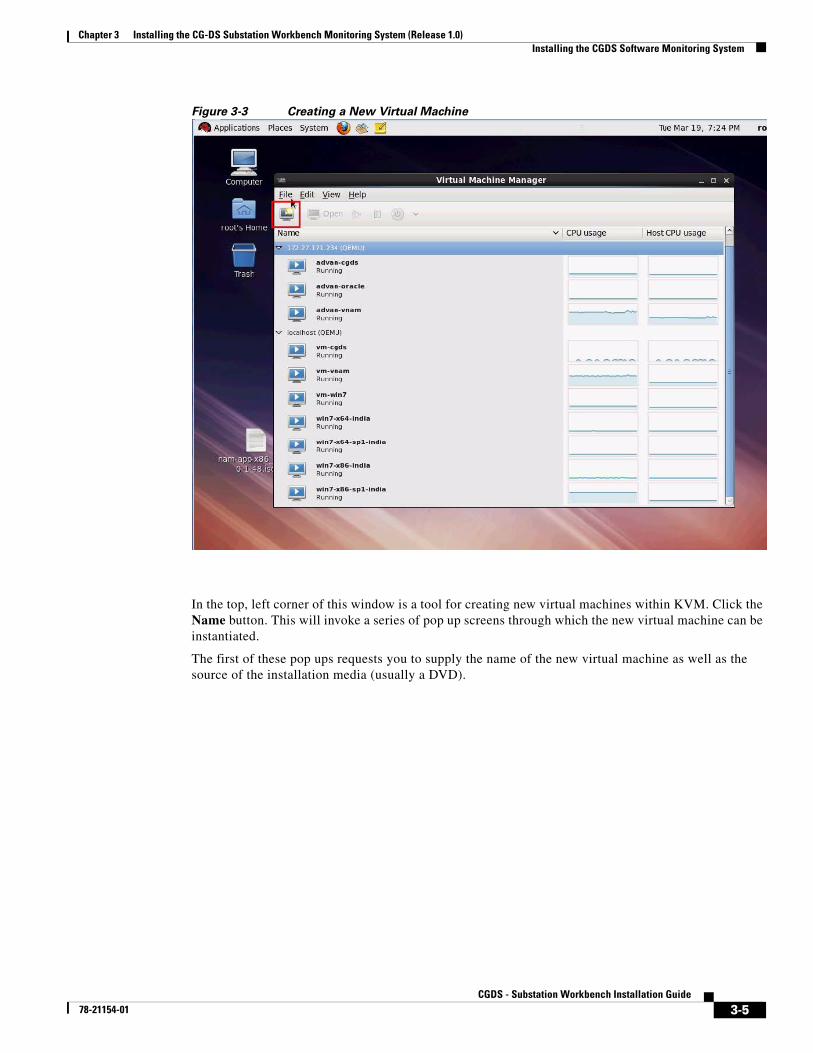
Figure 3-3 Creating a New Virtual Machine
In the top, left corner of this window is a tool for creating new virtual machines within KVM. Click the Name button. This will invoke a series of pop up screens through which the new virtual machine can be instantiated.
The first of these pop ups requests you to supply the name of the new virtual machine as well as the source of the installation media (usually a DVD).
3-5CGDS - Substation Workbench Installation Guide
78-21154-01
Chapter 3 Installing the CG-DS Substation Workbench Monitoring System (Release 1.0) Installing the CGDS Software Monitoring System
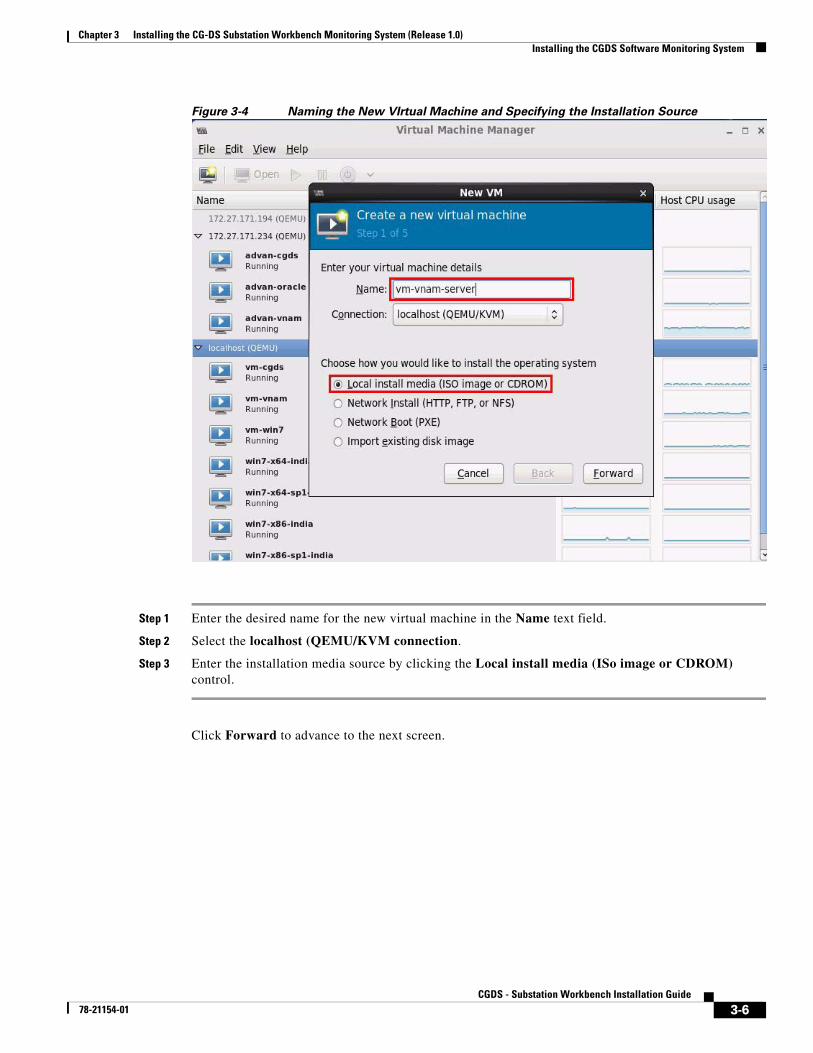
Figure 3-4 Naming the New VIrtual Machine and Specifying the Installation Source
Step 1 Enter the desired name for the new virtual machine in the Name text field.
Step 2 Select the localhost (QEMU/KVM connection.
Step 3 Enter the installation media source by clicking the Local install media (ISo image or CDROM) control.
Click Forward to advance to the next screen.
3-6CGDS - Substation Workbench Installation Guide
78-21154-01
Chapter 3 Installing the CG-DS Substation Workbench Monitoring System (Release 1.0) Installing the CGDS Software Monitoring System
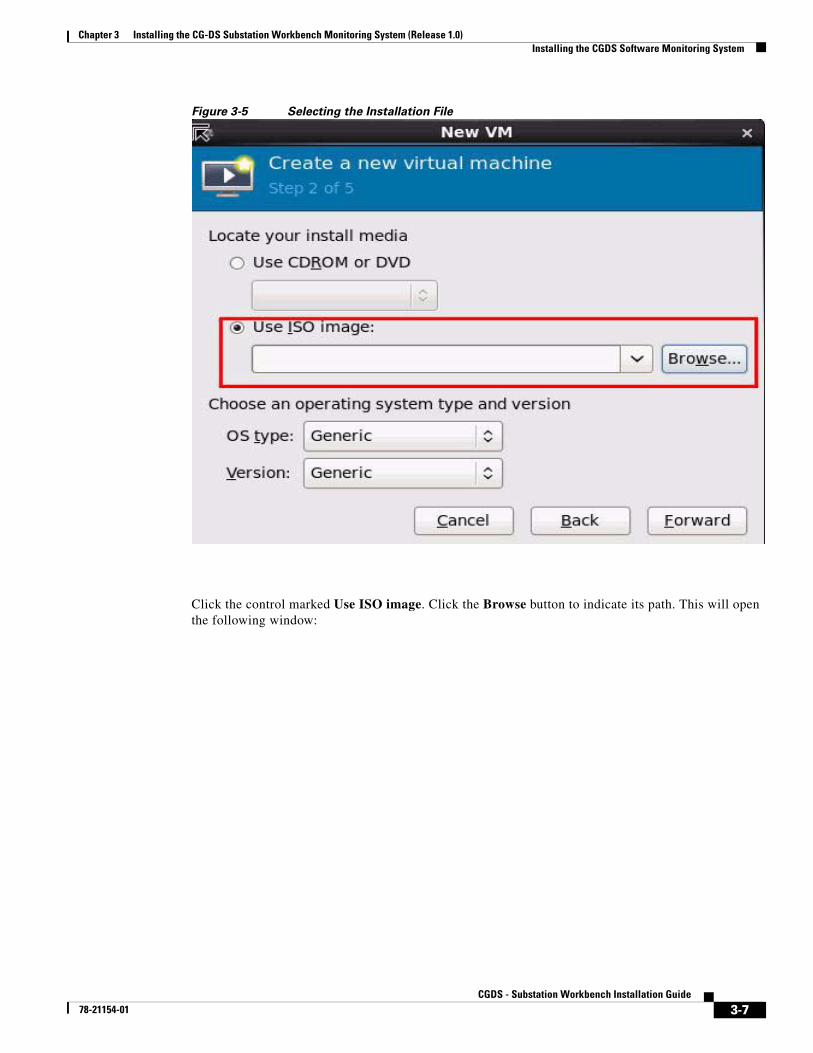
Figure 3-5 Selecting the Installation File
Click the control marked Use ISO image. Click the Browse button to indicate its path. This will open the following window:
3-7CGDS - Substation Workbench Installation Guide
78-21154-01
Chapter 3 Installing the CG-DS Substation Workbench Monitoring System (Release 1.0) Installing the CGDS Software Monitoring System
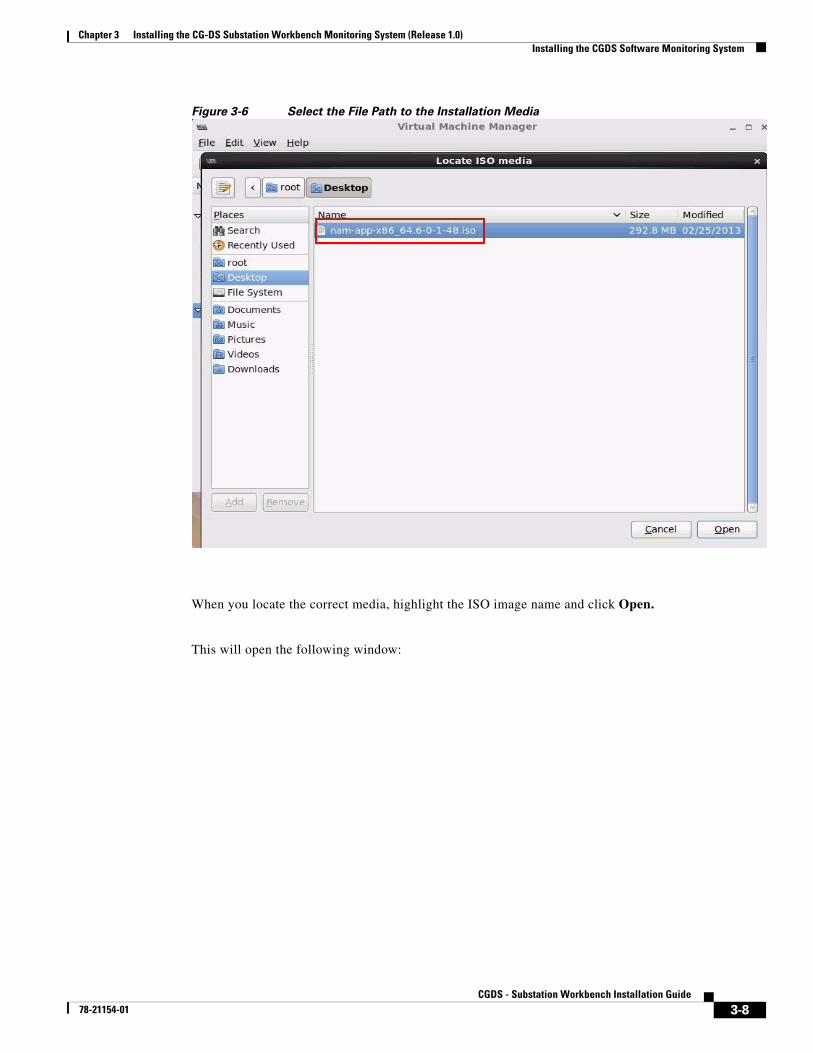
Figure 3-6 Select the File Path to the Installation Media
When you locate the correct media, highlight the ISO image name and click Open.
This will open the following window:
3-8CGDS - Substation Workbench Installation Guide
78-21154-01
Chapter 3 Installing the CG-DS Substation Workbench Monitoring System (Release 1.0) Installing the CGDS Software Monitoring System
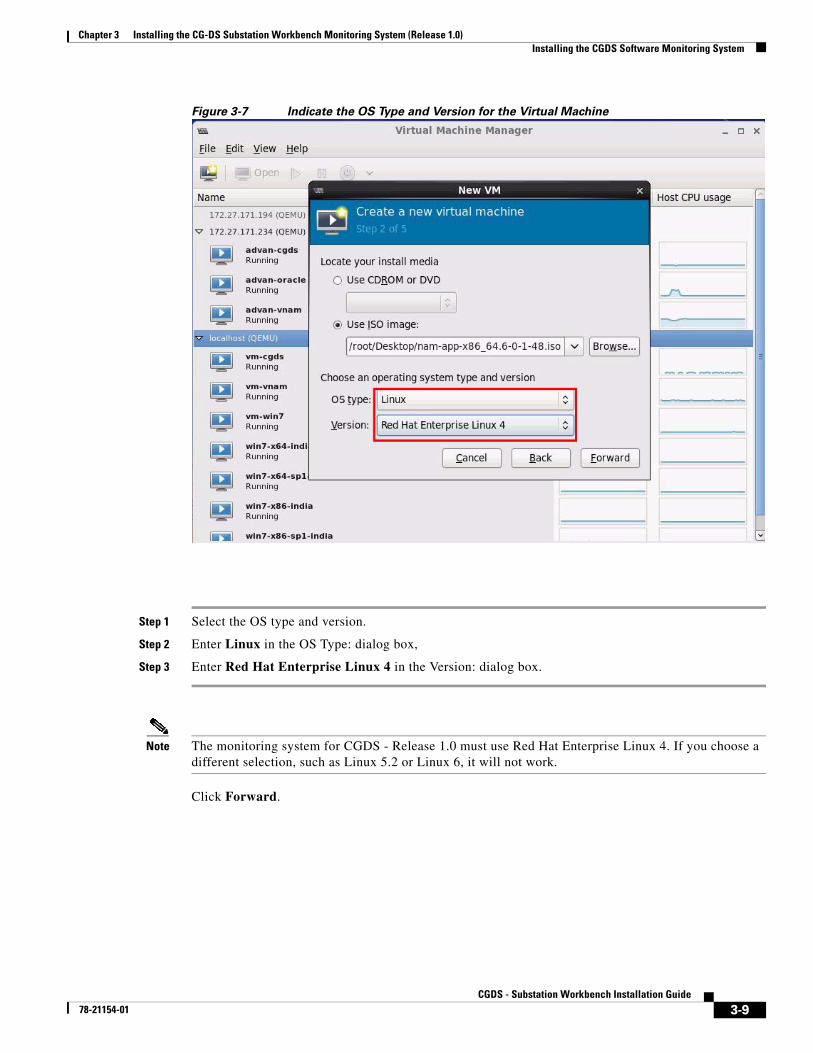
Figure 3-7 Indicate the OS Type and Version for the Virtual Machine
Step 1 Select the OS type and version.
Step 2 Enter Linux in the OS Type: dialog box,
Step 3 Enter Red Hat Enterprise Linux 4 in the Version: dialog box.
Note The monitoring system for CGDS - Release 1.0 must use Red Hat Enterprise Linux 4. If you choose a different selection, such as Linux 5.2 or Linux 6, it will not work.
Click Forward.
3-9CGDS - Substation Workbench Installation Guide
78-21154-01
Chapter 3 Installing the CG-DS Substation Workbench Monitoring System (Release 1.0) Installing the CGDS Software Monitoring System
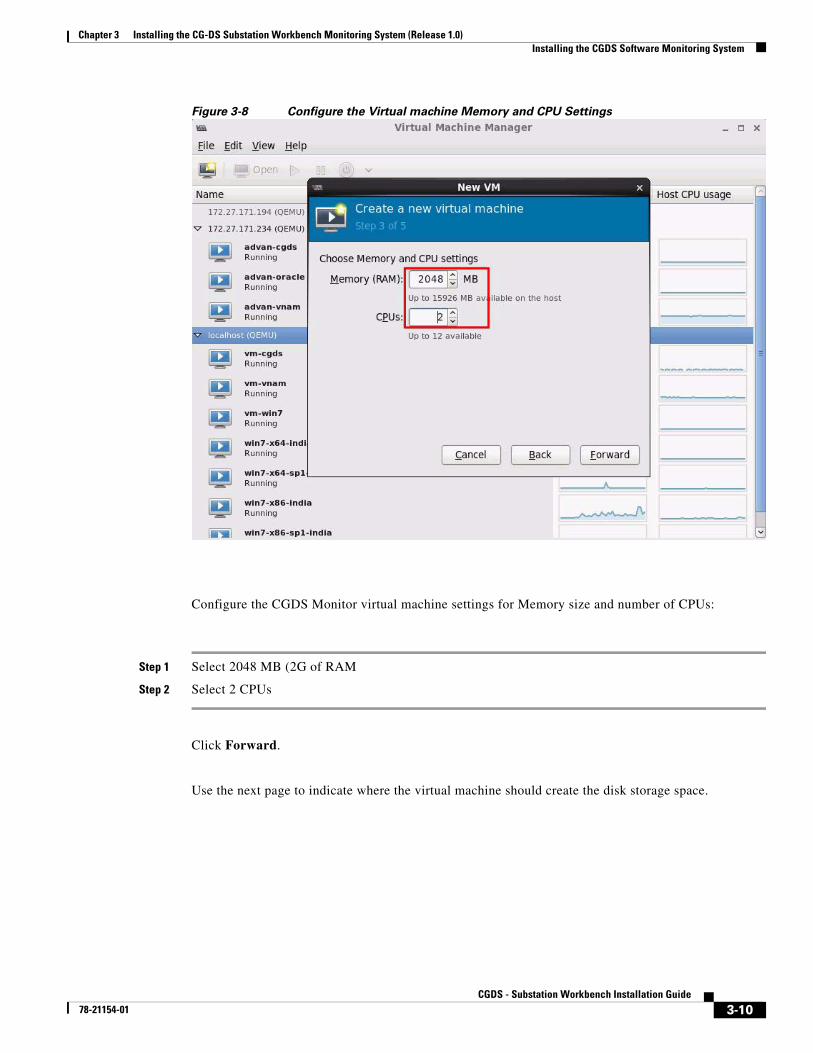
Figure 3-8 Configure the Virtual machine Memory and CPU Settings
Configure the CGDS Monitor virtual machine settings for Memory size and number of CPUs:
Step 1 Select 2048 MB (2G of RAM
Step 2 Select 2 CPUs
Click Forward.
Use the next page to indicate where the virtual machine should create the disk storage space.
3-10CGDS - Substation Workbench Installation Guide
78-21154-01
Chapter 3 Installing the CG-DS Substation Workbench Monitoring System (Release 1.0) Installing the CGDS Software Monitoring System
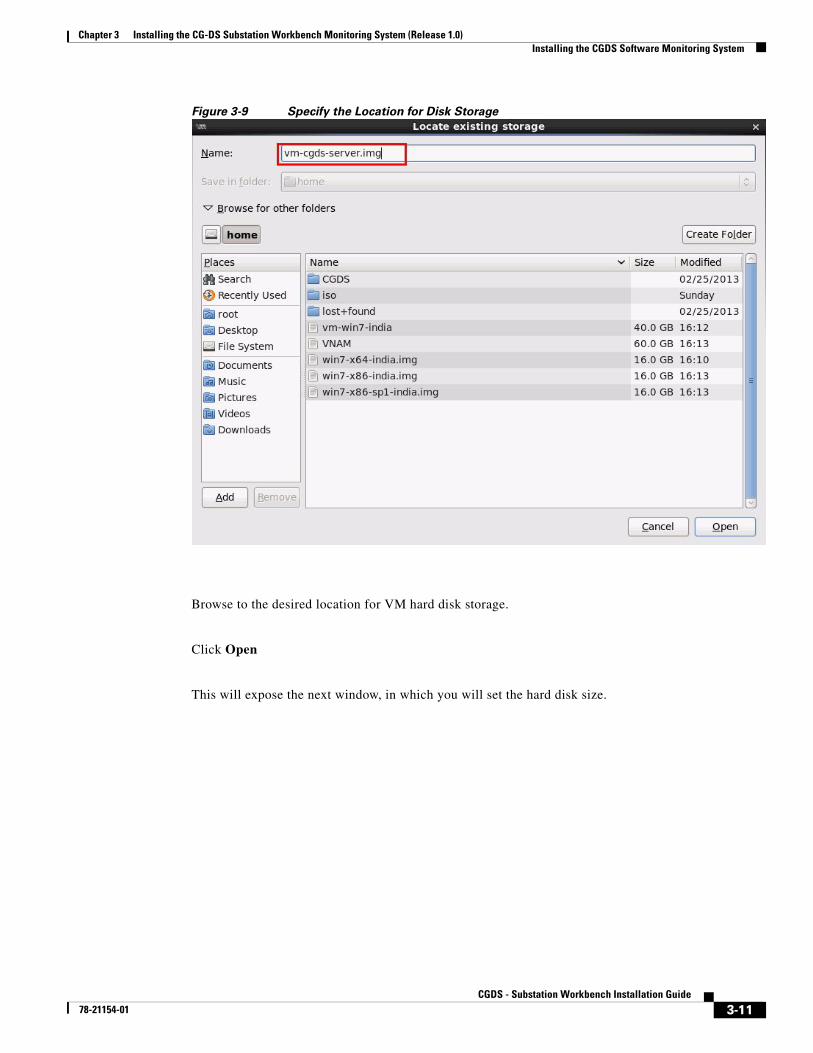
Figure 3-9 Specify the Location for Disk Storage
Browse to the desired location for VM hard disk storage.
Click Open
This will expose the next window, in which you will set the hard disk size.
3-11CGDS - Substation Workbench Installation Guide
78-21154-01
Chapter 3 Installing the CG-DS Substation Workbench Monitoring System (Release 1.0) Installing the CGDS Software Monitoring System
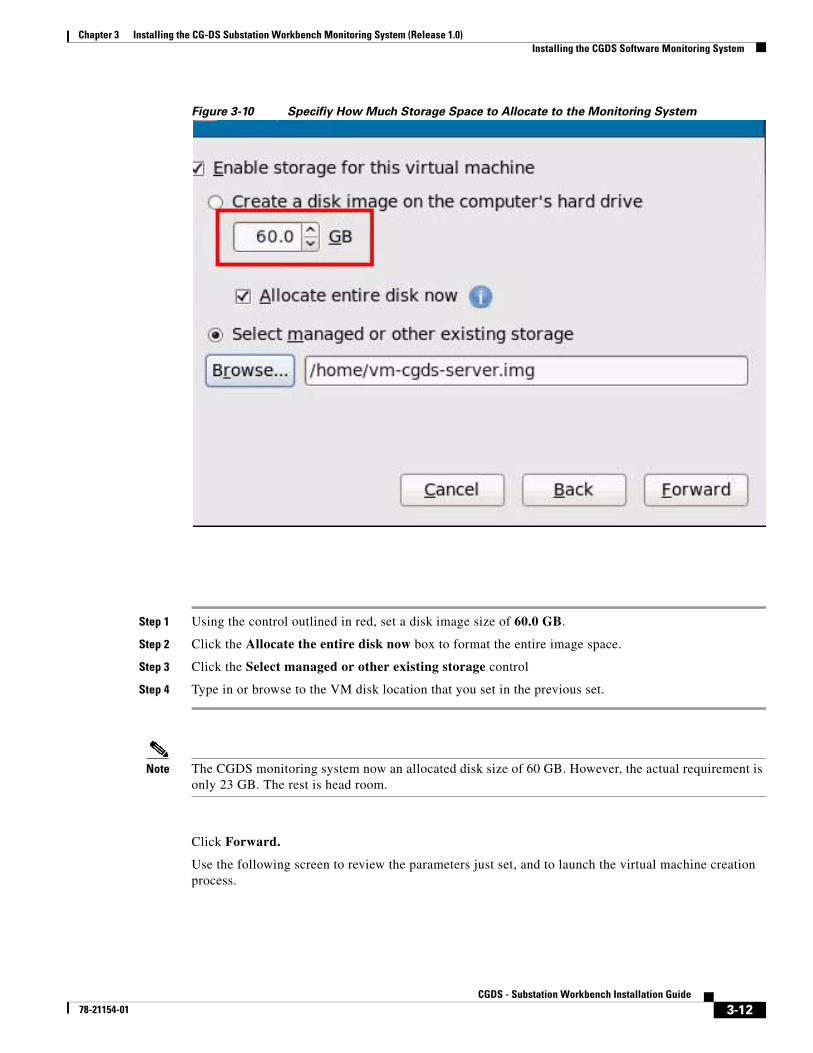
Figure 3-10 Specifiy How Much Storage Space to Allocate to the Monitoring System
Step 1 Using the control outlined in red, set a disk image size of 60.0 GB.
Step 2 Click the Allocate the entire disk now box to format the entire image space.
Step 3 Click the Select managed or other existing storage control
Step 4 Type in or browse to the VM disk location that you set in the previous set.
Note The CGDS monitoring system now an allocated disk size of 60 GB. However, the actual requirement is only 23 GB. The rest is head room.
Click Forward.
Use the following screen to review the parameters just set, and to launch the virtual machine creation process.
3-12CGDS - Substation Workbench Installation Guide
78-21154-01
Chapter 3 Installing the CG-DS Substation Workbench Monitoring System (Release 1.0) Installing the CGDS Software Monitoring System
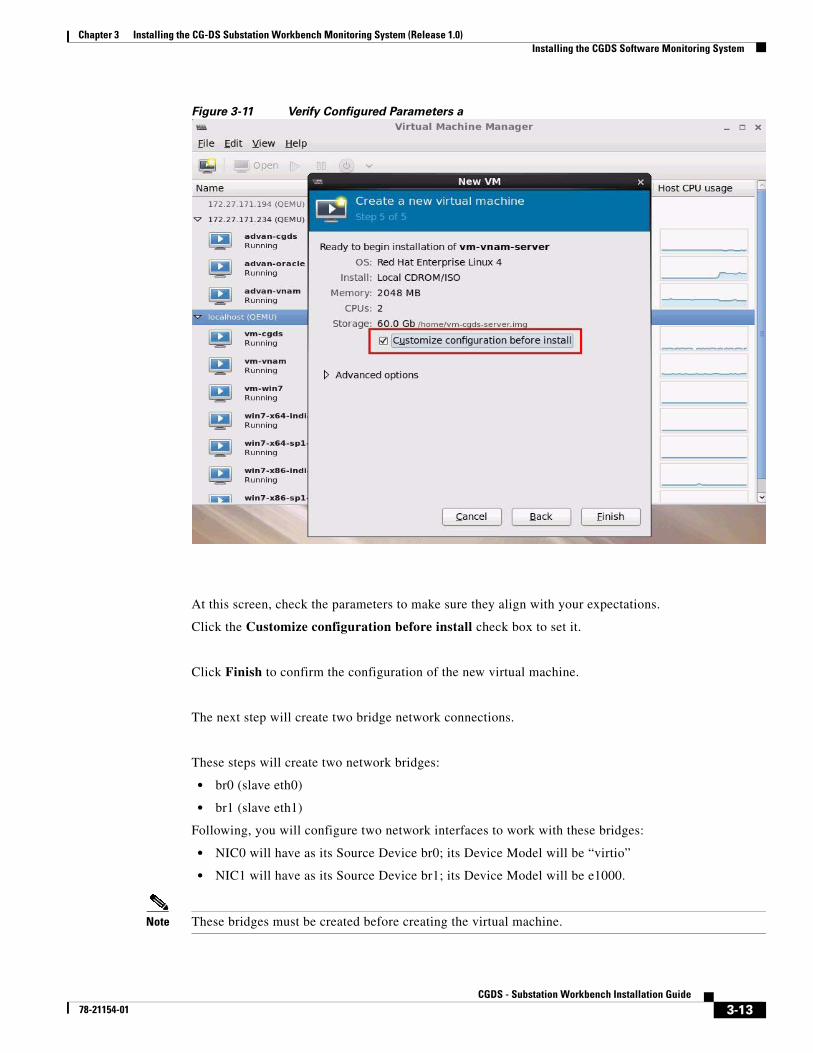
Figure 3-11 Verify Configured Parameters a
At this screen, check the parameters to make sure they align with your expectations.
Click the Customize configuration before install check box to set it.
Click Finish to confirm the configuration of the new virtual machine.
The next step will create two bridge network connections.
These steps will create two network bridges:
• br0 (slave eth0)
• br1 (slave eth1)
Following, you will configure two network interfaces to work with these bridges:
• NIC0 will have as its Source Device br0; its Device Model will be “virtio”
• NIC1 will have as its Source Device br1; its Device Model will be e1000.
Note These bridges must be created before creating the virtual machine.
3-13CGDS - Substation Workbench Installation Guide
78-21154-01
Chapter 3 Installing the CG-DS Substation Workbench Monitoring System (Release 1.0) Installing the CGDS Software Monitoring System
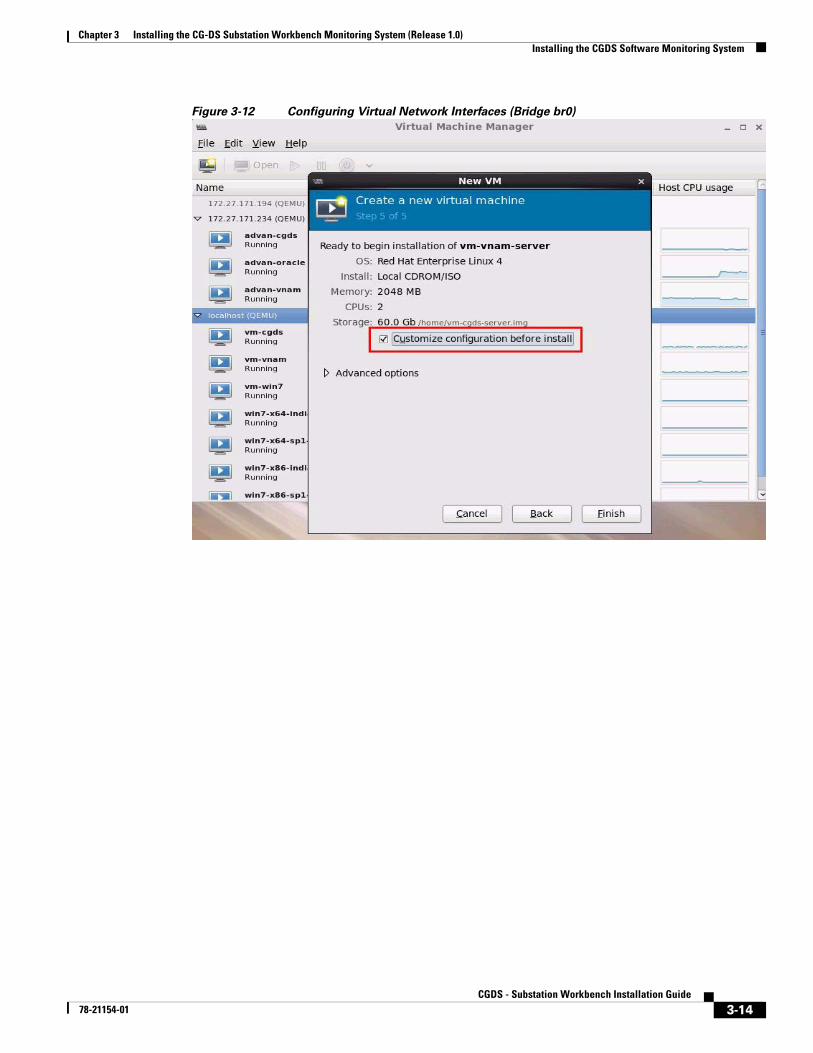
Figure 3-12 Configuring Virtual Network Interfaces (Bridge br0)
3-14CGDS - Substation Workbench Installation Guide
78-21154-01
Chapter 3 Installing the CG-DS Substation Workbench Monitoring System (Release 1.0) Installing the CGDS Software Monitoring System
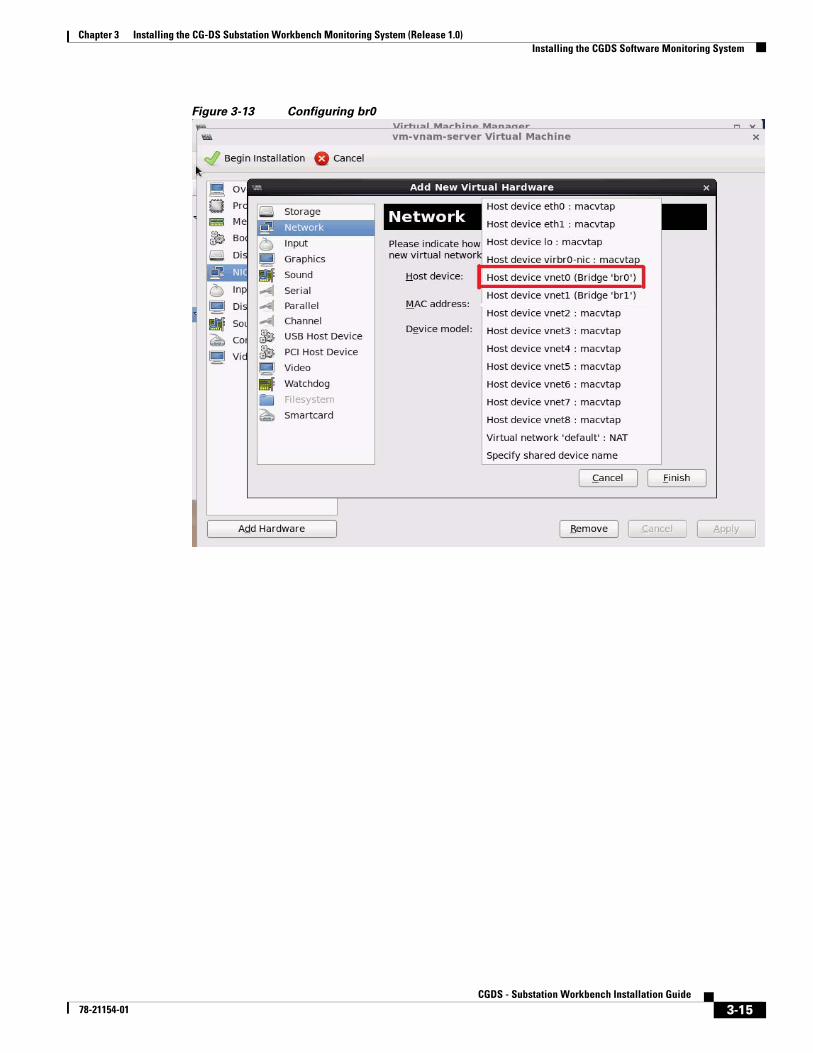
Figure 3-13 Configuring br0
3-15CGDS - Substation Workbench Installation Guide
78-21154-01
Chapter 3 Installing the CG-DS Substation Workbench Monitoring System (Release 1.0) Installing the CGDS Software Monitoring System
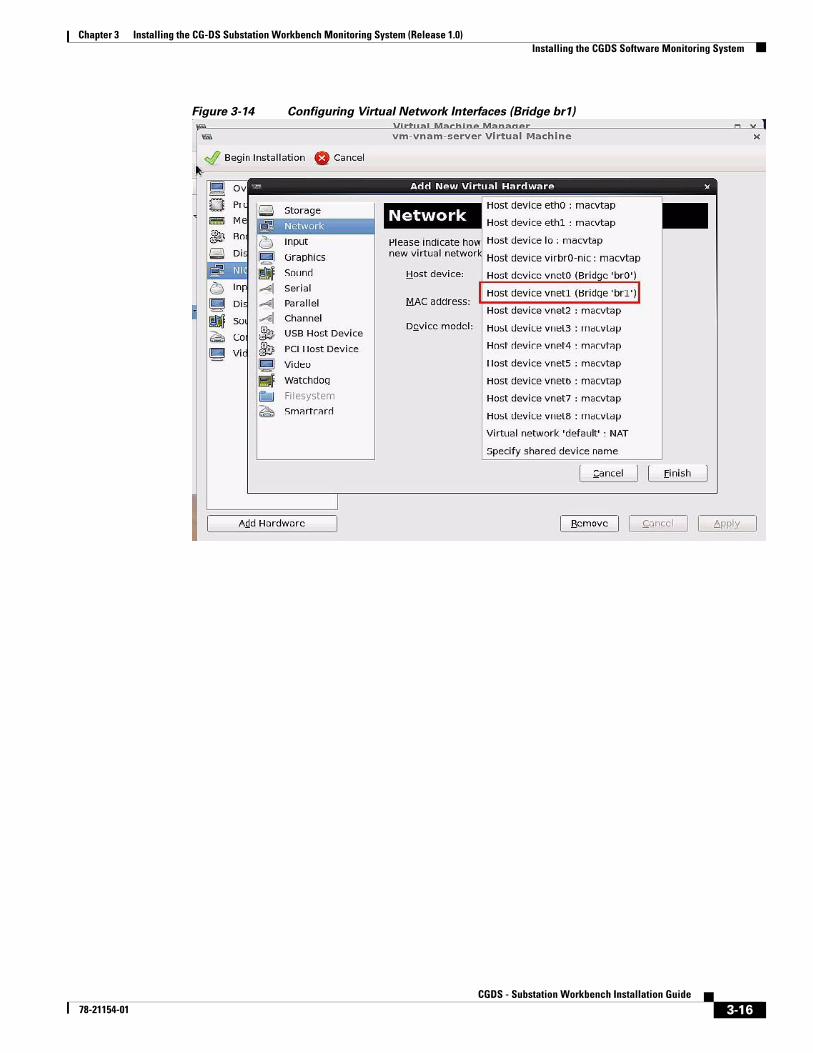
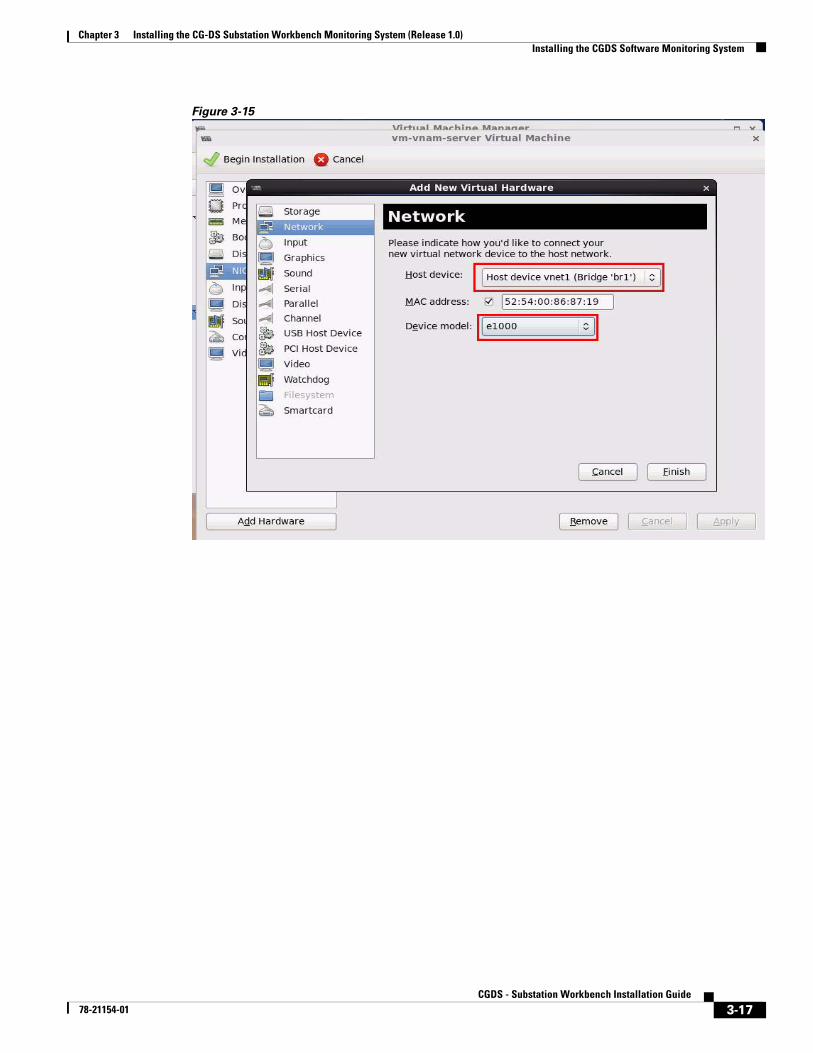
Figure 3-14 Configuring Virtual Network Interfaces (Bridge br1)
3-16CGDS - Substation Workbench Installation Guide
78-21154-01
Chapter 3 Installing the CG-DS Substation Workbench Monitoring System (Release 1.0) Installing the CGDS Software Monitoring System
Figure 3-15
3-17CGDS - Substation Workbench Installation Guide
78-21154-01
Chapter 3 Installing the CG-DS Substation Workbench Monitoring System (Release 1.0) Installing the CGDS Software Monitoring System
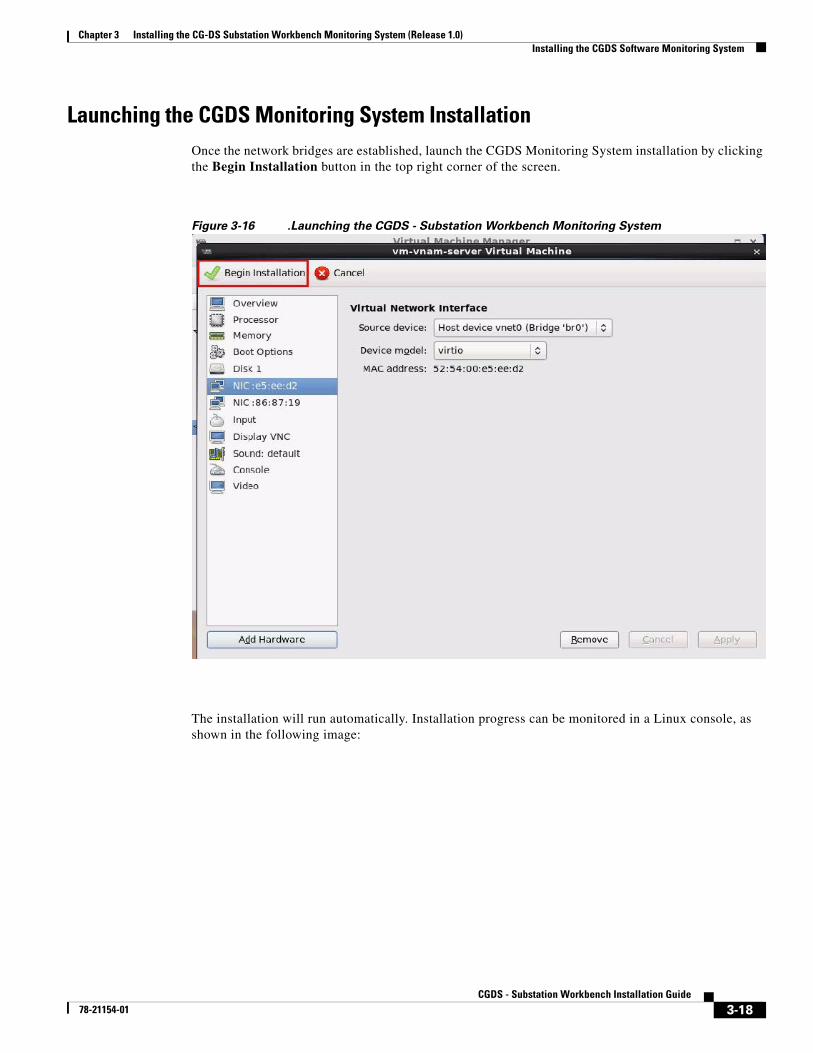
Launching the CGDS Monitoring System Installation Once the network bridges are established, launch the CGDS Monitoring System installation by clicking the Begin Installation button in the top right corner of the screen.
Figure 3-16 .Launching the CGDS - Substation Workbench Monitoring System
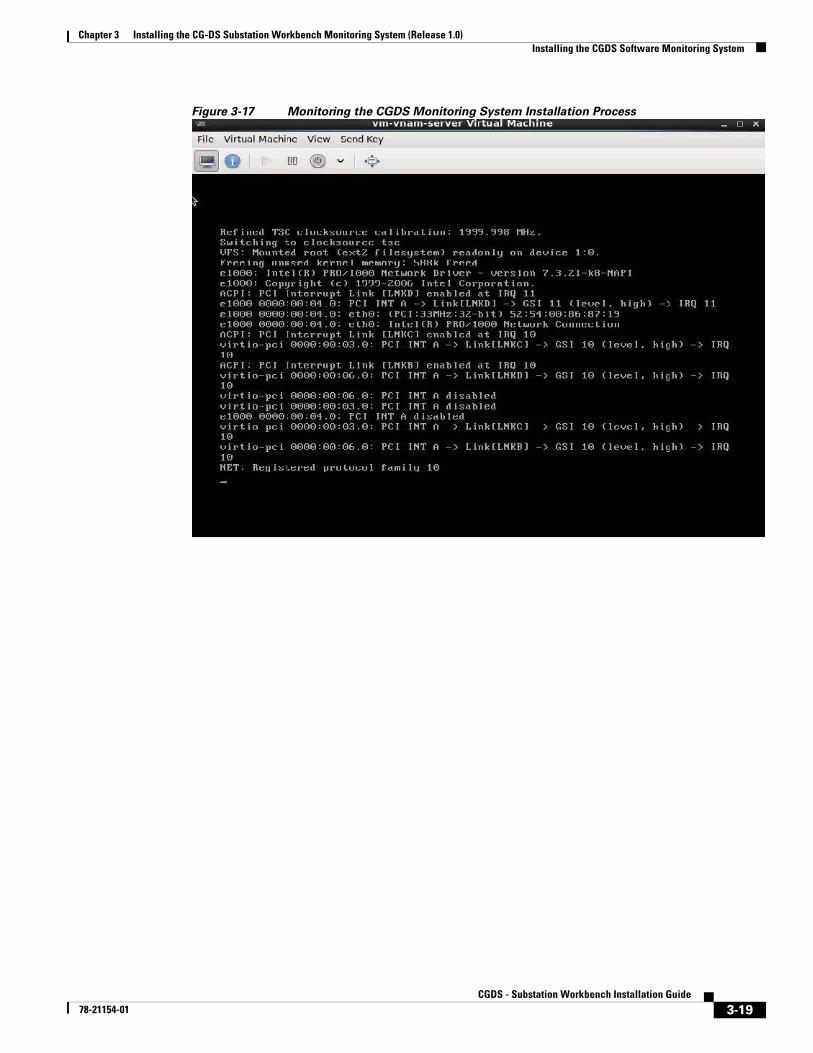
The installation will run automatically. Installation progress can be monitored in a Linux console, as shown in the following image:
3-18CGDS - Substation Workbench Installation Guide
78-21154-01
Chapter 3 Installing the CG-DS Substation Workbench Monitoring System (Release 1.0) Installing the CGDS Software Monitoring System
Figure 3-17 Monitoring the CGDS Monitoring System Installation Process
3-19CGDS - Substation Workbench Installation Guide
78-21154-01
Chapter 3 Installing the CG-DS Substation Workbench Monitoring System (Release 1.0) Installing the CGDS Software Monitoring System
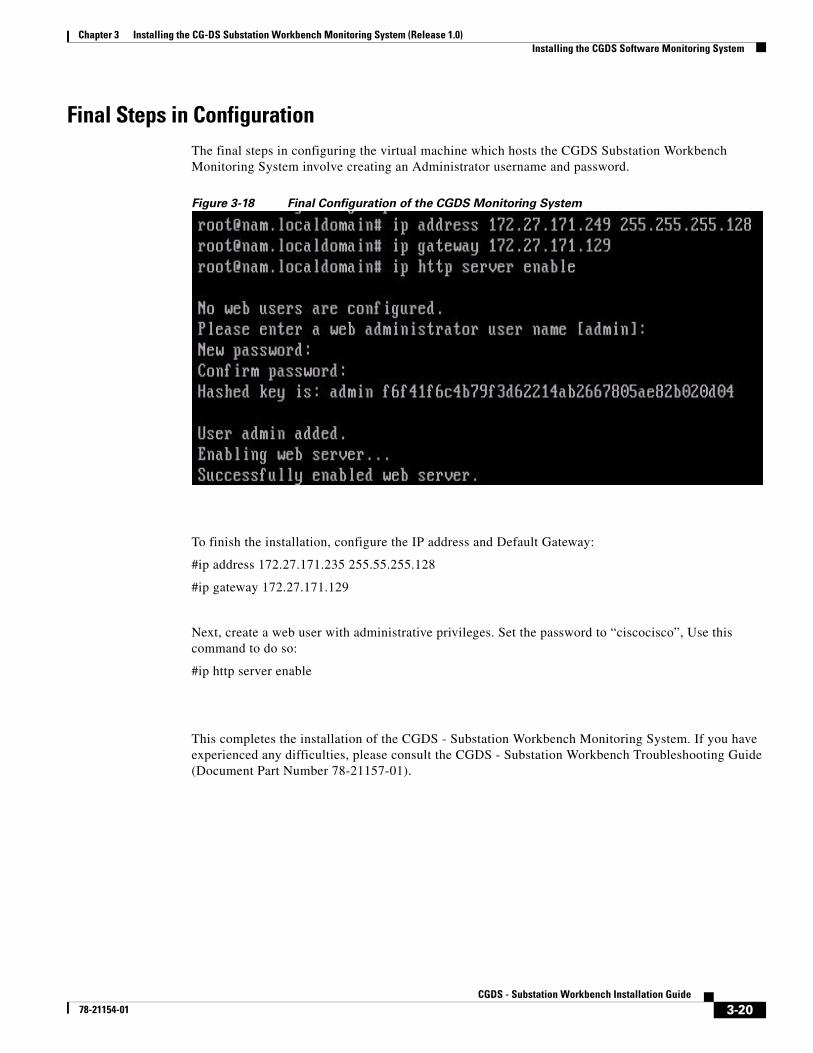
Final Steps in ConfigurationThe final steps in configuring the virtual machine which hosts the CGDS Substation Workbench Monitoring System involve creating an Administrator username and password.
Figure 3-18 Final Configuration of the CGDS Monitoring System
To finish the installation, configure the IP address and Default Gateway:
#ip address 172.27.171.235 255.55.255.128
#ip gateway 172.27.171.129
Next, create a web user with administrative privileges. Set the password to “ciscocisco”, Use this command to do so:
#ip http server enable
This completes the installation of the CGDS - Substation Workbench Monitoring System. If you have experienced any difficulties, please consult the CGDS - Substation Workbench Troubleshooting Guide (Document Part Number 78-21157-01).
3-20CGDS - Substation Workbench Installation Guide
78-21154-01
Chapter 3 Installing the CG-DS Substation Workbench Monitoring System (Release 1.0) Installing the CGDS Software Monitoring System
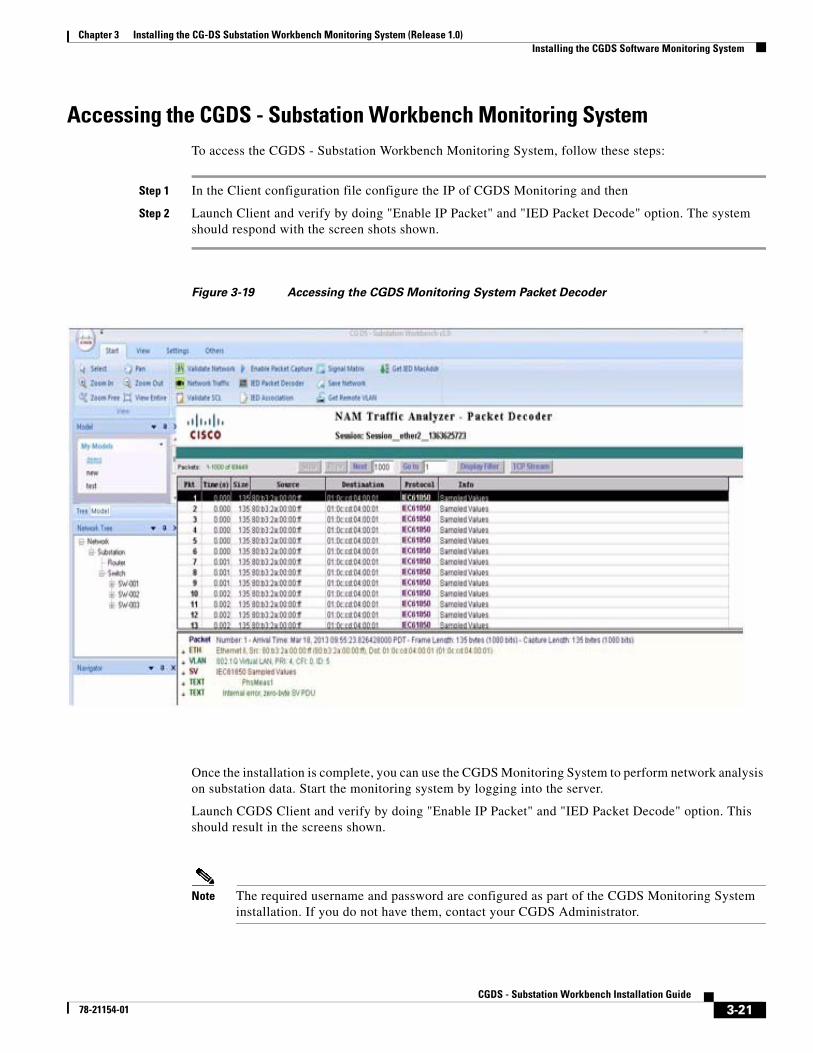
Accessing the CGDS - Substation Workbench Monitoring SystemTo access the CGDS - Substation Workbench Monitoring System, follow these steps:
Step 1 In the Client configuration file configure the IP of CGDS Monitoring and then
Step 2 Launch Client and verify by doing "Enable IP Packet" and "IED Packet Decode" option. The system should respond with the screen shots shown.
Figure 3-19 Accessing the CGDS Monitoring System Packet Decoder
Once the installation is complete, you can use the CGDS Monitoring System to perform network analysis on substation data. Start the monitoring system by logging into the server.
Launch CGDS Client and verify by doing "Enable IP Packet" and "IED Packet Decode" option. This should result in the screens shown.
Note The required username and password are configured as part of the CGDS Monitoring System installation. If you do not have them, contact your CGDS Administrator.
3-21CGDS - Substation Workbench Installation Guide
78-21154-01
Chapter 3 Installing the CG-DS Substation Workbench Monitoring System (Release 1.0) Installing the CGDS Software Monitoring System
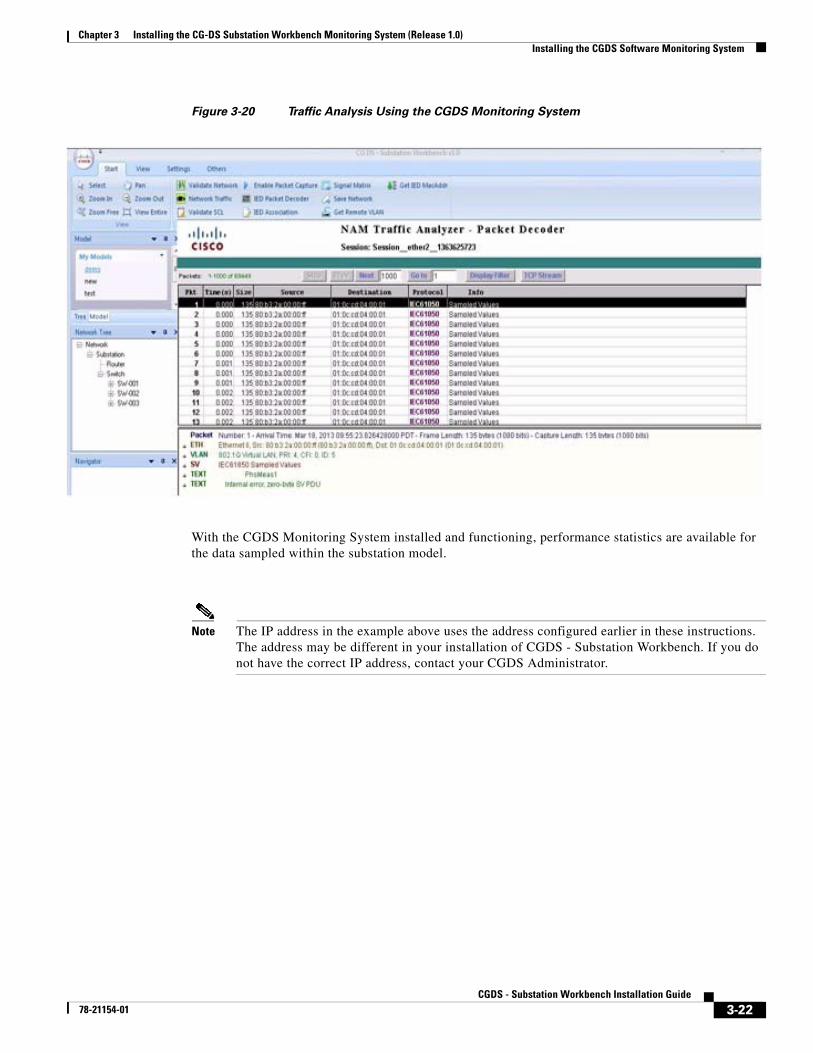
Figure 3-20 Traffic Analysis Using the CGDS Monitoring System
With the CGDS Monitoring System installed and functioning, performance statistics are available for the data sampled within the substation model.
Note The IP address in the example above uses the address configured earlier in these instructions. The address may be different in your installation of CGDS - Substation Workbench. If you do not have the correct IP address, contact your CGDS Administrator.
3-22CGDS - Substation Workbench Installation Guide
78-21154-01
Chapter 3 Installing the CG-DS Substation Workbench Monitoring System (Release 1.0) Installing the CGDS Software Monitoring System
CGDS System Monitor Remote ManagementIf you want to manage the CGDS - Substation Workbench monitoring system remotely, use these commands to enable telnet or ssh:
• To turn on Telnet:
#exsession on
• To turn on SSH
#exsession on ssh
This completes the installation of the Network Monitoring System portion of the CGDS - Substation Workbench Release 1.0.
3-23CGDS - Substation Workbench Installation Guide
78-21154-01
78-21154-01
C H A P T E R 4
Installing the CGDS - Substation Workbench Client Software (Substation Designer)Revised: April 16, 2013, 78-21154-01
Installing the CGDS Substation Designer ClientInstalling the CGDS - Substation Workbench client (Workbench Designer) is straightforward and automated.
This procedure need only be at the time the Substation Designer client software is installed, or at times when the network addresses have changed and reconfiguration is necessary.
Step 1 Verify that the client computer meets the hardware qualification.
Note The CGDS client computer should operate at 2 GHz or greater, have at least 2 GB of RAM, and have at least 1 GB of available hard disk space after the installer has removed any temporary installation files. The client computer will also require an Ethernet connection. The computer should be running Windows 7.
Step 2 Insert the CGDS - Substation Workbench Client Installation DVD in the client computer and launch it.
Step 3 Complete the installation process presented on the DVD.
Tip You will need to have on hand several pieces of information, such as the server IP address, and a valid user name and password. Obtain these before you start the installation process. If you are unable to provide the information required to complete an installation step, obtain the required information from your CGDS System Administrator.
4-1CGSD - Substation Workbench Client Installation
Chapter 4 Installing the CGDS - Substation Workbench Client Software (Substation Designer) Installing the CGDS Substation Designer Client
Launching CGDS Substation DesignerLocate the installer executable on the installation media. Double click on the Installer to begin loading. The following page will appear.
Figure 4-1 Loading the CGDS Substation Designer
After the CGDS Substation Designer software has finished loading, the CGDS Substation Designer identification page will appear.
4-2CGSD - Substation Workbench Client Installation
78-21154-01
Chapter 4 Installing the CGDS - Substation Workbench Client Software (Substation Designer) Installing the CGDS Substation Designer Client
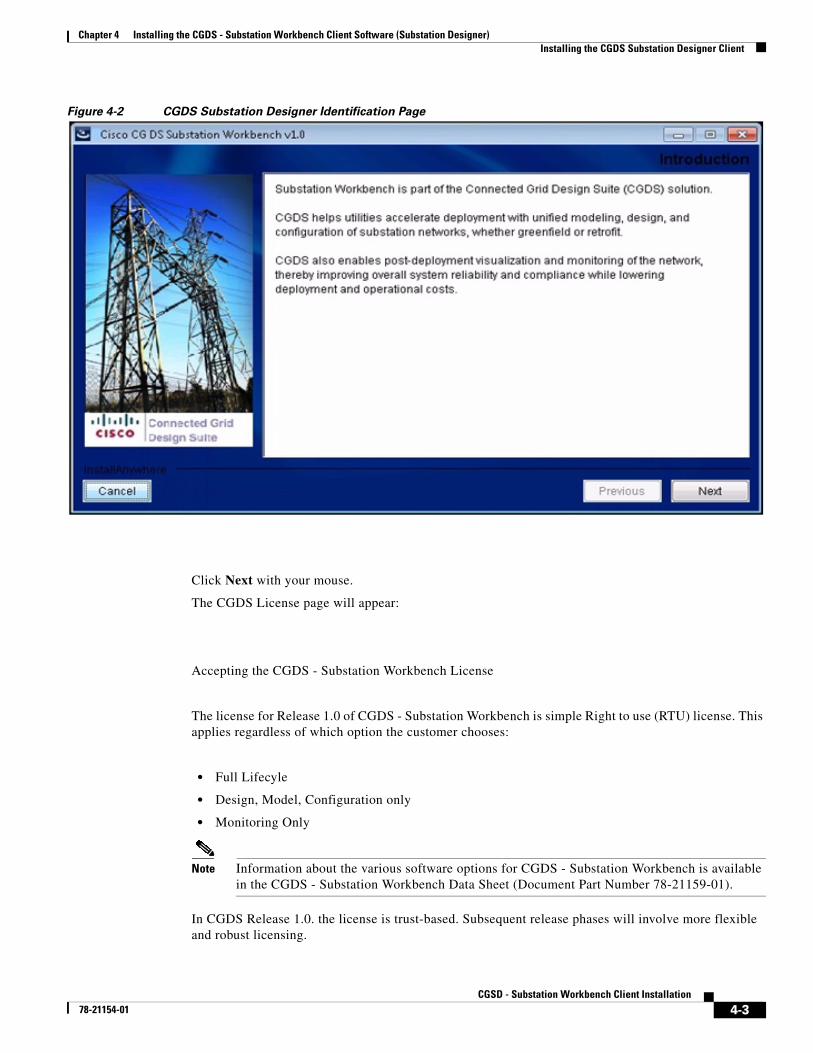
Figure 4-2 CGDS Substation Designer Identification Page
Click Next with your mouse.
The CGDS License page will appear:
Accepting the CGDS - Substation Workbench License
The license for Release 1.0 of CGDS - Substation Workbench is simple Right to use (RTU) license. This applies regardless of which option the customer chooses:
• Full Lifecyle
• Design, Model, Configuration only
• Monitoring Only
Note Information about the various software options for CGDS - Substation Workbench is available in the CGDS - Substation Workbench Data Sheet (Document Part Number 78-21159-01).
In CGDS Release 1.0. the license is trust-based. Subsequent release phases will involve more flexible and robust licensing.
4-3CGSD - Substation Workbench Client Installation
78-21154-01

Chapter 4 Installing the CGDS - Substation Workbench Client Software (Substation Designer) Installing the CGDS Substation Designer Client
Figure 4-3 CGDS License Page
Accept the agreement by clicking the button marked “I accept the terms of the License Agreement”.
Click Next.
The next page to appear is used to set the path to the CGDS client software in the Client Computer.
Setting the CGDS - Substation Designer Installation FolderAt this screen, set the path for the CGDS - Substation Designer installation folder. A specific path can be specified. Alternatively, the user can select the default path.
4-4CGSD - Substation Workbench Client Installation
78-21154-01
Chapter 4 Installing the CGDS - Substation Workbench Client Software (Substation Designer) Installing the CGDS Substation Designer Client
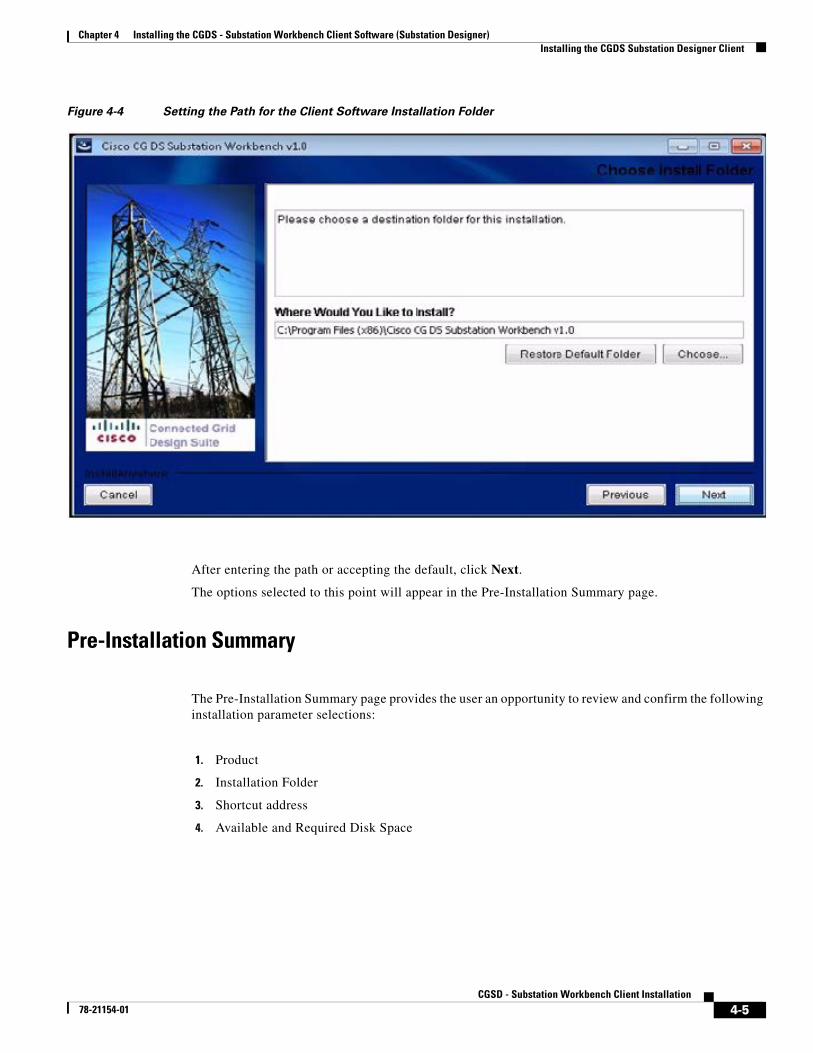
Figure 4-4 Setting the Path for the Client Software Installation Folder
After entering the path or accepting the default, click Next.
The options selected to this point will appear in the Pre-Installation Summary page.
Pre-Installation Summary
The Pre-Installation Summary page provides the user an opportunity to review and confirm the following installation parameter selections:
1. Product
2. Installation Folder
3. Shortcut address
4. Available and Required Disk Space
4-5CGSD - Substation Workbench Client Installation
78-21154-01
Chapter 4 Installing the CGDS - Substation Workbench Client Software (Substation Designer) Installing the CGDS Substation Designer Client
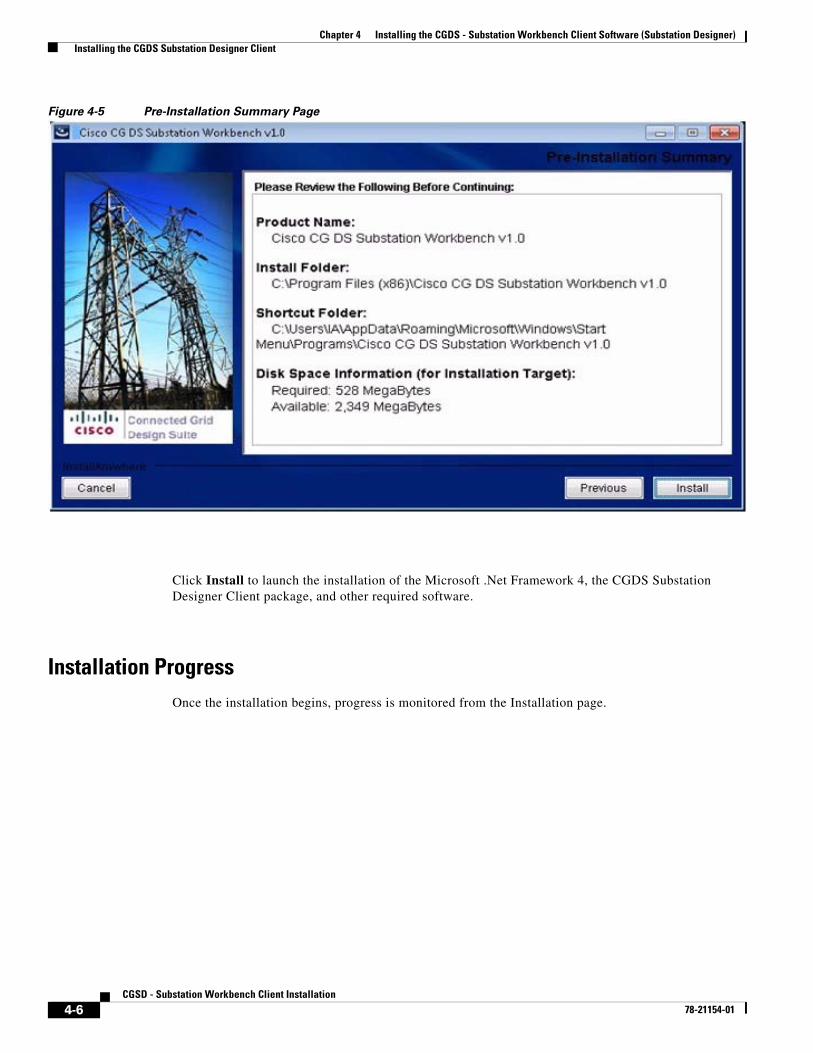
Figure 4-5 Pre-Installation Summary Page
Click Install to launch the installation of the Microsoft .Net Framework 4, the CGDS Substation Designer Client package, and other required software.
Installation ProgressOnce the installation begins, progress is monitored from the Installation page.
4-6CGSD - Substation Workbench Client Installation
78-21154-01

Chapter 4 Installing the CGDS - Substation Workbench Client Software (Substation Designer) Installing the CGDS Substation Designer Client
Figure 4-6 CGDS - Substation Workbench Install Screen
When the installation is finished, the configuration page for network connectivity for attachment to the server appears.
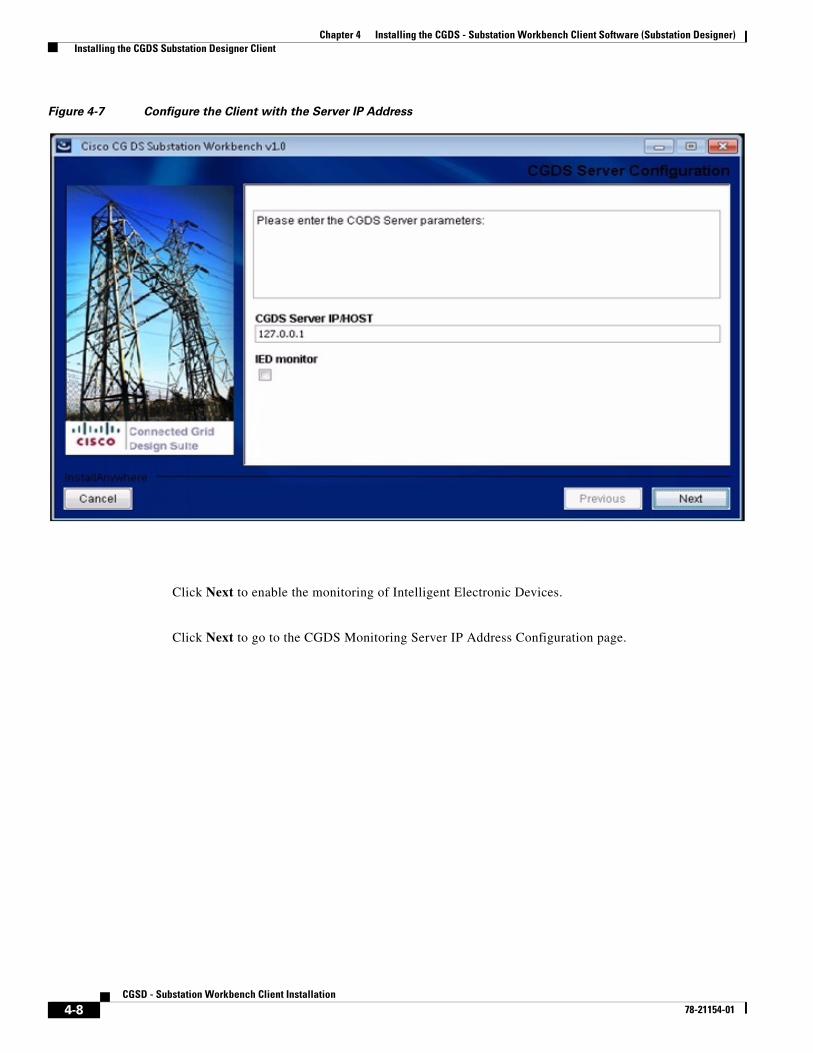
Configuring the Client IP AddressThe CGDS Substation Designer is on a client computer that connects to the CGDS - Substation Workbench server using Ethernet. This requires an IP address, which is configured using this screen. Even if the client exists within the server (for instance, by running on a virtual machine), it is still necessary to provide an IP address.
In addition to client-to-server communications, the CGDS Substation Designer communicates with network devices it can control using the Web Services Management Agent (WSMA). WSMA is a function of the Cisco IOS, through network devices can be fully managed. WSMA operates in both listener mode (Connections are initiated by external applications.) and initiator mode (WSMA initiates the connections.). WSMA supports HTTP, HTTPS, Secure Shell Version 2 (SSHv2) and TLS transports; provides XML encoded model for configuration and operational data; publishes schemas for web services; avoids screen scraping; allows faster NMS application development; and provides faster response times compared to traditional telnet-based access mechanisms. WSMA also requires IP addresses.
Note Some items in the next few screens may not be necessary or available in your particular installation. This will depend upon the Substation Workbench option ordered.
4-7CGSD - Substation Workbench Client Installation
78-21154-01
Chapter 4 Installing the CGDS - Substation Workbench Client Software (Substation Designer) Installing the CGDS Substation Designer Client
Figure 4-7 Configure the Client with the Server IP Address
Click Next to enable the monitoring of Intelligent Electronic Devices.
Click Next to go to the CGDS Monitoring Server IP Address Configuration page.
4-8CGSD - Substation Workbench Client Installation
78-21154-01
Chapter 4 Installing the CGDS - Substation Workbench Client Software (Substation Designer) Installing the CGDS Substation Designer Client
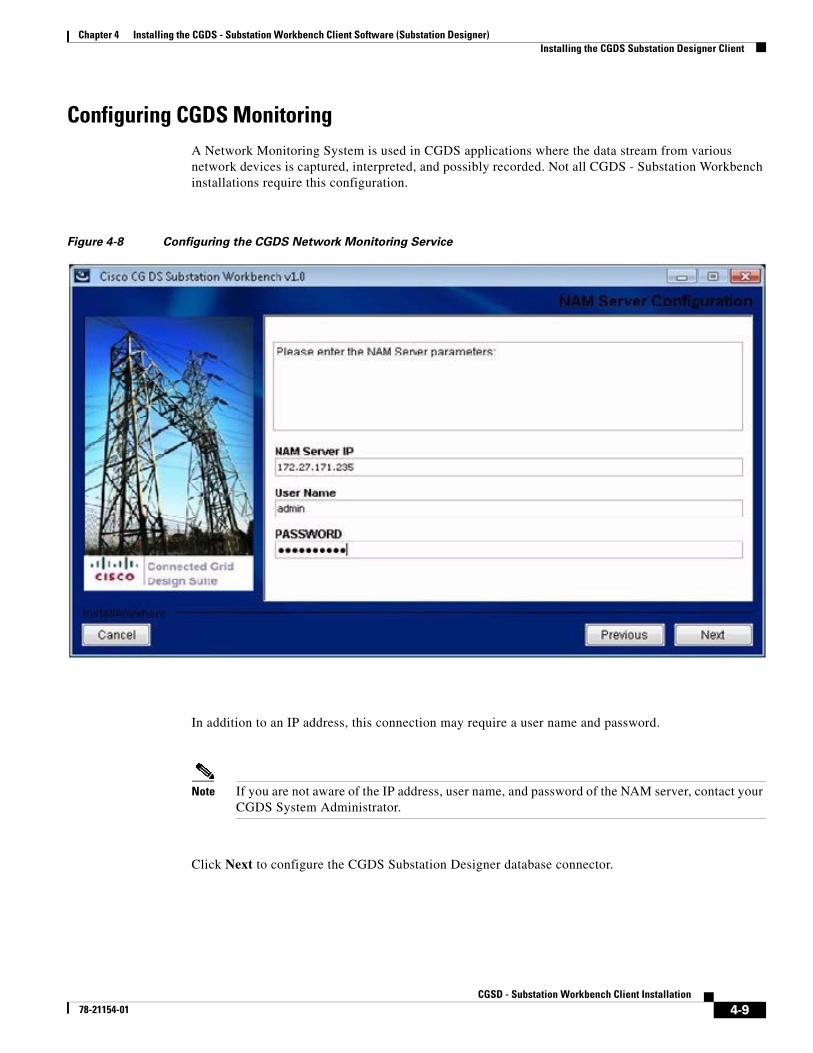
Configuring CGDS Monitoring A Network Monitoring System is used in CGDS applications where the data stream from various network devices is captured, interpreted, and possibly recorded. Not all CGDS - Substation Workbench installations require this configuration.
Figure 4-8 Configuring the CGDS Network Monitoring Service
In addition to an IP address, this connection may require a user name and password.
Note If you are not aware of the IP address, user name, and password of the NAM server, contact your CGDS System Administrator.
Click Next to configure the CGDS Substation Designer database connector.
4-9CGSD - Substation Workbench Client Installation
78-21154-01
Chapter 4 Installing the CGDS - Substation Workbench Client Software (Substation Designer) Installing the CGDS Substation Designer Client
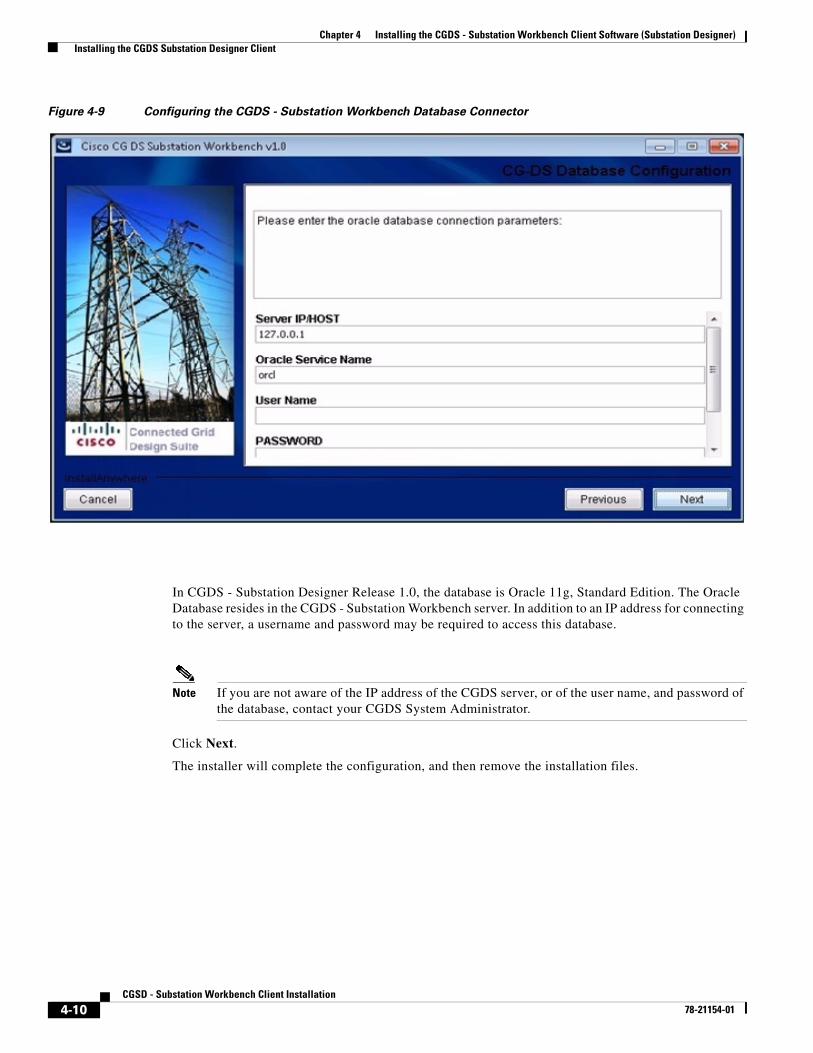
Figure 4-9 Configuring the CGDS - Substation Workbench Database Connector
In CGDS - Substation Designer Release 1.0, the database is Oracle 11g, Standard Edition. The Oracle Database resides in the CGDS - Substation Workbench server. In addition to an IP address for connecting to the server, a username and password may be required to access this database.
Note If you are not aware of the IP address of the CGDS server, or of the user name, and password of the database, contact your CGDS System Administrator.
Click Next.
The installer will complete the configuration, and then remove the installation files.
4-10CGSD - Substation Workbench Client Installation
78-21154-01

Chapter 4 Installing the CGDS - Substation Workbench Client Software (Substation Designer) Installing the CGDS Substation Designer Client
Figure 4-10 Installation Finish and Installer Clean Up
When the progress bar indicates the installation is finished, the following screen appears.
4-11CGSD - Substation Workbench Client Installation
78-21154-01
Chapter 4 Installing the CGDS - Substation Workbench Client Software (Substation Designer) Installing the CGDS Substation Designer Client
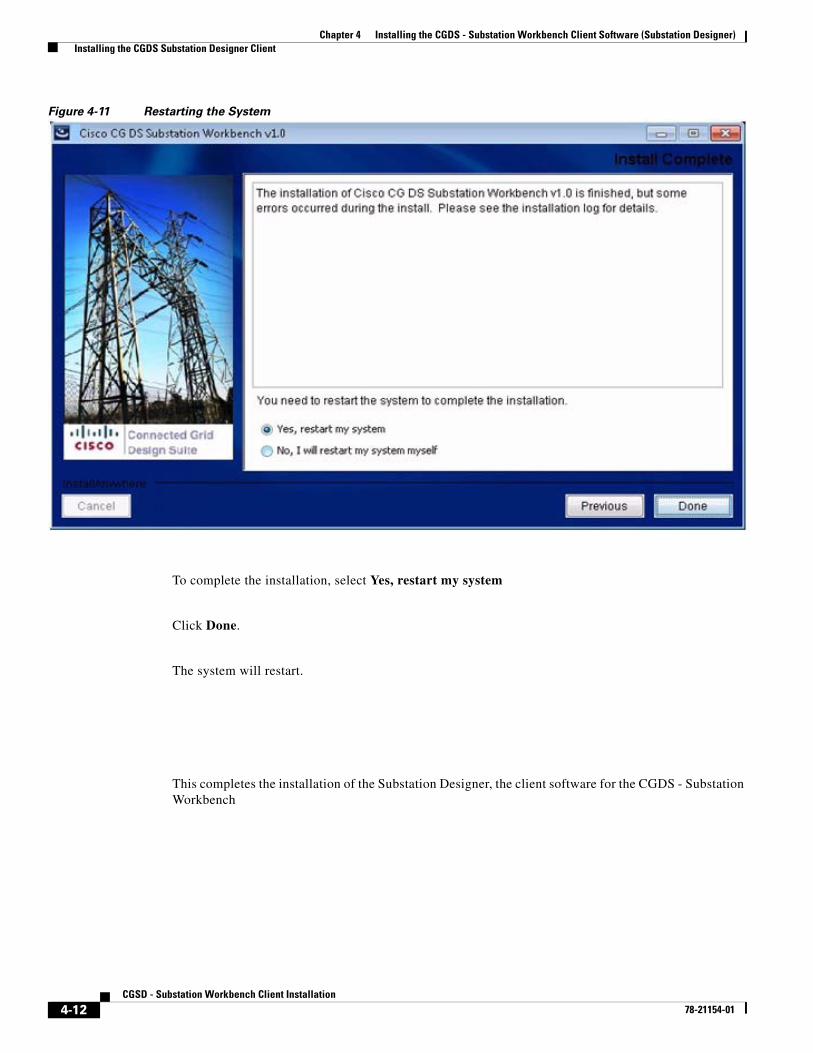
Figure 4-11 Restarting the System
To complete the installation, select Yes, restart my system
Click Done.
The system will restart.
This completes the installation of the Substation Designer, the client software for the CGDS - Substation Workbench
4-12CGSD - Substation Workbench Client Installation
78-21154-01


![[XLS]Acronym Server Simplified - ᐉ Переводческие ... · Web viewDocument Types Equipment Names Abbreviations Glossary TABLE TABLE TABLE_2 TABLE_2 Amine Surge Tank substation,](https://img.pdfslide.us/doc/110x75/5af44df67f8b9a190c8ce484/xlsacronym-server-simplified-viewdocument.jpg)