Embed Size (px)
Citation preview

Central Annals of Vascular Medicine & Research
Cite this article: Grant JP (2017) Central Venous Access Using Upper Body Veins. Ann Vasc Med Res 4(6): 1076.
*Corresponding authorJohn P. Grant, Department of Surgery, Duke University Hospital, Hospital in Durham, North Carolina, USA, Email:
Submitted: 26 September 2017
Accepted: 10 November 2017
Published: 13 November 2017
ISSN: 2378-9344
Copyright© 2017 Grant
OPEN ACCESS
Keywords•Antecubital vein•Cephalic vein•Subclavian vein•Internal jugular vein
Review Article
Central Venous Access Using Upper Body VeinsJohn P. Grant*Department of Surgery, Duke University Hospital, USA
Abstract
This paper reviews various methodologies for central line placement. For each technique, local anatomy is reviewed, necessary materials for insertion are listed, preparation of access site is described, and steps for catheter placement are detailed. The following routes for central venous access via the upper body veins are addressed: antecubital vein, cephalic vein, subclavian vein, internal jugular vein.
INTRODUCTIONCentral venous access has become a mainstay for management
of patients requiring nutritional support and critical care. Primary access is via the upper extremity veins. To optimize safety it is important to prepare the patient properly, understand the complex anatomy, and pay strict attention to details.
PREPARATION FOR CANNULATIONSkin preparation
Any hair should be removed with a depilatory to assist in the skin preparation and subsequent placement of a bandage. The skin should not be shaved with a razor as this can cause small skin nicks and increase risks of subsequent infection. 2% Chlorhexidine gluconate, combined with alcohol, is now accepted as the preferred skin antisepic solution during vascular access procedures [1,2]. If there is an allergic problem with chlorhexidine gluconate, povidone-iodine is the preferred second choice.
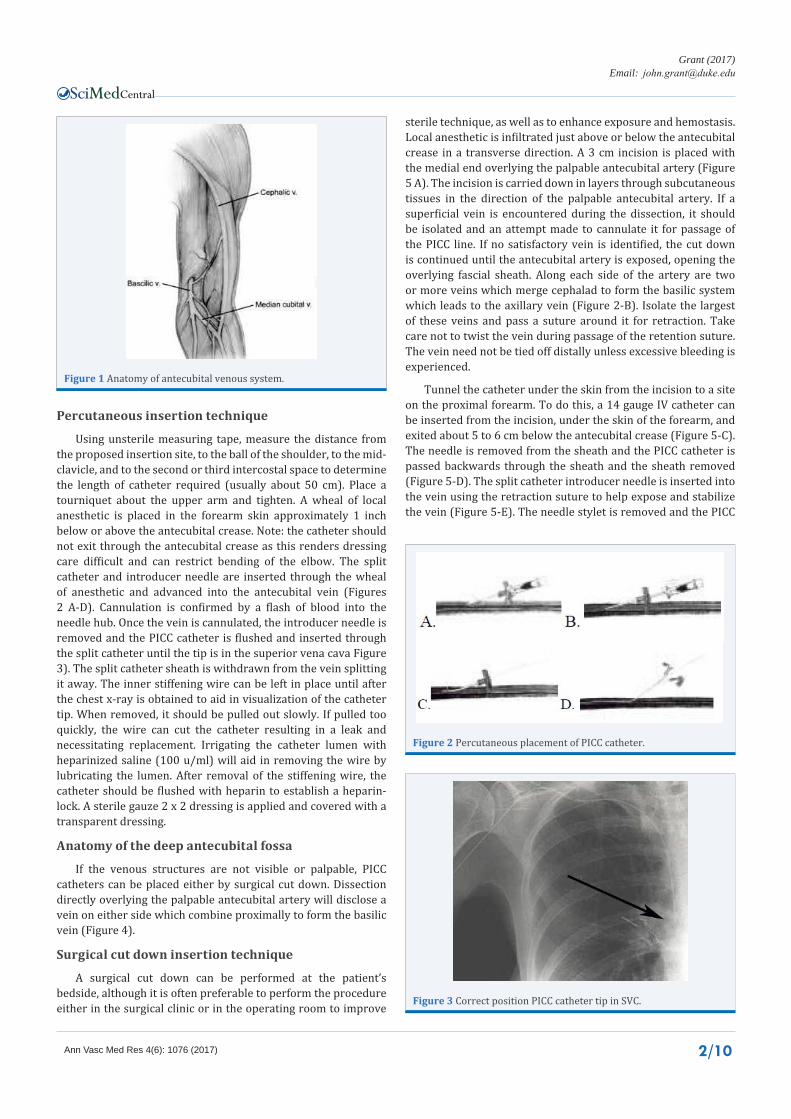
Optimal position of the catheter tip is in the superior vena cava [3]. Placing the catheter tip in the subclavian, axillary, internal or external jugular veins is associated with increased incidence of thrombosis, phlebitis, and infection [4]. Proper position should be verified with a chest x-ray before infusing irritating solutions.
Proper timing of catheterization
Whenever possible, placement of a central venous access catheter should be done on an elective basis. Proper time should be taken in patient preparation, skin preparation, definition of landmarks, and catheter insertion. Placement of catheters in emergency situations is associated with a significant increase in complication rate, mainly pneumothorax and catheter related sepsis. If an emergent catheterization is required, it should be performed by the most experienced physician available. To minimize risk of secondary seeding of the catheter following a positive blood culture or recent drainage of an abscess, a catheter should not be placed until at least 2 to 3 days of “effective” antibiotics have been given.
Site preparation
Central vein catheterization for temporary access is usually performed in the patient’s room. The number of people present should be minimized to avoid distraction and dust-borne contamination. A wide skin area should have all hair removed with a depilatory as necessary to assist in the skin preparation and subsequent placement of a bandage (the skin should not be shaved with a razor as this can cause small skin nicks and increase risk of subsequent infection). The skin cleansing should begin at the point of anticipated skin puncture and proceed in ever enlarging circles to the edges of the field. The physician should wear a mask, sterile gown, and don sterile gloves. The gloves should be wiped with saline soaked gauze to remove all talc (talc can bind to the catheter material and cause an inflammatory reaction within the vein). Place sterile towels to expose the cannulation site.
Antecubital vein
Although catheters placed across the antecubital fossa may mildly restrict flexion of the elbow, they can be used effectively in selected patients for up to 12 months. The most common indications for removal include termination of therapy, phlebitis, malfunction, and infection [5-7]. Very meticulous skin preparation, sterile insertion technique, and maintenance of a sterile occlusive dressing are mandatory.
Anatomy of the superficial antecubital fossa
The preferred vein for cannulation is the basilic which leads medially to the axillary vein (Figure 1). The cephalic vein (lateral vein) can be used but presents difficulty at times in passage of the catheter into the subclavian vein at the clavicle. A 3 to 5 French single lumen PICC line is the most commonly used catheter, although 5 and 6 Fr. dual lumen catheters are also available and find use when more vascular access is needed. The 3 Fr. catheters have a very small lumen and although they provide adequate venous access for standard fluids, they are not optimal for high volume infusions or viscous solutions such as blood products.
Central
Grant (2017)Email:
Ann Vasc Med Res 4(6): 1076 (2017) 2/10
Percutaneous insertion technique
Using unsterile measuring tape, measure the distance from the proposed insertion site, to the ball of the shoulder, to the mid-clavicle, and to the second or third intercostal space to determine the length of catheter required (usually about 50 cm). Place a tourniquet about the upper arm and tighten. A wheal of local anesthetic is placed in the forearm skin approximately 1 inch below or above the antecubital crease. Note: the catheter should not exit through the antecubital crease as this renders dressing care difficult and can restrict bending of the elbow. The split catheter and introducer needle are inserted through the wheal of anesthetic and advanced into the antecubital vein (Figures 2 A-D). Cannulation is confirmed by a flash of blood into the needle hub. Once the vein is cannulated, the introducer needle is removed and the PICC catheter is flushed and inserted through the split catheter until the tip is in the superior vena cava Figure 3). The split catheter sheath is withdrawn from the vein splitting it away. The inner stiffening wire can be left in place until after the chest x-ray is obtained to aid in visualization of the catheter tip. When removed, it should be pulled out slowly. If pulled too quickly, the wire can cut the catheter resulting in a leak and necessitating replacement. Irrigating the catheter lumen with heparinized saline (100 u/ml) will aid in removing the wire by lubricating the lumen. After removal of the stiffening wire, the catheter should be flushed with heparin to establish a heparin-lock. A sterile gauze 2 x 2 dressing is applied and covered with a transparent dressing.
Anatomy of the deep antecubital fossa
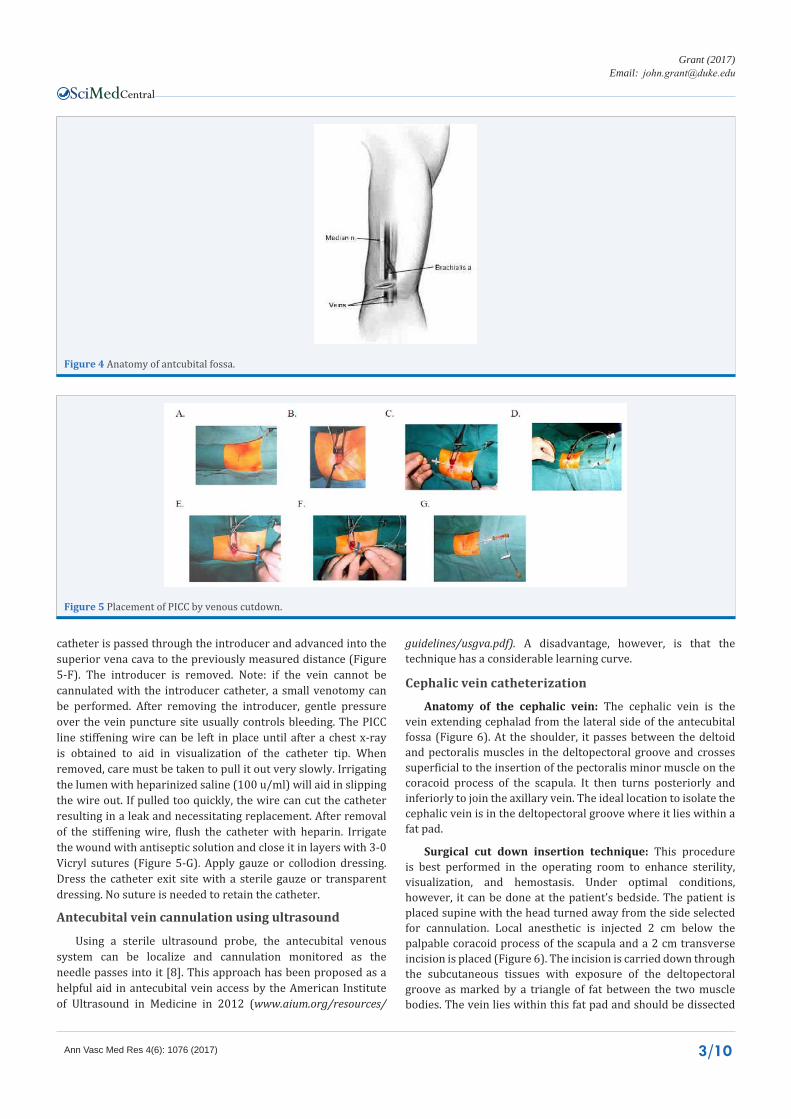
If the venous structures are not visible or palpable, PICC catheters can be placed either by surgical cut down. Dissection directly overlying the palpable antecubital artery will disclose a vein on either side which combine proximally to form the basilic vein (Figure 4).
Surgical cut down insertion technique
A surgical cut down can be performed at the patient’s bedside, although it is often preferable to perform the procedure either in the surgical clinic or in the operating room to improve
sterile technique, as well as to enhance exposure and hemostasis. Local anesthetic is infiltrated just above or below the antecubital crease in a transverse direction. A 3 cm incision is placed with the medial end overlying the palpable antecubital artery (Figure 5 A). The incision is carried down in layers through subcutaneous tissues in the direction of the palpable antecubital artery. If a superficial vein is encountered during the dissection, it should be isolated and an attempt made to cannulate it for passage of the PICC line. If no satisfactory vein is identified, the cut down is continued until the antecubital artery is exposed, opening the overlying fascial sheath. Along each side of the artery are two or more veins which merge cephalad to form the basilic system which leads to the axillary vein (Figure 2-B). Isolate the largest of these veins and pass a suture around it for retraction. Take care not to twist the vein during passage of the retention suture. The vein need not be tied off distally unless excessive bleeding is experienced.
Tunnel the catheter under the skin from the incision to a site on the proximal forearm. To do this, a 14 gauge IV catheter can be inserted from the incision, under the skin of the forearm, and exited about 5 to 6 cm below the antecubital crease (Figure 5-C). The needle is removed from the sheath and the PICC catheter is passed backwards through the sheath and the sheath removed (Figure 5-D). The split catheter introducer needle is inserted into the vein using the retraction suture to help expose and stabilize the vein (Figure 5-E). The needle stylet is removed and the PICC
Figure 1 Anatomy of antecubital venous system.
Figure 2 Percutaneous placement of PICC catheter.
Figure 3 Correct position PICC catheter tip in SVC.
Central
Grant (2017)Email:
Ann Vasc Med Res 4(6): 1076 (2017) 3/10
Figure 4 Anatomy of antcubital fossa.
Figure 5 Placement of PICC by venous cutdown.
catheter is passed through the introducer and advanced into the superior vena cava to the previously measured distance (Figure 5-F). The introducer is removed. Note: if the vein cannot be cannulated with the introducer catheter, a small venotomy can be performed. After removing the introducer, gentle pressure over the vein puncture site usually controls bleeding. The PICC line stiffening wire can be left in place until after a chest x-ray is obtained to aid in visualization of the catheter tip. When removed, care must be taken to pull it out very slowly. Irrigating the lumen with heparinized saline (100 u/ml) will aid in slipping the wire out. If pulled too quickly, the wire can cut the catheter resulting in a leak and necessitating replacement. After removal of the stiffening wire, flush the catheter with heparin. Irrigate the wound with antiseptic solution and close it in layers with 3-0 Vicryl sutures (Figure 5-G). Apply gauze or collodion dressing. Dress the catheter exit site with a sterile gauze or transparent dressing. No suture is needed to retain the catheter.
Antecubital vein cannulation using ultrasound
Using a sterile ultrasound probe, the antecubital venous system can be localize and cannulation monitored as the needle passes into it [8]. This approach has been proposed as a helpful aid in antecubital vein access by the American Institute of Ultrasound in Medicine in 2012 (www.aium.org/resources/
guidelines/usgva.pdf). A disadvantage, however, is that the technique has a considerable learning curve.
Cephalic vein catheterization
Anatomy of the cephalic vein: The cephalic vein is the vein extending cephalad from the lateral side of the antecubital fossa (Figure 6). At the shoulder, it passes between the deltoid and pectoralis muscles in the deltopectoral groove and crosses superficial to the insertion of the pectoralis minor muscle on the coracoid process of the scapula. It then turns posteriorly and inferiorly to join the axillary vein. The ideal location to isolate the cephalic vein is in the deltopectoral groove where it lies within a fat pad.
Surgical cut down insertion technique: This procedure is best performed in the operating room to enhance sterility, visualization, and hemostasis. Under optimal conditions, however, it can be done at the patient’s bedside. The patient is placed supine with the head turned away from the side selected for cannulation. Local anesthetic is injected 2 cm below the palpable coracoid process of the scapula and a 2 cm transverse incision is placed (Figure 6). The incision is carried down through the subcutaneous tissues with exposure of the deltopectoral groove as marked by a triangle of fat between the two muscle bodies. The vein lies within this fat pad and should be dissected
Central
Grant (2017)Email:
Ann Vasc Med Res 4(6): 1076 (2017) 4/10
out. Once freed, a suture is passed about the vein distally and tied. A second suture is passed around the vein proximally for retraction. Care must be taken not to twist the vein during passage of these sutures. The catheter is passed through the skin lateral to the incision and the tip drawn into the wound. With gentle tension on the sutures, a small venotomy is made in the vein, and the catheter passed into the vein and advanced into the superior vena cava. The proximal suture is gently secured about the vein and catheter to prevent back bleeding, yet not occluding the catheter. The wound is irrigated with saline solution and closed in layers using 3-0 Vicryl sutures. The skin is closed with subcuticular stitches. A 3-0 Nylon suture is placed at the catheter exit site and tied about the catheter to secure it in place, and a sterile dressing is applied. A chest x-ray is obtained to confirm proper catheter location in the superior vena cava.
Subclavian vein catheterization
The most common access to the superior vena cava is the subclavian vein. Aubaniac first reported the technique which he developed to provide rapid access to the central venous system with minimal complications, even in patients in shock after severe injury [9]. Although it was described in 1952, it was not until 1962 that use of the technique was reported in the United States by Wilson et al., [10].
Anatomy of the subclavian vein area
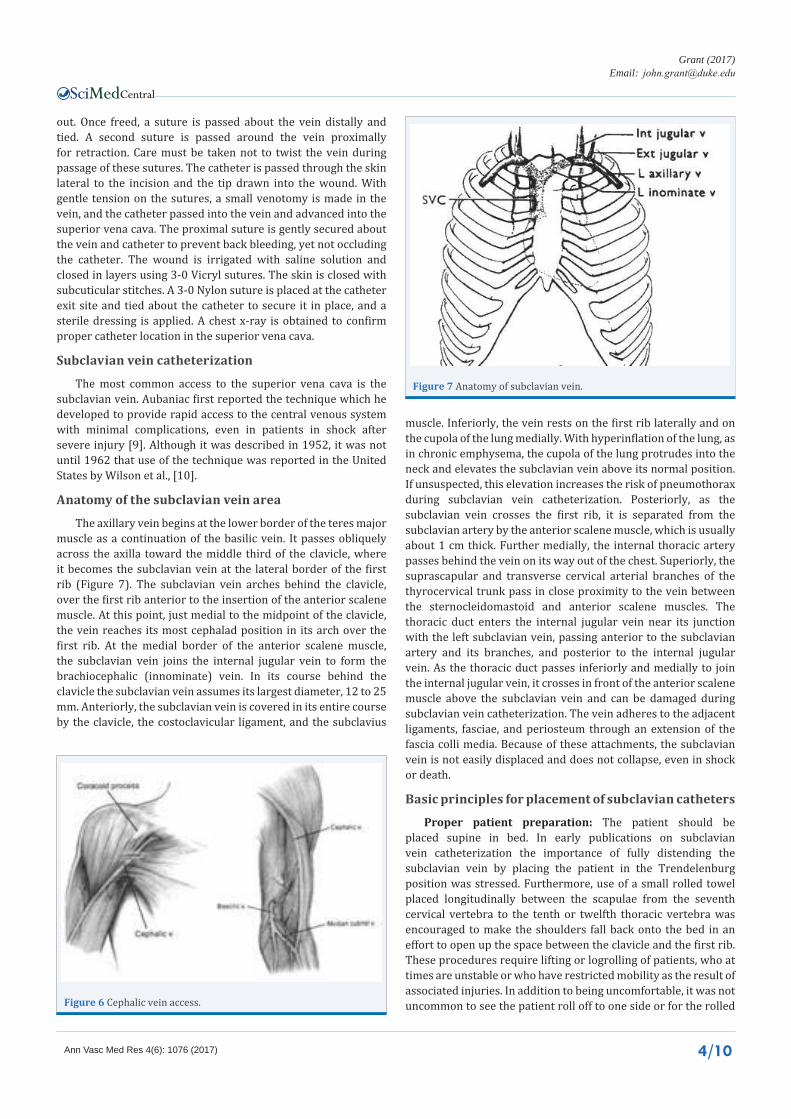
The axillary vein begins at the lower border of the teres major muscle as a continuation of the basilic vein. It passes obliquely across the axilla toward the middle third of the clavicle, where it becomes the subclavian vein at the lateral border of the first rib (Figure 7). The subclavian vein arches behind the clavicle, over the first rib anterior to the insertion of the anterior scalene muscle. At this point, just medial to the midpoint of the clavicle, the vein reaches its most cephalad position in its arch over the first rib. At the medial border of the anterior scalene muscle, the subclavian vein joins the internal jugular vein to form the brachiocephalic (innominate) vein. In its course behind the clavicle the subclavian vein assumes its largest diameter, 12 to 25 mm. Anteriorly, the subclavian vein is covered in its entire course by the clavicle, the costoclavicular ligament, and the subclavius
muscle. Inferiorly, the vein rests on the first rib laterally and on the cupola of the lung medially. With hyperinflation of the lung, as in chronic emphysema, the cupola of the lung protrudes into the neck and elevates the subclavian vein above its normal position. If unsuspected, this elevation increases the risk of pneumothorax during subclavian vein catheterization. Posteriorly, as the subclavian vein crosses the first rib, it is separated from the subclavian artery by the anterior scalene muscle, which is usually about 1 cm thick. Further medially, the internal thoracic artery passes behind the vein on its way out of the chest. Superiorly, the suprascapular and transverse cervical arterial branches of the thyrocervical trunk pass in close proximity to the vein between the sternocleidomastoid and anterior scalene muscles. The thoracic duct enters the internal jugular vein near its junction with the left subclavian vein, passing anterior to the subclavian artery and its branches, and posterior to the internal jugular vein. As the thoracic duct passes inferiorly and medially to join the internal jugular vein, it crosses in front of the anterior scalene muscle above the subclavian vein and can be damaged during subclavian vein catheterization. The vein adheres to the adjacent ligaments, fasciae, and periosteum through an extension of the fascia colli media. Because of these attachments, the subclavian vein is not easily displaced and does not collapse, even in shock or death.
Basic principles for placement of subclavian catheters
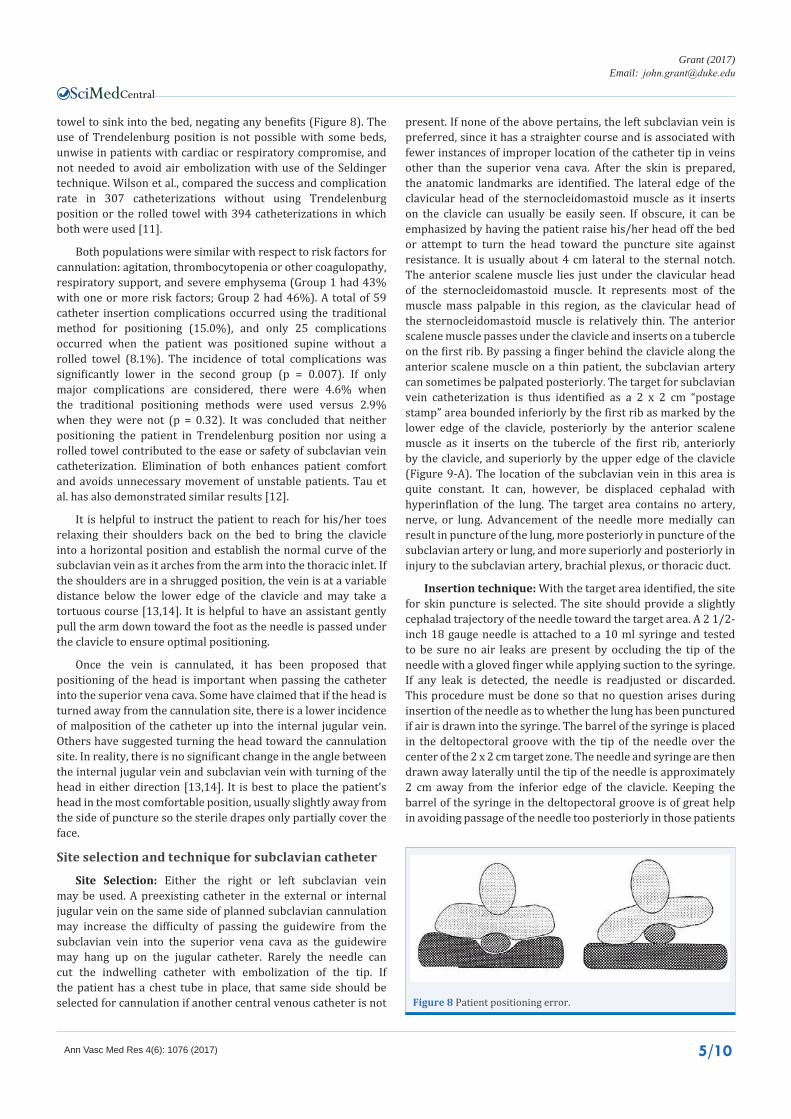
Proper patient preparation: The patient should be placed supine in bed. In early publications on subclavian vein catheterization the importance of fully distending the subclavian vein by placing the patient in the Trendelenburg position was stressed. Furthermore, use of a small rolled towel placed longitudinally between the scapulae from the seventh cervical vertebra to the tenth or twelfth thoracic vertebra was encouraged to make the shoulders fall back onto the bed in an effort to open up the space between the clavicle and the first rib. These procedures require lifting or logrolling of patients, who at times are unstable or who have restricted mobility as the result of associated injuries. In addition to being uncomfortable, it was not uncommon to see the patient roll off to one side or for the rolled Figure 6 Cephalic vein access.
Figure 7 Anatomy of subclavian vein.
Central
Grant (2017)Email:
Ann Vasc Med Res 4(6): 1076 (2017) 5/10
towel to sink into the bed, negating any benefits (Figure 8). The use of Trendelenburg position is not possible with some beds, unwise in patients with cardiac or respiratory compromise, and not needed to avoid air embolization with use of the Seldinger technique. Wilson et al., compared the success and complication rate in 307 catheterizations without using Trendelenburg position or the rolled towel with 394 catheterizations in which both were used [11].
Both populations were similar with respect to risk factors for cannulation: agitation, thrombocytopenia or other coagulopathy, respiratory support, and severe emphysema (Group 1 had 43% with one or more risk factors; Group 2 had 46%). A total of 59 catheter insertion complications occurred using the traditional method for positioning (15.0%), and only 25 complications occurred when the patient was positioned supine without a rolled towel (8.1%). The incidence of total complications was significantly lower in the second group (p = 0.007). If only major complications are considered, there were 4.6% when the traditional positioning methods were used versus 2.9% when they were not (p = 0.32). It was concluded that neither positioning the patient in Trendelenburg position nor using a rolled towel contributed to the ease or safety of subclavian vein catheterization. Elimination of both enhances patient comfort and avoids unnecessary movement of unstable patients. Tau et al. has also demonstrated similar results [12].
It is helpful to instruct the patient to reach for his/her toes relaxing their shoulders back on the bed to bring the clavicle into a horizontal position and establish the normal curve of the subclavian vein as it arches from the arm into the thoracic inlet. If the shoulders are in a shrugged position, the vein is at a variable distance below the lower edge of the clavicle and may take a tortuous course [13,14]. It is helpful to have an assistant gently pull the arm down toward the foot as the needle is passed under the clavicle to ensure optimal positioning.
Once the vein is cannulated, it has been proposed that positioning of the head is important when passing the catheter into the superior vena cava. Some have claimed that if the head is turned away from the cannulation site, there is a lower incidence of malposition of the catheter up into the internal jugular vein. Others have suggested turning the head toward the cannulation site. In reality, there is no significant change in the angle between the internal jugular vein and subclavian vein with turning of the head in either direction [13,14]. It is best to place the patient’s head in the most comfortable position, usually slightly away from the side of puncture so the sterile drapes only partially cover the face.
Site selection and technique for subclavian catheter
Site Selection: Either the right or left subclavian vein may be used. A preexisting catheter in the external or internal jugular vein on the same side of planned subclavian cannulation may increase the difficulty of passing the guidewire from the subclavian vein into the superior vena cava as the guidewire may hang up on the jugular catheter. Rarely the needle can cut the indwelling catheter with embolization of the tip. If the patient has a chest tube in place, that same side should be selected for cannulation if another central venous catheter is not
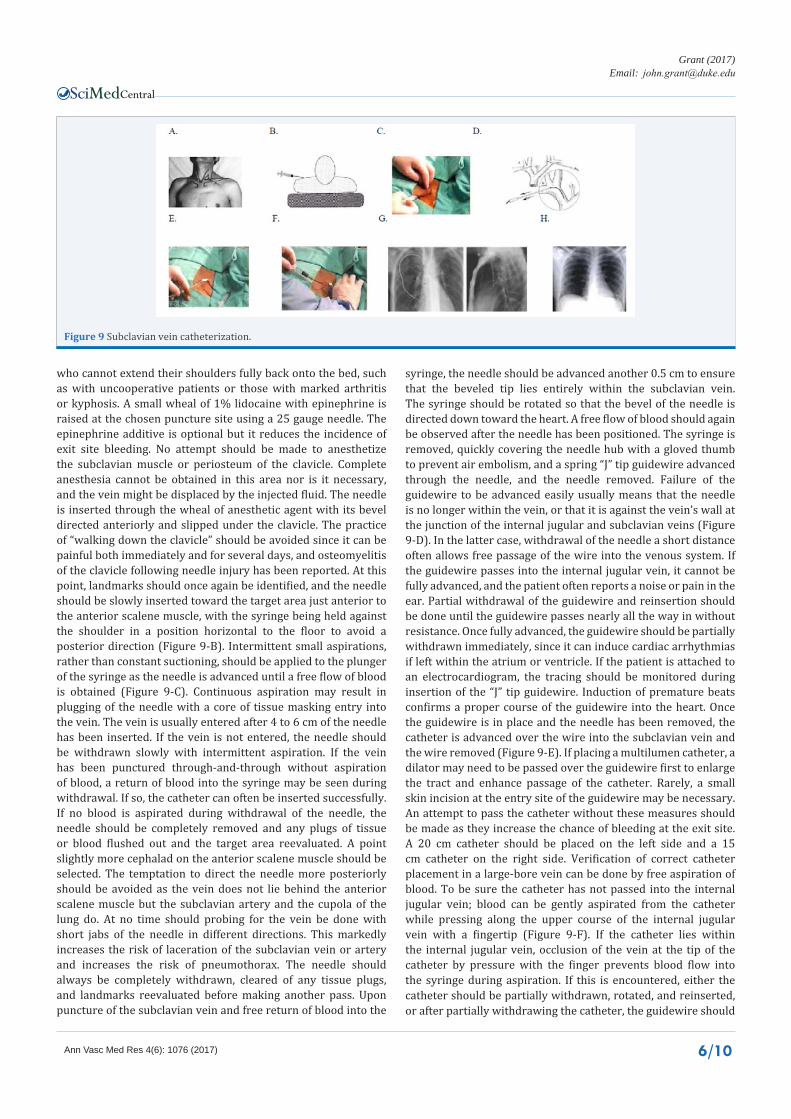
present. If none of the above pertains, the left subclavian vein is preferred, since it has a straighter course and is associated with fewer instances of improper location of the catheter tip in veins other than the superior vena cava. After the skin is prepared, the anatomic landmarks are identified. The lateral edge of the clavicular head of the sternocleidomastoid muscle as it inserts on the clavicle can usually be easily seen. If obscure, it can be emphasized by having the patient raise his/her head off the bed or attempt to turn the head toward the puncture site against resistance. It is usually about 4 cm lateral to the sternal notch. The anterior scalene muscle lies just under the clavicular head of the sternocleidomastoid muscle. It represents most of the muscle mass palpable in this region, as the clavicular head of the sternocleidomastoid muscle is relatively thin. The anterior scalene muscle passes under the clavicle and inserts on a tubercle on the first rib. By passing a finger behind the clavicle along the anterior scalene muscle on a thin patient, the subclavian artery can sometimes be palpated posteriorly. The target for subclavian vein catheterization is thus identified as a 2 x 2 cm “postage stamp” area bounded inferiorly by the first rib as marked by the lower edge of the clavicle, posteriorly by the anterior scalene muscle as it inserts on the tubercle of the first rib, anteriorly by the clavicle, and superiorly by the upper edge of the clavicle (Figure 9-A). The location of the subclavian vein in this area is quite constant. It can, however, be displaced cephalad with hyperinflation of the lung. The target area contains no artery, nerve, or lung. Advancement of the needle more medially can result in puncture of the lung, more posteriorly in puncture of the subclavian artery or lung, and more superiorly and posteriorly in injury to the subclavian artery, brachial plexus, or thoracic duct.
Insertion technique: With the target area identified, the site for skin puncture is selected. The site should provide a slightly cephalad trajectory of the needle toward the target area. A 2 1/2-inch 18 gauge needle is attached to a 10 ml syringe and tested to be sure no air leaks are present by occluding the tip of the needle with a gloved finger while applying suction to the syringe. If any leak is detected, the needle is readjusted or discarded. This procedure must be done so that no question arises during insertion of the needle as to whether the lung has been punctured if air is drawn into the syringe. The barrel of the syringe is placed in the deltopectoral groove with the tip of the needle over the center of the 2 x 2 cm target zone. The needle and syringe are then drawn away laterally until the tip of the needle is approximately 2 cm away from the inferior edge of the clavicle. Keeping the barrel of the syringe in the deltopectoral groove is of great help in avoiding passage of the needle too posteriorly in those patients
Figure 8 Patient positioning error.
Central
Grant (2017)Email:
Ann Vasc Med Res 4(6): 1076 (2017) 6/10
Figure 9 Subclavian vein catheterization.
who cannot extend their shoulders fully back onto the bed, such as with uncooperative patients or those with marked arthritis or kyphosis. A small wheal of 1% lidocaine with epinephrine is raised at the chosen puncture site using a 25 gauge needle. The epinephrine additive is optional but it reduces the incidence of exit site bleeding. No attempt should be made to anesthetize the subclavian muscle or periosteum of the clavicle. Complete anesthesia cannot be obtained in this area nor is it necessary, and the vein might be displaced by the injected fluid. The needle is inserted through the wheal of anesthetic agent with its bevel directed anteriorly and slipped under the clavicle. The practice of “walking down the clavicle” should be avoided since it can be painful both immediately and for several days, and osteomyelitis of the clavicle following needle injury has been reported. At this point, landmarks should once again be identified, and the needle should be slowly inserted toward the target area just anterior to the anterior scalene muscle, with the syringe being held against the shoulder in a position horizontal to the floor to avoid a posterior direction (Figure 9-B). Intermittent small aspirations, rather than constant suctioning, should be applied to the plunger of the syringe as the needle is advanced until a free flow of blood is obtained (Figure 9-C). Continuous aspiration may result in plugging of the needle with a core of tissue masking entry into the vein. The vein is usually entered after 4 to 6 cm of the needle has been inserted. If the vein is not entered, the needle should be withdrawn slowly with intermittent aspiration. If the vein has been punctured through-and-through without aspiration of blood, a return of blood into the syringe may be seen during withdrawal. If so, the catheter can often be inserted successfully. If no blood is aspirated during withdrawal of the needle, the needle should be completely removed and any plugs of tissue or blood flushed out and the target area reevaluated. A point slightly more cephalad on the anterior scalene muscle should be selected. The temptation to direct the needle more posteriorly should be avoided as the vein does not lie behind the anterior scalene muscle but the subclavian artery and the cupola of the lung do. At no time should probing for the vein be done with short jabs of the needle in different directions. This markedly increases the risk of laceration of the subclavian vein or artery and increases the risk of pneumothorax. The needle should always be completely withdrawn, cleared of any tissue plugs, and landmarks reevaluated before making another pass. Upon puncture of the subclavian vein and free return of blood into the
syringe, the needle should be advanced another 0.5 cm to ensure that the beveled tip lies entirely within the subclavian vein. The syringe should be rotated so that the bevel of the needle is directed down toward the heart. A free flow of blood should again be observed after the needle has been positioned. The syringe is removed, quickly covering the needle hub with a gloved thumb to prevent air embolism, and a spring “J” tip guidewire advanced through the needle, and the needle removed. Failure of the guidewire to be advanced easily usually means that the needle is no longer within the vein, or that it is against the vein’s wall at the junction of the internal jugular and subclavian veins (Figure 9-D). In the latter case, withdrawal of the needle a short distance often allows free passage of the wire into the venous system. If the guidewire passes into the internal jugular vein, it cannot be fully advanced, and the patient often reports a noise or pain in the ear. Partial withdrawal of the guidewire and reinsertion should be done until the guidewire passes nearly all the way in without resistance. Once fully advanced, the guidewire should be partially withdrawn immediately, since it can induce cardiac arrhythmias if left within the atrium or ventricle. If the patient is attached to an electrocardiogram, the tracing should be monitored during insertion of the “J” tip guidewire. Induction of premature beats confirms a proper course of the guidewire into the heart. Once the guidewire is in place and the needle has been removed, the catheter is advanced over the wire into the subclavian vein and the wire removed (Figure 9-E). If placing a multilumen catheter, a dilator may need to be passed over the guidewire first to enlarge the tract and enhance passage of the catheter. Rarely, a small skin incision at the entry site of the guidewire may be necessary. An attempt to pass the catheter without these measures should be made as they increase the chance of bleeding at the exit site. A 20 cm catheter should be placed on the left side and a 15 cm catheter on the right side. Verification of correct catheter placement in a large-bore vein can be done by free aspiration of blood. To be sure the catheter has not passed into the internal jugular vein; blood can be gently aspirated from the catheter while pressing along the upper course of the internal jugular vein with a fingertip (Figure 9-F). If the catheter lies within the internal jugular vein, occlusion of the vein at the tip of the catheter by pressure with the finger prevents blood flow into the syringe during aspiration. If this is encountered, either the catheter should be partially withdrawn, rotated, and reinserted, or after partially withdrawing the catheter, the guidewire should
Central
Grant (2017)Email:
Ann Vasc Med Res 4(6): 1076 (2017) 7/10
be passed through it and manipulated until it lies in the superior vena cava and then the catheter advanced back in, removing the guidewire. Experience from thousands of subclavian vein catheterizations has demonstrated that approximately 10% of the time the catheter will pass into the internal jugular vein. Some testing of the guidewire and catheter position, therefore, is indicated prior to taking a chest x-ray to avoid unnecessary cost and radiation exposure. When it has been determined that the catheter is properly positioned, a sterile luer lock cap is applied, any air aspirated from the hub, and the catheter flushed with heparinized saline (100 u/ml). Sterile towels are removed, and a sterile gauze or semi permeable transparent dressing is applied.
No suture is necessary to secure the catheter in place. If the dressing is applied correctly, the catheter will not fall out accidentally and when cared for by experienced individuals, the catheter will not be inadvertently removed during dressing changes. If the patient is confused or wants to remove the catheter, no suture will successfully hold it in place. The suture, as a foreign body, serves as a nidus for infection at the catheter exit site. Finally, owing to its erosion through the skin, the suture must frequently be replaced, further exposing the catheter to possible contamination.
Figure 9-G shows chest x-rays of a correctly placed right sided subclavian catheter from both the AP and lateral view and Figure 9-H shows one placed on the left side. Reports of perforation of the right ventricle and right atrium, location of the catheter in aberrant venous channels, and atrial arrhythmias due to improper positioning of the catheter reinforce the need for a post-insertion chest x-ray. After confirmation of location, infusion of other fluids and medications may begin.
Special considerations in placing a subclavian catheter
Clotting abnormalities: Prior to placement of a subclavian vein catheter in patients with clotting abnormalities or platelet counts below 40,000/mm3, an attempt should be made to correct the problem with fresh frozen plasma, platelets, or specific clotting factors. If heparin is being administered, it should be interrupted for 2 to 4 hours and the partial thromboplastin time allowed returning to near normal prior to cannulation. Following uncomplicated placement of the catheter, anticoagulant therapy can be resumed immediately. If an arterial puncture occurs, resumption of anticoagulant therapy should be delayed for 6 to 8 hours.
High pressure ventilatory support: In patients receiving high pressure ventilatory support, or with marked emphysema, the cannulation needle should be advanced during the end of expiration to minimize risks of pneumothorax. The initial needle passage should be slightly more cephalic than usual to avoid the hyperinflated lung.
Anasarca: In the presence of anasarca, the landmarks about the clavicle may be difficult to identify. Usually gentle pressure will displace the edema and palpation of the clavicle will be possible. Insertion of a subclavian catheter carries only slightly increased risk owing to the limited ability to identify the target area accurately. No increase in catheter-related infection
has been seen in patients with anasarca. Maintaining a sterile occlusive dressing with a persistent serous leak from the catheter site may, however, be difficult. A purse string suture in the skin about the catheter exit site may occasionally be required for control. Frequent dressing changes using multiple gauze sponges may also be necessary.
Subcutaneous emphysema: As with anasarca, marked subcutaneous emphysema can obscure landmarks. Catheterization, however, can proceed as above. The presence of subcutaneous emphysema has not been associated with an increase in catheter-related sepsis.
Altered anatomy: Surgical procedures or injury near the subclavian vein area renders catheterization of the vein more difficult. Unless no other choice is available, one should avoid attempting to gain access on the side where any of the following are present:
• A modified or radical mastectomy
• A pectoralis flap
• History of a fractured clavicle or shoulder
• Extensive radiation therapy with skin changes
• Supraclavicular mass as with primary or metastatic cancer
• A radical neck dissection
• An arterial graft such as an axillofemoral bypass or a carotid-subclavian bypass
• Arteriovenous fistula in the arm (the high flow state appears to lead to a higher incidence of subclavian vein stenosis and thrombosis).
Supraclavicular subclavian vein catheterization
The supraclavicular approach to the subclavian vein was first introduced by Yoffa in 1965 [15]. Although this technique was initially thought to be associated with less risk of insertion complications compared to the subclavicular approach, experience has not confirmed these impressions. This, along with the difficulty of maintaining a comfortable and sterile dressing at the catheter exit site above the clavicle, has limited the supraclavicular approach to only those patients in whom a subclavicular approach is not possible or safe.
Insertion Technique
Either side of the neck can be used for a supraclavicular approach. A right-handed physician will find the left side easier to cannulate, although threading of the catheter is easier on the right side as the course of the vein is straighter. Patient positioning and local anatomy are similar to the infraclavicular approach. The patient is placed supine in the bed. A slight Trendelenburg position should be used unless the patient’s condition contraindicates it, as the vein will distend with the increased venous pressure. Pertinent landmarks are identified, including the sternocleidomastoid-clavicular angle formed by the lateral portion of the sternocleidomastoid muscle as it inserts upon the clavicle, the anterior scalene muscle posterior
Central
Grant (2017)Email:
Ann Vasc Med Res 4(6): 1076 (2017) 8/10
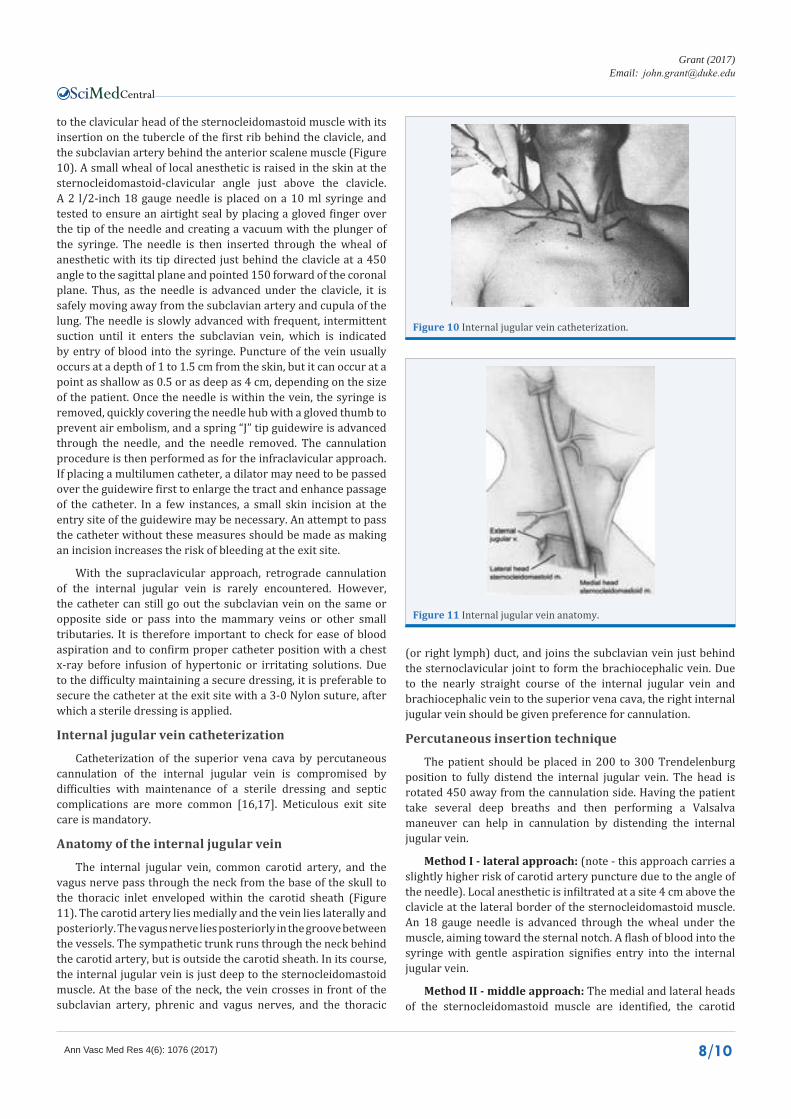
to the clavicular head of the sternocleidomastoid muscle with its insertion on the tubercle of the first rib behind the clavicle, and the subclavian artery behind the anterior scalene muscle (Figure 10). A small wheal of local anesthetic is raised in the skin at the sternocleidomastoid-clavicular angle just above the clavicle. A 2 l/2-inch 18 gauge needle is placed on a 10 ml syringe and tested to ensure an airtight seal by placing a gloved finger over the tip of the needle and creating a vacuum with the plunger of the syringe. The needle is then inserted through the wheal of anesthetic with its tip directed just behind the clavicle at a 450 angle to the sagittal plane and pointed 150 forward of the coronal plane. Thus, as the needle is advanced under the clavicle, it is safely moving away from the subclavian artery and cupula of the lung. The needle is slowly advanced with frequent, intermittent suction until it enters the subclavian vein, which is indicated by entry of blood into the syringe. Puncture of the vein usually occurs at a depth of 1 to 1.5 cm from the skin, but it can occur at a point as shallow as 0.5 or as deep as 4 cm, depending on the size of the patient. Once the needle is within the vein, the syringe is removed, quickly covering the needle hub with a gloved thumb to prevent air embolism, and a spring “J” tip guidewire is advanced through the needle, and the needle removed. The cannulation procedure is then performed as for the infraclavicular approach. If placing a multilumen catheter, a dilator may need to be passed over the guidewire first to enlarge the tract and enhance passage of the catheter. In a few instances, a small skin incision at the entry site of the guidewire may be necessary. An attempt to pass the catheter without these measures should be made as making an incision increases the risk of bleeding at the exit site.
With the supraclavicular approach, retrograde cannulation of the internal jugular vein is rarely encountered. However, the catheter can still go out the subclavian vein on the same or opposite side or pass into the mammary veins or other small tributaries. It is therefore important to check for ease of blood aspiration and to confirm proper catheter position with a chest x-ray before infusion of hypertonic or irritating solutions. Due to the difficulty maintaining a secure dressing, it is preferable to secure the catheter at the exit site with a 3-0 Nylon suture, after which a sterile dressing is applied.
Internal jugular vein catheterization
Catheterization of the superior vena cava by percutaneous cannulation of the internal jugular vein is compromised by difficulties with maintenance of a sterile dressing and septic complications are more common [16,17]. Meticulous exit site care is mandatory.
Anatomy of the internal jugular vein
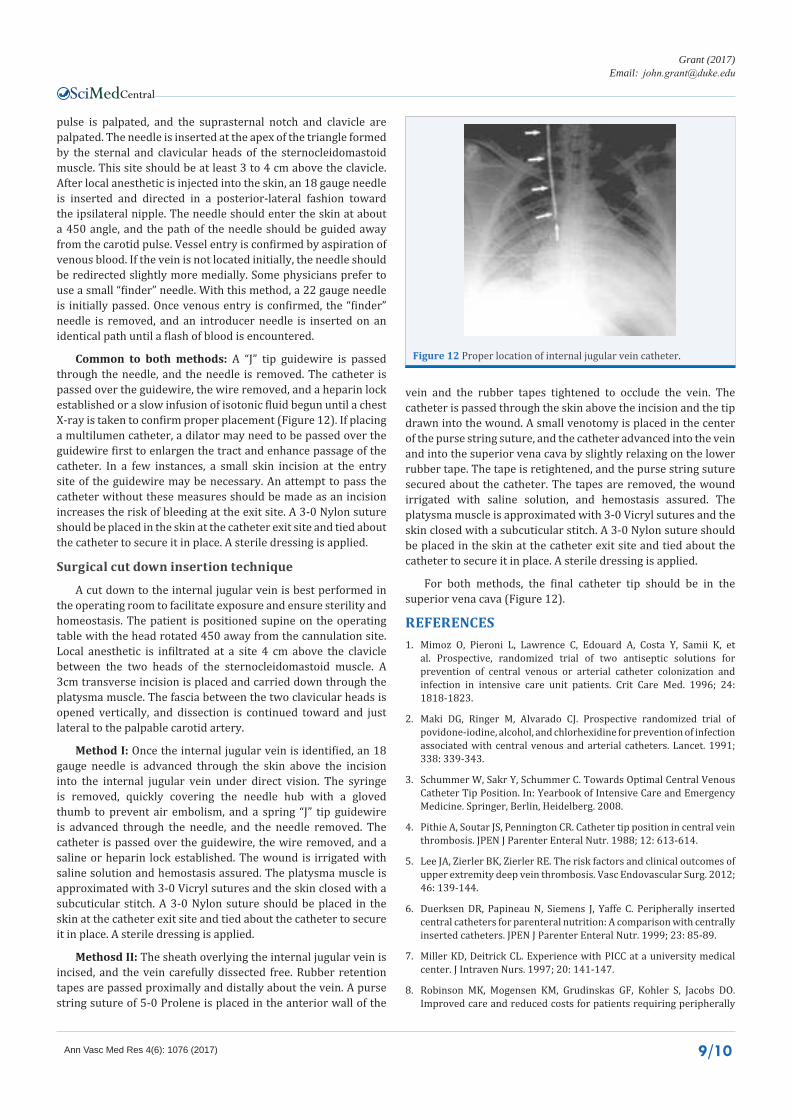
The internal jugular vein, common carotid artery, and the vagus nerve pass through the neck from the base of the skull to the thoracic inlet enveloped within the carotid sheath (Figure 11). The carotid artery lies medially and the vein lies laterally and posteriorly. The vagus nerve lies posteriorly in the groove between the vessels. The sympathetic trunk runs through the neck behind the carotid artery, but is outside the carotid sheath. In its course, the internal jugular vein is just deep to the sternocleidomastoid muscle. At the base of the neck, the vein crosses in front of the subclavian artery, phrenic and vagus nerves, and the thoracic
(or right lymph) duct, and joins the subclavian vein just behind the sternoclavicular joint to form the brachiocephalic vein. Due to the nearly straight course of the internal jugular vein and brachiocephalic vein to the superior vena cava, the right internal jugular vein should be given preference for cannulation.
Percutaneous insertion technique
The patient should be placed in 200 to 300 Trendelenburg position to fully distend the internal jugular vein. The head is rotated 450 away from the cannulation side. Having the patient take several deep breaths and then performing a Valsalva maneuver can help in cannulation by distending the internal jugular vein.
Method I - lateral approach: (note - this approach carries a slightly higher risk of carotid artery puncture due to the angle of the needle). Local anesthetic is infiltrated at a site 4 cm above the clavicle at the lateral border of the sternocleidomastoid muscle. An 18 gauge needle is advanced through the wheal under the muscle, aiming toward the sternal notch. A flash of blood into the syringe with gentle aspiration signifies entry into the internal jugular vein.
Method II - middle approach: The medial and lateral heads of the sternocleidomastoid muscle are identified, the carotid
Figure 10 Internal jugular vein catheterization.
Figure 11 Internal jugular vein anatomy.
Central
Grant (2017)Email:
Ann Vasc Med Res 4(6): 1076 (2017) 9/10
pulse is palpated, and the suprasternal notch and clavicle are palpated. The needle is inserted at the apex of the triangle formed by the sternal and clavicular heads of the sternocleidomastoid muscle. This site should be at least 3 to 4 cm above the clavicle. After local anesthetic is injected into the skin, an 18 gauge needle is inserted and directed in a posterior-lateral fashion toward the ipsilateral nipple. The needle should enter the skin at about a 450 angle, and the path of the needle should be guided away from the carotid pulse. Vessel entry is confirmed by aspiration of venous blood. If the vein is not located initially, the needle should be redirected slightly more medially. Some physicians prefer to use a small “finder” needle. With this method, a 22 gauge needle is initially passed. Once venous entry is confirmed, the “finder” needle is removed, and an introducer needle is inserted on an identical path until a flash of blood is encountered.
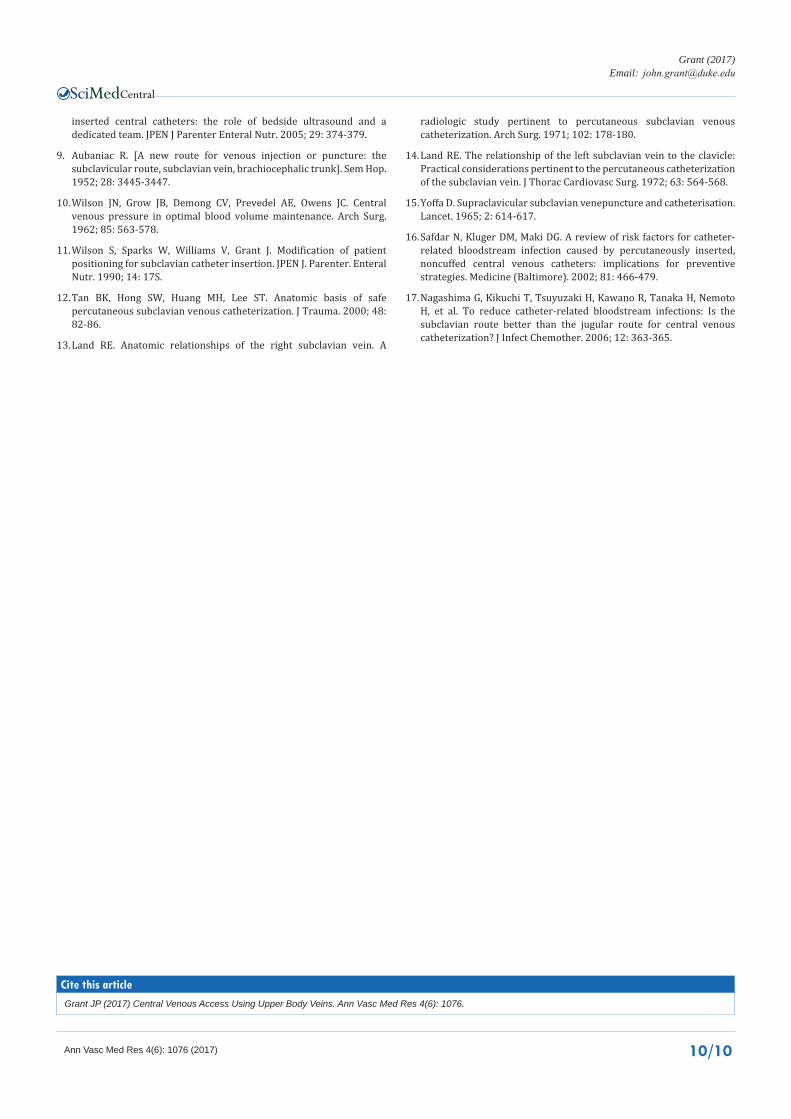
Common to both methods: A “J” tip guidewire is passed through the needle, and the needle is removed. The catheter is passed over the guidewire, the wire removed, and a heparin lock established or a slow infusion of isotonic fluid begun until a chest X-ray is taken to confirm proper placement (Figure 12). If placing a multilumen catheter, a dilator may need to be passed over the guidewire first to enlargen the tract and enhance passage of the catheter. In a few instances, a small skin incision at the entry site of the guidewire may be necessary. An attempt to pass the catheter without these measures should be made as an incision increases the risk of bleeding at the exit site. A 3-0 Nylon suture should be placed in the skin at the catheter exit site and tied about the catheter to secure it in place. A sterile dressing is applied.
Surgical cut down insertion technique
A cut down to the internal jugular vein is best performed in the operating room to facilitate exposure and ensure sterility and homeostasis. The patient is positioned supine on the operating table with the head rotated 450 away from the cannulation site. Local anesthetic is infiltrated at a site 4 cm above the clavicle between the two heads of the sternocleidomastoid muscle. A 3cm transverse incision is placed and carried down through the platysma muscle. The fascia between the two clavicular heads is opened vertically, and dissection is continued toward and just lateral to the palpable carotid artery.
Method I: Once the internal jugular vein is identified, an 18 gauge needle is advanced through the skin above the incision into the internal jugular vein under direct vision. The syringe is removed, quickly covering the needle hub with a gloved thumb to prevent air embolism, and a spring “J” tip guidewire is advanced through the needle, and the needle removed. The catheter is passed over the guidewire, the wire removed, and a saline or heparin lock established. The wound is irrigated with saline solution and hemostasis assured. The platysma muscle is approximated with 3-0 Vicryl sutures and the skin closed with a subcuticular stitch. A 3-0 Nylon suture should be placed in the skin at the catheter exit site and tied about the catheter to secure it in place. A sterile dressing is applied.
Methosd II: The sheath overlying the internal jugular vein is incised, and the vein carefully dissected free. Rubber retention tapes are passed proximally and distally about the vein. A purse string suture of 5-0 Prolene is placed in the anterior wall of the
vein and the rubber tapes tightened to occlude the vein. The catheter is passed through the skin above the incision and the tip drawn into the wound. A small venotomy is placed in the center of the purse string suture, and the catheter advanced into the vein and into the superior vena cava by slightly relaxing on the lower rubber tape. The tape is retightened, and the purse string suture secured about the catheter. The tapes are removed, the wound irrigated with saline solution, and hemostasis assured. The platysma muscle is approximated with 3-0 Vicryl sutures and the skin closed with a subcuticular stitch. A 3-0 Nylon suture should be placed in the skin at the catheter exit site and tied about the catheter to secure it in place. A sterile dressing is applied.
For both methods, the final catheter tip should be in the superior vena cava (Figure 12).
REFERENCES1. Mimoz O, Pieroni L, Lawrence C, Edouard A, Costa Y, Samii K, et
al. Prospective, randomized trial of two antiseptic solutions for prevention of central venous or arterial catheter colonization and infection in intensive care unit patients. Crit Care Med. 1996; 24: 1818-1823.
2. Maki DG, Ringer M, Alvarado CJ. Prospective randomized trial of povidone-iodine, alcohol, and chlorhexidine for prevention of infection associated with central venous and arterial catheters. Lancet. 1991; 338: 339-343.
3. Schummer W, Sakr Y, Schummer C. Towards Optimal Central Venous Catheter Tip Position. In: Yearbook of Intensive Care and Emergency Medicine. Springer, Berlin, Heidelberg. 2008.
4. Pithie A, Soutar JS, Pennington CR. Catheter tip position in central vein thrombosis. JPEN J Parenter Enteral Nutr. 1988; 12: 613-614.
5. Lee JA, Zierler BK, Zierler RE. The risk factors and clinical outcomes of upper extremity deep vein thrombosis. Vasc Endovascular Surg. 2012; 46: 139-144.
6. Duerksen DR, Papineau N, Siemens J, Yaffe C. Peripherally inserted central catheters for parenteral nutrition: A comparison with centrally inserted catheters. JPEN J Parenter Enteral Nutr. 1999; 23: 85-89.
7. Miller KD, Deitrick CL. Experience with PICC at a university medical center. J Intraven Nurs. 1997; 20: 141-147.
8. Robinson MK, Mogensen KM, Grudinskas GF, Kohler S, Jacobs DO. Improved care and reduced costs for patients requiring peripherally
Figure 12 Proper location of internal jugular vein catheter.
Central
Grant (2017)Email:
Ann Vasc Med Res 4(6): 1076 (2017) 10/10
Grant JP (2017) Central Venous Access Using Upper Body Veins. Ann Vasc Med Res 4(6): 1076.
Cite this article
inserted central catheters: the role of bedside ultrasound and a dedicated team. JPEN J Parenter Enteral Nutr. 2005; 29: 374-379.
9. Aubaniac R. [A new route for venous injection or puncture: the subclavicular route, subclavian vein, brachiocephalic trunk]. Sem Hop. 1952; 28: 3445-3447.
10. Wilson JN, Grow JB, Demong CV, Prevedel AE, Owens JC. Central venous pressure in optimal blood volume maintenance. Arch Surg. 1962; 85: 563-578.
11. Wilson S, Sparks W, Williams V, Grant J. Modification of patient positioning for subclavian catheter insertion. JPEN J. Parenter. Enteral Nutr. 1990; 14: 17S.
12. Tan BK, Hong SW, Huang MH, Lee ST. Anatomic basis of safe percutaneous subclavian venous catheterization. J Trauma. 2000; 48: 82-86.
13. Land RE. Anatomic relationships of the right subclavian vein. A
radiologic study pertinent to percutaneous subclavian venous catheterization. Arch Surg. 1971; 102: 178-180.
14. Land RE. The relationship of the left subclavian vein to the clavicle: Practical considerations pertinent to the percutaneous catheterization of the subclavian vein. J Thorac Cardiovasc Surg. 1972; 63: 564-568.
15. Yoffa D. Supraclavicular subclavian venepuncture and catheterisation. Lancet. 1965; 2: 614-617.
16. Safdar N, Kluger DM, Maki DG. A review of risk factors for catheter-related bloodstream infection caused by percutaneously inserted, noncuffed central venous catheters: implications for preventive strategies. Medicine (Baltimore). 2002; 81: 466-479.
17. Nagashima G, Kikuchi T, Tsuyuzaki H, Kawano R, Tanaka H, Nemoto H, et al. To reduce catheter-related bloodstream infections: Is the subclavian route better than the jugular route for central venous catheterization? J Infect Chemother. 2006; 12: 363-365.