Embed Size (px)
Citation preview

Mitsubishi Electric Building Air-conditioner Control System
Central Controller
G-50A/GB-50A Web Browser Operation Manual (For User)
Contents 1 Introduction............................................................................1
1-1 Conventions Used in this Manual..............................................1 1-2 Computer Requirements ...........................................................1
2 Setting the Operating Environment ........................................2 2-1 Setting the PC IP Address.........................................................2 2-2 Setting the Web Browser...........................................................4
3 Performing Operations...........................................................6 3-1 Entering the User Name and the Password, and Connecting to
the G-50A ...................................................................................6 3-2 Checking the Operation Condition of the Air Conditioner .........7 3-3 Performing Air Conditioner Operations .....................................9
Before using the web browser to monitor and operate the G-50A controller, please read this operation manual carefully to ensure correct operation. Store this operation manual in a location that is easy to find.

1
1 Introduction A special feature of Mitsubishi Electric Corporation’s “Central Controller G-50A” and "Central Controller GB-50A" are that a PC connected to a LAN can be used to monitor the operation condition of air conditioners and perform air conditioner operations. In this manual, the procedures to monitor the status of and to operate the central controller G-50A and GB-50A on the Web browser are described. Hereinafter, the central controller G-50A and GB-50A, unless otherwise specified, will be called "G-50A".
Note: License of "Personal Web" is necessary to operate or monitor the air conditioners. Register the license on the registration screen.
1-1 Conventions Used in this Manual - “Click” refers to the action of positioning the mouse cursor on the object (such as button or folder) and
pressing down and releasing the left mouse button once. - Unless otherwise specified, the example screen images used in this manual are Windows® XP and Internet
Explorer 6.0 screen images. Note: Windows is a registered trademark or trademark of Microsoft Corporation USA in the United States and other countries.
- The K transmission converter (PAC-SC25KAA) and OA processing unit (LOSSNAY) are not included in systems shipped to North America (USA & Canada).
1-2 Computer Requirements In order to monitor and operate air conditioners by web browser, your computer must meet the following requirements.
Table 1-1 Computer Requirements
Item Requirement
CPU Pentium 133MHz or faster (300MHz or faster recommended) Memory 64M Bytes or more (128M Bytes or more recommended) Screen resolution 1024 x 768 or higher recommended
Windows
Microsoft® Internet Explorer 5.0 or later Note: You must have a Java execution environment.
(Microsoft VM Ver5.0 or later or Sun Microsystems Java Plug-in Ver.1.4.2 or later).
Note: You can check the Microsoft VM version by entering “jview” in a command prompt.
Note: You can check the Sun Microsystems Java Plug-in version in “Java Plug-in” in a control panel. Compatible browser
Macintosh
Safari (with Mac OS X) Note: You must have a Java execution environment.
(Sun Microsystems Java Plug-in Ver.1.4.2 or later). You can download from Apple Computer's homepage.
Note: You can check the Sun Microsystems Java Plug-in version at the [Help]-[Installed Plug-ins] on the Safari browser.
On-board LAN port or LAN card One connector (10BASE-T) Other Pointing device such as a mouse
Note: Microsoft is a registered trademark or trademark of Microsoft Corporation USA in the United States and other countries.
2
2 Setting the Operating Environment Given below is an explanation of the PC settings and web browser settings that are required for using a web browser to monitor air conditioner units and perform operations.
2-1 Setting the PC IP Address You need to set an IP address on the PC that will enable you to connect to the G-50A using a web browser. For instance, if the G-50A IP address is [192.168.1.1], the PC IP address will need to belong to the same system (for example [192.168.1.101]). If the G-50A is connected to an existing LAN, ask the LAN administrator to decide what PC IP address to use.
Note: When using a G-50A dedicated LAN, we recommend the G-50A main unit be given an IP address within the range [192.168.1.1] — [192.168.1.40] and the PCs that will be connected to the G-50A be given an IP address within the range [192.168.1.101] — [192.168.1.150]
(1) Click on [Control Panel] under [Start] to open the Control Panel. (2) In the Control Panel window, double click [Network and Dial-up
Connections] and the Network and Dial-up Connections window will open. Double click on [Local Area Setting] and the [Local Area Connection Status] dialog will open. Click [Properties].
(3) In the [Local Area Connection Properties] dialog, click [Internet
Protocol] to select it and click the [Properties] button.
3
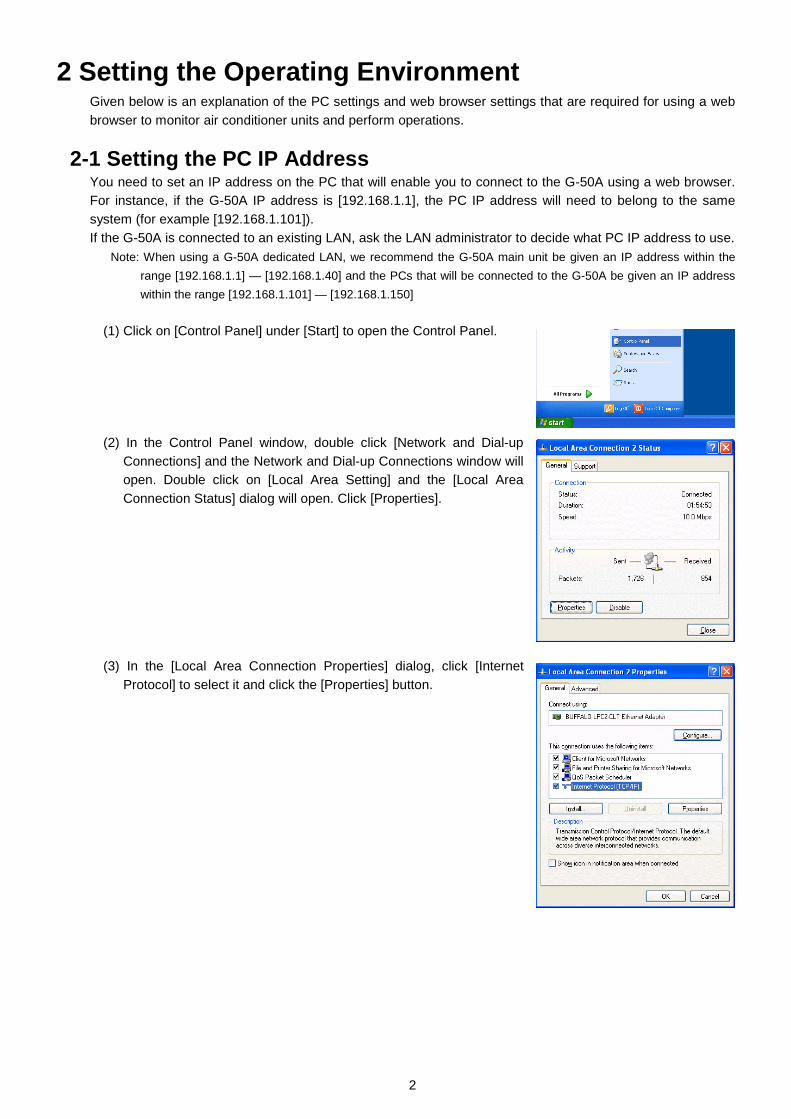
(4) In the [Internet Protocol (TCP/IP) Properties] dialog, click [Use the following IP address] and enter the IP address (for example, “192.168.1.101”) that you want to set in the IP address field. You normally set [255.255.255.0] as the subnet mask.
Note: Ask your LAN administrator to provide the IP addresses and subnet mask.
(5) Click the [OK] button to close this dialog, and then close the other
open dialogs to complete the network setting.
4
2-2 Setting the Web Browser Perform the necessary web browser settings to enable the web browser to connect to the G-50A.
Note: The settings and screen images used as examples in this manual are based on Internet Explorer 6.0.
2-2-1 Not connecting to the Internet If the PC you use for monitoring air conditioners and performing operations is not going to be connected to the Internet, use the procedure given below to set the web browser environment settings.
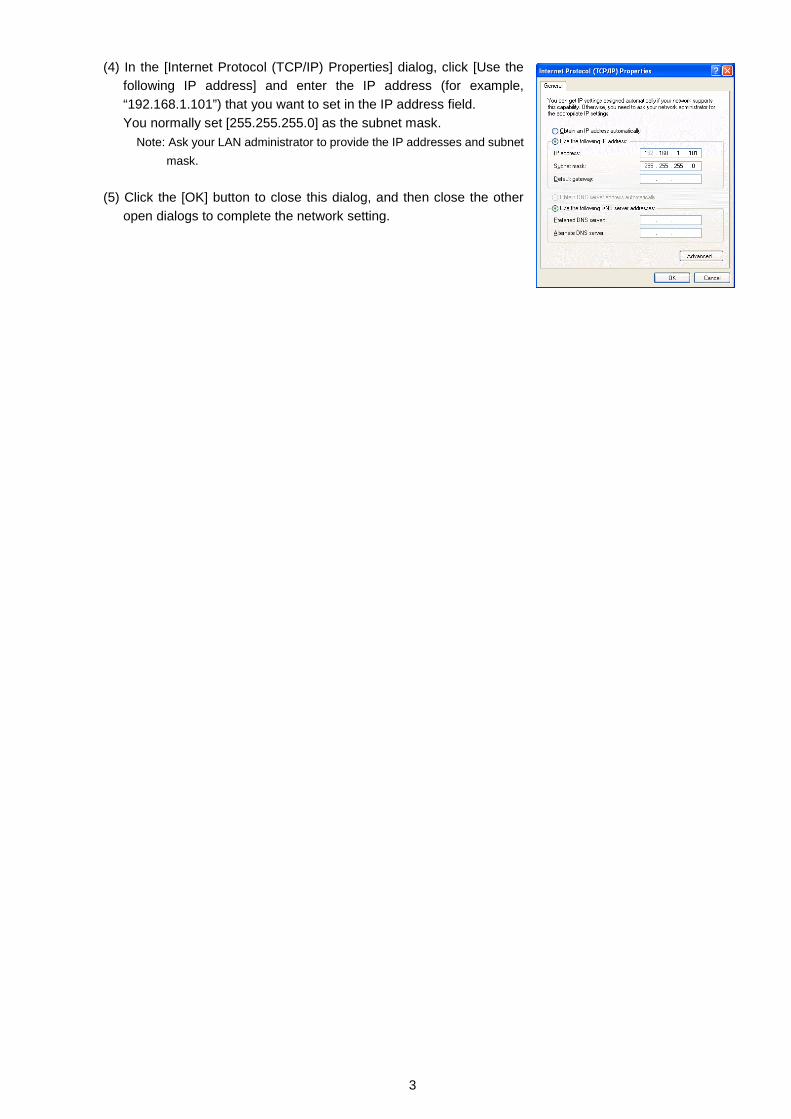
(1) Click the web browser menu item [Tools] and then click [Internet Options…] to select that option.
(2) In the [Internet Options] tabbed dialog, click the [Connections] tab to
display that page. (3) Select [Never dial a connection] in the Dial-up settings section and
click the [OK] button to close the dialog.
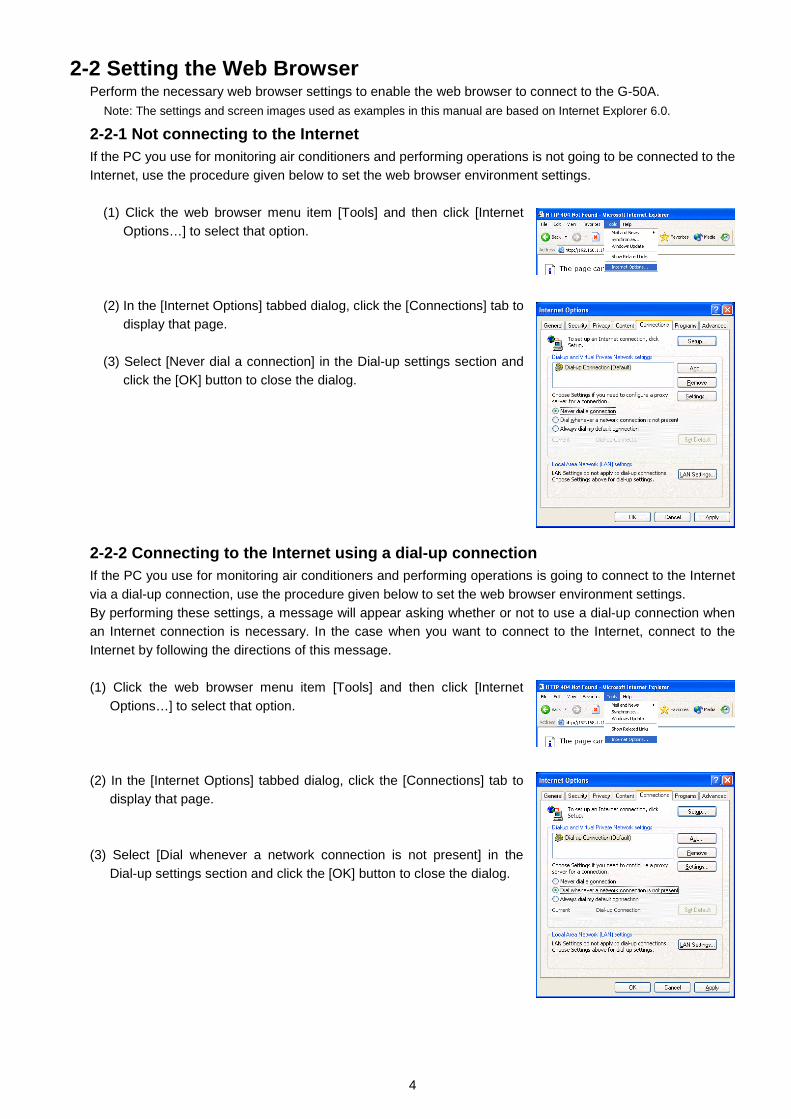
2-2-2 Connecting to the Internet using a dial-up connection If the PC you use for monitoring air conditioners and performing operations is going to connect to the Internet via a dial-up connection, use the procedure given below to set the web browser environment settings. By performing these settings, a message will appear asking whether or not to use a dial-up connection when an Internet connection is necessary. In the case when you want to connect to the Internet, connect to the Internet by following the directions of this message. (1) Click the web browser menu item [Tools] and then click [Internet
Options…] to select that option. (2) In the [Internet Options] tabbed dialog, click the [Connections] tab to
display that page. (3) Select [Dial whenever a network connection is not present] in the
Dial-up settings section and click the [OK] button to close the dialog.
5
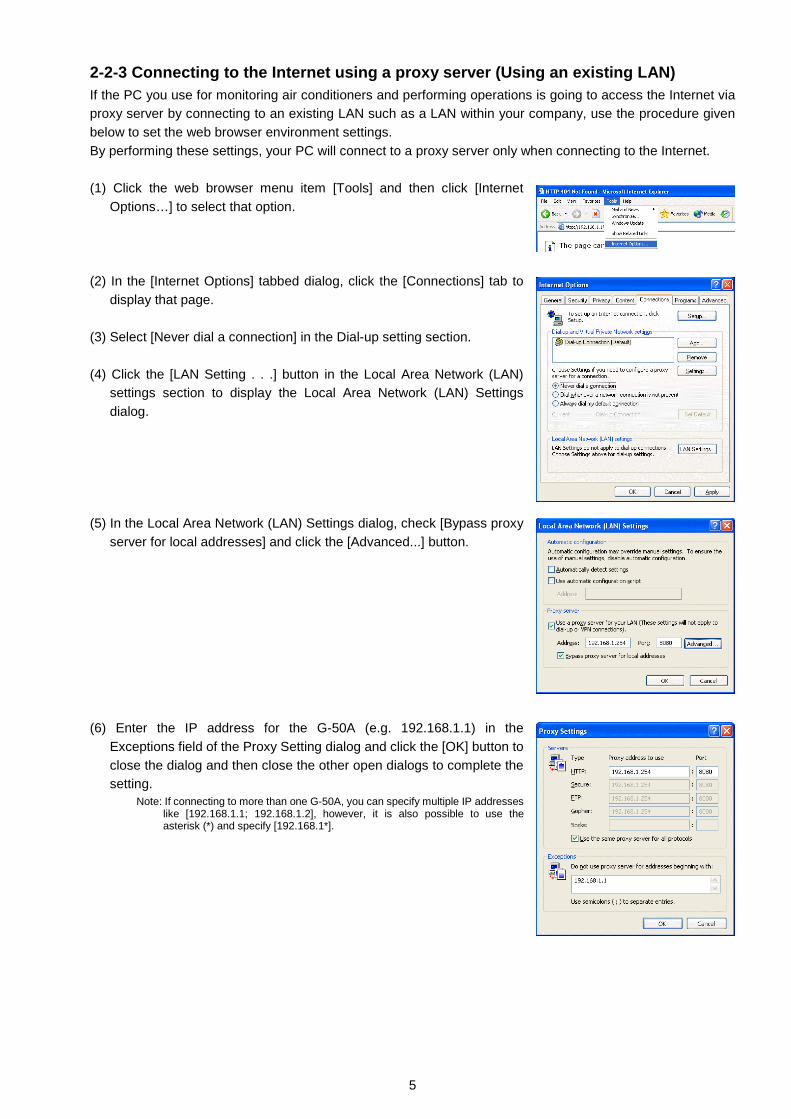
2-2-3 Connecting to the Internet using a proxy server (Using an existing LAN) If the PC you use for monitoring air conditioners and performing operations is going to access the Internet via proxy server by connecting to an existing LAN such as a LAN within your company, use the procedure given below to set the web browser environment settings. By performing these settings, your PC will connect to a proxy server only when connecting to the Internet. (1) Click the web browser menu item [Tools] and then click [Internet
Options…] to select that option. (2) In the [Internet Options] tabbed dialog, click the [Connections] tab to
display that page. (3) Select [Never dial a connection] in the Dial-up setting section. (4) Click the [LAN Setting . . .] button in the Local Area Network (LAN)
settings section to display the Local Area Network (LAN) Settings dialog.
(5) In the Local Area Network (LAN) Settings dialog, check [Bypass proxy
server for local addresses] and click the [Advanced...] button. (6) Enter the IP address for the G-50A (e.g. 192.168.1.1) in the
Exceptions field of the Proxy Setting dialog and click the [OK] button to close the dialog and then close the other open dialogs to complete the setting.
Note: If connecting to more than one G-50A, you can specify multiple IP addresses like [192.168.1.1; 192.168.1.2], however, it is also possible to use the asterisk (*) and specify [192.168.1*].

6
3 Performing Operations Given below is an explanation of how to connect to the G-50A and how to monitor and adjust the operation condition of air conditioners. Follow the directions given here when performing operations.
Note: If the G-50A is restarted due to circumstances like a power interruption, wait until the screen on the G-50A main unit displays the normal operation screen (it takes several minutes before the normal operation screen is displayed) before using a web browser to access the G-50A. If access is attempted while the G-50A is still starting up, the most recent data might not be displayed or communication errors could occur.
Note: Default IP address of G-50A (GB-50A) is "192.168.1.1". (Factory setting)
3-1 Entering the User Name and the Password, and Connecting to the G-50A
(1) Enter the web page address in the address field of the web browser as follows and press the [Enter] key on the keyboard. A screen appears for login.
http://[IP address of the G-50A]/index.html Note: For example, type “http://192.168.1.1/administrator.html” if the G-50A IP
address is [192.168.1.1]. (2) To make it easier to connect the next time, click the web browser
menu item [Favorites] and click [Add to Favorites] to select that option and add the address to your Favorites folder. Once this address is added to your Favorites folder, it is not necessary to input the address of (1). You can simply select it from your Favorites folder and the G-50A page will appear.
(3) Enter the user name and the password in the login screen, and click the [Login] button. The screen for
monitoring the operation condition will appear. An explanation on how to perform operations in the normal operation screen begins from the next page.
Note: Consult your administrator for your user name and password. Note: The Web page is displayed in the same language as the computer uses and it is also possible to display the Web page in
other languages by entering the following Web page addresses. English : Http://[IP address of G-50]/en/index.html German : Http://[IP address of G-50]/de/index.html French : Http://[IP address of G-50]/fr/index.html Spanish : Http://[IP address of G-50]/es/index.html Italian : Http://[IP address of G-50]/it/index.html Russian : Http://[IP address of G-50]/ru/index.html Chinese : Http://[IP address of G-50]/zh/index.html Japanese : Http://[IP address of G-50]/ja/index.html
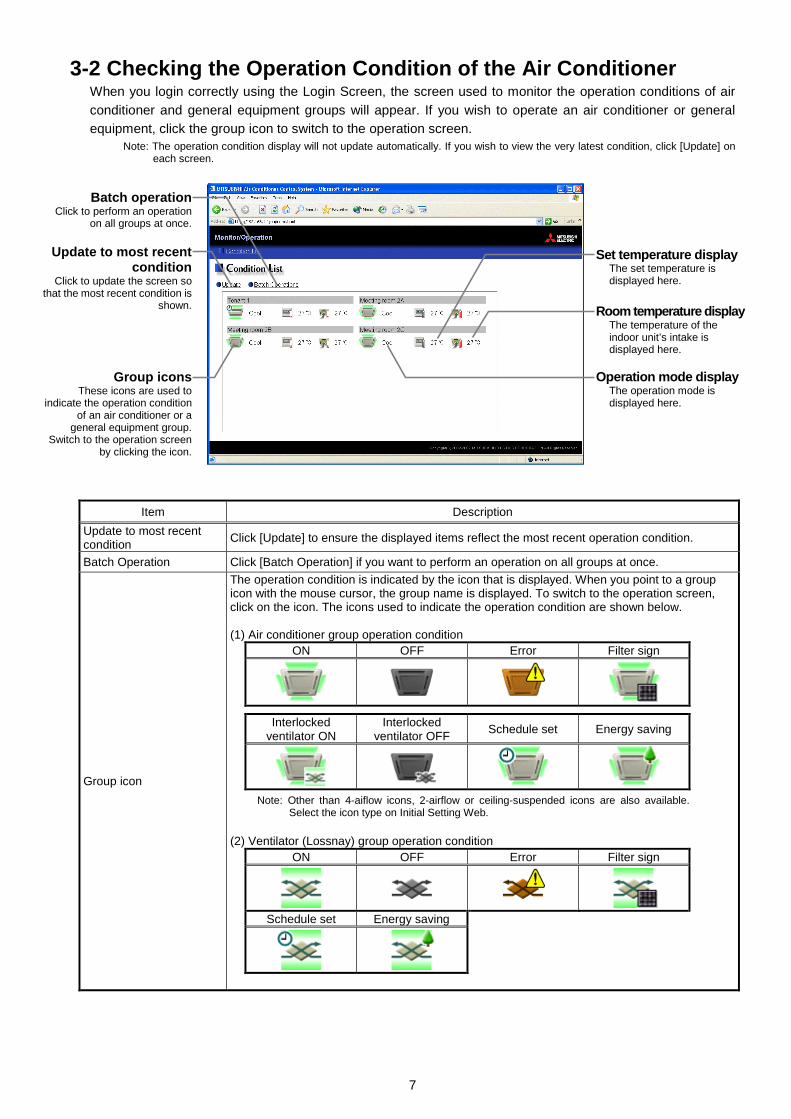
3-2 Checking the Operation Condition of the Air Conditioner When you login correctly using the Login Screen, the screen used to monitor the operation conditions of air conditioner and general equipment groups will appear. If you wish to operate an air conditioner or general equipment, click the group icon to switch to the operation screen.
Note: The operation condition display will not update automatically. If you wish to view the very latest condition, click [Update] on each screen.
Item Description
Update to most recent condition Click [Update] to ensure the displayed items reflect the most recent operation condition.
Batch Operation Click [Batch Operation] if you want to perform an operation on all groups at once.
Group icon
The operation condition is indicated by the icon that is displayed. When you point to a group icon with the mouse cursor, the group name is displayed. To switch to the operation screen, click on the icon. The icons used to indicate the operation condition are shown below. (1) Air conditioner group operation condition (2) Ventilator (Lossnay) group operation condition
ON OFF Error Filter sign
Interlocked ventilator ON
Interlocked ventilator OFF Schedule set Energy saving
Note: Other than 4-aiflow icons, 2-airflow or ceiling-suspended icons are also available.
Select the icon type on Initial Setting Web.
O
Sche
Batch operationClick to perform an operation
on all groups at once.
Update to most recent condition
Click to update the screen so that the most recent condition is
shown.
Group iconsThese icons are used to
indicate the operation condition of an air conditioner or a
general equipment group.Switch to the operation screen
by clicking the icon.
Set temperature displayThe set temperature is displayed here.
Room temperature displayThe temperature of the indoor unit’s intake is displayed here.
Operation mode displayThe operation mode is displayed here.
N OFF Error Filter sign
dule set Energy saving
7
8
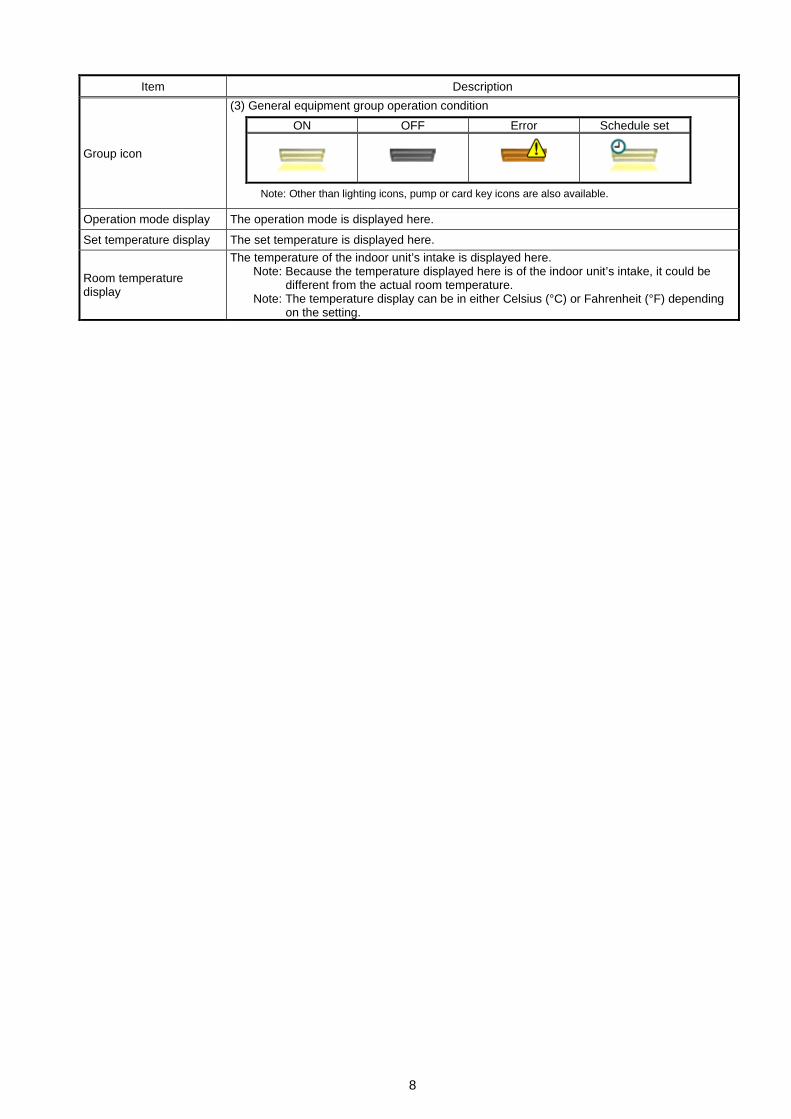
Item Description
Group icon
(3) General equipment group operation condition
Operation mode display The operation mode is displayed here.
Set temperature display The set temperature is displayed here.
Room temperature display
The temperature of the indoor unit’s intake is displayed here. Note: Because the temperature displayed here is of the indoor unit’s intake, it could be
different from the actual room temperature. Note: The temperature display can be in either Celsius (°C) or Fahrenheit (°F) depending
on the setting.
ON OFF Error Schedule set
Note: Other than lighting icons, pump or card key icons are also available.

9
3-3 Performing Air Conditioner Operations Given below is an explanation of how to perform air conditioner or general equipment operations.
3-3-1 Performing air conditioner operations that target one group When you click on a group icon in the operation condition monitoring screen, the operation screen for that group will appear. The items shown in this screen are the current operation conditions. Modify the items you want to change and click [OK] to confirm the operation details. Click [Cancel] to return to the previous screen without making any changes.
Item Description
ON/OFF Click [ON] or [OFF] to switch to ON or OFF.
Operation mode
Click [Cool], [Dry], [Fan], [Heat] or [Auto] to switch the operation mode. If it is a ventilator group, select [Bypass], [Heat Recovery] or [Auto].
Note: Some unit models do not support certain operation modes. Unsupported operation modes are not displayed.
Note: For K control models, all modes are displayed, however, choose only the modes that can be operated.
Set temperature
Click to adjust the set temperature. For [Cool] and [Dry], the setting range is 19 ~ 30°C/67 ~ 87°F, for [Heat] it is 17 ~ 28°C/63 ~ 83°F, and for [Auto] it is 19 ~ 28°C/67 ~ 83°F.
Note: The temperature setting range varies depending on the unit model. Note: If the setting range for set temperature is restricted, the temperature setting range will be smaller.Note: If it is a ventilator model, this item is not displayed.
Air direction
Click to adjust the air direction. Note: If it is a model that does not support air direction adjustment, this item is not displayed. Note: If it is a model that does not support the swing feature, the swing option is not displayed. Note: The temperature display can be set to display in either Celsius (°C) or Fahrenheit (°F).
Fan speed
Click to adjust the fan speed. Note: If it is a model that does not support fan speed adjustment, this item is not displayed. Note: The number of available fan speeds will be 2 settings, 3 settings or 4 settings, depending on the
number of fan speeds supported by the model.
Filter sign Click [Reset] to specify whether to reset the filter sign. It is set to reset when a green indicator is displayed on the left of Reset ([ Reset]).
Note: If filter signs are not triggered in the group, then this item is not displayed. Interlocked ventilator ON/OFF
Click [ON] or [OFF] to switch interlocked ventilator ON or OFF. Note: For groups that are not connected to an interlocked ventilator, the items related to interlocked
ventilators are not displayed.
Fan speed of interlocked ventilator
Click to adjust the fan speed of the interlocked ventilator. Note: For groups that are not connected to an interlocked ventilator, the items related to interlocked
ventilators are not displayed.
Operation Prohibition mark
When air conditioners are centrally controlled, the central control mark will be displayed, and if the prohibit setting has been set for any operations, the operation prohibition mark [ ] will be displayed next to those operation items. If the prohibit setting has been set for an item, it is not possible to operate that item.
Fan speed of interlocked ventilator
Click to adjust the fan speedof the interlocked ventilator.
Interlocked ventilator ON/OFF
Click to switch interlocked ventilator ON or OFF.
Group name The name of the group is displayed here.
Fan speed Click to adjust the fan speed.
OK button Click to confirm the operation details. You must press the OKbutton for the operation to takeeffect.
Central control mark This is displayed when the units are centrally controlled.
ON/OFFClick to switch to ON or OFF.
Set temperatureClick to adjust the set
temperature.
Operation modeClick to switch the operation
mode.
Air directionClick to adjust the air direction.
Filter signClick to reset the filter sign.
Cancel buttonClick to cancel all operations.
Block nameThe name of the block is
displayed here.
Operation prohibition mark
If the prohibit setting has been set for an operation, the prohibition mark will be
displayed.
10
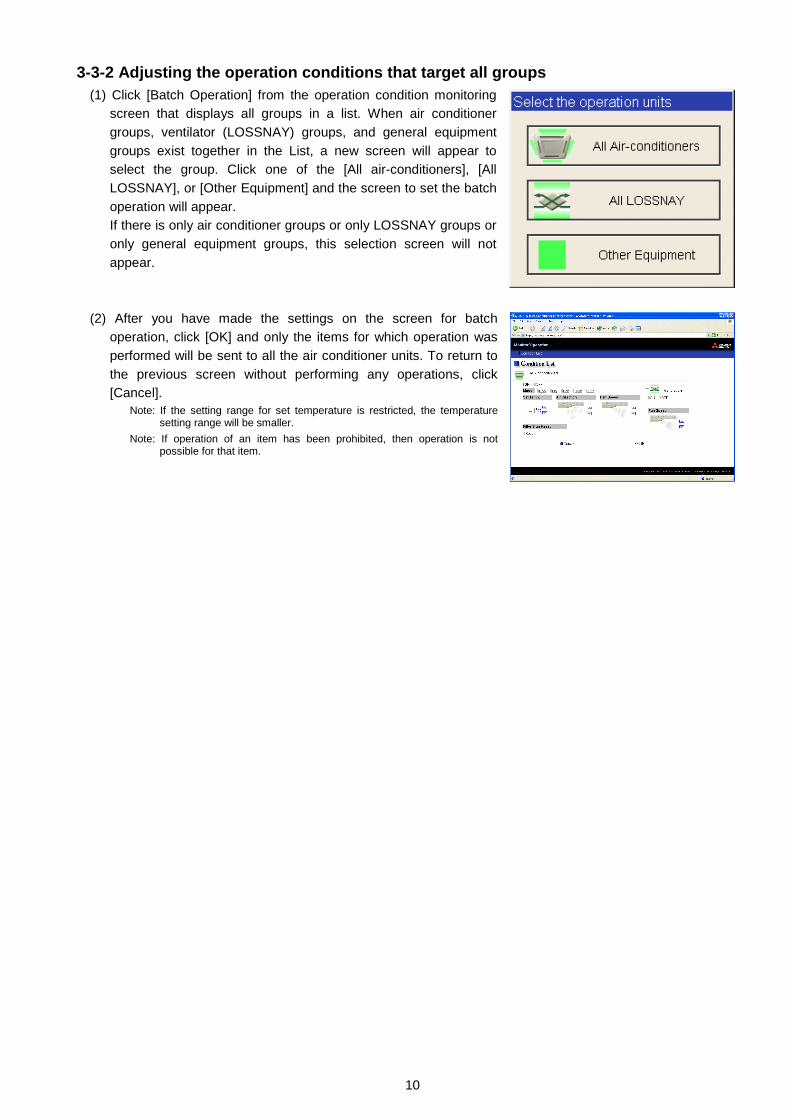
3-3-2 Adjusting the operation conditions that target all groups (1) Click [Batch Operation] from the operation condition monitoring
screen that displays all groups in a list. When air conditioner groups, ventilator (LOSSNAY) groups, and general equipment groups exist together in the List, a new screen will appear to select the group. Click one of the [All air-conditioners], [All LOSSNAY], or [Other Equipment] and the screen to set the batch operation will appear. If there is only air conditioner groups or only LOSSNAY groups or only general equipment groups, this selection screen will not appear.
(2) After you have made the settings on the screen for batch operation, click [OK] and only the items for which operation was performed will be sent to all the air conditioner units. To return to the previous screen without performing any operations, click [Cancel].
Note: If the setting range for set temperature is restricted, the temperature setting range will be smaller.
Note: If operation of an item has been prohibited, then operation is not possible for that item.

WT03797X08
HEAD OFFICE: MITSUBISHI DENKI BLDG., 2-2-3, MARUNOUCHI, CHIYODA-KU, TOKYO 100-8310, JAPAN