Embed Size (px)
Citation preview
1
48 PRESERVATIONBRIEFS
Preserving Grave Markers in Historic CemeteriesMary F. Striegel, Frances Gale, Jason Church, & Debbie Dietrich-Smith
National Park ServiceU.S. Department of the Interior
Technical Preservation Services
Cemeteries found across the country are not only places of burial, but they also provide a vivid record of community history. Whether large or small, well maintained or neglected, historic cemeteries are an important part of our cultural landscape. The vast richness of expression through form, decoration and materials informs our understanding of the individuals buried in historic cemeteries and their cultural signifi cance.
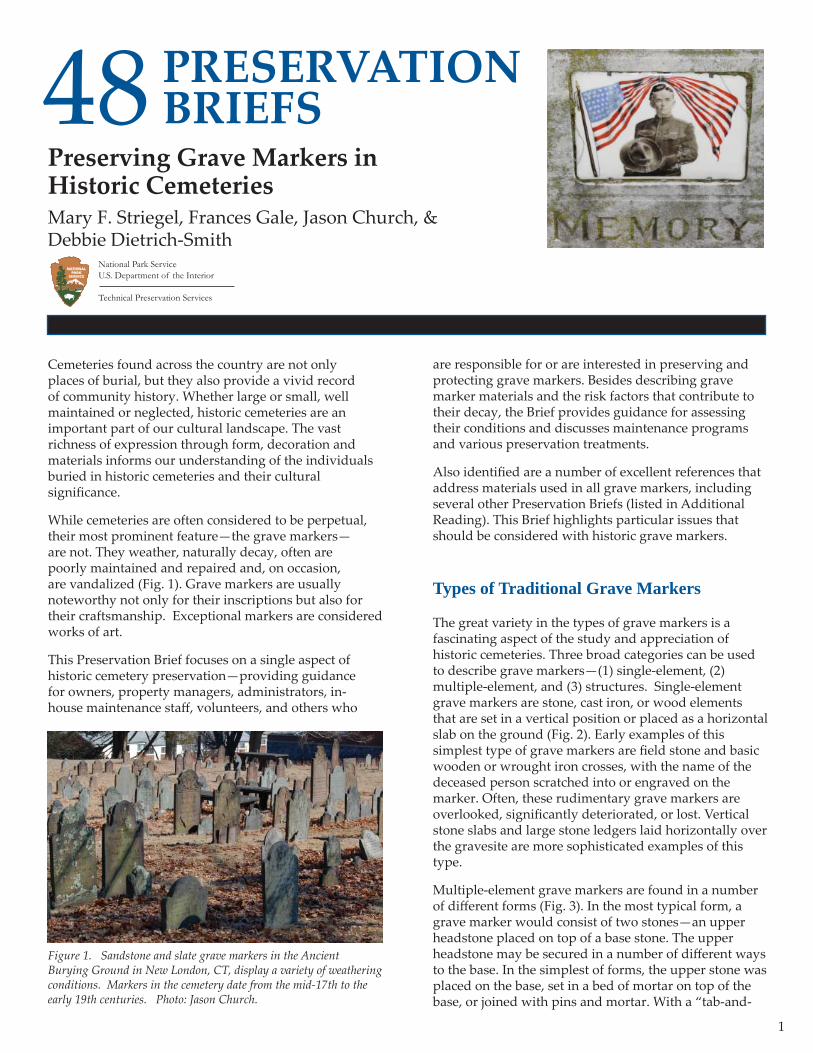
While cemeteries are often considered to be perpetual, their most prominent feature—the grave markers—are not. They weather, naturally decay, often are poorly maintained and repaired and, on occasion, are vandalized (Fig. 1). Grave markers are usually noteworthy not only for their inscriptions but also for their craftsmanship. Exceptional markers are considered works of art.
This Preservation Brief focuses on a single aspect of historic cemetery preservation—providing guidance for owners, property managers, administrators, in-house maintenance staff , volunteers, and others who
are responsible for or are interested in preserving and protecting grave markers. Besides describing grave marker materials and the risk factors that contribute to their decay, the Brief provides guidance for assessing their conditions and discusses maintenance programs and various preservation treatments.
Also identifi ed are a number of excellent references that address materials used in all grave markers, including several other Preservation Briefs (listed in Additional Reading). This Brief highlights particular issues that should be considered with historic grave markers.
Types of Traditional Grave Markers
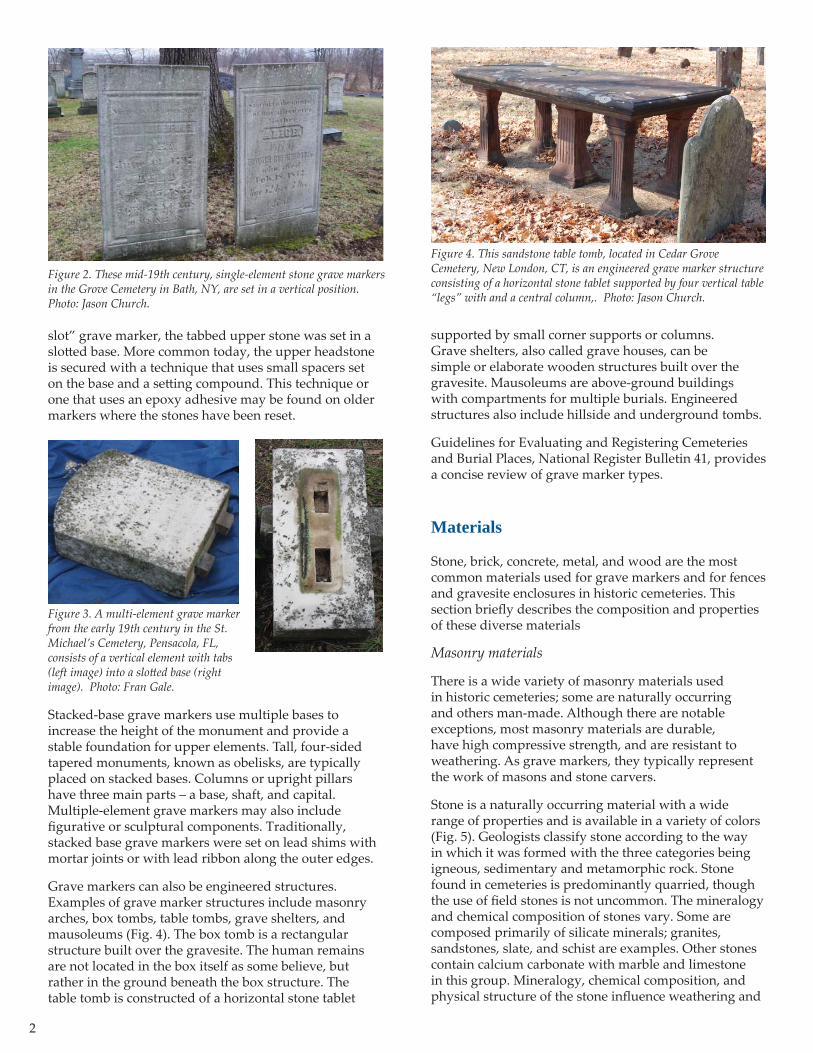
The great variety in the types of grave markers is a fascinating aspect of the study and appreciation of historic cemeteries. Three broad categories can be used to describe grave markers—(1) single-element, (2) multiple-element, and (3) structures. Single-element grave markers are stone, cast iron, or wood elements that are set in a vertical position or placed as a horizontal slab on the ground (Fig. 2). Early examples of this simplest type of grave markers are fi eld stone and basic wooden or wrought iron crosses, with the name of the deceased person scratched into or engraved on the marker. Often, these rudimentary grave markers are overlooked, signifi cantly deteriorated, or lost. Vertical stone slabs and large stone ledgers laid horizontally over the gravesite are more sophisticated examples of this type.
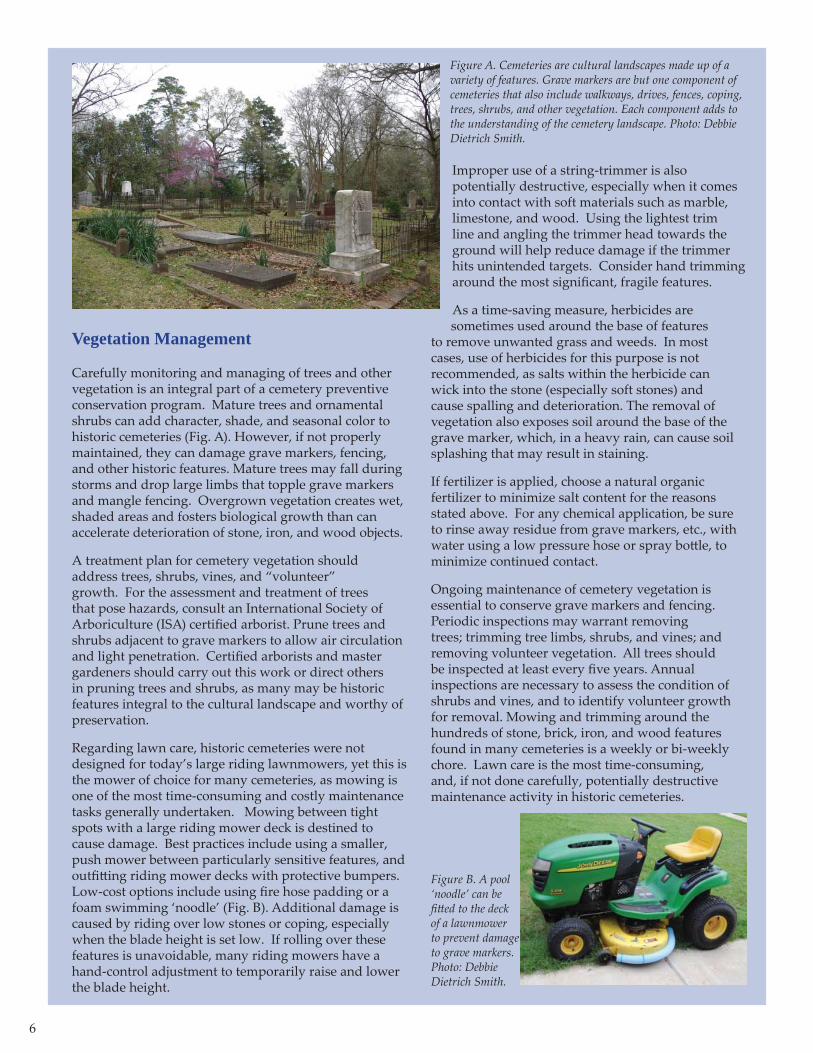
Multiple-element grave markers are found in a number of diff erent forms (Fig. 3). In the most typical form, a grave marker would consist of two stones—an upper headstone placed on top of a base stone. The upper headstone may be secured in a number of diff erent ways to the base. In the simplest of forms, the upper stone was placed on the base, set in a bed of mortar on top of the base, or joined with pins and mortar. With a “tab-and-
Figure 1. Sandstone and slate grave markers in the Ancient Burying Ground in New London, CT, display a variety of weathering conditions. Markers in the cemetery date from the mid-17th to the early 19th centuries. Photo: Jason Church.
2
slot” grave marker, the tabbed upper stone was set in a slott ed base. More common today, the upper headstone is secured with a technique that uses small spacers set on the base and a sett ing compound. This technique or one that uses an epoxy adhesive may be found on older markers where the stones have been reset.
Stacked-base grave markers use multiple bases to increase the height of the monument and provide a stable foundation for upper elements. Tall, four-sided tapered monuments, known as obelisks, are typically placed on stacked bases. Columns or upright pillars have three main parts – a base, shaft, and capital. Multiple-element grave markers may also include fi gurative or sculptural components. Traditionally, stacked base grave markers were set on lead shims with mortar joints or with lead ribbon along the outer edges.
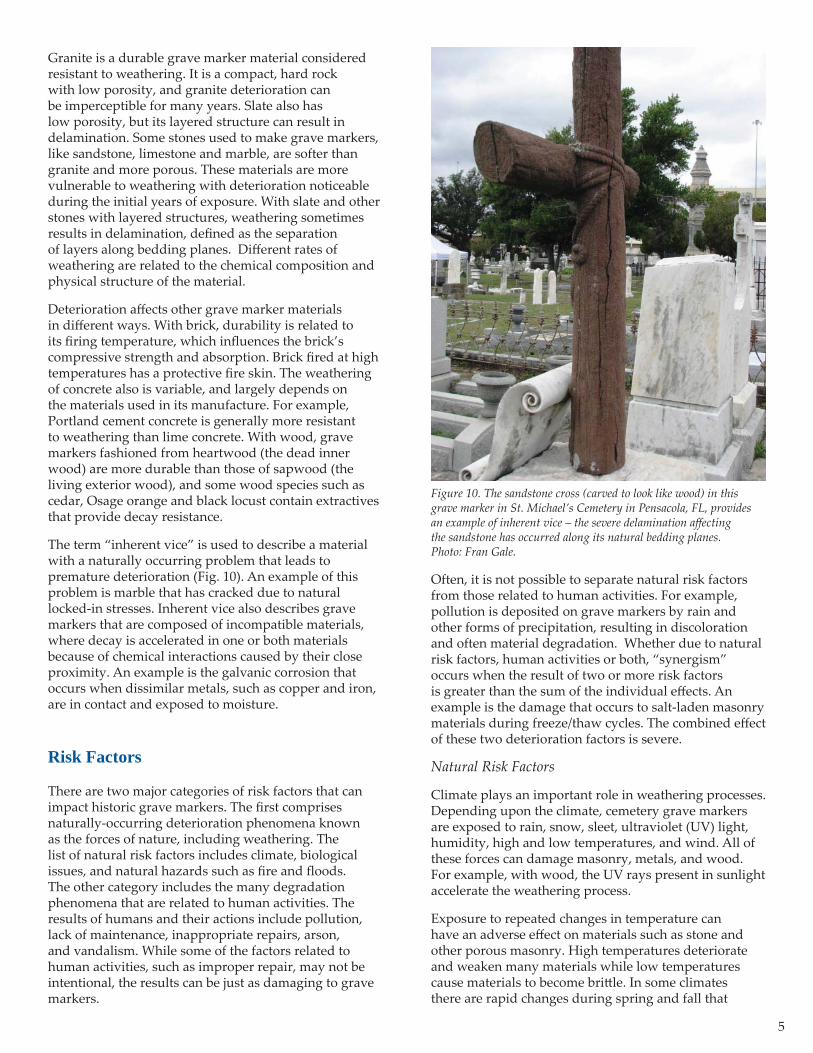
Grave markers can also be engineered structures. Examples of grave marker structures include masonry arches, box tombs, table tombs, grave shelters, and mausoleums (Fig. 4). The box tomb is a rectangular structure built over the gravesite. The human remains are not located in the box itself as some believe, but rather in the ground beneath the box structure. The table tomb is constructed of a horizontal stone tablet
supported by small corner supports or columns. Grave shelters, also called grave houses, can be simple or elaborate wooden structures built over the gravesite. Mausoleums are above-ground buildings with compartments for multiple burials. Engineered structures also include hillside and underground tombs.
Guidelines for Evaluating and Registering Cemeteries and Burial Places, National Register Bulletin 41, provides a concise review of grave marker types.
Materials
Stone, brick, concrete, metal, and wood are the most common materials used for grave markers and for fences and gravesite enclosures in historic cemeteries. This section briefl y describes the composition and properties of these diverse materials
Masonry materials
There is a wide variety of masonry materials used in historic cemeteries; some are naturally occurring and others man-made. Although there are notable exceptions, most masonry materials are durable, have high compressive strength, and are resistant to weathering. As grave markers, they typically represent the work of masons and stone carvers.
Stone is a naturally occurring material with a wide range of properties and is available in a variety of colors (Fig. 5). Geologists classify stone according to the way in which it was formed with the three categories being igneous, sedimentary and metamorphic rock. Stone found in cemeteries is predominantly quarried, though the use of fi eld stones is not uncommon. The mineralogy and chemical composition of stones vary. Some are composed primarily of silicate minerals; granites, sandstones, slate, and schist are examples. Other stones contain calcium carbonate with marble and limestone in this group. Mineralogy, chemical composition, and physical structure of the stone infl uence weathering and
Figure 2. These mid-19th century, single-element stone grave markers in the Grove Cemetery in Bath, NY, are set in a vertical position. Photo: Jason Church.
Figure 4. This sandstone table tomb, located in Cedar Grove Cemetery, New London, CT, is an engineered grave marker structure consisting of a horizontal stone tablet supported by four vertical table “legs” with and a central column,. Photo: Jason Church.
Figure 3. A multi-element grave marker from the early 19th century in the St. Michael’s Cemetery, Pensacola, FL, consists of a vertical element with tabs (left image) into a slott ed base (right image). Photo: Fran Gale.

3
the selection of materials and procedures for its cleaning and protection.
Man-made masonry materials are manufactured from naturally occurring raw materials. For example, the raw materials used to make brick include clay, sand, and shale. During fi ring, clay minerals and sand melt and come together forming silicates, aluminates, and metallic oxides. The resulting brick material has a hard-fi red outer surface with a softer interior.
Concrete is a man-made material composed of cement, sand, gravel, and water. Most concrete produced after 1870 contains Portland cement, another manufactured product. In its plastic or wet state, concrete can be cast or poured. It hardens by hydration, a chemical-curing process. The resulting product has excellent compressive strength, but much lower tensile strength. Reinforcing concrete with steel helps compensate for this limitation.
All masonry materials are porous with an interior network of pores. The porosity of sedimentary rocks such as limestone and sandstone can be as high as 20 percent while the pore volume of granite is very low. Because moisture is a key factor in many deterioration processes, porous masonry materials are more vulnerable to weathering.
Metals
Metals are solid materials that are typically hard, malleable, fusible, ductile, and often shiny when new (Fig. 6). A metal alloy is a mixture or solid solution of two or more metals. Metals are easily worked and can be melted or fused, hammered into thin sheets, or drawn into wires. Diff erent metals have varying physical
Figure 5. A variety of colors of natural stone are found in historic cemeteries, such as this pink granite marker in the Cedar Grove Cemetery, New London, CT. Photo: Jason Church.
Figure 6. Decorative cast-iron grave markers like this late-19th century one in Oakland Cemetery in Shreveport, LA, are produced by heating the iron alloy and casting the liquid metal into a mold. Photo: Jason Church.
and mechanical properties, aesthetics, and weathering characteristics.
Ferrous metals and alloys, including cast iron, wrought iron, and steel, all contain iron. Cast iron also contains carbon and silicon and has a relatively low melting point. When heated to a liquid state, it can be molded into a variety of shapes. Wrought iron is an alloy with low carbon content. Its fi brous inclusions (called slag) are sometimes visible to the naked eye. Unlike cast iron, wrought iron is heated to the point where it becomes soft and then is hammered or “worked” into desired shapes. Most of the wrought and cast iron in historic cemeteries is ornamental rather than structural. While cast iron, steel, and wrought iron all contain iron, steel and wrought iron are more resistant to corrosion. Paint was often applied to ferrous metals to help protect them from corrosion and for decorative purposes. Metal elements were painted in a variety of colors including black, white, and green, among others.
Nonferrous metals and alloys, such as bronze, zinc, and lead, do not contain iron. Bronze contains about 85% copper, 10-15% tin, and sometimes lead. Historic bronze cemetery markers were created by casting processes that involves pouring liquid bronze into a mold. The completed casting is hollow. Bronze work may comprise a single molded component, such as a plaque, or multiple molded components welded or fi tt ed together as with large statuary. Chemical patinas were applied to enhance color, and clear coatings for protection. Cast zinc monuments were popular from 1870 through the early 20th century. Most cast zinc is bluish-gray in color. Although cast zinc is resistant to corrosion, it is a britt le material with a tendency to “creep” or deform, especially when exposed to high outdoor temperatures.
Wood
Wood is a porous organic material composed of tubular cells in a parallel arrangement. The structure and characteristics of these cells determine the wood’s

4
appearance and infl uence wood properties. Wood-cell walls and cavities contain moisture. Oven drying reduces the moisture content of wood. After the drying process, the wood continues to expand and contract with changes in moisture content. The loss of water from cell walls causes wood to shrink, sometimes distorting its original shape (Fig. 7).
Hardwoods come from deciduous trees such as oak, maple, and walnut; softwoods from conifers such as pine, cedar, and fi r. In general, hardwoods have higher density than softwoods, which makes them more durable materials, and are darker in color. Wood cut at diff erent orientations aff ects its strength and weathering. As an organic material, wood is also particularly vulnerable to termites, carpenter ants, and other wood-destroying insects and fungi. Paints, coatings, and fungicides such as borates are used to help protect wood from various insect damage and fungal rot.
Other materials
Old cemeteries often include a wide variety of other materials not normally associated with contemporary grave markers, such as ceramics, stained glass, shells, and plastics (Fig. 8). As with masonry, metals, and wood, each has its own chemical and physical properties which aff ect durability and weathering. These materials
present unique challenges and their properties must be understood before establishing appropriate maintenance and repair. Documentation of unusual materials is critical when repair is not possible.
Weathering
All grave marker materials deteriorate when they are exposed to weathering such as sunlight, wind, rain, high and low temperatures, and atmospheric pollutants (Fig. 9). If a marker is composed of several materials, each may have a diff erent weathering rate. Some weathering processes occur very quickly, and others gradually aff ect the condition of materials. Weathering results in deterioration in a variety of ways. For example, when exposed to rainwater some stones lose surface material while others form harder outer crusts that may detach from the surface.
Figure 7. As shown by this 1877 marker in Silver Terrace Cemetery, Virginia City, NV, exposure to sunlight can damage wood grave markers, making the wood more susceptible to water damage and cracking. Photo: Jason Church.
Figure 8. A fi red ceramic, this cameo is set in a marble grave marker, located in Elmwood Cemetery, Memphis, TN. Diff erent materials may require diff erent conservation approaches. Photo: Mary Striegel.
Figure 9. The limestone and sandstone grave markers in this historic cemetery have diff erent weathering processes. On the left, the limestone shows surface loss in areas exposed to rainwater and gypsum crust formation below. The sandstone marker on the right displays uniform soiling, but surface hardening may be occurring. Photo: Fran Gale.
5
Granite is a durable grave marker material considered resistant to weathering. It is a compact, hard rock with low porosity, and granite deterioration can be imperceptible for many years. Slate also has low porosity, but its layered structure can result in delamination. Some stones used to make grave markers, like sandstone, limestone and marble, are softer than granite and more porous. These materials are more vulnerable to weathering with deterioration noticeable during the initial years of exposure. With slate and other stones with layered structures, weathering sometimes results in delamination, defi ned as the separation of layers along bedding planes. Diff erent rates of weathering are related to the chemical composition and physical structure of the material.
Deterioration aff ects other grave marker materials in diff erent ways. With brick, durability is related to its fi ring temperature, which infl uences the brick’s compressive strength and absorption. Brick fi red at high temperatures has a protective fi re skin. The weathering of concrete also is variable, and largely depends on the materials used in its manufacture. For example, Portland cement concrete is generally more resistant to weathering than lime concrete. With wood, grave markers fashioned from heartwood (the dead inner wood) are more durable than those of sapwood (the living exterior wood), and some wood species such as cedar, Osage orange and black locust contain extractives that provide decay resistance.
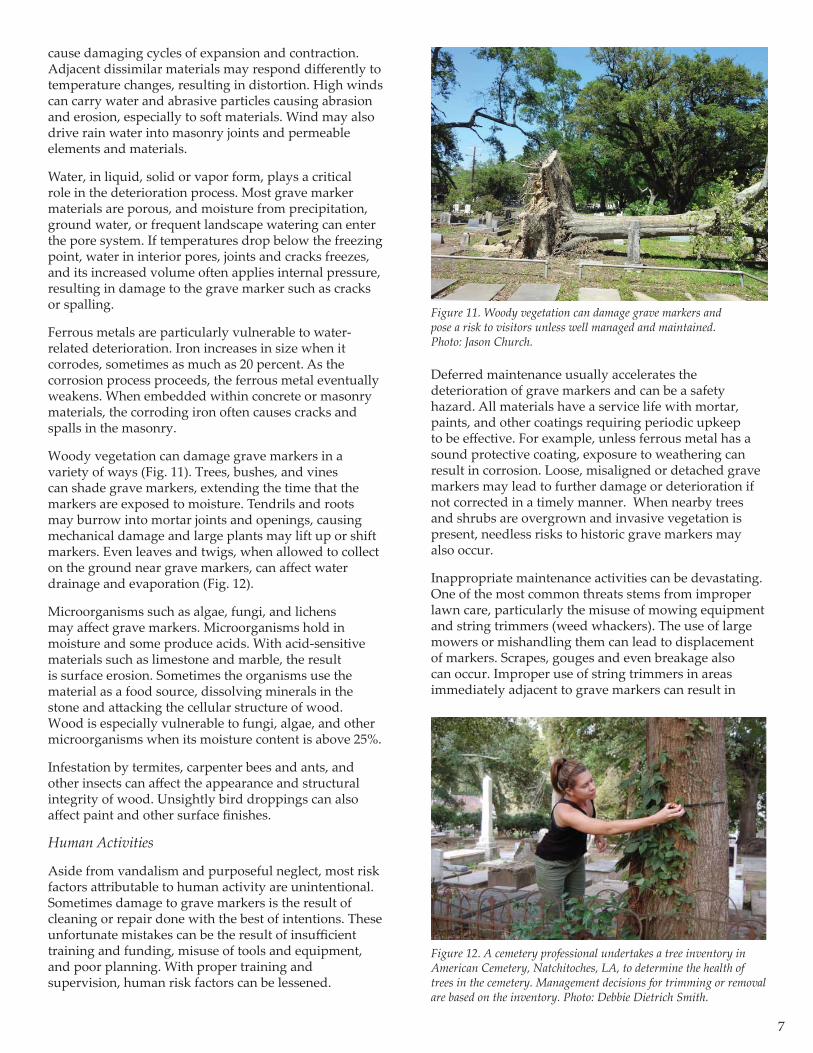
The term “inherent vice” is used to describe a material with a naturally occurring problem that leads to premature deterioration (Fig. 10). An example of this problem is marble that has cracked due to natural locked-in stresses. Inherent vice also describes grave markers that are composed of incompatible materials, where decay is accelerated in one or both materials because of chemical interactions caused by their close proximity. An example is the galvanic corrosion that occurs when dissimilar metals, such as copper and iron, are in contact and exposed to moisture.
Risk Factors
There are two major categories of risk factors that can impact historic grave markers. The fi rst comprises naturally-occurring deterioration phenomena known as the forces of nature, including weathering. The list of natural risk factors includes climate, biological issues, and natural hazards such as fi re and fl oods. The other category includes the many degradation phenomena that are related to human activities. The results of humans and their actions include pollution, lack of maintenance, inappropriate repairs, arson, and vandalism. While some of the factors related to human activities, such as improper repair, may not be intentional, the results can be just as damaging to grave markers.
Figure 10. The sandstone cross (carved to look like wood) in this grave marker in St. Michael’s Cemetery in Pensacola, FL, provides an example of inherent vice – the severe delamination aff ecting the sandstone has occurred along its natural bedding planes. Photo: Fran Gale.
Often, it is not possible to separate natural risk factors from those related to human activities. For example, pollution is deposited on grave markers by rain and other forms of precipitation, resulting in discoloration and often material degradation. Whether due to natural risk factors, human activities or both, “synergism” occurs when the result of two or more risk factors is greater than the sum of the individual eff ects. An example is the damage that occurs to salt-laden masonry materials during freeze/thaw cycles. The combined eff ect of these two deterioration factors is severe.
Natural Risk Factors
Climate plays an important role in weathering processes. Depending upon the climate, cemetery grave markers are exposed to rain, snow, sleet, ultraviolet (UV) light, humidity, high and low temperatures, and wind. All of these forces can damage masonry, metals, and wood. For example, with wood, the UV rays present in sunlight accelerate the weathering process.
Exposure to repeated changes in temperature can have an adverse eff ect on materials such as stone and other porous masonry. High temperatures deteriorate and weaken many materials while low temperatures cause materials to become britt le. In some climates there are rapid changes during spring and fall that
6
Vegetation Management
Carefully monitoring and managing of trees and other vegetation is an integral part of a cemetery preventive conservation program. Mature trees and ornamental shrubs can add character, shade, and seasonal color to historic cemeteries (Fig. A). However, if not properly maintained, they can damage grave markers, fencing, and other historic features. Mature trees may fall during storms and drop large limbs that topple grave markers and mangle fencing. Overgrown vegetation creates wet, shaded areas and fosters biological growth than can accelerate deterioration of stone, iron, and wood objects.
A treatment plan for cemetery vegetation should address trees, shrubs, vines, and “volunteer” growth. For the assessment and treatment of trees that pose hazards, consult an International Society of Arboriculture (ISA) certifi ed arborist. Prune trees and shrubs adjacent to grave markers to allow air circulation and light penetration. Certifi ed arborists and master gardeners should carry out this work or direct others in pruning trees and shrubs, as many may be historic features integral to the cultural landscape and worthy of preservation.
Regarding lawn care, historic cemeteries were not designed for today’s large riding lawnmowers, yet this is the mower of choice for many cemeteries, as mowing is one of the most time-consuming and costly maintenance tasks generally undertaken. Mowing between tight spots with a large riding mower deck is destined to cause damage. Best practices include using a smaller, push mower between particularly sensitive features, and outfi tt ing riding mower decks with protective bumpers. Low-cost options include using fi re hose padding or a foam swimming ‘noodle’ (Fig. B). Additional damage is caused by riding over low stones or coping, especially when the blade height is set low. If rolling over these features is unavoidable, many riding mowers have a hand-control adjustment to temporarily raise and lower the blade height.
Improper use of a string-trimmer is also potentially destructive, especially when it comes into contact with soft materials such as marble, limestone, and wood. Using the lightest trim line and angling the trimmer head towards the ground will help reduce damage if the trimmer hits unintended targets. Consider hand trimming around the most signifi cant, fragile features.
As a time-saving measure, herbicides are sometimes used around the base of features
to remove unwanted grass and weeds. In most cases, use of herbicides for this purpose is not recommended, as salts within the herbicide can wick into the stone (especially soft stones) and cause spalling and deterioration. The removal of vegetation also exposes soil around the base of the grave marker, which, in a heavy rain, can cause soil splashing that may result in staining.
If fertilizer is applied, choose a natural organic fertilizer to minimize salt content for the reasons stated above. For any chemical application, be sure to rinse away residue from grave markers, etc., with water using a low pressure hose or spray bott le, to minimize continued contact.
Ongoing maintenance of cemetery vegetation is essential to conserve grave markers and fencing. Periodic inspections may warrant removing trees; trimming tree limbs, shrubs, and vines; and removing volunteer vegetation. All trees should be inspected at least every fi ve years. Annual inspections are necessary to assess the condition of shrubs and vines, and to identify volunteer growth for removal. Mowing and trimming around the hundreds of stone, brick, iron, and wood features found in many cemeteries is a weekly or bi-weekly chore. Lawn care is the most time-consuming, and, if not done carefully, potentially destructive maintenance activity in historic cemeteries.
Figure A. Cemeteries are cultural landscapes made up of a variety of features. Grave markers are but one component of cemeteries that also include walkways, drives, fences, coping, trees, shrubs, and other vegetation. Each component adds to the understanding of the cemetery landscape. Photo: Debbie Dietrich Smith.
Figure B. A pool ‘noodle’ can be fi tt ed to the deck of a lawnmower to prevent damage to grave markers. Photo: Debbie Dietrich Smith.
7
cause damaging cycles of expansion and contraction. Adjacent dissimilar materials may respond diff erently to temperature changes, resulting in distortion. High winds can carry water and abrasive particles causing abrasion and erosion, especially to soft materials. Wind may also drive rain water into masonry joints and permeable elements and materials.
Water, in liquid, solid or vapor form, plays a critical role in the deterioration process. Most grave marker materials are porous, and moisture from precipitation, ground water, or frequent landscape watering can enter the pore system. If temperatures drop below the freezing point, water in interior pores, joints and cracks freezes, and its increased volume often applies internal pressure, resulting in damage to the grave marker such as cracks or spalling.
Ferrous metals are particularly vulnerable to water-related deterioration. Iron increases in size when it corrodes, sometimes as much as 20 percent. As the corrosion process proceeds, the ferrous metal eventually weakens. When embedded within concrete or masonry materials, the corroding iron often causes cracks and spalls in the masonry.
Woody vegetation can damage grave markers in a variety of ways (Fig. 11). Trees, bushes, and vines can shade grave markers, extending the time that the markers are exposed to moisture. Tendrils and roots may burrow into mortar joints and openings, causing mechanical damage and large plants may lift up or shift markers. Even leaves and twigs, when allowed to collect on the ground near grave markers, can aff ect water drainage and evaporation (Fig. 12).
Microorganisms such as algae, fungi, and lichens may aff ect grave markers. Microorganisms hold in moisture and some produce acids. With acid-sensitive materials such as limestone and marble, the result is surface erosion. Sometimes the organisms use the material as a food source, dissolving minerals in the stone and att acking the cellular structure of wood. Wood is especially vulnerable to fungi, algae, and other microorganisms when its moisture content is above 25%.
Infestation by termites, carpenter bees and ants, and other insects can aff ect the appearance and structural integrity of wood. Unsightly bird droppings can also aff ect paint and other surface fi nishes.
Human Activities
Aside from vandalism and purposeful neglect, most risk factors att ributable to human activity are unintentional. Sometimes damage to grave markers is the result of cleaning or repair done with the best of intentions. These unfortunate mistakes can be the result of insuffi cient training and funding, misuse of tools and equipment, and poor planning. With proper training and supervision, human risk factors can be lessened.
Figure 11. Woody vegetation can damage grave markers and pose a risk to visitors unless well managed and maintained. Photo: Jason Church.
Deferred maintenance usually accelerates the deterioration of grave markers and can be a safety hazard. All materials have a service life with mortar, paints, and other coatings requiring periodic upkeep to be eff ective. For example, unless ferrous metal has a sound protective coating, exposure to weathering can result in corrosion. Loose, misaligned or detached grave markers may lead to further damage or deterioration if not corrected in a timely manner. When nearby trees and shrubs are overgrown and invasive vegetation is present, needless risks to historic grave markers may also occur.
Inappropriate maintenance activities can be devastating. One of the most common threats stems from improper lawn care, particularly the misuse of mowing equipment and string trimmers (weed whackers). The use of large mowers or mishandling them can lead to displacement of markers. Scrapes, gouges and even breakage also can occur. Improper use of string trimmers in areas immediately adjacent to grave markers can result in
Figure 12. A cemetery professional undertakes a tree inventory in American Cemetery, Natchitoches, LA, to determine the health of trees in the cemetery. Management decisions for trimming or removal are based on the inventory. Photo: Debbie Dietrich Smith.
8
scratching and even cutt ing into softer stone and wood. Generally, the use of chemical weed killers at the base of grave markers should be avoided, especially if there is a risk that the marker would absorb the chemicals.
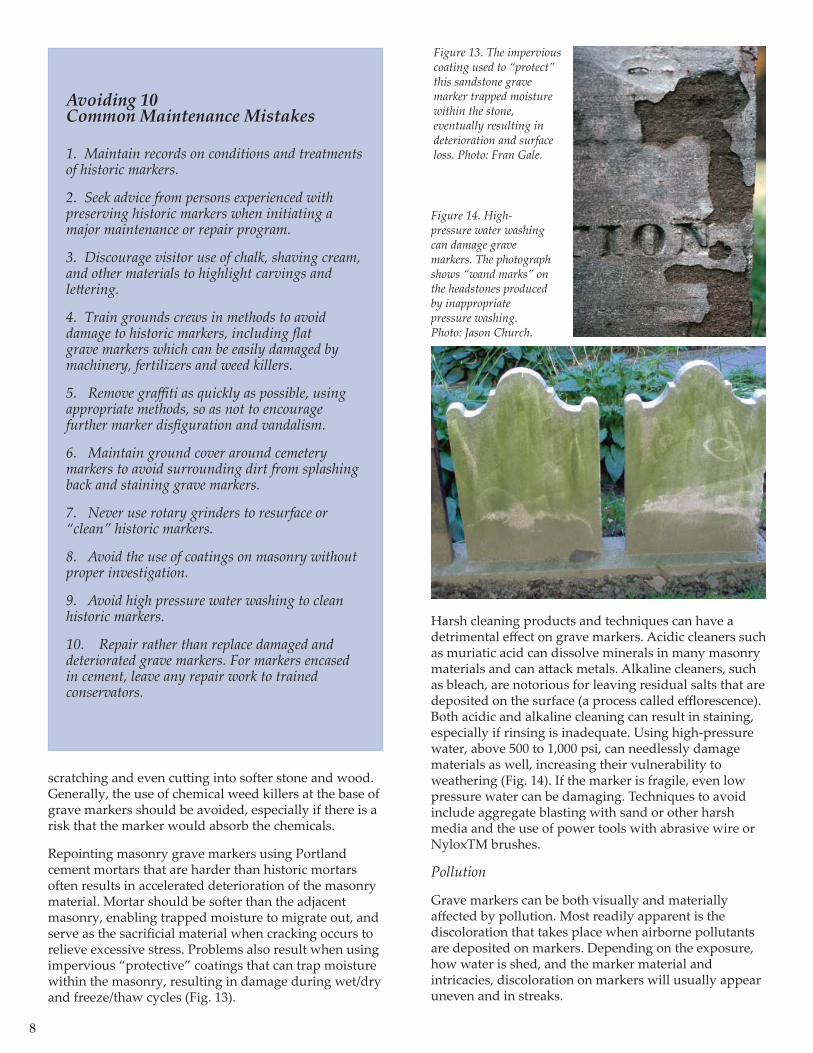
Repointing masonry grave markers using Portland cement mortars that are harder than historic mortars often results in accelerated deterioration of the masonry material. Mortar should be softer than the adjacent masonry, enabling trapped moisture to migrate out, and serve as the sacrifi cial material when cracking occurs to relieve excessive stress. Problems also result when using impervious “protective” coatings that can trap moisture within the masonry, resulting in damage during wet/dry and freeze/thaw cycles (Fig. 13).
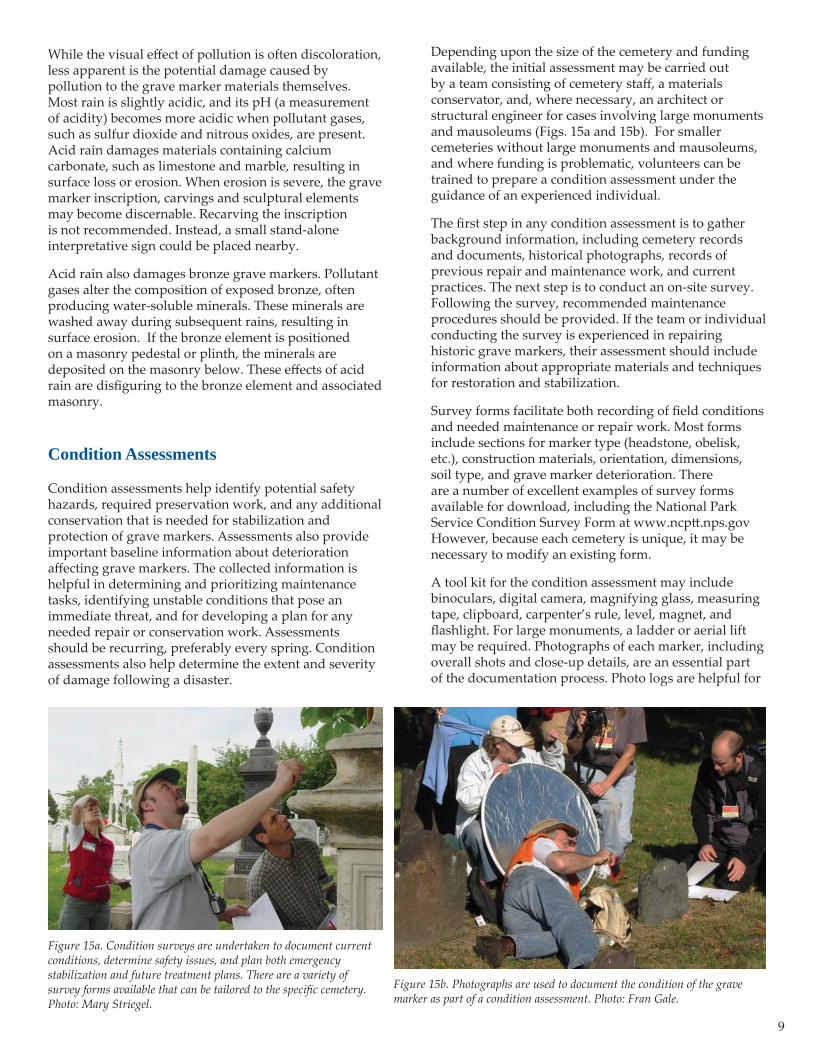
Harsh cleaning products and techniques can have a detrimental eff ect on grave markers. Acidic cleaners such as muriatic acid can dissolve minerals in many masonry materials and can att ack metals. Alkaline cleaners, such as bleach, are notorious for leaving residual salts that are deposited on the surface (a process called effl orescence). Both acidic and alkaline cleaning can result in staining, especially if rinsing is inadequate. Using high-pressure water, above 500 to 1,000 psi, can needlessly damage materials as well, increasing their vulnerability to weathering (Fig. 14). If the marker is fragile, even low pressure water can be damaging. Techniques to avoid include aggregate blasting with sand or other harsh media and the use of power tools with abrasive wire or NyloxTM brushes.
Pollution
Grave markers can be both visually and materially aff ected by pollution. Most readily apparent is the discoloration that takes place when airborne pollutants are deposited on markers. Depending on the exposure, how water is shed, and the marker material and intricacies, discoloration on markers will usually appear uneven and in streaks.
1. Maintain records on conditions and treatments of historic markers.
2. Seek advice from persons experienced with preserving historic markers when initiating a major maintenance or repair program.
3. Discourage visitor use of chalk, shaving cream, and other materials to highlight carvings and lett ering.
4. Train grounds crews in methods to avoid damage to historic markers, including fl at grave markers which can be easily damaged by machinery, fertilizers and weed killers.
5. Remove graffi ti as quickly as possible, using appropriate methods, so as not to encourage further marker disfi guration and vandalism.
6. Maintain ground cover around cemetery markers to avoid surrounding dirt from splashing back and staining grave markers.
7. Never use rotary grinders to resurface or “clean” historic markers.
8. Avoid the use of coatings on masonry without proper investigation.
9. Avoid high pressure water washing to clean historic markers.
10. Repair rather than replace damaged and deteriorated grave markers. For markers encased in cement, leave any repair work to trained conservators.
Figure 13. The impervious coating used to “protect” this sandstone grave marker trapped moisture within the stone, eventually resulting in deterioration and surface loss. Photo: Fran Gale.
Figure 14. High-pressure water washing can damage grave markers. The photograph shows “wand marks” on the headstones produced by inappropriate pressure washing. Photo: Jason Church.
Avoiding 10 Common Maintenance Mistakes
9
While the visual eff ect of pollution is often discoloration, less apparent is the potential damage caused by pollution to the grave marker materials themselves. Most rain is slightly acidic, and its pH (a measurement of acidity) becomes more acidic when pollutant gases, such as sulfur dioxide and nitrous oxides, are present. Acid rain damages materials containing calcium carbonate, such as limestone and marble, resulting in surface loss or erosion. When erosion is severe, the grave marker inscription, carvings and sculptural elements may become discernable. Recarving the inscription is not recommended. Instead, a small stand-alone interpretative sign could be placed nearby.
Acid rain also damages bronze grave markers. Pollutant gases alter the composition of exposed bronze, often producing water-soluble minerals. These minerals are washed away during subsequent rains, resulting in surface erosion. If the bronze element is positioned on a masonry pedestal or plinth, the minerals are deposited on the masonry below. These eff ects of acid rain are disfi guring to the bronze element and associated masonry.
Condition Assessments
Condition assessments help identify potential safety hazards, required preservation work, and any additional conservation that is needed for stabilization and protection of grave markers. Assessments also provide important baseline information about deterioration aff ecting grave markers. The collected information is helpful in determining and prioritizing maintenance tasks, identifying unstable conditions that pose an immediate threat, and for developing a plan for any needed repair or conservation work. Assessments should be recurring, preferably every spring. Condition assessments also help determine the extent and severity of damage following a disaster.
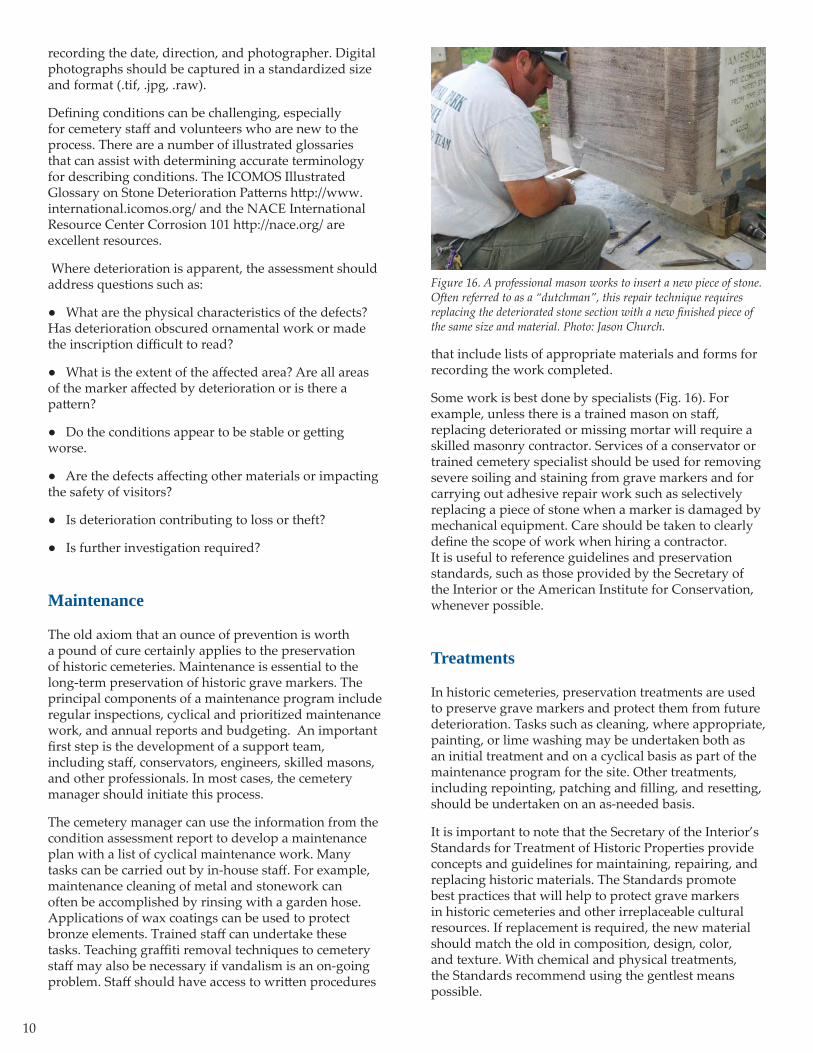
Figure 15a. Condition surveys are undertaken to document current conditions, determine safety issues, and plan both emergency stabilization and future treatment plans. There are a variety of survey forms available that can be tailored to the specifi c cemetery. Photo: Mary Striegel.
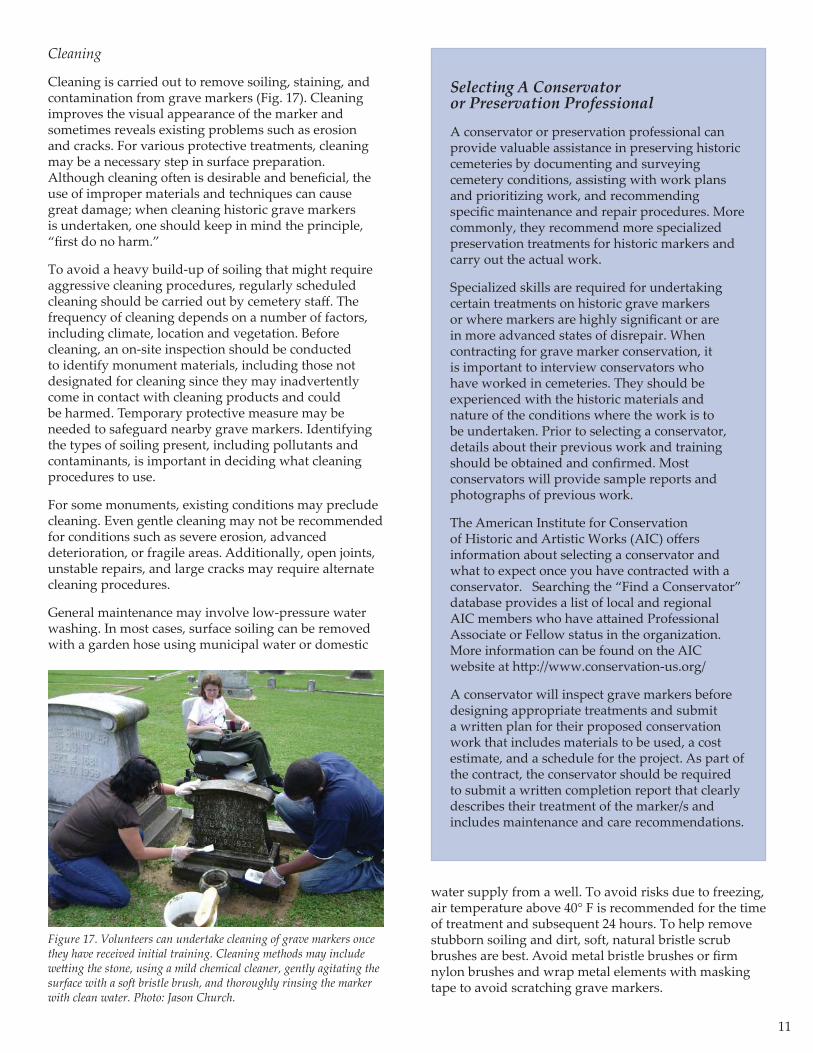
Figure 15b. Photographs are used to document the condition of the grave marker as part of a condition assessment. Photo: Fran Gale.
Depending upon the size of the cemetery and funding available, the initial assessment may be carried out by a team consisting of cemetery staff , a materials conservator, and, where necessary, an architect or structural engineer for cases involving large monuments and mausoleums (Figs. 15a and 15b). For smaller cemeteries without large monuments and mausoleums, and where funding is problematic, volunteers can be trained to prepare a condition assessment under the guidance of an experienced individual.
The fi rst step in any condition assessment is to gather background information, including cemetery records and documents, historical photographs, records of previous repair and maintenance work, and current practices. The next step is to conduct an on-site survey. Following the survey, recommended maintenance procedures should be provided. If the team or individual conducting the survey is experienced in repairing historic grave markers, their assessment should include information about appropriate materials and techniques for restoration and stabilization.
Survey forms facilitate both recording of fi eld conditions and needed maintenance or repair work. Most forms include sections for marker type (headstone, obelisk, etc.), construction materials, orientation, dimensions, soil type, and grave marker deterioration. There are a number of excellent examples of survey forms available for download, including the National Park Service Condition Survey Form at www.ncptt .nps.gov However, because each cemetery is unique, it may be necessary to modify an existing form.
A tool kit for the condition assessment may include binoculars, digital camera, magnifying glass, measuring tape, clipboard, carpenter’s rule, level, magnet, and fl ashlight. For large monuments, a ladder or aerial lift may be required. Photographs of each marker, including overall shots and close-up details, are an essential part of the documentation process. Photo logs are helpful for
10
recording the date, direction, and photographer. Digital photographs should be captured in a standardized size and format (.tif, .jpg, .raw).
Defi ning conditions can be challenging, especially for cemetery staff and volunteers who are new to the process. There are a number of illustrated glossaries that can assist with determining accurate terminology for describing conditions. The ICOMOS Illustrated Glossary on Stone Deterioration Patt erns htt p://www.international.icomos.org/ and the NACE International Resource Center Corrosion 101 htt p://nace.org/ are excellent resources.
Where deterioration is apparent, the assessment should address questions such as:
● What are the physical characteristics of the defects? Has deterioration obscured ornamental work or made the inscription diffi cult to read?
● What is the extent of the aff ected area? Are all areas of the marker aff ected by deterioration or is there a patt ern?
● Do the conditions appear to be stable or gett ing worse.
● Are the defects aff ecting other materials or impacting the safety of visitors?
● Is deterioration contributing to loss or theft?
● Is further investigation required?
Maintenance
The old axiom that an ounce of prevention is worth a pound of cure certainly applies to the preservation of historic cemeteries. Maintenance is essential to the long-term preservation of historic grave markers. The principal components of a maintenance program include regular inspections, cyclical and prioritized maintenance work, and annual reports and budgeting. An important fi rst step is the development of a support team, including staff , conservators, engineers, skilled masons, and other professionals. In most cases, the cemetery manager should initiate this process.
The cemetery manager can use the information from the condition assessment report to develop a maintenance plan with a list of cyclical maintenance work. Many tasks can be carried out by in-house staff . For example, maintenance cleaning of metal and stonework can often be accomplished by rinsing with a garden hose. Applications of wax coatings can be used to protect bronze elements. Trained staff can undertake these tasks. Teaching graffi ti removal techniques to cemetery staff may also be necessary if vandalism is an on-going problem. Staff should have access to writt en procedures
that include lists of appropriate materials and forms for recording the work completed.
Some work is best done by specialists (Fig. 16). For example, unless there is a trained mason on staff , replacing deteriorated or missing mortar will require a skilled masonry contractor. Services of a conservator or trained cemetery specialist should be used for removing severe soiling and staining from grave markers and for carrying out adhesive repair work such as selectively replacing a piece of stone when a marker is damaged by mechanical equipment. Care should be taken to clearly defi ne the scope of work when hiring a contractor. It is useful to reference guidelines and preservation standards, such as those provided by the Secretary of the Interior or the American Institute for Conservation, whenever possible.
Treatments
In historic cemeteries, preservation treatments are used to preserve grave markers and protect them from future deterioration. Tasks such as cleaning, where appropriate, painting, or lime washing may be undertaken both as an initial treatment and on a cyclical basis as part of the maintenance program for the site. Other treatments, including repointing, patching and fi lling, and resett ing, should be undertaken on an as-needed basis.
It is important to note that the Secretary of the Interior’s Standards for Treatment of Historic Properties provide concepts and guidelines for maintaining, repairing, and replacing historic materials. The Standards promote best practices that will help to protect grave markers in historic cemeteries and other irreplaceable cultural resources. If replacement is required, the new material should match the old in composition, design, color, and texture. With chemical and physical treatments, the Standards recommend using the gentlest means possible.
Figure 16. A professional mason works to insert a new piece of stone. Often referred to as a “dutchman”, this repair technique requires replacing the deteriorated stone section with a new fi nished piece of the same size and material. Photo: Jason Church.
11
Selecting A Conservator or Preservation Professional
A conservator or preservation professional can provide valuable assistance in preserving historic cemeteries by documenting and surveying cemetery conditions, assisting with work plans and prioritizing work, and recommending specifi c maintenance and repair procedures. More commonly, they recommend more specialized preservation treatments for historic markers and carry out the actual work.
Specialized skills are required for undertaking certain treatments on historic grave markers or where markers are highly signifi cant or are in more advanced states of disrepair. When contracting for grave marker conservation, it is important to interview conservators who have worked in cemeteries. They should be experienced with the historic materials and nature of the conditions where the work is to be undertaken. Prior to selecting a conservator, details about their previous work and training should be obtained and confi rmed. Most conservators will provide sample reports and photographs of previous work.
The American Institute for Conservation of Historic and Artistic Works (AIC) off ers information about selecting a conservator and what to expect once you have contracted with a conservator. Searching the “Find a Conservator” database provides a list of local and regional AIC members who have att ained Professional Associate or Fellow status in the organization. More information can be found on the AIC website at htt p://www.conservation-us.org/
A conservator will inspect grave markers before designing appropriate treatments and submit a writt en plan for their proposed conservation work that includes materials to be used, a cost estimate, and a schedule for the project. As part of the contract, the conservator should be required to submit a writt en completion report that clearly describes their treatment of the marker/s and includes maintenance and care recommendations.
Cleaning
Cleaning is carried out to remove soiling, staining, and contamination from grave markers (Fig. 17). Cleaning improves the visual appearance of the marker and sometimes reveals existing problems such as erosion and cracks. For various protective treatments, cleaning may be a necessary step in surface preparation. Although cleaning often is desirable and benefi cial, the use of improper materials and techniques can cause great damage; when cleaning historic grave markers is undertaken, one should keep in mind the principle, “fi rst do no harm.”
To avoid a heavy build-up of soiling that might require aggressive cleaning procedures, regularly scheduled cleaning should be carried out by cemetery staff . The frequency of cleaning depends on a number of factors, including climate, location and vegetation. Before cleaning, an on-site inspection should be conducted to identify monument materials, including those not designated for cleaning since they may inadvertently come in contact with cleaning products and could be harmed. Temporary protective measure may be needed to safeguard nearby grave markers. Identifying the types of soiling present, including pollutants and contaminants, is important in deciding what cleaning procedures to use.
For some monuments, existing conditions may preclude cleaning. Even gentle cleaning may not be recommended for conditions such as severe erosion, advanced deterioration, or fragile areas. Additionally, open joints, unstable repairs, and large cracks may require alternate cleaning procedures.
General maintenance may involve low-pressure water washing. In most cases, surface soiling can be removed with a garden hose using municipal water or domestic
Figure 17. Volunteers can undertake cleaning of grave markers once they have received initial training. Cleaning methods may include wett ing the stone, using a mild chemical cleaner, gently agitating the surface with a soft bristle brush, and thoroughly rinsing the marker with clean water. Photo: Jason Church.
water supply from a well. To avoid risks due to freezing, air temperature above 40° F is recommended for the time of treatment and subsequent 24 hours. To help remove stubborn soiling and dirt, soft, natural bristle scrub brushes are best. Avoid metal bristle brushes or fi rm nylon brushes and wrap metal elements with masking tape to avoid scratching grave markers.
12
Soaking and/or spraying water in a fi ne mist are eff ective methods to remove natural growth. Water also has a “swelling action” for some soiling, making it easier to remove with gentle scrubbing. With cyclic spraying, a fi ne mist of water is directed at the targeted area for a short time (e.g., 20 minutes or less), followed by a short “off ” period. This on/off process is repeated several times. Because high-pressure water can abrade the surface, this treatment is not recommended for masonry monuments.
For stains that are not water soluble or where organic solvents are ineff ective, it is sometimes necessary to use chemical cleaning. Chemical cleaners include acids, alkalis, detergents and organic solvents. Each has advantages and disadvantages. Acids dissolve the interface between the stain and substrate while alkalis allow for longer dwell periods but must be neutralized. Some detergents are near-neutral in pH (neither acidic nor alkaline) and easier to rinse.
Before selecting or using a chemical cleaning agent, the manufacturer’s Safety Data Sheet (SDS), available with the product and online, should be reviewed. The SDS provides information about the product’s composition, including identifi ed hazards, proper handling and storage, disposal, and required personal protective equipment. Once a chemical cleaning product has been selected, the manufacturer’s instructions should be followed. Before undertaking large-scale cleaning, it is always advisable to undertake small-scale tests (approximately 6" x 6"areas in discrete locations), and then waiting several days before assessing the results.
Chemical cleaning is used to remove metallic stains and other contaminants such as old coatings and graffi ti. For severe staining, poultice cleaning is useful as it extends contact time with the cleaner. A poultice is a mixture of clay or other inert material, such as paper pulp, and a cleaning agent. The mixture is applied to the surface and allowed an extended dwell period. The chemical cleaner dissolves the stain and the clay draws the stain out to the surface. When using a poultice, it should be applied just beyond the stained area and covered with polyethylene. The best practice is to leave the treatment on the surface for 24 hours and then remove the polyethylene cover and allow the poultice to continue drying. Once the poultice is dry, the mixture is then collected and the surface is thoroughly rinsed. For some stubborn stains, the application may need to be repeated.
Chemical cleaning also may be required if biological growth (algae, fungi and lichen) is severe. A study conducted by the National Park Service provides guidelines for cleaning government-issued marble headstones and recommends biocidal cleaners that contain quaternary ammonium compounds. Like all cleaning methods, chemical cleaning can accelerate deterioration. Adverse eff ects include effl orescence, stains, and etching.
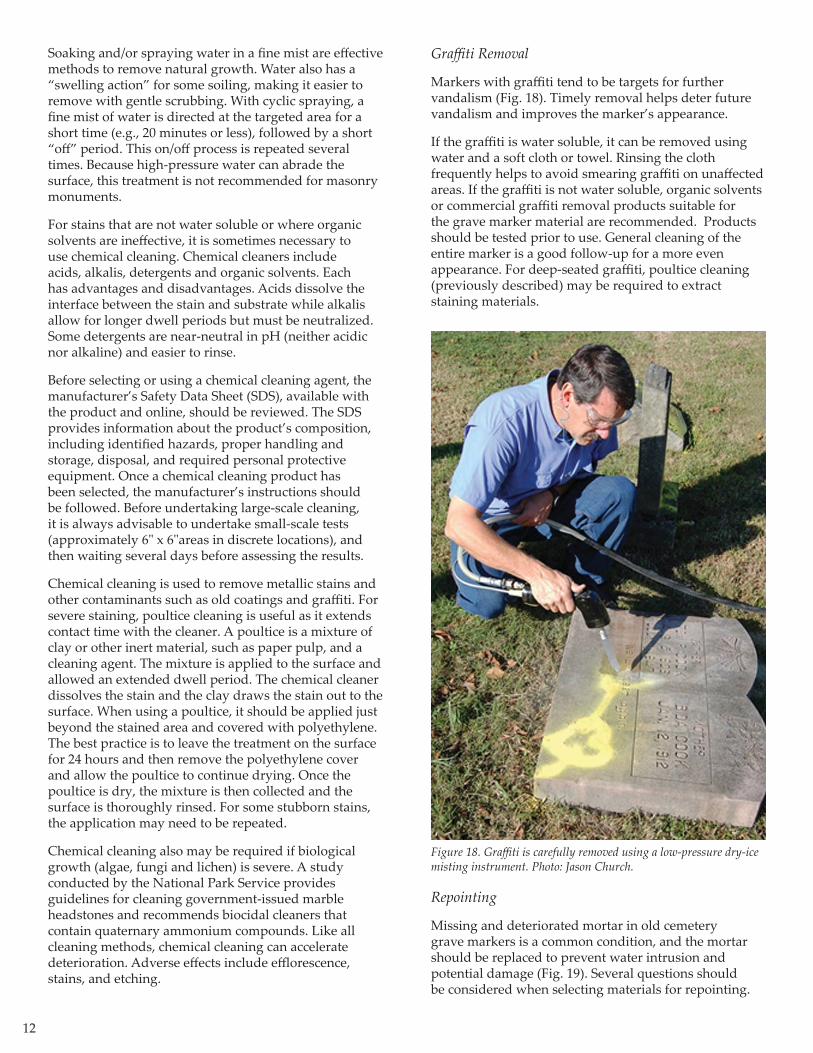
Graffi ti Removal
Markers with graffi ti tend to be targets for further vandalism (Fig. 18). Timely removal helps deter future vandalism and improves the marker’s appearance.
If the graffi ti is water soluble, it can be removed using water and a soft cloth or towel. Rinsing the cloth frequently helps to avoid smearing graffi ti on unaff ected areas. If the graffi ti is not water soluble, organic solvents or commercial graffi ti removal products suitable for the grave marker material are recommended. Products should be tested prior to use. General cleaning of the entire marker is a good follow-up for a more even appearance. For deep-seated graffi ti, poultice cleaning (previously described) may be required to extract staining materials.
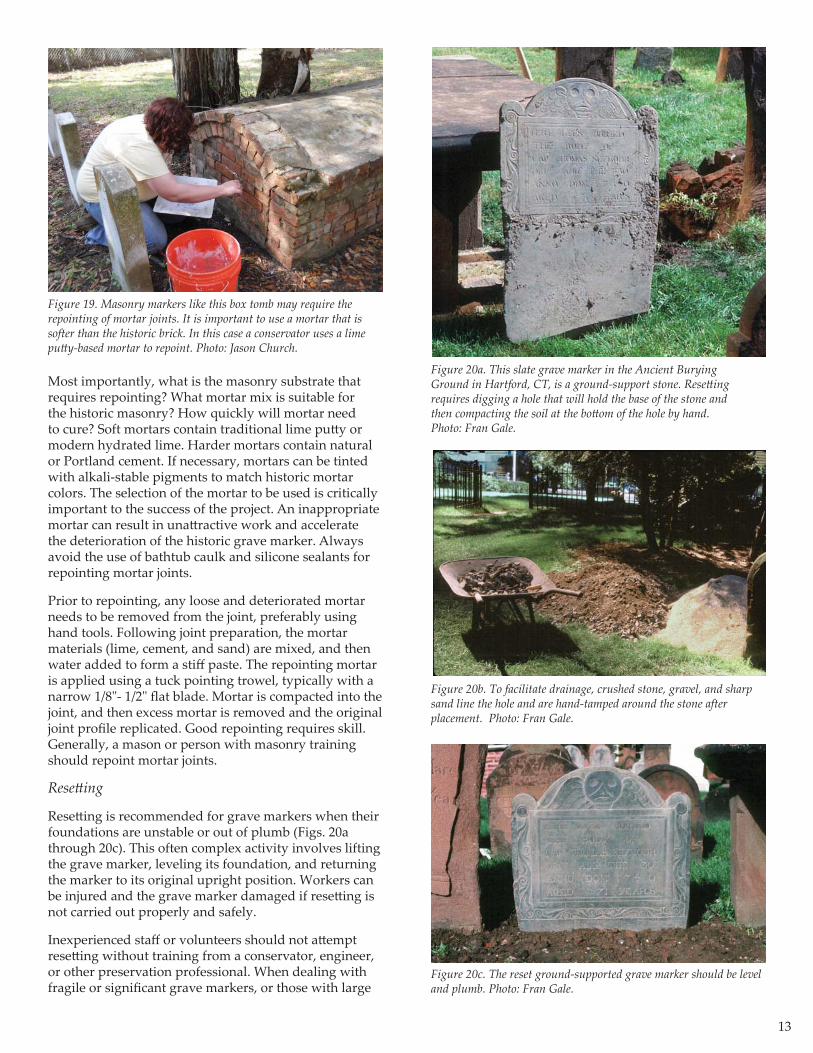
Repointing
Missing and deteriorated mortar in old cemetery grave markers is a common condition, and the mortar should be replaced to prevent water intrusion and potential damage (Fig. 19). Several questions should be considered when selecting materials for repointing.
Figure 18. Graffi ti is carefully removed using a low-pressure dry-ice misting instrument. Photo: Jason Church.
13
Most importantly, what is the masonry substrate that requires repointing? What mortar mix is suitable for the historic masonry? How quickly will mortar need to cure? Soft mortars contain traditional lime putt y or modern hydrated lime. Harder mortars contain natural or Portland cement. If necessary, mortars can be tinted with alkali-stable pigments to match historic mortar colors. The selection of the mortar to be used is critically important to the success of the project. An inappropriate mortar can result in unatt ractive work and accelerate the deterioration of the historic grave marker. Always avoid the use of bathtub caulk and silicone sealants for repointing mortar joints.
Prior to repointing, any loose and deteriorated mortar needs to be removed from the joint, preferably using hand tools. Following joint preparation, the mortar materials (lime, cement, and sand) are mixed, and then water added to form a stiff paste. The repointing mortar is applied using a tuck pointing trowel, typically with a narrow 1/8"- 1/2" fl at blade. Mortar is compacted into the joint, and then excess mortar is removed and the original joint profi le replicated. Good repointing requires skill. Generally, a mason or person with masonry training should repoint mortar joints.
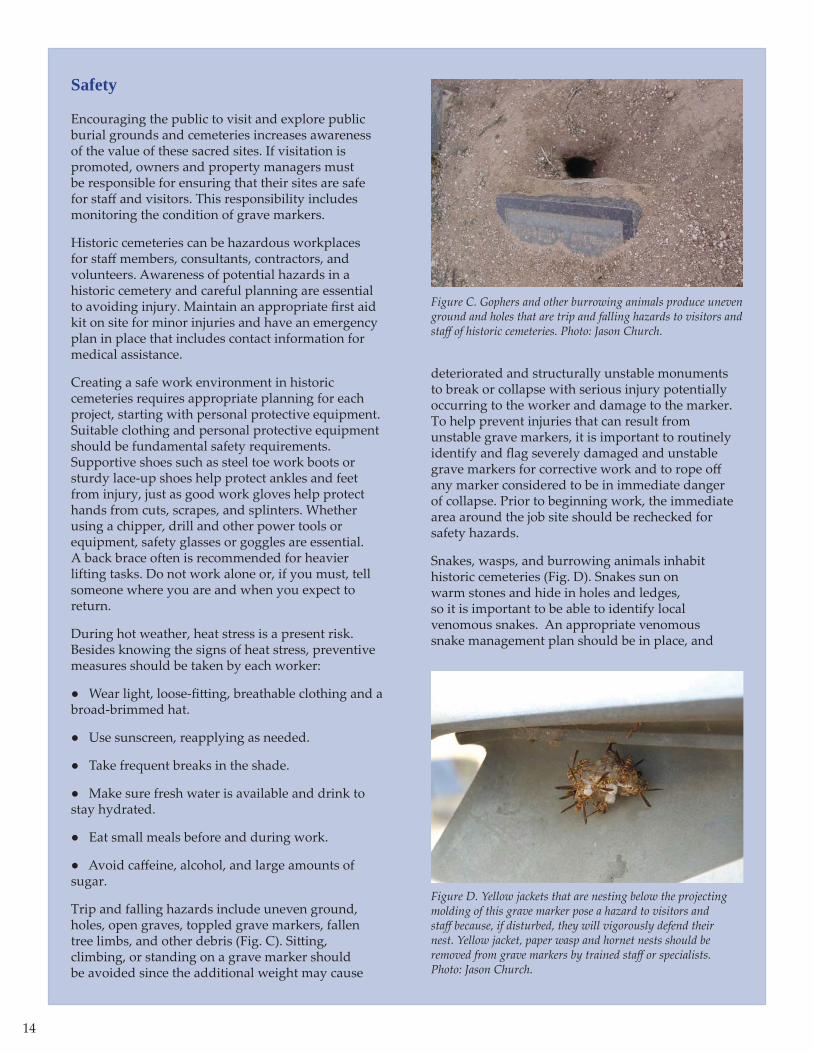
Resett ing
Resett ing is recommended for grave markers when their foundations are unstable or out of plumb (Figs. 20a through 20c). This often complex activity involves lifting the grave marker, leveling its foundation, and returning the marker to its original upright position. Workers can be injured and the grave marker damaged if resett ing is not carried out properly and safely.
Inexperienced staff or volunteers should not att empt resett ing without training from a conservator, engineer, or other preservation professional. When dealing with fragile or signifi cant grave markers, or those with large
Figure 19. Masonry markers like this box tomb may require the repointing of mortar joints. It is important to use a mortar that is softer than the historic brick. In this case a conservator uses a lime putt y-based mortar to repoint. Photo: Jason Church.
Figure 20a. This slate grave marker in the Ancient Burying Ground in Hartford, CT, is a ground-support stone. Resett ing requires digging a hole that will hold the base of the stone and then compacting the soil at the bott om of the hole by hand. Photo: Fran Gale.
Figure 20b. To facilitate drainage, crushed stone, gravel, and sharp sand line the hole and are hand-tamped around the stone after placement. Photo: Fran Gale.
Figure 20c. The reset ground-supported grave marker should be level and plumb. Photo: Fran Gale.
14
Safety
Encouraging the public to visit and explore public burial grounds and cemeteries increases awareness of the value of these sacred sites. If visitation is promoted, owners and property managers must be responsible for ensuring that their sites are safe for staff and visitors. This responsibility includes monitoring the condition of grave markers.
Historic cemeteries can be hazardous workplaces for staff members, consultants, contractors, and volunteers. Awareness of potential hazards in a historic cemetery and careful planning are essential to avoiding injury. Maintain an appropriate fi rst aid kit on site for minor injuries and have an emergency plan in place that includes contact information for medical assistance.
Creating a safe work environment in historic cemeteries requires appropriate planning for each project, starting with personal protective equipment. Suitable clothing and personal protective equipment should be fundamental safety requirements. Supportive shoes such as steel toe work boots or sturdy lace-up shoes help protect ankles and feet from injury, just as good work gloves help protect hands from cuts, scrapes, and splinters. Whether using a chipper, drill and other power tools or equipment, safety glasses or goggles are essential. A back brace often is recommended for heavier lifting tasks. Do not work alone or, if you must, tell someone where you are and when you expect to return.
During hot weather, heat stress is a present risk. Besides knowing the signs of heat stress, preventive measures should be taken by each worker:
● Wear light, loose-fi tt ing, breathable clothing and a broad-brimmed hat.
● Use sunscreen, reapplying as needed.
● Take frequent breaks in the shade.
● Make sure fresh water is available and drink to stay hydrated.
● Eat small meals before and during work.
● Avoid caff eine, alcohol, and large amounts of sugar.
Trip and falling hazards include uneven ground, holes, open graves, toppled grave markers, fallen tree limbs, and other debris (Fig. C). Sitt ing, climbing, or standing on a grave marker should be avoided since the additional weight may cause
deteriorated and structurally unstable monuments to break or collapse with serious injury potentially occurring to the worker and damage to the marker. To help prevent injuries that can result from unstable grave markers, it is important to routinely identify and fl ag severely damaged and unstable grave markers for corrective work and to rope off any marker considered to be in immediate danger of collapse. Prior to beginning work, the immediate area around the job site should be rechecked for safety hazards.
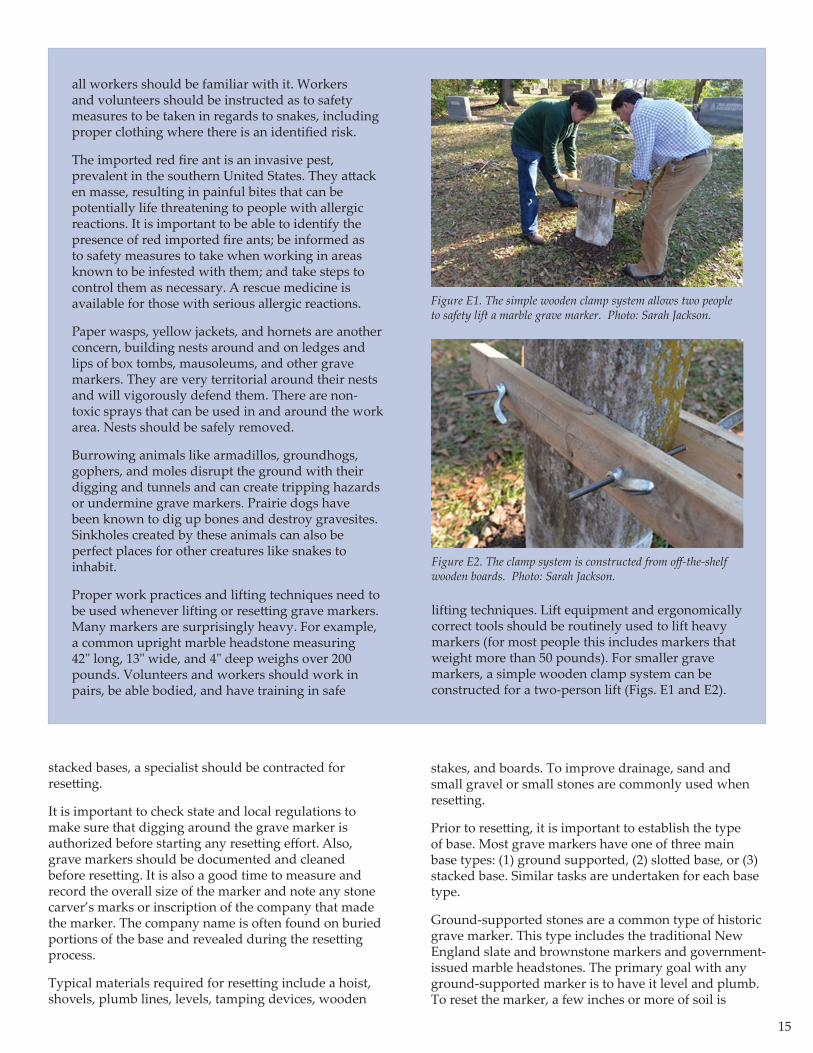
Snakes, wasps, and burrowing animals inhabit historic cemeteries (Fig. D). Snakes sun on warm stones and hide in holes and ledges, so it is important to be able to identify local venomous snakes. An appropriate venomous snake management plan should be in place, and
Figure C. Gophers and other burrowing animals produce uneven ground and holes that are trip and falling hazards to visitors and staff of historic cemeteries. Photo: Jason Church.
Figure D. Yellow jackets that are nesting below the projecting molding of this grave marker pose a hazard to visitors and staff because, if disturbed, they will vigorously defend their nest. Yellow jacket, paper wasp and hornet nests should be removed from grave markers by trained staff or specialists. Photo: Jason Church.
15
all workers should be familiar with it. Workers and volunteers should be instructed as to safety measures to be taken in regards to snakes, including proper clothing where there is an identifi ed risk.
The imported red fi re ant is an invasive pest, prevalent in the southern United States. They att ack en masse, resulting in painful bites that can be potentially life threatening to people with allergic reactions. It is important to be able to identify the presence of red imported fi re ants; be informed as to safety measures to take when working in areas known to be infested with them; and take steps to control them as necessary. A rescue medicine is available for those with serious allergic reactions.
Paper wasps, yellow jackets, and hornets are another concern, building nests around and on ledges and lips of box tombs, mausoleums, and other grave markers. They are very territorial around their nests and will vigorously defend them. There are non-toxic sprays that can be used in and around the work area. Nests should be safely removed.
Burrowing animals like armadillos, groundhogs, gophers, and moles disrupt the ground with their digging and tunnels and can create tripping hazards or undermine grave markers. Prairie dogs have been known to dig up bones and destroy gravesites. Sinkholes created by these animals can also be perfect places for other creatures like snakes to inhabit.
Proper work practices and lifting techniques need to be used whenever lifting or resett ing grave markers. Many markers are surprisingly heavy. For example, a common upright marble headstone measuring 42" long, 13" wide, and 4" deep weighs over 200 pounds. Volunteers and workers should work in pairs, be able bodied, and have training in safe
Figure E1. The simple wooden clamp system allows two people to safety lift a marble grave marker. Photo: Sarah Jackson.
Figure E2. The clamp system is constructed from off -the-shelf wooden boards. Photo: Sarah Jackson.
lifting techniques. Lift equipment and ergonomically correct tools should be routinely used to lift heavy markers (for most people this includes markers that weight more than 50 pounds). For smaller grave markers, a simple wooden clamp system can be constructed for a two-person lift (Figs. E1 and E2).
stacked bases, a specialist should be contracted for resett ing.
It is important to check state and local regulations to make sure that digging around the grave marker is authorized before starting any resett ing eff ort. Also, grave markers should be documented and cleaned before resett ing. It is also a good time to measure and record the overall size of the marker and note any stone carver’s marks or inscription of the company that made the marker. The company name is often found on buried portions of the base and revealed during the resett ing process.
Typical materials required for resett ing include a hoist, shovels, plumb lines, levels, tamping devices, wooden
stakes, and boards. To improve drainage, sand and small gravel or small stones are commonly used when resett ing.
Prior to resett ing, it is important to establish the type of base. Most grave markers have one of three main base types: (1) ground supported, (2) slott ed base, or (3) stacked base. Similar tasks are undertaken for each base type.
Ground-supported stones are a common type of historic grave marker. This type includes the traditional New England slate and brownstone markers and government-issued marble headstones. The primary goal with any ground-supported marker is to have it level and plumb. To reset the marker, a few inches or more of soil is
16
fi rst removed from around the stone. This is usually suffi cient to enable a stone marker to be straightened. The enlarged hole is then fi lled and compacted around the marker.
If a grave marker has fallen over and has been covered with soil or turf, it must fi rst be inspected for att ached concrete or other anchoring system. If this system is still att ached, the grave marker may break during lifting. After removing the stone, it can be cleaned and then temporarily set on wood supports.
The hole left from removal of the marker will need to be enlarged to hold the base of the stone. Soil at the bott om of the hole should be compacted by hand, not with a power tamper. In most cemeteries, crushed stone or sharp pea-size gravel mixed with angular sand can be used to line the hole and then hand-tamped around the stone after it is placed in the hole. The gravel helps facilitate drainage and keeps the stone from sett ling. A bubble level can be used to ensure that the stone is plumb. Markers should not be set in concrete.
The second type of monument base is the slott ed base where the upright element is secured to the base using mortise-and-tenon style construction. The upright element in the slott ed base may be leaning or loose. In any case, the upright element should be removed from the base, the base leveled, then the element returned to the base. It is important to keep in mind the depth that the base was intended to be set into the ground. This may be indicated by the style of the base or the observed soil- line staining. Many bases were intended to sit fl ush on grade while some were set a few inches below ground.
Prior to resett ing, the upright element should be disengaged from the base and carefully set aside. In most cases, the base will need to be removed to properly prepare the hole before resett ing the grave marker. After doing so, four to six inches of soil should be removed from the hole and the soil then tamped by hand to make a proper bed or foundation. The foundation area can be fi lled with crushed stone or sharp pea-sized gravel and sand, checking to make sure that the base is plumb and level as resett ing proceeds. Clean the headstone prior to resett ing. Old mortar, concrete or epoxy should be removed from the slot and the bott om of the upright element using a hammer and small chisel. Once the stone elements are cleaned and the base is level and plumb, the next step is placing the upright element into the slot. A lime mortar can be used to fi ll any gaps in the slot. This prevents water intrusion that may cause marker movement related to freeze-thaw cycles.
A third common base type is the stacked base. This style includes at least one element placed on a base or a series of bases of varying sizes. Resett ing a stacked-base grave marker usually requires special skills and lifting equipment. Depending upon the complexity of the marker, a conservator, experienced masonry contractor,
or preservation professional with engineering skills is usually needed.
The sections of a stacked-base grave marker often are pinned together for support. If deteriorated, the pins should be replaced. Using a hammer and chisel, a conservator or person experienced in working with historic grave markers should remove any corroded iron, copper, or bronze pins, as well as the old mortar or adhesive adhered to each section. Replacement pins should be stainless steel all-thread, and sized slightly shorter and smaller than the existing hole. The replacement pins then can be set with epoxy, lime mortar, or packed in lead. Once the pins are in place, the sections of the stacked base can be individually reset using traditional or contemporary materials. These include lead, shims, mortars, and sett ing compounds. Finally, each gap or seam between sections should be pointed with a sett ing compound or appropriate mortar to prevent water intrusion.
Filling and Patching
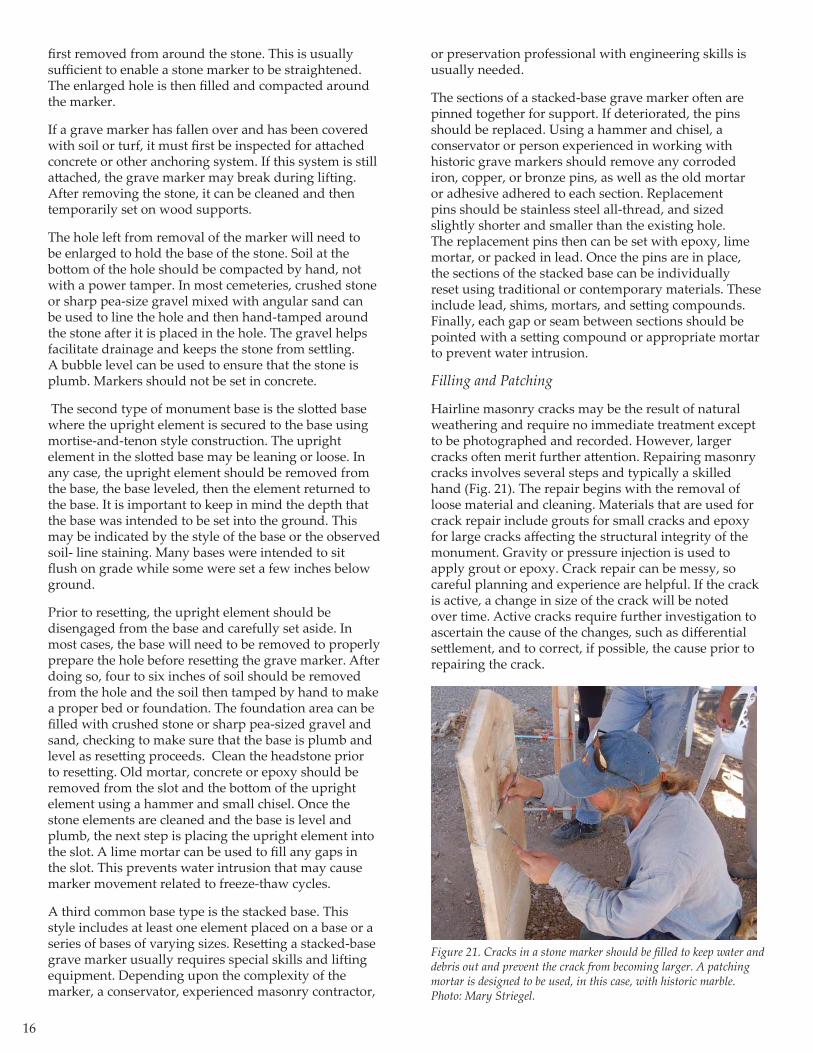
Hairline masonry cracks may be the result of natural weathering and require no immediate treatment except to be photographed and recorded. However, larger cracks often merit further att ention. Repairing masonry cracks involves several steps and typically a skilled hand (Fig. 21). The repair begins with the removal of loose material and cleaning. Materials that are used for crack repair include grouts for small cracks and epoxy for large cracks aff ecting the structural integrity of the monument. Gravity or pressure injection is used to apply grout or epoxy. Crack repair can be messy, so careful planning and experience are helpful. If the crack is active, a change in size of the crack will be noted over time. Active cracks require further investigation to ascertain the cause of the changes, such as diff erential sett lement, and to correct, if possible, the cause prior to repairing the crack.
Figure 21. Cracks in a stone marker should be fi lled to keep water and debris out and prevent the crack from becoming larger. A patching mortar is designed to be used, in this case, with historic marble. Photo: Mary Striegel.
17
Repairing masonry markers with severely damaged or missing pieces requires a skilled mason or conservator. The materials used for patching are similar to those used for repointing mortar joints. With patching, it is critical that the physical and mechanical properties of the patching material be appropriate for the masonry material. Work includes designing a durable patch compatible with the substrate. Proper curing is especially critical for large patches and often involves procedures to protect the patch from premature drying. Repairs to stucco-covered surface should be carried out by a skilled plasterer using a stucco mix that is compatible with the original material.
Repairing delaminated slate and brownstone grave markers also requires a skilled mason or conservator. With this condition, there are openings along bedding planes which expose the stone grave marker to moisture intrusion. Treatments are design to eliminate or reduce moisture intrusion that would accelerate deterioration. The selection of appropriate repair materials and procedures depends on the severity of the condition. Traditionally, delaminated slate or brownstone grave markers were “capped” with a strip of lead or other metal. Today, this repair technique is seldom used, in part because the drilling procedure used to att ach the cap can be damaging, if the stone is britt le. Also, there are toxicity issues associated with the use of lead. An alternative approach is to fi ll the openings exposed by delamination with grout or patching material that is compatible with the stone. Adhesion of the repair material to the delaminated surfaces is particularly important.
The decision whether to use patching material or undertake a dutchman repair with matching materialdepends on the grave marker material, location of the damaged area, size, and other factors. A successfully executed dutchman usually results in a repair that has long durability and maintains a similar weathering patt ern to the adjacent historic material. When working with stone grave markers, repairs using dutchman techniques are best done by a skilled stone craftsman.
Detached fragments should be collected, documented and stored in a suitable facility. Reatt achment of these fragments should be undertaken by a conservator or mason. This work often requires pins to reinforce the joints and patching to compensate for losses.
Protective treatments
Protective treatments for metal, stone, and wood grave markers stabilize corrosion and protect the monument from rainwater, pollutants, and other contaminants. Treatments may vary not only due to material diff erences, but also to specifi c site conditions.
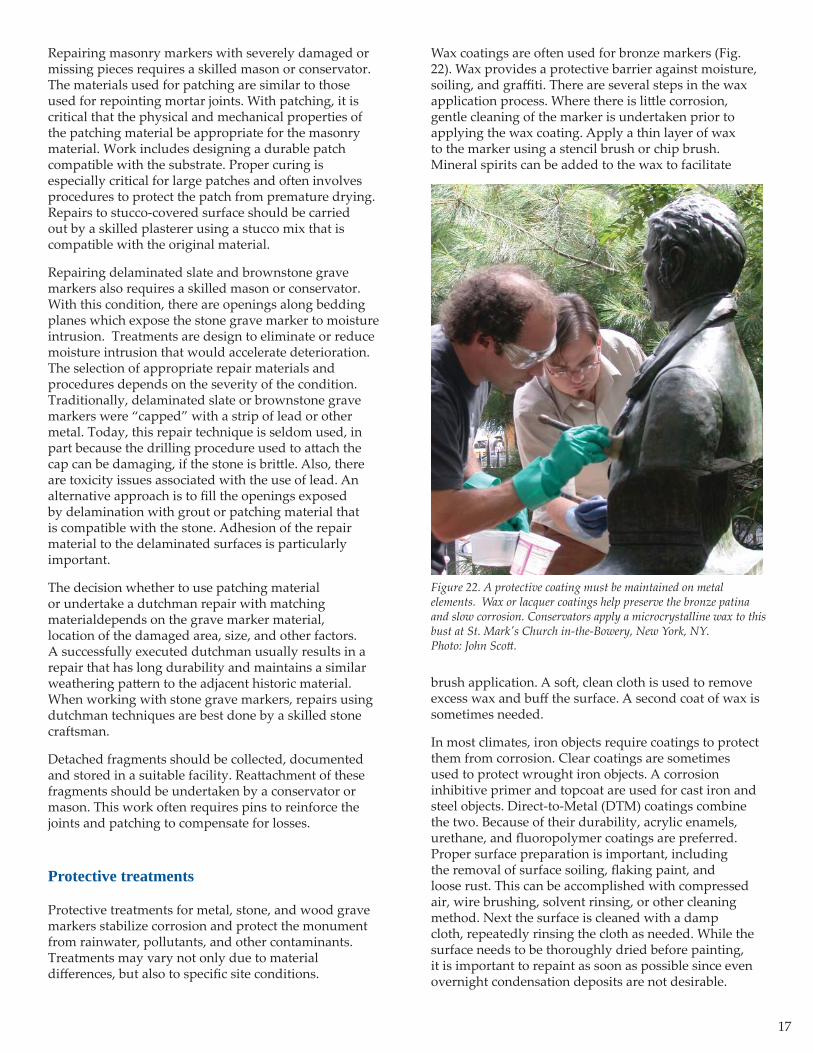
Wax coatings are often used for bronze markers (Fig. 22). Wax provides a protective barrier against moisture, soiling, and graffi ti. There are several steps in the wax application process. Where there is litt le corrosion, gentle cleaning of the marker is undertaken prior to applying the wax coating. Apply a thin layer of wax to the marker using a stencil brush or chip brush. Mineral spirits can be added to the wax to facilitate
Figure 22. A protective coating must be maintained on metal elements. Wax or lacquer coatings help preserve the bronze patina and slow corrosion. Conservators apply a microcrystalline wax to this bust at St. Mark's Church in-the-Bowery, New York, NY. Photo: John Scott .
brush application. A soft, clean cloth is used to remove excess wax and buff the surface. A second coat of wax is sometimes needed.
In most climates, iron objects require coatings to protect them from corrosion. Clear coatings are sometimes used to protect wrought iron objects. A corrosion inhibitive primer and topcoat are used for cast iron and steel objects. Direct-to-Metal (DTM) coatings combine the two. Because of their durability, acrylic enamels, urethane, and fl uoropolymer coatings are preferred. Proper surface preparation is important, including the removal of surface soiling, fl aking paint, and loose rust. This can be accomplished with compressed air, wire brushing, solvent rinsing, or other cleaning method. Next the surface is cleaned with a damp cloth, repeatedly rinsing the cloth as needed. While the surface needs to be thoroughly dried before painting, it is important to repaint as soon as possible since even overnight condensation deposits are not desirable.
18
Another approach for iron objects is using a rust converter to stabilize corrosion that involves less surface preparation. Commercially available rust converters contain tannin or phosphoric acid and react with rust to form more stable iron compounds. The surface must be painted following surface preparation with the rust converter.
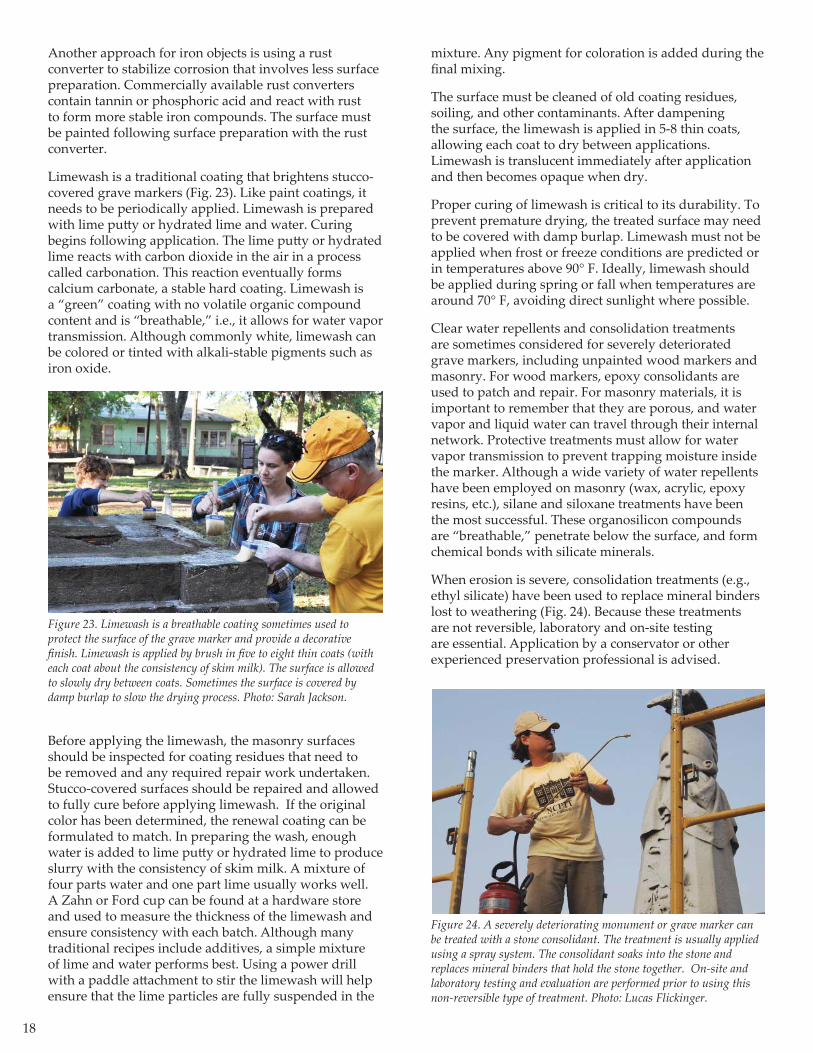
Limewash is a traditional coating that brightens stucco-covered grave markers (Fig. 23). Like paint coatings, it needs to be periodically applied. Limewash is prepared with lime putt y or hydrated lime and water. Curing begins following application. The lime putt y or hydrated lime reacts with carbon dioxide in the air in a process called carbonation. This reaction eventually forms calcium carbonate, a stable hard coating. Limewash is a “green” coating with no volatile organic compound content and is “breathable,” i.e., it allows for water vapor transmission. Although commonly white, limewash can be colored or tinted with alkali-stable pigments such as iron oxide.
Before applying the limewash, the masonry surfaces should be inspected for coating residues that need to be removed and any required repair work undertaken. Stucco-covered surfaces should be repaired and allowed to fully cure before applying limewash. If the original color has been determined, the renewal coating can be formulated to match. In preparing the wash, enough water is added to lime putt y or hydrated lime to produce slurry with the consistency of skim milk. A mixture of four parts water and one part lime usually works well. A Zahn or Ford cup can be found at a hardware store and used to measure the thickness of the limewash and ensure consistency with each batch. Although many traditional recipes include additives, a simple mixture of lime and water performs best. Using a power drill with a paddle att achment to stir the limewash will help ensure that the lime particles are fully suspended in the
Figure 23. Limewash is a breathable coating sometimes used to protect the surface of the grave marker and provide a decorative fi nish. Limewash is applied by brush in fi ve to eight thin coats (with each coat about the consistency of skim milk). The surface is allowed to slowly dry between coats. Sometimes the surface is covered by damp burlap to slow the drying process. Photo: Sarah Jackson.
mixture. Any pigment for coloration is added during the fi nal mixing.
The surface must be cleaned of old coating residues, soiling, and other contaminants. After dampening the surface, the limewash is applied in 5-8 thin coats, allowing each coat to dry between applications. Limewash is translucent immediately after application and then becomes opaque when dry.
Proper curing of limewash is critical to its durability. To prevent premature drying, the treated surface may need to be covered with damp burlap. Limewash must not be applied when frost or freeze conditions are predicted or in temperatures above 90° F. Ideally, limewash should be applied during spring or fall when temperatures are around 70° F, avoiding direct sunlight where possible.
Clear water repellents and consolidation treatments are sometimes considered for severely deteriorated grave markers, including unpainted wood markers and masonry. For wood markers, epoxy consolidants are used to patch and repair. For masonry materials, it is important to remember that they are porous, and water vapor and liquid water can travel through their internal network. Protective treatments must allow for water vapor transmission to prevent trapping moisture inside the marker. Although a wide variety of water repellents have been employed on masonry (wax, acrylic, epoxy resins, etc.), silane and siloxane treatments have been the most successful. These organosilicon compounds are “breathable,” penetrate below the surface, and form chemical bonds with silicate minerals.
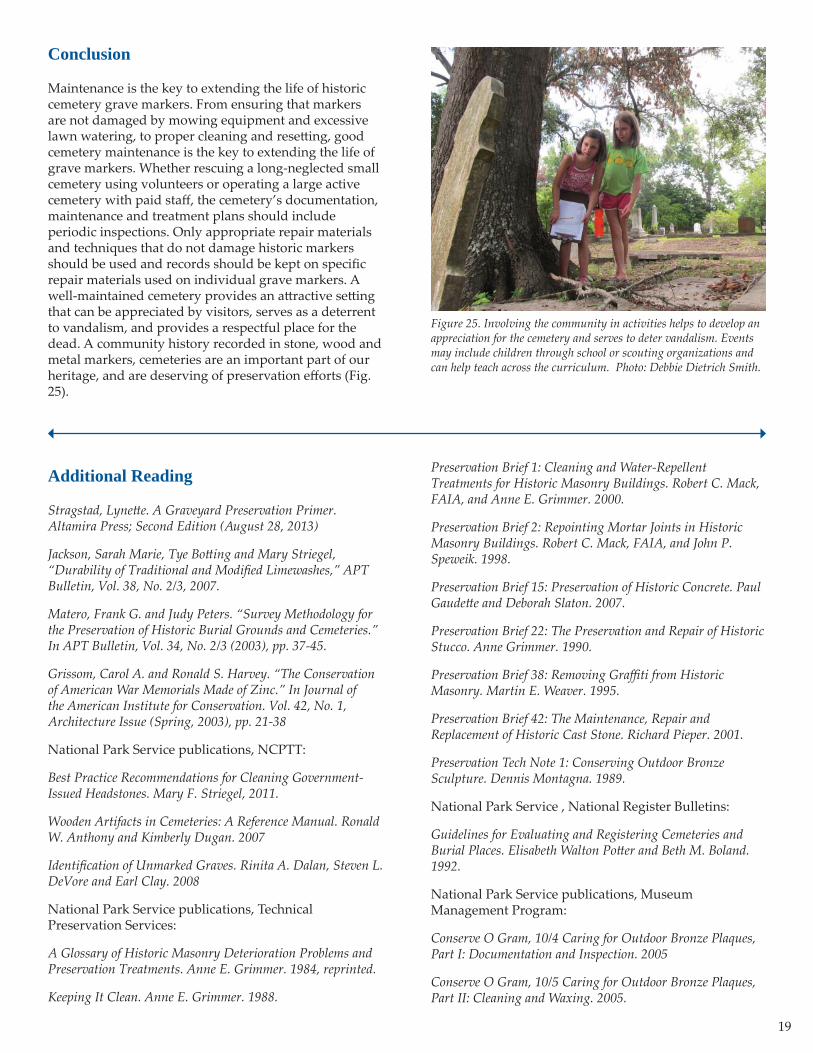
When erosion is severe, consolidation treatments (e.g., ethyl silicate) have been used to replace mineral binders lost to weathering (Fig. 24). Because these treatments are not reversible, laboratory and on-site testing are essential. Application by a conservator or other experienced preservation professional is advised.
Figure 24. A severely deteriorating monument or grave marker can be treated with a stone consolidant. The treatment is usually applied using a spray system. The consolidant soaks into the stone and replaces mineral binders that hold the stone together. On-site and laboratory testing and evaluation are performed prior to using this non-reversible type of treatment. Photo: Lucas Flickinger.
19
Conclusion
Maintenance is the key to extending the life of historic cemetery grave markers. From ensuring that markers are not damaged by mowing equipment and excessive lawn watering, to proper cleaning and resett ing, good cemetery maintenance is the key to extending the life of grave markers. Whether rescuing a long-neglected small cemetery using volunteers or operating a large active cemetery with paid staff , the cemetery’s documentation, maintenance and treatment plans should include periodic inspections. Only appropriate repair materials and techniques that do not damage historic markers should be used and records should be kept on specifi c repair materials used on individual grave markers. A well-maintained cemetery provides an att ractive sett ing that can be appreciated by visitors, serves as a deterrent to vandalism, and provides a respectful place for the dead. A community history recorded in stone, wood and metal markers, cemeteries are an important part of our heritage, and are deserving of preservation eff orts (Fig. 25).
Figure 25. Involving the community in activities helps to develop an appreciation for the cemetery and serves to deter vandalism. Events may include children through school or scouting organizations and can help teach across the curriculum. Photo: Debbie Dietrich Smith.
Additional Reading
Stragstad, Lynett e. A Graveyard Preservation Primer. Altamira Press; Second Edition (August 28, 2013)
Jackson, Sarah Marie, Tye Bott ing and Mary Striegel, “Durability of Traditional and Modifi ed Limewashes,” APT Bulletin, Vol. 38, No. 2/3, 2007.
Matero, Frank G. and Judy Peters. “Survey Methodology for the Preservation of Historic Burial Grounds and Cemeteries.” In APT Bulletin, Vol. 34, No. 2/3 (2003), pp. 37-45.
Grissom, Carol A. and Ronald S. Harvey. “The Conservation of American War Memorials Made of Zinc.” In Journal of the American Institute for Conservation. Vol. 42, No. 1, Architecture Issue (Spring, 2003), pp. 21-38
National Park Service publications, NCPTT:
Best Practice Recommendations for Cleaning Government-Issued Headstones. Mary F. Striegel, 2011.
Wooden Artifacts in Cemeteries: A Reference Manual. Ronald W. Anthony and Kimberly Dugan. 2007
Identifi cation of Unmarked Graves. Rinita A. Dalan, Steven L. DeVore and Earl Clay. 2008
National Park Service publications, Technical Preservation Services:
A Glossary of Historic Masonry Deterioration Problems and Preservation Treatments. Anne E. Grimmer. 1984, reprinted.
Keeping It Clean. Anne E. Grimmer. 1988.
Preservation Brief 1: Cleaning and Water-Repellent Treatments for Historic Masonry Buildings. Robert C. Mack, FAIA, and Anne E. Grimmer. 2000.
Preservation Brief 2: Repointing Mortar Joints in Historic Masonry Buildings. Robert C. Mack, FAIA, and John P. Speweik. 1998.
Preservation Brief 15: Preservation of Historic Concrete. Paul Gaudett e and Deborah Slaton. 2007.
Preservation Brief 22: The Preservation and Repair of Historic Stucco. Anne Grimmer. 1990.
Preservation Brief 38: Removing Graffi ti from Historic Masonry. Martin E. Weaver. 1995.
Preservation Brief 42: The Maintenance, Repair and Replacement of Historic Cast Stone. Richard Pieper. 2001.
Preservation Tech Note 1: Conserving Outdoor Bronze Sculpture. Dennis Montagna. 1989.
National Park Service , National Register Bulletins:
Guidelines for Evaluating and Registering Cemeteries and Burial Places. Elisabeth Walton Pott er and Beth M. Boland. 1992.
National Park Service publications, Museum Management Program:
Conserve O Gram, 10/4 Caring for Outdoor Bronze Plaques, Part I: Documentation and Inspection. 2005
Conserve O Gram, 10/5 Caring for Outdoor Bronze Plaques, Part II: Cleaning and Waxing. 2005.
20
About the Authors
Dr. Mary Striegel directs the Material Conservation Program at the National Park Service’s National Center for Technology and Training (NCPTT) in Natchitoches, Louisiana. Frances Gale is the former Training Chief (NCPTT) and currently is a Senior Lecturer and Director of the Architectural Conservation Laboratory, University of Texas at Austin. Jason Church is a Materials Conservator with NCPTT. Debbie Dietrich-Smith is the Chief, Historic Landscape Program, NCPTT.
Acknowledgements
The authors wish to thank Francis Miller, Conservator, ConserArt LLC; Mark Wolfe, Executive Director and Jennifer McWilliams, Cemetery Preservation Program Coordinator, Texas Historical Commission; Gus Fraser, Vice President of Preservation and Facilities, Mount Auburn Cemetery; Sara Amy Leach, Senior Historian and Jennifer Perunko, Historian, National Cemetery Administration, Department of Veterans Aff airs; and Jenny Parker Technical Preservation Services, National Park Service for their insightful comments in reviewing the brief. Thanks also go to Kirk Cordell, Executive Director, NCPTT, and Brian Goeken, Chief, Technical Preservation Services. Charles Fisher, Technical Preservation Services provided invaluable assistance in the editing and preparation of this brief.
This publication has been prepared pursuant to the National Historic Preservation Act, as amended, which directs the Secretary of the Interior to develop and make available information concerning historic
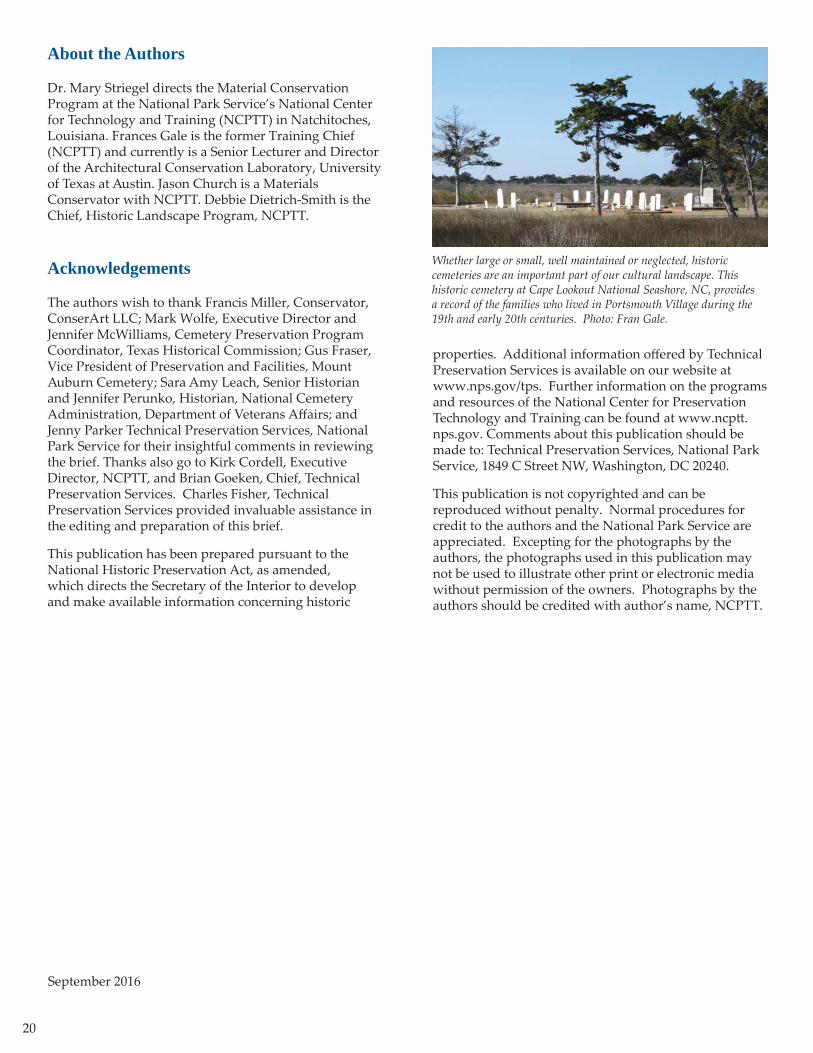
Whether large or small, well maintained or neglected, historic cemeteries are an important part of our cultural landscape. This historic cemetery at Cape Lookout National Seashore, NC, provides a record of the families who lived in Portsmouth Village during the 19th and early 20th centuries. Photo: Fran Gale.
properties. Additional information off ered by Technical Preservation Services is available on our website at www.nps.gov/tps. Further information on the programs and resources of the National Center for Preservation Technology and Training can be found at www.ncptt .nps.gov. Comments about this publication should be made to: Technical Preservation Services, National Park Service, 1849 C Street NW, Washington, DC 20240.
This publication is not copyrighted and can be reproduced without penalty. Normal procedures for credit to the authors and the National Park Service are appreciated. Excepting for the photographs by the authors, the photographs used in this publication may not be used to illustrate other print or electronic media without permission of the owners. Photographs by the authors should be credited with author’s name, NCPTT.
September 2016