Embed Size (px)
Citation preview
CEE 317GeoSurveying
HomeworkAutoCAD Civil 3D
For this assignment, you will need to create a Contour Map in Civil 3D using the Contours_Mueller_Points.csv file. Refer to the Civil 3D tutorial when creating the contour map. Use the drawing template (Civil 3D template file), as this contains a title block created for you already.
When importing the points, they will be Easting, Northing, Elevation (ENZ).
Label your contours at every 1’ (the same as in the tutorial).
Once competed, you will need to superimpose your contour map with the MuellerMap.dwg file that is provided. Use the steps provided on the next page to superimpose the maps.
The final deliverable will be a map printout with the title block filled in accordingly. You will determine the best scale for your map and note the scale in the title block. Use Civil 3D to printout the map (not AutoCAD), since the Civil 3D template has the title block. Print to 8.5” by 11”.

To superimpose the map, follow these steps:
1. Open the MuellerMap.dwg file in AutoCAD 2013 (NOT AutoCAD Civil 3D)
To superimpose the maps, you will be using a command called xref (stands for External Reference). The function of this command is to attach one drawing file within another drawing file, by externally referencing it. So in this case, you will be externally referencing the MuellerMap.dwg within your contour map (which will be a Civil 3D file).
2. Once your MuellerMap.dwg file is open, you need to create a base point for Civil 3D to use as a point of insertion. The default base point is (0,0,0). In this case, you have a control point (Point 20) which we can use as a base point.
3. In the command bar, type in BASE and hit Enter.
4. With your Object Snap turned on, zoom in on the Control Point and click on the X as your base point.
5. After this, Save your file and Close the AutoCAD file.
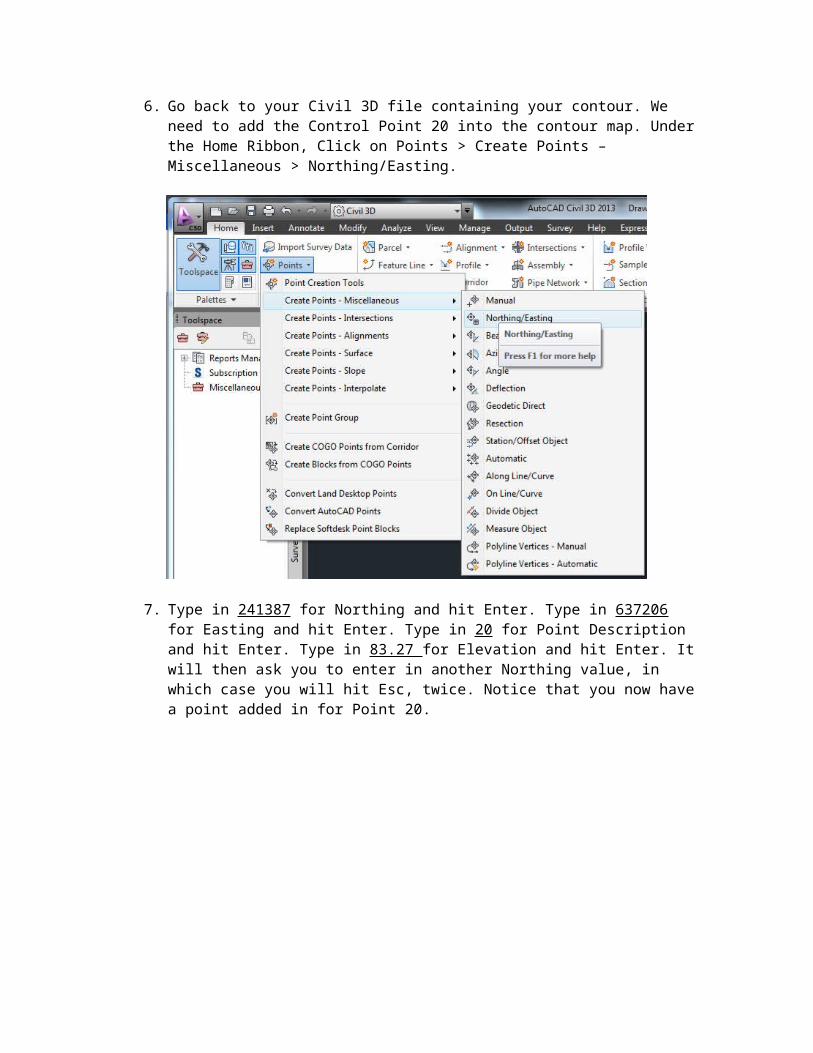
6. Go back to your Civil 3D file containing your contour. We need to add the Control Point 20 into the contour map. Under the Home Ribbon, Click on Points > Create Points – Miscellaneous > Northing/Easting.
7. Type in 241387 for Northing and hit Enter. Type in 637206 for Easting and hit Enter. Type in 20 for Point Description and hit Enter. Type in 83.27 for Elevation and hit Enter. It will then ask you to enter in another Northing value, in which case you will hit Esc, twice. Notice that you now have a point added in for Point 20.
8. In your command bar, type XREF and hit Enter. You will notice that a side panel will show up saying External Reference.
9. Click on the Attach DWG button.
10. Choose MuellerMap.dwg from your files and click Open.

11. An Attach External Reference Window will appear. You will need to enter in scale of 12 and click uniform scale. You will also need to specify the insertion point. In this case, it will be the coordinates to Point 20. Make sure your inputs match the window below and click OK.
12. You will notice that the drawing is a block (all one object and that it overlays your contour. The final step is to right click on the block , go to Display Order, and click Send to the Back. This will move the block underneath your contour so that you can make changes to the contour if needed. Save and fill in your title block on the Layout View and print.


![Addressing Sediment Transport Through Tobin Lake, … · 2020-05-01 · 2. BUILD CIVIL3D SURFACE • Convert elevation contours into Civil3D (2019) [11]. 3. BUILD HEC-RAS MODEL •](https://img.pdfslide.us/doc/110x75/5fa13bd5816e1244ef449165/addressing-sediment-transport-through-tobin-lake-2020-05-01-2-build-civil3d.jpg)