Embed Size (px)
Citation preview
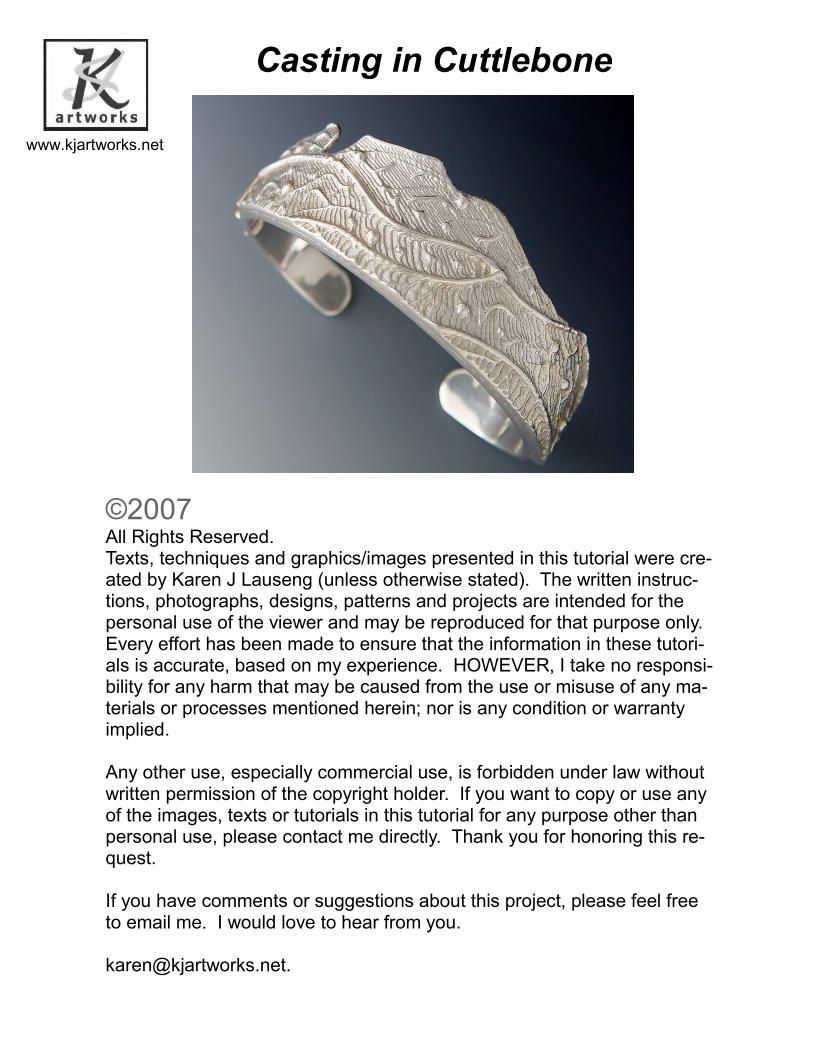
©2007 All Rights Reserved. Texts, techniques and graphics/images presented in this tutorial were cre-ated by Karen J Lauseng (unless otherwise stated). The written instruc-tions, photographs, designs, patterns and projects are intended for the personal use of the viewer and may be reproduced for that purpose only. Every effort has been made to ensure that the information in these tutori-als is accurate, based on my experience. HOWEVER, I take no responsi-bility for any harm that may be caused from the use or misuse of any ma-terials or processes mentioned herein; nor is any condition or warranty implied. Any other use, especially commercial use, is forbidden under law without written permission of the copyright holder. If you want to copy or use any of the images, texts or tutorials in this tutorial for any purpose other than personal use, please contact me directly. Thank you for honoring this re-quest. If you have comments or suggestions about this project, please feel free to email me. I would love to hear from you. [email protected].
Casting in Cuttlebone
www.kjartworks.net

Cuttlebone is the chalky internal shell of a ten legged, squid-like mollusk known as the cuttle-fish. It has a hard, thin crust on the outside which surrounds the internal softer shell. The soft side is composed of a calcium carbonate, which is almost pure calcium. Domestically, the bone is used by parakeets and canaries as a bill sharpener and can be purchased at most pet stores. In powdered form it is used as a polish-ing agent. Cuttlebones are found on beaches after sea storms and until recent years were seen, hung by a string on the walls in goldsmith's work-shops. Cuttlebone casting is an ancient tech-nique that was used in Mediterranean countries for centuries. Belt buckles made by German goldsmiths have been found dating before the seventh century. Since then, this method was employed throughout history from Italy to Greece, from France to England Until the end of the 1950's it was utilized by the largest gold manufacturers in the world for mass production. With the perfection of centrifugal casting, the cuttlebone technique became too time consum-ing and is no longer used by industry. Today, cuttlebone casting is mostly used by artists and craftsman. I absolutely love the spontaneity of the process. There are numerous ways to cre-ate a mold for cuttlefish casting. The procedure outlined is the direct method of carving into the bone. This is a simple, low-tech process which can be completed from start to finish in less than an hour. Please read through entire tutorial before you begin this project.
History
©2007 All Rights Reserved. Texts, techniques and graphics/images presented in this tutorial were created by Karen J Lauseng (unless otherwise stated). The written instructions, photographs, designs, patterns and projects are intended for the personal use of the viewer and may be reproduced for that purpose only. Every effort has been made to ensure that the information in these tutorials is accurate, based on my experience. HOWEVER, I take no responsi-bility for any harm that may be caused from the use or misuse of any materials or processes mentioned herein; nor is any condition or warranty implied. Any other use, especially commercial use, is forbidden under law without written permission of the copyright holder. If you want to copy or use any of the images, texts or tutorials on this site for any purpose other than personal use, please contact me directly. Thank you for honoring this request.

What You Will Need
Materials Cuttlebone Sterling scrap / casting grain
Tools Concrete block Carving and marking tools (pencil, dental tools, paint can opener, awl, square tubing, round tubing, etc. Wire cutters Soft Brush Masking tape Acetylene torch with a large and small tip Fireproof surface with adequate ventilation Fireproof brick Respirator Crucible Casting flux
©2007 All Rights Reserved. Texts, techniques and graphics/images presented in this tutorial were created by Karen J Lauseng (unless otherwise stated). The written instructions, photographs, designs, patterns and projects are intended for the personal use of the viewer and may be reproduced for that purpose only. Every effort has been made to ensure that the information in these tutorials is accurate, based on my experience. HOWEVER, I take no responsi-bility for any harm that may be caused from the use or misuse of any materials or processes mentioned herein; nor is any condition or warranty implied. Any other use, especially commercial use, is forbidden under law without written permission of the copyright holder. If you want to copy or use any of the images, texts or tutorials on this site for any purpose other than personal use, please contact me directly. Thank you for honoring this request.

Be Safe!
Wear a respirator! The dust from the cuttlefish shell is extremely haz-
ardous for your lungs—wear a respirator to filter out dust and other toxins, and sweep up and remove the dust from the studio when you are finished carving. I like to do my carving outside so the dust does not settle in my studio.
Ventilate! When casting, proper ventilation is necessary to remove the
fumes emitted from the flux, torch, and burning bone. Cuttlefish casting has a distinct, strong, fishy odor—you’ll definitely want to ventilate.
©2007 All Rights Reserved. Texts, techniques and graphics/images presented in this tutorial were created by Karen J Lauseng (unless otherwise stated). The written instructions, photographs, designs, patterns and projects are intended for the personal use of the viewer and may be reproduced for that purpose only. Every effort has been made to ensure that the information in these tutorials is accurate, based on my experience. HOWEVER, I take no responsi-bility for any harm that may be caused from the use or misuse of any materials or processes mentioned herein; nor is any condition or warranty implied. Any other use, especially commercial use, is forbidden under law without written permission of the copyright holder. If you want to copy or use any of the images, texts or tutorials on this site for any purpose other than personal use, please contact me directly. Thank you for honoring this request.

4. Continue to remove material until each
half has a flat, smooth plane. If outer shell be-gins to scrape on concrete, carefully clip that area of shell with small wire cutter.
Tip: if you want a large cast, use two shells and remove only the top 1/4 section of each shell.
1. Large cuttlebones can be purchased from
jewelry suppliers, small from pet stores.
2. To prepare mold for casting, divide cuttle-
fish bone in half by carving a straight line with an awl. Determine centerline and score,. Make several passes into line with your awl until a grove is cut completely through the soft side of the bone and you can feel scraping against hard shell. Next, break shell by snap-ping it along score line. Shell should break evenly in two.
Cuttlebone Preparation
3. Place soft surface down on a concrete
block and rub in a circular motion. Hold bone firmly and apply a light, even pressure as you rub.
Tip: Any rough, flat surface will work. I usually do this on my patio sidewalk. A concrete drive-way would also be good.
©2007 All Rights Reserved. Texts, techniques and graphics/images presented in this tutorial were created by Karen J Lauseng (unless otherwise stated). The written instructions, photographs, designs, patterns and projects are intended for the personal use of the viewer and may be reproduced for that purpose only. Every effort has been made to ensure that the information in these tutorials is accurate, based on my experience. HOWEVER, I take no responsi-bility for any harm that may be caused from the use or misuse of any materials or processes mentioned herein; nor is any condition or warranty implied. Any other use, especially commercial use, is forbidden under law without written permission of the copyright holder. If you want to copy or use any of the images, texts or tutorials on this site for any purpose other than personal use, please contact me directly. Thank you for honoring this request.

5. Using your awl, carve a sprue into each
half of mold, leaving an opening 1/3 the width of upper surface. From top to bottom, carving should measure less than 1” long. Make sure it has a smooth, gentle taper.
6. Add texture as you like now. I used an awl
to create the lines and a pencil for the domes.
7. Dental tools, square or round tubing, the
end of a paintbrush, or ink pen all make inter-esting designs. Experiment with what you have available.
5. Carve a shape into cuttlebone. Carve only
into one side of mold, leaving remaining sec-tion flat, except for sprue opening. For carving, you will need a tool with a flat edge. I like to use a paint can opener for this as it seems to work well to attain a level surface. I like to carve the border first and then remove interior area.
Tip: I learned this carving tech-nique from Chuck Evans, and it sure adds a unique texture to the casting.
Tip: Do not carve too deeply or the casting will be very thick and difficult to use. Try to keep the carved depth less than 1/16” - about the same as an 18-gauge piece of sheet metal.
©2007 All Rights Reserved. Texts, techniques and graphics/images presented in this tutorial were created by Karen J Lauseng (unless otherwise stated). The written instructions, photographs, designs, patterns and projects are intended for the personal use of the viewer and may be reproduced for that purpose only. Every effort has been made to ensure that the information in these tutorials is accurate, based on my experience. HOWEVER, I take no responsi-bility for any harm that may be caused from the use or misuse of any materials or processes mentioned herein; nor is any condition or warranty implied. Any other use, especially commercial use, is forbidden under law without written permission of the copyright holder. If you want to copy or use any of the images, texts or tutorials on this site for any purpose other than personal use, please contact me directly. Thank you for honoring this request.
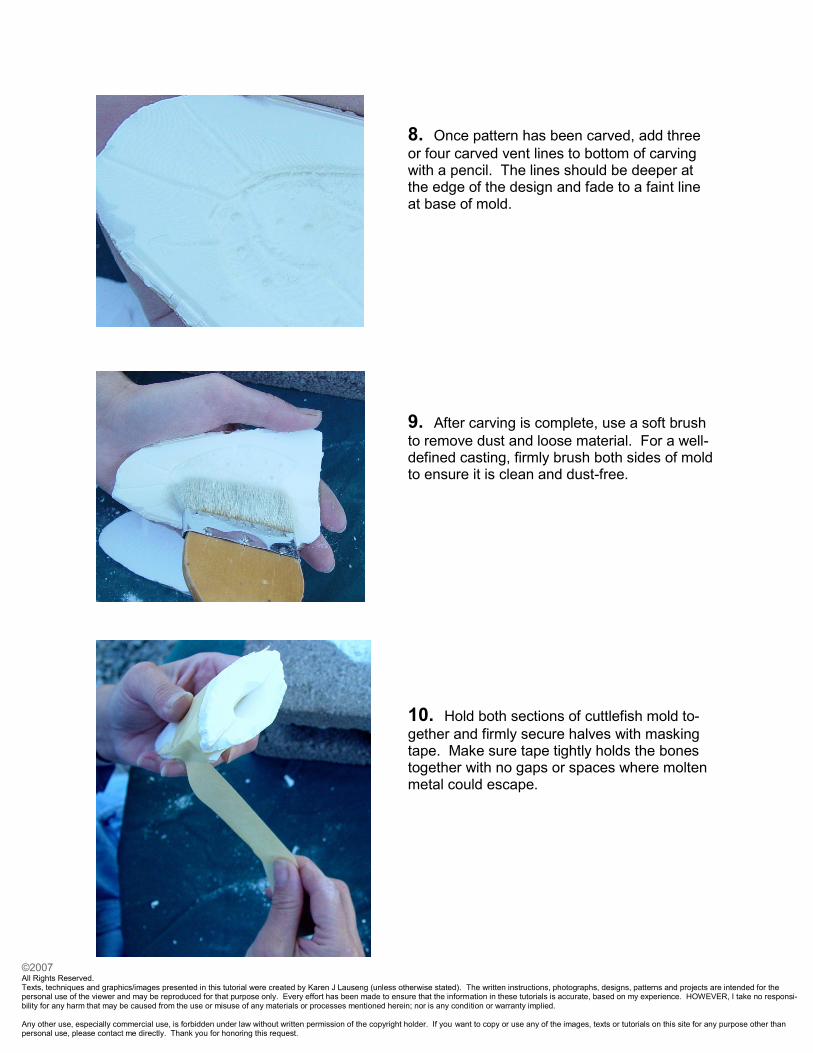
8. Once pattern has been carved, add three
or four carved vent lines to bottom of carving with a pencil. The lines should be deeper at the edge of the design and fade to a faint line at base of mold.
10. Hold both sections of cuttlefish mold to-
gether and firmly secure halves with masking tape. Make sure tape tightly holds the bones together with no gaps or spaces where molten metal could escape.
9. After carving is complete, use a soft brush
to remove dust and loose material. For a well-defined casting, firmly brush both sides of mold to ensure it is clean and dust-free.
©2007 All Rights Reserved. Texts, techniques and graphics/images presented in this tutorial were created by Karen J Lauseng (unless otherwise stated). The written instructions, photographs, designs, patterns and projects are intended for the personal use of the viewer and may be reproduced for that purpose only. Every effort has been made to ensure that the information in these tutorials is accurate, based on my experience. HOWEVER, I take no responsi-bility for any harm that may be caused from the use or misuse of any materials or processes mentioned herein; nor is any condition or warranty implied. Any other use, especially commercial use, is forbidden under law without written permission of the copyright holder. If you want to copy or use any of the images, texts or tutorials on this site for any purpose other than personal use, please contact me directly. Thank you for honoring this request.

13. Heat metal until molten.
11. Secure mold firmly in a place where it
will not tip. Whatever holding method you choose must be secure, fireproof, and placed on a fireproof surface. Proper venti-lation is essential..
12. With a large tipped acetylene torch,
preheat crucible until glowing red and then add metal. Small pieces of sterling left over from other projects, including old sterling chains, rings, etc., make fine scrap; otherwise, casting grain can be purchased from a jewelry sup-plier.
Tip: Methods I have used to se-cure the mold include: Bury the mold halfway in a coffee can filled with sand / place the mold between two bricks / (shown) hold it in place with a third hand apparatus.
©2007 All Rights Reserved. Texts, techniques and graphics/images presented in this tutorial were created by Karen J Lauseng (unless otherwise stated). The written instructions, photographs, designs, patterns and projects are intended for the personal use of the viewer and may be reproduced for that purpose only. Every effort has been made to ensure that the information in these tutorials is accurate, based on my experience. HOWEVER, I take no responsi-bility for any harm that may be caused from the use or misuse of any materials or processes mentioned herein; nor is any condition or warranty implied. Any other use, especially commercial use, is forbidden under law without written permission of the copyright holder. If you want to copy or use any of the images, texts or tutorials on this site for any purpose other than personal use, please contact me directly. Thank you for honoring this request.

16. When cool, remove masking tape
from piece to reveal your casting. Dispose of mold and clean metal with dishwashing detergent and a brass brush. The final casting is now ready to be used in your jew-elry design.
15. Ensure that pouring edge of crucible
is red hot, so metal doesn’t cool before en-tering mold. Pour molten metal into mold, being careful not to get fire too close to casting. Be sure to keep torch aimed at crucible until all metal has been poured. Smell will be quite unpleasant and you will be thankful for proper ventilation.
14. Once metal is molten, add a small
amount of flux with a steel tool. For a small casting, less than 1/8 teaspoon is sufficient. Flux helps keep metal clean and aids metal to flow as it is poured into mold.
Troubleshooting: 1. Metal does not flow all the way to the bottom of the mold: Metal was most likely not hot
enough when it entered the mold. Make absolutely sure the metal is completely molten and the pouring side of the crucible is a glowing red.
2. Metal flows through and out the bottom of the mold: Mold faces are not completely flat or mold faces are not securely connected with masking tape.
3. Detail is blurred: Mold was not adequately cleaned and cuttlebone powder remained in crevices.
4. Too little or too much metal: Estimate metal needs based on the size of your mold. This is not an exact science. Over time, you will develop a natural sense of how much metal is needed.
5. Key to success: HAVE FUN……………….
©2007 All Rights Reserved. Texts, techniques and graphics/images presented in this tutorial were created by Karen J Lauseng (unless otherwise stated). The written instructions, photographs, designs, patterns and projects are intended for the personal use of the viewer and may be reproduced for that purpose only. Every effort has been made to ensure that the information in these tutorials is accurate, based on my experience. HOWEVER, I take no responsi-bility for any harm that may be caused from the use or misuse of any materials or processes mentioned herein; nor is any condition or warranty implied. Any other use, especially commercial use, is forbidden under law without written permission of the copyright holder. If you want to copy or use any of the images, texts or tutorials on this site for any purpose other than personal use, please contact me directly. Thank you for honoring this request.

Whether you choose to create a piece using only silver cast in cuttlebone or decide to incorporate small pieces of metal in your design, you will have an original, one-of-a-kind piece of jewelry. I like to make pieces that include, mokume, silver wire, and re-ticulated silver. Have fun with the project. Please send any comments or suggestions. I would love to hear from you. [email protected]
©2007 All Rights Reserved. Texts, techniques and graphics/images presented in this tutorial were created by Karen J Lauseng (unless otherwise stated). The written instructions, photographs, designs, patterns and projects are intended for the personal use of the viewer and may be reproduced for that purpose only. Every effort has been made to ensure that the information in these tutorials is accurate, based on my experience. HOWEVER, I take no responsi-bility for any harm that may be caused from the use or misuse of any materials or processes mentioned herein; nor is any condition or warranty implied. Any other use, especially commercial use, is forbidden under law without written permission of the copyright holder. If you want to copy or use any of the images, texts or tutorials on this site for any purpose other than personal use, please contact me directly. Thank you for honoring this request.