Embed Size (px)
Citation preview
Technical Support 1-800-345-8172 CASHFLOW SC66 Page-1www.meigroup.com Part # 252055066 G3
2008©MEI Inc. All Rights Reserved.The MEI device, MEI CASHFLOW, MEI EASITRAX and SODECO are registered trademarks of MEI in the U.S. and othercountries. Information is subject to change without notice. MEI has made every effort to assure that the information in thisdocument is accurate. However, we cannot be held responsible for any errors or omissions.
CASHFLOW SC66 ®
Operation & Maintenance Manual
Technical Support 1-800-345-8172 CASHFLOW SC66 Page-2www.meigroup.com Part # 252055066 G3
TABLE OF CONTENTSOVERVIEW
Model Number ........................................................................................................ 3Serial Number......................................................................................................... 3Features ................................................................................................................ 4,5Main Components of the CASHFLOW SC66 Bill Acceptor ............................ 6Power Requirement ............................................................................................... 6
INSTALLATION AND REMOVAL OF COMPONENTSInstalling the Chassis ............................................................................................. 7Inserting and Removing the Acceptor Module ................................................... 8Installing a Bill Entry Guide ................................................................................. 9Installing the Cashbox ......................................................................................... 10Removing the Cashbox ........................................................................................ 10Installing Locks on the Cashbox ........................................................................ 11
STS SUPPORT TOOL................................................................ 12UPDATING SOFTWARE
Portable Programing Module (PPM) .......................................................... 13,14Replacing the PROM .................................................................................... 15,16
HARNESSING AND CONNECTORSEBDS Interface Pin Out ...................................................................................... 17RS232 Interface Pin Out ..................................................................................... 17
COUPONCoupon Configuration Instructions ................................................................... 18Coupon .................................................................................................................. 19
MAINTENANCECleaning the Acceptor Module ........................................................................... 20Calibration ............................................................................................................ 20
TROUBLESHOOTINGDiagnostic Codes ................................................................................................. 21
Frequently Asked Questions ...................................................22-26CASHFLOW SC66 DIMENSION DRAWINGS ....................... 27
Technical Support 1-800-345-8172 CASHFLOW SC66 Page-3www.meigroup.com Part # 252055066 G3
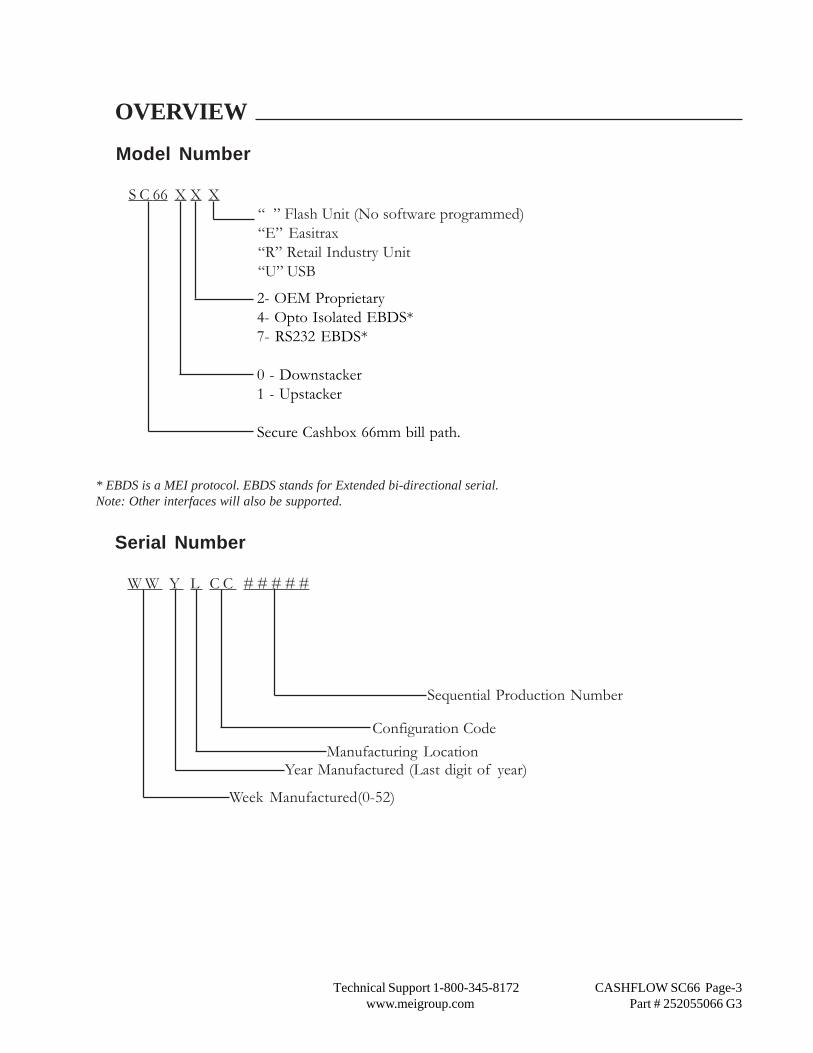
OVERVIEW
Serial Number
W W Y L C C # # # # #
Configuration CodeManufacturing Location
Year Manufactured (Last digit of year)
Week Manufactured(0-52)
Sequential Production Number
Model Number
S C 66 X X X
2- OEM Proprietary4- Opto Isolated EBDS*7- RS232 EBDS*
0 - Downstacker1 - Upstacker
Secure Cashbox 66mm bill path.
* EBDS is a MEI protocol. EBDS stands for Extended bi-directional serial.Note: Other interfaces will also be supported.
“ ” Flash Unit (No software programmed)“E” Easitrax“R” Retail Industry Unit“U” USB
Technical Support 1-800-345-8172 CASHFLOW SC66 Page-4www.meigroup.com Part # 252055066 G3
OVERVIEW
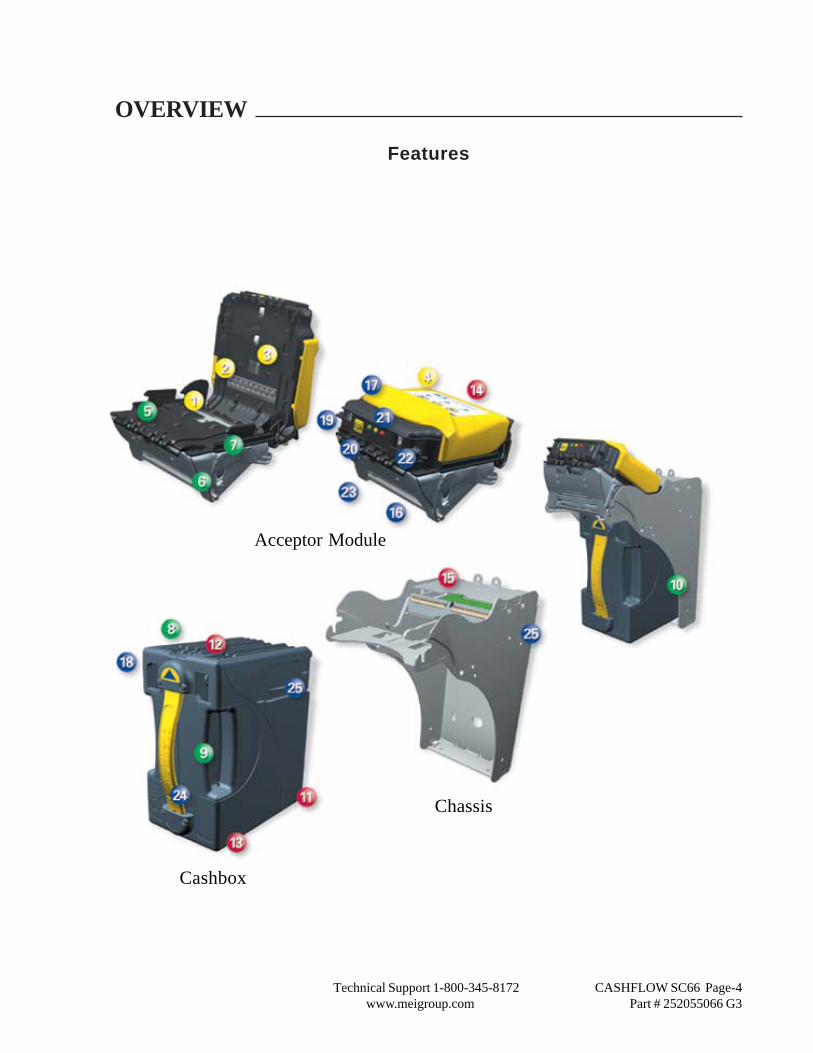
Features
Acceptor Module
Chassis
Cashbox
Technical Support 1-800-345-8172 CASHFLOW SC66 Page-5www.meigroup.com Part # 252055066 G3
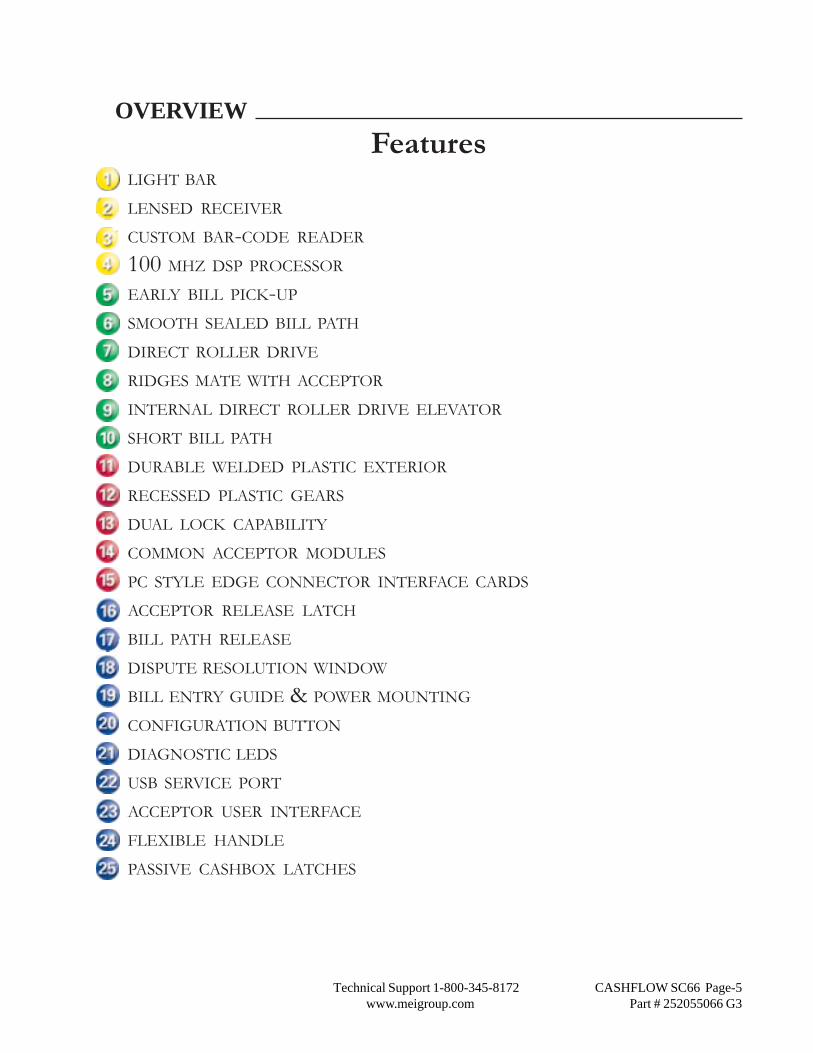
FeaturesLIGHT BAR
LENSED RECEIVER
CUSTOM BAR-CODE READER
100 MHZ DSP PROCESSOR
EARLY BILL PICK-UP
SMOOTH SEALED BILL PATH
DIRECT ROLLER DRIVE
RIDGES MATE WITH ACCEPTOR
INTERNAL DIRECT ROLLER DRIVE ELEVATOR
SHORT BILL PATH
DURABLE WELDED PLASTIC EXTERIOR
RECESSED PLASTIC GEARS
DUAL LOCK CAPABILITY
COMMON ACCEPTOR MODULES
PC STYLE EDGE CONNECTOR INTERFACE CARDS
ACCEPTOR RELEASE LATCH
BILL PATH RELEASE
DISPUTE RESOLUTION WINDOW
BILL ENTRY GUIDE & POWER MOUNTING
CONFIGURATION BUTTON
DIAGNOSTIC LEDS
USB SERVICE PORT
ACCEPTOR USER INTERFACE
FLEXIBLE HANDLE
PASSIVE CASHBOX LATCHES
OVERVIEW
Technical Support 1-800-345-8172 CASHFLOW SC66 Page-6www.meigroup.com Part # 252055066 G3
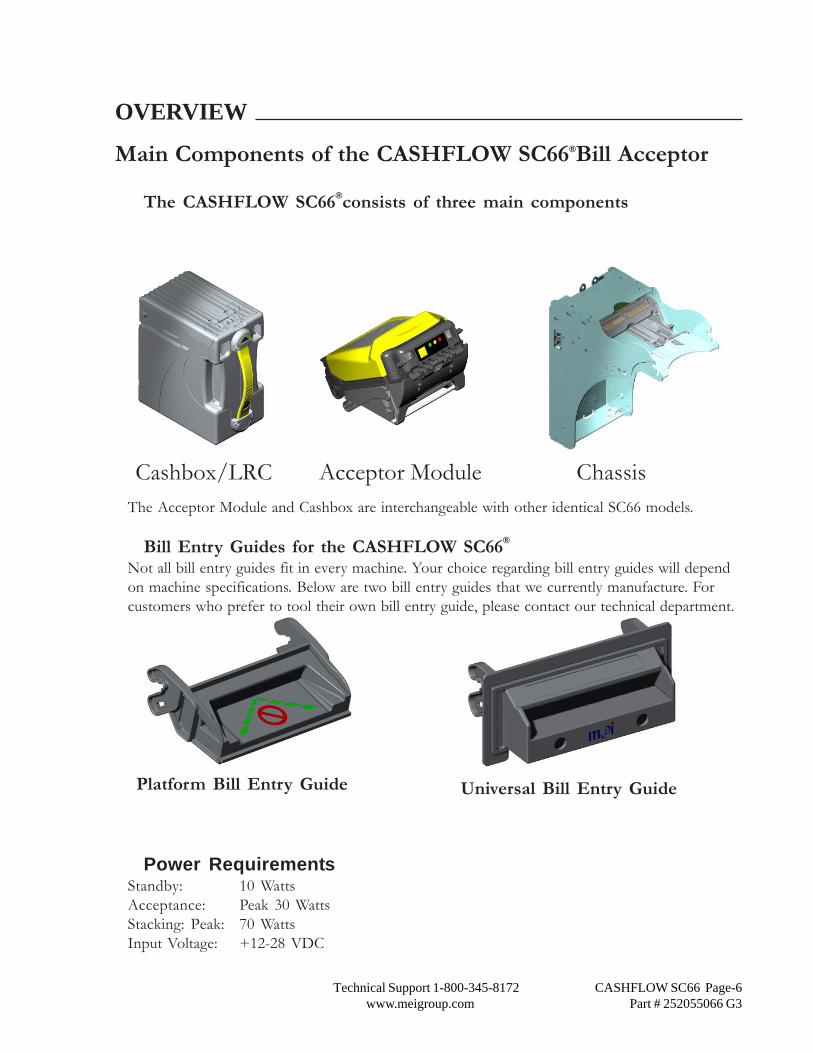
Main Components of the CASHFLOW SC66®Bill Acceptor
The CASHFLOW SC66®consists of three main components
Cashbox/LRC Acceptor Module Chassis
OVERVIEW
The Acceptor Module and Cashbox are interchangeable with other identical SC66 models.
Bill Entry Guides for the CASHFLOW SC66®
Not all bill entry guides fit in every machine. Your choice regarding bill entry guides will dependon machine specifications. Below are two bill entry guides that we currently manufacture. Forcustomers who prefer to tool their own bill entry guide, please contact our technical department.
Universal Bill Entry GuidePlatform Bill Entry Guide
Power RequirementsStandby: 10 WattsAcceptance: Peak 30 WattsStacking: Peak: 70 WattsInput Voltage: +12-28 VDC
Technical Support 1-800-345-8172 CASHFLOW SC66 Page-7www.meigroup.com Part # 252055066 G3
INSTALLATION
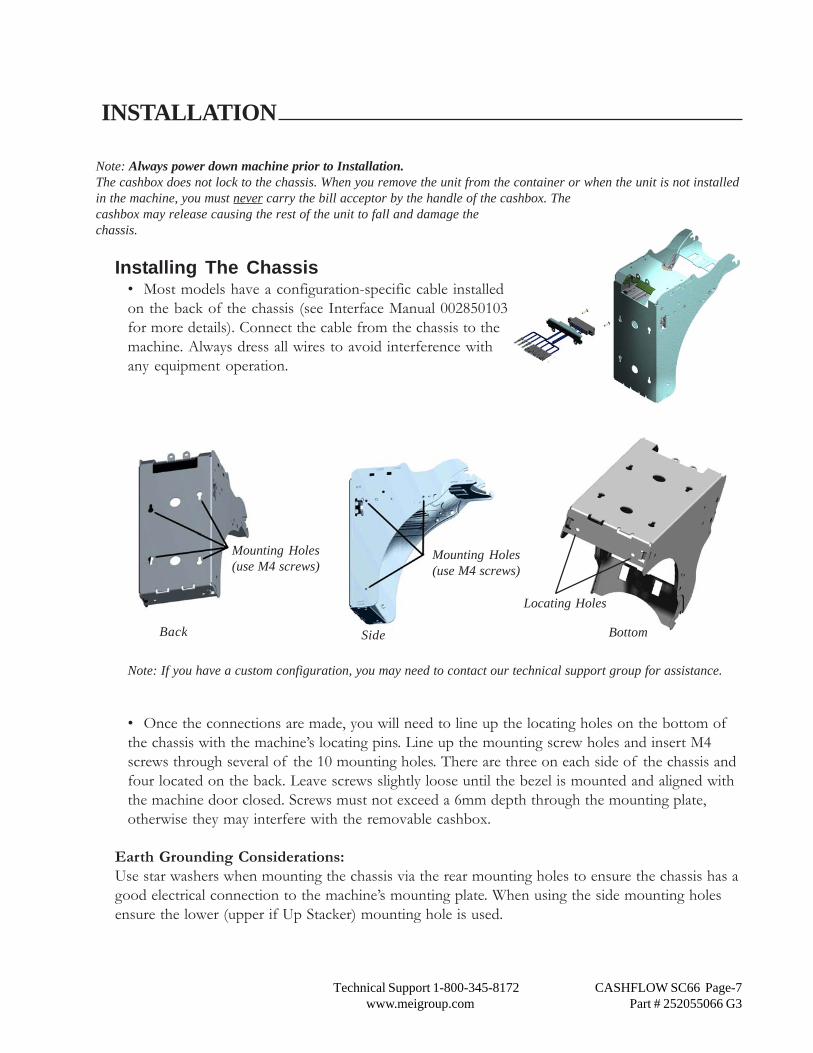
Mounting Holes(use M4 screws)
Mounting Holes(use M4 screws)
BottomBack Side
Note: Always power down machine prior to Installation.The cashbox does not lock to the chassis. When you remove the unit from the container or when the unit is not installedin the machine, you must never carry the bill acceptor by the handle of the cashbox. Thecashbox may release causing the rest of the unit to fall and damage thechassis.
Installing The Chassis• Most models have a configuration-specific cable installedon the back of the chassis (see Interface Manual 002850103for more details). Connect the cable from the chassis to themachine. Always dress all wires to avoid interference withany equipment operation.
Note: If you have a custom configuration, you may need to contact our technical support group for assistance.
• Once the connections are made, you will need to line up the locating holes on the bottom ofthe chassis with the machine’s locating pins. Line up the mounting screw holes and insert M4screws through several of the 10 mounting holes. There are three on each side of the chassis andfour located on the back. Leave screws slightly loose until the bezel is mounted and aligned withthe machine door closed. Screws must not exceed a 6mm depth through the mounting plate,otherwise they may interfere with the removable cashbox.
Earth Grounding Considerations:Use star washers when mounting the chassis via the rear mounting holes to ensure the chassis has agood electrical connection to the machine’s mounting plate. When using the side mounting holesensure the lower (upper if Up Stacker) mounting hole is used.
Locating Holes
Technical Support 1-800-345-8172 CASHFLOW SC66 Page-8www.meigroup.com Part # 252055066 G3
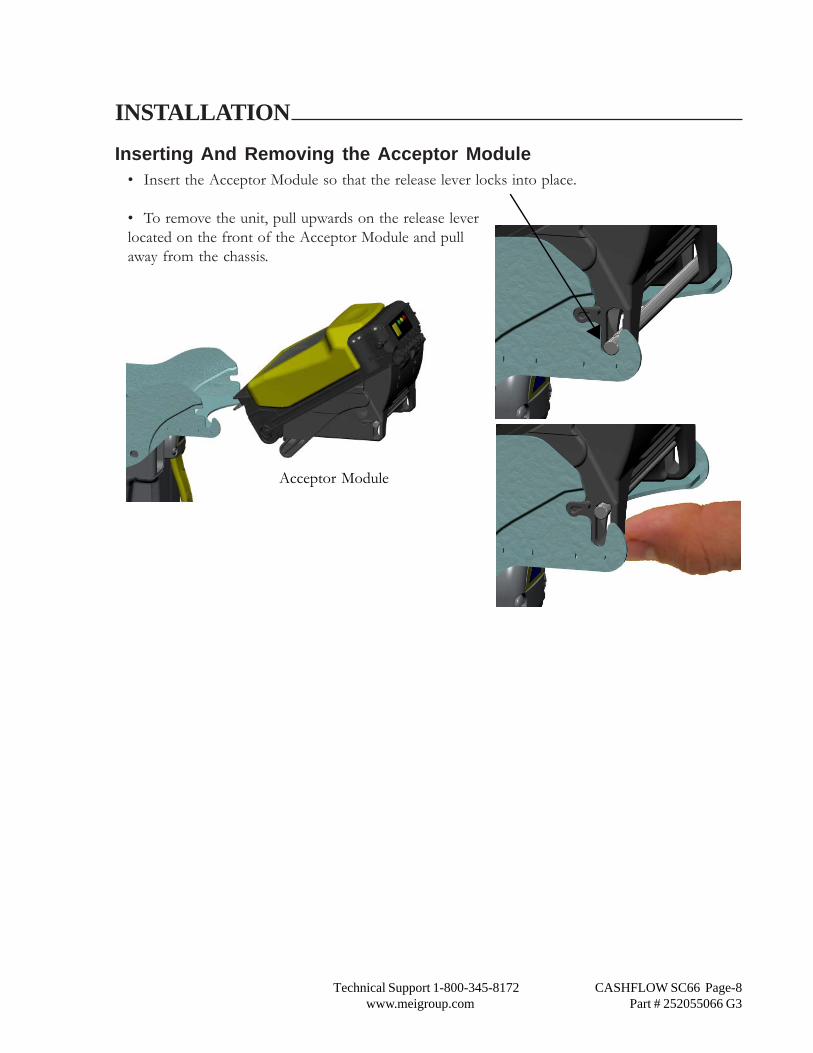
Inserting And Removing the Acceptor Module• Insert the Acceptor Module so that the release lever locks into place.
• To remove the unit, pull upwards on the release leverlocated on the front of the Acceptor Module and pullaway from the chassis.
Acceptor Module
INSTALLATION
Technical Support 1-800-345-8172 CASHFLOW SC66 Page-9www.meigroup.com Part # 252055066 G3
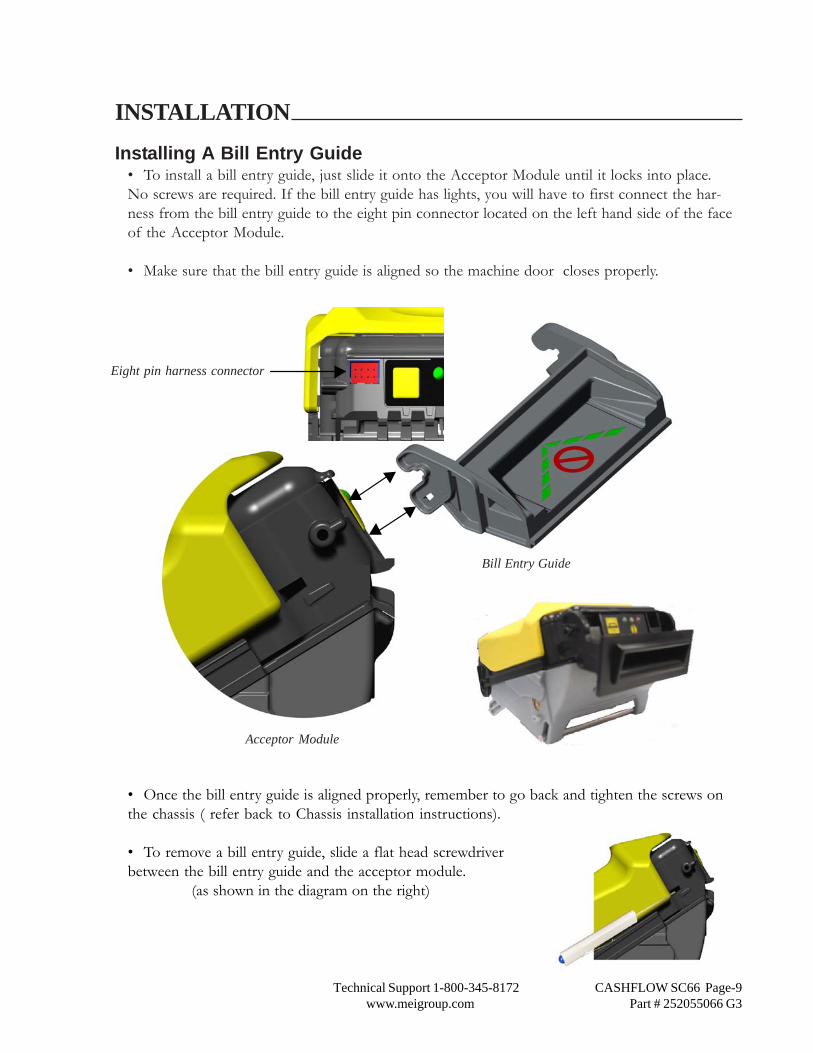
Eight pin harness connector
Installing A Bill Entry Guide• To install a bill entry guide, just slide it onto the Acceptor Module until it locks into place.No screws are required. If the bill entry guide has lights, you will have to first connect the har-ness from the bill entry guide to the eight pin connector located on the left hand side of the faceof the Acceptor Module.
• Make sure that the bill entry guide is aligned so the machine door closes properly.
Acceptor Module
Bill Entry Guide
INSTALLATION
• Once the bill entry guide is aligned properly, remember to go back and tighten the screws onthe chassis ( refer back to Chassis installation instructions).
• To remove a bill entry guide, slide a flat head screwdriverbetween the bill entry guide and the acceptor module.
(as shown in the diagram on the right)
Technical Support 1-800-345-8172 CASHFLOW SC66 Page-10www.meigroup.com Part # 252055066 G3
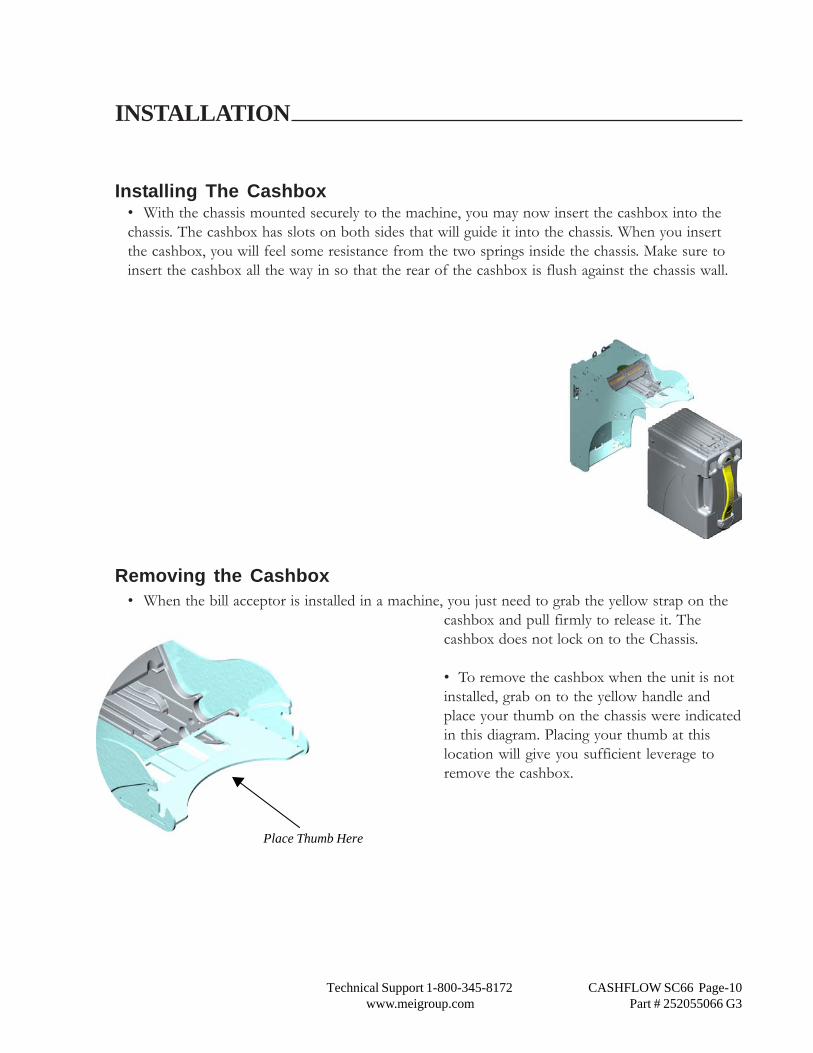
Installing The Cashbox• With the chassis mounted securely to the machine, you may now insert the cashbox into thechassis. The cashbox has slots on both sides that will guide it into the chassis. When you insertthe cashbox, you will feel some resistance from the two springs inside the chassis. Make sure toinsert the cashbox all the way in so that the rear of the cashbox is flush against the chassis wall.
Removing the Cashbox• When the bill acceptor is installed in a machine, you just need to grab the yellow strap on the
cashbox and pull firmly to release it. Thecashbox does not lock on to the Chassis.
• To remove the cashbox when the unit is notinstalled, grab on to the yellow handle andplace your thumb on the chassis were indicatedin this diagram. Placing your thumb at thislocation will give you sufficient leverage toremove the cashbox.
Place Thumb Here
INSTALLATION
Technical Support 1-800-345-8172 CASHFLOW SC66 Page-11www.meigroup.com Part # 252055066 G3
The cashbox may be fitted with either one or two security locks. The product is designed toaccept locks from a range of manufacturers including: -
MedecoKabaAbloyVSRMiwaDuo
Standard 5/8" and 1-1/8" formats are supported. There is a significant variety of lock designs,and spacer washers may be required for some lock types. Two locking hasps are shipped withevery cashbox. Contact MEI for cashbox lock specifications.
Locks vary greatly in price, security, keying policies, etc. The customer is responsible for selectinga lock with performance that is fit for the intended purpose. MEI does not test or endorse anyspecific brand of lock for security characteristics.
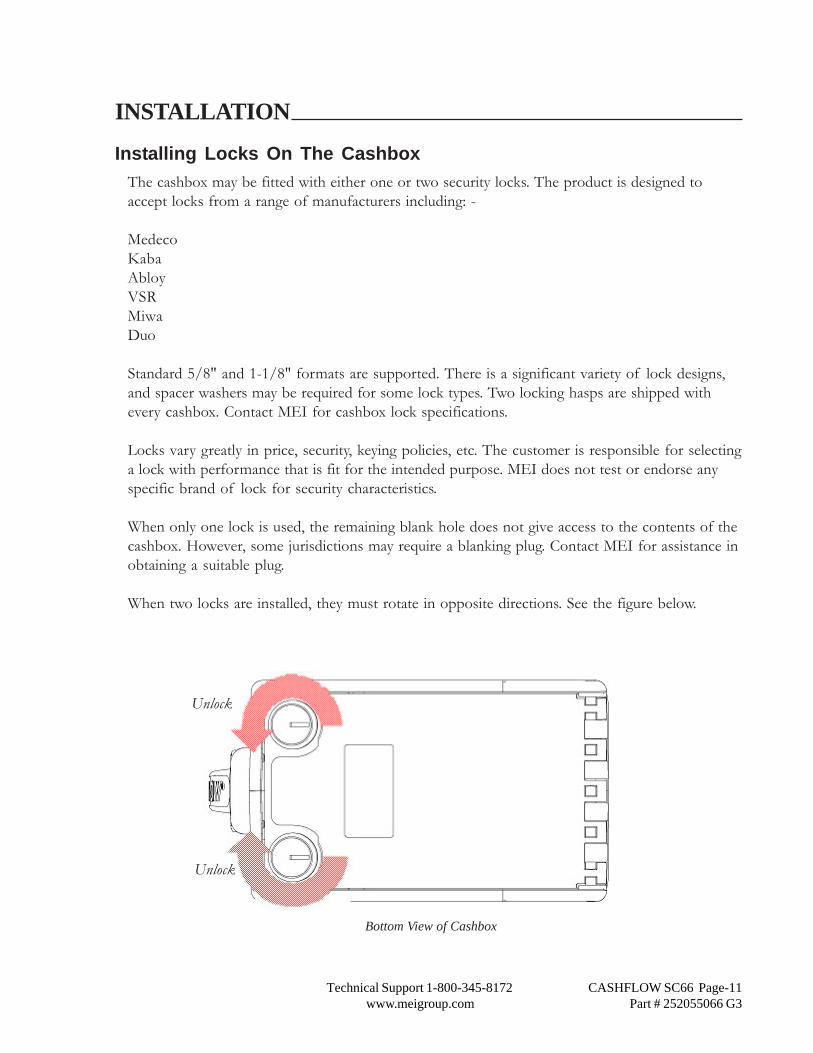
When only one lock is used, the remaining blank hole does not give access to the contents of thecashbox. However, some jurisdictions may require a blanking plug. Contact MEI for assistance inobtaining a suitable plug.
When two locks are installed, they must rotate in opposite directions. See the figure below.
Unlock
Unlock
INSTALLATION
Bottom View of Cashbox
Installing Locks On The Cashbox
Technical Support 1-800-345-8172 CASHFLOW SC66 Page-12www.meigroup.com Part # 252055066 G3
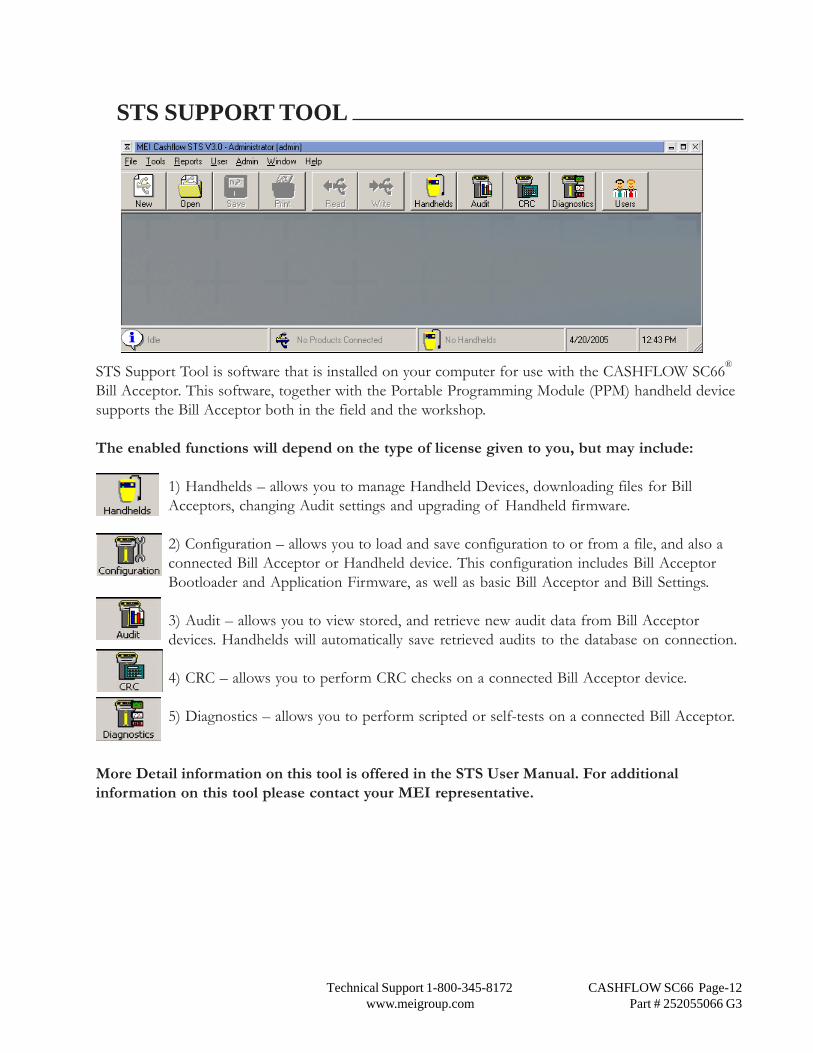
STS SUPPORT TOOL
STS Support Tool is software that is installed on your computer for use with the CASHFLOW SC66®
Bill Acceptor. This software, together with the Portable Programming Module (PPM) handheld devicesupports the Bill Acceptor both in the field and the workshop.
The enabled functions will depend on the type of license given to you, but may include:
1) Handhelds – allows you to manage Handheld Devices, downloading files for BillAcceptors, changing Audit settings and upgrading of Handheld firmware.
2) Configuration – allows you to load and save configuration to or from a file, and also aconnected Bill Acceptor or Handheld device. This configuration includes Bill AcceptorBootloader and Application Firmware, as well as basic Bill Acceptor and Bill Settings.
3) Audit – allows you to view stored, and retrieve new audit data from Bill Acceptordevices. Handhelds will automatically save retrieved audits to the database on connection.
4) CRC – allows you to perform CRC checks on a connected Bill Acceptor device.
5) Diagnostics – allows you to perform scripted or self-tests on a connected Bill Acceptor.
More Detail information on this tool is offered in the STS User Manual. For additionalinformation on this tool please contact your MEI representative.
Technical Support 1-800-345-8172 CASHFLOW SC66 Page-13www.meigroup.com Part # 252055066 G3
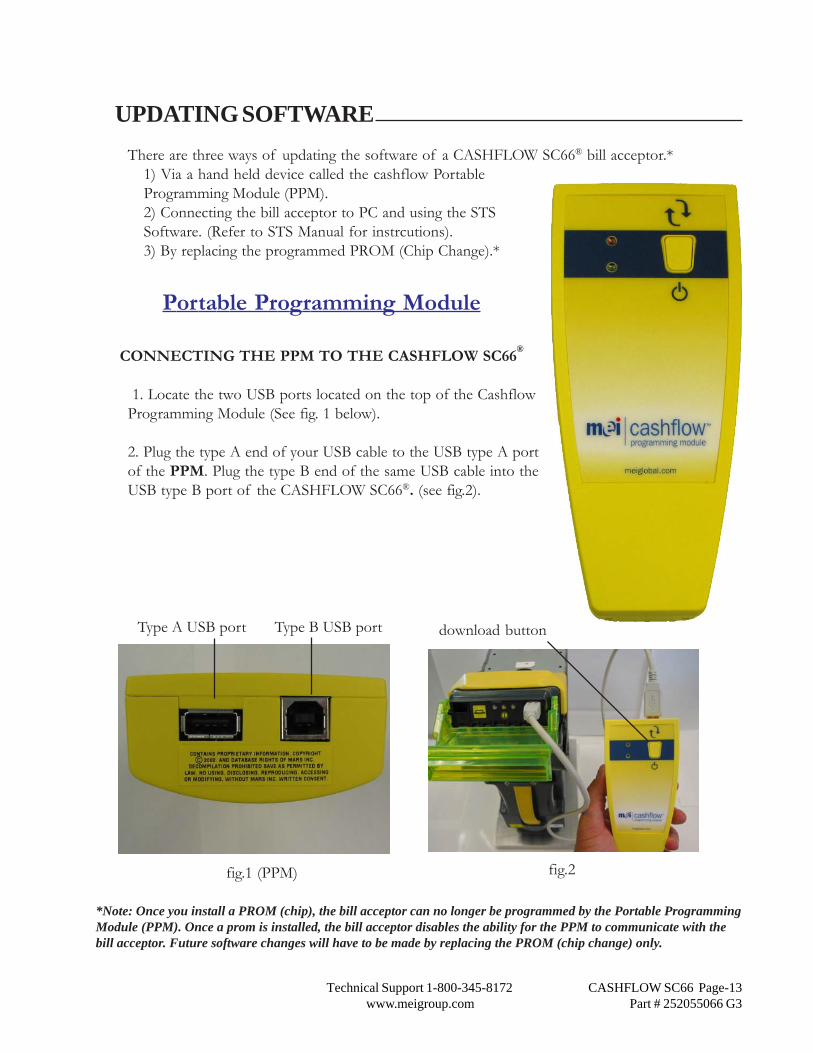
UPDATING SOFTWAREThere are three ways of updating the software of a CASHFLOW SC66® bill acceptor.*
1) Via a hand held device called the cashflow PortableProgramming Module (PPM).2) Connecting the bill acceptor to PC and using the STSSoftware. (Refer to STS Manual for instrcutions).3) By replacing the programmed PROM (Chip Change).*
Portable Programming Module
CONNECTING THE PPM TO THE CASHFLOW SC66®
1. Locate the two USB ports located on the top of the CashflowProgramming Module (See fig. 1 below).
2. Plug the type A end of your USB cable to the USB type A portof the PPM. Plug the type B end of the same USB cable into theUSB type B port of the CASHFLOW SC66®. (see fig.2).
fig.2
download button
fig.1 (PPM)
Type A USB port Type B USB port
*Note: Once you install a PROM (chip), the bill acceptor can no longer be programmed by the Portable ProgrammingModule (PPM). Once a prom is installed, the bill acceptor disables the ability for the PPM to communicate with thebill acceptor. Future software changes will have to be made by replacing the PROM (chip change) only.
Technical Support 1-800-345-8172 CASHFLOW SC66 Page-14www.meigroup.com Part # 252055066 G3
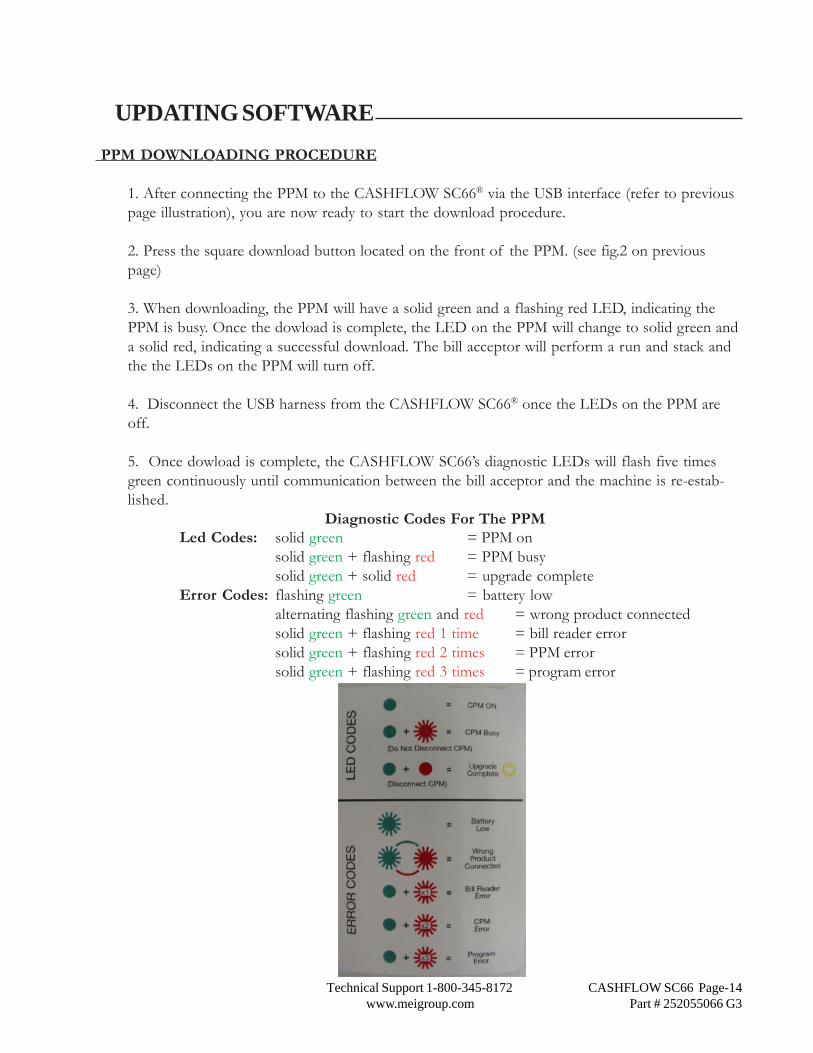
UPDATING SOFTWARE PPM DOWNLOADING PROCEDURE
1. After connecting the PPM to the CASHFLOW SC66® via the USB interface (refer to previouspage illustration), you are now ready to start the download procedure.
2. Press the square download button located on the front of the PPM. (see fig.2 on previouspage)
3. When downloading, the PPM will have a solid green and a flashing red LED, indicating thePPM is busy. Once the dowload is complete, the LED on the PPM will change to solid green anda solid red, indicating a successful download. The bill acceptor will perform a run and stack andthe the LEDs on the PPM will turn off.
4. Disconnect the USB harness from the CASHFLOW SC66® once the LEDs on the PPM areoff.
5. Once dowload is complete, the CASHFLOW SC66’s diagnostic LEDs will flash five timesgreen continuously until communication between the bill acceptor and the machine is re-estab-lished.
Diagnostic Codes For The PPMLed Codes: solid green = PPM on
solid green + flashing red = PPM busysolid green + solid red = upgrade complete
Error Codes: flashing green = battery lowalternating flashing green and red = wrong product connectedsolid green + flashing red 1 time = bill reader errorsolid green + flashing red 2 times = PPM errorsolid green + flashing red 3 times = program error
Technical Support 1-800-345-8172 CASHFLOW SC66 Page-15www.meigroup.com Part # 252055066 G3
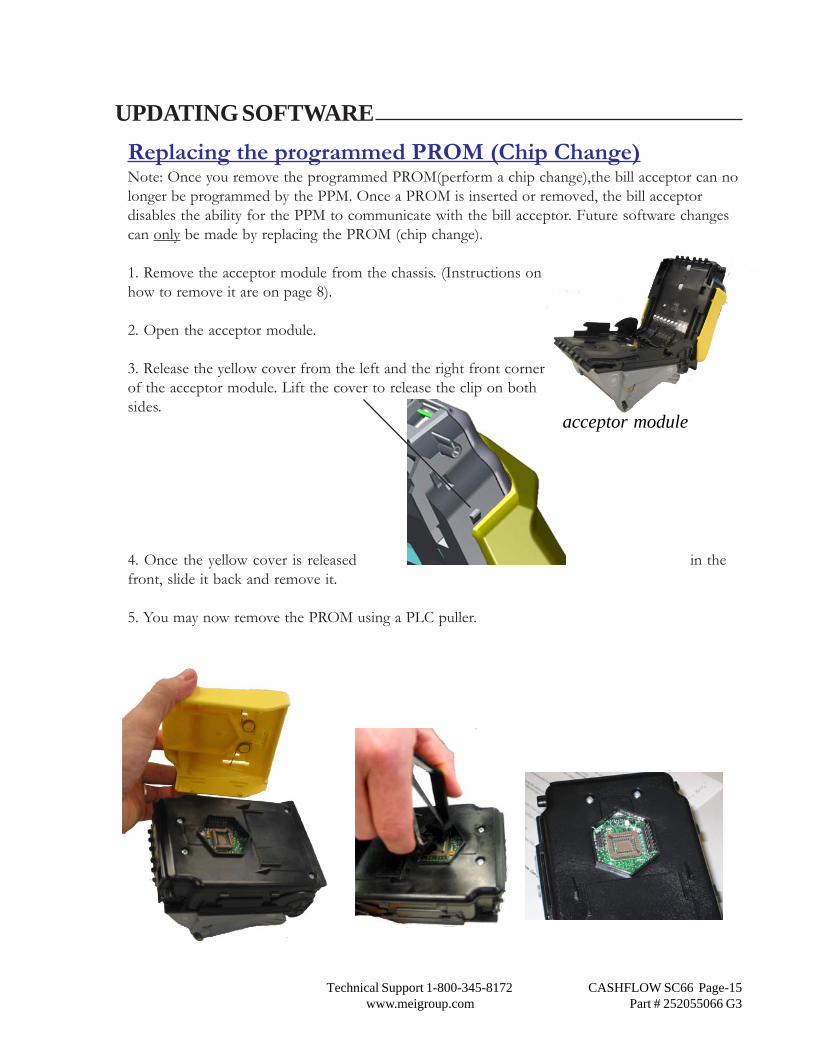
UPDATING SOFTWAREReplacing the programmed PROM (Chip Change)Note: Once you remove the programmed PROM(perform a chip change),the bill acceptor can nolonger be programmed by the PPM. Once a PROM is inserted or removed, the bill acceptordisables the ability for the PPM to communicate with the bill acceptor. Future software changescan only be made by replacing the PROM (chip change).
1. Remove the acceptor module from the chassis. (Instructions onhow to remove it are on page 8).
2. Open the acceptor module.
3. Release the yellow cover from the left and the right front cornerof the acceptor module. Lift the cover to release the clip on bothsides.
4. Once the yellow cover is released in thefront, slide it back and remove it.
5. You may now remove the PROM using a PLC puller.
acceptor module
Technical Support 1-800-345-8172 CASHFLOW SC66 Page-16www.meigroup.com Part # 252055066 G3
UPDATING SOFTWARE
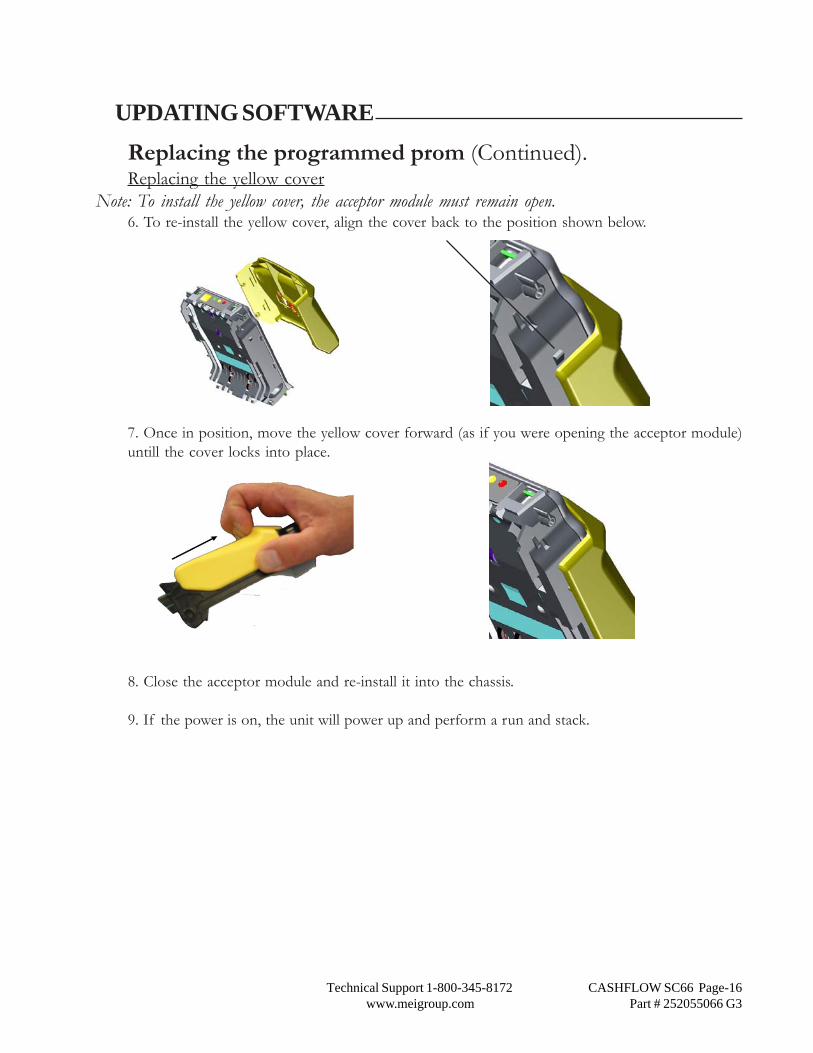
Replacing the programmed prom (Continued).Replacing the yellow cover
Note: To install the yellow cover, the acceptor module must remain open.6. To re-install the yellow cover, align the cover back to the position shown below.
7. Once in position, move the yellow cover forward (as if you were opening the acceptor module)untill the cover locks into place.
8. Close the acceptor module and re-install it into the chassis.
9. If the power is on, the unit will power up and perform a run and stack.
Technical Support 1-800-345-8172 CASHFLOW SC66 Page-17www.meigroup.com Part # 252055066 G3
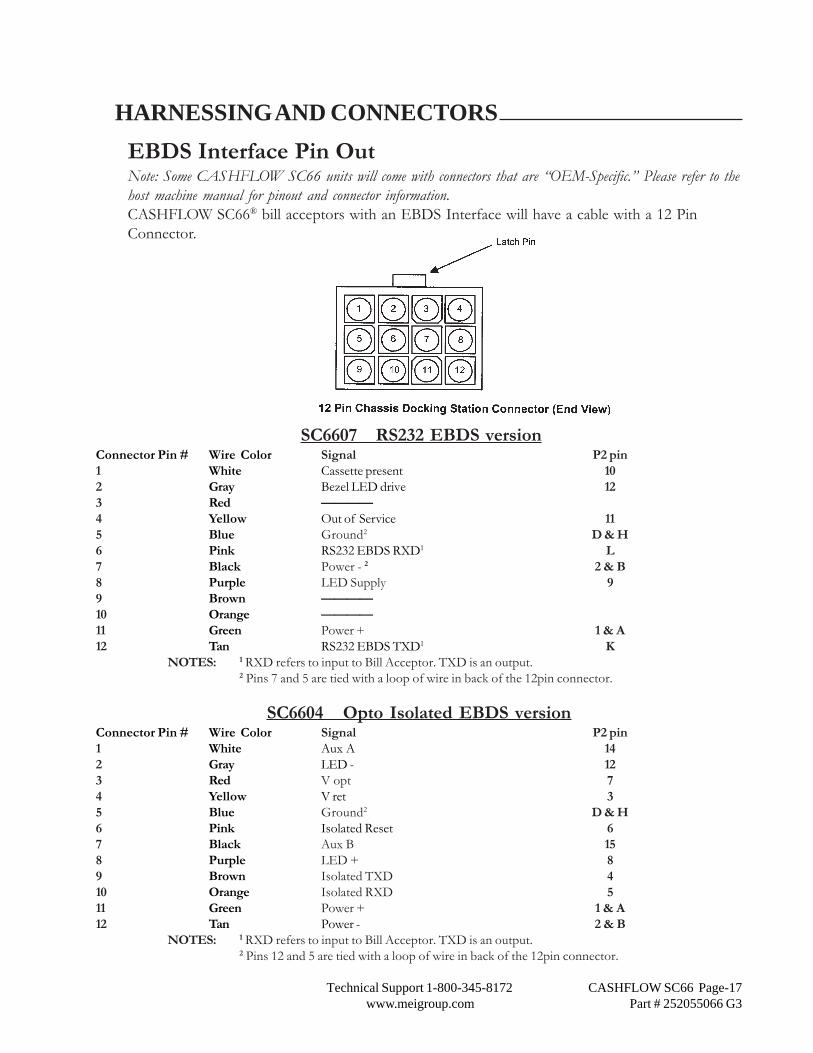
HARNESSING AND CONNECTORSEBDS Interface Pin OutNote: Some CASHFLOW SC66 units will come with connectors that are “OEM-Specific.” Please refer to thehost machine manual for pinout and connector information.CASHFLOW SC66® bill acceptors with an EBDS Interface will have a cable with a 12 PinConnector.
SC6607 RS232 EBDS versionConnector Pin # Wire Color Signal P2 pin1 White Cassette present 102 Gray Bezel LED drive 123 Red ————4 Yellow Out of Service 115 Blue Ground2 D & H6 Pink RS232 EBDS RXD1 L7 Black Power - 2 2 & B8 Purple LED Supply 99 Brown ————10 Orange ————11 Green Power + 1 & A12 Tan RS232 EBDS TXD1 K
NOTES: 1 RXD refers to input to Bill Acceptor. TXD is an output.2 Pins 7 and 5 are tied with a loop of wire in back of the 12pin connector.
SC6604 Opto Isolated EBDS versionConnector Pin # Wire Color Signal P2 pin1 White Aux A 142 Gray LED - 123 Red V opt 74 Yellow V ret 35 Blue Ground2 D & H6 Pink Isolated Reset 67 Black Aux B 158 Purple LED + 89 Brown Isolated TXD 410 Orange Isolated RXD 511 Green Power + 1 & A12 Tan Power - 2 & B
NOTES: 1 RXD refers to input to Bill Acceptor. TXD is an output.2 Pins 12 and 5 are tied with a loop of wire in back of the 12pin connector.
Technical Support 1-800-345-8172 CASHFLOW SC66 Page-18www.meigroup.com Part # 252055066 G3
COUPON CONFIGURATION INSTRUCTIONS (US Currency Only!)
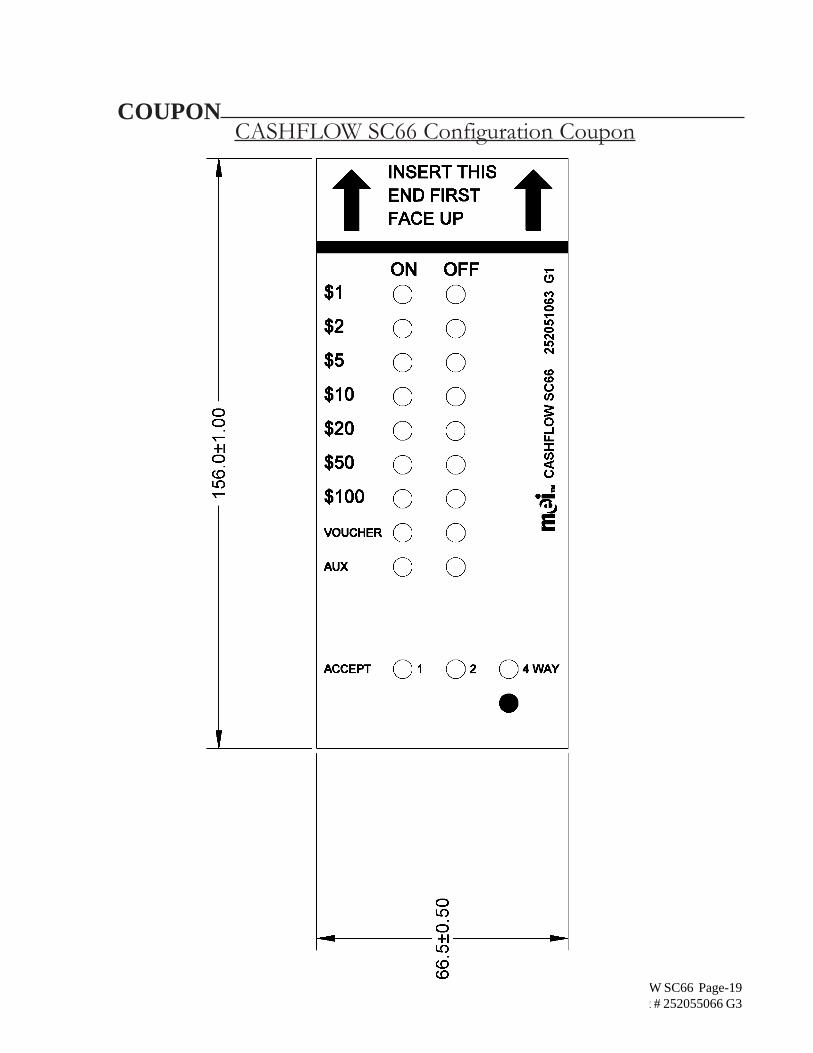
1. Paper copies of this Manual will have a usable coupon on the two next pages. Electroniccopies of the coupon are usable if your printer does not distort any areas of the coupon. Copiesof the coupon are usable if cut to match the size of the coupon on the next two pages.
2. Fill out the coupon using a #2 pencil to fill in the circle for the desired options. For correctoperation, all 10 lines must be completed. Fill in only one circle per line. Do not mark the backof the coupon.
3. Complete lines 1 to 7 to enable desired bill denominations. Fill in one circle for each denomi-nation. Line 8 voucher - allows you to enable/disables the acceptance of vouchers (also know asbar code tickets) should your unit be programmed to accept them. Line 9 Aux - enable/disablesthe use of the second serial port (Certain applications use the second serial port to communicateto the gaming player tracking systems). Complete line 10 to enable desired bill direction. Enable1 or 2 way face up, or 4 way acceptance (which allows acceptance in all directions).
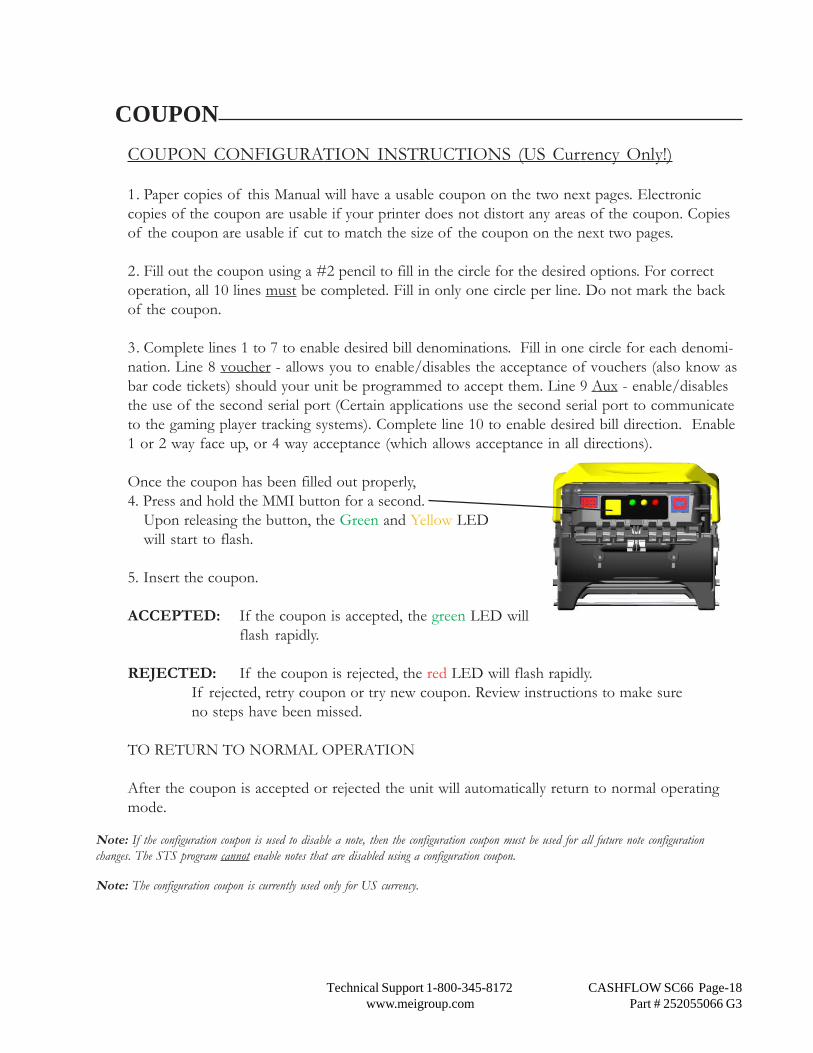
Once the coupon has been filled out properly,4. Press and hold the MMI button for a second.
Upon releasing the button, the Green and Yellow LEDwill start to flash.
5. Insert the coupon.
ACCEPTED: If the coupon is accepted, the green LED willflash rapidly.
REJECTED: If the coupon is rejected, the red LED will flash rapidly.If rejected, retry coupon or try new coupon. Review instructions to make sureno steps have been missed.
TO RETURN TO NORMAL OPERATION
After the coupon is accepted or rejected the unit will automatically return to normal operatingmode.
COUPON
Note: If the configuration coupon is used to disable a note, then the configuration coupon must be used for all future note configurationchanges. The STS program cannot enable notes that are disabled using a configuration coupon.
Note: The configuration coupon is currently used only for US currency.
Technical Support 1-800-345-8172 CASHFLOW SC66 Page-19www.meigroup.com Part # 252055066 G3
CASHFLOW SC66 Configuration CouponCOUPON
Technical Support 1-800-345-8172 CASHFLOW SC66 Page-20www.meigroup.com Part # 252055066 G3
Periodic maintenance can improve the performance and extend the working life of a bill accep-tor. Additional attention may be required if the bill acceptor becomes inoperable due to ajammed object or acceptance rates fall below normal.
Cleaning the Acceptor Module
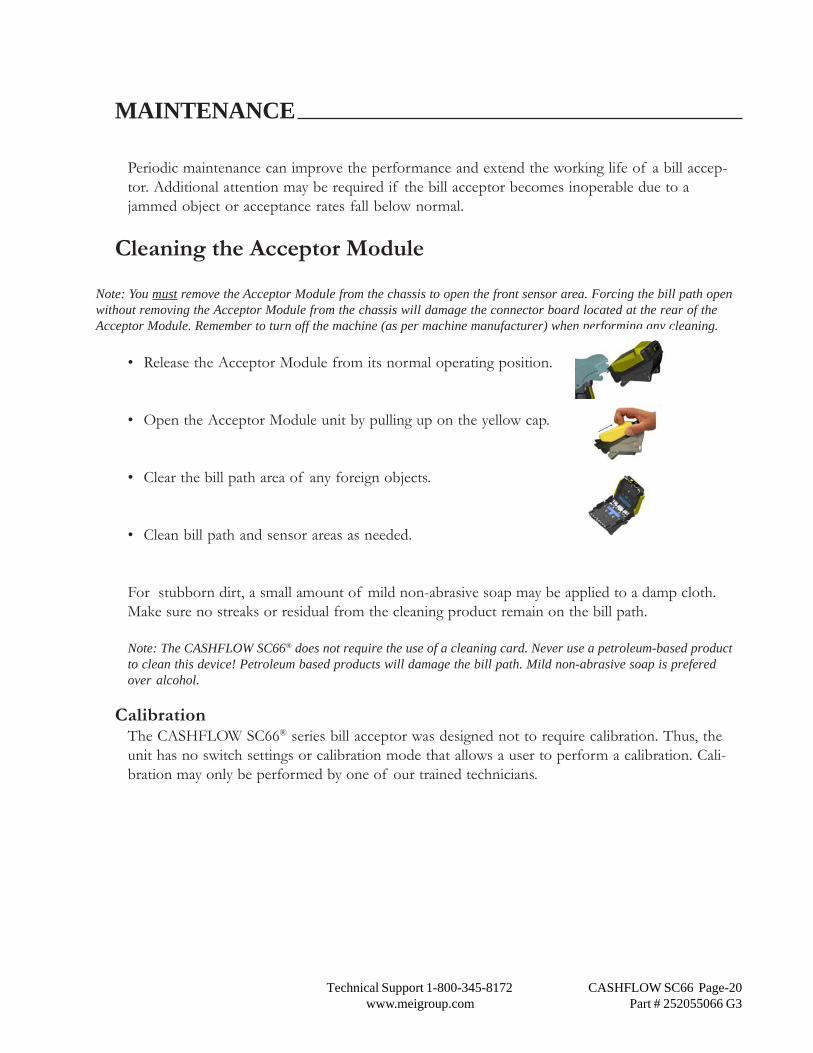
Note: You must remove the Acceptor Module from the chassis to open the front sensor area. Forcing the bill path openwithout removing the Acceptor Module from the chassis will damage the connector board located at the rear of theAcceptor Module. Remember to turn off the machine (as per machine manufacturer) when performing any cleaning.
• Release the Acceptor Module from its normal operating position.
• Open the Acceptor Module unit by pulling up on the yellow cap.
• Clear the bill path area of any foreign objects.
• Clean bill path and sensor areas as needed.
For stubborn dirt, a small amount of mild non-abrasive soap may be applied to a damp cloth.Make sure no streaks or residual from the cleaning product remain on the bill path.
Note: The CASHFLOW SC66® does not require the use of a cleaning card. Never use a petroleum-based productto clean this device! Petroleum based products will damage the bill path. Mild non-abrasive soap is preferedover alcohol.
CalibrationThe CASHFLOW SC66® series bill acceptor was designed not to require calibration. Thus, theunit has no switch settings or calibration mode that allows a user to perform a calibration. Cali-bration may only be performed by one of our trained technicians.
MAINTENANCE
Technical Support 1-800-345-8172 CASHFLOW SC66 Page-21www.meigroup.com Part # 252055066 G3
Diagnostic Codes
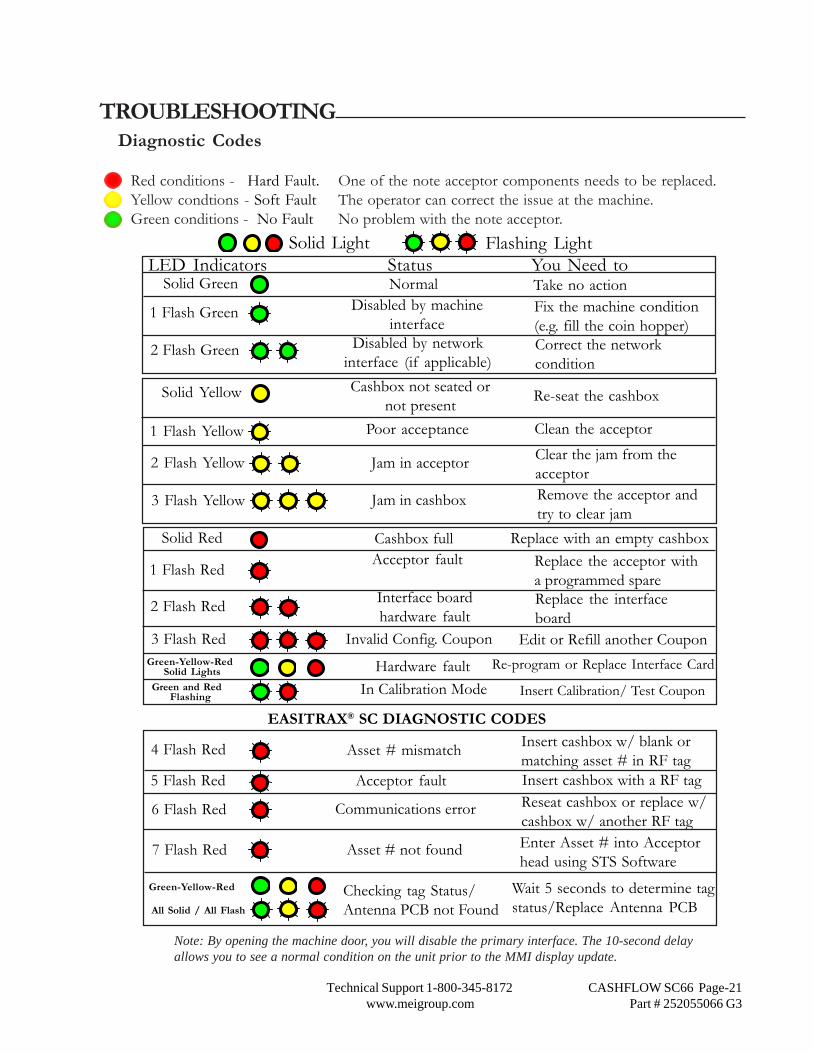
Red conditions - Hard Fault. One of the note acceptor components needs to be replaced.Yellow condtions - Soft Fault The operator can correct the issue at the machine.Green conditions - No Fault No problem with the note acceptor.
TROUBLESHOOTING
Note: By opening the machine door, you will disable the primary interface. The 10-second delayallows you to see a normal condition on the unit prior to the MMI display update.
Solid Light Flashing Light
Cashbox not seated ornot present Re-seat the cashbox
1 Flash Yellow Poor acceptance Clean the acceptor
2 Flash Yellow Clear the jam from theacceptor
3 Flash Yellow Jam in cashbox
Solid Yellow
Remove the acceptor andtry to clear jam
Jam in acceptor
LED Indicators Status You Need toNormal Take no action
1 Flash Green Disabled by machineinterface
Fix the machine condition(e.g. fill the coin hopper)
2 Flash Green Disabled by networkinterface (if applicable)
Correct the networkcondition
Solid Green
Asset # mismatch Insert cashbox w/ blank ormatching asset # in RF tag
5 Flash Red Acceptor fault Insert cashbox with a RF tag
6 Flash Red Communications error Reseat cashbox or replace w/cashbox w/ another RF tag
7 Flash Red Asset # not found Enter Asset # into Acceptorhead using STS Software
Green-Yellow-Red
All Solid / All Flash
Checking tag Status/Antenna PCB not Found
Wait 5 seconds to determine tagstatus/Replace Antenna PCB
4 Flash Red
EASITRAX® SC DIAGNOSTIC CODES
Cashbox full Replace with an empty cashbox
1 Flash RedAcceptor fault Replace the acceptor with
a programmed spare
2 Flash Red Interface boardhardware fault
Replace the interfaceboard
3 Flash Red Invalid Config. Coupon
Solid Red
Edit or Refill another CouponGreen-Yellow-Red
Solid Lights
Green and RedFlashing
Hardware fault Re-program or Replace Interface Card
In Calibration Mode Insert Calibration/ Test Coupon

Technical Support 1-800-345-8172 CASHFLOW SC66 Page-22www.meigroup.com Part # 252055066 G3
1) What are the 3 parts that make up a CASHFLOW SC66® unit?
A CASHFLOW SC66® unit consists of an Acceptor, Chassis and Cash Box. For moreinformation on these modules refer to the CASHFLOW SC66® Operation & MaintenanceManual.
2) What purpose do the Cash Box arrows serve?
Arrows highlight a cassette’s position (upright or upside-down). Arrows provide a visual aidto Soft count crews who frequently arrange cassettes by position to signal that they are fullor empty.
3) What is the purpose of the USB and 8-pin connectors on the front of the AcceptorModule?
The USB connector is used to connect a PPM (Portable Programming Module) to aCASHFLOW SC66® unit. The PPM is used to download new software into a CASHFLOWSC66®. The pupose of the 8-pin connector is to provide appropriate drive voltage andenable signals in some lighted BEG (Bill Entry Guide)that get installed on the billacceptor. Some BEG do not plug into the bill acceptor, they plug directly to the machine.
4) How is software updated in CASHFLOW SC66® Flash units and PROM units in thefield?
Flash versions of CASHFLOW SC66® units can be updated in the field by using a PortableProgramming Module (PPM). PROM versions of CASHFLOW SC66® units can beupdated by replacing the PROM Chip that is located under the yellow Acceptor Latch onthe Acceptor.
5) What is a Portable Programming Module (PPM) and how does it work?
A PPM is a yellow handheld device that is programmed by MEI and is used to downloadsoftware into a CASHFLOW SC66® Flash units. The PPM consists of a yellow button, ared and green LED and 2 USB connectors. To use a PPM, first connect a USB cable to thefront of a CASHFLOW SC66® unit then connect the other end to the PPM. Then press theyellow button and the PPM downloads new software into the CASHFLOW SC66® unit.The PPM uses the red and green LED’s to report its status and also give error messages.For more information on the PPM refer to the PPM User Guide.
FREQUENTLY ASKED QUESTIONS
Technical Support 1-800-345-8172 CASHFLOW SC66 Page-23www.meigroup.com Part # 252055066 G3
FREQUENTLY ASKED QUESTIONS
6) Can a PPM be used to update software for PROM CASHFLOW SC66® units?
No. A PPM can only be used to download software into Flash CASHFLOW SC66® units.
7) How can I tell the difference between a Flash and PROM CASHFLOW SC66® unit?
There are two ways to determine the difference:1) The STS Program can be used to determine if a unit is a PROM or Flash.2) You can remove the yellow cover on the acceptor. If a PROM is in the socket, it is aPROM unit. If no PROM is present, it is a Flash unit (Refer to page 14 on PROM units).
8) What are the MMI Diagnostic Error Codes (Green, Yellow and Red LED)?
Please refer to page 21 of this operation and maintenance manual for the MMI DiagnosticError Codes.
9) Can a CASHFLOW SC66® unit be calibrated in the Field?
A CASHFLOW SC66® unit can not be calibrated in the field. The CASHFLOW SC66® isdesigned not require field calibration. Calibration is only required after certain repairs aredone to a CASHFLOW SC66® unit. Therefore, only an approved CASHFLOW SC66®
Service Center are trained to calibrate a CAHSFLOW SC66® unit.
10) What are the differences among model #’s?
SC6602 is a Flash unit made to interface to IGT’s Netplex/SPC machines. It uses the IGTID024 interface and SPC USB interface.
SC6604 is a Flash unit made to interface to various machines. It uses MEI Opto IsolatedEBDS Interface.
SC6607 is a Flash unit made to interface to various machines. It uses MEI RS-232 EBDSInterfaces.
11) What are the differences among interfaces?
MEI EBDS (Extended Bi-Directional Serial) Protocol is a proprietary MEI protocolspecification used to accomplish two-way serial communication between the bill acceptor
Technical Support 1-800-345-8172 CASHFLOW SC66 Page-24www.meigroup.com Part # 252055066 G3
FREQUENTLY ASKED QUESTIONS
and a host machine. It is not used for interfacing to IGT machines. Open collector EBDSuses opto isolated interface hardware. RS-232 EBDS uses RS-232 level interface hardware.
IGT Netplex (Serial) Protocol is proprietary IGT interface used to communicatebetween the IGT host machine and the Bill Acceptor.
IGT SPC (USB) Protocol is proprietary IGT interface used to communicate between theIGT host machine and the Bill Acceptor.
12) How is a CASHFLOW SC66® unit manufacturing date determined?
Locate the unit’s serial number on the product label. The product label is located on thefront of the Acceptor below the BEG.
The first three digits of the serial number are the date code of the bill acceptor. The firsttwo digits indicate the week of the year it was made. The third digit indicates the year ofmanufacture.For example: 082 means the unit was manufactured the 8th week of 2002.
13) How do I and how often should I clean the CASHFLOW SC66® unit?
The best way to clean the bill acceptor is with mild, non-abrasive, diluted cleaning solutionsprayed onto a soft cloth and not directly onto the bill acceptor. Remove the Acceptor andopen the bill acceptor mouth. Wipe out the bill path. Cleaning should be performed aftertwo years, depending upon use, or if the unit’s acceptance rate drops below normal.
14) Can I use alcohol to clean a CASHFLOW SC66® unit?
Alcohol is not the preferred cleaning solution (Refer to Question # 13.).
15) Can I use cleaning cards?
Not necessary! Cleaning cards offer simple preventative maintenance for some billacceptors. Since the CASHFLOW SC66® unit is easily opened, more effective cleaning canbe accomplished with a soft, lint-free cloth and an appropriate cleaning solution. (Refer toQuestion # 13.)
16) What is the operating voltage for a CASHFLOW SC66® unit?
The operating voltage range is +12 to +28 VDC.
Technical Support 1-800-345-8172 CASHFLOW SC66 Page-25www.meigroup.com Part # 252055066 G3
FREQUENTLY ASKED QUESTIONS
17) Does a CASHFLOW SC66® unit have dip switches?
A CASHFLOW SC66® unit does not have any dip switches. Bills can be enabled anddisabled by using a configuration coupon. Refer to the section on the configuration couponin the Operation & Maintenance Manual.
18) What is the purpose of the red, black and white wires that come out of the main cable?
The wires are connected to an internally mounted switch and are used in conjunction withPlayer Tracking Systems to identify that a cassette (cash box) is present or that it has beenpulled. Different combinations allow Normally Open or Normally Closed wiring.
19) How do I clear a bill jam?
Remove the acceptor by pulling upwards on the release lever located on the front of theAcceptor Module and pull away from the chassis. Open the Acceptor by sliding the yellowAcceptor Latch forward then clear the bill jam.
20) Is it OK to swap Acceptors among my machines?
Same model Acceptors may be easily swapped (i.e. SC6602 to another SC6602).Verify that the following has been confirmed by the STS program before installing backinto the machine and applying power:
1)The correct firmware is installed.2)The correct BEG is installed for that particular machine.3)The correct acceptor configurations are selected.(bills are enabled/disabled, properBEG selected)
Different model acceptors (i.e. SC6604/07 to an SC6602 or vice versa) require, in additionto the changes above, a matching interface card (PCB).SC6604/07 require EBDS interface card (PCB).SC6602 require netplex interface card (PCB).
21) Where are your CASHFLOW SC66® Service Centers located?
Visit our website at www.meigroup.com for a list of service centers that repair theCASHFLOW SC66® .
Technical Support 1-800-345-8172 CASHFLOW SC66 Page-26www.meigroup.com Part # 252055066 G3
FREQUENTLY ASKED QUESTIONS
22) Where can I call for technical assistance?
MEI (US & Canada) Toll Free Technical Support Telephone # 800-345-8172or
Visit our website at www.meigroup.com. Fill a technical inquiry form and e-mail us yourquestions.
Technical Support 1-800-345-8172 CASHFLOW SC66 Page-27www.meigroup.com Part # 252055066 G3
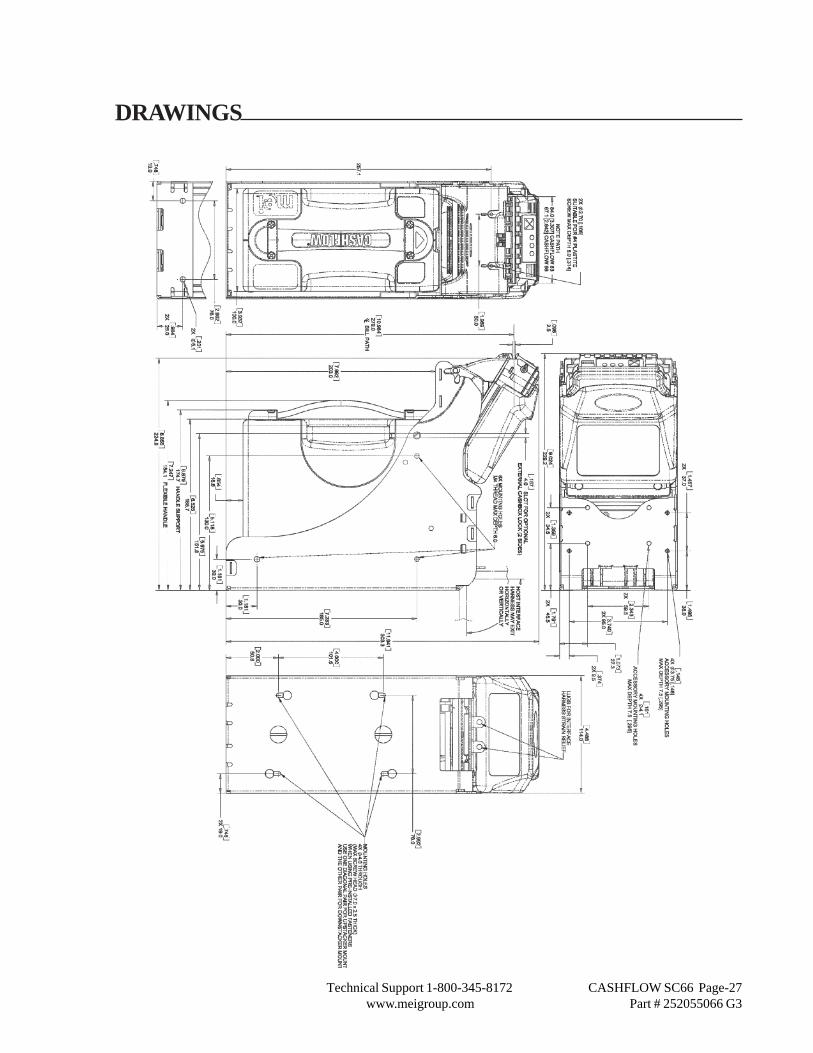
DRAWINGS