Embed Size (px)
Citation preview

2013-03-19
1
A combination of mini-implant and MEAW to correct a skeletal
Class II open bite
Tae-Woo Kim DDS MSD PhD Professor, Department of Orthodontics
School of Dentistry Seoul National University
Seoul, Korea
Before treatment After treatment
CASE 1
Before treatment After treatment
CASE 2 Before treatment After treatment
CASE 3
MEAW
Intrusion methods of posterior teeth
Extrusion or Intrusion Mechanics
Combination of two mechanics
Extraction options
Contents
There are two mechanics, extrusive and intrusive. Next, I would like to suggest guidelines, cases and indications for each of them.
Etiology of Open bite
In my clinic, I have many open bite cases with TMD, because they are referred from local clinics and other dentists. Seoul National University Dental Hospital is the final destination of problem cases.

2013-03-19
2
Open
bite
Mouth
breathing
Tongue
thrusting
TMD
Macro-
glossia
Thumb
sucking
Ankylosed
incisors
Open-bite cases look very similar. All of open bites have different causes.
Open
bite
Mouth
breathing
Tongue
thrusting
TMD
Macro-
glossia
Thumb
sucking
Ankylosed
incisors
Italia
Brazil Difficult to finish
Sometime it goes back!
Open bite cases have causes, some of which are not uncontrollable or even unknown. This makes it very difficult to treat them and/or retain their fine results.
Methods to intrude the posterior teeth
Methods were summarized into 6 categories.
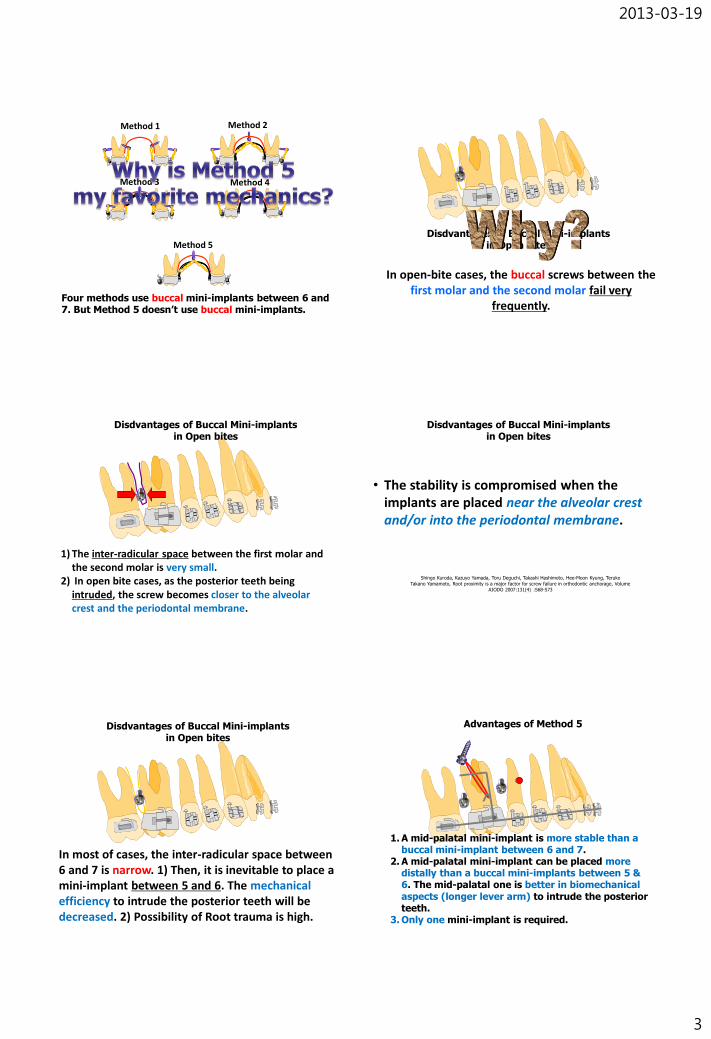
Method 1 Method 2 Method 3 Method 4 Method 5 Method 6
Supplied by RMO
1. Place a mid-palatal mini-implant(1.6 mm x 6 mm) , as far distally as possible. 2. Use a TPA with hooks. 3. Insert an 019x025” ss archwire. 4. Apply a power chain tightly.
Method 5 : Use a mid-palatal mini-implant
System of Method 5 is as follows;
Structure
2013-03-19
3
Method 1 Method 2
Method 3 Method 4
Method 5
Four methods use buccal mini-implants between 6 and 7. But Method 5 doesn’t use buccal mini-implants.
In open-bite cases, the buccal screws between the first molar and the second molar fail very
frequently.
Disdvantages of Buccal Mini-implants in Open bites
1) The inter-radicular space between the first molar and the second molar is very small.
2) In open bite cases, as the posterior teeth being intruded, the screw becomes closer to the alveolar crest and the periodontal membrane.
Disdvantages of Buccal Mini-implants in Open bites
• The stability is compromised when the implants are placed near the alveolar crest and/or into the periodontal membrane.
Shingo Kuroda, Kazuyo Yamada, Toru Deguchi, Takashi Hashimoto, Hee-Moon Kyung, Teruko
Takano Yamamoto, Root proximity is a major factor for screw failure in orthodontic anchorage, Volume
AJODO 2007:131(4) :S68-S73
Disdvantages of Buccal Mini-implants in Open bites
In most of cases, the inter-radicular space between 6 and 7 is narrow. 1) Then, it is inevitable to place a mini-implant between 5 and 6. The mechanical efficiency to intrude the posterior teeth will be decreased. 2) Possibility of Root trauma is high.
Disdvantages of Buccal Mini-implants in Open bites
Advantages of Method 5
1. A mid-palatal mini-implant is more stable than a buccal mini-implant between 6 and 7.
2. A mid-palatal mini-implant can be placed more distally than a buccal mini-implants between 5 & 6. The mid-palatal one is better in biomechanical aspects (longer lever arm) to intrude the posterior teeth.
3. Only one mini-implant is required.

2013-03-19
4
Orthognathic
Surgery
Orthodontic
treatment
vs
Intrusion of
Posterior Teeth
Mini-implant
Extrusion of
Anterior Teeth
MEAW
Extrusion or Intrusion mechanics to treat the open bite
1. Incisal display 2. Lip incompetency 3. Skeletal pattern
Open bite always means the intrusion of upper posterior teeth? No. I would like to emphasize three factors in differential diagnosis to select the adequate mechanics.
MEAW
Orthognathic
Surgery
Orthodontic
treatment
vs
Intrusion of
Posterior Teeth
Mini-implant
Extrusion of
Anterior Teeth
MEAW
Extrusion or Intrusion mechanics to treat the open bite
1. Incisal display 2. Lip incompetency 3. Skeletal pattern
Some cases were treated by combining the MEAW technique and the mini-implant intrusion.
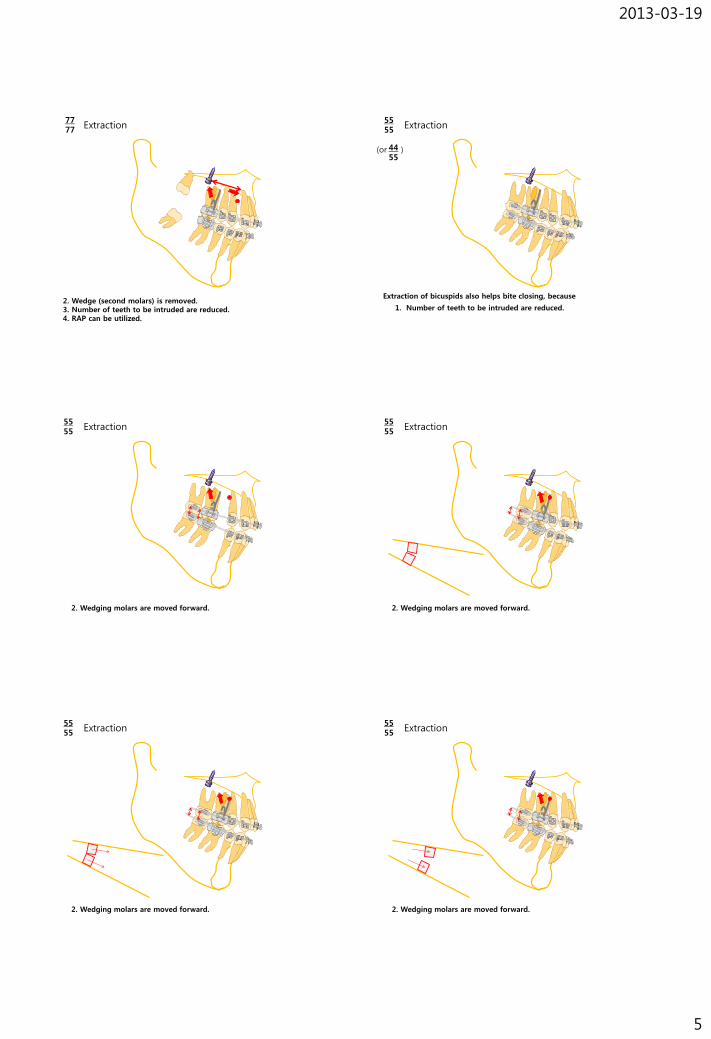
Non-ext
77 77
77 88
77 88
Non-ext
Extraction options in Class II open-bite cases
77 77
77 88
44 or 55 55
88 88
88 88
Extraction
1. Extraction of third molars brought spaces for second molars to be intruded and tipped back.
88 88
Extraction
By extracting third molars, bite closing is facilitated.
77 77
Extraction
1. Center of rotation moves forward. Lever arm becomes longer than third molar extraction.
Effects of seond molar extraction are as follows,
2013-03-19
5
77 77
Extraction
2. Wedge (second molars) is removed. 3. Number of teeth to be intruded are reduced. 4. RAP can be utilized.
55 55
Extraction
1. Number of teeth to be intruded are reduced.
44 55
(or )
Extraction of bicuspids also helps bite closing, because
55 55
Extraction
2. Wedging molars are moved forward.
55 55
Extraction
2. Wedging molars are moved forward.
55 55
Extraction
2. Wedging molars are moved forward.
55 55
Extraction
2. Wedging molars are moved forward.

2013-03-19
6
55 55
Extraction
2. Mesial movement of wedging molars are good to resolve the open bite.
Extraction options in Class II open-bite cases
77 77
77 88
Non-ext (presence of 8)
44 55
55 55
1. Third molars are good in shape. 2. The angle between 7 & 8 is between 20~30
degrees. 3. Third molars have erupting potential. Adolescent
patients are good.
Indications
00 08
88 88
Extraction options in Class II open-bite cases
77 77
77 88
Non-ext (presence of 8)
44 55
55 55
Clinical notes
Third molars erupt faster than usual. But the secondary minor orthodontic treatment may be required to align the third molars especially, for lower ones.
00 08
88 88
Extraction options in Class II open-bite cases
77 77
77 88
Non-ext (presence of 8)
44 55
55 55
1. Upper third molars are good in shape. But lower ones are abnormal in shape or impacted.
2. The angle between upper 7 & 8 is between 20~30 degrees. Lower ones are impacted.
3. Upper third molars have erupting potential. Adolescent patients are good.
Indications
00 08
88 88
Extraction options in Class II open-bite cases
77 77
77 88
Non-ext (presence of 8)
44 55
55 55
00 08
88 88
1. In adolescent or adult patients, third molars are not good in shape or impacted.
Indications
Clinical notes 1. Bite closing is slower than in 7-extraction cases.
Extraction options in Class II open-bite cases
77 77
77 88
Non-ext (presence of 8)
44 55
55 55
00 08
88 88
Clinical notes
1. Bite closing is much slower than in 7-extraction cases.
2. This option is not recommended. Please, extract third molars before closing the bite.

2013-03-19
7
Extraction options in Class II open-bite cases
77 77
77 88
Non-ext (presence of 8)
44 55
55 55
00 08
88 88
1. Class II canine and molar relationship 2. Severe upper anterior protrusion and labial
inclination, 3. Or upper anterior crowding.
Indications
Extraction options in Class II open-bite cases
77 77
77 88
Non-ext (presence of 8)
44 55
55 55
00 08
88 88
1. Class II canine and molar relationship 2. Mild to moderate upper anterior protrusion with
normal labial inclination, 3. Or slight upper anterior crowding.
Indications
Extraction options in Class II open-bite cases
77 77
77 88
Non-ext (presence of 8)
44 55
55 55
00 08
88 88
Clinical notes 1. Bite closing is facilitated by extraction of 5s.
Clinical Tips for Method 5 (Mid-palatal mini-implant & TPA for intrusion of upper posterior
teeth)
Tae-Woo Kim DDS MSD PhD Professor, Department of Orthodontics
School of Dentistry Seoul National University
Seoul, Korea
Copyright belongs to Dr. Tae-Woo Kim. Please, don’t copy and distribute without permission.
• There should be some space between the TPA and palatal tissue, which prevents the palatal bar to impinge the palatal tissue as the molars are being intruded.
Clinical Tip I for a mid-palatal mini-implant
Clinical Tip II for a mid-palatal mini-implant: How to ligate the power chain
Hole Big screw head
Method 1 using an undercut Method 2 using a hole

2013-03-19
8
Insert the ligature wire into the holes of the power chain as the figure shows.
Put the center ring around the screw neck. Pull the ligature wire with a hemostat.
Hook the ligature wire around the neck of screw. Twist the ligature.

2013-03-19
9
Cut the ligature and bend the remaining portion around the neck. Stretch the power chain tight and hang it up to the hook of TPA.
Use a long shank wrench. Please, give a 6 mm space between the bottom of the handpiece and the incisial edge. If the bottom of the angle touches the incisal edge, it will be impossible to remove or insert the screw anymore.
Clinical Tip III for a mid-palatal mini-implant
Long shank
(113-MD-204)
2010.7.16
In every patients, please measure a mid-palatal bone thickness. A mid-palatal mini-implant, 1.6x6mm, is used.
X≥6
6>X≥5
5>X≥4
4>X≥3
3>X
2mm
3mm
Male Female
•2-way ANOVA •Post-hoc test
Kang, SM, Kim, TW, AJODO:2007:131(4)-Supplement 1:74-81
Award of the best poster at KAO 2004

2013-03-19
10
Clinical Tip IV for a mid-palatal mini-implant
582424 이민아 566513 박명인
Place the mini-implant more distally + Extend the arch anteriorly! (O) (X)
Place the mini-implant more distally + Extend the arch anteriorly!
Then, upper poster teeth will be intruded more efficiently.
Clinical Tip V for a mid-palatal mini-implant
582424 이민아 566513 박명인
Attach the hooks distally and gingivally.
(O) (X)
2010.9.10
566513 박명인
Extract the upper third molars or second molars to remove the wedging effect and to provide the space for intrusion.
Clinical Tip VI for a mid-palatal mini-implant
Clinical Tip VII for a mid-palatal mini-implant
• If the insertion torque is higher than 30Ncm, use predrilling.
• Orthonia® (RMO)
- Wireless rechargeable handpiece
- Stops automatically when torque increases over 30 Ncm.
Jeilmedical Co. Seoul, Korea

2013-03-19
11
Problems experienced in mid-palatal mini-implants I experienced mini-implant fracture in two cases. In these cases I felt that their bones were much harder than usual. My fault was that excessive torque was applied more than 50Ncm. (In most of cases, less than 30Ncm is enough to place mid-palatal mini-implants without drilling.) Orthonia is good because it stops automatically at 30Ncm. If it stops, remove and drill. Then we can avoid fracture of a screw.
Trephine (=2 mm) adequate to the size of fractured tip was selected.
Implant Trephine kit
How to remove the fractured tip
1) Expose the fractured tip after retracting a flap.
2) Reposition the flap and suture.
29759(536480)이민형
Method 5
A TPA with crown buccal torque and a midpalatal mini-implant was used to intrude the molars. The main arch wire is 019x025 ss with a slight crown buccal torque. This arch is expanded a little.
1.6x6mm
Clinical Tip VIII for a mid-palatal mini-implant
Clinical Tip IX for a mid-palatal mini-implant
:How to control 2nd molars
Sometimes, upper 1st molars are intruded but 2nd molars don’t follow.
1) Solder hooks to intrude 2nd molars palatally

2013-03-19
12
2) Add a L loop with an intrusion step between 6 and 7
to intrude 2nd molars buccally
Clinical Tip X for a mid-palatal mini-implant
1) Monitor the extrusion of lower molars
1.6x6mm
Clinical Tip X for a mid-palatal mini-implant
2) If lower molars extrude, then apply the mechanics of lower molar intrusion.
This is the method using a Burstone lingual arch with lingual crown torque and a buccal mini-implants to intrude the lower molars. Crown lingual torque is applied slightly to counteract the buccal tipping by the intruding force from the power chains.
Burstone
lingual arch
Clinical Tip XI for a mid-palatal mini-implant
Intruding force should be strong.
(O) (X)
Clinical Tip XII for a mid-palatal mini-implant
; Retain the TPA and mid-palatal mini-implant during the finishing stage.
2011.5.4 After intrusion
2012.2.29 Debonding
Initial counterclockwise rotation of mandible relapsed during the detailing stage. Extrusion of upper molars was a cause of the changes. It is recommended to retain them as long as possible during the finishing stage.
2013-03-19
13
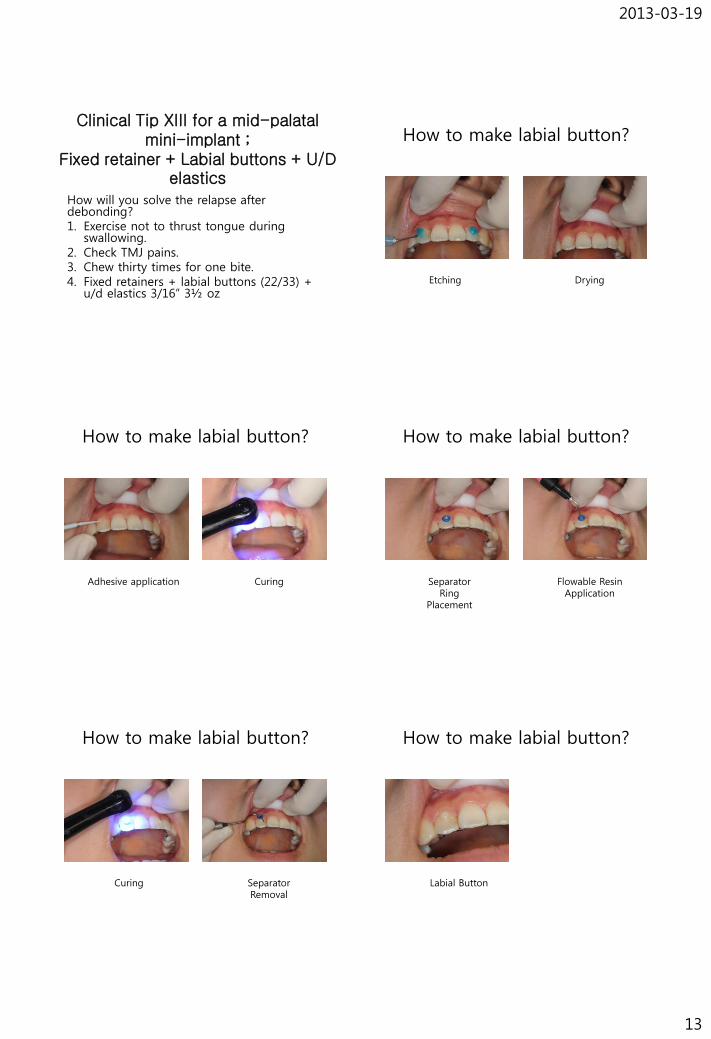
Clinical Tip XIII for a mid-palatal mini-implant ;
Fixed retainer + Labial buttons + U/D elastics
How will you solve the relapse after debonding? 1. Exercise not to thrust tongue during
swallowing. 2. Check TMJ pains. 3. Chew thirty times for one bite. 4. Fixed retainers + labial buttons (22/33) +
u/d elastics 3/16” 3½ oz
How to make labial button?
Etching Drying
How to make labial button?
Adhesive application Curing
How to make labial button?
Separator Ring
Placement
Flowable Resin Application
How to make labial button?
Curing Separator Removal
How to make labial button?
Labial Button

2013-03-19
14
Multiloop Edgewise Arch Wire (MEAW)
– 018x022 stainless steel
MEAWs are made of 018x022 ss wire.
Upper Lower
.022 X .028
He invented MEAW technique
Nov. 25, 2002, After lecture at Department of Orthodontics, SNU
•Class II correction
U: MEAW
L: Ideal arch wire
•Class III correction
U:Ideal arch wire
L: MEAW
Closing anterior open bite
U: MEAW
L: MEAW
MEAWs can be used to correct Class II relation, Class III
relation and open bite. To close the anterior open bite, MEAWs
are used both in upper and lower arches.

2013-03-19
15
•Class II correction
U: MEAW, L: Ideal arch wire
5/16” Class II elastics
To correct Class II relationship, MEAW is applied in the
maxillary arch and Ideal arch(019x025ss) is used in the
mandibular arch. Class II 5/16” 6oz elastics are applied.
•Class III correction
U: Ideal arch wire, L: MEAW
5/16” Class III elastics
To correct Class III relationship, MEAW is applied in the
mandibular arch and ideal arch(019x025ss) is used in the
maxillary arch. Class III 5/16” 6oz elastics are applied.
•Openbite correction
U: MEAW, L: MEAW
3/16” up/down elastics
To close the anterior open bite, MEAWs are used both in maillary
and mandibular arches. 3/16” 6oz elastics are applied from the first
upper loop to the first lower loop.
•018x022 stainless steel
To make MEAWs, 4 to 5 L-shaped loops are made between teeth.
An 043-CK plier is used to make a MEAW. First, anterior curvature is bent with a turret.

2013-03-19
16
Between #2 and #3, the first L loop is made.
1 3
6mm
2.5mm
4.5mm 2
Between #2 and #3, the first L loop is being bent.
7 1 3 4 5 6 7mm
8mm 6mm 7mm 6mm
2.5mm
4.5mm 2
7mm
Sequentially, upper L loops are being made.
The final upper and lower MEAWs were made.
7 1 3 4 5 6 7mm
8mm 6mm 7mm 6mm
2.5mm
4.5mm
7mm
8mm 6mm 6mm 7mm 6mm
2.5mm 4.5mm
2
7mm
7 1 3 4 5 6 2
Size of L loops
2013-03-19
17
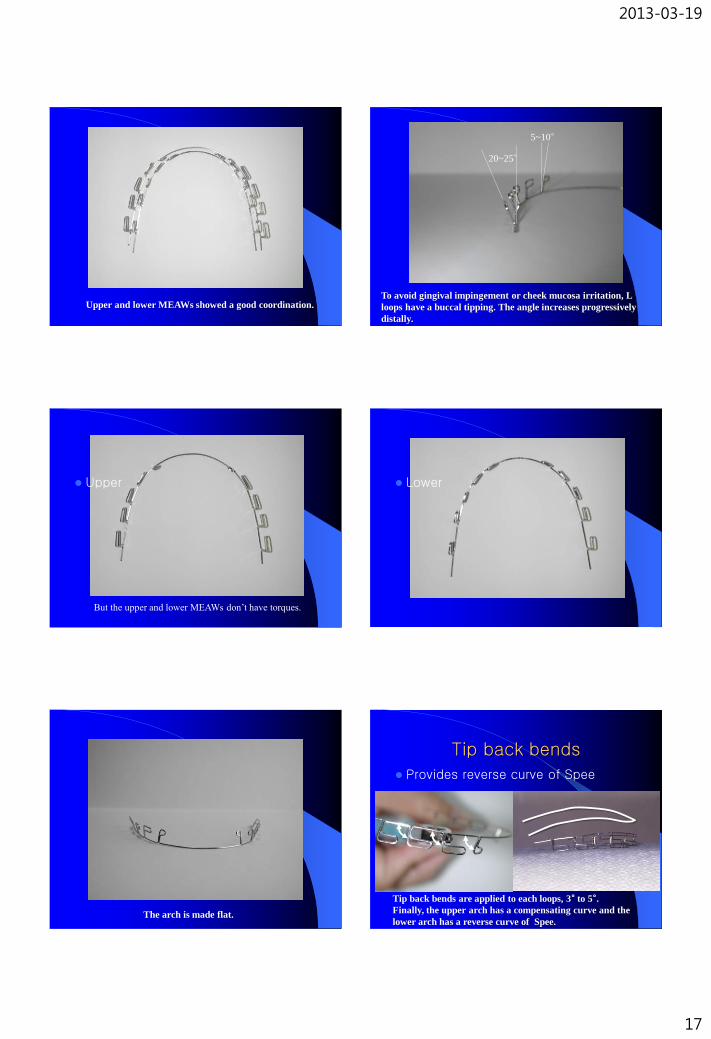
Upper and lower MEAWs showed a good coordination.
20~25°
5~10°
To avoid gingival impingement or cheek mucosa irritation, L
loops have a buccal tipping. The angle increases progressively
distally.
Upper
But the upper and lower MEAWs don’t have torques.
Lower
The arch is made flat.
Tip back bends
Provides reverse curve of Spee
Tip back bends are applied to each loops, 3° to 5°. Finally, the upper arch has a compensating curve and the
lower arch has a reverse curve of Spee.

2013-03-19
18
1. Extrusion of anterior teeth is the main effect.
2. Very slight intrusion of posterior teeth is also secondary effect,
“Rocking chair effect”.
“Rocking Chair”
v
Up & Down
elastics
1. Extrusion of anterior teeth is the main effect.
1. Extrusion of anterior teeth is the main effect.
2. Very slight intrusion of posterior teeth is also secondary effect,
“Rocking chair effect”.
“Rocking Chair” “Handle of a car”
1. Extrusion of anterior teeth is the main effect.
2. Very slight intrusion of posterior teeth is also secondary effect,
“Rocking chair effect”.
3. Distal tipping contributes to the correction of molar relationship.
“Handle of a car”
1. Extrusion of anterior teeth is the main effect.
2. Very slight intrusion of posterior teeth is also secondary effect,
“Rocking chair effect”.
3. Distal tipping contributes to the correction of molar relationship.
This effect is increased by Class II elastics (In Class III, by
Class III elastics).
4. .
“Molar movement in open-bite”
Very slight intrusion + Distal tipping

2013-03-19
19
Reasons why I use MEAWs instead of curved TMA or NiTi wires?
“Handle of a car”
Distal tipping or intrusion of a molar can be controlled very
accurately and effectively with a stiff stainless wire. And also the
load-deflection rate is decreased well with the L loops.
“Handle of a car”
1. If the handle is made of a flexible material, it would not be easy
to control well (tip-back and intrusion) and
2. it would be hard to adjust the wires (vertical or in-&-out steps)
for compensating the minute errors of bracket positioning.
Summary
• Some of skeletal open-bite cases can be treated orthodontically,
– by extrusive mechanics (MEAW) or
– by intrusive mechanics (Mini-implant).
• Three factors- incisal display, Lip
incompetency, and skeletal pattern - were suggested to select the mechanics differentially.
Summary
• Combination of a MEAW with a mid-palatal mini-implant
– produces intrusion of upper posterior teeth and extrusion of anterior teeth at the same time. And this may close open bite very rapidly just after extraction of 2nd molars.