Embed Size (px)
Citation preview

Aesthetics brought
back to the essentials
Essentia®
from GCClinical GuideProf Marleen Peumans &
Dr Javier Tapia Guadix
2
Open the door to simplification...
Prof Joseph Sabbagh Dr Lucile DahanDr Jason SmithsonProf Marco Ferrari
• Shade concept & layering options 4-5
• A biomimetic approach 6-7
• Tips & tricks for shade selection 8-9
• Direct veneers with the Bleach/Junior combination 10-11
• Class IV restorations with the Young combination 12-13
• Restoring stained teeth with the Adult combination 14-15
• Class V restorations with the Senior combination 16-17
• Posterior restoration with the 18-19 Posterior Duo combination
• Small posterior restorations with 20-21 the Universal shade
• Blocking discolourations with 22 the Masking Liner shade
• Creating an incisal halo using the 23 Opalescent Modifier
3
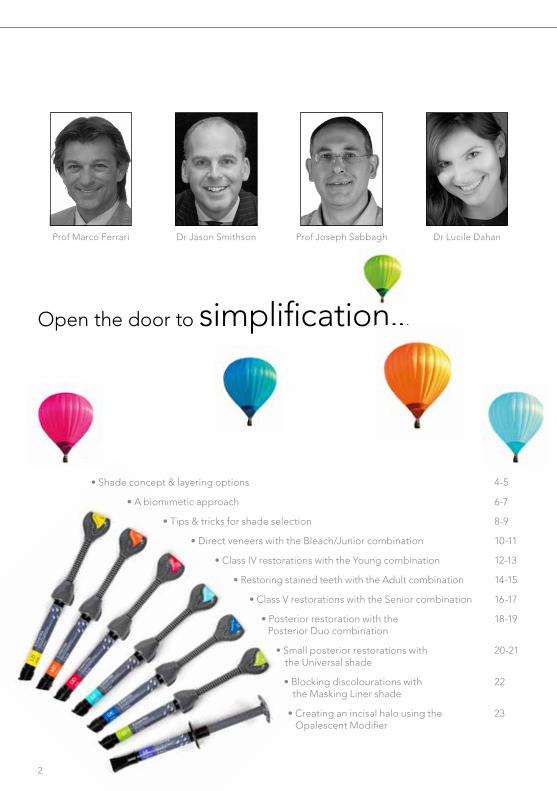
Dr Javier Tapia GuadixProf Marleen Peumans Dr Maciej Zarow Dr Stephane Browet
Aesthetic restorations are often associated with complex layering procedures using many different shades. GC is now introducing a paradigm shift in restorative dentistry with an innovative and bold shade concept.
Eight top experienced clinicians - the GC Restorative Advisory Board, together with GC Corporation R&D and GC Europe, participated in the development of this new concept.
Essentia represents a minimalistic approach inside the composite world: a simplified system that enables easy but effective restorative procedures. Creating most aesthetic restorations is now possible using an assortment of just seven syringes.
The case reports in this Clinical Guide will demonstrate the great aesthetic outcomes that can be achieved with this simplified composite system.
Discover how Essentia can help you reach top aesthetic standards using a straightforward duo-layering technique resulting in natural, lifelike restorations.
Aesthetics brought
back to the essentials
4
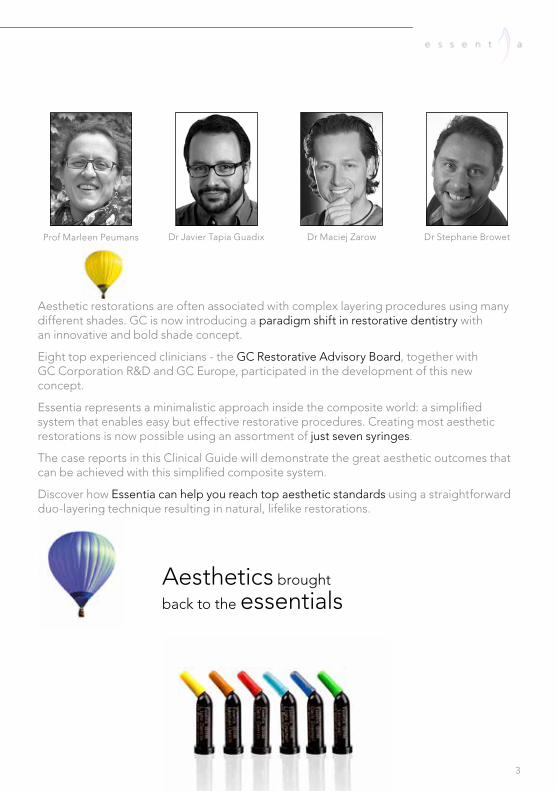
The concept of Essentia is simple: missing enamel and dentin are replaced with a material that closely reproduces their characteristics. Natural dentin and enamel change with the ageing process, becoming more chromatic and more translucent. Both Essentia dentins and enamels follow this ageing pattern.
With three dentins (Light Dentin, Medium Dentin, Dark Dentin) and two enamels (Light Enamel, Dark Enamel), layering becomes easy. In addition, Essentia also offers a Universal shade for small & posterior restorations, and a Masking Liner with an injectable viscosity to block discolourations in deep cavities.
Open the door to simplification...
Opacity
Chroma
Opacity
Chroma
Light Dentin
LD
Medium Dentin
MD
Light Enamel
LE
Dark Enamel
DE
Dark Dentin
DD
Universal
U
MaskingLiner
ML
55
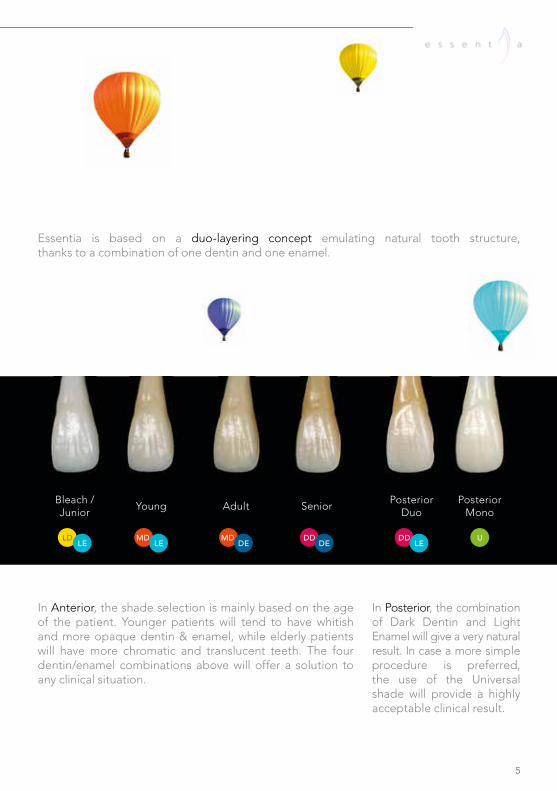
In Posterior, the combination of Dark Dentin and Light Enamel will give a very natural result. In case a more simple procedure is preferred, the use of the Universal shade will provide a highly acceptable clinical result.
In Anterior, the shade selection is mainly based on the age of the patient. Younger patients will tend to have whitish and more opaque dentin & enamel, while elderly patients will have more chromatic and translucent teeth. The four dentin/enamel combinations above will offer a solution to any clinical situation.
Essentia is based on a duo-layering concept emulating natural tooth structure, thanks to a combination of one dentin and one enamel.
LDLE
Bleach / Junior
MDLE
Young
MDDE
Adult
DDDE
Senior
DDLE
Posterior Duo
U
Posterior Mono
6
A biomimetic approach to direct restorations...
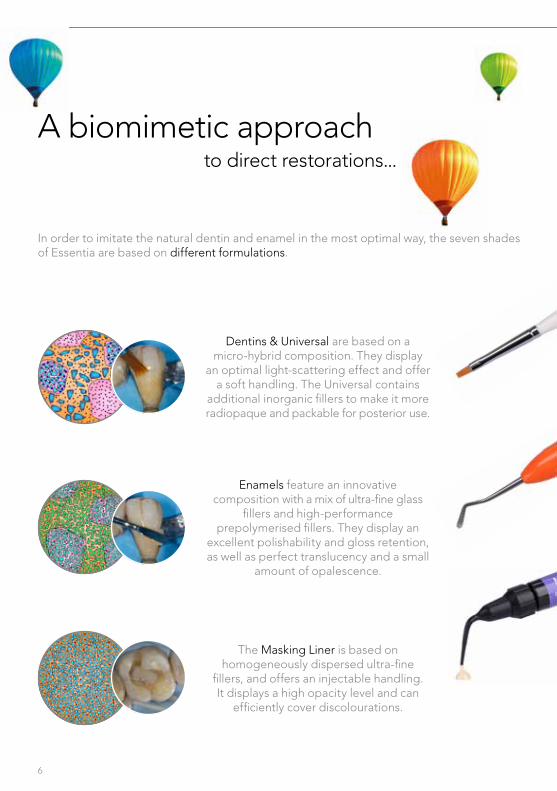
In order to imitate the natural dentin and enamel in the most optimal way, the seven shades of Essentia are based on different formulations.
Dentins & Universal are based on a micro-hybrid composition. They display
an optimal light-scattering effect and offer a soft handling. The Universal contains
additional inorganic fillers to make it more radiopaque and packable for posterior use.
Enamels feature an innovative composition with a mix of ultra-fine glass
fillers and high-performance prepolymerised fillers. They display an
excellent polishability and gloss retention, as well as perfect translucency and a small
amount of opalescence.
The Masking Liner is based on homogeneously dispersed ultra-fine
fillers, and offers an injectable handling. It displays a high opacity level and can
efficiently cover discolourations.
7
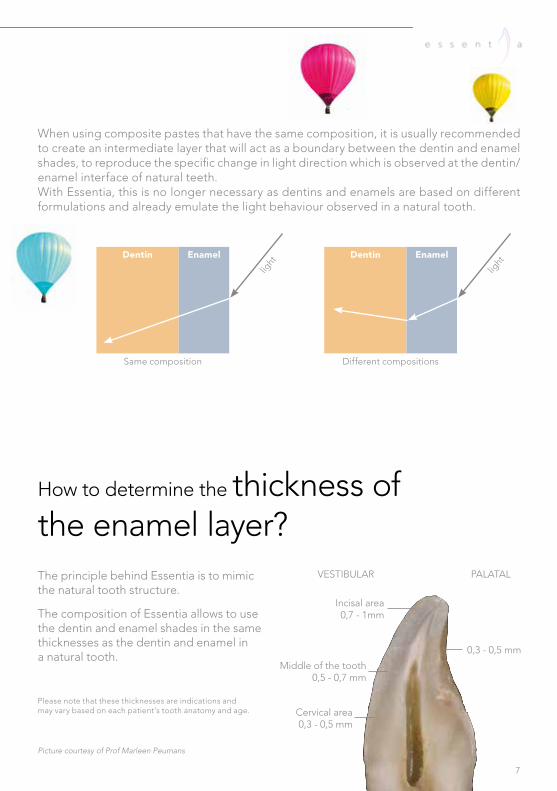
When using composite pastes that have the same composition, it is usually recommended to create an intermediate layer that will act as a boundary between the dentin and enamel shades, to reproduce the specific change in light direction which is observed at the dentin/enamel interface of natural teeth.With Essentia, this is no longer necessary as dentins and enamels are based on different formulations and already emulate the light behaviour observed in a natural tooth.
Dentin Enamellig
ht
Same composition
Dentin Enamel
light
Different compositions
Incisal area0,7 - 1mm
Middle of the tooth0,5 - 0,7 mm
Cervical area0,3 - 0,5 mm
0,3 - 0,5 mm
VESTIBULAR PALATAL
Picture courtesy of Prof Marleen Peumans
The principle behind Essentia is to mimic the natural tooth structure.
The composition of Essentia allows to use the dentin and enamel shades in the same thicknesses as the dentin and enamel in a natural tooth.
Please note that these thicknesses are indications and may vary based on each patient’s tooth anatomy and age.
How to determine the thickness of the enamel layer?
8
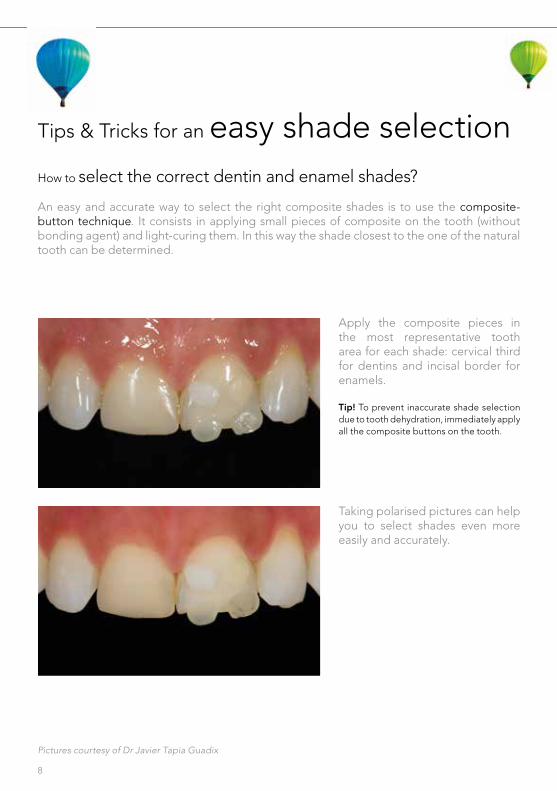
How to select the correct dentin and enamel shades?
An easy and accurate way to select the right composite shades is to use the composite-button technique. It consists in applying small pieces of composite on the tooth (without bonding agent) and light-curing them. In this way the shade closest to the one of the natural tooth can be determined.
Tips & Tricks for an easy shade selection
Apply the composite pieces in the most representative tooth area for each shade: cervical third for dentins and incisal border for enamels.
Tip! To prevent inaccurate shade selection due to tooth dehydration, immediately apply all the composite buttons on the tooth.
Taking polarised pictures can help you to select shades even more easily and accurately.
Pictures courtesy of Dr Javier Tapia Guadix
9
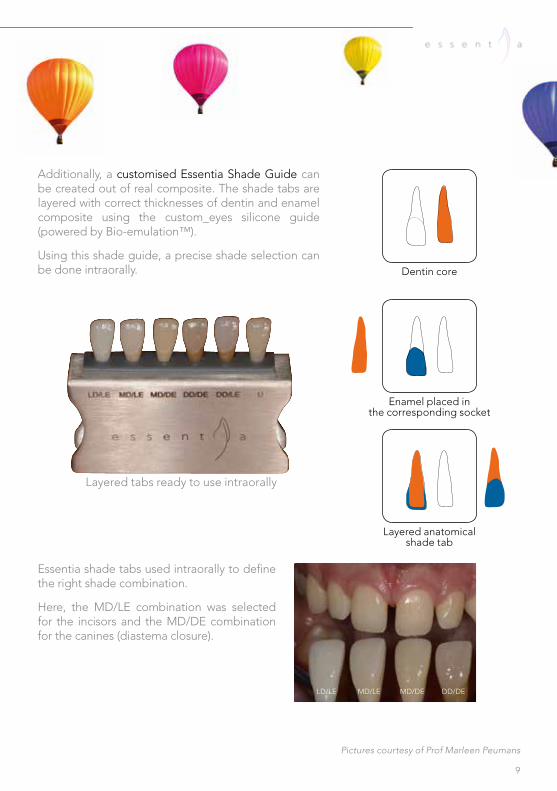
Dentin core
Layered tabs ready to use intraorally
LD/LE MD/LE MD/DE DD/DE
Additionally, a customised Essentia Shade Guide can be created out of real composite. The shade tabs are layered with correct thicknesses of dentin and enamel composite using the custom_eyes silicone guide (powered by Bio-emulation™).
Using this shade guide, a precise shade selection can be done intraorally.
Essentia shade tabs used intraorally to define the right shade combination.
Here, the MD/LE combination was selected for the incisors and the MD/DE combination for the canines (diastema closure).
Pictures courtesy of Prof Marleen Peumans
Enamel placed in the corresponding socket
Layered anatomical shade tab

10
The patient asked for aesthetic improvement of his discoloured central incisors. Both incisors were bleached internally 10 years ago, but a relaps of discolouration occurred. It was planned to mask the discoloured teeth with direct composite veneers.
Direct veneers with two shades
Initial pre-operative situation: both central incisors with old restorations displayed a colour mismatch.
LE
OM LE OM
After removal of the old restoration, a minimal enamel reduction (0.1-0.2mm) and surface sandblasting (27µm) were carried out. A space of 0.7mm was then available to mask the discolouration with the composite veneer.
Shade selection using the composite-button technique and polar_eyes®. Small amounts of composite were applied on the teeth and light-cured (without bonding agent). LD and LE showed the best colour match. Tip! To select enamel shades, placing the composite buttons on top of old restorations or areas to be replaced is not optimal as their shade is not necessarily right. The most accurate way to select shades is to use adjacent teeth and place the buttons in extension of the incisal edge, where there is no dentin in the back.
LDLE
Bleach / Junior
After creating a palatal shell with Light Enamel (LE), a thin layer of Light Dentin (LD) was built-up from cervical to incisal, reproducing the natural dentin structure with “mammelons” towards the incisal edge. The high opacity of the LD was able to mask the moderate discolouration.
LDMD
11
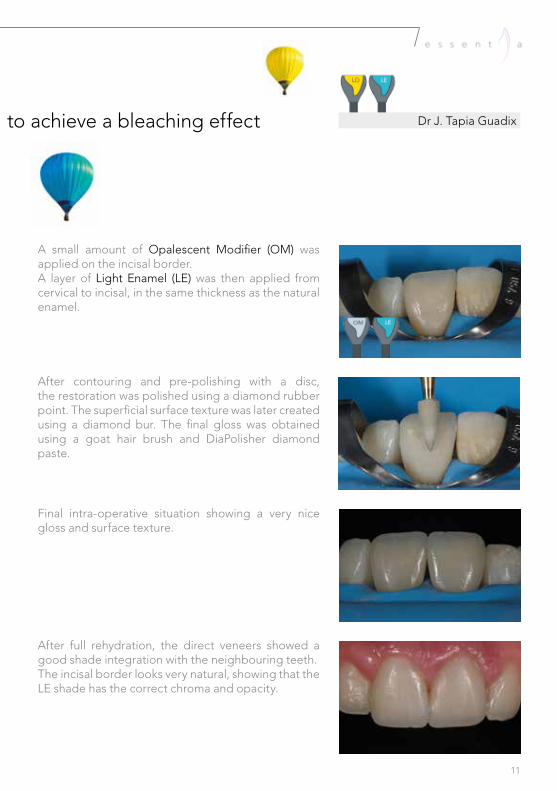
A small amount of Opalescent Modifier (OM) was applied on the incisal border.A layer of Light Enamel (LE) was then applied from cervical to incisal, in the same thickness as the natural enamel.
to achieve a bleaching effect
After full rehydration, the direct veneers showed a good shade integration with the neighbouring teeth. The incisal border looks very natural, showing that the LE shade has the correct chroma and opacity.
Final intra-operative situation showing a very nice gloss and surface texture.
After contouring and pre-polishing with a disc, the restoration was polished using a diamond rubber point. The superficial surface texture was later created using a diamond bur. The final gloss was obtained using a goat hair brush and DiaPolisher diamond paste.
Dr J. Tapia Guadix
LE LDOM MD
polar_eyes®
Duo-layering technique to solve a
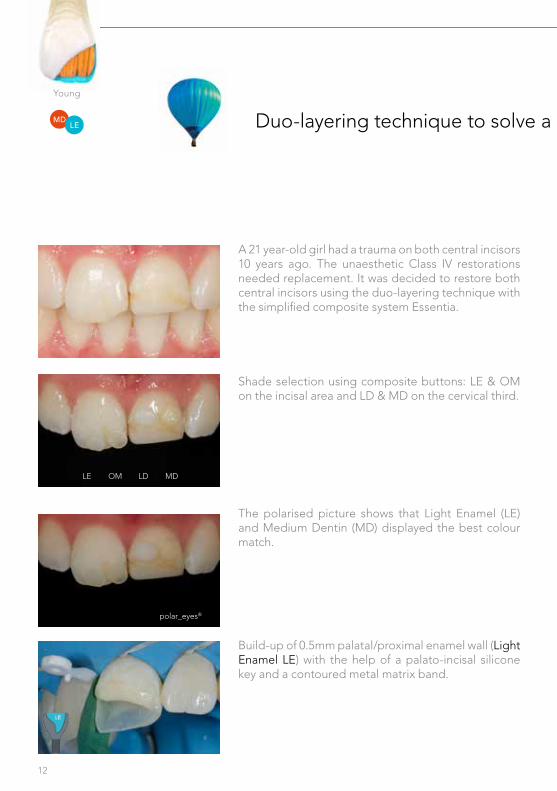
A 21 year-old girl had a trauma on both central incisors 10 years ago. The unaesthetic Class IV restorations needed replacement. It was decided to restore both central incisors using the duo-layering technique with the simplified composite system Essentia.
Build-up of 0.5mm palatal/proximal enamel wall (Light Enamel LE) with the help of a palato-incisal silicone key and a contoured metal matrix band.
The polarised picture shows that Light Enamel (LE) and Medium Dentin (MD) displayed the best colour match.
Shade selection using composite buttons: LE & OM on the incisal area and LD & MD on the cervical third.
MDLE
Young
12
13
Class IV case on a young patient Dr J. Tapia Guadix
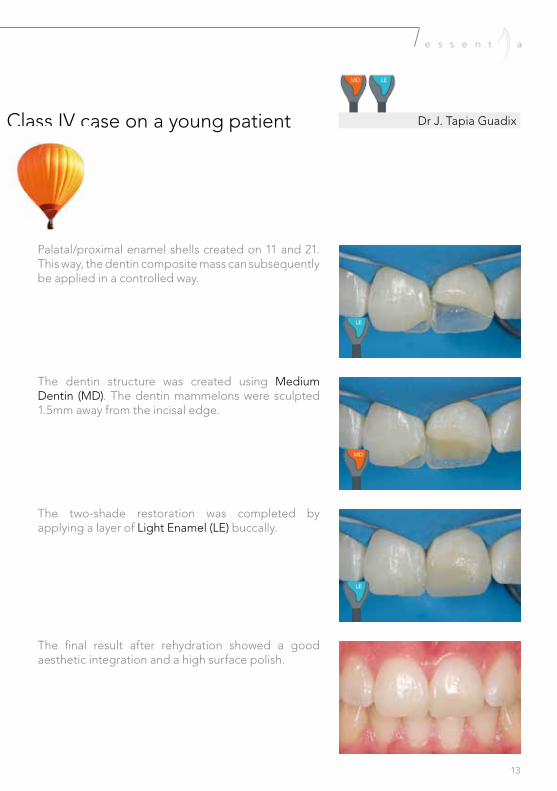
Palatal/proximal enamel shells created on 11 and 21. This way, the dentin composite mass can subsequently be applied in a controlled way.
The final result after rehydration showed a good aesthetic integration and a high surface polish.
The two-shade restoration was completed by applying a layer of Light Enamel (LE) buccally.
The dentin structure was created using Medium Dentin (MD). The dentin mammelons were sculpted 1.5mm away from the incisal edge.
LD/LE MD/LE MD/DE DD/DE DD/LE
Restoring tetracycline-stained teeth with
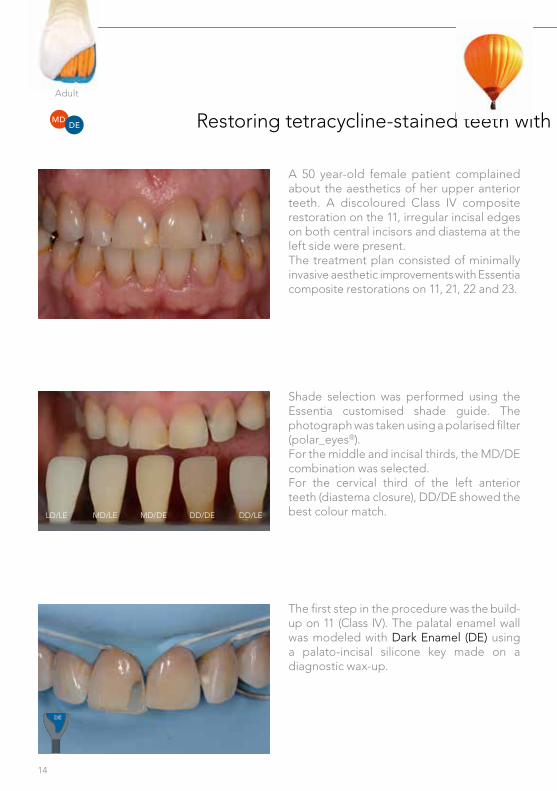
A 50 year-old female patient complained about the aesthetics of her upper anterior teeth. A discoloured Class IV composite restoration on the 11, irregular incisal edges on both central incisors and diastema at the left side were present.The treatment plan consisted of minimally invasive aesthetic improvements with Essentia composite restorations on 11, 21, 22 and 23.
MDDE
Adult
Shade selection was performed using the Essentia customised shade guide. The photograph was taken using a polarised filter (polar_eyes®). For the middle and incisal thirds, the MD/DE combination was selected. For the cervical third of the left anterior teeth (diastema closure), DD/DE showed the best colour match.
The first step in the procedure was the build-up on 11 (Class IV). The palatal enamel wall was modeled with Dark Enamel (DE) using a palato-incisal silicone key made on a diagnostic wax-up.
14
15
the Adult two-shade combination Prof M. Peumans
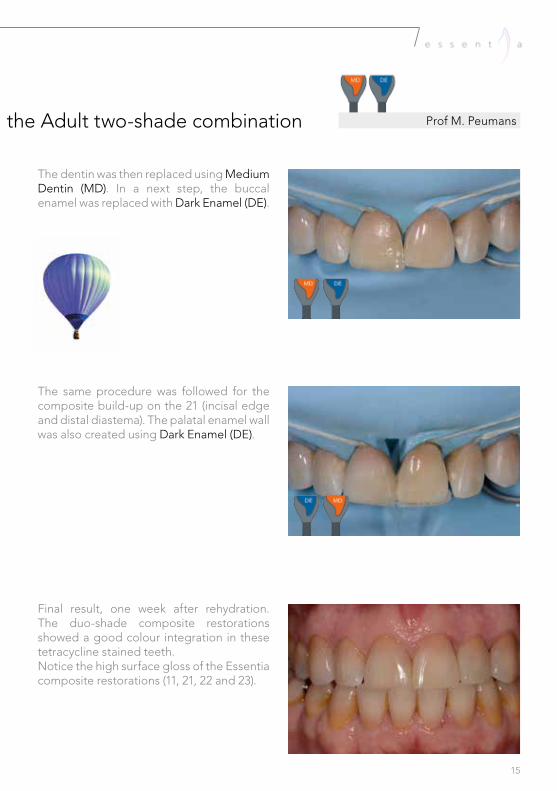
The dentin was then replaced using Medium Dentin (MD). In a next step, the buccal enamel was replaced with Dark Enamel (DE).
The same procedure was followed for the composite build-up on the 21 (incisal edge and distal diastema). The palatal enamel wall was also created using Dark Enamel (DE).
Final result, one week after rehydration. The duo-shade composite restorations showed a good colour integration in these tetracycline stained teeth. Notice the high surface gloss of the Essentia composite restorations (11, 21, 22 and 23).
Well-integrated Class V restorations in
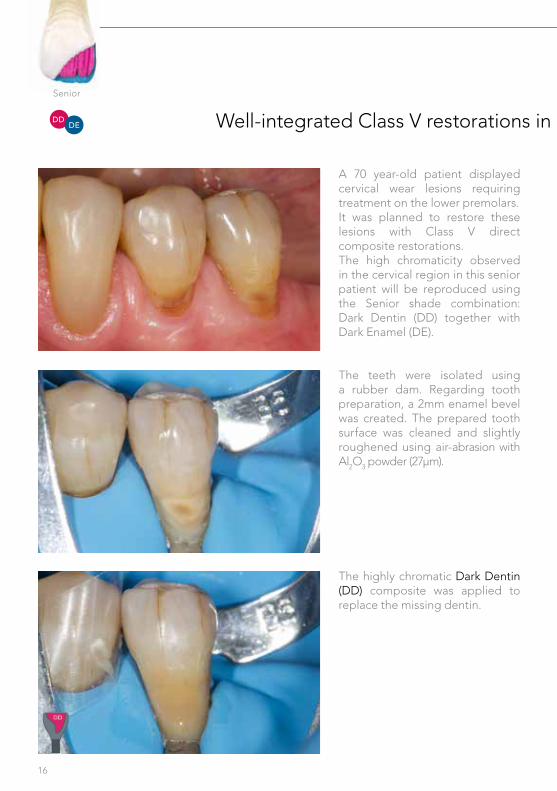
A 70 year-old patient displayed cervical wear lesions requiring treatment on the lower premolars. It was planned to restore these lesions with Class V direct composite restorations. The high chromaticity observed in the cervical region in this senior patient will be reproduced using the Senior shade combination: Dark Dentin (DD) together with Dark Enamel (DE).
DDDE
Senior
The teeth were isolated using a rubber dam. Regarding tooth preparation, a 2mm enamel bevel was created. The prepared tooth surface was cleaned and slightly roughened using air-abrasion with Al2O3 powder (27μm).
The highly chromatic Dark Dentin (DD) composite was applied to replace the missing dentin.
16

17
a senior patient Prof M. Peumans
Next, the dentin layer was covered with a layer of Dark Enamel (DE).
The cervical lesion on the first premolar was also restored according to the duo-layering technique. After rehydration, the restorations showed a nice colour match and natural surface gloss.
Natural-looking posterior restoration using
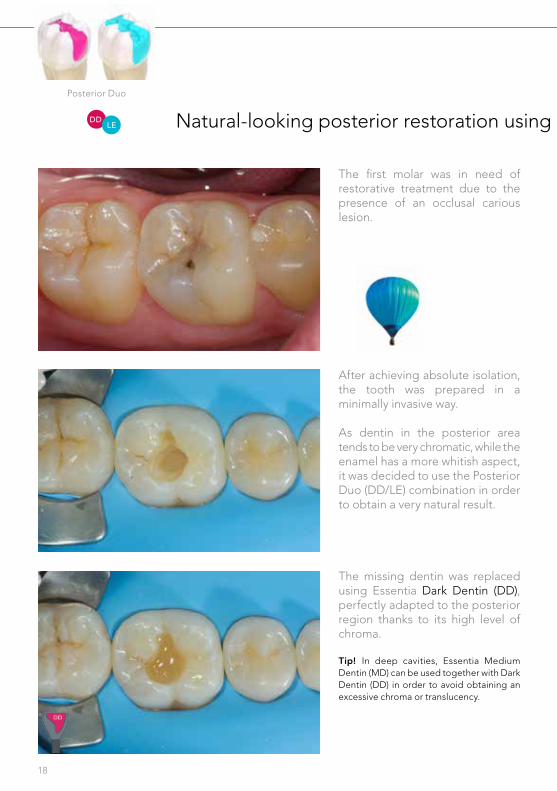
The first molar was in need of restorative treatment due to the presence of an occlusal carious lesion.
DDLE
Posterior Duo
After achieving absolute isolation, the tooth was prepared in a minimally invasive way.
As dentin in the posterior area tends to be very chromatic, while the enamel has a more whitish aspect, it was decided to use the Posterior Duo (DD/LE) combination in order to obtain a very natural result.
The missing dentin was replaced using Essentia Dark Dentin (DD), perfectly adapted to the posterior region thanks to its high level of chroma.
Tip! In deep cavities, Essentia Medium Dentin (MD) can be used together with Dark Dentin (DD) in order to avoid obtaining an excessive chroma or translucency.
18
19
the Posterior Duo combination Dr J. Tapia Guadix
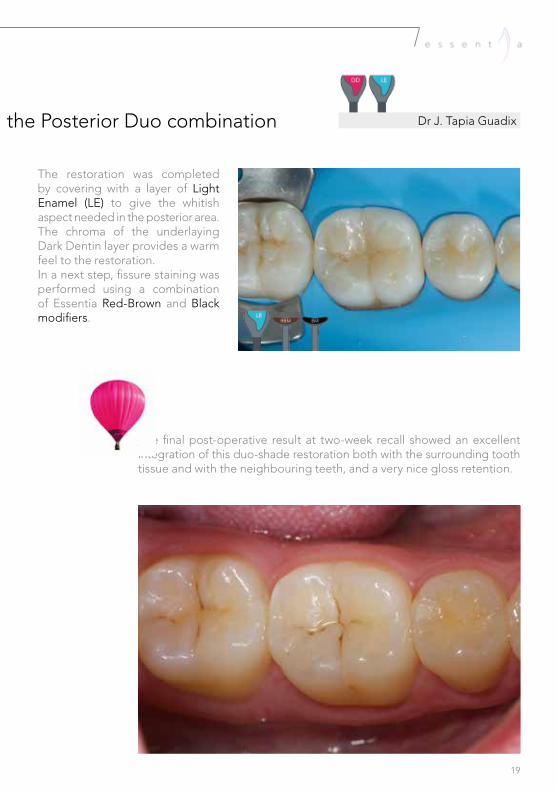
The restoration was completed by covering with a layer of Light Enamel (LE) to give the whitish aspect needed in the posterior area. The chroma of the underlaying Dark Dentin layer provides a warm feel to the restoration. In a next step, fissure staining was performed using a combination of Essentia Red-Brown and Black modifiers.
The final post-operative result at two-week recall showed an excellent integration of this duo-shade restoration both with the surrounding tooth tissue and with the neighbouring teeth, and a very nice gloss retention.

Aesthetic mono-shade result in small & posterior
The first upper molar needed restorative treatment due to the presence of several small carious lesions.
U
Universal
After isolation and preparation of the cavities, it was decided to keep the procedure as simple as possible as the cavities were small and located in the posterior area. Restoring the tooth using the Essentia Universal shade eliminates the need for duo-layering.
The cavities were filled using Essentia Universal (U) as a single-shade solution.Its packable consistency makes it easy to apply and shape in the posterior area.
Fissures were stained using Essentia BM and RBM modifiers.
20
21
cavities using Essentia Universal Dr J. Tapia Guadix
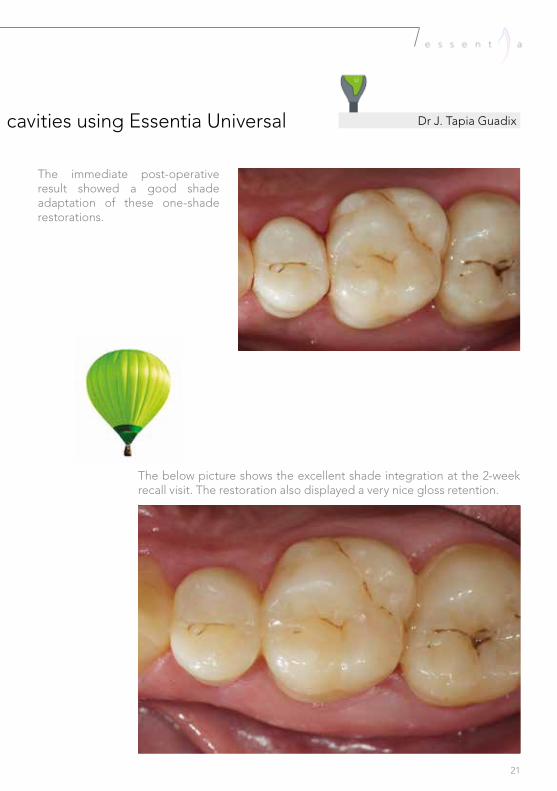
The immediate post-operative result showed a good shade adaptation of these one-shade restorations.
The below picture shows the excellent shade integration at the 2-week recall visit. The restoration also displayed a very nice gloss retention.
Use of the Masking Liner to block discolourations in the Posterior region
ML
Masking Liner
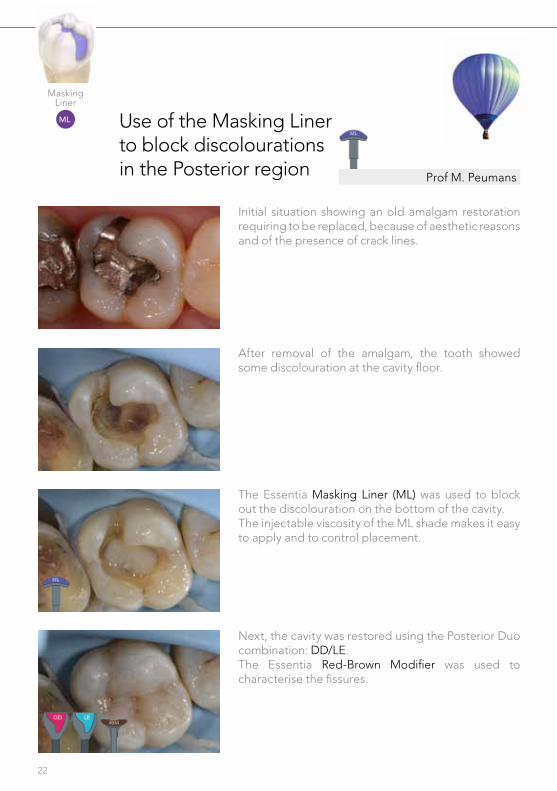
Initial situation showing an old amalgam restoration requiring to be replaced, because of aesthetic reasons and of the presence of crack lines.
Next, the cavity was restored using the Posterior Duo combination: DD/LE. The Essentia Red-Brown Modifier was used to characterise the fissures.
The Essentia Masking Liner (ML) was used to block out the discolouration on the bottom of the cavity. The injectable viscosity of the ML shade makes it easy to apply and to control placement.
After removal of the amalgam, the tooth showed some discolouration at the cavity floor.
Prof M. Peumans
22
23
Creation of a natural incisal halo using the Opalescent Modifier
OM
OpalescentModifier
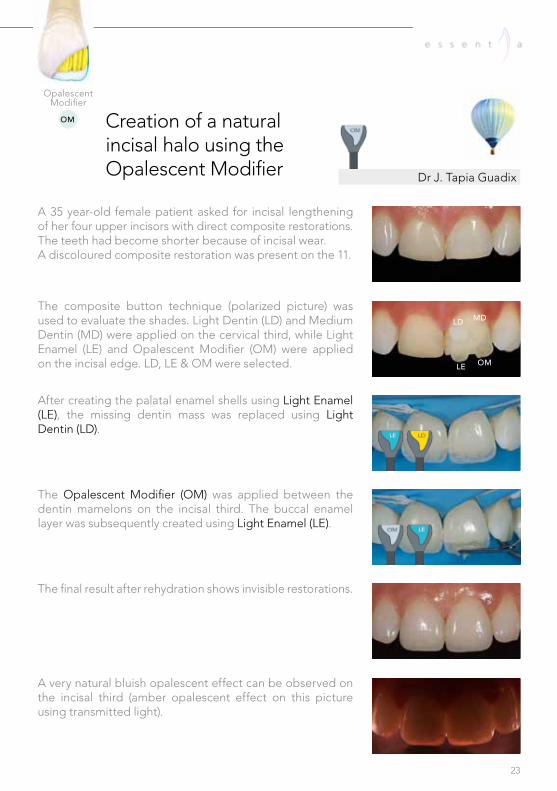
A 35 year-old female patient asked for incisal lengthening of her four upper incisors with direct composite restorations. The teeth had become shorter because of incisal wear. A discoloured composite restoration was present on the 11.
Dr J. Tapia Guadix
The composite button technique (polarized picture) was used to evaluate the shades. Light Dentin (LD) and Medium Dentin (MD) were applied on the cervical third, while Light Enamel (LE) and Opalescent Modifier (OM) were applied on the incisal edge. LD, LE & OM were selected.
After creating the palatal enamel shells using Light Enamel (LE), the missing dentin mass was replaced using Light Dentin (LD).
The Opalescent Modifier (OM) was applied between the dentin mamelons on the incisal third. The buccal enamel layer was subsequently created using Light Enamel (LE).
The final result after rehydration shows invisible restorations.
A very natural bluish opalescent effect can be observed on the incisal third (amber opalescent effect on this picture using transmitted light).
MDLD
OMLE
GC EUROPE N.V. Head Office Researchpark Haasrode-Leuven 1240Interleuvenlaan 33B-3001 Leuven Tel. +32.16.74.10.00Fax. +32.16.40.48.32 [email protected]://www.gceurope.com
GC UNITED KINGDOM Ltd.12-15, Coopers CourtNewport PagnellUK-Bucks. MK16 8JSTel. +44.1908.218.999Fax. [email protected]://uk.gceurope.com
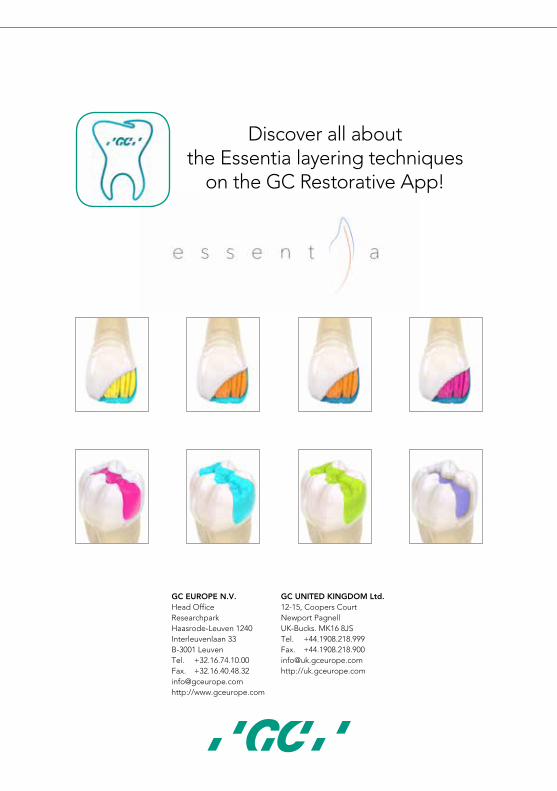
Discover all about the Essentia layering techniques
on the GC Restorative App!


![Passive Eruption Patterns in Central Incisors[1]](https://img.pdfslide.us/doc/110x75/55029cb74a7959362a8b4a9a/passive-eruption-patterns-in-central-incisors1.jpg)