Embed Size (px)
Citation preview

CASAS Banner User Guide
Digital Information Services Center (DISC) Updated: 3/16/2007

CASAS Banner User Guide
1
Table of Contents
General Tasks (Pages 2-4)
Logging into Banner
Self Service Tasks (Pages 6-16)
Term and ID Selection
Student Information Menu
View Student Information
View Test Scores (SAT/ACT and Assessment Tests)
View Transcript
View Schedule
View and Email Advisees
View Holds (Check to see if flag has been raised)
Add/Drop a Courses
Internet Native Banner Tasks (Pages 18-32)
Direct Access - Go To Box
Navigation Tips
View Course History (SHACRSE, SHATRNS)
View Degree History (SHADEGR)
View Academic Standing & GPA (SHAINST)
Print Transcript (SHARQTC)
Notepad - Viewing and Creating Comments (SPACMNT)
Raise a Flag (SOAHOLD)
Add or Remove an Advisee (SGAADVR)
Get Help (Page 35)

CASAS Banner User Guide
2
General Tasks

CASAS Banner User Guide
3
Logging into Banner
Go to the Banner Page http://www.liberty.edu/banner
Click on Login to Banner
Enter your SENSENET username and password
Select either the “Self Service” or “Internet Native Banner” link for “Live Production” to access the Banner system
Note: Self Service and INB (Internet Native Banner) both access the same information but function differently. INB is far more powerful and has
more options and information available while self service is much easier to use. The task you are trying to complete will determine which
method you use to access banner (it is possible to access banner via both methods simultaneously.)

CASAS Banner User Guide
4
Logging into Banner (cont’d)
Self Service - You will be directed to the Self Service Main Menu
Internet Native Banner (INB) – A new window will launch and you will need to login again
Enter your SENSENET username and password
Database can always be left blank
Note: The first time you launch banner on your computer you will be presented with a license agreement which you will need to accept. You
may also be presented with a security warning, choose “Run.”

CASAS Banner User Guide
5

CASAS Banner User Guide
6
Self Service Tasks

CASAS Banner User Guide
7
Term and ID Selection
Before you can look at any information inside of Self Service you must select a Term and ID (Student)
Term Selection and ID are available from the “Student Information Menu”
Note: If no student or term has been selected, Self Service will prompt for them, if you have already selected a student or term you will need to
change them by accessing the links above from the menu
REMEMBER: Student IDs must be in the format L00XXXXXX (9 Digits, including the CAPITAL L, padded with zeros at the beginning)

CASAS Banner User Guide
8
Student Information Menu
Self Service – Student Information Menu
Navigation: From the Self Service Main Menu select the Faculty Services tab
Then select “Student Information Menu”
Purpose:
This is where all self service navigating for advisors will begin

CASAS Banner User Guide
9
View Student Information
Self Service – Student Information
Navigation: From the “Student Information Menu” select “Student Information”
Purpose: Students Registration (Yes or No) Student’s status and type Biographical Information Students Advisor Expected Graduation Date Curriculum Information (Student’s Major) Link for Student’s Addresses (Both Mail and Email)

CASAS Banner User Guide
10
View Test Scores
Self Service – View Test Scores
Navigation: From the “Student Information Menu” select “View Test Scores”
Purpose: SAT Scores ACT Scores Assessment Test Scores

CASAS Banner User Guide
11
View Transcript
Self Service – Academic Transcript You must first select the level (i.e. Undergraduate) There is only one type available on Self Service
The Transcript will be displayed
Navigation: From the “Student Information Menu” select “Academic Transcript”
Purpose: View an unofficial transcript for one or more levels
Note: See the “Print Transcript” under the INB section for instructions on Printing Transcripts

CASAS Banner User Guide
12
View Schedule
Self Service – Student Schedule
Navigation: From the “Student Information Menu” select “Student Schedule”
Purpose: View Total Credit Hours View/Print a Students Schedule Email a Professor
Tip: Check the bottom of the screen for useful links such as “Add/Drop Courses”

CASAS Banner User Guide
13
View and Email Advisees
Self Service – Advisee Listing
There is an email link next to each advisee to email them individually. At the bottom of your list of advisees you will see a link: Do not use this link it will not work, a solution is under construction Notice the convenient links next to each advisee:
Navigation: From the “Student Information Menu” select “Advisee Listing”
Purpose: View Advisees Email an Advisee Convenient links
CASAS Banner User Guide
14
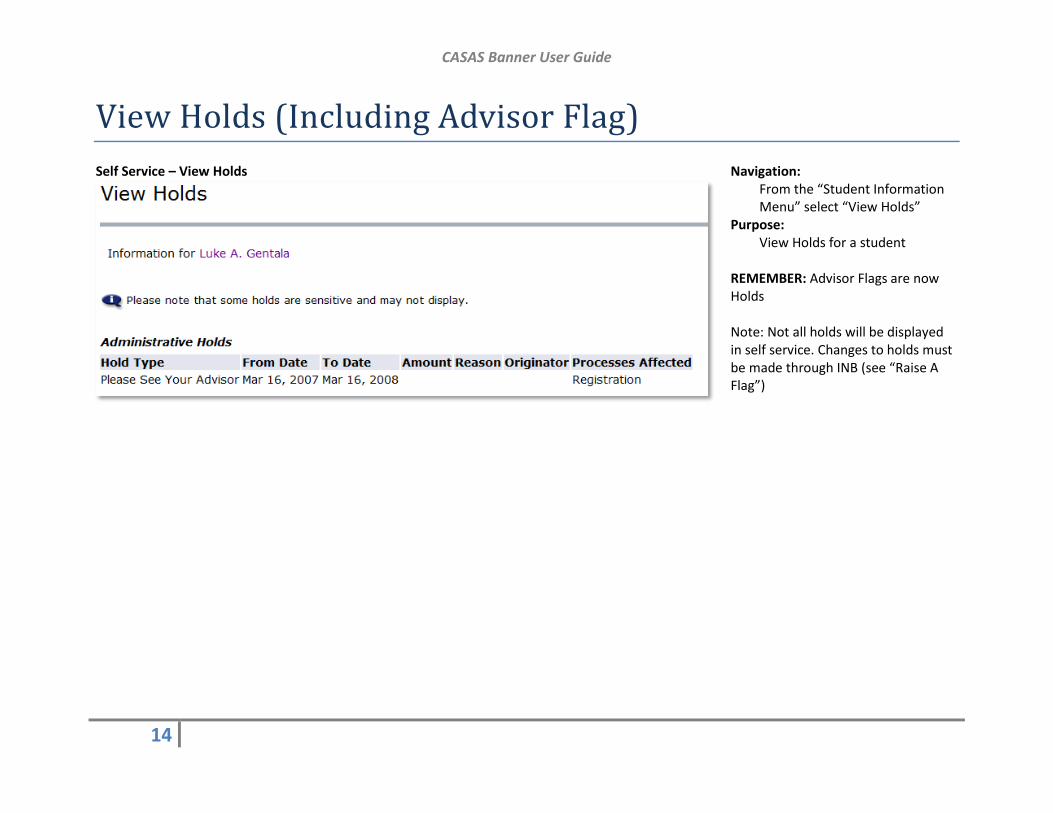
View Holds (Including Advisor Flag)
Self Service – View Holds
Navigation: From the “Student Information Menu” select “View Holds”
Purpose: View Holds for a student
REMEMBER: Advisor Flags are now Holds Note: Not all holds will be displayed in self service. Changes to holds must be made through INB (see “Raise A Flag”)

CASAS Banner User Guide
15
Add or Drop Classes
Self Service – Add or Drop Classes
This screen will display courses for which a student is currently registered and allow you to add or drop courses
Drop a Class
To drop a class use the Action drop down list and select “Drop Via Web”
Then click Submit changes
Navigation: From the “Student Information Menu” select “Add or Drop Classes”
Purpose: Add or Drop Courses for the selected term

CASAS Banner User Guide
16
Add or Drop Classes (Cont’d)
Add a Class If you know the CRNs of the courses you would like to add you may enter them here and simply press Submit Changes, the classes will be added to the students schedule immediately when using this method.
If you do not know the CRNs of the courses you would like you must use the “Class Search” button
Use the “Look Up Classes” page to search for the course you would like to add

CASAS Banner User Guide
17
Add or Drop Classes (Cont’d)
Add a Class (Cont’d)
The sections matching your search criteria are now shown, use the check box to the left to select the section you would like to add.
Click either “Register” or “Add to Worksheet”
Selecting “Register” will add the class to the students schedule right away
Selecting “Add to Worksheet” will add the CRN to one of the boxes on the “Add or Drop Classes Screen” (See below)

CASAS Banner User Guide
18
Internet Native Banner (INB) Tasks

CASAS Banner User Guide
19
Direct Access – Go To Box
The easiest way to open the form you would like to use inside of INB is to use Direct Access or the “Go To Box”
From the Main Menu the Go To Box is located near the top of the window just under the Toolbar
If you are already in a form and would like to open another one, you can bring up the Go To Box by Pressing F5
The Go To Box will now appear at the top of the form
Remember: After typing in the name of the form press Enter do not click the search arrow to the right of the Go To Box

CASAS Banner User Guide
20
Navigation Tips
Forms are made up of Blocks, use the Next and Previous Block buttons to move between those blocks
Click the Next Block Button or use CTRL+PGDN
To search a form use the Query Functions
To restart a form and select a new student use the Rollback function
Rollback toolbar button and keyboard shortcut

CASAS Banner User Guide
21
View Course History (SHACRSE, SHATRNS)
Inside of Banner Institutional Credit and Transfer Credit are stored in separate places. Institutional Credit can be found in SHACRSE while
Transfer Credit will be in SHATRNS.
Viewing Institutional Credit Open the SHACRSE form, then enter a student’s ID. Leave the term field blank to view all terms.
Move to the Next Block
The student’s courses are now displayed.
Note: You may query this form to narrow your results

CASAS Banner User Guide
22
View Course History (SHACRSE, SHATRNS) (Cont’d)
Viewing Transfer Credit Open the SHATRNS form. You need to enter a student’s ID, then select a Transfer Institution and Attendance Period.
The Transfer Institution Number represents a school. Click the List of Values Button next to transfer institution (Arrow)
The list of schools is now displayed, select the school you would like to view credit from
Next you need to select an Attendance Period. If a student has credits for more than one level from an institution there will be multiple
attendance periods. Click the List of Values Arrow to view existing Attendance Periods.
CASAS Banner User Guide
23
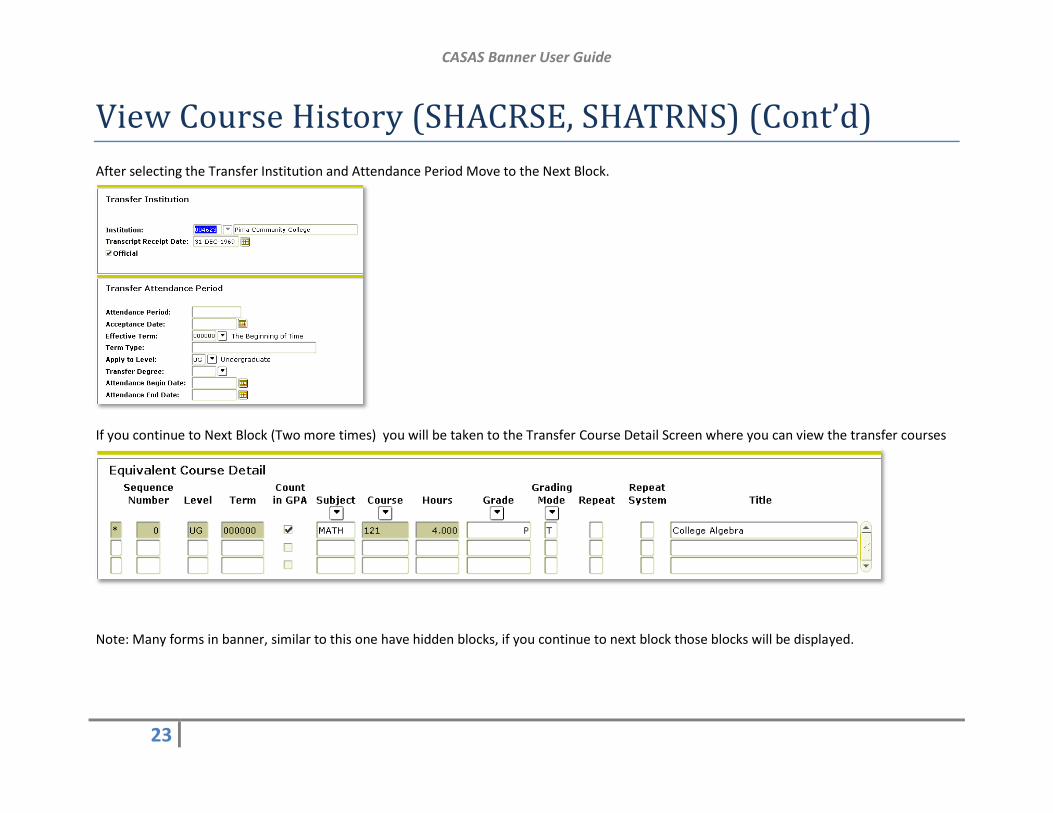
View Course History (SHACRSE, SHATRNS) (Cont’d)
After selecting the Transfer Institution and Attendance Period Move to the Next Block.
If you continue to Next Block (Two more times) you will be taken to the Transfer Course Detail Screen where you can view the transfer courses
Note: Many forms in banner, similar to this one have hidden blocks, if you continue to next block those blocks will be displayed.

CASAS Banner User Guide
24
View Degree History (SHADEGR)
Open the SHADEGR form and Enter a Students ID, then select a Degree Sequence. You can view existing degree sequences by clicking the button
next to degree sequence.
Select a Degree from the Screen (Highlight a record to view details) (Details of Sequence 6 are listed below)

CASAS Banner User Guide
25
View Degree History (SHADEGR) (Cont’d)
Move to the next block (If holds exist you may view and override them at this point, to override a hold place a Y in the Box)
Details of a the selected Degree will now be displayed, you can move to the Curricula tab for additional information
Note: The Curricula tab has 2 tabs under it, the Field of Study tab will show details about a program/major as well as minors

CASAS Banner User Guide
26
Academic Standing and GPA (SHAINST)
Academic standing and GPA are found on the SHAINST form. Academic Standing is on the first block while GPA is in a “hidden block”
First enter an ID and Term
Next Block
If Academic standing is Blank that means the student has Good Standing. If it is listed as “Good Standing” you will know that it was previously in
another state.

CASAS Banner User Guide
27
Academic Standing and GPA (SHAINST) (Cont’d)
To view GPA Next Blocktwice
GPA for the current term will be displayed. The best place to see GPA for all terms is in Self Service – Academic Transcript.

CASAS Banner User Guide
28
Print Transcript (SHARQTC, SHRTRTC)
There are two steps for Printing a transcript in Banner, first you must request the transcript using SHARQTC, then you can print the “request”
from SHRTRTC.
First, open the SHARQTC form to request a transcript.
After Selecting an ID Move to the Next Block (You may override holds by placing a Y in the override holds box)
Move to the Next Block
You will now see the previous transcript requests, to create a new request you need to “Insert a Record”.
You can insert a Record by Going to Record and choosing insert or by Pressing F6
You now need to enter the Level and Transcript type.
Level will be UG for Undergrad, GR for Graduate, etc. You may use AL to represent all levels
Transcript type will always be OT
CASAS Banner User Guide
29
Print Transcript (SHARQTC, SHRTRTC)
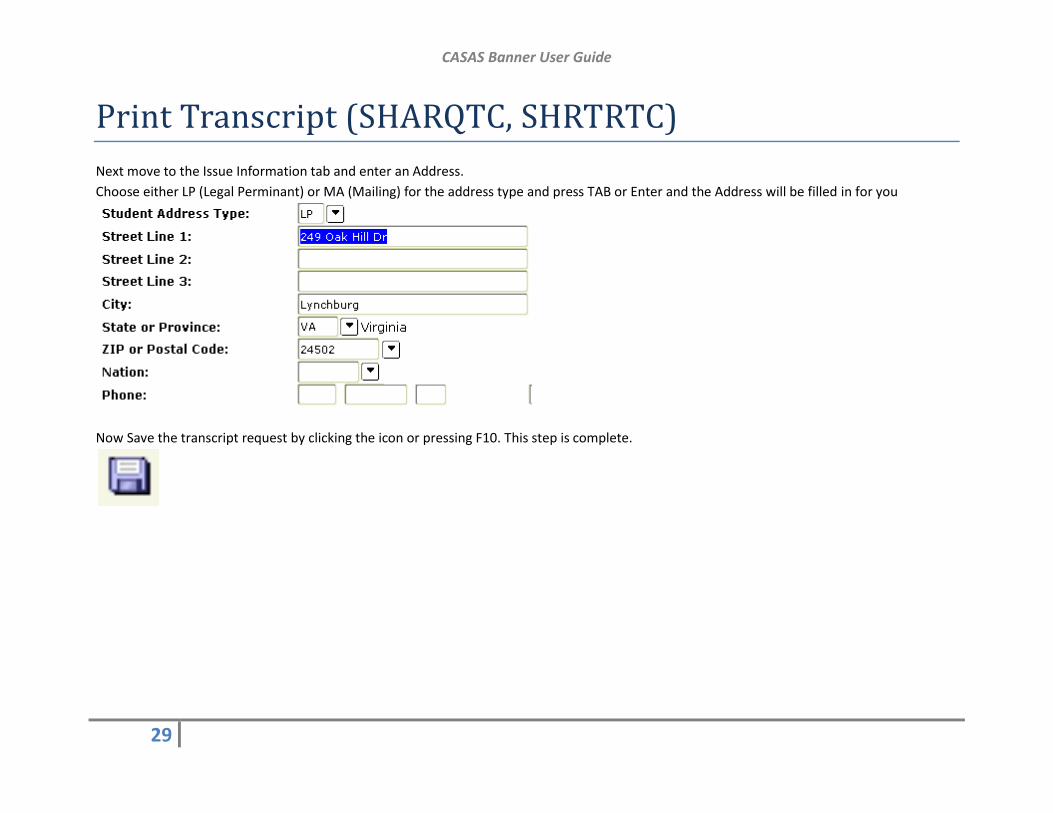
Next move to the Issue Information tab and enter an Address.
Choose either LP (Legal Perminant) or MA (Mailing) for the address type and press TAB or Enter and the Address will be filled in for you
Now Save the transcript request by clicking the icon or pressing F10. This step is complete.

CASAS Banner User Guide
30
Print Transcript (SHARQTC, SHRTRTC)
The next step is to Print the Transcript from SHRTRTC
Open SHRTRTC and move to the second block, then select a printer from the list
Place a lowercase t in the “Special Print” field to specify transcript. You may also choose email here, which will send the transcript to your email
address as a PDF.
Move to the Next Block
Line 2 – % means all requested transcripts will be printed, change to an ID for one transcript only
Line 7 – Y or N for Official Transcript (Choose N)
Line 15 – Sort Order Must be 5
Line 20 – Must be set to N
Move to the next block, you must be in this block to print.
Check the “Save Parameter Set” checkbox to save these values as default.
Click Save, the transcript will now print. (YOU MUST BE IN THE SUBMISSION BLOCK BEFORE YOU SAVE)
CASAS Banner User Guide
31
Notepad – Viewing and Creating Comments (SPACMNT)
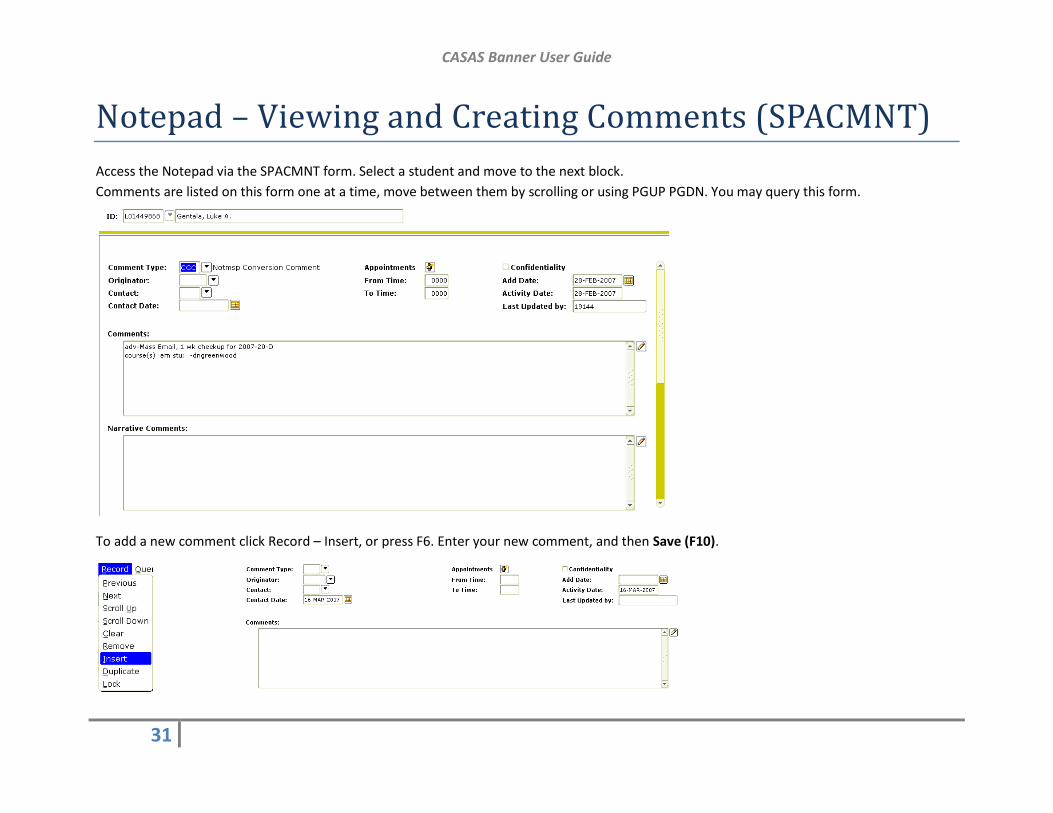
Access the Notepad via the SPACMNT form. Select a student and move to the next block.
Comments are listed on this form one at a time, move between them by scrolling or using PGUP PGDN. You may query this form.
To add a new comment click Record – Insert, or press F6. Enter your new comment, and then Save (F10).

CASAS Banner User Guide
32
Raise a Flag (SOAHOLD)
Advisor Flags are now Holds. The form to control Holds is SOAHOLD.
To lift an advisee’s flag simply select their ID on SOAHOLD and move to the Next Block.
The Advisor Hold code is AV and is labeled “Please See Your Advisor”
Enter a T in the To: date and press tab, this will change the date to today and effectively remove the hold and lift the flag
After Changing the date to today, Save (F10)
The students flag has now been raised

CASAS Banner User Guide
33
Add or Remove an Advisee
Advisee Advisor associations are set in the SGAADVR form.
Select a Student and a term (choose the current term), then move to the next block
To change an advisor you must backspace out the ID of the current advisor and enter the new advisors ID.
If there is no advisor you may add one on the first line, if you would like to add a second advisor use the down arrow and enter the ID of the
second advisor.
To remove an Advisor from a student use Record – Remove or Shift F6

CASAS Banner User Guide
34

CASAS Banner User Guide
35
Get Help
Help Desk
Email:
Website: http://www.liberty.edu/helpdesk
Phone: (434) 592-7800
Banner Support Page
http://www.liberty.edu/banner
Mike Mogren (Banner Student Module Trainer)
Email: [email protected]
Phone: (434) 592-4261