Embed Size (px)
Citation preview
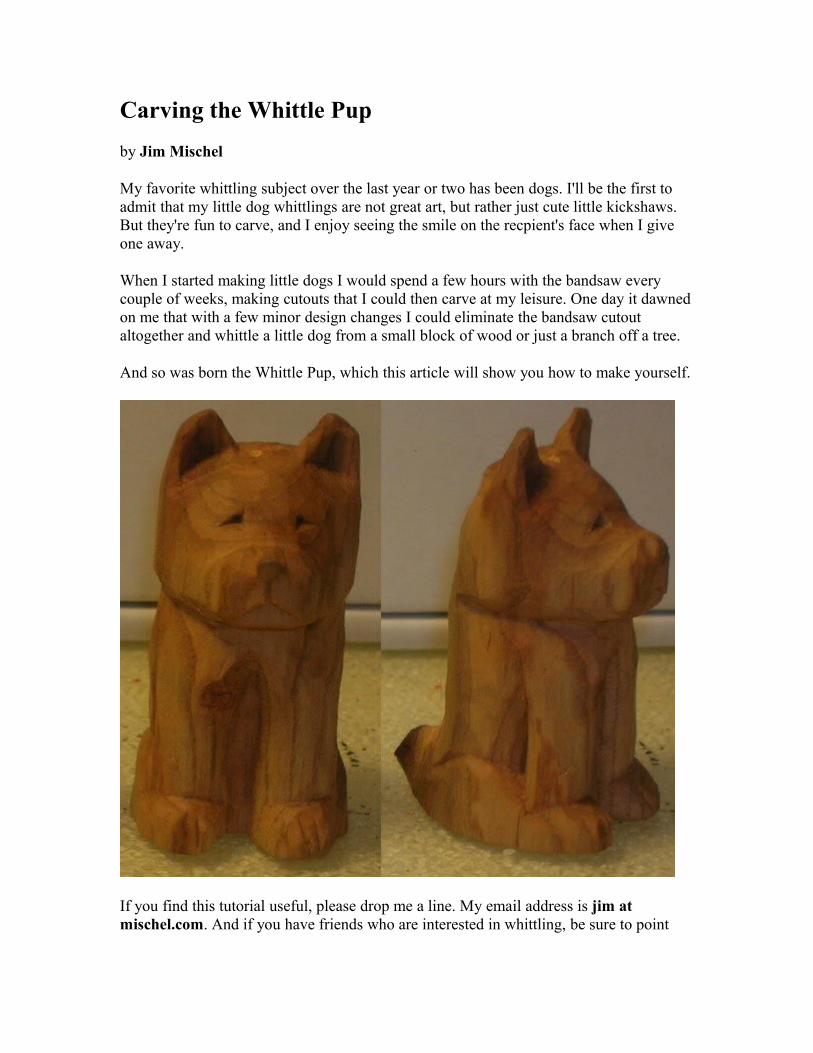
Carving the Whittle Pup
by Jim Mischel
My favorite whittling subject over the last year or two has been dogs. I'll be the first to admit that my little dog whittlings are not great art, but rather just cute little kickshaws. But they're fun to carve, and I enjoy seeing the smile on the recpient's face when I give one away.
When I started making little dogs I would spend a few hours with the bandsaw every couple of weeks, making cutouts that I could then carve at my leisure. One day it dawned on me that with a few minor design changes I could eliminate the bandsaw cutout altogether and whittle a little dog from a small block of wood or just a branch off a tree.
And so was born the Whittle Pup, which this article will show you how to make yourself.
If you find this tutorial useful, please drop me a line. My email address is jim at mischel.com. And if you have friends who are interested in whittling, be sure to point

them at this tutorial. Also, if you send a picture of your dog, I'll add it to my Whittle Pup Gallery, along with your name and a link to your blog or Web site.
Happy whittling!
What you need
Carving this little dog requires that you gather just a few things before you start:
• A piece of wood, two inches (5 cm) tall, and an inch or an inch and a half (2.5 to 4 cm) in diameter. See Wood selection, below, for more details.
• A sharp knife. Anything will do, although I would suggest something with a blade at least an inch long. I've done these with a pocket knife, a 2" roughing knife, a utility knife, a 1" detail knife, and pretty much everything in between. The primary requirement is that the knife be sharp.
• A pencil for marking on the wood. A ball point pen will work, but it's less than ideal. Do not use a Sharpie or other such marker, as the ink will be sucked into the wood and might bleed over where you don't want it. Other than a knife, the pencil is the most useful tool you can own. You should have at least one in your carving kit at all times.
• A ruler or small tape measure. This is optional. If you have it, great, but I'll include ways to estimate the few measurements we use.
• A thumb guard to protect the thumb on your carving hand (i.e. the hand that's holding the knife).
• A carving glove to protect the hand that's holding the carving.
I consider the carving glove and thumb guard to be mandatory safety equipment. I've never cut myself when wearing them, and I've received a few nasty cuts when not wearing them. These won't prevent all cuts, but they will prevent the typical slicing cuts

that many wood carvers--especially beginners--often inflict on themselves. For more on safety, see my article Getting started with wood carving – Safety.
Wood selection
I carved the figure shown above from a piece of an apricot limb, and that's the kind of wood I'm going to use in this tutorial. The piece I've selected is shown in the picture at the left. You can use any wood you choose. You want to start with a piece that's two inches tall and a little over an inch in diameter with the bark on. Don't worry too much about the thickness, although I would suggest for this first time that you not select a piece that's less than an inch thick, as it becomes difficult to work with pieces that small.
If you don't have a convenient stick from a tree, you can use a wooden dowel. The major home improvement stores sell dowels in varying thicknesses. I would suggest a one inch white wood dowel. Don't get an oak dowel unless you're
comfortable working with oak. It's a very hard wood to carve with hand tools. I'll carve pretty much anything, but I haven't tried to turn an oak dowel into a Whittle Pup.
I particularly like the fruit woods: pear, peach, apricot, apple, cherry, etc. for my Whittle Pups. I also rather like sycamore. But I've carved these dogs from dozens of different woods, including mesquite, walnut, fig, Paulownia (Royal Empress), maple, sumac, poplar, lyptus, elm, and a few "mystery sticks" that I picked up along the way.
It doesn't much matter if the wood is green (i.e. freshly cut) or if it's been drying outside for may years. Green wood will carve easier, but it might crack as it dries over time. I have a few Whittle Pups that cracked. I call it character.
You might get a few pieces of different wood and test them out by making some experimental cuts to gauge their hardness. Remember, though: it's possible to carve even very hard woods if you have a sharp knife, take your time, and make very small cuts. Patience and persistence will pay off. But for your first Whittle Pup, I suggest something you're comfortable carving.
This piece of wood and the piece I selected for the figure in the image above have little twig stubs on the bottom that I incorporated as the dog's tail. This isn't absolutely necessary, but it does add a nice touch to your carving. Don't worry about it if your piece of wood doesn't have a built-in tail like this. Later in the tutorial I'll show how to relief-carve a tail if you don't have one built in.
First steps

I start by removing the bark from the piece of wood, including the bark around the tail piece if it's there. Using your knife, take off the bark. Leave the sapwood (the thin layer of typically white wood that's directly under the bark). Most of the sapwood will be removed as part of carving the dog figure, and the few bits that are left make for some variety in the figure's coloring. You can remove the sapwood at this step if you like, although if you plan to do so then I would suggest starting with a slightly thicker limb. When you're done removing the bark, you want the block to be at least one inch in diameter.
After you have removed the bark, get out your trusty pencil and draw a line from the middle of the tail, straight up to the top of the piece of wood. From there, draw a line across the top, through the center of the wood to the other side, and then back down. That is the front center line, which we will use to make sure the figure's features are reasonably balanced.
You also want to draw a line perpendicular to the front/back line. Your best bet is to draw a line across the top that intersects the first line at a 90 degree angle in the center. Then extend the line down each side, as shown in the picture above.

Next, measure 1/4 inch (about 0.6 cm) from one of the side lines towards the front of the figure, and draw a line about halfway up the piece of wood, as shown in the picture above. If you don't have a ruler or tape measure, make it one pencil width as an estimate. That should be pretty close, since a standard pencil is 1/4 inch thick. Do the same thing on the other side of the block, making sure that the new line is towards the front of the figure. I call these the depth lines because they define how deeply we carve out the area for the legs.

Now, turn the block so that the front is facing you. We're going to draw three different lines here on the front of the block. The image above shows the lines we're going to draw.
Measure 1/4 inch (0.6 cm) from the bottom and draw a line horizontally from one depth line to the other. This is called the foot line, because it defines the feet. The little dog's paws will be shaped from the wood below this line.
Measure one inch (2.5 cm) up from the bottom of the block and draw another horizontal line between the two depth lines. I call this the jaw line. It defines the bottom of the dog's jaw. If you don't have a tape measure, you have two options. You can measure four pencil widths or, if you cut the piece of wood two inches tall, just estimate the halfway point.
Remember, your measurements here don't have to be exact. This is especially true when working with a piece of tree limb because it probably isn't perfectly round, anyway. In addition, this carving isn't intended to be a show entry. It's just a fun way to pass the time creating a cute little figure.

The last line you have to draw is called the nose line. It defines the top of the dog's nose. I usually make the nose a little bit taller than I absolutely have to at this point, which gives me some room to adjust things. Remember, it's better to leave wood that you have to take off later. Adding wood back after you've carved it away is kind of like asking a barber to make your hair longer. Draw the nose line 3/8 inch (about 1 cm) above the jaw line, again from one depth line to the other. If you don't have a tape measure, just make it one and a half or two pencil widths above the jaw line. We'll end up cutting it down later.
It might seem like a lot of work drawing all those lines, but it's important to know where you'll be cutting. After you've carved a few of these things, you might be comfortable trying it without the lines. But I'll tell you right now that after carving something like a hundred of these little dogs, I'm still more confident if I draw the lines before I start cutting. I think you'll find that drawing the lines takes you just a minute or two and will help prevent you from making some common mistakes.
I took a minute to draw the dog's features on the block so you can get an idea of what these lines mean. You don't need to do this, and in fact I'd discourage you from drawing the features on your block because they might confuse you. By the time you're ready to

carve legs, snout, eyes, and ears, the block of wood is going to look much different, and the lines you drew on it will be mostly gone.
With the cut lines marked, it's almost time to start whittling.
You should make it a point to strop your blade regularly when working on this project. Carving found wood is more destructive to the edge of your knife than is working with basswood. Not only is the wood typically harder, but it also contains bits of silica (sand) and other materials that can put tiny nicks in your blade. This is especially true when you're removing the bark and in some woods, the sap wood. You can't strop your knife too much, and doing so on a regular basis will keep the edge sharp.
So, after you've given your knife a good stropping, move on to the next section.
Making space for the legs
The first thing we're going to do is cut out the area between the jaw line and the foot line, where the legs will be. Start by making a cut along the foot line, from one depth line to the other, using the tip of your knife. This is called a stop cut.
If you're working with a wood that's harder than basswood (pretty much anything), then it's unlikely that you can make the stop cut deep enough to touch the depth line. Don't try. If you try to force the blade and it slips, you will lose control of it and can very well cut

yourself. Or break the knife. Make the cut as deep as you comfortably can. You can make it deeper after you've carved away some of the wood.
Make another stop cut from one depth line to the other, along the jaw line.
The purpose of the stop cut is to stop the knife--prevent it from going beyond the stop. You'll see, when you're whittling away the wood from between the nose and feet, that the wood on the other side of the stop cut very effectively stops the blade. Assuming, of course, you're not using too much force.

Now, carefully and using thin slices, begin carving away the wood between the two stop cuts. If you try to dig too deeply here, you're likely to break the feet off and you'll end up with a pawless dog. Take your time, starting from the middle or slightly higher, and with a slicing motion draw the knife through the wood to the stop cut. As you carve away material to the depth of the stop cut, take the tip of your knife and deepen the cut. Be careful, though, not to make the stop cut deeper than the depth line.

You'll also want to turn the piece over and carve from the middle to the stop cut along the jaw line. Continue removing wood until you have a flat spot between the jaw line and the foot line, that's as deep as the depth lines. Your figure should now look like this.

Slimming down
The dog's a little bit too fat, so we need to slim him down a bit. This won't be the final slimming, but doing a little slimming now will help with the next few steps.
Using your knife, you want to flatten the sides of the figure so that they're even with the depth lines. It's okay if you go a little bit deeper than the depth lines, but don't go too far. And take your time. Remember, thin slicing cuts. If you try to take too much off at once, you'll end up taking off a huge chunk.
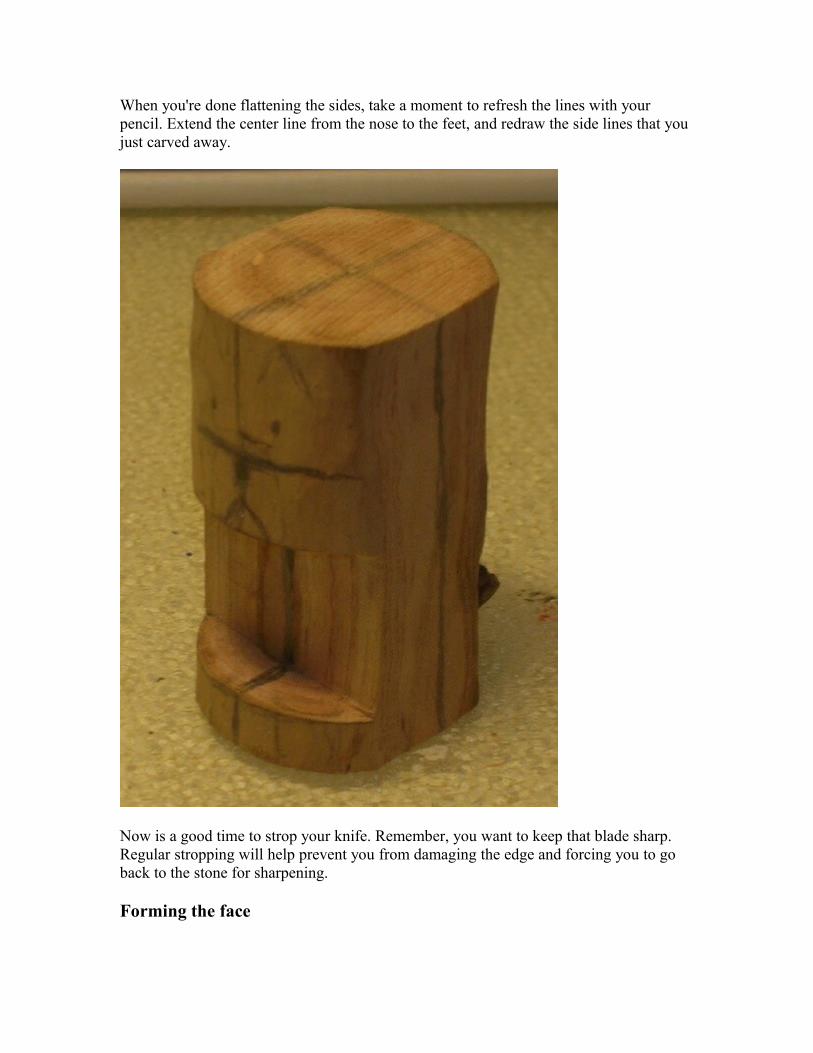
When you're done flattening the sides, take a moment to refresh the lines with your pencil. Extend the center line from the nose to the feet, and redraw the side lines that you just carved away.
Now is a good time to strop your knife. Remember, you want to keep that blade sharp. Regular stropping will help prevent you from damaging the edge and forcing you to go back to the stone for sharpening.
Forming the face

We're going to take the first few steps in forming the dog's face here. Start by drawing a diagonal line on each side of the figure, from the nose line to the side line at the top. I call this the face line.
Then, make a stop cut along the nose line and, starting from the top of the figure, carve material away at a diagonal, going no deeper than the face line.

I start at the top and work my way down because it's easier to get the slope that way. It's much more difficult to carve up from the nose because the back of the blade will bump up against the nose and will cause the edge to "chatter" across the wood. That can damage the edge.
The idea here is to create a surface that slopes from the back of the nose to the top of the figure (which will be the ears), and that's slightly curved from left to right. The top part of the nose is as deep as the depth lines. At the top of the figure, there should be a gentle curve from one side line to the other.

Note that I took a moment to extend the center line again. It's a good idea to keep redrawing your guidelines as you go along. You'll be surprised how much that helps in keeping your carvings reasonably symmetrical.
Blocking out the nose
I like big noses on my Whittle Pups. The figure at the top of this page, for example, has a nose that's 1/2 inch (1.3 cm) wide. I wouldn't go wider on a dog of this size, but you probably don't want the nose to be much thinner than 1/4 inch (0.6 cm). For this figure, I suggest that you draw a vertical line 1/4 inch (one pencil width) from each side of the center line, where you want the nose to be.

Then, place the edge of the knife along that line, angled slightly outward, and slice along the line. You'll be cutting a slight angle so that the back of the nose (where it meets the face) is slightly wider than the front of the nose. The result should be a pyramid-like shape, except the top is flat rather than pointed.
I've found the best way to do this with harder woods is to make a shallow angled stop cut, then remove wood from the side to the depth of the cut. Then deepen the stop cut, maintaining the angle, remove more wood from the side, etc.

Don't worry if you didn't get the angle perfect or if the nose (like mine) isn't quite square. We're just roughing it out at this stage, and we'll come back to even things out later.
Give your knife a good stropping before you continue.
Rounding the body
With the nose established, and the very rough curve of the face defined, it's time now to round the body. This is the first step in blending the nose into the face. It also will define to a large extent fhe final shape of the figure.

Unfortunately, there are no hard and fast rules here. I don't have measurements to give or exact instructions for what is "right" at this point. Instead, you want to begin rounding the hard edges from the sides of the dog, especially those edges where the depth lines used to be. Take it gradual, removing a little bit of material at a time. You want to take thin cuts to prevent going too deep and splintering the wood. You'll also need to take a little bit off the corners of the feet. Be careful when you're doing this or you'll end up chopping off a whole foot.
Don't be afraid to remove material, but don't be too aggressive about it. Especially towards the bottom. In fact, you might want to leave the bottom half (below the bottom of the nose) a little bit wider until the next step. It's not required, and I didn't do it in my

example. But it wouldn't hurt, since we'll be taking a little more off the bottom half in the next few steps.
Carving the tail
If the block of wood you selected has a stub tail built in, you can skip this step and go on to the next.
If you don't have a built-in tail, you need to relief carve one. Doing so is pretty easy. On the back of your figure, draw an outline of the tail as you would like it to appear. You'll want to draw the outline slightly larger than you want the tail to be when you're done.
Note that in this picture I've already outlined the back legs. You can wait until then to do the tail if you want, but I've found that it's easier to do it earlier.
With the tip of your knife, make a stop cut all around the outline of the tail. This cut should be pretty shallow, as the tail doesn't have to stick up from the body very far in order to look good. Again, be careful here. You're better off starting with the tip at the

base and cutting up towards the tip of the tail. If you carve down from the tip, you risk the tip of your knife slipping off the edge of the wood and ending up in your hand.
Once you've made the stop cut around the tail outline, carefully remove wood from the body up to that stop cut. Take your time and don't go too deep. If you need to go deeper, make the stop cut again and remove more wood.
When you've finished removing wood, carefully round the edges of the tail and try to make the entire tail look rounded from side to side. The tail in the picture below has the edges rounded, but I didn't complete rounding the entire thing.

I probably could have gone a little deeper on this tail, but it will do.
When you're done rounding the tail, take a little time to round the body from the tail to the sides, to hide the flat spot you probably created when you relief carved the tail.
Separating the head
Extend the side lines again, down from the top of the piece to the bottom. Then, draw the neck line from the bottom of the jaw, around the side, and 1/4 inch (0.6 cm) or one pencil width behind the side line. This is where we'll cut to separate the head from the body.

The neck line should be flat (parallel with the desk) or angle up very slightly. Do not make it angle down towards the back. You should be careful here and try to make the angles the same on both sides of the neck. We'll be rounding and shaping later, but it's easiest if you start with the sides looking at least somewhat similar.
Make a stop cut along the neck line, from one side, across the front, to the other side. This cut doesn't have to be very deep. Maybe 1/16 inch (0.15 cm). All you're going to do at this point is take a small amount of wood from the body to show the separation. The figure won't have much of a neck, if any at all.
Forming the back legs
We'll form the back legs next, so that we can get the body of the figure to its (almost) final width. It's important to do that now so that we can carve the head to match the body. Otherwise you're likely to end up with the head looking much too large.

With your trusty pencil, make a mark on the front-back center line at the top of the figure, about 1/4 inch (0.6 cm) from the back. Then, draw a line perpendicular to the front/back line and extend it all the way down both sides of the figure.
1/4 inch is an approximation. On my little figure, the line is actually 3/16 inch (about 0.5 cm). The measurement isn't critical, but it probably shouldn't be much more than 1/4 inch. The line is a guide for the next step.
Now, on the side of the dog, make a mark about 3/8 inch (about 1 cm) up from the bottom. Then, draw the outline of the back leg and paw, as shown in the figure. The top of the curve shouldn't go much higher than that 3/8 inch mark you made. Do this on both sides of the figure.

With the tip of your knife, carefully make a stop cut along those leg outlines. This doesn't have to be very deep: 1/16 inch to 1/8 inch (0.2 or 0.3 cm) is plenty. You have to be careful for two reasons. If you apply too much pressure the knife could very well slip and the point will end up in your hand. That carving glove is great for stopping minor slicing cuts, but it definitely will not stop the tip of your knife from going into your hand. Also, if you apply too much pressure, you're very likely to break off the tip of your knife on one of those curves.
I've found it easiest to start with the tip of the knife in the "corner" where the paw meets the leg. Do the stop cut from there to the back of the figure. Then, turn the carving over, put the tip of the knife in the corner again, and cut the outline of the paw. Be very careful, though, when coming off the edge, as the knife could slip. You might want to cut the top of the paw from the corner and then cut the front of the paw from the bottom up.
When you've made the stop cut, carefully slice wood away to the depth of the cut. If you want to go deeper, slice some wood away, score the stop cut again, and slice a little deeper.

You want to be careful when working near that stop cut, especially down towards the paw. It won't take much to slice that hip or paw right off, and then you'll have to make your dog thinner. Take your time and make thin slices, deepening the stop cut with the tip of your knife as required.
After you've relieved the back leg and paw on both sides, carve the sides of the figure flat, to the depth of the stop cut.

Don't worry right now if your cuts aren't clean. We'll come back and round the back legs after a bit. I just wanted to make sure that we know how wide the body is going to be before we do final shaping of the head.
Give your knife a good stropping now. You'll want the blade to be in good shape before moving on.
Blocking out the ears
Whittle Pups have very little in the way of detail. Most of what catches a person's eyes with these carvings is the head, and the ears make up a pretty big part of those features. An experienced carver can do wonders with the ears. I just try to make them reasonably symmetrical.
In this carving, the front of the ears lies along the left/right center line on the top of the wood. The ears are about 1/4 inch (0.6 cm) tall. To block them out, I start by drawing a line around the entire block, 1-3/4 inches (4.5 cm) from the bottom. If you started with a piece of wood 2 inches tall, that should make your ears 1/4 inch tall. We'll call this the ear line, since only ears appear above it. Then, extend the right/left center line down to that

line on both sides and draw another left/right line about 1/4 inch (0.6 cm) behind that. You should now have a block across the top that shows where the ears will go.
Now, start carving away everything above the ear line except that block where the ears will be. Take your time with this. Take small bites and try not to let the knife "chatter" over the wood. When you're done, your carving should have a flat head with a 1/4 inch block across the middle, like this.

The last step in blocking out the ears is to separate them. We're not going to give them their final shape, but we want to separate them so that we can shape the head.
On the front of the carving, extend your center line (it's probably still there on the nose) to the ears. Now, measure 1/4 inch (one pencil width or 0.6 cm) on each side of the center line and make a mark. We're going to remove the wood between the ears.

I've found the best way to remove the wood between the ears is to start by making deep cut along the center line at the top. Don't try to force the edge of your knife down there, as you might split the wood. Just make a nice deep cut with the edge. Then, make angled cuts from the top to the middle from each side of the center line.

Granted, that's not the cleanest cut I ever made. You'll probably be cutting through the pith (center of the branch) here, and that can get kind of fuzzy. Continue making those angled cuts, making thin slicing cuts and deepening the center cut as you go. Once you've reached the top of the head, begin carving away each side from the middle. I suggest that you not go all the way to the 1/4 lines that we drew, since you'll probably want to leave a little room for shaping the ears. Your figure should look like this when you're done blocking out the ears.

I probably left a little too much for the ears there, but you get the idea. Don't go all the way to the mark, but leave some. Strop your blade before going on to the next section.
Shaping the head
At the back of the figure, you want to create a gentle curve, sloping the head all the way up to the back of the ears. The curve should start at about the same level as the top of the nose. You also want to make sure that there is a curve from right to left. You don't want the back of the head to be flat. Take your time, starting at the top and working your way slowly down. You might also want to take this time to angle the back of the dog slightly up from the tail. Just take a few thin slices. There's probably some sapwood still on the back of the figure that you can remove to make this slope.

Make a mark on the side lines, about 1/8 inch (0.3 cm) below the top of the head, as shown in the figure above. Then, make an angled cut that slopes from that mark to about the mid-point of the blocked-out ear. Do this on both sides of the carving. This gives you a rough idea of the shape you want to make with the front of the head.

Now, starting again at the top, begin sloping the front of the head and the face back towards the ears, and rounding the face from left to right. The head should curve smoothly up from from the bottom of the two angled cuts we just made. The face should be almost flat (from side to side) in the center (about 1/4 inch or 0.6 cm wide), and begin to curve back to the sides.
From the nose, you want the face to slope up more steeply at the bottom and then flatten somewhat when it gets to the ears. The face is sloped and the top of the head is relatively flat.
You want to get nice smooth curves, but don't worry if it doesn't look exactly right. You still have to shape the snout and the sides of the head. After you do that, you'll want to come back and do some final touch-ups to the face before carving the details.

Again, strop your blade before continuing.
Shaping the snout
It's time to round that big block nose. We want to turn that square nose into an upside-down "U" shape, and smooth the edges. Start by slicing off the top corners of the nose block. Take a thin slice. Remember, you can always take off more. You want the middle part of the snout to be flat, but then to curve down a bit. Here's what mine looks like after I've taken off the corners.

Next, taking very thin slices, round the snout so that it makes a gentle curve from right to left. There should be no sharp edges on the left or right sides of the snout.

We're done with the snout for now. We'll come back to it later to add the details of the nose and the dog's mouth.
Finishing the head shape
The figure's head is still rather blocky. In truth, the final figure will have a somewhat blocky head, but what I currently have isn't quite right. The head is slightly too wide, and the separation between head and body needs to be gentled. The face, too, should slope more smoothly back from the snout. Right now there's a hard separation.
Start by cutting the hard edge off the bottom of the head, where the head is separated from the body. You want to angle the cut a little bit to give the appearance of rounding.
The head is slightly too wide for the body; at least it is on my figure. I elected to take a little bit off of each side, being sure to take it all the way up the ear blocks, too. Again, use thin slices so you don't take too much off. After you've made the head as wide as you think it should be, do the final rounding. You want to carve back from the snout, pulling away at a bit of an angle. The idea is to blend the snout with the face. You'll probably end up taking quite a bit of wood off the face as you blend in the snout.

Shaping the ears
It's time to get rid of those blocky ears. First, use your pencil to extend the center line over the dog's face and up between the ears. You want to make sure that inside edges of the ears, when you're done shaping, are approximately the same distance from that center line.
With this figure, I'm going to make the ears face forward. If you blocked out the ears as I described, there should be enough material that you could angle the ears in or out a little bit. If you decide to do that, don't get carried away. A very slight angle is sufficient.
I start shaping the ears by cutting away material from the back, thinning the ear from the top down. This allows me to make the top of the ear farily thin, while leaving enough wood at the bottom to keep it from snapping off. As the ear gets thinner, I begin to shape it, rounding it slightly. You don't want the back of the ear to be flat.
Dogs' ears come in all different shapes and sizes. I prefer my Whittle Pups to have somewhat pointy ears. Otherwise the dog looks more like a bear to me. But you can shape the ears however you like.

When you get the ear almost as thin as you like it, take a moment to cut a very thin sliver from the front of the ear, straight down. That will give a flat and smooth surface to the front of the ear and get rid of any knife marks that you made when shaping the face. Here's the figure with one ear carved.
Now carve the other ear. I've never been wholly successful in getting both ears to look the same. I get them as close as I can and call it good enough. If you look closely at pretty much any dog, you'll notice that their ears aren't mirror images of each other, so a little wonkiness in the ears is okay. Still, try to get the ears to resemble each other.
You'll notice that shaping the ears changes the dog's face a bit, and you'll probably want to do some more shaping to blend the dog's face in with the new ears. You'll also want to clean up the back of the dog's head. Leave the ears with hard edges. We'll smooth those edges after we hollow out the ears.
Here's the figure with both ears shaped.

We're going to leave the head now, and finish the body. The last thing we'll do is hollow the ears, detail the snout, and carve the eyes.
Legs and feet
Cut back the foot piece so that it's no more than 1/4 inch (0.6 cm) wide. The paws will be smaller than you think.
Then, sketch in the legs by drawing diagonal lines down from below the nose. You should have an "A" shape with the apex just a little bit below the bottom of the jaw. See the picture.

Separate the feet by making a stop cut on the center line of the feet, and then successive angled cuts towards that center cut. Deepen the center line cut as needed. Be careful. If you try to force your knife into the wood here, you'll end up splitting the wood and probably taking off a foot. One of the figure's feet rather than your own. If you can find the piece that breaks off, you can glue it back on, but you probably won't be able to hide the glue line.

Now, make a stop cut straight down the center line between the legs, all the way to the bottom of the figure. We're going to carve out a fairly deep space there between the legs, but there's no need to do it all at once. Make the cut as deep as you're comfortable with. Remember, if you try to force it, you'll probably lose control of the blade. And an out of control blade has a distressing tendency to end up buried in your body somewhere.
After you've made that center stop cut, make cuts along the "A", with the tip of the knive angling in torwards the center.cut. The idea is to remove about 1/8 inch of the wood between the legs. Be careful of your knife tip here. You'll have it buried in the wood, and twisting the knife will snap that tip pretty easily.

When you're done separating the legs, take a few moments to round the body. There are probably some hard corners from when you were thinning after creating the back legs. You'll also want to gentle the hard edges on the legs, and perhaps undercut the backs of the legs a bit.
The figure's paws might be slightly too tall, and possibly a bit too wide. If your figure's paws are too wide, narrow them by taking material from the outside. If you cut from the inside, you'll have to mess with widening the separation. Remember, though, that the paws are going to get shaped. If they look a little too big as blocks, then they'll probably be okay once you shape them.
To shape the paw, cut the top corners off, leaving a small flat spot on the top. See the first picture, below. Then, cut from the front of the paw, back, creating a slight slope. This will make the paw shorter, and give the top a curved look. Finally, round the front of the paw by taking thin slices from the corners, cutting with the grain (i.e. down).

Go ahead and form the other paw now, too. As with the ears, you want the paws to resemble each other, but they don't have to be identical.
Sides
Now you want to create some space on the sides, between the legs and the body. Start by drawing a line from the top of the "A" between the legs, back to the side lines of the figure. Then, draw a line from where the back paw meets the back leg, straight up to the horizontal line you drew. Finally, draw a line from where those two meet, down to where the side line touches the back leg. See the picture.

Make a stop cut along the outline of the back leg, that joins the ends of these two lines. Then, angling the top of the knife in towards the center, cut along the two longer lines to form a hollow between the front leg and the body.

As with separating the legs, take your time here. You will probably need multiple cuts in order to make that space deep enough. Be sure to keep the tip angled in towards the center, as you want to give the space a somewhat rounded look. The space is about as deep as the space between the frong legs, but is not flat inside.
Once you have the space hollowed out, carefully round the edges of the space. Also take the time to gentle the hard edges of the back leg and paw.

Make the same cuts on the other side of the figure. Then strop your blade, being especially mindful of the tip, which has been doing most of the work.
Hollowing the ears
You've seen by now that it's quite possible to hollow small areas with just your knife. Hollowing the ears is similar to hollowing the space between the body and the legs, although you have to be a bit more careful, since if you go too deep you'll make a hole in the back of the ear.
First, use your pencil to draw the outline of the area you want to remove.

Then, place the tip of your knife at the top of the ear, angling in towards the center, and cut, following the line down to the bottom of the ear. Remove your knife from the wood, turn the carving over, and do the same thing to the other side of the ear. Finally, cut across the bottom of the ear to remove the triangular chip.
Again, you don't have to do this with just three cuts. In fact, unless you've had a lot more practice than I have, you probably won't get a perfect chip with just three cuts. Take your

time, make shallow cuts, and be careful not to go so deep that you poke a hole in the back of the ear.
Hollow out the other ear and then use the end of your knife to clean up around the ears. In particular, remove any line between the forehead and the inside of the ear.
Also, take this time to round the edges of the ears.
Detailing the snout
Whenever I'm working on one of these Whittle Pups, I'm amazed at little the thing looks like a dog until I detail the snout and add the eyes. Everything leading up to this point gives shape to the figure, but no personality. In the next few steps, we're going to make a few small cuts that really bring the carving to life.
With your pencil, draw a square outline for the nose, as shown in the picture.


Use your knife to press on the corner of the nose, making a shallow stop cut.
And then make an angled cut from the side of the snout to that stop cut.

Do the same thing on the other side. Try to make the cuts as similar as possible, but don't fret if they're a little bit off. Remember, you're not trying to win any awards with this figure--just having a little fun.
With the tip of your knife, make a shallow stop cut across the bottom line of the nose.

And then very carefully cut up to that line from the bottom. I can't stress enough how careful you should be here. If you get too aggressive, you're going to slice that little nose right off.

Again, being very careful and taking thin slices, flatten the entire snout below the nose.
Now, cut the corners off the nose so you have approximately an octagon. If you have a magnifier, it might come in handy here. And then round the snout again, giving a gentle curve from side to side below the nose.

Re-draw the center line on the snout, and then draw lines from the center line to the bottom corners. My rule of thumb is to draw from the middle of the center line, halfway between the bottom of the nose and the bottom of the snout, but that's not a requirement. You do want to leave a little space between the nose and the top of the mouth.

Now, make a stop cut along each of those angled lines. This doesn't have to be very deep. Be careful, though. The snout is curved, so the tip of your knife will have a tendency to slip off the end. You might want to just place the tip of your knife at the apes and then press the edge along the line,
After you've scored the lines on both sides, use the tip of your knife underneath the jaw to remove the triangular chip. You've already severed the fibers, so this chip should come up pretty easily. The most difficult part here is getting that cut even, so that it's the same depth on both sides of the mouth.

Using the tip of your knife, carefully remove a small sliver from the center line between the nose and the mouth. My beginning carving instructor called this the "snot trough."
This next step is optional, but I think it adds a cute little touch to the figure. Draw a curved line from one side of the mouth area to the other. This will make it look like the dog's tongue is sticking out a bit.

Use the tip of your knife to make stop cuts along the tongue line and along the edges of the mouth below the tongue. These cuts don't have to be very deep at all. Then, again from underneath the jaw, remove the wood below the tongue.
Take a few moments to remove the hard edges of the mouth line. You can round the bottom edge if you like. I prefer to keep the hard edge there. For some reason I think it looks better.

Eyes
I'll be the first to admit that I can't carve a realistic-looking eye. I'm so bad at it, in fact, that I don't even try. And since this is supposed to be a simple carving, I make the eyes as simple as possible: a triangular chip cut.
Extend the center line up over the face. On one side, draw a vertical line and a horizontal line that meets the vertical line at the top. Do the same for the other side, trying to get the lines the same length and the same distance from the center line.
Now, press the tip of your knife into the wood with the very tip at the corner of the eye and the edge along the vertical line. Remove the knive and do the same with the horizontal line at the top. Then, put the tip of your knife at the bottom of the vertical line and cut out a triangular chip from there up to the horizontal line.
Do the same with the other eye.

Finishing
One of the things I really like about carving found wood is that I don't have to paint it. I don't much like painting, and I've found that wood grain makes a much more interesting look than anything I've ever been able to do with paint. Carvers all have their favorite types of finishes. Here's what I do.
When I'm done whittling, I give my knife a good stropping and then give the figure a once-over, removing any "fuzzies." If I have sandpaper available (220 grit or higher), I might lightly sand the cuts that separate the head from the body, and the cuts that form the rear legs, and any other places where fuzzies might exist. You can do the same kind of thing with a diamond file.

I also sand the bottom by placing a piece of 150 or 220 grit sandpaper on the bench and rubbing the base of the dog over it. This creates a nice flat base, and also makes it easier to sign my name on the bottom.
I'll write my name and the date (usually just the year) on the bottom of the carving with a ball point pen. I've used felt tip markers, but they tend to bleed over time and what I wrote blurs. It's hard enough to read my writing without having the ink blur it.
When I'm satisfied that carving and sanding are complete, I take the figure to the sink and scrub it with an old toothbrush and a little bit of hand soap. I prefer the liquid soap, but I've also used a bar of Ivory. Scrubbing with the toothbrush and soap will remove pencil marks, dirt, and oils from your hands. After I've rinsed all the soap, I blot the figure dry and then let is sit for a couple of hours to fully dry out.
I generally don't paint my Whittle Pups. I used to paint the nose black, the tongue red, and the inside of the ears pink, but that got to be too much trouble. Now, I just make a couple a dot inside each eye (usually with a pencil or a felt tip pen), and then apply Howard Feed 'N Wax to the entire carving, including the base. Feed 'N Wax is a mixture of orange oil and beeswax. I've also used Howard Butcher Block Conditioner, which is a mixture of mineral oil and beeswax. Or, you can just use straight mineral oil.
I've found that the Feed 'N Wax darkens the wood slightly, and somehow causes the details to stand out a little bit. If the wood is especially dry, I'll apply a coat of mineral oil, let it soak in for a half hour or so, and then apply a good coat of Feed 'N Wax. I usually let that sit overnight, and the next morning I buff the figure with a shoe brush that I've dedicated to my wood carving.
Many other finishes are possible. Some people like sprays like Deft or Krylon. If I use the sprays, I use a satin or matte finish because I don't like my Whittle Pups to have that shiny look.
Understand, nothing says you have to apply any kind of finish to the Whittle Pup. You can keep it all natural if you like, although I wouldn't recommend it.