Embed Size (px)
Citation preview

1
1
Carleton University
Map Schedule Planner
by
Tashi Topgyal
100688502
Computer Science COMP 4905 – Honours
Project Report
Supervisor: Dr. Dwight Deugo
School of Computer Science
Carleton University
Date: August 20, 2012
Location: Ottawa, Ontario

2
2
Abstract
Typically, first year students as well as visitors face difficulty in finding locations within Carleton
University. New students also find it difficult to interact with other students in a new environment. This
Carleton University Map Schedule Planner application is created for the purpose of providing Android
Location Based services to students. These services will be employed through Android device’s GPS
capabilities and integrating Google Map enabling the user to map everything. The app will formulate
customized route based on location inputs. The app will also address inter- app communication. Thus a
student is able to share his route with his friends, save route on time and preference, being able to add/
delete new friends within app, check out locations of added friends, being able to access his saved route
at any time as well as find nearest hot spots with ease. This app will be developed by integrating Android
SDK within Eclipse IDE.

3
3
Acknowledgements I would like to offer my special thanks to Dr Dwight Duego for his advice and support given during the
course of the development of this project. I would wish to further acknowledge Dr Dwight Duego for his
patience in me, since I never had any prior experience of developing in Android OS and also that of
doing such big project on my own.

4
4
Table of Contents
1 Introduction 7
1.1 Problem ……………………………………………………………………… 7
1.2 Motivation …………………………………………………………………… 7
1.3 Goal(s) & Objectives ………………………………………………………… 8
1.4 Outline ……………………………………………………………………….. 9
2 Background Information 11
2.1 Overview of Android ………………………………………………………… 11
2.2 Features of Android ………………………………………………………….. 12
2.2.1 Activity Life Cycle ……………………………………………………… 16
2.2.2 Android Operating System Layering ……………………………………. 18
2.2.3 Android Manifest File …………………………………………………… 19
2.2.4 Location Based Services ………………………………………………… 19
2.2.5 Android Location Classes …………………………………………….. 20
2.3 Similar work …………………………………………………………………… 20
3 Approach/Design 22
3.1 Planning ………………………………………………………………………… 22
3.1.1 Abstract Ideas ……………………………………………………………... 22
3.1.2 Scope Document …………………………………………………………... 24
3.1.3 Functional Requirements ………………………………………………….. 25
3.2 Design …………………………………………………………………………... 26
3.2.1 Class Diagram……………………………………………………………… 26
3.2.2 Sequence Diagram…………………………………………………………. 43
3.3 Implementation 54
3.3.1 Creating GUI & Adding Functionality Buttons …………………………... 54
3.3.2 Show Map based in Inputs & Updates ……………………………………. 57
3.3.3 Add or Delete Friend from Contacts List ……………………………….... 69
3.3.4 Show Friend’s location in real time on Map using SMS ……………….... 71
3.3.5 Show or Delete Saved Routes with Updates ……………………………… 73
3.3.6 Send Saved Routes to Friends …………………………………………….. 74
4 Results/ Validation 77
4.1 Goals/Objectives achieved …………………………………………………….. 77
5 Conclusion 81
5.1 Future Work …………………………................................................................. 82
5.1.1 Additional Problems faced ………………………………………………… 82
5.1.2 Additional Features ………………………………………………………... 84
6 Appendix 86

5
5
7 Reference 87
List of Figures & Table
Figure 1: Link between Android and Hardware components ……………………………………………………………11
Figure 2: Lifecycle of Service …………………………………………………………………………………………………………….13
Figure 3: Standard Content Provider Methods used to access data………………………………………………….14
Figure 4: Passing of Intent between Activities ………………………………………………………………………………….15
Figure 5: Activity Lifecycle in Diagram……………………………………………………………………………………………….17
Figure 6: High Level Class Diagram of Displaying and Saving Map…………………………………………………….26
Figure 7: High Level Class Diagram of Adding & Deleting Friend ………………………………………………………28
Figure 8: High Level Class Diagram to check friend’s current location ………………………………………………29
Figure 9: High Level Class Diagram to show Saved Map with updates ……………………………………………..30
Figure 10: High Level Class Diagram associated in Sending Saved Map …………………………………………….31
Figure 11: Class Diagram representing relationship between SmsReceiver and map classes ……………32
Figure 12: UML class diagram of the whole system ………………………………………………………………………….33
Figure 13: Class Diagram of GUIactivity representing attributes and operation ……………………………… 34
Figure 14: Class Diagram of TimeTable representing attributes and operation ………………………………. 34
Figure 15: Class Diagram of HonoursProjectActivity representing attributes and operation ………….. 36
Figure 16: Class Diagram of friendGroup representing attributes and operation ……………………………. 37
Figure 17: Class Diagram of checkFriend representing attributes and operation ……………………………. 37
Figure 18: Class Diagram of ContactSelector representing attributes and operation ……………………..38 Figure 19: Class Diagram of savedMapDisplay representing attributes and operation …………………..39 Figure 20: Class Diagram of SmsReceiver representing attributes and operation …………………………..40 Figure 21: Class Diagram of savedRoutes representing attributes and operation …………………………. 40 Figure 22: Class Diagram of savedRoutesMap representing attributes and operation ……………………41
6
6
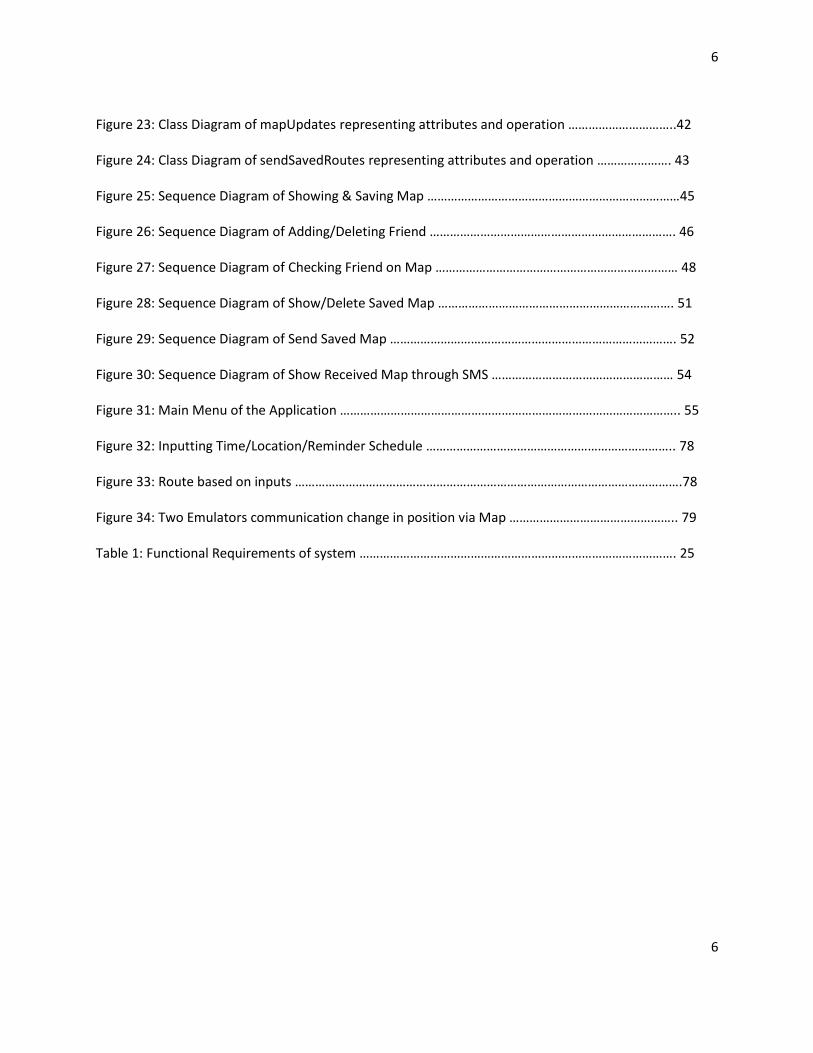
Figure 23: Class Diagram of mapUpdates representing attributes and operation …………………………..42 Figure 24: Class Diagram of sendSavedRoutes representing attributes and operation …………………. 43 Figure 25: Sequence Diagram of Showing & Saving Map …………………………………………………………………45 Figure 26: Sequence Diagram of Adding/Deleting Friend ………………………………………………………………. 46 Figure 27: Sequence Diagram of Checking Friend on Map ……………………………………………………………… 48 Figure 28: Sequence Diagram of Show/Delete Saved Map ……………………………………………………………. 51 Figure 29: Sequence Diagram of Send Saved Map …………………………………………………………………………. 52 Figure 30: Sequence Diagram of Show Received Map through SMS ……………………………………………… 54 Figure 31: Main Menu of the Application ……………………………………………………………………………………….. 55 Figure 32: Inputting Time/Location/Reminder Schedule ……………………………………………………………….. 78 Figure 33: Route based on inputs …………………………………………………………………………………………………….78 Figure 34: Two Emulators communication change in position via Map ………………………………………….. 79 Table 1: Functional Requirements of system …………………………………………………………………………………. 25

7
7
Chapter 1
Introduction
1.1 Problem
First year Carleton University students face problems when coming into university for the first time.
Mainly it comes from finding it difficult to locate their classes for the first few months. This lead to
coming to classes late and affecting studies in the long run. This problem of finding places within
University not only affects students but also to any visitors to University. Also, a typical student when
coming into a new school environment needs to be constantly in touch with friends/associates whether
it being group work, meeting new friend, planning lunch together. Since most students use smart
phones, it would be ideal to have an application that provided inter application communication. There
are not many University app that provide such feature of interaction within application. I find interaction
within app very useful in a setting like University, since it will aid the student in finding friends within
University, sharing app based information, accessing app based friends and so on. That said, by knowing
each other’s location, there are lots of benefits such as both can agree at a place closest to each other’s
location.
1.2 Motivation
Therefore, this app will be developed in the foreground, targeting the problems stated above. This
application will feature Carleton University map and provide location based services to students. It will
also incorporate inter application communication. Its development will not only aid first year student
but also help regular students and any visitors to University as well. A student/visitor is able to schedule
for places to go in the University for the day and also write updates on what time and what to do at
those scheduled places in the map. It will allow a student to add friends within app, be able to

8
8
communicate to each other and share app based resources within added friends who use the same app.
Therefore two friends are able to know each other’s current location and share each other’s daily route
for that particular day.
From a practical viewpoint, being a student myself, I especially found it difficult in my first years in terms
of finding classes particularly those classes which continued right after one another. The main appeal of
doing project such as this is, it primarily uses powerful IDE such as Eclipse that we as a computer science
student are accustomed to and then combines it with Android OS plugins, thus being able to produce
powerful apps that can be interesting for the developers as well as providing multipurpose uses for
others. For this project, I chose to build my application based on Android Mapping features
concentrating on features such as Location Based Services (LBS). LBS applications are becoming popular
among mobile device companies due to the rapid development in wireless communication and location
positioning technologies. LBS in simple terms are set of services available for the users of mobile devices
and these set of services gets originated on the basis of the user’s current geographic location. One of
the most popular services is the GPS service for mapping and getting directions. Hence this project will
use GPS service with powerful mapping features of Google which are already incorporated into Android
devices. Thus the integration of maps onto Android devices makes it possible to use LBS and hence be
able to produce mapping applications such as formulating a route, finding the nearest restaurant based
on current location and so on.
1.3 Goal (s) & Objectives
Since this project pertains to creating a Map Schedule Planner application based on locations, my
primary purpose is to capture the map of Carleton University. This project should also capture a clear
drawn route formed based on information entered by a typical student. So if a student wanted to go

9
9
from one building to another building, it should be able to draw a route that connects the two buildings
and hence show it on the map. Second objective is to be able to add and delete friends and be able to
share saved routes with friends so that friends can be updated about your daily schedule. Thus friends
are able to see each other’s schedule on a map upon request by each friend. Third objective shows each
friend’s current location in real time on the map upon request. Thus any friend is able to see their
position and other friend’s position change every 5 second on the same map. Fourth objective involves
adding updates on created routes on the map. Thus each person has the choice of adding updates of
time and notes/reminder for each specified location as medium of reminder. Fifth objective is being able
to save routes for that particular day so that it can be accessed for later uses or that saved route be
shared with friends. Sixth objective is the choice of accessing or deleting saved route at any time of day,
also including the updates that were carried out on that particular date.
1.4 Outline
In Chapter 1, I define the problems that the project addresses, and based on the problems, the
motivation behind undertaking this map application based project. Then I discuss the goals and
objectives of the project. In Chapter 2, I discuss the background information on Android OS by showing
architecture of the components of the Android OS and then providing detailed review on the four
important application components. It also describes Location Based Services and its various classes
used. In Chapter 3, I show the Planning phase of the project under Approach/Design section. The
Planning phase states the functional requirements of the system to develop. I also describe a detailed
review on the Design phase including Class Diagram and Sequence Diagram that describes all the major
functionality of the system. Then I outline the Implementation phase that shows detailed description of
each class used in the project with code illustration. The chosen classes are the ones which are mainly

10
10
involved in the creation the functionality of the system. In chapter 4, I describe the Results/Validation
part that shows the goals/objectives achieved from the project after the implementation phase. It also
validates the functional requirements stated in the Planning phase. In Chapter 5, I state the Conclusion
of the project describing the reason for choosing to create Location Based Service application using
Android OS environment. In Chapter 5, section 5.1, I highlight the Future work, stating ideas and
improvements for the created app. It also describes the errors encountered in the implementation
phase and possible solutions for these errors.
11
11
Chapter 2
Background Information
2.1 Overview of Android
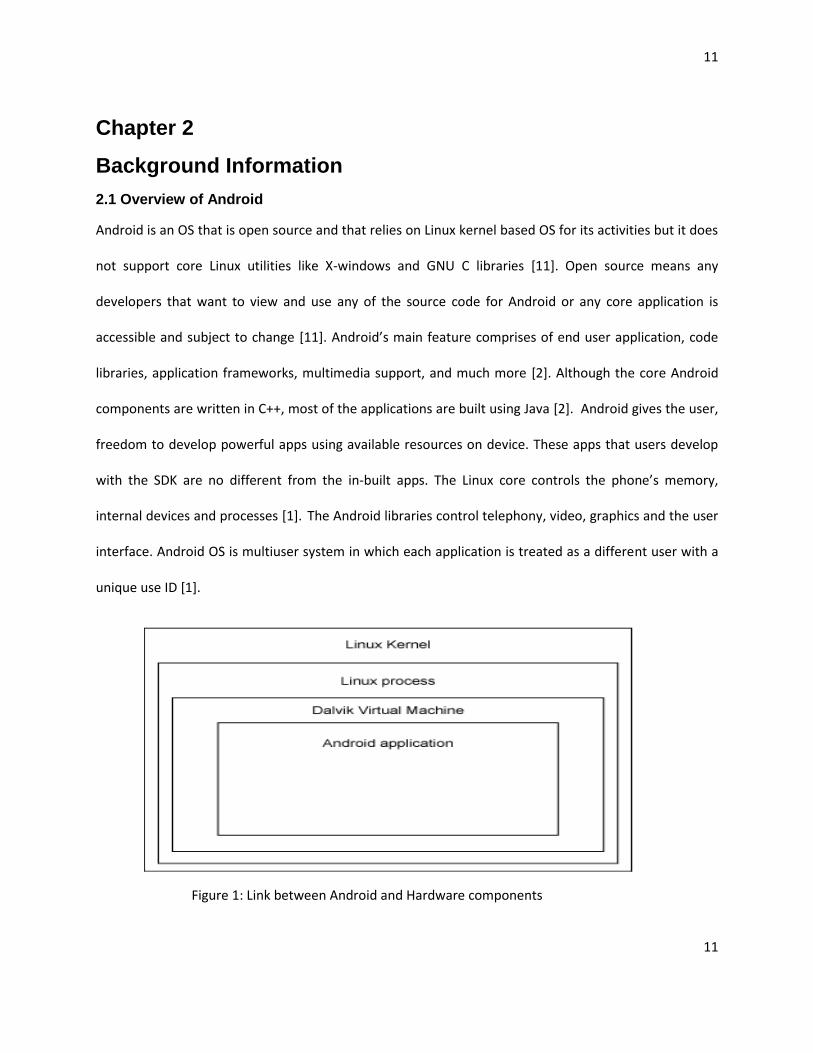
Android is an OS that is open source and that relies on Linux kernel based OS for its activities but it does
not support core Linux utilities like X-windows and GNU C libraries [11]. Open source means any
developers that want to view and use any of the source code for Android or any core application is
accessible and subject to change [11]. Android’s main feature comprises of end user application, code
libraries, application frameworks, multimedia support, and much more [2]. Although the core Android
components are written in C++, most of the applications are built using Java [2]. Android gives the user,
freedom to develop powerful apps using available resources on device. These apps that users develop
with the SDK are no different from the in-built apps. The Linux core controls the phone’s memory,
internal devices and processes [1]. The Android libraries control telephony, video, graphics and the user
interface. Android OS is multiuser system in which each application is treated as a different user with a
unique use ID [1].
Figure 1: Link between Android and Hardware components

12
12
2.2 Features of Android
Android Software Development Kit (SDK) uses Java as the standard language. Android uses its own User
Interface (UI) framework instead of using other tool kits and popular packages such as Java AWT and
Swing packages. Android is recognized as powerful software development platform as it uses Java which
contains its extensive class libraries and then combines it with Android Development Kit. The Java on
Android runs on its own optimized Java Virtual Machine called Dalvik Virtual Machine [2]. Thus it is
different from regular Java which makes the application run on its own JVM.
Android applications are divided into four components. They are activities, services, content providers
and broadcast receivers. Every application is made up of one or more of these components.
Activities: The building block of the user interface is the activity. It is an application component that
represents a single screen and capable of displaying UI elements implemented as Views and XML
layout files [3]. It is a single Java class that is part of the android.app Java package with the
application’s main class extending the Android Development Kit’s Activity class. Activities are
independent of one another but one activity can start another using startActivity() or the
startActivityForResult() method for initiation.
Service: A process that runs in the background and don’t have any user interface components unlike
Activity classes [3]. The main function of Service is to perform long term operations or work for
remote processes regardless of what is on the screen. It’s a class in the Android runtime that is
created by the developer and extends Android Service class. Service’s lifecycle is simpler than
activities [3]. Developers largely control when to start and stop services while the system has
minimal control over its lifecycle.

13
13
Figure 2: Lifecycle of Service
Content Provider: They are interfaces that implement a standard set of methods to permit an
application to access a data store while providing a level of abstraction for that data stored [3]. The
access to data might be for read or write operations, or for both. Although Android discourages
sharing files or databases, data stored in ContentProvider can be traditional type where the users
make their own data available to other applications, as well as their own applications. Users have
complete control over how the data gets accessed. The ContentProvider’s data is accessed by an
application through Content URI which is defined as public static final String. The methods listed in
the Content Provider interface below in the figure 3 allow database access [3].

14
14
Figure 3: Standard Content Provider Methods used to access data
Intent: Are basically asynchronous messages or events that are passed between major building
block components such as Activities, Services, Broadcast Receivers, and Content Providers [8].
Intents are called asynchronous meaning the code that is sending doesn’t have to wait for them to
be completed. They trigger an activity to start up, tell a service to stop or start, or are simply
broadcasts. Intents are instances of the android.content.Intent class and they are one of the most
important aspects of Android development [8]. Intents are used extensively in this project.
According to Google, an Intent object is a passive data structure holding an abstract description of
an operation to be performed [7]. Intent has property to hold data, which can be used by the
receiving application component, hence facilitating an innovative way of navigating and sharing
data. Intents are of two types explicit or implicit [3]. Explicit Intents are used when the sender knows
the name of the activity to launch [8]. Implicit Intents instead of specifying the target component
receiving the Intent, specifies the type of receiver for that Intent [8]. Thus it leaves it on the system
to choose which component is best suited to respond.

15
15
Two primary pieces of information in Intent are, requested action and generically the data that
accompanies the requested action. The action attribute of Intents are ACTION_VIEW, ACTION_EDIT,
ACTION_MAIN, OR ACTION_PICK [9]. The data attribute of Intents are database to be accessed using
Uri. The application developers are allowed to create new action attributes on top of the already
existing built in Intent actions defined as members of the Intent class. Once the Intent is sent to the
Android system, the process of determining which suitable applications component to respond for
that Intent is based on Intent Filters. Android compares the three (action, category and data) to
Intent Filters declared by target components willing to accept implicit Intent [9].
Figure 4: Passing of Intent between Activities
Android uses SQLite, a lightweight relational database for data storage. For connectivity, it supports
GSM/EDGE, IDEN, CDMA, EV-DO, UMTS, Bluetooth (includes A2DP AND AVRCP), Wi-Fi, LTE and Wi-MAX.
For messaging it supports both SMS and MMS. For Hardware support it has Accelerometer Sensor,
Camera, Digital Compass, Proximity Sensor, and GPS. For multi-touch, it supports multi- touch screens
and for Multi-tasking it supports multi-tasking applications. It also supports Flash Support using Android
2.3 Flash 10.1 and for Tethering it supports sharing of internet connections as a wired/wireless hotspot.

16
16
2.2.1 Activity Life Cycle
Activities in the system are managed in an activity stack (last in last out) [4]. Any new launched activity
having the highest priority holds the top of the stack [4], and the previous activity will be below it and
won’t come until the new activity ceases. The activity which is not visible has lower priority than the
new launched visible activity. Thus the system can sometimes shut down the non-visible activity to free
memory so that the higher visible activity can get more memory. Android runs each activity in a
separate process each of which hosts separate Virtual Machine [4]. Activity creation involves creating a
new Linux process, allocating memory for the user interfaces and setting up XML layouts and screen. So
therefore the amount of work done in setting up new activity is hefty and once the user decides to leave
the activity, then the amount of work put into is gone to waste and starting another one in similar way is
too expensive and time consuming. To avoid this waste of setting up new activity, we are introduced to
Activity Manager that controls the activity life cycle.
Activity Manager controls the creation of activity as well destroying and other related activity usage
such as pausing and resuming and so on. Therefore Activity Manager makes sure when the user leaves
one activity, it makes sure that the previous activity is not destroyed and if the user wants to go back to
an older activity, less time is involved. Older activities which are not used for a while are destroyed to
make space for the current active ones. Each activity contains numerous methods such as onCreate(),
onPause() and so on that change the status of the activity. It can create, start, resume, pause, stop and
destroy depending on what is listed in that activity. The overall objective in controlling activity usage is
to improve the speed of the user interface, ease user experience and improve overall time and
efficiency [3].
The activity can be in one of the four states:

17
17
Active: the activity is started, is visible, running and in the foreground.
Paused: the activity is running and visible but cannot interact with the activity because the user has
launched a new activity and the new activity has taken priority. The activity still maintains state and
member information and can be killed if the higher priority activity demands extra memory.
Stopped: the activity is invisible but running. The activity still maintains state and member information
and can be destroyed by system if the higher priority activity demands extra memory.
Dead: the activity destroyed by the system after being in paused or stop state due to memory issues. It
could also be user’s manual action in killing process or the activity was never started.
Figure 5: Activity Lifecycle in Diagram

18
18
2.2.2 Android Operating System Layering
Linux Kernel – it contains Linux 2.6 series Kernel, created specifically to increase efficiency in
power management, memory management, high security and the runtime environment. All the
hardware components of the android device have access to all the low level device drivers in
this layer [2].
Libraries – all libraries can be used by developers through application framework. The libraries
for CPU and GPU tasks are formulated into native code since the device supporting the Android
OS are mainly with low powered CPU and little main memory [11]. Libraries such as Standard C
system libraries are revised and adjusted to be compatible with Linux based device. Libraries like
libc or libm were also revised and developed to accommodate the low memory consumption
device.
Android runtime – being in the same layer as libraries, it contains the Dalvik virtual machine and
the Java core libraries [2]. These core libraries are mainly for developers wishing to develop
Android apps using Java. Every application developed on Android runs on interpreter Dalvik
Virtual Machine (changes Java Byte Code) which provides its own process with its own instance
[11].
Application Framework – this layer contain framework layer written in Java, thus provides
abstraction and delivers all kinds of API’s for developers to develop Android application.
Application lifecycle is managed in this layer.
19
19
Application – this layer contains in-built applications developed in Java that are loaded with the
Android device such as email client, Phone, Contacts, Browser and so on [11]. The apps
developed by the developer are located in this layer [11].
2.2.3 Android Manifest File
The manifest file is an XML file contained in every application which presents essential information
about the application to the Android system, information the system must have before it can run any of
the application’s code *6+. It is a file that allows you to explain what the application consists of, the
functionality and requirements of your application to Android and what its major building blocks are. All
the major application components such as activities, services, broadcast receivers and content providers
used in the application are declared. It also declares which permissions are required for both accessing
protected parts of the API and interact with other applications [6] and permissions that others are
required to have in order to interact with the application’s components [6].
2.2.4 Location Based Services
It is the ability to locate a mobile user geographically through mobile network, and the services
delivered to the user based on his/her device’s location. Determining location of the android devices can
be found accurately using different means provided by the location based services. Location based
service also include providing services that add value to the user. Therefore not only does it integrate
mobile device’s location but being able to provide valuable services such as providing route. Main LBS
elements include Location Manager Class and Location Provider Class [2]. Location Manager Class
provides access to the system location services [10]. Location Manager Class allows you to access
location providers, set up location update listeners and proximity alerts and so on [10]. Each Location
Provider instances provided by the android environment represent a different locating service that is

20
20
available on the device. Location Provider provides not only your device location periodically but each
comes with a set of criteria which the user must specify [10]. LocationListener instances return location
updates to the requesting application using specified providers [2]. Before we can use the
LocationManager, we need permission in our application to retrieve location services or the various
location APIs will fail due to a security violation [10]. This permission is set in the application’s manifest.
Depending on which location providers you wish to use, you may need
ACCESS_COARSE_LOCATION, ACCESS_FINE_LOCATION, or both [2].
2.3.5 Android Location Classes
Address: A class representing an Address, i.e, a set of strings describing a location.
Criteria: A class indicating the application criteria for selecting a location provider.
Geocoder: A class for handling geocoding.
GpsSatellite: This class represents the current state of a GPS satellite.
GpsStatus: This class represents the current state of the GPS engine.
Location: A class representing a geographic location sensed at a particular time (a "fix").
LocationManager: This class provides access to the system location services.
LocationProvider: An abstract superclass for location providers
GpsStatus.Listener: Used for receiving notifications when GPS status has changed.
GpsStatus.NmeaListener: Used for receiving NMEA sentences from the GPS.
LocationListener: Used for receiving notifications from the LocationManager when the location has changed.
2.3 Similar work
This section will look into other applications that I found on the Internet that addresses similar
functionalities like mine. So most of the applications listed below will have direct relation to mapping
based property of Android. I narrowed it down to few map apps out of many out there, that used
mapping feature system of android to create routes, show routes, show current location of the user and

21
21
so on. But I personally haven’t had the luxury of exploring one in detail, since I don’t own a smart phone
that can use these map based apps.
Trimble Outdoors Navigator Hiking GPS App: The Trimble Outdoors Navigator app has a robust
feature set for hikers including fully integrated GPS, five different map types, including streets,
aerial, hybrid, topographic, and terrain, plus the ability to download and store maps on the
phone, so you can use maps when out of cell phone/data range [14]. The Navigator app is also
rich in technical features for the more experienced hiker, including digital compass showing
magnetic north and true north, the ability to mark, store, and describe way points, stored tracks,
and the ability to match your latitude/longitude or UTM coordinates to your paper map or GPS
device [12]. The Guide Trips feature lets you follow trips recorded by others [14]. You may store
and share trips on the Trimble Outdoors website [14] [12].
Columbia GPS Pal: contained similar features such as track and store routes. Store data in the
app and use updates such as videos, notes and photos to set GPS tags at favorite spots [14] [13].
Google My Tracks: contains features like loading nice maps and route tracking utility, detailed
speed, time, distance, and elevation tracking, and the ability to upload and store routes to
Google Maps [14].
GPS-Logger: able to take pictures and able to add those pictures taken from different cameras
and connect those pictures to a specific location on a specific date [15].
Route Planner: finding easiest and fastest travel route to destination [16]. Only insert starting
point and destination or simply use your current location and you’ll get your current location,
and you’ll get custom road map directly - complete with driving directions. Save a specific route,
in order to use it later on by saving it in 'My Routes' [16]. You can star or un-star your favorite
routes in the My Routes-list [16].

22
22
Walk Route Planner: For assisting in walk route planning - This application uses your "last
known" location to plan potential routes to the nearest places of interest based on satellite
image data. It also allows retrieval of the relevant location information [17].
Chapter 3 Approach/Design 3.1 Planning As a student who had no prior exposure to Android OS beforehand, my initial planning was
concentrated on understanding the basic concepts of Android. This involved reading lots of material
related to Android mainly books that I managed to get from Carleton University Library. I was also
browsing through Android Developers main site with hands on tutorials that helped me in my
development stage.
My second planning stage consisted of reading on major feature of Android used for this project, which
is the Location Based Services. This was crucial stage for my project as it contributed in helping me plan
for how to use classes such as android.location package and libraries such as external library provided by
Google that includes the com.google.android.maps package.
After successful, installation of the Android SDK and Eclipse plugins necessary to start an Android
Project, I started off by creating simple apps that were mentioned step by step in Android Developer’s
site as well many examples mentioned in the books as well.
Before the actual implementation process, to meet the objectives, I firstly broke down the span of the
project into little parts which made it easier for me to tackle. I looked at all the objectives of the project

23
23
and tried to solve each one by one. I also looked up lots of examples on the internet of techniques
people used to achieve something similar to what I was trying to implement.
3.1.1 Abstract Ideas
1) Initially before starting on project, my first target was to create a manual map of Carleton
University and then by drawing self-created nodes to signify buildings and edges connecting
between different buildings and places. The manual map would be created by taking snap shot
of the Carleton University official map and drawing manual edges where the length of the edge
is calculated using approximations. Then I wanted to use Djikstra’s algorithm to find the shortest
path from one place to another dependent on length of the edges drawn.
2) Then the route that was formed would change accordingly in real time with change in position
of the user as well as time. So if a route was formed based on time, then with correct time and
position of the user, route would adjust to it. Just like in GPS of a car, when someone makes a
wrong turn, the GPS adjusts and creates a new route based on the current position.
3) After formulating the map, my next plan was to create a GUI that would input the schedule of
buildings and then formulating the best path possible between buildings based on Djikstra’s
algorithm.
4) After the route was formulated, then I had plans to create a friends group where each person
would be able to add friends to the group or delete friends from that group. The friends would
contain information such as phone number, name and address and so on.
5) I also will have option of either viewing the map or saving the map. Thus the saved map would
somehow be accessible to the friends of the selected group that you belong to.
6) Then I had plans to implement the option of seeing any friend’s current position on the map in
real time. The map would show the user’s current position as well as friend’s current position on

24
24
the same map and the status being updated every 5 second. This would be implemented by
sharing GPS co-ordinates through SMS or email.
7) They would also be the option of adding updates on the map i.e. reminders or notes. I thought
this would be useful since the app I am trying to build is schedule planner and the inclusion of
this property of adding updates on map is necessary.
8) Another option would be able to see your own saved routes at a different time. I thought this
feature would be useful as it would aid in helping you remember what you did 2 or 3 weeks ago
along with notes/reminders.
3.1.2 Scope Document
My initial abstract ideas and requirements changed as I started doing my project. I found out there were
better methods of accomplishing the same thing. Also due to time constraints, some of the ideas I
stated above needed additional resources and then I had to modify the project to adjust to it.
1) The major change was the feature of implementing Djikstra’s algorithm to the self-created
Carleton University map. After reading books and checking on the net, I realized that there were
classes like HttpURLConnection, URL and DocumentBuilderFactory, which helped in finding the
shortest path with given to and from as we would have done in Google search. So I didn’t need
to use Djikstra’s algorithm in my project to accomplish the shortest path.
2) Initially I wanted my route to change in real time according to my position and current time, but
then I had to discard this method of implementation as it would be too detailed and time
consuming.
3) I wasn’t aware that saving or retrieving data were implemented as SQLite in Android when I first
wrote my project proposal. Until about halfway through project, I realized that to add friends or

25
25
save routes on map, I needed some sort of external form of storing persistent data, so that
when the phone is turned off, all the data won’t disappear. Due to time constraints, I was
required to save all the data as Global variables Singleton class and hence lose all the data once
the device is turned off. I had a brief conversation about this issue with professor and told him if
time permitted, I would be reading about usage of SQLite database in Android and
implementing in my project. I have stated this problem in greater detail in Future Work section.
Except these three features mentioned above, rest of the requirements were carried out and finished as
per stated. Below is the list of the functional requirements for the whole project.
3.1.3 Functional Requirements
ID Description
1 Users are responsible for adding friends and deleting friends
2 Users are responsible for inputting schedules and system creates a map with routes based on inputs
3 Users are able to view the map of the routes after inputs
4 Users are able to save the route map reflected on the current date and time
5 Users are able to add updates on the route map and view the map with updates
6 Users are able to save the route map with updates reflected on the current date and time
7 Users are able to see added friends and their profiles.
8 Users are able to see added friend’s live position on map relative to the user’s current position. The map updates every 5 seconds.
9 Users are able to see the nearest food courts, public transportations stops and other items on route map.
26
26
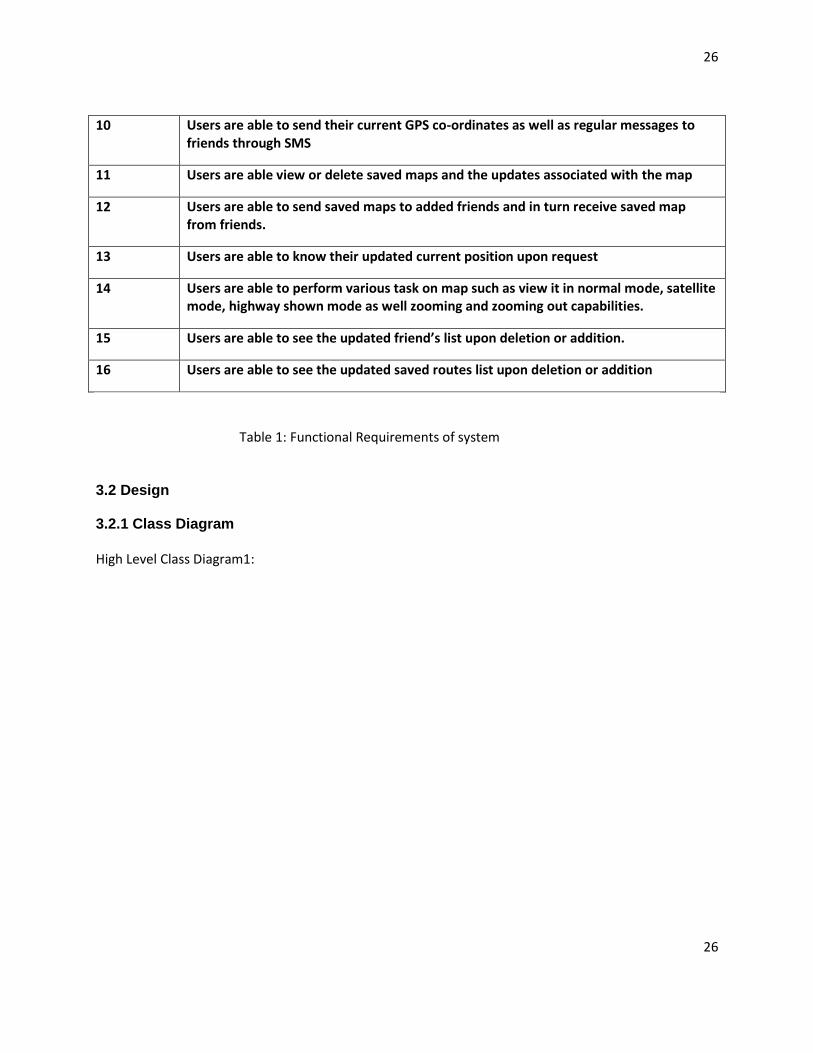
10 Users are able to send their current GPS co-ordinates as well as regular messages to friends through SMS
11 Users are able view or delete saved maps and the updates associated with the map
12 Users are able to send saved maps to added friends and in turn receive saved map from friends.
13 Users are able to know their updated current position upon request
14 Users are able to perform various task on map such as view it in normal mode, satellite mode, highway shown mode as well zooming and zooming out capabilities.
15 Users are able to see the updated friend’s list upon deletion or addition.
16 Users are able to see the updated saved routes list upon deletion or addition
Table 1: Functional Requirements of system 3.2 Design 3.2.1 Class Diagram High Level Class Diagram1:

27
27
HonoursProjectActivity
TimeTable
GUIactivity
MyApplication
1
1
1..*
1
1..*
1LocationFind
DisplayCurrLocationItemizedOverlaydateCalender
1..*1
1
1..*
1
1..*
1
1..*
1..*
1
1
1
1..*1
Person
1..*
1
1..*1
1
1
HelloItemizedOverlay1..*
1
HonProjCount
1
1
Figure 6: High Level Class Diagram of Displaying and Saving Map This class diagram demonstrates display of map as well choice of saving map based on schedule inputs.
GUIactivity class:
It starts TimeTable class.
GUIactivity class is associated with MyApplication class, since it has to save the current location
of the user using the getLastKnownLocation() as well as when user changes location.
TimeTable class:
It is associated with LocationFind class since it has to save the initial location of all the buildings.

28
28
It is associated with MyApplication so that it can listen to any changes to location and update
current location. It also saves the initial location of buildings to an arraylist inside MyApplication.
HonoursProjectActivity class:
It has composition relationship with TimeTable class because TimeTable instance will always
have one HonoursProjectActivity instance, and without HonoursProjectActivity instance,
TimeTable instance is useless and redundant.
It is associated with DisplayCurrLocationItemizedOverlay class to add overlays such as
updates/reminders on the map, updating location on the map, adding bus stop, food store and
so on.
It is associated with HelloItemizedOverlay to draw routes of the input schedules on the map.
It is associated with dateCalender class, since it needs to create an instance of current date
calendar at times of saving the map.
It is associated with MyApplication so that it can update changes in location of user, saving all
the date calenders as an arraylist and saving initial locations as arraylist.
High Level Class Diagram2:

29
29
GUIactivity
MyApplication
1..*
1
friendGroup
1
1
1..*
1
Person1
1..*
LocationFind
dateCalender
1..*
1
1..*1
1..*
1
Figure 7: High Level Class Diagram of Adding & Deleting Friend friendGroup class:
GUIactivity is associated with friendGroup class as it launches friendGroup class.
friendGroup is associated with Person class as it aids in creating new person once name and
number is retrieved from contact list.
friendGroup is associated with MyApplication for adding new Person objects to the arraylist of
Person in MyApplication.
High Level Class Diagram 3:

30
30
GUIactivity
checkFriend Person
MyApplication
ContactSelector
1
1
1..*1
1..*
1
1..*
11
1
1..*
1
1..*
1LocationFind
dateCalender
11..*
1
1..*1
Figure 8: High Level Class Diagram to check friend’s current Location checkFriend class:
It is associated with GUIactivity as it is being launched by GUIactivity class.
It is associated with MyApplication as it has to retrieve the arraylist that contains all the added
friends for selection purposes.
ContactSelector class:
It has composition relationship with Person, since without any creation of new Person instance,
this class would not exist.
It is associated with checkFriend class since checkFriend launches ContactSelector with selected
Friends name and number.

31
31
High Level Class Diagram 4:
GUIactivity
savedRoutes
MyApplication
Person
dateCalender
LocationFind
1
1
1..*
1
1..*
11..*
1
1..* 1
savedMapDisplay
DisplayCurrLocationItemizedOverlay
1..*
1
1..*
1
1..*
1
1..*
11
1..*1
1
1
1
HelloItemizedOverlay 1..* 1
Figure 9: High Level Class Diagram to show Saved Map with updates savedRoutes class:
It is associated with GUIactivity as GUIactivity launches savedRoutes class.
It has composition relationship with savedMapDisplay, since without a savedRoutes instance
there would be no instance of savedMapDisplay.
It has composition relationship with dateCalender, since this instance would be useless and
redundant without any instances of dateCalender.
It has association with MyApplication class since it has to retrieve the arraylist that contains all
the saved dateCalender objects for selection purposes.
savedMapDisplay class:

32
32
It gets all the information such as dateCalender objects containing dates and updates associated
with that dates as well as routes from the savedRoutes instance.
It is associated with DisplayCurrLocationItemizedOverlay class to add overlays such as
updates/reminders on the map, updating location on the map, adding bus stop, food store and
so on.
It is associated with HelloItemizedOverlay to draw routes of the input schedules on the map.
High Level Class Diagram5:
GUIactivity
sendSavedRoutes
MyApplication
dateCalender
Person
LocationFind
1
1
1..*
1
1..*
1
11..*
1..*
1
1
1..*
1..*
1
1..*
1
Figure 10: High Level Class Diagram associated in Sending Saved Map sendSavedRoutes class:
It is associated with GUIactivity class as it is being launched by GUIactivity class
It is associated with MyApplication to access the dateCalender object arraylist. It also has to
retrieve the Person object arraylist from MyApplication class.

33
33
High Level Class Diagram6:
SmsReceiver
MyApplication
mapUpdates
1..*
1
savedRoutesMap
1
1
1
1
updateMapItemizedOverlay
1..*
1
1..*
1
LocationFind
1..*
1
GUIactivity
1
1
MyCount
1
1
HelloItemizedOverlay
addMarkerOverlay
1
1
1
1
Figure 11: Class Diagram representing relationship between SmsReceiver and map classes. SmsReceiver class:
It has a composition relationship with mapUpdates class since without SmsReceiver instance
mapUpdates instance would not exist at all.
It has composition relationship with savedRoutesMap class as map needs inputs from
SmsReceiver to exist. So instance of SmsReceiver is necessary for existence of savedRoutesMap.
It has association with MyApplication class since it has to update current location of user and
friend, as SMS containing GPS are received constantly.
mapUpdates class:
34
34
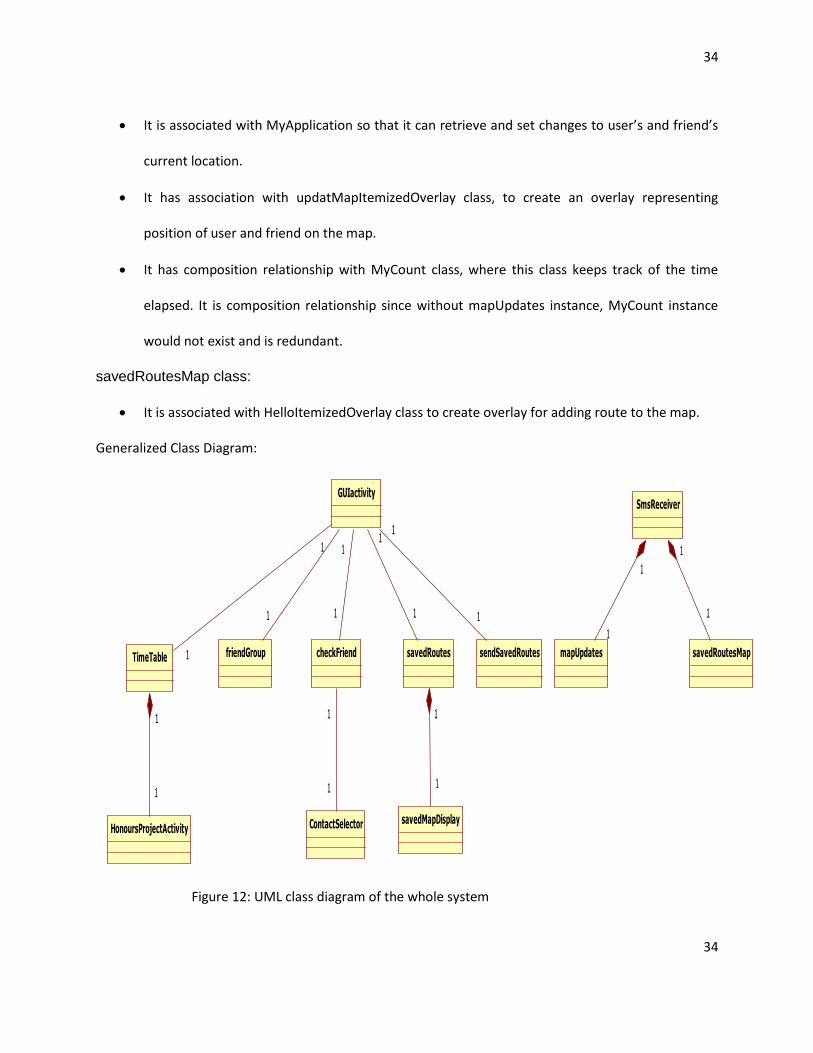
It is associated with MyApplication so that it can retrieve and set changes to user’s and friend’s
current location.
It has association with updatMapItemizedOverlay class, to create an overlay representing
position of user and friend on the map.
It has composition relationship with MyCount class, where this class keeps track of the time
elapsed. It is composition relationship since without mapUpdates instance, MyCount instance
would not exist and is redundant.
savedRoutesMap class:
It is associated with HelloItemizedOverlay class to create overlay for adding route to the map.
Generalized Class Diagram:
TimeTable
GUIactivity
1
1 friendGroup
1
HonoursProjectActivity
1
1
checkFriend
1
1
ContactSelector
1
1
savedRoutes
savedMapDisplay
1
1
1
1
sendSavedRoutes
1
1
SmsReceiver
mapUpdates savedRoutesMap
1
1
1
1
Figure 12: UML class diagram of the whole system

35
35
GUIactivity class:
GUIactivity
+currLocation: Location+location: Location#retrieveLocationButton: Button-locManager: LocationManager-locListener: LocationListener
+onCreate(savedInstanceState: Bundle)+sendMessage(view: View)#showCurrentLocation()+checkFriendLocation(view: View)+seeFriendLocation(view: View)+showSavedRoutes(view: View)+sendSavedRoutes(view: View)+onResume()+onRestart()+onPause()-initLocationManager()
Figure 13: Class Diagram of GUIactivity representing attributes and operation GUIactivity class is responsible for launching all the other activities. The starting GUI is represented by
this activity class. It is also responsible for getting and updating the current location of the user.
TimeTable class:
TimeTable
+c: Calender-s1,s2,s3,s4: Spinner-et: EditText[4]+tet: EditText[4]+mess: String[4]+remtime: String[4]+toSend: String[4]+message1,message2,message3,message4: String+bmessage1,bmessage2,bmessage3,bmessage4: String-locListener: LocationListener-locManager: LocationManager+location: Location+currLocation: Location
+onCreate(savedInstanceState: Bundle)+updateGeoPoints()+updateMessage(view: View)+saveMap(view: View)+onStart()+onResume()+onPause()-initLocationManager()
Figure 14: Class Diagram of TimeTable representing attributes and operation

36
36
TimeTable class contains eight EditTexts, four Spinners, two buttons which are used for entering the
initial schedules to display route on the map. It listens and updates changes in user’s location. It contains
two buttons to both show the map or show and save the map.

37
37
HonoursProjectActivity class:
HonoursProjectActivity
-mapView: MapView = null-c: Calender-mapOverlays: List<Overlay>-mC: MapController = null-myLocationOverlay,overlay,overlay2: DisplayCurrLocationItemizedOverlay-locitem: OverlayItem-geoPoint,pi: GeoPoint = null-gps,val,time,check: String-loc1,loc2,loc3,loc4,loc5,loc6: LocationFind+counter: HonProjCount+currLocation: Location-foodStop,busStop,helpStop: CheckBox-dC: dateCalender-foodoverlay: DisplayCurrLocationItemizedOverlay[7]-busoverlayDisplayCurrLocationItemizedOverlay[9]-helpoverlayDisplayCurrLocationItemizedOverlay[22]-myLoc: ArrayList<LocationFind>-myLoc2: ArrayList<LocationFind>-bmessage1,bmessage2,bmessage3,bmessage4: String-message1,message2,message3,message4: String-st: StringTokenizer[4]-overlaycount: int = 0-checkmsg: String = ""-fromLat,fromLong, toLat, toLong: toLong = 0-latfoodPlot: double[7]-lngfoodPlot: double[7]-latOtherPlot: double[22]-latbusPlot: double[9]-lngbusPlot: double[9]-lngOtherPlot: double[22]-foodGP: GeoPoint[7]-busGP: GeoPoint[9]-helpGP: GeoPoint[22]
+onCreate(savedInstanceState: Bundle)+myClickHandler(target: View)+foodStop(target: View)+busStop(target: View)+helpStop(target: View)+onResume()+getMylocation(): DisplayCurrLocationItemizedOverlay+updateMyPosition()+updateGeoPoints()+plotFlagNotSave()+plotFlag()+checkforsamelocation(gp: String): boolean+updateMap(): DisplayCurrLocationItemizedOverlay+onStart()+drawLine(fromLat: double, fromLong: double, toLat: double, toLong: double)-getDirectionData(sourceLat: String, sourceLong: String, destinationLat: String, destinationLong: String): String[]-initLocationManager()+onPause()+goBackMainMenu(v: View)
Figure 15: Class Diagram of HonoursProjectActivity representing attributes and operation

38
38
HonoursProjectActivity is a map activity for displaying the routes entered from the TimeTable class. It is
also used for adding other overlays such as tunnels, bus stops and so on to the mapview. This activity
also updates the current location of the user on the mapview.
friendGroup class:
friendGroup
-btn: Button = null-txtPhoneNo,txtName,grpName: EditText-toSend1: String = ""-btnaddFriend,dltFriend: Button-name,no: String = ""-s1: Spinner-dataAdapter: ArrayAdapter<Person>
+onCreate(savedInstanceState: Bundle)+onClick(v: View)+onActivityResultreqCode(reqCode: int, resultCode: int, data: Intent)+addFriend(view: View)+deleteFriend(view: View)
Figure 16: Class Diagram of friendGroup representing attributes and operation
friendGroup class contains three buttons, three EditTexts and one Spinner. It accesses the Contact’s List
of the device and adds friends from the list. Added friends can also be deleted in this class. It will then
save these friends for later purposes such as sending saved routes to friends or checking friend’s
location in real time on map.
checkFriend class:
checkFriend
-s: Spinner-btnSubmit: Button-e1: EditText-toSend: String = ""-nothing: String = "default"-key: String
+onCreate(savedInstanceState: Bundle)+sendMessage(view: View)
Figure 17: Class Diagram of checkFriend representing attributes and operation

39
39
checkFriend class contains one Spinner, one EditText and one Button. It is used for choosing friend from
added friend list and then checking that friend’s current location in real time on a map.
ContactSelector class:
ContactSelector
-btn: Button = null-txt: TextView = null+lat,lat1,lon,lon1: String+currLocation: Location+lastlocation: Location = null-locManager2: LocationManager-locListener2: LocationListener-name,no: String = ""-btnSendSMS: Button-txtPhoneNo,txtMessage,smsReplyMessage: EditText-phoneNo,smsNumber,smsText,message,smsMess: String
+onCreate(savedInstanceState: Bundle)+onStart()+onPause()+updateGPS(view: View)-initLocationManager()-sendSMS(phoneNumber: String, message: String)+onClick(arg0: View)+onActivityResult(reqCode: int, resultCode: int, data: Intent)
Figure 18: Class Diagram of ContactSelector representing attributes and operation

40
40
savedMapDisplay class:
savedMapDisplay
-mapView: MapView = null-c: Calender-mapOverlays: List<Overlay>-mC: MapController = null-myLocationOverlay,overlay,overlay2: DisplayCurrLocationItemizedOverlay-locitem: OverlayItem-geoPoint,pi: GeoPoint = null-gps,val,time,check: String-loc1,loc2,loc3,loc4,loc5,loc6: LocationFind+counter: HonProjCount+currLocation: Location-foodStop,busStop,helpStop: CheckBox-dC: dateCalender-foodoverlay: DisplayCurrLocationItemizedOverlay[7]-busoverlayDisplayCurrLocationItemizedOverlay[9]-helpoverlayDisplayCurrLocationItemizedOverlay[22]-myLoc: ArrayList<LocationFind>-myLoc2: ArrayList<LocationFind>-bmessage1,bmessage2,bmessage3,bmessage4: String-message1,message2,message3,message4: String-st: StringTokenizer[4]-overlaycount: int = 0-checkmsg: String = ""-fromLat,fromLong, toLat, toLong: toLong = 0-latfoodPlot: double[7]-lngfoodPlot: double[7]-latOtherPlot: double[22]-latbusPlot: double[9]-lngbusPlot: double[9]-lngOtherPlot: double[22]-foodGP: GeoPoint[7]-busGP: GeoPoint[9]-helpGP: GeoPoint[22]
+onCreate(savedInstanceState: Bundle)+myClickHandler(target: View)+foodStop(target: View)+busStop(target: View)+helpStop(target: View)+onResume()+getMylocation(): DisplayCurrLocationItemizedOverlay+updateMyPosition()+updateGeoPoints()+plotFlagNotSave()+plotFlag()+checkforsamelocation(gp: String): boolean+updateMap(): DisplayCurrLocationItemizedOverlay+onStart()+drawLine(fromLat: double, fromLong: double, toLat: double, toLong: double)-getDirectionData(sourceLat: String, sourceLong: String, destinationLat: String, destinationLong: String): String[]-initLocationManager()+onPause()+goBackMainMenu(v: View)+createAndShowMyItemizedOverlay(newLocation: Location)

41
41
Figure 19: Class Diagram of savedMapDisplay representing attributes and operation savedMapDisplay is used to show maps saved by the user. The choice of map is done by savedRoutes
class which sends all the messages related to the map chosen. This class thus displays the route, and the
updates/reminders associated with the saved map.
SmsReceiver class:
SmsReceiver
-key,MSG_BODY: String-gps: String = ""-msg_from: String-MAX_SMS_MESSAGE_LENGTH: final int = 160-loc: Location = null+lat,lon: String
+onReceive(context: Context, intent: Intent)-sendSms(phonenumber: String, message: String)
Figure 20: Class Diagram of SmsReceiver representing attributes and operation
SmsReceiver is a BroadcastReceiver class that listens for SMS messages, and once it receives SMS, it
decodes the message to start appropriate maps. If the SMS contains message related to GPS of friends,
it opens mapUpdates, whereas if the SMS contains message related to showing saved route of friend, it
opens savedRoutesMap. Once SMS is received, it also sends SMS back to the sender containing
information such as current location of the user along with other related message bodies.
savedRoutes class:
savedRoutes
-s: Spinner-e1,e2,e3: TextView-key: String-toSend, toSend2, dateName: String = ""+dataAdapter: ArrayAdapter<dateCalender>
+onCreate(savedInstanceState: Bundle)+deleteRoute(view: View)+showMap(view: View)
Figure 21: Class Diagram of savedRoutes representing attributes and operation

42
42
savedRoutes class contain one Spinner, three textView and two buttons. The main function of this class
is to allow the user to check his/her saved maps. It also allows the option to delete maps if needed.
savedRoutesMap class:
savedRoutesMap
-mapView: MapView = null-mapOverlays: List<Overlay>-mC: MapController = null-st: StringTokenizer-geoPoint,pi: GeoPoint-lat,lng: double-message: String[4]-myLoc: ArrayList<LocationFind>-number, smsMess: String+fromLat,i,fromLong,toLat,toLong: double = 0+et1: EditText
+onCreate(savedInstanceState: Bundle)+myClickHandler(target: View)+onResume()+updateGeoPoints()+onStart()+drawLine(fromLat: double, fromLong: double, toLat: double, toLong: double)-getDirectionData(sourceLat: String, sourceLong: String, destinationLat: String, destinationLong: String): String[]+onKeyDown(keyCode: int, event: KeyEvent): boolean+onPause()+goBackMainMenu(v: View)
Figure 22: Class Diagram of savedRoutesMap representing attributes and operation
savedRoutesMap is a map activity class that is used to show the route of friends sent over through SMS.
Once as a friends sends his GPS coordinates through SMS, SmsReceiver BroadcastReceiver receives the
message and opens savedRouteMap class and plots the route from the message received.

43
43
mapUpdates class:
mapUpdates
-mapView: MapView = null-mapOverlays: List<Overlay>-mC: MapController = null-myLocationOverlay: MyLocationOverlay-locManager2: LocationManager-locListener2: LocationListener-overlayItem1,overlayItem: OverlayItem-lati1,lngi1,updateMyLat,updateMyLng,updateFriendLat,updateFrienLng: double-friendlat,friendlng: double-gps,val,MSG_BODY,lat,lon,number, coordinates: String+counter: MyCount-pi,friendGP,myUpdatedGP,friendUpdatedGP: GeoPoint = null-userPicOverlay,nearPicOverlay: updateMapItemizedOverlay-userPic,atmPic: Drawable-currLocation: Location-num, content,content1: EditText-latfoodPlot: double[7]-lngfoodPlot: double[7]-latOtherPlot: double[22]-latbusPlot: double[9]-lngbusPlot: double[9]-lngOtherPlot: double[22]-foodGP: GeoPoint[7]-busGP: GeoPoint[9]-helpGP: GeoPoint[22]-foodStop,busStop,helpStop: CheckBox-foodoverlay: DisplayCurrLocationItemizedOverlay[7]-busoverlay: DisplayCurrLocationItemizedOverlay[9]-helpoverlay: DisplayCurrLocationItemizedOverlay[22]-fooditem: OverlayItem[7]-busitem: OverlayItem[9]-helpitem: OverlayItem[22]
+onCreate(savedInstanceState: Bundle)+updateMyPosition()+getMylocation(): updateMapItemizedOverlay+getFriendslocation(): updateMapItemizedOverlay-initLocationManager()+myClickHandler(target: View)-sendSMS(phoneNumber: String, message: String)+clearTheMap()+goBackMainMenu(v: View)
Figure 23: Class Diagram of mapUpdates representing attributes and operation
mapUpdates is a map activity class that is used to show user and friend’s current location on the map.
Once a friend sends his GPS coordinates through SMS, SmsReceiver BroadcastReceiver receives the

44
44
message and opens mapUpdates class, decodes the messages and gets friend’s current location, gets
user’s current location from MyApplication class and plots both the location on the map. It also updates
the map every 5 second to check for change in location. Once the location of the user changes, it sends a
notifying SMS to the friend whose location user is tracking about the change in user’s location and then
updates its own change in position on the map.
sendSavedRoutes class:
sendSavedRoutes
-s1,s2: Spinner-e1,e2,e3: TextView-toSend,toSend2,contactSelected: String = ""-txtPhoneNo: EditText-name,number: String
+onCreate(savedInstanceState: Bundle)+sendRoute(v: View)-sendSMS(phoneNumber: String, message: String)
Figure 24: Class Diagram of sendSavedRoutes representing attributes and operation
sendSavedRoutes class contain two Spinners, one EditText, three TextView and two buttons. The
function of this class is to show all the saved maps by the user and display them on TextView. It also
allows user to choose which friend to send the saved map to. After choosing a friend from the added
friend, it uses the friend’s number to send SMS message containing the route of the saved map. The
friend to whom it is sent, upon receiving the SMS will by default open savedRoutesMap class and then is
able to see the map route sent by the user.
3.2.2 Sequence Diagram Show map based on schedule: This sequence diagram shows interaction of objects involved in showing & saving map based on input
schedules. In the GUIactivity class, it used sendMessage(View v), which starts an intent and creates an
45
45
instance of TimeTable class. Then it initializes LocationManager class, and registers LocationListener()
with the location manager to receive notifications from the LocationManager when the location has
changed. It also calls updateGeoPoints(), which updates the location of places to an arraylist contained
MyApplication singleton class. Using global variable is useful since it allows all Activities to be able to
access and edit the same instance of application specific data. After choosing and filling all our data in
the TimeTable GUI, it calls updateMessage() method creating an intent and starting an instance of
HonoursProjectActivity map class. However along with the intent that was passed, the intent was also
added with the information of all the locations chosen, and the updates associated with it. After starting
HonoursProjectActivity instance, after onCreate(), it calls updateGeoPoints() method for the purpose of
allowing comparisons between locations received from the intent and locations updated to plot on the
map. As each locations are being compared, it calls drawLine() and decodePoly() method to draw the
line on the map. After drawing the route, it goes to onResume() method where it checks, if the map is
supposed to be saved or not to be saved. If the map is to be saved it calls plotFlag() method and if the
map is not to be saved it calls plotFlagNotSave(). For both the plotFlag() and plotFlagNotSave() method,
it uses checkforsamelocation() method to check for criteria where the user enters two same places in
the same schedule. Then it calls goBackMainMenu() method to return back to the GUIactivity class.

46
46
CombinedFragment1seq
: GUIactivity
: TimeTable
: HonoursProjectActivity
1 : sendMessage()
2 : initLocationManager()
3 : updateGeoPoints()
4 : updateMessage()
5 : onCreate()
6 : updateGeoPoints()
7 : initLocationManager()
8 : drawLine()
9 : decodePoly()
10 : onResume()
11 : plotFlag()
12 : plotFlagNotSave()
13 : checkforsamelocation()
14 : goBackMainMenu()

47
47
Figure 25: Sequence Diagram of Showing & Saving Map
Add/Delete Friend:
CombinedFragment2seq
: GUIactivity : friendGroup
1 : checkFriendLocation()
2 : onClick()
3 : onActivityResult()
4 : addFriend()
5 : deleteFriend()
Figure 26: Sequence Diagram of Adding/Deleting Friend This sequence diagram shows interaction of objects involved in adding and deleting friends. In the
GUIactivity class, it uses checkFriendLocation(View v), which starts an intent and creates an instance of
friendGroup class. Then after pressing Choose Contact, it calls onClick() and onActivityResult() method to
retrieve contact from device’s contacts list. It then calls addFriend() or deleteFriend() method, where it
accesses singleton MyApplication class that contains the arraylist of Person. It then updates the arraylist
by adding a new contact or deleting one from the existing list. The updated friend’s list after addition
and deletion are shown in the EditText.

48
48
Check Friend Online in Real time/ Send SMS This sequence diagram shows interaction of objects involved in checking friend’s current location on
map. In the GUIactivity class, it calls seeFriendLocation(View v), where it creates an instance of
checkFriend object. In checkFriend class, a friend is chosen, and hence calls sendMessage(View view). In
that sendMessage() method, it creates an intent, adds the friend chosen’s information as extra and
creates a new ContactSelector instance. ContactSelector receives that intent in onCreate() method and
then in sends SMS about user’s current location in sendSMS() method. After sending the SMS, on the
friend’s side, it has SMSReceiver BroadcastReceiver class that listens for incoming SMS. When it detects
the SMS sent by the user, it gets this message, decodes it and gets the GPS coordinates sent by the user.
Then it updates the currentlocation of friend through setFriendCurrentLocation() method. After that the
onReceive() method of SmsReceiver class from friend’s device, also gets their current location and sends
the friend’s location as an intent to mapUpdates instance. In the onCreate() method of mapUpdates, it
receives the intent and plots both the user’s and friend’s current location on the map. Then it initializes
LocationManager class, and registers LocationListener() with the location manager to receive
notifications from the LocationManager when the location has changed. After that, it creates an
instance of MyCount object, to keep track of time. After the timer finishes, it resets and calls onFinish()
method where it clears the map in mapUpdates class through clearTheMap() method, updates the map
with current position if there has been change of position via updateMyPosition() method and calls
resetTime() to start the timer again. Then from the mapUpdates class, one has the choice of going back
to the main menu by selecting goBackMainMenu() method.

49
49
: GUIactivity
: checkFriend
: ContactSelectorSmsReceiver mapUpdates
: MyApplication
: MyCount
1 : seeFriendLocation()
2 : sendMessage()
3 : onCreate()
4 : initLocationManager()
5 : sendSMS()
6 : setFriendCurrentLocation()
7 : getCurrentLocation()
8 : onReceive()
9 : onCreate()
10 : initLocationManager()
11 : onCreate()
12 : onFinish()
13 : clearTheMap()
14 : updateMyPosition()
15 : resetTimer()
16 : goBackMainMenu()

50
50
Figure 27: Sequence Diagram of Checking Friend on Map
Show/Delete Saved Map This sequence diagram shows interaction of objects involved in showing/deleting saved maps. In the
GUIactivity class, it calls showSavedRoutes(View v), where it creates an instance of savedRoutes object.
In the savedRoutes() class, it calls getDate() method which returns the arraylist of all dateCalender
objects in MyApplication singleton class. It populates this dateCalender objects in the Spinner of
savedRoutes instance. Once all the arraylist of dateCalender objects are retrieved, user has to choose a
date that the map was saved.
Case 1: It calls showMap() method, where the user gets the route information as well
updates/reminders related to the date chosen. In the showMap() method, it creates an Intent object,
and adds all these route/updates information to the intent. It then creates an instance of
savedMapDisplay object, where it receives the Intent sent by savedRoutes() class at onCreate() method.
Then it initializes LocationManager class, and registers LocationListener() with the location manager to
receive notifications from the LocationManager when the location has changed. It also calls
updateGeoPoints(), which updates the location of places to an arraylist contained MyApplication
singleton class. The purpose of calling updateGeoPoints() is to allow comparisons between locations
received from the intent and locations updated to plot on the map. As each locations are being
compared, it calls drawLine() and decodePoly() method to draw the line on the map. After drawing the
route, it goes to onResume() method where it checks, if the map is supposed to be saved or not to be
saved. If the map is to be saved it calls plotFlag() method and if the map is not to be saved it calls
plotFlagNotSave(). For both the plotFlag() and plotFlagNotSave() method, it uses checkforsamelocation()
method to check for criteria where the user enters two same places in the same schedule.

51
51
Case 2: If the user wishes to delete a saved route, it calls deleteRoute() method. In the deleteRoute()
method, it accesses MyApplication singleton class. It calls the removeDateEntry() method of
MyApplication singleton class and removes the chosen date from the arraylist of dateCalender objects
saved in the MyApplication class.

52
52
CombinedFragment1seq
CombinedFragment4seq
: GUIactivity
: MyApplication
: savedRoutes
: savedMapDisplay1 : showSavedRoutes()
2 : getDate()
3 : showMap()
4 : onCreate()
5 : updateGeoPoints()
6 : initLocationManager()
7 : drawLine()
8 : decodePoly()
9 : plotFlag()
10 : plotFlagNotSave()
11 : checkforsamelocation()
12 : deleteRoute()
13 : removeDateEntry()

53
53
Figure 28: Sequence Diagram of Show/Delete Saved Map Send Saved Maps: This sequence diagram shows interaction of objects involved in sending saved maps to friends through
SMS. In the GUIactivity class, it calls sendSavedRoutes (View v), where it creates an instance of
sendSavedRoutes object. Then in the sendSavedRoutes class, it accesses MyApplication Singleton class
and calls getDate() and getGroup() method. getDate() returns the arraylist of dateCalender objects and
getGroup() returns the arraylist of Person objects. It populates the Spinner with arraylist of
dateCalender and arraylist of Person objects. After choosing the date and person to send to, it calls
sendRoute() method which sends SMS message containing the route to the person chosen.
: GUIactivity
: sendSavedRoutes : MyApplication
1 : sendSavedRoutes()
2 : getDate()
3 : getGroup()
4 : sendRoute()
Figure 29: Sequence Diagram of Send Saved Map

54
54
Show Map received from Friend through SMS: This sequence diagram shows interaction of objects involved in receiving SMS that contains routes. In a
scenario when a friend decides to send their saved map route to me, I will first receive the SMS at
SmsReceiver BroadcastReceiver class that is listening for any incoming SMS. The message will be
received at onReceive() method of SmsReceiver class. In the onReceive() method, it will check if the
message contains friend’s route map. If so, it will create an instance of savedRoutesMap object, by
creating an Intent object and adding the received message containing the route to the Intent object. In
the onCreate() method of savedRoutesMap class, it will receive the intent containing the saved route of
friend sent by SmsReceiver object. By using StringTokenizer class, it is able to extract the individual
locations from the saved route received through Intent in the onCreate() method. Then it calls
updateGeoPoints(), which updates the location of places to an arraylist contained MyApplication
singleton class. The purpose of calling updateGeoPoints() is to allow comparisons between locations
received from the intent and locations updated to plot on the map. As each locations are being
compared, it calls drawLine() and decodePoly() method to draw the line on the map.

55
55
: SmsReceiver
: savedRoutesMap
1 : onReceive()
2 : onCreate()
3 : updateGeoPoints()
4 : drawLine()
5 : decodePoly()
Figure 30: Sequence Diagram of Show Received Map through SMS
3.3 Implementation
3.3.1 Creating GUI & Adding Functionality Buttons
The implementation phase started with construction of the GUI of the main page that will be used as a
source for all other activities. The GUI was created in the class GUIactivity.java, and it has six buttons
that launches other activities. The first button is Get Route which is used for inputting places to go in
Carleton Uni., time and reminder/update. The second button is Activate GPS which gets the last known
location and updates the current location to last known location. Then it contains Add Friend/Check
Group button which is where it adds friends from contact list and puts them in group. Fourth button is

56
56
See friend on Map which is used to check location of any friend added in the group in real time. Check
saved Route button is used for checking schedules including routes and updates which were saved
earlier when entering timetables. Send saved Route is used for sending saved schedules containing
routes to friends who were added as friends in the group. Help button is used for giving clear
instructions for new users of this app.
Figure 31: Main Menu of the Application To get the required LBS services (such as user’s location) on an Android device, appropriate permissions
are needed which must be stated in Android Manifest file. The LBS services cannot be used unless
appropriate <uses-permission> settings are configured. The most common permissions in this app are
getting the location based on GPS. Therefore I have implemented the

57
57
android.permission.ACESS_FINE_LOCATION permission in the android manifest file. I have also used
android.permission.ACESS_COARSE_LOCATION permission, which is used for coarse location such as cell
ID and Wi-Fi.
private void initLocationManager() { locManager = (LocationManager) getSystemService(Context.LOCATION_SERVICE); locListener = new LocationListener() { public void onLocationChanged(Location newLocation) { String message = String.format( "Changed Location is: \n Longitude: %1$s \n Latitude: %2$s", newLocation.getLongitude(), newLocation.getLatitude()); Toast.makeText(GUIactivity.this, "Reporting from GUIactivity: " +message, Toast.LENGTH_LONG).show(); currLocation = newLocation; //update current location in the global variable MyApplication.getInstance().updateCurrLocation(currLocation);} public void onProviderDisabled(String arg0) {} public void onProviderEnabled(String arg0) {} public void onStatusChanged(String arg0, int arg1, Bundle arg2) {} }; locManager.requestLocationUpdates(LocationManager.GPS_PROVIDER, 0, 0, locListener); }
After the permissions are registered in the Android Manifest file, I was able to access the
LocationManager class (android.location.LocationManager) by using the getSystemService() method as
shown above. The LocationManager class helps in accessing the GPS provider and their functionality
available on your device. The variables newLocation, currLocation are reference variable for class
Location, which then will be used to access methods like getLatitude() and getLongitude() methods to
retrieve coordinates from the Location object.
In the above code, I also used method onLocationChanged(Location newLocation). This method is used
for listening for change in location of the device where the device was registered for periodic location
updates by using the requestLocationUpdates() of the LocationManager class of above code. This
method allows an activity to listen to notifications from the GPS provider that was registered. Therefore

58
58
I had to implement LocationListener class (android.location.LocationListener) interface which allows the
activity to response to typical changes. These changes include location changes and provider type
changes and so on. MyApplication.getInstance().updateCurrLocation(currLocation) from the above code
is used to update the Global variable current location. MyApplication is a singleton class, where we don’t
instantiate the object by calling “new”, but instead we use getInstance() method and return our static
object.
3.3.2 Show Map based on inputs & updates
For adding inputs to the timetable, we are introduced to TimeTable.java, where I update the arrays of
locations by creating an object for each LocationFind class and setting it as global variable in
MyApplication class.
LocationFind loc1 = new LocationFind("Architecturebuilding",45.384014,-75.697281,45.383976,-75.697775); MyApplication.getInstance().setLocationVariable(loc1);
I also have to initialize a new LocationManager class and create a new LocationListener object for
TimeTable.java class since in the previous class, I implemented the removeUpdates() in the onPause()
for GUIactivity class. Remove updates removes the ability for registered LocationListener to listen for
location updates. I also use onLocationChanged method to listen for any change in locations and update
the new location as a current location via MyApplication global singleton class.
In the onCreate() method, I populate the Spinner objects with a list of choices containing LocationFind
objects. I used SpinnerAdapter for that purpose by creating an instance of ArrayAdapter. The first line of
code below creates a dataAdapater from the ArrayList of LocationFind from the MyApplication class.
The android.R.layout.simple_spinner_item argument defines layout resource that defines how the

59
59
selected choice appears in spinner control. Then the setDropDownViewResource () sets the adapter the
customized layout to be used to display the spinner choices such as
android.R.layout.simple_spinner_dropdown_item used in this case.
ArrayAdapter<LocationFind> dataAdapter = new ArrayAdapter<LocationFind>(this, android.R.layout.simple_spinner_item, MyApplication.getInstance().getLocationFind()); dataAdapter.setDropDownViewResource(android.R.layout.simple_spinner_dropdown_item);
For the code below, the setAdapter applies the dataAdapter to spinner s1. To show the item selected, I
implemented the selection event handler for spinner using setOnItemSelected (new
AdapterView.OnItemSelectedListener() interface and then implemented onItemSelected() callback
method. Since AdapterView.OnItemSelectedListener interface requires onItemSelected() and
onNothingSelected() callback methods. Then I make toSend[0] which is a string equals the item that was
selected. The item that was selected returned toString() method which is the toString() method of the
LocationFind returning the name of the location specified. If nothing was specified, I specify toSend[0] to
empty string in the callback method onNothingSelected().
s1.setAdapter(dataAdapter); s1.setOnItemSelectedListener(new AdapterView.OnItemSelectedListener() { public void onItemSelected(AdapterView<?> parent,View view, int pos, long id) { toSend[0] = parent.getItemAtPosition(pos).toString(); } public void onNothingSelected(AdapterView parent) { toSend[0] = ""; } });
There are two buttons in TimeTable class, which are Show Map and Save and Show Map.
Once the Show Map button is pressed, it first creates a new Intent object. Then we initialize String
variable message1 to the selected spinner drop down item. In the code below, we primarily check to see
what users fill in the EditText boxes so that I can retrieve the messages filled inside the box and map it.

60
60
Therefore I first check that in the line 1 and line 2 of the code below where there was any text filled in
the given EditText box. In the line3, then I check the condition that if the name EditText represented by
et*i+ is empty, then I set the string mess*i+ to “nothing” as show in line 4. Inside the condition where the
name was empty, if the time represented by tet[i] is empty as shown in line 5, then I set the remtime[i]
to “time not specified”, otherwise the set the remtime*i+ to the text set in the EditText box for time as
shown in line 7.
Whereas in the line 3 where I had an if statement, therefore we continue with else statement in line 8
where if et[i] is not empty, then I set mess[i] to the text contained in the EditText box for name. I repeat
the same thing for time as shown in line 5 earlier in the code to check if user entered anything in the
EditText for time.
for(int i = 0;i < 4; i++) { String strUserName = et[i].getText().toString(); //(Line1) String time = tet[i].getText().toString(); //(Line2) //there is nothing check for time if(strUserName.trim().equals("") || !(strUserName.length() > 0)) //(Line3) { mess[i] = "nothing"; //(Line4) if(time.trim().equals("") || !(time.length() > 0)) //(Line5) {remtime[i] = "time not specified";} //(Line6) else{remtime[i] = tet[i].getText().toString();}}//(Line7) else{ mess[i] = et[i].getText().toString();//(Line8) if(time.trim().equals("") || !(time.length() > 0)) //(Line9) { remtime[i] = "time not specified"; //(Line10) }else {remtime[i] = tet[i].getText().toString();}}}//(Line11)
Overall, from this I get to set the message written in EditText to the variables declared and hence I am
able to send put these messages in the intent that I created so that I can send these messages to
another activities. From the code below, I made sure that I pass in “toSave” as “no” String object (Line
61
61
4), when putting into intent so that the receiving activity would be able to recognize which method has
sent this intent.
bmessage1 = message1 + ":" + mess[0] + ":" + remtime[0]; intent2.putExtra("m1", message1); intent2.putExtra("bm1", bmessage1); intent1.putExtra("toSave", "no"); //Line 4 startActivity(intent1);
For the Save and Show Map button, all the features are the same as when I chose the option of Show
Map, where I declare many string variables and set them to the text that is entered in the respective
EditText box of the GUI. However the difference is that when I press Save and Show Map button, I set
the intent object that I created to have “toSave” as “yes” String object instead of “no” that I had earlier.
That way, the activity that is receiving the intent recognizes which method to trigger next dependent on
the state of the intent received.
In the the onPause() method, I implemented the removeUpdates(). Remove updates removes the ability
for registered LocationListener to listen for location updates.
From the inputs containing location and updates entered in the TimeTable class, now we have to plot
these locations on a map and represent these updates correctly with the location associated with it.
Therefore I show these features in HonoursProjectActivity.java class which inherits from MapActivity
class which provides important mapping capabilities. In the onCreate() method of
HonoursProjectActivity class, it first gets the intent that is being sent by TimeTable class which contains
messages which has location and updates in string. Then I check whether to save or not to save the map
from the property of intent that I just received. I know this by checking the variable “toSave”, whether it
is set to “yes” or “no”. If the “toSave” variable is “yes”, then I create a new dateCalender object which
contains the current date as its argument. The current date is acquired using Calender class’s method

62
62
called getInstance which returns a Calender object whose time fields have been initialized with the
current date and time.
c= Calendar.getInstance();
Once I get the current date and time, then I create a new dateCalender object passing the current time
in the constructor. However from the intent that I received from the TimeTable class, I pass the name of
the places that I have to be in the addEntries method of the dateCalender. That way, I know what places
were selected for the dateCalender object created. Suppose if I had chosen buildings “Paterson-Library-
FieldHouse-Library”, then this whole string would be passed as message[0] as an argument of
addEntries.
dC.addEntries(message[0]);
I also initialized CheckBox such as foodStop,busStop and helpStop. These CheckBox variables are used to
show items on the map that contain specific points such as tim hortons, bus stops and so on. So for the
code below, first I would manually come up with latitude and longitude values which are in double
primitive type. Then I create a GeoPoint object passing the latitude and longitude values in the
constructor and then arguments as set in microdegrees (degrees * 1E6). Android supports bitmap files in
(.png) and then references this file directly using the filename as the resource ID i.e
R.drawable.nameoffile. It then creates a Drawable resource for these bitmap files by retrieving the
image using the resource reference. Therefore I saved lots of (.png) files in the res/drawable/ directory
and retrieve them using getResources().getDrawable() method. Since I already have a map, I have to
create ItemizedOverlay class. Therefore I create DisplayCurrLocationItemizedOverlay that implements
63
63
ItemizedOverlay which contains arraylist of OverlayItems as instance variable. From the code below in
line1, I initialize a new ItemizedOverlay class with icon1 which is the bound Drawable image and the
context passed in as the argument of the constructor. Then create a new Overlay item called
fooditem[0] with its first argument of constructor containing the geopoint where the position of image
is to be drawn on the map, second argument containing the item’s title to be shown in String and third
argument containing text snippet to be shown on the image in the map. Then I add the OverlayItem
fooditem[0] to foodoverlay[0] using addOverlay method. This method adds to the arraylist of
OverlayItems initialized in the DisplayCurrLocationItemizedOverlay class. I do this for many OverlayItems
by adding and then finally when I am done adding to the OverlayItems in
DisplayCurrLocationItemizedOverlay, I add this Overlay to the map by getOverlays().add() method which
adds to the MapView.
latfoodPlot[0] = 45.386162; lngfoodPlot[0] = -75.693687; foodGP[0] = new GeoPoint((int)(latfoodPlot[0] * 1E6), (int)(lngfoodPlot[0] * 1E6)); Drawable icon1 = getResources().getDrawable(R.drawable.icon_tims); icon1.setBounds(0, 0, icon1.getIntrinsicWidth(), icon1 .getIntrinsicHeight()); // create my overlay and show it foodoverlay[0] = new DisplayCurrLocationItemizedOverlay(icon1,this); //line1 fooditem[0] = new OverlayItem(foodGP[0], "Tim Hortons", null); foodoverlay[0].addOverlay(fooditem[0]); mapView.getOverlays().add(foodoverlay[0]);
In the onResume(), I show my current location using the similar method as above. First I create a
GeoPoint object and then for the location I retrieve the current location from MyApplication class which
contains my current location point. Then I input the current location into the GeoPoint constructor to
get my geopoints to plot on the map. Then I initialize the Drawable image retrieving the .png files saved
in the res/drawable/ directory and retrieve them using getResources().getDrawable() method. After

64
64
setting the bounds, then I create DisplayCurrLocationItemizedOverlay object and set the Drawable
image and the context as argument of the constructor. That way, it will display the Drawable image
passed as constructor on the map. Then after creating and adding new OverlayItem to the arraylist of
ItemizedOverlay of the object of DisplayCurrLocationItemizedOverlay, I was able to add the image and
the associated geopoint as an OverlayItem which finally is added to the MapView. Thus I was able to see
the image I saved in res/drawable/ directory on the map and everytime I change the location using
DDMS where I feed different geopoints, I was able to see the change on the map. This worked properly
because I was able to successfully, update my current location everytime my position changes using the
LocationListener that I used.
Now to show the points on the map, I first declare arrays of message and bmessage variables and make
them equal to the String messages that contain the location chosen, time and reminders/updates sent
as intent from TimeTable class. I store these values through intent received by invoking getStringExtra()
method. The code show below basically tries to go through the array of bmessage String messages and
then it creates StringTokenizer class for each iteration and for each value of bmessage array, it divides
the string into name of building, message and time specified. Then for each iteration of bmessage array,
then it iterates through each myLoc arraylist which contains all the Location initialized as shown in the
updateGeoPoints() method. For each iteration of bmessage, after using the StringTokenizer, it compares
each name of the location chosen to the location specified in myLoc. If locations are the same and value
of message is not “nothing” i.e if blank was left , then it uses checkforsamelocation() boolean method
which returns true if the location specified has already been added to second arraylist myLoc2. If the
location has not already been added to the myLoc2 arraylist, then it plots a new icon to the map with
Geopoints being used from geopoint of the locations stored in myLoc.

65
65
In a nutshell, when I initialized the Location for arraylist myLoc, I use two different geopoints for each
location so that when I have two similar places having different updates, I can show both locations on
the map with different updates due to different geopoints. Therefore when two locations are similar, I
use different geopoints to plot them on the map. I use invalidate() to redraw the map after being added
the overlays to the MapView after each iteration.
for(int i = 0; i < bmessage.length; i++) { st[i] = new StringTokenizer(bmessage[i], ":"); while(st[i].hasMoreTokens()) { gps = st[i].nextToken(); //name of building val = st[i].nextToken(); //message or reminder time = st[i].nextToken(); //time specified } for (int j = 0; j < myLoc.size(); j++) { if(gps.equals(myLoc.get(j).getName()) && !val.equals("nothing") ) if(checkforsamelocation(gps) == false) {lat = Double.valueOf(myLoc.get(j).getLatitude()); lng = Double.valueOf(myLoc.get(j).getLongitude()); GeoPoint geopoint = new GeoPoint( (int) (lat * 1E6), (int) (lng * 1E6)); // initialize icon Drawable icon = getResources().getDrawable(R.drawable.nying); icon.setBounds(0, 0, icon.getIntrinsicWidth(), icon.getIntrinsicHeight()); // create my overlay and show it overlay = new DisplayCurrLocationItemizedOverlay(icon,this); OverlayItem item = new OverlayItem(geopoint,"Reminder or Notes" , "Time: " + time + " notes/reminder : " + val); overlay.addOverlay(item); overlay.doPopulate(); mapView.getOverlays().add(overlay); myLoc2.add(myLoc.get(j)); }else {lat = Double.valueOf(myLoc.get(j).getLatitude1()); lng = Double.valueOf(myLoc.get(j).getLongitude1()); GeoPoint geopoint = new GeoPoint( (int) (lat * 1E6), (int) (lng * 1E6)); // initialize icon Drawable icon = getResources().getDrawable(R.drawable.bluewhite); icon.setBounds(0, 0, icon.getIntrinsicWidth(), icon.getIntrinsicHeight()); // create my overlay and show it overlay2 = new DisplayCurrLocationItemizedOverlay(icon,this); OverlayItem item = new OverlayItem(geopoint,"Reminder or Notes" , "Time: " + time + " notes/reminder : " + val); overlay2.addOverlay(item); overlay2.doPopulate(); mapView.getOverlays().add(overlay2);}
66
66
Similarly I use the same principle for saving map where I have to not only display the map but also save
the location, and the updates for viewing at different times. The only different thing is that after
displaying each location on the map, I create a new LocationFind object and initialize with same name,
same location points, updates associated with it to the location that is currently iterated over in myLoc
arraylist and then I add this LocationFind object to the dateCalender as shown in code below . I also
choose when the user leaves the whole updates as empty because there are chances when someone
can go to places but not have any updates. In that case, where updates equal “nothing”, I still create a
new LocationFind object and initialize it with values associated with current location chosen from myLoc
arraylist. Therefore the dateCalender object that I created with current date time in the onCreate()
method at the beginning is populated with lots of LocationFind objects that is stored inside
dateCalender object as an arraylist.
LocationFind addloc = new LocationFind(myLoc.get(j).getName(),myLoc.get(j).getLatitude(),myLoc.get(j).getLongitude(),myLoc.get(j).getLatitude1(),myLoc.get(j).getLongitude1()); addloc.setMessage(val); addloc.setTime(time); dC.addLocationFind(addloc);
Now I will shift to forming routes between locations. Since I already updated all the locations manually
by creating an arraylist myLoc and updating the Geopoints for all these locations, now all I do is check
the name of the location that is chosen in the Spinner of TimeTable class and that location which is
passed as intent to HonoursProjectActivity map activity class. If we have the names of the location from
the intent and compare them to the myLoc arraylist, I am able to extract the GeoPoints for these
locations. Once I have this Geopoints, then I call drawLine method which takes in argument, latitude for
previous location, longitude of previous location, latitude for next location, longitude for next location. It
then forms a string where the directions API request takes the following form:

67
67
http://maps.googleapis.com/maps/api/directions/output?parameters
I used JSON (Java Script Object Notation) as the output and for the parameters, the origin specifies the
source latitude and longitude specified in string and directions service will geocode the string and
convert it to latitude and longitude co-ordinates to calculate directions. All the parameters are
separated by (&) character, therefore for destination parameter I use latitude and longitude string and it
gets converted to coordinates. And the last parameter is the sensor which is set to false. Sensor
parameters are used to check if the directions request comes from a device with a location sensor or
not.
Generate an HttpPost to get JSON encoded data from Google as shown from code below and the
contents are put in the declared InputStream.
//use HttpPost to generate JSON encoded data from Google and contents are put in the InputStream istream HttpClient httpclient = new DefaultHttpClient(); HttpPost httppost = new HttpPost(url); //execute HTTP requests HttpResponse response = httpclient.execute(httppost); HttpEntity entity = response.getEntity(); InputStream istream = null; // creates a new InputStream object of the entity that returns that entity data istream = entity.getContent();
Then read the result of the HttpPost to build a string encoding a JSON using StringBuilder class and store the result in String variable result [20].
//read the result of the HttpPost to build a string encoding a JSON BufferedReader reader = new BufferedReader(new InputStreamReader(is, "iso-8859-1"), 8); StringBuilder sb = new StringBuilder(); //add the result to the stringbuilder sb sb.append(reader.readLine() + "\n"); String line = "0"; while ((line = reader.readLine()) != null) {

68
68
sb.append(line + "\n");} istream.close(); reader.close(); String result = sb.toString();
Parse the string into JSON entities creating JSONObject object and JSONArray class. Add all the “routes”
associated with the parameter key and store it into String encodedString as String points using key
“points” as argument. Then decode these String points into the collection of Geopoints List called
pointToDraw using extractPoly() method to decode the string which contains string points to real
GeoPoints. Then using HelloItemizedOverlay class, I was able to draw a line between these points and
eventually added this overlay to MapView.
// Parse the string into JSON entities,and store the decoded string containing the route into variable pointToDraw JSONObject jsonObject = new JSONObject(result); //Returns the value mapped by "routes" if it exists and is a JSONArray JSONArray jsonrouteArray = jsonObject.getJSONArray("routes"); JSONObject jsonroutes = routeArray.getJSONObject(0); //Returns the value mapped by name "overview_polyline" if it exists and is a JSONObject. JSONObject ovP = jsonroutes.getJSONObject("overview_polyline"); //Returns the value mapped by name "points" String eS = ovP.getString("points"); //store the Geopoints extracted using extractPoly() int List pointToDraw List<GeoPoint> pointToDraw = extractPoly(eS); //add these GeoPoints to HelloItemizedOverlay and this overlay to MapView mapView.getOverlays().add(new HelloItemizedOverlay(pointToDraw,Color.RED, true));
The extractPoly() method decoder used in my app is the decoder algorithm that I managed to get from
the StackOverflow site and it is used by many people to parse string into GeoPoints for plotting onto the
map [20].

69
69
After storing all the Geopoints in List after using method extractPoly(), I had to create an object of
HelloItemizedOverlay class. For the arguments of the constructor, I had to pass in the List of Geopoints,
color that I want for the route and Boolean value to show if contains start and end geopoints. Then it
calls the draw() method where it first calls mapView.getProjection(), which is used for translation
between geopoints to on screen pixel coordinates. Then I create starting point and ending point with
class Point. An object of Point is a coordinates plotted on screen that is converted from Geopoint. Then I
define an object of Path that I need. Then to create the path, I loop through arraylist of geopoints and
initialize a new Point object and by using projection.toPixels(geoPoint, Point), I transform geoPoint to a
Point object using Projection. Then for the first iteration of geopoint, I set the starting point sp to the
first geopoint and by calling moveTo of Path class, I set the beginning of the contour to that specified
point. If condition is the last iteration, then I set the ending point ep to the last iterated geopoint.
However if geopoint is not the first or last geopoint, then we use lineTo() method of Path class to draw
line from the previous geopoint to the current geopoint. Then I initialize the paint object, where I specify
the feature of the path or line will be drawn. I set the color to be the color that I passed as an argument
of the constructor i.e red, AntiAliasing to smooth the edges out when set to true, and will have stroke
style and stroke width to be 5 as float and so on. Then I will use drawPath() method to draw this path or
line with the specified paint object features set earlier.
Then when all the geopoints have finished iteration and line has been drawn, then I move to drawOval()
method. Since my Boolean value of start and end geopoints has been set to true in the initialization of
the object, therefore, I am able to enter the condition and draw oval on the point coordinates
transformed from geoPoint coordinates. I am able to draw oval on the same canvas that drew line by
passing the canvas layer as argument of the drawOval() method. I also create ovalPaint object of Pain to
specify feature of Oval that I want and use that when drawOval() method is called.

70
70
Projection projection = mapView.getProjection(); //check condition if GeoPoints ArrayList geopoints isn't empty if (shadow == false && geopoints != null) { Point sP = null; //starting point Point eP = null; //ending point //create a Path object for drawing of straight lines Path path = new Path(); int totalNum = geopoints.size() - 1; //create the route here for (int count = 0; count < geopoints.size(); count++) { //get the first GeoPoint GeoPoint gPointA = geopoints.get(count); Point pointA = new Point(); //Converts the given GeoPoint to OnScreen pixel coordinates projection.toPixels(gPointA, pointA); if (count == 0) { //set starting point to pointA at first iteration
sP = pointA; path.moveTo(pointA.x, pointA.y); } else if (count == totalNum) { eP = pointA;//set ending point to pointA at last iteration path.lineTo(pointA.x, pointA.y); //draw line from the last point to the specified point } else { path.lineTo(pointA.x, pointA.y); //draw line from the last point to the specified point } } //after every iteration of GeoPoints between source and destination GeoPoints Paint paint = new Paint(); paint.setAntiAlias(true); paint.setColor(colorOfPath); paint.setStyle(Paint.Style.STROKE); paint.setStrokeWidth(5); paint.setAlpha(90); //when all the GeoPoints between starting and destination GeoPoints //are iterated in the ArrayList, then draw Oval for the starting GeoPoint and destination GeoPoint if (dS) { if (sP != null && eP != null) { //draw oval for the starting point drawOval(canvas, paint, sP); //draw oval for the destination point drawOval(canvas, paint, eP); } } //if path contains no lines if (!path.isEmpty()) canvas.drawPath(path, paint); } return super.draw(canvas, mapView, shadow, when); } /* * draw oval at starting point and at destination point */ private void drawOval(Canvas canvas, Paint paint, Point point) {
71
71
Paint ovalPaint = new Paint(paint); ovalPaint.setStyle(Paint.Style.FILL_AND_STROKE); ovalPaint.setStrokeWidth(2); int ovalRadius = 6; RectF oval = new RectF(point.x - ovalRadius, point.y - ovalRadius, point.x + ovalRadius, point.y + ovalRadius); canvas.drawOval(oval, ovalPaint); }
3.3.3 Add or Delete Friend from Contacts list
This activity contains ability to check the contacts list and pick contact of choice and be able to add that
contact chosen to a friend’s group. To be able to read contact’s information, first I needed to set the
proper permission in the application manifest which being “android.permission.READ_CONTACTS”. Then
within the activity I create an intent that has Intent.ACTION_PICK that asks the system to find an activity
that can perform a PICK action from the items in the Contacts URI. Then this intent can be used along
with the startActivityForResult() method to retrieve the result. To handle the results of the picker, I used
onActivityResult() method which is the method that waits for the result from the started activity. Here
you can check if the result matches your requestCode and that result was good. Activity.RESULT_OK
means a successful result.
Then we retrieve the URI of the picked contact through data.getData(). It gets this returned data in a
content provider. Now we query the result so that we can retrieve the phone number of the contact
chosen. Content provider store and retrieve data. And the only way to access content provider is to use
content resolver by calling ContentResolver class. In my code, I used ContentResolver contect_resolver =
getContentResolver() to access ContentProvider DataSet. Before that I query my data set using
managedQuery() method using URI that stores the CONTENT_URI. The managedQuery() method returns
a Cursor, which provides a read-write access to the result set returned by a database query. Now to
access Cursor, we move the cursor to the first row and get the id of the first row in string. We get id in
int by using getString() method with argument as string value representing the ID in the dataset. Now as

72
72
we go through different id for each row, we set another query which accesses phone numbers. To query
the number table use the URI stored in SDK variable
ContactsContract.CommonDataKinds.Phone.CONTENT_URI. For the selection filter i.e WHERE clause in
Query method, I show which rows to return, therefore to get numbers for the specified contact.
Therefore combined with selectionArgs shown by id, I select rows based on specific id.
Now for that particular query returned by each phone cursor, I choose the column, DISPLAY_NAME and
NUMBER and store each unique id’s name and number.
Uri contactData = data.getData(); Cursor firsCur = managedQuery(contactData, null, null, null, null); ContentResolver contect_resolver = getContentResolver(); if (firsCur.moveToFirst()) { //Move the cursor to the first row. String id = firsCur.getString(firsCur.getColumnIndexOrThrow(ContactsContract.Contacts._ID Cursor phoneCursor = contect_resolver.query(ContactsContract.CommonDataKinds.Phone.CONTENT_URI, null,ContactsContract.CommonDataKinds.Phone.CONTACT_ID + " = ?", new String[] { id }, null); if (phoneCursor.moveToFirst()) { name = phoneCursor.getString(phoneCursor.getColumnIndex(ContactsContract.CommonDataKinds.Phone.DISPLAY_NAME)); no = phoneCursor.getString(phoneCursor.getColumnIndex(ContactsContract.CommonDataKinds.Phone.NUMBER));}
3.3.4 Show friends location in real time on Map using SMS messaging
In the class ContactSelector, I am able to choose a friend and then when I press See Friend’s on Map
button, I am able to open a map and see the friend’s location on the map change every few seconds.
The way it works is that when I use a contacts number, I am able to send SMS of my current GPS to the
selected friend’s device. In order to send SMS, I need to add the following permission (
“android.permission.SEND_SMS”) to my Manifest File.xml.
Now to send SMS message, I need to instantiate SmsManager class, using getDefault() static method to
obtain SmsManager object.

73
73
SmsManager sms = SmsManager.getDefault(); sms.sendTextMessage(phoneNumber, null, message, objSent, objDel);
Now to show to the user of the app that any SMS sent is prompted of its action, whether successful sent
or failure in sent, I use “PendingIntent” for that purpose. This is an Intent that the receiving activity will
use to call our activity back with once the message has been sent. In our case, the PendingIntent is
pointing to the same activity with (this) as argument, so when the SMS is sent, nothing will happen. Now
to receive the PendingIntent message, I created a “BroadcastReceiver” and register it. So in my code,
when I send SMS, I use PendingIntent object objSent and objDel to monitor the sending and delivering
process. When the SMS is sent, the onReceive() method is invoked from BroadcastReceiver class.
Similarly when the SMS is delivered the same event onReceive() of BroadcastReceiver is invoked. Then
depending on the retrieved result code, I am able to know whether the SMS has been sent or delivered
successfully. The SMS is actually sent by method sendTextMessage which takes in argument the phone
number, the body of message to send, and the two pending intents.
After the SMS has been sent, now for the receiving part, I added the following permission
(“android.permission.RECEIVE_SMS”) to my Manifest File.xml. We also add an “Intent Filter” which
launches a specific class when an SMS is received. This Intent Filter is also done in the Manifest File. So
when SMS is received, it will launch the BroadcastReceiver class SmsReceiver. Then in the SmsReceiver
class it invokes the onReceive() method, and the message is attached to the Intent object passed in as
argument via a Bundle object. The messages are stored as PDU(protocol description unit) format as an
Object array. The PDU string message contains not only the message but also other information about
the sender. In order to extract from PDU to byte array, createFromPdu() method is used. So first, I
create an array of SmsMessage objects with length of array being the length of the message extracted
from the Bundle that was attached to the Intent object. I create Object array called pdus that gets all the

74
74
messages from Bundle in the PDU format. Then to extract the PDU message, I create SmsMessage array,
I iterate each array and set each SmsMessage object to the message that I extract from PDU to byte
array. The store this byte array in each SmsMessage array that I create.
Object[] pdus = (Object[]) bundle.get("pdus"); msgs = new SmsMessage[pdus.length]; for (int i=0; i<msgs.length; i++){ msgs[i] = SmsMessage.createFromPdu((byte[])pdus[i]);
After the SMS is being able to successfully send and receive, I was able to set it properly so that I can
retrieve the GPS being transferred and update my current location and friend’s location accordingly.
After containing both friend’s and my own location, I was able to transfer that to the map and then plot.
However to check for location updates every time, I set it up using a timer class, that extends
CountDownTimer abstract class. When the map is plotted with current position, then the timer starts,
however after 5 second when the time finishes, it clears the map, updates the position and resets the
timer again. The map is cleared by clearing all the overlays associated with the MapView. Updating the
position involves, checking friend’s current location variable as well my own current location variable
and using that geopoints to draw new OverlayItem and add it to the Overlay and eventually to the
MapView. Then at the end of the update I use invalidate() method to redraw the MapView each time
update method is called.
3.3.5 Show or Delete Saved Routes with Updates
Since I already have access to all saved maps containing updates according to the current date/time. I
saved all my locations as a string message such Herzberg-Paterson-Library, therefore I managed to use
StringTokenizer for this message and extract the location and save it to array. To populate an Android
Spinner, I first create an empty Array Adapter and it’s important to include <dateCalender> part so that

75
75
the Array Adapter knows that type of data to expect. The Array Adapter is also given some standard
Android Spinner layout items so that it will know how to display the content that we are about to feed
it. So in the Spinner of the class savedRoutes.java, I feed that dataAdapter to retrieve the arraylist of all
the dates being saved in the global variable. I then set the adapter to our Spinner.
dataAdapter = new ArrayAdapter<dateCalender>(this, android.R.layout.simple_spinner_item, MyApplication.getInstance().getDate()); dataAdapter.setDropDownViewResource(android.R.layout.simple_spinner_dropdown_item);
Then I implement the OnItemSelectedListener that will listen for selection from the Spinner. Then from
the selected Spinner item which shows the date of the saved map, I am able to see the route saved at
that particular date. Not only does the date object contain the route but also the updates associated
with the route. This is also shown in the EditText boxes where it displays the date selected, route saved
and the updates including time and reminders/notifications that were saved along with it. From the
code below, the first selection shows the toString() method of dateCalender object chosen among the
arraylist of dateCalender objects. The toString() method returns the string value of the date that was
passed in at the time of object creation. In the second selection, it shows the getRoute() of dateCalender
object which displays the location of places joined together as one string separated by “-”. The last
selection displays the lf() method of dateCalender object that returns
e1.setText(parent.getItemAtPosition(pos).toString()); e2.setText(((dateCalender) parent.getItemAtPosition(pos)).getRoute()); e3.setText((((dateCalender) parent.getItemAtPosition(pos)).lf()));
From that then I pass these messages via Intent to a map activity. In the map since the locations saved
are in the form that is similar to this pattern i.e Paterson-Library-Herzberg, then I had to use
StringTokenizer class to extract each location from the route. Once I have the location that I saved then I
76
76
compare these locations to the locations that I already had saved as global variables. The locations that I
saved as global variables contain the geopoints associated with that location.
So through the process of comparing the locations saved as global variable to the locations that I
extracted through saved route string, I was able to get the geopoints to my extracted location and hence
plot them on the map using Overlay.
3.3.6 Send saved routes to friends
In the sendSavedRoutes class, I first create two Spinners, one showing friends group and other showing
the date group. The main idea here is to choose which saved route to send to which friend. For
confirmation purposes, I put in EditText boxes to show whether each date shows the correct route and
each date shows the messages such as updates times and reminders associated with it. When the Send
Saved Route buttons is pressed then it calls the sendRoute() method and then before it calls sendSMS()
method, it creates a string variable called alteredMessage containing message of the form “Kaljasd:
Paterson-Library-Minto”. Now this “Kaljasd: “is added on purpose so that the SmsReceiver
BroadcastReceiver class which receives this alteredMessage, recognizes from any received message by
comparing if the message received contains “Kaljasd: “in its message. If the message received by
SmsReceiver is of the form “Kaljasd: Paterson-Library-Minto” then we start a new map activity class call
savedRoutesMap passing the route message through intent object.
Now to launch an map activity from onReceive() method of BroadcastReceiver SmsReceiver class. As we
all know that by default if you call an activity by intent, a new instance of that activity will be created
everytime, so therefore to avoid many instances of the activity being launched every time the activity is
called with intent, I made the activity to be flagged. I achieved that by setting the launchMode of the
activity to singleTash in the AndroidManifest.xml.

77
77
id:launchMode="singleTask"
By setting the BroadcastReceiver SmsReceiver with this launchmode, whenever this activity is called
using an intent, if there is an existing instance, the system will route the request to the existing instance.
Now to load a new activity from onReceive() method of SmsReceiver, I will use intent flags on the intent
instance before passing the intent to startActivity(intent).If the flag is set to as
FLAG_ACTIVITY_NEW_TASK then, a new task is created and a new instance of the called activity
becomes the first element of that task. However a new task is only created if there is not already a task
present for that target activity. Then a new activity will not be started, instead the current task is
brought to the foreground.
However if the intent flag is set to FLAG_ACTIVITY_SINGLE_TOP then, no new instance is created if the
target activity is already at the top of the stack. If intent flag is set to FLAG_FROM_BACKGROUND, then
the SmsReceiver BroadcastReceiver is indicating that the intent started with this flag comes from
BroadcastReceiver which only performs background operation and not direct user interaction.
iAlarm.addFlags(Intent.FLAG_FROM_BACKGROUND); iAlarm.addFlags(Intent.FLAG_ACTIVITY_SINGLE_TOP); iAlarm.addFlags(Intent.FLAG_ACTIVITY_NEW_TASK);
After the SMS message containing the route is received, and starting an intent object to start a map
activity, I show these routes on the map by using StringTokenizer object to extract the location from “-“.
Then we display these location on map using Overlay class and adding to MapView.
st = new StringTokenizer(smsMess, "-"); while(st.hasMoreTokens()) { message [i] = st.nextToken(); i++;}

78
78
Chapter 4 Results/Validation 4.1 Goals/Objectives achieved
The application that was created for this project fulfilled all the goals and objectives proposed earlier
before the project was created. The results accomplished from this application are fully expected i.e.
draws correct route on map, correctly sends route to specified friend, updates correctly and so on,
where every functional requirements in Chapter 3 were met and successfully implemented. I have also
shown images taken from my application to show few of the functionalities.
The goal of this application was to create a working Carleton University Map Scheduling application
where the user would be able to find locations and create routes based on their preferences. Now in this
application, user is able to enter schedule of the places to visit for the day, time of visit, and updates and
reminders. Based on the schedule input, user is successfully able to see a clear drawn route showing the
time and updates. Check Figure 4 and Figure 5 below. User is also able to see his/her own current
location on the map. By looking at the scheduled route for the day and comparing with his/her own
current location, user is able to know where he/she has to be for that day. Also the user is able to check
other hot spots such as Food Court, Bus Stops, etc. on the same map.

79
79
Figure 32: Inputting Time/Location/Reminder Schedule Figure 33: Route based on inputs This application also managed to successfully validate all other functional requirements specified in
Chapter 3, such as adding/deleting friends, being able to see friend’s location relative to your location,
sharing saved routes with friends and finally being able to access the saved routes at any time of the
day. (Check Source Code for full Result/Validation)
From the image below, it successfully shows that by starting up two emulators containing the same
application, I am able to see friend’s location compared to my location in real time. When I feed another
GPS coordinates via DDMS to one of the emulator, I was able to see the change in position in both the

80
80
emulators. Note: From the image below the green android icon represents my current position and
monkey icon represents friend’s current location. The image shows two different emulators
communication with each other.
Figure 34: Two Emulators communication change in position via Map The closest comparison of this application would be Carleton University Mobile App, which also provides
features such as Class Schedule and University Map. However, my application is different from
CUMobile app in a way that it is more geared towards of it being a social app. In a sense, mine would
81
81
contain features not included in CUMobile, such as being able to see your own location and any friend of
your choice’s location on the same map changing every second in real time. This feature is extremely
useful in a setting like university where one needs to be constantly in touch with others for purposes
such as group work, assignment meeting, lab work and so on. By knowing each other’s location, both
can agree at a place closest to each other’s location.
My application not only provides Class Scheduling feature as CUMobile app but also being able to form
those schedules as clear drawn route on a map. In addition, it also contains the feature of being able to
add updates on the schedule i.e. reminders/notes and displaying it on the map. Being able to add
updates such as reminder to your schedule truly helps a student as part of his scheduling, as having
separate reminder section for the day provides great service in a usual hectic student life.

82
82
Chapter 5 Conclusion The application that I created for my Honours Project Research was primarily created for the sole
purpose of helping Carleton University students be able to solve problems such as finding locations in a
new school environment. Since this application’s main target were first year students aiding them in
finding locations, I also tried to solve other regular student related problems such as connecting to
friends, being able to see and meet friends, and also see what friends are doing for that day. All these
activities were incorporated as a mapping activity in this application. “Connecting to friends” feature
was shown by being able to add a friend in a group using phone number of that friend or choosing friend
via device’s contact list. “See and meet friends” feature was captured by mapping activity where the
user is able see friend’s location on the map. “See what friends are doing for that day” feature is
captured by being able to share scheduled routes between friends. Therefore at the end of the project,
this application was able to meet those all those student problems and hence act as a guide in easing
the student settle into new school life and environment. This application provides all the features
specified in the research proposal. In comparison with CUMobile app, it delivers features that are very
different and unique.
Before undertaking this project, I had no knowledge on Android. Therefore more than creating this
application for my Honours Project, it proved to be an important personal learning curve for me. It made
me understand and create an interest in the world of mobile application and technology, also forming a
firm grasp on Android Operating System concepts. On top of that, as this map application was
developed using Google Maps APIs, I was able to understand the core concepts and libraries associated
83
83
with it. This being my first app, I am further motivated to touch on other areas of Android and be able to
produce more related apps.
5.1 Future Work
In this section, I will list the parts that didn’t work and ways that I went around trying to solve the
problem. Also in this section I will list parts that I could have added to the application if time wasn’t the
issue, to improve the functionality of the application further.
5.1.1 Additional Problems faced:
1) One minor problem arose from the HonoursProjectActivity.java class which is a map activity
class. The problem was that the map was not loading properly and was displaying tiles when I
try to go places beyond Carleton University. Although the map to show routes and other related
activities are being displayed properly yet if I go beyond and further, it only displays tiles. I found
out about this problem when I finished setting up the whole app. So I had to delete and add lots
of stuff to test and see where the problem lied. I even asked suggestion from the professor
about this. After taking out pieces of the code one by one, I realized that the problem lies in the
fact that I am using both (extends Overlay) and (extends ItemizedOverlay<OverlayItem>)
together in the HonoursProjectActivity.java class which is a map class. If I just use (extends
Overlay) throughout the map activity class, the map loads properly. I used this Overlay class
called HelloItemizedOverlay which is a class that draws the path between two geopoints using
its draw method. So when I load the HelloItemizedOverlay and add it to mapOverlay, then the
paths are drawn clearly and the map loads properly everywhere.

84
84
However when I use DisplayCurrLocationItemizedOverlay an ItemizedOverlay<OverlayItem>
which takes lots of OverlayItems, puts it in a OverlayItem arraylist that stores it and draws it
with given image file then the map does not load properly. I feel the problem is due to the same
usage of HelloItemizedOverlay and DisplayCurrLocationItemizedOverlay class as two means of
adding overlays and this overlapping of different kind of Overlay classes is affecting the
MapView.
I am not sure why this is happening as it does not make sense logically. I tried to overwrite draw
method that I used for HelloItemizedOverlay into DisplayCurrLocationItemizedOverlay but
somehow it doesn’t work since DisplayCurrLocationItemizedOverlay is only used for adding
multiple markers with image file while HelloItemizedOverlay is used for drawing lines and circles
and so on. I didn’t have much time to change the code drastically as I thought this would affect
the logical flow of my already constructed app.
2) Another problem faced is the problem of launching the app from Eclipse to android 4.0.2 API
phone. The problem faced was the map was not launching on the phone. Initially I thought it
was logical mistake in my code but then after deleting everything except the map, still the
problem was persisting. When I re-connected to phone and ran it again, the map was not
showing, only tiles. The error was “Couldn’t get connection factory client”. Then I read into
Google and realized that there were lots of other people with similar problem where it worked
on the emulator but somehow didn’t work on the phone. My first solution was to formulate a
new Google map API key again, where I applied for a new key and retested everything but
somehow that wasn’t the reason and still didn’t work. Then I tried signing my android app with a
private key creating a keystore. I was able to create a keystore but that didn’t work as well.

85
85
Then my next solution was that since I was using Android 2.3.3 and it’s Google API for my
project while the phone I was trying to launch onto was using Android 4.0.2. I thought the
mismatch in these two versions of Android might be the problem. I thought the Android 2.3.3 is
obsolete and was the reason for not loading map on the new Android platform on the phone.
Then I installed the latest android which was Android 4.1 with its Google API on my computer.
After that I started up a new android project called MapTestStart with build SDK using Android
4.1(API 16). I changed the minSdkVersion to 8 and targetSdkVersion to 16 in the new map
Android Manifest XML file. I created a new AVD supporting the new Android 4.1 platform. Then I
launched the MapTestStart on the new AVD and it worked and map was showing. Then I
connected the phone to and launched it on there. Somehow the map still didn’t work and the
same error “Couldn’t get connection factory client” was the error shown. I was tempted to look
further into the problem but then due to time constraints, I wasn’t unable to.
3) Initially, in my research I suggested on using Djikstra’s algorithm for finding the shortest path
between two locations. My initial plan was to create manual map with nodes and edges and use
the algorithm to find the shortest edge out of all edges. However along the way, I realized that
Android provided Google’s reverse geocoding API thus providing access to a Geocoder via an
HTTP request. Therefore I was able to feed in GPS coordinates and get addresses using
Geocoding API request over HTTPS, store the results, parse it and display them on the map.
5.1.2 Additional Features
4) When I first proposed my project, I wasn’t aware that Android used SQLite database as means of
storing persistent data. I talked to my professor about the issue of SQLite database creating
problems to my project when I was halfway through development stage. The problem was that

86
86
when the phone is turned off, all the data would be wiped off. Since my app contains adding
friends, deleting friends, saving map, storing current location, saving locations and so on,
therefore it would be ideal to store these data using SQLite for it to persist either in application
own files directory or to the phone’s SD car. The problems that would be created for the present
app would be when the program’s life cycle is over all the variables gets destroyed and memory
gets release from RAM/Heap. My main target was to finish the project first and make the app
functional, using Global Variable means of storing data temporarily, and at the end if time
permitted, switching onto saving the data for persistence i.e File System, SQLite database or
sharedPreference storage. Apparently I wasn’t able to get the time to implement this feature.
5) If time permitted, I would readily improve my GUI features to add aesthetic outlook.
6) Additional features to complement my current application would be to have features such as
being able to access Student News and receive Connect emails constantly in case of any dangers
on campus and track your device remotely if it is lost or misplaced.
7) As I was reading into Android books on Location based Services, I could think of other related
features that would be interesting such as implement touch features on the map. The touch
features would be useful in a case when one needs to update directly on the map. Other feature
would be being able to take photos, update on the go and immediately updating it on the map.
Also I would also try to show on the map the distance between two friends and being able to
communicate to each while looking at the map at the same time. Such would be useful in a case
where one has to give directions while checking the map.

87
87

88
88
Appendix
All code details are provided in source code.

89
89
References
1. Sheusi, James C.. Android Application Development for Java Programmers. Cengage Learning, © 2013. Books24x7.Web.Aug.6, 2012.http://common.books24x7.com.proxy.library.carleton.ca/toc.aspx?bookid=45291
2. Abelson, W. Frank, et al. Android in Action, Third Edition. Manning Publications, 2011, EBook.
3. Gargenta, Marko. Learning Android. O’Reilly Media, 2011, EBook.
4. Samy, Mina. “Android App Development: Activity Life Cycle.” Mobile Orchard. Website Builder, 26 Jan. 2011. Web. 28 July 2012. <http://mobileorchard.com/android-app-development-activity-life-cycle/>.
5. “Android Activity Lifecycle – Android Key Concepts.” Android-App-Market.com. 1 Mar 2012.
Web. 2 Aug 2012. <http://www.android-app-market.com/android-activity-lifecycle.html>.
6. “The AndroidManifest.xml File.” Android Developers. Android, 14 Aug 2012. Web. 26 July 2012. <http://developer.android.com/guide/topics/manifest/manifest-intro.html>.
7. “Intents and Intent Filters.” Android Developers. Android, 14 Aug 2012. Web. 2 August 2012. <http://developer.android.com/guide/components/intents-filters.html>.
8. Vogel, Lars. “Android Intents.” Android Intents – Tutorial. Google Group, 19 July 2010. Web. 1 Aug 2012. < http://www.vogella.com/articles/AndroidIntent/article.html#intents >.
9. Vinay. “Understanding Implicit Intent in Android.” Skill Guru. 18 Jan 2011. Web. 3 Aug 2012. < http://www.skill-guru.com/blog/2011/01/18/understanding-implicit-intent-in-android/ >.
10. Allen, Grant. Beginning Android 4. Apress, © 2012.Books24x7. Web. Aug. 4, 2012. http://common.books24x7.com.proxy.library.carleton.ca/toc.aspx?bookid=45284
11. Lee, Wei-Meng. "Chapter 1 - Getting Started with Android Programming". Beginning Android 4 Application Development.Wrox Press, © 2012. Books24x7. Web. Jul. 26, 2012.http://common.books24x7.com.proxy.library.carleton.ca/toc.aspx?bookid=45955
12. “The Trimble Outdoors Insider Blog”. Kris Wagner. 30 May 2012. Trimble Navigation Limited. Jul 15 2012. < http://insider.trimbleoutdoors.com/ >.

90
90
13. “Columbia GPS Pal”. Columbia. Accessed at 12 Aug 2012. < http://gpspal.columbia.com/ >.
14. “Best Hiking GPS Apps”. Zahradnik, Fred. About.com. Accessed at 2 Aug 2012. < http://gps.about.com/od/mobilephonegps/tp/Best-Hiking-GPS-Apps.htm>.
15. “GPS Logger”. Google. Accessed at 4 Aug 2012. < https://play.google.com/store/apps/details?id=com.mendhak.gpslogger&hl=en>.
16. “Route Planer”. Google Inc. Accessed at 6 Aug 2012.
<http://www.androidzoom.com/android_applications/travel_and_local/route-planner_wjmj.html>.
17. “Walk Route Planner”. Farnham, Tim. Google Inc. Accessed at 26 Jul 2012. <http://www.androidzoom.com/android_applications/travel_and_local/walk-route-planner_boexl.html>.
18. Rani Ch. Radhika , et al. “Location Based Services In Android.” International Journal of Advances in Engineering Vol. 3. Issue 1 (2012): 209-220. IJAET. Web. 2 Aug 2012. <http://www.archives-ijaet.org/media/24I7-IJAET0703805-LOCATION-BASED-SERVICES-IN-ANDROID.pdf >.
19. Victor Matos. “Android Location Based Services.” CIS 493. Cleveland State University. Cleveland, Web. 12 August 2012. <http://grail.cba.csuohio.edu/~matos/notes/cis-493/lecture-notes/Android-Chapter24-LocationServices.pdf >.
20. “Google Maps output = kml broken?”. Michael Donohue. July 27 2012 . Stackoverflow. Accessed at 23 July 2012. < http://stackoverflow.com/questions/11680872/google-maps-output-kml-broken>.