Embed Size (px)
Citation preview
CARESTREAM Vue Reporting User Guide
Part # 6K9436 2015-06-17
TITLE: CARESTREAM Vue Reporting User Guide PART #: 6K9436 VERSION # 2.4 Confidential (C) PAGE 1 of 44
Table of Contents 1 Before You Begin ............................................................................................................................................ 5
1.1 Using the Speech Microphone Buttons.................................................................................................. 5 2 Audio Wizard ................................................................................................................................................... 6
2.1 Running the Audio Wizard ..................................................................................................................... 6 3 Initial Training Wizard ...................................................................................................................................... 7
3.1 Running the Initial Training Wizard ........................................................................................................ 8 4 Voice Recognition ........................................................................................................................................... 9
4.1 Voice Adaptation and Synchronization .................................................................................................. 9 4.2 Creating Reports with Voice Recognition .............................................................................................. 9 4.3 Using the Accuracy Trainer ................................................................................................................... 9
5 Report Editor Overview ................................................................................................................................. 11 5.1 The Report Editor Window ................................................................................................................... 11 5.2 Launching the Report Editor ................................................................................................................ 18 5.3 Signing a Report .................................................................................................................................. 18
6 Working With Vue Reporting ......................................................................................................................... 19 6.1 Using Report Templates ...................................................................................................................... 19 6.2 Using Document Editing Tools ............................................................................................................ 28 6.3 Adding Hyperlinks to Bookmarks ......................................................................................................... 28 6.4 Adding Hyperlinks to Priors ................................................................................................................. 29 6.5 Using and Creating Auto-text ............................................................................................................... 30 6.6 Using Color Coding.............................................................................................................................. 30 6.7 Viewing a Print Preview ....................................................................................................................... 30 6.8 Viewing Priors ...................................................................................................................................... 31 6.9 Copying Key Images............................................................................................................................ 31 6.10 Copying Analysis Results .................................................................................................................... 31 6.11 Assigning the Study ............................................................................................................................. 32 6.12 Batch-signing Reports ......................................................................................................................... 32 6.13 Creating an Addendum ........................................................................................................................ 32 6.14 Creating a Critical Results Notification................................................................................................. 32 6.15 Creating a Report with No Study ......................................................................................................... 33 6.16 Creating a Report for Multiple Studies ................................................................................................. 33 6.17 Creating Multiple Reports for a Single Study ....................................................................................... 34
7 Roles and Statuses ....................................................................................................................................... 35 7.1 Roles ................................................................................................................................................... 35 7.2 Workflow Status ................................................................................................................................... 36 7.3 Getting Status Information about Reports ............................................................................................ 37
8 Using Worklist Mode ..................................................................................................................................... 38 9 Viewing Final Report Previews from PACS ................................................................................................... 38 10 Adjusting the Layout of the Report Editor................................................................................................. 38 11 Voice Commands ..................................................................................................................................... 39
11.1 Default Voice Commands .................................................................................................................... 39
TITLE: CARESTREAM Vue Reporting User Guide PART #: 6K9436 VERSION # 2.4 Confidential (C) PAGE 2 of 44
11.2 CARESTREAM Vue PACS Client Voice Commands .......................................................................... 40 12 Using Vue Reporting in an Integrated Vue RIS-PACS System ................................................................ 41
12.1 Creating a Report ................................................................................................................................ 41 12.2 Study Statuses .................................................................................................................................... 42 12.3 Transcriptionist .................................................................................................................................... 43
TITLE: CARESTREAM Vue Reporting User Guide PART #: 6K9436 VERSION # 2.4 Confidential (C) PAGE 3 of 44

Preface Trademark and Copyright Information
CARESTREAM is a trademark of Carestream Health.
This document is copyrighted with all rights reserved.
Under the copyright laws, this document may not be copied, in whole or in part, without the written consent of Carestream Health, Inc. Under the law, copying includes translating into another language or format.
All names or identities used in this document are fictitious.
Caution: Federal law restricts this device to sale to, by, or on order of a physician.
The information contained herein is based on the experience and knowledge relating to the subject matter gained by Carestream Health, Inc. prior to publication. No patent license is granted by this information.
Carestream Health, Inc. reserves the right to change this information without notice and makes no warranty, express or implied, with respect to this information.
Carestream Health, Inc. shall not be liable for any loss or damage, including consequential or special damages, resulting from the use of this information, even if loss or damage is caused by Carestream Health, Inc.'s negligence or other fault.
FCC Compliance This equipment has been tested and found to comply with the limits for a Class A digital device, pursuant to Part 15 of the FCC Rules.
These limits are designed to provide reasonable protection against harmful interference when the equipment is operated in a commercial environment. This equipment generates, uses, and can radiate radio frequency energy and, if not installed and used in accordance with the instruction manual, may cause harmful interference to radio communications.
Operation of this equipment in a residential area is likely to cause harmful interference in which case users will be required to correct the interference at their own expense.
Regulatory Information AUTHORIZED REPRESENTATIVE (European Union)
Carestream Health France 1 rue Galilée 93192 Noisy Le Grand cedex France
Importer for European Union Carestream Health Netherlands B.V. Bramenberg 12 3755 BZ Eemnes
The Netherlands
TITLE: CARESTREAM Vue Reporting User Guide PART #: 6K9436 VERSION # 2.4 Confidential (C) PAGE 4 of 44
1 Before You Begin IMPORTANT: This document may describe features that are optional and require a special license to run. If these are not available on your system, contact Carestream for further details regarding license and feature upgrades.
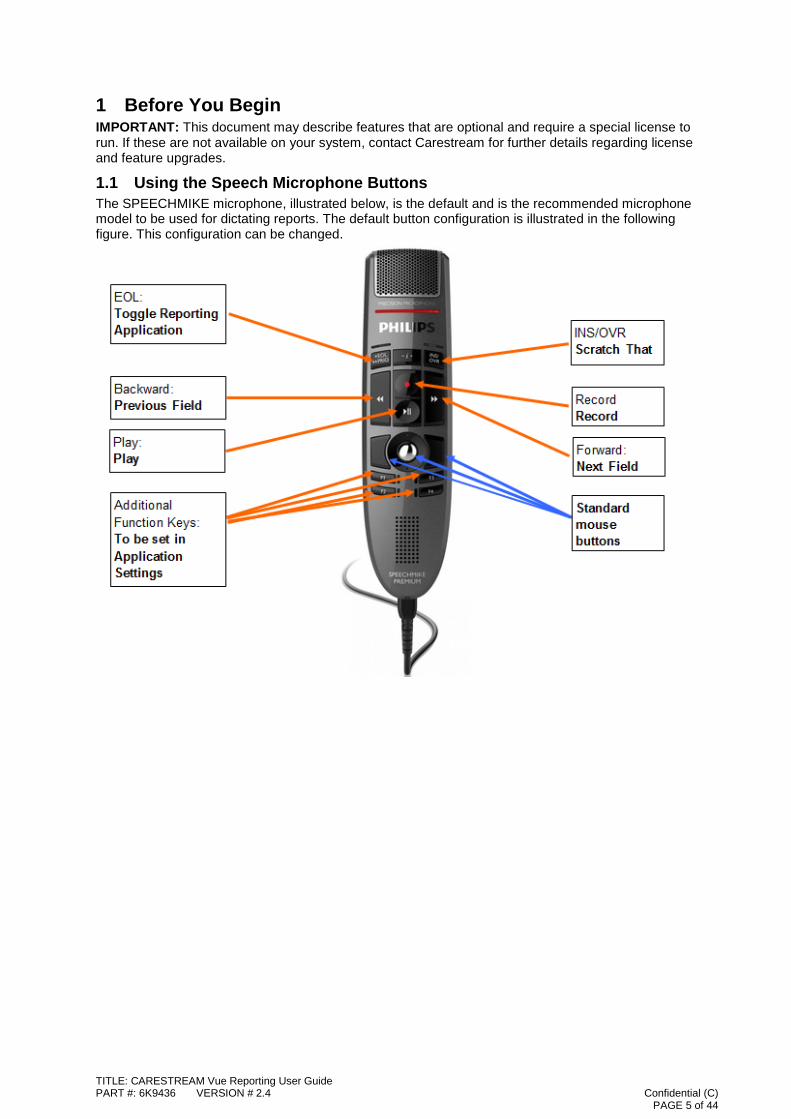
1.1 Using the Speech Microphone Buttons The SPEECHMIKE microphone, illustrated below, is the default and is the recommended microphone model to be used for dictating reports. The default button configuration is illustrated in the following figure. This configuration can be changed.
TITLE: CARESTREAM Vue Reporting User Guide PART #: 6K9436 VERSION # 2.4 Confidential (C) PAGE 5 of 44
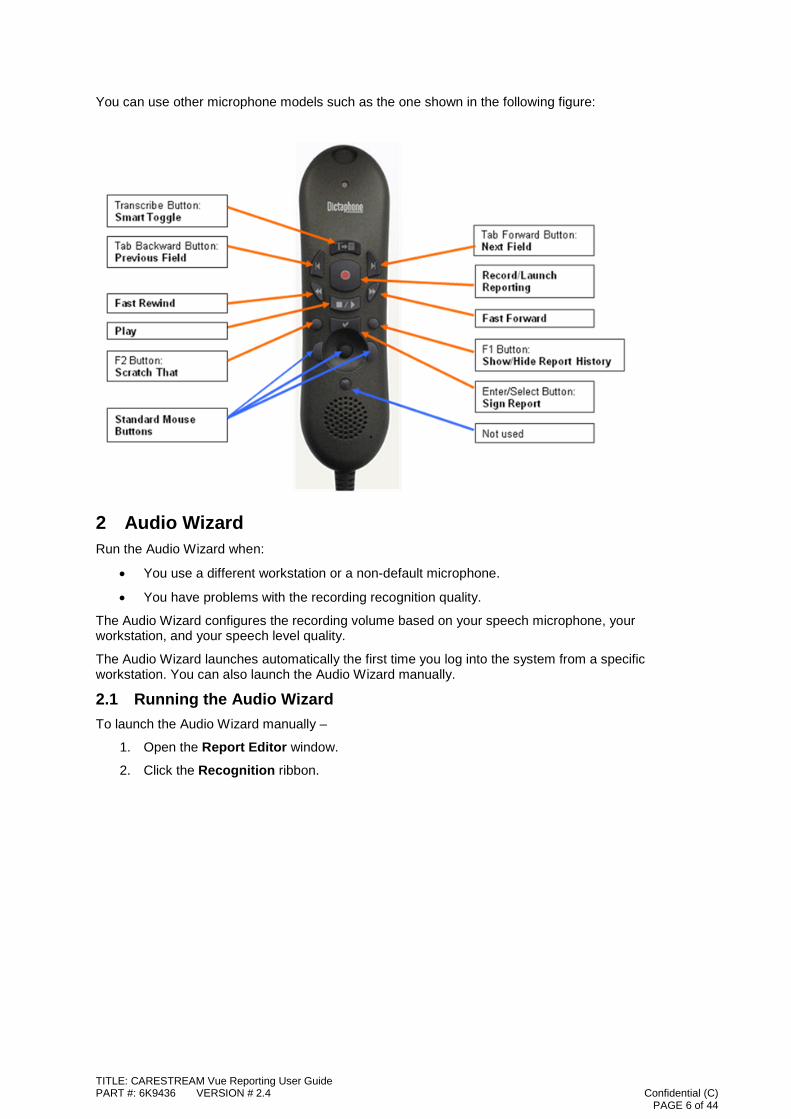
You can use other microphone models such as the one shown in the following figure:
2 Audio Wizard Run the Audio Wizard when:
• You use a different workstation or a non-default microphone.
• You have problems with the recording recognition quality.
The Audio Wizard configures the recording volume based on your speech microphone, your workstation, and your speech level quality.
The Audio Wizard launches automatically the first time you log into the system from a specific workstation. You can also launch the Audio Wizard manually.
2.1 Running the Audio Wizard To launch the Audio Wizard manually –
1. Open the Report Editor window.
2. Click the Recognition ribbon.
TITLE: CARESTREAM Vue Reporting User Guide PART #: 6K9436 VERSION # 2.4 Confidential (C) PAGE 6 of 44
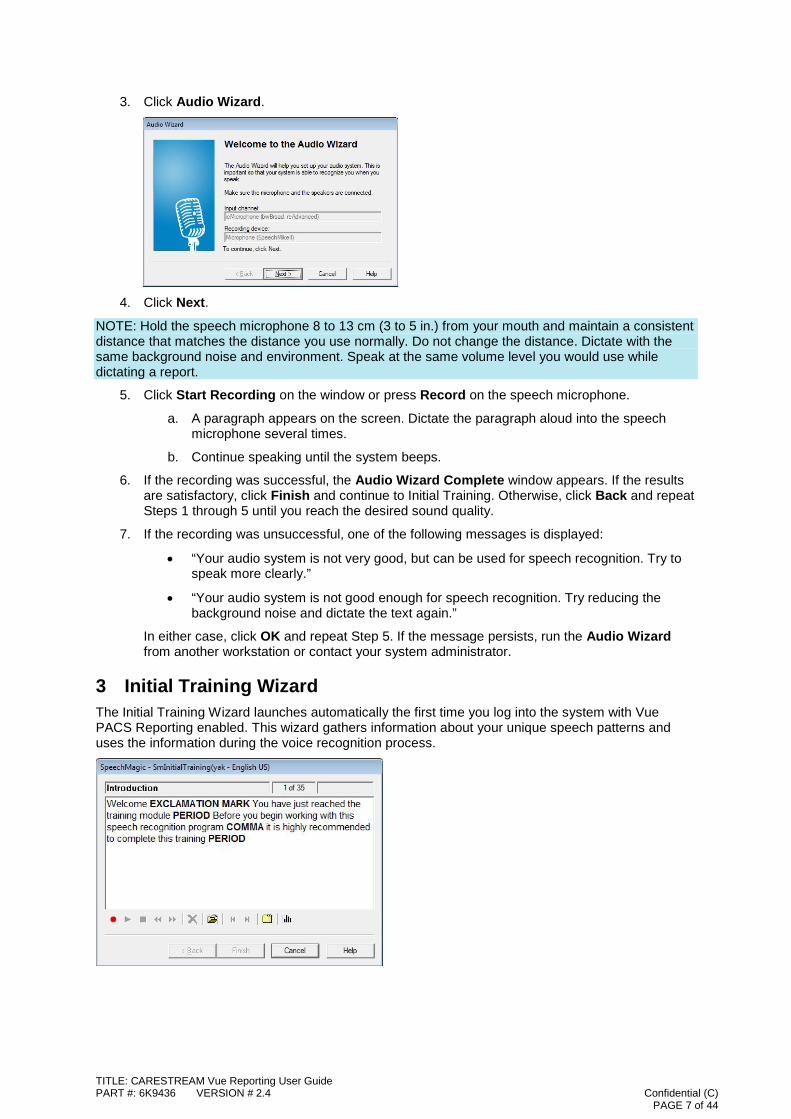
3. Click Audio Wizard.
4. Click Next.
NOTE: Hold the speech microphone 8 to 13 cm (3 to 5 in.) from your mouth and maintain a consistent distance that matches the distance you use normally. Do not change the distance. Dictate with the same background noise and environment. Speak at the same volume level you would use while dictating a report.
5. Click Start Recording on the window or press Record on the speech microphone.
a. A paragraph appears on the screen. Dictate the paragraph aloud into the speech microphone several times.
b. Continue speaking until the system beeps.
6. If the recording was successful, the Audio Wizard Complete window appears. If the results are satisfactory, click Finish and continue to Initial Training. Otherwise, click Back and repeat Steps 1 through 5 until you reach the desired sound quality.
7. If the recording was unsuccessful, one of the following messages is displayed:
• “Your audio system is not very good, but can be used for speech recognition. Try to speak more clearly.”
• “Your audio system is not good enough for speech recognition. Try reducing the background noise and dictate the text again.”
In either case, click OK and repeat Step 5. If the message persists, run the Audio Wizard from another workstation or contact your system administrator.
3 Initial Training Wizard The Initial Training Wizard launches automatically the first time you log into the system with Vue PACS Reporting enabled. This wizard gathers information about your unique speech patterns and uses the information during the voice recognition process.
TITLE: CARESTREAM Vue Reporting User Guide PART #: 6K9436 VERSION # 2.4 Confidential (C) PAGE 7 of 44
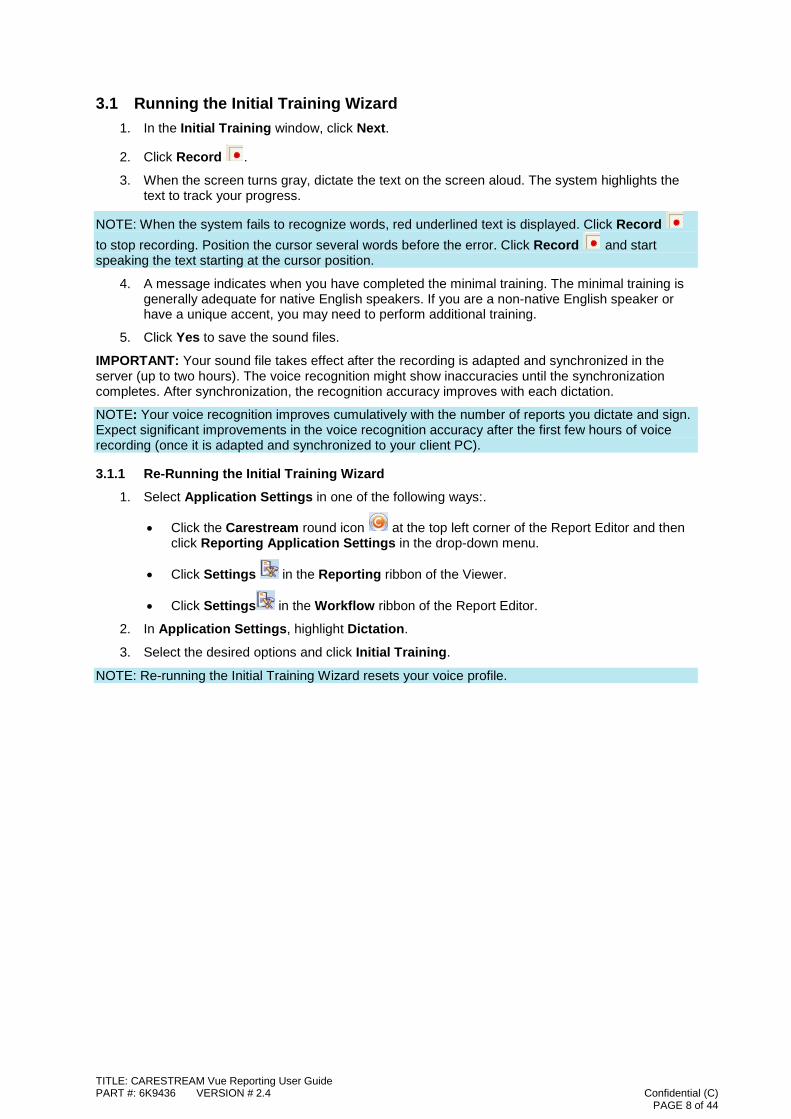
3.1 Running the Initial Training Wizard 1. In the Initial Training window, click Next.
2. Click Record .
3. When the screen turns gray, dictate the text on the screen aloud. The system highlights the text to track your progress.
NOTE: When the system fails to recognize words, red underlined text is displayed. Click Record to stop recording. Position the cursor several words before the error. Click Record and start speaking the text starting at the cursor position.
4. A message indicates when you have completed the minimal training. The minimal training is generally adequate for native English speakers. If you are a non-native English speaker or have a unique accent, you may need to perform additional training.
5. Click Yes to save the sound files.
IMPORTANT: Your sound file takes effect after the recording is adapted and synchronized in the server (up to two hours). The voice recognition might show inaccuracies until the synchronization completes. After synchronization, the recognition accuracy improves with each dictation.
NOTE: Your voice recognition improves cumulatively with the number of reports you dictate and sign. Expect significant improvements in the voice recognition accuracy after the first few hours of voice recording (once it is adapted and synchronized to your client PC).
3.1.1 Re-Running the Initial Training Wizard
1. Select Application Settings in one of the following ways:.
• Click the Carestream round icon at the top left corner of the Report Editor and then click Reporting Application Settings in the drop-down menu.
• Click Settings in the Reporting ribbon of the Viewer.
• Click Settings in the Workflow ribbon of the Report Editor.
2. In Application Settings, highlight Dictation.
3. Select the desired options and click Initial Training.
NOTE: Re-running the Initial Training Wizard resets your voice profile.
TITLE: CARESTREAM Vue Reporting User Guide PART #: 6K9436 VERSION # 2.4 Confidential (C) PAGE 8 of 44
4 Voice Recognition 4.1 Voice Adaptation and Synchronization Adaptation—The server updates your voice profile according to your style of pronunciation. The text and voice of every signed report are kept on the server and are used by the server for adaptation purposes.
Synchronization—The server transfers your updated voice profile to the client workstation.
Click the Recognition ribbon and select Synchronize to initiate a network or offline synchronization.
NOTE: The system synchronizes the voice profile automatically.
4.2 Creating Reports with Voice Recognition The following table lists some tips for better voice recognition.
Remember To: Do Not:
• Speak at a normal rate, normal volume, and with normal pronunciation and emphasis.
• Establish a speech rhythm, speaking in phrases of 6-to-8 words and pausing briefly.
• Pause briefly before and after small words. Speak small words slowly and clearly.
• Pause briefly between sentences when dictating over 100 words per minute. Pausing during speech helps to prevent the software from blending your dictation into one sentence.
• Hold the microphone 8 to 13 cm (3 to 5 in.) from your mouth. If the background noise level is high, you may need to hold the microphone closer to your mouth. If the background noise level is low, move the microphone away from your mouth to minimize breath sounds.
• Rewind and re-record if you make a mistake.
• Turn the microphone off when you complete the dictation.
• Over-enunciate your words.
• Lower the volume of your voice when you say small words.
• Cough, clear your throat, insert extra sounds between words, click your tongue, or think aloud during dictation.
• Dictate with any audible background noise, including a radio or additional conversation. Unrelated noise can cause recognition errors.
• Consume food or beverages, chew gum, or have conversations with others.
4.3 Using the Accuracy Trainer Use the Accuracy Trainer to enhance word recognition abilities. You can –
• Teach the Speech Recognition system new words that do not yet exist in it.
• Improve recognition of existing words by training the system to better recognize your acoustic qualities.
To train the system, dictate the word, select it, and click Accuracy Training in the Recognition ribbon.
TITLE: CARESTREAM Vue Reporting User Guide PART #: 6K9436 VERSION # 2.4 Confidential (C) PAGE 9 of 44
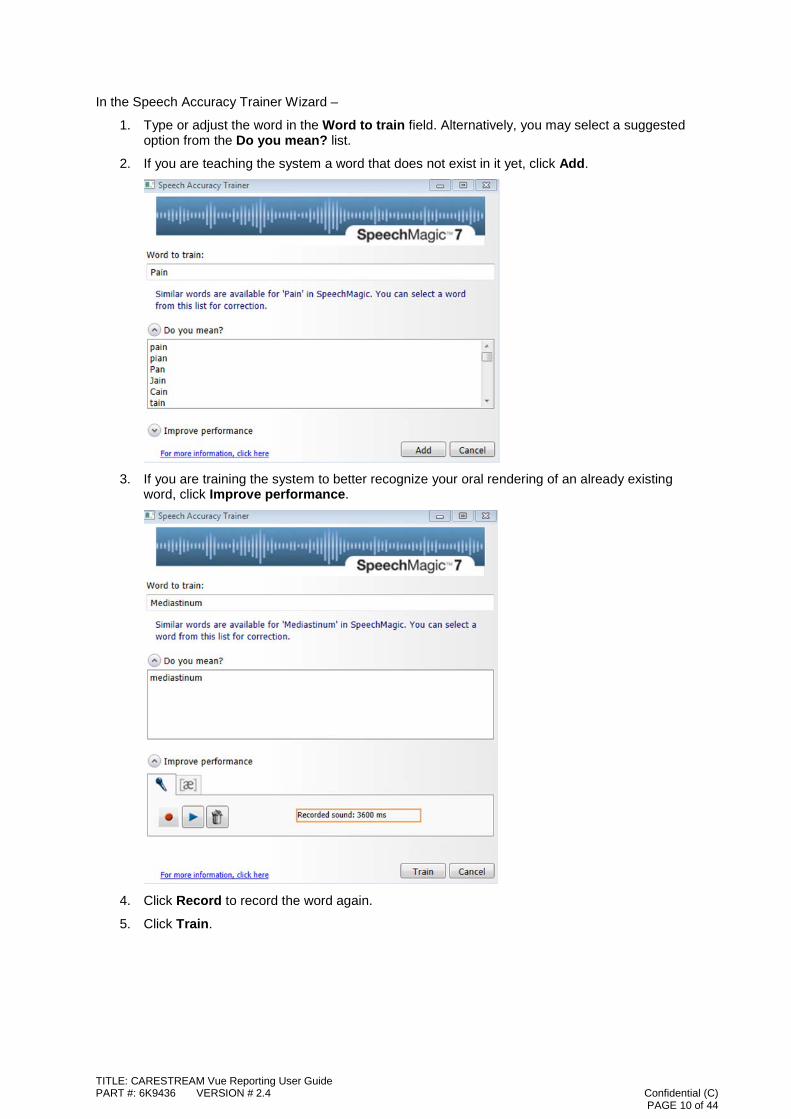
In the Speech Accuracy Trainer Wizard –
1. Type or adjust the word in the Word to train field. Alternatively, you may select a suggested option from the Do you mean? list.
2. If you are teaching the system a word that does not exist in it yet, click Add.
3. If you are training the system to better recognize your oral rendering of an already existing
word, click Improve performance.
4. Click Record to record the word again.
5. Click Train.
TITLE: CARESTREAM Vue Reporting User Guide PART #: 6K9436 VERSION # 2.4 Confidential (C) PAGE 10 of 44
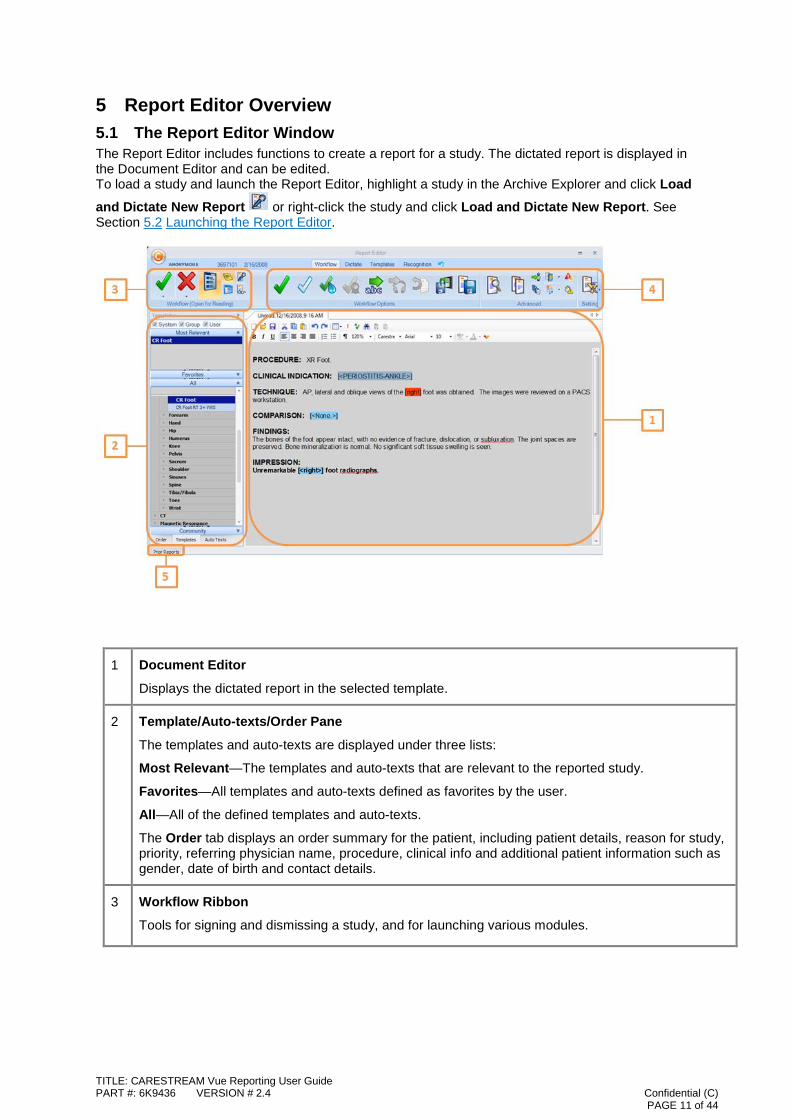
5 Report Editor Overview 5.1 The Report Editor Window The Report Editor includes functions to create a report for a study. The dictated report is displayed in the Document Editor and can be edited. To load a study and launch the Report Editor, highlight a study in the Archive Explorer and click Load and Dictate New Report or right-click the study and click Load and Dictate New Report. See Section 5.2 Launching the Report Editor.
1 Document Editor
Displays the dictated report in the selected template.
2 Template/Auto-texts/Order Pane
The templates and auto-texts are displayed under three lists:
Most Relevant—The templates and auto-texts that are relevant to the reported study.
Favorites—All templates and auto-texts defined as favorites by the user.
All—All of the defined templates and auto-texts.
The Order tab displays an order summary for the patient, including patient details, reason for study, priority, referring physician name, procedure, clinical info and additional patient information such as gender, date of birth and contact details.
3 Workflow Ribbon
Tools for signing and dismissing a study, and for launching various modules.
TITLE: CARESTREAM Vue Reporting User Guide PART #: 6K9436 VERSION # 2.4 Confidential (C) PAGE 11 of 44
4 Reporting-specific Ribbons
Dictate ribbon—Tools for creating and editing reports, and for applying templates.
Template Ribbon—Tools for creating, editing, and associating templates.
Recognition Ribbon—Tools for handling your voice profile and acoustic voice qualities.
Workflow—Tools for users of various roles to advance the report status in the appropriate workflow, to add alerts, to save and print the report and to assign the study.
5 Prior Reports
Hovering with the mouse over the Prior Reports button displays the Prior Reports pane with a list of all the patient’s past reports.
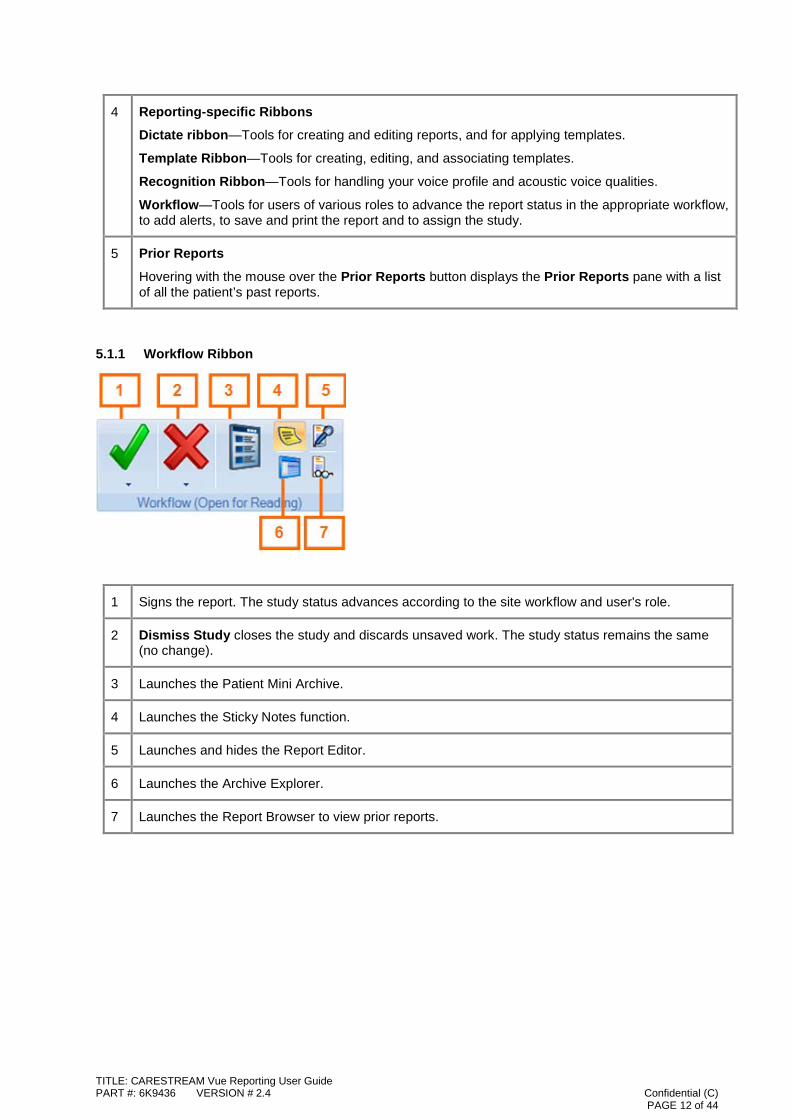
5.1.1 Workflow Ribbon
1 Signs the report. The study status advances according to the site workflow and user's role.
2 Dismiss Study closes the study and discards unsaved work. The study status remains the same (no change).
3 Launches the Patient Mini Archive.
4 Launches the Sticky Notes function.
5 Launches and hides the Report Editor.
6 Launches the Archive Explorer.
7 Launches the Report Browser to view prior reports.
TITLE: CARESTREAM Vue Reporting User Guide PART #: 6K9436 VERSION # 2.4 Confidential (C) PAGE 12 of 44
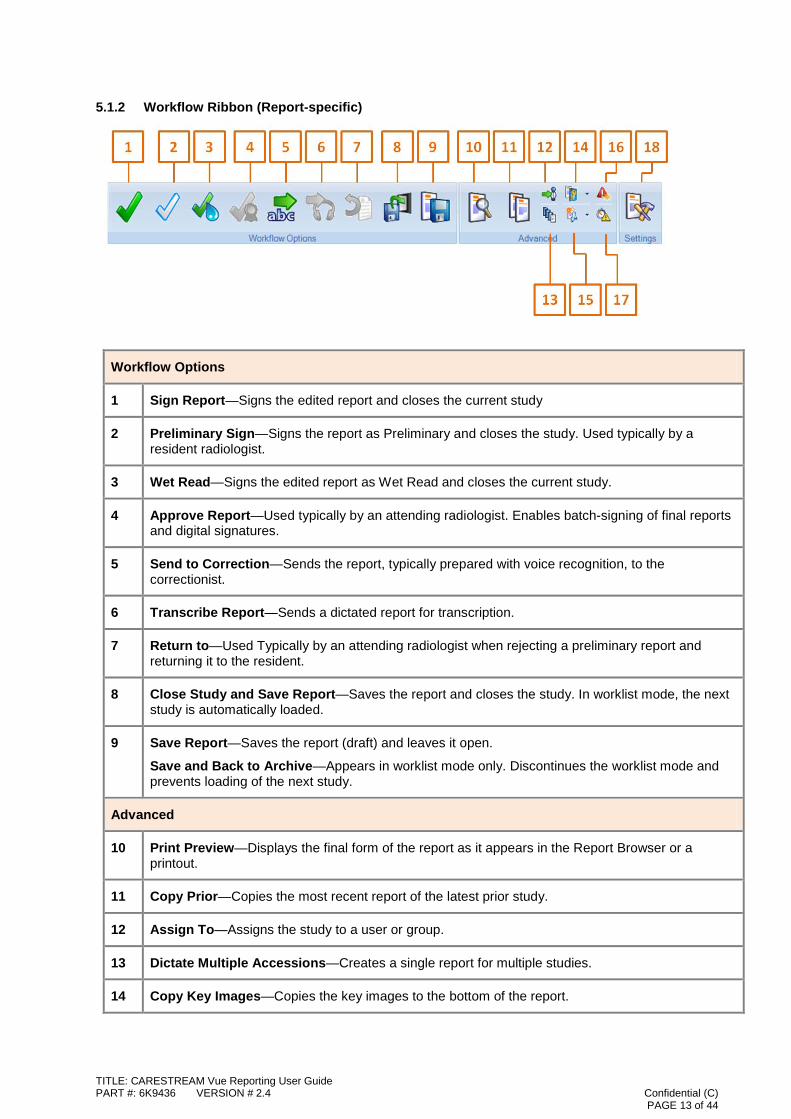
5.1.2 Workflow Ribbon (Report-specific)
Workflow Options
1 Sign Report—Signs the edited report and closes the current study
2 Preliminary Sign—Signs the report as Preliminary and closes the study. Used typically by a resident radiologist.
3 Wet Read—Signs the edited report as Wet Read and closes the current study.
4 Approve Report—Used typically by an attending radiologist. Enables batch-signing of final reports and digital signatures.
5 Send to Correction—Sends the report, typically prepared with voice recognition, to the correctionist.
6 Transcribe Report—Sends a dictated report for transcription.
7 Return to—Used Typically by an attending radiologist when rejecting a preliminary report and returning it to the resident.
8 Close Study and Save Report—Saves the report and closes the study. In worklist mode, the next study is automatically loaded.
9 Save Report—Saves the report (draft) and leaves it open.
Save and Back to Archive—Appears in worklist mode only. Discontinues the worklist mode and prevents loading of the next study.
Advanced
10 Print Preview—Displays the final form of the report as it appears in the Report Browser or a printout.
11 Copy Prior—Copies the most recent report of the latest prior study.
12 Assign To—Assigns the study to a user or group.
13 Dictate Multiple Accessions—Creates a single report for multiple studies.
14 Copy Key Images—Copies the key images to the bottom of the report.
TITLE: CARESTREAM Vue Reporting User Guide PART #: 6K9436 VERSION # 2.4 Confidential (C) PAGE 13 of 44
15 Copy analysis—Copies analysis results from analysis tools in Vue PACS such as Bookmarks, Vessel analysis, and others.
16 Critical Results Notification—Adds a Critical Results indication for the study in the database.
17 Mark as STAT—Marks the study as STAT. A STAT indication appears in the Archive Explorer.
18 Settings—Opens the Reporting Application Settings window, where you can select settings relating to workflow, appearance, dictation, keyboard shortcuts and colors.
Note that the availability of the tools in Workflow Options changes according to the user’s role, the report status, and the workflow defined in the system. The following illustrations show the various workflow options in the Workflow ribbon:
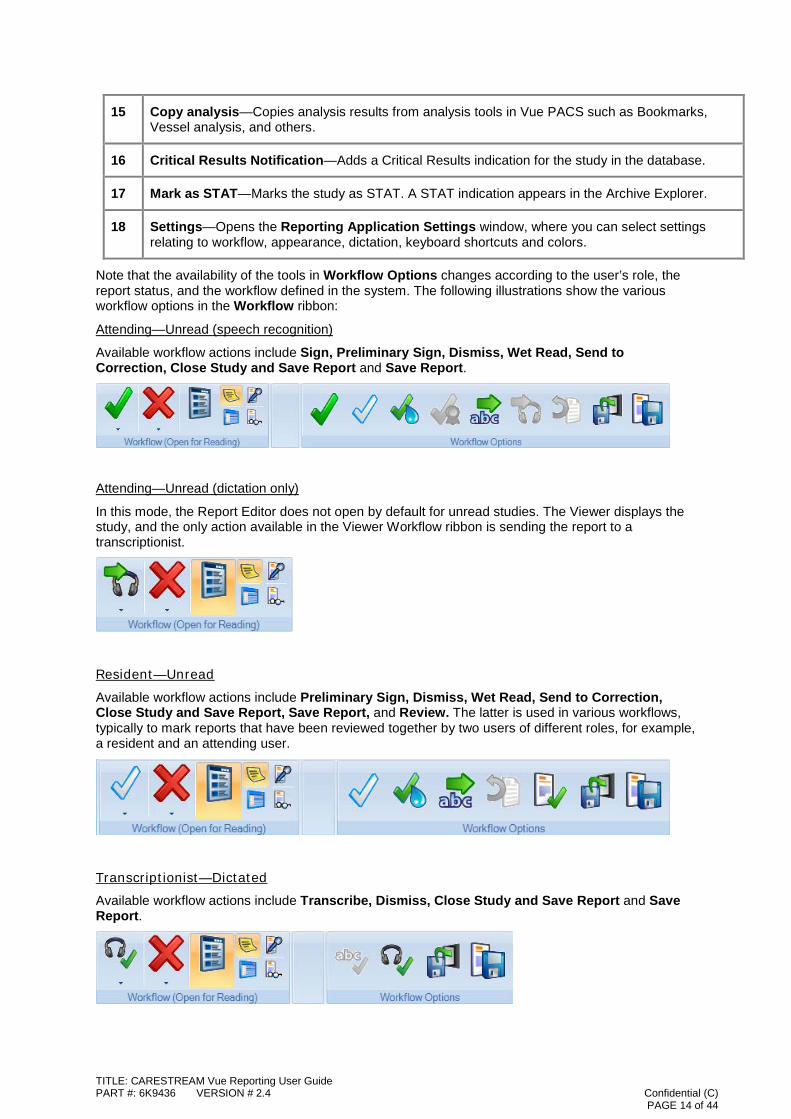
Attending—Unread (speech recognition)
Available workflow actions include Sign, Preliminary Sign, Dismiss, Wet Read, Send to Correction, Close Study and Save Report and Save Report.
Attending—Unread (dictation only)
In this mode, the Report Editor does not open by default for unread studies. The Viewer displays the study, and the only action available in the Viewer Workflow ribbon is sending the report to a transcriptionist.
Resident—Unread
Available workflow actions include Preliminary Sign, Dismiss, Wet Read, Send to Correction, Close Study and Save Report, Save Report, and Review. The latter is used in various workflows, typically to mark reports that have been reviewed together by two users of different roles, for example, a resident and an attending user.
Transcriptionist—Dictated
Available workflow actions include Transcribe, Dismiss, Close Study and Save Report and Save Report.
TITLE: CARESTREAM Vue Reporting User Guide PART #: 6K9436 VERSION # 2.4 Confidential (C) PAGE 14 of 44
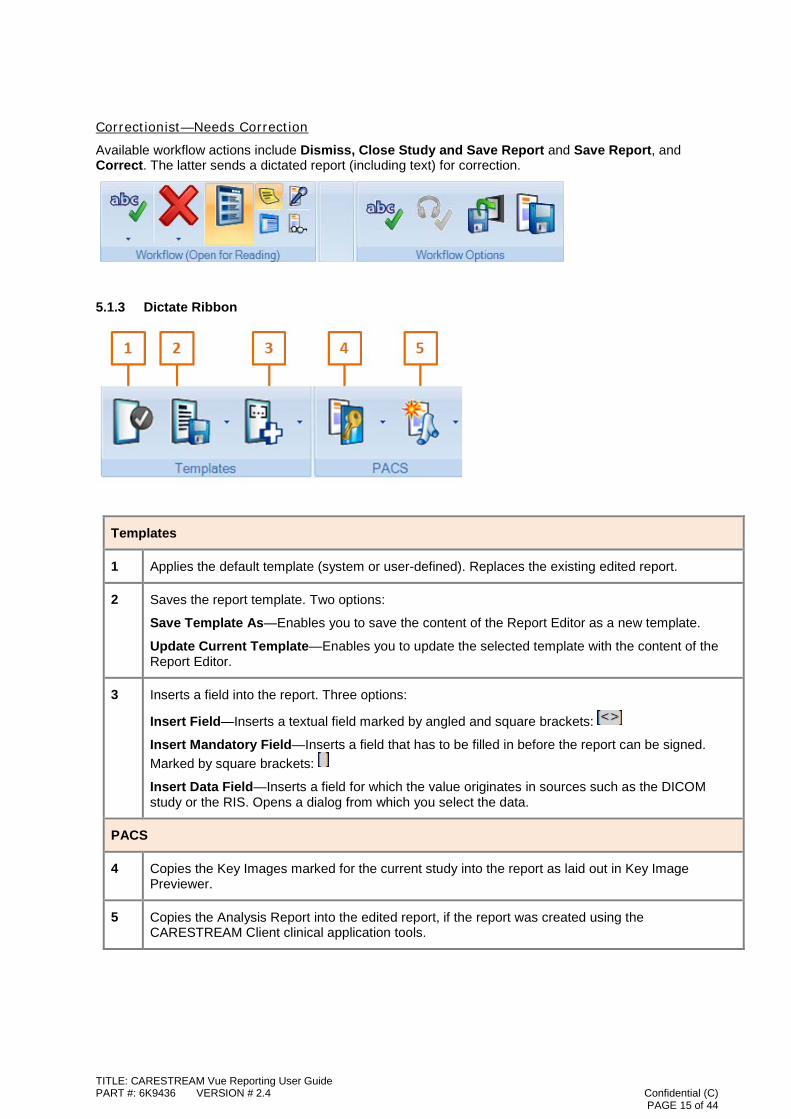
Correctionist—Needs Correction
Available workflow actions include Dismiss, Close Study and Save Report and Save Report, and Correct. The latter sends a dictated report (including text) for correction.
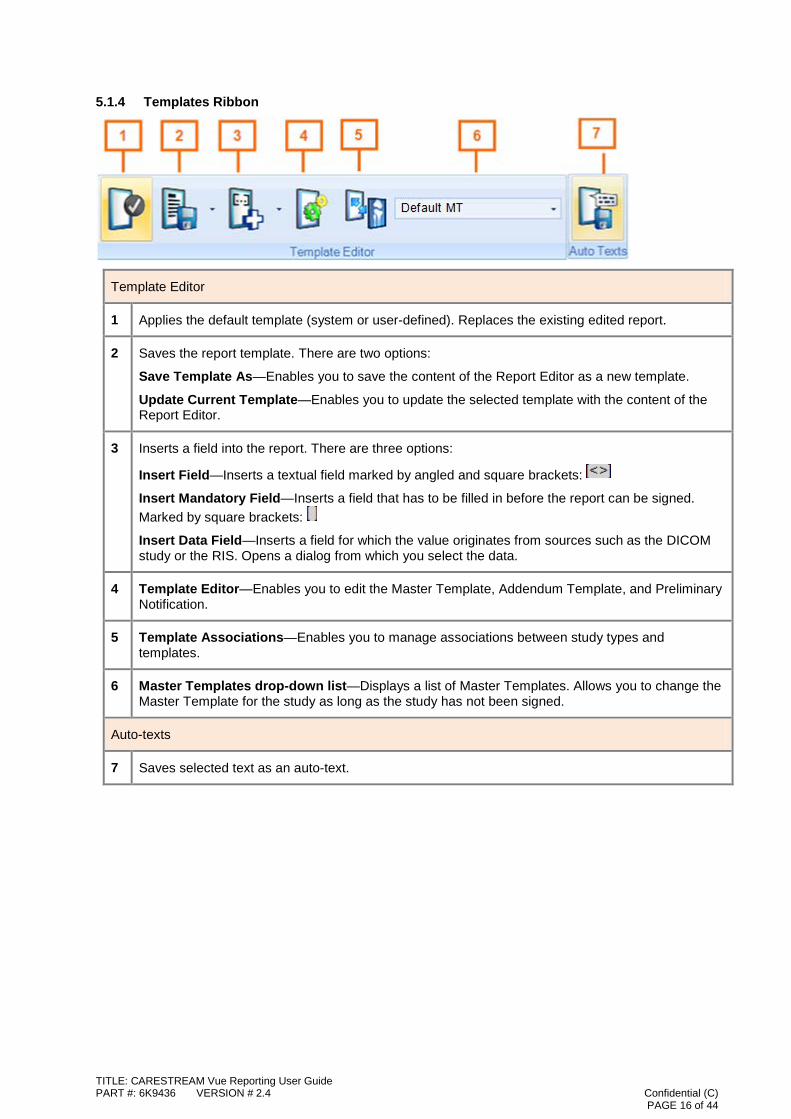
5.1.3 Dictate Ribbon
Templates
1 Applies the default template (system or user-defined). Replaces the existing edited report.
2 Saves the report template. Two options:
Save Template As—Enables you to save the content of the Report Editor as a new template.
Update Current Template—Enables you to update the selected template with the content of the Report Editor.
3 Inserts a field into the report. Three options:
Insert Field—Inserts a textual field marked by angled and square brackets:
Insert Mandatory Field—Inserts a field that has to be filled in before the report can be signed. Marked by square brackets:
Insert Data Field—Inserts a field for which the value originates in sources such as the DICOM study or the RIS. Opens a dialog from which you select the data.
PACS
4 Copies the Key Images marked for the current study into the report as laid out in Key Image Previewer.
5 Copies the Analysis Report into the edited report, if the report was created using the CARESTREAM Client clinical application tools.
TITLE: CARESTREAM Vue Reporting User Guide PART #: 6K9436 VERSION # 2.4 Confidential (C) PAGE 15 of 44
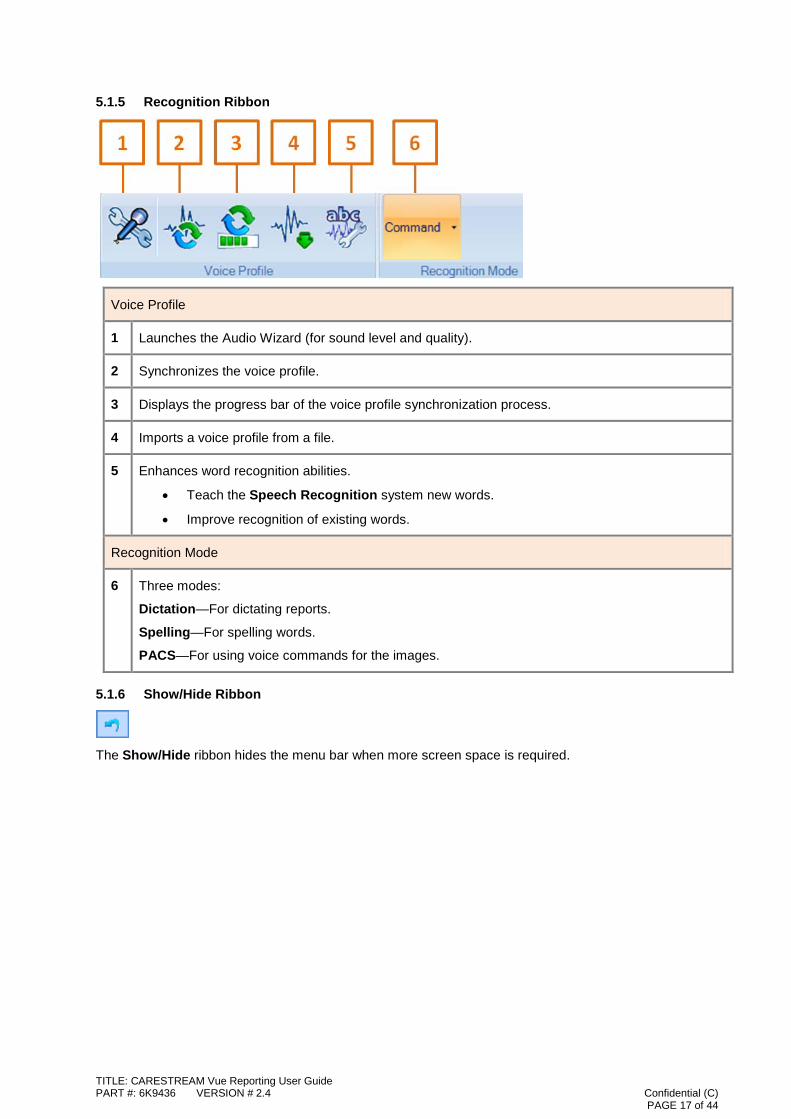
5.1.4 Templates Ribbon
Template Editor
1 Applies the default template (system or user-defined). Replaces the existing edited report.
2 Saves the report template. There are two options:
Save Template As—Enables you to save the content of the Report Editor as a new template.
Update Current Template—Enables you to update the selected template with the content of the Report Editor.
3 Inserts a field into the report. There are three options:
Insert Field—Inserts a textual field marked by angled and square brackets:
Insert Mandatory Field—Inserts a field that has to be filled in before the report can be signed. Marked by square brackets:
Insert Data Field—Inserts a field for which the value originates from sources such as the DICOM study or the RIS. Opens a dialog from which you select the data.
4 Template Editor—Enables you to edit the Master Template, Addendum Template, and Preliminary Notification.
5 Template Associations—Enables you to manage associations between study types and templates.
6 Master Templates drop-down list—Displays a list of Master Templates. Allows you to change the Master Template for the study as long as the study has not been signed.
Auto-texts
7 Saves selected text as an auto-text.
TITLE: CARESTREAM Vue Reporting User Guide PART #: 6K9436 VERSION # 2.4 Confidential (C) PAGE 16 of 44
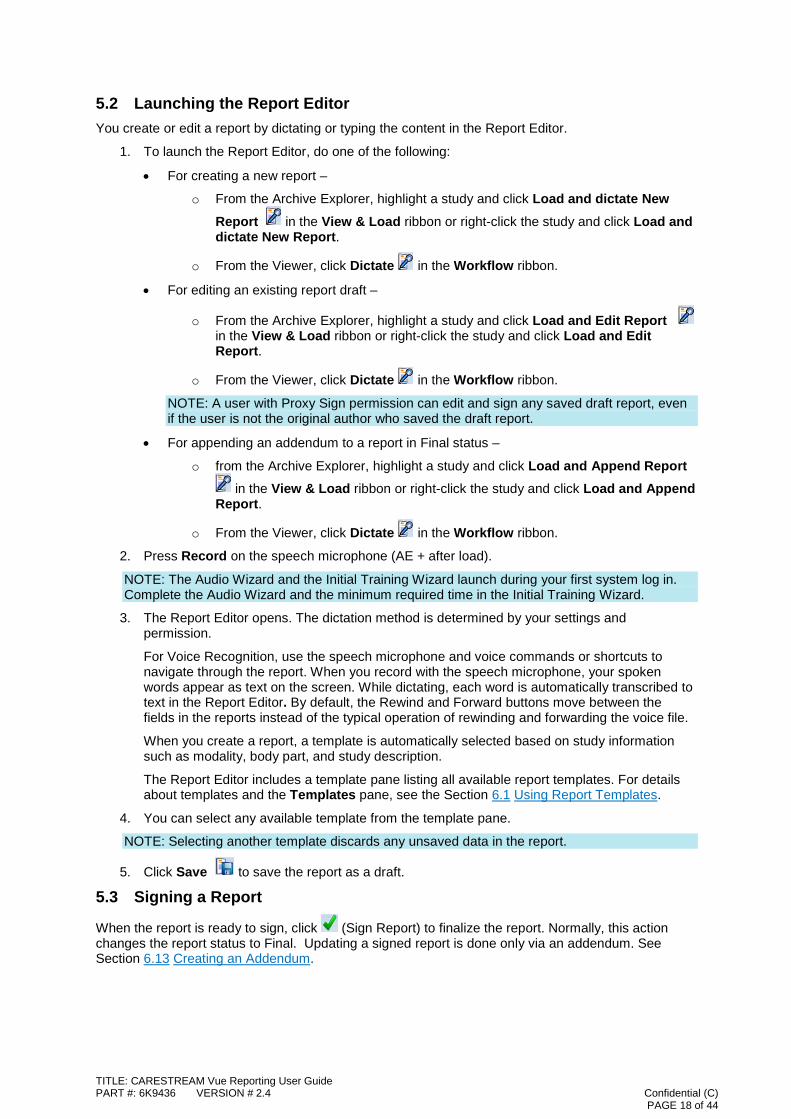
5.1.5 Recognition Ribbon
Voice Profile
1 Launches the Audio Wizard (for sound level and quality).
2 Synchronizes the voice profile.
3 Displays the progress bar of the voice profile synchronization process.
4 Imports a voice profile from a file.
5 Enhances word recognition abilities.
• Teach the Speech Recognition system new words.
• Improve recognition of existing words.
Recognition Mode
6 Three modes:
Dictation—For dictating reports.
Spelling—For spelling words.
PACS—For using voice commands for the images.
5.1.6 Show/Hide Ribbon
The Show/Hide ribbon hides the menu bar when more screen space is required.
TITLE: CARESTREAM Vue Reporting User Guide PART #: 6K9436 VERSION # 2.4 Confidential (C) PAGE 17 of 44
5.2 Launching the Report Editor You create or edit a report by dictating or typing the content in the Report Editor.
1. To launch the Report Editor, do one of the following:
• For creating a new report –
o From the Archive Explorer, highlight a study and click Load and dictate New Report in the View & Load ribbon or right-click the study and click Load and dictate New Report.
o From the Viewer, click Dictate in the Workflow ribbon.
• For editing an existing report draft –
o From the Archive Explorer, highlight a study and click Load and Edit Report in the View & Load ribbon or right-click the study and click Load and Edit Report.
o From the Viewer, click Dictate in the Workflow ribbon.
NOTE: A user with Proxy Sign permission can edit and sign any saved draft report, even if the user is not the original author who saved the draft report.
• For appending an addendum to a report in Final status –
o from the Archive Explorer, highlight a study and click Load and Append Report in the View & Load ribbon or right-click the study and click Load and Append
Report.
o From the Viewer, click Dictate in the Workflow ribbon.
2. Press Record on the speech microphone (AE + after load).
NOTE: The Audio Wizard and the Initial Training Wizard launch during your first system log in. Complete the Audio Wizard and the minimum required time in the Initial Training Wizard.
3. The Report Editor opens. The dictation method is determined by your settings and permission.
For Voice Recognition, use the speech microphone and voice commands or shortcuts to navigate through the report. When you record with the speech microphone, your spoken words appear as text on the screen. While dictating, each word is automatically transcribed to text in the Report Editor. By default, the Rewind and Forward buttons move between the fields in the reports instead of the typical operation of rewinding and forwarding the voice file.
When you create a report, a template is automatically selected based on study information such as modality, body part, and study description.
The Report Editor includes a template pane listing all available report templates. For details about templates and the Templates pane, see the Section 6.1 Using Report Templates.
4. You can select any available template from the template pane.
NOTE: Selecting another template discards any unsaved data in the report.
5. Click Save to save the report as a draft.
5.3 Signing a Report
When the report is ready to sign, click (Sign Report) to finalize the report. Normally, this action changes the report status to Final. Updating a signed report is done only via an addendum. See Section 6.13 Creating an Addendum.
TITLE: CARESTREAM Vue Reporting User Guide PART #: 6K9436 VERSION # 2.4 Confidential (C) PAGE 18 of 44
6 Working With Vue Reporting Vue Reporting offers you the following report-handling capabilities:
• Creating, changing, and associating a report template
• Using document editing tools
• Adding hyperlinks
• Using auto-text
• Using color coding
• Viewing a print preview
• Viewing prior reports
• Copying key images
• Copying analysis results from tools such as Vessel Analysis, Bookmarks, and others.
• Assigning the report to a user or group
• Batch-signing reports
• Creating an addendum when the report is already signed
• Creating a critical results notification
• Creating a report without study
• Creating a report for multiple studies
• Creating multiple reports for a single study
The following sections describe the activities you perform when handling reports.
6.1 Using Report Templates Report templates save you the work of re-dictating content. Report templates include content commonly used in your reports or any text you want to include in the report. Templates allow you to add sections and fields to structure and organize the report according to your preferences. Each report template might be relevant to a specific procedure or to a general subject. The system selects the template automatically based on the conditions defined for the template and the DICOM tags for the dictated study. See Section 6.1.1 The Templates Pane for details.
TITLE: CARESTREAM Vue Reporting User Guide PART #: 6K9436 VERSION # 2.4 Confidential (C) PAGE 19 of 44

6.1.1 The Templates Pane
By default, the templates and auto-texts listed in the Templates pane are displayed as a tree in which the templates are sorted by modality and body part. You can change the display to a flat alphabetical list.
1. Select Application Settings in one of the following ways:.
• Click the Carestream round icon at the top left corner of the Report Editor and then click Reporting Application Settings in the drop-down menu.
• Click Settings in the Reporting ribbon of the Viewer.
• Click Settings in the Workflow ribbon of the Report Editor.
2. Highlight Appearance and select the desired display form in the Additional Settings section.
The templates and auto-texts are displayed under three lists:
• Most Relevant—Displays the templates and auto-texts that are relevant to the reported study. The system selects the most relevant templates based on the study characteristics which you have defined, e.g., modality, body part, and study description.
NOTE: The Most Relevant indication is active only when Template Matching is activated or when the Template Association mechanism has matched a template to the current study.
• Favorites—All templates and auto-texts defined as favorites. You define a template or auto-text as a favorite in the properties dialog box.
• All—All the defined templates and auto-texts are grouped per modality and body part. You define the modality and body part when you save the template or auto-text.
An additional list, Community, allows you to select another user and view their templates. You can then copy a template from that user or insert it into the editor.
The scope selection (System, Group, and User) influences the template and auto-text shown in the different lists. For example, clearing the system check box removes system templates and auto-texts from the lists.
IMPORTANT: Inserting a new template replaces the existing text.
TITLE: CARESTREAM Vue Reporting User Guide PART #: 6K9436 VERSION # 2.4 Confidential (C) PAGE 20 of 44
Right-click any template or auto-text and select:
• Associate with Study to associate a template to a study type.
• Template Associations to see a list of the existing template associations of study types to this template.
• Insert to insert the selected template to the Report Editor.
• Rename to change the name.
• Properties to open a dialog that allows you to define the template’s properties, e.g., modality, body part, procedure, etc.
• Delete to remove.
• Edit to display the template with its fields as they appear before their replacements with values.
6.1.2 Template Matching
Template Matching allows automatic matching of templates to different studies according to predefined rules. The matching rules are based on a synonym table that must be defined in advance.
By default, the Template Matching mechanism is disabled. When it is activated, the Site ID and Description options become available in the Save Template Wizard. See Section 6.1.5.4 Using the Save Template Wizard.
NOTE: Enabling Template Matching requires implementation work. For further information contact your system administrator.
6.1.3 Template Association
The template association mechanism allows you to match template to study type so that the template is automatically launched when you create a report for that study. Right-click the template displayed in the Templates pane and select Associate with Study. To see a list of all existing associations, click Template Associations in the Templates ribbon (or right-click a template and select Template Associations…). You can then select associations and remove them.
NOTE: Template association takes precedence over Template Matching (when it is enabled).
TITLE: CARESTREAM Vue Reporting User Guide PART #: 6K9436 VERSION # 2.4 Confidential (C) PAGE 21 of 44
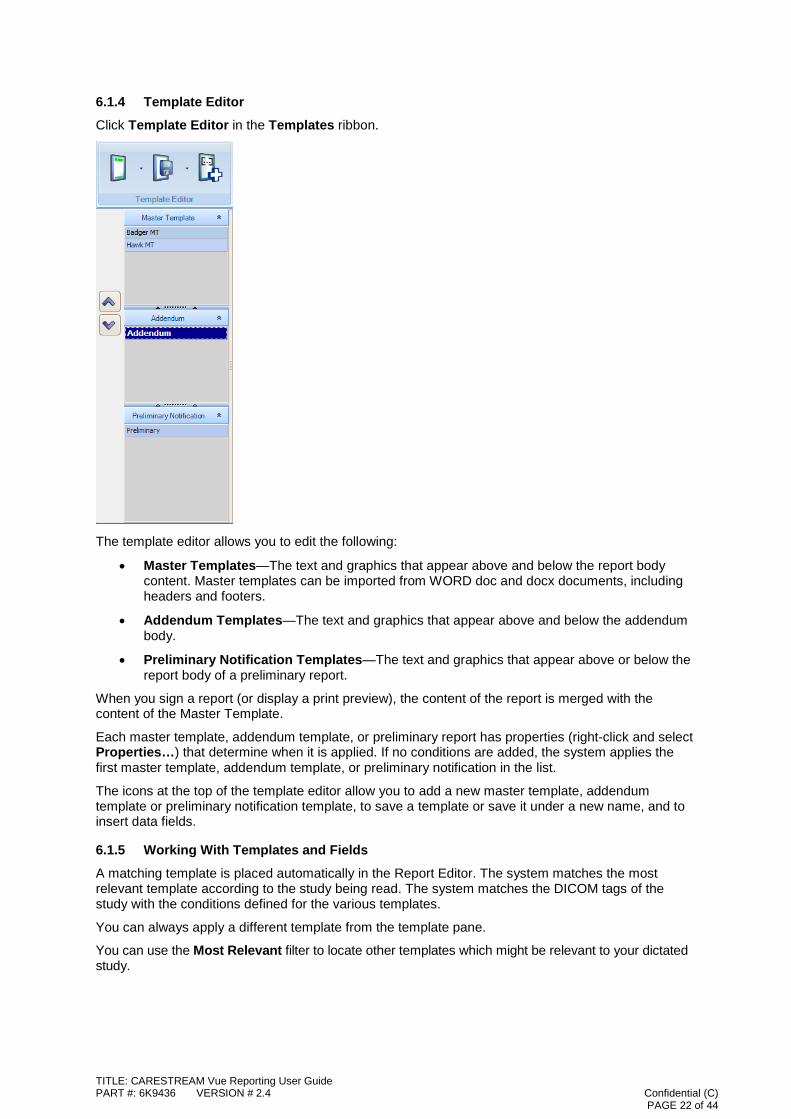
6.1.4 Template Editor
Click Template Editor in the Templates ribbon.
The template editor allows you to edit the following:
• Master Templates—The text and graphics that appear above and below the report body content. Master templates can be imported from WORD doc and docx documents, including headers and footers.
• Addendum Templates—The text and graphics that appear above and below the addendum body.
• Preliminary Notification Templates—The text and graphics that appear above or below the report body of a preliminary report.
When you sign a report (or display a print preview), the content of the report is merged with the content of the Master Template.
Each master template, addendum template, or preliminary report has properties (right-click and select Properties…) that determine when it is applied. If no conditions are added, the system applies the first master template, addendum template, or preliminary notification in the list.
The icons at the top of the template editor allow you to add a new master template, addendum template or preliminary notification template, to save a template or save it under a new name, and to insert data fields.
6.1.5 Working With Templates and Fields
A matching template is placed automatically in the Report Editor. The system matches the most relevant template according to the study being read. The system matches the DICOM tags of the study with the conditions defined for the various templates.
You can always apply a different template from the template pane.
You can use the Most Relevant filter to locate other templates which might be relevant to your dictated study.
TITLE: CARESTREAM Vue Reporting User Guide PART #: 6K9436 VERSION # 2.4 Confidential (C) PAGE 22 of 44
6.1.5.1 Applying a New Template
To apply a new template, do one of the following:
• Double-click a template in the Templates pane.
• Right-click a template and click Insert.
• Type the abbreviation of the template name (if an abbreviation has been defined. See Section 6.1.5.4 Using the Save Template Wizard).
• Voice command—Say “Macro” + <template name>.
6.1.5.2 Applying the default template
In the Templates ribbon, click Insert Default Template .
6.1.5.3 Editing an Existing Template
NOTE: You can edit the text content or the properties of an existing template.
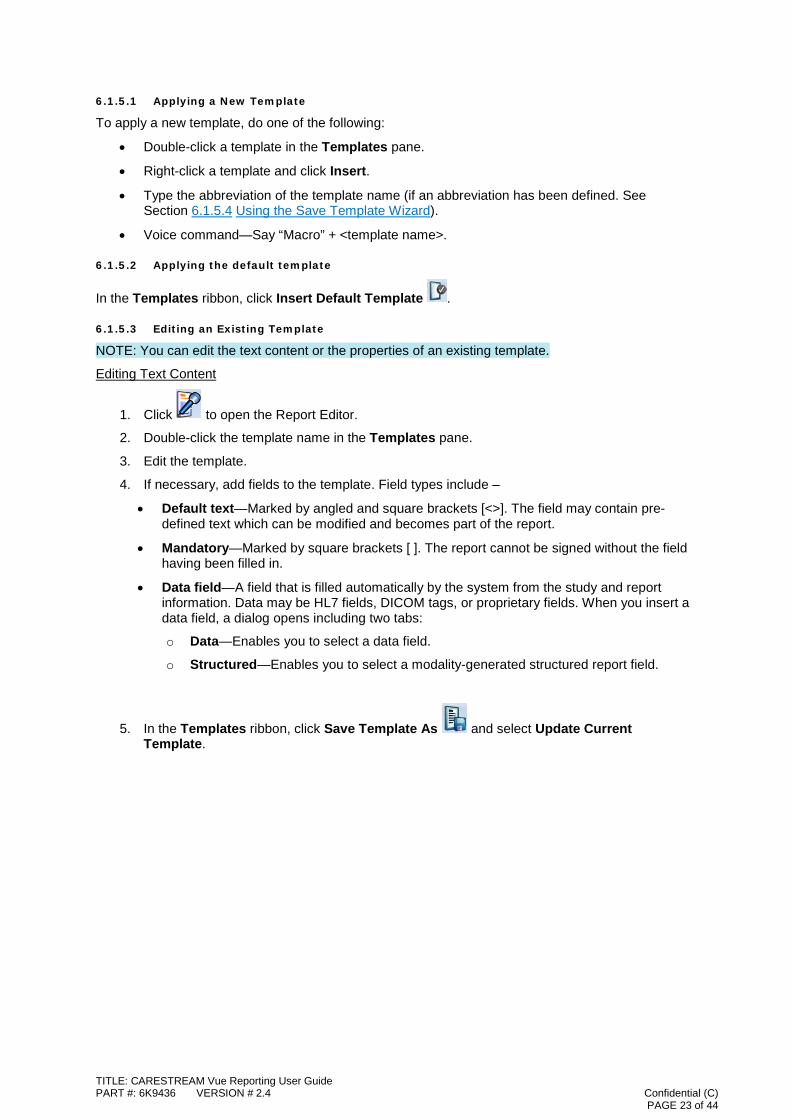
Editing Text Content
1. Click to open the Report Editor.
2. Double-click the template name in the Templates pane.
3. Edit the template.
4. If necessary, add fields to the template. Field types include –
• Default text—Marked by angled and square brackets [<>]. The field may contain pre-defined text which can be modified and becomes part of the report.
• Mandatory—Marked by square brackets [ ]. The report cannot be signed without the field having been filled in.
• Data field—A field that is filled automatically by the system from the study and report information. Data may be HL7 fields, DICOM tags, or proprietary fields. When you insert a data field, a dialog opens including two tabs:
o Data—Enables you to select a data field.
o Structured—Enables you to select a modality-generated structured report field.
5. In the Templates ribbon, click Save Template As and select Update Current Template.
TITLE: CARESTREAM Vue Reporting User Guide PART #: 6K9436 VERSION # 2.4 Confidential (C) PAGE 23 of 44
Editing Properties
1. Right-click the template name in the Templates pane.
2. Use the drop-down menu to insert, rename, edit, delete, or change the template properties. See Sections 6.1.1 The Templates Pane and Section 6.1.5.4 Using the Save Template Wizard.
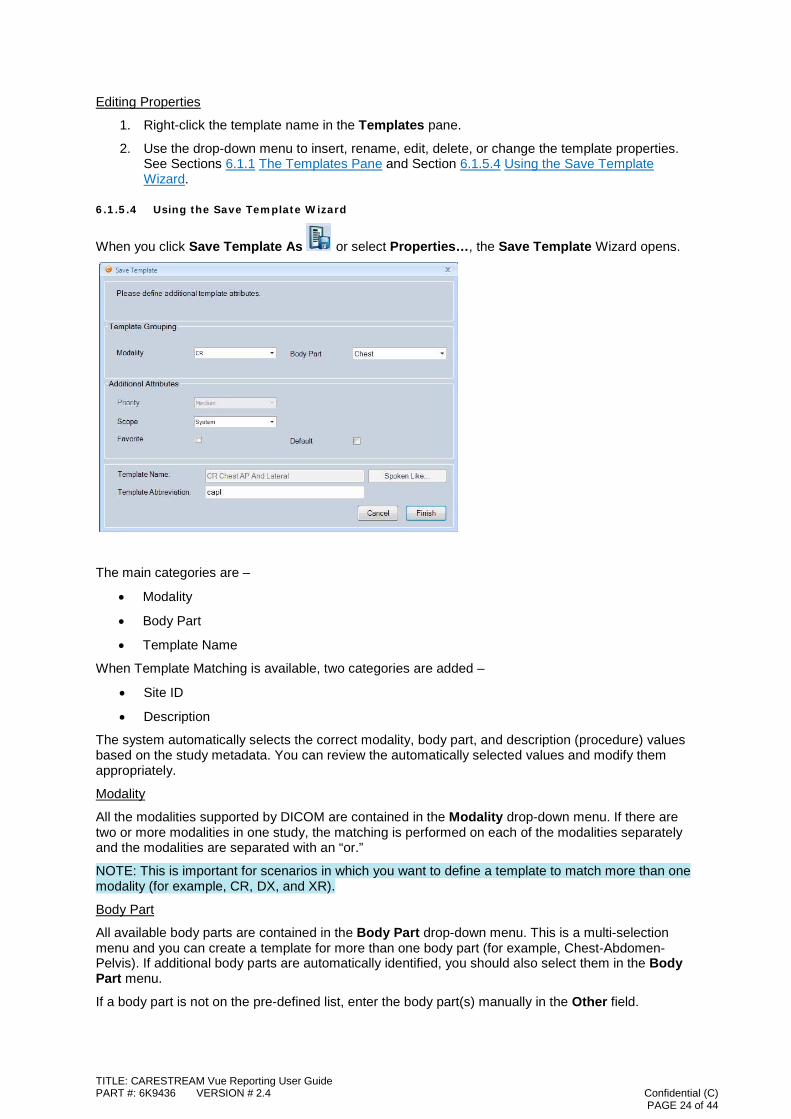
6.1.5.4 Using the Save Template Wizard
When you click Save Template As or select Properties…, the Save Template Wizard opens.
The main categories are –
• Modality
• Body Part
• Template Name
When Template Matching is available, two categories are added –
• Site ID
• Description
The system automatically selects the correct modality, body part, and description (procedure) values based on the study metadata. You can review the automatically selected values and modify them appropriately.
Modality
All the modalities supported by DICOM are contained in the Modality drop-down menu. If there are two or more modalities in one study, the matching is performed on each of the modalities separately and the modalities are separated with an “or.”
NOTE: This is important for scenarios in which you want to define a template to match more than one modality (for example, CR, DX, and XR).
Body Part
All available body parts are contained in the Body Part drop-down menu. This is a multi-selection menu and you can create a template for more than one body part (for example, Chest-Abdomen-Pelvis). If additional body parts are automatically identified, you should also select them in the Body Part menu.
If a body part is not on the pre-defined list, enter the body part(s) manually in the Other field.
TITLE: CARESTREAM Vue Reporting User Guide PART #: 6K9436 VERSION # 2.4 Confidential (C) PAGE 24 of 44
NOTE: Contact your system administrator to add new body parts and synonyms to the list using the Central Configuration.
Site ID – Only available when Template Matching is enabled
All available site IDs are contained in the Site ID drop-down menu. This is a multi-selection menu and you can create a template for more than one site ID.
Description – Only available when Template Matching is enabled
The Description section contains menus and fields that define the specific procedure of the study. They include:
Procedure Contains a list of relevant procedures based on the Modality and/or the Body Part selected.
You can mark a specific procedure relevant for the template you are editing. For example, if you select IVP for a template and then a study with “IVP” in the study description arrives, the IVP template is matched even if the body part is not matched.
If a procedure is not contained in the list, use the Other field to enter text for any other procedure, term, value, or property to the template matching conditions.
NOTE: Contact your system administrator to add new specific procedures to the list using the Central Configuration.
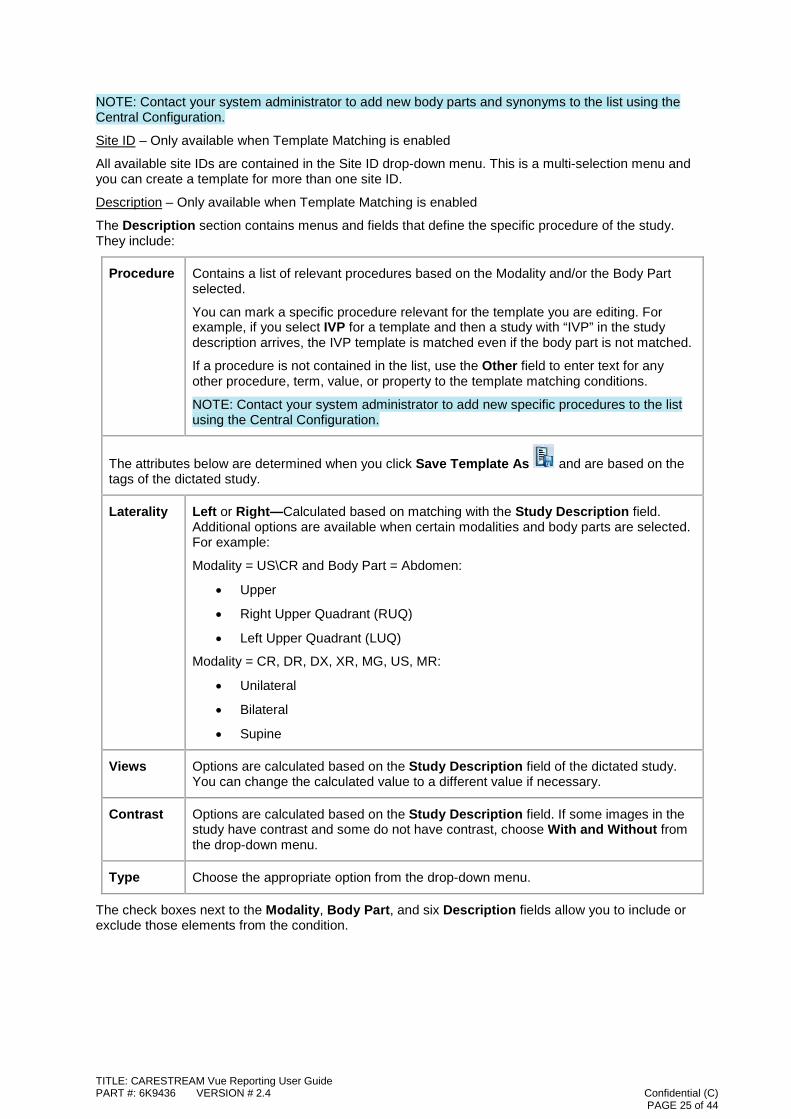
The attributes below are determined when you click Save Template As and are based on the tags of the dictated study.
Laterality Left or Right—Calculated based on matching with the Study Description field. Additional options are available when certain modalities and body parts are selected. For example:
Modality = US\CR and Body Part = Abdomen:
• Upper
• Right Upper Quadrant (RUQ)
• Left Upper Quadrant (LUQ)
Modality = CR, DR, DX, XR, MG, US, MR:
• Unilateral
• Bilateral
• Supine
Views Options are calculated based on the Study Description field of the dictated study. You can change the calculated value to a different value if necessary.
Contrast Options are calculated based on the Study Description field. If some images in the study have contrast and some do not have contrast, choose With and Without from the drop-down menu.
Type Choose the appropriate option from the drop-down menu.
The check boxes next to the Modality, Body Part, and six Description fields allow you to include or exclude those elements from the condition.
TITLE: CARESTREAM Vue Reporting User Guide PART #: 6K9436 VERSION # 2.4 Confidential (C) PAGE 25 of 44
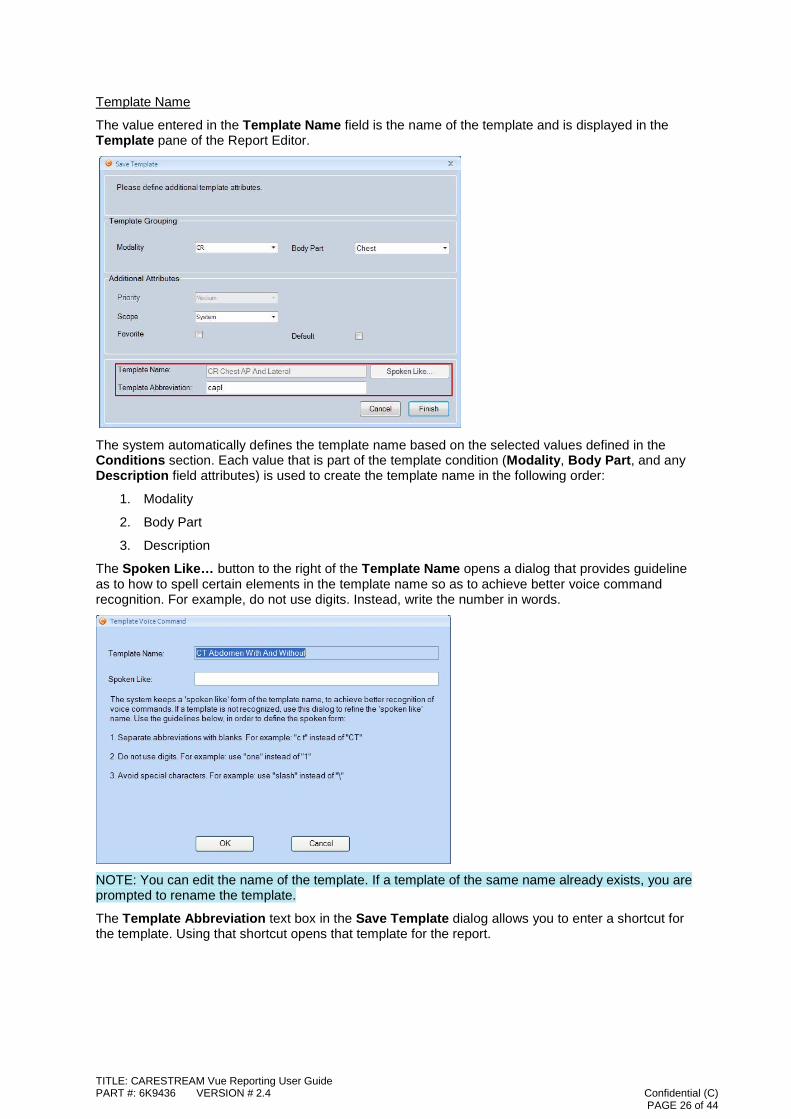
Template Name
The value entered in the Template Name field is the name of the template and is displayed in the Template pane of the Report Editor.
The system automatically defines the template name based on the selected values defined in the Conditions section. Each value that is part of the template condition (Modality, Body Part, and any Description field attributes) is used to create the template name in the following order:
1. Modality
2. Body Part
3. Description
The Spoken Like… button to the right of the Template Name opens a dialog that provides guideline as to how to spell certain elements in the template name so as to achieve better voice command recognition. For example, do not use digits. Instead, write the number in words.
NOTE: You can edit the name of the template. If a template of the same name already exists, you are prompted to rename the template.
The Template Abbreviation text box in the Save Template dialog allows you to enter a shortcut for the template. Using that shortcut opens that template for the report.
TITLE: CARESTREAM Vue Reporting User Guide PART #: 6K9436 VERSION # 2.4 Confidential (C) PAGE 26 of 44
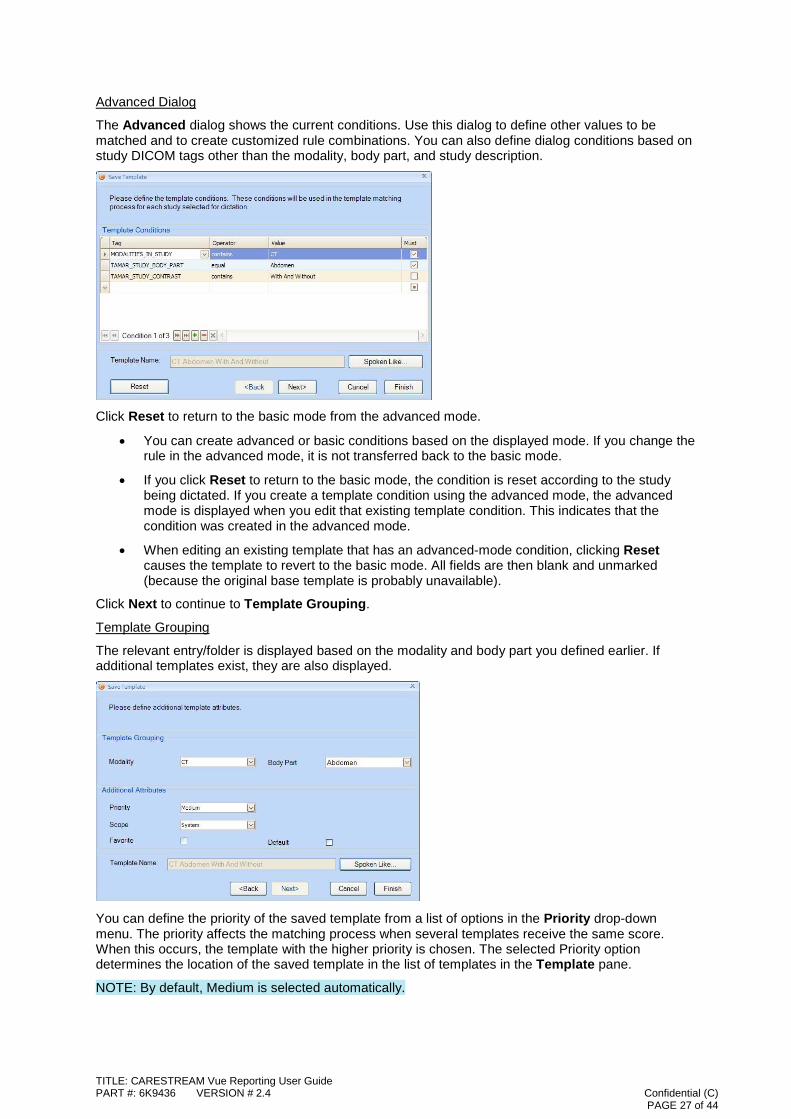
Advanced Dialog The Advanced dialog shows the current conditions. Use this dialog to define other values to be matched and to create customized rule combinations. You can also define dialog conditions based on study DICOM tags other than the modality, body part, and study description.
Click Reset to return to the basic mode from the advanced mode.
• You can create advanced or basic conditions based on the displayed mode. If you change the rule in the advanced mode, it is not transferred back to the basic mode.
• If you click Reset to return to the basic mode, the condition is reset according to the study being dictated. If you create a template condition using the advanced mode, the advanced mode is displayed when you edit that existing template condition. This indicates that the condition was created in the advanced mode.
• When editing an existing template that has an advanced-mode condition, clicking Reset causes the template to revert to the basic mode. All fields are then blank and unmarked (because the original base template is probably unavailable).
Click Next to continue to Template Grouping.
Template Grouping
The relevant entry/folder is displayed based on the modality and body part you defined earlier. If additional templates exist, they are also displayed.
You can define the priority of the saved template from a list of options in the Priority drop-down menu. The priority affects the matching process when several templates receive the same score. When this occurs, the template with the higher priority is chosen. The selected Priority option determines the location of the saved template in the list of templates in the Template pane.
NOTE: By default, Medium is selected automatically.
TITLE: CARESTREAM Vue Reporting User Guide PART #: 6K9436 VERSION # 2.4 Confidential (C) PAGE 27 of 44
The Scope field of the saved template allows you to define the saved template as a User, Group, or System template, depending on system permissions.
NOTE: By default, the User scope is selected automatically.
Select the Favorites checkbox to display the template in the Favorites section of the Templates pane. This allows you to find the template more easily. If two or more templates have the same matching grade, the system selects the favorite template.
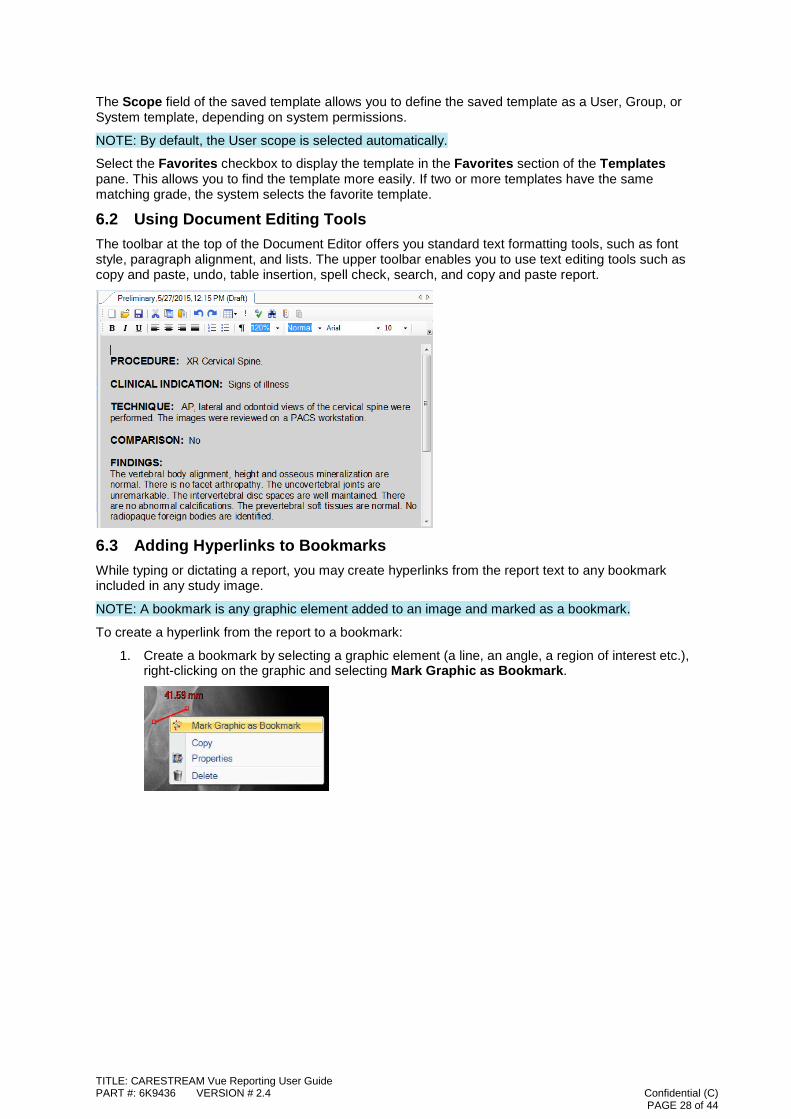
6.2 Using Document Editing Tools The toolbar at the top of the Document Editor offers you standard text formatting tools, such as font style, paragraph alignment, and lists. The upper toolbar enables you to use text editing tools such as copy and paste, undo, table insertion, spell check, search, and copy and paste report.
6.3 Adding Hyperlinks to Bookmarks While typing or dictating a report, you may create hyperlinks from the report text to any bookmark included in any study image.
NOTE: A bookmark is any graphic element added to an image and marked as a bookmark.
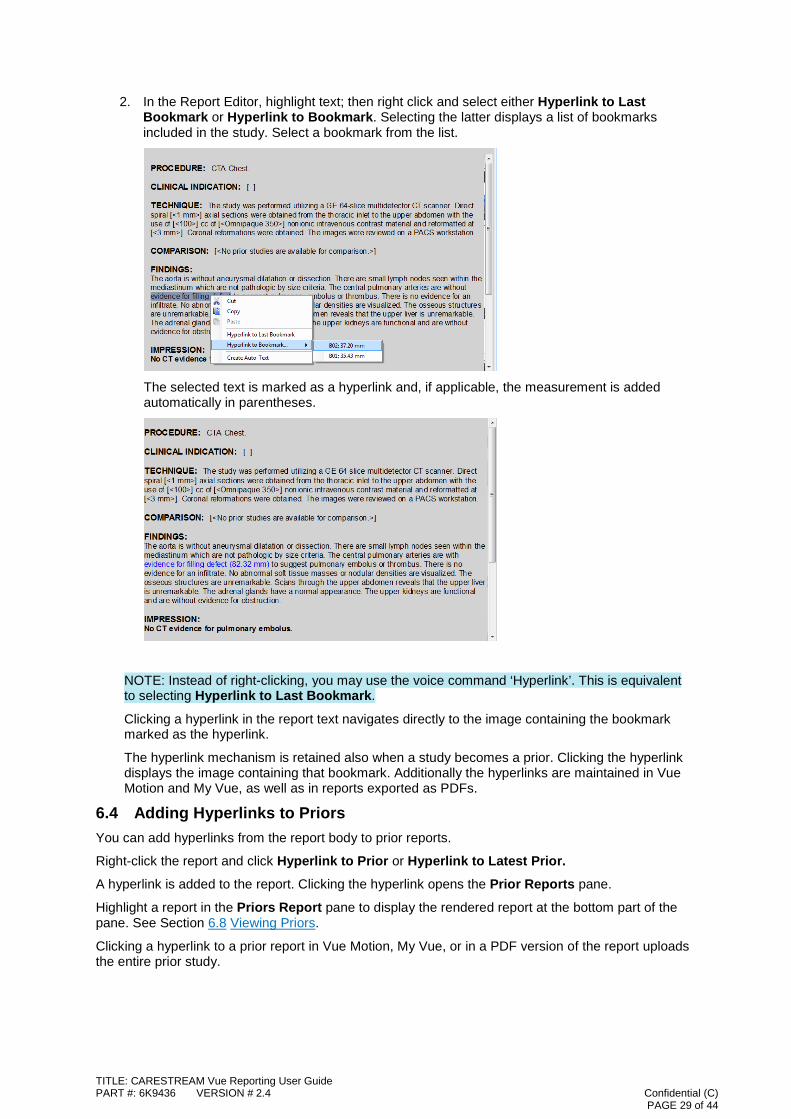
To create a hyperlink from the report to a bookmark:
1. Create a bookmark by selecting a graphic element (a line, an angle, a region of interest etc.), right-clicking on the graphic and selecting Mark Graphic as Bookmark.
TITLE: CARESTREAM Vue Reporting User Guide PART #: 6K9436 VERSION # 2.4 Confidential (C) PAGE 28 of 44
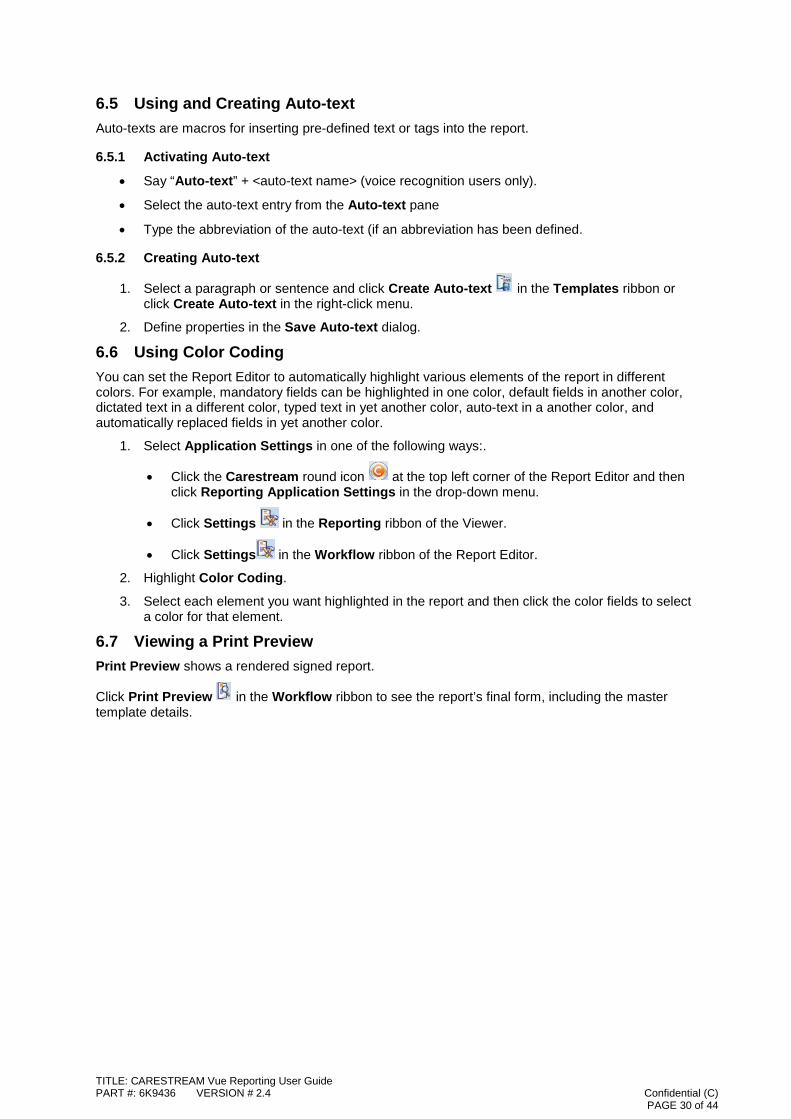
2. In the Report Editor, highlight text; then right click and select either Hyperlink to Last Bookmark or Hyperlink to Bookmark. Selecting the latter displays a list of bookmarks included in the study. Select a bookmark from the list.
The selected text is marked as a hyperlink and, if applicable, the measurement is added automatically in parentheses.
NOTE: Instead of right-clicking, you may use the voice command ‘Hyperlink’. This is equivalent to selecting Hyperlink to Last Bookmark.
Clicking a hyperlink in the report text navigates directly to the image containing the bookmark marked as the hyperlink.
The hyperlink mechanism is retained also when a study becomes a prior. Clicking the hyperlink displays the image containing that bookmark. Additionally the hyperlinks are maintained in Vue Motion and My Vue, as well as in reports exported as PDFs.
6.4 Adding Hyperlinks to Priors You can add hyperlinks from the report body to prior reports.
Right-click the report and click Hyperlink to Prior or Hyperlink to Latest Prior.
A hyperlink is added to the report. Clicking the hyperlink opens the Prior Reports pane.
Highlight a report in the Priors Report pane to display the rendered report at the bottom part of the pane. See Section 6.8 Viewing Priors.
Clicking a hyperlink to a prior report in Vue Motion, My Vue, or in a PDF version of the report uploads the entire prior study.
TITLE: CARESTREAM Vue Reporting User Guide PART #: 6K9436 VERSION # 2.4 Confidential (C) PAGE 29 of 44
6.5 Using and Creating Auto-text Auto-texts are macros for inserting pre-defined text or tags into the report.
6.5.1 Activating Auto-text
• Say “Auto-text” + <auto-text name> (voice recognition users only).
• Select the auto-text entry from the Auto-text pane
• Type the abbreviation of the auto-text (if an abbreviation has been defined.
6.5.2 Creating Auto-text
1. Select a paragraph or sentence and click Create Auto-text in the Templates ribbon or click Create Auto-text in the right-click menu.
2. Define properties in the Save Auto-text dialog.
6.6 Using Color Coding You can set the Report Editor to automatically highlight various elements of the report in different colors. For example, mandatory fields can be highlighted in one color, default fields in another color, dictated text in a different color, typed text in yet another color, auto-text in a another color, and automatically replaced fields in yet another color.
1. Select Application Settings in one of the following ways:.
• Click the Carestream round icon at the top left corner of the Report Editor and then click Reporting Application Settings in the drop-down menu.
• Click Settings in the Reporting ribbon of the Viewer.
• Click Settings in the Workflow ribbon of the Report Editor.
2. Highlight Color Coding.
3. Select each element you want highlighted in the report and then click the color fields to select a color for that element.
6.7 Viewing a Print Preview Print Preview shows a rendered signed report.
Click Print Preview in the Workflow ribbon to see the report’s final form, including the master template details.
TITLE: CARESTREAM Vue Reporting User Guide PART #: 6K9436 VERSION # 2.4 Confidential (C) PAGE 30 of 44
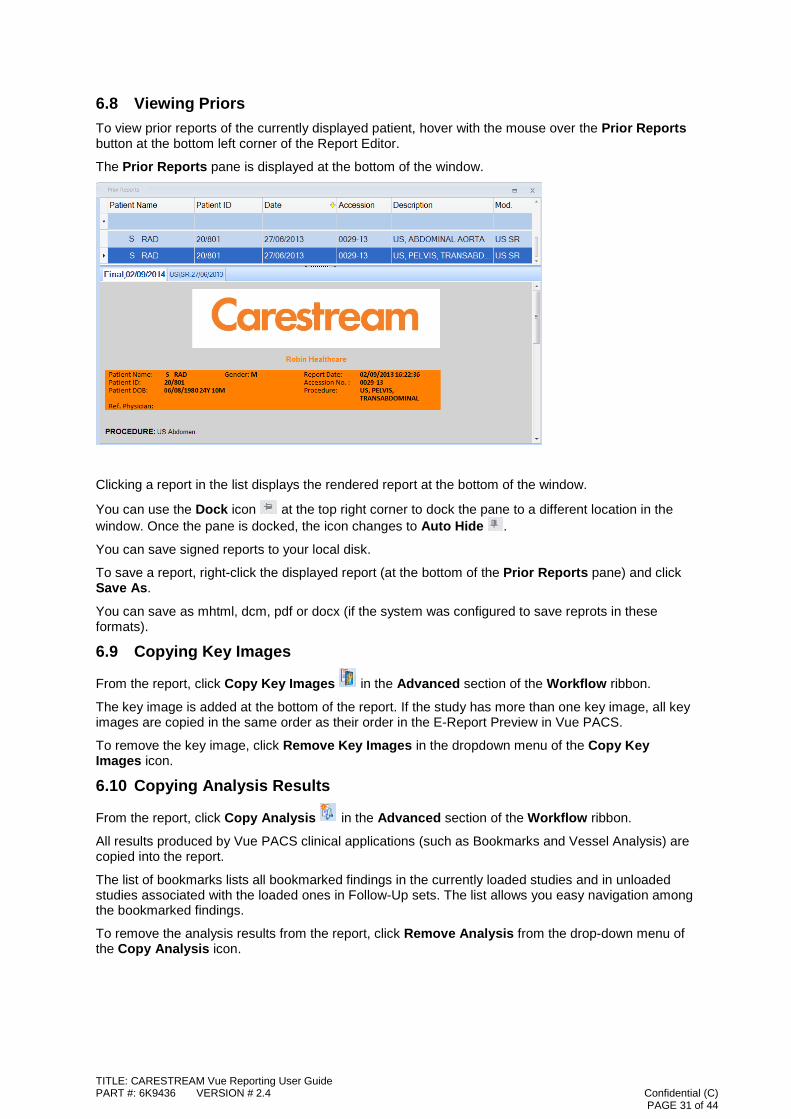
6.8 Viewing Priors To view prior reports of the currently displayed patient, hover with the mouse over the Prior Reports button at the bottom left corner of the Report Editor.
The Prior Reports pane is displayed at the bottom of the window.
Clicking a report in the list displays the rendered report at the bottom of the window.
You can use the Dock icon at the top right corner to dock the pane to a different location in the window. Once the pane is docked, the icon changes to Auto Hide .
You can save signed reports to your local disk.
To save a report, right-click the displayed report (at the bottom of the Prior Reports pane) and click Save As.
You can save as mhtml, dcm, pdf or docx (if the system was configured to save reprots in these formats).
6.9 Copying Key Images
From the report, click Copy Key Images in the Advanced section of the Workflow ribbon.
The key image is added at the bottom of the report. If the study has more than one key image, all key images are copied in the same order as their order in the E-Report Preview in Vue PACS.
To remove the key image, click Remove Key Images in the dropdown menu of the Copy Key Images icon.
6.10 Copying Analysis Results
From the report, click Copy Analysis in the Advanced section of the Workflow ribbon.
All results produced by Vue PACS clinical applications (such as Bookmarks and Vessel Analysis) are copied into the report.
The list of bookmarks lists all bookmarked findings in the currently loaded studies and in unloaded studies associated with the loaded ones in Follow-Up sets. The list allows you easy navigation among the bookmarked findings.
To remove the analysis results from the report, click Remove Analysis from the drop-down menu of the Copy Analysis icon.
TITLE: CARESTREAM Vue Reporting User Guide PART #: 6K9436 VERSION # 2.4 Confidential (C) PAGE 31 of 44
6.11 Assigning the Study From the report, click Assign To in the Advanced section of the Workflow ribbon.
The window that opens allows you to assign the report to a user or reading group.
6.12 Batch-signing Reports Bach-signing is a process by which a batch of signed reports undergoes a process of additional approval resulting in a change of status. Normally, batch-signing is applied to studies in status Final. When the studies have been signed, their status changes to Approved. (This flow is applied in sites with specific configuration). The signature may be an electronic signature, if the system is configured to include this type of signature.
NOTE: The ability to batch-sign reports requires appropriate permissions.
1. In the Archive Explorer, highlight the studies to be included in the batch-signing. Use the Ctrl key to multi-select.
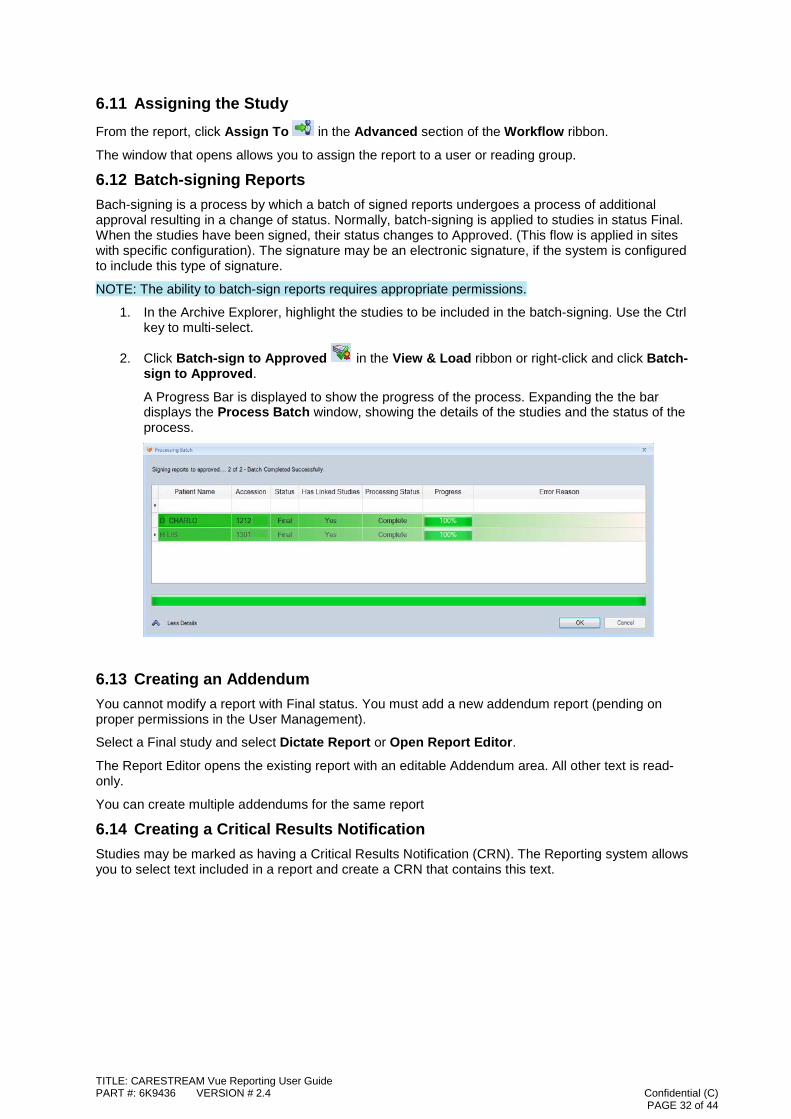
2. Click Batch-sign to Approved in the View & Load ribbon or right-click and click Batch-sign to Approved.
A Progress Bar is displayed to show the progress of the process. Expanding the the bar displays the Process Batch window, showing the details of the studies and the status of the process.
6.13 Creating an Addendum You cannot modify a report with Final status. You must add a new addendum report (pending on proper permissions in the User Management).
Select a Final study and select Dictate Report or Open Report Editor.
The Report Editor opens the existing report with an editable Addendum area. All other text is read-only.
You can create multiple addendums for the same report
6.14 Creating a Critical Results Notification Studies may be marked as having a Critical Results Notification (CRN). The Reporting system allows you to select text included in a report and create a CRN that contains this text.
TITLE: CARESTREAM Vue Reporting User Guide PART #: 6K9436 VERSION # 2.4 Confidential (C) PAGE 32 of 44
1. In the report, select the text that signifies a critical result and then click Set Critical Result in
the right-click menu or click CRN in the Workflow ribbon.
2. The Sticky Notes dialog opens, displaying the selected text in the Critical Results Notification tab.
3. Click Save at the top of the Sticky Notes dialog.
6.15 Creating a Report with No Study You can create a report for a study that does not exist in the Vue PACS system.
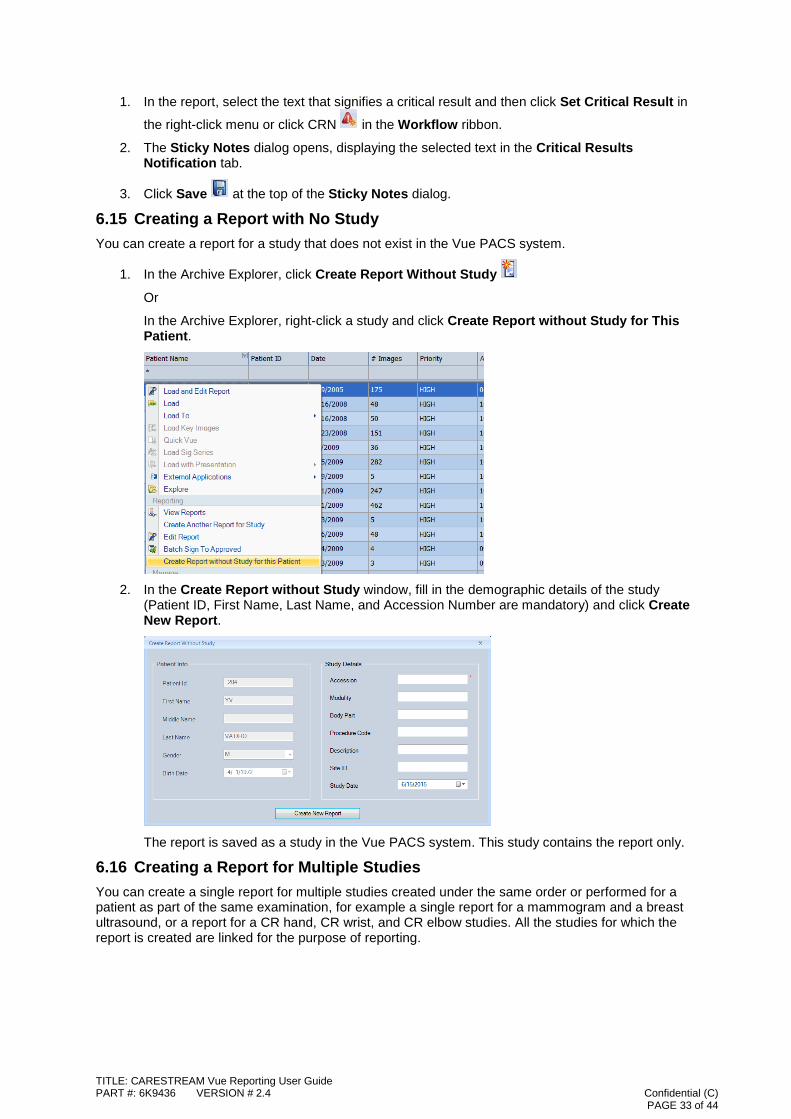
1. In the Archive Explorer, click Create Report Without Study
Or
In the Archive Explorer, right-click a study and click Create Report without Study for This Patient.
2. In the Create Report without Study window, fill in the demographic details of the study
(Patient ID, First Name, Last Name, and Accession Number are mandatory) and click Create New Report.
The report is saved as a study in the Vue PACS system. This study contains the report only.
6.16 Creating a Report for Multiple Studies You can create a single report for multiple studies created under the same order or performed for a patient as part of the same examination, for example a single report for a mammogram and a breast ultrasound, or a report for a CR hand, CR wrist, and CR elbow studies. All the studies for which the report is created are linked for the purpose of reporting.
TITLE: CARESTREAM Vue Reporting User Guide PART #: 6K9436 VERSION # 2.4 Confidential (C) PAGE 33 of 44
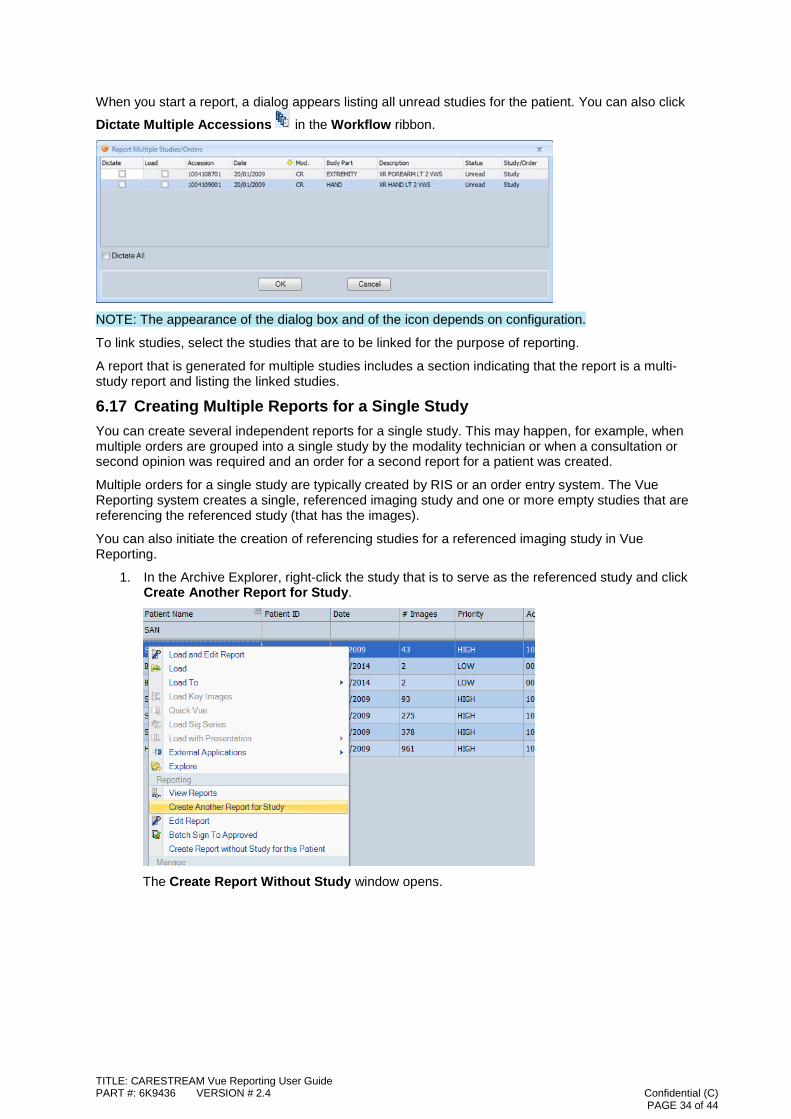
When you start a report, a dialog appears listing all unread studies for the patient. You can also click
Dictate Multiple Accessions in the Workflow ribbon.
NOTE: The appearance of the dialog box and of the icon depends on configuration.
To link studies, select the studies that are to be linked for the purpose of reporting.
A report that is generated for multiple studies includes a section indicating that the report is a multi-study report and listing the linked studies.
6.17 Creating Multiple Reports for a Single Study You can create several independent reports for a single study. This may happen, for example, when multiple orders are grouped into a single study by the modality technician or when a consultation or second opinion was required and an order for a second report for a patient was created.
Multiple orders for a single study are typically created by RIS or an order entry system. The Vue Reporting system creates a single, referenced imaging study and one or more empty studies that are referencing the referenced study (that has the images).
You can also initiate the creation of referencing studies for a referenced imaging study in Vue Reporting.
1. In the Archive Explorer, right-click the study that is to serve as the referenced study and click Create Another Report for Study.
The Create Report Without Study window opens.
TITLE: CARESTREAM Vue Reporting User Guide PART #: 6K9436 VERSION # 2.4 Confidential (C) PAGE 34 of 44
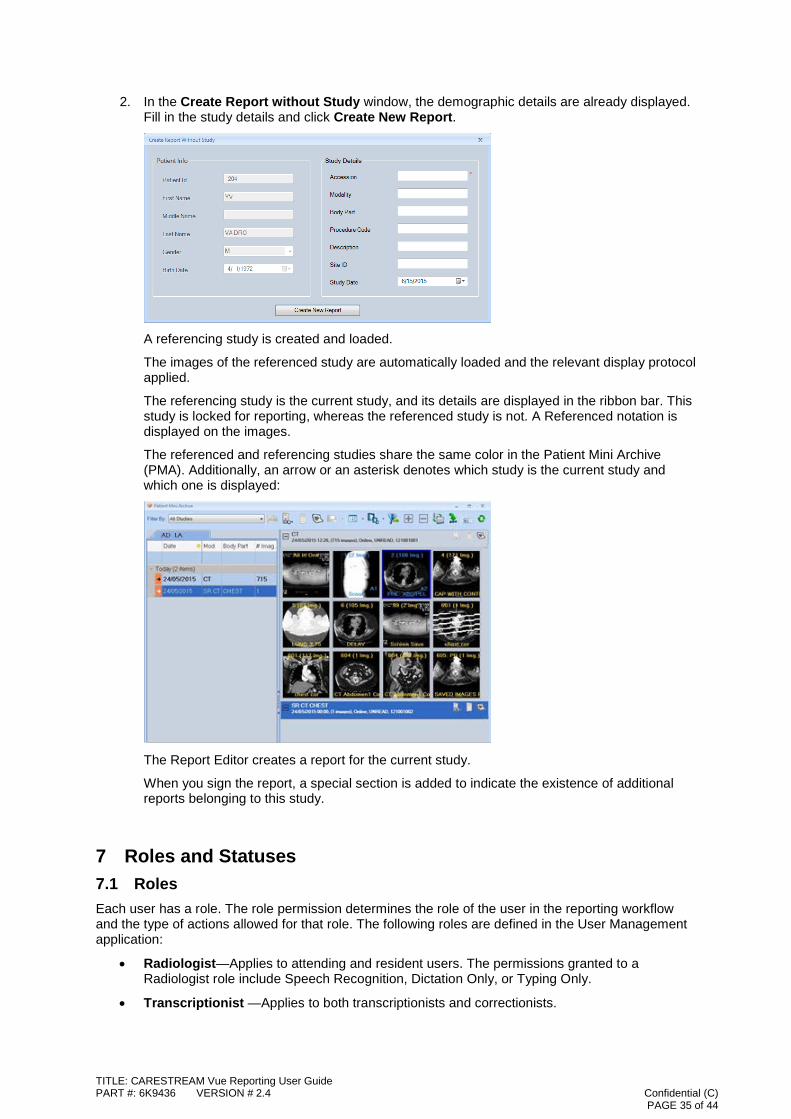
2. In the Create Report without Study window, the demographic details are already displayed. Fill in the study details and click Create New Report.
A referencing study is created and loaded.
The images of the referenced study are automatically loaded and the relevant display protocol applied.
The referencing study is the current study, and its details are displayed in the ribbon bar. This study is locked for reporting, whereas the referenced study is not. A Referenced notation is displayed on the images.
The referenced and referencing studies share the same color in the Patient Mini Archive (PMA). Additionally, an arrow or an asterisk denotes which study is the current study and which one is displayed:
The Report Editor creates a report for the current study.
When you sign the report, a special section is added to indicate the existence of additional reports belonging to this study.
7 Roles and Statuses 7.1 Roles Each user has a role. The role permission determines the role of the user in the reporting workflow and the type of actions allowed for that role. The following roles are defined in the User Management application:
• Radiologist—Applies to attending and resident users. The permissions granted to a Radiologist role include Speech Recognition, Dictation Only, or Typing Only.
• Transcriptionist —Applies to both transcriptionists and correctionists.
TITLE: CARESTREAM Vue Reporting User Guide PART #: 6K9436 VERSION # 2.4 Confidential (C) PAGE 35 of 44
A transcriptionist listens to reports dictated by radiologists (without any associated text) and transcribes it to written reports. The user works on a study in Dictated status. When the user completes the work, the study status changes to Transcribed.
A Correctionist listens to reports dictated by radiologists while viewing the text on screen and correcting mistakes in the text. The user works on a study in status Needs Correction. When the user completes the work, the study changes to status Corrected.
Transcription and correction can be done by a single person using a single account.
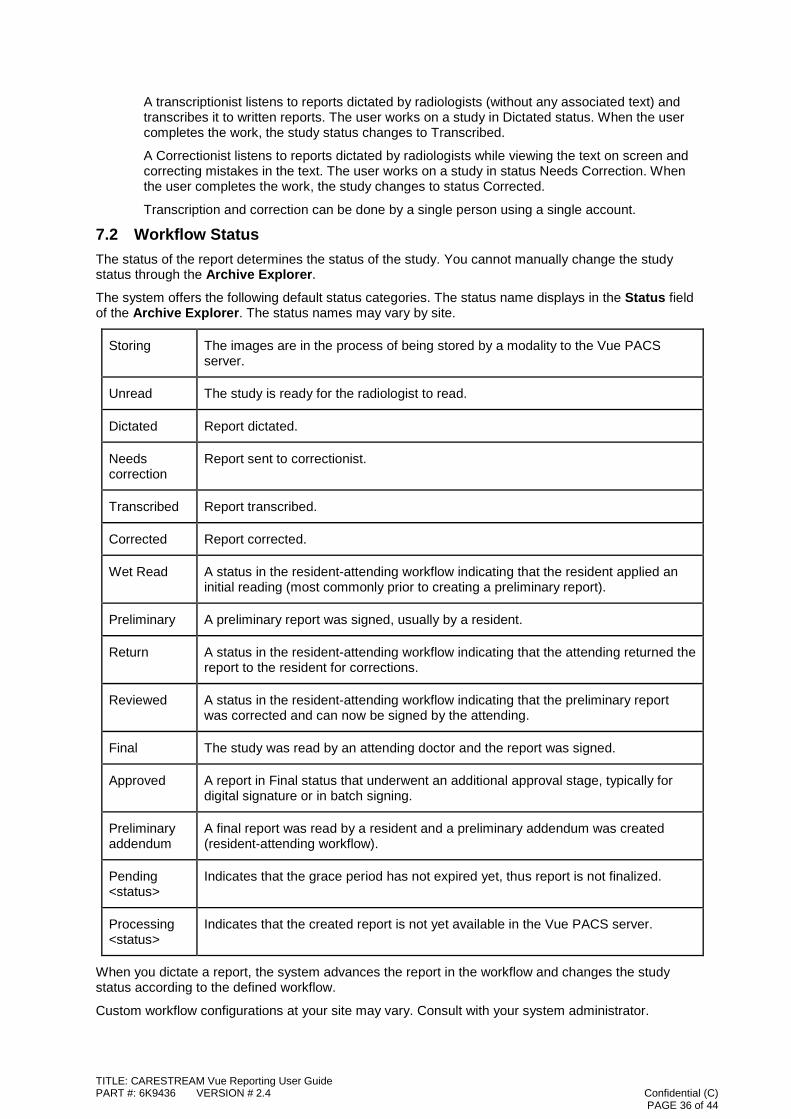
7.2 Workflow Status The status of the report determines the status of the study. You cannot manually change the study status through the Archive Explorer.
The system offers the following default status categories. The status name displays in the Status field of the Archive Explorer. The status names may vary by site.
Storing The images are in the process of being stored by a modality to the Vue PACS server.
Unread The study is ready for the radiologist to read.
Dictated Report dictated.
Needs correction
Report sent to correctionist.
Transcribed Report transcribed.
Corrected Report corrected.
Wet Read A status in the resident-attending workflow indicating that the resident applied an initial reading (most commonly prior to creating a preliminary report).
Preliminary A preliminary report was signed, usually by a resident.
Return A status in the resident-attending workflow indicating that the attending returned the report to the resident for corrections.
Reviewed A status in the resident-attending workflow indicating that the preliminary report was corrected and can now be signed by the attending.
Final The study was read by an attending doctor and the report was signed.
Approved A report in Final status that underwent an additional approval stage, typically for digital signature or in batch signing.
Preliminary addendum
A final report was read by a resident and a preliminary addendum was created (resident-attending workflow).
Pending <status>
Indicates that the grace period has not expired yet, thus report is not finalized.
Processing <status>
Indicates that the created report is not yet available in the Vue PACS server.
When you dictate a report, the system advances the report in the workflow and changes the study status according to the defined workflow.
Custom workflow configurations at your site may vary. Consult with your system administrator.
TITLE: CARESTREAM Vue Reporting User Guide PART #: 6K9436 VERSION # 2.4 Confidential (C) PAGE 36 of 44
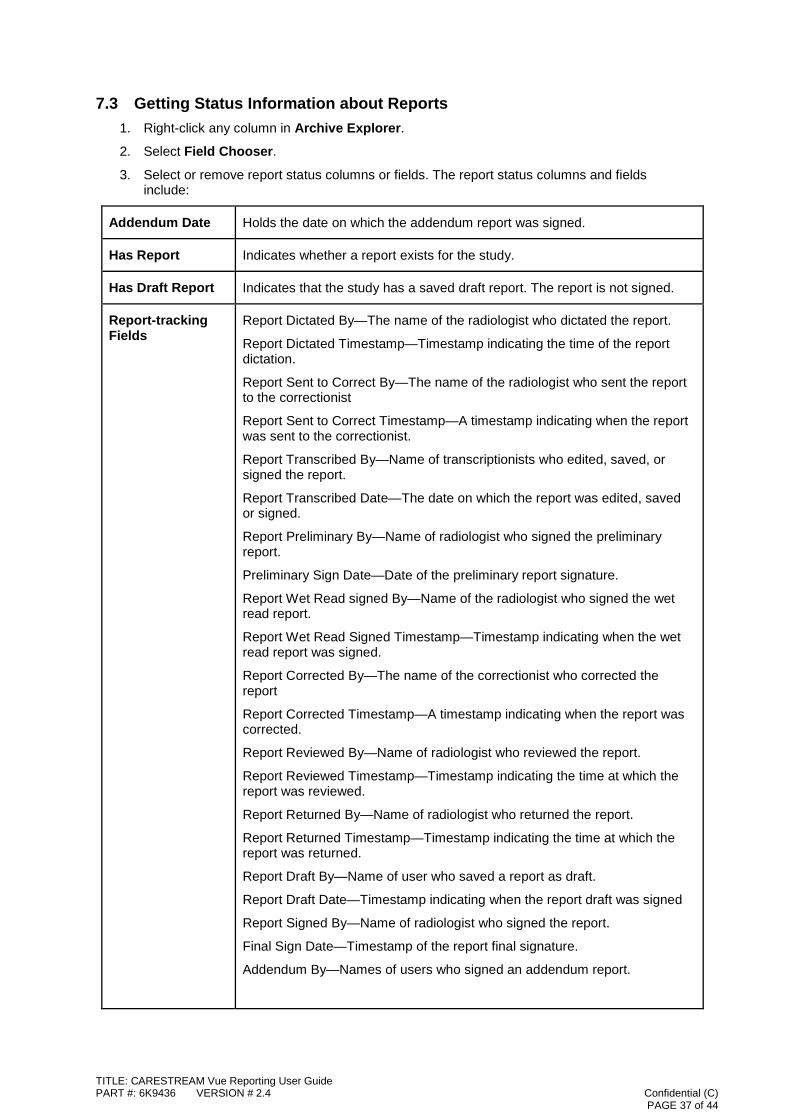
7.3 Getting Status Information about Reports 1. Right-click any column in Archive Explorer.
2. Select Field Chooser.
3. Select or remove report status columns or fields. The report status columns and fields include:
Addendum Date Holds the date on which the addendum report was signed.
Has Report Indicates whether a report exists for the study.
Has Draft Report Indicates that the study has a saved draft report. The report is not signed.
Report-tracking Fields
Report Dictated By—The name of the radiologist who dictated the report.
Report Dictated Timestamp—Timestamp indicating the time of the report dictation.
Report Sent to Correct By—The name of the radiologist who sent the report to the correctionist
Report Sent to Correct Timestamp—A timestamp indicating when the report was sent to the correctionist.
Report Transcribed By—Name of transcriptionists who edited, saved, or signed the report.
Report Transcribed Date—The date on which the report was edited, saved or signed.
Report Preliminary By—Name of radiologist who signed the preliminary report.
Preliminary Sign Date—Date of the preliminary report signature.
Report Wet Read signed By—Name of the radiologist who signed the wet read report.
Report Wet Read Signed Timestamp—Timestamp indicating when the wet read report was signed.
Report Corrected By—The name of the correctionist who corrected the report
Report Corrected Timestamp—A timestamp indicating when the report was corrected.
Report Reviewed By—Name of radiologist who reviewed the report.
Report Reviewed Timestamp—Timestamp indicating the time at which the report was reviewed.
Report Returned By—Name of radiologist who returned the report.
Report Returned Timestamp—Timestamp indicating the time at which the report was returned.
Report Draft By—Name of user who saved a report as draft.
Report Draft Date—Timestamp indicating when the report draft was signed
Report Signed By—Name of radiologist who signed the report.
Final Sign Date—Timestamp of the report final signature.
Addendum By—Names of users who signed an addendum report.
TITLE: CARESTREAM Vue Reporting User Guide PART #: 6K9436 VERSION # 2.4 Confidential (C) PAGE 37 of 44
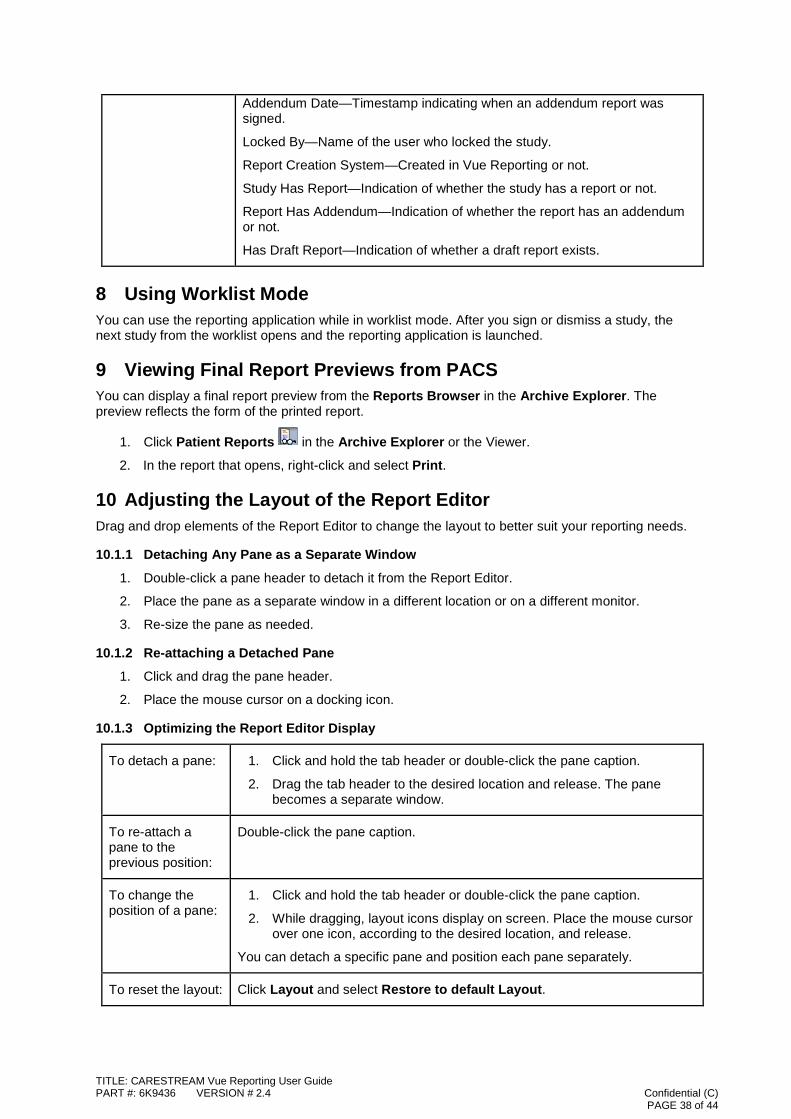
Addendum Date—Timestamp indicating when an addendum report was signed.
Locked By—Name of the user who locked the study.
Report Creation System—Created in Vue Reporting or not.
Study Has Report—Indication of whether the study has a report or not.
Report Has Addendum—Indication of whether the report has an addendum or not.
Has Draft Report—Indication of whether a draft report exists.
8 Using Worklist Mode You can use the reporting application while in worklist mode. After you sign or dismiss a study, the next study from the worklist opens and the reporting application is launched.
9 Viewing Final Report Previews from PACS You can display a final report preview from the Reports Browser in the Archive Explorer. The preview reflects the form of the printed report.
1. Click Patient Reports in the Archive Explorer or the Viewer.
2. In the report that opens, right-click and select Print.
10 Adjusting the Layout of the Report Editor Drag and drop elements of the Report Editor to change the layout to better suit your reporting needs.
10.1.1 Detaching Any Pane as a Separate Window
1. Double-click a pane header to detach it from the Report Editor.
2. Place the pane as a separate window in a different location or on a different monitor.
3. Re-size the pane as needed.
10.1.2 Re-attaching a Detached Pane
1. Click and drag the pane header.
2. Place the mouse cursor on a docking icon.
10.1.3 Optimizing the Report Editor Display
To detach a pane: 1. Click and hold the tab header or double-click the pane caption.
2. Drag the tab header to the desired location and release. The pane becomes a separate window.
To re-attach a pane to the previous position:
Double-click the pane caption.
To change the position of a pane:
1. Click and hold the tab header or double-click the pane caption.
2. While dragging, layout icons display on screen. Place the mouse cursor over one icon, according to the desired location, and release.
You can detach a specific pane and position each pane separately.
To reset the layout: Click Layout and select Restore to default Layout.
TITLE: CARESTREAM Vue Reporting User Guide PART #: 6K9436 VERSION # 2.4 Confidential (C) PAGE 38 of 44
11 Voice Commands 11.1 Default Voice Commands
11.1.1 Voice Commands for Dictation
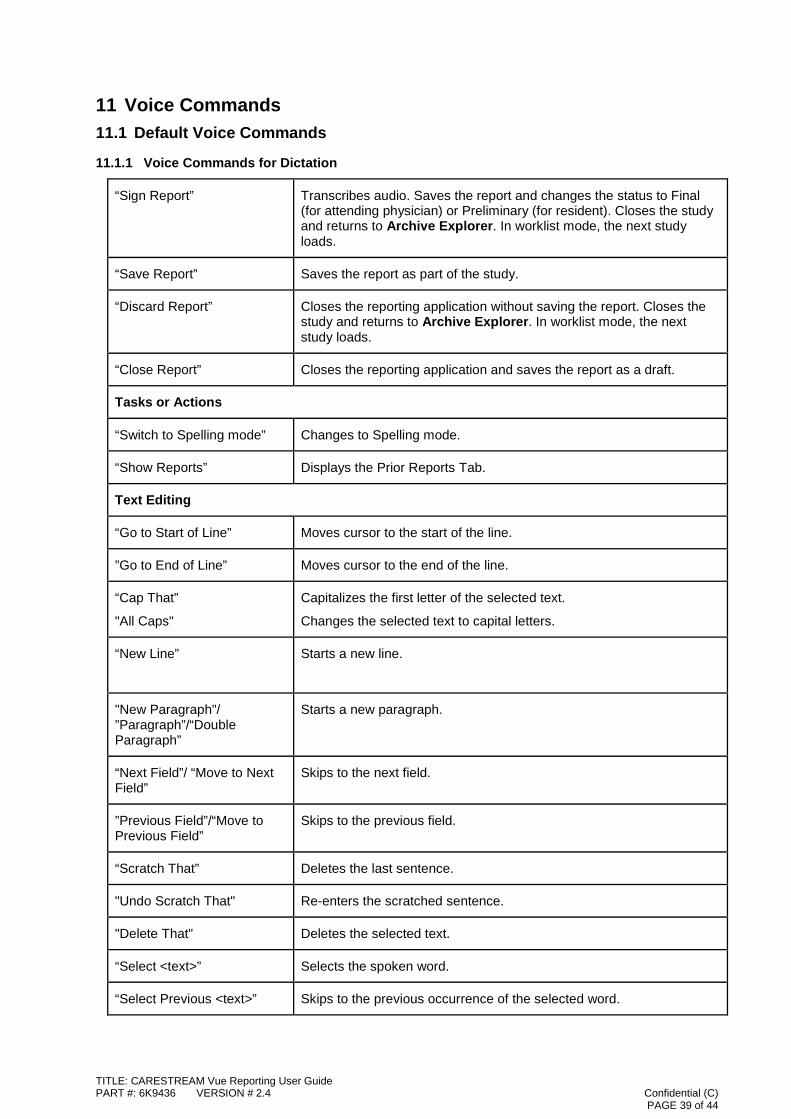
“Sign Report” Transcribes audio. Saves the report and changes the status to Final (for attending physician) or Preliminary (for resident). Closes the study and returns to Archive Explorer. In worklist mode, the next study loads.
“Save Report” Saves the report as part of the study.
“Discard Report” Closes the reporting application without saving the report. Closes the study and returns to Archive Explorer. In worklist mode, the next study loads.
“Close Report” Closes the reporting application and saves the report as a draft.
Tasks or Actions
“Switch to Spelling mode” Changes to Spelling mode.
“Show Reports” Displays the Prior Reports Tab.
Text Editing
“Go to Start of Line” Moves cursor to the start of the line.
”Go to End of Line” Moves cursor to the end of the line.
“Cap That”
"All Caps"
Capitalizes the first letter of the selected text.
Changes the selected text to capital letters.
“New Line” Starts a new line.
"New Paragraph"/ ”Paragraph”/“Double Paragraph”
Starts a new paragraph.
“Next Field”/ “Move to Next Field”
Skips to the next field.
”Previous Field”/“Move to Previous Field”
Skips to the previous field.
“Scratch That” Deletes the last sentence.
"Undo Scratch That" Re-enters the scratched sentence.
"Delete That" Deletes the selected text.
“Select <text>” Selects the spoken word.
“Select Previous <text>” Skips to the previous occurrence of the selected word.
TITLE: CARESTREAM Vue Reporting User Guide PART #: 6K9436 VERSION # 2.4 Confidential (C) PAGE 39 of 44
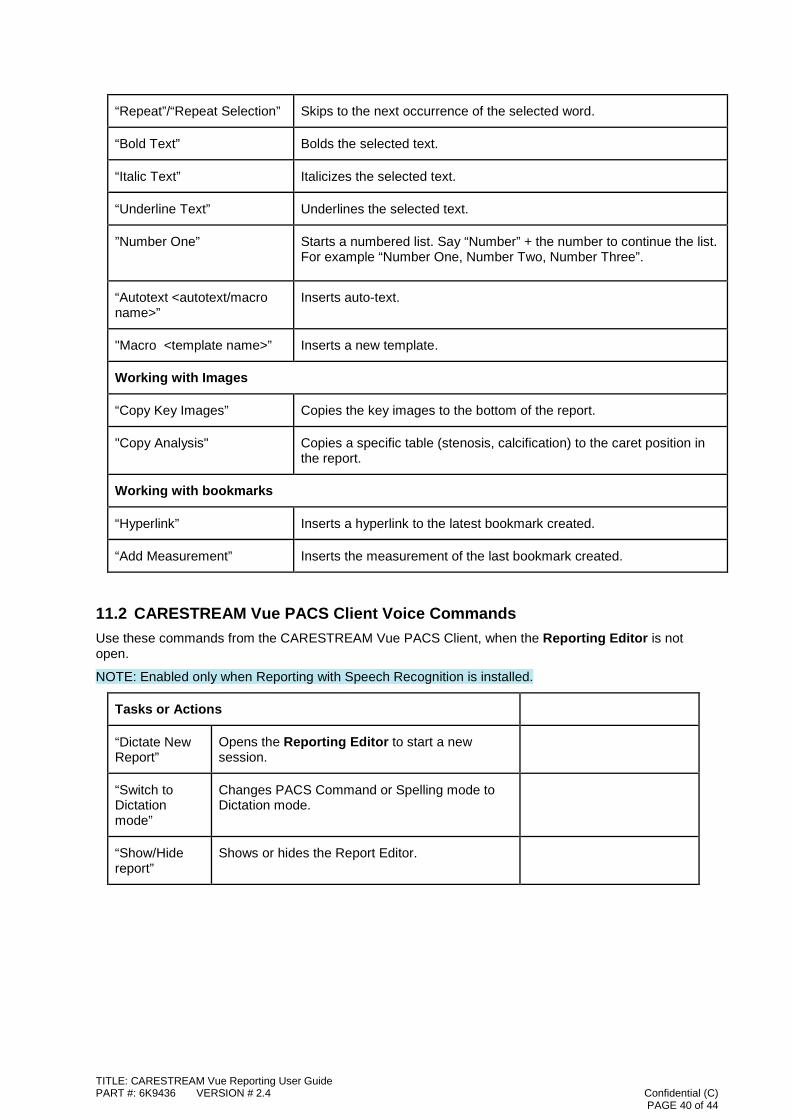
“Repeat”/“Repeat Selection” Skips to the next occurrence of the selected word.
“Bold Text” Bolds the selected text.
“Italic Text” Italicizes the selected text.
“Underline Text” Underlines the selected text.
”Number One”
Starts a numbered list. Say “Number” + the number to continue the list. For example “Number One, Number Two, Number Three”.
“Autotext <autotext/macro name>”
Inserts auto-text.
"Macro <template name>” Inserts a new template.
Working with Images
“Copy Key Images” Copies the key images to the bottom of the report.
"Copy Analysis" Copies a specific table (stenosis, calcification) to the caret position in the report.
Working with bookmarks
“Hyperlink” Inserts a hyperlink to the latest bookmark created.
“Add Measurement” Inserts the measurement of the last bookmark created.
11.2 CARESTREAM Vue PACS Client Voice Commands Use these commands from the CARESTREAM Vue PACS Client, when the Reporting Editor is not open.
NOTE: Enabled only when Reporting with Speech Recognition is installed.
Tasks or Actions
“Dictate New Report”
Opens the Reporting Editor to start a new session.
“Switch to Dictation mode”
Changes PACS Command or Spelling mode to Dictation mode.
“Show/Hide report”
Shows or hides the Report Editor.
TITLE: CARESTREAM Vue Reporting User Guide PART #: 6K9436 VERSION # 2.4 Confidential (C) PAGE 40 of 44
12 Using Vue Reporting in an Integrated Vue RIS-PACS System 12.1 Creating a Report When you use Vue Reporting in an integrated RIS-PACS environment, the workflow you follow is RIS-driven. You access the Vue PACS Report Editor via Vue RIS and then work in Vue PACS to create or edit the report. Finally, the report is sent back to the RIS for status synchronization and further distribution.
NOTE: Supported systems are Vue PACS 12.0 and Vue RIS 11.0.14.30.
12.1.1 Creating a Report
To create a report:
1. Log in to Vue PACS. Vue RIS launches automatically.
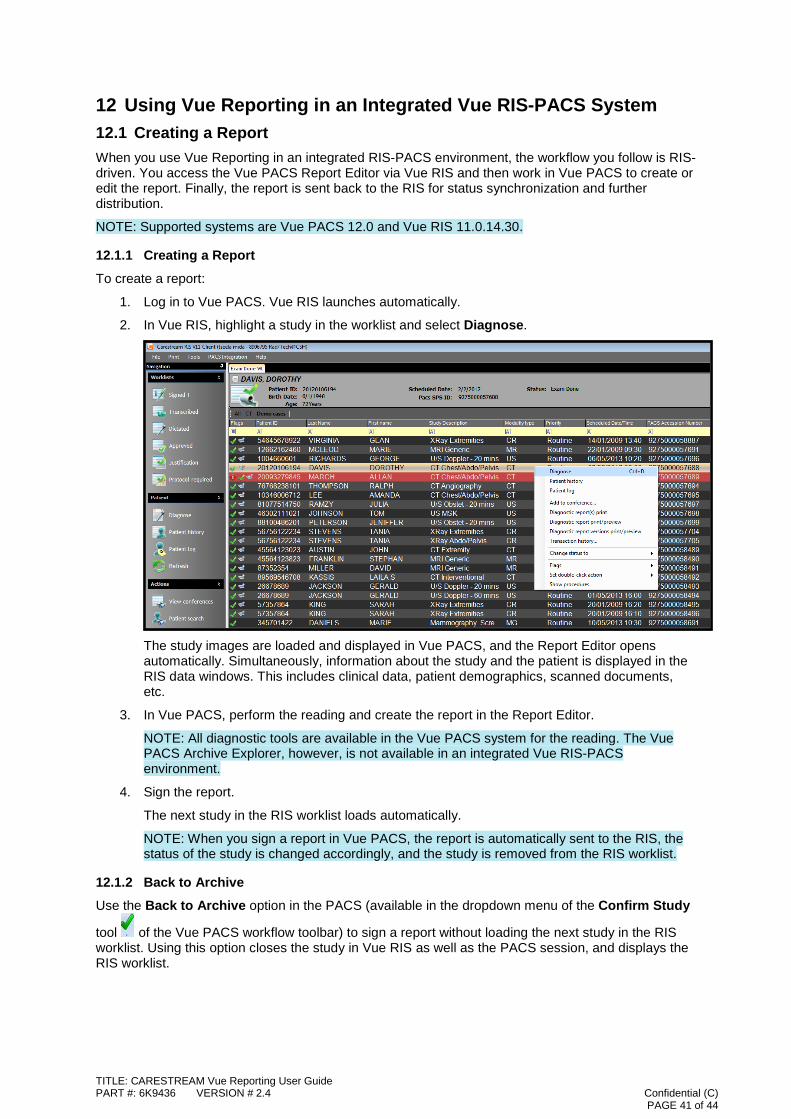
2. In Vue RIS, highlight a study in the worklist and select Diagnose.
The study images are loaded and displayed in Vue PACS, and the Report Editor opens automatically. Simultaneously, information about the study and the patient is displayed in the RIS data windows. This includes clinical data, patient demographics, scanned documents, etc.
3. In Vue PACS, perform the reading and create the report in the Report Editor.
NOTE: All diagnostic tools are available in the Vue PACS system for the reading. The Vue PACS Archive Explorer, however, is not available in an integrated Vue RIS-PACS environment.
4. Sign the report.
The next study in the RIS worklist loads automatically.
NOTE: When you sign a report in Vue PACS, the report is automatically sent to the RIS, the status of the study is changed accordingly, and the study is removed from the RIS worklist.
12.1.2 Back to Archive
Use the Back to Archive option in the PACS (available in the dropdown menu of the Confirm Study
tool of the Vue PACS workflow toolbar) to sign a report without loading the next study in the RIS worklist. Using this option closes the study in Vue RIS as well as the PACS session, and displays the RIS worklist.
TITLE: CARESTREAM Vue Reporting User Guide PART #: 6K9436 VERSION # 2.4 Confidential (C) PAGE 41 of 44
12.1.3 Diagnose Fast Sign
Use the Diagnose Fast Sign option in Vue RIS to open the Report Editor in Vue PACS without loading the study images. Similar to a regular signing operation, after a fast sign the next study in the Vue RIS worklist opens automatically.
12.1.4 Linked Studies
In integrated environments, linking studies that are to share the same report is initiated via the Vue RIS.
1. Click Diagnose.
2. From the Patient History pane in the Vue RIS, right-click the study to link to the current study for which you are presently writing the report, and select Link Study.
The linked studies are marked as linked in the Vue PACS and in the Vue RIS.
NOTE: Linking may be performed prior to Diagnose (either automatically based on configuration, or manually by a Technician).
NOTE: Only studies that have not yet been signed or dictated can be linked.
You can also unlink studies that have been linked.
• In the Vue RIS Patient History pane, right-click the linked study and select Unlink.
This action cancels the linking, so that each study can be reported independently.
12.1.5 Conference Mode
Conferences are worklists prepared in Vue RIS for specific purposes such as weekly meetings, etc. As with any other study, you may create a report for a study defined as part of a conference. When preparing the studies for the conference in the Vue PACS, the Radiologist may save a presentation. When you read a study belonging to a conference, the study would be displayed based on the presentation settings (not the study’s original Display Protocol).
12.1.6 Logging Out
• To end a reading session, exit the Vue PACS system. This operation automatically causes the Vue RIS to exit as well.
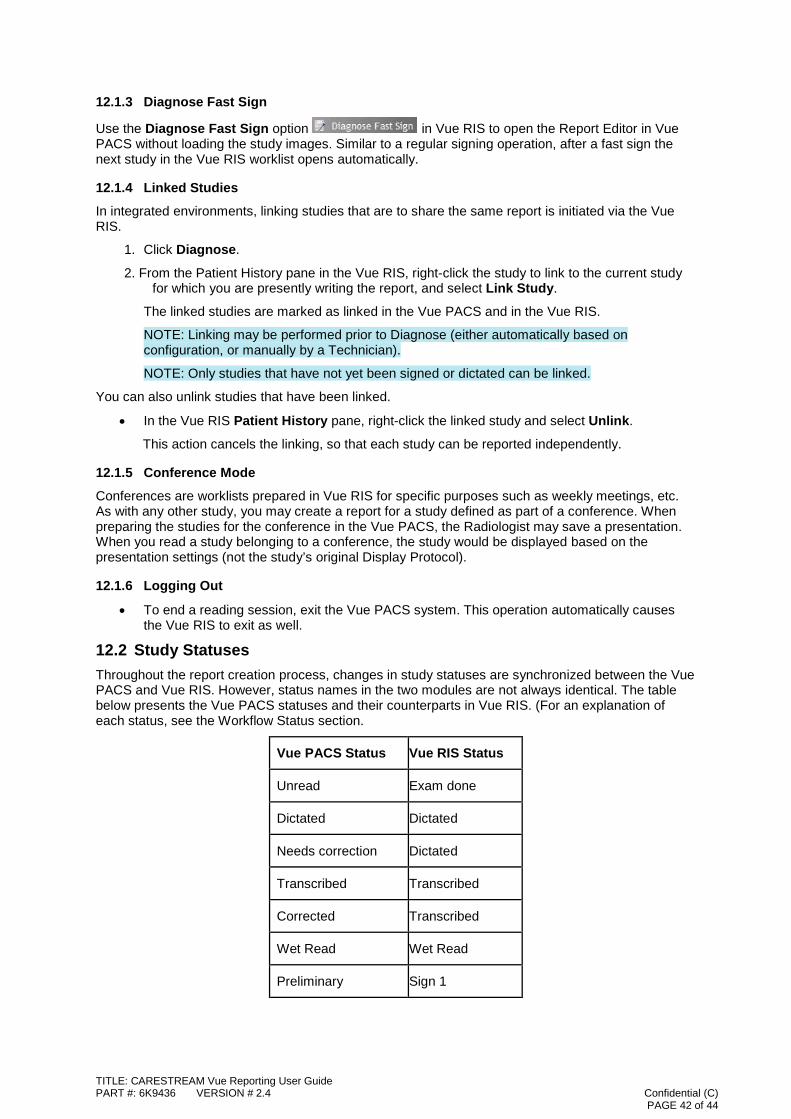
12.2 Study Statuses Throughout the report creation process, changes in study statuses are synchronized between the Vue PACS and Vue RIS. However, status names in the two modules are not always identical. The table below presents the Vue PACS statuses and their counterparts in Vue RIS. (For an explanation of each status, see the Workflow Status section.
Vue PACS Status Vue RIS Status
Unread Exam done
Dictated Dictated
Needs correction Dictated
Transcribed Transcribed
Corrected Transcribed
Wet Read Wet Read
Preliminary Sign 1
TITLE: CARESTREAM Vue Reporting User Guide PART #: 6K9436 VERSION # 2.4 Confidential (C) PAGE 42 of 44
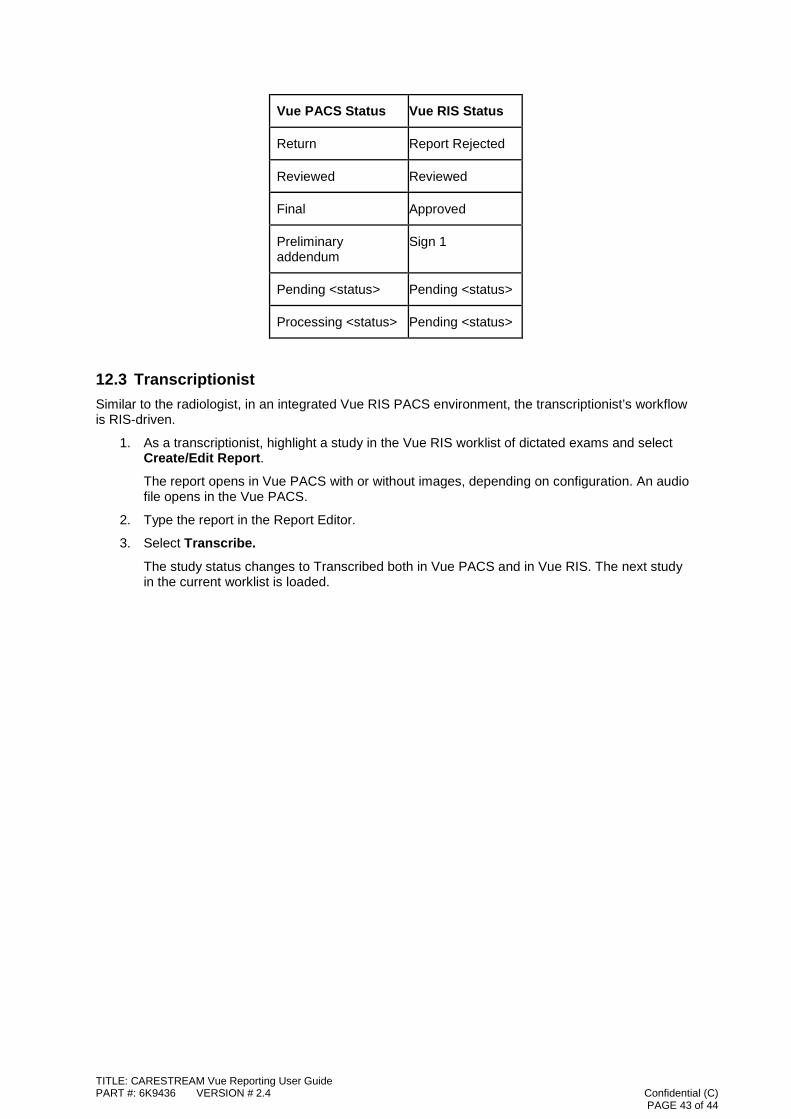
Vue PACS Status Vue RIS Status
Return Report Rejected
Reviewed Reviewed
Final Approved
Preliminary addendum
Sign 1
Pending <status> Pending <status>
Processing <status> Pending <status>
12.3 Transcriptionist Similar to the radiologist, in an integrated Vue RIS PACS environment, the transcriptionist’s workflow is RIS-driven.
1. As a transcriptionist, highlight a study in the Vue RIS worklist of dictated exams and select Create/Edit Report.
The report opens in Vue PACS with or without images, depending on configuration. An audio file opens in the Vue PACS.
2. Type the report in the Report Editor.
3. Select Transcribe.
The study status changes to Transcribed both in Vue PACS and in Vue RIS. The next study in the current worklist is loaded.
TITLE: CARESTREAM Vue Reporting User Guide PART #: 6K9436 VERSION # 2.4 Confidential (C) PAGE 43 of 44
CARESTREAM is a trademark of Carestream Health
© Carestream Health, Inc., 2015 150 Verona Street Rochester, NY 14608 USA
Made in the USA
P/N 6K9436 v3.0
TITLE: CARESTREAM Vue Reporting User Guide PART #: 6K9436 VERSION # 2.4 Confidential (C) PAGE 44 of 44