Embed Size (px)
Citation preview
1 CameraPro Manual
CameraPro 2.1.9
Manual
Version 1.4, 13 th August 2011
Harald Meyer
Table of Contents Introduction........................................................................................................................................2
Download and Updates ...................................................................................................................2
Contact Information ........................................................................................................................2
User Interface .....................................................................................................................................3
Flash ...........................................................................................................................................3
Effects .........................................................................................................................................3
Exposure Mode ...........................................................................................................................4
Focus Range ................................................................................................................................4
Autofocus Type ...........................................................................................................................4
White Balance .............................................................................................................................4
Image Controls ............................................................................................................................5
ISO Mode ....................................................................................................................................5
Camera Mode .............................................................................................................................5
Settings .......................................................................................................................................6
Taking Pictures.................................................................................................................................. 10
Focusing an Object ........................................................................................................................ 10
Simulating Touch Focus ............................................................................................................. 10
Uploading Pictures to Web Services .............................................................................................. 10
Frequently Asked Questions ............................................................................................................. 11
Change Log ....................................................................................................................................... 11

2 CameraPro Manual
Introduction CameraPro is a touch-optimized application for Symbian 5th Edition and Symbian^3/Anna/Belle
mobile phones. It is focused toward:
- Fast accessibility of camera features, such as flash, exposure, macro, effects, etc.
- Full accessibility to camera features.
- Quick backup of pictures to Facebook, FlickR, Picasa, and TwitPic/Twitter (since version 2.0)
Download and Updates CameraPro can be purchased through Ovi-Store. I also accept Paypal payments if you do not have
access to Ovi-Store. Further details and download links are located here:
http://www.tequnique.com/wb/pages/products/camerapro.php#download
CameraPro is updated regularly. At the moment the update procedure with Ovi-Store is a bit
inconvenient:
1. Uninstall CameraPro.
2. Re-download and install CameraPro with the Ovi client.
3. In case of problems (e.g. download limit reached) contact Ovi support.
Contact Information The fastest way to contact the author is by email or with the contact form which can be found here:
http://www.tequnique.com/wb/pages/contact.php
If you want to keep up-to-date please also join the CameraPro newsletter:
http://www.tequnique.com/wb/pages/newsletter.php
Besides this manual the FAQ section offers useful information:
http://www.tequnique.com/wb/pages/products/camerapro.php#faq

3 CameraPro Manual
User Interface One of the major goals of CameraPro is to provide fast access to camera features. The most
important settings can be reached with two taps.
Figure 1 CameraPro user interface
The five icons located on the left and right side of the screen provide access to all settings. The
settings differ between phone models. For instance the Nokia N8 offers single- and continuous
autofocus while the Nokia C7 has only a fixed focus.
When the icons are tapped then a popup window is opened which provides different options. The
popup window can be closed either by:
- Tapping the “Close” button on the lower right, or
- Double-tapping the selected option.
New in Version 1.1.3: A small +/- symbol on the bottom left allows showing and hiding the menu bar.
This is useful if full visibility of the camera viewfinder is needed.
New in Version 1.1.5: With a fast double tap on an empty region on the viewfinder it is now possible
to zoom in and out (2x for still images and 3x for video). It is also possible to set an exact zooming
range by double tapping the zooming slider.
New in Version 2.1.5: The still picture resolution can be changed by tapping on the resolution on-
screen information on the top left of the screen.
Flash
This button opens a popup window with different flash options:
- No Flash
- Auto: The flash will automatically fire when required.
- Forced: The flash will always fire.
- Red Eye Reduction
- Videolight: Constant light is emitted during video recording.
The mode “Videolight” works only on devices with a LED flash and while in video recording mode.
Devices having a Xenon flash, such as the Nokia N8, do not support this mode.
Effects
This button opens a popup window with image effects which are applied in real-time to the image:

4 CameraPro Manual
- None: No effect is applied to the image.
- Negative: The colors of the picture are inverted.
- Black&White
- Sepia: Gives the picture an old photo touch.
- Vivid: Increases saturation of colors.
- Natural
All effects work for still images and during video recording.
Exposure Mode
This button opens a popup window with different exposure modes:
- Auto: The exposure is automatically adjusted by the camera firmware.
- Night: Long exposure for night shootings without flash.
- Backlight: For pictures where the light source is behind the object (bright background).
- Center: The (weighted) center region of the image is used to adjust exposure.
- Sport: Short exposure time for quick movements.
- Very long: Very long exposure. Please note that this mode does not work correctly on all
phone models.
At the moment there are no means to control the exposure manually due to lack of firmware
support.
Focus Range
This button opens a popup window with different focus ranges:
- Auto: Automatically selects focus range.
- Macro: For close objects where details are of interest, such as flowers, insects, etc.
- Normal: Sets the focus range to normal.
- Hyperfocal: All objects at distances from half of the hyperfocal distance out to infinity will be
in focus. This gives maximum depth of field, for instance for landscape pictures.
- Infinite: Focus on distance.
Note: The focus range cannot be changed during video recording.
Note: Single autofocus focus does not work with Hyperfocal or Infinite focus.
Autofocus Type
This button opens a popup window with different autofocus types:
- None: Autofocus is switched off.
- Single: This option works only in image mode. The success (green) and failure (red) are
indicated by the color of the focusing rectangle.
- Continuous: The focus is continuously adjusted (also during video recording). This option
consumes more energy than single autofocus.
White Balance
This button opens a popup window with different white balance modes:
- Auto: The white balance is set automatically.
5 CameraPro Manual
- Daylight: Normal daylight.
- Cloudy: Overcast daylight.
- Tungsten: Tungsten filament lightning.
- Fluorescent: Fluorescent tube lightning.
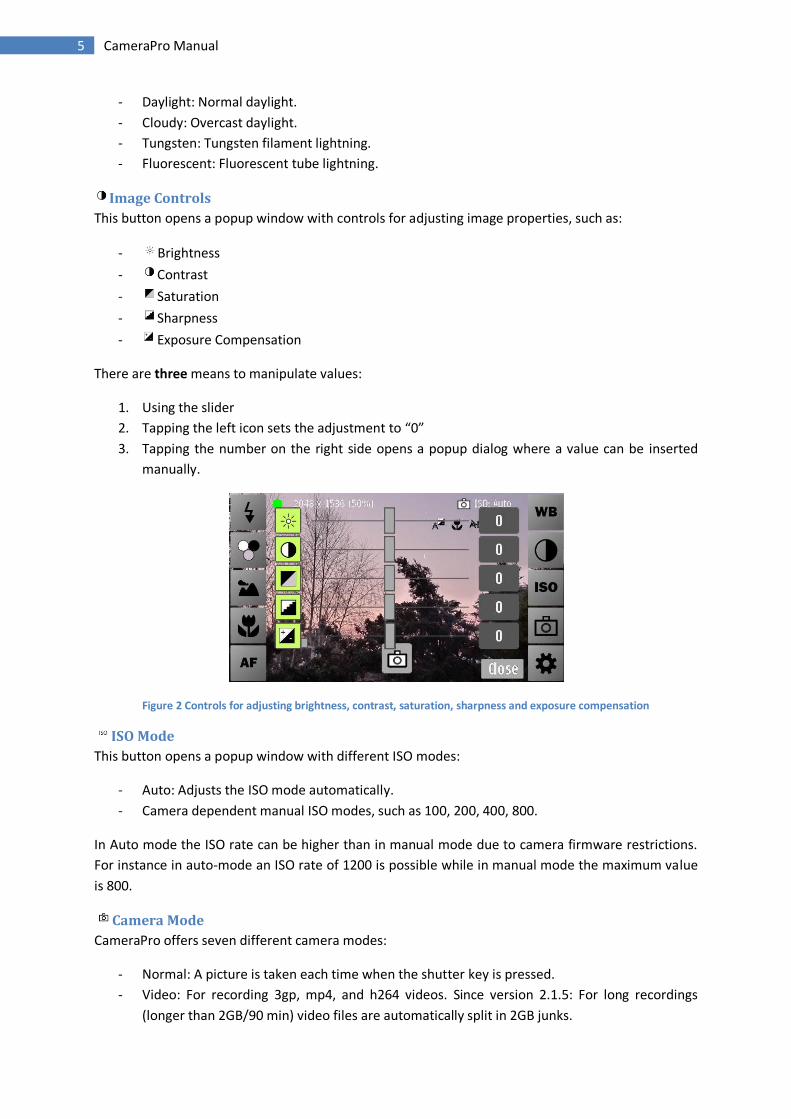
Image Controls
This button opens a popup window with controls for adjusting image properties, such as:
- Brightness
- Contrast
- Saturation
- Sharpness
- Exposure Compensation
There are three means to manipulate values:
1. Using the slider
2. Tapping the left icon sets the adjustment to “0”
3. Tapping the number on the right side opens a popup dialog where a value can be inserted
manually.
Figure 2 Controls for adjusting brightness, contrast, saturation, sharpness and exposure compensation
ISO Mode
This button opens a popup window with different ISO modes:
- Auto: Adjusts the ISO mode automatically.
- Camera dependent manual ISO modes, such as 100, 200, 400, 800.
In Auto mode the ISO rate can be higher than in manual mode due to camera firmware restrictions.
For instance in auto-mode an ISO rate of 1200 is possible while in manual mode the maximum value
is 800.
Camera Mode
CameraPro offers seven different camera modes:
- Normal: A picture is taken each time when the shutter key is pressed.
- Video: For recording 3gp, mp4, and h264 videos. Since version 2.1.5: For long recordings
(longer than 2GB/90 min) video files are automatically split in 2GB junks.

6 CameraPro Manual
- Self-Timer: Shooting is delayed by a user-defined amount.
- Anti-Shake: A picture is taken when the camera is held still.
- Bracketing: Either 3 or 5 consecutive images with different exposure settings are taken.
These images can be used for high dynamic range (HDR) photos.
- Burst: A user-defined number of pictures are taken as fast as possible.
- Time-Lapse: Pictures are taken in a user-defined interval.
The wheel icon on the right side of each mode opens a settings dialog with settings specific to the
selected camera mode. In “Normal” mode the wheel icon will open the “Global Settings” dialog for
image settings, while in “Video” mode the “Global Settings” dialog for video settings will be opened.
For all other modes selection of the wheel icon leads to camera mode specific dialogs:
Self-Timer
Dialog options:
- Delay in seconds
Anti-Shake
Dialog options:
- Sensitivity of movement detection. For “High Sensitivity” the camera must not move at all,
while the other modes accept small movements.
Bracketing
Dialog options:
- Three, respectively five different exposure compensation rates for each picture can be
selected. On the right side a shooting delay (delay when the bracketing series will be started)
and between three or five picture mode can be selected.
Due to camera firmware restrictions it is not possible to set guaranteed exposure steps. The
camera automatically adjusts the values according to the current light conditions.
Burst
Dialog options:
- Delay when the burst shooting will be started
- Number of pictures to take
Time-Lapse
Dialog options:
- Interval in which pictures are taken
A more advanced program for taking time-lapse videos on Symbian phones is FastMotion:
http://s.meh.at/fastmotion
Settings
The settings dialog provides access to
- Presets,
7 CameraPro Manual
- Global Settings,
- Feedback, Info, and Updates.
Besides, four different graphical overlay hints for taking pictures can be enabled in the settings
dialog:
- Sparse Grid: A 2x2 sparse grid.
- Dense Grid: A 6x6 dense grid.
- Compass: A compass is not supported on all phones. If the phone does not support
compass mode, then an error message is displayed.
- Virtual Horizon: Overlays a virtual horizon/level meter over the camera viewfinder to align
pictures with the horizon. This can be useful if the exact level is uncertain (for instance to
show the steepness of a hillside during skiing or hiking).
Presets
Presets can be created, loaded, and deleted. A preset holds values for all camera settings, such as
exposure, flash mode, focus range, image brightness, etc.
Creating a preset
A preset can be created with the following steps:
- Set exposure, flash, etc. settings
- Open the “Settings” popup dialog and select “Presets”
- Click on “Save” and enter a preset name
Load a preset
A preset can be loaded with the following steps:
- Open the “Settings” popup dialog and select “Presets”
- Click on “Load” and select the preset you want to load
Delete a preset
A preset can be deleted with the following steps:
- Open the “Settings” popup dialog and select “Presets”
- Click on “Delete” and select the preset you want to delete
Global Settings
This Section describes how to change global settings which are used by all camera modes, such as
picture quality, resolution, geo tagging, etc. There are two different global setting modes, one for still
images (“Image Settings”) and one for videos (“Video Settings”).
Image Settings
The global image settings store settings which are valid for all still camera modes.
- Storage location: Here a storage location can be selected. If a drive, such as c: or e: is
selected then images are stored in the default image folders, which are usually
“c:\data\Images” or “e:\Images”. “Custom location” can be used to store images in a
different directory.

8 CameraPro Manual
- File prefix: The file prefix defines the filename pattern. Either the shooting date or a custom
pattern can be selected. The date-based format is: “YYYYMMDDHHMMSS.jpg” where YYYY is
the current year, MM month, DD day, HH hour, MM minutes, and SS seconds.
- Image size: List of all possible picture resolutions.
- Image quality: The jpeg picture quality between 1 to 100 percent. The recommended setting
is 90.
- Show captured image: If on, then the captured image is shown after capturing. This applies
only to “Normal” camera mode. The captured image view provides options to discard and
save images. If the camera shutter key is (accidently) pressed when the preview is visible,
then the picture is saved and another picture is taken. Since version 2.1.5 it is possible to
select a timeout (2, 5, 7, 10, 60 seconds). When this timeout passes then the viewed image is
automatically saved. If the screen has been touched (also on positions outside of buttons)
then the timer is stopped.
- Face detection: If enabled, then single and continuous focus will focus on faces. This option
is only available on Symbian^3 devices. Please note, that this feature is still experimental.
(since version 1.1.5)
- Geotag (GPS): This option allows to geo-tag pictures with the current GPS position.
- Play sounds: If enabled, then sounds are played. At the moment the only available sound is a
ticker sound for the last 5 seconds in Self-Timer camera mode.
- One tap selection: If enabled, then a single tap on a setting selects the setting and closes the
popup dialog.
- Autofocus light: If the phone has an autofocus light, then the behavior can be set here.
Possible options are “On”, “Off”, and “Auto”.
- Show on-screen info: If on, then information such as current image resolution, or currently
selected settings are displayed on top of the viewfinder.
- Set CameraPro as default: If on, CameraPro will be started as default camera application
when the hardware shutter key is pressed.
- Web upload resize: Here a dimension can be selected for rescaling images before they are
uploaded to a web service (such as Facebook, FlickR, Picasa, and TwitPic/Twitter). This option
is especially useful if only a low bandwidth internet connection is available. Please note, that
the selected dimension is only an approximation. The effective rescaled image dimensions
can differ depending on the original image aspect ratio.
- Access point: Here the access point can be selected which will be used for the web upload of
photos.
- Reset to default on start: If on, then CameraPro settings are set to default when CameraPro
is restarted.
- Design: Here a design can be selected to change the look of CameraPro. CameraPro should
be restarted after changing this setting.
- Language: CameraPro has localizations for: English, French, German, Italian, Spanish, and
Turkish. CameraPro must be restarted after changing this setting. Note: Localization is
currently under beta – not all translations are perfect yet.
Note: In versions earlier than 1.1.3 some settings (file prefix, play sounds, one tap selection, and
show on-screen info) which are only visible under “Image Settings” also apply for video settings. This
issue has been removed with CameraPro 1.1.3.
9 CameraPro Manual
Video Settings
The global video settings store settings which are valid for video recording mode.
- Video type: A list of default video resolutions and container formats. Depending on the
device, 3gp, mp4, and h264 encoders are supported.
- Storage location: Here a storage location can be selected. If a drive, such as c: or e: is
selected then videos are stored in the default video folders, which are usually
“c:\data\Videos” or “e:\Videos”. “Custom location” can be used to store videos in a different
directory.
- File prefix: The file prefix defines the filename pattern. Either the shooting date or a custom
pattern can be selected. The date-based format is: “YYYYMMDDHHMMSS.jpg” where YYYY is
the current year, MM month, DD day, HH hour, MM minutes, and SS seconds.
- Audio recording: Option to turn on/off audio recording.
- Video stabilization: Option to turn on/off video stabilization. This mode is not supported on
all phone models. If a device does not support video stabilization then this setting is ignored.
- Expert mode: If enabled, then expert settings are used instead of the default “Video type”
settings. To change expert settings select “Options” – “Expert mode settings”.
- “Shutter key autofocus”: If enabled then the camera shutter key enables/disables
continuous autofocus in video recording mode.
- Play sounds: If enabled, then sounds are played. At the moment the only available sound is a
ticker sound for the last 5 seconds in Self-Timer (still) camera mode.
- One tap selection: If enabled, then a single tap on a setting selects the setting and closes the
popup dialog.
- Show on-screen info: If on, then information such as current video resolution, or currently
selected settings are displayed on top of the viewfinder.
Note: In versions earlier than 1.1.3 some settings (file prefix, play sounds, one tap selection, and
show on-screen info) which are only visible under “Image Settings” also apply for video settings. This
issue has been removed with CameraPro 1.1.3.
Expert Video Settings
The expert video settings can be reached from the “Video Settings” – “Options” – “Expert mode
settings”. Expert settings are only enabled if “Expert mode” is turned on. The expert mode is
intended for experimentation and only some setting combinations will work. If a combination is not
allowed then an error message is displayed when trying to record a video.
The following options are available:
- Preset: Allows storing expert settings as presets.
- Video type: Selection of video encoder and container format.
- Frame size / custom width, custom height: Sets the video’s dimensions. If custom width and
custom height are greater than 0 then the custom width/height are used. Else the predefined
frame size is used.
- Frame rate: The video frame rate between 1 to 30 pictures per second.
- Video bit rate: The video bit rate in bits per second.
- Audio type: The audio encoder. Either AAC or AMR.
- Audio bit rate: The audio bit rate in bits per second.

10 CameraPro Manual
A sample expert setting could be as follows:
- Video type: video/H264; profile=42801F
- Frame size: 1280 x 720
- Custom width/height: 0
- Frame rate: 30
- Video bit rate: 3000000
- Audio type: AAC
- Audio bit rate: 128000
Taking Pictures Depending on the phone model there are three means for taking pictures:
- By pressing the hardware camera shutter key.
- By tapping the touch screen camera button.
- By pressing the hardware “Ok”/”Enter” key.
Additionally, in video mode a touch button is available to pause and resume video recording.
Focusing an Object If your phone model supports autofocus an object can be focused either
- By slightly pressing down the hardware camera shutter key, or
- By tapping on “Single focus” in the autofocus popup menu.
The success or failure of the focus operation is visualized by a red/green rectangle.
Simulating Touch Focus
Due to technical restrictions it is currently not possible to touch-and-focus with Nokia Symbian
smartphones. But there is an easy way to simulate touch focus:
- Move the phone so that the object (distance) you want to focus is close to the center of the
viewfinder
- Apply a single focus
- Reposition the phone without changing the distance to the object
- Take the picture without re-focusing
Uploading Pictures to Web Services Since version 2.0.0 CameraPro supports backup and posting of captured pictures to web services
such as Facebook, FlickR, Picasa, and TwitPic/Twitter.
Note: To upload pictures, “Show captured image” has to be enabled under “Settings”.
Note: Pictures are uploaded with full size by default. You can scale down the image dimensions by
selecting a different size under “Settings”-”Web upload resize” which is highly recommended to save
bandwidth.
After taking a picture the following options are presented:
- Save: Save the picture visible in the preview to the storage medium.

11 CameraPro Manual
- Delete: Skip the captured picture without saving it.
- Web Upload: Upload the captured picture to a web service.
- EXIF: Show the most important EXIF data, such as aperture, shutter speed, digital zoom
ration, and exposure time.
The access to all web services is implemented in an anonymous way, which means that no
username/password information has to be entered into CameraPro. CameraPro never sees your
login details. When a web service is used for the first time (or authentication failed) with CameraPro
then a new browser window is opened which points to the web service provider (for instance
www.facebook.com). In the browser window access rights for CameraPro have to be granted so that
CameraPro can upload pictures to your account. The access rights can always be revoked later.
Frequently Asked Questions
How can I replace the built in camera app with CameraPro?
Open CameraPro and go to “Settings”. There you find an option “Set CameraPro as default”.
Can I manually set exposure, focus range, and aperture?
At the moment it is only possible to use the presets because manual selection is not possible due to
camera firmware restrictions.
Taking pictures with CameraPro seems to be slower than with the built-in camera application!
CameraPro processes images in background, so you can capture multiple images directly after taking
a picture. But CameraPro provides 100% quality (=raw jpeg) which results in up to 5 times larger
image sizes (like 10 MB instead of 2 MB). Thus sometimes CameraPro can be a little bit slower than
the built in camera when taking pictures with 100% quality.
How can I take pictures in 16:9 formats?
When you are in photo mode, go to "Settings" and change the image size to dimension with a 16:9
ration, e.g. "4000x2248".
The display hangs and/or the video frame rate varies for 1280x720 video at 30 fps!
The Nokia N8’s official maximum recording setting is 1280x720 at 25 fps. With the current firmware
30fps overload the N8's CPU which causes stuttering.
The exposure in bracketing mode is not constant.
The camera firmware allows only little manual intervention of parameters. Adjusting the exposure
compensation value gives the camera only a hint which is sometimes ignored.
Change Log Note: Missing version numbers are private beta releases.
Version 2.1.9
- Improved processing speed of image preview
- Fixed hardware shutter key
- Added Symbian Anna icon

12 CameraPro Manual
Version 2.1.8
- Image preview window can be closed by pressing focus key
- Popups are closed when tapping outside of functional regions
- Cleaned up video settings view
- Added options to adjust video frame rate, video and audio bitrates under video settings
Version 2.1.7
- Fixed typos
Version 2.1.6
- Fixed typos in French and Italian translations
Version 2.1.5
- Fixed Symbian Belle issues when pressing hardware shutter button
- CameraPro is now moved to the foreground when the shutter button is pressed while
CameraPro is running
- Changed default image file name format to YYYYMMDD_hhmmss
- Changed default expert video mode preset settings to valid ones after first(!) start
- Added: change image resolution fast by touching the resolution on-screen information text
- Added: view important EXIF data of captured image
- Added: close picture preview automatically after X seconds
- Added: record videos bigger than 2GB/90 minutes (video files are split!)
Version 2.1.3
- Added different color schemes (under "Settings" - "Design")
- Added album support for Facebook, FlickR, and Picasa
- Added localization: German, French, Italian, Spanish, and Turkish.
- Small improvements of the user interface
Version 2.0.3
- Improved (single) autofocus mode
- Added option to restore default settings after restart of CameraPro
- When phone is exactly aligned (vertical or horizontal) the color of the virtual horizon is
changed
- Moved selection of access point (for web-upload) to "Settings" view
- Improved bracketing mode user interface
- Fixed some typos
- Fixed video presets
- Non-touch devices (with autofocus support): added autofocusing by holding down the Enter
key
- Added tooltip text for setting entries
Version 2.0.2

13 CameraPro Manual
- Removed "Ok/Back" buttons when leaving settings
- Improved "Set CameraPro as default" functionality
- Fixed: CameraPro now does not start when keylock is enabled
Version 2.0.1
- Replaced white color with black color for selected items (better to read)
Version 2.0.0
- Fixed scrolling behavior of settings menus
- Added option to start CameraPro with hardware camera shutter key (can be enabled under
"Settings" - "Set CameraPro as default")
- Improved user interface
- Upload pictures to Facebook, FlickR, Picasa, and TwitPic/Twitter
- Resize pictures before webupload to reduce bandwidth usage
Version 1.1.6
- Fixed aspect ratio of 16:9 picture preview
Version 1.1.5
- Added face detection support
- Zoom in/out with double-tap on empty viewfinder area (2x for still images, 3x for video)
- Open selection dialog when double-tap on zoom slider
Version 1.1.4
- Popup dialogs can now be closed with a second tap on the same menu button
- Fixed virtual horizon
Version 1.1.3
- Changed date-based file format to YYYYMMDDHHMMSS
- Fixed custom filename for videos function
- Added options "file prefix", "audio", "one-tap-selection", and "show onscreen information"
to video options dialog
- Fixed jpeg quality onscreen information
- Pictures are now automatically saved when the camera shutter key is pressed while the
photo preview is visible
- Added option to show/hide menu bars
Version 1.1.1
- Automatic screenlock is now disabled while CameraPro is running
- Option to set shooting delay in burst- and bracketing mode
- Option to check for program updates
- Removed tactile feedback for zooming slider in video mode
- Correct video resolution is now displayed in video expert mode
- Pause function for video recording
14 CameraPro Manual
- Fixed GPS status information
Version 1.1.0
- Added option to take 5 pictures in bracketing mode
Version 1.0.9
- Fixed compass
- Option to disable on-screen information
- Camera orientation is now stored in EXIF header. Note: the N8 photo viewer does not rotate
the picture
- Show remaining number of pictures in bracketing/burst mode
Version 1.0.8
- Added icons and on-screen information for whitebalance, autofocus, focus mode, flash,
camera mode, and ISO mode
- Added on-screen information: image dimensions, video dimensions and framerate
- Improved continuous AF in video mode
Version 1.0.7
- AF light on/off/auto
- Option to use camera shutter button for continuous autofocus
- Fixed autofocus mode
- Changed default jpeg quality from 100% to 50%
- Set h264 default video bit rate from 3000000 to 300000000
Version 1.0.6
- Added default presets
- Added time indication for time-lapse
- Added indicator for anti-shake
- Fixed zooming
Version 1.0.5
- Auto focusing with camera-key fixed
- Auto focus success/failure is now visualized by a rectangle
- Fixed focus modes (macro, etc.)
Version 1.0.4
- Improved bracketing mode
- Option to store images and video in custom locations
- Whitebalance fixed
- Auto ISO mode fixed
Version 1.0.3
- Fixed image controls

15 CameraPro Manual
- Fixed recording time text for video mode
- Better audio quality for h264 video recordings
- Added touch camera button