Embed Size (px)
Citation preview
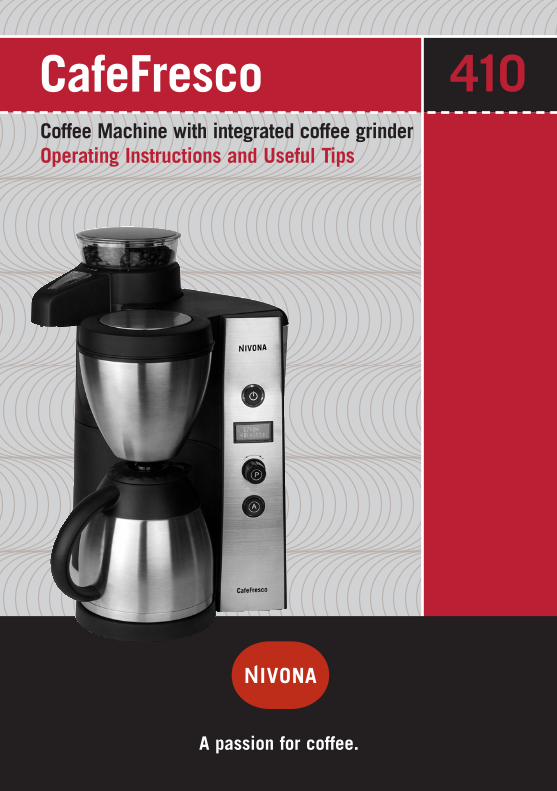
CafeFrescoCoffee Machine with integrated coffee grinderOperating Instructions and Useful Tips
410
A passion for coffee.

2
Operating Instructions and Useful Tips
Dear Customer,
Congratulations and many thanks for choosing a high-qualityNIVONA product. To get the most out of your NIVONA machine,please read this manual carefully before use. Please start byreading the safety notes.
Please keep this manual in a safe place. You may want to use it as reference guide or hand it on to any further users of yourmachine.
Purchase made at
Place, date
3
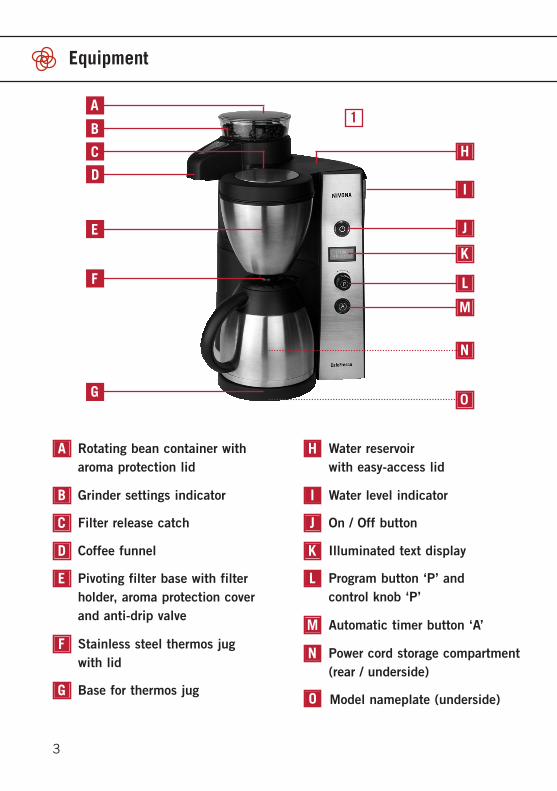
Equipment
Rotating bean container with aroma protection lid
A Water reservoir with easy-access lid
H
Water level indicator I
On / Off buttonJ
Illuminated text displayK
Program button ‘P’ and control knob ‘P’
L
Automatic timer button ‘A’M
Power cord storage compartment(rear / underside)
N
Model nameplate (underside)O
Grinder settings indicator B
Filter release catch C
Coffee funnelD
Pivoting filter base with filter holder, aroma protection coverand anti-drip valve
E
Stainless steel thermos jug with lid
F
Base for thermos jugG
A
B
C
D
E
F
H
I
J
K
L
M
N
0G
1
Equipment
2 3 4
5
8
11
10
6
9
7
Contents
1. Safety instructions
2. Before use
3. Set up3.1 Preparing the machine3.2 Getting started
4. Making coffee4.1 Using pre-ground coffee 4.2 Programming the machine to use pre-ground coffee 4.3 Operating the coffee-grinder4.4 Using fresh coffee from the coffee-grinder 4.5 Programming the machine to use fresh coffee from
the coffee-grinder
5. General settings for operating the coffee-grinder5.1 Selecting the number of cups / quantity of coffee 5.2 Selecting the coffee strength
6. General settings / useful tips 6.1 Deactivating the timer function 6.2 Switching the machine off6.3 Removing the coffee jug before brewing is complete6.4 Pouring coffee
7. Cleaning7.1 Cleaning the coffee grinder7.2 Cleaning the coffee machine
8. Descaling
9. Further instructions

• The machine is for domestic useonly and is not suitable for com-mercial applications.
• Operating voltage must be the same as mains voltage. Please note the sticker on the under-side of the machine (Fig. 1/0).
• Keep the power cord away from hot parts.
• Do not operate the machine if the power cord or machine case is damaged.
• Do not unplug the machine by pulling on the power cord.
• Certain machine parts, such as the filter base, become very hot during operation. Only handle the machine using the grips andcontrols provided for the pur-pose.
• Never open the reservoir lid while coffee is being brewed, as you may burn yourself.
• Do not pour water into the machine when hot – turn the coffee machine off first and let it cool for at least 5 minutes.
• Make sure to switch off and unplug the machine before maintenance or cleaning.
• Do not submerge the machine in water.
• Use the coffee grinder for grind-ing roasted coffee beans only –do not use it to grind other foods. Always make sure there isnothing but coffee beans in the beans container, otherwise guarantee will not apply.
• Note: Do not use beans which have been treated with supple-ments such as sugar during or after roasting. Supplements can damage the grinding mechanismand any repair costs arising as aresult are not covered by the guarantee.
• Place the machine on a level, solid surface and use it indoors only.
• Do not place the machine on a hot surface or near open flames.
• Keep the machine away from children.
• Always unplug the machine during extended periods of absence.
• Do not put the machine or in-dividual parts in the dishwasher.Wipe the outside with a damp cloth only.
1. Safety instructions
6

7
... 1. Safety instructions
• Unplug immediately if there is adefect (do not pull the cord or machine to unplug).
• Liability for damages cannot be accepted if the machine is in-correctly operated, subject to improper use or non-professionalservicing. In such cases, serviceswill not be provided under the guarantee.
• This machine is not suitable for individuals (including children) with physical, sensory or mental impairments, including indivi-duals who do not have sufficientexperience or knowledge, unlessthey are shown how to operate the machine or initially super-vised by someone responsible for their safety.
If repair services are required, in -cluding replacement of the powercord, please send the machine tothe dealer from whom it was purchased, or to NIVONA CentralCustomer Services.
Caution! Electrical appliancesmust be repaired by qualified per-sonnel! Non-professional repairs
can expose the user to significant risks. Liability for damages cannotbe accepted if the machine isused for any other than the in -tended purpose, incorrectly main-tained or serviced.
CE – This machine conforms tothe following EC guidelines:
• 73/23/EWG dated 19/02/1973 “Low Voltage Directive”, includ-ing amendment 93/68/EWG.
• 89/336/EWG dated 03/05/1989“EMV Directive”, including amendment 92/31/EWG.
Specifications
Mains voltage: 220 – 240 VPower input: 1000 W
Note: Your coffee machine has acord storage compartment – if thepower cord is too long, any surpluscan be accommodated in the storage area on the underside ofthe machine to avoid accidents.

8
2. Before use
Unpacking
➔ Carefully extract the machineand all parts from the packagingand remove all protective seals.
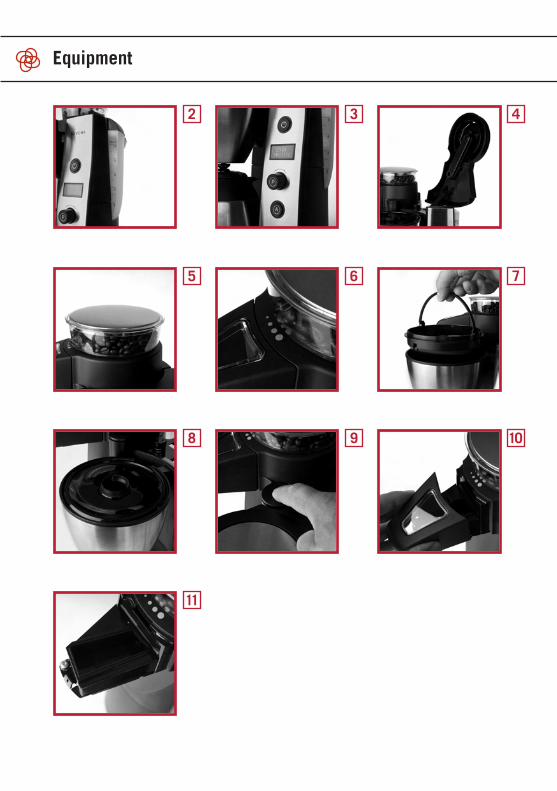
Caution: Please remove the pro-tective seal on the pivoting filter!In order to do this, open the lid ofthe water reservoir and remove thearoma protection cover and filterholder (fig. 1/E, fig. 7, fig. 8).Remove the seal which fixes thefilter to the water reservoir andreplace the filter holder and aromaprotection cover afterwards.
Note: If you need to return yourmachine for servicing, it can besent by post in the original packa-ging. Please keep all packagingand protective material for thispurpose.
Important: This machine wasinspected and tested with coffeebefore leaving the factory. Alt-hough the machine was thoroughlycleaned, coffee traces may remainin the machine. It is nonethelessbrand new.
Setting the time
The time must be set before themachine is first operated – other-wise it can not be switched on.Please follow the instructionsbelow:
➔ Plug the machine into themains power supply. The displayshows in German “Zeit, Std.”(“Time, hrs”).➔ To enter the time (hours), turnthe control knob P (fig. 1/L) untilthe correct hour appears. Confirmby pressing the button ‘P’ (fig. 1/L). ➔ Now turn the control knob Pagain to adjust the minute. Con-firm by pressing the button ‘P’(fig. 1/L).
You have now set the time. Unlessyou press the button ‘P’ again with in 3 seconds in order toadjust the coffee quantity settings(aroma selection), the default setting in German “8, Mittel” (“8, me dium”) appears.
9
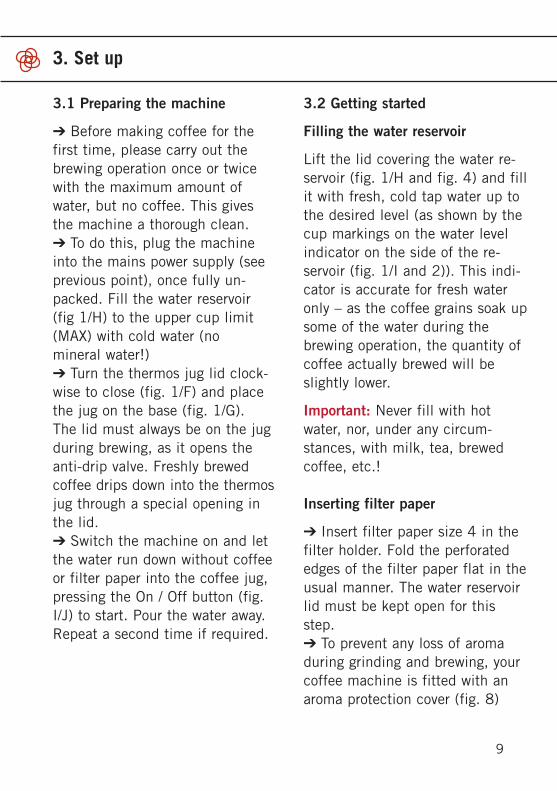
3. Set up
3.1 Preparing the machine
➔ Before making coffee for thefirst time, please carry out thebrew ing operation once or twicewith the maximum amount ofwater, but no coffee. This givesthe machine a thorough clean.➔ To do this, plug the machineinto the mains power supply (seeprevious point), once fully un -packed. Fill the water reservoir (fig 1/H) to the upper cup limit(MAX) with cold water (no mineral water!)➔ Turn the thermos jug lid clock -wise to close (fig. 1/F) and placethe jug on the base (fig. 1/G). The lid must always be on the jugduring brewing, as it opens theanti-drip valve. Freshly brewedcoffee drips down into the thermosjug through a special opening inthe lid. ➔ Switch the machine on and letthe water run down without coffeeor filter paper into the coffee jug,pressing the On / Off button (fig.I/J) to start. Pour the water away.Repeat a second time if required.
3.2 Getting started
Filling the water reservoir
Lift the lid covering the water re -servoir (fig. 1/H and fig. 4) and fillit with fresh, cold tap water up tothe desired level (as shown by thecup markings on the water levelindicator on the side of the re -servoir (fig. 1/I and 2)). This indi-cator is accurate for fresh wateronly – as the coffee grains soak upsome of the water during thebrew ing operation, the quant ity ofcoffee actually brewed will beslightly lower.
Important: Never fill with hotwater, nor, under any circum -stances, with milk, tea, brewedcoffee, etc.!
Inserting filter paper
➔ Insert filter paper size 4 in thefilter holder. Fold the perforatededges of the filter paper flat in theusual manner. The water reservoirlid must be kept open for thisstep.➔ To prevent any loss of aromaduring grinding and brewing, yourcoffee machine is fitted with anaroma protection cover (fig. 8)
10
➔ You can brew your coffee invarious ways: using pre-groundcoffee or fresh coffee beans, forimmediate or timer-operated start.In each case the machine switchesoff automatically after brewing.➔ If you use fresh coffee beansand the integrated grinder, youcan choose between various aromaand quantity settings. If you usetraditional pre-ground coffee,CafeFresco operates like a normalcoffee machine.
4.1 Using pre-ground coffee
➔ Fill the water reservoir withwater as detailed above (see point3.2) and insert a filter (size 4).
Fill the filter with the desiredamount of ground coffee and placethe coffee jug on the base. Switchthe machine on using the On / Offbutton (fig. 1/J). The red lightcomes on and the brewing oper -ation begins.
Hint: To avoid overfilling, makesure that you do not use moreground coffee than is necessary tomake 10 cups of coffee (generalrule: 1 heaped spoon per cup).Only use ground coffee suitablefor filter coffee – do not use pre-ground espresso coffee.
4.2 Programming the machine touse pre-ground coffee
As for the previous point, fill thereservoir with water and insert filter
... 3. Set up
4. Making coffee
which must be removed to insertthe filter paper. When the size 4filter paper has been inserted,make sure the aroma protectioncover is correctly fitted. On oneside it has a semi-circular ribwhich fits into the correspondinggroove in the filter holder.➔ When the filter is in place, shutthe water reservoir lid.
Install the coffee jug
➔ Now place the closed coffeejug on the machine base (fig.1/G). The lid must always be onthe jug, as it opens the anti-dripvalve. The freshly brewed coffeedrips down into the thermos jugthrough a special opening in thelid.
11
paper (see point 3.2). Then addground coffee to the filter and place the thermos jug on the base(fig. 1/G). Select a start time forthe brewing operation as follows: ➔ Press the button ‘P’ (fig. 1/L).The display reads in German “Brühen?” (“Brew?”).➔ Turn the control knob ‘P’ andthe display reads in German“Zeit?” (“Time?”).➔ Press ‘P’ again and the displayreads in German “Autostart: Zeit?”(“Autostart: time?”).➔ After pressing ‘P’, select thedesired start time (hours) by turn -ing the control knob ‘P’. ➔ Confirm by pressing the button‘P’.➔ Now select the number ofminutes in the same way, con -firming by pressing the button ‘P’.➔ When you have selected a starttime, it appears for a few secondsin the display as confirmation.➔ As soon as the start time dis -appears, activate the automatictimer by pressing the button ‘A’(fig. 1/M).
The display shows the programmedstart time and the green light inthe button ‘A’ comes on. The brew-ing operation will then start at thegiven time. The second line of thedisplay does not mean anything in
this function. When the given timearrives, the green light goes offand the red light comes on for theduration of the brewing operation.
Tip: Unless you wish to changethe start time, you can activatethe programmed settings simplyby pressing button ‘A’ (afterhaving filled the water reservoirand set in place filter paper,ground coffee and coffee jug!).
4.3 Operating the coffee grinder
Fill the bean container
➔ There is a bean container locat edabove the coffee grinder of yourCafeFresco (fig. 1/A and fig. 5), de -signed to keep your coffee beans asfresh as possible. Please fill the beancontainer with fresh coffee beans.
Grinding settings
➔ You can adjust the fineness ofthe grind to suit your preferencesand the roast of the beans (fig. 1/Band fig. 6). Simply turn the rotatingbean container (fig. 1/A and fig. 5).
Tip: We recommend that you startwith a medium setting, as this issuitable for most coffee typesavail able in the shops. You can
... 4. Making coffee

12
ascertain the current setting byreading the scale (fig. 1/B and fig. 6).
➔ The basic principle is that thesmaller the dot, the finer the grind:• A light roast requires a finer
grind• A dark roast requires a coarser
grind
4.4 Brewing coffee using freshcoffee from the coffee grinder
Fill the water reservoir with waterand insert filter paper (see point3.2). Make sure that there areenough coffee beans in the beancontainer. Then place the coffeejug on the base.
Select the desired brewing sett ings:
➔ Press the button ‘P’. The dis -play reads in German “Brühen?”(“Brew?”).➔ Press the button ‘P’ again andthe display reads in German “Brühen: Jetzt” (“Brew: now”).➔ Having again pressed the but-ton ‘P’, you can select the desiredquantity of ground coffee andcups (4, 6, 8 or 10 cups) by turn -ing the control knob ‘P’.➔ Confirm by pressing the button‘P’.
➔ Now select the coffee strength(aroma selection) settings in thesame way: “Mild, Mittel, Stark”(“mild, medium or strong”).➔ Confirm the desired choice bypressing the button ‘P’.
After you have selected the brew -ing settings, swing the filter base(fig. 1/E) out to the left until it clicksinto place (fig. 1/E) and press the‘On’ button. The red light thencomes on and coffee grinding be -gins. When the grind ing process iscomplete, the filter automaticallyswings back into brewing positionand the brewing operation begins.
Note: There may be slight dis -crepancies in quantities when thegrinder is used for the first time.
4.5 Programming the machine touse fresh coffee from the coffeegrinder
Fill the water reservoir with waterand insert filter paper (see point3.2). Make sure that there areenough coffee beans in the beancontainer. Place the coffee jug onthe base. Now select the desiredbrewing options (quantity, strengthand time settings):
... 4. Making coffee

13
➔ Press the button ‘P’ (fig. 1/L).The display reads in German “Brühen?” (“Brew?”).➔ Press the button ‘P’ again andthe display reads in German “Brühen: Jetzt” (“Brew: now”).➔ Turn the control knob ‘P’ (fig. 1/L)and the display reads in German“Brühen: Auto” (“Brew: auto”).➔ After pressing the button ‘P’you can select grinding and cupquantities (4, 6, 8 or 10 cups) byturning the control knob ‘P’.➔ Confirm by pressing the button‘P’.➔ Now select the desired coffeestrength (aroma selection) in thesame way: “Mild, Mittel, Stark”(“mild, medium or strong”)➔ Confirm your selection by press -ing the button ‘P’.➔ Press the button ‘P’ again. Thedisplay reads in German “Brühen?”(“Brew?”).➔ Turn the control knob ‘P’ andthe display reads in German“Zeit?” (“Time?”).➔ Press the button ‘P’ again andthe display reads in German “Auto-start: Zeit?” (“Autostart: time?”).➔ After pressing the button ‘P’,select the desired start time (hours)by turning the control knob ‘P’.➔ Confirm by pressing the button‘P’.
➔ Now select the desired minutesetting in the same way.➔ After you have selected the starttime, it appears for a few secondsin the display as con firmation.➔ As soon as the start time dis -appears, activate the automatictimer by pressing the button ‘A’(fig. 1/M).➔ The display shows the pro -grammed start time, and the greenlight in the button ‘A’ comes on.
Now swing the filter base (fig. 1/E)out to the left until it clicks intoplace.
The grinding and brewing operationstarts automatically at the giventime. When the given time arrives,the green light goes off and the redlight comes on for the duration ofthe brewing operation. After thegrind ing process, the filter swingsautomatically back into brewing position and the brewing operationbegins.
Tip: Unless you wish to change thestart time, you can activate theprogrammed settings simply bypressing the button ‘A’ (after havingfilled the water reservoir and beancontainer, set in place filter paperand coffee jug and swung the filterbase out to the left!).
... 4. Making coffee

14
5.1 Selecting the number of cups
Even numbers of cups can beselected (4, 6, 8 or 10) by turningand pressing the ‘P’ control knob,as described in 4.4. The numberof cups selected then appears onthe left in the second line of thedisplay.
5.2 Selecting the coffee strength
You can select coffee strength sett-ings by pressing the button ‘P’ asdescribed in point 4.4. The dis playreads in German “Mild, Mittel,Stark” (“mild”, medium or strong”)to show whether mild, medium orstrong coffee is to be brewed.
5. General settings for operating the coffee grinder
6.1 Deactivating the timer function
If you have activated the timerfunction by pressing the button ‘A’(fig. 1/M) but would not like theprogram to run, simply press thebutton ‘A’ again. The green lightgoes off again and the program isdeactivated.
6.2 Switching off
If you would like to end the brew -ing operation before it is complete,switch the machine off by press -ing the On / Off button (fig. 1/J).
6.3 Removing the coffee jugduring the brewing operation
When the jug is removed, the anti-drip valve prevents any drips from
falling onto the base. If you are ina hurry, you can therefore brieflyremove the thermos jug during the brewing operation, pour out 1– 2 cups and replace it within 20 seconds to continue the brew -ing operation.
6.4 Pouring out coffee
To pour coffee from the thermosjug, remove it when the brewingoperation is complete and open byturning the lid counter-clockwiseuntil the dot symbol is level withthe jug’s spout.
Tip: In order to ensure that thecoffee is of even strength throughout, gently move it backand forth in the thermos jug whenthe brew ing operation is complete.
6. General settings / useful tips
15
Note: It is essential to observe thefollowing instructions for cleaning.
7.1 Cleaning the coffee grinder
The grinder funnel occasionallyneeds to be cleaned (at the latestwhen it blocks!) to keep it clear ofoily coffee residues. Follow theinstructions below (when the beancontainer is empty!):
➔ First unplug the machine.➔ Hold the grinder funnel cover(fig. 10) by the front and lift thecover slowly off towards the front.➔ Open the water reservoir lid(fig. 4) and remove the aroma pro-tection cover (fig. 8).➔ Place a filter in the filter holderand swing it out to the left until itclicks into grinding position. ➔ Remove any coffee residuesfrom the grinder funnel (fig. 11),not forgetting the rear section ofthe funnel, using a suitable instru-ment (e.g. a clean paint brush), sothat it falls into the filter paper. Asuitable vacuum cleaner accessoryalso works well. ➔ Wipe out the grinder funnel andempty bean container with a drycloth.➔ Press the release button (fig. 9)to swing the filter back into brew -ing position.
➔ Empty the filter paper and putthe grinder funnel cover back on(push it in at the front until itaudibly clicks into place). ➔ Finally make sure the aromaprotection cover is correctly fitted,and shut the water reservoir lid.The machine is now operationalagain.
Tip: If lighter coffee beans areused, the grinder funnel does notneed to be cleaned as regularly aswhen darker, oilier coffee beansare used.
Avoid blockages in the grinderfunnel as follows:
➔ Do not use frozen coffee beans,as thawing causes condensationwhich can cause blockages.➔ Do not swing the filter out intothe grinding position immediatelyafter brewing, as the steam risingfrom the coffee grounds can causeblockages.➔ Do not place the coffee machinenext to a hob or deep fryer, as fatcan cause blockages. ➔ Always keep the coffee beancontainer closed, and occasionallywipe out any oily coffee residuesusing a dry cloth.
7. Cleaning

7.2 Cleaning the coffee machine
The filter holder can be removedfor easy emptying and cleaning(see fig. 7).
➔ Remove the thermos jug andopen fully the lid of the waterreservoir (fig. 4)➔ Remove the aroma protectioncover. Then use your finger to findthe rear grip indentation in the filter holder and pull out the filterholder using the pop-up handle.You can now clean it, not for -getting to actuate the anti-dripvalve several times.➔ Replace the filter holder, keep -ing the pop-up handle upright. Then lay the handle flat in thedirection of the water reservoir.Make sure the holder is correctlyinserted. The filter holder is nowlocked in place.
Then replace the aroma protectioncover, close the water reservoir lidand set the thermos jug back onthe base.
Caution! Use a damp cloth only toclean the outside of the machine,and never submerge in water. Theparts of your high-quality NIVONAcoffee machine are not suitablefor the dishwasher.
16
... 7. Cleaning
17
Your coffee machine will retain itshigh quality longer if you descaleregularly.
Your CafeFresco comes with anautomatic descaling reminderfunction. After 800 cups of coffeehave been brewed, in German„Entkalken“ (“Descale”) appearsin the display. Follow the steps asindicated. If the descaling re -minder has not appeared after 3 months:
We recommend that, as a pre -caution, you descale your machineevery 3 months. (If you have pur-chased a reusable gold tone filterplease remove it from the filterholder before descaling.)
Only use ecological descalingagents for descaling and followthe instructions provided by themanufacturer. Never use descalingagents based on concentrated formic acid and ideally no agentsin powder form. Never use vinegaror acetic acid based agents fordescaling. Use standard liquidproducts recommended for use oncoffee machines.
Descaling procedure:
➔ Fill the water reservoir withwater, then add the descalingagent – never the other way round!➔ Set the thermos jug on the baseand leave the descaling agents forabout 15 minutes, then turn onthe machine.➔ Start the cycle by pressing theOn / Off button (fig. 1/J). When allthe descaling agent has runthrough, turn the machine offagain.➔ Repeat if necessary. For eachdescaling cycle, however, performat least two subsequent cycleswith clean water only.
Rinse the coffee jug, coffee jug lidand filter holder thoroughly underrunning water after the descalingoperation. Remember to actuatethe anti-drip valve several times.
8. Descaling
9. Further instructions
18
➔ If the machine is unplugged orthere is a power cut, the settingsentered remain saved for about 3 minutes. They must be re-entered if the power supply is cutfor any longer period of time.
➔ If the filter swings out to theleft by accident, swing it back tothe right by pressing the releasecatch (fig. 1/C and fig. 9).
What to do, if ...
... the filter does not automaticallyswing back into brewing position?➔ Make sure the filter holder iscorrectly fitted.➔ Make sure the aroma protectioncover is correctly fitted.
... the coffee runs too slowly intothe coffee jug?➔ Clean the anti-drip valve.➔ Descale the machine.➔ Select a coarser grinder setting(see 4.3, grinder settings).

19
Please keep the original packagingand protective material for storageand transport purposes.
Spare parts / accessories
You can purchase spare parts anddescaling agents from any well-stocked specialist retailer.
Customer service
NIVONA products are designed tomeet the highest quality standards.However, if questions do arise whileyou operate your machine, wewould like to hear from you. Yoursupport is essential to our missionto further develop and improve ourproducts so that they fully meetyour needs.
Guarantee and customer serviceconditions
Please consult the detailedguaran tee and customer serviceconditions in the appropriateinformation booklet.
Protecting the environment
Electric and electronic ap -pliances often contain valu-able or harmful materialswhich should not be pro-
cessed in the same way as normalhousehold waste. If incorrectlyprocessed, they can harm humanhealth and the environment. Please therefore do not put yourmachine in the dustbin with normalwaste. Instead submit it to the“collection point for the disposaland recycling of electric and elec-tronic appliances” provided byyour local council. You can obtainfurther information from your localcouncil, the waste collection services or the specialist retailerwho sold you the product.
... 9. Further instructions

20
Notices

21
Notices

Nivona Apparate GmbHFritz-Haber-Straße 10D-90449 Nürnbergwww.nivona.com
© 2008 by NIVONA