Embed Size (px)
Citation preview
C17
16
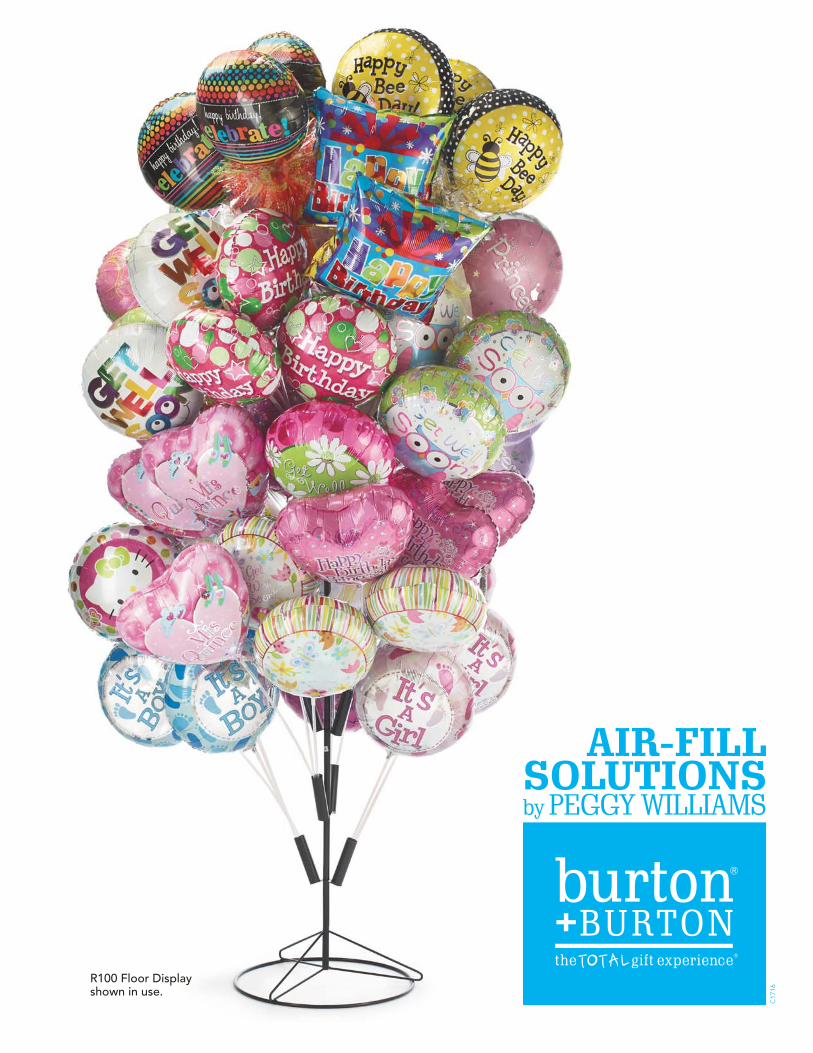
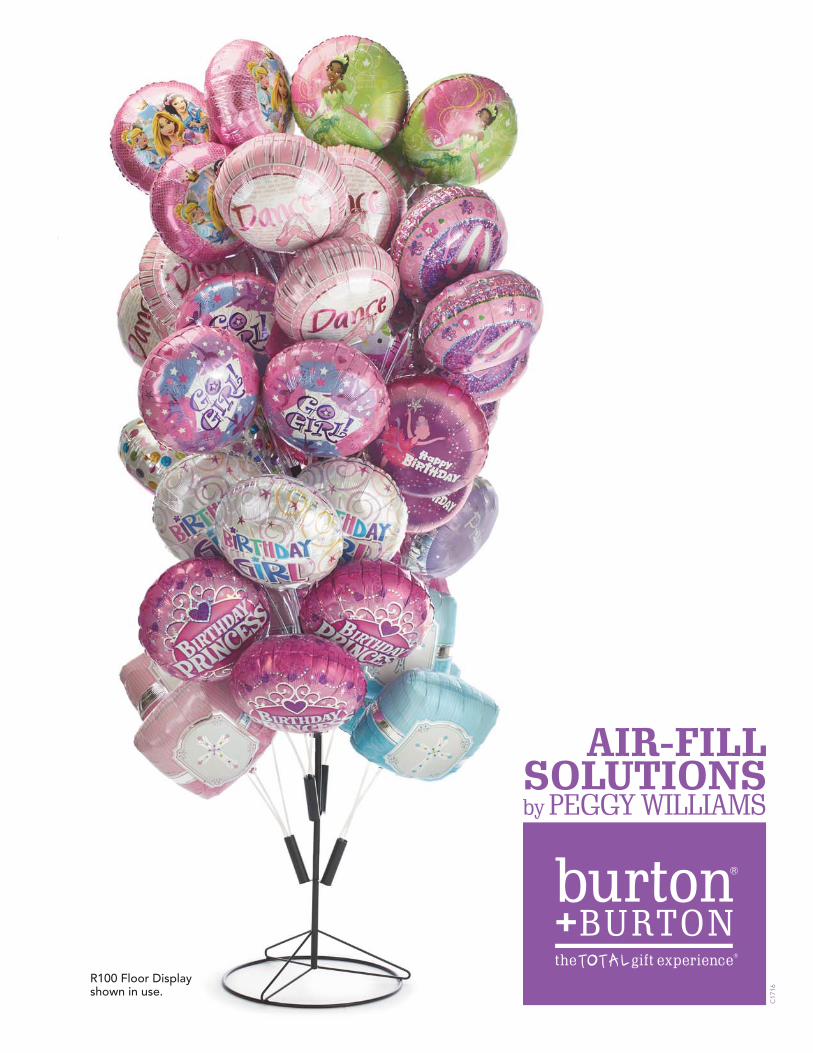
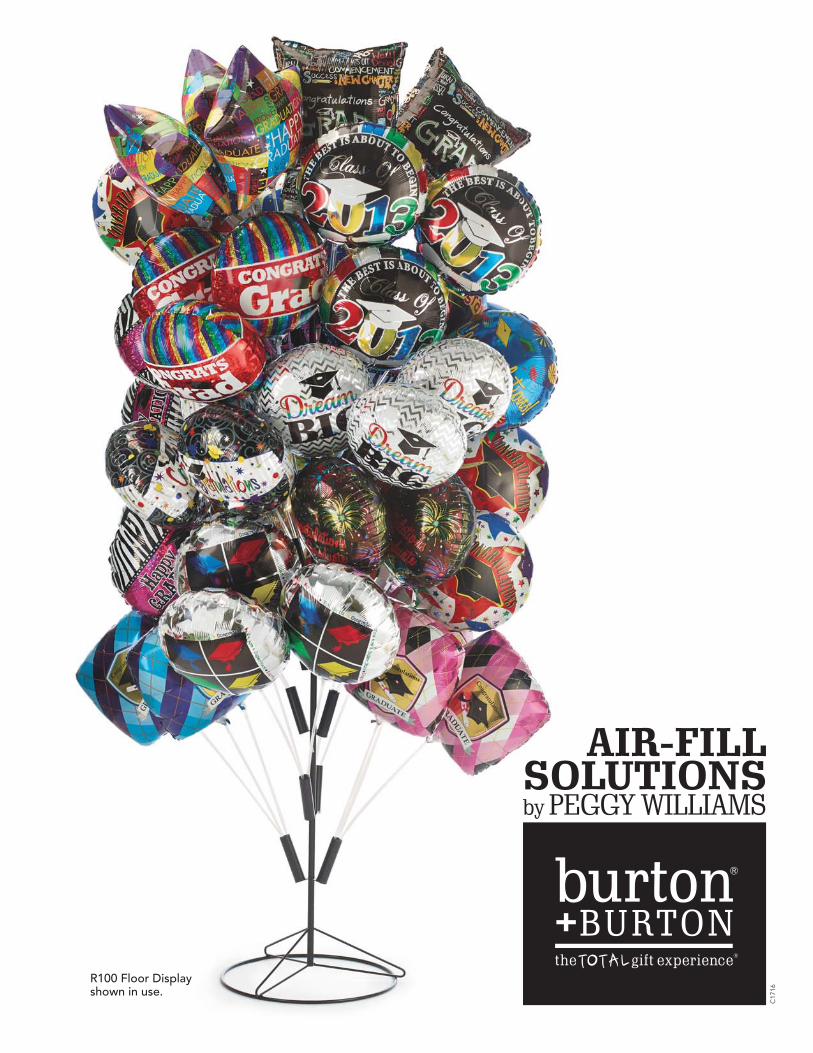
AIR-FILLSOLUTIONSby PEGGY WILLIAMS
R100 Floor Display shown in use.
instructions:
HI795Qualatex®
Hand Inflator
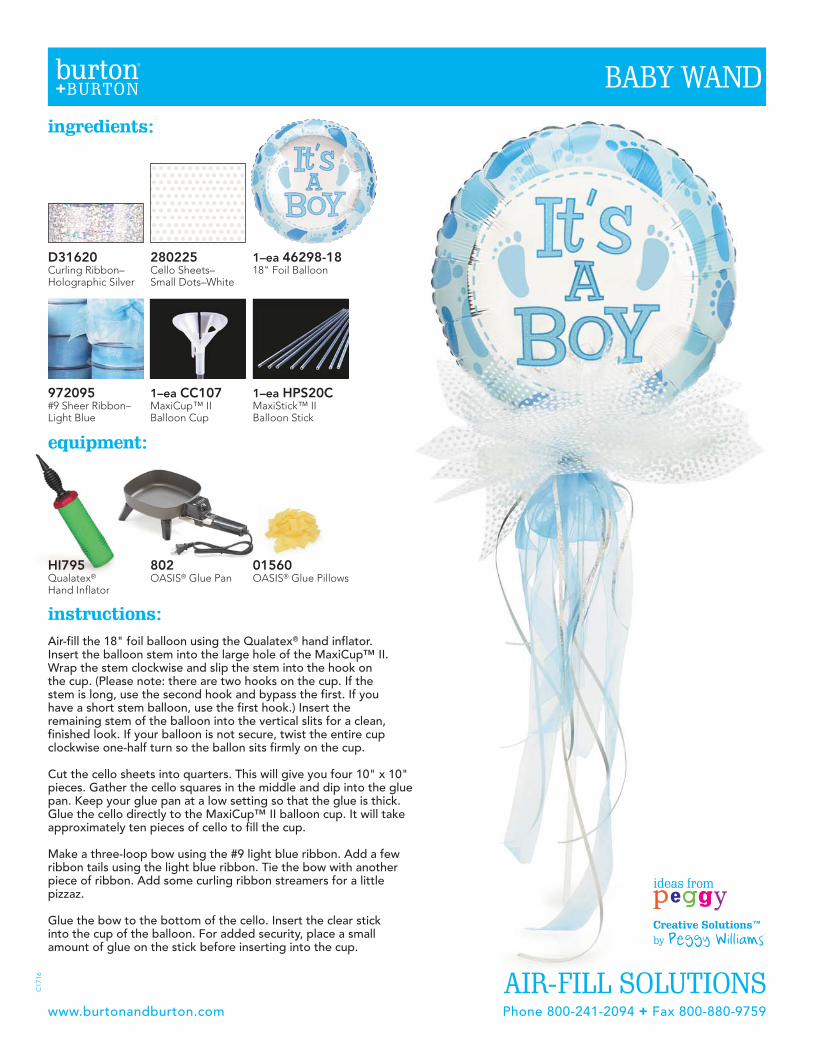
1–ea 46298-1818" Foil Balloon
ingredients:
1–ea CC107MaxiCup™ IIBalloon Cup
1–ea HPS20CMaxiStick™ IIBalloon Stick
802OASIS® Glue Pan
01560OASIS® Glue Pillows
972095#9 Sheer Ribbon–Light Blue
280225Cello Sheets–Small Dots–White
equipment:
C17
16
www.burtonandburton.com Phone 800-241-2094 + Fax 800-880-9759
AIR-FILL SOLUTIONS
BABY WAND
Air-fill the 18" foil balloon using the Qualatex® hand inflator. Insert the balloon stem into the large hole of the MaxiCup™ II. Wrap the stem clockwise and slip the stem into the hook on the cup. (Please note: there are two hooks on the cup. If the stem is long, use the second hook and bypass the first. If you have a short stem balloon, use the first hook.) Insert the remaining stem of the balloon into the vertical slits for a clean, finished look. If your balloon is not secure, twist the entire cup clockwise one-half turn so the ballon sits firmly on the cup.
Cut the cello sheets into quarters. This will give you four 10" x 10" pieces. Gather the cello squares in the middle and dip into the glue pan. Keep your glue pan at a low setting so that the glue is thick. Glue the cello directly to the MaxiCup™ II balloon cup. It will take approximately ten pieces of cello to fill the cup.
Make a three-loop bow using the #9 light blue ribbon. Add a few ribbon tails using the light blue ribbon. Tie the bow with another piece of ribbon. Add some curling ribbon streamers for a little pizzaz.
Glue the bow to the bottom of the cello. Insert the clear stick into the cup of the balloon. For added security, place a small amount of glue on the stick before inserting into the cup.
D31620Curling Ribbon–Holographic Silver
instructions:
HI795Qualatex®
Hand Inflator
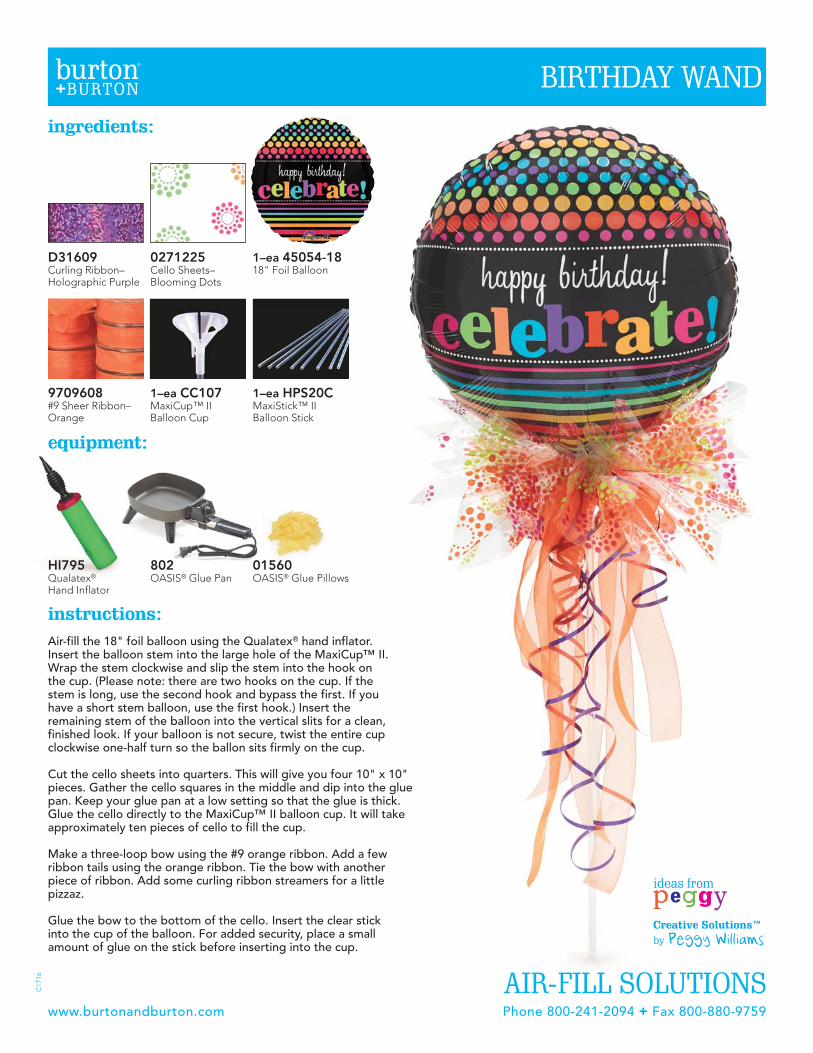
1–ea 45054-1818" Foil Balloon
ingredients:
1–ea CC107MaxiCup™ IIBalloon Cup
1–ea HPS20CMaxiStick™ IIBalloon Stick
802OASIS® Glue Pan
01560OASIS® Glue Pillows
9709608#9 Sheer Ribbon–Orange
0271225Cello Sheets–Blooming Dots
equipment:
C17
16
www.burtonandburton.com Phone 800-241-2094 + Fax 800-880-9759
AIR-FILL SOLUTIONS
BIRTHDAY WAND
Air-fill the 18" foil balloon using the Qualatex® hand inflator. Insert the balloon stem into the large hole of the MaxiCup™ II. Wrap the stem clockwise and slip the stem into the hook on the cup. (Please note: there are two hooks on the cup. If the stem is long, use the second hook and bypass the first. If you have a short stem balloon, use the first hook.) Insert the remaining stem of the balloon into the vertical slits for a clean, finished look. If your balloon is not secure, twist the entire cup clockwise one-half turn so the ballon sits firmly on the cup.
Cut the cello sheets into quarters. This will give you four 10" x 10" pieces. Gather the cello squares in the middle and dip into the glue pan. Keep your glue pan at a low setting so that the glue is thick. Glue the cello directly to the MaxiCup™ II balloon cup. It will take approximately ten pieces of cello to fill the cup.
Make a three-loop bow using the #9 orange ribbon. Add a few ribbon tails using the orange ribbon. Tie the bow with another piece of ribbon. Add some curling ribbon streamers for a little pizzaz.
Glue the bow to the bottom of the cello. Insert the clear stick into the cup of the balloon. For added security, place a small amount of glue on the stick before inserting into the cup.
D31609Curling Ribbon–Holographic Purple

ingredients:
1–ea CC107MaxiCup™ IIBalloon Cup
1–ea HPS20CMaxiStick™ IIBalloon Stick
972093#9 Sheer Ribbon–Light Yellow
1081225Cello Sheets–A Little Honey
C17
16
www.burtonandburton.com Phone 800-241-2094 + Fax 800-880-9759
AIR-FILL SOLUTIONS
HAPPY BEE DAY
532225Cello Sheets–Small Dots–Black
1–ea A61231-1818" Foil Balloon
instructions:
HI795Qualatex®
Hand Inflator
802OASIS® Glue Pan
01560OASIS® Glue Pillows
equipment:
Air-fill the 18" foil balloon using the Qualatex® hand inflator. Insert the balloon stem into the large hole of the MaxiCup™ II. Wrap the stem clockwise and slip the stem into the hook on the cup. (Please note: there are two hooks on the cup. If the stem is long, use the second hook and bypass the first. If you have a short stem balloon, use the first hook.) Insert the remaining stem of the balloon into the vertical slits for a clean, finished look. If your balloon is not secure, twist the entire cup clockwise one-half turn so the ballon sits firmly on the cup.
Cut the cello sheets into quarters. This will give you four 10" x 10" pieces. Gather the cello squares in the middle and dip into the glue pan. Keep your glue pan at a low setting so that the glue is thick. Glue the cello directly to the MaxiCup™ II balloon cup. It will take approximately ten pieces of cello to fill the cup.
Make a three-loop bow using the #9 light yellow ribbon. Add a few ribbon tails using the light yellow ribbon. Tie the bow with another piece of ribbon. Add some curling ribbon streamers for a little pizzaz.
Glue the bow to the bottom of the cello. Insert the clear stick into the cup of the balloon. For added security, place a small amount of glue on the stick before inserting into the cup.
D31626Curling Ribbon–Holographic Black

1–ea CC107MaxiCup™ IIBalloon Cup
1–ea HPS20CMaxiStick™ IIBalloon Stick
972104#9 Sheer Ribbon–White
6212225Cello Sheets–Large Dots–Pink
C17
16
www.burtonandburton.com Phone 800-241-2094 + Fax 800-880-9759
AIR-FILL SOLUTIONS
FABULOUS BIRTHDAYingredients:
1–ea 44515-1818" Foil Balloon
instructions:
HI795Qualatex®
Hand Inflator
802OASIS® Glue Pan
01560OASIS® Glue Pillows
equipment:
Air-fill the 18" foil balloon using the Qualatex® hand inflator. Insert the balloon stem into the large hole of the MaxiCup™ II. Wrap the stem clockwise and slip the stem into the hook on the cup. (Please note: there are two hooks on the cup. If the stem is long, use the second hook and bypass the first. If you have a short stem balloon, use the first hook.) Insert the remaining stem of the balloon into the vertical slits for a clean, finished look. If your balloon is not secure, twist the entire cup clockwise one-half turn so the ballon sits firmly on the cup.
Cut the cello sheets into quarters. This will give you four 10" x 10" pieces. Gather the cello squares in the middle and dip into the glue pan. Keep your glue pan at a low setting so that the glue is thick. Glue the cello directly to the MaxiCup™ II balloon cup. It will take approximately ten pieces of cello to fill the cup.
Make a three-loop bow using the #9 white ribbon. Add a few ribbon tails using the white ribbon. Tie the bow with another piece of ribbon. Add some curling ribbon streamers for a little pizzaz.
Glue the bow to the bottom of the cello. Insert the clear stick into the cup of the balloon. For added security, place a small amount of glue on the stick before inserting into the cup.
D31641Curling Ribbon–Holographic Cerise
BZ3401Curling Ribbon–Zebra Stripe
ingredients:
1–ea CC107MaxiCup™ IIBalloon Cup
1–ea HPS20CMaxiStick™ IIBalloon Stick
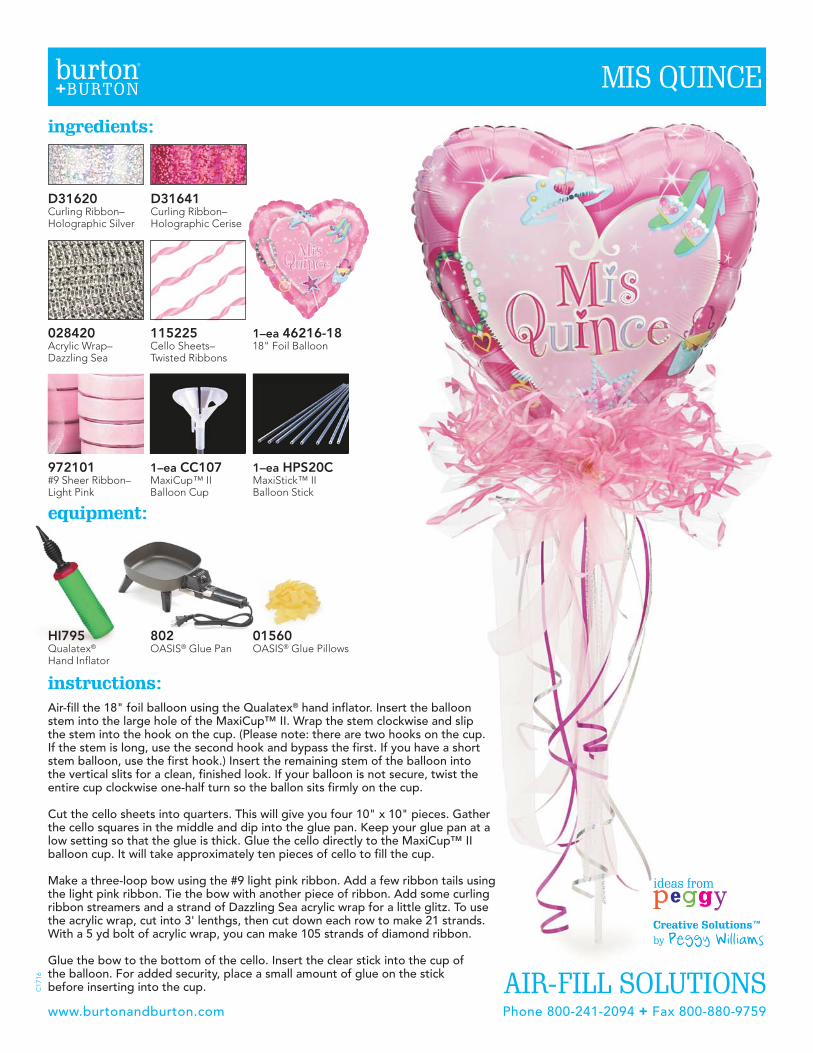
972101#9 Sheer Ribbon–Light Pink
115225Cello Sheets–Twisted Ribbons
C17
16
www.burtonandburton.com Phone 800-241-2094 + Fax 800-880-9759
AIR-FILL SOLUTIONS
MIS QUINCE
1–ea 46216-1818" Foil Balloon
instructions:
HI795Qualatex®
Hand Inflator
802OASIS® Glue Pan
01560OASIS® Glue Pillows
equipment:
Air-fill the 18" foil balloon using the Qualatex® hand inflator. Insert the balloonstem into the large hole of the MaxiCup™ II. Wrap the stem clockwise and slipthe stem into the hook on the cup. (Please note: there are two hooks on the cup. If the stem is long, use the second hook and bypass the first. If you have a short stem balloon, use the first hook.) Insert the remaining stem of the balloon into the vertical slits for a clean, finished look. If your balloon is not secure, twist the entire cup clockwise one-half turn so the ballon sits firmly on the cup.
Cut the cello sheets into quarters. This will give you four 10" x 10" pieces. Gather the cello squares in the middle and dip into the glue pan. Keep your glue pan at a low setting so that the glue is thick. Glue the cello directly to the MaxiCup™ II balloon cup. It will take approximately ten pieces of cello to fill the cup.
Make a three-loop bow using the #9 light pink ribbon. Add a few ribbon tails using the light pink ribbon. Tie the bow with another piece of ribbon. Add some curling ribbon streamers and a strand of Dazzling Sea acrylic wrap for a little glitz. To use the acrylic wrap, cut into 3' lenthgs, then cut down each row to make 21 strands. With a 5 yd bolt of acrylic wrap, you can make 105 strands of diamond ribbon.
Glue the bow to the bottom of the cello. Insert the clear stick into the cup of the balloon. For added security, place a small amount of glue on the stick before inserting into the cup.
028420Acrylic Wrap–Dazzling Sea
D31641Curling Ribbon–Holographic Cerise
D31620Curling Ribbon–Holographic Silver
instructions:
HI795Qualatex®
Hand Inflator
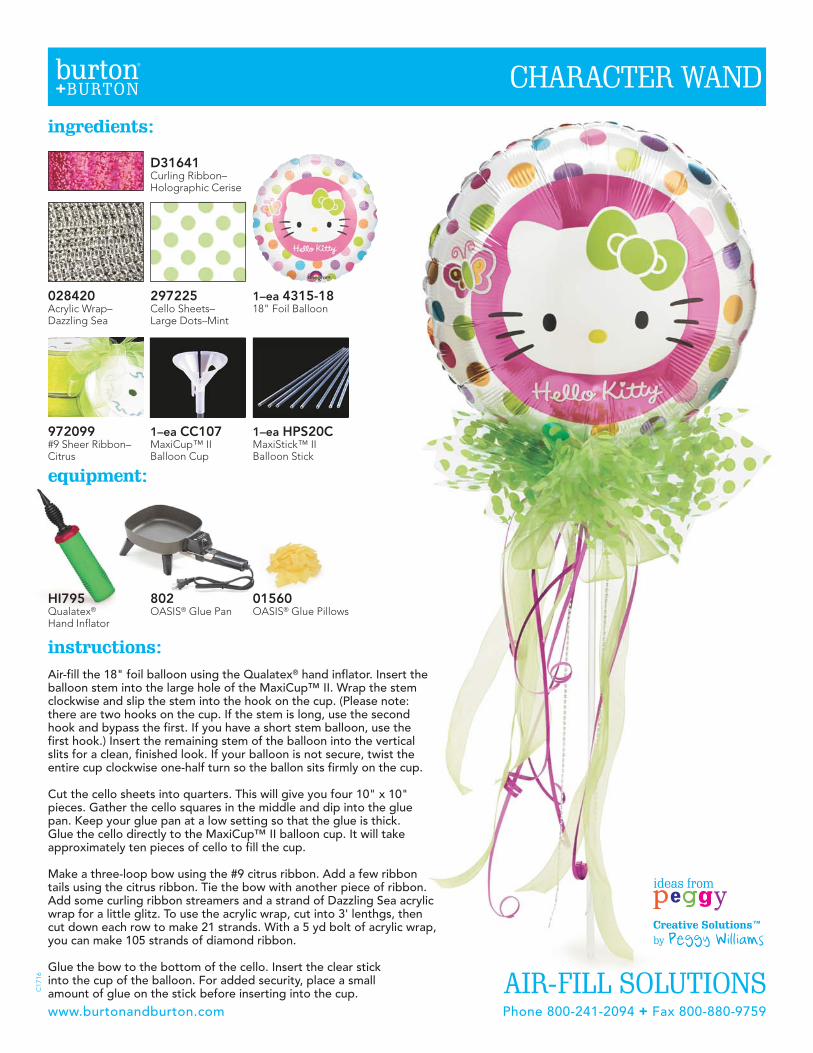
1–ea 4315-1818" Foil Balloon
ingredients:
1–ea CC107MaxiCup™ IIBalloon Cup
1–ea HPS20CMaxiStick™ IIBalloon Stick
802OASIS® Glue Pan
01560OASIS® Glue Pillows
972099#9 Sheer Ribbon–Citrus
297225Cello Sheets–Large Dots–Mint
equipment:
C17
16
www.burtonandburton.com Phone 800-241-2094 + Fax 800-880-9759
AIR-FILL SOLUTIONS
CHARACTER WAND
Air-fill the 18" foil balloon using the Qualatex® hand inflator. Insert the balloon stem into the large hole of the MaxiCup™ II. Wrap the stem clockwise and slip the stem into the hook on the cup. (Please note: there are two hooks on the cup. If the stem is long, use the second hook and bypass the first. If you have a short stem balloon, use the first hook.) Insert the remaining stem of the balloon into the vertical slits for a clean, finished look. If your balloon is not secure, twist the entire cup clockwise one-half turn so the ballon sits firmly on the cup.
Cut the cello sheets into quarters. This will give you four 10" x 10" pieces. Gather the cello squares in the middle and dip into the glue pan. Keep your glue pan at a low setting so that the glue is thick. Glue the cello directly to the MaxiCup™ II balloon cup. It will take approximately ten pieces of cello to fill the cup.
Make a three-loop bow using the #9 citrus ribbon. Add a few ribbontails using the citrus ribbon. Tie the bow with another piece of ribbon. Add some curling ribbon streamers and a strand of Dazzling Sea acrylic wrap for a little glitz. To use the acrylic wrap, cut into 3' lenthgs, then cut down each row to make 21 strands. With a 5 yd bolt of acrylic wrap, you can make 105 strands of diamond ribbon.
Glue the bow to the bottom of the cello. Insert the clear stick into the cup of the balloon. For added security, place a small amount of glue on the stick before inserting into the cup.
028420Acrylic Wrap–Dazzling Sea
D31641Curling Ribbon–Holographic Cerise
instructions:
HI795Qualatex®
Hand Inflator
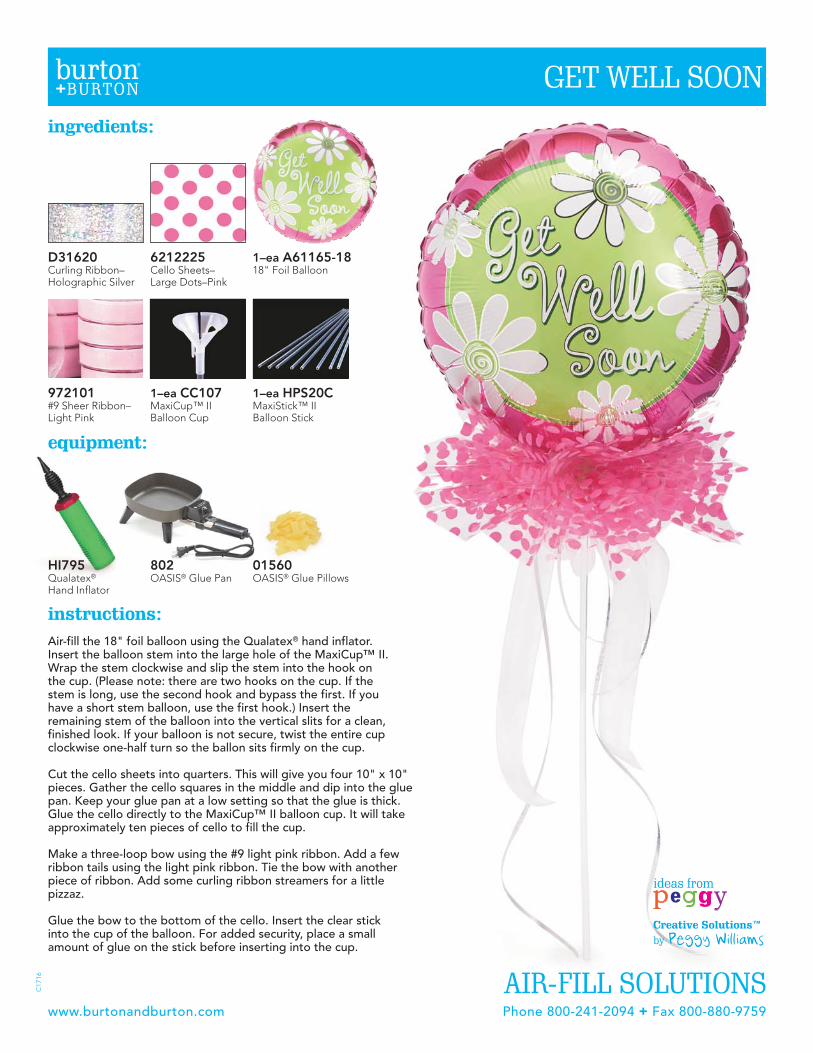
1–ea A61165-1818" Foil Balloon
ingredients:
1–ea CC107MaxiCup™ IIBalloon Cup
1–ea HPS20CMaxiStick™ IIBalloon Stick
802OASIS® Glue Pan
01560OASIS® Glue Pillows
972101#9 Sheer Ribbon–Light Pink
6212225Cello Sheets–Large Dots–Pink
equipment:
C17
16
Air-fill the 18" foil balloon using the Qualatex® hand inflator. Insert the balloon stem into the large hole of the MaxiCup™ II. Wrap the stem clockwise and slip the stem into the hook on the cup. (Please note: there are two hooks on the cup. If the stem is long, use the second hook and bypass the first. If you have a short stem balloon, use the first hook.) Insert the remaining stem of the balloon into the vertical slits for a clean, finished look. If your balloon is not secure, twist the entire cup clockwise one-half turn so the ballon sits firmly on the cup.
Cut the cello sheets into quarters. This will give you four 10" x 10" pieces. Gather the cello squares in the middle and dip into the glue pan. Keep your glue pan at a low setting so that the glue is thick. Glue the cello directly to the MaxiCup™ II balloon cup. It will take approximately ten pieces of cello to fill the cup.
Make a three-loop bow using the #9 light pink ribbon. Add a few ribbon tails using the light pink ribbon. Tie the bow with another piece of ribbon. Add some curling ribbon streamers for a little pizzaz.
Glue the bow to the bottom of the cello. Insert the clear stick into the cup of the balloon. For added security, place a small amount of glue on the stick before inserting into the cup.
www.burtonandburton.com Phone 800-241-2094 + Fax 800-880-9759
AIR-FILL SOLUTIONS
GET WELL SOON
D31620Curling Ribbon–Holographic Silver
C17
16
AIR-FILLSOLUTIONSby PEGGY WILLIAMS
R100 Floor Display shown in use.
instructions:
HI795Qualatex®
Hand Inflator
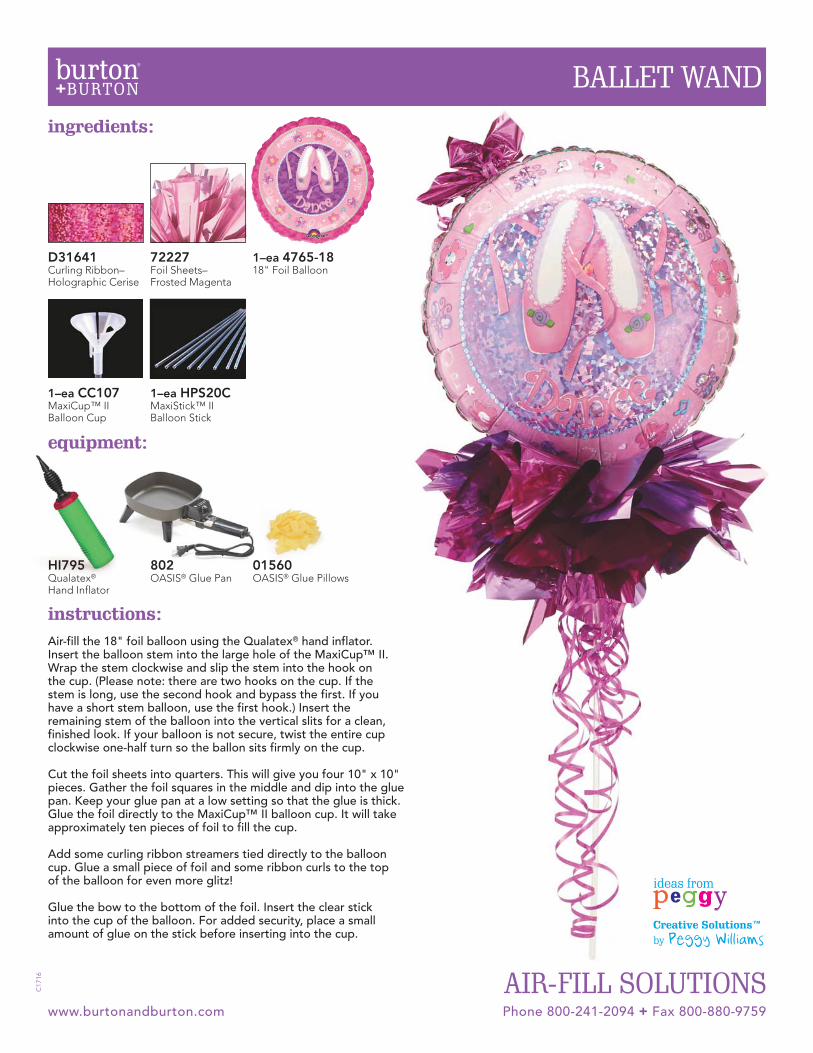
1–ea 4765-1818" Foil Balloon
ingredients:
1–ea CC107MaxiCup™ IIBalloon Cup
1–ea HPS20CMaxiStick™ IIBalloon Stick
802OASIS® Glue Pan
01560OASIS® Glue Pillows
72227Foil Sheets–Frosted Magenta
equipment:
C17
16
Air-fill the 18" foil balloon using the Qualatex® hand inflator. Insert the balloon stem into the large hole of the MaxiCup™ II. Wrap the stem clockwise and slip the stem into the hook on the cup. (Please note: there are two hooks on the cup. If the stem is long, use the second hook and bypass the first. If you have a short stem balloon, use the first hook.) Insert the remaining stem of the balloon into the vertical slits for a clean, finished look. If your balloon is not secure, twist the entire cup clockwise one-half turn so the ballon sits firmly on the cup.
Cut the foil sheets into quarters. This will give you four 10" x 10" pieces. Gather the foil squares in the middle and dip into the glue pan. Keep your glue pan at a low setting so that the glue is thick. Glue the foil directly to the MaxiCup™ II balloon cup. It will take approximately ten pieces of foil to fill the cup.
Add some curling ribbon streamers tied directly to the balloon cup. Glue a small piece of foil and some ribbon curls to the top of the balloon for even more glitz!
Glue the bow to the bottom of the foil. Insert the clear stick into the cup of the balloon. For added security, place a small amount of glue on the stick before inserting into the cup.
www.burtonandburton.com Phone 800-241-2094 + Fax 800-880-9759
AIR-FILL SOLUTIONS
BALLET WAND
D31641Curling Ribbon–Holographic Cerise
instructions:
HI795Qualatex®
Hand Inflator
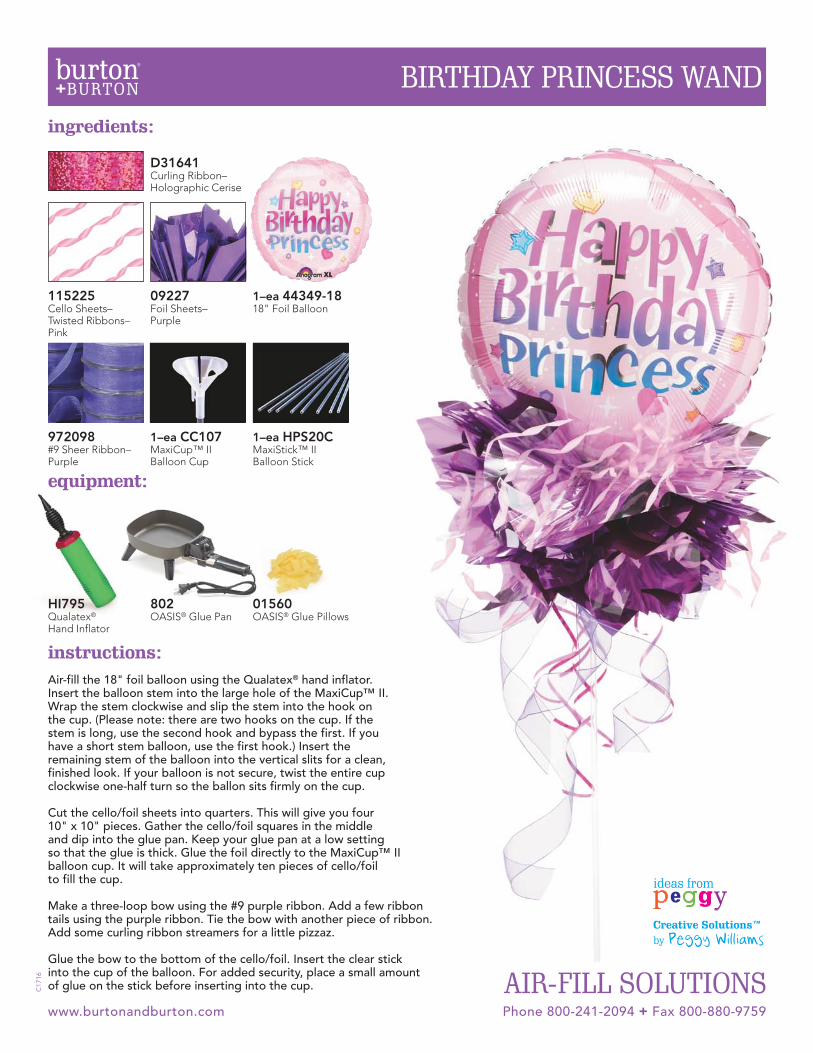
1–ea 44349-1818" Foil Balloon
ingredients:
1–ea CC107MaxiCup™ IIBalloon Cup
1–ea HPS20CMaxiStick™ IIBalloon Stick
802OASIS® Glue Pan
01560OASIS® Glue Pillows
09227Foil Sheets–Purple
equipment:
C17
16
Air-fill the 18" foil balloon using the Qualatex® hand inflator. Insert the balloon stem into the large hole of the MaxiCup™ II. Wrap the stem clockwise and slip the stem into the hook on the cup. (Please note: there are two hooks on the cup. If the stem is long, use the second hook and bypass the first. If you have a short stem balloon, use the first hook.) Insert the remaining stem of the balloon into the vertical slits for a clean, finished look. If your balloon is not secure, twist the entire cup clockwise one-half turn so the ballon sits firmly on the cup.
Cut the cello/foil sheets into quarters. This will give you four 10" x 10" pieces. Gather the cello/foil squares in the middle and dip into the glue pan. Keep your glue pan at a low setting so that the glue is thick. Glue the foil directly to the MaxiCup™ II balloon cup. It will take approximately ten pieces of cello/foil to fill the cup.
Make a three-loop bow using the #9 purple ribbon. Add a few ribbon tails using the purple ribbon. Tie the bow with another piece of ribbon. Add some curling ribbon streamers for a little pizzaz.
Glue the bow to the bottom of the cello/foil. Insert the clear stick into the cup of the balloon. For added security, place a small amount of glue on the stick before inserting into the cup.
www.burtonandburton.com Phone 800-241-2094 + Fax 800-880-9759
AIR-FILL SOLUTIONS
BIRTHDAY PRINCESS WAND
115225Cello Sheets–Twisted Ribbons–Pink
972098#9 Sheer Ribbon–Purple
D31641Curling Ribbon–Holographic Cerise
instructions:
HI795Qualatex®
Hand Inflator
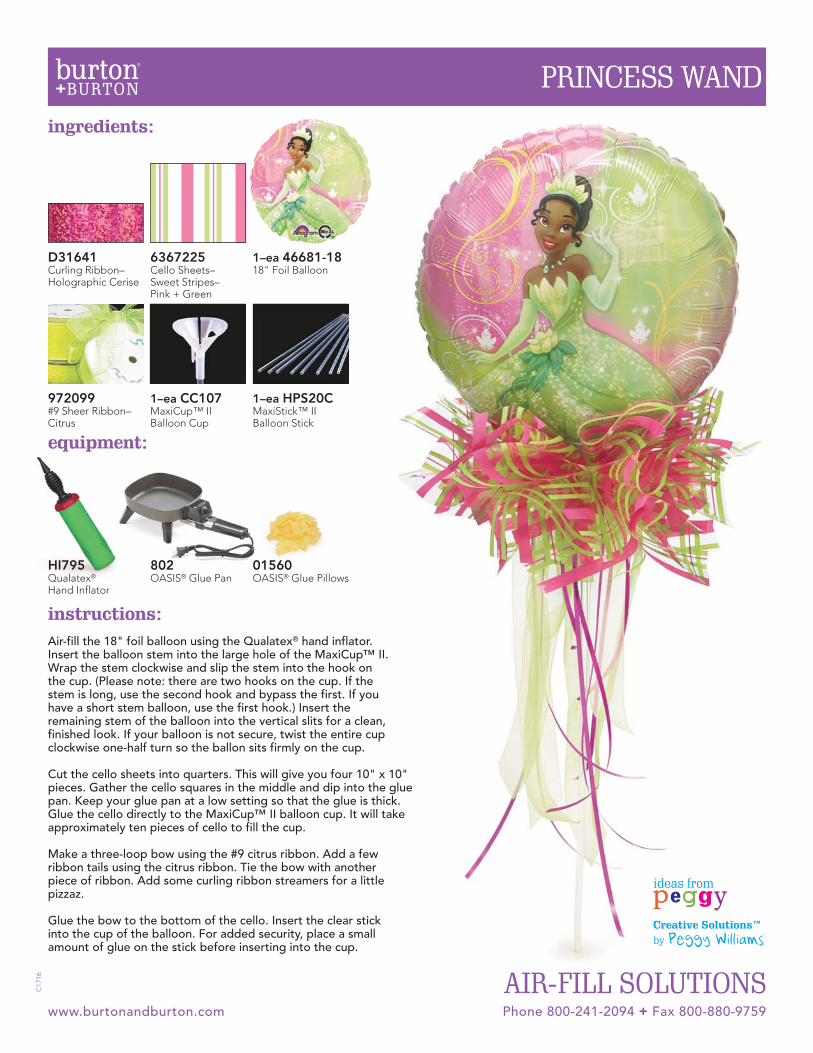
1–ea 46681-1818" Foil Balloon
ingredients:
1–ea CC107MaxiCup™ IIBalloon Cup
1–ea HPS20CMaxiStick™ IIBalloon Stick
802OASIS® Glue Pan
01560OASIS® Glue Pillows
972099#9 Sheer Ribbon–Citrus
6367225Cello Sheets–Sweet Stripes–Pink + Green
equipment:
C17
16
Air-fill the 18" foil balloon using the Qualatex® hand inflator. Insert the balloon stem into the large hole of the MaxiCup™ II. Wrap the stem clockwise and slip the stem into the hook on the cup. (Please note: there are two hooks on the cup. If the stem is long, use the second hook and bypass the first. If you have a short stem balloon, use the first hook.) Insert the remaining stem of the balloon into the vertical slits for a clean, finished look. If your balloon is not secure, twist the entire cup clockwise one-half turn so the ballon sits firmly on the cup.
Cut the cello sheets into quarters. This will give you four 10" x 10" pieces. Gather the cello squares in the middle and dip into the glue pan. Keep your glue pan at a low setting so that the glue is thick. Glue the cello directly to the MaxiCup™ II balloon cup. It will take approximately ten pieces of cello to fill the cup.
Make a three-loop bow using the #9 citrus ribbon. Add a few ribbon tails using the citrus ribbon. Tie the bow with another piece of ribbon. Add some curling ribbon streamers for a little pizzaz.
Glue the bow to the bottom of the cello. Insert the clear stick into the cup of the balloon. For added security, place a small amount of glue on the stick before inserting into the cup.
www.burtonandburton.com Phone 800-241-2094 + Fax 800-880-9759
AIR-FILL SOLUTIONS
PRINCESS WAND
D31641Curling Ribbon–Holographic Cerise

C17
16
AIR-FILLSOLUTIONSby PEGGY WILLIAMS
R100 Floor Display shown in use.
instructions:
HI795Qualatex®
Hand Inflator
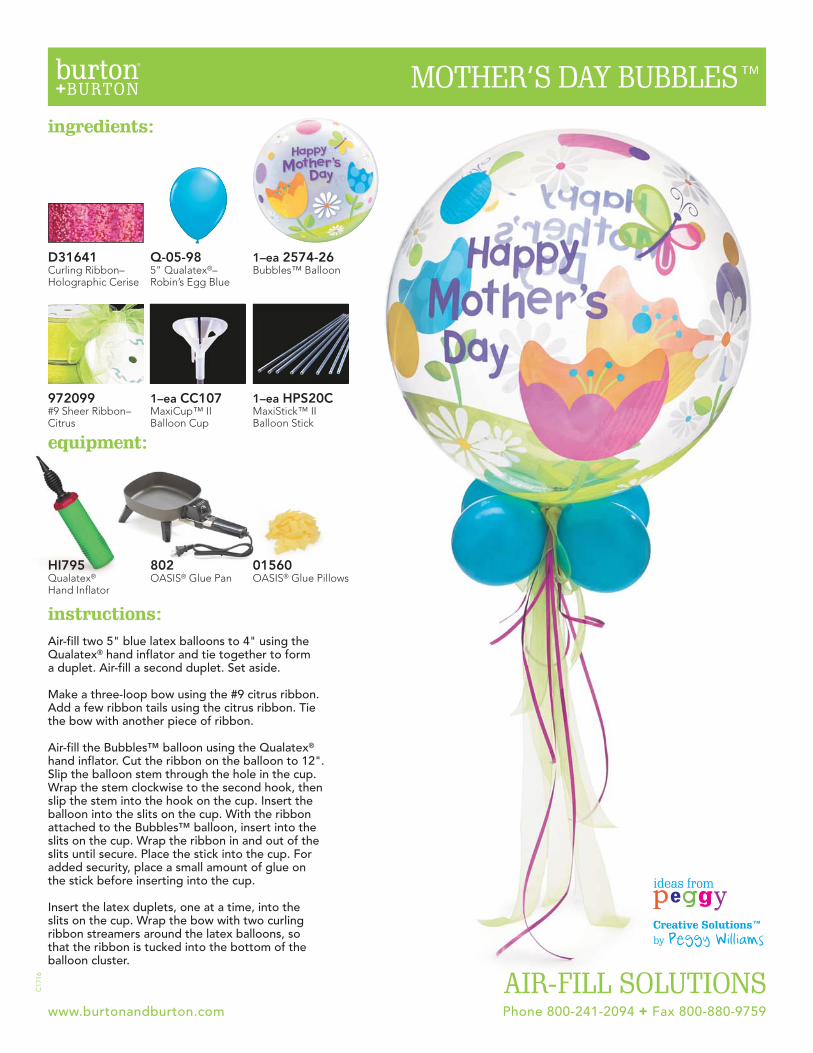
1–ea 2574-26Bubbles™ Balloon
ingredients:
1–ea CC107MaxiCup™ IIBalloon Cup
1–ea HPS20CMaxiStick™ IIBalloon Stick
802OASIS® Glue Pan
01560OASIS® Glue Pillows
972099#9 Sheer Ribbon–Citrus
Q-05-985" Qualatex®–Robin’s Egg Blue
equipment:
C17
16
Air-fill two 5" blue latex balloons to 4" using the Qualatex® hand inflator and tie together to form a duplet. Air-fill a second duplet. Set aside.
Make a three-loop bow using the #9 citrus ribbon. Add a few ribbon tails using the citrus ribbon. Tie the bow with another piece of ribbon.
Air-fill the Bubbles™ balloon using the Qualatex®
hand inflator. Cut the ribbon on the balloon to 12". Slip the balloon stem through the hole in the cup. Wrap the stem clockwise to the second hook, then slip the stem into the hook on the cup. Insert the balloon into the slits on the cup. With the ribbon attached to the Bubbles™ balloon, insert into the slits on the cup. Wrap the ribbon in and out of the slits until secure. Place the stick into the cup. For added security, place a small amount of glue on the stick before inserting into the cup.
Insert the latex duplets, one at a time, into the slits on the cup. Wrap the bow with two curling ribbon streamers around the latex balloons, so that the ribbon is tucked into the bottom of the balloon cluster.
www.burtonandburton.com Phone 800-241-2094 + Fax 800-880-9759
AIR-FILL SOLUTIONS
MOTHER’S DAY BUBBLES™
D31641Curling Ribbon–Holographic Cerise
instructions:
HI795Qualatex®
Hand Inflator
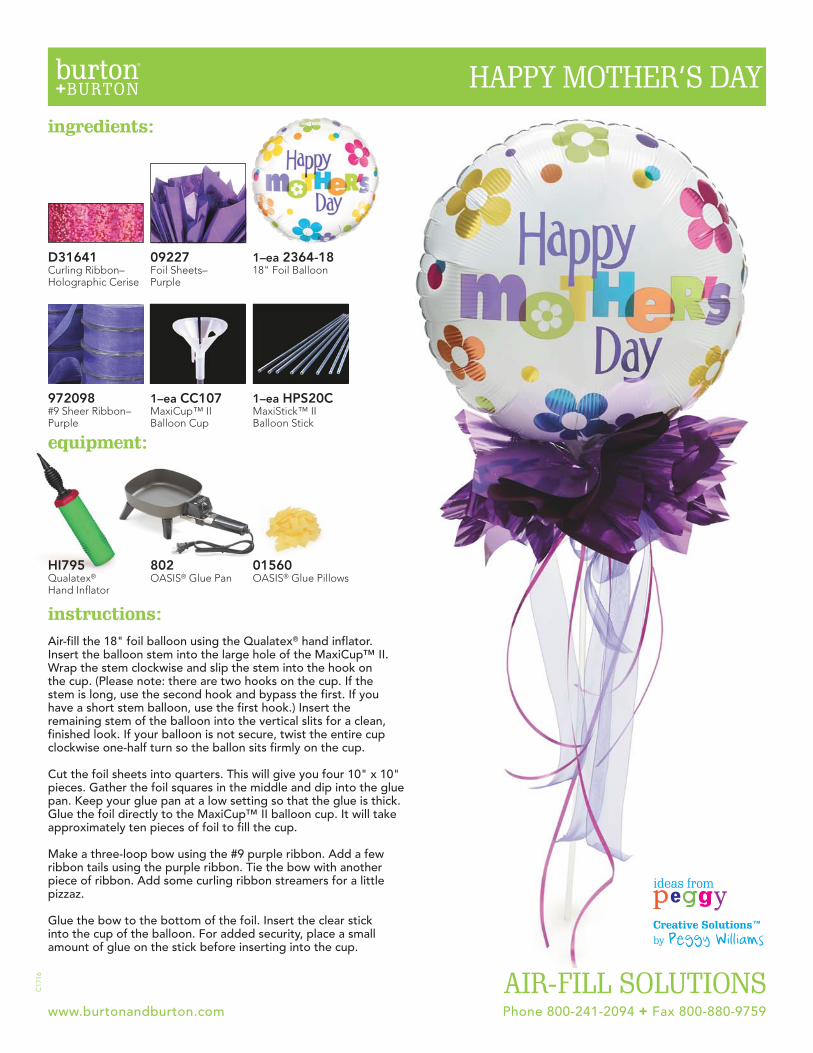
1–ea 2364-1818" Foil Balloon
ingredients:
1–ea CC107MaxiCup™ IIBalloon Cup
1–ea HPS20CMaxiStick™ IIBalloon Stick
802OASIS® Glue Pan
01560OASIS® Glue Pillows
972098#9 Sheer Ribbon–Purple
09227Foil Sheets–Purple
equipment:
C17
16
Air-fill the 18" foil balloon using the Qualatex® hand inflator. Insert the balloon stem into the large hole of the MaxiCup™ II. Wrap the stem clockwise and slip the stem into the hook on the cup. (Please note: there are two hooks on the cup. If the stem is long, use the second hook and bypass the first. If you have a short stem balloon, use the first hook.) Insert the remaining stem of the balloon into the vertical slits for a clean, finished look. If your balloon is not secure, twist the entire cup clockwise one-half turn so the ballon sits firmly on the cup.
Cut the foil sheets into quarters. This will give you four 10" x 10" pieces. Gather the foil squares in the middle and dip into the glue pan. Keep your glue pan at a low setting so that the glue is thick. Glue the foil directly to the MaxiCup™ II balloon cup. It will take approximately ten pieces of foil to fill the cup.
Make a three-loop bow using the #9 purple ribbon. Add a few ribbon tails using the purple ribbon. Tie the bow with another piece of ribbon. Add some curling ribbon streamers for a little pizzaz.
Glue the bow to the bottom of the foil. Insert the clear stick into the cup of the balloon. For added security, place a small amount of glue on the stick before inserting into the cup.
www.burtonandburton.com Phone 800-241-2094 + Fax 800-880-9759
AIR-FILL SOLUTIONS
HAPPY MOTHER’S DAY
D31641Curling Ribbon–Holographic Cerise
instructions:
HI795Qualatex®
Hand Inflator
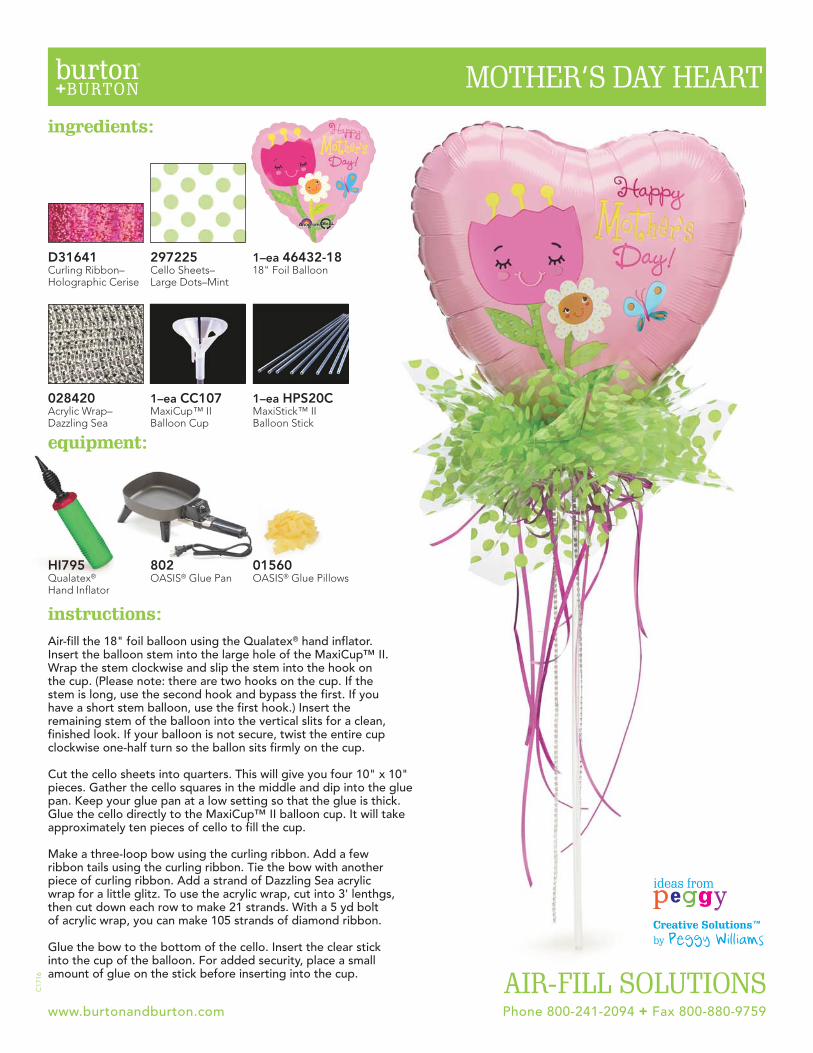
1–ea 46432-1818" Foil Balloon
ingredients:
1–ea CC107MaxiCup™ IIBalloon Cup
1–ea HPS20CMaxiStick™ IIBalloon Stick
802OASIS® Glue Pan
01560OASIS® Glue Pillows
297225Cello Sheets–Large Dots–Mint
equipment:
C17
16
Air-fill the 18" foil balloon using the Qualatex® hand inflator. Insert the balloon stem into the large hole of the MaxiCup™ II. Wrap the stem clockwise and slip the stem into the hook on the cup. (Please note: there are two hooks on the cup. If the stem is long, use the second hook and bypass the first. If you have a short stem balloon, use the first hook.) Insert the remaining stem of the balloon into the vertical slits for a clean, finished look. If your balloon is not secure, twist the entire cup clockwise one-half turn so the ballon sits firmly on the cup.
Cut the cello sheets into quarters. This will give you four 10" x 10" pieces. Gather the cello squares in the middle and dip into the glue pan. Keep your glue pan at a low setting so that the glue is thick. Glue the cello directly to the MaxiCup™ II balloon cup. It will take approximately ten pieces of cello to fill the cup.
Make a three-loop bow using the curling ribbon. Add a few ribbon tails using the curling ribbon. Tie the bow with another piece of curling ribbon. Add a strand of Dazzling Sea acrylic wrap for a little glitz. To use the acrylic wrap, cut into 3' lenthgs, then cut down each row to make 21 strands. With a 5 yd bolt of acrylic wrap, you can make 105 strands of diamond ribbon.
Glue the bow to the bottom of the cello. Insert the clear stick into the cup of the balloon. For added security, place a small amount of glue on the stick before inserting into the cup.
www.burtonandburton.com Phone 800-241-2094 + Fax 800-880-9759
AIR-FILL SOLUTIONS
MOTHER’S DAY HEART
028420Acrylic Wrap–Dazzling Sea
D31641Curling Ribbon–Holographic Cerise
instructions:
HI795Qualatex®
Hand Inflator
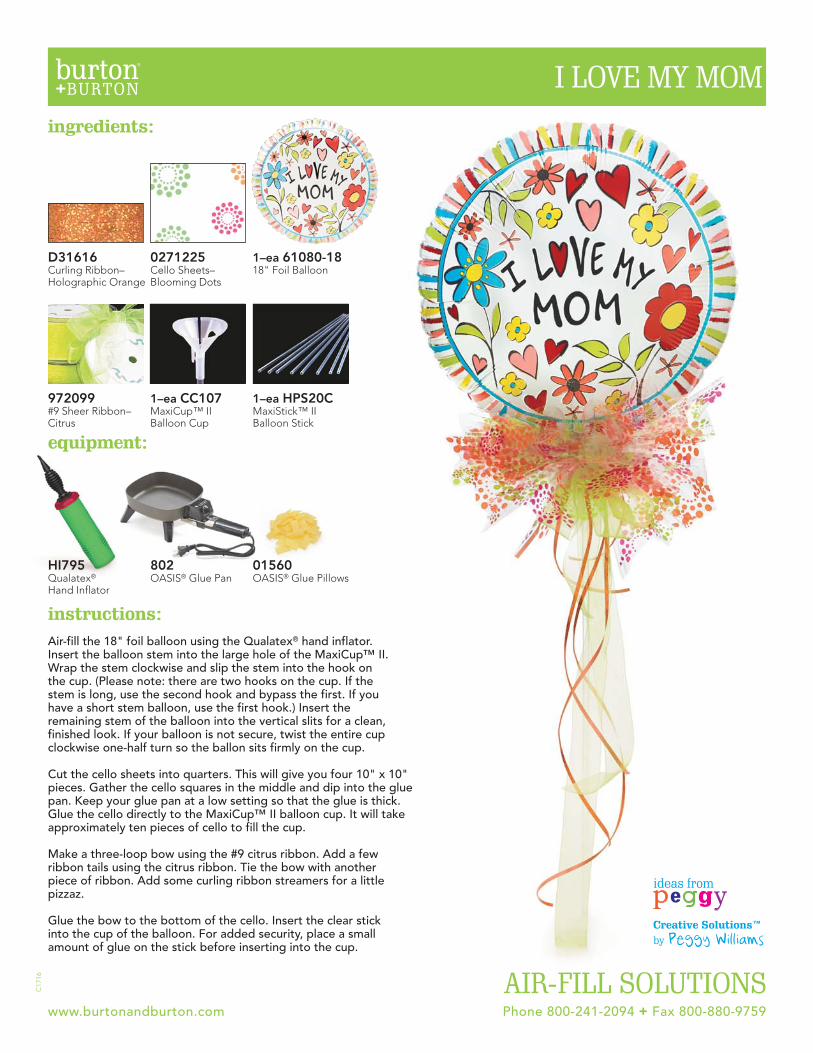
1–ea 61080-1818" Foil Balloon
ingredients:
1–ea CC107MaxiCup™ IIBalloon Cup
1–ea HPS20CMaxiStick™ IIBalloon Stick
802OASIS® Glue Pan
01560OASIS® Glue Pillows
972099#9 Sheer Ribbon–Citrus
0271225Cello Sheets–Blooming Dots
equipment:
C17
16
Air-fill the 18" foil balloon using the Qualatex® hand inflator. Insert the balloon stem into the large hole of the MaxiCup™ II. Wrap the stem clockwise and slip the stem into the hook on the cup. (Please note: there are two hooks on the cup. If the stem is long, use the second hook and bypass the first. If you have a short stem balloon, use the first hook.) Insert the remaining stem of the balloon into the vertical slits for a clean, finished look. If your balloon is not secure, twist the entire cup clockwise one-half turn so the ballon sits firmly on the cup.
Cut the cello sheets into quarters. This will give you four 10" x 10" pieces. Gather the cello squares in the middle and dip into the glue pan. Keep your glue pan at a low setting so that the glue is thick. Glue the cello directly to the MaxiCup™ II balloon cup. It will take approximately ten pieces of cello to fill the cup.
Make a three-loop bow using the #9 citrus ribbon. Add a few ribbon tails using the citrus ribbon. Tie the bow with another piece of ribbon. Add some curling ribbon streamers for a little pizzaz.
Glue the bow to the bottom of the cello. Insert the clear stick into the cup of the balloon. For added security, place a small amount of glue on the stick before inserting into the cup.
www.burtonandburton.com Phone 800-241-2094 + Fax 800-880-9759
AIR-FILL SOLUTIONS
I LOVE MY MOM
D31616Curling Ribbon–Holographic Orange

www.burtonandburton.com Phone 800-241-2094 + Fax 800-880-9759
C17
16
AIR-FILLSOLUTIONSby PEGGY WILLIAMS
R100 Floor Display shown in use.

instructions:
HI795Qualatex®
Hand Inflator
1–ea 44588-1818" Foil Balloon
ingredients:
1–ea CC107MaxiCup™ IIBalloon Cup
1–ea HPS20CMaxiStick™ IIBalloon Stick
802OASIS® Glue Pan
01560OASIS® Glue Pillows
972099#9 Sheer Ribbon–Citrus
09227Foil Sheets–Purple
equipment:
C17
16
Air-fill the 18" foil balloon using the Qualatex® hand inflator. Insert the balloon stem into the large hole of the MaxiCup™ II. Wrap the stem clockwise and slip the stem into the hook on the cup. (Please note: there are two hooks on the cup. If the stem is long, use the second hook and bypass the first. If you have a short stem balloon, use the first hook.) Insert the remaining stem of the balloon into the vertical slits for a clean, finished look. If your balloon is not secure, twist the entire cup clockwise one-half turn so the ballon sits firmly on the cup.
Cut the cello/foil sheets into quarters. This will give you four 10" x 10" pieces. Gather the cello/foil squares in the middle and dip into the glue pan. Keep your glue pan at a low setting so that the glue is thick. Glue the foil directly to the MaxiCup™ II balloon cup. It will take approximately ten pieces of cello/foil to fill the cup.
Make a three-loop bow using the #9 citrus ribbon. Add a few ribbon tails using the citrus ribbon. Tie the bow with another piece of ribbon. Add some curling ribbon streamers for a little pizzaz.
Glue the bow to the bottom of the cello/foil. Insert the clear stick into the cup of the balloon. For added security, place a small amount of glue on the stick before inserting into the cup.
www.burtonandburton.com Phone 800-241-2094 + Fax 800-880-9759
AIR-FILL SOLUTIONS
CONGRATS GRAD
532225Cello Sheets–Small Dots–Black
D31609Curling Ribbon–Holographic Purple
instructions:
HI795Qualatex®
Hand Inflator
1–ea 44991-1818" Foil Balloon
ingredients:
1–ea CC107MaxiCup™ IIBalloon Cup
1–ea HPS20CMaxiStick™ IIBalloon Stick
802OASIS® Glue Pan
01560OASIS® Glue Pillows
9709608#9 Sheer Ribbon–Orange
0271225Cello Sheets–Blooming Dots
C17
16
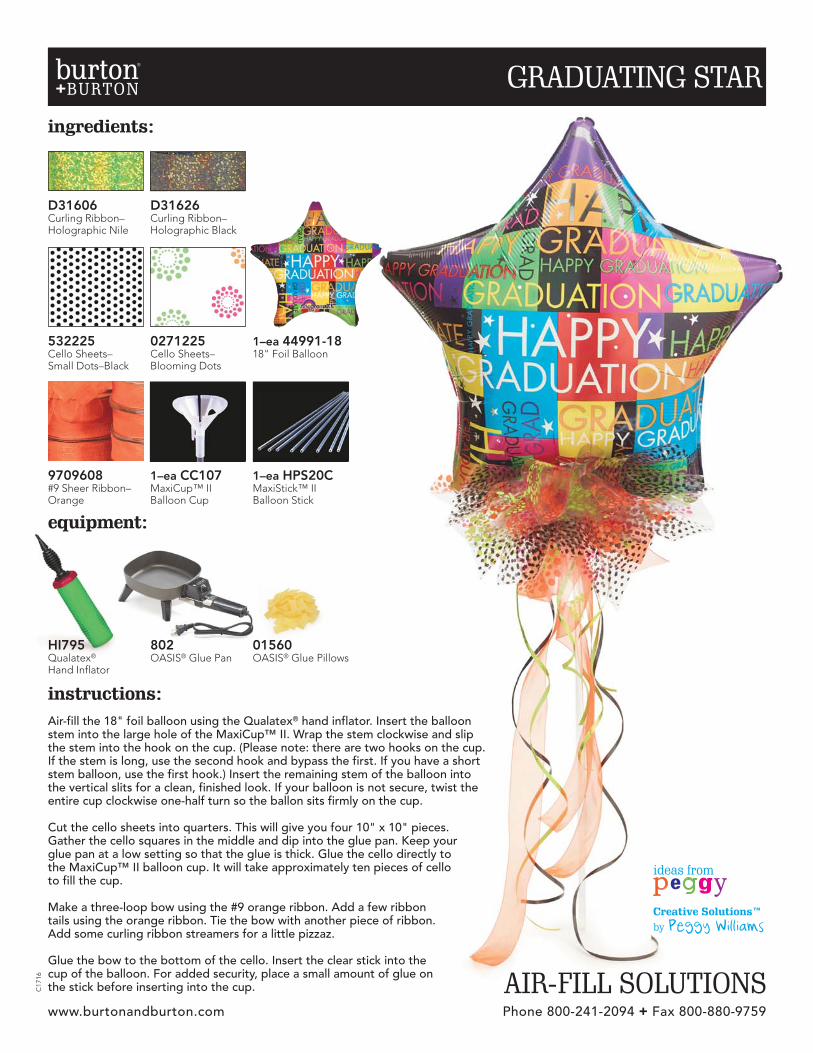
Air-fill the 18" foil balloon using the Qualatex® hand inflator. Insert the balloonstem into the large hole of the MaxiCup™ II. Wrap the stem clockwise and slipthe stem into the hook on the cup. (Please note: there are two hooks on the cup. If the stem is long, use the second hook and bypass the first. If you have a short stem balloon, use the first hook.) Insert the remaining stem of the balloon into the vertical slits for a clean, finished look. If your balloon is not secure, twist the entire cup clockwise one-half turn so the ballon sits firmly on the cup.
Cut the cello sheets into quarters. This will give you four 10" x 10" pieces. Gather the cello squares in the middle and dip into the glue pan. Keep your glue pan at a low setting so that the glue is thick. Glue the cello directly to the MaxiCup™ II balloon cup. It will take approximately ten pieces of cello to fill the cup.
Make a three-loop bow using the #9 orange ribbon. Add a few ribbon tails using the orange ribbon. Tie the bow with another piece of ribbon. Add some curling ribbon streamers for a little pizzaz.
Glue the bow to the bottom of the cello. Insert the clear stick into the cup of the balloon. For added security, place a small amount of glue on the stick before inserting into the cup.
www.burtonandburton.com Phone 800-241-2094 + Fax 800-880-9759
AIR-FILL SOLUTIONS
GRADUATING STAR
532225Cello Sheets–Small Dots–Black
D31626Curling Ribbon–Holographic Black
D31606Curling Ribbon–Holographic Nile
equipment:

instructions:
HI795Qualatex®
Hand Inflator
1–ea 77359-1818" Foil Balloon
ingredients:
1–ea CC107MaxiCup™ IIBalloon Cup
1–ea HPS20CMaxiStick™ IIBalloon Stick
802OASIS® Glue Pan
01560OASIS® Glue Pillows
974994#9 Sheer Ribbon–Black
41227Foil Sheets–Fuchsia
C17
16
Air-fill the 18" foil balloon using the Qualatex® hand inflator. Insert the balloonstem into the large hole of the MaxiCup™ II. Wrap the stem clockwise and slipthe stem into the hook on the cup. (Please note: there are two hooks on the cup. If the stem is long, use the second hook and bypass the first. If you have a short stem balloon, use the first hook.) Insert the remaining stem of the balloon into the vertical slits for a clean, finished look. If your balloon is not secure, twist the entire cup clockwise one-half turn so the ballon sits firmly on the cup.
Cut the foil sheets into quarters. This will give you four 10" x 10" pieces. Gather the foil squares in the middle and dip into the glue pan. Keep your glue pan at a low setting so that the glue is thick. Glue the foil directly to the MaxiCup™ II balloon cup. It will take approximately ten pieces of foil to fill the cup.
Make a three-loop bow using the #9 black ribbon. Add a few ribbon tails using the black ribbon. Tie the bow with another piece of ribbon. Add some curling ribbon streamers and a strand of Dazzling Sea acrylic wrap for a little glitz. To use the acrylic wrap, cut into 3' lenthgs, then cut down each row to make 21 strands. With a 5 yd bolt of acrylic wrap, you can make 105 strands of diamond ribbon.
Glue the bow to the bottom of the foil. Insert the clear stick into the cup of the balloon. For added security, place a small amount of glue on the stick before inserting into the cup.
www.burtonandburton.com Phone 800-241-2094 + Fax 800-880-9759
AIR-FILL SOLUTIONS
CHIC GRADUATE
028420Acrylic Wrap–Dazzling Sea
D31641Curling Ribbon–Holographic Cerise
BZ3401Curling Ribbon–Zebra Stripe
equipment: