Embed Size (px)
Citation preview

CHICK EMBRYOLOGY
Hatching Eggs in the Classroom
K-STATE RESEARCH AND EXTENSION- SEDGWICK COUNTY7001 W. 21st St. North
Wichita, KS 67205-1759(316) 722-7721
FAX (316) [email protected]
http://www.sedgwickcountyextension.org

Cooperative Extension Service Sedgwick County Extension Education Center7001 W. 21st St. NorthWichita, KS 67205-1759316-722-7721FAX 316-722-7727
HOME PAGEhttp://www.oznet.ksu.edu/sedgwick
Page 1
CHICK EMBRYOLOGYHatching Chicks in the Classroom
One of the greatest miracles of nature is the rapid transformation of a seeminglylifeless egg into a new living organism. Egg hatching provides a rare opportunityto study the stages of embryonic growth during the 21 days of incubation, andgives students a chance to relate the stages of chick development to that of otherembryos.
Although chick embryos start to develop as soon as they are formed in the hen’s body, many things can affect their speed of growth and their ability to formhealthy chicks. Variations in temperature can have a large impact on thegrowing embryo. Growth will temporarily or permanently cease if thetemperature drops below 96°F or above 103°F. Too much or too little humiditycan result in weak embryos or a reduced number of chicks that are able to hatch.
This lesson will help guide students through the process of controlling severalenvironmental variables during the incubation process as they watch the growthand development of chick embryos in the classroom.
How do chicks grow and develop while they are in the egg?
What factors affect embryo growth?
How can healthy chicks be hatched in the classroom?
Page 2
OBJECTIVES
U Students will describe the 21 day process of chick embryo development
U Students will list the factors that affect the development of the embryo
U Students will compare and contrast the development of the embryos of variousanimals
U Students will demonstrate their knowledge of classroom incubation and recordkeeping procedures
MATERIALS
º Incubator (May be purchased at the store or constructed in the classroom)
º Fertile chicken eggs (Your school will receive information and order forms from Sedgwick CountyExtension 4-H in early February. Fertile egg pick-up day is usually scheduled forlate March or early April.)
º Chick Embryology video (Available for purchase or loan from Sedgwick County Extension 4-H)
º “Charlie the Chick” handouts (One per student)
º Chick Incubation Calendar (One per class)
º Brooder box (Large cardboard, wood or metal box with heater or lamp)
º Water Container with marbles or medium-sized pebbles
º Chick starter food and chick feeder container
Page 3
PREPARATION ACTIVITIES
& Introduce students to the chick embryology project with a classroom discussion. Use the following questions as a guide:
* Have you ever hatched a chick before?
* If so, what do you remember about it?
* Was there anything that surprised you about the chick hatching you didbefore? What was it?
* When we hatch our chicks in the classroom, there are some things wewill need to do to make sure that the eggs hatch. What do you think theymight be? (Make a list- some items might be care of eggs before they go into theincubator, temperature and humidity control during incubation, turningeggs, recordkeeping, care of chicks after hatching, etc)
* Why do you think each one is important?
* What will happen if the eggs are not cared for before or duringincubation?
* How might we make sure that the eggs get proper care duringincubation?
Discuss the use of the calendar chart as a way to make sure that the eggs getthe care they need to hatch into healthy chicks. Make plans as a class to shareresponsibility for temperature monitoring, egg turning, keeping the waterreservoir filled (for adequate humidity), and recordkeeping.
& Many changes need to happen inside the egg before the chick is ready to hatch. There are several ways that students can observe embryonic growth before andduring the incubation process:
* Show the Chick Embryology video available from the Sedgwick CountyOffice of K-State Research and Extension
* Click on the “Chick Embryology” link on the Sedgwick County Extensionwebsite:
http://www.SedgwickCountyExtension.com
Page 4
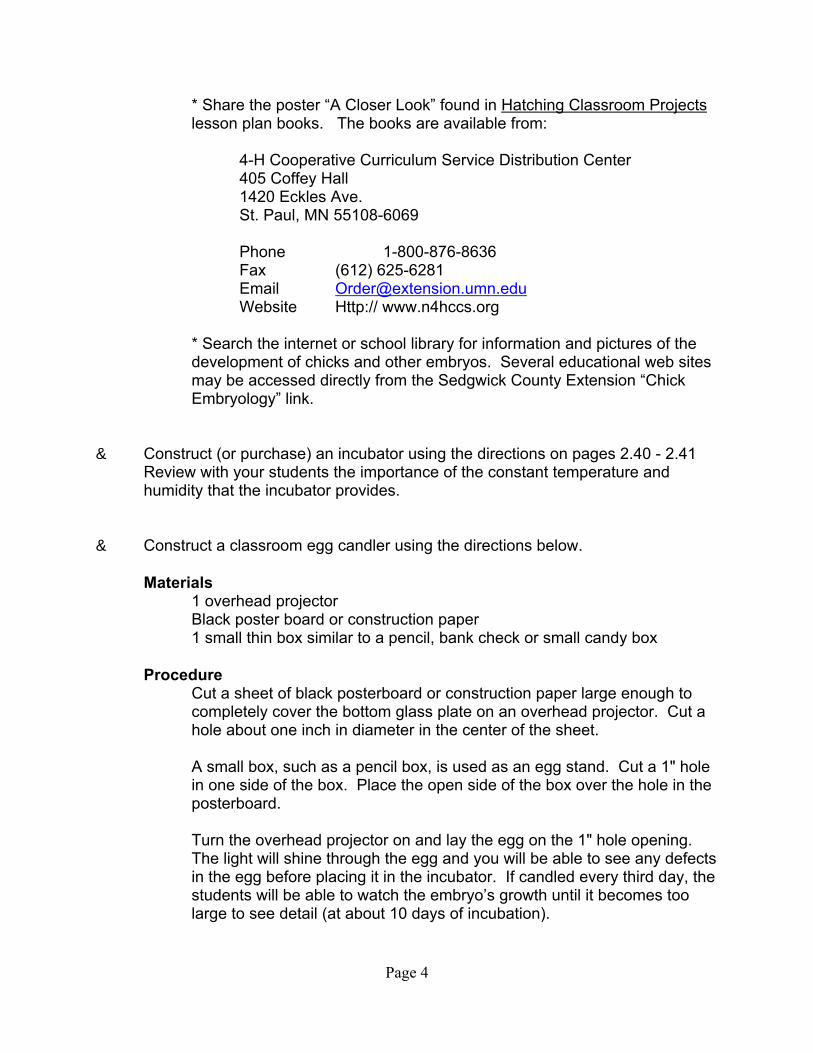
* Share the poster “A Closer Look” found in Hatching Classroom Projectslesson plan books. The books are available from:
4-H Cooperative Curriculum Service Distribution Center405 Coffey Hall1420 Eckles Ave.St. Paul, MN 55108-6069
Phone 1-800-876-8636 Fax (612) 625-6281 Email [email protected] Http:// www.n4hccs.org
* Search the internet or school library for information and pictures of thedevelopment of chicks and other embryos. Several educational web sitesmay be accessed directly from the Sedgwick County Extension “ChickEmbryology” link.
& Construct (or purchase) an incubator using the directions on pages 2.40 - 2.41 Review with your students the importance of the constant temperature andhumidity that the incubator provides.
& Construct a classroom egg candler using the directions below.
Materials 1 overhead projector Black poster board or construction paper1 small thin box similar to a pencil, bank check or small candy box
Procedure Cut a sheet of black posterboard or construction paper large enough tocompletely cover the bottom glass plate on an overhead projector. Cut ahole about one inch in diameter in the center of the sheet.
A small box, such as a pencil box, is used as an egg stand. Cut a 1" holein one side of the box. Place the open side of the box over the hole in theposterboard.
Turn the overhead projector on and lay the egg on the 1" hole opening. The light will shine through the egg and you will be able to see any defectsin the egg before placing it in the incubator. If candled every third day, thestudents will be able to watch the embryo’s growth until it becomes toolarge to see detail (at about 10 days of incubation).
Page 5
Be careful not to candle any one egg too frequently. It is very easy todamage or kill the developing embryos if the eggs are handled excessivelyduring incubation.
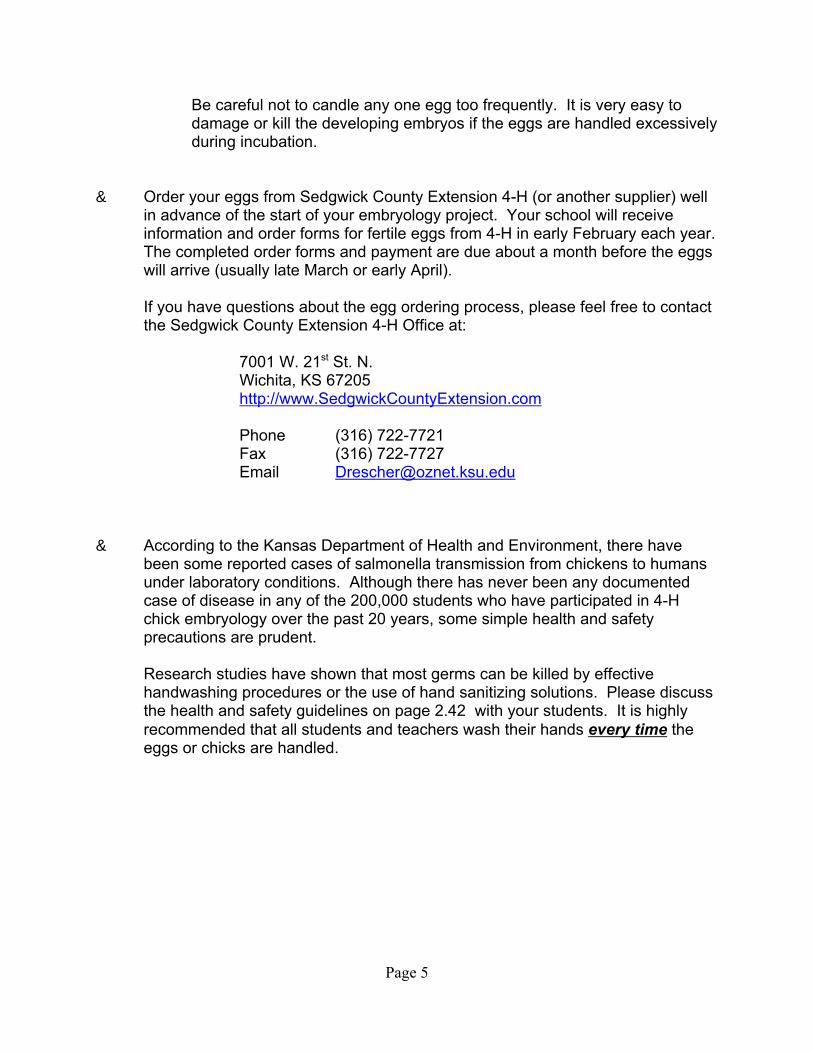
& Order your eggs from Sedgwick County Extension 4-H (or another supplier) wellin advance of the start of your embryology project. Your school will receiveinformation and order forms for fertile eggs from 4-H in early February each year. The completed order forms and payment are due about a month before the eggswill arrive (usually late March or early April).
If you have questions about the egg ordering process, please feel free to contactthe Sedgwick County Extension 4-H Office at:
7001 W. 21st St. N.Wichita, KS 67205http://www.SedgwickCountyExtension.com
Phone (316) 722-7721 Fax (316) 722-7727Email [email protected]
& According to the Kansas Department of Health and Environment, there havebeen some reported cases of salmonella transmission from chickens to humansunder laboratory conditions. Although there has never been any documentedcase of disease in any of the 200,000 students who have participated in 4-Hchick embryology over the past 20 years, some simple health and safetyprecautions are prudent.
Research studies have shown that most germs can be killed by effectivehandwashing procedures or the use of hand sanitizing solutions. Please discussthe health and safety guidelines on page 2.42 with your students. It is highlyrecommended that all students and teachers wash their hands every time the eggs or chicks are handled.
Page 6
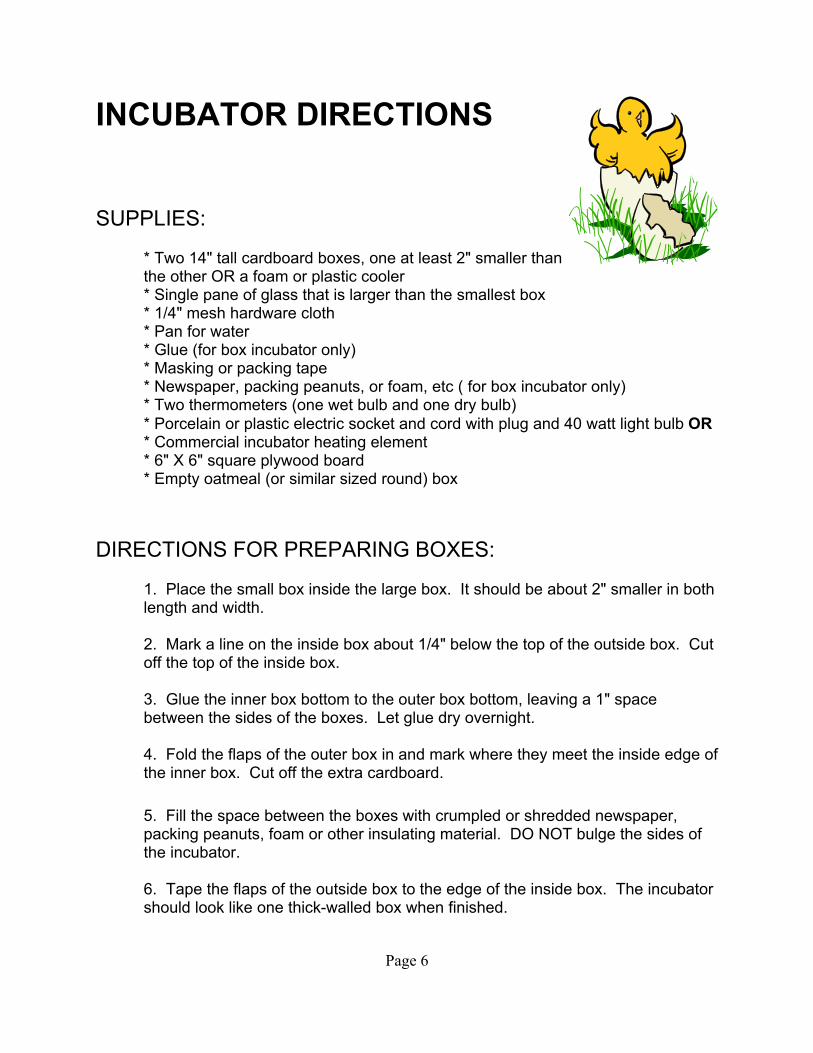
INCUBATOR DIRECTIONS
SUPPLIES:
* Two 14" tall cardboard boxes, one at least 2" smaller thanthe other OR a foam or plastic cooler* Single pane of glass that is larger than the smallest box* 1/4" mesh hardware cloth* Pan for water* Glue (for box incubator only)* Masking or packing tape * Newspaper, packing peanuts, or foam, etc ( for box incubator only)* Two thermometers (one wet bulb and one dry bulb)* Porcelain or plastic electric socket and cord with plug and 40 watt light bulb OR* Commercial incubator heating element* 6" X 6" square plywood board* Empty oatmeal (or similar sized round) box
DIRECTIONS FOR PREPARING BOXES:
1. Place the small box inside the large box. It should be about 2" smaller in bothlength and width.
2. Mark a line on the inside box about 1/4" below the top of the outside box. Cutoff the top of the inside box.
3. Glue the inner box bottom to the outer box bottom, leaving a 1" spacebetween the sides of the boxes. Let glue dry overnight.
4. Fold the flaps of the outer box in and mark where they meet the inside edge ofthe inner box. Cut off the extra cardboard.
5. Fill the space between the boxes with crumpled or shredded newspaper,packing peanuts, foam or other insulating material. DO NOT bulge the sides ofthe incubator.
6. Tape the flaps of the outside box to the edge of the inside box. The incubatorshould look like one thick-walled box when finished.
Page 7
MAKING THE INCUBATOR:
1. Use metal shears to cut a rectangle of hardware cloth that is 4" longer andwider than the inside measurement of the prepared box or cooler.
2. Cut out a 2" square at each corner of the hardware cloth.
3. Wear heavy work gloves for this step! Fold down 2" of the hardware cloth allaround the rectangle to a 90E angle.
4. Place the water pan in the bottom of the incubator and put the hardware clothover it.
5. Install a commercial heating element in the incubator as directed in theinstructions sent with the unit OR
6. Mount a porcelain or plastic socket on a board 6" square. Place the mountingboard in the center of the hardware cloth. Put a 40 watt light bulb in the socket.
7. Place a cardboard tube around the light (an oatmeal box is good). To reducethe fire hazard, do not let the tube come in contact with the light bulb or the glasscover.
8. Tape the edges of the glass cover and position it on top of the incubator. Theglass is adjusted to regulate the temperature and humidity. It should NOTcompletely cover the opening- the eggs need air to develop properly.
9. Install the thermometers so the bulbs are level with the eggs, but do not letthem touch the eggs.
10. You may wish to cover the inside of the box with self-stick plastic to help withclean-up after the hatch.
11. The temperature on the dry bulb thermometer should ideally be 99.5E-100.5E(acceptable range is 98.5E to 101.5E).
12. The humidity for the first 18 days of incubation should ideally be 60%. Thetemperature of the wet bulb at this humidity should be between 83E and 87E. Forthe last 4 days of incubation increase the humidity to 65% to 70%; a wet bulbtemperature of 87E to 91E.
Page 8
PROTECT HEALTH WITH PROPER HANDWASHING SKILLS
The Center for Disease Control has expressedconcern about chicks and ducklings as pets because of the possibility of salmonella infections. Since 1980, more than 200,000 Kansas studentshave participated in classroom 4-H ChickEmbryology programs. There has not been asingle reported case of salmonella infection fromcontact with eggs or chicks during that time.
In the interest of insuring the health of your students during this exciting and importantproject, here are some handwashing guidelines to follow EVERY time the chicks oreggs are handled during this project.
Most disease-carrying organisms can be effectively "washed away" by following theserecommended steps.
* Use SOAP and warm RUNNING WATER* RUB your hands vigorously with soap and water for 20 seconds
(about the time it takes your students to sing the Alphabet song)* WASH the back of hands, wrists, between fingers and under fingernails* RINSE well* DRY thoroughly with a paper towel* TURN OFF water faucets with an elbow or paper towel
If there is no access to running water try anti-bacterial lotions or hand sanitizers. Twoproducts investigated at K-State (Vionex No Rinse Gel Antiseptic Handwash and PurellInstant Hand Sanitizer) are extremely effective in killing salmonella typhimuriumbacteria. Within 30 seconds, both products killed 98.78% to 99.99% of the bacteria. Other similar products may equally be as effective, even though they were not part of this clinical trial.
A variety of anti-bacterial lotions and hand sanitizers are available at most grocery, drugor department stores. Your school nurse and food service personnel may already haveaccess to these products at your school.
(Handwashing instructions adapted from information presented by Helen Stucky Risdon, R.N.)
Page 9
PROCEDURAL STEPS
â Find a place in the school for the incubator where the temperature will ALWAYSbe above 65E. It is important to locate the incubator away from sources ofsunlight and/or drafts which might affect the temperature inside. Even a littlesun shining on the incubator for part of a day can easily raise the temperatureinside to a lethal level (over 103E or under 96E for several hours, or 105E for evena few minutes)!
Check to make sure that the outlet you will use is “on” 24 hours a day and theincubator will not be unplugged for cleaning or other purposes at night. If theeggs will be turned by hand, you will need to make arrangements to get into theschool at least once a day on weekends and/or holidays to turn the eggs.
Plug in the incubator and regulate the temperature for 48 to 96 hours before youplan to begin the egg incubation. Still air incubators (the most commonlyavailable type) are most effective when the temperature inside is 99.5E- 100.5E. If the incubator is a purchased or used one, you may wish to check thetemperature with a scientific thermometer before placing the eggs inside.
ã After picking up the eggs, use your egg candler to check for cracked or infertileeggs before placing them in the incubator. If you have access to the internet atyour school, you and your students can practice candling virtual eggs on the 4-HCooperative Curriculum Service (CCS) website at:
http://ulisse.cas.psu.edu/4hembryo/index.html
ä Place the eggs in the incubator within 24 to 48 hours of picking them up if at allpossible. Be very careful to keep the eggs at a temperature between 50E and65E and 70% humidity while they are out of the incubator. Store them in an eggcarton with the small end down and turn them once a day if they are held out ofthe incubator for more than 24 hours.
Page 10
å Place the eggs in the regulated incubator. If using an automatic turner, put thesmall end of the eggs down into the cups.
If turning the eggs by hand, use a pencil to write an “X” on one side of the egg,and an “O” on the other. Lay the eggs carefully on the screen with all the “X” orall the “O” marks facing up. Make sure that the eggs are turned 180E three timesa day. The “X” and “O” marks can help students make sure that all the eggs areturned each time.
Check the temperature every time the eggs are turned. As the embryos growthey begin to produce their own body heat, so minor adjustments of the incubatormay be needed. Remember to adjust the temperature only a little at a time. You will need to wait at least 4 hours for the incubator to reach its newequilibrium temperature.
Keep the water pan(s) full at all times by pouring lukewarm water into thereservoirs as needed. NEVER allow the water to touch the eggs.
æ Turn the eggs three times each day (and at LEAST once a day on weekends)until the 18th day of incubation. Use the incubation calendar on page 2.45 and/orindividual learning journals to record all egg care activities (turning times, incubator temperatures, water added, candling, etc.) and student observationsthroughout the incubation process.
Stop turning the eggs three days before hatching (18 days of incubation). Ifusing an automatic turner, remove the eggs from the turner and lay the eggscarefully on the incubator screen. Clean the turner and disinfect it with a solutionof liquid chlorine bleach and water (1:4) that is sprayed or wiped over ALL thesurfaces (do not rinse), and put it away.
ç About 24 hours before the eggs will hatch, it is possible to hear the chickspeeping in the shell. You may begin to see cracks and chips in the shells soonafter this. Some chicks may hatch very quickly; others will take as long as 24hours to emerge.
Increased incubator humidity will help the chicks hatch, so you may want to placeseveral dish sponges in the incubator on the 18th day of incubation. Keep themmoist until the last chick has hatched, then remove and discard them.
Do NOT help the chicks from the shell. If they are unable to hatch on their own,there are usually have developmental abnormalities that will prevent the chicksfrom surviving once they are hatched.

Page 11
è Leave the hatched chicks in the incubator until they are mostly dry (about 3hours), then move them to a brooder box (see page 2.51) to continue the dryingprocess. The temperature in the brooder should be about 95E .
It is easy to tell by observation if the temperature in the brooder box is correct:
* If chicks are clustered together under the light (or heat source), thetemperature is not high enough
* If the chicks are as far as possible away from the light (or heat source),the temperature is too high.
* If chicks are evenly spaced throughout the incubator, the temperature isjust right.
é Provide clean water at least once a day in chick watering jar or in a shallow dishfilled with clean pebbles or marbles. You will need to allow 1/2 gallon of waterdaily for each 25 chicks. NEVER allow the chicks to run out of water!
For the first 2 days add 3 tablespoons of table sugar to each quart of lukewarmwater to give the chicks extra energy. Use plain water after that. DIP THE BEAKOF EACH CHICK IN THE WATER BEFORE YOU TURN IT LOOSE. Thisteaches the chicks how and where to drink and increases their survival rate.
Provide a commercial chick starter as soon as the chicks are dry enough to gointo the brooder. Sprinkle some feed on a piece of cardboard for the first 2 days,then put the feed in low troughs or a chick feeder if either is available. Never letthe chicks run out of feed!
ê If you do not have access to a suitable home for your chicks, you may returnthem to Sedgwick County Extension 4-H on the chick return day listed in theinformation packet. The unwanted chicks will be placed with local 4-H membersor sent to a nearby family farm.
If you have questions or concerns about any part of the chick embryologyprogram, please contact the Sedgwick County Extension 4-H Office at
Address 7001 W. 21st St. N.Wichita, KS 67205
Phone (316) 722-7721Fax (316) 722-7727Email [email protected]
Page 12
ë About 60 hours after the first chicks have hatched, turn the incubator off anddiscard the remaining unhatched eggs. Some classes like to open theunhatched eggs and examine the partly formed embryos. Use caution duringthis process since some eggs may be decayed enough inside for the contents to“explode” when the shell is cut.
As soon as the incubator cools enough to handle safely, scrub the inside with asoap solution to remove dirt and debris. Rinse thoroughly. An incubator that isallowed to sit even overnight is MUCH more difficult to clean! Disinfect theincubator with a solution of liquid chlorine bleach and water (1:4) that is sprayedor wiped over ALL the surfaces (do not rinse), and put it away.
11 After completing the chick incubation project, use one or more of the activitiesbelow to help your students analyze and integrate their experience.
* Calculate the daily, weekly, and 3-week average incubator temperatures. Chick embryos develop best at a steady temperature of 99.5E to 100.5Ethat does not vary significantly over the course of the 21 day incubationperiod.
- What were the average temperatures during this incubation? - Were the temperatures steady for the entire 21 days?- Were the temperatures consistently within the target range?- Was it difficult to keep the incubator temperature constant? What might affect it and why?- Using the information you have gathered, how might you changethe incubation process next time? Why?
* Have a class discussion about the chick embryology experience usingthe following questions as a guide:
- Why was it important to mark the eggs in the incubator? - How did you keep the humidity at the proper level in the incubator?- Was it difficult to keep the incubator at the correct temperature and humidity? Why or why not?- Can you think of other ways that you could have kept a constant
temperature and humidity? - Could you have done it if there was no electricity? How?
Page 13
- Was there anything that surprised you about the process of hatching eggs? What was it? Why did it surprise you?
- Was there anything that you would do differently if you were to hatch chicks again? What is it?
- Compare the development of a chick embryo to that of other kindsof embryos. How are they the same? How are they different?
- What does the chick embryo need to grow? How does it get whatit needs? Does every embryo need these things? Do otherembryos get what they need in the same way? Why do you thinkthat is so?
- Once the chick is hatched, what does it need to grow? Compare the needs before hatching with the needs after hatching. How arethey the same, and how are they different?
- How do the needs of other animal babies compare to the needs ofchicks? List the differences and similarities.
- What things do you need to grow up strong and healthy? Compare your needs to a chick’s needs. How are they different and thesame?
- How is the life cycle of a chick the same as yours? How is it the same as other animals? What are some things that all animals have incommon?
* Divide the class into teams of 3 to 5 students. Each team should make adisplay, design a game, draw pictures, or write stories about chick embryology. Encourage the students to share their information with a group of youngerstudents at your school.

CHICK INCUBATION CALENDAR
Day 1 __________
Eggs Set: __________
Turned: Temperature_______ __________
_______ __________
Average __________
Day 2 __________
Turned: Temperature_______ __________
_______ __________
_______ __________
Average __________
Day 3 __________
Turned: Temperature_______ __________
_______ __________
_______ __________
Average __________
Day 4 __________
Turned: Temperature_______ __________
_______ __________
_______ __________
Average __________
Day 5 __________
Turned: Temperature_______ __________
_______ __________
_______ __________
Average __________
Day 6 __________
Turned: Temperature_______ __________
_______ __________
_______ __________
Average __________
Day 7 __________
Turned: Temperature_______ __________
_______ __________
_______ __________
Average __________
Day 8 __________
Turned: Temperature_______ __________
_______ __________
_______ __________
Average __________
Day 9 __________
Turned: Temperature_______ __________
_______ __________
_______ __________
Average __________
Day 10 __________
Turned: Temperature_______ __________
_______ __________
_______ __________
Average __________
Day 11 __________
Turned: Temperature_______ __________
_______ __________
_______ __________
Average __________
Day 12 __________
Turned: Temperature_______ __________
_______ __________
_______ __________
Average __________
Day 13 __________
Turned: Temperature_______ __________
_______ __________
_______ __________
Average __________
Day 14 __________
Turned: Temperature_______ __________
_______ __________
_______ __________
Average __________
Day 15 __________
Turned: Temperature_______ __________
_______ __________
_______ __________
Average __________
Day 16 __________
Turned: Temperature_______ __________
_______ __________
_______ __________
Average __________
Day 17 __________
Turned: Temperature_______ __________
_______ __________
_______ __________
Average __________
Day 18 __________
STOP TURNING EGGS!
Temp. ___________ ___________ ___________
Average ___________
Day 19 __________
DO NOT TURN EGGS!
Temp. _________________________________
Average ___________
Day 20 __________
DO NOT TURN EGGS!
Temp. ___________ ___________ ___________
Average ___________
Day 21 __________
HATCHING DAY!
Temp.___________
___________
___________Average ___________
Fill in the days of the week at the top of the chart. Write in the date on the top line in each box.Write in the times the eggs are turned and the incubator temperature in each day’s box.
Use this information to help analyze the success of this project at the end of the 21 day incubation period.
Page 15
INQUIRY AND FOLLOW UP ACTIVITIES
h Calculate the Relative Humidity in Your Incubator.
Relative humidity is the ratio of the actual amount of moisture in the atmosphereto the amount of moisture the atmosphere can hold. A relative humidity of 100%means the air can hold no more water, and a relative humidity of 0% indicatesthere is no moisture in the atmosphere. A relative humidity of about 85% isimportant for the proper development of the chick embryo.
Relative humidity can be determined from wet bulb and dry bulb temperatures.Dry bulb temperature is the actual air temperature, measured by thethermometer in the incubator. Wet bulb temperature can be determined by usinga wet shoe lace to cover the bulb of a thermometer. As the water evaporates,energy is used and the temperature decreases. Record this temperature as the"wet bulb" temperature.
The chart below is measured in degrees Fahrenheit; if your thermometer iscalibrated in Celsius, use the equation below to convert the temperature beforeusing the chart:
Temperature in degrees Fahrenheit = (1.8 x Temperature in degrees Celsius) + 32
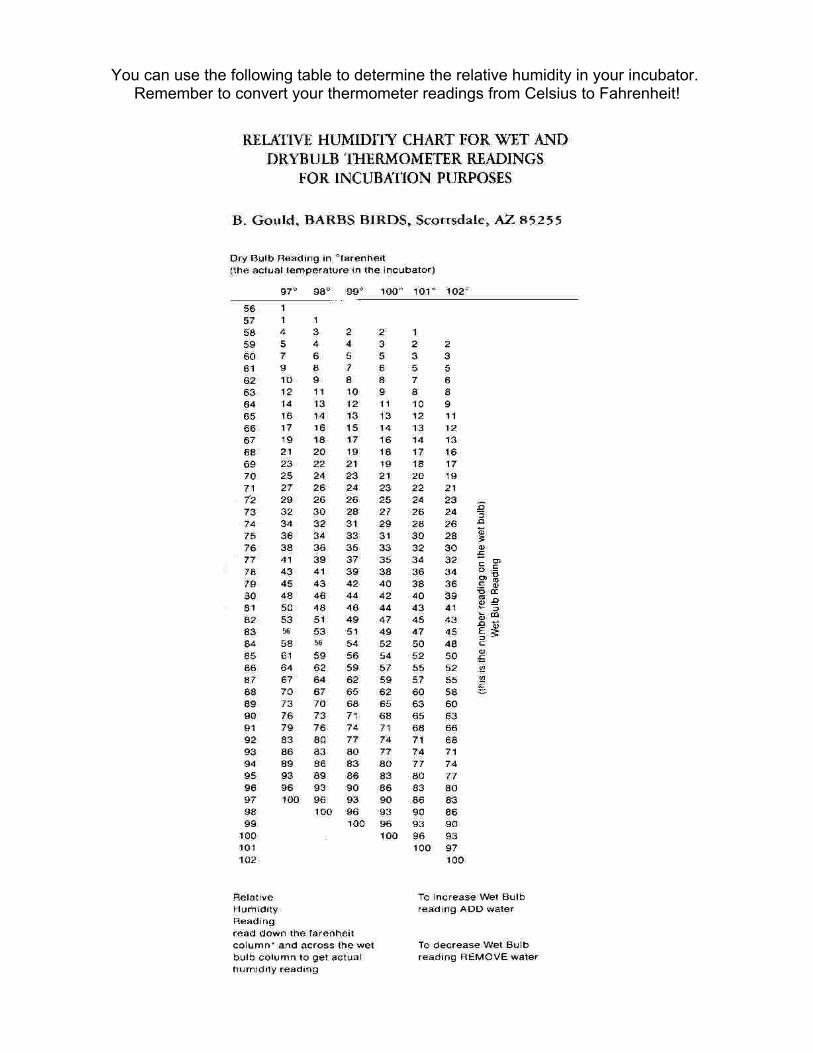
You can use the following table to determine the relative humidity in your incubator. Remember to convert your thermometer readings from Celsius to Fahrenheit!
Page 17
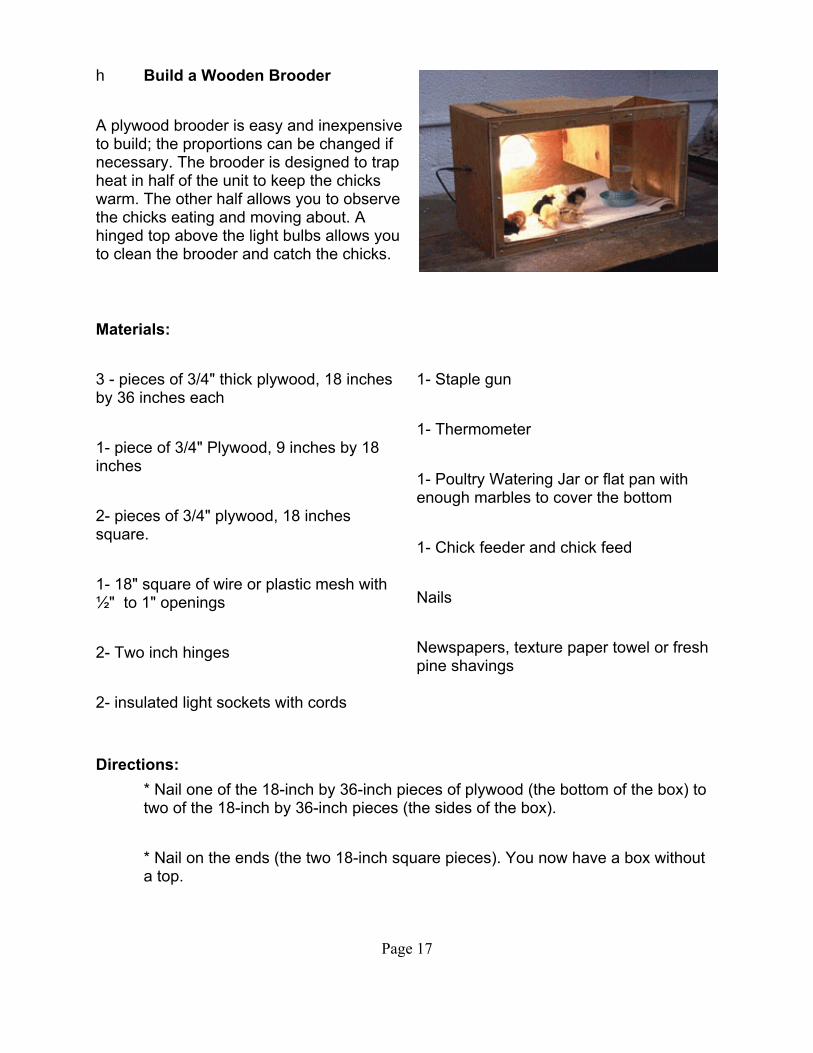
h Build a Wooden Brooder
A plywood brooder is easy and inexpensiveto build; the proportions can be changed ifnecessary. The brooder is designed to trapheat in half of the unit to keep the chickswarm. The other half allows you to observethe chicks eating and moving about. Ahinged top above the light bulbs allows youto clean the brooder and catch the chicks.
Materials:
3 - pieces of 3/4" thick plywood, 18 inchesby 36 inches each
1- piece of 3/4" Plywood, 9 inches by 18inches
2- pieces of 3/4" plywood, 18 inchessquare.
1- 18" square of wire or plastic mesh with½" to 1" openings
2- Two inch hinges
2- insulated light sockets with cords
1- Staple gun
1- Thermometer
1- Poultry Watering Jar or flat pan withenough marbles to cover the bottom
1- Chick feeder and chick feed
Nails
Newspapers, texture paper towel or freshpine shavings
Directions:* Nail one of the 18-inch by 36-inch pieces of plywood (the bottom of the box) totwo of the 18-inch by 36-inch pieces (the sides of the box).
* Nail on the ends (the two 18-inch square pieces). You now have a box withouta top.
Page 18
* Looking down from above the open top, measure 18 inches from the ends onboth sides. Place the 9" X 18" piece of plywood at the 18-inch mark with its edgeflush with the top. Nail it along the sides to make a light trap. It will divide the boxinto two halves with a space at the bottom.
* In the right half of the box, screw the insulated light sockets to each side, facingeach other. (The middle of each light socket should be at the bottom of the lighttrap.). You may want to drill holes in the side of the box for the electric cords togo through.
* Screw the hinges onto one end of the remaining 18-inch-square piece of wood.Screw the hinges to the right end of the box. This is the hinged plywood top. Thetop above the light bulbs should be hinged to allow you to open the top so youcan clean the brooder and catch the chicks.
* Staple or nail the 18-inch-square piece of chicken wire or mesh across the leftside top of the box. Use two light bulbs on the heated end of the brooder. If oneburns out, the other will help maintain heat in the brooder. In a classroom, two25-watt bulbs usually will produce enough heat. If more heat is needed increasethe size of the bulbs (One bulb at a time).
* Place a layer of newspaper about five pages thick in the bottom of the brooderand cover with two layers of paper towel. This will keep the chicks from slippingand hurting their legs.
* Add a waterer and feeder, and your brooder is ready for the chicks.
The temperature of the brooder should be 95°F for the first week. Decrease thetemperature by 5 degrees F each week by decreasing the light bulb size. Use two lightbulbs on the heated end of the brooder and adjust the size of the bulbs to regulate thetemperature. If one burns out, the other will help maintain heat in the brooder. In aclassroom, two 25-watt bulbs will usually produce enough heat.
Written by Phillip J. Clauer , Senior Extension Associate, 4-H Youth and Specialty Poultry at Pennsylvania StateUniversity
Page 19
OTHER RESOURCES
The Sedgwick County Office of K-State Research and Extension maintains a chickembryology website each spring, usually from mid-March until late April. The websiteincludes an on-line chick hatch, links to other chick embryology websites, lists ofeducational resources and equipment suppliers, and a guest book for students’ andteachers’ comments. The website can be found at:
http://www.SedgwickCountyExtension.com
The following websites have more information about poultry and poultry products:
American Poultry Association http://ampltya.com/
National Chicken Council http://www.eatchicken.com/
National Turkey Federation http://www.turkeyfed.org
U.S. Poultry and Egg Federation http://www.poultryegg.org/
The American Egg Board has an interesting website that includes recipes, egg nutritionand food safety information, an “eggcyclopedia”, and information about the egg industry. It also has a free educational unit for 4th to 6th graders that features Albert Eggstein,Beggsy Ross, William Sheggspeare, and Crepe Suzegg. It can be found at:
http://www.aeb.org
Page 20
LESSON SOURCES
Lesson Resources:“Chick Embryology 4-H School Enrichment Program”K-State Research and Extension Publications Distribution Office24 Umberger HallManhattan, Kansas 66506
Hatching Classroom Projects4-H Cooperative Curriculum ServiceDistribution Center405 Coffey Hall1420 Eckles Ave.St. Paul, MN 55108-6069
R. Scott BeyerAssociate Professor, Poultry Nutrition and ManagementK-State Research and Extension130 Call HallManhattan, KS 66506
Lynanne DeGarmoSedgwick County 4-H Poultry Project Leader7001 W. 21st St. N.Wichita, KS 67205
Lesson Written by:Beth Drescher, County Extension Agent Youth DevelopmentSedgwick County Office of K-State Research and Extension7001 W. 21st St. N.Wichita, KS 67205
Page 21
CURRICULAR CORRELATIONSKansas Science Standards
h 2nd Grade
Standard 1: Science as InquiryAs a result of activities in grades K-2, all students will experience science as full inquiry. In the elementary grades, students begin to develop the physical and intellectualabilities of scientific inquiry.
Benchmark 1: All students will be involved in activities that develop skills necessary toconduct scientific inquiries.
Indicator 4: Ask and answer questions about objects, organisms, and events intheir environment.Indicator 5: Describe an observation orally or pictorially.
Standard 2: Physical ScienceAs a result of activities in grades K-2, all students will explore the world by observingand manipulating common objects and materials in their environment.
Benchmark 1: All students will develop skills to describe objects* Indicator 1: Observe properties and measure those properties using ageappropriate tools.
Standard 3: Life ScienceAs a result of activities in grades K-2, all students will begin to develop anunderstanding of biological concepts.
Benchmark 1: All students will develop an understanding of the characteristics of livingthings.
* Indicator 1: Discuss that living things need air water and food.Indicator 2: Observe life cycles of different living things

Page 22
CURRICULAR CORRELATIONSKansas Science Standards
h 4th Grade
Standard 1: Science as InquiryAs a result of activities in grades 3-4, all students will experience science as inquiry.
Benchmark 1: All students will develop the skills necessary to do full inquiry. Fullinquiry involves asking a simple question, completing an investigation, answering thequestion, and sharing the results with others.
* Indicator 3: Employ appropriate equipment and tools to gather data.
Standard2: Physical ScienceAs a result of activities in grades 3-4, students will increase their understanding of theproperties of objects and materials that they encounter on a daily basis. Students willcompare, describe, and sort these materials by observable properties.
Benchmark 1: All students will develop skills to describe objects.* Indicator 1: Observe properties and measure those properties using appropriatetools.
Standard 3: Life ScienceAs a result of activities in grades 3-4, all students will develop an understanding ofbiological concepts through direct experience with living things, their life cycles, andtheir habitats.
Benchmark 2: All students will observe and illustrate the life cycles of variousorganisms.
* Indicator 1: Compare, contrast and ask questions about life cycles of variousorganisms
* = assessed indicator
Page 23
CURRICULAR CORRELATIONSKansas Science Standards
h 8th GradeStandard 1: Science as InquiryAs a result of activities in grades 5 - 8, all students will develop the abilities to doscientific inquiry, be able to demonstrate how scientific inquiry is applied, and developunderstandings about scientific inquiry.
Benchmark 1: the students will demonstrate abilities necessary to do the processes ofscientific inquiry.
* Indicator 3: Use appropriate tools, mathematics, technology, and techniques togather, analyze, and interpret data.
Standard 3: Life ScienceAs a result of activities in grades 5 - 8, all students will apply process skills to exploreand understand structure and function in living systems, reproduction, and heredity,regulation and behavior, populations and ecosystems, and diversity and adaptations oforganisms.
Benchmark 1:The students will model structures of organisms and relate functions tostructures.
* Indicator 1: Relate the structure of cells, organs, tissues, organ systems andwhole organisms to their functions.
Benchmark 3: The students will describe the effects of changing external environmenton the regulation/balance of internal conditions and processes of organisms.
* Indicator 2: Identify behaviors of an organism that are responses made tointernal or environmental stimuli.* Indicator 3: Explain that all organisms must be able to maintain and regulatestable internal conditions to survive in a constantly changing externalenvironment.
Benchmark 5: The students will observe the diversity of living things and relate theiradaptations to their survival or extinction.
* Indicator 1: Conclude that millions of species of animals, plants andmicroorganisms may look dissimilar on the outside but have similarities in internalstructures, developmental characteristics, and chemical processes.