Embed Size (px)
Citation preview
TM
C 0 R P 0 R A T
by Alien Technologies, Inc.
Copyright © 1988 Cinemaware Corp. All rights reserved.
Warp Speed™ is a trademark of Alien Technologies, Inc.
CONGRATULATIONS!
You now own the most useful and complete cartridge utility ever produced
for the Commodore 64 and 128 computers: the Warp Speed™ Fast DOS
Cartridge from Cinemaware. It contains the fastest Commodore-compatible
DOS ever produced, allowing you to format disks, load, save, verify, and copy
files up to ten times faster than beforel In addition, Warp Speed includes: a
full-featured machine language computer-and-disk-drive monitor/assembler,
with up/down scrolling and an integrated sector editor; an expanded DOS wedge
for convenience when using a disk drive; complete support for two or more disk
drives, including a 30-second two-drive copier for making convenient backups
of your unprotected disks; a reset button; and an "unnew" feature to restore
BASIC programs, for recovering control of your computer when you experience
a "crash".
All Warp Speed functions work identically on the 64 and 128 in both 40- and
80-column modes, and are fully compatible with most commercial software,
including many heavily protected programs that are incompatible with other
cartridge utilities. They also work with most compatible disk drives, including
the new Commodore 1581 floppy drives and several of the new hard disk drives
available, as well as the MSD dual drive popular with many developers.
Whether you are a beginner, a serious hacker, or a professional developer,
you will find Warp Speed an indispensable aid which you may never remove from
your computer once you have plugged it in!
Fast Load/Save/Verify
, When the Warp Speed cartridge is inserted into the expansion port of your
computer, the fast disk access routines are automatically engaged during all
disk loads and saves. The routines will work with any application which uses
Kernal load and save routines but not the Kernal restore routine (which resets
the vectors to their default values). The fast load routines are the most
compatible of any comparable cartridge-based loader and work with
approximately 99% of all commercially available software. However, the
fast-loading DOS can be easily disabled and re-enabled if necessary.
The speed at which files will load depends on how they were originally saved.
Files saved with a 1541 disk drive without the aid of Warp Speed are written out
in a skew 10 format. This means that after each sector is written to a disk, 9
sectors are skipped before the next sector is used. Warp Speed loads these
files as fast as the data goes by the drive head, approximately 500% faster than
a 1541 alone. If, however, the files were saved using a 1571 disk drive or with
the Warp Speed fast save function, they were written in a skew 6 format,
skipping only 5 sectors each time, and can be loaded up to 1,000% faster than a
normal Commodore 64. Other fast loaders can only load these files about 300%
faster.
Copyright © 1988 Cinemaware Corp. All rights reserved.
Warp Speed™ is a registered trademark of Alien Technologies, Inc.
1
Most older commercial programs were created with a 1541 disk drive, and
should be file copied to new disks using Warp Speed so that the maximum
improvement in loading times can be obtained. Warp Speed will load, save and
verify at the same speed regardless of the type of disk drive (or mode on a
Commodore 128). The scratch and validate commands will work fastest if the
drive is a 1571 in double-sided mode.
The DOS Wedae
The DOS wedge consists of a group of commands to take some of the
hassle out of disk access. These commands simplify loading and saving files,
viewing directories, etc.
Loading files. To load a machine language file, use the percent <%> key
followed by the file name and <return>. This is the same as typing load
"filename".8.1 from BASIC. To load a program to the start of BASIC, use the
diagonal slash key followed by the BASIC file to load, then press <return>. This
is comparable to typing load 1ilename".8 . To load and run the first file on the
disk, press the Commodore <C=> and <run/stop> keys at the same time. (This
will ALWAYS load the first file on a disk - we have fixed the bug in Commodore's
DOS which would occasionally cause the wrong file to load.)
When loading from multiple drive systems, Warp Speed will search both drive 8
and drive 9 looking for the file. If it finds the file, it will change the currently
logged drive to the drive on which it found the file.
Saving files. To save a file, type the backarrow < <- > key followed by
the name of the file, then <return>. This corresponds to the BASIC command
save *filename".8 . The file will be saved to the currently logged drive unless the
drive number is specified in the command.
Verifying files. To fast-verify a file, type an exclamation point (!)
followed by the name of the file to be verified, then press <return>. It is
equivalent to the verify "filename". 8.1.
Listing files and directories. You can list any normal text file to the
screen using the ampersand <&> key followed by the name of the file and
<return>. There is no equivalent BASIC command to do this, but it is similar to
the MS-DOS "TYPE" command. To view the directory of a disk, type a dollar
sign <$> then <return>. The directory will be printed to screen without affecting
program memory. In both cases, you can pause the listing and restart it by
using the spacebar, or exit at any time using <run/stop>.
Setting the currently logged drive. You can manually set drive by
using the number sign <#> followed by the drive number and <return>. The
number sign by itself will toggle back and forth between drives 8 and 9.
Accessing the drive command channel. The circumflex <@>
followed by <retum> will print the current drive error status to screen. This is the
equivalent of doing an open 15.8.15 from BASIC and reading the error channel.
You can also send a command to the drive in this way. See the section on drive
commands for more information.
Entering the main menu and machine language monitor. To
enter the main menu, use the english pound <£> key. To enter the built-in
machine language monitor, use the pi <rc> key.

Utility Commands
Several additional utility commands which start with the up-arrow <T> key
can be used from BASIC. They are also available from the machine language
monitor (described later) when preceded by the circumflex <@> character.
The disk menu command, < T > <$>, will load the directory into the
computer's memory and will allow you to scroll up and down through the
directory to select a file to load and/or run.
The kill fast-dos command, < T ><k>, disables only the fast loader -- all other
functions, including the wedge, will remain active. The enable command, < T
><e>, re-activates the load, save and restore vectors.
The unnew command, < T ><u>, can be used to restore a BASIC program
after a new command, or after using the reset button to recover from a crash.
The re-number drive command, < t ><r>, or < T xrxdrive number> can be
used to temporarily change the device number of the currently logged drive to
another number. If, for example, you had two disk drives, both set as drive 8,
you could use the < T ><r> command to change one to drive 9, then power up
the second drive and have a powerful two-drive system to work with.
The screen hard-copy command, < T ><h>, will print a copy of the screen
contents to a printer connected as device number 4 (text screens only). With
the type file <$> command, you can then print a text file without even loading a
word processor! (This feature is also great for printing those readme.doc files
that come with many public domain programs.)
Owners of 1571 disk drives will appreciate the set format commands, < t
><s> and < T ><d> for single- and double-sided modes, respectively. These
commands will allow you to use a 1571 in single- or double-sided mode
regardless of whether you are working with a 64 or a 128. We recommend
placing the drives in double-sided mode at all times, especially when scratching
a file or validating a disk, as these processes will go much faster when the
drives are in double-sided (2 Mhz) mode. A couple of exceptions to this rule:
don't place a 1571 in double-sided mode when loading most copy-protected
Commodore 64 software, and dont place in them double-sided mode when
working with "flippy" disks (different programs on each side of the disk) if you
intend to format only one side.
The format commands, both our fast-format and Commodore's own format
command, use the drive's current mode to determine whether to format the disk
as single- or double-sided. If your drive has trouble reading a single-sided disk
when set to double-sided mode, then you should contact Commodore to obtain
their upgraded drive ROMs, which are considerably improved over the original
ones.
Using the Menu Functions
The english pound key, "£," activates the built-in menu-driven features of
Warp Speed. Upon entering the menu system, the Main Menu will appear. There
are nine options to select:
1. View Directory
2. Sector Editor
3. File Utilities
4. Single Copier
5. Dual Copier
6. Drive Command
7. Set Drives
8. ML Monitor
9. Quit To BASIC
Select the desired option by moving the highlighted cursor up or down with the
cursor key and then press <return>; or you can press the number key to choose
the option you want. Two other keys are also active in the menu system: the
spacebar can be used to swap source and target drive assignments, and the
"Q" key will exit directly back to BASIC.
Here are brief descriptions of the nine menu choices available on the main
menu.
1. VIEW DIRECTORY
Shows both the source and target drive directories on the screen. Use the
spacebar to pause and restart the directory listing. Press the <run/stop> key
once to end the first drive/directory; press <run/stop> a second time to end the
directory display. Use <q> to return to the main menu.
2. SECTOR EDITOR
Can be used to edit a data file or a program file directly on a disk without
having to first bad the file into the computer's memory. Use <q> to return to the
main menu. See the section on the Sector Editor for instructions.
3. FILE UTILITIES
Brings up a second menu of choices for file handling. Choices include
copying one or more files, scratching one or more files, selecting a file from the
disk menu feature, using drive commands, or setting drives.
See the list in the command summary for an explanation of the commands in
the sub-menu selections.
4. SINGLE COPIER
Activates a sub-menu for a disk copier which can copy either single or
double-sided disks using either one or two disk drives. The utility also verifies
both the source and target disks for bad sectors. If you have a disk which this
copier will not copy, format a new disk, and use the file copier to copy all the
files which are still intact to the new disk. This copier compresses the data
during the read process, so many disks which are not completely full can be
copied in only one or two passes. Note: double-sided disks can, of course,
only be copied on a 1571 disk drive.
5. DUAL COPIER
Activates a sub-menu for a two drive, nibble-type copier which can copy
either single or double sided disks (with two 1571 drives) in approximately 30
(single-sided) or 60 (double-sided) seconds. This type of copier, while
extremely fast, is not as reliable as the fully verified single copier listed above.
It is, however, write verified, so that it will report any errors created during the
copy process. If you have difficulty copying a disk with this copier, try
switching your source and target drives. If this doesnt work, then you will need
to use the single copier with this disk or this hardware.
6. DRIVE COMMAND
Used to display the status of a disk drive, or to send direct access
commands to the drive. Press <return> to get the error status; or enter any
drive command by pressing the letter of that command and then <return> (see
Drive Commands). You can also enter any of the utility commands at the ">"
prompt (the commands which begin with an up-arrow). Press <q> to return to the
main menu.
7. SET DRIVES
Allows you to set source and target drives for the file copier, disk copiers,
and sector editor.
8. ML MONITOR
Enters the machine language monitor. (See Machine Language Monitor later
in this manual.) Return to the main menu from the monitor by typing the HXMN
command.
9. QUIT TO BASIC
Exits the menu system.
Drive Commands
Drive commands are commands that may be used directly from the Drive
Command selection in the main menu, or (when prefixed with a circumflex <@>)
from the DOS wedge or machine language monitor. These commands are
detailed in the manuals that come with your disk drive. A few of the more useful
ones are: <@f>, which does a fully-verified fast format; <@uj>, which resets a
disk drive as though it had just been turned on; <@v>, which validates a disk to
eliminate bad "PRG" files and clean up the block availability map (BAM) on
heavily used disks; and <@sO:><filename>, which will scratch (delete) a file
from the disk.
Perhaps the most powerful features of the Warp Speed cartridge are the
sector editor and machine language drive monitor. They have been integrated
together to create a very powerful program creation, de-bugging and editing
tool.
Sector Editor
To enter the sector editor from BASIC, choose 2. SECTOR EDITOR from the
main menu. Entering the sector editor in this way will clear an editing buffer
from $7E00 to $7EFF and set the default track and sector to the start of the
directory (usually at track 18 sector 1). From within the machine language
monitor, you can enter the sector editor with the <xs> command. Entering this
way will not clear the buffer or change the current rack and sector settings, so
you can go back and forth between the editor and the monitor to read a file a
sector at a time, make any changes you need, and then write the sector back
out to disk, without loading the whole file into memory first.
To read a sector, type <r><track><sector> (where the track and sector are
in hexadecimal), or just <r> if the default values are o.k. The desired track and
sector will be read in and transferred to the editing buffer at $7E00 in the
computer. To write the sector back to the disk, use <w>.
To edit a sector, move the cursor to the desired position with the cursor
keys, then enter the new value in hexadecimal. Because of the size of the
screen, only half of a sector will be visible at a time. To see the other half,
simply move the cursor off the top or the bottom of the data and the other half
scroll on . rf you are making changes to text, you can simply type in the desired
letters by pressing <t> to enter text mode. When you are through typing text,
use <run/stop> to exit text mode.
Several keys allow you to move to a different sector on a disk <+> will
advance you to the next sector. <-> will move you back one sector. <shift><+>
will advance you one track. <shifl><-> will move you back one track. The <n>
key will allow you to go to the "next" track and sector in a file (as pointed to by
the first two bytes in the sector). The <j> key will "jump" to the track and sector
pointed to by the bytes currently under the cursor. This can be used by the
directory entry of the file to move to the start of the file, so you can edit a
complete file without ever entering a track or sector manually!
At any time, if you wish to enter the machine language monitor to edit the
data, use the <m> command. Remember to exit back to the sector editor with
the <xs> command so your changes wont be erased from the buffer.
If you have a Commodore printer attached as device 4, you can print out the
entire sector contents with the <p> command. This is not merely a screen
dump, as both halves of the sector are printed together. If you are in the
second half of the sector data, pressing <clr/home> once will move you to the
top of the screen editing area. Pressing <clr/home> a second time will move the
cursor to the beginning of the sector data. Pressing <shift><clr/home> will
erase the buffer (fill it with zeros) from the cursor position forward to the end of
the sector. Pressing <q> will exit the sector editor. The <run/stop> <restore>
combination will always bring you back to BASIC from sector editor (without
crashing the machine).
One very powerful (but somewhat dangerous) feature of this sector editor is
the use of the source and target drives. This means you can read a sector from
one drive, make any changes to it you like, then write it out to a different disk in
a second drive. BE CAREFUL NOT TO DO THIS ACCIDENTALLY!!! You must
set your source and target drives from the main menu before entering the sector
editor - there was no room in our ROM to make this command available from
within the sector editor itself. If you find that you do not have the target drive
set correctly, you can switch source and target drives by pressing the
spacebar. Source and target assignments will then be swapped. Please be
careful not to swap them accidentally as well! A write-protect tab can save
many headaches by protecting you from such mistakes.
Machine Language Monitor
The machine language monitor is one of the most advanced monitors ever
produced for the Commodore 64 and 128. It was designed to be flexible and
accept the syntax of most other previously available monitors; for example, you
can separate most parameters with spaces, commas, shifted spaces or
sometimes no spaces at all.
To disassemble a file, type <d> followed by addresses to start and end
disassembly at; for example D 1000 1050 to disassemble $1000 to $1050. You
can pause and resume the disassembly at any time using the spacebar, or stop
using <run/stop>. A <d> without an ending address will disassemble continuously
to the end of the memory. A <d> by itself will continue a disassembly from the
last address displayed for about a half of screen and then stop again. You can
also continue a disassembly (or other memory display) by using the cursor keys
to scroll up or down. The <m> command (hexadecimal memory dump) and the <t>
command (interrogate memory in ASCII) work similarly.
To compare the areas of memory, use the <o command followed by the start
and ending address of the first block of memory followed by the start address of
the second block to compare to, as in C 8000 9FFF A000 to compare the block at
$8000 to $9FFF to the block at $A000 to $BFFF. Any addresses in the first block
which differ from the corresponding addresses in the second block will be printed
to the screen. To fill an area of memory with a constant value, use the <f>
command followed by starting and ending addresses and the value to fill the
memory block with.
The «-> key followed by a value will set the configuration (bank select)
register to the new value. This is location $01 in a Commodore 64 and $FF00 in a
Commodore 128 in 128 mode. For example, 4-34 on a C64 will allow you to peek
under the BASIC and Kernal ROMs, and work with the RAM under the I/O block at
$D000. Using <-00 or 4-01 in 128 mode will allow you to do the same thing on a
C128 for RAM bank 0 and 1, respectively.
The <r> command will display the current processor registers and
configuration register values. These are the values which the processor will use
if you issue <g> command to go (execute) a routine, as in G FCE2 to reset a
Commodore 64. If you wish the routine being called to return to the monitor on
completion, then end it in a BRK instruction. An RTS instruction would return you
to BASIC.
You can hunt for a sequence of bytes in memory with the <h> command, as in
H E000 FFFF 8D 00 DP which will hunt through the Kernal ROMS for all
occurrences of the sequence $8D $00 $DD. You can move a block of code from
one memory location to another using the transfer <t> command, as in T 1000
1FFF 1002 to move the code which presently sits at $1000 to $1FFF to the new
location of $1002 to $2001. Note that you can move blocks up or down in
memory over their current locations without worry -- qui move command will not
turn into an acccidental fill command! Two additional transfer commands, <td>
and <tc> will transfer blocks of memory to and from disk drive memory,
respectively.
To output all screen information to a printer attached as device number 4, use
the <p> command to toggle the printer output on and off. While output is
redirected to the printer, no screen printing will occur.
You can also assemble a program with the <a> command, as in A
1000LDA#$01 which will assemble the instruction LDA #$01 to $1000. Spaces
here are optional.
The <o> I/O command can be used to switch from programming in computer
RAM to disk drive RAM. Use O 08 to move to drive 8 RAM, or <o> by itself to
return to the computer. All of the monitor commands are available when
programming in the disk drive except <r> and «->.
The <$> command will list the directory of the currently logged drive to the
screen. <@#> can be used to toggle between two drives (see the DOS Wedge).
All DOS wedge commands are available, as are all utility commands provided you
precede then with a circumflex <@> as in <3>tR 0A to renumber the currently
logged drive to drive 10 (see Utility Commands).
The load, save and verify commands (<l>, <s> & <v>) all work similarly. The
syntax is <l> (or <v>) then the filename followed by an optional drive number and
an optional relocated load address. For example L "myprogram" I234 will load a
file from the currently logged drive (or a second drive if the first returns "file not
found") and relocate it to the address $1234. Note that you do not have to specify
a load address if the default one saved with the file will do. Similarly,
S"yourprogram" 08 1234 5678 9AB would be used to save a program from the
range of $1234 to $5678, inclusive, to a disk on drive 8 and give it the new default
load address of $9ABC. As in the load command you do not have to specify a
disk drive number, but if you have more than one drive it is a good idea. If you do
not specify the third address, then the default load address will be the same
address as the file is being saved from.
Finally, there are five ways to exit the monitor! The <q> command will return
to BASIC, and restore the BREAK vector back to its normal value (pointing to
BASIC Warm Start on a C64 and Commodore's monitor on a C128 in 128 mode).
The <x> instruction will also exit to BASIC, but the BREAK vector will remain set
to re-enter the cartridge monitor. <xs> will exit to the sector editor, <xm> will exit
to the cartridge main menu, and <xo will cause a cold start of BASIC (clearing
the BREAK vector in the process).
So, there you have it. We hope you enjoy working with your new accelerator
cartridge! We have spent many hours designing and programming it to be the
finest utility available for a Commodore 64 or Commodore 128. We have taken
32K of machine language code, and re-written it over and over until we could fit it
inside a 16K ROM (to keep your cost down). We ended up with zero bytes left
over, not even enough room to credit the programmers! The Alien Technologists
who devoted over two man-years to create this product are Marty Franz, Joe
Peter and Harald Seeley. Many thanks are also do to Bob and Phyllis Jacob as
well as John Cutter for their faith in our efforts.
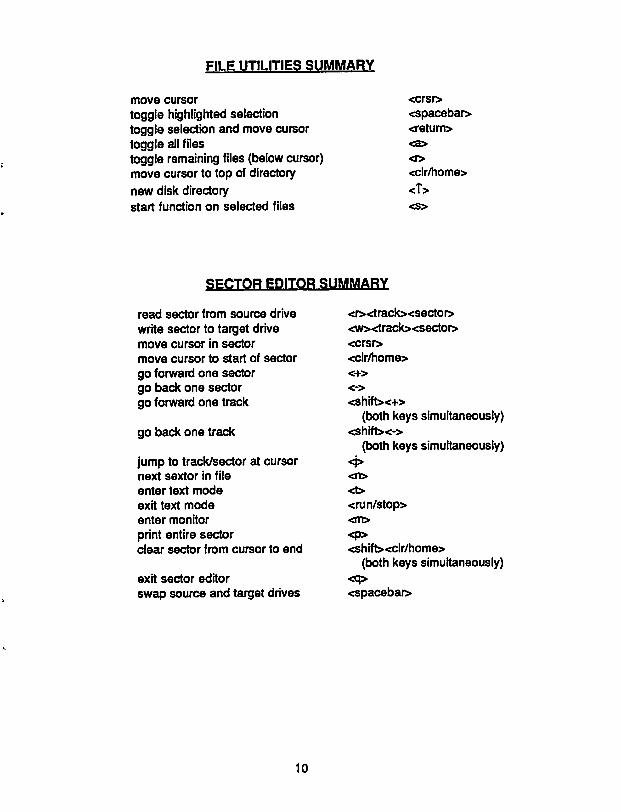
FILE UTILITIES SUMMARY
move cursor
toggle highlighted selection
toggle selection and move cursor
toggle all files
toggle remaining files (below cursor)
move cursor to top of directory
new disk directory
start function on selected files
<crsr>
<spacebar>
<return>
<clr/home>
SECTOR EDITOR SUMMARY
read sector from source drive
write sector to target drive
move cursor in sector
move cursor to start of sector
go forward one sector
go back one sector
go forward one track
go back one track
jump to track/sector at cursor
next sextor in file
enter text mode
exit text mode
enter monitor
print entire sector
clear sector from cursor to end
exit sector editor
swap source and target drives
<r><track><sector>
<w><track><sector>
<crsr>
<clr/home>
<shift><+>
(both keys simultaneously)
<shift><->
(both keys simultaneously)
<run/stop>
<shift><clr/home>
(both keys simultaneously)
<spacebar>
10
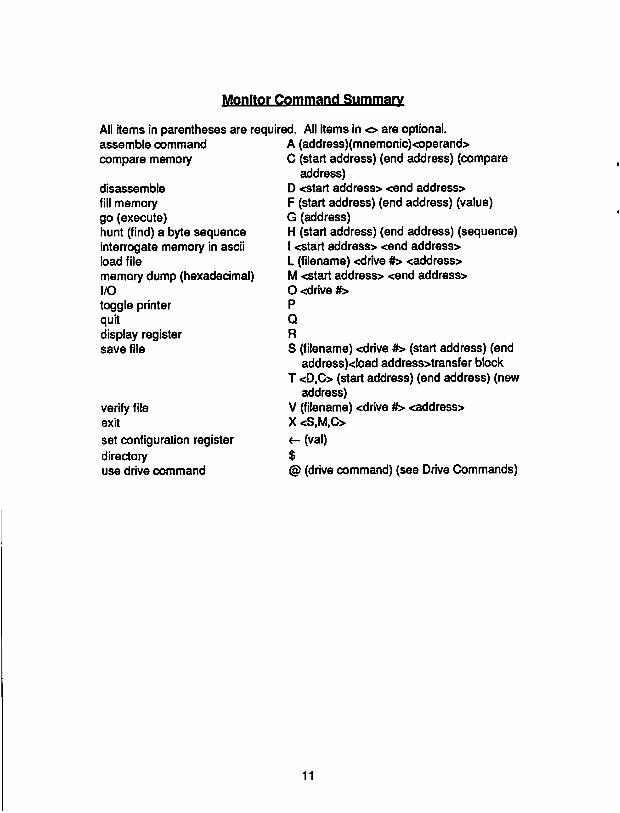
Monitor Command Summary
All items in parentheses are required. All items in o are optional.
assemble command
compare memory
disassemble
fill memory
go (execute)
hunt (find) a byte sequence
interrogate memory in ascii
load file
memory dump (hexadecimal)
I/O
toggle printer
quit
display register
save file
verify file
exit
set configuration register
directory
use drive command
A (address)(mnemonic)<operand>
C (start address) (end address) (compare
address)
D <start address> <end address>
F (start address) (end address) (value)
G(address)
H (start address) (end address) (sequence)
I <start address> <end address>
L (filename) <drive #> <address>
M <start address> <end address>
0<drive#>
P
Q
R
S (filename) <drive #> (start address) (end
address)<load address>transfer block
T <D,C> (start address) (end address) (new
address)
V (filename) <drive #> <address>
X <S,M,C>
<- (val)
$@ (drive command) (see Drive Commands)
11
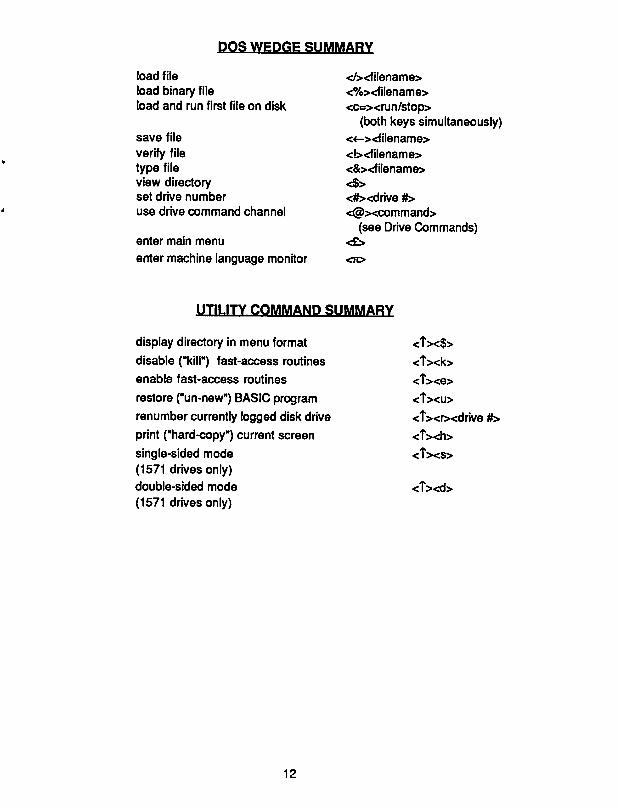
DOS WEDGE SUMMARY
load file </><filename>
load binary file <%xfilename>
load and run first file on disk <o=xrun/stop>
(both keys simultaneously)
save file «-><filename>
verify file <!><fi!ename>
type file <&><filename>
view directory <$>
set drive number <#><drive #>
use drive command channel <@xcommand>
(see Drive Commands)
enter main menu <£>
enter machine language monitor <rc>
UTILITY COMMAND SUMMARY
display directory in menu format <t><$>
disable ("kill") fast-access routines <Txk>
enable fast-access routines <T><e>
restore ("un-new") BASIC program <Txu>
renumber currently logged disk drive <Txr><drive #>
print ("hard-copy") current screen <Txh>
single-sided mode <Txs>
(1571 drives only)
double-sided mode <Txd>
(1571 drives only)
12
Congratulations! You are now the proud owner of another program
from Cinemaware's bestselling line of computer software!
Because we really want to know about the people buying Cinemaware
software, we strongly encourage you to fill out and return the attached
product registration card.
When you complete and return this card, you help us get a profile of the
people who buy our software. By learning more about your interests and
software buying habits, we can more effectively serve your needs when
producing future Cinemaware software products.
Make certain when you fill out the registration card that you accurately
record your complete name and address, including the Zip code. That way
we can send you information on future Cinemaware products as they are
published.
So send in those cards! We want to know about you!
Cinemaware Corp.
4165 Thousand Oaks Blvd.
Westlake Village, CA 91362
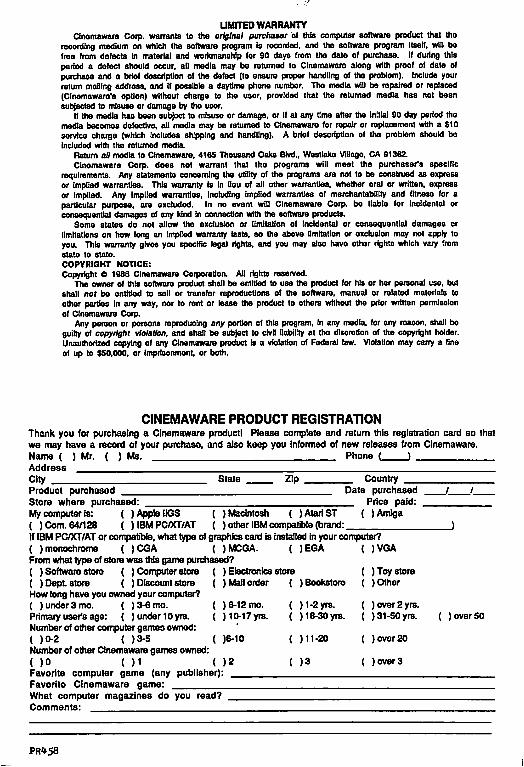
LIMITED WARRANTY
CInemaware Corp. warrants to the original purchaser of this computer software product that the
recording medium on which the software program is recorded, and the software program itself, will be
free from defects in material and workmanship for 90 days from the date of purchase. If during this
period a defect should occur, all media may be returned to Cinemaware along with proof of date of
purchase and a brief description of the defect (to ensure proper handling of the problem). Include your
return mailing address, and if possible a daytime phone number. The media will be repaired or replaced
(Clnemaware's option) without charge to the user, provided that the returned media has not been
subjected to misuse or damage by the user.
If the media has been subject to misuse or damage, or if at any time after the initial 90 day period the
media becomes defective, all media may be returned to Cinemaware for repair or replacement with a $10
service charge (which includes shipping and handling). A brief description of the problem should be
included with the returned media.
Return a/7 media to Cinemaware, 4165 Thousand Oaks Blvd., Westlake Village, CA 91362.
Cinemaware Corp. does not warrant that the programs will meet the purchaser's specific
requirements. Any statements concerning the utility of the programs are not to be construed as express
or Implied warranties. This warranty is in lieu of all other warranties, whether oral or written, express
or implied. Any implied warranties, including Implied warranties of merchantability and fitness for a
particular purpose, are excluded. In no event will Cinemaware Corp. be liable for incidental or
consequential damages of any kind in connection with the software products.
Some states do not allow the exclusion or limitation of incidental or consequential damages or
limitations on how long an implied warranty lasts, so the above Omitation or exclusion may not apply to
you. This warranty gives you specific legal rights, and you may also have other rights which vary from
state to state.
COPYRIGHT NOTICE:
Copyright e 1988 Cinemaware Corporation. All rights reserved.
The owner of this software product shall be entitled to use the product for his or her personal use. but
shall not be entitled to sell or transfer reproductions of the software, manual or related materials to
other parties in any way, nor to rent or lease the product to others without the prior written permission
of Cinemaware Corp.
Any person or persons reproducing any portion of this program. In any media, for any reason, shall be
guilty of copyright violation, and shall be subject to civil liability at the discretion of the copyright holder.
Unauthorized copying of any Cinemaware product is a violation of Federal law. Violation may carry a fine
of up to $50,000, or Imprisonment, or both.
CINEMAWARE PRODUCT REGISTRATION
Thank you for purchasing a Cinemaware product! Please complete and return this registration card so that
we may have a record of your purchase, and also keep you informed of new releases from Cinemaware.
Name ( ) Mr. ( ) Ms. Phone ( )
Address
State Zip CountryCity
Product purchased
Store where purchased:
Mycomputeris: ( )AppleIIGS ( )Macintosh ( )AtariST
( ) Com. 64/128 ( ) IBM PC/XT/AT ( ) other IBM compatfole (brand:
If IBM PC/XT/AT or compatible, what type of graphics card is installed in your computer?
Date purchased
Price paid:
( ) Amiga
( ) Mail order ( ) Bookstore
( ) monochrome ( )CGA ( )MCGA.
From what type of store was this game purchased?
( ) Software store ( ) Computer store ( ) Electronics store
( ) DepL store ( ) Discount store
How long have you owned your computer?
( ) under 3 mo. ( ) 3-6 mo.
Primary user's age: ( ) under 10 yrs.
Number of other computer games owned:
( )0-2 ( )3-5
Number of other Cinemaware games owned:
( )0 ( )1 ( )2
Favorite computer game (any publisher): _
Favorite Cinemaware game:
( )EGA
( ) 6-12 mo.
( ) 10-17 yrs.
( J6-10
( ) 1-2 yrs.
( ) 18-30 yrs.
( )11-20
( )3
)VGA
( ) Toy store
( ) Other
( )over2yre.
( ) 31-50 yre.
( ) over 20
( ) over 3
What computer magazines do you read?
Comments:
( ) over 50
PR458
MN-212


![NERC actions dl/finalfil…Translate this page%PDF-1.6 %âãÏÓ 1525 0 obj > endobj 1541 0 obj >/Filter/FlateDecode/ID[196EC8D0561FF26C6F43AE0BE3EBD647>]/Index[1525 42]/Info 1524](https://img.pdfslide.us/doc/110x75/5aa211897f8b9a436d8c7c42/actions-dlfinalfiltranslate-this-pagepdf-16-1525-0-obj-endobj-1541-0-obj.jpg)