Embed Size (px)
Citation preview

i
BY JÖKULL GiSLASON
ii
introductionFirestorm: Villers-Bretonneux is the recreation of the Second Battle of Villers-Bretonneux. This battle is famous in military history as the first battle where opposing tanks met. As a playtester I have the privilege of having access to projects under development at Battlefront. My group declined to take part in the Great War design but the project fascinated me, and I started to work on a Firestorm. I had not before spent much time in research of the period of the Great War and never focused on any particular battle, so this is rather new to me. This year marks 100 years from the start of the First World War so it is a good time to give the Great War consideration.
Having written five Firestorms previously, I feel very comfortable with the medium. Adjusting the rules to my needs and Firestorm Villers-Bretonneux is no different. To start with, it is a completely different period than previous Firestorms and it is not a Campaign, but rather a Battle of 4 days in April, 1918. With that in mind, it is much shorter than previous Firestorms and is therefore very suitable to two players. It also gives you an excellent framework to bring your new armies to play and recreate the very battle that is Battlefront’s entry into the Great War.
Again I would like to give special thanks to Maurice V. Holmes Jr. who has been a great help in proofreading this Firestorm. His advice and suggestions make the finished version so much better.
So enter The Great War and bring your new models into battle.
Jökull
SPECIAL ORDER OF THE DAY By FIELD-MARSHAL SIR DOUGLAS HAIG K.T., G.C.B., G.C.V.O., K.C.I.E. Commander-in-Chief, British Armies in France
To ALL RANKS OF THE BRITISH ARMY IN FRANCE AND FLANDERS
Three weeks ago to-day the enemy began his terrific attacks against us on a fifty-mile front. His objects are to separate us from the French, to take the Channel Ports and destroy the British Army.
In spite of throwing already 106 Divisions into the battle and enduring the most reckless sacrifice of human life, he has as yet made little progress towards his goals.
We owe this to the determined fighting and self-sacrifice of our troops. Words fail me to express the admiration which I feel for the splendid resistance offered by all ranks of our Army under the most trying circumstances.
Many amongst us now are tired. To those I would say that Victory will belong to the side which holds out the longest. The French Army is moving rapidly and in great force to our support.
There is no other course open to us but to fight it out. Every position must be held to the last man: there must be no retirement. With our backs to the wall and believing in the justice of our cause each one of us must fight on to the end. The safety of our homes and the Freedom of mankind alike depend upon the conduct of each one of us at this critical moment.
(Signed) D. Haig F.M. Commander-in-Chief British Armies in France General Headquarters Tuesday, April 11th, 1918
1
Introduction II
Do I Need Firestorm Bagration or Market Garden to play? 1
What is different? 1
Further Reading and Bibliography 2
What forces should I play? 2
The Second Battle of Villers-Bretonneux 3
Firestorm Villers-Bretonneux 4
Firestorm Campaign Map 6
Recommended or Historical Play 8
How Firestorm Works 9
Order one – Planning Phase 9
Order two – Battle Phase 10
One – Manoeuvre Step 10
Two – Combat Step 11
Three – After Action Step 13
Order Three – Strategic Step 14
Campaign Victory Point Table 15
Turns 17
Turn 1 – 24. April – Morning 18
Turn 2 – 24. April – Day 19
Turn 3 – 25. April – Counter-attack 20
Turn 4 – 26.-27. April – Consolidation21
Firestorm Troops – German Imperial Army22
Firestorm Troops – British Expeditionary Force 23
Firestorm Terms 25
The General’s Wargame 26
Firestorm Troop Values 27
Contents
Commonwealth forces. Likewise the AIF stands for the Australian Imperial Force, the correct term for the Australian army in WW I.
Captured: Being captured was common in World War I and during the Second Battle of Villers-Bretonneux was no different. To represent this, when a Firestorm Troop is destroyed roll a second time for the side that lost the battle. If it is destroyed a second time, it has surrendered and is captured. If the Firestorm troop was out of supply when it was destroyed, then this happens automatically. Captured Firestorm Troops give Victory Points to the capturing side.
Destroyed Firestorm Troops do not return to play: Firestorm: Villers-Bretonneux represents only four days of battle, so any Firestorm Troops destroyed do not return to the game. Even if they are not captured, they do not have the time to reorganise to return to battle.
Engagements: An engagement refers to a Flames of War game or General’s Game dice roll. It is when you resolve a battle for an area on the map.
Exploitation Moves: There are no Exploitation Moves in Firestorm: Villers-Bretonneux.
Firestorm Troops Value: In Firestorm: Villers-Bretonneux you have the option of adding points to your force rather than specific units. Perhaps you don’t have the correct troops available, or you would prefer to do things a bit differently. Each Firestorm Troop has a value listed. You will notice that this is less than the actual value of the unit presented and this is intentional.
Do I neeD FIrestorm–BagratIon or market garDen to play? Nope. Firestorm: Villers-Bretonneux is self-contained. All the rules you will need are included to play, so it is not necessary to own Firestorm: Bagration/Market Garden. Downloadable tokens are provided although you can easily substitute them with other models.
For those who are FamIlIar wIth FIrestorm
what Is DIFFerent?Players familiar with Firestorms and especially Firestorm Caen and other more recent Firestorms will find many things familiar in Firestorm: Villers-Bretonneux. Here is a list of major differences:
Aircraft: No aircraft.
Attacker: In Firestorm: Villers-Bretonneux, the player with the initiative automatically becomes the attacker in the Flames of War game; this supersedes any other special rules, both in missions and army lists. Only the attacker can capture areas. If the defender wins, he remains in control of the area but does not capture anything.
Attacks: In this version of Firestorm only the attacking player can capture an area. If the defender wins, he has done just that, successfully defended.
BEF: Stands for the British Expeditionary Force and is frequently used in this Firestorm to refer to the British and
2
Gas: In the first turn the Germans use a gas attack and this gives them an advantage as BEF Firestorm Troops are halved.
Initiative: Initiative is determined at the beginning of each turn, and can change from turn to turn. On turn one the Germans are automatically the attacker in all battles. From turn 2 onwards you roll for initiative. The Germans have a +1 initiative bonus on turn 2, the BEF have a +1 initiative bonus on turns 3 and 4. In addition to the +1 bonus given one side each turn, the side that won the last battle gains a +1 on its roll for initiative.
Missions: There are three missions for the Great War, and you play a mission according to what is happening on the map. At the start you play The Big Push, followed by Through the Mud and Blood and finally The Green Fields Beyond. Usually the area being attacked determines what mission is played.
Night Attack: On turn three the Australian Imperial Force Brigades 13th and 15th will attack at night. The two first battles will be night attacks and bring other advantages to the Australian Brigades.
Stacking: There are no stacking restrictions in Firestorm: Villers-Bretonneux.
Turns: There are 4 turns and each turn has a number of special rules. You should read the briefing of each turn thoroughly before playing it out. Each turn also has a fixed number of engagements ranging from 3 to 5 in number for a total of 17 engagements. The number is optimised to fit the historical battle.
Further reaDIng anD BIBlIography
Firestorm: Villers-Bretonneux uses the following main sources.
Flames of War Great War briefing.
2nd Villers-Bretonneux – Australians on the Western Front – www.WW Iwesternfront.gov.au
http://www.WW Iwesternfront.gov.au/villers-bretonneux/what-happened-here.php
Wikipedia: Second Battle of Villers-Bretonneux -
http://en.wikipedia.org/wiki/Second_Battle_of_Villers-Bretonneux
Firstworldwar.com – Mitchell’s story.
http://www.firstworldwar.com/diaries/whentankfoughttank.htm
Official History of Australian in the War of 1914 – 1918
http://www.awm.gov.au
Osprey Mark IV vs. A7V: Villers-Bretonneux, 1918 (Duel) by David R. Higgins.
I found that researching WW I was considerably more difficult than for WW II and details are harder to find.
what Forces shoulD I play? Firestorm: Villers-Bretonneux is designed to be played with The Great War briefing. Since these are the only WWI forced currently released by Battlefront these are the forces you should play.
report Back! All feedback on the game is happily received and I would love to hear from you gamers how you find the Campaign. A short email with the outcome to [email protected] would be most welcome and you can write your reports and comments on www.flamesofwar.com forum under the Campaigns section or at Flames of War at Facebook.
3
THE SECOND BATTLE OF ViLLERS-BRETONNEUX
Punch a hole and let the rest follow.
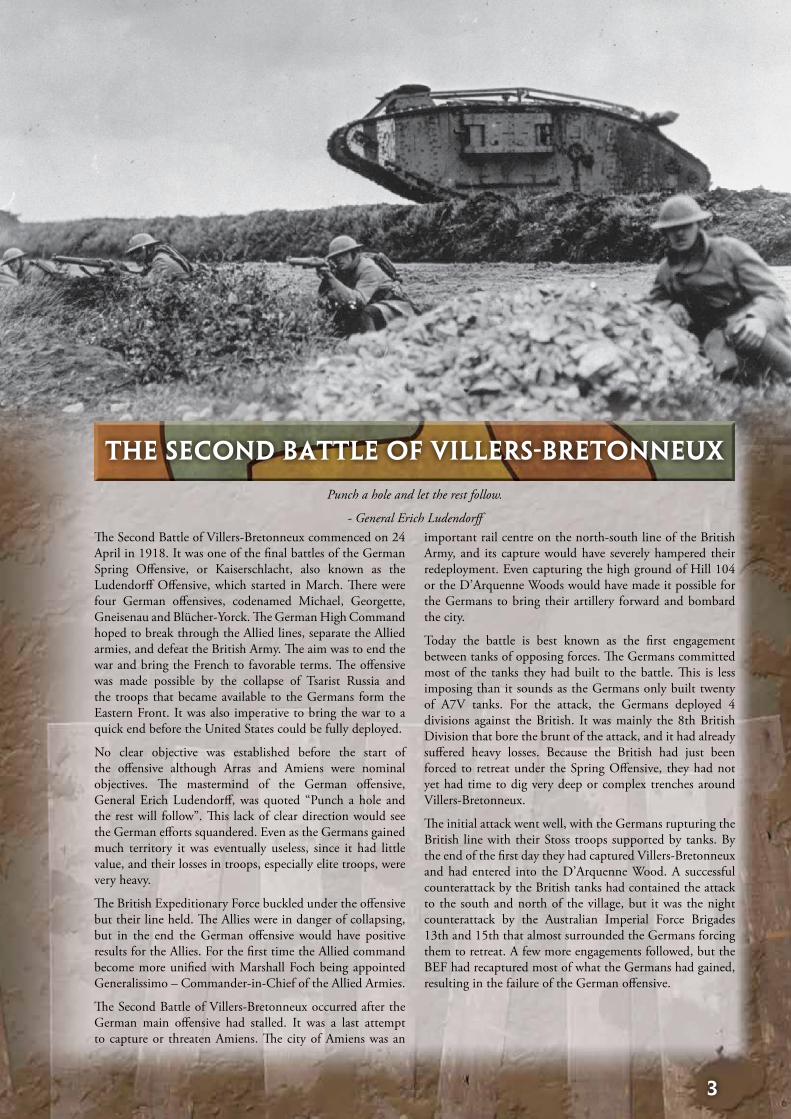
- General Erich LudendorffThe Second Battle of Villers-Bretonneux commenced on 24 April in 1918. It was one of the final battles of the German Spring Offensive, or Kaiserschlacht, also known as the Ludendorff Offensive, which started in March. There were four German offensives, codenamed Michael, Georgette, Gneisenau and Blücher-Yorck. The German High Command hoped to break through the Allied lines, separate the Allied armies, and defeat the British Army. The aim was to end the war and bring the French to favorable terms. The offensive was made possible by the collapse of Tsarist Russia and the troops that became available to the Germans form the Eastern Front. It was also imperative to bring the war to a quick end before the United States could be fully deployed.
No clear objective was established before the start of the offensive although Arras and Amiens were nominal objectives. The mastermind of the German offensive, General Erich Ludendorff, was quoted “Punch a hole and the rest will follow”. This lack of clear direction would see the German efforts squandered. Even as the Germans gained much territory it was eventually useless, since it had little value, and their losses in troops, especially elite troops, were very heavy.
The British Expeditionary Force buckled under the offensive but their line held. The Allies were in danger of collapsing, but in the end the German offensive would have positive results for the Allies. For the first time the Allied command become more unified with Marshall Foch being appointed Generalissimo – Commander-in-Chief of the Allied Armies.
The Second Battle of Villers-Bretonneux occurred after the German main offensive had stalled. It was a last attempt to capture or threaten Amiens. The city of Amiens was an
important rail centre on the north-south line of the British Army, and its capture would have severely hampered their redeployment. Even capturing the high ground of Hill 104 or the D’Arquenne Woods would have made it possible for the Germans to bring their artillery forward and bombard the city.
Today the battle is best known as the first engagement between tanks of opposing forces. The Germans committed most of the tanks they had built to the battle. This is less imposing than it sounds as the Germans only built twenty of A7V tanks. For the attack, the Germans deployed 4 divisions against the British. It was mainly the 8th British Division that bore the brunt of the attack, and it had already suffered heavy losses. Because the British had just been forced to retreat under the Spring Offensive, they had not yet had time to dig very deep or complex trenches around Villers-Bretonneux.
The initial attack went well, with the Germans rupturing the British line with their Stoss troops supported by tanks. By the end of the first day they had captured Villers-Bretonneux and had entered into the D’Arquenne Wood. A successful counterattack by the British tanks had contained the attack to the south and north of the village, but it was the night counterattack by the Australian Imperial Force Brigades 13th and 15th that almost surrounded the Germans forcing them to retreat. A few more engagements followed, but the BEF had recaptured most of what the Germans had gained, resulting in the failure of the German offensive.
4
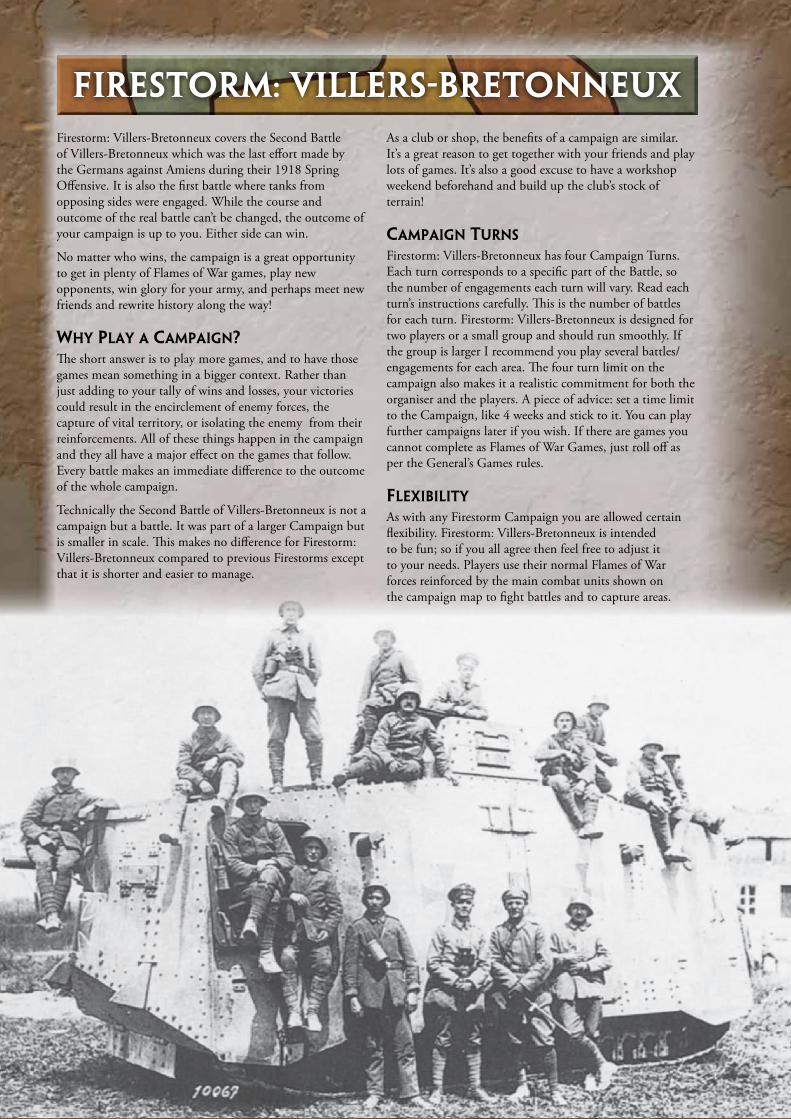
FiRESTORM: ViLLERS-BRETONNEUXFirestorm: Villers-Bretonneux covers the Second Battle of Villers-Bretonneux which was the last effort made by the Germans against Amiens during their 1918 Spring Offensive. It is also the first battle where tanks from opposing sides were engaged. While the course and outcome of the real battle can’t be changed, the outcome of your campaign is up to you. Either side can win.
No matter who wins, the campaign is a great opportunity to get in plenty of Flames of War games, play new opponents, win glory for your army, and perhaps meet new friends and rewrite history along the way!
why play a campaIgn?The short answer is to play more games, and to have those games mean something in a bigger context. Rather than just adding to your tally of wins and losses, your victories could result in the encirclement of enemy forces, the capture of vital territory, or isolating the enemy from their reinforcements. All of these things happen in the campaign and they all have a major effect on the games that follow. Every battle makes an immediate difference to the outcome of the whole campaign.
Technically the Second Battle of Villers-Bretonneux is not a campaign but a battle. It was part of a larger Campaign but is smaller in scale. This makes no difference for Firestorm: Villers-Bretonneux compared to previous Firestorms except that it is shorter and easier to manage.
As a club or shop, the benefits of a campaign are similar. It’s a great reason to get together with your friends and play lots of games. It’s also a good excuse to have a workshop weekend beforehand and build up the club’s stock of terrain!
campaIgn turns
Firestorm: Villers-Bretonneux has four Campaign Turns. Each turn corresponds to a specific part of the Battle, so the number of engagements each turn will vary. Read each turn’s instructions carefully. This is the number of battles for each turn. Firestorm: Villers-Bretonneux is designed for two players or a small group and should run smoothly. If the group is larger I recommend you play several battles/engagements for each area. The four turn limit on the campaign also makes it a realistic commitment for both the organiser and the players. A piece of advice: set a time limit to the Campaign, like 4 weeks and stick to it. You can play further campaigns later if you wish. If there are games you cannot complete as Flames of War Games, just roll off as per the General’s Games rules.
FlexIBIlIty
As with any Firestorm Campaign you are allowed certain flexibility. Firestorm: Villers-Bretonneux is intended to be fun; so if you all agree then feel free to adjust it to your needs. Players use their normal Flames of War forces reinforced by the main combat units shown on the campaign map to fight battles and to capture areas.

5
Each game the player makes a new force to respond to the situation they face, allowing them to recover from previous defeats and fight on. While players may lose the support of main combat units destroyed in previous battles, they always get their core force. This has the advantage of keeping the campaign fun right to the end. It is simply not possible for one side to become much stronger than the other, so every battle is winnable and every fight counts. This flexibility applies to players as well as their forces. While fielding an Entente or Central force is nice from a historical viewpoint, it doesn’t matter if you don’t have one. You can fight with any force you have. Firestorm: Villers-Bretonneuxisis is best suited for small 1000-1500 point games plus Firestorm troops. I recommend 1250 as a starting force, but you certainly can play whatever points you and your opponent would like. Small games are generally resolved more quickly. Remember that the Firestorm Troops are added to the Total so it is advisable to restrict the force number. If you allow for armies around 1750 points and then add Firestorm Troops the battles can quickly become too large and take too long to complete without being any more fun. You can also run larger battles or Total War battles in between as team events or just to mix things up. Ultimately, the size of your force is not an issue. You can play large or small battles or anything in between. You can even swap sides if you want to; although turning traitor can mark you as a target for your former comrades! All that matters is that you are playing games, contributing to the campaign’s outcome, and having fun.
terraIn
The Second Battle of Villers-Bretonneux was fought in a small area. In fact each square on the map is 1 kilometre per side so the total area is 4.5 x 4 kilometres or 3 by 2.5 miles. Important places are marked on the map but there are only four kinds of terrain. B-4, B-5, C-1, C-3, C-4, C-5, D-1, D-2 and D-3 are all trenches, A-2 (D’Arquenne)
and D-4 (Lancer) are woods and B-2 Villers-Bretonneux is a town/city. All other areas are considered to be open areas. You might want to add a few houses if an area contains a small village, or burned down trees like Hangard or Monument woods, but this should not cover the whole playing area. Note that A-3 Cachy has a small trench line but certainly does not count as trenches. The trench line is a switch trench and is minor, but if you know the history of the battle then the first tank engagement in history was just beyond it, in area B-3 on this map.
mIssIons
In the Great War briefing there are three missions. These are the missions you will play. Detailed instructions dictating which mission should be played are found later.
what are you waItIng For?Read through the Firestorm: Villers-Bretonneux rules, get everyone together, organise the venue, and start playing. There’s nothing else needed to begin, so you can start right away!
6
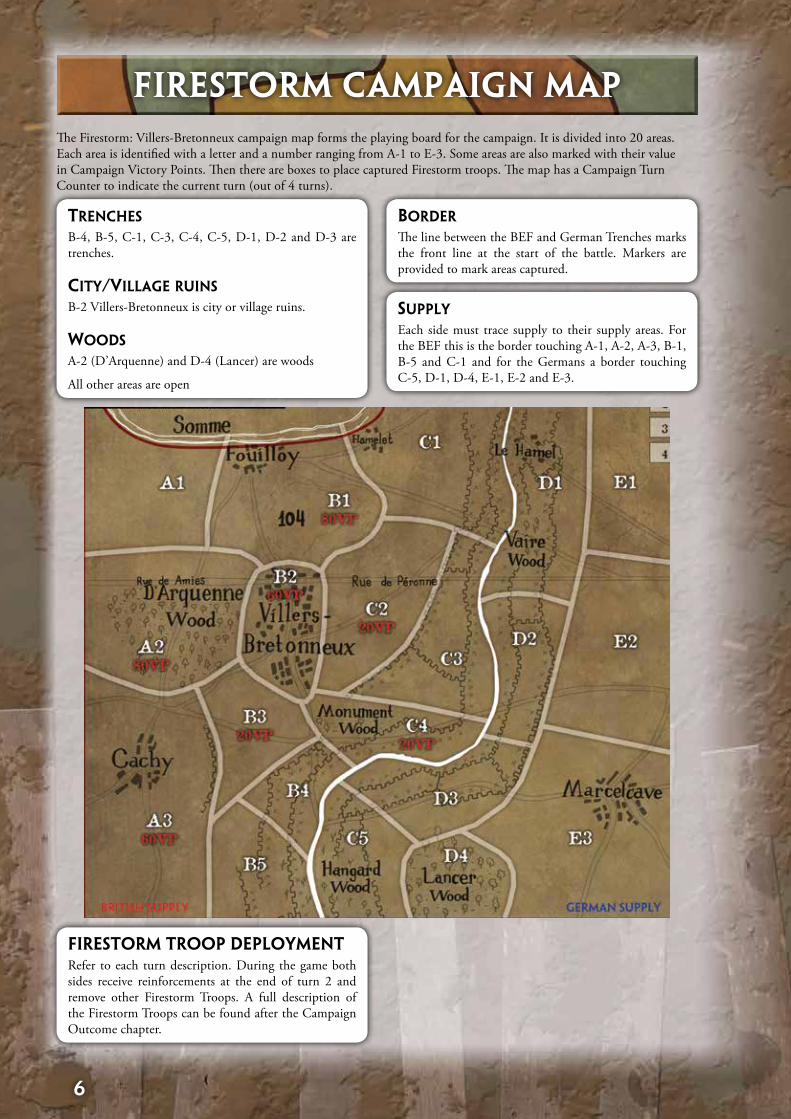
FiRESTORM CAMPAiGN MAPThe Firestorm: Villers-Bretonneux campaign map forms the playing board for the campaign. It is divided into 20 areas. Each area is identified with a letter and a number ranging from A-1 to E-3. Some areas are also marked with their value in Campaign Victory Points. Then there are boxes to place captured Firestorm troops. The map has a Campaign Turn Counter to indicate the current turn (out of 4 turns).
trenches
B-4, B-5, C-1, C-3, C-4, C-5, D-1, D-2 and D-3 are trenches.
cIty/VIllage ruIns
B-2 Villers-Bretonneux is city or village ruins.
wooDs
A-2 (D’Arquenne) and D-4 (Lancer) are woods
All other areas are open
BorDer
The line between the BEF and German Trenches marks the front line at the start of the battle. Markers are provided to mark areas captured.
supply Each side must trace supply to their supply areas. For the BEF this is the border touching A-1, A-2, A-3, B-1, B-5 and C-1 and for the Germans a border touching C-5, D-1, D-4, E-1, E-2 and E-3.
FIrestorm troop DeploymentRefer to each turn description. During the game both sides receive reinforcements at the end of turn 2 and remove other Firestorm Troops. A full description of the Firestorm Troops can be found after the Campaign Outcome chapter.

7
german ImperIal army
478 RIR (Veteran Infantry) at D-1
48 RIR (Veteran Infantry), 207 RIR (Veteran Infantry) and Group I (A7V tanks) at D-2
G Gr. 5 (Stoss), 93 RIR (Veteran Infantry) and Group III (A7V tanks) at D-3
257 (Stoss) and 419 RIR (Trained Infantry) and Group II (A7V tanks) at C-5
BrItIsh expeDItIonary Force
No 2 – A Coy Grove (Mark IV tanks) at A-1
No 1 – A Coy Mitchell (Mark IV tanks) and X Coy Price (Whippet tanks) at A-2
24 Bde (Trained Infantry) at B-2
58 Bn MGC (Trained HMG) at B-4
173 Bde (Trained Infantry) at B-5
14 Bde AIF (Veteran Infantry) at C-1
25 Bde (Trained Infantry) at C-3
23 Bde (trained Infantry) at C-4
initial deployment
8
Recommended or Historical
Firestorm: Villers-Bretonneux is designed to make the most of the newly released Flames of War Great War briefing and models. The Firestorm should be a campaign that makes the most of your forces and lets you enjoy your battles. Therefore it is recommended that you play with what forces you have available at all times.
At the end of turn 2 all tank Firestorm Troops will be removed from the game but don’t let that stop you from including tanks in your force. You just don’t get them as Firestorm Troops anymore.
RECOMMENDED PLAY
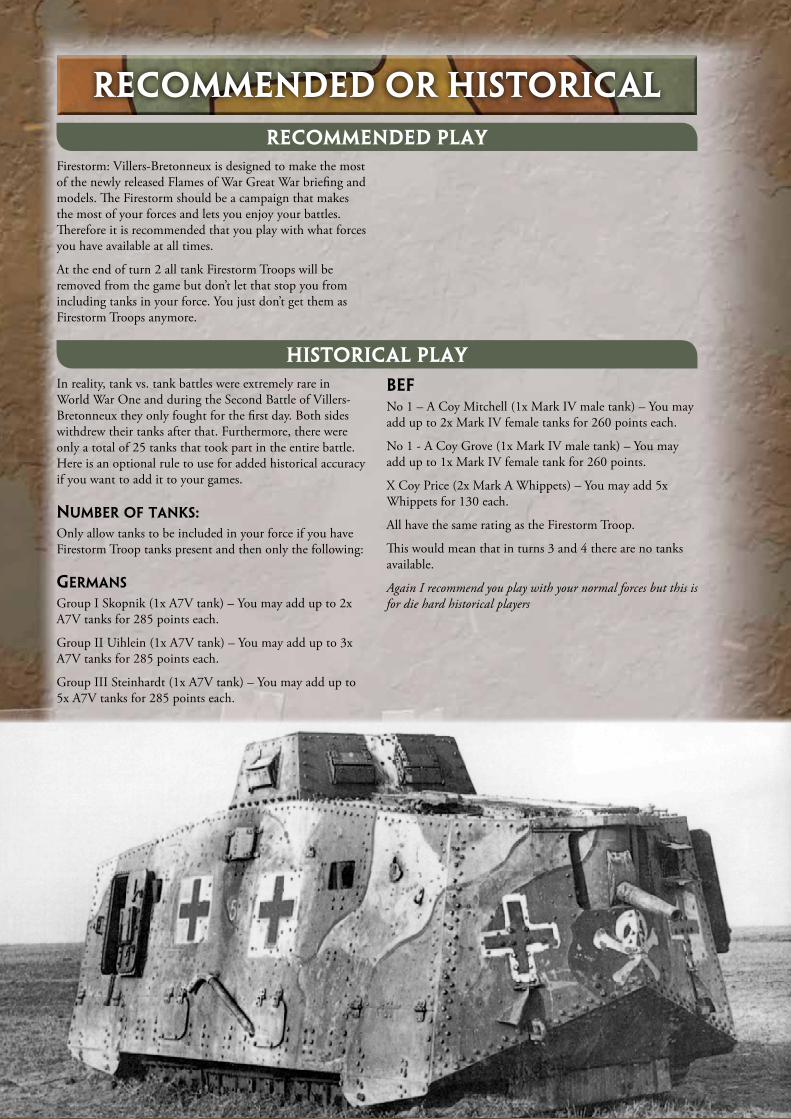
HiSTORiCAL PLAYIn reality, tank vs. tank battles were extremely rare in World War One and during the Second Battle of Villers-Bretonneux they only fought for the first day. Both sides withdrew their tanks after that. Furthermore, there were only a total of 25 tanks that took part in the entire battle. Here is an optional rule to use for added historical accuracy if you want to add it to your games.
numBer oF tanks:Only allow tanks to be included in your force if you have Firestorm Troop tanks present and then only the following:
germans
Group I Skopnik (1x A7V tank) – You may add up to 2x A7V tanks for 285 points each.
Group II Uihlein (1x A7V tank) – You may add up to 3x A7V tanks for 285 points each.
Group III Steinhardt (1x A7V tank) – You may add up to 5x A7V tanks for 285 points each.
BeFNo 1 – A Coy Mitchell (1x Mark IV male tank) – You may add up to 2x Mark IV female tanks for 260 points each.
No 1 - A Coy Grove (1x Mark IV male tank) – You may add up to 1x Mark IV female tank for 260 points.
X Coy Price (2x Mark A Whippets) – You may add 5x Whippets for 130 each.
All have the same rating as the Firestorm Troop.
This would mean that in turns 3 and 4 there are no tanks available.
Again I recommend you play with your normal forces but this is for die hard historical players

9
How Firestorm WorkscommanDers
Commanders make up the bulk of players in Firestorm: Villers-Bretonneux. They are the players that actually fight the table top battles that decide the outcome of the campaign. Commanders play their games of Flames of War in the Battle Phase.
campaIgn turn There are four turns in Firestorm: Villers-Bretonneux. Turn one and two happen on the first day of the German offensive and the first three engagements are fixed in turn 1. Each turn has a suggested number of battles/engagements from 2 to 5 in number. There is a reason for this number of battles/engagements; that is to keep the campaign running efficiently and within a reasonable timeframe. I have played many Firestorm Games and found this crucial to a good outcome. It also places pressure on both sides.
There are three types of participants in Firestorm: Villers-Bretonneux. The Commanders, the Generals, and the Organiser. Since this is a Mini-Campaign the General on one side can also be a Commander. The rules for the campaign are separated into three parts corresponding to these three roles.
two generals
Each side has a General who is in charge of strategy. The General devises their plan in the Planning Phase for the Commanders to execute in the Battle Phase. Once the Commanders have fought all of their games, the two Generals redeploy and reinforce their armies in the Strategic Phase and get ready for the next campaign turn. Once the Generals have finished their planning, they step into the Commander’s role during the Battle Phase and play table top games. Then they step back into the General’s role for the Strategic Phase.
one organIser
The campaign also needs an Organiser to set it up and make sure that everything runs smoothly. The Organiser may choose to play in the campaign as well if they wish, or they may simply be the owner of the store where the campaign is being played. The chief responsibilities of the Organiser are selecting the scenario that will be played, arranging a suitable venue, and getting plenty of players involved.
Order One - Planning phase
orDer one – plannIng phase1. Determine the number of Battles
2. Determine Initiative Bonus
3. Plan your games
orDer two – Battle phase(Players fight the Battle Phase)
1. Manoeuvre Step
2. Combat Step
3. After Action Step
orDer three – strategIc phase1. Make Redeployment Moves
2. Deploy new Firestorm Troops and remove tanks (end of turn 2 only)
3. Total Your Victory Points
“Into the bastards, boys!”
- AIF battle cry, the night of the 25th April
The leader of each side in Firestorm: Villers-Bretonneux is a General. As a General, you are responsible for planning your army’s campaign and leading your commanders to victory. You need to develop a battle plan for your commanders to carry out. Get this right and victory will be yours. A General has three standing orders: the Planning Phase conducted at the beginning of each Campaign Turn, the Battle Phase where you and your commanders fight battles, and the Strategic Phase at the end of each Campaign Turn.
There are many ways of planning a battle and experienced generals will have their own way of doing things. This section outlines a simple step-by-step approach to planning your campaign that can help you on your way to victory. Choose the parts that work for you and use them to plan your victory.
1. DetermIne the numBer oF Battles thIs turn
First thing you need to do is to determine the number of engagements/battles. This gives you a number between three and five, depending on the turn. I suggest you use a die to count how many battles are remaining.
10
2. DetermIne InItIatIVe Bonus
Germans are automatically the attacker in all battles on turn. On turn 2 they have a +1 initiative bonus and win on ties. On turns 3 and 4 it is the BEF that have a +1 bonus and win on a ties. In addition during turns 2 through 4 the side that won the last battle gets a +1 bonus as well. This bonus is for that turn only and does not carry to the next turn.
If you are playing a game with more than two players it can be hard to keep track of who has the bonus for winning the last battle, so give the winning player the bonus in his next battle in the same turn.
Example: Mike and John play, and Mike wins during the same turn that Rob and Dave play. So next time Mike plays he gets a +1 bonus.
3. plan your games
Depending on the size of the group you may want to spend some time planning ahead and make strategic decisions. But then you are off to play actual games.
Order TWO – BATTLE PHASEThe Battle Phase is where you and your Commanders fight their battles.
As the General you are expected to lead your army into battle. Taking your own force onto the battlefield and engaging the enemy inspires confidence. Once the Planning Phase is finished, it’s up to you and your Commanders to fight the Battle Phase. For the rest of the Campaign turn they will fight battles using the three steps of the Battle Phase:
Manoeuvre Step,
Combat Step, and
After Action Step.
A General also leads his own forces in Firestorm, participating in the campaign as a Commander.
Each Commander fights Flames of War battles to advance their armies on the campaign map. The more victorious battles Commanders fight during a Campaign Turn the better chance their army has of winning the campaign.
1. select an opponent
Your opponents in Firestorm come from the other Commanders participating in the campaign. Find an opposing Commander and challenge them to a game of Flames of War. It doesn’t really matter if the people you play are on your side or even part of the campaign. If you can’t find an opposing Commander to play, just grab anyone who is available as the opposing Commander.
2. DetermIne InItIatIVe
In Firestorm: Villers-Bretonneux the initiative passes from one player to the other. Both players roll one dice and apply any turn modifiers. The side that has the higher score wins the initiative, becomes the attacker and therefore can choose where the battle will be fought. The attacker must attack but since only the defender can lose an area the attacker will only be risking his Firestorm Troops. He will also automatically be the attacker in any mission played and this supersedes any other rule including forces that always attack or always defend.
3. place a Battle arrow
After you win initiative, mark the areas on the Campaign map where you will battle using a Battle Arrow. If you win the initiative select an area that your side controls to attack from and an area that the enemy controls to attack into. Place a Battle Arrow pointing from your area into the enemy area you are attacking.
4. choose FIrestorm troops Firestorm Troops represent the most powerful units that fought in the Second Battle of Villers-Bretonnuex. You can strengthen your force with these troops. Both the BEF and Germans have Firestorm Troops to assist their armies in the campaign.
You may add up to two Firestorm Troops from the area you are fighting in to your Flames of War force. Place these Firestorm Troops on the Battle Arrow. Treat these Firestorm Troops as extra Divisional Support choices in your force. You do not need to have Firestorm Troops to fight. Not having Firestorm Troops simply means that you will not gain additional troops for your Flames of War games. Nor do you have to commit troops even if you have them, except the attacker must place 1 Firestorm Troop in attack.
There are a few special rules regarding Firestorm Troops in Firestorm: Villers-Bretonneux.
FIrestorm troop poInts Value
Unlike previous games, Firestorm: Villers-Bretonneux gives you an option to add points to your force rather than the Firestorm Troop listed. So instead of the platoon listed you may add points to your force. The points are listed in the upper right corner with each Firestorm Troop. You will notice that they are of less value than the Firestorm Troop itself. That is intentional to encourage you to have the right Troops present but it gives you flexibility and an alternative if you do not have every unit.
STEP ONE: MANOEUVRE STEP
11
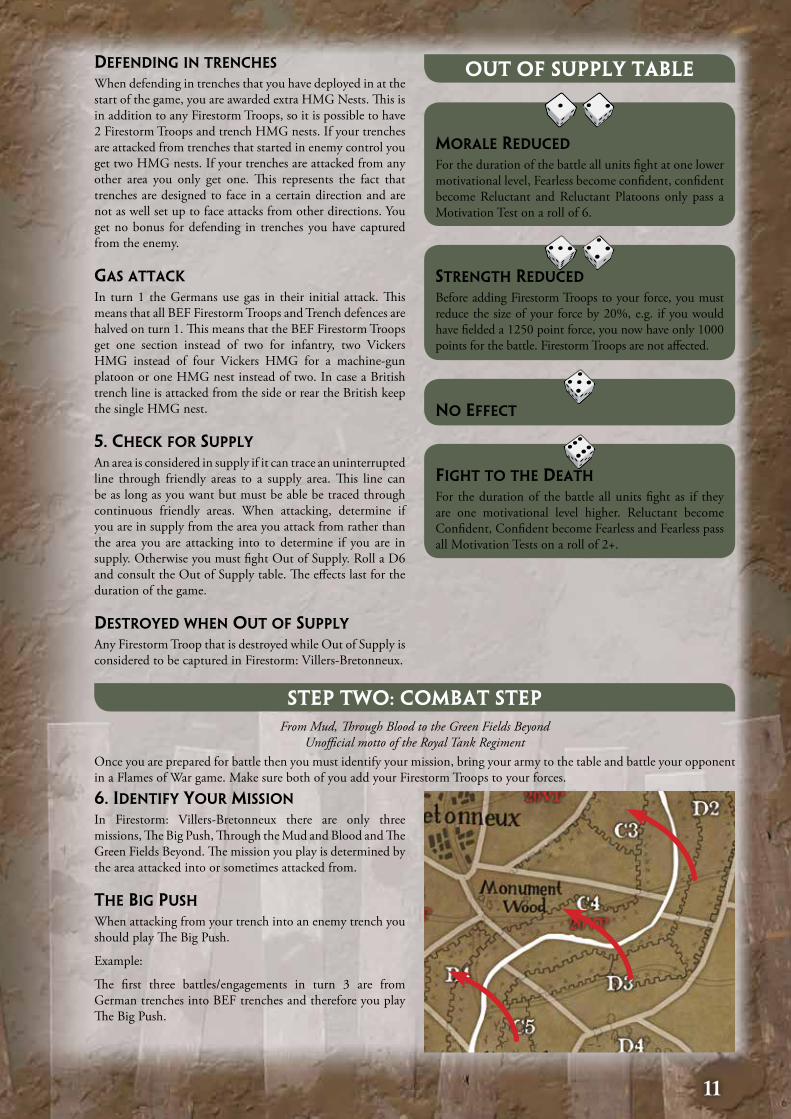
morale reDuceD For the duration of the battle all units fight at one lower motivational level, Fearless become confident, confident become Reluctant and Reluctant Platoons only pass a Motivation Test on a roll of 6.
strength reDuceD
Before adding Firestorm Troops to your force, you must reduce the size of your force by 20%, e.g. if you would have fielded a 1250 point force, you now have only 1000 points for the battle. Firestorm Troops are not affected.
no eFFect
FIght to the Death
For the duration of the battle all units fight as if they are one motivational level higher. Reluctant become Confident, Confident become Fearless and Fearless pass all Motivation Tests on a roll of 2+.
OUT OF SUPPLY TABLEDeFenDIng In trenches When defending in trenches that you have deployed in at the start of the game, you are awarded extra HMG Nests. This is in addition to any Firestorm Troops, so it is possible to have 2 Firestorm Troops and trench HMG nests. If your trenches are attacked from trenches that started in enemy control you get two HMG nests. If your trenches are attacked from any other area you only get one. This represents the fact that trenches are designed to face in a certain direction and are not as well set up to face attacks from other directions. You get no bonus for defending in trenches you have captured from the enemy.
gas attack
In turn 1 the Germans use gas in their initial attack. This means that all BEF Firestorm Troops and Trench defences are halved on turn 1. This means that the BEF Firestorm Troops get one section instead of two for infantry, two Vickers HMG instead of four Vickers HMG for a machine-gun platoon or one HMG nest instead of two. In case a British trench line is attacked from the side or rear the British keep the single HMG nest.
5. check For supply
An area is considered in supply if it can trace an uninterrupted line through friendly areas to a supply area. This line can be as long as you want but must be able be traced through continuous friendly areas. When attacking, determine if you are in supply from the area you attack from rather than the area you are attacking into to determine if you are in supply. Otherwise you must fight Out of Supply. Roll a D6 and consult the Out of Supply table. The effects last for the duration of the game.
DestroyeD when out oF supply
Any Firestorm Troop that is destroyed while Out of Supply is considered to be captured in Firestorm: Villers-Bretonneux.
STEP TWO: COMBAT STEP
Once you are prepared for battle then you must identify your mission, bring your army to the table and battle your opponent in a Flames of War game. Make sure both of you add your Firestorm Troops to your forces.
From Mud, Through Blood to the Green Fields Beyond Unofficial motto of the Royal Tank Regiment
6. IDentIFy your mIssIon
In Firestorm: Villers-Bretonneux there are only three missions, The Big Push, Through the Mud and Blood and The Green Fields Beyond. The mission you play is determined by the area attacked into or sometimes attacked from.
the BIg push
When attacking from your trench into an enemy trench you should play The Big Push.
Example:
The first three battles/engagements in turn 3 are from German trenches into BEF trenches and therefore you play The Big Push.
12
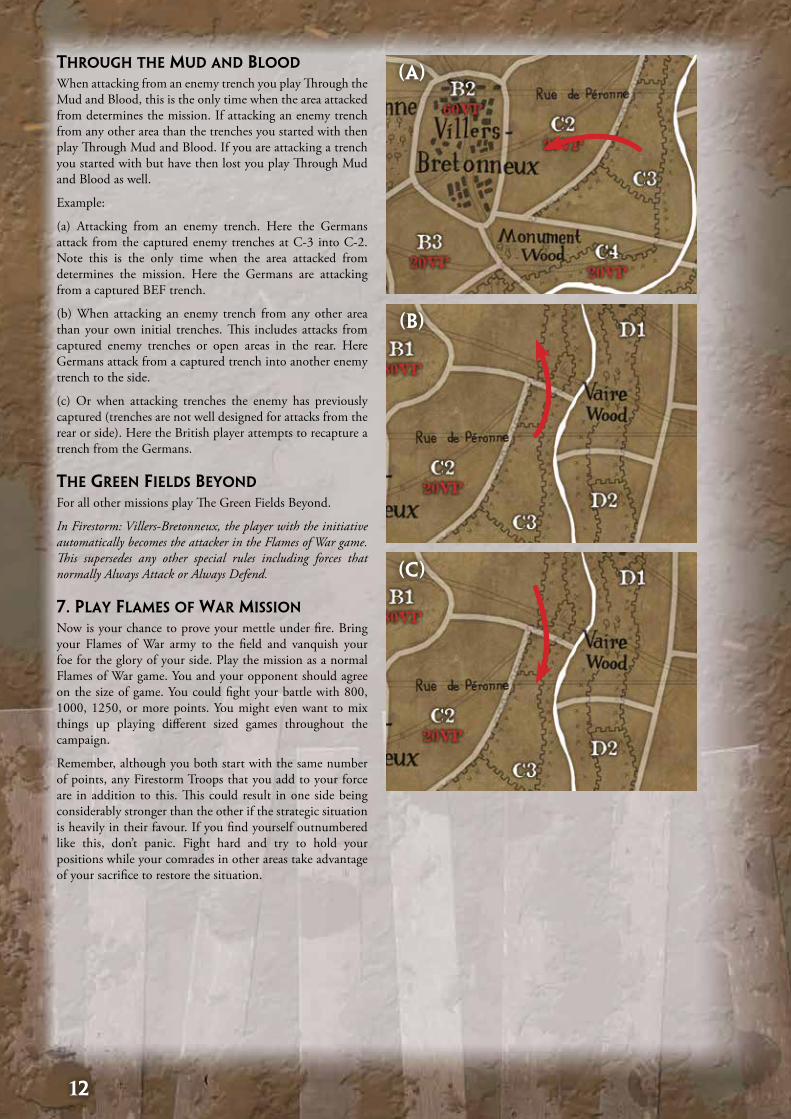
through the muD anD BlooD
When attacking from an enemy trench you play Through the Mud and Blood, this is the only time when the area attacked from determines the mission. If attacking an enemy trench from any other area than the trenches you started with then play Through Mud and Blood. If you are attacking a trench you started with but have then lost you play Through Mud and Blood as well.
Example:
(a) Attacking from an enemy trench. Here the Germans attack from the captured enemy trenches at C-3 into C-2. Note this is the only time when the area attacked from determines the mission. Here the Germans are attacking from a captured BEF trench.
(b) When attacking an enemy trench from any other area than your own initial trenches. This includes attacks from captured enemy trenches or open areas in the rear. Here Germans attack from a captured trench into another enemy trench to the side.
(c) Or when attacking trenches the enemy has previously captured (trenches are not well designed for attacks from the rear or side). Here the British player attempts to recapture a trench from the Germans.
the green FIelDs BeyonD
For all other missions play The Green Fields Beyond.
In Firestorm: Villers-Bretonneux, the player with the initiative automatically becomes the attacker in the Flames of War game. This supersedes any other special rules including forces that normally Always Attack or Always Defend.
7. play Flames oF war mIssIon
Now is your chance to prove your mettle under fire. Bring your Flames of War army to the field and vanquish your foe for the glory of your side. Play the mission as a normal Flames of War game. You and your opponent should agree on the size of game. You could fight your battle with 800, 1000, 1250, or more points. You might even want to mix things up playing different sized games throughout the campaign.
Remember, although you both start with the same number of points, any Firestorm Troops that you add to your force are in addition to this. This could result in one side being considerably stronger than the other if the strategic situation is heavily in their favour. If you find yourself outnumbered like this, don’t panic. Fight hard and try to hold your positions while your comrades in other areas take advantage of your sacrifice to restore the situation.
(A)
(B)
(C)

13
No job is done until the paperwork is finished!
At the end of your battle you need to take note of your Victory Points. Remove your Battle Arrow from the Campaign Map, unless there was already a Battle Arrow in place for these areas when you started your battle and it has not yet been removed. If there are multiple simultaneous battles in your area, leave your Battle Arrow in place and wait until the earlier battles are resolved before completing your After Action Step.
8.a roll to Destroy
Committing your Firestorm Troops to battle offers great rewards, but brings great risk. Their destruction in battle will leave you weakened, hindering your general’s battle plan.
All Firestorm Troops that fought in the battle are at risk of destruction in the campaign if they are defeated on the battlefield. While tactical losses can be made good by a victorious army, a defeated army must conduct a difficult retreat that can result in the total destruction of its best troops. For each Firestorm troop used in the battle, regardless of its fate during the game, the opposing Commander will roll a die. The score needed to destroy the Firestorm Troop in the campaign is given on the Roll to Destroy table and depends on the number of Victory Points that you scored. Remove any Firestorm Troops that are destroyed from the Campaign Map. In Villers-Bretonneux they never return but may count as captured, see below.
8.B roll to capture
Any destroyed Firestorm Troops from the side that lost the battle may be captured because they surrender. Roll a second time on the same table for any destroyed Firestorm Troops from the side that lost the battle. If they are destroyed a second time they count as captured and award Victory Points to the capturing side. Place them in the captured box.
Example:
The British lose an Infantry Firestorm Troop in a battle they lost. Since they lost 5-2 the Firestorm Troop is destroyed on 5+ and the German player rolls 5 and the Infantry is destroyed. Since the British lost the Battle there is a chance they are captured so the German player rolls a second time, again needing 5+. He rolls a 6 and the Infantry is captured.
Troops that are out of supply or cannot retreat when destroyed are automatically captured.
9. retreat DeFeateD troops
When you have been defeated in battle you must surrender the battlefield to your opponent. In order to save your force from utter destruction retreat is your only recourse. If the attacker is defeated he retreats into the area he attacked from, if the defender is defeated he must retreat into a friendly adjacent area.
If your opponent scored at least three Victory Points in the game and scored more Victory Points than you did, then you have been defeated and must retreat. After rolling for destruction, all remaining Firestorm Troops in the defeated Commander’s area must be retreated. Attacking troops simply return from the area they attacked from while
TERRAiNThe Second Battle of Villers-Bretonneux was fought in a small area. In fact each square on the map is 1 kilometre to each side so the total area is 4.5 x 4 kilometres or 3 by 2.5 miles. Important places are marked on the map but there are only four kinds of terrain. B-4, B-5, C-1, C-3, C-4 (British) and C-5, D-1, D-2 and D-3 (German) are all trenches, A-2 (D’Arquenne) and D-4 (Lancer) are woods and B-2 Villers-Bretonneux is a town/city. All other areas are considered to be open areas.
You might want to add a few houses if an area contains a small village, or burned down trees like Hangard or Monument woods but this should not cover the whole playing area. Note that A-3 Cachy has a small trench line but certainly does not count as trenches. The trench line is a switch trench and is minor but if you know the history of the battle then the first tank engagement in history was just beyond it, in area B-3 on this map.
STEP THREE: AFTER ACTiON STEP
Your Score needed to Destroy Victory Points Enemy Firestorm Troops
6+ 4+
5 5+
3 or 4 6
2 or less No roll
ROLL TO DESTROY

14
ORDER THREE – STRATEGiC PHASE
defeated defending troops must retreat to any adjacent areas of their choice that are under their control. If there are no adjacent friendly-controlled areas to retreat into, then all of the Firestorm Troops in the area, including any that were destroyed, are captured and permanently removed from the campaign. In addition any Firestorm Troop that is destroyed while out of supply is captured as well even if there are friendly areas to retreat to. This earns the victorious Commander extra Campaign Victory Points. Report the capture of these Firestorm Troops to your General. If neither side scores 4 points, the battle automatically counts as a defender victory.
Example: the Battle ends as 3-1 for the attacker. He captures the area since the attacker has at least three points and more points than the defender. The attacker does not capture the area if he has only 2 points or loses the battle. In case of a 3-3 tie, the defender wins.
10. aDVance VIctorIous troops
As an attacker vanquishing your foe, you have gained control of his position. To claim your prize, march your
forces forward and take control of the battlefield. As the defender you have managed to defend your territory and remain in control but do not capture the attacker’s territory.
If as attacker you defeated your opponent, you now control the area the defeated forces retreated from. Place a Control marker on your new area to show that you now control it. As the victorious Commander, you may move up to three Firestorm Troops into the newly-controlled area from any adjacent areas. The first troops to move into the newly-acquired area must be any surviving Firestorm Troops that you used in your battle. Once these troops have advanced, you may select the remaining Firestorm Troops to advance from any adjacent area.
If there were multiple battles being fought in the areas you were fighting in, it is entirely possible for you to capture an area from the enemy and occupy it, while another player on your side loses the area that you just fought out of. While this can be disturbing, as it often leaves you cut off, such is the ebb and flow of battle.
1. make reDeployment moVes
Redeploying forces before the next engagements provides you with the flexibility to meet both known and unknown threats. In Firestorm: Villers-Bretonneux you may redeploy your units before the next turn starts. Both sides starting with the Germans can now move any units on the map up to one friendly area. They cannot enter enemy held areas.
2. Deploy new FIrestorm troops anD remoVe tanks. - End of turn 2 only.
At the end of turn 2 all tank Firestorm Troops that remain in play from both sides are removed. This does not mean you cannot have tanks in your force, only that you will no longer receive them as Firestorm Troops. See Recommended and Historical Play.
Then the German player may add two HMG Firestorm Troops to any areas he controls on the Map.
After this the British player receives four Veteran Infantry Firestorm Troops. Two are from the 13th AIF Brigade and two are from the 15th AIF Brigade. They must be placed together in the following areas:
13th Brigade in A-3 Cachy or any friendly adjacent area.
15th Brigade in B-1 Fouilloy/Hill 104 or any friendly adjacent area.
Place them carefully as they may not be moved after they are placed.
3. total VIctory poInts The last thing to do in the Strategic Phase is to total your Campaign Victory Points. While this does not matter until the end of the campaign, it is useful to know how well you are doing as the campaign progresses.
Both Generals now total the Campaign Victory Points that they have earned from capturing and holding objective areas and capturing Firestorm Troops.
15
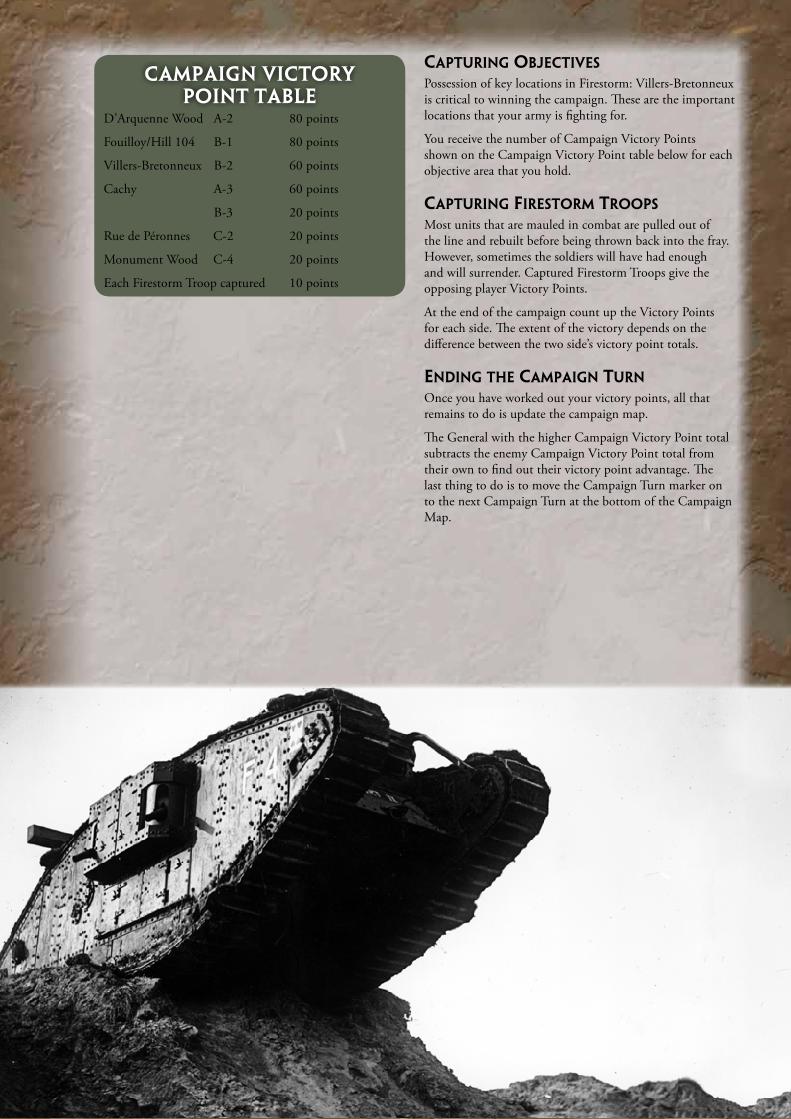
D’Arquenne Wood A-2 80 points
Fouilloy/Hill 104 B-1 80 points
Villers-Bretonneux B-2 60 points
Cachy A-3 60 points
B-3 20 points
Rue de Péronnes C-2 20 points
Monument Wood C-4 20 points
Each Firestorm Troop captured 10 points
CAMPAiGN ViCTORY POiNT TABLE
capturIng oBjectIVes
Possession of key locations in Firestorm: Villers-Bretonneux is critical to winning the campaign. These are the important locations that your army is fighting for.
You receive the number of Campaign Victory Points shown on the Campaign Victory Point table below for each objective area that you hold.
capturIng FIrestorm troops
Most units that are mauled in combat are pulled out of the line and rebuilt before being thrown back into the fray. However, sometimes the soldiers will have had enough and will surrender. Captured Firestorm Troops give the opposing player Victory Points.
At the end of the campaign count up the Victory Points for each side. The extent of the victory depends on the difference between the two side’s victory point totals.
enDIng the campaIgn turn
Once you have worked out your victory points, all that remains to do is update the campaign map.
The General with the higher Campaign Victory Point total subtracts the enemy Campaign Victory Point total from their own to find out their victory point advantage. The last thing to do is to move the Campaign Turn marker on to the next Campaign Turn at the bottom of the Campaign Map.
16
CAMPAiGN OUTCOMEThe Monument is your goal and nothing is to stop your getting there.
Kill every bloody German you see,we don’t want any prisoners, and God bless you.
- Captain “Billy” HarburnAt the end of the campaign count up the Victory Points for each side. The extent of the victory depends on the difference between the two side’s victory point totals.
The side with the higher Campaign Victory Point total wins the campaign. There are four levels of victory in Firestorm: Villers-Bretonneux based on the difference in Campaign Victory Points between the two sides
entente VIctoryThe Entente side wins if it has more Campaign Victory Points then the Central powers.
entente strategIc VIctory
wIn By 150 campaIgn poInts
You have put the Hun in his rightful place and smashed his offensive. Good show, you are on your way to a promotion.
This is the historical outcome of the Firestorm: Villers-Bretonneux.
entente operatIonal VIctory
wIn By 100 campaIgn poInts
A hard won battle old boy, but your line has held and Fritz is out of steam. Jolly good show all around and I am sure there will be a medal for you in the near future.
entente tactIcal VIctory
wIn By 50 campaIgn poInts
By the skin of our teeth the line has held. Well done. The Bosche have shot their last bolt. Next it will be our turn, you deserve a mention in the dispatches.
central powers VIctoryThe Central Powers side wins if it has more Campaign Victory Points then the Entente.
central powers strategIc VIctory
wIn By 150 campaIgn poInts
The road to Amiens lies open and the awaited breakthrough has been achieved and by you. Your name will be recorded in history as the man who broke the Western Front!
central powers operatIonal VIctory
wIn By 100 campaIgn poInts
We have pushed far enough to bring our heavy guns within distance of Amiens. The British Expeditionary Force will now find its north/south movement severely hindered and maybe now is the time to seek a favourable settlement with the Allies.
central powers tactIcal VIctory
wIn By 50 campaIgn poInts
You have broken into the line but failed to exploit your success. Never the less conditions are favourable for another push. You have shown yourself to be a determined general and Ludendorff is pleased with your efforts.
DrawThe forces have fought each other to a standstill and further effort is called for. Reinforcements are on their way but for now it is left to you and your tired men to push on. Slowly the landscape becomes unrecognisable by bomb craters and deadly sweet smelling yellow green mist. Gaunt grey faced men ever fewer in number are called to fight on as lives and resources are wasted on this bloody ground.
Designers note: The German player will find it hard to win Firestorm: Villers-Bretonneux, so he can claim a moral victory by doing better than his historical counterpart.

17
Firestorm: Villers-Bretonneux is played over four turns. Each turn is played differently to best simulate the battle itself.
Each Turn details the following information:• The number of engagements to be played.• How initiative is determined• The Firestorm Troops available.• Details of deployment.
The number of battles each turn is optimal. Firestorm: Villers-Bretonneux should be a tight game and have the feel of historical events.
Firestorm: Villers-Bretonneux is different from other Firestorms in that it is a battle rather than a full campaign. The number of engagements (Flames of War games) fought each turn is fixed. First turn has 4, second has 5, third has 5 and the fourth has 3. It is perfect for small groups or just two friends. For this reason the game is much shorter than other firestorms and should be a reasonable commitment for anyone. Still playing 17 battles can be a little too much and if you need to then Firestorm: Villers-Bretonneux can easily be adjusted to your needs by combining the standard game and General’s Game. There are a few ways to do this.
Decide how many battles you will play as Flames of War Battles each turn and roll off for the rest as per a General’s Game. After rolling for initiative and deciding on Firestorm Troops, both players, starting with the attacker, can declare that they wish to fight one particular battle as a Flames of War game. If neither wishes to fight a particular battle, or both players have already used up their allotment for battles, then roll for the battle as per the Generals Game.
This can be expanded by extra rules, such as following a certain Brigade or Regiment; such as the Mitchell’s tanks or
any other Firestorm Troop. This will place the Generals in command of certain units while other battles are rolled off as in the General’s Game.
By mixing up Flames of War games and General’s Games roll offs you can make the Campaign manageable. A word of caution though. Decide at the outset exactly how you intend to play it and fix the number of battles you intend to play, because it can be very tempting to play every battle.
As in real war, Generals and Commanders can only be in one place, and it is left to others to fight elsewhere.
optIonal rule
Since the turns represent days you might want to mix things up a bit and add Dusk and Dawn. Turn 1 is all in daylight. Fight the last battle in turn 2 using the rules for Dusk. After fighting the two night time battles on turn 3, play the first battle using the rules for Dawn and the last for Dusk and the first battle on turn 4 with Dawn and the last with Dusk.
Rules for Dusk and Dawn can be found on page 273 in the main rulebook.
Turns
BATTLE
18
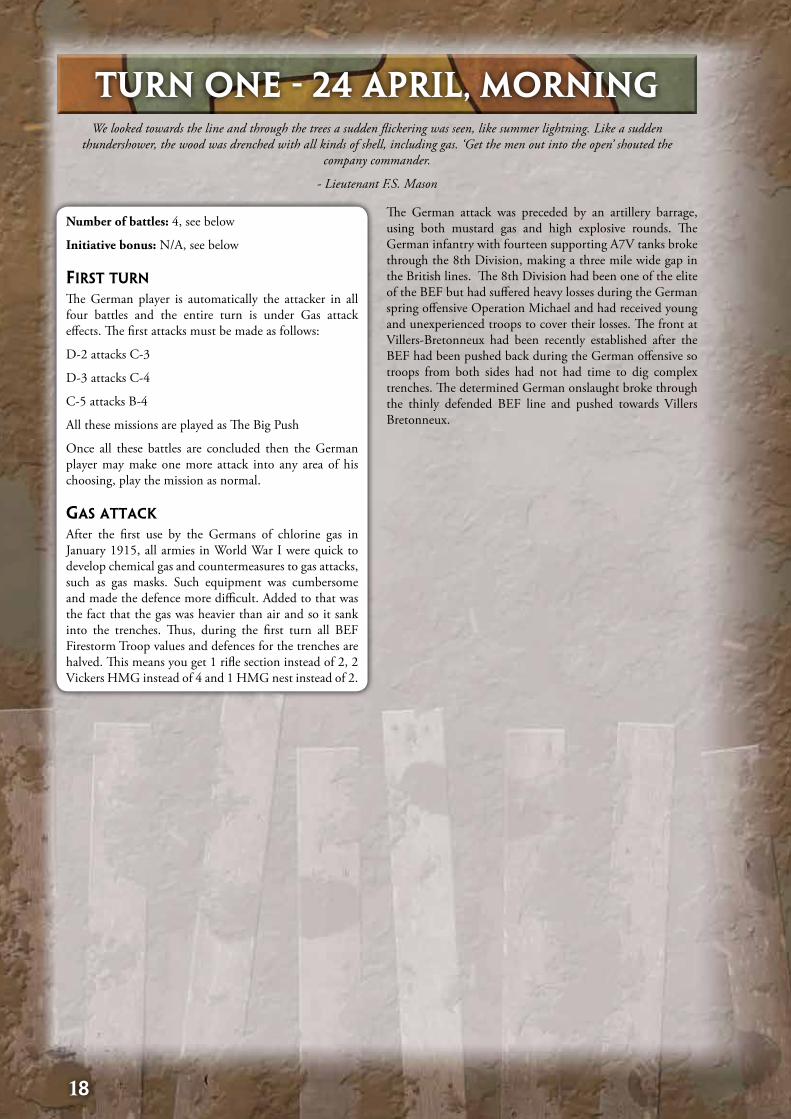
Number of battles: 4, see below
Initiative bonus: N/A, see below
FIrst turn
The German player is automatically the attacker in all four battles and the entire turn is under Gas attack effects. The first attacks must be made as follows:
D-2 attacks C-3
D-3 attacks C-4
C-5 attacks B-4
All these missions are played as The Big Push
Once all these battles are concluded then the German player may make one more attack into any area of his choosing, play the mission as normal.
gas attack
After the first use by the Germans of chlorine gas in January 1915, all armies in World War I were quick to develop chemical gas and countermeasures to gas attacks, such as gas masks. Such equipment was cumbersome and made the defence more difficult. Added to that was the fact that the gas was heavier than air and so it sank into the trenches. Thus, during the first turn all BEF Firestorm Troop values and defences for the trenches are halved. This means you get 1 rifle section instead of 2, 2 Vickers HMG instead of 4 and 1 HMG nest instead of 2.
We looked towards the line and through the trees a sudden flickering was seen, like summer lightning. Like a sudden thundershower, the wood was drenched with all kinds of shell, including gas. ‘Get the men out into the open’ shouted the
company commander.
- Lieutenant F.S. Mason
Turn One - 24 April, Morning
The German attack was preceded by an artillery barrage, using both mustard gas and high explosive rounds. The German infantry with fourteen supporting A7V tanks broke through the 8th Division, making a three mile wide gap in the British lines. The 8th Division had been one of the elite of the BEF but had suffered heavy losses during the German spring offensive Operation Michael and had received young and unexperienced troops to cover their losses. The front at Villers-Bretonneux had been recently established after the BEF had been pushed back during the German offensive so troops from both sides had not had time to dig complex trenches. The determined German onslaught broke through the thinly defended BEF line and pushed towards Villers Bretonneux.
19
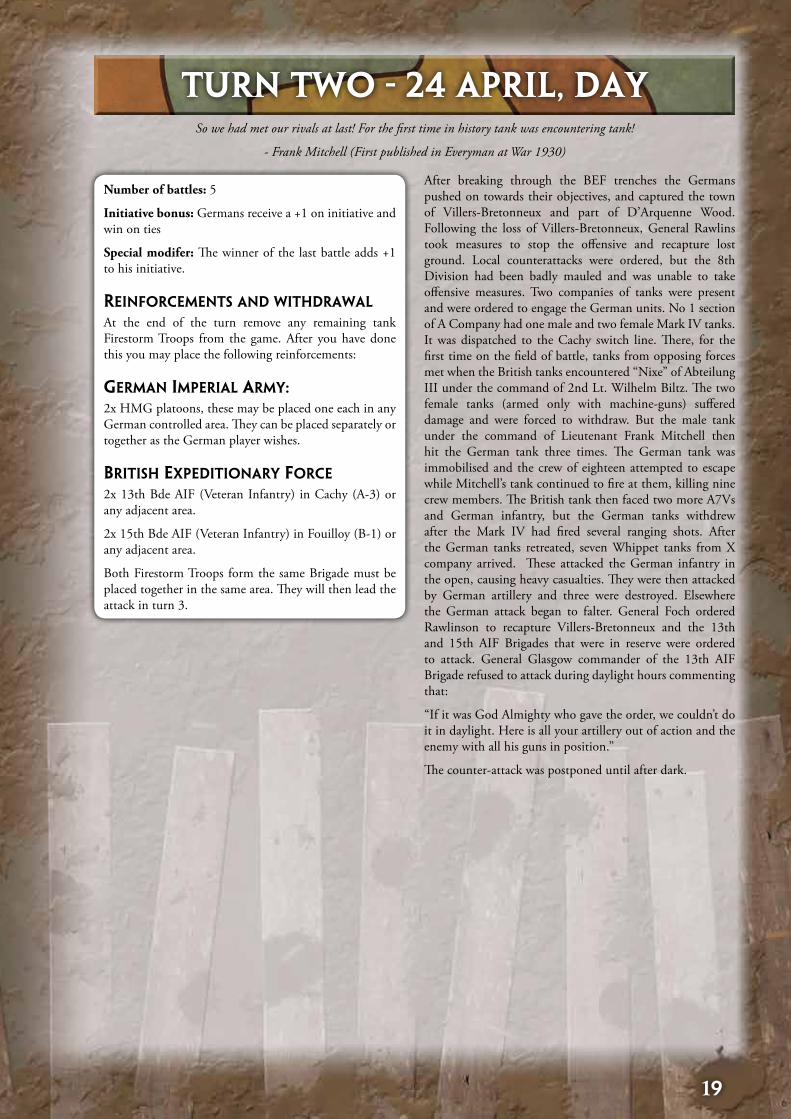
Number of battles: 5
Initiative bonus: Germans receive a +1 on initiative and win on ties
Special modifer: The winner of the last battle adds +1 to his initiative.
reInForcements anD wIthDrawal
At the end of the turn remove any remaining tank Firestorm Troops from the game. After you have done this you may place the following reinforcements:
german ImperIal army:2x HMG platoons, these may be placed one each in any German controlled area. They can be placed separately or together as the German player wishes.
BrItIsh expeDItIonary Force
2x 13th Bde AIF (Veteran Infantry) in Cachy (A-3) or any adjacent area.
2x 15th Bde AIF (Veteran Infantry) in Fouilloy (B-1) or any adjacent area.
Both Firestorm Troops form the same Brigade must be placed together in the same area. They will then lead the attack in turn 3.
So we had met our rivals at last! For the first time in history tank was encountering tank!
- Frank Mitchell (First published in Everyman at War 1930)
Turn two - 24 April, Day
After breaking through the BEF trenches the Germans pushed on towards their objectives, and captured the town of Villers-Bretonneux and part of D’Arquenne Wood. Following the loss of Villers-Bretonneux, General Rawlins took measures to stop the offensive and recapture lost ground. Local counterattacks were ordered, but the 8th Division had been badly mauled and was unable to take offensive measures. Two companies of tanks were present and were ordered to engage the German units. No 1 section of A Company had one male and two female Mark IV tanks. It was dispatched to the Cachy switch line. There, for the first time on the field of battle, tanks from opposing forces met when the British tanks encountered “Nixe” of Abteilung III under the command of 2nd Lt. Wilhelm Biltz. The two female tanks (armed only with machine-guns) suffered damage and were forced to withdraw. But the male tank under the command of Lieutenant Frank Mitchell then hit the German tank three times. The German tank was immobilised and the crew of eighteen attempted to escape while Mitchell’s tank continued to fire at them, killing nine crew members. The British tank then faced two more A7Vs and German infantry, but the German tanks withdrew after the Mark IV had fired several ranging shots. After the German tanks retreated, seven Whippet tanks from X company arrived. These attacked the German infantry in the open, causing heavy casualties. They were then attacked by German artillery and three were destroyed. Elsewhere the German attack began to falter. General Foch ordered Rawlinson to recapture Villers-Bretonneux and the 13th and 15th AIF Brigades that were in reserve were ordered to attack. General Glasgow commander of the 13th AIF Brigade refused to attack during daylight hours commenting that:
“If it was God Almighty who gave the order, we couldn’t do it in daylight. Here is all your artillery out of action and the enemy with all his guns in position.”
The counter-attack was postponed until after dark.
20
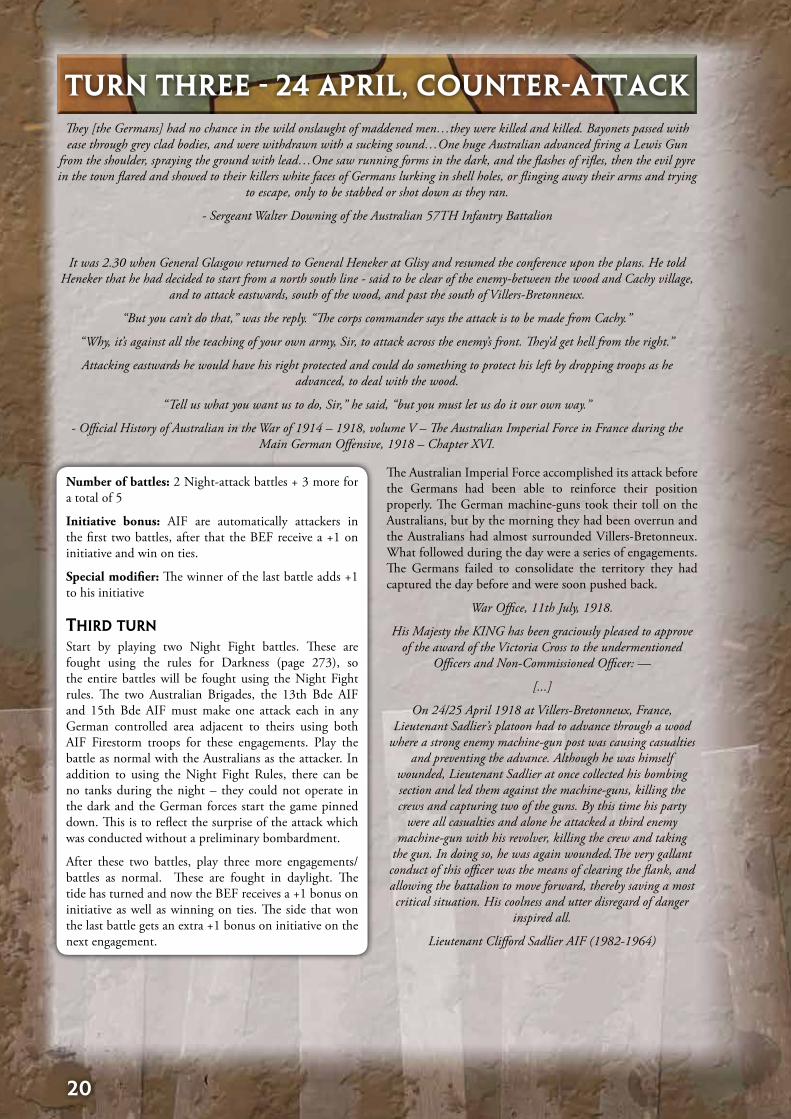
Number of battles: 2 Night-attack battles + 3 more for a total of 5
Initiative bonus: AIF are automatically attackers in the first two battles, after that the BEF receive a +1 on initiative and win on ties.
Special modifier: The winner of the last battle adds +1 to his initiative
thIrD turn
Start by playing two Night Fight battles. These are fought using the rules for Darkness (page 273), so the entire battles will be fought using the Night Fight rules. The two Australian Brigades, the 13th Bde AIF and 15th Bde AIF must make one attack each in any German controlled area adjacent to theirs using both AIF Firestorm troops for these engagements. Play the battle as normal with the Australians as the attacker. In addition to using the Night Fight Rules, there can be no tanks during the night – they could not operate in the dark and the German forces start the game pinned down. This is to reflect the surprise of the attack which was conducted without a preliminary bombardment.
After these two battles, play three more engagements/battles as normal. These are fought in daylight. The tide has turned and now the BEF receives a +1 bonus on initiative as well as winning on ties. The side that won the last battle gets an extra +1 bonus on initiative on the next engagement.
They [the Germans] had no chance in the wild onslaught of maddened men…they were killed and killed. Bayonets passed with ease through grey clad bodies, and were withdrawn with a sucking sound…One huge Australian advanced firing a Lewis Gun
from the shoulder, spraying the ground with lead…One saw running forms in the dark, and the flashes of rifles, then the evil pyre in the town flared and showed to their killers white faces of Germans lurking in shell holes, or flinging away their arms and trying
to escape, only to be stabbed or shot down as they ran.
- Sergeant Walter Downing of the Australian 57TH Infantry Battalion
It was 2.30 when General Glasgow returned to General Heneker at Glisy and resumed the conference upon the plans. He told Heneker that he had decided to start from a north south line - said to be clear of the enemy-between the wood and Cachy village,
and to attack eastwards, south of the wood, and past the south of Villers-Bretonneux.
“But you can’t do that,” was the reply. “The corps commander says the attack is to be made from Cachy.”
“Why, it’s against all the teaching of your own army, Sir, to attack across the enemy’s front. They’d get hell from the right.’’
Attacking eastwards he would have his right protected and could do something to protect his left by dropping troops as he advanced, to deal with the wood.
“Tell us what you want us to do, Sir,” he said, “but you must let us do it our own way.”
- Official History of Australian in the War of 1914 – 1918, volume V – The Australian Imperial Force in France during the Main German Offensive, 1918 – Chapter XVI.
Turn Three - 24 April, Counter-Attack
The Australian Imperial Force accomplished its attack before the Germans had been able to reinforce their position properly. The German machine-guns took their toll on the Australians, but by the morning they had been overrun and the Australians had almost surrounded Villers-Bretonneux. What followed during the day were a series of engagements. The Germans failed to consolidate the territory they had captured the day before and were soon pushed back.
War Office, 11th July, 1918.
His Majesty the KING has been graciously pleased to approve of the award of the Victoria Cross to the undermentioned
Officers and Non-Commissioned Officer: —
[...]
On 24/25 April 1918 at Villers-Bretonneux, France, Lieutenant Sadlier’s platoon had to advance through a wood
where a strong enemy machine-gun post was causing casualties and preventing the advance. Although he was himself
wounded, Lieutenant Sadlier at once collected his bombing section and led them against the machine-guns, killing the crews and capturing two of the guns. By this time his party
were all casualties and alone he attacked a third enemy machine-gun with his revolver, killing the crew and taking
the gun. In doing so, he was again wounded.The very gallant conduct of this officer was the means of clearing the flank, and allowing the battalion to move forward, thereby saving a most critical situation. His coolness and utter disregard of danger
inspired all.
Lieutenant Clifford Sadlier AIF (1982-1964)
21
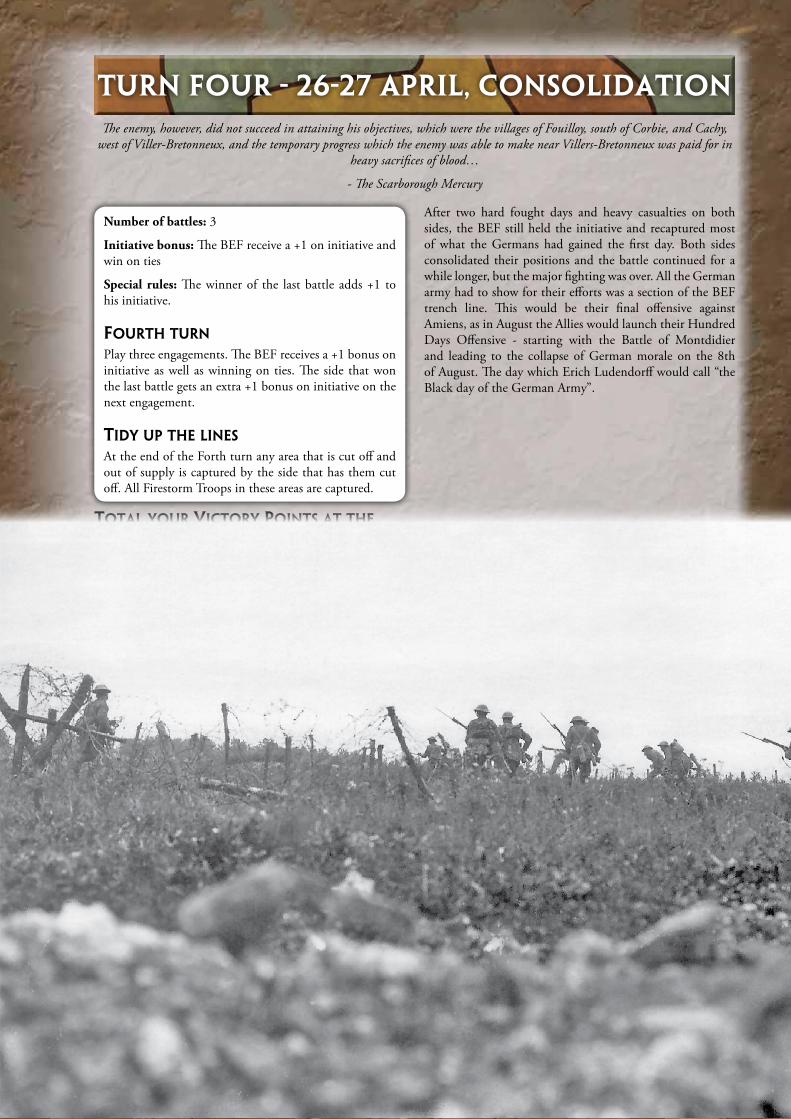
Number of battles: 3
Initiative bonus: The BEF receive a +1 on initiative and win on ties
Special rules: The winner of the last battle adds +1 to his initiative.
Fourth turn
Play three engagements. The BEF receives a +1 bonus on initiative as well as winning on ties. The side that won the last battle gets an extra +1 bonus on initiative on the next engagement.
tIDy up the lInes
At the end of the Forth turn any area that is cut off and out of supply is captured by the side that has them cut off. All Firestorm Troops in these areas are captured.
The enemy, however, did not succeed in attaining his objectives, which were the villages of Fouilloy, south of Corbie, and Cachy, west of Viller-Bretonneux, and the temporary progress which the enemy was able to make near Villers-Bretonneux was paid for in
heavy sacrifices of blood…
- The Scarborough Mercury
Turn four - 26-27 April, Consolidation
After two hard fought days and heavy casualties on both sides, the BEF still held the initiative and recaptured most of what the Germans had gained the first day. Both sides consolidated their positions and the battle continued for a while longer, but the major fighting was over. All the German army had to show for their efforts was a section of the BEF trench line. This would be their final offensive against Amiens, as in August the Allies would launch their Hundred Days Offensive - starting with the Battle of Montdidier and leading to the collapse of German morale on the 8th of August. The day which Erich Ludendorff would call “the Black day of the German Army”.
total your VIctory poInts at the enD oF the turn anD DetermIne the wInner oF FIrestorm: VIllers-Bretonneux.
22
Firestorm Troops
GERMAN iMPERiAL ARMY
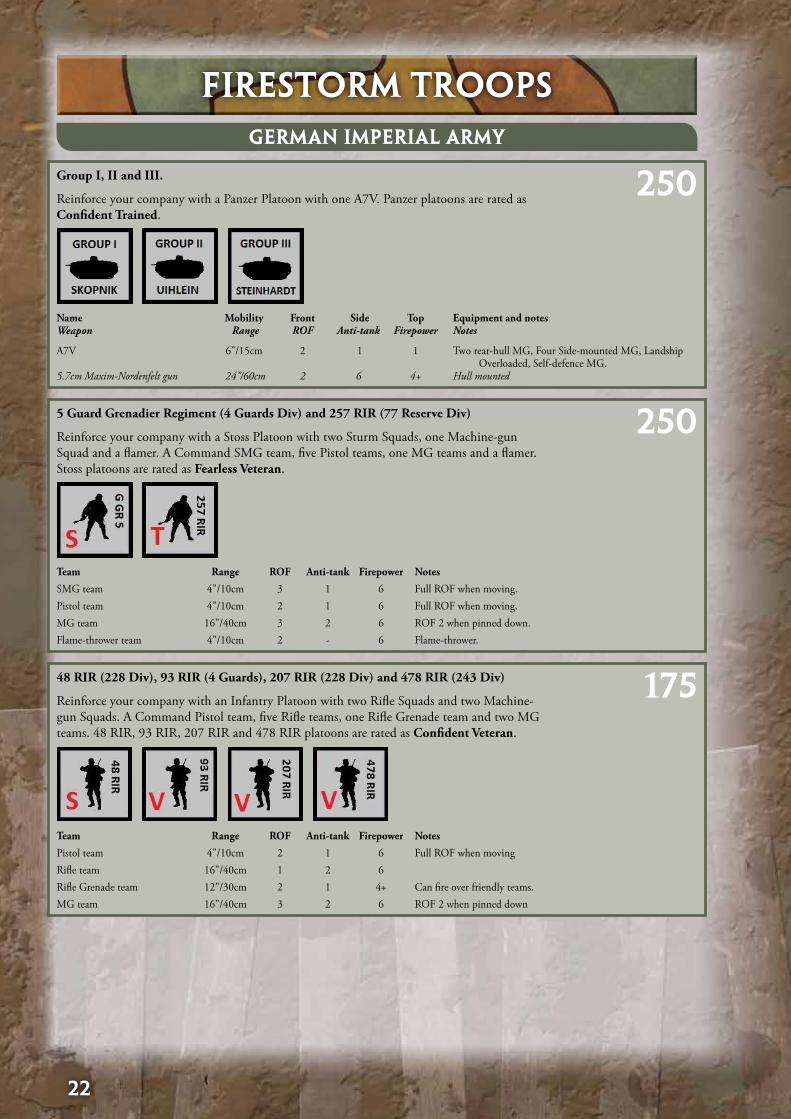
Group I, II and III.
Reinforce your company with a Panzer Platoon with one A7V. Panzer platoons are rated as Confident Trained.
5 Guard Grenadier Regiment (4 Guards Div) and 257 RIR (77 Reserve Div)
Reinforce your company with a Stoss Platoon with two Sturm Squads, one Machine-gun Squad and a flamer. A Command SMG team, five Pistol teams, one MG teams and a flamer. Stoss platoons are rated as Fearless Veteran.
48 RIR (228 Div), 93 RIR (4 Guards), 207 RIR (228 Div) and 478 RIR (243 Div)
Reinforce your company with an Infantry Platoon with two Rifle Squads and two Machine-gun Squads. A Command Pistol team, five Rifle teams, one Rifle Grenade team and two MG teams. 48 RIR, 93 RIR, 207 RIR and 478 RIR platoons are rated as Confident Veteran.
Name Mobility Front Side Top Equipment and notesWeapon Range ROF Anti-tank Firepower Notes
A7V 6”/15cm 2 1 1 Two rear-hull MG, Four Side-mounted MG, Landship Overloaded, Self-defence MG.
5.7cm Maxim-Nordenfelt gun 24”/60cm 2 6 4+ Hull mounted
Team Range ROF Anti-tank Firepower Notes
SMG team 4”/10cm 3 1 6 Full ROF when moving.Pistol team 4”/10cm 2 1 6 Full ROF when moving.MG team 16”/40cm 3 2 6 ROF 2 when pinned down.Flame-thrower team 4”/10cm 2 - 6 Flame-thrower.
Team Range ROF Anti-tank Firepower Notes
Pistol team 4”/10cm 2 1 6 Full ROF when movingRifle team 16”/40cm 1 2 6 Rifle Grenade team 12”/30cm 2 1 4+ Can fire over friendly teams.MG team 16”/40cm 3 2 6 ROF 2 when pinned down
250
250
175

23
BRiTiSH EXPEDiTiONARY FORCE
419 RIR (77 Reserve Div)
Reinforce your company with an Infantry Platoon with two Rifle Squads and two Machine-gun Squads. A Command Pistol team, five Rifle teams, one Rifle Grenade team and two MG teams. The 478 RIR platoon is rated as Confident Trained.
MG Abt 4G and MG Abt 228
Reinforce your company with an Infanterie Machine-Gun platoon with two Maxim HMG. A Command Pistol team and two Maxim HMG teams. Rated as Confident Veteran.
No 1 and No 2 Sections of A Company
Reinforce your company with a Heavy Tank Platoon with one Mark IV male tank. Heavy Tank platoons are rated as Confident Veteran.
X Company
Reinforce your company with a Medium Tank Platoon with two Mark A Whippets. Medium Tank platoons are rated as Confident Trained.
Team Range ROF Anti-tank Firepower Notes
Pistol team 4”/10cm 2 1 6 Full ROF when movingRifle team 16”/40cm 1 2 6 Rifle Grenade team 12”/30cm 2 1 4+ Can fire over friendly teams.MG team 16”/40cm 3 2 6 ROF 2 when pinned down
Team Mobility Range ROF Anti-tank Firepower Notes
Maxim HMG Man-packed 24”/60cm 6 3 6 ROR 3 when pinned down or moving Firing bombardments 40”/100cm - - -
Name Mobility Front Side Top Equipment and notesWeapon Range ROF Anti-tank Firepower Notes
Mark IV male 4”/10cm 1 1 1 Landship, Self-defence MG, Wide tracks.OQF 6 pdr gun 24”/60cm 2 6 4+ Side mountedOQF 6 pdr gun 24”/60cm 2 6 4+ Side mounted
Name Mobility Front Side Top Equipment and notesWeapon Range ROF Anti-tank Firepower Notes
Mark A Whippet 8”/20cm 1 1 1 Two MG.
125
150
300
250
24
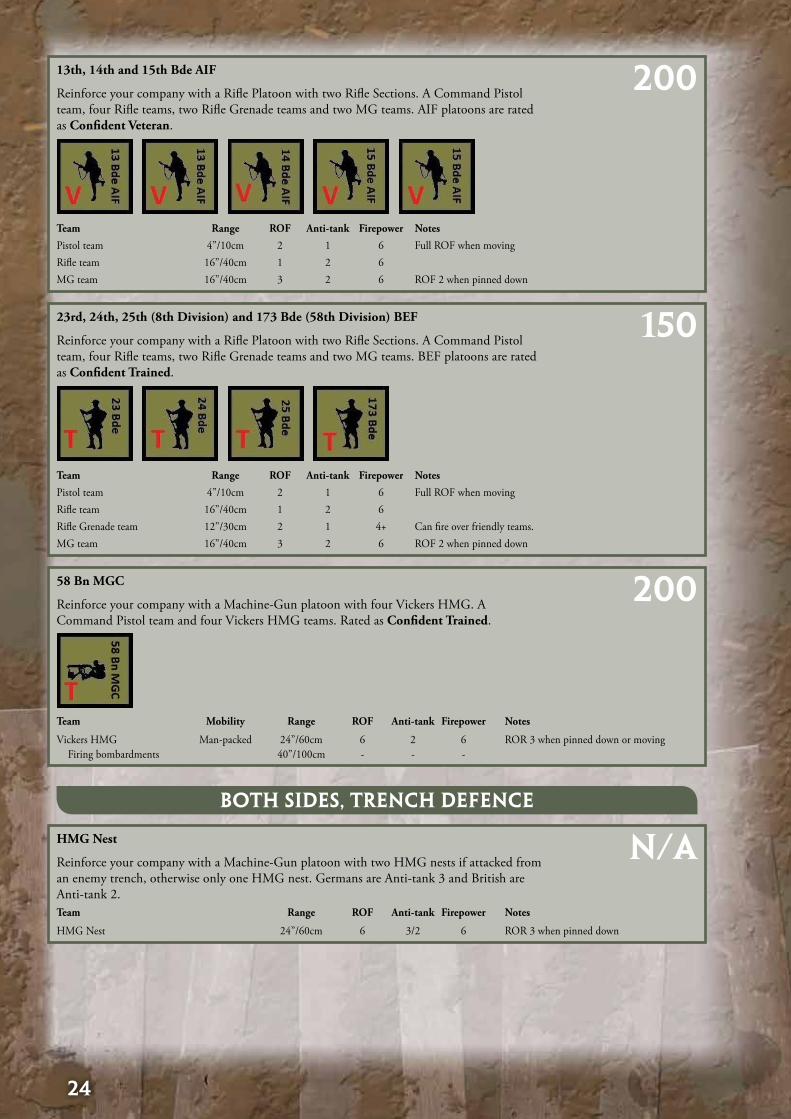
13th, 14th and 15th Bde AIF
Reinforce your company with a Rifle Platoon with two Rifle Sections. A Command Pistol team, four Rifle teams, two Rifle Grenade teams and two MG teams. AIF platoons are rated as Confident Veteran.
58 Bn MGC
Reinforce your company with a Machine-Gun platoon with four Vickers HMG. A Command Pistol team and four Vickers HMG teams. Rated as Confident Trained.
HMG Nest
Reinforce your company with a Machine-Gun platoon with two HMG nests if attacked from an enemy trench, otherwise only one HMG nest. Germans are Anti-tank 3 and British are Anti-tank 2.
23rd, 24th, 25th (8th Division) and 173 Bde (58th Division) BEF
Reinforce your company with a Rifle Platoon with two Rifle Sections. A Command Pistol team, four Rifle teams, two Rifle Grenade teams and two MG teams. BEF platoons are rated as Confident Trained.
Team Range ROF Anti-tank Firepower Notes
Pistol team 4”/10cm 2 1 6 Full ROF when movingRifle team 16”/40cm 1 2 6 MG team 16”/40cm 3 2 6 ROF 2 when pinned down
Team Mobility Range ROF Anti-tank Firepower Notes
Vickers HMG Man-packed 24”/60cm 6 2 6 ROR 3 when pinned down or moving Firing bombardments 40”/100cm - - -
Team Range ROF Anti-tank Firepower Notes
Pistol team 4”/10cm 2 1 6 Full ROF when movingRifle team 16”/40cm 1 2 6 Rifle Grenade team 12”/30cm 2 1 4+ Can fire over friendly teams.MG team 16”/40cm 3 2 6 ROF 2 when pinned down
200
200
N/A
150
BOTH SiDES, TRENCH DEFENCE
Team Range ROF Anti-tank Firepower Notes
HMG Nest 24”/60cm 6 3/2 6 ROR 3 when pinned down
25
Firestorm TermsAIF: Australian Imperial Force.
After Action Step: The commanders complete the After Action Step after fighting a battle. Troops advance, retreat or are destroyed in this step.
Area: The campaign map is divided into areas. All movement is from one area to another, and all Flames of War battles take place between two areas.
Battle/Engagement: There are 3 to 5 battles/engagements each turn. Ideally a battle should be played out before the next battle is determined so it is possible to launch a counterattack into the area just captured. Read the turn description to see how many battles there are in each turn.
Battle Arrow: Battle arrows mark battles that are currently taking place on the campaign map. Place Firestorm Troops fighting in the battle in the holes on the battle arrow. In order to make an attack you must support it with at least one ground Firestorm Troop.
Battle Phase: Each turn the commanders fight Flames of War games in the Battle Phase. Each game played in the phase has three steps: the Manoeuvre Step, the Combat Step, and the After Action Step.
BEF: British Expeditionary Force.
Campaign Turn: The campaign is divided into four campaign turns. In each Campaign turn the players act out distinct parts of the Second Battle of Villers-Bretonneux. In each campaign turn the rules dictate how initiative is determined and the number of battles to be played.
Campaign Victory Points: Campaign victory points are used to measure the success of each side in the campaign. Campaign victory points are awarded for capturing cities and other objectives, and for surrounding and capturing enemy forces.
Combat Step: In the Combat Step of the Battle Phase commanders select the mission that they will play and fight a Flames of War game.
Commander: Commanders are the players who fight the Flames of War games that determine the campaign’s outcome.
Control Marker: Control markers identify areas that you control. When you advance into an area, place a control marker in it to show that you now control it.
Firestorm Troops: Firestorm Troops are miniatures representing the key units in the campaign. Firestorm Troops can be committed to a battle giving extra troops in the Flames of War game that decides its outcome.
General: Each side has a General who coordinates the side’s strategy in the Planning and Strategic Phases. Since Firestorm: Villers-Bretonneux is a single battle this is much simpler than in other Firestorms.
Reinforcements: At the end of turn 2 both sides receive reinforcements. These are the only units that are added to the map after the game begins.
Supply: BEF units trace supply to A-1, A-2, A-3, B-1, B-5 and C-1 while the Germans trace supply to C-5, D-1, D-4, E-1, E-2 and E-3. From these areas supplies can be traced through any number of friendly areas to the fighting units. If an area cannot trace supply it is considered out of supply and must fight as such. This also presents the added danger of Firestorm Troops being captured.
Turn: Firestorm: Villers-Bretonneux has four turns, each with 3 to 5 battles. At the end of each turn both players can perform certain actions such as moving Firestorm Troops etc.
Victory Points: The advantage currently held by the winning side is shown by the position of the victory point marker on the victory point indicator on the side of the map.

26
THE GENERAL’S WARGAMELook out! Jerry tanks about!
- Anon soldier warning Mitchell and his squadron.
Generals have used wargames to test their plans for centuries. Manoeuvring pieces around on maps instead of troops on the battlefield allows them to fight battles in a matter of hours rather than days, and at little cost especially if they lose. If their strategy works, they can then apply it in the real battle. If it fails, they can come up with another plan before they have to commit their soldiers’ lives in action.
In The General’s Wargame you command the German or BEF army during the Second Battle of Villers-Bretonneux 24 to 27 April 1918. As the General, you experience the ebb and flow of a large campaign that will decide the course of the war. It is strongly recommended that you play the campaign several times this way before playing it with Flames of War forces.
The General’s Wargame is a fast-paced two-player game based on Firestorm: Villers-Bretonneux that takes about half an hour to play. When both players are constantly involved in planning and executing attacks, time flies and the hardest question is whether you can fit in another game!
This makes it an ideal game when you have a few spare hours, but not enough space for a miniatures game. Or you’ve just finished your Flames of War game and have an hour to spare before you head home.
Got a quiet evening? Grab a friend and relax with some drinks and snacks around the kitchen table! Travelling and want to take a game along? Grab Firestorm: Villers-Bretonneuxand play The General’s Wargame.
As well as being a stand-alone game, The General’s Wargame is a great tool for generals playing the Firestorm: Villers-Bretonneuxcampaign. Before the campaign begins, you should run through a few games of The General’s Wargame to test out your strategies and see how they perform. Just like the real generals, this experience will help you make winning plans when the real campaign begins. You can also set up your map to match the campaign map and try out plans for the next turn. Run through each strategy a few times to see the most likely outcome, and then write your battle plan accordingly.
Whether you play The General’s Wargame on its own or as part of a Firestorm: Villers-Bretonneuxcampaign, remember above all else that, like Napoleon, your country needs lucky generals — so roll good dice.
orDer one – plannIng phase
1. Determine the number of Battles
2. Determine Initiative Bonus
3. Plan your games
orDer two - Battle phase
(Repeat for each Battle)
1. Roll for Initiative
2. Place a Battle Arrow
3. Choose Firestorm Troops
4.Check for Supply
5. Resolve the Battle
6. Roll to Destroy/Capture
7. Retreat Defeated Troops
8. Advance Victorious Troops
orDer three – strategIc phase
1. Make Redeployment Moves
2. Deploy new Firestorm Troops and remove tanks
(End of Turn 2 only)
3. Total Your Victory Points
27
Set up the campaign maps and play each turn as normal.
orDer one – plannIng phase1. Determine the Number of Battles this Turn
The first thing you need to do is to determine the number of Battles each turn. This is listed under each turn. You are given a number between two and four. Place the Battle Turn marker on the correct number. That is the number of Battles for this turn.
2. Determine Initiative Bonus
Each turn has an initiative bonus listed. Check it for each turn.
3. Plan your games
Depending on the size of the group you may want to spend some time planning ahead and make strategic decisions. But then you are off to play actual battles.
orDer two – Battle phase (Repeat for each Battle)
1. Roll for Initiative
Applying any bonuses as listed under the turn.
2. Place a Battle Arrow
After you win initiative, mark the areas on the Campaign map where you will battle using a Battle Arrow. If you win the initiative select an area that your side controls to attack from and an area that the enemy controls to attack into. Place a Battle Arrow pointing from your area into the enemy area you are attacking.
Setting Up the Campaign MapConclude the outcome of each battle before going to the next.
3. Choose Firestorm Troops
Both players now allocate up to two Firestorm Troops to each battle. Then apply situational bonuses. Fortifications do not count to this limit and may be used in addition to the two Firestorm Troops allowed.
4. Check for supply
Supply is determined as in the main game. If an area (attackers or defenders) fights out of supply it suffers a -2 penalty. Look up the rules of supply in the main game.
5. Resolve the Battle
Generals plan to win battles by committing their strongest and freshest troops against the enemy’s weaknesses. However, despite the best laid plans of generals, it is fortune that ultimately decides battles.
The battle is decided on the roll of the dice. Each player rolls a die and adds the Firestorm Troop Bonuses for the Firestorm Troops that they committed and any applicable Situation Modifiers. The higher roll wins the battle. A tie with both players rolling the same score results in an attacker defeated.v
FIrestorm troop Bonuses
Each Firestorm Troop placed on a Battle Arrow and committed to a battle gives a bonus to your die roll.
Use the Firestorm Troop Bonuses table to determine your bonus for each Firestorm Troop placed on the Battle Arrow.
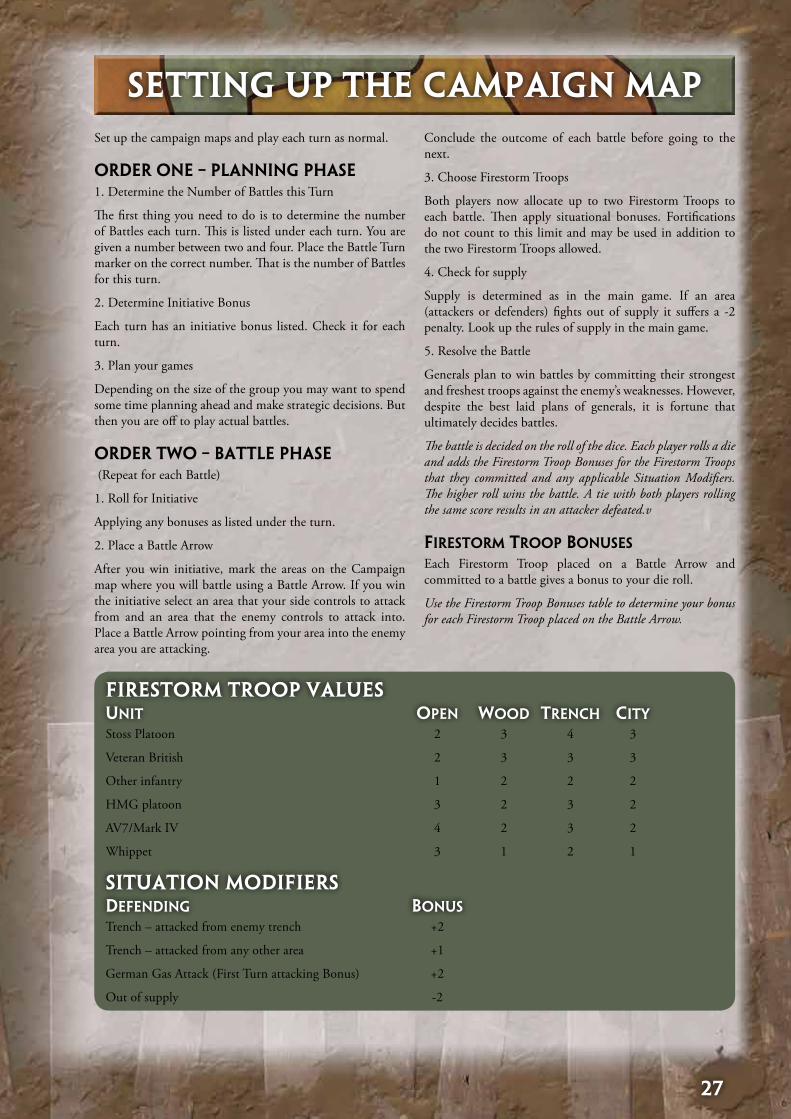
FiRESTORM TROOP VALUES
SiTUATiON MODiFiERS
unIt open wooD trench cIty
DeFenDIng Bonus
Stoss Platoon 2 3 4 3
Veteran British 2 3 3 3
Other infantry 1 2 2 2
HMG platoon 3 2 3 2
AV7/Mark IV 4 2 3 2
Whippet 3 1 2 1
Trench – attacked from enemy trench +2
Trench – attacked from any other area +1
German Gas Attack (First Turn attacking Bonus) +2
Out of supply -2
28
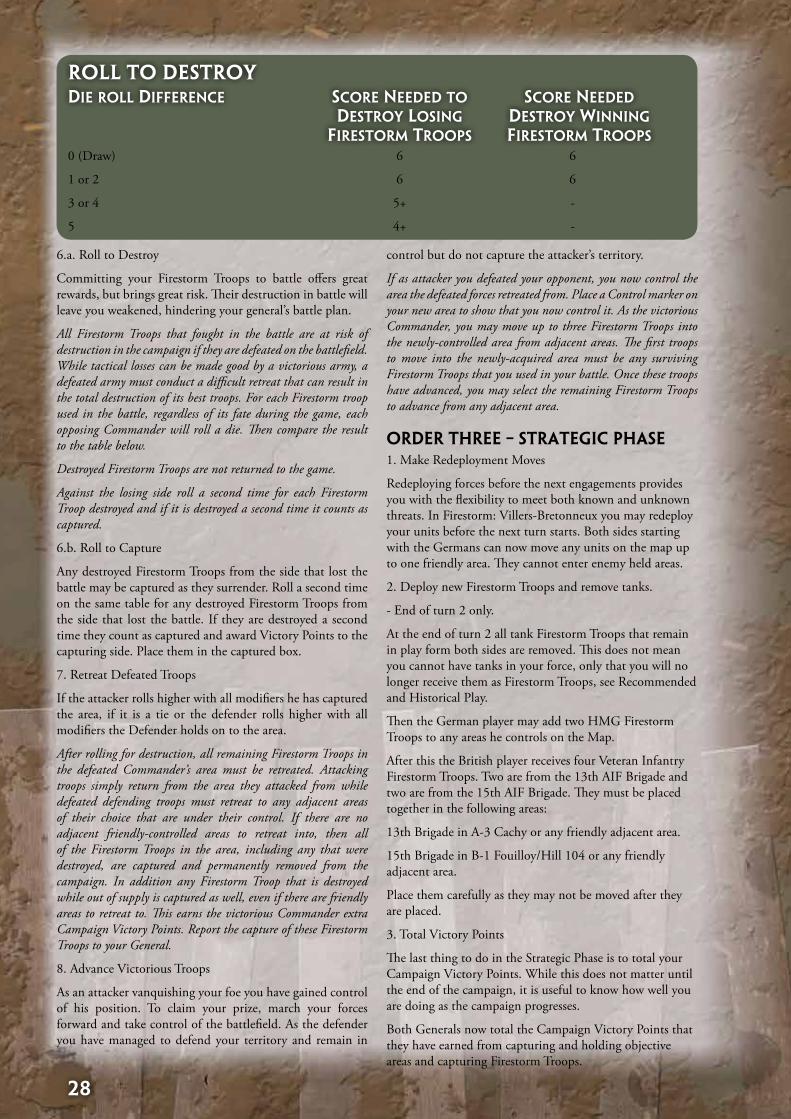
6.a. Roll to Destroy
Committing your Firestorm Troops to battle offers great rewards, but brings great risk. Their destruction in battle will leave you weakened, hindering your general’s battle plan.
All Firestorm Troops that fought in the battle are at risk of destruction in the campaign if they are defeated on the battlefield. While tactical losses can be made good by a victorious army, a defeated army must conduct a difficult retreat that can result in the total destruction of its best troops. For each Firestorm troop used in the battle, regardless of its fate during the game, each opposing Commander will roll a die. Then compare the result to the table below.
Destroyed Firestorm Troops are not returned to the game.
Against the losing side roll a second time for each Firestorm Troop destroyed and if it is destroyed a second time it counts as captured.
6.b. Roll to Capture
Any destroyed Firestorm Troops from the side that lost the battle may be captured as they surrender. Roll a second time on the same table for any destroyed Firestorm Troops from the side that lost the battle. If they are destroyed a second time they count as captured and award Victory Points to the capturing side. Place them in the captured box.
7. Retreat Defeated Troops
If the attacker rolls higher with all modifiers he has captured the area, if it is a tie or the defender rolls higher with all modifiers the Defender holds on to the area.
After rolling for destruction, all remaining Firestorm Troops in the defeated Commander’s area must be retreated. Attacking troops simply return from the area they attacked from while defeated defending troops must retreat to any adjacent areas of their choice that are under their control. If there are no adjacent friendly-controlled areas to retreat into, then all of the Firestorm Troops in the area, including any that were destroyed, are captured and permanently removed from the campaign. In addition any Firestorm Troop that is destroyed while out of supply is captured as well, even if there are friendly areas to retreat to. This earns the victorious Commander extra Campaign Victory Points. Report the capture of these Firestorm Troops to your General.
8. Advance Victorious Troops
As an attacker vanquishing your foe you have gained control of his position. To claim your prize, march your forces forward and take control of the battlefield. As the defender you have managed to defend your territory and remain in
ROLL TO DESTROYDIe roll DIFFerence score neeDeD to score neeDeD Destroy losIng Destroy wInnIng FIrestorm troops FIrestorm troops0 (Draw) 6 6
1 or 2 6 6
3 or 4 5+ -
5 4+ -
control but do not capture the attacker’s territory.
If as attacker you defeated your opponent, you now control the area the defeated forces retreated from. Place a Control marker on your new area to show that you now control it. As the victorious Commander, you may move up to three Firestorm Troops into the newly-controlled area from adjacent areas. The first troops to move into the newly-acquired area must be any surviving Firestorm Troops that you used in your battle. Once these troops have advanced, you may select the remaining Firestorm Troops to advance from any adjacent area.
orDer three – strategIc phase1. Make Redeployment Moves
Redeploying forces before the next engagements provides you with the flexibility to meet both known and unknown threats. In Firestorm: Villers-Bretonneux you may redeploy your units before the next turn starts. Both sides starting with the Germans can now move any units on the map up to one friendly area. They cannot enter enemy held areas.
2. Deploy new Firestorm Troops and remove tanks.
- End of turn 2 only.
At the end of turn 2 all tank Firestorm Troops that remain in play form both sides are removed. This does not mean you cannot have tanks in your force, only that you will no longer receive them as Firestorm Troops, see Recommended and Historical Play.
Then the German player may add two HMG Firestorm Troops to any areas he controls on the Map.
After this the British player receives four Veteran Infantry Firestorm Troops. Two are from the 13th AIF Brigade and two are from the 15th AIF Brigade. They must be placed together in the following areas:
13th Brigade in A-3 Cachy or any friendly adjacent area.
15th Brigade in B-1 Fouilloy/Hill 104 or any friendly adjacent area.
Place them carefully as they may not be moved after they are placed.
3. Total Victory Points
The last thing to do in the Strategic Phase is to total your Campaign Victory Points. While this does not matter until the end of the campaign, it is useful to know how well you are doing as the campaign progresses.
Both Generals now total the Campaign Victory Points that they have earned from capturing and holding objective areas and capturing Firestorm Troops.
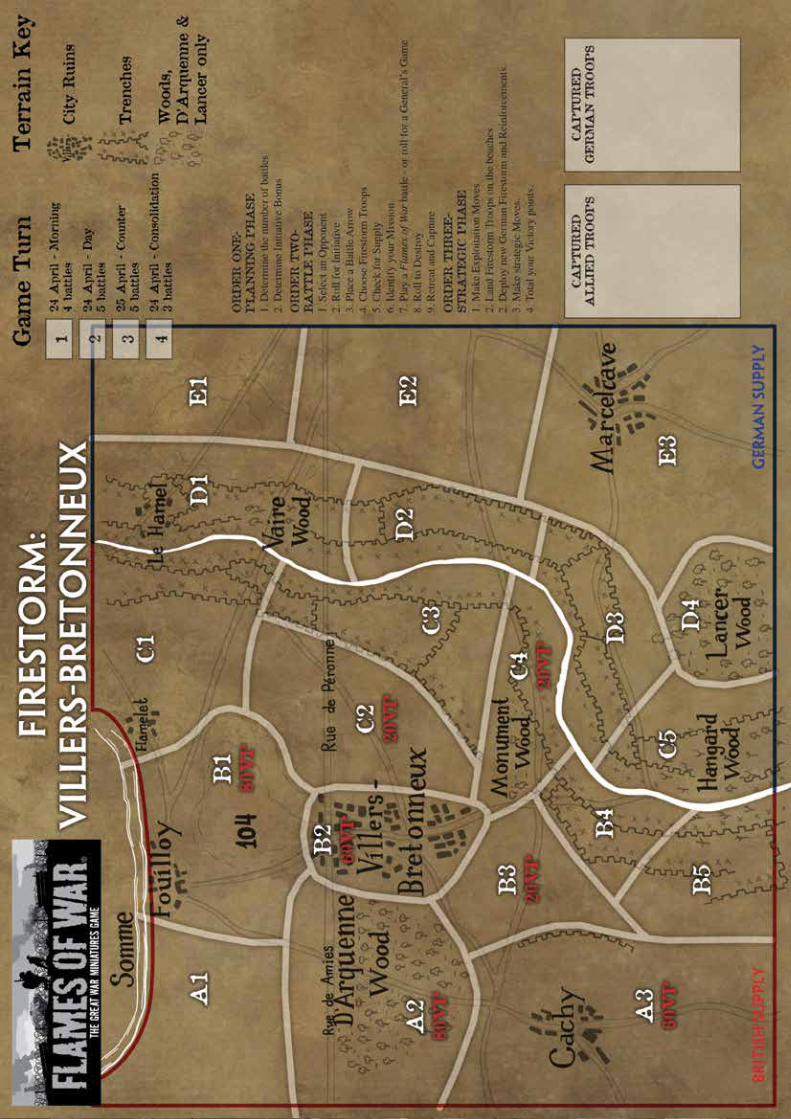
29
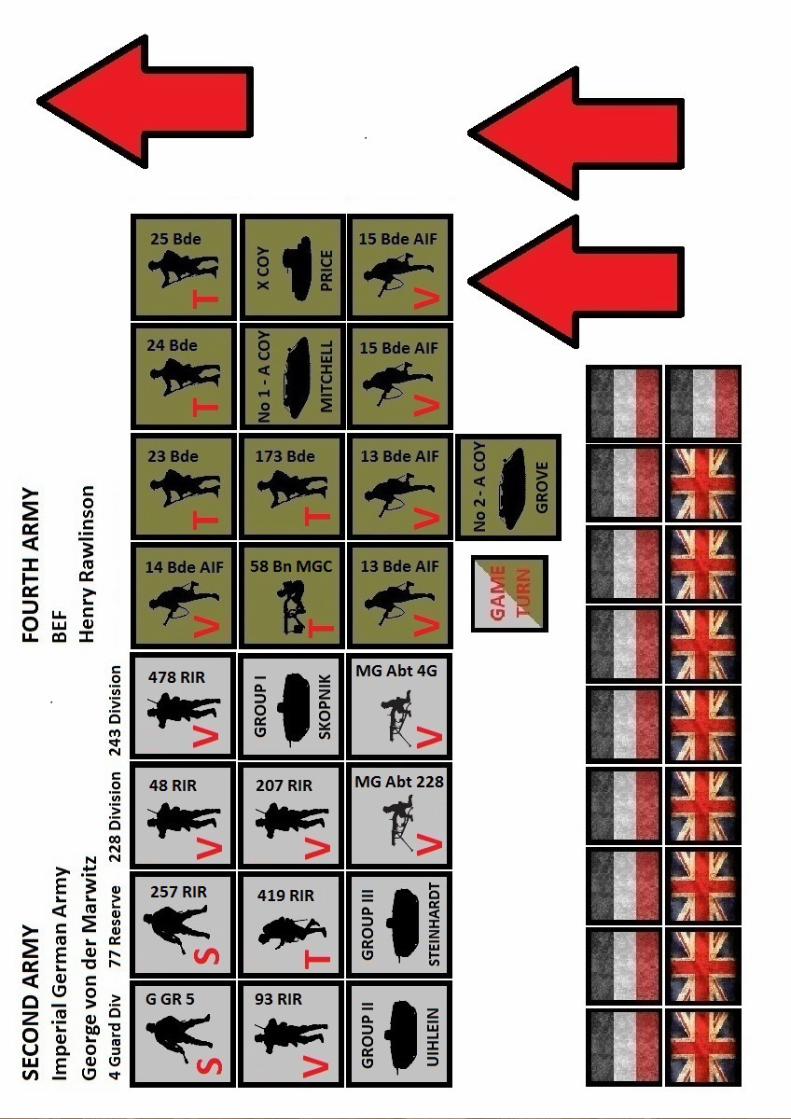
30


![by Jökull Gislason...as the Greco-Italian War. The first is the Italian Invasion or Emergenza G (“Contingency G[Greece]”) focusing on the fighting between the 28 th October and](https://img.pdfslide.us/doc/110x75/5fb1fdd4da0cb060cc681e1a/by-jkull-gislason-as-the-greco-italian-war-the-first-is-the-italian-invasion.jpg)