Embed Size (px)
Citation preview
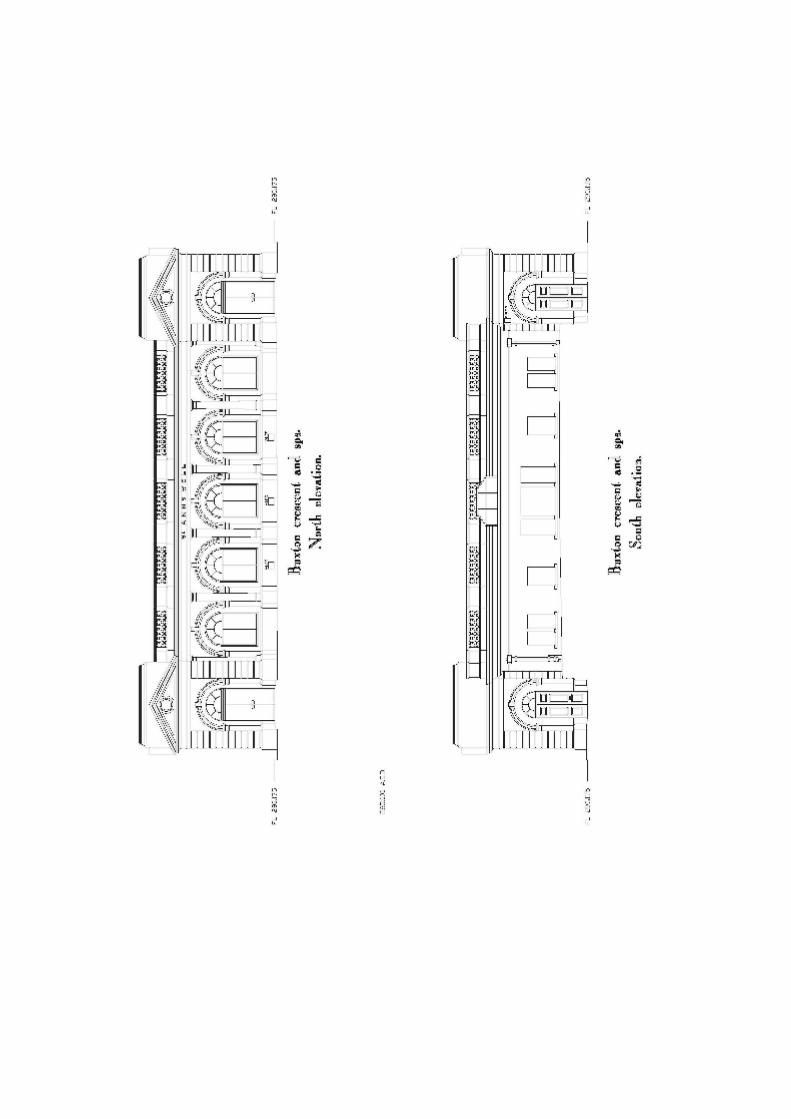
BUXTON CRESCENT AND SPA
APPENDIX E
SCHEDULE OF CONDITION
OF
THE PUMP ROOM
Prepared by Nicholas Jacob Architects
February 2006
APPENDIX E
SCHEDULE OF CONDITION AND REPAIR FOR THE PUMP ROOM,
BUXTON CRESCENT AND SPA PROJECT.
This report has been prepared to support the stage 2 application to the Heritage
Lottery Fund and other funding bodies. It cross references to the drawings reports
including the internal room condition schedule.
The Pump Room was designed by Henry Currey and opened by the 8th
Duke and
Duchess of Devonshire, on the 13th
June 1894. The building is almost unaltered with
the exception of the enclosure of the arcade at the front, partial removal of the wall
between the main room and the arcade, the addition to the rear of an apsidal extension
housing the spring water well to the rear and the later removal of the two domes.
The proposal is to repair all elements of the building, re-instate the 2no. missing
cupolas, introduce modern services and adapt to create wc’s and a ser? The building
will have public access to the spring water well and sprint water and conservation
policy is to repair on a like for like basis with minimum intern? restoration of the
cupolas is based on architectural photographs and drawings.
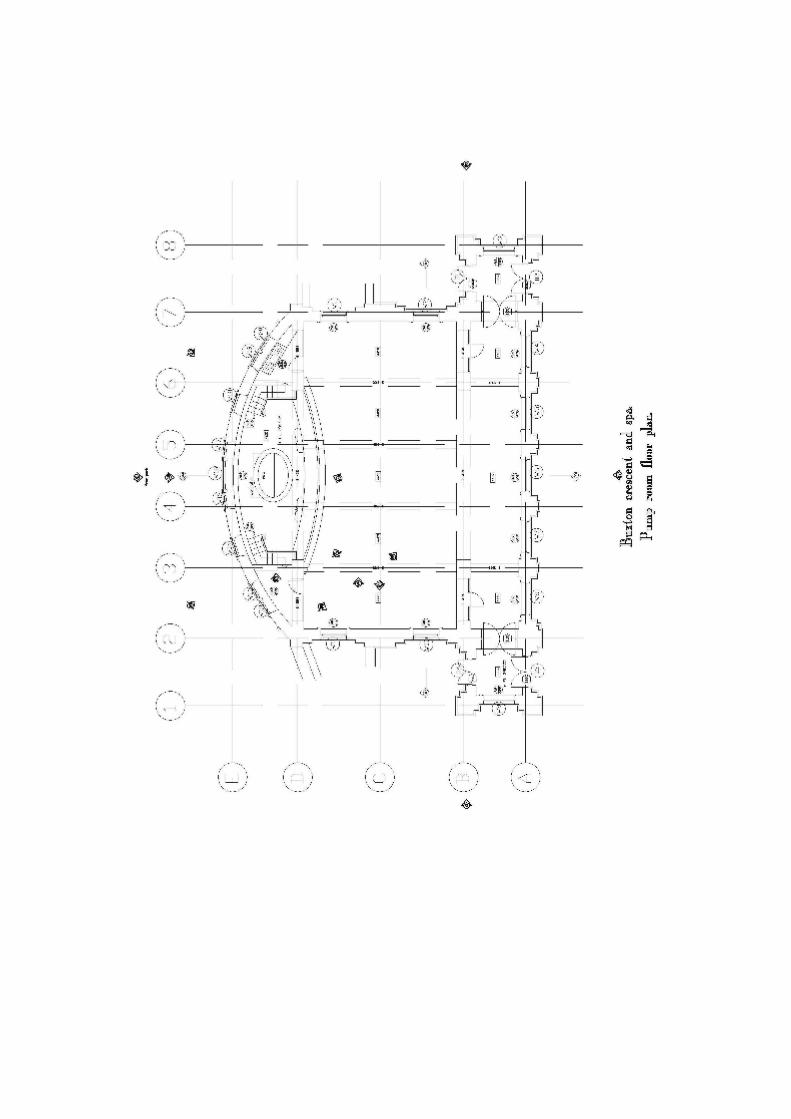
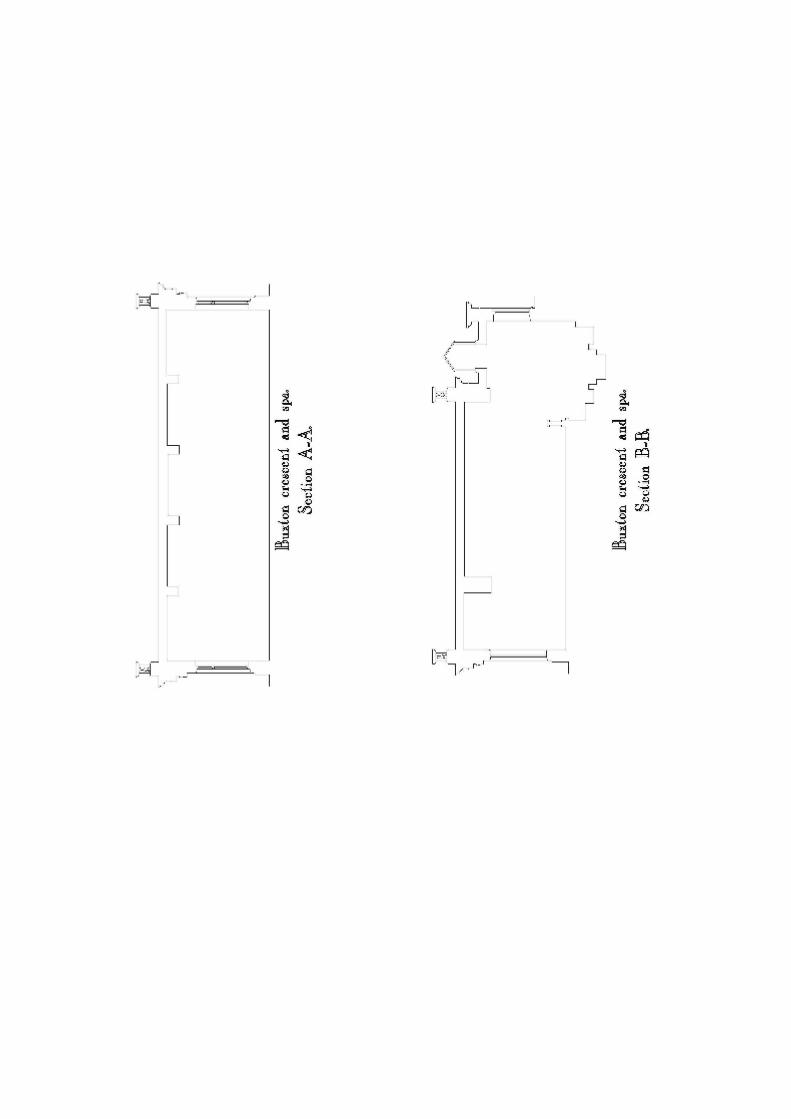
For reference to the location of windows, doors, etc. refer to the extracts from the
survey drawings at the back of this document.
1.0 The Exterior of The Pump Room
1.1 West façade
1.1.1 Bottle balustrade central pier has area of spalling stone approximately 450 x
450mm. This should be removed and the surface exposed examined for
further failures. Assuming this is sound, clean off rough surface and re-point
joints with lime sand mortar.
1.1.2 Coping stones - generally in good condition.
One minor area of worn drip on the outside face above window 2. Cut out
damaged drip of coping approximately 300mm long by 100mm high and
65mm deep and cut in new section with moulded underside.
1.1.3 Re-point 7no joints in coping stone with lime sand mortar 1:3.
1.1.4 West façade cornice is cloaked in lead and has adequate drip.
1.1.5 Joint between central pier of balustrade and bottle balusters over window 2:-
There is an open joint to be filled vertically 1.1 linear meters.
1.1.6 Joints in cornice below lead cloaking are generally open. Re-point 8no. joints.
0.5 linear meters each.
1.1.7 Ventilation hole approximately 225 x 150mm below cornice has no grill. Re-
instate cast iron grill in this location.
1.1.8 String moulding below cornice very worn but reinstatement of lead work
above will have stopped the weathering here.
1.1.9 At central pier:- one stone between the cornice and string moulding has a
spalling face approximately 150mm high x 450mm - long remove spalled face
and clean up.
1.1.10 Arch to window one:- re-point four joints approximately 350mm long each and
rake out and re-point 9no. joints approximately 500mm long around window.
1.1.11 Window 1 in sound condition with re-leaded light with secondary reinforcing
glazing on the outside.
1.1.12 Arch over window 2:- Re-point stones to the moulded architrave of the arch.
Remove small areas of spalling including 100mm x 250mm of reveal on left
hand edge.
1.1.13 Remove external electric telephone cabling and associated clips (10no. clips).
1.1.14 Rake out stone joints to window surround; 6no joints 500mm long and re-
point in lime sand mortar.
1.1.15 Low level below window 2:- rake out joint at top of plinth and re-point 2.5
linear meters.
1.2 South wall of west pavilion of arcade.
1.2.1 Double door of 3 panels each raised and fielded with panel mouldings.
Replace lost section of panel moulding remove letter box prepare and re-
decorate. Redecorate sunburst window frame above door.
1.2.2 Cupilar base above cornice, rake out and re-point 14 linear meters of joint.
1.3 West wall of arcade pavilion.
1.3.1 Remove sand hopper to more appropriate location.
1.3.2 Move telephone cable from southwest corner, including straps approximately
500mm each side of corner fix with 3no. bolts to each side.
1.3.3 Rake out and re-point joints of plinth 5 linear meters.
1.3.4 Remove vegetation from horizontal surfaces and spray with herbicide.
1.3.5 Window 3 in west wall sill rotten, cut out and replace approximately 1.6
meters wide x 65mm high x 100mm deep using appropriate hardwood and
redecorate window.
1.3.6 Below pediment cornice where MICRARIUM sign has been removed take out
approximately 30no expanding bolt fittings and fill holes, approximately
10mm diameter with lime mortar.
1.3.7 Rake out and re-point joints 5 no. 450mm long and 2 no.300mm long.
Pediment, rake out and re-point joints 500mm long 5 no. Rake out and re-
point further 2m.
1.4 North façade. 1.4.1 Door 2 - remove plate glass doors.
Form stone infill up to sill level in stone retrieved from adjacent bay
(approximately 1m high x 1.7m wide).
Install stained glass window using material from adjacent salvaged window,
all in new frame.
1.4.2 Window 4, remove window below sunburst and form new door opening to
receive double doors to match pattern of door D1. Make good reveals.
Removed stone to be used in the making good to underside of cill where new
window put in existing door opening adjacent.
1.4.3 Window 5 good. Re-decorate.
1.4..4 Window 6 good redecorated.
1.4.5 Window 7 good with 1 damaged of glass adjacent to cill. 3 no. pieces of clear
glass broken and requiring replacement.
1.4.6 W8 and opening D3 description of forming new opening and closing in
opening to be as per mirrored image of W4 and D2.
1.4.7 Metal brackets to each side of entrance doors D3 and D2 fixed with two
number screws each to be removed. Adjacent screw fixings for previous signs
and lamps total number 12 screws adjacent to D3 and 2no adjacent to D2. All
to be removed and holes filled with lime mortar.
1.4.8 Remove expanded bolt fixings in stonework below cornice over both doors,
where MICRARIUM signs removed, fill holes approx 10mm diameter, approx 50
no. using lime mortar.
1.4.9 General façade re-pointing, rake out and re-point 15 linear meters.
1.5 East Façade
1.5.1 Re-point cupola base approximately with lime sand pointing 5m.
1.5.2 Pavilion south façade of colonnade;- Redecorate existing double doors and
stained glass over light sunburst frame.
1.5.3 Rake out and re-point 5no joints to arch over south door No. D4
approximately 400mm long each. Re-point stone around door opening 7no.
joints approximately 500mm long.
1.5.4 Façade of main pump room, re-point balustrade coping joints, 4 no.
approximately 500mm across the top and 250 mm down front and inside
faces.
1.5.5 East Façade of main pump room:- The area of windows W10 and W11. Re-
point coping approximately 700mm per joint 8no joints.
1.5.6 Rake out and re-point 3no cornice joints approximately 500mm long.
1.5.7 Remove burglar alarm cabling and associated power cable running along
string banding below cornice and in through window W12.
1.5.8 Remove broken grill from below cornice, approximately 225 x 150mm and
replace with new cast iron grill similar.
1.5.9 Clean debris from behind protective grills to windows W10 and W11 and
redecorate windows.
1.5.10 Allow rake out and re-point stone joints 4 linear meters.
1.6 South elevation of pump room (behind the spring water source).
1.6.1 Stained glass windows are boarded up for protection. Allow a provisional
sum for repair.
1.6.2 Cornice has felt roofing weathering over full length. Approximately 19 linear
meters and approximately 600 mm wide. Replace capping with code 5 lead
work to standard Lead Sheet Development Association detail.
1.6.3 Remove vegetation and spray with herbicide on this roof.
1.6.4 Remake roof outlets through parapet in code 6 lead dressed down into cast
iron hoppers to rainwater downpipes.
1.6.5 Replace existing cast iron rainwater pipes with similar new square section
approx. 85x125mm x 2m long with square hoppers and outlets.
1.7 Elevation to main pump room behind the curved wall.
1.7.1 Re-point parapet coping joints 9 no. approximately 700mm round.
1.8 Roof
1.8.1 Current roof is torched felt over a screed to falls. Entire roof structure to be
repaired to engineers specification and recovered in code 6 lead. Skylight
above alabaster pool to be replaced with new to traditional detail in iron. All
cast iron rainwater goods externally to be replaced.
1.8.2 The two flues serving the chimneys are to be examined more closely, new
outlet fittings attached at the top. All in accordance with appropriate
appliances in the two fireplaces.
1.8.3 Proposals to roof
See architects proposals for reinstatement of ‘cupolas’ to the east and west
pavilions to be cloaked in lead and with central finials.
See Faber Maunsell report for the repairs and reinforcement of the roof.
2.0 Interior of The Pump Room
2.1 East Pavilion
2.1.1 Floor patterned mosaic in generally good condition. There is an area of minor
damage on the front face but this is where new stonework below cill level is to
be installed.
2.1.2 Dado to approximately 1.5m high in green glazed ceramic tiles. South West
corner of dado moulding at top of tiling damaged - replica corner dado tile to
be made and reinstated.
2.1.3 Door D4 to have locks and fire escape push bars removed etc and fixed in the
shut position.
2.1.4 Walls generally plastered with timber architraves, reveals and sills to the
windows all painted and in sound condition.
2.1.5 Opening with existing door D3 - architraves reveals to be altered and new cill
installed. Plain panel to be installed below window cill.
2.1.6 This are is to become toilets and an obscured panel of glass will have to be put
on the inside of all areas of stained glass window up to the line of the sunburst.
Interior of this area is subject to fine detail when the design layout has been
agreed.
2.1.7 Archway into main part of colonnade - Plaster reveal suffering from damp
ingress. Hack off all failed plaster approximately 4m² remake rounded corner
moulding and re-plaster to match existing detail.
2.1.8 Ceiling appears intact however close examination should be made as adjacent
areas have suffered failing plaster and concrete.
2.1.9 Double hardwood mahogany doors into main pump room arcade to be retained
insitu and obscured glass finish to be added to the bevelled glass pains. Doors
are on two-way swinging, sprung hinge mechanism which will need thorough
overhaul, new door stops and one way closures provided.
2.1.10 Oak Panelling to walls of arcade and main room to be cleaned, re-polished and
escape sign removed.
2.1.11 As with arched opening on pavilion side, plaster is showing signs of serious
damp ingress and failure to the surface. Hack off 7m² of plaster and re-plaster
including rounded corner detail.
2.1.12 Ceiling of bay adjacent to window W8 has failing concrete with iron bars or
conduit exposed and damage cornice. See structural engineers report for roof
works current visible damage 1m² of flat ceiling and 1 linear meter of cornice.
2.1.13 Marble to pier B2 between D4 and W10 appears generally in sound condition
with the joint between the two visible faces in the arcade consistent full height.
Minor damage approximately 75mm vertically to be made good along joint.
2.1.14 Pier A2 between D3 and W8 marble finish sound.
2.1.15 Pier A3 between W8 and W7 marble pulling slightly away on the face -
suggest careful investigation as movement is approximately 3mm.
2.1.16 Pier B3 on the inside of the arcade behind W8, W7 - pier largely covered by
protection. There are joints in the marble cladding greater than 2mm to the
NW and SW edges. Fill arris joint full height. Fix back stone with mechanical
fastenings within rebated holes and fill with matching resin repair.
2.1.17 Hack off and re-plaster 3m² above arch on grid line 2 between grids A and B.
2.1.18 Column B2 Arris damage 3no. 75mm long. Broken along meeting joint. This
re-fixed section of broken marble 500mm high x 120mm wide. Fix back stone
with mechanical fastenings within rebated holes and fill with matching resin
repair.
2.1.19 Column at A3 southwest aris as opened up by 3mm. Marble bowing. Item
2.1.20 column A6 Arris to southeast opened up by 2mm. Damage section 100
x 50mm. Fix back stone with mechanical fastenings within rebated holes and
fill with matching resin repair.
2.1.21 Move metal fastening strips from column at A6.
2.1.22 Column A6 Arris damage to southwest aris 50mm long. Fix back stone with
mechanical fastenings within rebated holes and fill with matching resin repair.
2.1.23 Beam on grid line B between 3 and 6 arch has movement monitors and
exposed steel work.
2.1.24 Beam on grid line B between grids 2 and 3 – rusting RSJ steel. Masonry core
of wall exposed will require 5m² of re-plastering after steel work repairs. Care
must be taken of plaque of damsel above column B3.
2.1.25 Column at B7 - 6m² of crazed plaster above arch. Hack off and re-plaster with
appropriate plaster.
2.1.26 At grid B7 - 600mm of dado missing from the top of the panelling. Replace
section.
2.1.27 Columns B6 and B7 have curvature occurring in the marble cladding and
arrises opening up. Fix back stone with mechanical fastenings within rebated
holes and fill with matching resin repair.
2.1.28 Vertical ducts on grid line 7 close by grid B and grid D recessed within the
vertical walling close to the corners of the main pump room area. Signs of
damp and condensation ingress. Hack off 500mm wide strip approximately
3.5 meters in length to each vertical duct and re-plaster.
2.1.29 Column at D6 pressure internally is causing the panels of marble to be pressed
outwards. Arises extremely broken. Total length 700mm. Fix back with
mechanical anchors on all faces of marble with fixings re-bated and filled with
matching resin repair. Make good broken area of Arris with resin repair.
Above column at D6 there are movement cracks 900mm long leading
diagonally up to location of steel work above.
2.1.31 Colum at D7 and D2 strip off marble cladding and investigate core of column.
Following investigative works and repairs to the pier re-clad with new
matching marble. Columns are bad in three panels, one is 450mm wide, one is
600mm wide and one is 250mm wide. Height of column is 1.9meters.
2.1.32 Marble of capital has missing section 60 x 60 x 750mm. Replace bedded in
neat putty lime as others.
2.1.33 Re-instate missing moulding band approximately 1.5m from ground around
south curved wall approximately 125mm wide x 35mm deep x 16m long.
2.1.34 Re-instate second dado type moulding approximately 125 wide by 35mm deep
with rounded moulding linearly and total 9.5 meters long.
2.1.35 Remove seat shelf of marble approximately 9.5 meters long make good
bedding including removal of damp deposits remove vertical marble cladding
below seat. Investigate wall for ingress of water and prevention of the same.
Allow for remedial damp proofing. Re-instate marble on repaired backing.
Fix back stone with mechanical fastenings within rebated holes and fill with
matching resin repair.
2.1.36 On grid line 6 at the west end of the spring pool area adjacent to the steps
down the marble is being forced away from the wall. Carefully remove
marble and make good backing masonry. Re-instate marble paneling
following remedial works. Fix back stone with mechanical fastenings within
rebated holes and fill with matching resin repair.
2.1.37 On grid line 3 top step of steps down to spring water pool – re-bed broken
marble step.
2.1.38 Hack off and re-plaster high level 7m² on grid line 2 between grid line B and
D.
2.1.39 Ceiling – we have assumed that the entire fibrous plaster moulding of the
ceiling is unstable and that we should allow for re-plastering the entire ceiling
to match the existing with new fibrous plaster mouldings.
2.1.40 Fireplace on gridline 2 and fireplace on gridline 7 – See fireplace schedule for
works.
2.1.41 Terrazzo floors. Floor generally in sound condition, however allow total 20
linear meters of crack repairs. End of