Embed Size (px)
Citation preview
Copyright 2015 General Motors. All Rights Reserved.
Recall Bulletin
Bulletin No.: Date:
14093 January 2015
PRODUCT SAFETY RECALL SUBJECT: Daytime Running Lamp (DRL) Inoperative – DRL Module Overheating
MODELS: 2004-2008 Chevrolet Aveo 2004-2006 Chevrolet Epica (Canada Only) 2004-2007 Chevrolet Optra (Canada Only) 2005-2008 Pontiac Wave / G3 (Canada Only)
It is a violation of Federal law for a dealer to deliver a new motor vehicle or any new or used item of motor vehicle equipment (including a tire) covered by this notification under a sale or lease until the defect or noncompliance is remedied.
CONDITION
General Motors has decided that a defect which relates to motor vehicle safety exists in all 2004-2008 model year Chevrolet Aveo, 2004-2006 Chevrolet Epica (Canada), 2004-2007 Chevrolet Optra (Canada) and 2005-2008 Pontiac Wave/G3 Models (Canada). Some of these vehicles have a condition in which heat generated within the headlamp switch, which is located on the left side of the steering column, can deform a plastic actuator within the switch intended to lift the headlamp switch contacts. As this actuator deforms, the headlamp switch contacts can close. If carbon has formed on the headlamp switch contacts, it could cause a resistive short and melt the switch, which could cause a fire.
In addition, a metal oxide semiconductor field effect transistor (MOSFET) within the DRL module, which is located under the instrument panel, may operate in an unintended state due to an external cause. While in this state, if the over temperature protection circuit and heat sinking capability of the DRL module do not adequately protect the DRL module, the DRL module could melt and cause a fire. CORRECTION
Dealers are to install a revised DRL module, inspect wiring connectors for heat damage and clean DRL circuit grounds. Note: Optra model vehicles also receive a new multifunction signal switch and jumper relay kit.
VEHICLES INVOLVED
All involved vehicles are identified by Vehicle Identification Number on the Investigate Vehicle History screen in GM Global Warranty Management system. Dealership service personnel should always check this site to confirm vehicle involvement prior to beginning any required

Page 2 January 2015 Bulletin No.: 14093
inspections and/or repairs. It is important to routinely use this tool to verify eligibility because not all similar vehicles may be involved regardless of description or option content.
For dealers with involved vehicles, a listing with involved vehicles containing the complete vehicle identification number, customer name, and address information has been prepared and will be provided to US and Canadian dealers through the GM GlobalConnect Recall Reports, or sent directly to export dealers. Dealers will not have a report available if they have no involved vehicles currently assigned.
The listing may contain customer names and addresses obtained from Motor Vehicle Registration Records. The use of such motor vehicle registration data for any purpose other than follow-up necessary to complete this recall is a violation of law in several states/provinces/countries. Accordingly, you are urged to limit the use of this report to the follow-up necessary to complete this recall. PART INFORMATION
Parts required to complete this recall are to be obtained from General Motors Customer Care and Aftersales (GMCC&A). Please refer to your “involved vehicles listing” before ordering parts. Normal orders should be placed on a DRO = Daily Replenishment Order. In an emergency situation, parts should be ordered on a CSO = Customer Special Order.
Part Number
Description Quantity/Vehicle
95333617 Module, Daytime Running Lamp (All) 1
96387324 Signal Switch (W/Fog Lamp) Optra HF Only 1
96392862 Signal Switch (W/O Fog Lamp) Optra HW Only 1
94543674 Harness – Jumper Relay Kit (Optra All) 1
05297428 CLIP, WRG HARN SPLICE (merch pk of 10) As Req’d
12355010 TUBING, SHRINK (1/8" BLACK) (merch pk of 10) As Req’d
94509624 Optra Pigtail harness repair kit for Signal Switch As Req’d
94509625 Optra Pigtail harness repair kit for DRL Module As Req’d
42364044 Aveo/Wave/G3 Pigtail harness repair kit for DRL Module As Req’d SERVICE PROCEDURE
Use the following steps to install a revised DRL module, inspect wiring connectors for heat
damage and clean DRL circuit grounds. Note: Optra model vehicles also receive a new
multifunction signal switch and jumper relay kit.
Installation of DRL Module (All Vehicles)
NOTE: Radios with an Anti-Theft Function enabled will become inoperable when battery power
is removed. Before beginning these service procedure, have the vehicle owner provide their
Radio Anti-Theft Code to ensure continued radio operation.
1. Record the radio presets then turn the ignition switch to the “LOCK” position and remove
the key.
2. Disconnect the battery negative (-) cable and wait at least 90 seconds before proceeding.
3. Remove the DRL module. Refer to Daytime Running Lamp Control Module Replacement
in SI.
Page 3 January 2015 Bulletin No.: 14093
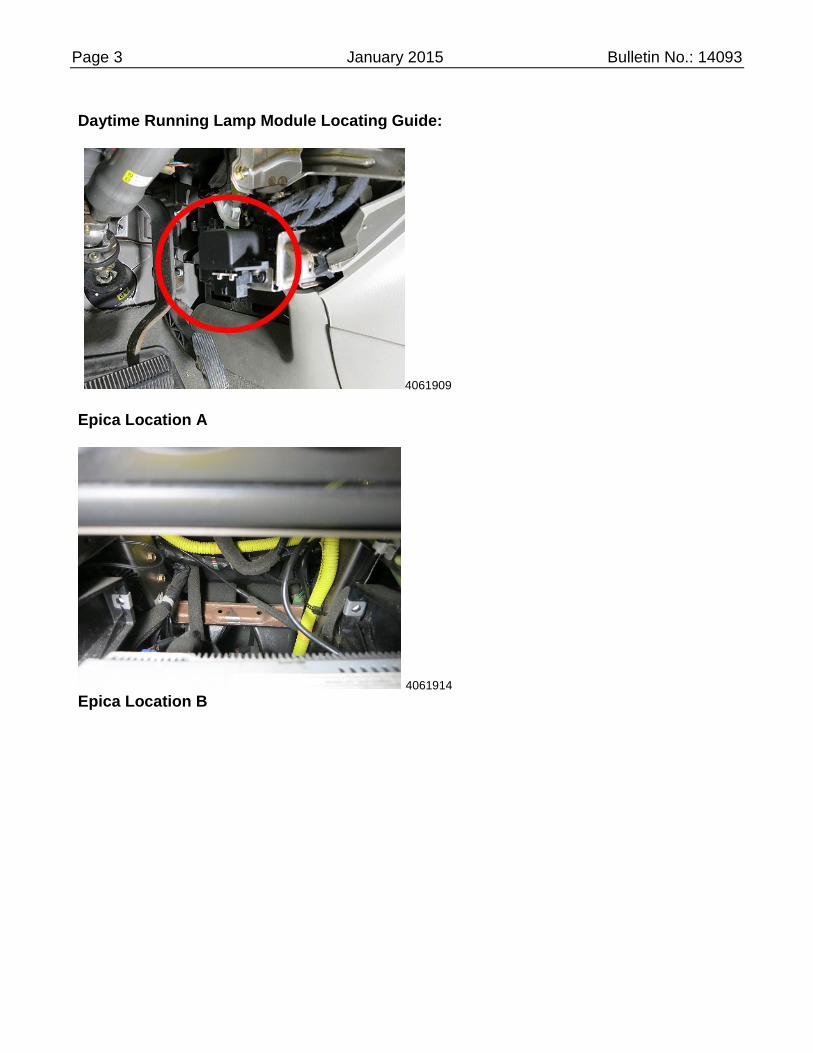
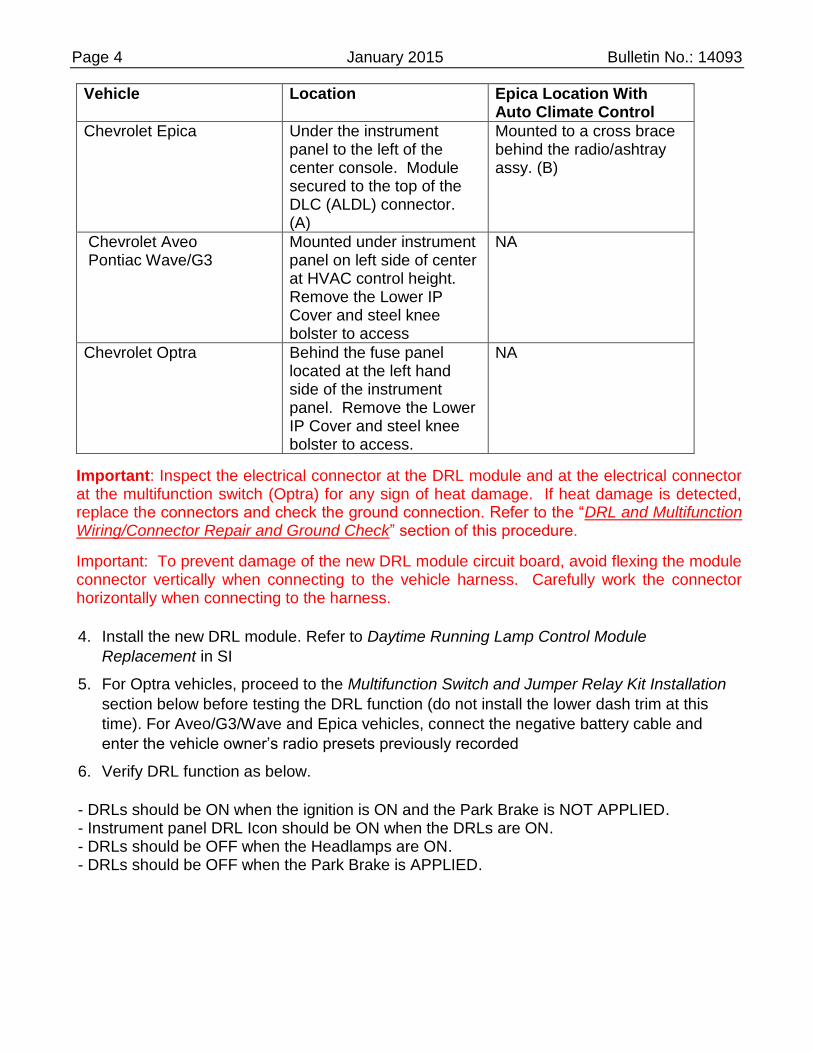
Daytime Running Lamp Module Locating Guide:
4061909 Epica Location A
4061914 Epica Location B
Page 4 January 2015 Bulletin No.: 14093
Vehicle Location Epica Location With Auto Climate Control
Chevrolet Epica Under the instrument panel to the left of the center console. Module secured to the top of the DLC (ALDL) connector. (A)
Mounted to a cross brace behind the radio/ashtray assy. (B)
Chevrolet Aveo Pontiac Wave/G3
Mounted under instrument panel on left side of center at HVAC control height. Remove the Lower IP Cover and steel knee bolster to access
NA
Chevrolet Optra Behind the fuse panel located at the left hand side of the instrument panel. Remove the Lower IP Cover and steel knee bolster to access.
NA
Important: Inspect the electrical connector at the DRL module and at the electrical connector at the multifunction switch (Optra) for any sign of heat damage. If heat damage is detected, replace the connectors and check the ground connection. Refer to the “DRL and Multifunction Wiring/Connector Repair and Ground Check” section of this procedure.
Important: To prevent damage of the new DRL module circuit board, avoid flexing the module connector vertically when connecting to the vehicle harness. Carefully work the connector horizontally when connecting to the harness.
4. Install the new DRL module. Refer to Daytime Running Lamp Control Module
Replacement in SI
5. For Optra vehicles, proceed to the Multifunction Switch and Jumper Relay Kit Installation
section below before testing the DRL function (do not install the lower dash trim at this
time). For Aveo/G3/Wave and Epica vehicles, connect the negative battery cable and
enter the vehicle owner’s radio presets previously recorded
6. Verify DRL function as below.
- DRLs should be ON when the ignition is ON and the Park Brake is NOT APPLIED. - Instrument panel DRL Icon should be ON when the DRLs are ON. - DRLs should be OFF when the Headlamps are ON. - DRLs should be OFF when the Park Brake is APPLIED.
Page 5 January 2015 Bulletin No.: 14093
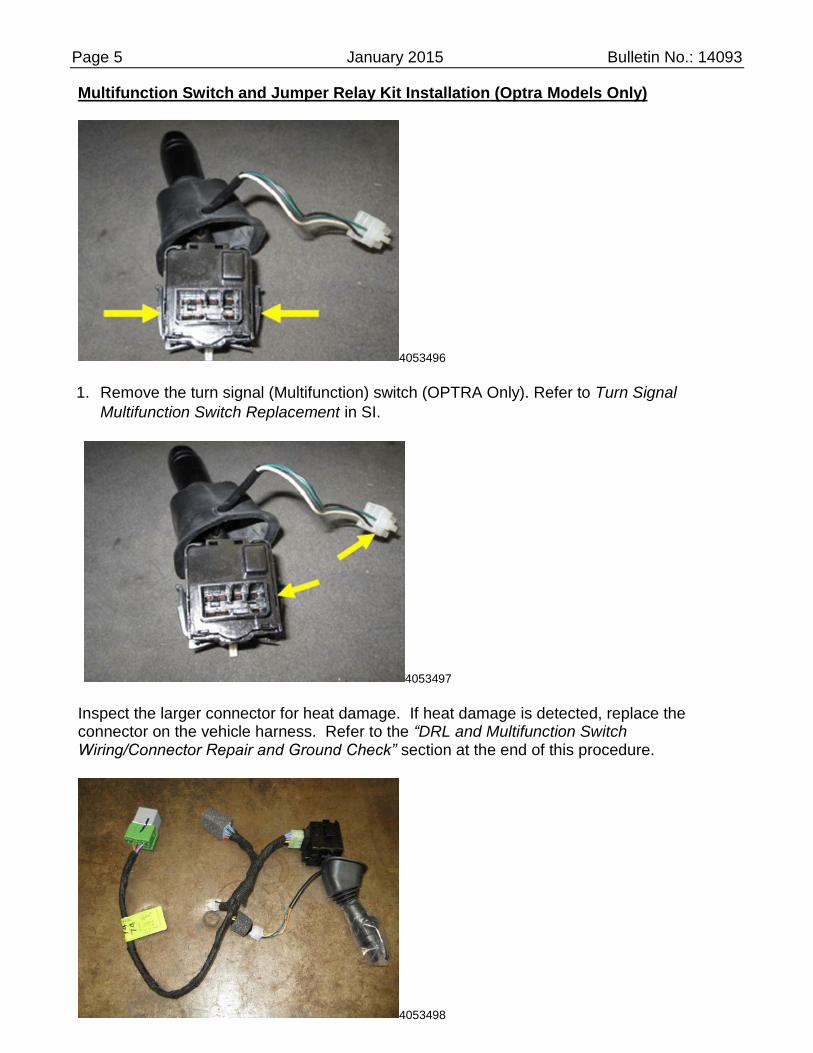
Multifunction Switch and Jumper Relay Kit Installation (Optra Models Only)
4053496
1. Remove the turn signal (Multifunction) switch (OPTRA Only). Refer to Turn Signal
Multifunction Switch Replacement in SI.
4053497
Inspect the larger connector for heat damage. If heat damage is detected, replace the connector on the vehicle harness. Refer to the “DRL and Multifunction Switch Wiring/Connector Repair and Ground Check” section at the end of this procedure.
4053498
Page 6 January 2015 Bulletin No.: 14093
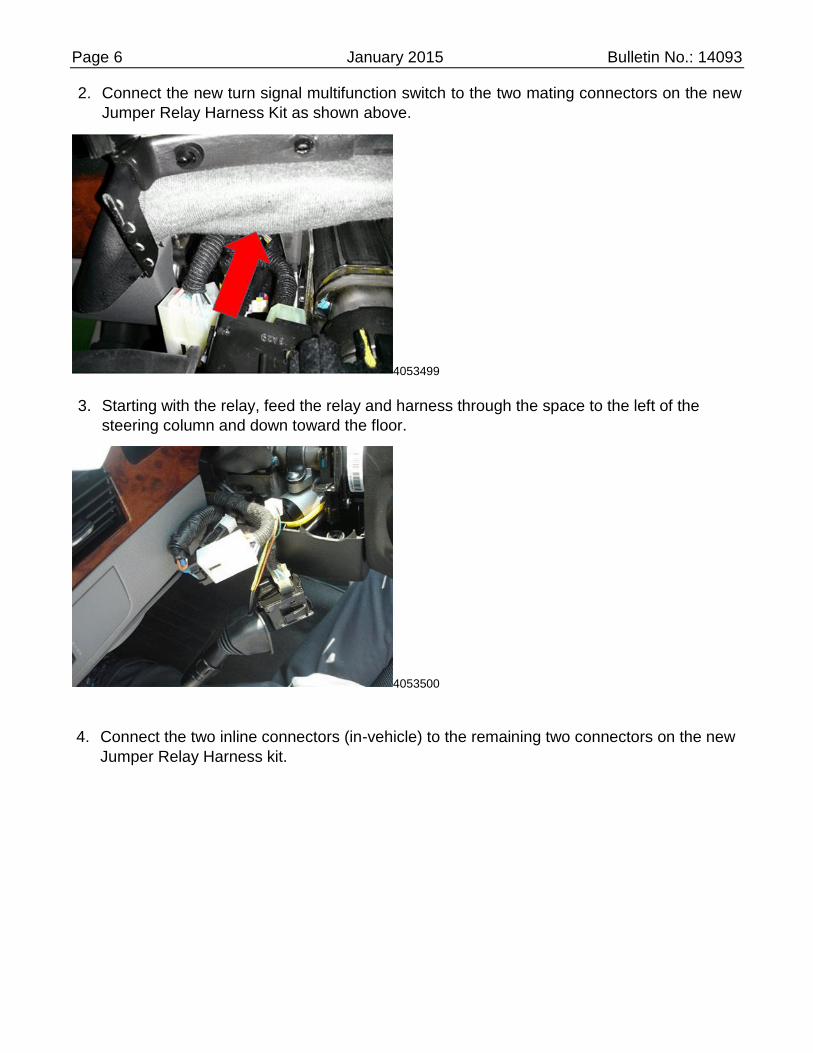
2. Connect the new turn signal multifunction switch to the two mating connectors on the new
Jumper Relay Harness Kit as shown above.
4053499
3. Starting with the relay, feed the relay and harness through the space to the left of the
steering column and down toward the floor.
4053500
4. Connect the two inline connectors (in-vehicle) to the remaining two connectors on the new
Jumper Relay Harness kit.
Page 7 January 2015 Bulletin No.: 14093
4053501
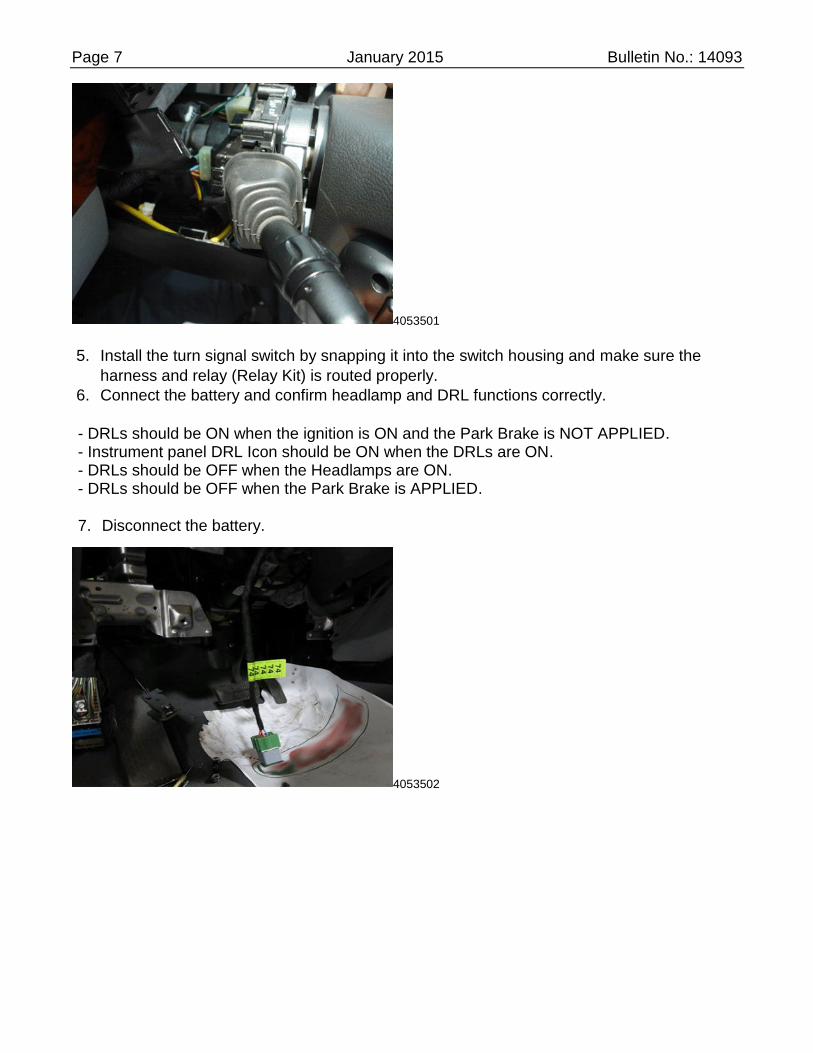
5. Install the turn signal switch by snapping it into the switch housing and make sure the
harness and relay (Relay Kit) is routed properly.
6. Connect the battery and confirm headlamp and DRL functions correctly.
- DRLs should be ON when the ignition is ON and the Park Brake is NOT APPLIED. - Instrument panel DRL Icon should be ON when the DRLs are ON. - DRLs should be OFF when the Headlamps are ON. - DRLs should be OFF when the Park Brake is APPLIED.
7. Disconnect the battery.
4053502
Page 8 January 2015 Bulletin No.: 14093
4053503
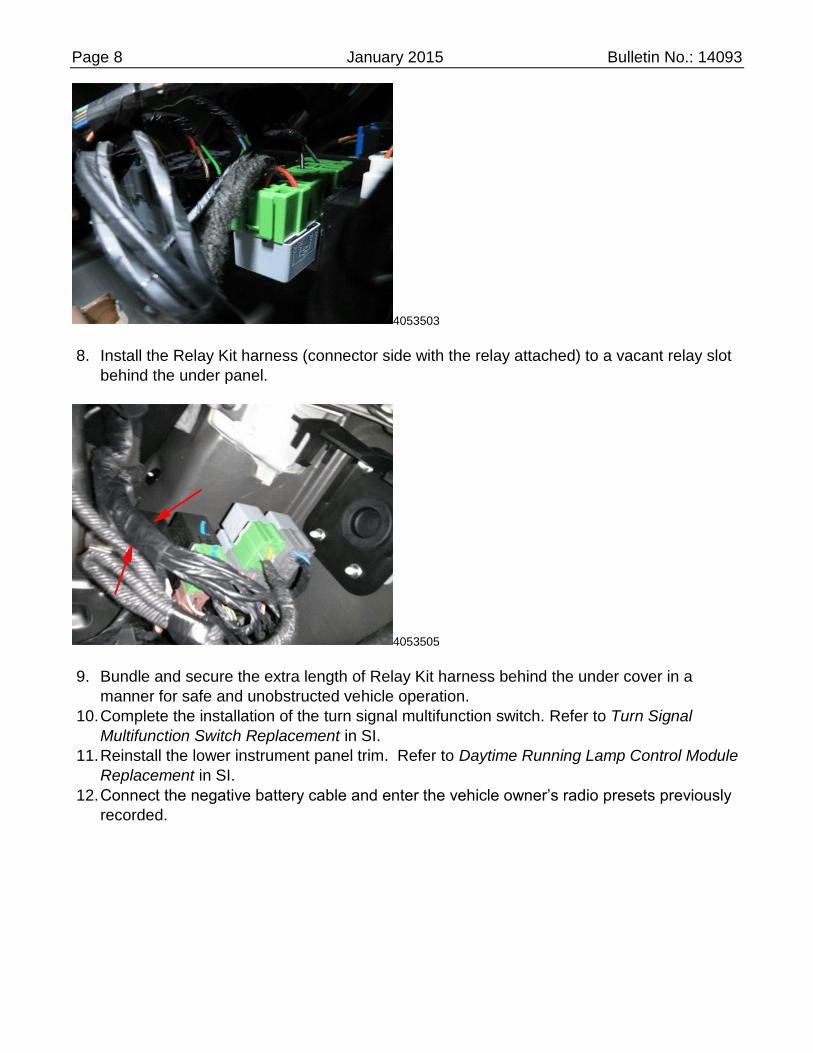
8. Install the Relay Kit harness (connector side with the relay attached) to a vacant relay slot
behind the under panel.
4053505
9. Bundle and secure the extra length of Relay Kit harness behind the under cover in a
manner for safe and unobstructed vehicle operation.
10. Complete the installation of the turn signal multifunction switch. Refer to Turn Signal
Multifunction Switch Replacement in SI.
11. Reinstall the lower instrument panel trim. Refer to Daytime Running Lamp Control Module
Replacement in SI.
12. Connect the negative battery cable and enter the vehicle owner’s radio presets previously
recorded.
Page 9 January 2015 Bulletin No.: 14093
DRL and Multifunction Wiring/Connector Repair and Ground Check (Optra/Aveo/Wave/G3 Models Only)
Note: Only the Optra may require service to the turn signal multifunction switch harness connector.
Reference the pigtail part numbers listed in the parts section for Optra and Aveo.
If the Epica DRL module connector shows signs of heat is damaged due to heat DRL, the connector may be replaced using the Aveo/G3/Wave pigtail (PN 42364044). See Aveo/Epica DRL Connector End Views at the end of this section to map the Aveo Pigtail wires to the Epica DRL harness.
Perform the following steps only if heat damage was detected on the wiring connector at the DRL module (all models) and/or turn signal multifunction switch (Optra only).
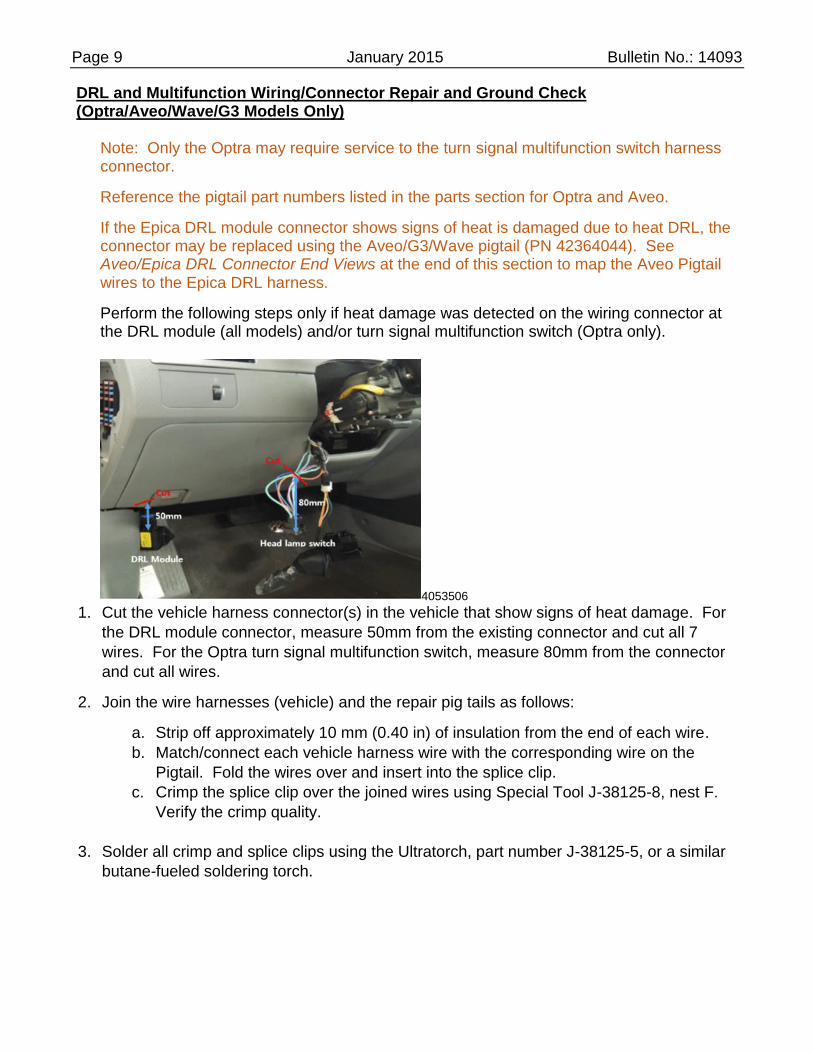
4053506 1. Cut the vehicle harness connector(s) in the vehicle that show signs of heat damage. For
the DRL module connector, measure 50mm from the existing connector and cut all 7
wires. For the Optra turn signal multifunction switch, measure 80mm from the connector
and cut all wires.
2. Join the wire harnesses (vehicle) and the repair pig tails as follows:
a. Strip off approximately 10 mm (0.40 in) of insulation from the end of each wire.
b. Match/connect each vehicle harness wire with the corresponding wire on the
Pigtail. Fold the wires over and insert into the splice clip.
c. Crimp the splice clip over the joined wires using Special Tool J-38125-8, nest F.
Verify the crimp quality.
3. Solder all crimp and splice clips using the Ultratorch, part number J-38125-5, or a similar
butane-fueled soldering torch.
Page 10 January 2015 Bulletin No.: 14093
4053507
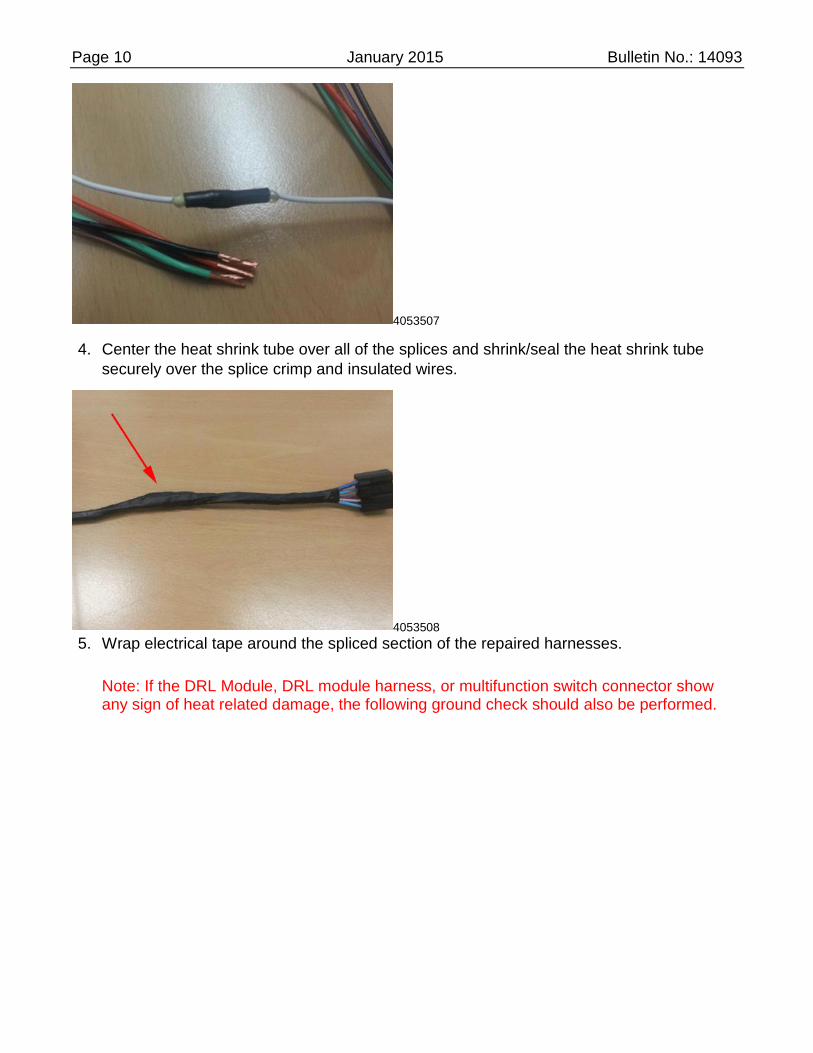
4. Center the heat shrink tube over all of the splices and shrink/seal the heat shrink tube
securely over the splice crimp and insulated wires.
4053508 5. Wrap electrical tape around the spliced section of the repaired harnesses.
Note: If the DRL Module, DRL module harness, or multifunction switch connector show any sign of heat related damage, the following ground check should also be performed.
Page 11 January 2015 Bulletin No.: 14093
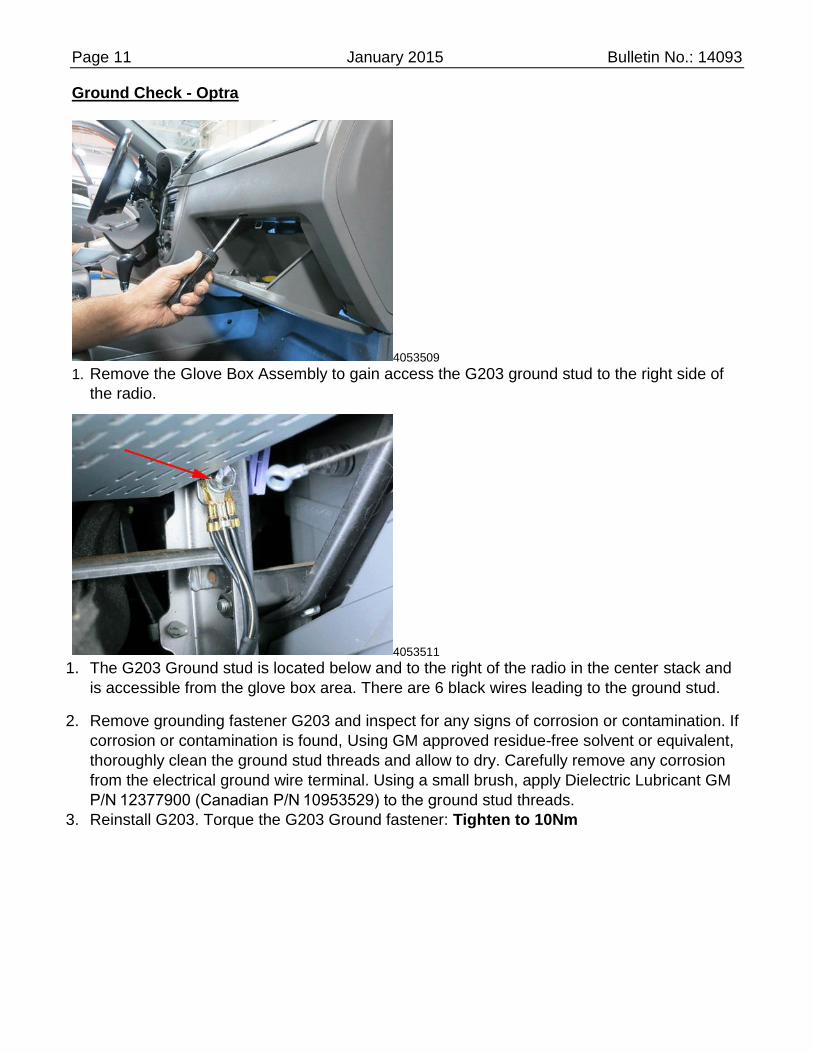
Ground Check - Optra
4053509 1. Remove the Glove Box Assembly to gain access the G203 ground stud to the right side of
the radio.
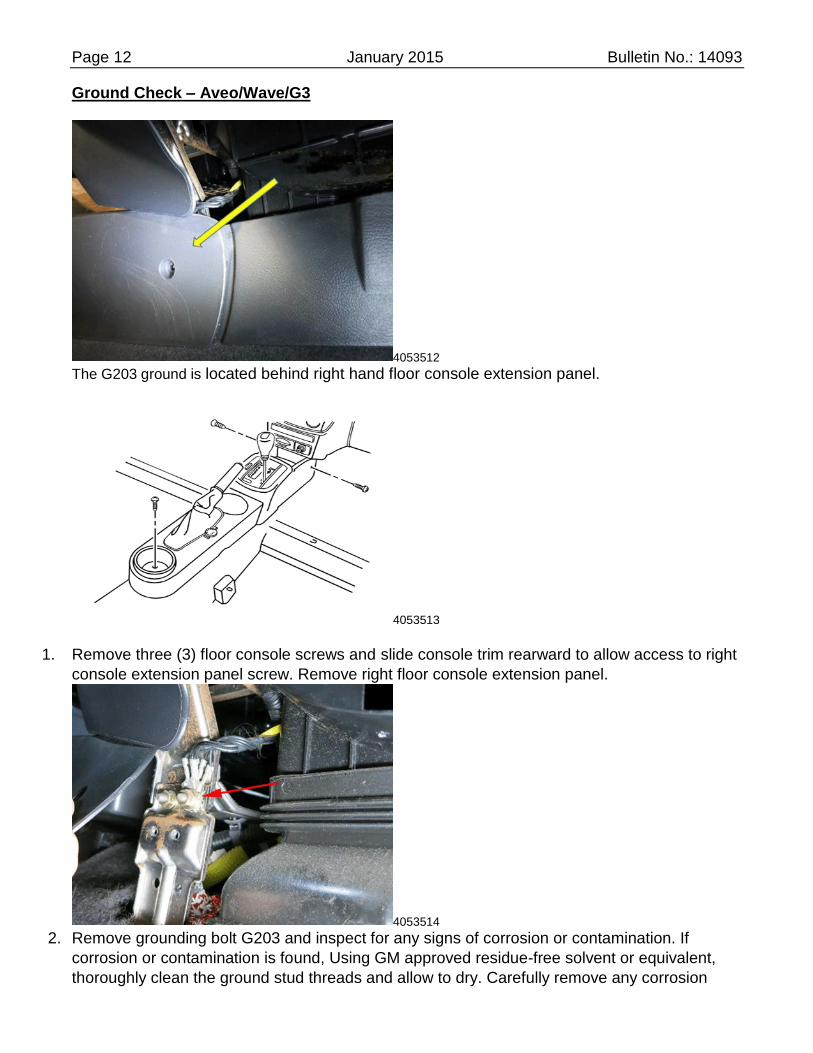
4053511
1. The G203 Ground stud is located below and to the right of the radio in the center stack and
is accessible from the glove box area. There are 6 black wires leading to the ground stud.
2. Remove grounding fastener G203 and inspect for any signs of corrosion or contamination. If
corrosion or contamination is found, Using GM approved residue-free solvent or equivalent,
thoroughly clean the ground stud threads and allow to dry. Carefully remove any corrosion
from the electrical ground wire terminal. Using a small brush, apply Dielectric Lubricant GM
P/N 12377900 (Canadian P/N 10953529) to the ground stud threads.
3. Reinstall G203. Torque the G203 Ground fastener: Tighten to 10Nm
Page 12 January 2015 Bulletin No.: 14093
Ground Check – Aveo/Wave/G3
4053512
The G203 ground is located behind right hand floor console extension panel.
4053513
1. Remove three (3) floor console screws and slide console trim rearward to allow access to right
console extension panel screw. Remove right floor console extension panel.
4053514 2. Remove grounding bolt G203 and inspect for any signs of corrosion or contamination. If
corrosion or contamination is found, Using GM approved residue-free solvent or equivalent,
thoroughly clean the ground stud threads and allow to dry. Carefully remove any corrosion
Page 13 January 2015 Bulletin No.: 14093
from the electrical ground wire terminal. Using a small brush, apply Dielectric Lubricant GM
P/N 12377900 (Canadian P/N 10953529) to the ground stud threads.
3. Reinstall G203. Torque the G203 Ground bolt: Tighten 10Nm
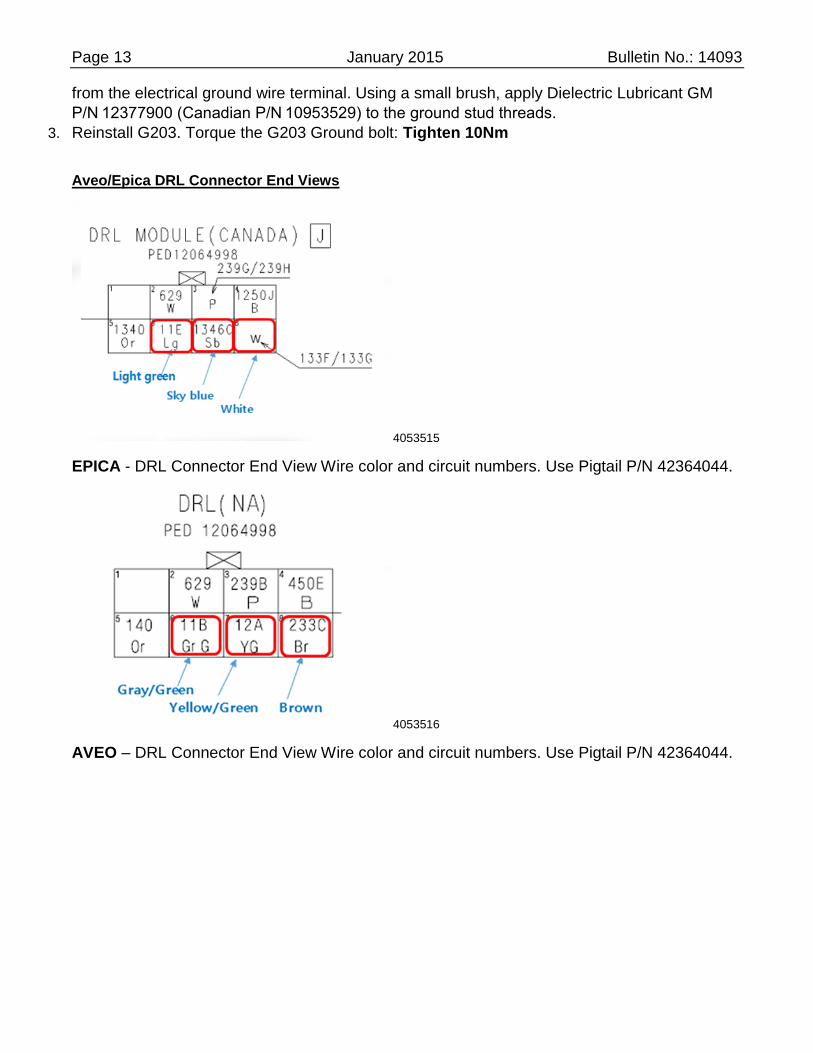
Aveo/Epica DRL Connector End Views
4053515
EPICA - DRL Connector End View Wire color and circuit numbers. Use Pigtail P/N 42364044.
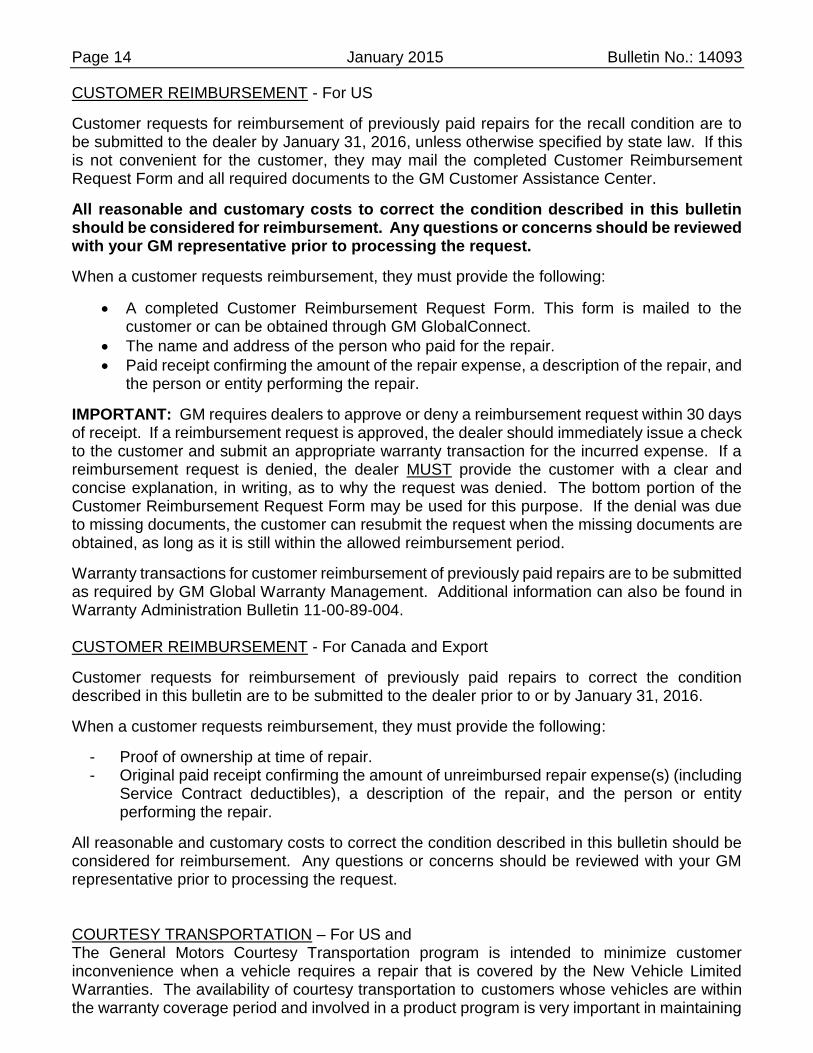
4053516
AVEO – DRL Connector End View Wire color and circuit numbers. Use Pigtail P/N 42364044.
Page 14 January 2015 Bulletin No.: 14093
CUSTOMER REIMBURSEMENT - For US
Customer requests for reimbursement of previously paid repairs for the recall condition are to be submitted to the dealer by January 31, 2016, unless otherwise specified by state law. If this is not convenient for the customer, they may mail the completed Customer Reimbursement Request Form and all required documents to the GM Customer Assistance Center. All reasonable and customary costs to correct the condition described in this bulletin should be considered for reimbursement. Any questions or concerns should be reviewed with your GM representative prior to processing the request.
When a customer requests reimbursement, they must provide the following:
A completed Customer Reimbursement Request Form. This form is mailed to the customer or can be obtained through GM GlobalConnect.
The name and address of the person who paid for the repair.
Paid receipt confirming the amount of the repair expense, a description of the repair, and the person or entity performing the repair.
IMPORTANT: GM requires dealers to approve or deny a reimbursement request within 30 days of receipt. If a reimbursement request is approved, the dealer should immediately issue a check to the customer and submit an appropriate warranty transaction for the incurred expense. If a reimbursement request is denied, the dealer MUST provide the customer with a clear and concise explanation, in writing, as to why the request was denied. The bottom portion of the Customer Reimbursement Request Form may be used for this purpose. If the denial was due to missing documents, the customer can resubmit the request when the missing documents are obtained, as long as it is still within the allowed reimbursement period.
Warranty transactions for customer reimbursement of previously paid repairs are to be submitted as required by GM Global Warranty Management. Additional information can also be found in Warranty Administration Bulletin 11-00-89-004. CUSTOMER REIMBURSEMENT - For Canada and Export
Customer requests for reimbursement of previously paid repairs to correct the condition described in this bulletin are to be submitted to the dealer prior to or by January 31, 2016.
When a customer requests reimbursement, they must provide the following:
- Proof of ownership at time of repair. - Original paid receipt confirming the amount of unreimbursed repair expense(s) (including
Service Contract deductibles), a description of the repair, and the person or entity performing the repair.
All reasonable and customary costs to correct the condition described in this bulletin should be considered for reimbursement. Any questions or concerns should be reviewed with your GM representative prior to processing the request. COURTESY TRANSPORTATION – For US and The General Motors Courtesy Transportation program is intended to minimize customer inconvenience when a vehicle requires a repair that is covered by the New Vehicle Limited Warranties. The availability of courtesy transportation to customers whose vehicles are within the warranty coverage period and involved in a product program is very important in maintaining

Page 15 January 2015 Bulletin No.: 14093
customer satisfaction. Dealers are to ensure that these customers understand that shuttle service or some other form of courtesy transportation is available and will be provided at no charge. Dealers should refer to the General Motors Service Policies and Procedures Manual for Courtesy Transportation guidelines. WARRANTY TRANSACTION INFORMATION
Submit a transaction using the table below. All transactions should be submitted as a ZFAT transaction type, unless noted otherwise.
Note: To avoid having to "H" route the customer reimbursement for approval, it must be submitted prior to the repair transaction.
Labor Code Description
Labor Time
Net Item
Optra Aveo, G3/Wave,
Epica
9100726 DRL Module Replacement (Includes Signal Switch & Relay Kit on Optra)
0.9 0.4 N/A
9101187 DRL Module Replacement (w/Auto A/C) (Epica Only) N/A 0.7 N/A
9100983 Part Repl. [DRL Module, Multifunction SW & Jumper Relay Kit (Optra ONLY) + Pigtail harness repair for one connector + Ground Check
1.6 1.0 N/A
9100984 Part Repl. [DRL Module, Multifunction SW & Jumper Relay Kit (Optra Only)] + Pigtail harness repair for two connectors + Ground Check
1.9 N/A N/A
9101203 Customer Reimbursement Approved 0.2 0.2 *
9101204 Customer Reimbursement Denied - For US dealers only 0.1 0.1 N/A
Note: Customer reimbursement will not close this recall. The service procedure must also be performed on the vehicle.
* The amount identified in “Net Item” should represent the dollar amount reimbursed to the customer.
CUSTOMER NOTIFICATION – For US and Canada
General Motors will notify customers of this recall on their vehicle CUSTOMER NOTIFICATION – For Export
Letters will be sent to known owners of record located within areas covered by the US National Traffic and Motor Vehicle Safety Act. For owners outside these areas, dealers should notify customers using the attached sample letter. DEALER RECALL RESPONSIBILITY – For US and Export (US States, Territories,
and Possessions)
It is a violation of Federal law for a dealer to deliver a new motor vehicle or any new or used item of motor vehicle equipment (including a tire) covered by this notification under a sale or lease until the defect or noncompliance is remedied.
The US National Traffic and Motor Vehicle Safety Act provides that each vehicle that is subject to a recall of this type must be adequately repaired within a reasonable time after the customer

Page 16 January 2015 Bulletin No.: 14093
has tendered it for repair. A failure to repair within sixty days after tender of a vehicle is prima facie evidence of failure to repair within a reasonable time. If the condition is not adequately repaired within a reasonable time, the customer may be entitled to an identical or reasonably equivalent vehicle at no charge or to a refund of the purchase price less a reasonable allowance for depreciation. To avoid having to provide these burdensome remedies, every effort must be made to promptly schedule an appointment with each customer and to repair their vehicle as soon as possible. In the recall notification letters, customers are told how to contact the US National Highway Traffic Safety Administration if the recall is not completed within a reasonable time. DEALER RECALL RESPONSIBILITY – All
All unsold new vehicles in dealers' possession and subject to this recall must be held and inspected/repaired per the service procedure of this recall bulletin before customers take possession of these vehicles.
Dealers are to service all vehicles subject to this recall at no charge to customers, regardless of mileage, age of vehicle, or ownership, from this time forward.
Customers who have recently purchased vehicles sold from your vehicle inventory, and for which there is no customer information indicated on the dealer listing, are to be contacted by the dealer. Arrangements are to be made to make the required correction according to the instructions contained in this bulletin. A copy of the customer letter is provided in this bulletin for your use in contacting customers. Recall follow-up cards should not be used for this purpose, since the customer may not as yet have received the notification letter.
In summary, whenever a vehicle subject to this recall enters your vehicle inventory, or is in your dealership for service in the future, you must take the steps necessary to be sure the recall correction has been made before selling or releasing the vehicle.
GM bulletins are intended for use by professional technicians, NOT a "do-it-yourselfer". They are written to inform these technicians of conditions that
may occur on some vehicles, or to provide information that could assist in the proper service of a vehicle. Properly trained technicians have the tools,
equipment, safety instructions, and know-how to do a job properly and safely. If a condition is described, DO NOT assume that the bulletin applies to
your vehicle, or that your vehicle will have that condition. See your dealer for information on whether your vehicle may benefit from the information.
We Support
Voluntary Technician
Certification


![La cesura epica come problema lirico [1]](https://img.pdfslide.us/doc/110x75/617f6bb2c23bf340232e638b/la-cesura-epica-come-problema-lirico-1.jpg)