Embed Size (px)
Citation preview
Built-In Multifunction Electric Oven
Model No.XOU177SS
INSTALLATION AND USER INSTRUCTIONS

2
G107
CONTENTSINTRODUCTION page 3
INSTRUCTIONS FOR THE INSTALLER pages 4-7
FOR YOUR OWN SAFETY page 8
DESCRIPTION OF THE APPLIANCE page 9
KNOW YOUR OVEN page 10
AUTOMATIC COOKING page 11
OVEN TIMER OPERATION pages 12-17
COOKING FUNCTIONS pages 18-19
COOKERY NOTES page 20
FAN OVEN COOKING GUIDE page 21
CONVENTIONAL OVEN COOKING GUIDE page 22
GRILLING GUIDE page 23
COOKING GUIDE page 24
CLEANING AND MAINTENANCE page 25
IS THERE SOMETHING WRONG WITH YOUR OVEN? page 26
SERVICE page 27

3
G107
INTRODUCTION
Your Belling OvenThank you for purchasing a new Belling electric built-in oven. Its stylish and practical design willenhance your kitchen and make cooking a pleasure. It features a large multifunction oven with a grill.There is also a clock/timer which features a minute minder and an automatic main oven switch onand off feature.
Even if you have used an electric oven before, it is important that you read these instructions thoroughlybefore starting to cook, as there may be many new features not featured on your previous oven . Payparticular attention to the installation and safety instructions.
Getting HelpIf you have any problems with installation, operating or cooking with your Belling oven please checkthrough these instructions thoroughly to make sure that you have not missed anything. If you stillneed help, then please contact (including a daytime telephone number if possible):
Consumer Relations Department
Belling Appliances Ltd.,
Talbot Road,
Mexborough
South Yorkshire.
S64 8AJ.
BELLING HELP LINE Tel: 01709 579902
Please quote the oven model and serial number with your enquiries. This can be found on the ratinglabel, positioned on the rear panel of the appliance.
WARNING! For your own safety, make sure that these instructions on installation, use andmaintenance are followed.
We advise you to keep these instructions in a safe place for future reference. If you sell or transferownership of this product, please pass on these instructions to the new owner.
This appliance conforms to EN55014 regarding suppression of Radio and Television receptioninterference.
4
G107
INSTRUCTIONS FOR THE INSTALLER
TECHNICAL INFORMATION
• All installation and maintenance must only becarried out by qualified personnel. The manufacturercannot be held responsible for any damage topersons or property resulting from an incorrectinstallation of the appliance.
• The safety and automatic adjustment devices ofthe appliance may, during its life, only be modifiedby the manufacturer or duly authorised supplier.
• n accordance with the electricity standard theappliance is type Y.
• The walls adjacent to and surrounding the appliancemust be able to withstand a temperature rise of65K.
UNPACKING YOUR OVEN
• Remove all packaging before use and check tomake sure that the appliance is in perfect condition.If you have any doubts do not use the applianceand call your supplier for advice. Do not move theappliance using the handles.
• Some parts on the appliance are protected by aplastic film. This protective film must be removedbefore the appliance is used. We recommendcarefully slitting the plastic film along the edgeswith a sharp knife or pin. Our products useenvironmentally friendly packaging, which can beeither recycled or disposed of in the appropriatemanner.
The packaging materials should carefullydiscarded and not left within easy reach ofchildren as they are a potential safety hazard.
DISPOSAL OF YOUR PRODUCT
To minimise the risk of injury to children please disposeof your product carefully and safely. Remove the mainscable (where fitted) by cutting off flush with the applianceand always ensure that no plug is left in a conditionwhere it could be connected to the electricity supply. Tohelp the environment, Local Authority instructions shouldbe followed for the disposal of your product.

5
G107
INSTALLATION INSTRUCTIONS
GENERAL
This appliance is designed specifically for domesticpurposes and Belling Appliances Limited cannot acceptresponsibility if used in any other type of installation.
All Belling oven units are suitable for installation underBelling hob units.
This appliance must not be installed over any appliancethat generates heat.
IMPORTANT
For your own safety, we recommend that your applianceis installed by a qualified electrician.
The oven should be installed in accordance with thelatest Edition of the IEE Regulations.
TYPE XOU177Dimensions for mounting H/W/D (mm) 570/560/540
Mains voltage AC 230 V
Operating voltage AC 230 V, 50 Hz
Upper element (kW) 0.7 (outer) + 1.8 (inner)
Lower element (kW) 1,6
Grill element (kW) 1,8
Fan element (kW) 2,0
Fan only (W) 25 - 29
Oven light (W) 15W - E 14 - T300
Cooling fan (W) 18 - 22
TECHNICAL DATA
6
G107
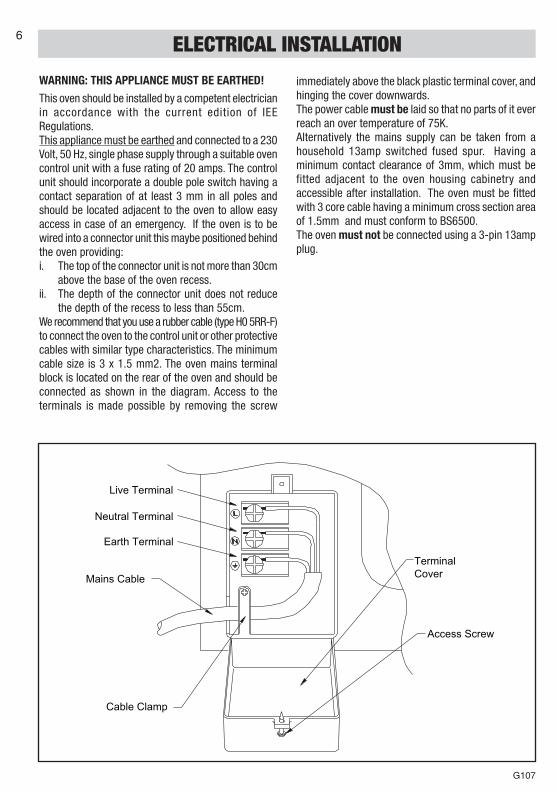
WARNING: THIS APPLIANCE MUST BE EARTHED!
This oven should be installed by a competent electricianin accordance with the current edition of IEERegulations.This appliance must be earthed and connected to a 230Volt, 50 Hz, single phase supply through a suitable ovencontrol unit with a fuse rating of 20 amps. The controlunit should incorporate a double pole switch having acontact separation of at least 3 mm in all poles andshould be located adjacent to the oven to allow easyaccess in case of an emergency. If the oven is to bewired into a connector unit this maybe positioned behindthe oven providing:i. The top of the connector unit is not more than 30cm
above the base of the oven recess.ii. The depth of the connector unit does not reduce
the depth of the recess to less than 55cm.We recommend that you use a rubber cable (type H0 5RR-F)to connect the oven to the control unit or other protectivecables with similar type characteristics. The minimumcable size is 3 x 1.5 mm2. The oven mains terminalblock is located on the rear of the oven and should beconnected as shown in the diagram. Access to theterminals is made possible by removing the screw
ELECTRICAL INSTALLATION
Cable Clamp
Terminal
Cover
Access Screw
Live Terminal
Neutral Terminal
Earth Terminal
Mains Cable
immediately above the black plastic terminal cover, andhinging the cover downwards.The power cable must be laid so that no parts of it everreach an over temperature of 75K.Alternatively the mains supply can be taken from ahousehold 13amp switched fused spur. Having aminimum contact clearance of 3mm, which must befitted adjacent to the oven housing cabinetry andaccessible after installation. The oven must be fittedwith 3 core cable having a minimum cross section areaof 1.5mm and must conform to BS6500.The oven must not be connected using a 3-pin 13ampplug.
7
G107
VV
BUILDING-IN THE APPLIANCE
INSTALLATION DIMENSIONS
WARNING Always use the recommended measurements of the build-in opening, as shown in the table on page 5and the diagrams below. To make sure the appliance is properly aerated, remove the rear panel of the base moduleor make a hole (A), as shown in thi figure below.
FIXING THE APPLIANCE
Push the appliance into the cabinet, open the oven doorand drill pilot holes 2mm X 5mm deep, through the holesin the frame at the sides into the sides of the cabinet.Fix the oven to the cabinet with the enclosed screws(V).
Take care not to tighten the screws too much as thismay cause damage to the cabinet sides or the applianceenamel.
BEFORE COOKING
Before you cook for the first time, we recommend thatyou switch on each element in turn to burn off anyodours remaining from manufacture. Simply operate thegrill on maximum for a few minutes, and the oven forabout 30 mins. Although the smell is harmless, we wouldrecommend that you open the window to allow freshair to circulate during this procedure.
597
595 540
560
40
560
570
570
550
550
A
A560

8
G107
FOR YOUR OWN SAFETY
NEVER
• NEVER allow anyone except an authorised BellingService Agent to service or repair your oven.
• NEVER remove any part of the oven other than thoseintended in normal use, or attempt to modify theoven in any way.
• NEVER use the oven for commercial catering. It isdesigned for domestic use and for cooking foodonly.
• NEVER allow young children to operate or playwith the oven.
• NEVER line the shelves, floor, or sides of the ovenor grill, with aluminium foil as overheating anddamage may result.
• NEVER store anything which might catch fire in theoven or grill.
• NEVER heat unopened containers.
• NEVER dry clothes on the oven door.
• NEVER store flammable liquids, aerosols, etc. inadjacent cabinets.
• NEVER wear garments with long flowing sleeveswhilst cooking.
• NEVER place or store the grill pan on the floor ofthe oven during cooking, as damage to theappliance or adjacent cabinet may occur, due tooverheating
When used properly your Belling oven is completely safe but as with any electrical product there are certainprecautions that must be observed.
PLEASE READ THE PRECAUTIONS BELOW BEFORE USING YOUR APPLIANCE.
ALWAYS
• ALWAYS take care when touching any part of theoven which may be hot. Use dry, good quality, ovengloves when removing or replacing food or dishes.
• ALWAYS stand back when opening the oven doorto allow any build-up of heat or steam to disperse.
• ALWAYS keep the oven door closed when not inuse to prevent accidents.
• ALWAYS keep your oven clean, as build-up ofgrease or fat from cooking may be a fire hazard.
• ALWAYS switch off at the mains before cleaningyour oven.
• ALWAYS supervise children and pets, particularlywhen grilling, as exposed parts of the grill maybecome hot.
• ALWAYS make sure that all controls are switchedoff when you have finished cooking.
• ALWAYS remember that your oven may stay hotfor a time even after you have finished cooking.
• ALWAYS keep ventilation slots clear of obstructions.
• ALWAYS keep children away from the oven whencleaning at maximum setting.

9
G107
3
2
1
DESCRIPTION OF APPLIANCE
SHELF POSITIONS
Your oven features shelf supports formed into its cavitysides, which offer the user 3 different cooking positions.
ACCESSORIES
The oven is supplied with 2 oven shelves (A) (see below),which can be placed in any of the runners formed intothe sides of the oven walls. The shelf positions arenumbered from the bottom of each oven.
A grill pan (B), food support grid (C) and handle (D) isalso included (see below), which is placed on top of theappropriate shelf. Use the grill pan (B) directly under ashelf for grilling a large amount of food.
When removing the tray from the oven, always use thehandle (D) provided. Hook the handle to the edge of thetray and pull it out, slightly lifting it as you do so.
During cooking, do not place the grill pan on the floorof the oven, as damage to the appliance or adjacentcabinet may occur, due to overheating.
A
B
D
C

10
G107
KNOW YOUR OVEN
CONTROLS
FUNCTION SELECTOR (1)
The cooking mode is selected using the function selector(1). The functions available are as follows,
Light Only
Fan Defrost
Conventional Oven (top and base elements)
Conventional Oven with Fan Assist (top and
base elements plus fan)
Base heat with Fan Assist
Fan Oven (rear element plus fan)
Grill
Fan Grill
THERMOSTAT (2)
The Thermostat (2) is used to set the desired cookingtemperature, and is used in conjunction with the functionselector. It is not necessary to set a temperature whenusing the oven in light only and fan defrost modes.
Temperature is set by turning the control clockwise tothe desired setting, with a range between 50ºC andapproximately 230ºC being available
WARNING:- DURING USE THE APPLIANCEBECOMES HOT.CARE SHOULD BE TAKEN TO AVOIDTOUCHING HEATING ELEMENTS INSIDE THE OVEN.
CONTROL PANEL
OVEN INDICATOR NEON (3)
The yellow indicator neon illuminates whenever the ovenis heating up, so it serves as a guide to the user forwhen the oven has preheated. It will switch on and offduring normal operation, as the elements cycle tomaintain the oven temperature.
1 34 2
11
G107
The oven programmer offers you the following features:
1. Time of Day
2. Minute Minder
3. Automatic Cooking with cook and delay cookingfunctions.
We recommend following the guidelines below, toensure the best performance from you oven when usingautomatic cooking programs,
1. Select foods which will take the same time to cookand require approximately the same temperature.
2. Set the oven programmer so that the food has justfinished or about to finish cooking on your returnto the oven. This will ensure the food has not cooleddown and does not require reheating beforeserving.
3. Food should be as cold as possible when it goesinto the oven, ideally straight from the refrigerator.Frozen meat and poultry should be thawedthoroughly before it is put in the oven.
4. We advise that warm food should never be placedin the oven if there is to be a delay period. Stewsprepared by frying the meat and vegetables shouldbe cooked as soon as possible.
5. We advise dishes containing left-over cookedpoultry or meat, for example
Shepherds Pie, should not be cooked automaticallyif there is to be a delay period.
6. Stews and joints should be cooked by the long slowmethod, so that the delay period is kept to aminimum.
7. On warm days, to prevent harmful bacterial growthin certain foods (i.e. poultry, joints, etc) the delayedstart should be kept to a minimum.
8. Wine or beer may ferment and cream may curdleduring the delay period, so it is best to add theseingredients just before serving.
9. Foods which discolour should be protected bycoating in fat or tossing in water to which lemonjuice has been added, prior to placing food in theoven.
AUTOMATIC COOKING
10. Dishes containing liquid should not be filled too fullto prevent boiling over.
11. Foods should be well sealed (but not airtight) in acontainer to prevent the loss of liquid during cooking.Aluminium foil gives a good seal.
12. Ensure food is cooked thoroughly before serving.
12
G107
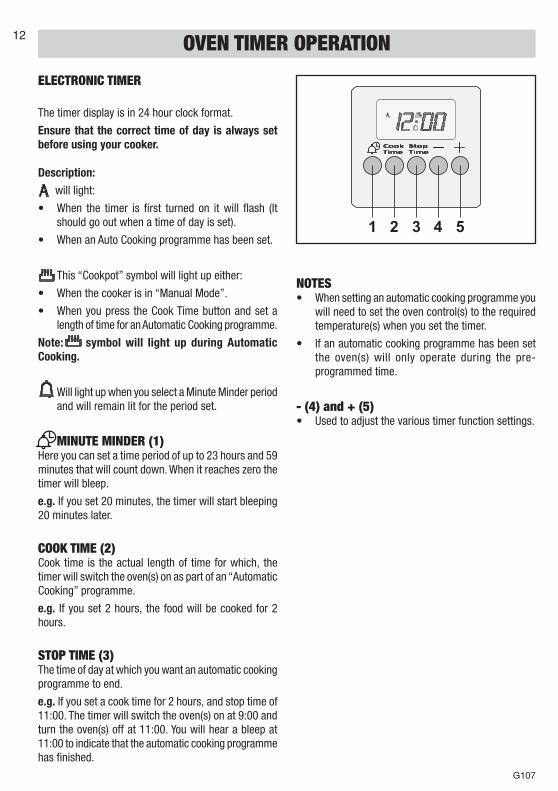
OVEN TIMER OPERATION
ELECTRONIC TIMER
The timer display is in 24 hour clock format.
Ensure that the correct time of day is always setbefore using your cooker.
Description: will light:
• When the timer is first turned on it will flash (Itshould go out when a time of day is set).
• When an Auto Cooking programme has been set.
This “Cookpot” symbol will light up either:
• When the cooker is in “Manual Mode”.
• When you press the Cook Time button and set alength of time for an Automatic Cooking programme.
Note: symbol will light up during AutomaticCooking.
Will light up when you select a Minute Minder periodand will remain lit for the period set.
MINUTE MINDER (1)Here you can set a time period of up to 23 hours and 59minutes that will count down. When it reaches zero thetimer will bleep.
e.g. If you set 20 minutes, the timer will start bleeping20 minutes later.
COOK TIME (2)Cook time is the actual length of time for which, thetimer will switch the oven(s) on as part of an “AutomaticCooking” programme.
e.g. If you set 2 hours, the food will be cooked for 2hours.
STOP TIME (3)The time of day at which you want an automatic cookingprogramme to end.
e.g. If you set a cook time for 2 hours, and stop time of11:00. The timer will switch the oven(s) on at 9:00 andturn the oven(s) off at 11:00. You will hear a bleep at11:00 to indicate that the automatic cooking programmehas finished.
NOTES• When setting an automatic cooking programme you
will need to set the oven control(s) to the requiredtemperature(s) when you set the timer.
• If an automatic cooking programme has been setthe oven(s) will only operate during the pre-programmed time.
- (4) and + (5)• Used to adjust the various timer function settings.
1 2 3 4 5
13
G107
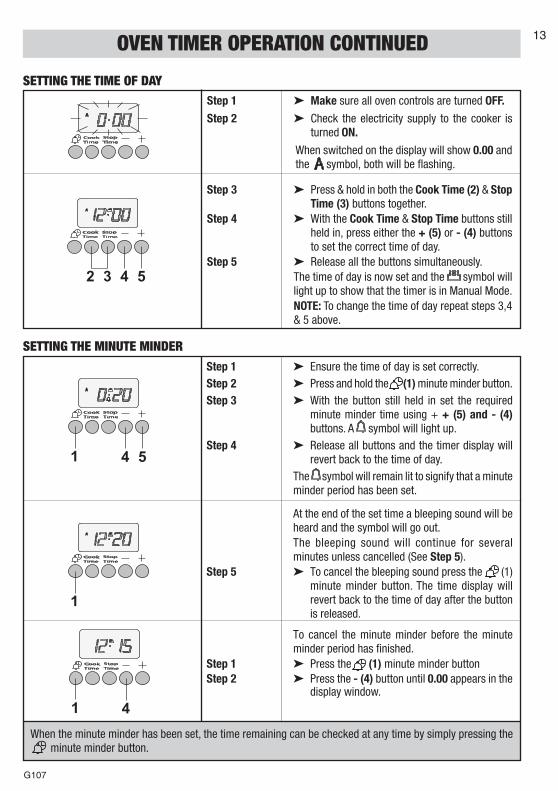
OVEN TIMER OPERATION CONTINUED
SETTING THE TIME OF DAYStep 1 ➤ Make sure all oven controls are turned OFF.
Step 2 ➤ Check the electricity supply to the cooker isturned ON.
When switched on the display will show 0.00 andthe symbol, both will be flashing.
Step 3 ➤ Press & hold in both the Cook Time (2) & StopTime (3) buttons together.
Step 4 ➤ With the Cook Time & Stop Time buttons stillheld in, press either the + (5) or - (4) buttonsto set the correct time of day.
Step 5 ➤ Release all the buttons simultaneously.The time of day is now set and the symbol willlight up to show that the timer is in Manual Mode.NOTE: To change the time of day repeat steps 3,4& 5 above.
SETTING THE MINUTE MINDERStep 1 ➤ Ensure the time of day is set correctly.Step 2 ➤ Press and hold the (1) minute minder button.Step 3 ➤ With the button still held in set the required
minute minder time using + + (5) and - (4)buttons. A symbol will light up.
Step 4 ➤ Release all buttons and the timer display willrevert back to the time of day.
The symbol will remain lit to signify that a minuteminder period has been set.
At the end of the set time a bleeping sound will beheard and the symbol will go out.The bleeping sound will continue for severalminutes unless cancelled (See Step 5).
Step 5 ➤ To cancel the bleeping sound press the (1)minute minder button. The time display willrevert back to the time of day after the buttonis released.
To cancel the minute minder before the minuteminder period has finished.
Step 1 ➤ Press the (1) minute minder buttonStep 2 ➤ Press the - (4) button until 0.00 appears in the
display window.
When the minute minder has been set, the time remaining can be checked at any time by simply pressing the minute minder button.
2 3 4 5
1 4 5
1
1 4
14
G107
OVEN TIMER OPERATION CONTINUED
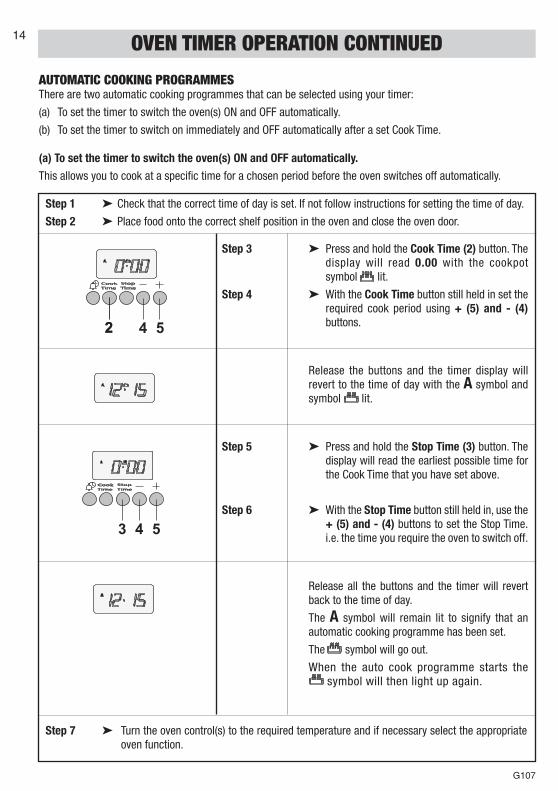
AUTOMATIC COOKING PROGRAMMESThere are two automatic cooking programmes that can be selected using your timer:
(a) To set the timer to switch the oven(s) ON and OFF automatically.
(b) To set the timer to switch on immediately and OFF automatically after a set Cook Time.
(a) To set the timer to switch the oven(s) ON and OFF automatically.
This allows you to cook at a specific time for a chosen period before the oven switches off automatically.
Step 3 ➤ Press and hold the Cook Time (2) button. Thedisplay will read 0.00 with the cookpotsymbol lit.
Step 4 ➤ With the Cook Time button still held in set therequired cook period using + (5) and - (4)buttons.
Release the buttons and the timer display willrevert to the time of day with the A symbol andsymbol lit.
Step 5 ➤ Press and hold the Stop Time (3) button. Thedisplay will read the earliest possible time forthe Cook Time that you have set above.
Step 6 ➤ With the Stop Time button still held in, use the+ (5) and - (4) buttons to set the Stop Time.i.e. the time you require the oven to switch off.
Release all the buttons and the timer will revertback to the time of day.
The A symbol will remain lit to signify that anautomatic cooking programme has been set.
The symbol will go out.
When the auto cook programme starts thes symbol will then light up again.
Step 1 ➤ Check that the correct time of day is set. If not follow instructions for setting the time of day.
Step 2 ➤ Place food onto the correct shelf position in the oven and close the oven door.
Step 7 ➤ Turn the oven control(s) to the required temperature and if necessary select the appropriateoven function.
2 4 52
3 4 5

15
G107
OVEN TIMER OPERATION CONTINUED
At the end of the automatic cook period the Asymbol will flash and an intermittent bleepingsound will be heard. The symbol will go out.
The bleeping sound will continue for severalminutes unless cancelled (see Step 8). The Asymbol will continue to flash until the timer isreturned to manual operation (see below).
Step 8 ➤ Press the Cook Time (2) button to cancel thebleeping sound.
Step 9 ➤ Turn the oven control(s) to the OFF position.
Step 10 ➤ Press the Cook Time (2) and Stop Time (3)buttons together to return the oven to manualoperation. The A symbol will go out and thessssssymbol will light up.
When cooking automatically the Cook Time can be checked at any time by simply pressing the Cook Time (2)button and the Stop Time by pressing the Stop Time (3) button.
To cancel the auto-cooking programme before or after auto cooking starts, press the Cook Time (2) and theStop Time (3) buttons together. This will return the cooker to manual operation.
2
2 3
16
G107
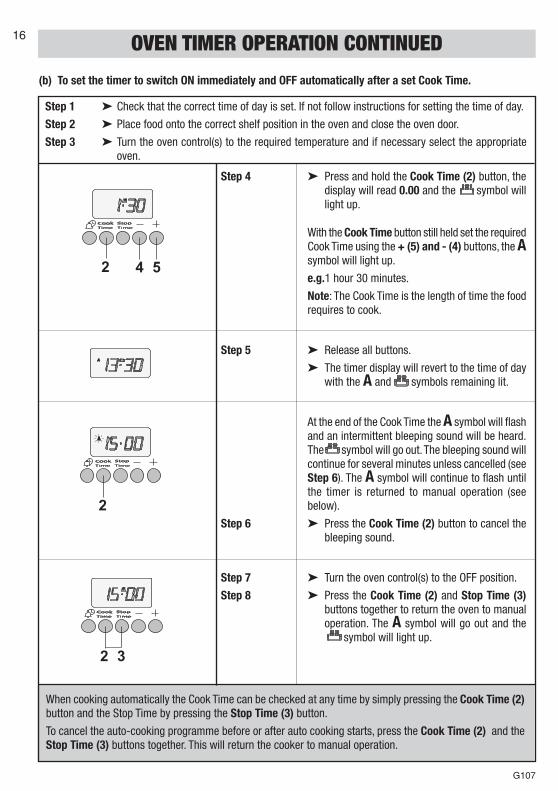
(b) To set the timer to switch ON immediately and OFF automatically after a set Cook Time.
Step 4 ➤ Press and hold the Cook Time (2) button, thedisplay will read 0.00 and the symbol willlight up.
With the Cook Time button still held set the requiredCook Time using the + (5) and - (4) buttons, the Asymbol will light up.
e.g.1 hour 30 minutes.
Note: The Cook Time is the length of time the foodrequires to cook.
Step 5 ➤ Release all buttons.
➤ The timer display will revert to the time of daywith the A and symbols remaining lit.
At the end of the Cook Time the A symbol will flashand an intermittent bleeping sound will be heard.The symbol will go out. The bleeping sound willcontinue for several minutes unless cancelled (seeStep 6). The A symbol will continue to flash untilthe timer is returned to manual operation (seebelow).
Step 6 ➤ Press the Cook Time (2) button to cancel thebleeping sound.
Step 7 ➤ Turn the oven control(s) to the OFF position.
Step 8 ➤ Press the Cook Time (2) and Stop Time (3)buttons together to return the oven to manualoperation. The A symbol will go out and thes symbol will light up.
Step 1 ➤ Check that the correct time of day is set. If not follow instructions for setting the time of day.
Step 2 ➤ Place food onto the correct shelf position in the oven and close the oven door.
Step 3 ➤ Turn the oven control(s) to the required temperature and if necessary select the appropriateoven.
When cooking automatically the Cook Time can be checked at any time by simply pressing the Cook Time (2)button and the Stop Time by pressing the Stop Time (3) button.
To cancel the auto-cooking programme before or after auto cooking starts, press the Cook Time (2) and theStop Time (3) buttons together. This will return the cooker to manual operation.
OVEN TIMER OPERATION CONTINUED
4 52
2
2 3

17
G107
OVEN TIMER OPERATION CONTINUED
1. To cancel the automatic cooking programme before or after automatic cooking starts, press the Cook Time (2)and Stop Time (3) buttons together, this will return the cooker to manual operation.
2. When cooking automatically the Cook Time can be checked at any time simply by pressing the Cook Time (2)button.
3. When cooking automatically the Stop Time can be checked at any time by simply pressing the Stop Time (3button.
4. Having set a Cook Time and Stop Time an electronic device stores the information. The device within the timerwill switch the oven(s) on and off at the required time.
5. When setting an automatic cooking programme and a mistake is made, to clear:
(a) Press the Cook Time (2) and Stop Time (3 buttons together to return the cooker to Manual operation.
(b) Start the sequence again.
6. If at any time the display shows three flashing zero’s . It is likely that the electricity supply to theoven has been interrupted. Reset the timer to the correct time of day. Food in the oven may therefore not havebeen cooked, before serving check food is thoroughly heated and completely cooked.
7. To set each function always press and hold the required function button and at the same time press + (5) or- (4) buttons.
18
G107
COOKING FUNCTIONS
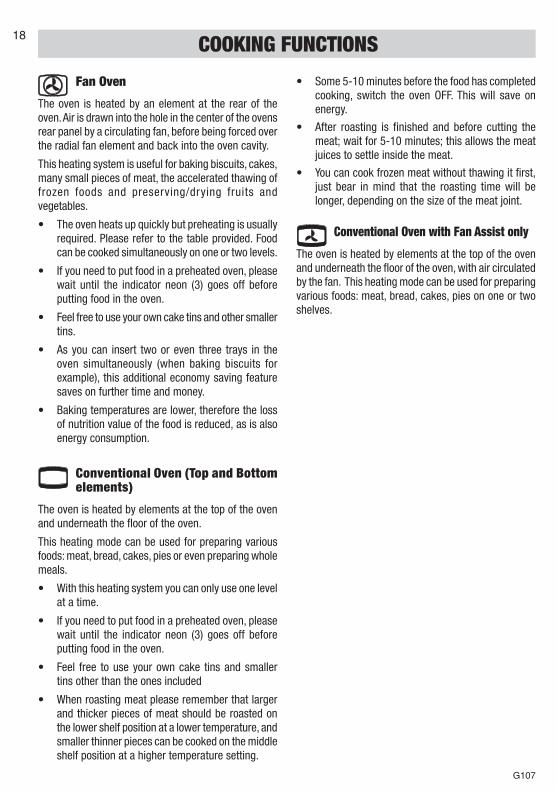
Fan Oven
The oven is heated by an element at the rear of theoven. Air is drawn into the hole in the center of the ovensrear panel by a circulating fan, before being forced overthe radial fan element and back into the oven cavity.
This heating system is useful for baking biscuits, cakes,many small pieces of meat, the accelerated thawing offrozen foods and preserving/drying fruits andvegetables.
• The oven heats up quickly but preheating is usuallyrequired. Please refer to the table provided. Foodcan be cooked simultaneously on one or two levels.
• If you need to put food in a preheated oven, pleasewait until the indicator neon (3) goes off beforeputting food in the oven.
• Feel free to use your own cake tins and other smallertins.
• As you can insert two or even three trays in theoven simultaneously (when baking biscuits forexample), this additional economy saving featuresaves on further time and money.
• Baking temperatures are lower, therefore the lossof nutrition value of the food is reduced, as is alsoenergy consumption.
Conventional Oven (Top and Bottomelements)
The oven is heated by elements at the top of the ovenand underneath the floor of the oven.
This heating mode can be used for preparing variousfoods: meat, bread, cakes, pies or even preparing wholemeals.
• With this heating system you can only use one levelat a time.
• If you need to put food in a preheated oven, pleasewait until the indicator neon (3) goes off beforeputting food in the oven.
• Feel free to use your own cake tins and smallertins other than the ones included
• When roasting meat please remember that largerand thicker pieces of meat should be roasted onthe lower shelf position at a lower temperature, andsmaller thinner pieces can be cooked on the middleshelf position at a higher temperature setting.
• Some 5-10 minutes before the food has completedcooking, switch the oven OFF. This will save onenergy.
• After roasting is finished and before cutting themeat; wait for 5-10 minutes; this allows the meatjuices to settle inside the meat.
• You can cook frozen meat without thawing it first,just bear in mind that the roasting time will belonger, depending on the size of the meat joint.
Conventional Oven with Fan Assist only
The oven is heated by elements at the top of the ovenand underneath the floor of the oven, with air circulatedby the fan. This heating mode can be used for preparingvarious foods: meat, bread, cakes, pies on one or twoshelves.
19
G107
COOKING FUNCTIONS CONTINUED
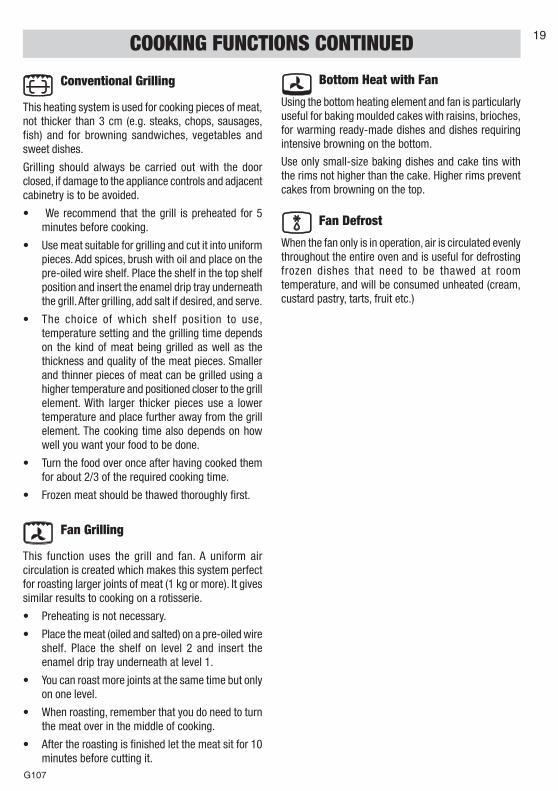
Conventional Grilling
This heating system is used for cooking pieces of meat,not thicker than 3 cm (e.g. steaks, chops, sausages,fish) and for browning sandwiches, vegetables andsweet dishes.
Grilling should always be carried out with the doorclosed, if damage to the appliance controls and adjacentcabinetry is to be avoided.
• We recommend that the grill is preheated for 5minutes before cooking.
• Use meat suitable for grilling and cut it into uniformpieces. Add spices, brush with oil and place on thepre-oiled wire shelf. Place the shelf in the top shelfposition and insert the enamel drip tray underneaththe grill. After grilling, add salt if desired, and serve.
• The choice of which shelf position to use,temperature setting and the grilling time dependson the kind of meat being grilled as well as thethickness and quality of the meat pieces. Smallerand thinner pieces of meat can be grilled using ahigher temperature and positioned closer to the grillelement. With larger thicker pieces use a lowertemperature and place further away from the grillelement. The cooking time also depends on howwell you want your food to be done.
• Turn the food over once after having cooked themfor about 2/3 of the required cooking time.
• Frozen meat should be thawed thoroughly first.
Fan Grilling
This function uses the grill and fan. A uniform aircirculation is created which makes this system perfectfor roasting larger joints of meat (1 kg or more). It givessimilar results to cooking on a rotisserie.
• Preheating is not necessary.
• Place the meat (oiled and salted) on a pre-oiled wireshelf. Place the shelf on level 2 and insert theenamel drip tray underneath at level 1.
• You can roast more joints at the same time but onlyon one level.
• When roasting, remember that you do need to turnthe meat over in the middle of cooking.
• After the roasting is finished let the meat sit for 10minutes before cutting it.
Bottom Heat with Fan
Using the bottom heating element and fan is particularlyuseful for baking moulded cakes with raisins, brioches,for warming ready-made dishes and dishes requiringintensive browning on the bottom.
Use only small-size baking dishes and cake tins withthe rims not higher than the cake. Higher rims preventcakes from browning on the top.
Fan Defrost
When the fan only is in operation, air is circulated evenlythroughout the entire oven and is useful for defrostingfrozen dishes that need to be thawed at roomtemperature, and will be consumed unheated (cream,custard pastry, tarts, fruit etc.)
20
G107
COOKING NOTE
Temperature and Time
When two shelves are used to cook large quantities offood for home freezing or parties, it may be necessaryto increase the cooking times given in the charts onpage 17 by a few minutes, to allow for the loss of heatdue to the extra time taken to load the oven, and thelarger mass of food. Baking trays should allow an equalgap on all sides of the oven.
To prepare Meat and Poultry for Roasting in yourFan Oven
(a) Wipe the meat or poultry, dry well and weigh it.Meat which has for been stored in a refrigeratorshould be allowed to come to room temperaturebefore cooking, and frozen meat or poultry mustbe completely defrosted before placing in the oven.
(b) The weight of any stuffing used should be addedbefore calculating the cooking time.
(c) Place meat/poultry in a suitable meat pan. Smalljoints weighing less than 1.75kg (31/2 lbs) shouldbe roasted in a smaller meat pan/tin - or they maybe ‘pot roasted’ - a small joint or a large meat pancauses unnecessary oven splashing andevaporation of meat juices.
(d) Additional fat should not be added, except for veal,very lean meat or poultry which can either be‘larded’ with fat bacon or brushed very sparinglywith cooking oil or melted fat.
(e) Beef, lamb, mutton and poultry may be dusted lightlywith seasoned flour to give a crisp outer surface.The skin of duck and goose should be pricked torelease excess fat during cooking, and the rind ofpork should be scored, brushed lightly with oil, andrubbed with salt to give crisp crackling.
(f) Meat and poultry wrapped in, or covered with atent of aluminium foil will be juicy and tender.Roasting bags offer the same advantages. Alwaysfollow the manufacturer’s pack instructions, andremember to reduce the temperatures given forconventional ovens by approximately 25 C and thetime by approximately 10 minutes per hour.
(g) Potatoes for roasting only require to be brushed withcooking oil or melted fat.
(h) It is not necessary to baste when roasting in anelectric oven and stock or liquid should not be addedto the meat pan since this only causes unnecessarysoiling, steam and condensation.
Frozen Meat and Poultry
Joints of meat and whole birds should be defrostedslowly, preferably in a domestic refrigerator (allowing5-6 hours per 450g, 1 lb), or at room temperature(allowing 2-3 hours per 450g, 1 lb).
Frozen meat or poultry must be completely defrostedbefore placing in the oven. It is essential to washthoroughly and cook meat and poultry immediately afterdefrosting.
21
G107
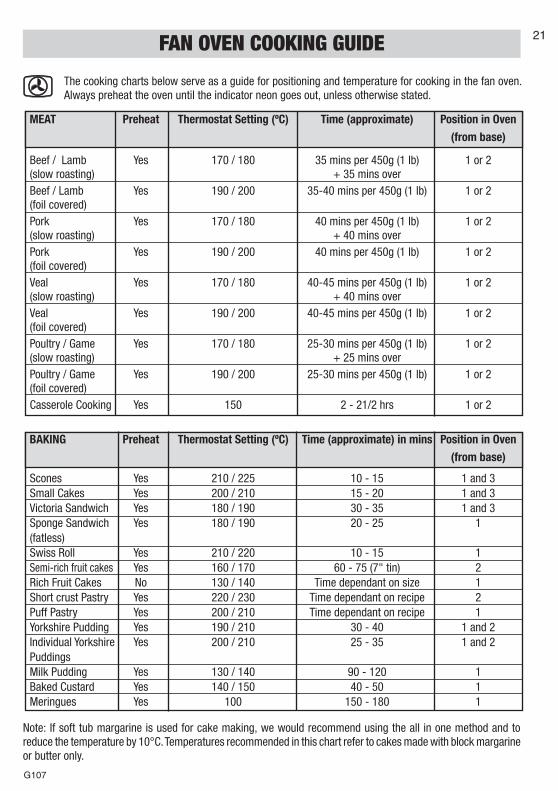
The cooking charts below serve as a guide for positioning and temperature for cooking in the fan oven.Always preheat the oven until the indicator neon goes out, unless otherwise stated.
MEAT Preheat Thermostat Setting (ºC) Time (approximate) Position in Oven
(from base)
Beef / Lamb Yes 170 / 180 35 mins per 450g (1 lb) 1 or 2(slow roasting) + 35 mins overBeef / Lamb Yes 190 / 200 35-40 mins per 450g (1 lb) 1 or 2(foil covered)Pork Yes 170 / 180 40 mins per 450g (1 lb) 1 or 2(slow roasting) + 40 mins overPork Yes 190 / 200 40 mins per 450g (1 lb) 1 or 2(foil covered)Veal Yes 170 / 180 40-45 mins per 450g (1 lb) 1 or 2(slow roasting) + 40 mins overVeal Yes 190 / 200 40-45 mins per 450g (1 lb) 1 or 2(foil covered)Poultry / Game Yes 170 / 180 25-30 mins per 450g (1 lb) 1 or 2(slow roasting) + 25 mins overPoultry / Game Yes 190 / 200 25-30 mins per 450g (1 lb) 1 or 2(foil covered)Casserole Cooking Yes 150 2 - 21/2 hrs 1 or 2
BAKING Preheat Thermostat Setting (ºC) Time (approximate) in mins Position in Oven(from base)
Scones Yes 210 / 225 10 - 15 1 and 3Small Cakes Yes 200 / 210 15 - 20 1 and 3Victoria Sandwich Yes 180 / 190 30 - 35 1 and 3Sponge Sandwich Yes 180 / 190 20 - 25 1(fatless)Swiss Roll Yes 210 / 220 10 - 15 1Semi-rich fruit cakes Yes 160 / 170 60 - 75 (7" tin) 2Rich Fruit Cakes No 130 / 140 Time dependant on size 1Short crust Pastry Yes 220 / 230 Time dependant on recipe 2Puff Pastry Yes 200 / 210 Time dependant on recipe 1Yorkshire Pudding Yes 190 / 210 30 - 40 1 and 2Individual Yorkshire Yes 200 / 210 25 - 35 1 and 2PuddingsMilk Pudding Yes 130 / 140 90 - 120 1Baked Custard Yes 140 / 150 40 - 50 1Meringues Yes 100 150 - 180 1
Note: If soft tub margarine is used for cake making, we would recommend using the all in one method and toreduce the temperature by 10°C. Temperatures recommended in this chart refer to cakes made with block margarineor butter only.
FAN OVEN COOKING GUIDE

22
G107
The cooking charts below serve as a guide for positioning and temperature for cooking in the conventionaloven. Always preheat the oven until indicator neon goes out, unless otherwise stated.
CONVENTIONAL OVEN COOKING GUIDE
MEAT Preheat Thermostat Setting (ºC) Time (approximate) Position in Oven
(from base)
Beef / Lamb Yes 170 / 190 35 mins per 450g (1 lb) 2(slow roasting) + 35 mins overBeef / Lamb Yes 190 / 210 35-40 mins per 450g (1 lb) 2(foil covered)Pork Yes 170 / 190 40 mins per 450g (1 lb) 2(slow roasting) + 40 mins overPork Yes 190 / 210 40 mins per 450g (1 lb) 2(foil covered)Veal Yes 170 / 190 40-45 mins per 450g (1 lb) 2(slow roasting) + 40 mins overVeal Yes 190 / 210 40-45 mins per 450g (1 lb) 2(foil covered)Poultry / Game Yes 170 / 190 25-30 mins per 450g (1 lb) 2(slow roasting) + 25 mins overPoultry / Game Yes 190 / 210 25-30 mins per 450g (1 lb) 2(foil covered)Casserole Cooking Yes 150 2 - 21/2 hrs 2
BAKING Preheat Thermostat Setting (ºC) Time (approximate) in mins Position in Oven(from base)
Scones Yes 215 / 220 8 - 12 2Small Cakes Yes 160 / 170 20 - 25 2Victoria Sandwich Yes 150 / 160 30 - 35 2Sponge Sandwich Yes 190 / 2000 23 - 28 2(fatless)Swiss Roll Yes 210 / 220 10 - 15 2Semi-rich fruit cakes Yes 160 / 170 60 - 75 (7" tin) 2Rich Fruit Cakes Yes 125 / 135 Time dependant on size 2Short crust Pastry Yes 190 / 210 Time dependant on recipe 2Puff Pastry Yes 210 / 220 Time dependant on recipe 2Yorkshire Pudding Yes 195 / 215 30 - 40 2Individual Yorkshire Yes 200 / 215 20 - 30 2PuddingsMilk Pudding Yes 140 / 150 90 - 120 2Baked Custard Yes 140/ 160 40 - 50 2Meringues Yes 100 150 - 180 2
Note: If soft tub margarine is used for cake making, we would recommend using the all in one method and toreduce the temperature by 10°C. Temperatures recommended in this chart refer to cakes made with block margarineor butter only.
23
G107
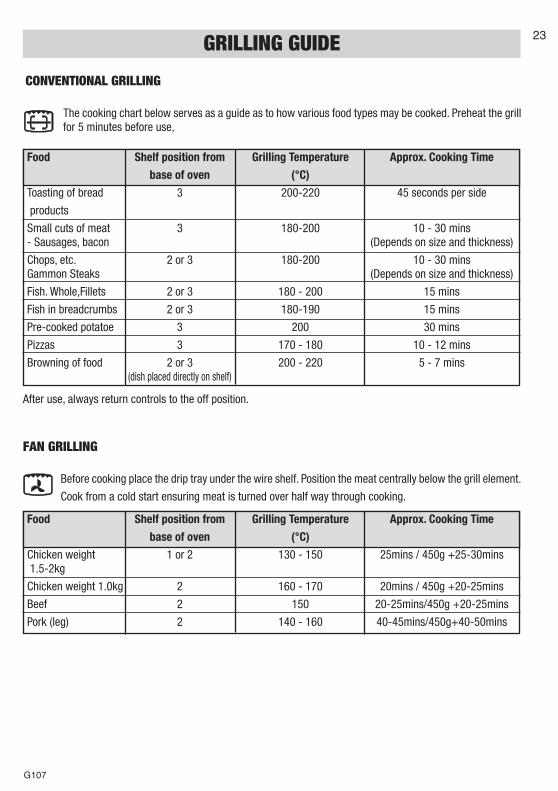
GRILLING GUIDE
CONVENTIONAL GRILLING
The cooking chart below serves as a guide as to how various food types may be cooked. Preheat the grillfor 5 minutes before use,
Food Shelf position from Grilling Temperature Approx. Cooking Time
base of oven (°C)
Toasting of bread 3 200-220 45 seconds per side
products
Small cuts of meat 3 180-200 10 - 30 mins- Sausages, bacon (Depends on size and thickness)
Chops, etc. 2 or 3 180-200 10 - 30 minsGammon Steaks (Depends on size and thickness)
Fish. Whole,Fillets 2 or 3 180 - 200 15 mins
Fish in breadcrumbs 2 or 3 180-190 15 mins
Pre-cooked potatoe 3 200 30 mins
Pizzas 3 170 - 180 10 - 12 mins
Browning of food 2 or 3 200 - 220 5 - 7 mins(dish placed directly on shelf)
FAN GRILLING
Before cooking place the drip tray under the wire shelf. Position the meat centrally below the grill element.
Cook from a cold start ensuring meat is turned over half way through cooking.
Food Shelf position from Grilling Temperature Approx. Cooking Time
base of oven (°C)
Chicken weight 1 or 2 130 - 150 25mins / 450g +25-30mins 1.5-2kg
Chicken weight 1.0kg 2 160 - 170 20mins / 450g +20-25mins
Beef 2 150 20-25mins/450g +20-25mins
Pork (leg) 2 140 - 160 40-45mins/450g+40-50mins
After use, always return controls to the off position.
24
G107
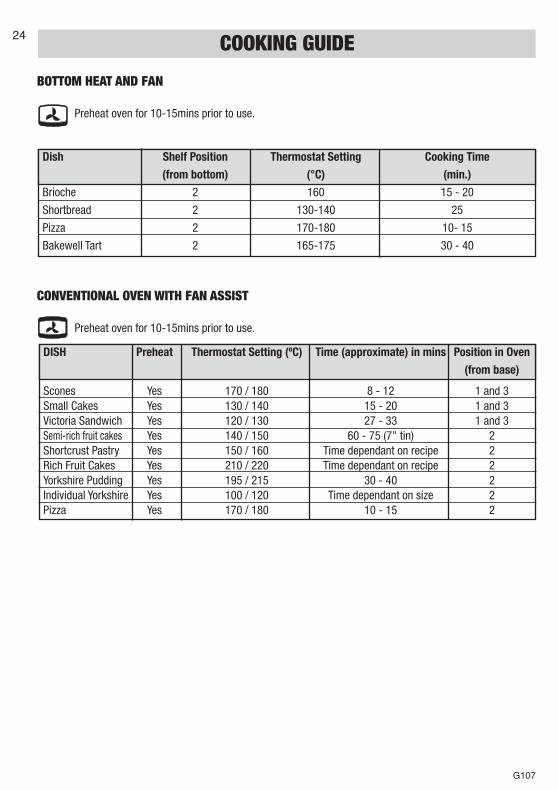
COOKING GUIDE
BOTTOM HEAT AND FAN
Preheat oven for 10-15mins prior to use.
Dish Shelf Position Thermostat Setting Cooking Time
(from bottom) (°C) (min.)Brioche 2 160 15 - 20
Shortbread 2 130-140 25
Pizza 2 170-180 10- 15
Bakewell Tart 2 165-175 30 - 40
CONVENTIONAL OVEN WITH FAN ASSIST
Preheat oven for 10-15mins prior to use.
DISH Preheat Thermostat Setting (ºC) Time (approximate) in mins Position in Oven
(from base)
Scones Yes 170 / 180 8 - 12 1 and 3Small Cakes Yes 130 / 140 15 - 20 1 and 3Victoria Sandwich Yes 120 / 130 27 - 33 1 and 3Semi-rich fruit cakes Yes 140 / 150 60 - 75 (7" tin) 2Shortcrust Pastry Yes 150 / 160 Time dependant on recipe 2Rich Fruit Cakes Yes 210 / 220 Time dependant on recipe 2Yorkshire Pudding Yes 195 / 215 30 - 40 2Individual Yorkshire Yes 100 / 120 Time dependant on size 2Pizza Yes 170 / 180 10 - 15 2
25
G107
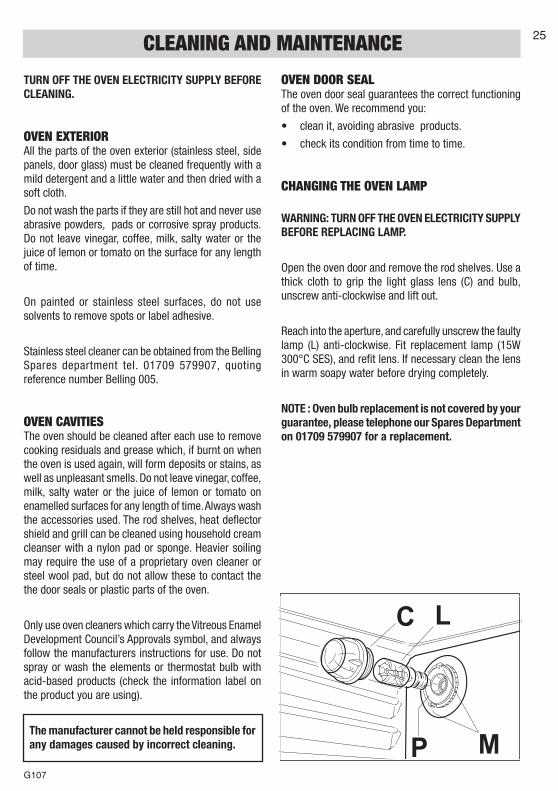
CLEANING AND MAINTENANCE
TURN OFF THE OVEN ELECTRICITY SUPPLY BEFORECLEANING.
OVEN EXTERIORAll the parts of the oven exterior (stainless steel, sidepanels, door glass) must be cleaned frequently with amild detergent and a little water and then dried with asoft cloth.
Do not wash the parts if they are still hot and never useabrasive powders, pads or corrosive spray products.Do not leave vinegar, coffee, milk, salty water or thejuice of lemon or tomato on the surface for any lengthof time.
On painted or stainless steel surfaces, do not usesolvents to remove spots or label adhesive.
Stainless steel cleaner can be obtained from the BellingSpares department tel. 01709 579907, quotingreference number Belling 005.
OVEN CAVITIESThe oven should be cleaned after each use to removecooking residuals and grease which, if burnt on whenthe oven is used again, will form deposits or stains, aswell as unpleasant smells. Do not leave vinegar, coffee,milk, salty water or the juice of lemon or tomato onenamelled surfaces for any length of time. Always washthe accessories used. The rod shelves, heat deflectorshield and grill can be cleaned using household creamcleanser with a nylon pad or sponge. Heavier soilingmay require the use of a proprietary oven cleaner orsteel wool pad, but do not allow these to contact thethe door seals or plastic parts of the oven.
Only use oven cleaners which carry the Vitreous EnamelDevelopment Council’s Approvals symbol, and alwaysfollow the manufacturers instructions for use. Do notspray or wash the elements or thermostat bulb withacid-based products (check the information label onthe product you are using).
The manufacturer cannot be held responsible forany damages caused by incorrect cleaning.
OVEN DOOR SEALThe oven door seal guarantees the correct functioningof the oven. We recommend you:
• clean it, avoiding abrasive products.
• check its condition from time to time.
CHANGING THE OVEN LAMP
WARNING: TURN OFF THE OVEN ELECTRICITY SUPPLYBEFORE REPLACING LAMP.
Open the oven door and remove the rod shelves. Use athick cloth to grip the light glass lens (C) and bulb,unscrew anti-clockwise and lift out.
Reach into the aperture, and carefully unscrew the faultylamp (L) anti-clockwise. Fit replacement lamp (15W300°C SES), and refit lens. If necessary clean the lensin warm soapy water before drying completely.
NOTE : Oven bulb replacement is not covered by yourguarantee, please telephone our Spares Departmenton 01709 579907 for a replacement.
LC
P M

26
G107
IS THERE SOMETHING WRONG WITH YOUR OVEN?
Fault finding guide Before contacting your Belling service Centre / Installer, check the problemguide below: there may be nothing wrong with your oven
Problem CheckNothing works Is the main oven wall switch turned on?.
Is the timer display blank?.
If the timer is not working it is likely that there is no electricity supply to youroven.
Timer flashing The electricity supply to the oven has been interrupted. The timer must bereset.
Timer bleeping Press timer button 4 to cancel.
Grill keeps turning on and off. This is normal during use, as the grill maintains temperature.
Oven lamp does not work. The oven lamp is not covered by the guarantee. The part is easily changed- see the section on Oven Lamp Replacement. A new lamp may be obtainedfrom our spares department by calling :- 01709 579907
Problem CheckGrilling Ensure that the grill is positioned centrally below the grill element
Uneven Cooking front to back
Baking - General Ensure that the oven shelves are level by using a spirit level on the rod shelfUneven rising of cakes and adjusting the wheels/feet. The oven should be checked both left to right
and front to back.
Sinking of cakes The following may cause cakes to sink:
1. Preheating of fan ovens.
2. Cooking at to high a temperature.
3. Using normal creaming method with soft margarine. (Use the all-in-onemethod - see Cook Book supplied)
Over/Under cooking Refer to the cooking times and temperatures given in the charts provided,Fast/Slow cooking however, it may be necessary to increase or decrease temperatures by 10ºC
to suit personal tastes. Do not use oven/meat tins greater than 56mm (21/4")in height.
Are cooking results not satisfactory?

27
G107
SERVICE
Belling Appliances Ltd., Mexborough, South Yorkshire S64 8AJ
XOU177001 - 20/08/02
Date Nature of fault Parts Replaced or Repaired Authorised Stamp or Signature
Please check your guarantee card for who to contact for service. Remember that service agents may charge forvisits (even during the guarantee period) if nothing is found to be wrong with the appliance, so always check theinstructions to make sure you have not missed anything.
Belling Appliances After Sales Division (Service)
Tel: 08457 454540 (all calls will be charged at local rate)
Before contacting a service agent, please note the following details about your oven:
Model Number ..............................................
Serial Number ..............................................
Date of Purchase ..............................................
In order to provide a complete service history for your Belling product, please ask the service engineer to record theappropriate details in the chart below.
IMPORTANT NOTICE:- In line with our continuing policy of research and development, we reserve the right to altermodels and specifications without prior notice.
This instruction manual is accurate at the date of printing but will be superseded and should be disregarded if thespecifications are changed.

461304737 04/11/2002 Stampa TLF G107