Embed Size (px)
Citation preview

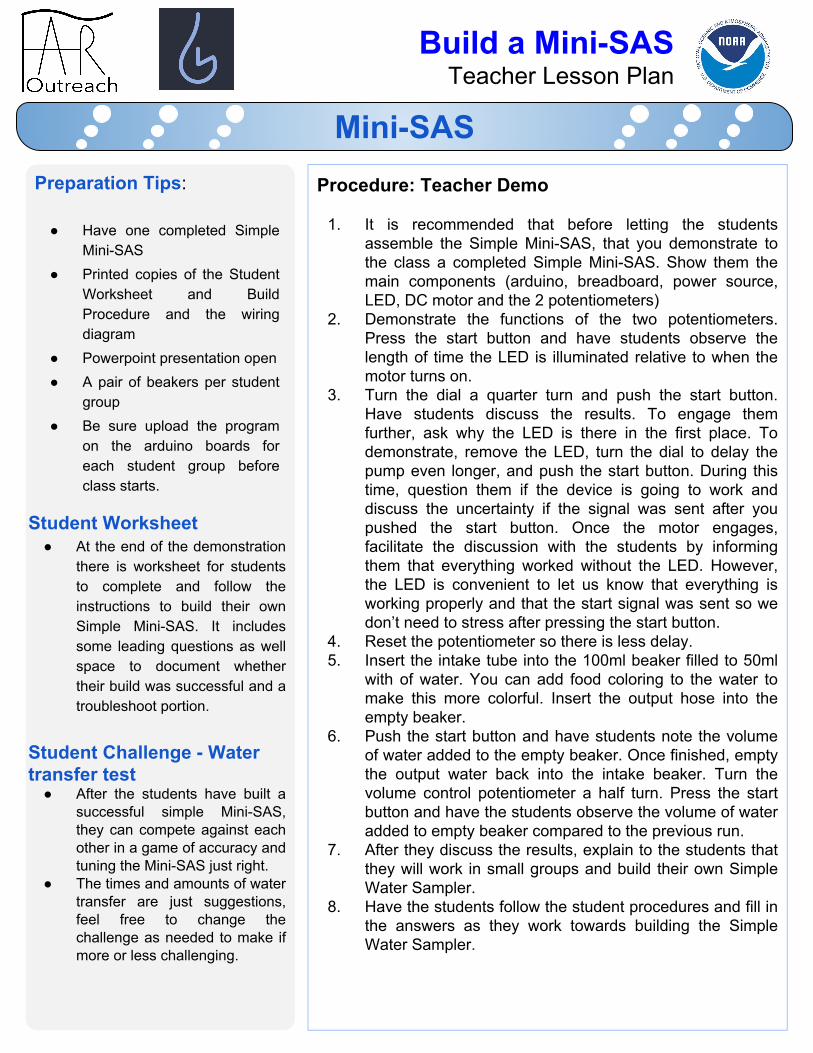
Build a Mini-SAS Teacher Lesson Plan
Mini-SASObjectives:
Students will be able to:● Build a simple water sampler ● Work Collaboratively to create
a functioning sampler ● Understand the benefits of
how automation can increase the productivity of any project
● Compete in a Water Transfer Challenge
Terms of Materials not included in Sparkfun kit
● Rectifier Diode: The diode's function is to limit the flow of electrical current in one direction. The small electrical "pulse" that occurs when the motor turns on and off could damage the MOSFET without the diode there to prevent that backflow of increased current.
● Arduino: consists of both a physical programmable circuit board (often referred to as a microcontroller) and a piece of software, or IDE (Integrated Development Environment) that runs on your computer, used to write and upload computer code to the physical board.
● Basic FET N-channel: A transistor that can be open or closed when voltage is applied. By amplifying or switching electronic signals the MOSFET can act like a simple on/off switch.
● TRIMPOT: small potentiometer which is used for adjustment, tuning and calibration in circuits.
● Resistor: is a passive two-terminal electrical component that implements electrical resistance as a circuit element.
Overview:In this lesson students will get a hand-ons experience
building an automated Mini-SAS of their own called the Simple Mini-SAS. This lesson is a great introduction to the fundamentals of building any device where the goal is to have a simple switch turned on and off to run a motor without having to be physically present. Students will first follow the diagrams to build the simple sampler and then progress to testing the accuracy of their water sample volumes and timing.
SimpleMini-SASCustomizable...- Motor Delay- Motor Run-time- LED
List of materials:The base of the Simple Mini-SAS is Sparkfun Inventor’s
Kit v3.3. Other materials are required for the simple sampler that are not included in the sparkfun kit..
Materials not included in the Sparkfun kit:
(1) Rectifier Diode (1) DC Motor(1) Power plug(1) Basic FET N-channel
(2) TRIMPOT (1) DC power source (2) 10” of 5mm OD and 3mm ID tubing per group
Build a Mini-SAS Teacher Lesson Plan
Mini-SASPreparation Tips:
● Have one completed Simple Mini-SAS
● Printed copies of the Student Worksheet and Build Procedure and the wiring diagram
● Powerpoint presentation open● A pair of beakers per student
group● Be sure upload the program
on the arduino boards for each student group before class starts.
Student Worksheet● At the end of the demonstration
there is worksheet for students to complete and follow the instructions to build their own Simple Mini-SAS. It includes some leading questions as well space to document whether their build was successful and a troubleshoot portion.
Student Challenge - Water transfer test
● After the students have built a successful simple Mini-SAS, they can compete against each other in a game of accuracy and tuning the Mini-SAS just right.
● The times and amounts of water transfer are just suggestions, feel free to change the challenge as needed to make if more or less challenging.
Procedure: Teacher Demo
1. It is recommended that before letting the students assemble the Simple Mini-SAS, that you demonstrate to the class a completed Simple Mini-SAS. Show them the main components (arduino, breadboard, power source, LED, DC motor and the 2 potentiometers)
2. Demonstrate the functions of the two potentiometers. Press the start button and have students observe the length of time the LED is illuminated relative to when the motor turns on.
3. Turn the dial a quarter turn and push the start button. Have students discuss the results. To engage them further, ask why the LED is there in the first place. To demonstrate, remove the LED, turn the dial to delay the pump even longer, and push the start button. During this time, question them if the device is going to work and discuss the uncertainty if the signal was sent after you pushed the start button. Once the motor engages, facilitate the discussion with the students by informing them that everything worked without the LED. However, the LED is convenient to let us know that everything is working properly and that the start signal was sent so we don’t need to stress after pressing the start button.
4. Reset the potentiometer so there is less delay.5. Insert the intake tube into the 100ml beaker filled to 50ml
with of water. You can add food coloring to the water to make this more colorful. Insert the output hose into the empty beaker.
6. Push the start button and have students note the volume of water added to the empty beaker. Once finished, empty the output water back into the intake beaker. Turn the volume control potentiometer a half turn. Press the start button and have the students observe the volume of water added to empty beaker compared to the previous run.
7. After they discuss the results, explain to the students that they will work in small groups and build their own Simple Water Sampler.
8. Have the students follow the student procedures and fill in the answers as they work towards building the Simple Water Sampler.

Build a Mini-SAS Student Activity
Mini-SAS
Student Handout and Build Procedure
Prior Activity Questions
1. What is an activity or chore that you do on a daily or basis that you wish were
automated?___________________________________________________________________________
_____________________________________________________________________________________
_____________________________________________________________________________________
_____________________________________________________________________________________
2. Read the interview on the SAS webpage entitled ‘About Us’. What was the motivation behind the
scientists wanting to create an automated water sampler?
_____________________________________________________________________________________
_____________________________________________________________________________________
_____________________________________________________________________________________
______________________________________________________________________________
Lab Procedure
1. With your group members, examine the Mini-SAS diagram that shows where all the components and the wires will be placed.
2. Open up the sparkfun kit and organize the spare parts provided by your teacher. 3. To begin the assembly, start by adding the large components to the breadboard first and then add
the wires as shown. 4. Once you have completed adding all the components and wires to the breadboard, plug in the power
sources for the arduino and DC motor. 5. Push the ‘start’ button and record your observations
a. Did the LED bulb turn on?____________________________b. Did the motor turn on?_______________________________c. Was there a delay?_________________________________
* If you did not get your desired results, see the next page for troubleshooting.
Build a Mini-SAS Student Activity
Mini-SAS
Student Handout and Lab ProcedureTroubleshooting Tips
6. Troubleshooting:a. If nothing turned on, consult the diagram to be sure you followed the diagram exactly.b. Delay
i. If the delay was too long, turn the potentiometer a half turn and press the start button to test again.
ii. If the delay was too short, turn the potentiometer a half turn in the other direction and press the start button to test again.
c. Motori. If the motor ran long, turn the potentiometer a half turn and press the start button to test
again. ii. If the motor ran to brief, turn the potentiometer a half turn in the other direction and
press the start button to test again.
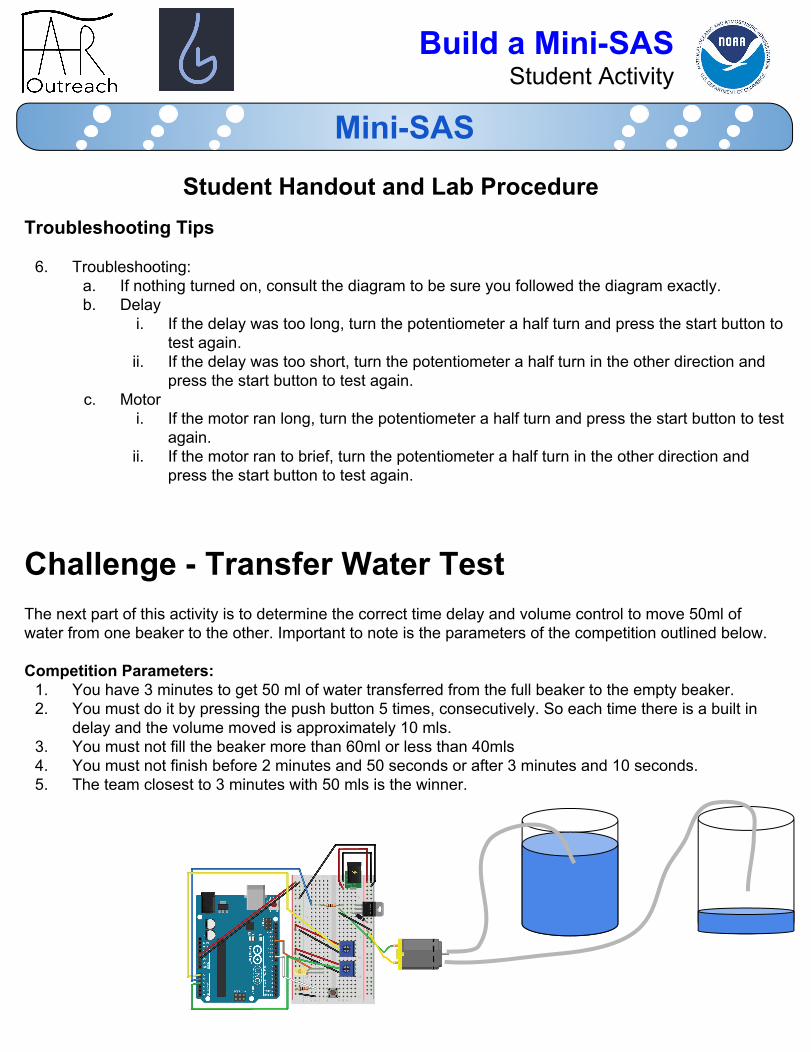
Challenge - Transfer Water TestThe next part of this activity is to determine the correct time delay and volume control to move 50ml of water from one beaker to the other. Important to note is the parameters of the competition outlined below.
Competition Parameters:1. You have 3 minutes to get 50 ml of water transferred from the full beaker to the empty beaker.2. You must do it by pressing the push button 5 times, consecutively. So each time there is a built in
delay and the volume moved is approximately 10 mls. 3. You must not fill the beaker more than 60ml or less than 40mls 4. You must not finish before 2 minutes and 50 seconds or after 3 minutes and 10 seconds. 5. The team closest to 3 minutes with 50 mls is the winner.

Build a Mini-SAS Wiring Diagram
Mini-SAS
Simple Time Sipper Wiring Diagram
DC Motor
Basic Fet N-Channel Potentiometers
1 & 2
Power plug
Resistors (3)
LED