Embed Size (px)
Citation preview
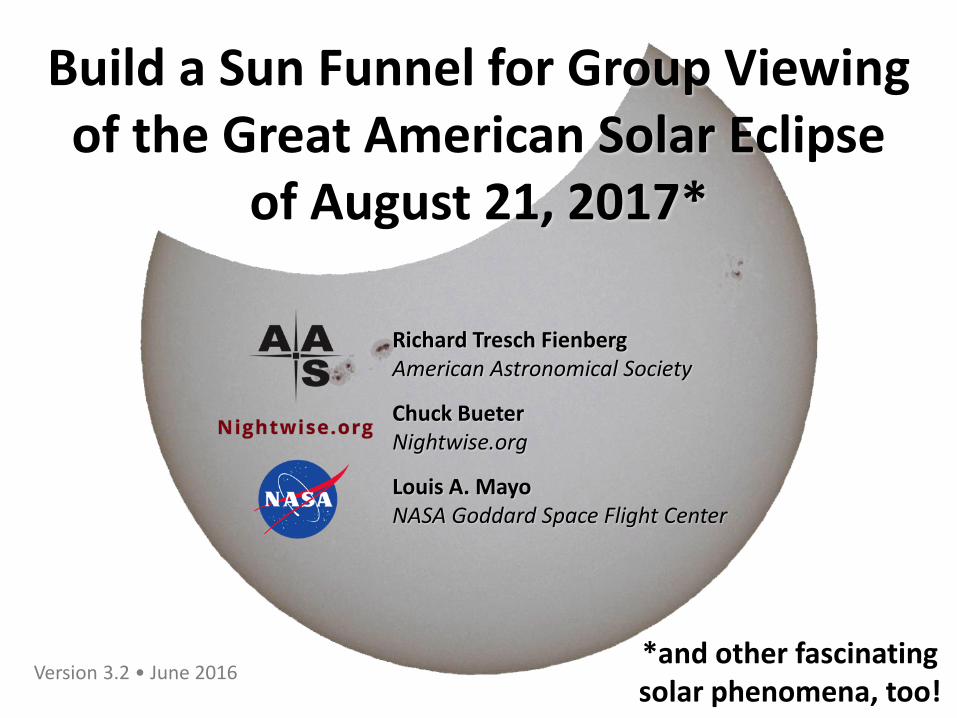
Build a Sun Funnel for Group Viewing of the Great American Solar Eclipse
of August 21, 2017*
Version 3.2 • June 2016
Richard Tresch Fienberg American Astronomical Society
Chuck Bueter Nightwise.org
Louis A. Mayo NASA Goddard Space Flight Center
*and other fascinating solar phenomena, too!
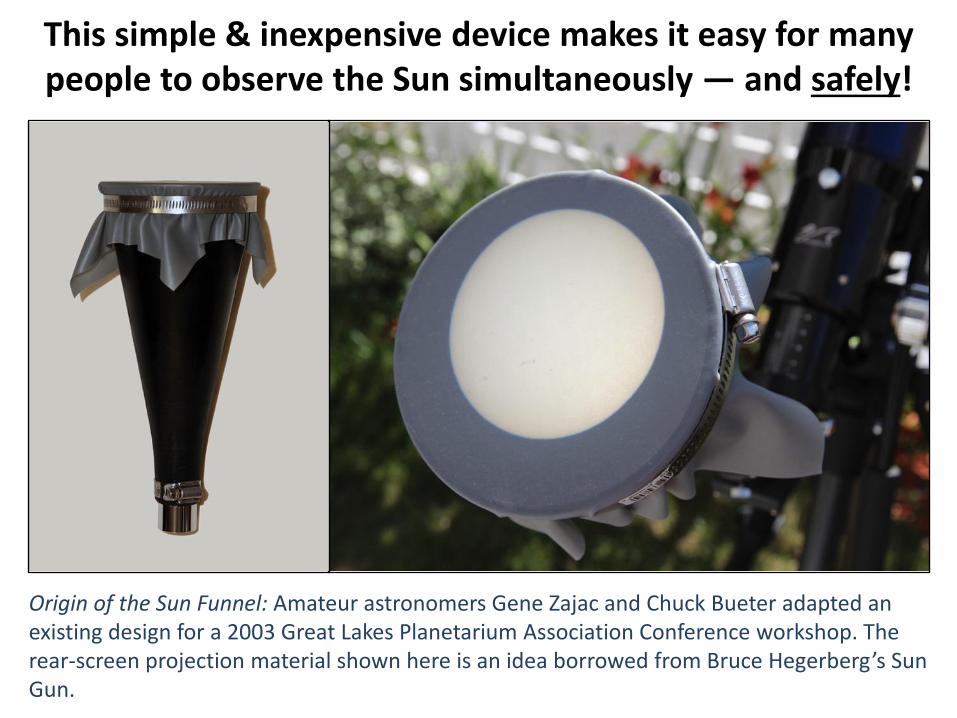
This simple & inexpensive device makes it easy for many people to observe the Sun simultaneously — and safely!
Origin of the Sun Funnel: Amateur astronomers Gene Zajac and Chuck Bueter adapted an existing design for a 2003 Great Lakes Planetarium Association Conference workshop. The rear-screen projection material shown here is an idea borrowed from Bruce Hegerberg’s Sun Gun.
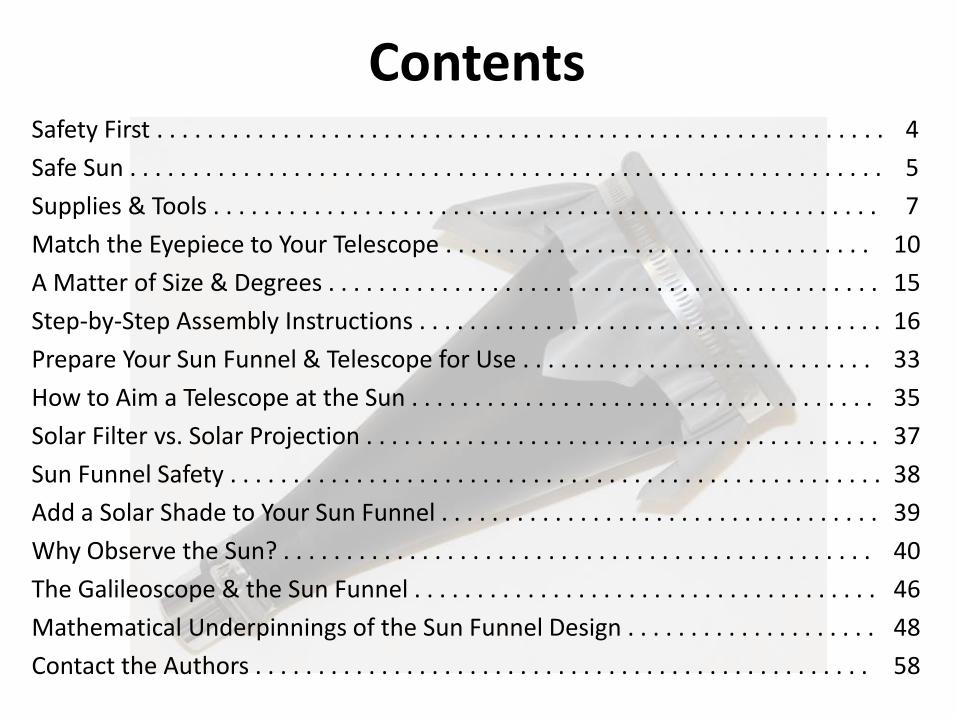
Contents Safety First . . . . . . . . . . . . . . . . . . . . . . . . . . . . . . . . . . . . . . . . . . . . . . . . . . . . . . . . . . 4
Safe Sun . . . . . . . . . . . . . . . . . . . . . . . . . . . . . . . . . . . . . . . . . . . . . . . . . . . . . . . . . . . . 5
Supplies & Tools . . . . . . . . . . . . . . . . . . . . . . . . . . . . . . . . . . . . . . . . . . . . . . . . . . . . . 7
Match the Eyepiece to Your Telescope . . . . . . . . . . . . . . . . . . . . . . . . . . . . . . . . . . 10
A Matter of Size & Degrees . . . . . . . . . . . . . . . . . . . . . . . . . . . . . . . . . . . . . . . . . . . . 15
Step-by-Step Assembly Instructions . . . . . . . . . . . . . . . . . . . . . . . . . . . . . . . . . . . . . 16
Prepare Your Sun Funnel & Telescope for Use . . . . . . . . . . . . . . . . . . . . . . . . . . . . 33
How to Aim a Telescope at the Sun . . . . . . . . . . . . . . . . . . . . . . . . . . . . . . . . . . . . . 35
Solar Filter vs. Solar Projection . . . . . . . . . . . . . . . . . . . . . . . . . . . . . . . . . . . . . . . . . 37
Sun Funnel Safety . . . . . . . . . . . . . . . . . . . . . . . . . . . . . . . . . . . . . . . . . . . . . . . . . . . . 38
Add a Solar Shade to Your Sun Funnel . . . . . . . . . . . . . . . . . . . . . . . . . . . . . . . . . . . 39
Why Observe the Sun? . . . . . . . . . . . . . . . . . . . . . . . . . . . . . . . . . . . . . . . . . . . . . . . 40
The Galileoscope & the Sun Funnel . . . . . . . . . . . . . . . . . . . . . . . . . . . . . . . . . . . . . 46
Mathematical Underpinnings of the Sun Funnel Design . . . . . . . . . . . . . . . . . . . . 48
Contact the Authors . . . . . . . . . . . . . . . . . . . . . . . . . . . . . . . . . . . . . . . . . . . . . . . . . 58
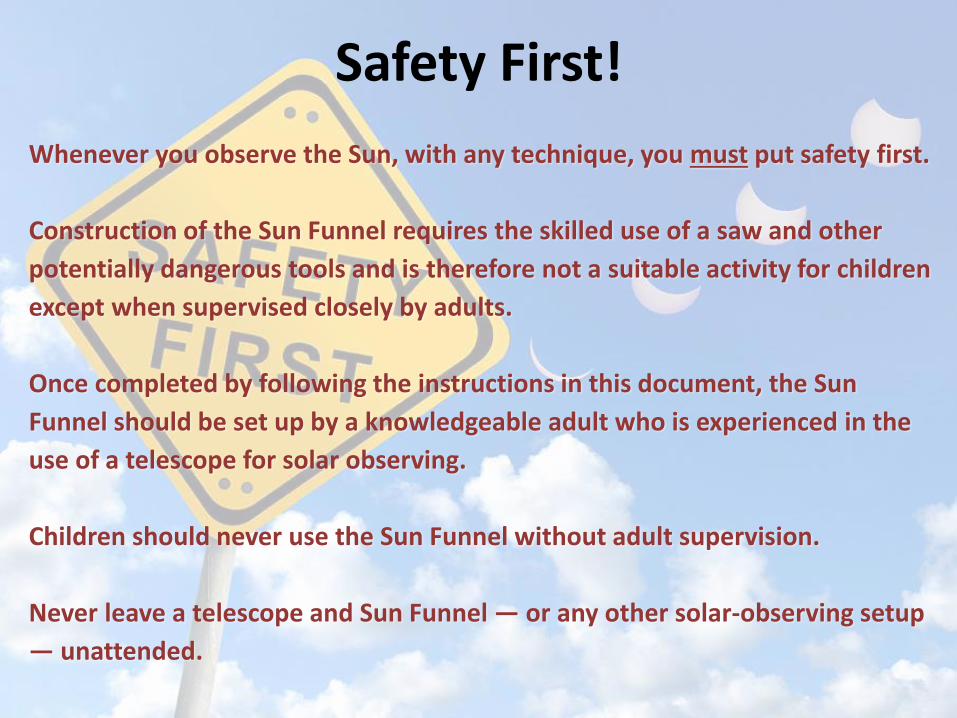
Safety First!
Whenever you observe the Sun, with any technique, you must put safety first.
Construction of the Sun Funnel requires the skilled use of a saw and other
potentially dangerous tools and is therefore not a suitable activity for children
except when supervised closely by adults.
Once completed by following the instructions in this document, the Sun
Funnel should be set up by a knowledgeable adult who is experienced in the
use of a telescope for solar observing.
Children should never use the Sun Funnel without adult supervision.
Never leave a telescope and Sun Funnel — or any other solar-observing setup
— unattended.
Safe Sun
You’ve probably been warned many times never to look directly at the Sun to
avoid injuring your eyes. That’s good advice! Also, most commercial
telescopes have a sticker warning you never to point your instrument at the
Sun — again, good advice, not only to protect your eyes but also to protect
your telescope.
But experienced telescope users know that there are at least two ways to
observe the Sun safely. One is to use a special-purpose aperture filter — that
is, a filter that fits over the instrument’s aperture, or front opening — to block
all but a minuscule fraction of the Sun’s light and thereby create a comfortably
bright image in the telescope’s eyepiece. Most such solar filters are made
from metal-coated glass, metalized polyester film, or a sheet of black-polymer
material.
Sometimes, though, it can be hard to convince people to look through a
filtered telescope; despite your most sincere reassurances, they’re afraid
they’ll hurt their eyes. In any case, only one person at a time can view the Sun
in the telescope’s eyepiece.
One way around these problems is to project an image of the Sun from your
telescope onto a card or screen. Now nobody has to look through the
telescope (which means no refocusing and no bumping), and many people can
view the solar image at the same time. But there’s a risk that someone might
accidentally look into the bright beam of sunlight emerging from the eyepiece.
The solution to that problem, and an even safer way to use a telescope to
observe the Sun, is rear-screen projection. That’s the technique used in the
Sun Funnel. Let’s build one!
Safe Sun, Continued
1
3 2
5
4
9
7 6
8
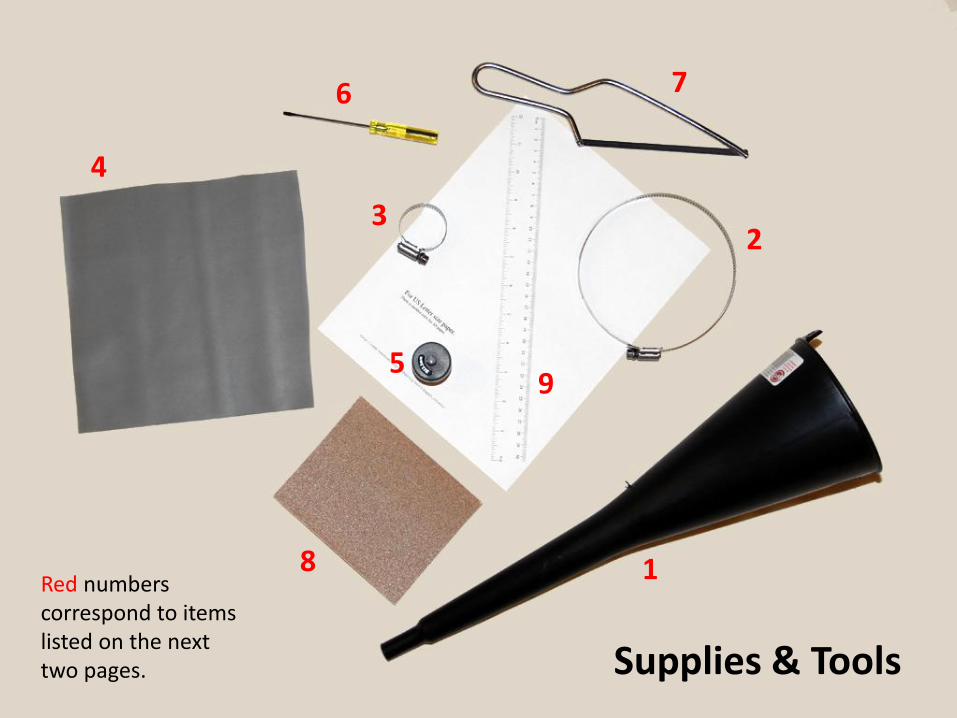
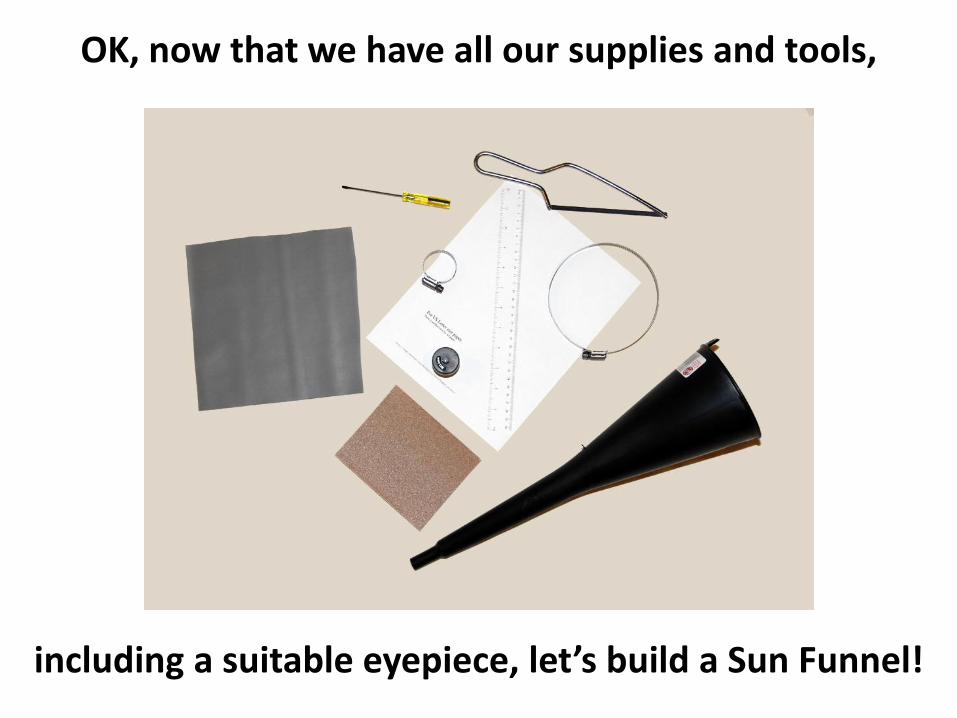
Supplies & Tools
Red numbers correspond to items listed on the next two pages.
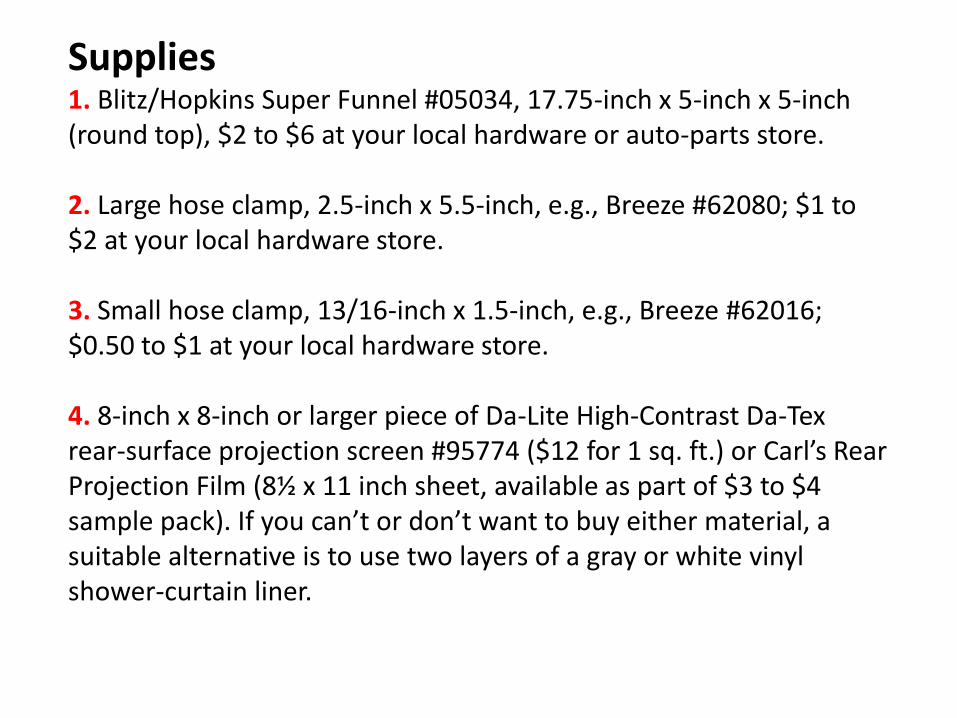
Supplies 1. Blitz/Hopkins Super Funnel #05034, 17.75-inch x 5-inch x 5-inch (round top), $2 to $6 at your local hardware or auto-parts store. 2. Large hose clamp, 2.5-inch x 5.5-inch, e.g., Breeze #62080; $1 to $2 at your local hardware store. 3. Small hose clamp, 13/16-inch x 1.5-inch, e.g., Breeze #62016; $0.50 to $1 at your local hardware store. 4. 8-inch x 8-inch or larger piece of Da-Lite High-Contrast Da-Tex rear-surface projection screen #95774 ($12 for 1 sq. ft.) or Carl’s Rear Projection Film (8½ x 11 inch sheet, available as part of $3 to $4 sample pack). If you can’t or don’t want to buy either material, a suitable alternative is to use two layers of a gray or white vinyl shower-curtain liner.

Supplies, Continued 5. Inexpensive (e.g., Huygens, Kellner, Plössl) all-metal-and-glass telescope eyepiece, 1.25-inch barrel, focal length ~5 to ~25 mm (tips on choosing the optimum focal length follow on subsequent pages). Use one that you already have lying around, as long as it has no plastic in it, which would melt or catch fire. If you don’t have one, they’re available from numerous manufacturers and dealers — just type “telescope eyepieces” into any internet search engine, and you’ll find many to choose from. Another good source is Surplus Shed.
Tools 6. Flat-head screwdriver
7. Small hacksaw
8. Medium- to fine-grit sandpaper
9. 12-inch ruler
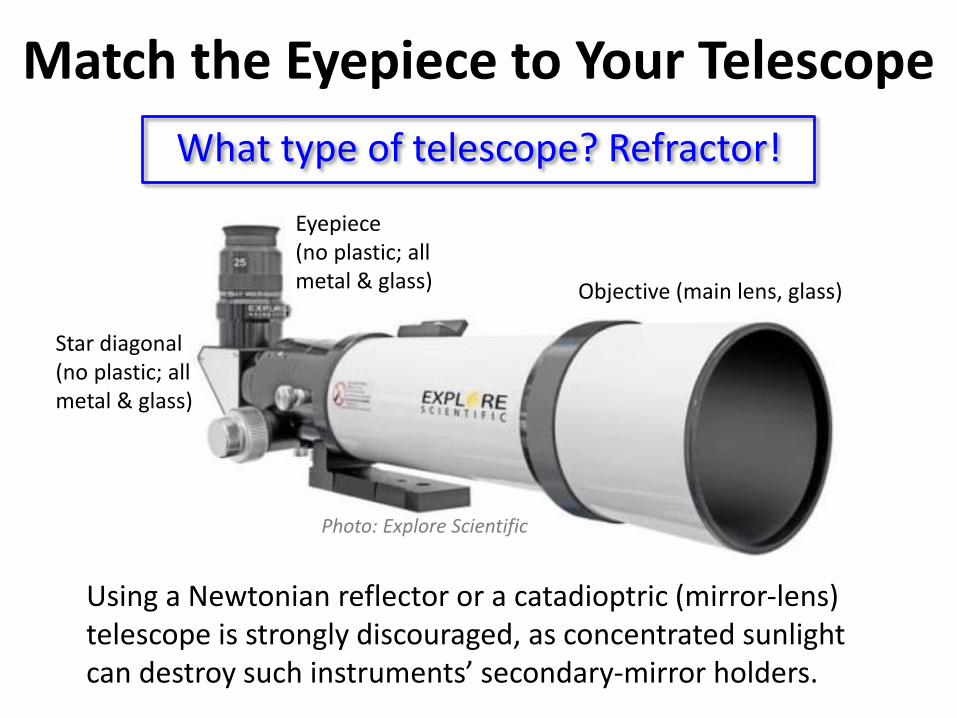
Match the Eyepiece to Your Telescope
What type of telescope? Refractor!
Eyepiece (no plastic; all metal & glass)
Using a Newtonian reflector or a catadioptric (mirror-lens) telescope is strongly discouraged, as concentrated sunlight can destroy such instruments’ secondary-mirror holders.
Objective (main lens, glass)
Photo: Explore Scientific
Star diagonal (no plastic; all metal & glass)
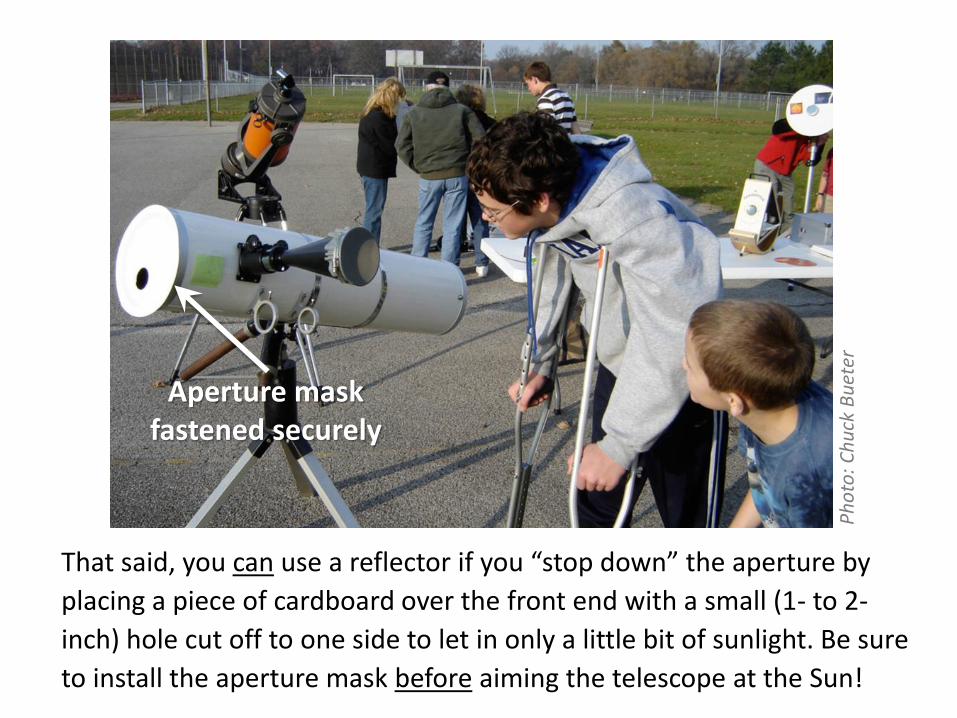
That said, you can use a reflector if you “stop down” the aperture by
placing a piece of cardboard over the front end with a small (1- to 2-
inch) hole cut off to one side to let in only a little bit of sunlight. Be sure
to install the aperture mask before aiming the telescope at the Sun!
Aperture mask fastened securely
Ph
oto
: C
hu
ck B
uet
er
Focal length (f)
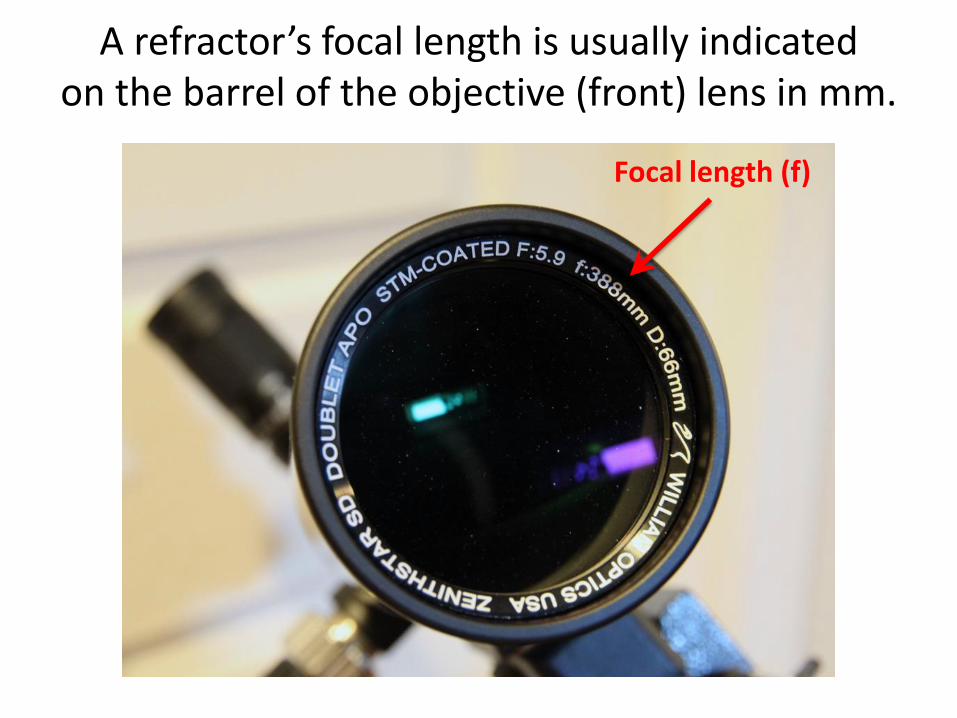
A refractor’s focal length is usually indicated on the barrel of the objective (front) lens in mm.

Or, you can calculate the focal length of your telescope from its diameter (D) and focal ratio (f/ratio or f/number):
FLtelescope = Dtelescope × f/ratio
Example: For the 66-mm f/5.9 refractor shown on the previous page, FLtelescope = 66 mm × 5.9 = 389 mm (close enough; round-off error!)
Best eyepiece for a full-disk (~100 mm diameter) solar image:
FLeyepiece (mm) ≈ FLtelescope (mm) ÷ 43
(The derivation of this formula appears later in this document.)
Example: For the Galileoscope, a 50-mm f/10 refractor (FLtelescope = 500 mm), the eyepiece that will produce a full-disk solar image has a focal length of FLeyepiece = 500 ÷ 43 = 11.6 mm. There are many inexpensive 12.5-mm eyepieces available; any would make a good choice.
An eyepiece with a shorter focal length will produce a larger Sun image; an eyepiece with a longer focal length will produce a smaller Sun image.
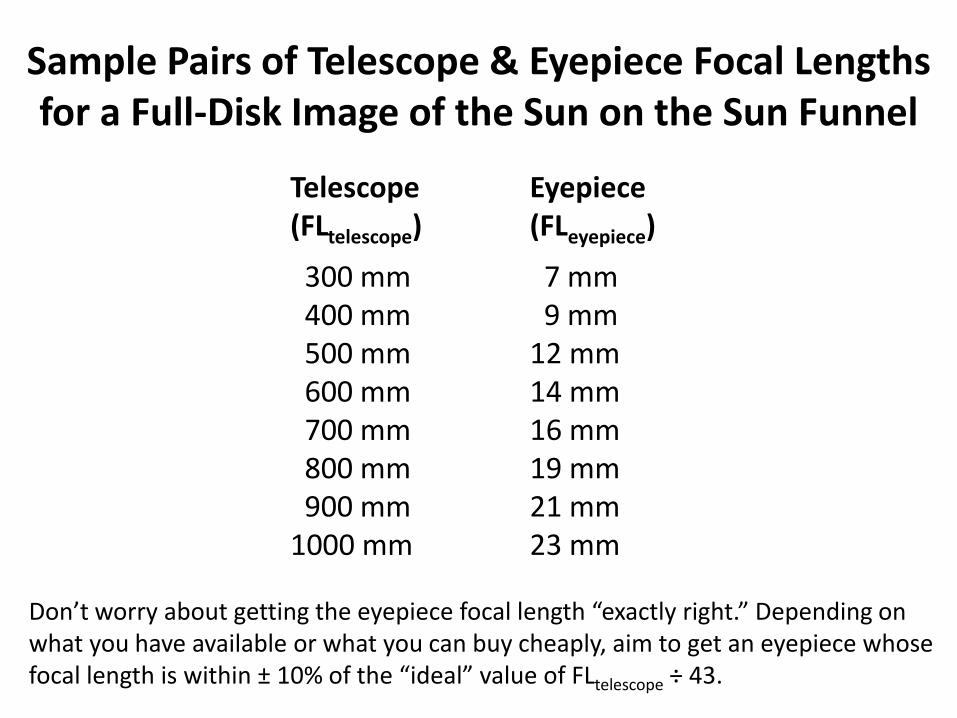
Telescope Eyepiece (FLtelescope) (FLeyepiece)
300 mm 7 mm 400 mm 9 mm 500 mm 12 mm 600 mm 14 mm 700 mm 16 mm 800 mm 19 mm 900 mm 21 mm 1000 mm 23 mm
Sample Pairs of Telescope & Eyepiece Focal Lengths for a Full-Disk Image of the Sun on the Sun Funnel
Don’t worry about getting the eyepiece focal length “exactly right.” Depending on what you have available or what you can buy cheaply, aim to get an eyepiece whose focal length is within ± 10% of the “ideal” value of FLtelescope ÷ 43.
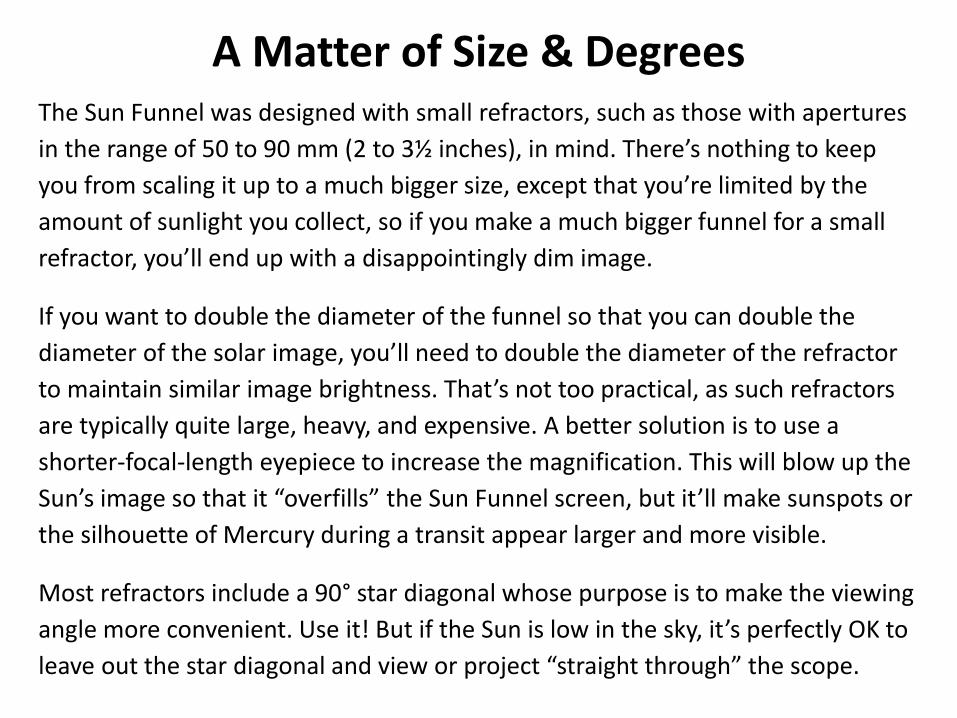
The Sun Funnel was designed with small refractors, such as those with apertures
in the range of 50 to 90 mm (2 to 3½ inches), in mind. There’s nothing to keep
you from scaling it up to a much bigger size, except that you’re limited by the
amount of sunlight you collect, so if you make a much bigger funnel for a small
refractor, you’ll end up with a disappointingly dim image.
If you want to double the diameter of the funnel so that you can double the
diameter of the solar image, you’ll need to double the diameter of the refractor
to maintain similar image brightness. That’s not too practical, as such refractors
are typically quite large, heavy, and expensive. A better solution is to use a
shorter-focal-length eyepiece to increase the magnification. This will blow up the
Sun’s image so that it “overfills” the Sun Funnel screen, but it’ll make sunspots or
the silhouette of Mercury during a transit appear larger and more visible.
Most refractors include a 90° star diagonal whose purpose is to make the viewing
angle more convenient. Use it! But if the Sun is low in the sky, it’s perfectly OK to
leave out the star diagonal and view or project “straight through” the scope.
A Matter of Size & Degrees
OK, now that we have all our supplies and tools,
including a suitable eyepiece, let’s build a Sun Funnel!
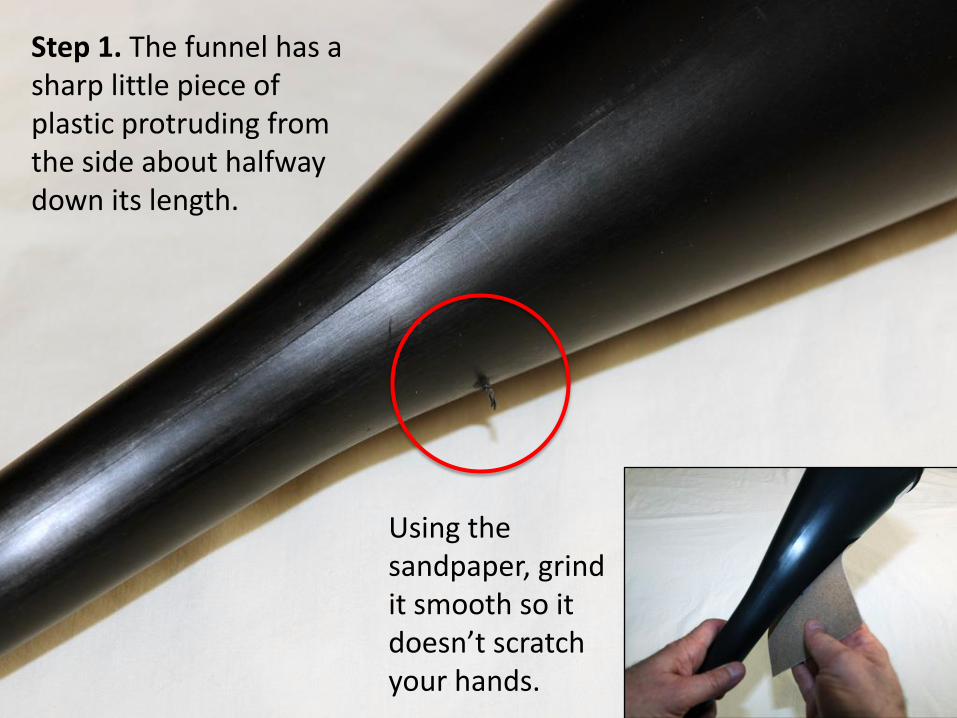
Step 1. The funnel has a sharp little piece of plastic protruding from the side about halfway down its length.
Using the sandpaper, grind it smooth so it doesn’t scratch your hands.
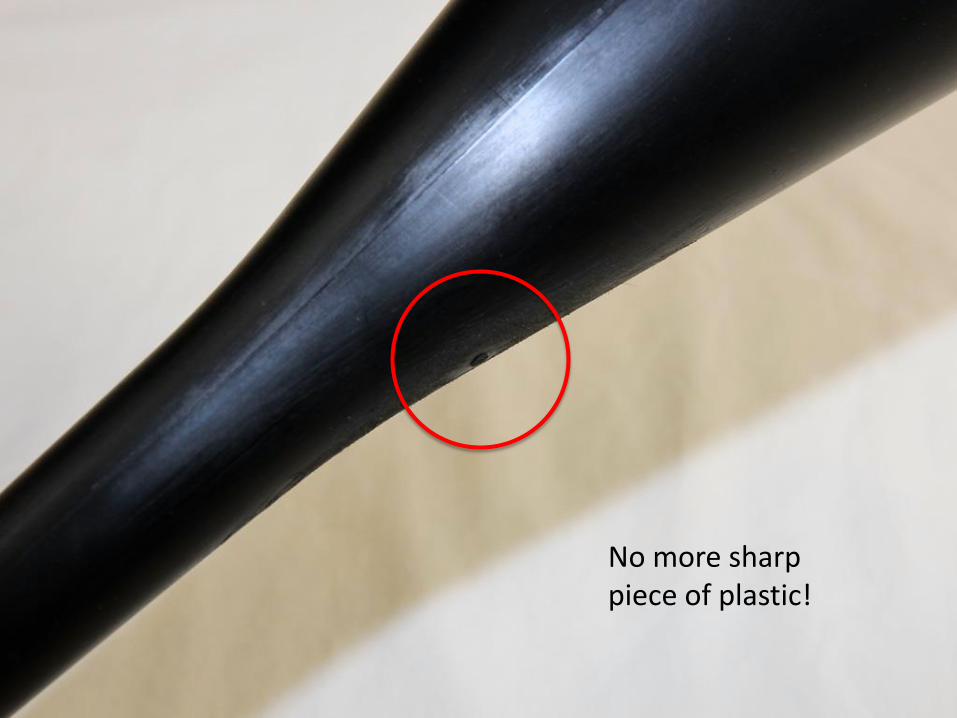
No more sharp piece of plastic!
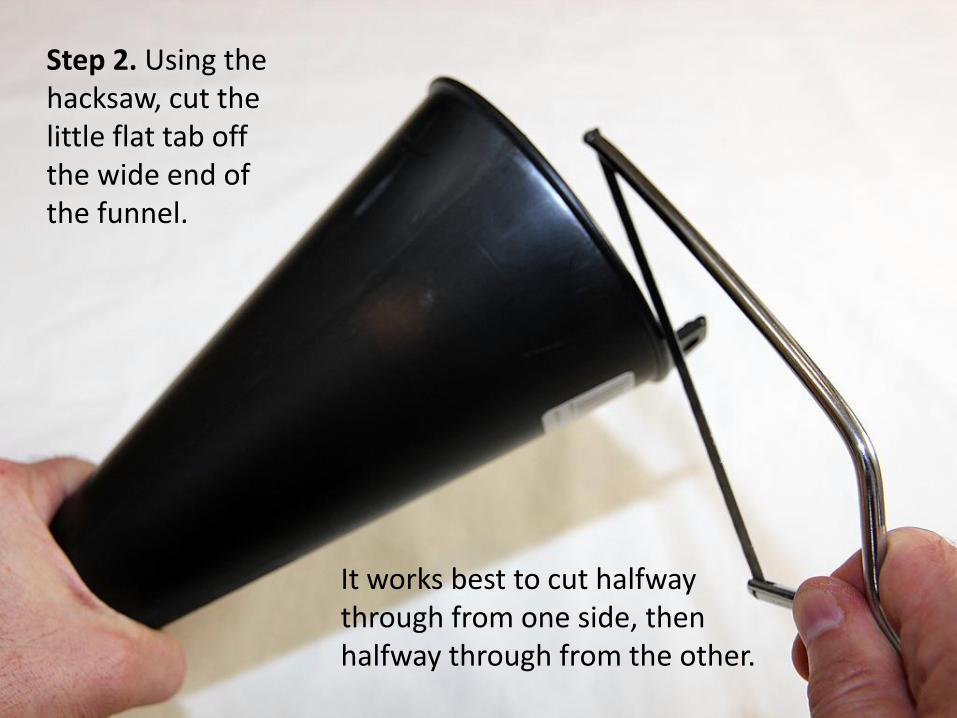
Step 2. Using the hacksaw, cut the little flat tab off the wide end of the funnel.
It works best to cut halfway through from one side, then halfway through from the other.
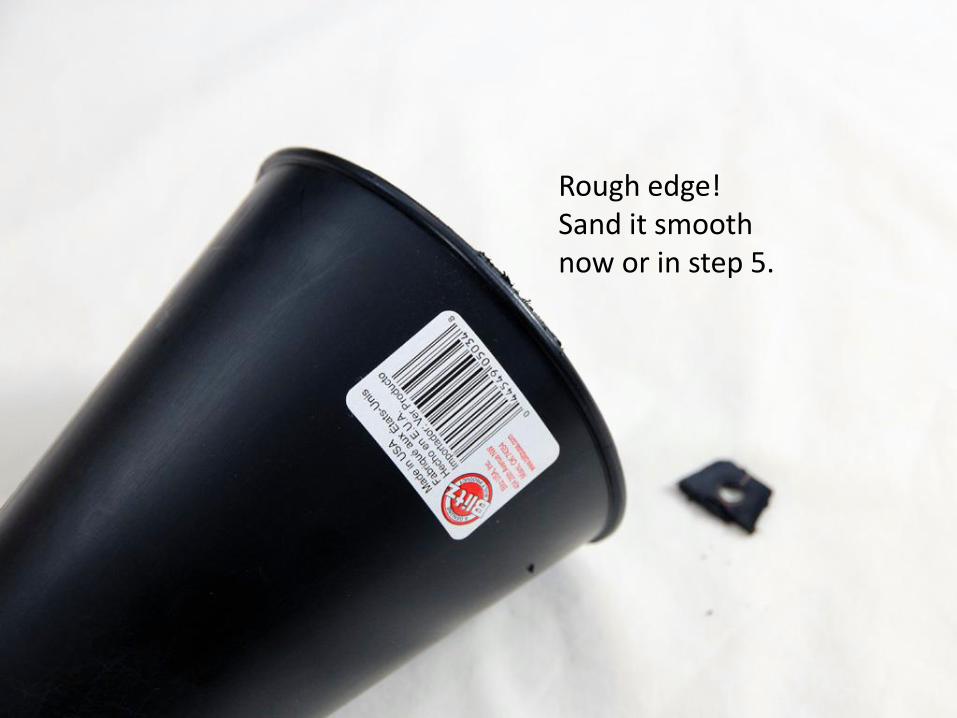
Rough edge! Sand it smooth now or in step 5.
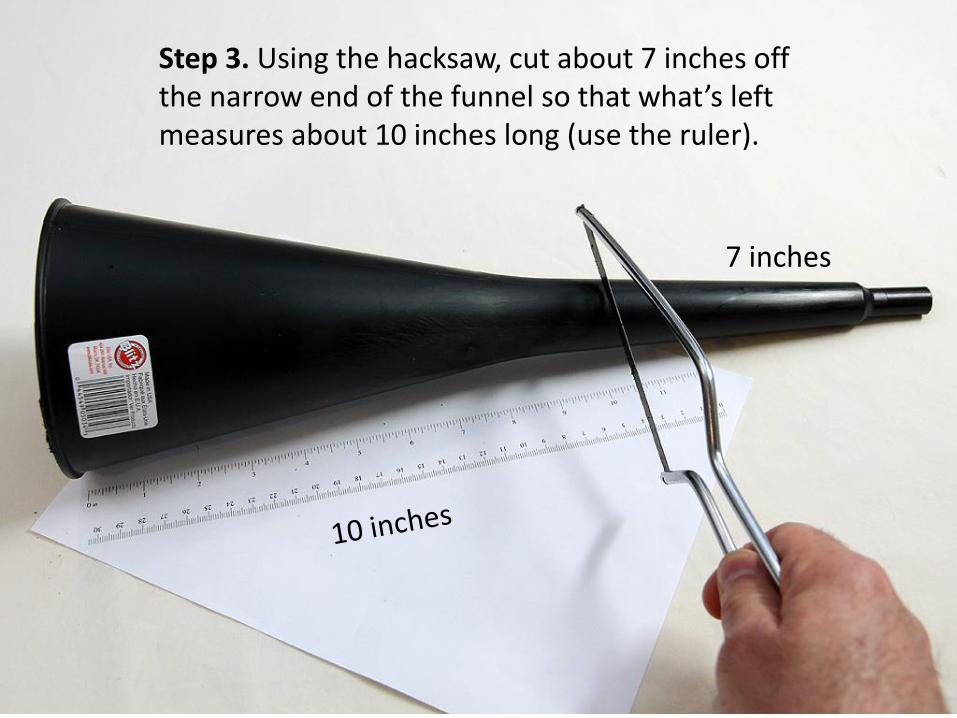
Step 3. Using the hacksaw, cut about 7 inches off the narrow end of the funnel so that what’s left measures about 10 inches long (use the ruler).
7 inches
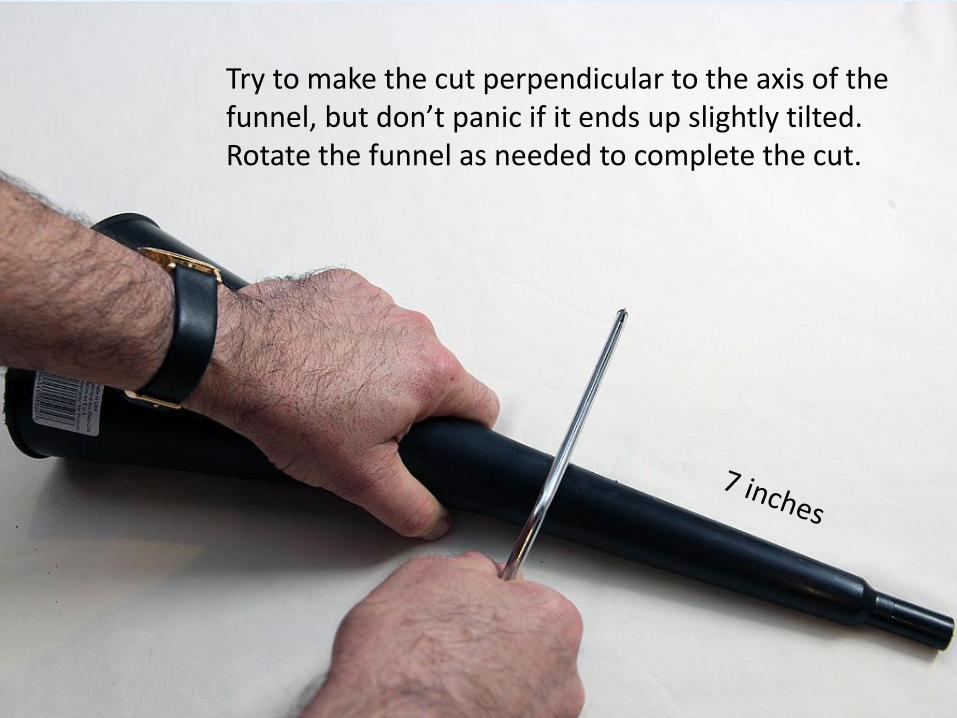
Try to make the cut perpendicular to the axis of the funnel, but don’t panic if it ends up slightly tilted. Rotate the funnel as needed to complete the cut.
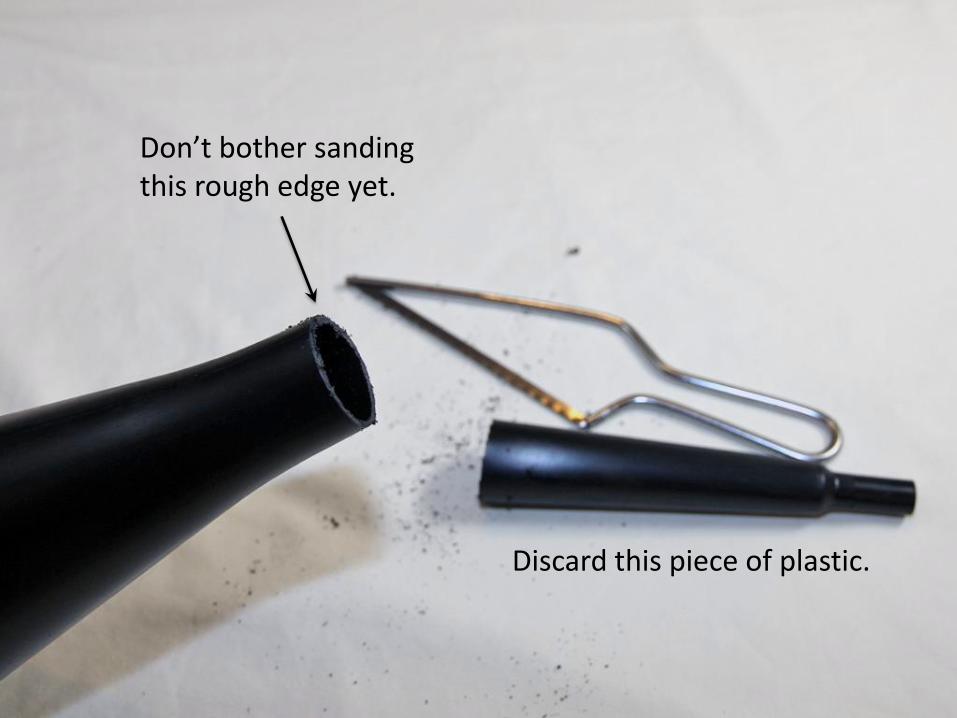
Don’t bother sanding this rough edge yet.
Discard this piece of plastic.
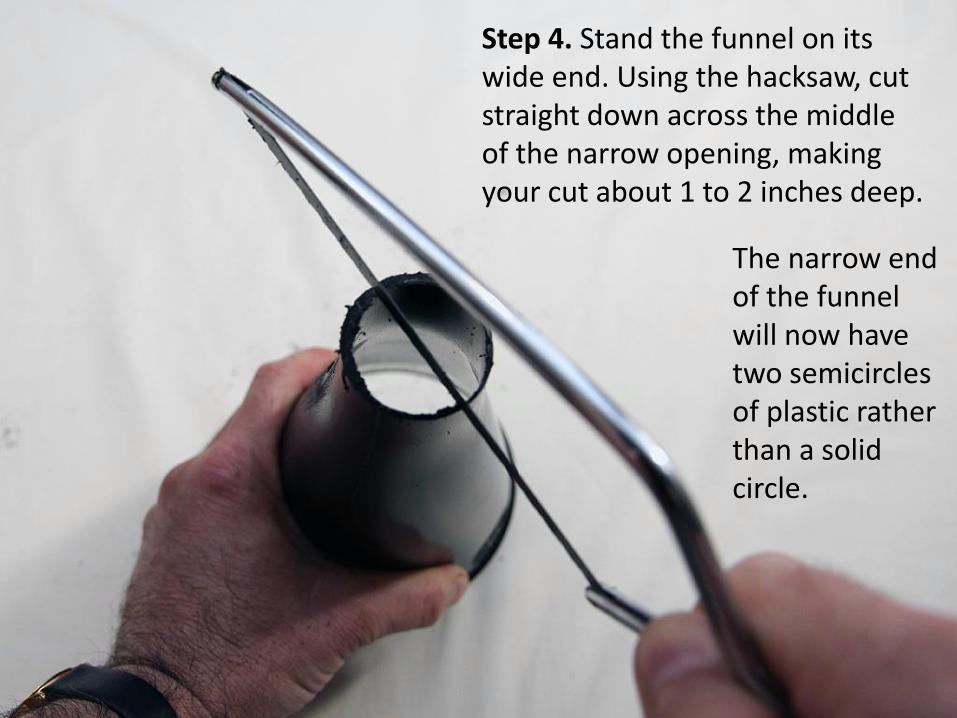
Step 4. Stand the funnel on its wide end. Using the hacksaw, cut straight down across the middle of the narrow opening, making your cut about 1 to 2 inches deep.
The narrow end of the funnel will now have two semicircles of plastic rather than a solid circle.
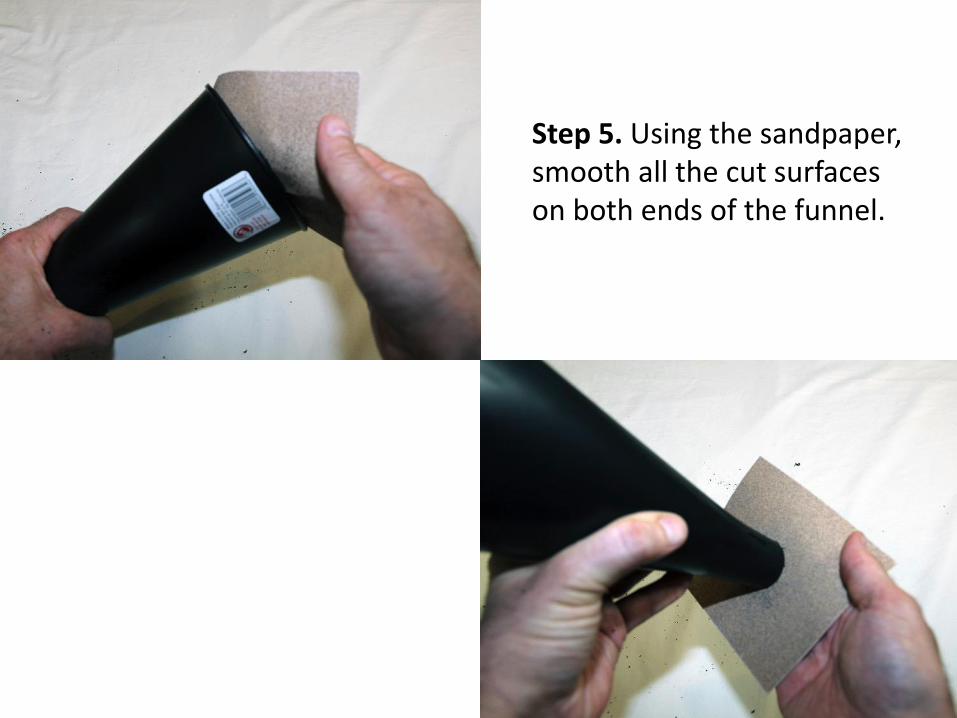
Step 5. Using the sandpaper, smooth all the cut surfaces on both ends of the funnel.
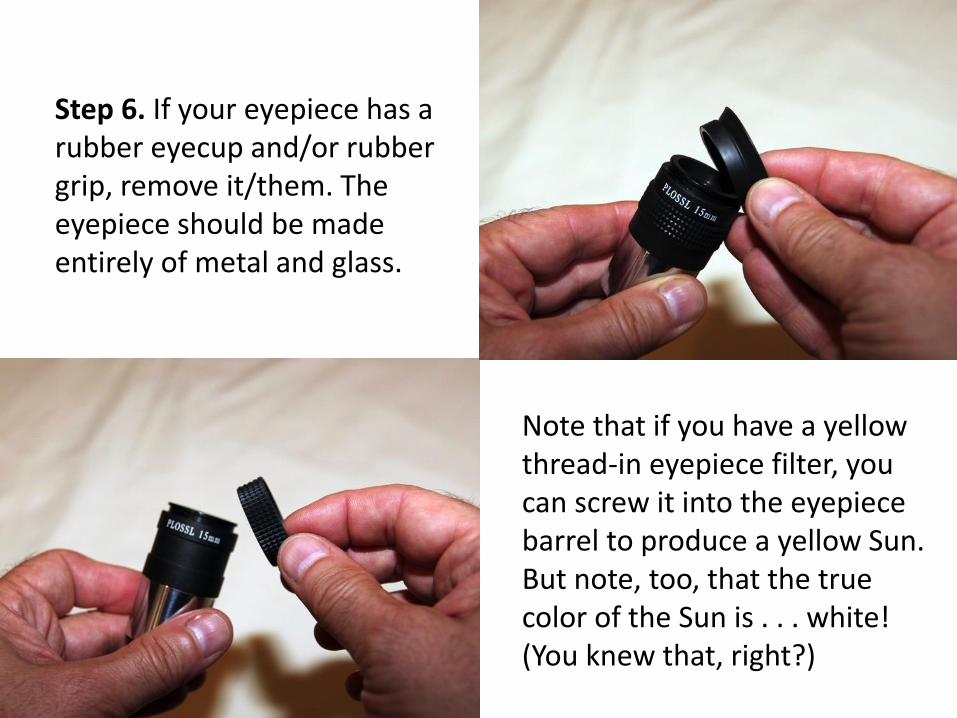
Step 6. If your eyepiece has a rubber eyecup and/or rubber grip, remove it/them. The eyepiece should be made entirely of metal and glass.
Note that if you have a yellow thread-in eyepiece filter, you can screw it into the eyepiece barrel to produce a yellow Sun. But note, too, that the true color of the Sun is . . . white! (You knew that, right?)
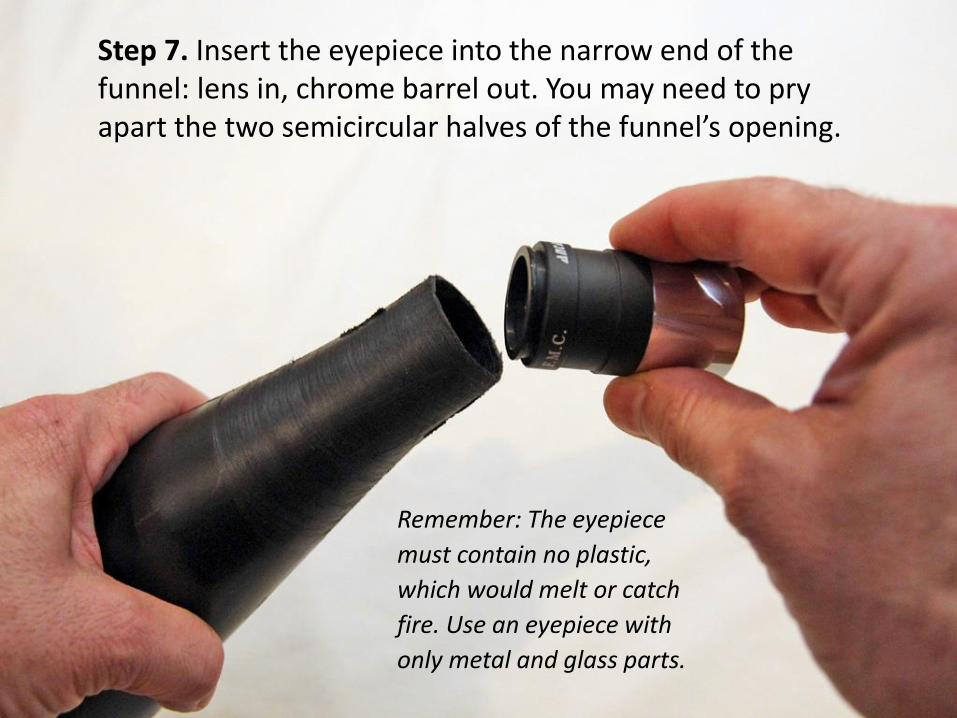
Step 7. Insert the eyepiece into the narrow end of the funnel: lens in, chrome barrel out. You may need to pry apart the two semicircular halves of the funnel’s opening.
Remember: The eyepiece
must contain no plastic,
which would melt or catch
fire. Use an eyepiece with
only metal and glass parts.

If the eyepiece still won’t go in, cut away a little more of the funnel to widen the opening, then try again.
Aim to get at least a half inch of the length of the eyepiece into the funnel.
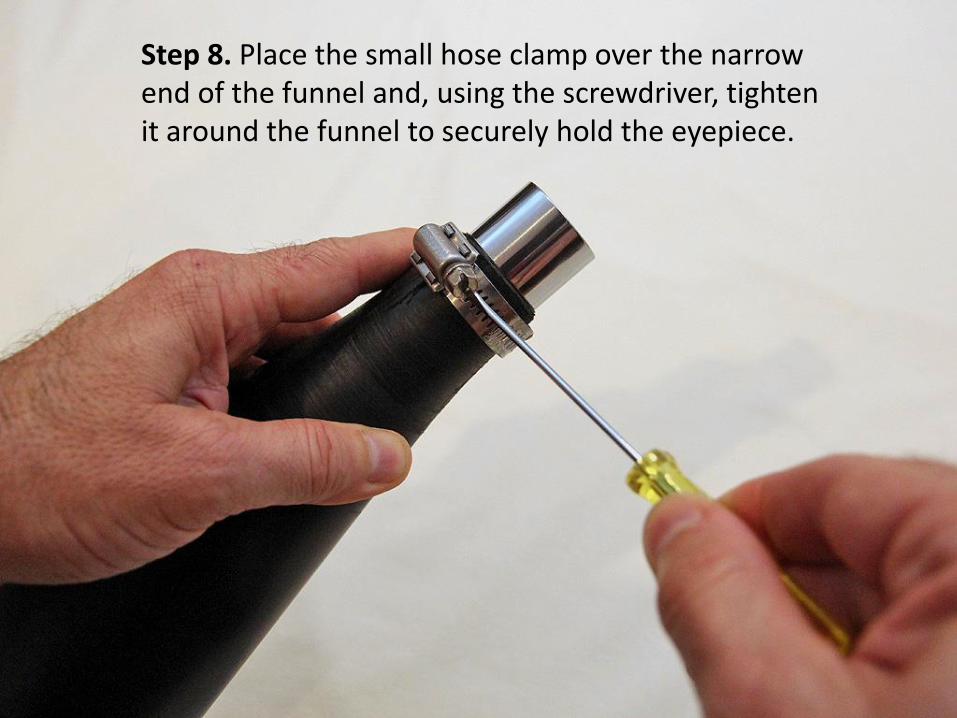
Step 8. Place the small hose clamp over the narrow end of the funnel and, using the screwdriver, tighten it around the funnel to securely hold the eyepiece.
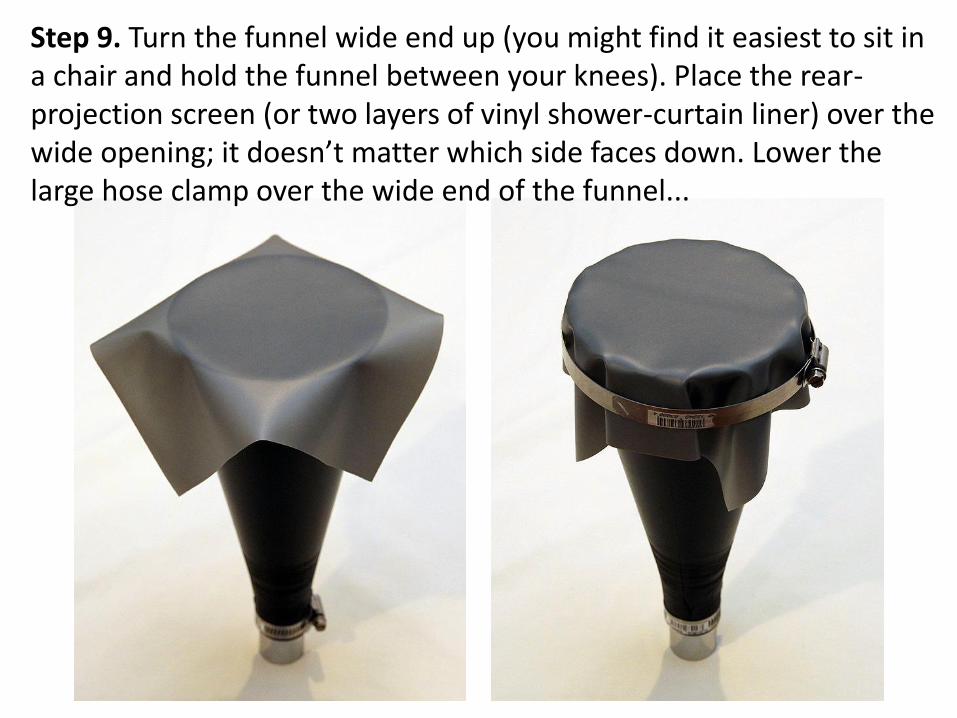
Step 9. Turn the funnel wide end up (you might find it easiest to sit in a chair and hold the funnel between your knees). Place the rear-projection screen (or two layers of vinyl shower-curtain liner) over the wide opening; it doesn’t matter which side faces down. Lower the large hose clamp over the wide end of the funnel...
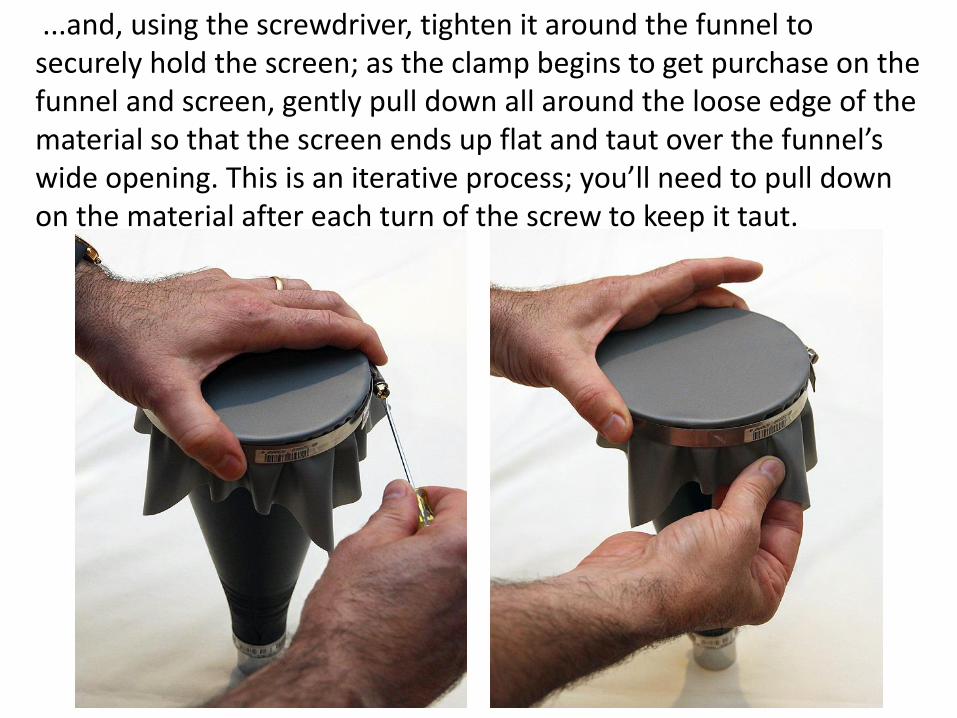
...and, using the screwdriver, tighten it around the funnel to securely hold the screen; as the clamp begins to get purchase on the funnel and screen, gently pull down all around the loose edge of the material so that the screen ends up flat and taut over the funnel’s wide opening. This is an iterative process; you’ll need to pull down on the material after each turn of the screw to keep it taut.
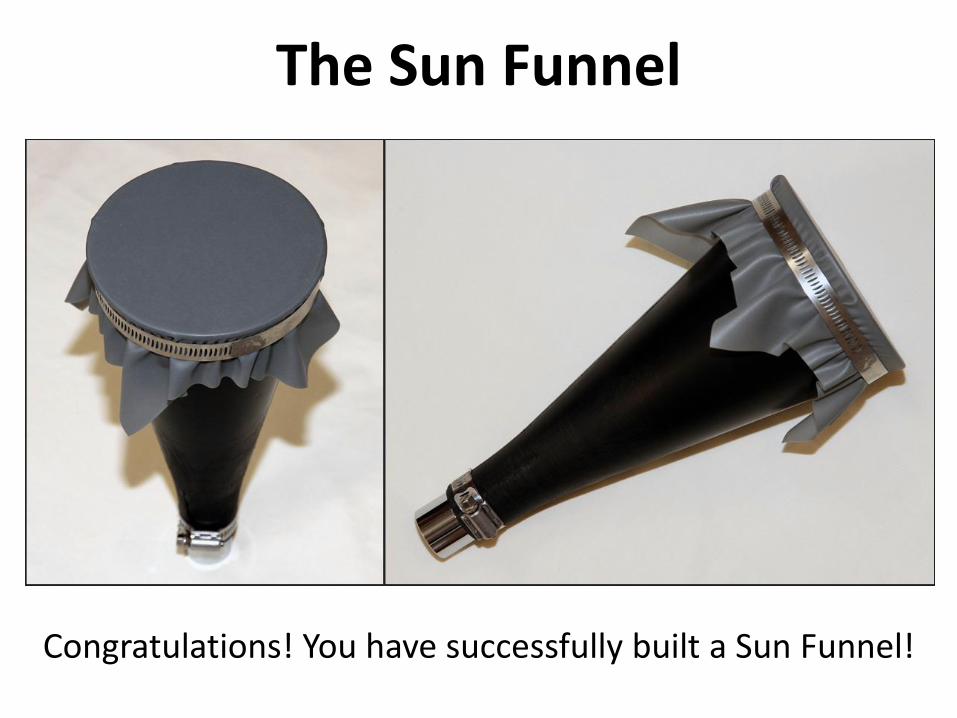
The Sun Funnel
Congratulations! You have successfully built a Sun Funnel!

Step 10. Inspect your Sun Funnel to make sure there are no holes in the projection screen. It is important to do this each and every time you go to use your Sun Funnel. If you find any holes or deep scratches, you will need to replace the projection screen. Step 11. Remove or cover your telescope’s finder scope or red-dot finder, if any. Bright sunlight entering a finder scope will quickly melt its crosshairs and could burn anyone or anything positioned behind it. If you cover rather than remove your finder scope or red-dot finder, make sure the cover is secure against wind and the prying fingers of small children.
Prepare Your Sun Funnel & Telescope for Use
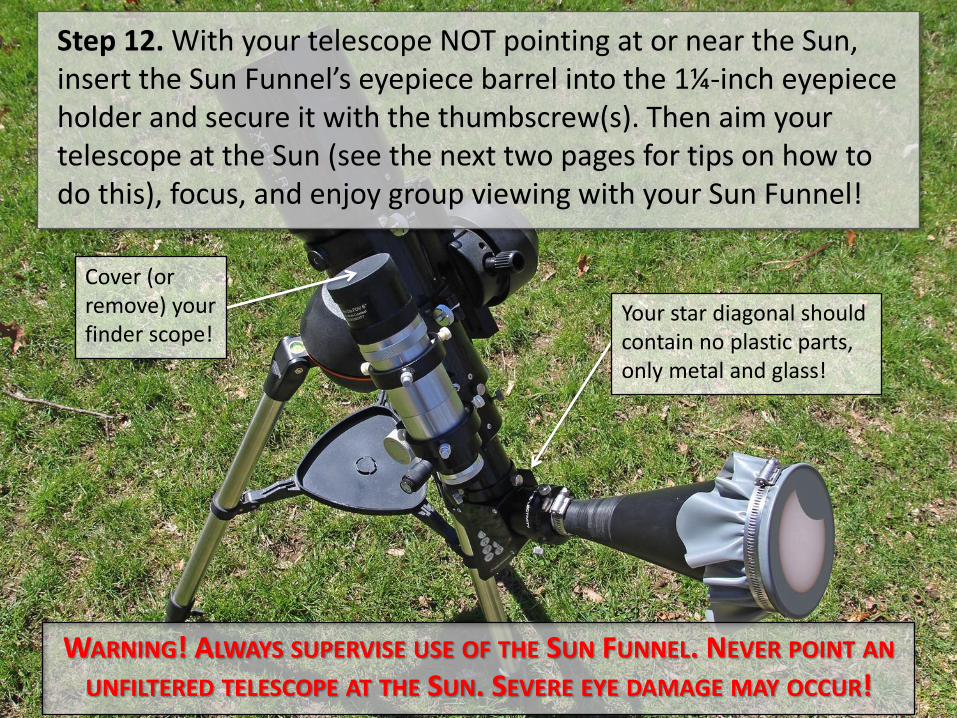
Step 12. With your telescope NOT pointing at or near the Sun, insert the Sun Funnel’s eyepiece barrel into the 1¼-inch eyepiece holder and secure it with the thumbscrew(s). Then aim your telescope at the Sun (see the next two pages for tips on how to do this), focus, and enjoy group viewing with your Sun Funnel!
WARNING! ALWAYS SUPERVISE USE OF THE SUN FUNNEL. NEVER POINT AN UNFILTERED TELESCOPE AT THE SUN. SEVERE EYE DAMAGE MAY OCCUR!
Cover (or remove) your finder scope!
Your star diagonal should contain no plastic parts, only metal and glass!
How to Aim a Telescope at the Sun How do you aim a telescope at the Sun when you’re not supposed to look through it, and when you’re supposed to remove or cover your finder so that you don’t look through that either?! One solution is to watch your telescope’s shadow on the ground and adjust the aim until the tube’s shadow is as small and as round as you can get it. Another solution is to add a special-purpose Sun finder that projects a shadow or a spot of sunlight onto a target. There are several commercial units available, including these:
• Far Laboratories Helio Pod • Tele Vue Sol-Searcher • Meade Coronado Sol Ranger
Yet another solution is to make something yourself based on the design of one of these products. See the next page for an example.
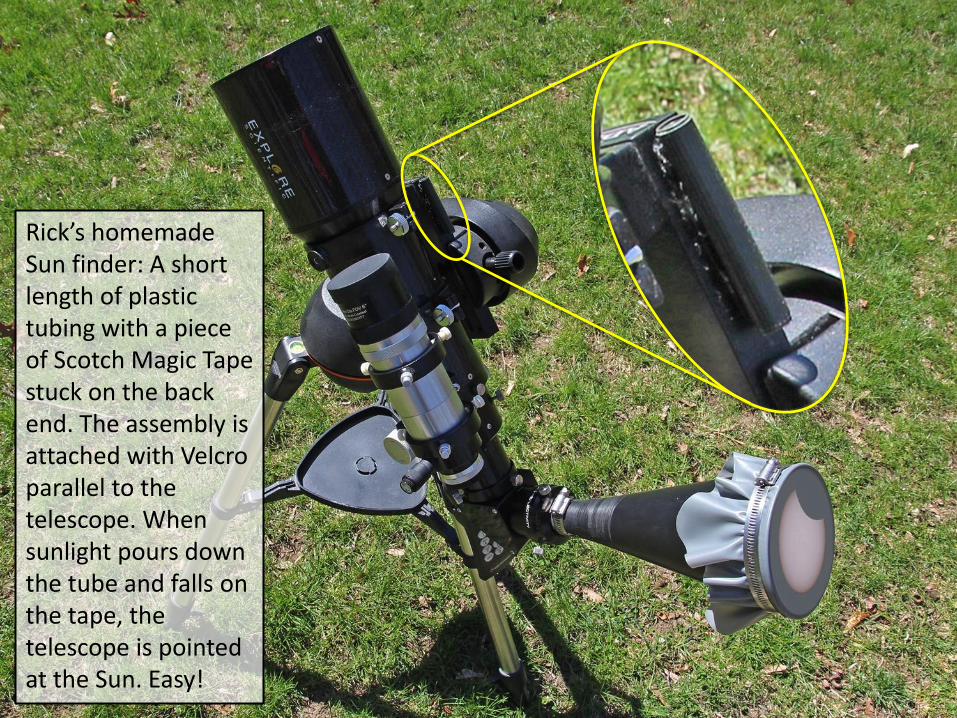
Rick’s homemade Sun finder: A short length of plastic tubing with a piece of Scotch Magic Tape stuck on the back end. The assembly is attached with Velcro parallel to the telescope. When sunlight pours down the tube and falls on the tape, the telescope is pointed at the Sun. Easy!
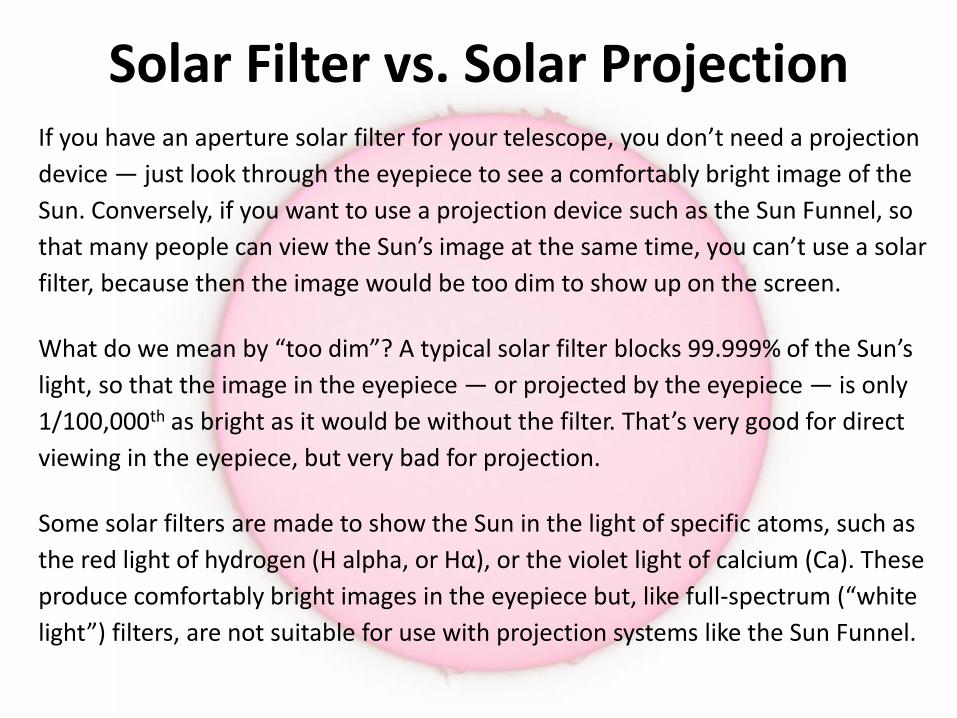
Solar Filter vs. Solar Projection If you have an aperture solar filter for your telescope, you don’t need a projection
device — just look through the eyepiece to see a comfortably bright image of the
Sun. Conversely, if you want to use a projection device such as the Sun Funnel, so
that many people can view the Sun’s image at the same time, you can’t use a solar
filter, because then the image would be too dim to show up on the screen.
What do we mean by “too dim”? A typical solar filter blocks 99.999% of the Sun’s
light, so that the image in the eyepiece — or projected by the eyepiece — is only
1/100,000th as bright as it would be without the filter. That’s very good for direct
viewing in the eyepiece, but very bad for projection.
Some solar filters are made to show the Sun in the light of specific atoms, such as
the red light of hydrogen (H alpha, or Hα), or the violet light of calcium (Ca). These
produce comfortably bright images in the eyepiece but, like full-spectrum (“white
light”) filters, are not suitable for use with projection systems like the Sun Funnel.
Sun Funnel Safety The key to successful solar projection, including use of the Sun Funnel, is to use the right kind of telescope — one that can tolerate having full-strength sunlight pass through the optical train — and to use an eyepiece that doesn’t have any plastic in it. We’ll say it again: We recommend using a refractor (a telescope with a front lens) — not a reflector (unless you stop it down to a 1- or 2-inch aperture), and never a mirror-lens telescope — with a decent-quality commercial eyepiece. Always take the utmost care when passing unfiltered sunlight through any optics, as you’ll do when using the Sun Funnel or any other projection device. If you see or smell smoke, your equipment is unsuitable or set up incorrectly — get it out of the Sun immediately! Do your solar observing in short stints. Don’t leave a telescope pointed at the Sun — or even sitting out in the Sun pointed elsewhere — for hours at a time. And, as noted earlier, never leave a solar-observing setup unattended. When you’re finished with an observing session, aim your telescope away from the Sun before removing the Sun Funnel.
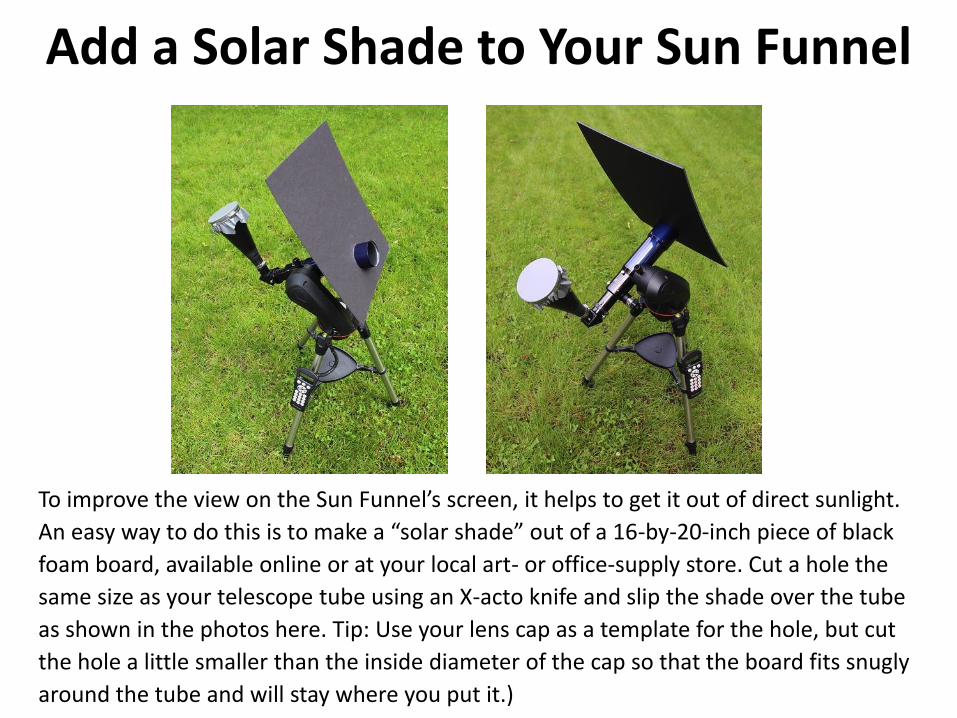
Add a Solar Shade to Your Sun Funnel
To improve the view on the Sun Funnel’s screen, it helps to get it out of direct sunlight.
An easy way to do this is to make a “solar shade” out of a 16-by-20-inch piece of black
foam board, available online or at your local art- or office-supply store. Cut a hole the
same size as your telescope tube using an X-acto knife and slip the shade over the tube
as shown in the photos here. Tip: Use your lens cap as a template for the hole, but cut
the hole a little smaller than the inside diameter of the cap so that the board fits snugly
around the tube and will stay where you put it.)
Why Observe the Sun? With either an aperture filter or a projection system, there are all sorts of
interesting things to see on the Sun, including these:
Sunspots. The Sun has an 11-year magnetic-activity cycle marked by sunspots,
dark blotches that are cooler and therefore dimmer than their surroundings.
There are generally more sunspots at the peak of the cycle, called solar maximum,
and fewer at solar minimum. The last maximum was in 2014, and the next will
occur around 2025. Big sunspots have a dark inner part, the umbra, and a lighter
outer part, the penumbra, and these can take on many different shapes and sizes.
Solar rotation. If you observe the Sun from day to day, you’ll note that its rotation
carries sunspots about 15° east each day. Because the Sun spins once about every
25 days, it takes less than two weeks for new spots to appear on the western limb
(edge), march across the Sun’s face, and disappear around the eastern limb.
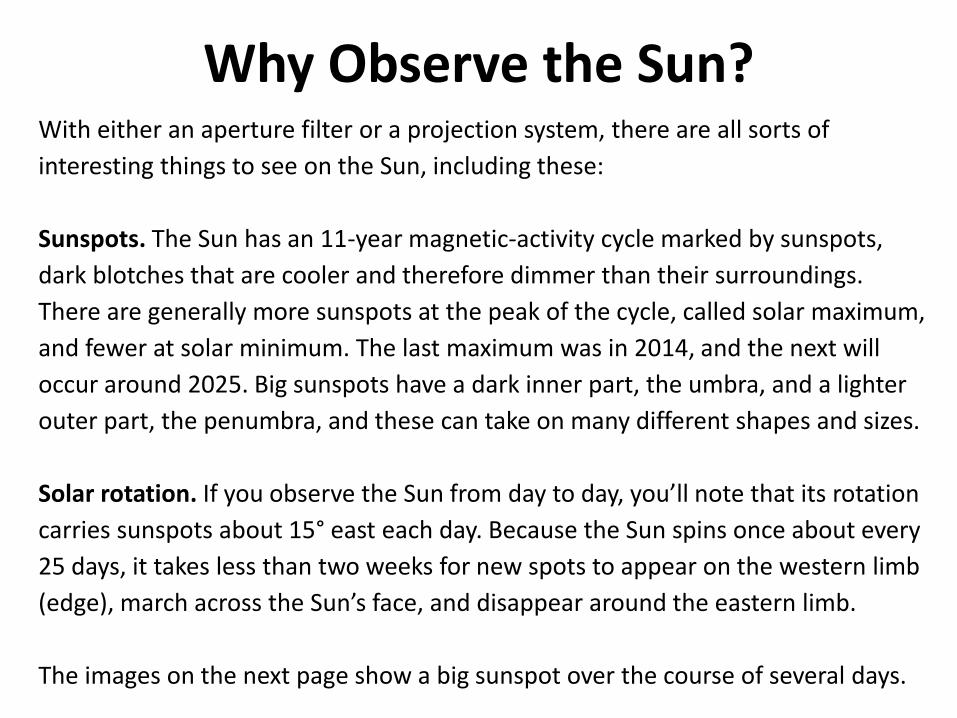
The images on the next page show a big sunspot over the course of several days.
Sunspot,
April 13, 2016
Umbra
Penumbra
Two days later (April 15)
Two days later (April 17)
Limb darkening. The outer parts of the Sun’s disk, toward the limb (edge), look
darker than the center. The Sun is a ball of hot gas, so it doesn’t have a hard
surface like a planet or moon. When you look toward the center of the disk, your
gaze penetrates to deeper, hotter layers. When you look toward the edge, you’re
looking through higher, cooler layers, which aren’t quite as bright.
Planets in transit. Occasionally one of the inner planets, Venus or Mercury,
crosses in front of the Sun as seen from Earth. This is called a transit, and when it
happens, you can see the planet in silhouette moving across the Sun’s face over
several hours. Venus transited the Sun on June 8, 2004, and June 6, 2012, but it
won’t do so again until December 11, 2117, so if you missed the last two, you’re
out of luck. Transits of Mercury are more frequent; recent and upcoming transits
of Mercury include November 8, 2006; May 9, 2016; Nov. 11, 2019; Nov. 13, 2032.
To find out when transits of Mercury occur, and from where in the world a given
transit is visible. *For commercial products, please visit an local or online store to
purchase.
Why Observe the Sun, Continued
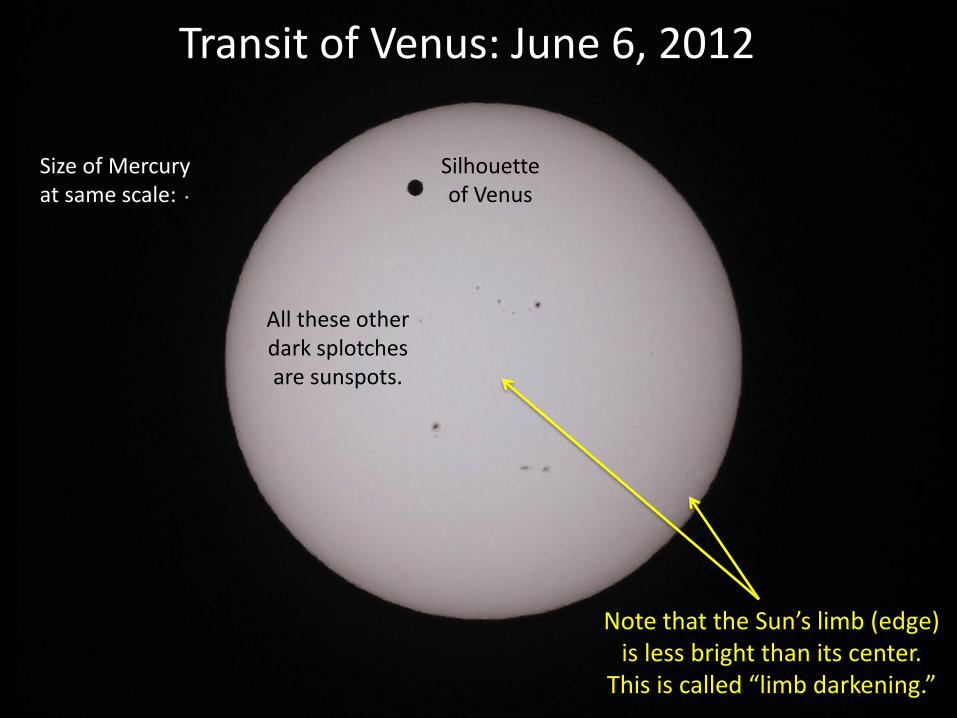
Transit of Venus: June 6, 2012
Silhouette of Venus
Note that the Sun’s limb (edge) is less bright than its center.
This is called “limb darkening.”
Size of Mercury at same scale:
All these other dark splotches are sunspots.
Partial solar eclipses. A solar eclipse occurs when the Moon partially or totally
blocks the Sun. On Monday, August 21, 2017, a solar eclipse will be visible
(weather permitting) across all of North America. The whole continent will
experience a partial eclipse lasting 2 to 3 hours. Halfway through the event, anyone
within a ~65-mile-wide path from Oregon to South Carolina will experience a brief
total eclipse, when the Moon will completely block the Sun’s bright face for up to 2
minutes 40 seconds, turning day into night and making visible the spectacular
corona — the Sun’s ethereal outer atmosphere.
Looking directly at the Sun is safe during the brief total phase of a solar eclipse
(“totality”), when the Moon entirely blocks the Sun’s bright face. At all other times
you must follow the safety advice that appears throughout this document. The Sun
Funnel will be useless during totality; it is suitable only during the partial phases.
Why Observe the Sun, Continued
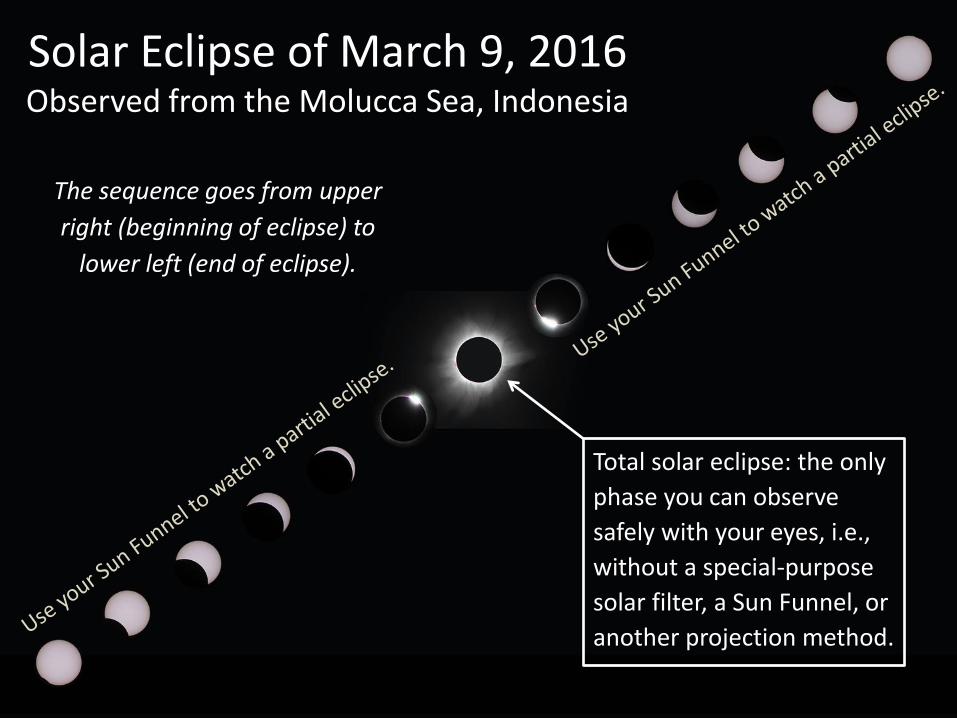
Solar Eclipse of March 9, 2016 Observed from the Molucca Sea, Indonesia
The sequence goes from upper
right (beginning of eclipse) to
lower left (end of eclipse).
Total solar eclipse: the only
phase you can observe
safely with your eyes, i.e.,
without a special-purpose
solar filter, a Sun Funnel, or
another projection method.
The Galileoscope is a fine telescope to use with the Sun Funnel. With some
250,000 of these inexpensive, high-quality telescopes in use around the
world, it would be a shame not to use them for public viewing, for example,
during the partial phases of the August 21, 2017, solar eclipse in the
Americas. But there are two problems: (1) the supplied eyepiece is plastic
and would melt if used for solar projection, and (2) the Galileoscope is
designed to be used “straight-through,” without a star diagonal, which
leaves the Sun Funnel’s screen awkwardly pointed at the ground.
To solve the first problem, note that the Galileoscope has a standard 1¼-
inch eyepiece holder, so it can use standard 1¼-inch metal eyepieces with
glass lenses, preferably one with an 11- to 12.5-mm focal length.
The Galileoscope & the Sun Funnel
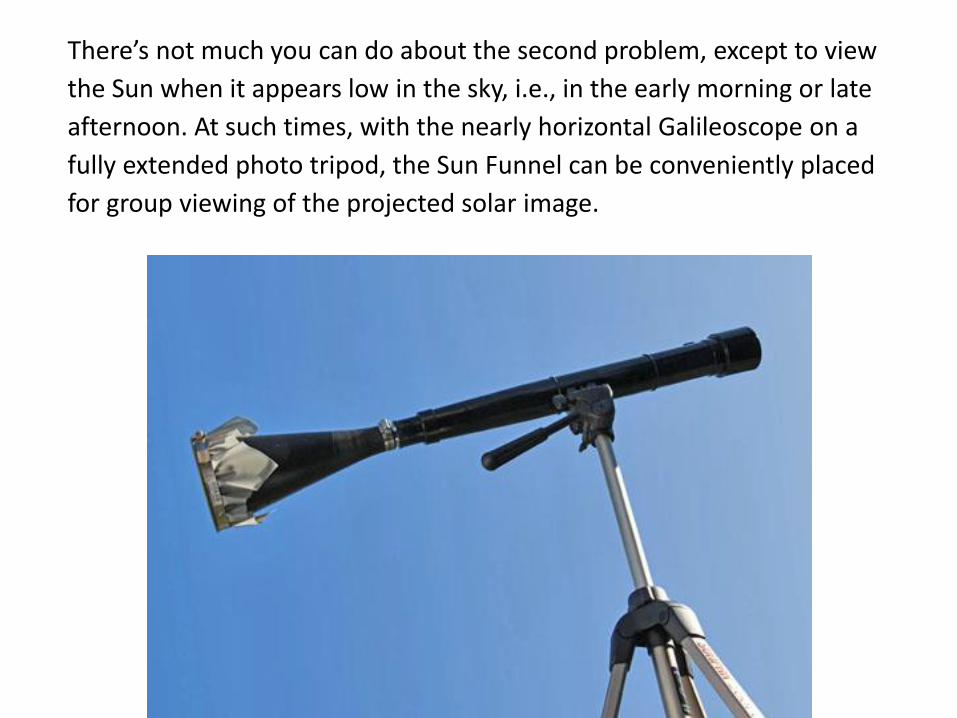
There’s not much you can do about the second problem, except to view
the Sun when it appears low in the sky, i.e., in the early morning or late
afternoon. At such times, with the nearly horizontal Galileoscope on a
fully extended photo tripod, the Sun Funnel can be conveniently placed
for group viewing of the projected solar image.
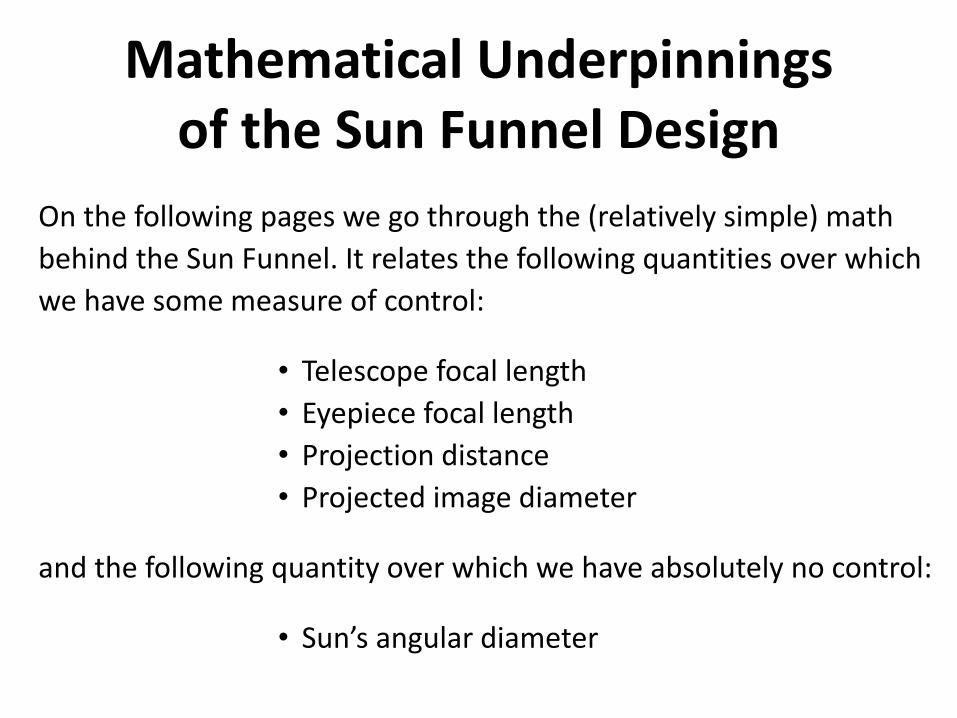
Mathematical Underpinnings of the Sun Funnel Design
On the following pages we go through the (relatively simple) math
behind the Sun Funnel. It relates the following quantities over which
we have some measure of control:
• Telescope focal length
• Eyepiece focal length
• Projection distance
• Projected image diameter
and the following quantity over which we have absolutely no control:
• Sun’s angular diameter
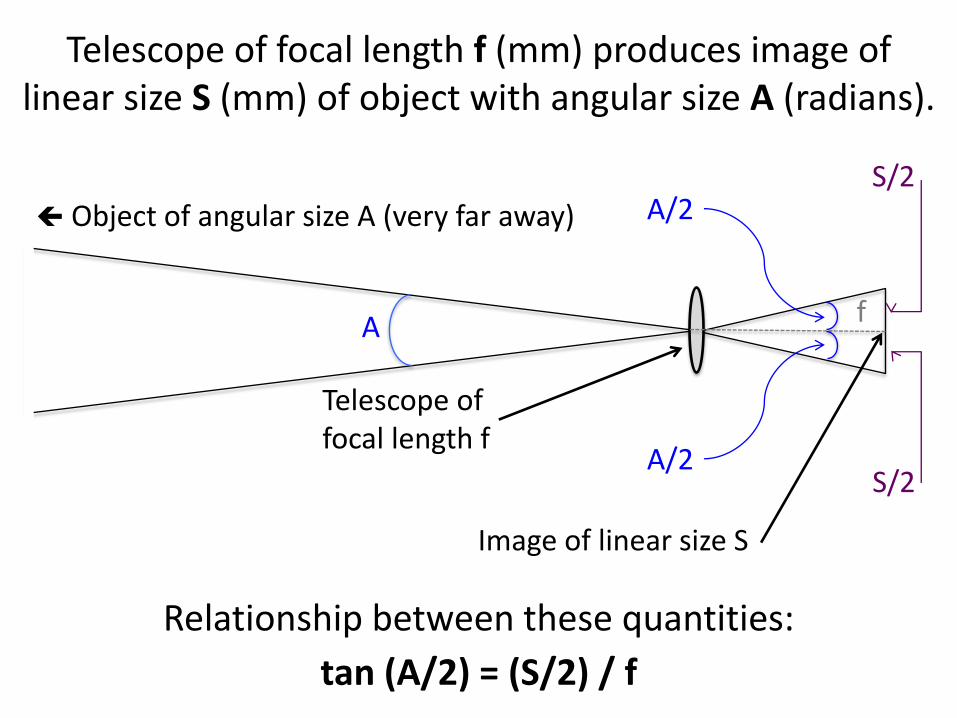
A
A/2
A/2 S/2
S/2 Object of angular size A (very far away)
Telescope of focal length f
Image of linear size S
f
Telescope of focal length f (mm) produces image of linear size S (mm) of object with angular size A (radians).
Relationship between these quantities:
tan (A/2) = (S/2) / f
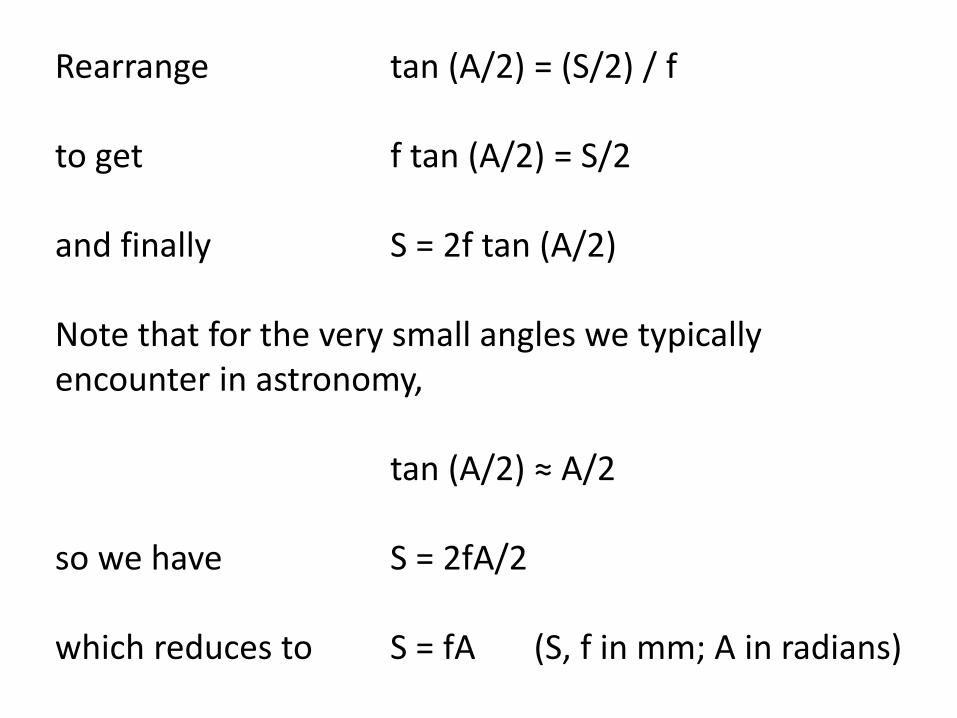
Rearrange tan (A/2) = (S/2) / f to get f tan (A/2) = S/2 and finally S = 2f tan (A/2) Note that for the very small angles we typically encounter in astronomy, tan (A/2) ≈ A/2 so we have S = 2fA/2 which reduces to S = fA (S, f in mm; A in radians)
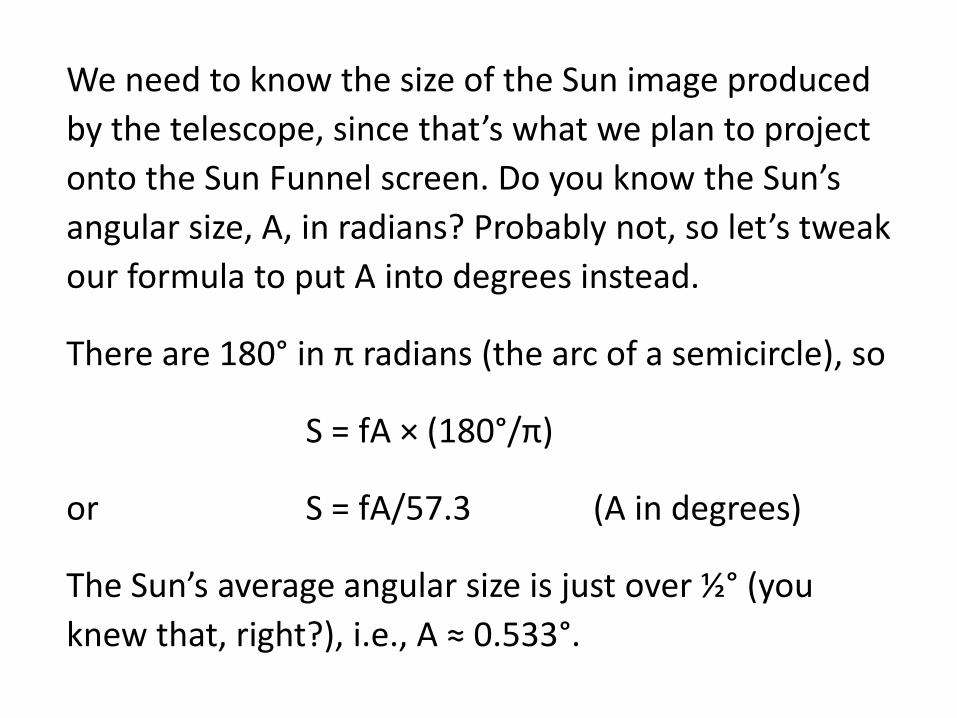
We need to know the size of the Sun image produced
by the telescope, since that’s what we plan to project
onto the Sun Funnel screen. Do you know the Sun’s
angular size, A, in radians? Probably not, so let’s tweak
our formula to put A into degrees instead.
There are 180° in π radians (the arc of a semicircle), so
S = fA × (180°/π)
or S = fA/57.3 (A in degrees)
The Sun’s average angular size is just over ½° (you
knew that, right?), i.e., A ≈ 0.533°.
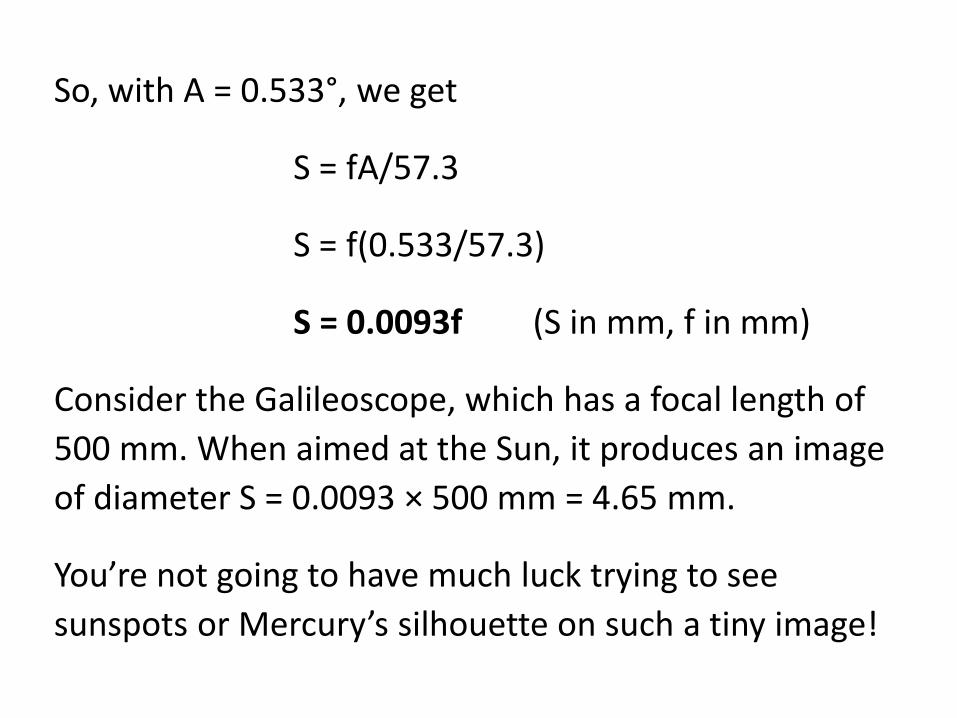
So, with A = 0.533°, we get
S = fA/57.3
S = f(0.533/57.3)
S = 0.0093f (S in mm, f in mm)
Consider the Galileoscope, which has a focal length of
500 mm. When aimed at the Sun, it produces an image
of diameter S = 0.0093 × 500 mm = 4.65 mm.
You’re not going to have much luck trying to see
sunspots or Mercury’s silhouette on such a tiny image!
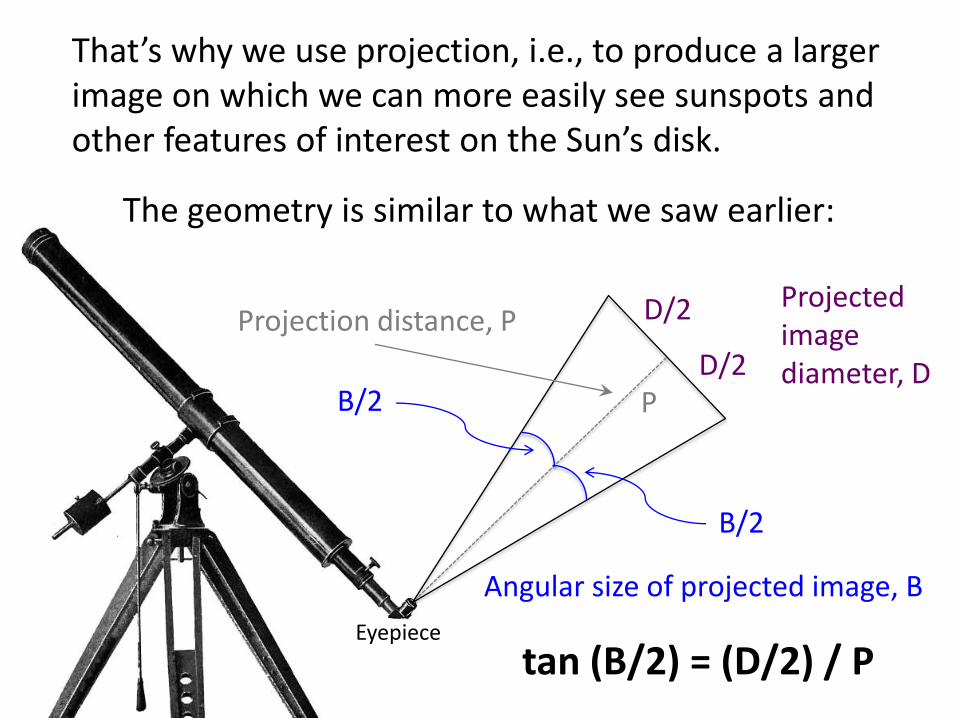
That’s why we use projection, i.e., to produce a larger image on which we can more easily see sunspots and other features of interest on the Sun’s disk.
The geometry is similar to what we saw earlier:
P
D/2
D/2 B/2
B/2
Projection distance, P Projected image diameter, D
Angular size of projected image, B
tan (B/2) = (D/2) / P Eyepiece
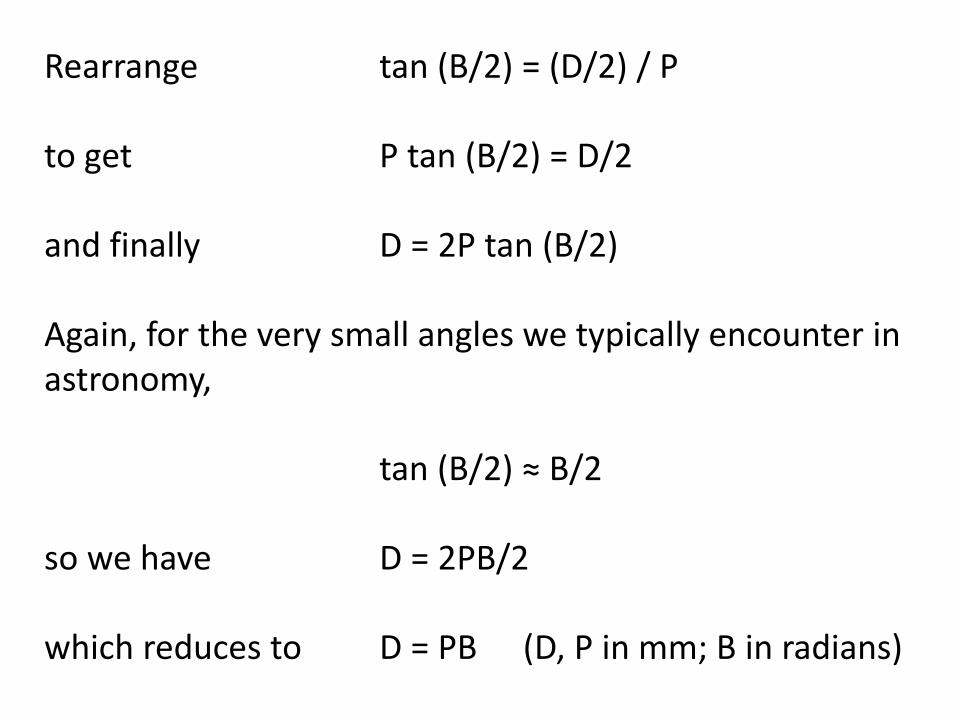
Rearrange tan (B/2) = (D/2) / P to get P tan (B/2) = D/2 and finally D = 2P tan (B/2) Again, for the very small angles we typically encounter in astronomy, tan (B/2) ≈ B/2 so we have D = 2PB/2 which reduces to D = PB (D, P in mm; B in radians)
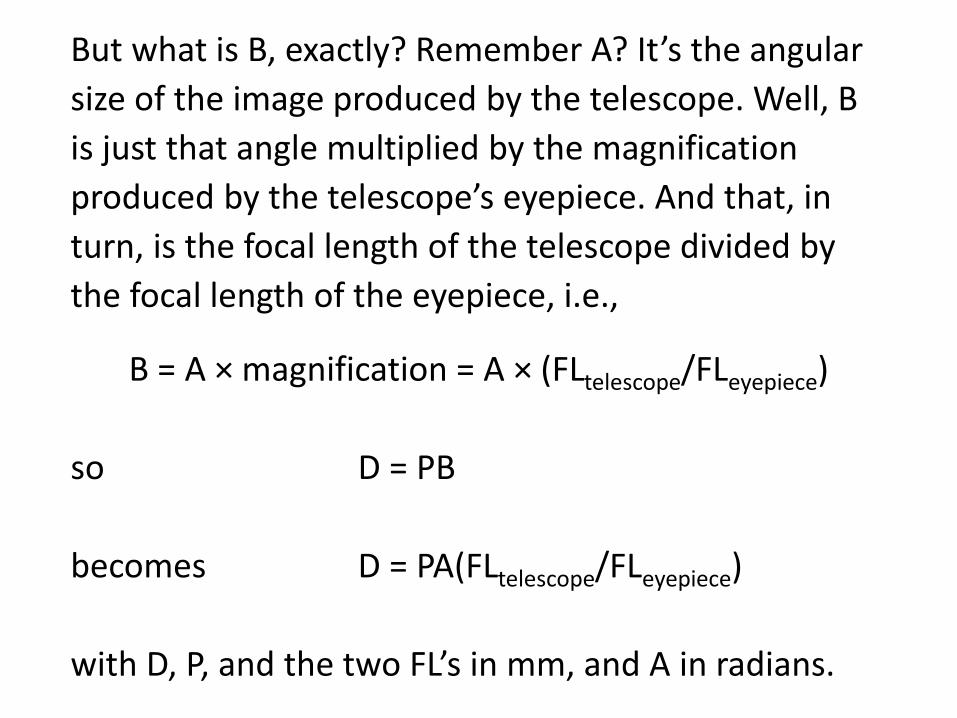
But what is B, exactly? Remember A? It’s the angular
size of the image produced by the telescope. Well, B
is just that angle multiplied by the magnification
produced by the telescope’s eyepiece. And that, in
turn, is the focal length of the telescope divided by
the focal length of the eyepiece, i.e.,
B = A × magnification = A × (FLtelescope/FLeyepiece)
so D = PB
becomes D = PA(FLtelescope/FLeyepiece)
with D, P, and the two FL’s in mm, and A in radians.
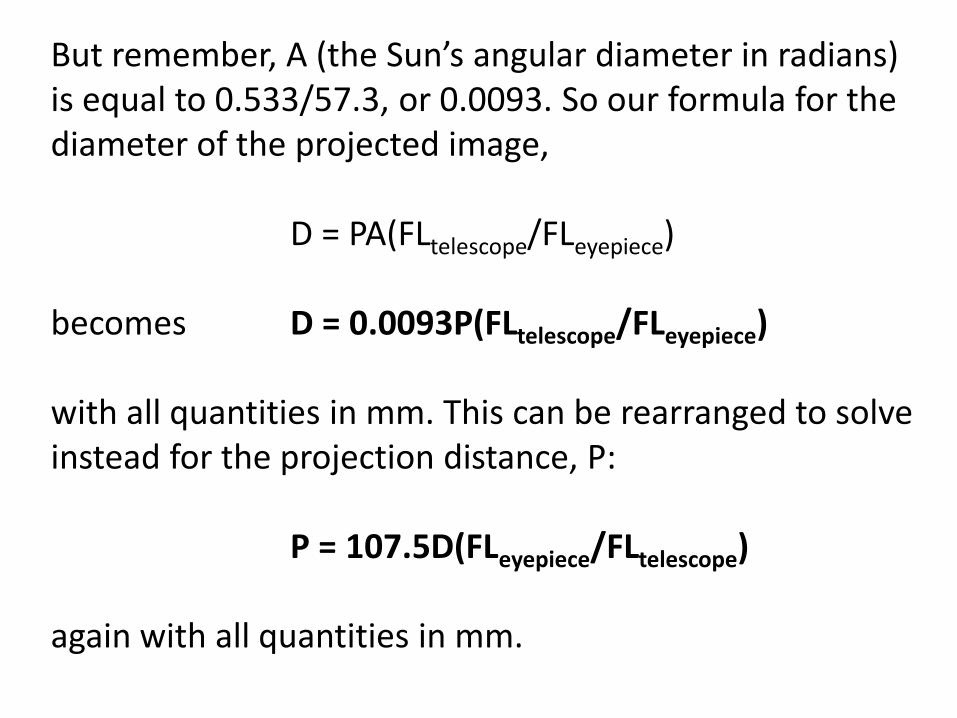
But remember, A (the Sun’s angular diameter in radians) is equal to 0.533/57.3, or 0.0093. So our formula for the diameter of the projected image, D = PA(FLtelescope/FLeyepiece) becomes D = 0.0093P(FLtelescope/FLeyepiece) with all quantities in mm. This can be rearranged to solve instead for the projection distance, P: P = 107.5D(FLeyepiece/FLtelescope) again with all quantities in mm.
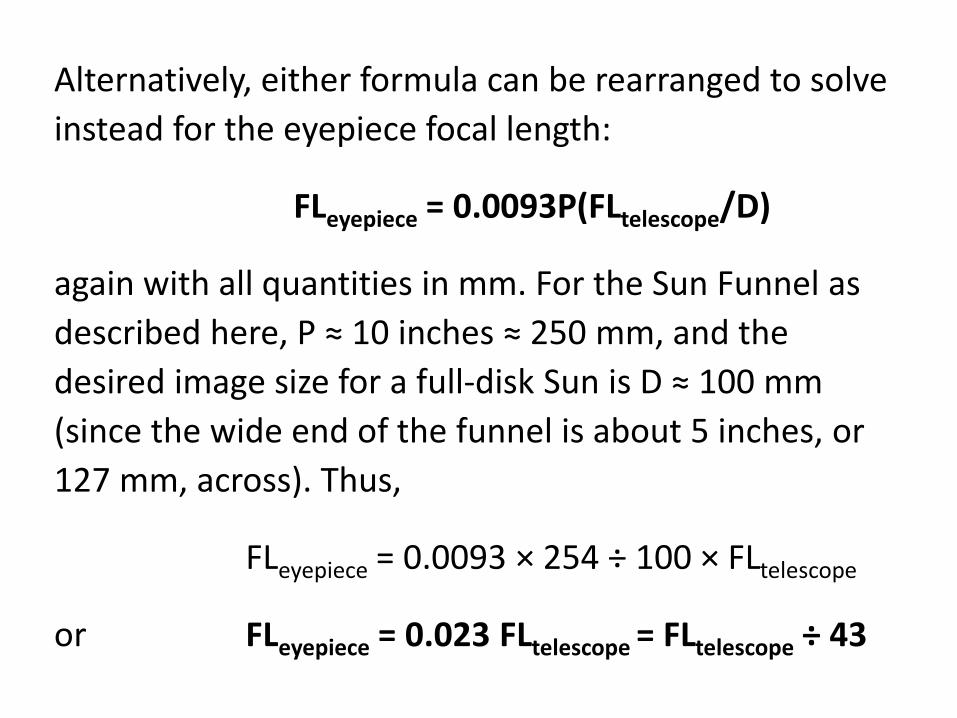
Alternatively, either formula can be rearranged to solve
instead for the eyepiece focal length:
FLeyepiece = 0.0093P(FLtelescope/D)
again with all quantities in mm. For the Sun Funnel as
described here, P ≈ 10 inches ≈ 250 mm, and the
desired image size for a full-disk Sun is D ≈ 100 mm
(since the wide end of the funnel is about 5 inches, or
127 mm, across). Thus,
FLeyepiece = 0.0093 × 254 ÷ 100 × FLtelescope
or FLeyepiece = 0.023 FLtelescope = FLtelescope ÷ 43
Questions? Comments?
You may contact the authors by email:
Rick Fienberg: [email protected]
Chuck Bueter: [email protected]
Lou Mayo: [email protected]
Now that you have all the mathematical relationships between
telescope focal length, eyepiece focal length, projection distance,
and projected image size, you can design your own solar-projection
device using materials other than those suggested here.
Except where otherwise noted, all photos are © 2011-2016 by Richard Tresch Fienberg.