Embed Size (px)
Citation preview
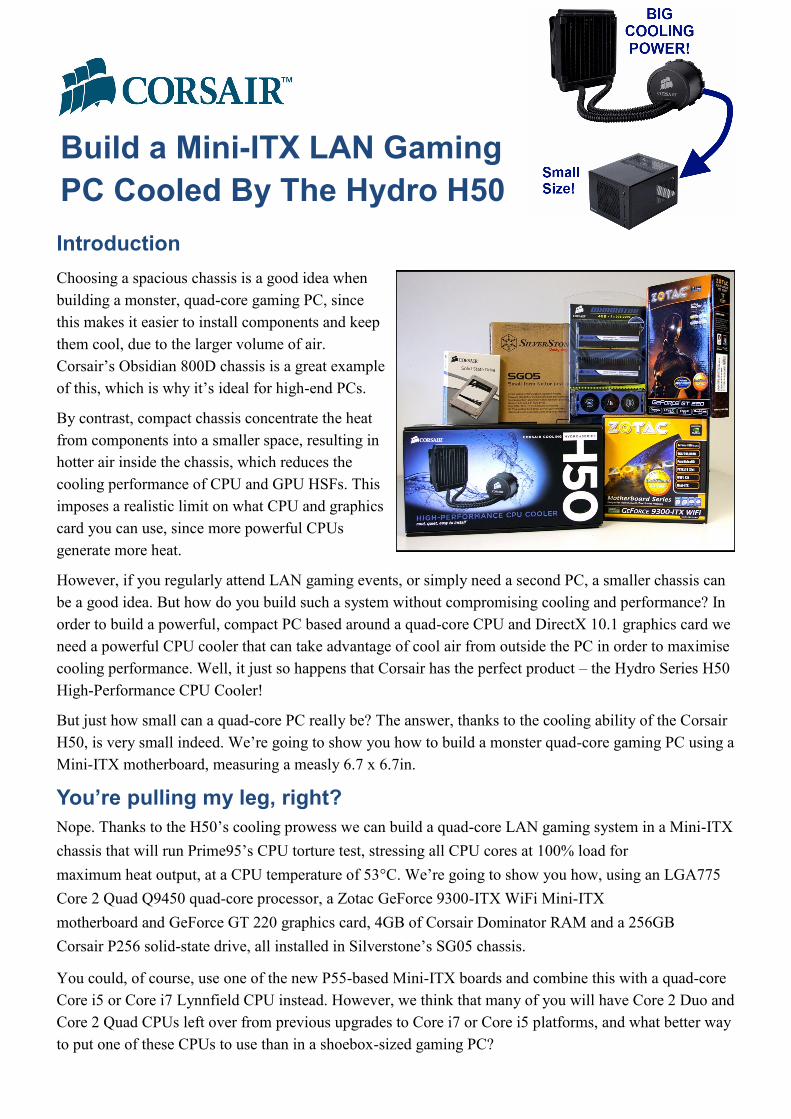
Build a Mini-ITX LAN Gaming
PC Cooled By The Hydro H50
Introduction
Choosing a spacious chassis is a good idea when
building a monster, quad-core gaming PC, since
this makes it easier to install components and keep
them cool, due to the larger volume of air.
Corsair’s Obsidian 800D chassis is a great example
of this, which is why it’s ideal for high-end PCs.
By contrast, compact chassis concentrate the heat
from components into a smaller space, resulting in
hotter air inside the chassis, which reduces the
cooling performance of CPU and GPU HSFs. This
imposes a realistic limit on what CPU and graphics
card you can use, since more powerful CPUs
generate more heat.
However, if you regularly attend LAN gaming events, or simply need a second PC, a smaller chassis can
be a good idea. But how do you build such a system without compromising cooling and performance? In
order to build a powerful, compact PC based around a quad-core CPU and DirectX 10.1 graphics card we
need a powerful CPU cooler that can take advantage of cool air from outside the PC in order to maximise
cooling performance. Well, it just so happens that Corsair has the perfect product – the Hydro Series H50
High-Performance CPU Cooler!
But just how small can a quad-core PC really be? The answer, thanks to the cooling ability of the Corsair
H50, is very small indeed. We’re going to show you how to build a monster quad-core gaming PC using a
Mini-ITX motherboard, measuring a measly 6.7 x 6.7in.
You’re pulling my leg, right?
Nope. Thanks to the H50’s cooling prowess we can build a quad-core LAN gaming system in a Mini-ITX
chassis that will run Prime95’s CPU torture test, stressing all CPU cores at 100% load for
maximum heat output, at a CPU temperature of 53°C. We’re going to show you how, using an LGA775
Core 2 Quad Q9450 quad-core processor, a Zotac GeForce 9300-ITX WiFi Mini-ITX
motherboard and GeForce GT 220 graphics card, 4GB of Corsair Dominator RAM and a 256GB
Corsair P256 solid-state drive, all installed in Silverstone’s SG05 chassis.
You could, of course, use one of the new P55-based Mini-ITX boards and combine this with a quad-core
Core i5 or Core i7 Lynnfield CPU instead. However, we think that many of you will have Core 2 Duo and
Core 2 Quad CPUs left over from previous upgrades to Core i7 or Core i5 platforms, and what better way
to put one of these CPUs to use than in a shoebox-sized gaming PC?
Build a Mini-ITX LAN Gaming PC Cooled By The Hydro H50
Component List
Building the system - step-by-step
Deconstruct the chassis
The first step is to unpack the SG05 chassis and remove all the
panels and drive trays, following the steps outlined in the chassis
manual so that you have a blank canvass to work with. Since
we’re using a 2.5in Corsair Performance P256 solid-state drive,
we can remove and discard the 3.5in drive tray (far left of
image), which not only frees up more space inside the chassis
but improves airflow too.
It’s also worth installing the motherboard I/O shield (the thin
metal plate that covers the connectors on the motherboard back
panel) at this point too. You’ll find the I/O shield in the
motherboard box.
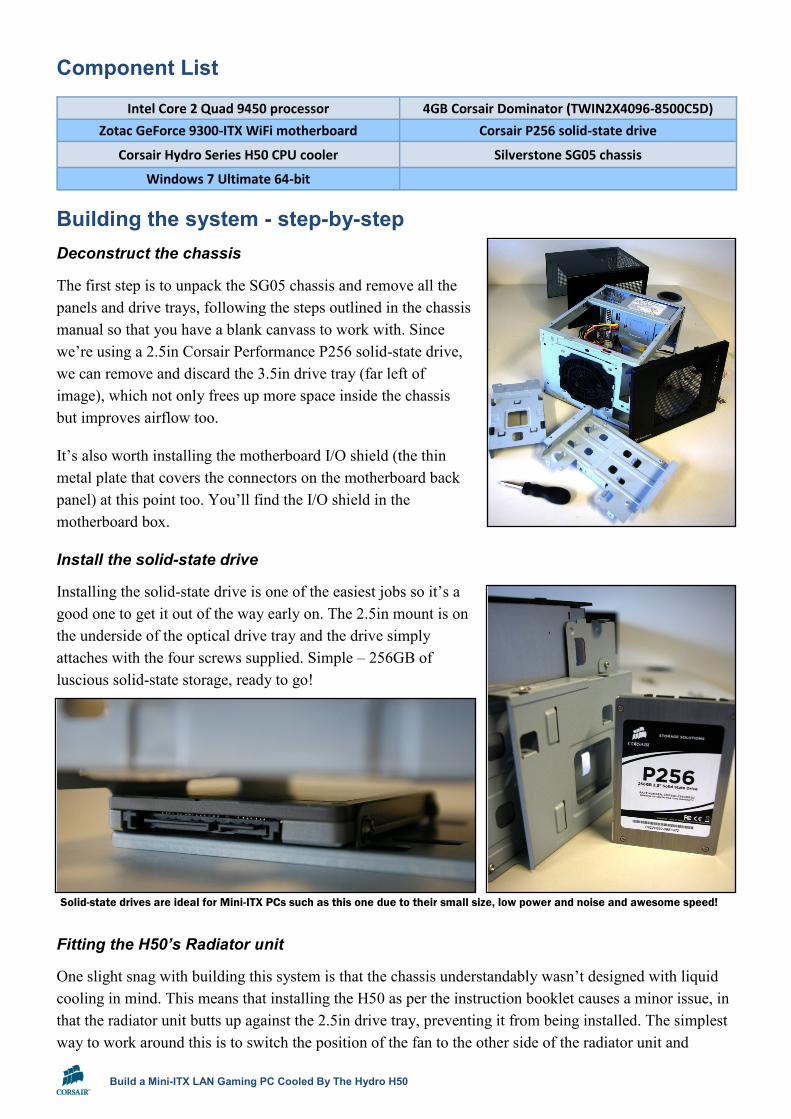
Install the solid-state drive
Installing the solid-state drive is one of the easiest jobs so it’s a
good one to get it out of the way early on. The 2.5in mount is on
the underside of the optical drive tray and the drive simply
attaches with the four screws supplied. Simple – 256GB of
luscious solid-state storage, ready to go!
Fitting the H50’s Radiator unit
One slight snag with building this system is that the chassis understandably wasn’t designed with liquid
cooling in mind. This means that installing the H50 as per the instruction booklet causes a minor issue, in
that the radiator unit butts up against the 2.5in drive tray, preventing it from being installed. The simplest
way to work around this is to switch the position of the fan to the other side of the radiator unit and
Intel Core 2 Quad 9450 processor 4GB Corsair Dominator (TWIN2X4096-8500C5D)
Zotac GeForce 9300-ITX WiFi motherboard Corsair P256 solid-state drive
Corsair Hydro Series H50 CPU cooler Silverstone SG05 chassis
Windows 7 Ultimate 64-bit
Solid-state drives are ideal for Mini-ITX PCs such as this one due to their small size, low power and noise and awesome speed!
Build a Mini-ITX LAN Gaming PC Cooled By The Hydro H50
attach it using cable ties. This provides some flexibility with respect to where the fan can be positioned,
allowing you to lower it relative to the radiator in order to accommodate the 2.5in drive tray.
This creative solution was employed by Kim over at www.itrends.dk, so thanks to him for the idea!
Fix the fan to the radiator using cables ties, as shown in the images here. Take note of the positioning
carefully, as the fan needs to be closer to the floor of the chassis than the radiator once installed. Pull the
ties as tightly as possible without altering the position of the fan.
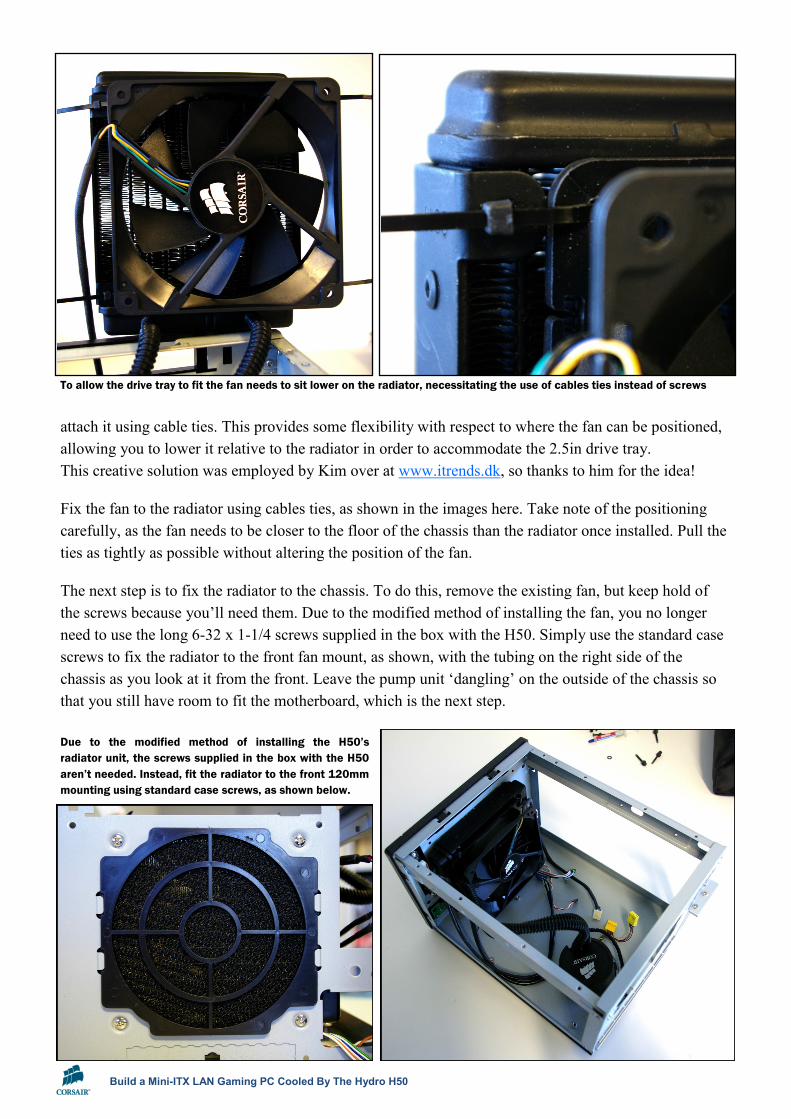
The next step is to fix the radiator to the chassis. To do this, remove the existing fan, but keep hold of
the screws because you’ll need them. Due to the modified method of installing the fan, you no longer
need to use the long 6-32 x 1-1/4 screws supplied in the box with the H50. Simply use the standard case
screws to fix the radiator to the front fan mount, as shown, with the tubing on the right side of the
chassis as you look at it from the front. Leave the pump unit ‘dangling’ on the outside of the chassis so
that you still have room to fit the motherboard, which is the next step.
Due to the modified method of installing the H50’s
radiator unit, the screws supplied in the box with the H50
aren’t needed. Instead, fit the radiator to the front 120mm
mounting using standard case screws, as shown below.
To allow the drive tray to fit the fan needs to sit lower on the radiator, necessitating the use of cables ties instead of screws
Build a Mini-ITX LAN Gaming PC Cooled By The Hydro H50
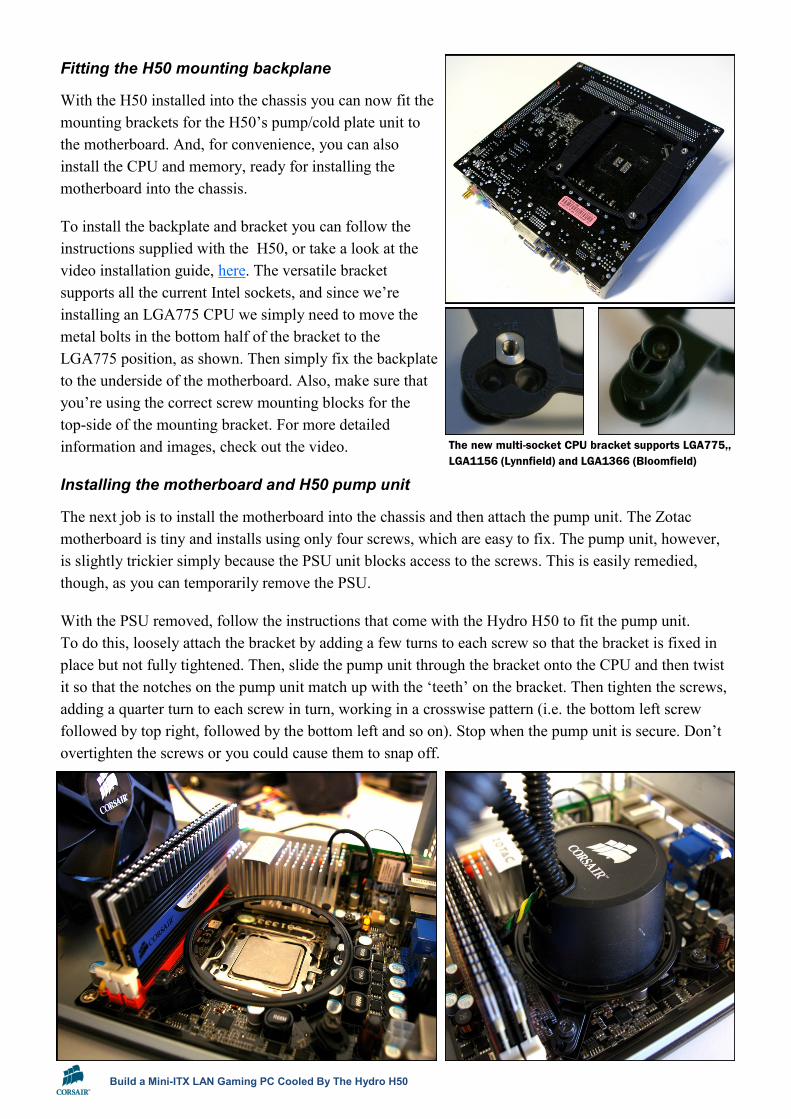
Fitting the H50 mounting backplane
With the H50 installed into the chassis you can now fit the
mounting brackets for the H50’s pump/cold plate unit to
the motherboard. And, for convenience, you can also
install the CPU and memory, ready for installing the
motherboard into the chassis.
To install the backplate and bracket you can follow the
instructions supplied with the H50, or take a look at the
video installation guide, here. The versatile bracket
supports all the current Intel sockets, and since we’re
installing an LGA775 CPU we simply need to move the
metal bolts in the bottom half of the bracket to the
LGA775 position, as shown. Then simply fix the backplate
to the underside of the motherboard. Also, make sure that
you’re using the correct screw mounting blocks for the
top-side of the mounting bracket. For more detailed
information and images, check out the video.
Installing the motherboard and H50 pump unit
The next job is to install the motherboard into the chassis and then attach the pump unit. The Zotac
motherboard is tiny and installs using only four screws, which are easy to fix. The pump unit, however,
is slightly trickier simply because the PSU unit blocks access to the screws. This is easily remedied,
though, as you can temporarily remove the PSU.
With the PSU removed, follow the instructions that come with the Hydro H50 to fit the pump unit.
To do this, loosely attach the bracket by adding a few turns to each screw so that the bracket is fixed in
place but not fully tightened. Then, slide the pump unit through the bracket onto the CPU and then twist
it so that the notches on the pump unit match up with the ‘teeth’ on the bracket. Then tighten the screws,
adding a quarter turn to each screw in turn, working in a crosswise pattern (i.e. the bottom left screw
followed by top right, followed by the bottom left and so on). Stop when the pump unit is secure. Don’t
overtighten the screws or you could cause them to snap off.
The new multi-socket CPU bracket supports LGA775,,
LGA1156 (Lynnfield) and LGA1366 (Bloomfield)

Build a Mini-ITX LAN Gaming PC Cooled By The Hydro H50
Complete assembly and boost the graphics!
With the main components now installed, re-fit the
power supply and drive tray and neaten up the wiring,
ready to install the graphics card. Cable routing is
always tricky in such a small chassis, but it’s also very
important, because excess cable clutter will restrict
airflow and limit the cooling potential.
With everything tidied up and screwed down, it’s time
to unpack the graphics card and upgrade the 3D
gaming capabilities of this miniature monster PC. Of
course, if you’re not planning to use the system for
gaming (at least for modern games) then simply skip
the graphics card part and use the on-board GeForce
9300 graphics on the Zotac motherboard, which is certainly good enough for many popular games and
multimedia tasks. However, we decided to add a 1GB Zotac GeForce GT 220 graphics card, which is a
good compromise between performance and power usage, given that SG05 has only a 300W PSU.
Let’s see what she can do...
The Hydro H50-cooled Mini-ITX LAN gaming PC is now completed, so all that’s left to do is put it
though its paces to gauge the cooling effectiveness of the H50 in this miniaturised gaming system.
For all the tests we set the Smart Fan controls to
‘Medium’ in the BIOS, which runs the Corsair
120mm fan at around 1400-1500rpm, which is
extremely quiet (ideal if you’re using this as a
media / HTPC).
We tested the cooling performance using the
64-bit version of Prime95, and after running the
In-Place Large FFTs test for several hours, the
CPU temperature never exceeded 53°C,
demonstrating the awesome effectiveness of the
Hydro H50 CPU Cooler.
In terms of gaming performance, the GeForce
GT 220 has enough grunt to run modern games
at medium to high settings at mid resolutions,
and older/less demanding games ran perfectly.
So whether it’s a high-end PC in a full tower
chassis, or a diminutive Mini-ITX PC in a
shoebox-sized chassis, the Corsair Hydro H50
CPU cooler is more than up to the task.
The finished Mini ITX gaming PC, complete with
GeForce GT 220 and Corsair Hydro H50 CPU cooler!
© December 2009, Corsair Memory, Inc.
All rights reserved. All trademarks and registered trademarks are the property of their respective owners in the United States and/or other countries.


![iTX Manual[1]](https://img.pdfslide.us/doc/110x75/5477c1cf5906b57d318b463b/itx-manual1.jpg)