Embed Size (px)
Citation preview

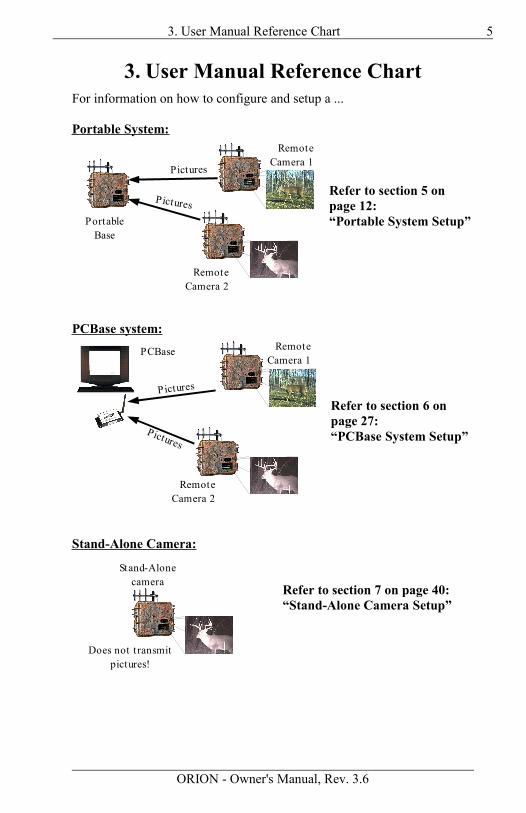
BuckEye CamTM
ORIONWireless Scouting Camera System
Model RC-5030
Owner's ManualRevision 3.6

WARRANTY REGISTRATION
ATSI warrants Products (BuckEye CamTM ) sold by it and guarantees to correct, byrepair or replacement at our option, any defects of material and workmanship which developunder normal and proper use within six (6) months from the date of the original purchasewhen inspection proves the fault to be of manufacturing. Circuit board components onlyreceive a twelve (12) month warranty. All such Products must be returned to our servicecenter, transportation charges prepaid. This warranty does not apply to any of our Productswhich have been repaired or altered by unauthorized persons or service centers in any way soas, in our judgment, to injure their stability or reliability, or which have been subject tomisuse, negligence, or accident or which have had their serial number altered, effaced orremoved.We will not assume any expense or liability for repairs made by other parties without ourwritten consent. ATSI is not responsible for damage to any associated equipment orapparatus, nor shall we be held liable for loss of profit or other special damages. There is noother guarantee or warranty except as herein stated.The Buyer, his employees, or others assumes all risks and liabilities for the operation, the useand the misuse of the product described herein and agree to defend and to save the sellerharmless from any and all claims arising from any cause whatsoever, including seller’snegligence for personal injury incurred in connection with the use of the said product.ATSI reserves the right to discontinue models at any time or change specifications, price ordesign without notice and without incurring any obligation.The express warranties are in lieu of all other warranties, guarantees, promises, affirmations,or representations, express or implied which would be deemed applicable to the goods soldhereunder. No express warranties and no implied warranties, whether of merchantability,fitness for any particular use or purpose, against infringement, or otherwise (except as to title)other than those expressly set forth herein, shall apply.
FOR REPAIR, CONTACT US AT:ATSI8157 US Hwy 50 • Athens, OH 45701(866) 325-8172 • (740) 592-2874Fax (740) [email protected]

1
Table of contents1. Warnings...................................................................................................32. ORION Camera System Specifications....................................................43. User Manual Reference Chart...................................................................54. ORION Camera System Overview...........................................................6
4.1. Camera Controls...............................................................................95. Portable System Setup ...........................................................................12
5.1. Configuring Camera Unit as a Portable Base................................125.2. Registering Cameras to a Portable Base........................................135.3. Unregistering Camera from a Portable Base..................................145.4. Unregistering a Camera at the Camera..........................................155.5. Changing Time and Date...............................................................165.6. Changing Settings on the Camera..................................................165.7. Testing Signal Strength..................................................................245.8. Checking Battery Level..................................................................245.9. Taking a Test Picture.....................................................................255.10. Receiving Pictures from the Camera............................................26
6. PCBase System Setup.............................................................................276.1. Installing the PCBase Modem Driver............................................276.2. Installing the PCBase Software......................................................276.3. Launching the PCBase Software....................................................286.4. Adding a Camera............................................................................296.5. Controlling Camera from PCBase.................................................306.6. Changing Camera Settings.............................................................336.7. Changing PCBase Settings.............................................................336.8. Setting up PCBase to Email Pictures.............................................366.9. Setting up LiveCam........................................................................38
7. Stand-Alone Camera Setup.....................................................................407.1. Configuring Unit as a Stand-Alone Camera..................................407.2. Changing Settings on Stand-Alone Camera...................................407.3. Changing Time and Date...............................................................417.4. Switching Stand-Alone Camera to Wireless..................................417.5. Checking Battery Level..................................................................42
8. Repeater Function Description...............................................................438.1. Description.....................................................................................438.2. Setting and Changing Routing Path...............................................438.3. Communication Delay in Repeater Network.................................458.4. Viewing the Routing Structure on PCBase....................................468.5. Unregistering a Camera..................................................................46
9. Camera Operation and Maintenance.......................................................489.1. Saving Pictures to Memory Card at the Camera............................489.2. Replacing the Battery on the Camera.............................................499.3. Charging the Battery......................................................................50
ORION - Owner's Manual, Rev. 3.6

2
9.4. Capturing License Plate.................................................................509.5. Using the Optional Solar Charger..................................................519.6. Reading Firmware Version and Serial Number.............................519.7. Checking for Updates and Messages.............................................52
10. Troubleshooting....................................................................................5411. Replacement Parts and Accessories......................................................5612. How to Contact BuckEye Cam.............................................................57Appendix A. Camera Display Character Set..............................................57
ORION - Owner's Manual, Rev. 3.6

1. Warnings 3
1. Warnings
WARNING: This equipment is approved only for mobile and base station transmitting devices. Antenna(s) used for this transmitter must be installed to provide a separation distance of at least 30 cm from all persons and must not be co-located or operating in conjunction with any other antenna or transmitter.
Contains FCC ID: OUR-9XTENDThe enclosed device complies with Part 15 of the FCC Rules. Operation is subject to the following two conditions: (i.) this device may not cause harmful interference and (ii.) this device must accept any interference received, including interference that may cause undesired operation.
If the camera is used with any antenna other than the portable antenna supplied with the ORION Camera Unit or PCBase Unit, the system may not comply with the FCC regulation Part 15.247, Operation within the license-free band 902 – 928 MHz. Contact manufacturer regarding use of optional high-gain antennas with the ORION wireless camera system. Contact information is listed in section 12 on page 56 of this manual.
ORION - Owner's Manual, Rev. 3.6

4 2. ORION Camera System Specifications
2. ORION Camera System Specifications
Still picture resolution options 3.1 Mpixel (2048x1536)1.3 Mpixel (1360x1016)0.8 Mpixel (1024x768)0.3 Mpixel (640x480)
Video resolution options VGA (640x480) 1 frame/secondQVGA (320x240) 3 frames/second
Video clip length 5 seconds to 60 secondsReaction speed 2 0.2 secondsStamps on the picture Date, Time, Temperature
Moon Phase, 4 custom text fieldsMinimum delay between pictures or video clips
1 sec. (0.3Mp)5 sec. (0.8Mp)10 sec. (1.3Mp)15 sec. (3Mp)
Time lapse photography YesCamera scheduling Yes (for each day of week)Additional settings Adjustable image compression
Reverse order file transferBurst modeLicense Plate Mode
RF transmission range 3 +2 miles L.O.S.Maximum number of cameras on one base
30 (for Portable Base)30 (for PCBase)
Transmission speed 4 Up to 3KB/secTransmission power 1WMaximum allowed gain of the antenna (including loss in cable) 5
6dBi
Memory Card SD-compatible card, 2GB max. Not compatible with SDHC.
1 Specifications listed here are subject to change. New features may be added. For firmware updates and instructions visit www.buckeyecam.com.2 Time from the moment the motion is recognized by the sensor till the moment the picture is captured3 Transmission range will depend on the type of antenna used, elevation of the antenna, and surrounding terrain. It can be reduced by trees, hills, and other obstacles. On flat terrain without obstacles can exceed 5 miles.4 Transmission speed will depend on the signal strength and amount of interference at the receiver.5 According to FCC Part 15.247 (1 watt intentional radiator employing 50 hopping channels).
ORION - Owner's Manual, Rev. 3.6
1
3. User Manual Reference Chart 5
3. User Manual Reference ChartFor information on how to configure and setup a ...
Portable System:
Refer to section 5 on page 12:“Portable System Setup”
PCBase system:
Refer to section 6 on page 27:“PCBase System Setup”
Stand-Alone Camera:
Refer to section 7 on page 40:“Stand-Alone Camera Setup”
ORION - Owner's Manual, Rev. 3.6
Remote Camera 1
Remote Camera 2
PortableBase
Pictures
Pictures
Remote Camera 1
Remote Camera 2
Pictures
Pictures
PCBase
Stand-Alone camera
Does not t ransmit pictures!
6 4. ORION Camera System Overview
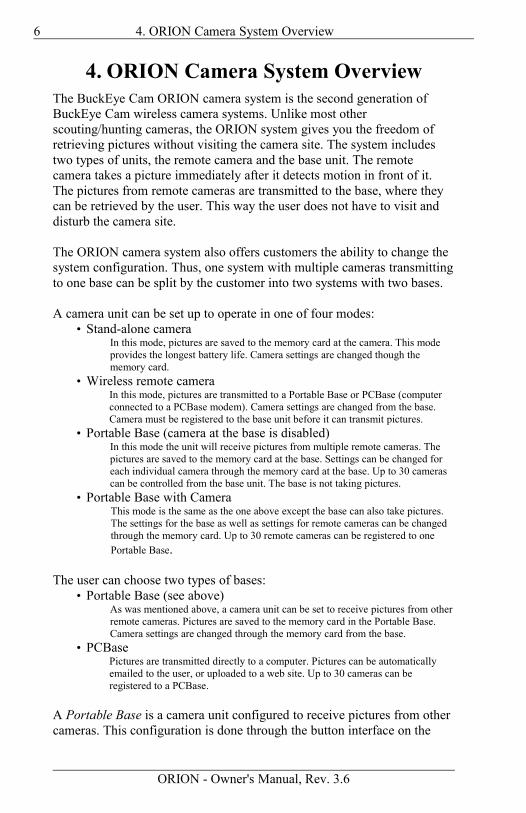
4. ORION Camera System OverviewThe BuckEye Cam ORION camera system is the second generation of BuckEye Cam wireless camera systems. Unlike most other scouting/hunting cameras, the ORION system gives you the freedom of retrieving pictures without visiting the camera site. The system includes two types of units, the remote camera and the base unit. The remote camera takes a picture immediately after it detects motion in front of it. The pictures from remote cameras are transmitted to the base, where they can be retrieved by the user. This way the user does not have to visit and disturb the camera site.
The ORION camera system also offers customers the ability to change the system configuration. Thus, one system with multiple cameras transmitting to one base can be split by the customer into two systems with two bases.
A camera unit can be set up to operate in one of four modes:• Stand-alone camera
In this mode, pictures are saved to the memory card at the camera. This mode provides the longest battery life. Camera settings are changed though the memory card.
• Wireless remote cameraIn this mode, pictures are transmitted to a Portable Base or PCBase (computer connected to a PCBase modem). Camera settings are changed from the base. Camera must be registered to the base unit before it can transmit pictures.
• Portable Base (camera at the base is disabled)In this mode the unit will receive pictures from multiple remote cameras. The pictures are saved to the memory card at the base. Settings can be changed for each individual camera through the memory card at the base. Up to 30 cameras can be controlled from the base unit. The base is not taking pictures.
• Portable Base with CameraThis mode is the same as the one above except the base can also take pictures. The settings for the base as well as settings for remote cameras can be changed through the memory card. Up to 30 remote cameras can be registered to one Portable Base.
The user can choose two types of bases:• Portable Base (see above)
As was mentioned above, a camera unit can be set to receive pictures from other remote cameras. Pictures are saved to the memory card in the Portable Base. Camera settings are changed through the memory card from the base.
• PCBasePictures are transmitted directly to a computer. Pictures can be automatically emailed to the user, or uploaded to a web site. Up to 30 cameras can be registered to a PCBase.
A Portable Base is a camera unit configured to receive pictures from other cameras. This configuration is done through the button interface on the
ORION - Owner's Manual, Rev. 3.6
4. ORION Camera System Overview 7
unit. At the Portable Base, the user can check the status of a battery on a remote camera, tell the camera to take a picture, update camera settings on any of the remote cameras.
A PCBase is software that is running on a computer and communicating with remote cameras through a PCBase modem. Unlike a Portable Base, a PCBase gives the user an easy access to all the camera controls and settings. With one click of a button the user can check the battery level on a remote camera and can quickly change settings without going outside.
Figure 1 illustrates an example of a system with three units, two cameras taking pictures and transmitting to the base unit.
Figure 2 illustrates a system similar to the one in Figure 1 except the base unit is operating in a base-camera mode and will also be taking pictures just like the remote cameras. System in Figure 1 can be turned into system illustrated in Figure 2 by simply changing the operating mode of the base unit.
ORION - Owner's Manual, Rev. 3.6
Camera unit configured as portable base
Remote Camera 1
Remote Camera 2
Figure 1
PortableBase
Pictures
Pictures
Camera unit configured as
base and camera
Remote Camera 1
Remote Camera 2
Figure 2
PortableBase
Pictures
Pictures

8 4. ORION Camera System Overview
Figure 3 illustrates a system with three cameras registered to one PCBase. Pictures in this system are transmitted directly to the computer. PCBase software can also be setup to email pictures to multiple email addresses or to upload pictures to the LiveCam website.
Before a camera can transmit pictures to a base it needs to be registered to that base. During the registration process the base tells a remote camera the unique identification of the base that should be receiving pictures. Registration permits several camera systems to be located in close proximity and still be transmitting pictures to the appropriate bases. Thus your neighbor will not be able to receive pictures from your cameras.
Once a camera is registered to a base, it can only be controlled from the base and unregistered from the base. It means that the camera must be unregistered before it can be setup as a Portable Base or a stand-alone camera. Unregistration can easily be executed from the base. However, unregistration of the camera at that camera will require a password, which is provided along with the camera documentation and can be found on the last two pages of the manual. The user should keep it in a safe place. The password may also be required to reset the camera registration in the case of computer crash, when a camera was registered to a PCBase.
The registration process also provides a security feature and makes the camera unusable if it is stolen, since a thief would not be able to retrieve pictures or change settings without knowing the password. If a user loses or forgets the password, he or she can request it from the manufacturer. In this case the user will have to provide the contact information and the serial number of the camera. The information will be compared against the product registration information submitted by the user and a password will be sent to the user.
ORION - Owner's Manual, Rev. 3.6
Remote Camera 1
Remote Camera 2
Figure 3
Remote Camera 3
Pictures
Pictures
PCBase
Pict
ures

4. ORION Camera System Overview 9
4.1. Camera Controls
The following figure describes the inside detail of the camera.
Battery Connectors - Two battery connectors are available on the camera. These connectors can be used to “hot-swap” the battery without powering down the camera.
READY Indicator – After you press the SAVE PICS TO CARD button, this light will turn on to notify you that it is safe to remove the memory card.
WAIT Indicator – This light will turn on when you first turn on the power and when accessing the memory card. Do not remove the memory card when this light is on.
ERROR Indicator – This light will turn on when there is an error writing to the memory card. If this light turns on consistently, try a different memory card.
ORION - Owner's Manual, Rev. 3.6
DisplayControlButtons
BatteryConnectors Main
Battery
ClockBattery
Memory Card Slot
READY, WAIT, and ERROR indicators
Reverse Battery Indicator
Power Switch
External Power
Connector
USB Connector

10 4. ORION Camera System Overview
Reverse Battery Indicator – This light will turn on if you plug the battery cable in backwards. If this happens, simply unplug and reverse the cable.
Power Switch – This switch turns power on and off to the camera.
Control Buttons – used to setup and configure the camera or to send commands to remote cameras from a Portable Base.
Clock Battery – The clock battery powers the internal clock while the camera is turned off.
Main Battery – 6V lead acid battery powers the camera. It provides a significant amount of charge and operates well in low temperatures.
Display – This displays all messages and menus.
External Power Connector – This connector is used to supply external power. Do not disconnect this connector. Do NOT plug the battery into this connector.
Memory Card Slot – SD-compatible Memory Card connector. Maximum card size is 2GB (2 gigabytes). The camera is NOT compatible with SD High-Capacity memory cards.
USB Connector – DO NOT USE. For factory use only.
ORION - Owner's Manual, Rev. 3.6
4. ORION Camera System Overview 11
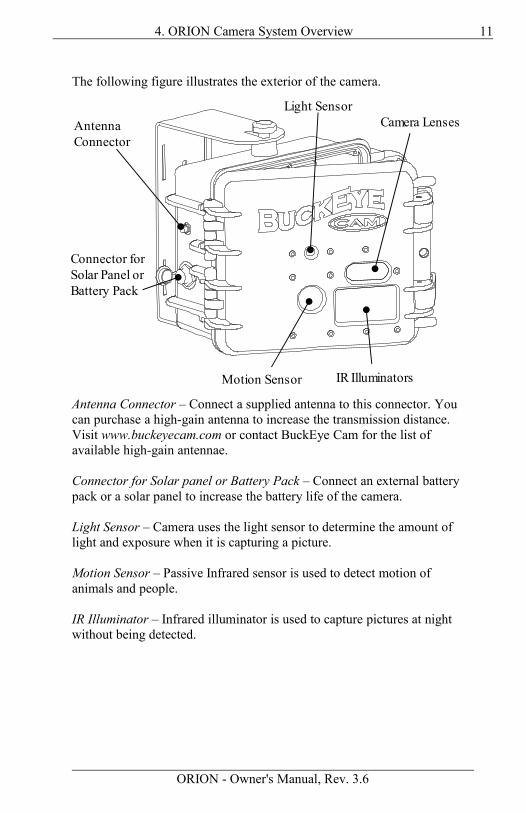
The following figure illustrates the exterior of the camera.
Antenna Connector – Connect a supplied antenna to this connector. You can purchase a high-gain antenna to increase the transmission distance. Visit www.buckeyecam.com or contact BuckEye Cam for the list of available high-gain antennae.
Connector for Solar panel or Battery Pack – Connect an external battery pack or a solar panel to increase the battery life of the camera.
Light Sensor – Camera uses the light sensor to determine the amount of light and exposure when it is capturing a picture.
Motion Sensor – Passive Infrared sensor is used to detect motion of animals and people.
IR Illuminator – Infrared illuminator is used to capture pictures at night without being detected.
ORION - Owner's Manual, Rev. 3.6
Antenna Connector
Connector for Solar Panel or Battery Pack
Motion Sensor IR Illuminators
Camera LensesLight Sensor

12 5. Portable System Setup
5. Portable System Setup
5.1. Configuring Camera Unit as a Portable BaseChoose a camera unit that you want to be receiving pictures from other cameras, this will be your Portable Base. Turn the camera on. If the camera
is unregistered, it should say CAMERA C--- indicating that camera is
unregistered. Wait until REGCamC--- is shown on the display. If the camera
is in stand-alone mode, it will say CAMERA CA . In this case wait until P-0000 is shown on the display. If the camera is registered to another base refer to section 5.4 Unregistering Camera from the Camera located on page 15.
To setup the camera unit as a Portable Base:1. Press MENU button2. Using UP/DOWN buttons scroll until you see MODE on the
display3. Press SELECT button4. Using UP/DOWN buttons select:
a. BASE if you do not want the base to be taking picturesb. CamBAS if you want the base to be taking pictures
5. Press SELECT button. The camera should reboot and switch to a Portable Base mode. Please note that if the camera feature is activated, the camera will be immediately ready to take pictures.
After the camera is set to operate as a Portable Base, you can start registering remote cameras.
NOTE: If you are changing the operating mode from stand-alone to Portable Base, from Portable Base to Portable Base with camera, or from Portable Base with camera to Portable Base, make sure you save pictures to the card first. After the mode is changed the unit will reboot and any pictures that were not saved to the card will be lost.
NOTE: Maximum card size is 2GB (2 gigabytes). The camera is NOT compatible with SD High-Capacity (SDHC) memory cards.
It is recommended to leave a memory card inserted into the card slot on the Portable Base. If a memory card is not inserted, the base will temporarily store pictures to its internal memory. Up to 200 pictures of 0.3Mpixel resolution or up to 60 picture of 3Mpixel resolution can be buffered in the internal memory. After the internal memory is filled up, the base will stop receiving pictures from remote cameras. If the the base looses power,
ORION - Owner's Manual, Rev. 3.6

5. Portable System Setup 13
pictures that were stored in the internal memory will be lost.To copy pictures from internal memory to the card, insert the card into the card slot and press SAVE PICS TO CARD button.
5.2. Registering Cameras to a Portable BaseDuring registration the base tells the camera what channel, address, and camera number it should use. Also the base adds the unit to the list of active cameras. Up to 30 cameras can be registered to one Portable Base.
NOTE: Only add one camera at a time to avoid possible communication errors. Turn on the Portable Base unit before completing the following steps.
To register cameras to a Portable Base, the camera should be unregistered.
Turn the camera on and wait until REGCamC--- is shown on the display. If the display shows P-00000, the camera must be unregistered first. Refer to section 5.4 Unregistering Camera from the Camera located on page 15. To ensure a reliable registration and initialization, it is recommended to register the cameras before placing them in the field.To register a camera to a base:
1. Turn on the power to the camera you wish to add to the Portable Base. If you are wanting to add more camera, only turn on one at this time.• Make sure the camera powers up and display shows
REGCamC--- with a scrolling bar at the upper left hand corner. If this message does not appear, the camera is either already registered to a base, setup as a Portable Base, or is in stand-alone mode.
• Make sure the remote unit and Portable Base unit both have antennas connected and batteries are charged to 50% or more.
2. Press MENU button on your Portable Base unit.3. Using UP/DOWN buttons scroll until you see AddCAM on the
display4. Once you see AddCAM on your display press the SELECT
button.5. The Portable Base will detect the camera and the camera will be
automatically registered to the system.
After successful registration, the camera will reboot automatically. The
Portable Base will display REG OK C-01, with camera number in the upper right hand corner as C-01 for camera #1, C-02 for camera #2, etc.
ORION - Owner's Manual, Rev. 3.6

14 5. Portable System Setup
If the base cannot find a camera it will show NO CAM rEG on the display. If that happens make sure the camera is turned on and antennae are connected to both base and remote camera. Repeat steps 1 through 5.
5.3. Unregistering Camera from a Portable BaseTo properly unregister a camera from a Portable Base, the CAMERA MUST BE TURNED ON and located in close proximity to ensure reliable unregistration. Do not turn off the camera or Portable Base until the following process is complete.
To unregister the camera from the Portable Base:1. Make sure the camera you want to unregister is turned on and
located near the Portable Base.2. Press MENU button on your Portable Base.3. Using UP/DOWN buttons scroll through the menu until you see
DelCAM on the display.4. Press SELECT button5. Using UP/DOWN buttons choose the appropriate camera number
you want to unregister. The camera number will be shown in the upper right corner of the display. Example: C-01 corresponds to camera #1, C-02 corresponds to camera #2, etc.
6. Once you have chosen the correct camera number press SELECT button
7. Using UP/DOWN buttons select YES on the display to confirm your intention to unregister the selected camera.
8. Press SELECT button to initiate unregistration. The camera will be automatically unregistered from the Portable Base.
Upon successful unregistration, the Portable Base will display
UnREGD C-01 with the camera number in the upper right hand corner. At the same time, the camera will reboot into an unregistered state. At that point the camera can be registered to another base, switched to a stand-alone camera, or switched to a Portable Base.
If the Portable Base cannot communicate with a camera, it will say
FAILED UrEG . If that happens, make sure the camera is turned on, antennas are properly connected, and repeat the process from step 1.
NOTE: In some cases the user may need to unregister the camera the user no longer has. For that case, the user can force unregistration of the camera from the base.
ORION - Owner's Manual, Rev. 3.6
5. Portable System Setup 15
To force unregistration at the Portable Base follow steps 1-8 as mentioned above, then:
9. When message FAILED UrEG is displayed, using UP/DOWN
buttons, select PROCED UrEG 10. Press SELECT button to ignore the communication failure and
proceed with unregistration. This will remove the camera registration from the Portable Base.
NOTE: If the user forces unregistration, the remote camera will maintain its registration information, and on the first attempt to communicate it will automatically register itself back to the base.
5.4. Unregistering a Camera at the CameraThis operation requires entering a password. Each camera has a unique password which is assigned by the manufacturer and cannot be changed. The password for each camera is supplied along with the camera. For convenience, each camera comes with two password stickers. One sticker can be attached at the end of the manual in the Password Codes section.
NOTE: Camera unregistration from the camera should normally be executed only when a user does not have the base to which the camera is registered, and he/she needs to set the camera to a different mode, or register the camera to another base.
To unregister the remote camera from the camera:1. Turn on the camera if it is not turned on and wait until P-0000 is
shown on the display.2. Press MENU button.
3. Using UP/DOWN buttons scroll until you see UnREG -CA- on the display.
4. Press SELECT button. You will be prompted to enter the password.
5. Using UP/DOWN buttons, select scroll until the character matches the first character of the password.
6. Press SELECT button.7. Repeat steps 5 and 6 for the other 5 characters of the password.8. After the last character is entered, the camera will start the
unregistration sequence.
After completing the unregistration sequence the camera will reboot into
an unregistered wireless camera mode, and REGCam C--- will be shown on
ORION - Owner's Manual, Rev. 3.6

16 5. Portable System Setup
the display. At this point, the user can register the camera to another base or switch it to another mode such as Portable Base or stand-alone camera.
5.5. Changing Time and DateNOTE: The BuckEye Cam ORION uses Military settings when displaying the time. The time and date is maintained with a 3V Lithium battery located next to the On/Off switch.
You only need to set the Time and Date on the Portable Base. The Remote Camera(s) will be updated automatically when it communicates with the base.
To change the on the Portable Base:1. Press and hold the SET CLOCK button for two seconds until
HOURS appears on the display. Release the SET CLOCK button.2. Press the UP or DOWN buttons to set the Hour.3. Press the SET CLOCK button to display MINUTE.4. Press the UP or DOWN button to set the Minute.5. Repeat steps 3 and 4 to update SECOND, DAY, MONTH, and
YEAR. Note, when updating seconds, pressing UP/DOWN button will reset the seconds to 00.
After the time is changed, the Portable Base will automatically notify the cameras about the new time and date, and the clock the the Remote Cameras will be synchronized to the clock on the Portable Base.
5.6. Changing Settings on the CameraSettings for a remote cameras can be changed at the Portable Base through a memory card using a special program located on the memory card. Any time a card is inserted into the Portable Base, the base verifies and make sure the software to change settings and the settings file are present on the card. If the software or settings file is not present, or the file is corrupted, the base copies the files to the card. This is done automatically and no user intervention is required.
To copy the setup software to the memory card:1. If the memory card was not inserted, insert the memory card into
the card slot on the Portable Base. For stand-alone camera, insert the card into the card slot on the camera.
2. The WAIT light will flash once. If the light stays on for longer than 1 second it means that the program is copied to the memory card.
ORION - Owner's Manual, Rev. 3.6

5. Portable System Setup 17
3. Press SAVE PICS TO CARD button. This will indicate that you are about to remove the memory card and the Portable Base will not attempt to access the card giving you time to remove the card.
4. Wait till the READY light turns on, indicating that the operation was completed successfully.
5. Remove the card from the card slot by lightly pushing the card into the card slot and releasing it. The card will be ejected from the card slot.
After you connect the card reader to your computer and insert the memory card, a window will pop up displaying the contents of the memory card. If the window does not appear automatically, click the Start button on the task bar and select My Computer. In the opened window double-click onto the removable disk icon that corresponds to the memory card.
Example of the content of the memory card is shown in below.
In the open window, click on the camsetup.exe file to open the User-Options software as shown below.
NOTE: Do not worry if you only see camsetup and not camsetup.exe. Your computer is probably set up to hide the three letter extension and there are no problems with the files.
ORION - Owner's Manual, Rev. 3.6

18 5. Portable System Setup
This software allows you to choose settings and edit text that you would like displayed on the pictures for each registered camera including the camera acting as base. You select the camera by clicking on the corresponding button on the left had side. If you only have one camera, only one button will appear. When more cameras are added, more buttons will appear. By default, the cameras are listed by their index. You can choose to list cameras by names or locations by clicking on the button and selecting the corresponding option.
Please note, that for a stand-alone camera, the camera buttons on the left will not be shown.
To change the camera settings, select the options you want by clicking on the corresponding check box and filling in the fields. If you make any changes, the button at the bottom of the window is enabled and the corresponding camera button is marked with a green dot. When you are done updating settings, click the button to save the changes and close the software. After that, you can remove the card from the card reader. Insert the card into the card slot on the Portable Base to update settings on any of the remote cameras or the base. The base will automatically detect new settings on the card and show SetOUT on the display. Once settings are updated for a camera a message SetOK is displayed with corresponding camera number C-01 in the upper right hand
corner. When all cameras are updated, the display will show SetOKALL.
If the settings were modified for a stand-alone camera, insert the card into that camera. The stand-alone camera will detect new settings on the card and show a SetOK message on the display. This indicates that the new settings were accepted.
Camera Options :
In the settings software, you can enter up to 4 custom text labels onto the picture. To add a label to the picture, place a check box next to the text field and type in the text. You can enter 31 characters into Text 1, Text 2, and Text 3, and up to 63 characters into Text 4. Please note, as you click on a text box, the location of the corresponding label is highlighted in the sample picture in the upper right hand corner.
The date, time, temperature, and moon phase at the time the picture was taken can also be stamped on the picture. Click on the corresponding check boxes to add or remove the stamps from the picture. Location of the stamp will also be highlighted in the sample picture area.
ORION - Owner's Manual, Rev. 3.6
5. Portable System Setup 19
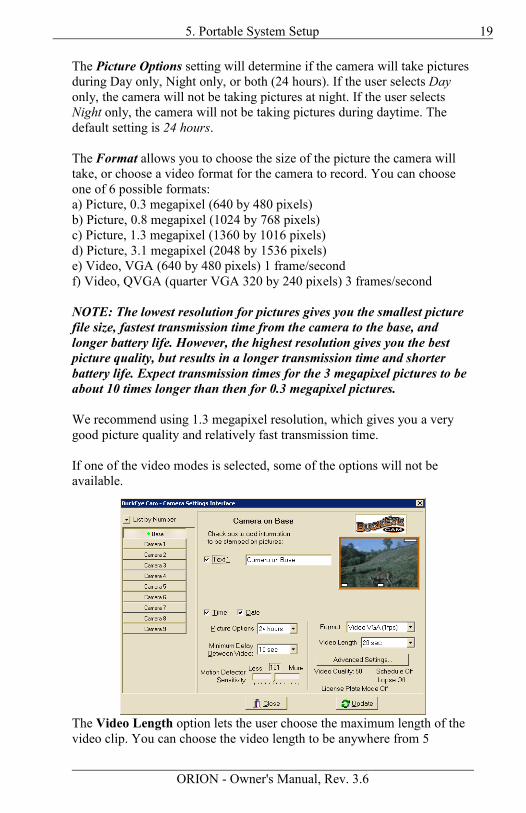
The Picture Options setting will determine if the camera will take pictures during Day only, Night only, or both (24 hours). If the user selects Day only, the camera will not be taking pictures at night. If the user selects Night only, the camera will not be taking pictures during daytime. The default setting is 24 hours.
The Format allows you to choose the size of the picture the camera will take, or choose a video format for the camera to record. You can choose one of 6 possible formats:a) Picture, 0.3 megapixel (640 by 480 pixels)b) Picture, 0.8 megapixel (1024 by 768 pixels)c) Picture, 1.3 megapixel (1360 by 1016 pixels)d) Picture, 3.1 megapixel (2048 by 1536 pixels)e) Video, VGA (640 by 480 pixels) 1 frame/secondf) Video, QVGA (quarter VGA 320 by 240 pixels) 3 frames/second
NOTE: The lowest resolution for pictures gives you the smallest picture file size, fastest transmission time from the camera to the base, and longer battery life. However, the highest resolution gives you the best picture quality, but results in a longer transmission time and shorter battery life. Expect transmission times for the 3 megapixel pictures to be about 10 times longer than then for 0.3 megapixel pictures.
We recommend using 1.3 megapixel resolution, which gives you a very good picture quality and relatively fast transmission time.
If one of the video modes is selected, some of the options will not be available.
The Video Length option lets the user choose the maximum length of the video clip. You can choose the video length to be anywhere from 5
ORION - Owner's Manual, Rev. 3.6

20 5. Portable System Setup
seconds to 60 seconds. After the camera is triggered it will record the video clip up to the selected number of seconds. However, the recording may stop earlier if the camera does not see or detect any motion for at least 5 seconds. This feature helps the camera to keep the video file size to a minimum, reduce transmission time and in turn increase battery life.
The Minimum Delay Between Pictures/Video setting allows you to choose how much time elapses before the camera can take another picture upon next activation. You can choose up to 2 hours delay. The lowest delay available depends on the selected resolution and is 1 second for 0.3 megapixel resolution, 5 seconds for 0.8 megapixel resolution, 10 seconds for 1.3 megapixel resolution, and 15 seconds for 3.0 megapixel resolution.
The Motion Detector Sensitivity setting allows you to increase or decrease how sensitive the camera is to detecting a change in motion/heat pattern of the animal or individual. The default factory setting is 120.
More advanced options can be opened up by clicking on the button. This will open the advanced settings
window.
The Daytime picture brightness setting allows you to adjust the brightness of the picture or video captured by the camera. The Low setting may give a better picture for general use with dark or normal backgrounds. The High setting may be used when there is a significant amount of bright background such as snow or sky present. To change the brightness level, click and drag the slider.
The Picture/Video Quality allows you to adjust the amount of compression to be applied to the JPEG picture files. The default setting for a remote camera is 70% for still pictures and 55% for video clips . A “Higher” quality setting will reduce the amount of compression and result in a larger
ORION - Owner's Manual, Rev. 3.6

5. Portable System Setup 21
file size. This also results in a longer time to transmit the picture from the camera to the base. A “Lower” quality setting reduces the file size and which results in faster transmission times and longer battery life.
Since Quality is “in the eye of the beholder”, we suggest you experiment with this setting until you find something that produces pictures of acceptable quality and at the same time keeps the picture transmission time at a minimum.
Receive Latest Picture/Video First setting activates the reverse order of file transmission. When this option is not selected, the pictures or video clips from that camera are transmitted in the first-taken-first-transmitted order. Every time a picture or a video clip is taken, it is placed on top of the stack of files to be transmitted. The camera will take files from the bottom of the stack to transmit. When this option is selected, the files from the camera are transmitted in the last-taken-first-transmitted order. In this case, to transmit the camera will take pictures from the top of the stack where the latest picture or video clip is locate.
NOTE: Receive Latest Picture First setting is not available on Base and stand-alone camera. Burst Mode provides you the ability to take a preset number of pictures when the camera is triggered. This option is not available if a video mode is selected.
Capture License Plate option activates a special image capturing mode where lighting in the picture is adjusted to make the license plate most readable. This mode allows the camera to be used in security applications where it might be important to capture a license plate of a vehicle. Refer to
ORION - Owner's Manual, Rev. 3.6
Pic 003
Pic 005Pic 004
Pic 006Pic 007
Pic 002Picture t ransmit ted to base
Pic 008Recently taken picture
Pic
ture
que
ueat
the
cam
era
P ic 002
Pic 004Pic 003
Pic 005Pic 006
Pic 007Picture t ransmit ted to base
Pic 008Recently taken picture
Pic
ture
que
ueat
the
cam
era
Rece ive Latest Picture First option not se lected
Rece ive Latest Picture First option se lected

22 5. Portable System Setup
section 9.4 Capturing License Plate on page 50 for more details.
Camera active on schedule allows you to select time intervals during which you do not want the camera to be taking pictures of anything moving in front of it. Click on the check box to activate the schedule feature. Once activated, you can select any of the predefined schedules, or you can define your own schedule. To access the predefined schedules, click on the button and select Schedules. Here, you will have a list of the predefined schedules:
Nights and Weekends – the camera will trigger after 5PM until 8AM on the next day, and all day on Saturday and Sunday.Monday ... Friday, 8AM-5PM – the camera will trigger only between 8AM and 5PM on Monday through Friday.Nights Only – Camera will trigger only between 5PM and 8AM.
The green area on the schedule shows the time when camera is active. Gray area indicates the time when the camera is inactive. There are several types of activation patterns you can define. You can have only one deactivation and one activation for any day of the week not counting the midnight activations and deactivations.
Possible activation patterns:1. Camera is activated and later deactivated during one day:
2. Camera is activated at midnight and deactivated later that day. It is activated once more on the same day and stays active till midnight:
3. Camera is activated at midnight and deactivated later on the same day. The camera stays deactivated till midnight:
4. Camera is activated some time during the day and stays active until midnight:
5. Camera is active all day (from midnight till midnight):
6. Camera is inactive all day (from midnight till midnight):
To select a time interval, click and hold down the left mouse button while dragging it across the day. You will also notice a text label describing the
ORION - Owner's Manual, Rev. 3.6

5. Portable System Setup 23
current interval you are selecting. Release the mouse button to complete the interval. You can start and stop at every hour or 30 minutes after the hour. To get a 10 minute resolution, hold the Alt button on the keyboard while highlighting the schedule.
To clear the schedule for any given day of the week click on the corresponding button locater to the right of the schedule. You can leave a day blank, which will deactivate the camera for the entire day.
You can copy schedule from one day to another day. To copy, while holding down the Ctrl key on the keyboard, drag the day you want to copy to another day.
Time Lapse Photography allows user to tell the camera to take pictures or record video clips at a certain time of day. Interval between pictures/video defines how often you want the the pictures to be taken. Start every day at defines the time the camera should start counting the intervals. Thus if the interval between pictures is 8 hours and the start time is 8:00AM, the camera will take one picture at 8:00AM, at 4:00PM, and at 12:00AM. If the start time is 2:00PM with 8 hours interval, the camera will take a picture at 2:00PM, then at 10:00PM, and then at 6:00AM on the next day. You can also limit the number of pictures taken after the start time. You can do so by selecting Limit number of pictures/videos per 24 hours and selecting the number of pictures. For example, you want the camera to take 7 pictures pictures at 8PM, 9PM, 10PM, 11PM, 12AM, 1AM, and 2AM in the morning. To do so, select the start time as 8:00PM, 1 hour interval between pictures, and limit number of pictures to 7.
Please note, time lapse photography is not restricted by the schedule since the schedule only disables the motion sensor.
You can make any setting to be the same for all cameras by right-clicking on the corresponding option and selecting Make the same for all cameras. This feature can save you time when you are trying to define the same schedule, lapse photography, or a text label for multiple cameras.
5.7. Testing Signal StrengthIt is important to test communication between the base and the camera to make sure the the camera will be able to transmit pictures to the base.
ORION - Owner's Manual, Rev. 3.6

24 5. Portable System Setup
To test the signal strength at the camera, press the SIGNAL button. The camera will make several attempts to contact the base. During that process you will see -WAIT- message on the display. If the camera is able to contact the base and get the signal measurement, you will see a message similar to the one to the right. The bar at the top of the display indicates the signal strength. BASE at the top right corner of the display indicates the the signal was measured at the base indicating how well the base can “hear” the camera. If the camera cannot “talk” to the base the message on the display would be NO COM.
You can also measure the signal from the base to the camera. For that:1. Press SIGNAL button on the Portable Base2. Using UP/DOWN buttons select the camera for which you want
to measure the signal strength. The camera number will be shown in the top right corner of the display.
3. Press SELECT button to command the base to measure signal to the selected camera.
The base will make several attempts to contact the camera. If communication was successful, you will see a message similar to the one to the right. C-01 indicates Camera #1. The bar at the top of the display indicates the signal strength at the camera indicating how well the camera can “hear” the base. If the base cannot “talk” to the camera the message on the display would be NO COM.
5.8. Checking Battery LevelTo check the battery level on the Portable Base press the BATTERY button. The battery level will be displayed as shown to the right. The bar at the top will display the actual battery level. When the battery level drops below 2 bars, the battery will need to be charged.
To check the battery level on a remote camera from the Portable Base:1. Press the BATTERY button on the Portable Base2. Using UP/DOWN buttons scroll to select the camera number on
which you want to check the battery level. The camera number will be shown in the upper right corner of the display as C-01 for
ORION - Owner's Manual, Rev. 3.6
5. Portable System Setup 25
Camera #1, C-02 for Camera #2, and etc. NOTE: If the selected camera is in low battery mode, the display will have LowBat message while that camera is selected. The battery on that camera will need to be charged or replaced.
3. Once the camera is selected, press SELECT button. The Portable Base will contact the selected camera and request the battery level. Once the camera returns the battery level, it will be shown on the display. The bar will indicate the current battery level on the selected camera. If the Portable Base cannot contact the camera, NO COM message will be shown on the display. In this case, test the battery level again. Make sure the camera is turned on and the antennae on the camera and base are properly connected.
To check the camera battery level at the camera, press the BATTERY button. The battery level will be shown on the display.
5.9. Taking a Test PictureYou can remotely tell the camera to take a test picture from the Portable Base by completing the following steps.
1. Press MENU button on the base. 2. Use UP/DOWN buttons to scroll until TAKPIC is displayed3. Press SELECT button.4. Press UP/DOWN buttons to select the camera that you want to take
the picture. The camera number will be shown in the upper right corner of the display.
5. Once the camera is selected, press SELECT button. The base will send a command to the camera to take a picture. During this process the display will show -WAIT- message. When the picture has been taken the base will display TAKEOK message.
Please note that transmission of the picture may not start immediately since the camera will compress the picture first.
5.10. Receiving Pictures from the CameraPictures from remote cameras are transmitted automatically and no special commands are required to initiate the transfer. As the Portable Base receives pictures from remote camera it will be saving them to the memory card.
ORION - Owner's Manual, Rev. 3.6

26 5. Portable System Setup
The base will be saving pictures two at a time to minimize the number of write cycles and extend the life of the memory card. This means that if the Portable Base receives one picture from a camera, it will not be saved to the memory card until the second picture is received by the base. This picture will be stored in the internal memory. When the second picture is received, the base will store both pictures in one write cycle. However, the user can tell the base to save one picture by pressing the SAVE PICS TO CARD button on the Portable Base.
NOTE: To ensure that all pictures are saved to the memory card always press SAVE PICS TO CARD button and wait for the READY light to come on before removing the memory card.
As the Portable Base is receiving pictures, the bar at the top of the display will show the transmission progress.
If a memory card is not inserted, the Portable Base will store pictures in its internal memory. It has allocated about 20 megabytes to store pictures which is equal to about 60 pictures of 3.0Mpixel resolution or about 200 pictures of 0.3Mpixel resolution. When the internal memory is full, the base will stop receiving pictures from all registered cameras. To allow the Portable Base to receive more pictures insert the memory card into the card slot on the base and press SAVE PICS TO CARD button. This action will save picture to the card, free up internal memory, and allow the base to receive more pictures.
ORION - Owner's Manual, Rev. 3.6
6. PCBase System Setup 27
6. PCBase System SetupTo get started, you will need to install the following onto your computer: a) ORION PCBase Modem driver (section 6.1) b) ORION PCBase Software (section 6.2)
6.1. Installing the PCBase Modem DriverInsert the supplied CD into the CD-ROM of your computer. If the computer has the autorun enabled, you will see a Welcome screen appear. In the Welcome screen, click “Install PCBase Modem Driver” option. This will start the driver installation wizard.
NOTE: Please make sure the USB cable from the modem is NOT connected to the computer during driver installation.
Follow the on-screen prompts to complete the PCBase modem driver installation onto the computer. After the driver is installed, connect the modem to the computer with the USB cable. After the modem is connected, the computer will notify the user about new hardware and will automatically recognize and install the modem.
At this point the PCBase modem is ready to used.
NOTE: To ensure reliable operation and reduce the possibility of USB port shutdown, make sure the supplied wall adapter is connected to the PCBase modem and plugged into the AC outlet.
6.2. Installing the PCBase SoftwareIn the Welcome screen of the ORION PCBase installation CD, click “Install ORION PCBase Software” option and follow the on-screen prompts to complete the installation process.
Before you can run the software you must install the PCBase modem driver. Detailed description of driver installation process is described in the previous section.
NOTE: If you need to uninstall the PCBase Software, be sure to unregister all cameras from the PCBase first.
Visit www.buckeyecam.com to get the latest version of the ORION PCBase Software.
ORION - Owner's Manual, Rev. 3.6

28 6. PCBase System Setup
6.3. Launching the PCBase SoftwareWhen you start the software the first time, it will appear as shown below:
At this moment, the PCBase modem is not operating and cameras cannot communicate with the PCBase.
Click start button to activate the PCBase. The PCBase will detect the modem and request an authentication code as shown to the right. The authentication code is printed on the label on the PCBase modem. Enter the code and click Apply button. If the code is entered correctly, the software will be activated. The PCBase software will remember the authentication code so you will have to enter it only once.
If no cameras are registered to the PCBase the screen will look like this:
ORION - Owner's Manual, Rev. 3.6
6. PCBase System Setup 29
The following controls are available on PCBase software:
This button registers another camera to the system. Refer to section 6.4 for more information.
This button opens a dialog for changing camera settings. The dialog is similar to the one used to change settings in a portable system.
This button opens a dialog box to change the settings for the PCBase. Using this dialog you can tell the PCBase to make a sound every time a camera takes a picture, setup the PCBase to email pictures or upload them to the LiveCam website.
This button opens a drop-down menu with tools and commands.
This button opens an About window with information about the software and its configuration.
This button open the user manual.
Click to button to close the PCBase software.
6.4. Adding a CameraBefore the PCBase can communicate with a camera, it needs to be registered with the PCBase. Only an unregistered camera can be registered
to a base. Turn the camera on and wait until REGCamC--- is shown on the display. If the display shows P-00000, the camera must be unregistered first. Refer to section 5.4 Unregistering Camera at the Camera on page 15. To ensure a reliable registration and initialization, it is recommended to register the cameras first before placing them in the field.
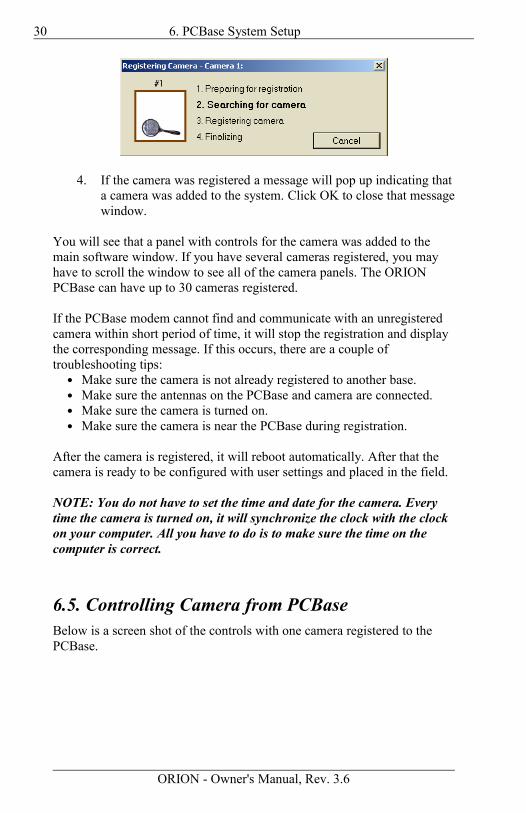
1. Turn the camera on and wait until REGCamC--- is shown on the display.
2. Click the button in the software screen.3. A camera registration window will open as shown below. The
current stages of the registration process will be highlighted in bold.
ORION - Owner's Manual, Rev. 3.6
30 6. PCBase System Setup
4. If the camera was registered a message will pop up indicating that a camera was added to the system. Click OK to close that message window.
You will see that a panel with controls for the camera was added to the main software window. If you have several cameras registered, you may have to scroll the window to see all of the camera panels. The ORION PCBase can have up to 30 cameras registered.
If the PCBase modem cannot find and communicate with an unregistered camera within short period of time, it will stop the registration and display the corresponding message. If this occurs, there are a couple of troubleshooting tips:• Make sure the camera is not already registered to another base.• Make sure the antennas on the PCBase and camera are connected.• Make sure the camera is turned on.• Make sure the camera is near the PCBase during registration.
After the camera is registered, it will reboot automatically. After that the camera is ready to be configured with user settings and placed in the field.
NOTE: You do not have to set the time and date for the camera. Every time the camera is turned on, it will synchronize the clock with the clock on your computer. All you have to do is to make sure the time on the computer is correct.
6.5. Controlling Camera from PCBaseBelow is a screen shot of the controls with one camera registered to the PCBase.
ORION - Owner's Manual, Rev. 3.6

6. PCBase System Setup 31
Each camera panel contains buttons and status indicators displaying information on the status of the camera. Below is a description of the buttons and status indicators.
Buttons
This button requests a battery status and radio signal strength from the camera. This may take several seconds. The battery and signal status is displayed as shown to the right. If for some reason the PC Base cannot access the camera, No Communication is displayed in the status window.
Commands the camera to take a picture.
Opens a folder in which pictures from that camera are stored.
Click to unregister a camera from the PC Base. Once unregistered, a camera can be registered with another PC Base or Portable Base or can be used in Stand-Alone Mode.TIP: Check signal strength prior to unregistering.
Resets the Received Picture counter.
Advanced Commands button contains additional commands that can be sent to the camera. Click the button to open up the menu of auxiliary commands. The following command is available:
Discard pictures on this camera – this command tells the camera to terminate any active picture transmission and discard all the pictures at the camera that have not yet been transmitted.
ORION - Owner's Manual, Rev. 3.6
32 6. PCBase System Setup
NOTE: In version 3.6 of the ORION PCBase Software there is only one command available. As firmware and software updates are released, more commands may be added to this menu in the future.
Status Indicators
Message:
This indicator displays information from the last command given to the camera.Pics On Camera:
This label displays the number of pictures on the camera that still need to be transmitted. When a picture is transmitted from the camera to the PC Base, the number is updated. This indicator is updated every time a camera takes a picture. If the counter says N/A the PCBase does not know yet how many pictures are at the camera. Click the button. This button besides getting the battery/signal info will also update the indicator to the current value.
Receiving:
Displayed when receiving a picture from the camera. Shows the picture transfer progress.
Signal from the camera:
Displays the strength of the signal at the base, i.e. “how well the base can hear a camera.” Note: This is different from the signal shown below.
Battery and Signal:
Display the status of the battery level at the camera and the strength of the signal at the camera, i.e. “how well the camera can hear the base.”Click the button to check the battery and signal at the camera.
Status:
Displays the status of the camera. OK means that battery is good.Low Battery means that the camera is in low battery mode. While in this mode, the camera will not communicate or take pictures, however it will preserve any pictures that have not yet been transmitted. User must plug a
ORION - Owner's Manual, Rev. 3.6

6. PCBase System Setup 33
good battery in and unplug the bad battery after that to restore the communication without losing pictures. If a solar panel is connected to the camera and exposed to enough sunlight, the camera will resume its operation when the battery is charged to about 30%.
Updating settings:
This message is displayed below the status indicator when the PCBase is transferring new settings to the camera.
Received pictures:
This indicator is incremented every time PCBase receives a picture from the camera. You can use this counter to track how many pictures were received from the camera during some period of time. The counter can be reset by click on the button.
6.6. Changing Camera SettingsTo change camera settings click the button. This will open a dialog similar to the one used to change settings on a portable system (see picture on page 17). Refer to camera options on page 18 for description of different settings that can be changed on a remote camera.
Once you are done modifying settings for a camera or a number of cameras, click the Update button. The PCBase will start updating settings on cameras one by one. The cameras that need their settings updated will have an status displayed on the panel. Once the settings are updated, the status disappears and a message “Settings Updated” is displayed in the message window.
NOTE: If you need to stop the PCBase and close the software before the new settings are transferred to the cameras, you can safely do that. The PCBase will restart the unfinished settings transfer next time it is launched.
6.7. Changing PCBase SettingsTo change PCBase settings click the button. This will open a dialog window as shown below.
ORION - Owner's Manual, Rev. 3.6

34 6. PCBase System Setup
There are three tabs in the dialog window:General – this tab contains controls for the settings specific to the operation of PCBaseE-mail – this tab is used to setup the PCBase to email picturesLiveCam – this tab is used to setup the PCBase to upload pictures to the LiveCam website.
To apply settings that were changed on any of the tabs and close the dialog window, click OK button. To close the dialog window and discard the changes, click Cancel button.
General Tab
If this option is selected, the software will automatically “click” the Start PCBase button every time it opens up. This option is useful when a shortcut to launch the PCBase software is placed into the Startup shortcut group to start the software automatically when the computer starts up.
If this option is selected, the PCBase will play a default sound every time a remote camera takes a picture.
If this option is selected, the PCBase will synchronize the clock on the camera with the clock on computer every time it starts up.
ORION - Owner's Manual, Rev. 3.6

6. PCBase System Setup 35
If this option is selected, the software will automatically check for updates and notify the user if such updates are available. The user may select the time when to check for updates. Refer to section 9.7 Checking for Updatesand Messages on page 52 for details.
NOTE: Check for updates or messages automatically option requires an active (always on) Internet connection. If such connection is not available at the computer, it might be preferred to turn this option off.
E-mail Tab To activate the email feature, check the Send pictures via email box. When the box is checked, two more tabs will be available, E-mail Server and E-mail Preferences.
Refer to section 6.8 Setting up PCBase to Email Pictures on page 36 for more information on how to setup the email feature.
LiveCam Tab
NOTE: To use the LiveCam feature you must sign up for the LiveCam account. To sign up for the account go to www.buckeyecam.com. After you sign up, within a few days you should receive a passport file that will be used by the software as a security key to upload pictures to the LiveCam website.
To activate the LiveCam feature on the PCBase, check the Upload pictures to my Live Cam account box. After the LiveCam is activated, you must install the passport file. Save the attached passport file to a location that is easy to find such as the Computer Desktop. After that, click the Install new passport file button and browse to the passport file you have saved. Select the passport file and click Open button. This should install the passport file. After the file is installed you should see the account name and the web URL to the page that will contain your pictures.
After the passport file is installed, you must select cameras that will have their pictures uploaded.
When the LiveCam feature is activated in the software, the PCBase will highlight the status on the status bar.
NOTE: A default account can have a limited number of cameras and limited number of latest pictures per camera that can be stored and displayed on the web page. Certain features like a custom logo and a link
ORION - Owner's Manual, Rev. 3.6

36 6. PCBase System Setup
to another website can be added to your account. Contact BuckEye Cam to have those features activated or to increase the limit on the number of pictures and number of cameras.
6.8. Setting up PCBase to Email PicturesTo setup the PCBase to email pictures, click on the button. This will open the PCBase Settings window. Click on the E-mail tab and check the box next to Send pictures via email. The window will look like the one shown below. Note, that two more tabs were added, E-mail Server and E-mail Preferences.
Under the Send maximum of option, select how many pictures you would like to send in one email. If more than one picture is selected, specify how long to wait for the rest of the pictures before sending the email.
In the Send To: field enter the email address of the main recipient of the pictures.
You can have pictures sent to more than one email address. To specify more recipients, enter the email addresses in the text box above CC or BCC list one at a time adding each one by clicking on the Add to CC list or Add to BCC list button.
Click on the E-mail Server tab.
ORION - Owner's Manual, Rev. 3.6

6. PCBase System Setup 37
If you are using a dial-up Internet connection, check the box next to Use Dial-Up Internet Connection and select the connection name in from the drop-down box to the right.
In the boxes below, you will need to enter the required server information. You may contact the provider of your email account to obtain the following information:
• SMTP Server Name• Port number on the Server and secure connection requirement• Your email address• Your user name, used to login to the server when sending an email• Password, that is used to login to the server when sending an email
(if required)
Enter the server name in the Server Name text box. If the server does not use a secure connection, select No next to Use secure connection. If the server requires a secure connection select the corresponding type (SSL or TSL). Make sure the port number matches the port number for your server.
Enter the email address of the account into the Email address text box. This is the address of the sending email account. Receiving email addresses are entered on the tab.
If your server requires a user name, enter it into the User Name text box, otherwise, leave the box blank.
If your server requires a password authentication, check the box next to Use password authentication, and type in the password. Note, for security purpose, the characters entered will be shown as '*'s.
ORION - Owner's Manual, Rev. 3.6

38 6. PCBase System Setup
Click on E-mail Preferences tab.
On this tab, mark the cameras that will have their picture emailed by placing a check mark next to the corresponding camera.
If you would like to receive Low Battery notifications, check the Send Low Battery on Camera notification option.
NOTE: When Send Low Battery on Camera notification option is activated, the low battery notifications will be sent for any registered camera that has low battery status, regardless of the cameras that are selected to have their pictures emailed.
To apply the changes and close the Setup dialog click OK button.
To verify your email settings, you can send a test email by clicking on the button on the mail window and selecting Send a Test Email from
the drop-down menu.
6.9. Setting up LiveCamThe LiveCam feature of the ORION PCBase allows you to post pictures from selected cameras to the LiveCam website at:
http://livecam.buckeyecam.comBefore you activate the LiveCam you must sign up for the LiveCam account. To sign up, go to www.buckeyecam.com, select LiveCam and click on Registration. You will need to have the PCBase modem and Authentication code ready (both numbers are printed on the PCBase
ORION - Owner's Manual, Rev. 3.6
6. PCBase System Setup 39
modem) to complete the registration.
After you register you will receive a passport file which will be used by the PCBase Software to get access to the website and to upload pictures. Save the file to some known location on your computer such as Desktop or My Documents folder. To install the passport file, open the LiveCam setup tab in the Setup dialog box and click on Install new passport file button.Navigate to the passport file that you have saved and click Open.
You will notice that the account name and a link to your own LiveCam page are displayed in the window. Remember the account name which you will be using when you are visiting the LiveCam website.
After the passport file is installed, select the cameras you you want to be published on the LiveCam web site. Also select how often you want you LiveCam web site to be updated and click the OK button to close the Setup window and apply you LiveCam settings.
Once the LiveCam is activated, you can upload the latest pictures to your LiveCam account manually by clicking on the and selecting Synchronize LiveCam pictures. This will run the LiveCam update script and will upload pictures to the website.
Once the pictures are uploaded, go to livecam.buckeyecam.com, enter the account name, and press Enter. This will take you to your own LiveCam web page.
NOTE: The LiveCam feature of the software does not have the option to open a dial-up Internet connection. For the LiveCam to work best an “always-on” Internet connection such as DSL or Cable is recommended.
ORION - Owner's Manual, Rev. 3.6

40 7. Stand-Alone Camera Setup
7. Stand-Alone Camera SetupThe Stand-alone mode allows the user to place a camera in locations where no communication to the base is available. Stand-alone camera is not registered to any base and will store pictures to the memory card inserted into that camera.
7.1. Configuring Unit as a Stand-Alone CameraCamera can be switched to stand-alone mode if it is in one of the following state:
a) Portable Base mode with no cameras registeredb) unregistered wireless camera mode
To set the camera into stand-alone mode:1. Press MENU button.2. Using UP/DOWN buttons select MODE.3. Press SELECT button.4. Using UP/DOWN buttons select ALONE.5. Press SELECT button. WAIT light should turn on indicating that
the camera is rebooting into stand-alone mode.
After the camera reboots it will immediately start operating with default settings, resolution of 1.3 Mpixels, trigger delay of 15 seconds.
7.2. Changing Settings on Stand-Alone CameraAny time a card is inserted into a stand-alone camera, the camera would verify and make sure the software to change settings and the settings file are present on the card. If the software or settings file is not present, or the file is corrupted, it would update it on the card. This is done automatically and no user intervention is required.
If you purchases a new blank memory card or accidentally deleted the program, to place a copy of the software along with the settings file just insert it into the card slot on a stand-alone camera. The camera would verify that the software is present on the card and if needed it would copy one to the card. If that happens, you will notice that WAIT light is staying on longer than one second. Before you remove the card from the camera, press SAVE PICS TO CARD button. By pressing this button you are telling the camera that you are about to remove the card and the camera would make sure that it is not accessing the card for about 10 seconds giving you the time to safely remove the card.
ORION - Owner's Manual, Rev. 3.6
7. Stand-Alone Camera Setup 41
Insert the card into the card reader and open it on your computer. Run the camsetup.exe located on the memory card. After you changed the settings in the software, insert the card back into the camera to update the settings.
Refer to section 5.6 on page 16 for step-by-step instructions and description of different settings.
7.3. Changing Time and DateNOTE: The BuckEye Cam ORION uses Military settings when displaying the time. The time and date is maintained with a 3V Lithium battery located next to the On/Off switch.
To change the time and date on the stand-alone camera:1. Press and hold the SET CLOCK button for two seconds until
HOURS appears on the display. Release the SET CLOCK button.2. Press the UP or DOWN buttons to set the Hour.3. Press the SET CLOCK button to display MINUTE.4. Press the UP or DOWN button to set the Minute.5. Repeat steps 3 and 4 to update SECOND, DAY, MONTH, and
YEAR. Note, when updating seconds, pressing UP/DOWN button will reset the seconds to 00.
After the time is changed, the Portable Base will automatically notify the cameras about the new time and date, and the clock the the Remote Cameras will be synchronized to the clock on the Portable Base.
7.4. Switching Stand-Alone Camera to WirelessIf you want to have your camera transmit pictures to a PCBase or a Portable base, the stand-alone camera needs to be first switched to a wireless camera mode and then registered to the base.
To switch the stand-alone camera to wireless mode:1. Press MENU button on the camera2. Using UP/DOWN buttons scroll until you see MODE on the display3. Press SELECT button4. Using UP/DOWN buttons scroll until you see WIRELS on the
display5. Press SELECT button
NOTE: Before you change the operating mode from stand-alone to wireless camera, make sure you save pictures from the camera to the card first. After the mode is changed the unit will reboot and any
ORION - Owner's Manual, Rev. 3.6
42 7. Stand-Alone Camera Setup
pictures that were not saved to the card will be lost.
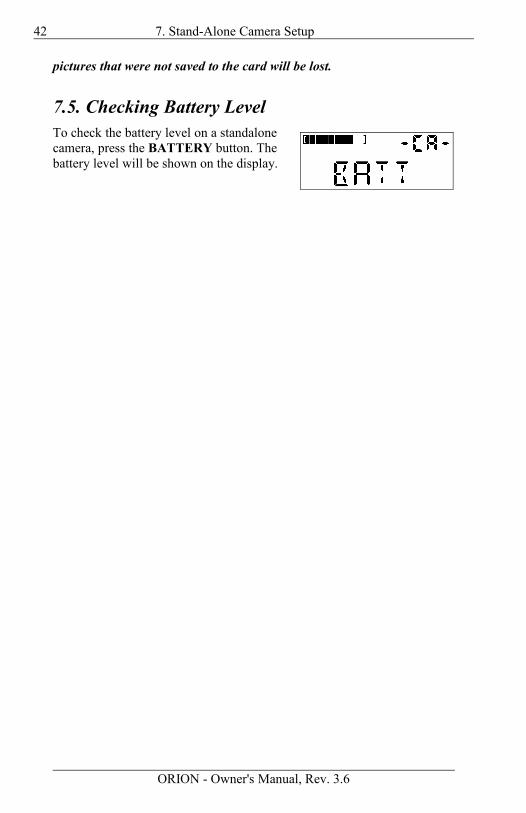
7.5. Checking Battery LevelTo check the battery level on a standalone camera, press the BATTERY button. The battery level will be shown on the display.
ORION - Owner's Manual, Rev. 3.6

8. Repeater Function Description 43
8. Repeater Function Description
8.1. DescriptionRepeater function is available in the ORION camera firmware version 106 and above and ORION PCBase software version 3.0 and above. Refer to Owner's Manual for information on how to check the firmware version of the camera. For information on how to update the camera firmware and PCBase software visit www.buckeyecam.com.
Repeater function is designed to extend the wireless range of the system. It allows a camera to transmit pictures back to the PCBase through other cameras.
The figure below illustrates an example where the repeater feature is used. In this example:
Camera 4 is set to transmit through Camera 3Camera 3 is set to transmit through Camera 1Camera 2 is set to transmit through Camera 1Camera 1 is set to transmit directly to the PCBase.
Since repeating cameras are transmitting data from other cameras, they will have a shorter battery life. In the example above, Camera 1 would be expected to have the shortest battery life since it is servicing the other three cameras.
8.2. Setting and Changing Routing PathTo setup the repeater network, each camera needs to have the path to the base defined by the user. After a camera is registered to the PCBase, by default it is set to transmit pictures directly to that base.
To enable the repeater feature, the camera needs to be “told” which other camera is the path to the PCBase.
ORION - Owner's Manual, Rev. 3.6
PCBase
Camera 1
Camera 2
Camera 3
Camera 4

44 8. Repeater Function Description
In an example illustrated blow, Camera 1 needs to be set to transmit pictures through Camera 3. All the user has to do is to change routing configuration on Camera 1:
1. Press MENU button2. Using UP/DOWN buttons scroll until you see ROUTE on the
display3. Press SELECT button4. Using UP/DOWN buttons select the camera that will retransmit
pictures to the PCBase. For the given example select C-03. This will tell the camera “to transmit pictures to Camera 3 and camera 3 will repeat them to the base”.
5. Press SELECT button. This will change the routing path for the camera.
NOTE: Because the camera is not “aware” of what other cameras are registered to the PCBase, any camera number from C-01 to C-30 can be selected. The user has to make sure that the camera number selected is registered in the PCBase.
After the routing path is changed on the camera, it is recommended that the user check the signal strength using the signal button. If a camera is set to route to another camera (not the base), pressing the SIGNAL button on that camera will initiate the signal measurement to the next camera down the path to the base. In the example above, the reported signal strength on Camera 1 will be how well Camera 3 can hear Camera 1.On the other hand, if the signal for Camera 1 is measured from the base, the strength reported will be the how well Camera 1 can hear Camera 3.There is no set limit to how long the chain can be. However, the user should keep in mind the longer the chain on repeating cameras, the slower the transmission speed is going to be. User should also make sure that there are no routing loops created, where Camera 3 transmits pictures to Camera 2, Camera 2 transmits pictures to Camera 1, and Camera 1 transmits
ORION - Owner's Manual, Rev. 3.6
Remote Camera 1
PCBase
Remote Camera 2
Remote Camera 3

8. Repeater Function Description 45
pictures back to Camera 3.
To configure the camera back to transmit pictures directly to the base, the following needs to be done at the camera:
1. Press MENU button2. Using UP/DOWN buttons scroll until you see ROUTE on the
display3. Press SELECT button4. Using UP/DOWN buttons select BASE.5. Press SELECT button. This will change the routing path for the
camera.After the routing path is changed to route to the base directly, signal strength should be measure to make sure the camera can communicate directly to the base.
8.3. Communication Delay in Repeater NetworkNOTE: It is common to have longer communication delays with cameras that are communicating with the base through a repeater compared to the cameras that are communicating directly with the base.
NOTE: The repeaters in the network only affect the radio communication delays between the cameras and the base. The time it takes the camera to take a picture in response to a motion in front of that camera (some times called Trigger Time) does not change.
The delays increase the time it takes to update settings on those cameras. The more repeaters are in the path to the cameras the longer the delay will be.
The delay will also affect the Battery/Signal test and may result in frequent No Communication messages. To improve the Battery/Signal test, a second cycle was added. Thus, if the Battery/Signal requested for the camera that communicates through a repeater, and the communication fails, the PCBase will start the request one more time. In this case a message “No Communication. Trying again...” will be displayed in the Message box. When the second try fails, “No Communication” message will be shown in the Message box and the request will be aborted.
The delays also affects the time it takes to transmit a picture from a camera to the base.
In the example illustrated on page 44, for the same picture quality and resolution, the transmission time for Camera 1 will be longer than
ORION - Owner's Manual, Rev. 3.6

46 8. Repeater Function Description
transmission time for Cameras 3 and 2 because the communication path for Camera 1 has two hops compared to just one hop for the other cameras:
Camera 1: first hop Cam1-to-Cam3, second hop Cam3-to-Base;Camera 2: just one hop Cam2-to-Base; Camera 3: just one hop Cam3-to-Base.
8.4. Viewing the Routing Structure on PCBaseTo view the routing structure on ORION PCBase, click on menu button and select Routing Structure. This opens a BuckEye Cam ORION Network Structure window with graphical representation of the current network setup. This is a dynamic window, meaning that if the routing settings on the network change, the structure will automatically rearrange to represent the new structure.
NOTE: Depending on the number of repeaters in the path from a camera to the base, it may take some time after the camera routing was changed before the changes are reflected on the network structure window.
To close the window, click on the button in the upper right hand corner.
8.5. Unregistering a CameraTo unregister the camera that is set to communicate through another camera (repeater), it needs to be placed near the PCBase. During unregistration the base will ignore the routing settings and try to communicate directly to the camera. This protocol insures correct and successful unregistration process.
NOTE: User cannot unregister a camera that is also carrying a repeater function for other cameras. First, all the cameras behind repeating
ORION - Owner's Manual, Rev. 3.6
8. Repeater Function Description 47
camera should be either unregistered or routed around the repeater. Only then, the camera can be unregistered.
Thus, before unregistering Camera 3 on Figure 1, Camera 4 should be unregistered or routed to either Camera 2, Camera 1, or directly to the PCBase. Only after routing is changed on Camera 4 and the change is reflected in the Routing Structure window, Camera 3 can be unregistered.
ORION - Owner's Manual, Rev. 3.6

48 9. Camera Operation and Maintenance
9. Camera Operation and Maintenance
9.1. Saving Pictures to Memory Card at the CameraUnder normal operation the wireless camera will transmit pictures to the Base. When the camera is unable to transmit pictures to the base, the user may wish to retrieve the pictures directly from the camera. For that reason, the pictures can be saved to an SD-compatible card inserted into the Memory Card slot in the camera.
The maximum compatible memory card size is 2GB (2 gigabytes). The camera is NOT compatible with SD High-Capacity (SD HC) memory cards.
NOTE: This operation requires entering a password. Each camera has a unique password which is assigned by the manufacturer and cannot be changed. The password for each camera is supplied along with the camera. For convenience, each camera comes with two password stickers. One sticker can be attached at the end of the manual in the Password Codes section.
NOTE: Make sure you DO NOT TURN THE CAMERA OFF. Turning the camera off will clear the internal memory and will erase all of the pictures.
Before saving the pictures to a memory card, make sure there is enough space on the card. It is recommended to have at least 64 megabytes of free space available on the card.
1. While the camera is turned on, insert the card into the Memory Card slot in the camera.
2. Press SAVE PICS TO CARD button. You will be prompted to enter the password.
3. Using UP/DOWN buttons, scroll until the character matches the first character of the password.
4. Press SELECT button.5. Repeat steps 3 and 4 for the other 5 characters of the password.6. After the last character is entered, the camera will start saving
pictures to the card. During this process the WAIT indicator will come on. DO NOT REMOVE the card while the pictures are copied to the memory card.
7. When all of the pictures are copied to the card, the READY indicator will come on. Now, the card can be removed from the camera.
ORION - Owner's Manual, Rev. 3.6
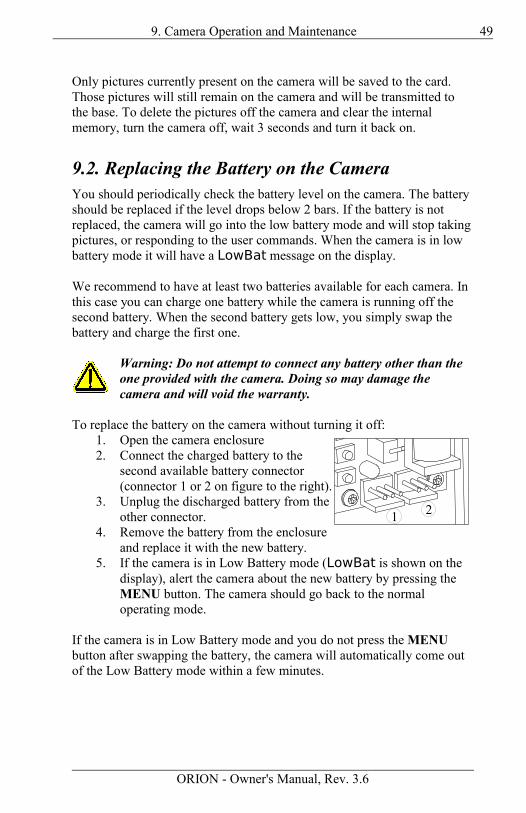
9. Camera Operation and Maintenance 49
Only pictures currently present on the camera will be saved to the card. Those pictures will still remain on the camera and will be transmitted to the base. To delete the pictures off the camera and clear the internal memory, turn the camera off, wait 3 seconds and turn it back on.
9.2. Replacing the Battery on the CameraYou should periodically check the battery level on the camera. The battery should be replaced if the level drops below 2 bars. If the battery is not replaced, the camera will go into the low battery mode and will stop taking pictures, or responding to the user commands. When the camera is in low battery mode it will have a LowBat message on the display.
We recommend to have at least two batteries available for each camera. In this case you can charge one battery while the camera is running off the second battery. When the second battery gets low, you simply swap the battery and charge the first one.
Warning: Do not attempt to connect any battery other than the one provided with the camera. Doing so may damage the camera and will void the warranty.
To replace the battery on the camera without turning it off:1. Open the camera enclosure2. Connect the charged battery to the
second available battery connector (connector 1 or 2 on figure to the right).
3. Unplug the discharged battery from the other connector.
4. Remove the battery from the enclosure and replace it with the new battery.
5. If the camera is in Low Battery mode (LowBat is shown on the display), alert the camera about the new battery by pressing the MENU button. The camera should go back to the normal operating mode.
If the camera is in Low Battery mode and you do not press the MENU button after swapping the battery, the camera will automatically come out of the Low Battery mode within a few minutes.
ORION - Owner's Manual, Rev. 3.6
21

50 9. Camera Operation and Maintenance
9.3. Charging the BatteryThe ORION batteries are charged using a special battery charger designed to charge 6V Sealed Lead Acid (SLA) batteries.
Warning: Do not attempt to charge the batteries using any other type of battery charger. Charging the battery with the wrong charger may reduce the battery life or damage the battery.
Warning: Do not attempt to charge any type of battery other than 6V Sealed Lead Acid (SLA) batteries using the provided battery charger.
Before you plug the battery charger into the wall, make sure the alligator clips on the charger are not touching each other.
To charge the battery, plug the battery charger to the wall. Connect the RED alligator clip of the charger to the positive RED terminal on the battery. Connect the BLACK alligator clip to the negative BLACK terminal on the battery. The indicator on the battery charger should turn RED, indicating that the battery is charging.
Tip: To make sure the alligator clips make good contact with the battery terminals lightly squeeze the alligator clip jaws and wiggle them a bit to help pierce through the battery terminal insulators.
When the battery is charged, the indicator will turn solid GREEN or flashing GREEN. At this point, you may disconnect the battery from the battery charger.
9.4. Capturing License PlateActivation of Capture License Plate option (see page 21) switches the camera to a special picture capturing mode. In this mode, the lighting in the picture is adjusted to make a license plate in the picture the most readable, where as in regular mode the camera will try to obtain the best overall picture brightness and contrast. Because of that, the day time pictures may appear darker and may not have the correct color representation. The night time pictures completely dark with just the license plate and possibly headlights or taillights visible.
License plate mode is activated by selecting Capture License Plate option which can be accessed by clicking on Advanced Settings... button in Camera Settings.
ORION - Owner's Manual, Rev. 3.6
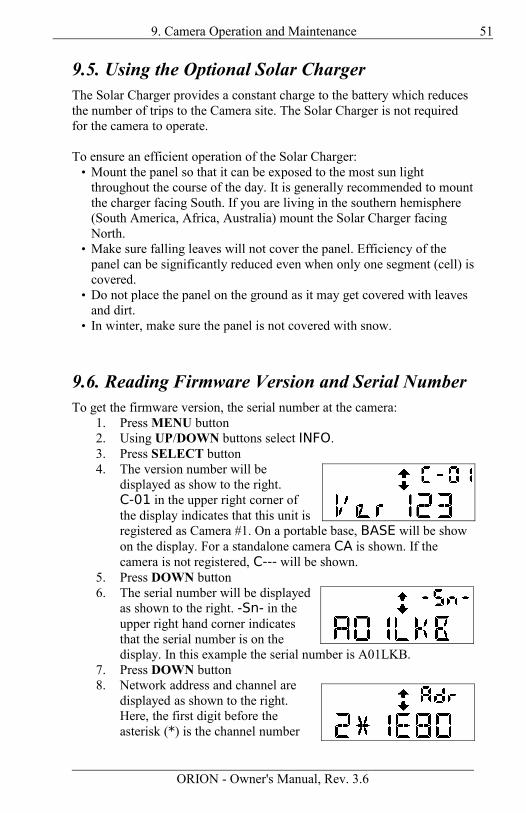
9. Camera Operation and Maintenance 51
9.5. Using the Optional Solar ChargerThe Solar Charger provides a constant charge to the battery which reduces the number of trips to the Camera site. The Solar Charger is not required for the camera to operate.
To ensure an efficient operation of the Solar Charger:• Mount the panel so that it can be exposed to the most sun light
throughout the course of the day. It is generally recommended to mount the charger facing South. If you are living in the southern hemisphere (South America, Africa, Australia) mount the Solar Charger facing North.
• Make sure falling leaves will not cover the panel. Efficiency of the panel can be significantly reduced even when only one segment (cell) is covered.
• Do not place the panel on the ground as it may get covered with leaves and dirt.
• In winter, make sure the panel is not covered with snow.
9.6. Reading Firmware Version and Serial NumberTo get the firmware version, the serial number at the camera:
1. Press MENU button2. Using UP/DOWN buttons select INFO.3. Press SELECT button4. The version number will be
displayed as show to the right.C-01 in the upper right corner of the display indicates that this unit is registered as Camera #1. On a portable base, BASE will be show on the display. For a standalone camera CA is shown. If the camera is not registered, C--- will be shown.
5. Press DOWN button6. The serial number will be displayed
as shown to the right. -Sn- in the upper right hand corner indicates that the serial number is on the display. In this example the serial number is A01LKB.
7. Press DOWN button8. Network address and channel are
displayed as shown to the right. Here, the first digit before the asterisk (*) is the channel number
ORION - Owner's Manual, Rev. 3.6
52 9. Camera Operation and Maintenance
and the four digits after represent the address. Adr in the upper right hand corner indicates that the address is shown on the display.
A camera serial number and the firmware version can also be read in the PCBase software thus eliminating the need to visit the camera.
Place the mouse cursor over the Camera X label with X being the camera number in the corresponding camera control panel. The camera label is highlighted in the picture on the right. A hint box will appear showing the camera serial number and the firmware version as shown in the picture.
NOTE: If the camera serial number and firmware version are shown as N/A, the software might not be aware of that information yet. To update the information, click the button.
9.7. Checking for Updates and MessagesTo check for updates or messages, click on the button and select Check for Updates/Messages. This will open the user notification area at the bottom of the software window as shown below. To activate automatic update notifications, refer to page 35.
More information can be obtained by clicking on the corresponding text or buttons.To close the notification area, click on the button to the right.
ORION - Owner's Manual, Rev. 3.6

10. Troubleshooting 53
10. TroubleshootingDescription of a Problem Possible Reason of Failure Possible Solution
“No communication” or No COM message when testing signal.
Spike in interference. Repeat the signal test.
Low signal level. Use higher gain antenna.Ground the antenna properly to improve reception.
High gain antenna cable is too long.
Use shorter cable.Use cable with reduced signal loss.
Signal is blocked by obstacles.
Elevate the antenna.
For a Portable Base system consider repositioning the base.
Bad antenna connection. Check the connections between antenna and cable.
Antenna cable is damaged. Replace the cable. Avoid pinching the cable in doors or windows.
Holding high gain antenna while testing the signal strength.
Attach the antenna to a non-conducting pole (PVC pipe, broom stick)
Camera routed through a repeater and battery in that repeater is low
Replace battery in the repeater unit to restore the communication path
Battery in the camera is low Replace the battery
Error1 message appears on the display when inserting a memory card.
File structure is corrupted on the card.
Reformat the card using FAT16.
Card is bad. Replace the card.
Unable to register a camera. Camera is not turned on. Turn the camera on.
Camera is already registered to another base.
Unregister the camera from the base before registering it to another base. Refer to section 5.4 on page 15 on how to reset the camera registration.
Camera is in stand-alone mode.
Switch camera to wireless mode. Refer to section 7.4 on page 41.
Antenna is not connected. Connect the antenna.
Low signal. Always register camera before placing it in the field. When registering, place the camera near the Portable Base or PCBase modem.
ORION - Owner's Manual, Rev. 3.6

54 10. Troubleshooting
Description of a Problem Possible Reason of Failure Possible Solution
PCBase software cannot find the PCBase modem.
PCBase modem driver is not installed.
Refer to section 6.1 on page 27 for instructions on how to install the driver.
PCBase modem is not connected to the computer.
Make sure PCBase modem is connected to the USB cable and the cable is plugged to the computer.
Bad USB port on computer. Connect to a different USB port. Make sure the supplied wall adapter is connected to the PCBase modem and plugged into the AC outlet.
Portable Base not receiving pictures. Picture counter on the display is showing that there are pictures on the portable base.
Wrong memory card type used causing the received pictures buffer on the base to get filled up.
Make sure a compatible memory card is used, i.e.SD-compatible, 2GB maximum size. SD High-Capacity (SDHC) memory cards are NOT compatible.Insert a compatible memory card into the card slot on the Portable Base and press SAVE PICS TO CARD button to free up the space. The Portable Base will automatically start receiving pictures.
ORION - Owner's Manual, Rev. 3.6

11. Replacement Parts and Accessories 55
11. Replacement Parts and AccessoriesReplacement parts and optional accessories can be purchased via our website at www.buckeyecam.com or by calling (866) 325-8172.
ORION - Owner's Manual, Rev. 3.6

56 12. How to Contact BuckEye Cam
12. How to Contact BuckEye CamIf you have any questions about using your BuckEye Cam ORION System, you can contact us via any of the following:
E-mail: [email protected]
Website: www.buckeyecam.com
Telephone: 1-866-325-8172 Monday through Friday, 8:00 am – 5:00 pm E.S.T.
ORION - Owner's Manual, Rev. 3.6
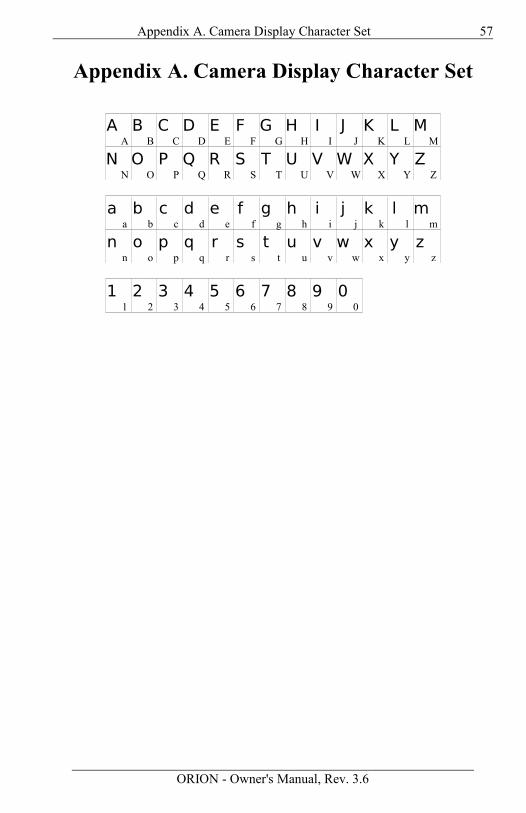
Appendix A. Camera Display Character Set 57
Appendix A. Camera Display Character Set
A B C D E F G H I J K L MA B C D E F G H I J K L M
N O P Q R S T U V W X Y ZN O P Q R S T U V W X Y Z
a b c d e f g h i j k l ma b c d e f g h i j k l m
n o p q r s t u v w x y zn o p q r s t u v w x y z
1 2 3 4 5 6 7 8 9 01 2 3 4 5 6 7 8 9 0
ORION - Owner's Manual, Rev. 3.6

Password Codes

Password Codes