Embed Size (px)
Citation preview

PARTS LISTING WITHMOUNTING AND OPERATINGINSTRUCTIONS
BREAK-AWAYSIDE FLAIL
ASSEMBLIESMF 2660-2680HD
Tiger Corporation3301 N. Louise Ave.
Sioux Falls, SD 571071-800-843-68491-605-336-7900
www.tiger-mowers.com
Current as of 06/01/2012
06040006

TO THE OWNER / OPERATOR / DEALERAll implements with moving parts are potentially hazardous. There is no substitute for a cautious,
safe-minded operator who recognizes the potential hazards and follows reasonable safety practices.The manufacturer has designed this implement to be used with all its safety equipment properly at-tached to minimize the chance of accidents.
BEFORE YOU START!! Read the safety messages on the implement and shown in this manual.Observe the rules of safety and use common sense!
READ AND UNDERSTAND THIS MANUAL! Non–English speaking operators will need to GETTHE MANUAL TRANSLATED as needed!
Warranty Information: Read and understand the complete Warranty Statement found in this manual. Fill out theWarranty Registration form in full and return it within 90 days. Make certain the Serial Number of the machine isrecorded on the Warranty Card, and form that you retain.

FORWARD
This manual contains information about many features of the Tiger mowingand roadside maintenance equipment. Some of these include: Safety precautions,Assembly instructions, Operations, Maintenance and Parts. This manual will alsoassist you in the proper break-in, daily care, and troubleshooting of your newmower.
We recommend that you read carefully the entire manual before operating theunit. Also, time spent in becoming fully acquainted with its performance features,adjustments, and maintenance schedules will be repaid in a long and satisfactorylife of the equipment.
Troubleshooting - Please, before you call, help us to help you!Please look at the equipment to observe what is happening, then:• Classify the problem
• Hydraulic, electrical or mechanical - Read the trouble shooting section• Tractor or Truck chassis - Contact vehicle dealer
• If unable to correct the problem yourself, contact your local Tiger Dealer after gathering:
• Machine model _______________________• Serial number ________________________• Dealer name _________________________• Detailed information about the problem including results of troubleshooting
Attention Owner / Operator / Dealer: It is your obligation to read, and understand,the warranty information section located at the back of this manual denoting that thepurchaser understands the safety issues relating to this machine and has receivedand will read a copy of this manual.
If at any time, you have a service problem with your Tiger mower, Contactyour local dealer for service and parts needed.
MANUFACTURED BY: DISTRIBUTED BY:Tiger Corporation _____________________3301 N. Louise Ave. _____________________Sioux Falls, SD 57107 1-_____-_____-________1-800-843-6849 1-_____-_____-________1-605-336-7900www.tiger-mowers.com


TABLE OF CONTENTS
SAFETY SECTION_____________________________________ 1
ASSEMBLY / MOUNTING SECTION______________________ 2
OPERATION SECTION_________________________________ 3
MAINTENANCE SECTION______________________________ 4
PARTS SECTION______________________________________ 5
COMMON PARTS SECTION____________________________ 6
WARRANTY INFORMATION_____________________________ 7
This symbol means:CAUTION – YOUR SAFETY IS AT RISK!
When you see this symbol, read andfollow the associated instructions carefullyor personal injury or damage may result.
Tiger is a registered trademark.


Side & Rear flail Safety Section 1-1
SAFETY
SAFETYSECTION

Side & Rear flail Safety Section 1-2
SAFETY
Indicates an imminently hazardous situation that, if not avoided, WILL result in DEATHOR VERY SERIOUS INJURY.
Indicates an imminently hazardous situation that, if not avoided, COULD result inDEATH OR SERIOUS INJURY.
Indicates an imminently hazardous situation that, if not avoided, MAY result in MINORINJURY.
Identifies special instructions or procedures that, if not strictly observed, could resultin damage to, or destruction of the machine, attachments or the enviroment.
NOTE: Identifies points of particular interest for more efficient or convienient operation orrepair. (SG-1)
General Safety Instructions and PracticesA safe and careful operator is the best operator. Safety is of primary importance to themanufacturer and should be to the owner / operator. Most accidents can be avoided by beingaware of your equipment, your surroundings, and observing certain precautions. The firstsection of this manual includes a list of Safety Messages that, if followed, will help protect theoperator and bystanders from injury or death. Read and understand these Safety Messagesbefore assembling, operating or servicing this mower. This equipment should only beoperated by those persons who have read the Manual, who are responsible and trained, andwho know how to do so safely and responsibly.
The Safety Alert Symbol combined with a Signal Word, as seen below, is usedthroughout this manual and on decals which are attached to the equipment. TheSafety Alert Symbol means: “ATTENTION! BECOME ALERT! YOUR SAFETY ISINVOLVED!” The symbol and signal word are intended to warn the owner /operator of impending hazards and the degree of possible injury when operatingthis equipment.
Practice all usual and customary safe working precautions andabove all -- remember safety is up to YOU! Only YOU can
prevent serious injury or death from unsafe practices.
READ, UNDERSTAND, and FOLLOW the following Safety Messages.Serious injury or death may occur unless care is taken to follow thewarnings and instructions stated in the Safety Messages. Always usegood common sense to avoid hazards. (SG-2)
IMPORTANT!

Side & Rear flail Safety Section 1-3
SAFETY
DANGER! Never operate the Tractor or Implement until you have read andcompletely understand this Manual, the Tractor Operator’s Manual,and each of the Safety Messages found in the Manual or on the Tractorand Implement. Learn how to stop the tractor engine suddenly in anemergency. Never allow inexperienced or untrained personnel tooperate the Tractor and Implement without supervision. Make surethe operator has fully read and understands the manuals prior tooperation. (SG-4)
WARNING! Always maintain the safety decals in good readable condition. If thedecals are missing, damaged, or unreadable, obtain and install replace-ment decals immediately. (SG-5)
WARNING! Make certain that the “Slow Moving Vehicle” (SMV) sign is installed insuch a way as to be clearly visible and legible. When transporting theEquipment use the Tractor flashing warning lights and follow all local trafficregulations. (SG-6)
WARNING! Operate this Equipment only with a Tractor equipped with anapproved roll-over-protective system (ROPS). Always wear seatbelts. Serious injury or even death could result from falling off thetractor--particularly during a turnover when the operator could bepinned under the ROPS. (SG-7)
WARNING! Do not modify or alter this Implement. Do not permit anyone to modifyor alter this Implement, any of its components or any Implementfunction. (SG-8)
DANGER! BEFORE leaving the tractor seat, always engage the brake and/or setthe tractor transmission in parking gear, disengage the PTO, stop theengine, remove the key, and wait for all moving parts to stop. Place thetractor shift lever into a low range or parking gear to prevent the tractorfrom rolling. Never dismount a Tractor that is moving or while the engineis running. Operate the Tractor controls from the tractor seat only.
(SG-9)
!Si no lee Ingles, pida ayuda a alguien quesi lo lea para que le traduzca las medidasde seguridad. (SG-3)
PELIGRO! LEA ELINSTRUCTIVO!

Side & Rear flail Safety Section 1-4
SAFETY
DANGER! Never allow children or other persons to ride on the Tractor or Implement.Falling off can result in serious injury or death.
(SG-10)
DANGER! Never allow children to operate or ride on the Tractor or Implement. (SG-11)
WARNING! Do not mount the tractor while the tractor is moving. Mount the tractoronly when the tractor and all moving parts are completely stopped.
(SG-12)
DANGER! Start tractor only when properly seated in the tractor seat. Starting atractor in gear can result in injury or death. Read the tractor operatorsmanual for proper starting instructions. (SG-13)
DANGER! Never work under the Implement, the framework, or any lifted compo-nent unless the Implement is securely supported or blocked up toprevent sudden or inadvertent falling which could cause serious injuryor even death. (SG-14)
DANGER! Do not operate this Equipment with hydraulic oil leaking. Oil isexpensive and its presence could present a hazard. Do not check forleaks with your hand! Use a piece of heavy paper or cardboard. High-pressure oil streams from breaks in the line could penetrate the skinand cause tissue damage including gangrene. If oil does penetrate theskin, have the injury treated immediately by a physician knowledge-able and skilled in this procedure. (SG-15)

Side & Rear flail Safety Section 1-5
SAFETY
WARNING! Transport only at safe speeds. Serious accidents and injuriescan result from operating this equipment at unsafe speeds.Understand the Tractor and Implement and how it handles beforetransporting on streets and highways. Make sure the Tractorsteering and brakes are in good condition and operate properly.Before transporting the Tractor and Implement, determine
the safe transport speeds for you and the equipment. Makesure you abide by the following rules:
Be aware of the operating conditions. Do not operate the Tractorwith weak or faulty brakes. When operating down a hill or on wetor rain slick roads, the braking distance increases: use extremecare and reduce your speed. When operating in traffic always usethe Tractor’s flashing warning lights and reduce your speed. Beaware of traffic around you and watch out for the other guy. (SG-19)
Test the equipment at a slow speed in turns. Increase the speedthrough the turn only after you determine that it is safe to operateat a higher speed. Use extreme care and reduce your speedwhen turning sharply to prevent the tractor and implement fromturning over. Determine the maximum safe turning speed for youand this equipment before operating on roads or uneven ground.
Only transport the Tractor and Implement at the speeds that youhave determined are safe and which allow you to properlycontrol the equipment.
Test the tractor at a slow speed and increase the speed slowly.Apply the brakes smoothly to determine the stopping characteristicsof the Tractor and Implement. As you increase the speed of theTractor the stopping distance increases. Determine the maximumsafe transport speed for you and this equipment.
2.
1.
3.
CAUTION! PROLONGED EXPOSURE TO LOUD NOISE MAY CAUSE PERMA-NENT HEARING LOSS! Tractors with or without an Implement at-tached can often be noisy enough to cause permanent hearing loss.We recommend that you always wear hearing protection if the noise inthe operator’s position exceeds 80db. Noise over 85db over an ex-tended period of time will cause severe hearing loss. Noise over 90dbadjacent to the operator over an extended period of time will causepermanent or total hearing loss. Note: Hearing loss from loud noise[from tractors, chain saws, radios, and other such sources close to theear] is cumulative over a lifetime without hope of natural recovery. (SG-I7)
WARNING! The operator and all support personnel should wear hard hats,safety shoes, safety glasses, and proper hearing protection at alltimes for protection from injury including injury from items thrown bythe equipment. (SG-16)

Side & Rear flail Safety Section 1-6
SAFETY
WARNING! Never attempt to lubricate, adjust, or remove material from theImplement while it is in motion or while tractor engine is running. Makesure the tractor engine is OFF before working on the Implement.
(SG-20)
WARNING! Periodically inspect all moving parts for wear and replace whennecessary with authorized service parts. Look for loose fasteners,worn or broken parts, and leaky or loose fittings. Make sure all pinsare properly secured. Serious injury may occur from not maintainingthis machine in good working order. (SG-21)
WARNING! Always read carefully and comply fully with the manufacturers instruc-tions when handling oil, solvents, cleansers, and any other chemicalagent. (SG-22)
DANGER! Never run the tractor engine in a closed building or without adequateventilation. The exhaust fumes can be hazardous to your health.
(SG-23)
DANGER! KEEP AWAY FROM ROTATING ELEMENTS to prevent entanglementand possible serious injury or death. (SG-24)
DANGER! Never allow children to play on or around Tractor or Implement. Childrencan slip or fall off the Equipment and be injured or killed. Children cancause the Implement to shift or fall crushing themselves or others. (SG-25)
WARNING! Do not exceed the rated PTO speed for the Implement. Excessive PTOspeeds can cause Implement driveline or blade failures resulting inserious injury or death. (SG-26)

Side & Rear flail Safety Section 1-7
SAFETY
DANGER! NEVER use drugs or alcohol immediately before or while operating theTractor and Implement. Drugs and alcohol will affect an operator’salertness and coordination and therefore affect the operator’s ability tooperate the equipment safely. Before operating the Tractor or Imple-ment, an operator on prescription or over-the-counter medication mustconsult a medical professional regarding any side effects of the medi-cation that would hinder their ability to operate the Equipment safely.NEVER knowingly allow anyone to operate this equipment when theiralertness or coordination is impaired. Serious injury or death to theoperator or others could result if the operator is under the influence ofdrugs or alcohol. (SG-27)
DANGER!
Operate the Tractor and/or Implement controls only while properly seatedin the Tractor seat with the seat belt securely fastened around you.Inadvertent movement of the Tractor or Implement may cause seriousinjury or death. (SG-29)
WARNING! Mow only in conditions where you have clear visibility in daylight or withadequate artificial lighting. Never mow in darkness or foggy conditionswhere you cannot clearly see at least 100 yards in front and to the sides ofthe tractor and mower. Make sure that you can clearly see and identifypassersby, steep slopes, ditches, drop-offs, overhead obstructions, powerlines, debris and foreign objects. If you are unable to clearly see this typeof items discontinue mowing. (SGM-1)
DANGER! There are obvious and hidden potential hazards in the operation of thisMower. REMEMBER! This machine is often operated in heavy brushand in heavy weeds. The Blades of this Mower can throw objects ifshields are not properly installed and maintained. Serious injury oreven death may occur unless care is taken to insure the safety of theoperator, bystanders, or passersby in the area. Do not operate thismachine with anyone in the immediate area. Stop mowing if anyoneis within 100 yards of mower. (SFL-1)
All Safety Shields, Guards and Safety devices including(but not limited to) - the Deflectors, Steel Guards,Gearbox Shields, PTO integral shields , and RetractableDoor Shields should be used and maintained in goodworking condition. All safety devices should be in-spected carefully at least daily for missing or brokencomponents. Missing, broken, or worn items must bereplaced at once to reduce the possibility of injury ordeath from thrown objects, entanglement, or blade con-tact. (SFL-5)
DANGER!

Side & Rear flail Safety Section 1-8
SAFETY
WARNING!Extreme care should be taken when operating near loose objects suchas gravel, rocks, wire, and other debris. Inspect the area beforemowing. Foreign objects should be removed from the site to preventmachine damage and/or bodily injury or even death. Any objects thatcannot be removed must be clearly marked and carefully avoided bythe operator. Stop mowing immediately if blades strike a foreignobject. Repair all damage and make certain rotor or blade carrier isbalanced before resuming mowing. (SGM-5)
WARNING! Many varied objects, such as wire, cable, rope, or chains, can becomeentangled in the operating parts of the mower head. These items couldthen swing outside the housing at greater velocities than the blades. Sucha situation is extremely hazardous and could result in serious injury oreven death. Inspect the cutting area for such objects before mowing.Remove any like object from the site. Never allow the cutting blades tocontact such items. (SGM-6)
WARNING! Mow at the speed that you can safely operate and control the tractor andmower. Safe mowing speed depends on terrain condition and grass type,density, and height of cut. Normal ground speed range is from 0 to 5 mph.Use slow mowing speeds when operating on or near steep slopes,ditches, drop-offs, overhead obstructions, power lines, or when debris andforeign objects are to be avoided. (SGM-7)
WARNING! Avoid mowing in reverse direction when possible. Check to make surethere are no persons behind the mower and use extreme care whenmowing in reverse. Mow only at a slow ground speed where you can safelyoperate and control the tractor and mower. Never mow an area that youhave not inspected and removed debris or foreign material. (SGM-8)
DANGER! Replace bent or broken blade with new blades. NEVER ATTEMPT TOSTRAIGHTEN OR WELD ON BLADES SINCE THIS WILL LIKELYCRACK OR OTHERWISE DAMAGE THE BLADE WITH SUBSE-QUENT FAILURE AND POSSIBLE SERIOUS INJURY FROM THROWNBLADES. (SGM-10)
WARNING!Do not mow with two machines in the same area except with Cab tractorswith the windows closed. (SGM-11)
DANGER! The rotating parts of this machine have been designed and tested forrugged use. However, the blades could fail upon impact with heavy,solid objects such as metal guard rails and concrete structures. Suchimpact could cause the broken objects to be thrown outward at veryhigh velocities. To reduce the possibility of property damage, seriousinjury, or even death, never allow the cutting blades to contact suchobstacles. (SGM-4)

Side & Rear flail Safety Section 1-9
SAFETY
DANGER! Flail Mowers are capable under adverse conditions of throwing objectsfor great distances (100 yards or more) and causing serious injury ordeath. Follow safety messages carefully.
STOP MOWING IF PASSERSBY ARE WITHIN 100 YARDS UN-LESS:
-Front and Rear Deflectors are installed and in good, working condition;
-Mower Head is running close to and parallel to the ground without exposed Blades;
-Passersby are outside the existing thrown-object zone;-All areas have been thoroughly inspected and all foreign
material such as rocks, cans, glass, and general debris has been removed.
NOTE: Where there are grass and weeds high enough to hide debristhat could be struck by the blades, the area should be: in-spected and large debris removed, mowed at an intermediateheight, inspected closely with any remaining debris being re-moved, and mowed again at desired final height. (SFL-6)
DANGER! Do not put hands or feet under mower decks. Blade Contact can resultin serious injury or even death. Stay away until all motion has stoppedand the decks are securely blocked up. (SFL-2)
WARNING!Each Rear Wheel must have a minimum of 1,000 pounds contact withthe surface to prevent lateral instability and possible tip-over whichcould result in serious bodily injury or even death. Widen the wheeltread and add weights if needed. Refer to the mounting instructionsor call Customer Service if you need assistance with CouterweightProcedure. (SFL-3)
WARNING!
Do not operate Mower if excessive vibration exists. Shut down PTOand the Tractor engine. Inspect the Mower to determine the sourceof the vibration. If Mower blades are missing or damaged replacethem immediately. Do not operate the mower until the blades havebeen replaced and the Mower operates smoothly. Operating theMower with excessive vibration can result in component failure andbroken objects to be thrown outward at very high velocities. To reducethe possibility of property damage, serious injury, or even death, neverallow the Mower to be operated with blades missing. (SFL-4)
WARNING!
Be particularly careful when transporting the Implement with the Tractor.Turn curves or go up hills only at a low speed and using a gradualsteering angle. Rear mounted implements move the center of gravity tothe rear and remove weight from the front wheels. Make certain, byadding front ballast, that at least 20% of the tractor’s weight is on thefront wheels to prevent rearing up, loss of steering control or Tractor tip-over. Slow down on rough or uneven surfaces to prevent loss ofsteering control which could result in property damage or possible injury.Do not transport unless 3-Point lift lever is fully raised and in the latchedtransport position. Dropping implement in transport can cause seriousdamage to the tractor and/or Implement and possibly cause the operatoror others to be injured or killed. (S3PT-2)

Side & Rear flail Safety Section 1-10
SAFETY
DANGER! Always disconnect the main PTO Driveline from the Tractor beforeperforming service on the Mower. Never work on the Mower with thetractor PTO driveline connected and running. Blades or Drivelines couldturn without warning and cause immediate entanglement, injury or death.(SRM-3)
WARNING! Do not let the Blades turn when the Mower Deck is raised for anyreason, including clearance or for turning. Raising the Mowerdeck exposes the Cutting Blades which creates a potentiallyserious hazard and could cause serious injury or even death fromobjects thrown from the Blades. (SRM-7)
WARNING!Never leave Tractor and Implement unattended while the implement is inthe lifted position. Accidental operation of lifting lever or a hydraulic failuremay cause sudden drop of unit with injury or death by crushing. Toproperly park the implement when disconnecting it from the tractor, lowerthe stand and put the retaining pin securely in place, or put a securesupport under the A-Frame. Lower the implement carefully to the ground.Do not put hands or feet under lifted components. (SPT-1)
DANGER! Make sure the PTO shield, integral driveline shields, and input shields areis installed when using PTO-driven equipment. Always replace anyshield if it is damaged or missing. (S3PT-8)
WARNING! Relieve hydraulic pressure prior to doing any maintenance or repair workon the Implement. Place the Implement on the ground or securelyblocked up, disengage the PTO, and turn off the tractor engine. Pushand pull the Remote Cylinder lever in and out several times prior tostarting any maintenance or repair work. (S3PT-9)
WARNING! Use extreme care when lowering or unfolding the implement’s wings.Make sure no bystanders are close by or underneath the wings. Allowample clearance around the implement when folding or unfolding thewings. Use extreme caution around buildings or overhead power lines.
(S3PT-5)
DANGER!When the Wings are folded for transport, the center of gravity is raisedand the possibility of overturn is increased. Drive slowly and useextremecaution when turning on hillsides. Overturning the Implementcould cause the Implement to overturn the Tractor and vice versa resultingin serious injury or even death. Never fold wings on a hillside...theImplement may overturn. (STI-2)
DANGER!DO NOT allow any person under a folded wing unless wing is securelylocked up or supported. DO NOT approach the Implement unless theTractor is turned off and all motion has ceased. Never work under theframe work, or any lifted component unless the implement is securelysupported or blocked up. A sudden or inadvertent fall by any of thesecomponents could cause serious injury or even death. (STI-3)

Side & Rear flail Safety Section 1-11
SAFETY
WARNING!
In addition to the design and configuration of this Implement, including Safety Signs and SafetyEquipment, hazard control and accident prevention are dependent upon the awareness,concern, prudence, and proper training of personnel involved in the operation, transport,maintenance, and storage of the machine. Refer also to Safety Messages and operationinstruction in each of the appropriate sections of the Tractor and Equipment Manuals. Payclose attention to the Safety Signs affixed to the Tractor and Equipment. (SG-18)
Tiger mowers use balanced and matched system components for blade carriers, blades, cutter-shafts, knives, knife hangers, rollers, drive-train components and bearings. These parts are made andtested to Tiger specifications. Non-genuine “will fit” parts do not consistently meet these specifications.The use of “will fit” parts may reduce mower performance, void mower warranties and present a safetyhazard. Use genuine Tiger mower parts for economy and safety.
SEE YOUR DEALER
Engine Exhaust, some of its constituents, and certain components contain or emitchemicals known to the state of California to cause cancer and birth or otherreproductive harm.
WARNING!Battery posts, terminals and related accessories contain lead and lead compounds,chemicals known to the state of California to cause cancer and birth or otherreproductive harm. Wash hands after handling!
WARNING! The rotating parts of this machine continue to rotate even after the PTO has been turnedoff. The operator should remain in his seat for 60 seconds after the brake has been set,the PTO disengaged, the tractor turned off, and all evidence of rotation has ceased.(3PT-10)
“Wait a minute...Save a life!”
DANGER! The flail cutter shaft is designed for standard rotation (samerotation as the tractor wheels during forward travel). Never operate thecutter shaft in the reverse rotation. Operating this mower in reverserotation may cause objects to be thrown out the front of the mowerhead.

Side & Rear flail Safety Section 1-12
SAFETY
24028 MOWER DECK
22839 MOWER DECK
21405 MOWER DECK
22840 INSIDE OF CAB
PART NO.LOCATION

Side & Rear flail Safety Section 1-13
SAFETY
42350 MOWER DECK
33743 INSIDE OF CAB
10” x 5.5” 31522 MOWER DECK18.25” x10” 31523 HYDRAULIC TANK
PART NO.LOCATION

Side & Rear flail Safety Section 1-14
SAFETY
6T3217 MOWER DECK
42399 MOWER DECK
6T3219 INSIDE OF CAB
6T3220FRONT PUMP MOUNT
PART NO.LOCATION
42400 MOWER DECK

Side & Rear flail Safety Section 1-15
SAFETY
6T3223 INSIDE OF CAB
6T3224 MOWER DECK
6T3221 INSIDE OF CAB
6T3222 INSIDE OF CAB
PART NO.LOCATION
6T3230 INSIDE OF CAB

Side & Rear flail Safety Section 1-16
SAFETY
6T3243 INSIDE OF CAB
6T3236 MOWER DECK HYDRAULIC TANK
6T3233 HYDRAULIC TANK
6T3234 INSIDE OF CAB
PART NO.LOCATION

Side & Rear flail Safety Section 1-17
SAFETY
34852 HYDRAULIC TANK
06550054 ON MOWER HEAD

Side & Rear flail Safety Section 1-18
SAFETY
ITEM PART NO. QTY. DESCRIPTION
50023 AVAIL MANUAL CANISTER COMPLETE1 00776031 1 ROUND MANUAL CANISTER
33997 1 DECAL, SHEET, MANUAL CANISTER2 * DECAL3 * DECAL4 * DECAL5 * AVAIL SPECIFIC PRODUCT MANUAL6 33753 1 E M I SAFETY MANUAL7 34296 1 FRONT ADHESIVE PAD8 34297 1 REAR ADHESIVE PAD9 6T1823 4 ZIP TIE 14” LONG
NOTE:The manual canister can be bolted, zip tied or adhered to a variety ofsurfaces. Locate a protected area within the view of the operator. Thenselect an installation method and attach the canister. CAUTION - AVOIDDRILLING HOLES INTO UNKNOWN AREAS, wires and other parts maybe located behind these areas. When adhering the canister to a surface,thoroughly clean that surface before installing the canister.

Side & Rear flail Safety Section 1-19
SAFETY
This section is intended to explain in broad terms the concept and effect of federal laws and regulationsconcerning employer and employee equipment operators. This section is not intended as a legalinterpretation of the law and should not be considered as such.
Employer-Employee Operator RegulationsU.S. Public Law 91-596 (The Williams-Steiger Occupational and Health Act of 1970) OSHA
This Act Seeks:“...to assure so far as possible every working man and woman in the nation safe andhealthful working conditions and to preserve our human resources...”
DUTIESSec. 5 (a) Each employer-(1) shall furnish to each of his employees employment and a place of employment whichare free from recognized hazards that are causing or are likely to cause death or seriousphysical harm to his employees;(2) shall comply with occupational safety and health standards promulgated under thisAct.(b) Each employee shall comply with occupational safety and health standards and allrules, regulations and orders issued pursuant to this Act which are applicable to hisown actions and conduct.
OSHA RegulationsOSHA regulations state in part: “At the time of initial assignment and at least annuallythereafter, the employer shall instruct every employee in the safe operation and servicingof all equipment with which the employee is, or will be involved.”
Employer Responsibilities:To ensure employee safety during Tractor and Implement operation, it is the employer’s responsibilityto:
1. Train the employee in the proper and safe operation of the Tractor and Implement.
2. Require that the employee read and fully understand the Tractor and Implement Operator’s manual.
3. Permit only qualified and properly trained employees to operate the Tractor and Implement.
4. Maintain the Tractor and Implement in a safe operational condition and maintain all shields andguards on the equipment.
5. Ensure the Tractor is equipped with a functional ROPS and seat belt and require that the employeeoperator securely fasten the safety belt and operate with the ROPS in the raised position at alltimes.
6. Forbid the employee operator to carry additional riders on the Tractor or Implement.
7. Provide the required tools to maintain the Tractor and Implement in a good safe working conditionand provide the necessary support devices to secure the equipment safely while performing repairsand service.
Child Labor Under 16 Years of AgeSome regulations specify that no one under the age of 16 may operate power machinery. It is yourresponsibility to know what these regulations are in your own area or situation. (Refer to U.S. Dept. ofLabor, Employment Standard Administration, Wage & Home Division, Child Labor Bulletin #102.)
FEDERAL LAWS AND REGULATIONS

Side & Rear flail Safety Section 1-20
SAFETY

Assembly Section 2-1
ASSEMBLY SECTION
MASSEY 2660 SIDE FLAIL

ASSEMBLY
Assembly Section 2-2
Before attempting to mount your Tiger mower, it is importantto read an understand all of the Safety Messages in the Safetysection of this manual.
Check complete shipment list against the packing list to make sure there are no shortages. Make certain the tractor model is the appropriate one for the mower received!
Always use a floor jack, hoist or fork lift to lift and raise heavy parts.
Read and understand the entire assembly section instructions before attempting to mount your Tiger mower. Refer to the parts section of this manual for detailed illustrations to locate all parts. (ASM-C-0001)
TRACTOR PREPARATIONA. Remove right and left hand steps.
B. Disconnect battery cables from both batteries.
C. Remove engine side panels, or raise hood to access front pulley.
D. Remove plugs from tractor casting where main frame and pump mount will be attached.
E. Remove any front weights and weight supports.
F. Raise the tractor onto jack-stands and remove the right and left rear wheels.
(ASM-C-0024)
CRANKSHAFT ADAPTERIf necessary remove the four capscrews from the crankshaft pulley. Then install the crank-
shaft adapter to the pulley with capscrews and lockwashers as shown in the parts section.(ASM-MF-0001

ASSEMBLY
Assembly Section 2-3
2WD FRONT PUMP MOUNTINGThe tractors front frame will need to be cut off to allow access to drill the driveshaft hole
larger. Cut the frame 2 inches in front of the side mounting hole as shown below.
Drill the drive shaft access hole to Ø1.75 through the front casting to allow the coupler to fit.Also, the top edge of the mounting face may need to be ground to mount the pump flush to thetractor. After test fitting the pump, weld the front of the tractor frame back together.
Apply anti-seize to the splines on the driveshaft and the pump. Slide the pump driveshaft into the crankshaft adapter. The end with the external threads should be inserted into the adapter.
Slide the splined driveshaft coupler onto the pump drive shaft. Install the pump onto the tractor under the engine behind the front axle. NOTE: The shaft is offset to one direction, the pump should be installed with the offset side on bottom. Install hardware for securing pump to the tractor.
Align pump so that splined coupling can be moved back and forth by hand. Tighten pump mounting bolts rechecking for spline coupling movement. After all bolts are torqued, the end play on the drive shaft should be 1/16” to 1/8”, and coupler should move freely with hand pressure. If end play is less than 1/16”, grind the end of the shaft to achieve the proper end play. If there is more than 1/4" of end play, return the shaft with specifications for a longer shaft.
CAUTION: DO NOT START THE TRACTOR UNTIL ALL HOSES ARE ATTACHED, TANKIS FILLED WITH PROPER OIL AND BALL VALVES ARE OPEN! STARTING AT THIS TIMEWILL CAUSE SERIOUS DAMAGE TO THE PUMP. (ASM-MF-0022)
ASSEMBLY
Assembly Section 2-4
4WD FRONT PUMP MOUNTINGSlide the pump drive shaft into the crankshaft adapter. The end with the external threads
should be inserted into the adapter.Slide the splined drive shaft coupler onto the pump drive shaft. Install the pump onto the
tractor under the engine behind the front axle. NOTE: The shaft is offset to one direction, the pump should be installed with the offset side on the bottom. Install hardware for securing pump to the tractor. You may need to grind the top of the tractor casting to ensure a flush fit.
Align pump so that splined coupling can be moved back and forth by hand. Tighten pump mounting bolts rechecking for spline coupling movement. After all bolts are torqued, the end play on the drive shaft should be 1/16” to 1/8”, and coupler should move freely with hand pressure. If end play is less than 1/16”, grind the end of the shaft to achieve the proper end play. If there is more than 1/4" of end play, return the shaft with specifications for a longer shaft.
CAUTION: DO NOT START THE TRACTOR UNTIL ALL HOSES ARE ATTACHED, TANKIS FILLED WITH PROPER OIL AND BALL VALVES ARE OPEN! STARTING AT THIS TIMEWILL CAUSE SERIOUS DAMAGE TO THE PUMP. (ASM-MF-0016)
4WD FRONT TIRE ADJUSTMENTIn order to prevent interference with mounted equipment, the front tires on a 4WD MF2260
tractor will have to be switched from side to side. The tires will then be mounted on the inside ofthe tractor rims. Double check the wheel spacing after adjustment by oscillating and turning thetires fully to check for interference. (ASM-MF-0023)
ADJUSTING REAR WHEELSRaise rear of tractor onto jack-stands. Follow the instructions in the tractor owners
manual for adjusting tires and rims.The wheels need to be switched to the opposite sides of tractor. The left side needs to be
set to the widest possible setting. The right side needs to be set to one notch in from the widest setting. Also take note of any width restrictions when transporting by trailer. For ease of installation, it is best to leave the rear wheels removed during installation of the mower.(ASM-MF-0003)
MAIN FRAME INSTALLATIONWith an overhead hoist and / or jack-stands, raise one side of the frame up to the
correctly matching mounting holes. Install capscrews and all other hardware as shown in main frame parts section to secure the sides of the main frame to the tractor casting, DO NOT tighten at this time. Remove the capscrews one at a time and apply a thread locking agent. Reinsert the capscrews and tighten / torque to values noted in the torque chart located in the maintenance section of this manual. (ASM-C-0003)

ASSEMBLY
Assembly Section 2-5
WEATHER-PACK/METRI-PACK ASSEMBLYThese instructions apply to both Weather-Pack and Metri-pack connectors.
NOTE: Use the specific tool for the type of connector you are assembling.(ASM-C-0009)
RETURN LINE INSTALLATION The return port is located on the left side of the rear hydraulic remotes, refer to the image
below. Remove the cap on the tee of tractor rear remotes for the return line. Connect the adapt-ers as shown in the Parts Section and run the hose from the tractor to the return port of the lift valve. (ASM-MF-0017)

ASSEMBLY
Assembly Section 2-6
PRESSURE LINE INSTALLATIONThe Tiger lift valve used needs to access the power beyond of the tractor to be used as
the lift valve pressure. The tractor power beyond is located on the bottom of the right hand end cap of the tractors remote valve.
Remove the plug and install the Tiger fittings and hoses from the tractor to the high pressure filter, located on the valve mounting bracket. Finally, install the fittings and hose from the filter to the lift valve. Refer to the Parts Section for fittings and hoses. (ASM-MF-0018)
MANUAL LIFT VALVE PORTS
(ASM-C-0102)
ASSEMBLY
Assembly Section 2-7
HIGH PRESSURE FILTER (CABLE CONTROL)
The high pressure filter is mounted to the right valve mounting bracket with hardware, as shown in the parts section. Attach the two adapters to the filter. The pressure line from the trac-tor is plumbed to the left (Inlet) side of the filter. The pressure hose that is attached to the right side of the filter is routed to the pressure port of the Tiger lift valve. (ASM-C-0031)
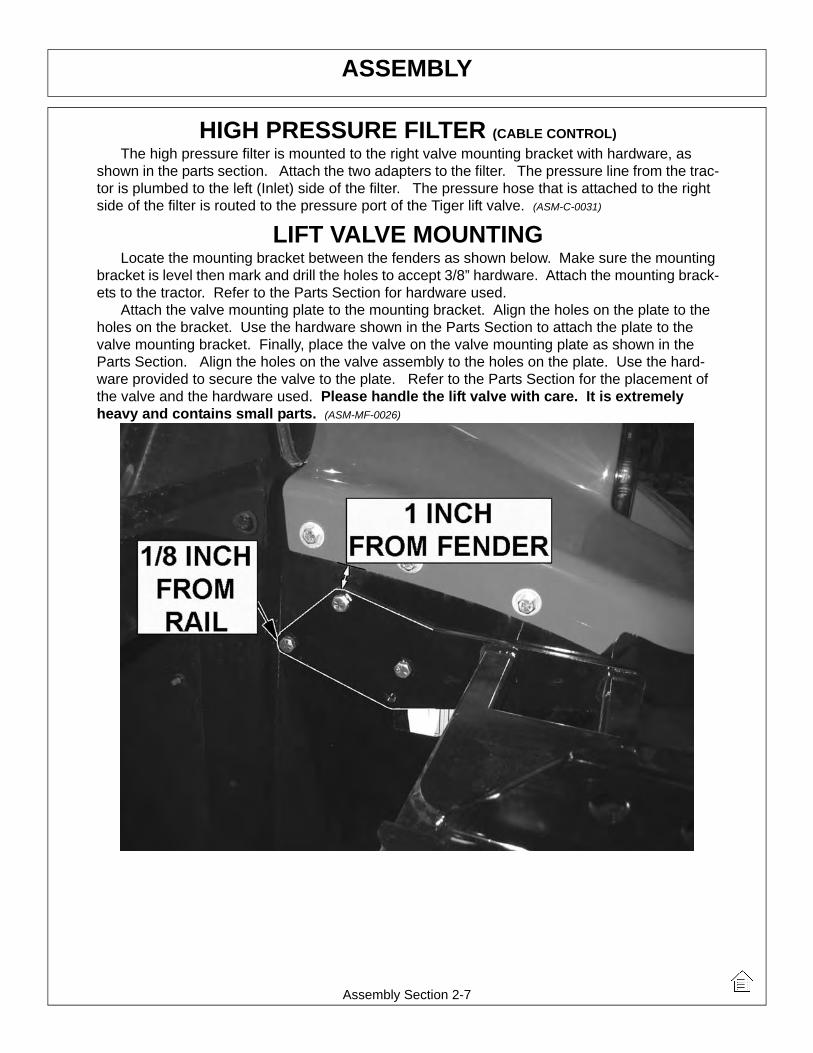
LIFT VALVE MOUNTINGLocate the mounting bracket between the fenders as shown below. Make sure the mounting
bracket is level then mark and drill the holes to accept 3/8” hardware. Attach the mounting brack-ets to the tractor. Refer to the Parts Section for hardware used.
Attach the valve mounting plate to the mounting bracket. Align the holes on the plate to the holes on the bracket. Use the hardware shown in the Parts Section to attach the plate to the valve mounting bracket. Finally, place the valve on the valve mounting plate as shown in the Parts Section. Align the holes on the valve assembly to the holes on the plate. Use the hard-ware provided to secure the valve to the plate. Refer to the Parts Section for the placement of the valve and the hardware used. Please handle the lift valve with care. It is extremely heavy and contains small parts. (ASM-MF-0026)

ASSEMBLY
Assembly Section 2-8
LIFT VALVE HOSE ROUTING The 1/4 inch lift valve hoses that are routed from the lift valve to the draft beam and mower
cylinders should be secured as follows. After connecting the hoses, cinch them together with zip ties. Add an insulated clamp (P/N 06520013) to the wheel well wall using the existing tractor hardware in the location shown below. Route the cinched hoses through the clamp and secure them to the axle brace. Make sure hoses are not kinked and will not rub on any edges.(ASM-MF-0029)
MANUAL SWITCH BOX MOUNTING The switch box is to be secured to the front window cross member as shown below. Refer
to the parts section for assembly and components needed.
(ASM-MF-0021)

ASSEMBLY
Assembly Section 2-9
CABLE CONTROL LEVER STANDPreassemble the cable control boxes to the cable control bracket as shown in the parts
section. Use the image below for positioning the cable control bracket. Place the front edge of the support bracket 1/2” from the fender wall and 5” from the corner of the door and the fender wall as shown below. The base will sit on top of the floor mat. Be sure that the location of the stand will allow clearance between the cable control box handles and all existing interior levers, etc. Also watch out for wiring and brackets when placing the bracket for drilling and cutting.
The spacers provided are used to allow the cable control bracket to set on top of the floor mat while being held securely to the floor of the cab. Use the base of the cable control bracket to mark the floor mat for cutting. Cut the holes for the spacer with a 1” hole saw. Drill 3 holes for the capscrews using the bracket and spacers as a template. Then secure with cap-screws,washers and nuts as noted in the parts section. (ASM-MF-0020)
Drill a 1-3/4” hole throught the mat and floor of the cab in the location shown. Control cables from the levers and electrical wires from the switch box will be routed through this hole to the valve and should not have any sharp bends or kinks in them. Wrap the wires and cables with split hose and secure cables with zip ties and apply RTV sealer or similar product in and around individual cables, inside and outside of the cab for a water tight seal. Do not allow excess cable to hang unsecured on the outside of the cab.

ASSEMBLY
Assembly Section 2-10
MANUAL SWITCH BOX WIRINGRoute the green wires and the red wire from the switchbox to the front console panel. Refer
to the parts section for wiring diagram to hook up the switch box. Cover the wires from the switch box with plastic wire wrap provided. Remove the console panel under the steering wheel to access wires.
Attach the red wire from the switch box to the open plug on the ignition switch. NOTE: Be certain that the power taken for the switch box is “HOT” only when the tractor ignition is “ON”.
Remove the neutral safety wire from the plug and splice this wire with one of the green wires from the switch box. The other green wire from the switch box should be attached to the ignition switch where the neutral safety wire was removed.
Run the white and black wire to the solenoid valve. Route the wires through the back window with the cable control wires. Use the rubber grommet in the window to protect the wire, and route the wire out of the cab down to the 1/4” hydraulic hoses. Follow the hydraulic hoses through the wheel well to the front of the tractor. The black wire from the switchbox should be routed to a tractor ground.
If applicable, the orange and black wires from the switch box should also be covered with wire wrap and should run with the white wire through the window. These wires will be connected to the electronic travel lock.
The wires from the switch box are longer than needed and should carefully cut and spliced as required. Zip ties should be used to secure the wires to the tractor framework and boom hoses, if applicable, to eliminate vibration and rubbing. (ASM-MF-0019)

ASSEMBLY
Assembly Section 2-11
BREAK-AWAY MOWER HYDRAULIC DIAGRAM
(ASM-MF-0027)

ASSEMBLY
Assembly Section 2-12
BREAK-AWAY SIDE FLAIL HOSE ROUTINGWARNING NOTE: The sudden release of hydraulic pressure could cause the suddenmovement of very heavy parts. Anyone in the way of these parts could be severely hurt or killed.DO NOT ALLOW these hydraulic hoses to BREAK or BURST in order to prevent hydraulic failureMake sure the hoses do not pinch or stretch as the mower moves. Measure TWICE, checkTWICE then proceed with caution.
Route the hoses from the flail motor through Top Hose Clamp. Clamp the hoses with hoseclamp P/N 35131, but do not tighten as this time. Next, route the hoses from the Top HoseClamp underneith the hydraulic cylinder and through the Cylinder Mounting Bracket. From there,route the hoses through the Side Hose Clamp P/N TB3031 and to the Brake Valve. Next, attachthe hose cover P/N 06505022 between the Break Valve and the Side Hose Clamp. Also, wrapthe hoses with split hose secured with zip ties where they run under the Cylinder MountingBracket to prevent rubbing. Refer to the Parts Section for hardware. Make sure the hoses do notpinch, stretch or rub on any edges when the flail head moves through its articulation beforetightening the hose clamps. (ASM-MF-0028)
FILLING HYDRAULIC RESERVOIRRefer to the maintenance section for filling specifications and hydraulic oil requirements.
NOTE: Starting or running your Tiger mower before filling reservoir will causeserious damage to hydraulic pump.
(ASM-C-0004hydro resrv)
INSTALLING O-RING FITTINGSInstalling straight, 45º and 90º O-rings requires that the O-ring and washer be up against the
swivel body. Insert the swivel and turn in until the swivel is pointed in the desired direction and O-ring contact is made. Hold swivel in set direction with a wrench and turn the O-ring nut awayfrom the swivel body and carefully tighten. (ASM-C-0056)

ASSEMBLY
Assembly Section 2-13
INSTALLING NATIONAL PIPE FITTINGSWhenever installing a pipe fitting, wrap the threads clockwise (looking at the end) with teflon
tape. In this way, the tape will be tightened when installed. NOTE: It is not necessary to tape O-ring fittings, or those installed in swivels. (ASM-C-0088)
GENERAL HOSE INSTALLATIONRefer to the parts section for detailed information about hoses and fittings for this application.
(ASM-C-0011)
HOSE COVERINGSecure hoses together with zip ties wherever loose. Wrap the hoses between the swivel and
main boom with the hose cover provided. Wrap the hoses between the main boom andsecondary boom with the hose cover provided. Where hoses may contact the frame or otheredges, wrap with split hose and secure with hose clamps or zip ties.
On non cab units, the pressure and return hoses from the control valve will also need to berouted inside the protective clear hose wrap. Cover the valve, valve fittings with the yellow hosecover and secure with black string provided. (ASM-C-0058)
SOLENOID BRAKE VALVEInstall a solenoid valve on the mounting bracket with the supplied hardware as shown in the
Parts Section in this manual. While installing the fittings to the brake valve, the electical coil onthe spool may have to be removed to make room. When reinstalling the coil, it is important touse no more than 5 ft. lbs. (or 60in. lbs.) torque. WARNING: OVER TORQUE TO THE COILWILL RESULT IN HYDRAULIC FAILURE OF SPOOL. (ASM-C-0025)
TEMPERATURE GAUGE MOUNTING (OPTIONAL)Mount the temperature gauge where it is clearly visible to the operator. Attach the green (-)
wire from the negative post on the gauge to a grounded bolt on the tractor frame. Remove paintif needed to make a good ground. Remove the pipe plug from the side of the hydraulic reservoirand install the temperature sensor using thread sealing tape. Run the white wire from the (s)sensor post of the gauge to the temperature sensor on the hydraulic reservoir tank. (ASM-C-0051)
AXLE BRACE INSTALLATIONWith the tractor on jack-stands, remove the existing hardware on the rear axle where
the axle braces will be mounted. Use a hoist to raise the axle braces to the correctly matching mounting holes on the rear axle and the main frame. Use the hardware shown in the parts section to attach the braces to the tractor, DO NOT tighten until the main frame has been positioned onto the axle braces. The main frame hardware will not be tightened at this time.
When the main frame is in position, remove the capscrews one at a time and apply a thread locking agent. Reinsert the capscrews and tighten / torque to values noted in the torque chart located in the maintenance section of this manual. (ASM-MF-0013)

ASSEMBLY
Assembly Section 2-14
DECK / MOTOR FEEDLINEInstall the 1” hoses from the motor to the solenoid valve. Refer to the parts section for
detailed information about hoses and fittings for this application.Install split hoses around hydraulic hoses where they contact sharp edges, or any other
edges that may rub hoses.Be sure that all grease zerks are installed in the draft beam pin bosses. Grease all areas of
the draft beam according to the instructions in the maintenance section. Re-check all fittings for tightness.
Fill hydraulic tank with fluid as recommended in the Maintenance Section. BE SURE TO OPEN THE BALL VALVES. Start the tractor and operate the inboard cylinder through the entire stroke and the outboard cylinder through the bottom ¾ stroke repeatedly to clear the lines of air. DO NOT run outboard cylinder out to full stroke until stop bolt has been adjusted!
Check for oil leaks at all fittings and connections using a piece of paper or cardboard. If a leak is found, you must shut down the tractor and set the cutter head on the ground. Before attempting to fix the leak, you must actuate the lift valve handles several times to relieve any pressure in the lines. DO NOT USE HANDS TO CHECK FOR FLUID LEAKS!
Raise the three point hitch and check the tractor internal hydraulics, fill to proper level ifneeded. (ASM-C-0079)

ASSEMBLY
Assembly Section 2-15
COMBO LIFT DRAFT BEAM INSTALLATIONInstall ½” O-ring breather into butt port of inboard cylinder. Install fittings in the rod end of the
cylinder according to the diagram in the commons section. These fittings should be positioned to face the butt end of the cylinder.
Next turn the clevis onto the rod of the cylinder until it is tight against the shoulder and lock into place with locking bolt on clevis.
The inboard cylinder can now be installed into the main frame mast with the pin, flat-washers and R-clips as shown below. Use teflon tape on all fitting and hose connections.
Install all fittings in the outboard cylinder and adjust to point towards the butt end of the cylin-der. Attach the hoses as specified in the parts book. Slide the cylinder into the draft beam from the outside of the draft beam and attach cylinder to the draft beam with clevis pin and rollpins.
DRAFT BEAM MOUNTINGPull the inboard cylinder piston rod down to the extreme extended position. Slide the draft
beam under the cylinder, and align clevis hole with draft beam hole nearest to the tractor. Install pin and secure with rollplins.
Using inboard cylinder as a pivot point, slide draft beam under tractor and install draft beam pin. Align hole in draft beam pin with holes in main frame boss and install cap-screw, lock-washer and hex nut. (ASM-MF-0024)
ASSEMBLY
Assembly Section 2-16
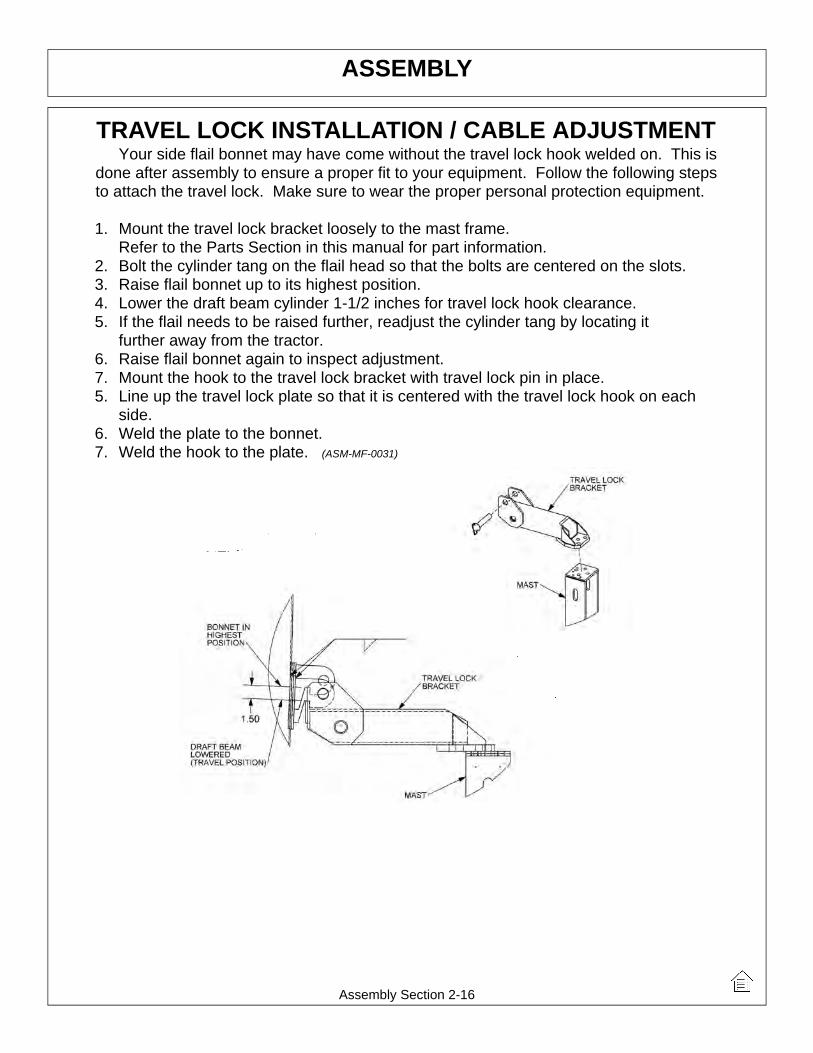
TRAVEL LOCK INSTALLATION / CABLE ADJUSTMENTYour side flail bonnet may have come without the travel lock hook welded on. This is
done after assembly to ensure a proper fit to your equipment. Follow the following stepsto attach the travel lock. Make sure to wear the proper personal protection equipment.
1. Mount the travel lock bracket loosely to the mast frame.Refer to the Parts Section in this manual for part information.
2. Bolt the cylinder tang on the flail head so that the bolts are centered on the slots.3. Raise flail bonnet up to its highest position.4. Lower the draft beam cylinder 1-1/2 inches for travel lock hook clearance.5. If the flail needs to be raised further, readjust the cylinder tang by locating it
further away from the tractor.6. Raise flail bonnet again to inspect adjustment.7. Mount the hook to the travel lock bracket with travel lock pin in place.5. Line up the travel lock plate so that it is centered with the travel lock hook on each
side.6. Weld the plate to the bonnet.7. Weld the hook to the plate. (ASM-MF-0031)

ASSEMBLY
Assembly Section 2-17
MOWER MOUNTINGCheck that all grease zerks have been installed in the inner and outer draft beams.Using the pin,washers and roll pins, connect the outboard cylinder to the outboard draft
beam. Next, connect the outboard draft beam to the inner draft beam using the hardware provided. (ASM-MF-0025)
Slide the mower deck into the ears of the outer draft beam. Line up the holes and install the pins and hardware provided.
Bolt the cable to the outer draft beam. Attach the butt end of the deck lift cylinder to the mower deck using the clevis pin and roll pins provided. Attach the cable to the rod end of the deck lift cylinder using the clevis pin and roll pins provided.
LIFT CONTROL FEEDLINESHose lengths will vary between tractor applications such as cab and non-cab units. See the
Parts Section that pertains to your tractor for hose applications.Install a hose from the bottom or inner valve port (behind cab for cab units, on stand for non-
cab units) to the restrictor on the inboard cylinder gland.Install a hose from the upper or outer valve port to the restrictor on the outboard cylinder butt.See Parts Section for part numbers and hose routing illustrations. (ASM-C-0093)

ASSEMBLY
Assembly Section 2-18
FINAL PREPARATION FOR OPERATIONPlace operators safety and operation decals on the steering column and side counsel where
they are clearly visible to the operator. These decals should be understood by each operator ofthe machine in conjunction with the safety and operation section of this book. The decals are tobe maintaned in good condition as a reminder to the operator, and should be replaced ifdamaged.
Finally, all bosses, pins and pivot points will need to be greased as instructed in themaintenance section of this manual. The hydraulic reservoir can also be filled with therecommended fluid (see maintenance section) and the filter installed in the top of the tank.Double check all fittings and fasteners BEFORE starting tractor. Also secure any loose hosestogether with zip ties and wrap with split hoses where friction may occur on the hoses.
BEFORE starting or operating the tractor you must read and understand the safety and operation sections of this manual completely.
BE SURE THE BALL VALVES ARE OPEN! Start tractor and allow instruments to stabilize.Using a piece of paper or cardboard as noted in the safety and maintenance sections, check allfittings and connections for hydraulic leaks.
If a leak is found, you must shut down the tractor, set the cutter on the ground. Beforeattempting to fix the leak, you must actuate the lift valve handles several times to relieve anypressure in the lines.
Before operating the mower, the cutter head and boom should be slowly moved throughoutthe full range of motion. Watch for any condition that would cause pinching or excess stress onthe hoses. The steering and front axle travel should also be carefully moved through their fullrange of motion. If any condition occurs in which the hoses contact the tires, the steering and /or front axle travel may need to be limited as described in the tractor operators manual. Thisshould also be done if the tires rub, or are extremely close to any other part of the mower such asthe hydraulic tank or draft beam. This may include adding shims, or adjusting stop bolts in thetractor front to solve the problem. While checking motion, you should also check that the controlcircuits are connected according to the operators decal for the valve handles.
MOWER TESTINGTake the tractor to a place free of loose objects on the ground. Operate the cylinders through
their full range of motion again, to clear the lines of air. Follow the instructions in the operationsection to operate the mower. Vibration of the mower should be minimal at all times. After a 5minute test run, the knife bolts should be retorqued and once again after the first few hours ofoperation.
If any parts of this assembly section, or any other section of this manual arenot clearly understood you must contact your dealer or the address on the front ofthis manual for assistance!(ASM-C-0010)

Operation Section 3-1
© 2011 Alamo Group Inc.
OPERATION SECTION

OPERATION
Side and Rear Flail Operation Section 3-2
© 2011 Alamo Group Inc.
OP
ER
AT
ION
TIGER SIDE AND REAR FLAIL MOWER OPERATING INSTRUCTIONS
Tiger Side and Rear flail mowers are manufactured with quality material by skilled workers. These mowers are
designed for cutting grass and small weeds. The mower is equipped with protective deflectors to prevent
objects being thrown from the mower by the blades, however, no shielding is 100% effective. All shields,
guards, and deflectors equipped on the mower must be maintained in good operational condition.
It is the operator’s responsibility to be knowledgeable of all potential operating hazards and to take every
reasonable precaution to ensure oneself, others, animals, and property are not injured or damaged by the
mower, tractor, or a thrown object. Do not operate the mower if passersby, pets, livestock, or property are
within 100 yards of the unit.
This section of the Operator’s Manual is designed to familiarize, instruct, and educate safe and proper mower
use to the operator. Pictures contained in this section are intended to be used as a visual aid to assist in
explaining the operation of a Side and Rear flail mower and are not specific to any model. Some pictures may
show shields removed for picture clarity. NEVER operate implement without all shields in place and in good
operational condition. The operator must be familiar with the mower and tractor and all associated safety
practices before operating the mower and tractor. Proper operation of the mower, as detailed in this manual,
will help ensure years of safe and satisfactory use of the mower.
IMPORTANT: To avoid mower damage, retorque all bolts after the first 10 hours of operation. Refer to the
Torque Chart at the end of the Maintenance Section to ensure bolts are properly
tightened.
READ AND UNDERSTAND THE ENTIRE OPERATING INSTRUCTIONS AND SAFETY SECTION OF THIS
MANUAL AND THE TRACTOR MANUAL BEFORE ATTEMPTING TO USE THE TRACTOR AND
IMPLEMENT. If you do not understand any of the instructions, contact your nearest authorized dealer for a
full explanation. Pay close attention to all safety signs and safety messages contained in this manual and
those affixed to the implement and tractor. OPS-U- 0001
READ, UNDERSTAND, and FOLLOW the following Safety Messages. Serious injury or
death may occur unless care is taken to follow the warnings and instructions stated in the
Safety Messages. Always use good common sense to avoid hazards. (SG-2)
Si no lee ingles, pida ayuda a alguien que si lo lea para que le traduzca las
medidas de seguridad. (SG-3)

OPERATION
Side and Rear Flail Operation Section 3-3
© 2011 Alamo Group Inc.
OP
ER
AT
ION
1. OPERATOR REQUIREMENTS
Safe operation of the unit is the responsibility of a qualified operator. A qualified operator has read and
understands the implement and tractor Operator’s Manuals and is experienced in implement and tractor
operation and all associated safety practices. In addition to the safety messages contained in this manual,
safety signs are affixed to the implement and tractor. If any part of the operation and safe use of this
equipment is not completely understood, consult an authorized dealer for a complete explanation.
If the operator cannot read the manuals for themselves or does not completely understand the operation of the
equipment, it is the responsibility of the supervisor to read and explain the manuals, safety practices, and
operating instructions to the operator.
Safe operation of equipment requires that the operator wear approved Personal Protective Equipment (PPE)
for the job conditions when attaching, operating, servicing, and repairing the equipment. PPE is designed to
provide operator protection and includes the following safety wear:
PERSONAL PROTECTIVE EQUIPMENT (PPE)
• Always Wear Safety Glasses• Hard Hat• Steel Toe Safety Footwear• Gloves• Hearing Protection• Close Fitting Clothing• Respirator or Filter Mask (depends on
operating conditions) OPS-U- 0002
NEVER use drugs or alcohol immediately before or while operating the
Tractor and Implement. Drugs and alcohol will affect an operator’s
alertness and coordination and therefore affect the operator’s ability to
operate the equipment safely. Before operating the Tractor or Implement,
an operator on prescription or over-the-counter medication must consult
a medical professional regarding any side effects of the medication that
would hinder their ability to operate the Equipment safely. NEVER
knowingly allow anyone to operate this equipment when their alertness or
coordination is impaired. Serious injury or death to the operator or others
could result if the operator is under the influence of drugs or alcohol. (SG-27)

OPERATION
Side and Rear Flail Operation Section 3-4
© 2011 Alamo Group Inc.
OP
ER
AT
ION
2. TRACTOR REQUIREMENTS
The tractor used to operate the mower must have the power, capacity and required equipment to safely
operate the mower at a ground speed between 2 and 5 MPH. Operating the mower with a tractor that does not
meet the following requirements may cause tractor or mower damage and could be a potential danger to the
operator and passersby.
Tractor Requirements and Capabilities• ASAE approved Roll-Over Protective Structure (ROPS) or ROPS cab and seat belt.• Tractor Safety Devices ..................... Slow Moving Vehicle (SMV) emblem, lighting, PTO master shield• Tractor Horsepower-Minimum.......... 65 HP Min Recommended• Power Take Off................................. 540 RPM
2.3 Tractor HorsepowerThe horsepower required to operate the mower depends on many factors including the vegetation to be cut,
terrain condition, operator experience, and condition of the mower and tractor. For most mowing conditions,
the Side and Rear mowers require a tractor with at least 65HP. Operating the mower with a tractor that does
not have adequate power may damage the tractor engine.
2.1 ROPS and Seat BeltThe tractor must be equipped with a Roll-Over-Protective-Structure (ROPS) (tractor cab or roll-bar) and seat
belt to protect the operator from falling off the tractor, especially during a roll over where the driver could be
crushed and killed. Only operate the tractor with the ROPS in the raised position and seat belt fastened.
Tractor models not equipped with a ROPS and seat belt should have these life saving features installed by an
authorized dealer. OPS-U- 0003
Operate this Equipment only with a Tractor equipped with an approved roll-
over-protective system (ROPS). Always wear seat belts. Serious injury or
even death could result from falling off the tractor--particularly during a turnover
when the operator could be pinned under the ROPS. (SG-7)
2.2 Tractor Safety DevicesIf transporting or operating the tractor and implement near a public roadway, the tractor must be equipped with
proper warning lighting and a Slow Moving Vehicle (SMV) emblem which are clearly visible from the rear of
the unit. Lights and a SMV emblem must be equipped directly on implements if the visibility of the tractor
warning signals are obscured.
Maintain all manufacturer equipped safety shields and guards. Always replace shields and guards that were
removed for access to connect, service, or repair the tractor or implement. Never operate the tractor PTO
with the PTO master shield missing or in the raised position. OPS-U- 0004

OPERATION
Side and Rear Flail Operation Section 3-5
© 2011 Alamo Group Inc.
OP
ER
AT
ION
2.4 Front End WeightMaintain a minimum of 20% total tractor weight on the tractor front end at all times. Front end weight is critical
to maintain steering ability and to prevent the front end from rearing up. Consult your authorized tractor dealer
for front weights and carriers.
2.5 Power Take Off (PTO)Only operate the mower on a tractor equipped to operate at 540 rpm PTO speed. Tractors operating at 540
rpm will have a 1-3/8” diameter 6-spline PTO shaft stub. Refer to the tractor operator’s manual for operating
the PTO at the proper speed.
If operating an older model tractor where the tractor’s transmission and PTO utilize one master clutch, an over-
running clutch must be used between the PTO output shaft and the driveline of the mower. Consult an
authorized tractor dealer to purchase and install an over-running clutch if needed.
DO NOT use a PTO adapter to attach a non-matching Implement driveline to a Tractor
PTO. Use of an adapter can double the operating speed of the Implement resulting in
excessive vibration, thrown objects, and blade and implement failure. Adapter use will also
change the working length of the driveline exposing unshielded driveline areas. Serious
bodily injury and/or equipment failure can result from using a PTO adapter. Consult an
authorized dealer for assistance if the Implement driveline does not match the Tractor PTO.(S3PT-14)
Never operate the Tractor and Mower if the Implement input driveline is directly connected
to the Tractor transmission. Tractor braking distances can be substantially increased by
the momentum of the rotating Mower blades driving the Tractor transmission even though
the Tractor clutch has been disengaged. Install an over running clutch between the Tractor
PTO and the Mower driveline to prevent this potentially dangerous situation. (S3PT-16)
3. GETTING ON AND OFF THE TRACTOR
Before getting onto the tractor, the operator must read and completely understand the implement and tractor
operator manuals. If any part of either manual is not completely understood, consult an authorized dealer for
a complete explanation. OPS-U- 0007
Do not mount or dismount the Tractor while the tractor is moving. Mount
the Tractor only when the Tractor and all moving parts are completely
stopped. (SG-12)

OPERATION
Side and Rear Flail Operation Section 3-6
© 2011 Alamo Group Inc.
OP
ER
AT
ION
3.1 Boarding the TractorUse both hands and equipped handrails and steps for support when boarding the tractor. Never use control
levers for support when mounting the tractor. Seat yourself in the operator’s seat and secure the seat belt
around you.
Never allow passengers to ride on the tractor or attached equipment. Riders can easily fall off and be
seriously injured or killed from falling off and being ran over. It is the operator’s responsibility to forbid all extra
riders at all times. OPS-U- 0008
Never allow children to operate, ride on, or come close to the Tractor or
Implement. Usually, 16-17 year-old children who are mature and
responsible can operate the implement with adult supervision, if they
have read and understand the Operator’s Manuals, been trained in
proper operation of the tractor and Implement, and are physically large
enough to reach and operate the controls easily. (SG-11)
Never allow children or other persons to ride on the Tractor or Implement.
Falling off can result in serious injury or death. (SG-10)
Do not mount or dismount the Tractor while the tractor is moving. Mount
the Tractor only when the Tractor and all moving parts are completely
stopped. (SG-12)
3.2 Dismounting the TractorBefore dismounting, park the tractor and implement on a reasonably level surface, apply the parking brake,
idle the engine down, disengage the PTO, and lower the implement to the ground. Shut down the tractor
engine according to the operator’s manual, remove the key, and wait for all motion to completely stop. Never
leave the seat until the tractor, its engine and all moving parts have come to a complete stop.
Use hand rails and steps when exiting the tractor. Be careful of your step and use extra caution when mud,
ice, snow or other matter has accumulated on the steps or hand rails. Use all handrails and steps for support
and never rush or jump off the tractor. OPS-U- 0009
BEFORE leaving the tractor seat, always set the parking brake and/or set
the tractor transmission in parking gear, disengage the PTO, stop the
engine, remove the key, and wait for all moving parts to stop. Place the
tractor shift lever into a low range or parking gear to prevent the tractor
from rolling. Never dismount a Tractor that is moving or while the engine
is running. Operate the Tractor controls from the tractor seat only. (SG-9)

OPERATION
Side and Rear Flail Operation Section 3-7
© 2011 Alamo Group Inc.
OP
ER
AT
ION
4. STARTING THE TRACTOR
The operator must have a complete understanding of the placement, function, and operational use of all
tractor controls before starting the tractor. Review the tractor operator’s manual and consult an authorized
dealer for tractor operation instructions if needed.
Essential Tractor Controls:
• Locate the light control switch. • Locate the engine shut off control. • Locate the brake pedals and the clutch. • Locate the PTO control. • Locate the 3-point hitch control lever.• Locate the hydraulic remote control levers.Before starting the tractor ensure the following:
• Conduct all pre-start operation inspection and service according to the tractor operator’s manual. • Make sure all guards, shields, and other safety devices are securely in place.• The parking brake is on. • The PTO control lever is disengaged. • The 3-point hitch control lever is in the lowered position.• The hydraulic remote control levers are in the neutral position.• The tractor transmission levers are in park or neutral. Refer to the tractor owner’s manual for tractor starting procedures. Only start the tractor while seated and
belted in the tractor operator’s seat. Never bypass the ignition switch by short circuiting the starter solenoid.
After the tractor engine is running, avoid accidental contact with the tractor transmission to prevent sudden
Never run the Tractor engine in a closed building or without adequate ventilation. The
exhaust fumes can be hazardous to your health. (SG-23)
Start tractor only when properly seated in the Tractor seat. Starting a
tractor in gear can result in injury or death. Read the Tractor operators
manual for proper starting instructions. (SG-13)
5. CONNECTING THE MOWER TO THE TRACTOR
Use extreme caution when connecting the mower to the tractor. The mower should be securely resting at
ground level or setting on blocks. Keep hands and feet from under the mower deck and clear of pinch points
between the tractor hitch arms and mower pins. OPS-R-0001

OPERATION
Side and Rear Flail Operation Section 3-8
© 2011 Alamo Group Inc.
OP
ER
AT
ION
5.1 Connecting the Rear Flail to the Tractor1. Make sure the tractor is equipped with the
correct PTO shaft. Change shafts if needed.2. Shorten or remove the tractor drawbar to avoid
interference when raising and lowering themower.
3. Board the tractor and start the engine. Positionthe tractor to the mower with the 3-point liftarms positioned between the respective set ofmower A-frame lift lugs. Note: Set the 3-pointlift control to “Position Control” so that the liftarms maintain a constant height whenattaching the mower. See the tractor Operator’sManual for correct settings when attaching 3-point equipment.
4. Turn off the tractor engine and dismount. 5. One lift arm at a time, align arm end hole
between the set of A-frame lift lugs. Insert hitchpin through the lug and arm holes and insertretaining pin into hitch pin.
6. Walk around to opposite side and repeatprocedure for remaining lift arm and hitch pin.
7. Extend or retract 3-point top link to align its endhole with the holes of the mower’s top link.Insert the top link hitch pin and insert retainingpin into hitch pin.
Adjust any lower link check chains, guide blocks, or
sway blocks to prevent the mower from swaying
side to side and possible contact with tractor rear
tires.
NOTE: Offset Adaptor Hitches are available to position the mower to the left or right. Mowers with Offset
Adaptor hitches connect to the 3-Point hitch the same way as the mower A-frame.
Always shut the Tractor completely down, place the transmission in park, and set the
parking brake before you or anyone else attempts to connect or disconnect the Implement
and Tractor hitches. (S3PT-15)

OPERATION
Side and Rear Flail Operation Section 3-9
© 2011 Alamo Group Inc.
OP
ER
AT
ION
5.2 Connecting the Side Flails to the Tractor1. Install the Draft Beam onto the Main Frame.2. Raise the Draft Beam to line up with the the ‘ears’ on the Side Flail and install Pins and hardware.3. Connect the Linkage and Cylinder to the Side Flail for a Combo Lift set-up or route and connect the cable
to the Side Flail if it’s a Cable Lift set-up.4. Route and connect the hydraulic lines to the cylinders and from the Brake Valve to the Side Flail motor.
Do not operate this Equipment with hydraulic oil or fuel leaking. Oil
and fuel are explosive and their presence could present a hazard. Do
not check for leaks with your hand! High-pressure oil streams from
breaks in the line could penetrate the skin and cause tissue damage
including gangrene. To check for a hose leak, SHUT the unit ENGINE
OFF and remove all hydraulic pressure. Wear oil impenetrable gloves,
safety glasses and use Cardboard to check for evidence of oil leaks. If
you suspect a leak, REMOVE the HOSE and have it tested at a Dealer.
If oil does penetrate the skin, have the injury treated immediately by a
physician knowledgeable and skilled in this procedure. (SG-15)
Avoid contact with hot surfaces including hydraulic oil tanks, pumps, motors, valves and
hose connections. Relieve hydraulic pressure before performing maintenance or repairs.
Use gloves and eye protection when servicing hot components. Contact with a hot surface
or fluid can cause serious injury from burns or scalding. (SG-34)
DO NOT allow any person under a side mower unless mower is
securely locked up or supported. DO NOT approach the Implement
unless the Tractor is turned off and all motion has ceased. Never work
under the frame work, or any lifted component unless the implement is
securely supported or blocked up. A sudden or inadvertent fall by any
of these components could cause serious injury or even death. (STI-03_A)

OPERATION
Side and Rear Flail Operation Section 3-10
© 2011 Alamo Group Inc.
OP
ER
AT
ION
6.1 Roller Height Adjustment1. The mower’s cutting height is set by
positioning the roller assembly for eachmower section. Each section must be set atthe same height to ensure an even cutacross the entire width of the mower.
2. Place the tractor and mower on a levelsurface and completely lower the mower tothe ground.
3. Shut down the tractor, place the transmissionin park, and set the parking brake beforedismounting.
4. One section at a time, place lifting device(scissors jack or hydraulic jack) under centerof cutter housing.
5. Remove hex nuts, washers and carriagebolts from brackets at each end of roller.Make certain that roller bracket is free tomove once the fasteners are removed. Astuck roller could drop unexpectedly andcause injury.
6. For Standard Duty flails, use lifting device toreposition cutter housing to desired cuttingheight. Align bracket holes with cutterhousing, then reinstall hardware.
7. For Heavy Duty flails, loosen the Adjustmentrod lock nut and adjust height by turning theAdjustment Rod. Retighten the Adjustmentrod lock nut and then reinstall hardware.
8. Lower cutter housing to the ground andremove lifting device.
6. SETTING THE MOWER
Properly setting the cutting height is essential for efficient and safe operation. A properly set mower will make
a more uniform cut, distribute clippings more evenly, require minimal tractor work, and follow the contour of
uneven terrain. NOTE: Avoid very low cutting heights, striking the ground with the blades gives the mostdamaging shock loads and will cause damage to the mower and drive. Blades contacting the ground maycause objects to be thrown out from under the mower deck. Always avoid operating the mower at a heightwhich causes the blades to contact the ground. OPS-U- 0010
Never work under the Implement, the framework, or any lifted
component unless the Implement is securely supported or blocked up
to prevent sudden or inadvertent falling which could cause serious
injury or even death. (SG-14)
Standard Duty
Heavy Duty

OPERATION
Side and Rear Flail Operation Section 3-11
© 2011 Alamo Group Inc.
OP
ER
AT
ION
Set cutting height according to procedures above for remaining two cutter sections. Make sure that all three
rollers are set at the same height to ensure an even cut across the entire width of the mower.
6.2 Leveling Rear Flail DeckTo facilitate a safe and efficient mowing operation,
the mower should be operated parallel to the
ground at all times. Never operate if front or rear of
mower is tilted upward. Objects may be discharged
at high speeds causing possible injury or even
death.
Adjust Top Link to level mower roller adjustment.
Side Skid Shoes should always be parallel to
ground throughout the full adjustment range. Adjust
cutting height of machine by raising or lowering rear
roller as specified in Operation Section.
Do not let the Blades turn when the Mower Deck is raised for any
reason, including clearance or for turning. Raising the Mower deck
exposes the Cutting Blades which creates a potentially serious hazard
and could cause serious injury or even death from objects thrown from
the Blades. (SRM-07)
7. DRIVELINE ATTACHMENT
The driveline yoke and tractor PTO shaft must bedirt free and greased for attachment.
To connect the mower driveline to the tractor
PTO output shaft, pull the driveline yoke collar
back and align the grooves and splines of the
yoke with those of the PTO shaft. Push the
driveline yoke onto the PTO shaft, release the
locking collar, and position the yoke until the
locking collar balls are seated onto the PTO
shaft. Push and pull the driveline back and forth
several times to ensure a secure attachment.
After the driveline is securely attached, place the
tractor PTO master shield back in the operating
position. OPS-R-0003
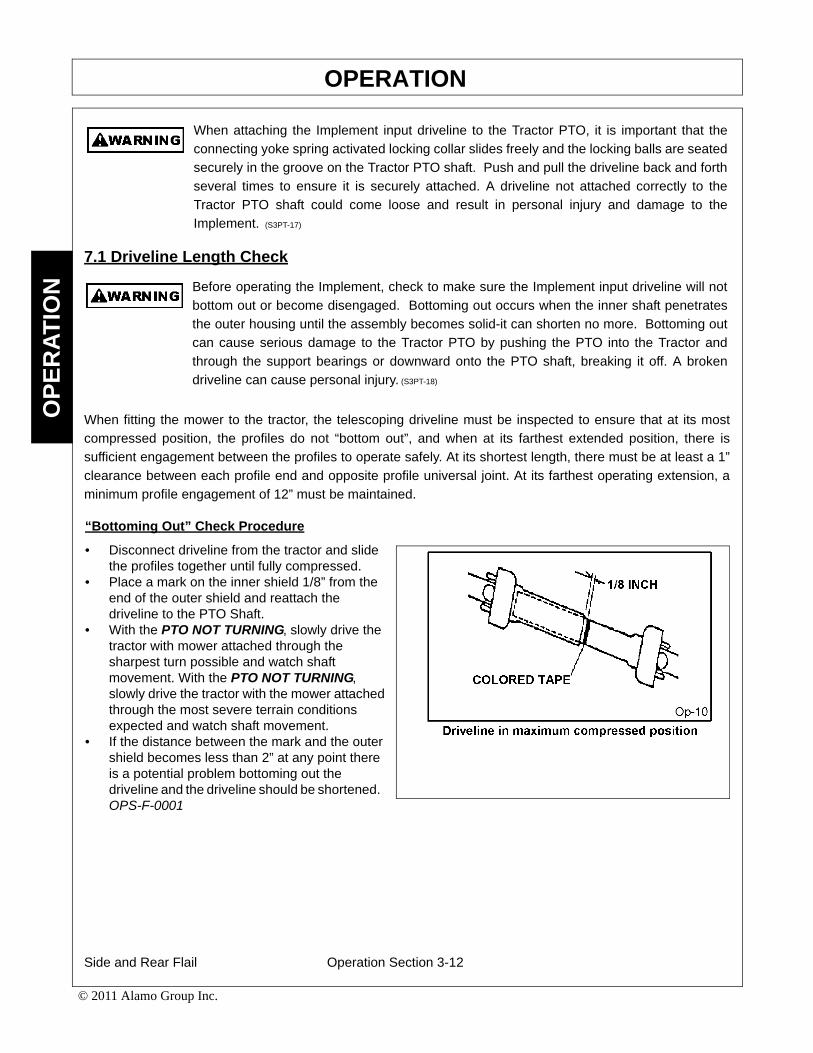
OPERATION
Side and Rear Flail Operation Section 3-12
© 2011 Alamo Group Inc.
OP
ER
AT
ION
7.1 Driveline Length Check
When fitting the mower to the tractor, the telescoping driveline must be inspected to ensure that at its most
compressed position, the profiles do not “bottom out”, and when at its farthest extended position, there is
sufficient engagement between the profiles to operate safely. At its shortest length, there must be at least a 1”
clearance between each profile end and opposite profile universal joint. At its farthest operating extension, a
minimum profile engagement of 12” must be maintained.
When attaching the Implement input driveline to the Tractor PTO, it is important that the
connecting yoke spring activated locking collar slides freely and the locking balls are seated
securely in the groove on the Tractor PTO shaft. Push and pull the driveline back and forth
several times to ensure it is securely attached. A driveline not attached correctly to the
Tractor PTO shaft could come loose and result in personal injury and damage to the
Implement. (S3PT-17)
Before operating the Implement, check to make sure the Implement input driveline will not
bottom out or become disengaged. Bottoming out occurs when the inner shaft penetrates
the outer housing until the assembly becomes solid-it can shorten no more. Bottoming out
can cause serious damage to the Tractor PTO by pushing the PTO into the Tractor and
through the support bearings or downward onto the PTO shaft, breaking it off. A broken
driveline can cause personal injury. (S3PT-18)
“Bottoming Out” Check Procedure
• Disconnect driveline from the tractor and slide the profiles together until fully compressed.
• Place a mark on the inner shield 1/8” from the end of the outer shield and reattach the driveline to the PTO Shaft.
• With the PTO NOT TURNING, slowly drive the tractor with mower attached through the sharpest turn possible and watch shaft movement. With the PTO NOT TURNING, slowly drive the tractor with the mower attached through the most severe terrain conditions expected and watch shaft movement.
• If the distance between the mark and the outer shield becomes less than 2” at any point there is a potential problem bottoming out the driveline and the driveline should be shortened. OPS-F-0001

OPERATION
Side and Rear Flail Operation Section 3-13
© 2011 Alamo Group Inc.
OP
ER
AT
ION
Shorten the driveline profiles as follows:
• Remove the driveline from the tractor.• Position the mower to the point with the
shortest distance between the tractor PTO shaft and cutter gearbox. Shut down the tractor and securely block the mower in this position.
• Pull driveline apart and reattach yoke to PTO shaft.
• Hold driveline sections parallel to one another and measure back 1” from yoke of each shaft and place mark on opposite section. Cut this length off with a saw.
• Round off all sharp edges and debur.• Thoroughly grease then reinstall the driveline.• Recheck for proper operation.
Engagement Check Procedure
• With the driveline attached, position the mower to the point where the telescoping driveline is at its maximum extension. Completely shut down the tractor and secure in position.
• Mark the inner driveline shield 1/8” from the end of the outer shield.• Disconnect the driveline from the tractor and separate the two driveline halves. • Measure the distance from the mark to the end of the inner profile. This length is the amount the driveline
profiles were engaged.• If the engaged length is less than 12” the shaft is considered too short and should be replaced with a
longer shaft. Consult an authorized dealer to purchase the required driveline length.NOTE: If the driveline cannot be shortened and still maintain the required profile engagement, the operatormust be made aware of terrain conditions and avoid situations which pose a potential problem to avoiddamaging the driveline. OPS-F-0002
8. PRE-OPERATION INSPECTION AND SERVICE
Before each use, a pre-operation inspection and service of the implement and tractor must be performed.
This includes routine maintenance and scheduled lubrication, inspecting that all safety devices are equipped
and functional, and performing needed repairs. DO NOT operate the unit if the pre-operation inspection
reveals any condition affecting safe operation. Perform repairs and replacement of damaged and missing
parts as soon as noticed. By performing a thorough pre-operation inspection and service, valuable down time
and repair cost can be avoided. OPS-U-0029
Always disconnect the main PTO Driveline from the Tractor before performing service on
the Implement. Never work on the Implement with the tractor PTO driveline connected and
running. Rotating Parts, Blades or Drivelines could turn without warning and cause
immediate entanglement, injury or death. (S3PT-11)

OPERATION
Side and Rear Flail Operation Section 3-14
© 2011 Alamo Group Inc.
OP
ER
AT
ION
DO NOT allow any person under a folded wing unless wing is securely
locked up or supported. DO NOT approach the Implement unless the
Tractor is turned off and all motion has ceased. Never work under the
frame work, or any lifted component unless the implement is securely
supported or blocked up. A sudden or inadvertent fall by any of these
components could cause serious injury or even death. (STI-03)
Periodically inspect all moving parts for wear and replace when
necessary with authorized service parts. Look for loose fasteners, worn
or broken parts, and leaky or loose fittings. Make sure all pins have
attaching hardware. Serious injury may occur from not maintaining this
machine in good working order. (SG-21_A)
8.1 Tractor Pre-Operation Inspection/ServiceRefer to the tractor operator’s manual to ensure a
complete pre-operation inspection and scheduled
service is performed according to the
manufacturers recommendations. The following
are some of the items that require daily service and
inspection:
• Tire condition/air pressure• Wheel lug bolts • Steering linkage• PTO shield • SMV sign is clean and visible• Tractor’s lights are clean and functional• Tractor Seat belt is in good condition • Tractor ROPS is in good condition• ROPS is in the raised position• No tractor oil leaks • Radiator free of debris • Engine oil level and condition• Engine coolant level and condition • Power brake fluid level • Power steering fluid level • Fuel condition and level • Sufficient lubrication at all lube points• Air filter condition OPS-U-0030

OPERATION
Side and Rear Flail Operation Section 3-15
© 2011 Alamo Group Inc.
OP
ER
AT
ION
8.2 Mower Pre-Operation Inspection/ServiceBefore each mower use, a complete inspection and service is required to ensure the mower is in a good and
safe working condition. Damaged and/or broken parts should be repaired and/or replaced immediately. To
ensure the mower is ready for operation, conduct the following. OPS-R-0007
All Safety Shields, Guards and Safety devices including (but not
limited to) - the Deflectors, Steel Guards, Gearbox Shields, PTO
integral shields , and Retractable Door Shields should be used and maintained in good
working condition. All safety devices should be inspected carefully at least daily for
missing or broken components. Missing, broken, or worn items must be replaced at
once to reduce the possibility of injury or death from thrown objects, entanglement, or
Replace bent or broken blades with new blades. NEVER ATTEMPT TO STRAIGHTEN,
WELD, OR WELD HARDFACING ON BLADES SINCE THIS WILL LIKELY CRACK OR
OTHERWISE DAMAGE THE BLADE WITH SUBSEQUENT FAILURE AND POSSIBLY
CAUSE SERIOUS INJURY FROM THROWN BLADES. (SGM-10)
The operator’s manual and safety signs affixed on
the unit contain important instructions on the safe
and proper use of the equipment. Maintain these
important safety features on the implement in good
condition to ensure the information is available to
the operator at all times.
• Ensure all safety signs are in place and legible. Replace missing, damaged, and illegible decals. OPS-U- 0011_A
• Check that the main driveline securely attached to the tractor and the locking collar is seated in the groove of the PTO Shaft.
• Inspect that the 3-point hitch pins are the proper size, correctly installed and secured to the tractor lift arms with retaining pins inserted.
• Ensure side mower hydraulics are secure at both ends. OPS-F-0015_A
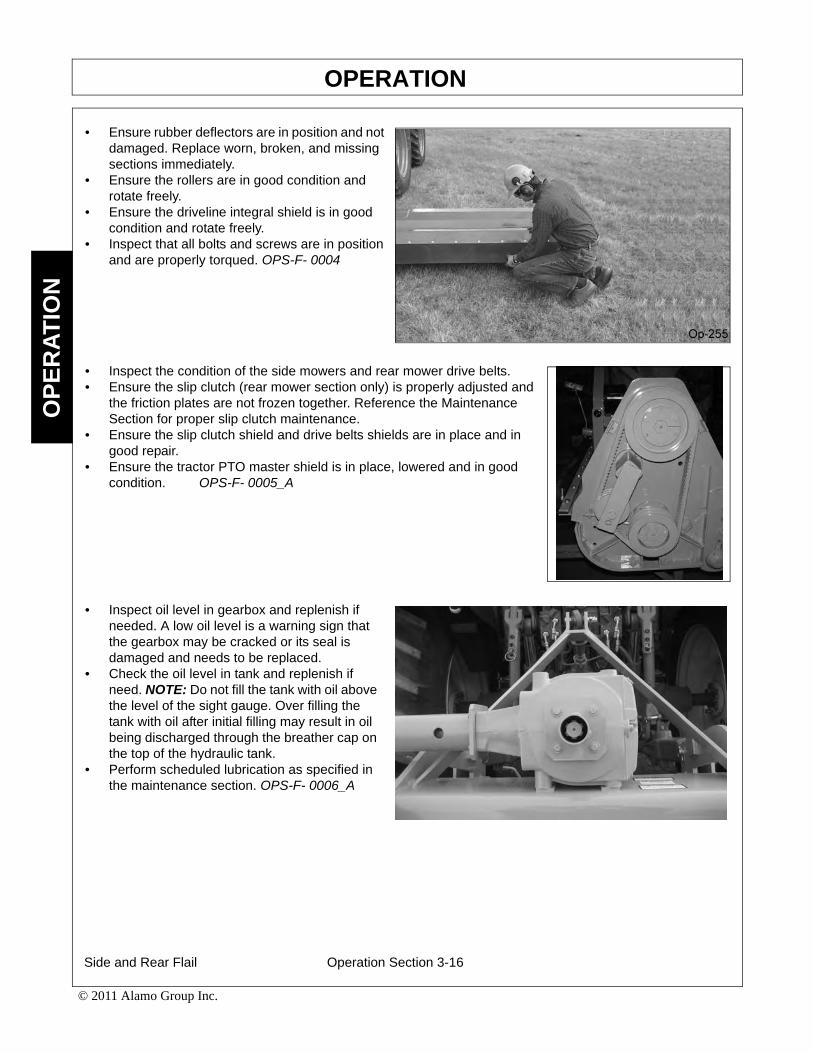
OPERATION
Side and Rear Flail Operation Section 3-16
© 2011 Alamo Group Inc.
OP
ER
AT
ION
• Ensure rubber deflectors are in position and not damaged. Replace worn, broken, and missing sections immediately.
• Ensure the rollers are in good condition and rotate freely.
• Ensure the driveline integral shield is in good condition and rotate freely.
• Inspect that all bolts and screws are in position and are properly torqued. OPS-F- 0004
• Inspect the condition of the side mowers and rear mower drive belts.• Ensure the slip clutch (rear mower section only) is properly adjusted and
the friction plates are not frozen together. Reference the Maintenance Section for proper slip clutch maintenance.
• Ensure the slip clutch shield and drive belts shields are in place and in good repair.
• Ensure the tractor PTO master shield is in place, lowered and in good condition. OPS-F- 0005_A
• Inspect oil level in gearbox and replenish if needed. A low oil level is a warning sign that the gearbox may be cracked or its seal is damaged and needs to be replaced.
• Check the oil level in tank and replenish if need. NOTE: Do not fill the tank with oil above the level of the sight gauge. Over filling the tank with oil after initial filling may result in oil being discharged through the breather cap on the top of the hydraulic tank.
• Perform scheduled lubrication as specified in the maintenance section. OPS-F- 0006_A
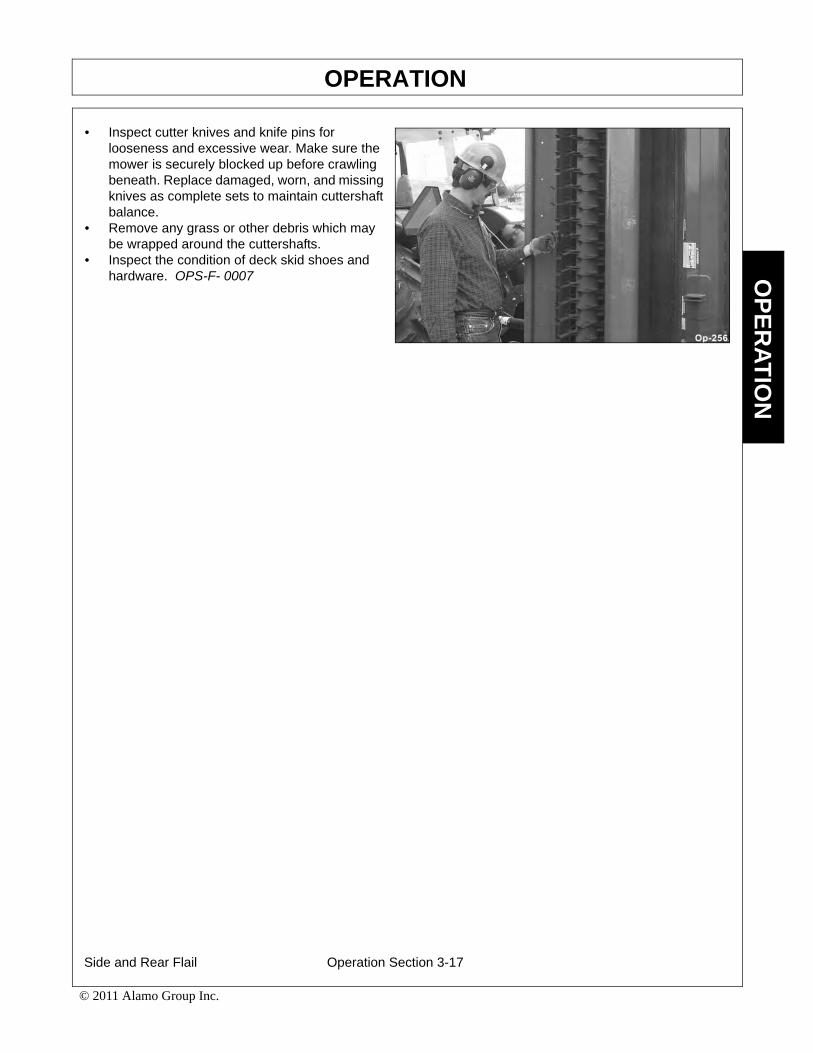
OPERATION
Side and Rear Flail Operation Section 3-17
© 2011 Alamo Group Inc.
OP
ER
AT
ION
• Inspect cutter knives and knife pins for looseness and excessive wear. Make sure the mower is securely blocked up before crawling beneath. Replace damaged, worn, and missing knives as complete sets to maintain cuttershaft balance.
• Remove any grass or other debris which may be wrapped around the cuttershafts.
• Inspect the condition of deck skid shoes and hardware. OPS-F- 0007

OPERATION
Side and Rear Flail Operation Section 3-18
© 2011 Alamo Group Inc.
OP
ER
AT
ION
Flail Mower PRE-OPERATION Inspection
Mower ID#________________ Make ____________________
Date: ________________ Shift ____________________
Before conducting the inspection, make sure the tractor engine is off, all rotation
has stopped and the tractor is in park with the parking brake engaged. Make sure
the mower is resting on the ground or securely blocked up and all hydraulic
pressure has been relieved.
Operator’s Signature:
Table 1:
Item Condition at Start of Shift
Specific Comments if not O.K.
The Operator’s Manual is in the canisterAll safety decals are in place and legibleThe Mounting frame bolts are in place and tightThe connection bolts & pins are tightThere are no cracks in mowerThe Hydraulic Cylinders pins are tightThe Hydraulic Pump hose connections are tightThe Hydraulic Valve hose connections are tightThe Hydraulic Valve controls function properlyThere are no leaking or damaged hosesThe Hydraulic Oil level is fullThere is no evidence of Hydraulic leaksThe Blades are not chipped, cracked or bentThe Blade bolts are tightThe Deflectors are in place and in good conditionThe shields are in place and in good conditionThe Skid shoes are in good condition & tightThe Hyd. motor mounting bolts are tight
DO NOT OPERATE an UNSAFE TRACTOR or BOOM

OPERATION
Side and Rear Flail Operation Section 3-19
© 2011 Alamo Group Inc.
OP
ER
AT
ION
Tractor PRE-OPERATION Inspection
Mower ID#________________ Make ____________________
Date: ________________ Shift ____________________
Before conducting the inspection, make sure the tractor engine is off, all rotation
has stopped and the tractor is in park with the parking brake engaged. Make sure
the mower is resting on the ground or securely blocked up and all hydraulic
pressure has been relieved.
Operator’s Signature:
Item Condition at Start of Shift
Specific Comments if not O.K.
The flashing lights function properlyThe SMV Sign is clean and visibleThe tires are in good condition with proper pressureThe wheel lug bolts are tightThe tractor brakes are in good conditionThe steering linkage is in good conditionThere are no visible oil leaksThe hydraulic controls function properlyThe ROPS or ROBS Cab is in good conditionThe seatbelt is in place and in good conditionThe 3-point hitch is in good conditionThe drawbar pins are securely in placeThe PTO master shield is in placeThe engine oil level is fullThe brake fluid level is fullThe power steering fluid level is fullThe fuel level is adequateThe engine coolant fluid level is fullThe radiator is free of debrisThe air filter is in good condition
DO NOT OPERATE an UNSAFE TRACTOR or MOWER
This Inspection Form may be freely duplicated for extra copies.

OPERATION
Side and Rear Flail Operation Section 3-20
© 2011 Alamo Group Inc.
OP
ER
AT
ION
9. DRIVING THE TRACTOR AND IMPLEMENT
Safe tractor transport requires the operator possess a thorough knowledge of the model being operated and
precautions to take while driving with an attached implement. Ensure the tractor has the capacity to handle the
weight of the implement and the tractor operating controls are set for safe transport. To ensure safety while
driving the tractor with an attached implement, review the following. OPS-U- 0012
This Implement may be wider than the Tractor. Be careful when operating or transporting
this equipment to prevent the Implement from running into or striking sign posts, guard rails,
concrete abutments or other solid objects. Such an impact could cause the Implement and
Tractor to pivot violently resulting in loss of steering control, serious injury, or even death.
Never allow the Implement to contact obstacles. (S3PT-12)
Transport only at speeds where you can maintain control of the
equipment. Serious accidents and injuries can result from operating this
equipment at high speeds. Understand the Tractor and Implement and how it handles
before transporting on streets and highways. Make sure the Tractor steering and brakes
are in good condition and operate properly.
Before transporting the Tractor and Implement, determine the proper transport speeds for
you and the equipment. Make sure you abide by the following rules:
Test the tractor at a slow speed and increase the speed slowly. Apply the Brakes smoothly
to determine the stopping characteristics of the Tractor and Implement. As you increase
the speed of the Tractor the stopping distance increases. Determine the maximum
transport speed not to exceed 20 mph (30 kph) for transporting this equipment.
Test the equipment at a slow speed in turns. Increase the speed through the turn only after
you determine that the equipment can be operated at a higher speed. Use extreme care
and reduce your speed when turning sharply to prevent the tractor and implement from
turning over. Determine the maximum turning speed for you and this equipment before
operating on roads or uneven ground.
Only transport the Tractor and Implement at the speeds which allow you to properly control
the equipment.
Be aware of the operating conditions. Do not operate the Tractor with weak or faulty brakes
or worn tires. When operating down a hill or on wet or rain slick roads, the braking distance
increases: use extreme care and reduce your speed. When operating in traffic always use
the Tractor’s flashing warning lights and reduce your speed. Be aware of traffic around you
and watch out for the other guy. (SG-19)

OPERATION
Side and Rear Flail Operation Section 3-21
© 2011 Alamo Group Inc.
OP
ER
AT
ION
Raising the Mower
9.1 Starting the TractorThe procedure to start the tractor is model specific.
Refer to the tractor operator’s manual for starting
procedures for your particular tractor. Consult an
authorized dealer if the starting procedure is
unclear. Ensure the 3-point control lever is in the
lowered position and the PTO is disengaged before
starting the tractor. OPS-U-0033
9.2 Brake and Differential Lock SettingMake sure the tractor brakes are in good operating
condition. Tractor brakes can be set to operate
independently allowing single rear wheel braking
action or locked together to provide simultaneous
rear wheel braking. FOR MOST DRIVING AND
OPERATING CONDITIONS, THE BRAKE PEDALS
SHOULD BE LOCKED TOGETHER TO PROVIDE
THE MOST EFFECTIVE BRAKING ACTION.
Always disengage the tractor differential lock when
turning. When engaged the differential lock will
prevent or limit the tractor from turning. During
normal cutting conditions, locking the differential
provides no benefit and should not be used.
OPS-U- 0013

OPERATION
Side and Rear Flail Operation Section 3-22
© 2011 Alamo Group Inc.
OP
ER
AT
ION
Using the tractor 3-point hitch control lever, raise
the mower off the ground about 6”, or just high
enough to clear any ground obstacles. When
raising the mower, make sure all connection points
are securely attached and at least 1” clearance is
maintained between the driveline and the deck. If
necessary, place an upper lift strip on the 3-point
hitch control lever to limit the height the mower can
be raised to avoid driveline damage.
9.3 Driving the Tractor and ImplementsStart off driving at a slow speed and gradually
increase your speed while maintaining complete
control of the tractor and units. Moving slowly at
first will also prevent the tractor from rearing up
and loss of steering control. The tractor should
never be operated at speeds that cannot be
safely handled or which will prevent the operator
from stopping quickly during an emergency. If the
power steering or engine ceases operating, stop
the tractor immediately as the tractor will be
difficult to control.
Drive the tractor with the 3-Point lift arms in the
raised position and lock the control lever in the
transport detent position to prevent damage to
the mower driveline when turning.
Perform turns with the tractor and units at slow
speeds to determine how the tractor with an
attached mower handles a turn. Determine the
safe speed to maintain proper control of the
tractor when making turns.
To avoid overturns, drive the tractor with care and
at safe speeds, especially when operating over
rough ground, crossing ditches or slopes, and
turning corners. Tractor wheel tread spacing
should be increased when working on inclines or
rough ground to reduce the possibility of tipping.
Use extreme caution when operating on steep

OPERATION
Side and Rear Flail Operation Section 3-23
© 2011 Alamo Group Inc.
OP
ER
AT
ION
9.4 Crossing Ditches and Steep InclinesWhen crossing ditches with steep banks or going up
sharp inclines, it is possible that the main driveline
inner profile will penetrate into the outer housing to its
maximum depth until the assembly becomes solid
(driveline is at its extreme shortest length). This type
of abusive operation can cause serious damage to
the tractor and mower drive by pushing the PTO into
the tractor and through the support bearings or
downward onto the PTO shaft, breaking it off.
Damage resulting from over-collapse of the driveline’s inner profile and its outer housing
may allow the driveline to come loose from the Tractor which could cause bodily injury to the
operator or bystanders and/or extensive damage to the Tractor or Implement. OPS-R-0020
When confronted with an incline or ditch, do not
approach from an angle which is perpendicular or
straight on as damaged to over collapse of the
driveline may occur.
When crossing such terrain, the implement should
be fully lowered for a lower center of gravity and
added stability. OPS-R-0021

OPERATION
Side and Rear Flail Operation Section 3-24
© 2011 Alamo Group Inc.
OP
ER
AT
ION
Inclines and ditches should be approached along a
line which is at an angle as shown. This type of
path will reduce the possibility of over-collapse of
the driveline and resulting damage. If the gradient
is so steep that such an approach increases the
possibility of a tractor roll-over, select an alternate
crossing path.
When operating the tractor and mower across
slopes and inclines, through ditches, and other
uneven terrain conditions, it is important to maintain
sufficient deck to ground clearance. Blade contact
with the ground may cause soil, rocks and other
debris to be thrown out from under the mower
resulting in possible injury and/or property damage.
Ground contact also produces a severe shock load
on the mower drive and to the mower blades
resulting in possible damage and premature wear.
OPS-R-0022
10. OPERATING THE TRACTOR AND IMPLEMENT
THE OPERATOR MUST COMPLETELY UNDERSTAND HOW TO OPERATE THE TRACTOR AND
IMPLEMENT AND ALL CONTROLS BEFORE ATTEMPTING TO OPERATE. The operator must read and
understand the Safety and Operation Sections of the implement and tractor operator’s manuals. These
manuals must be read and explained to any operator who cannot read. Never allow someone to operate the
implement and tractor without complete operating instructions.
Before starting any operation, the operator must become familiar with the area to be worked in and any
obstacles and hazards contained within to ensure safety to the operator, bystanders, and equipment. Special
attention should be paid to foreign debris, rough terrain, steep slopes, and passersby and animals in the area.
OPS-U- 0015
Extreme care should be taken when operating near loose objects such
as gravel, rocks, wire, and other debris. Inspect the area before
mowing. Foreign objects should be removed from the site to prevent
machine damage and/or bodily injury or even death. Any objects that
cannot be removed must be clearly marked and carefully avoided by the
operator. Stop mowing immediately if blades strike a foreign object.
Repair all damage and make certain rotor or blade carrier is balanced
before resuming mowing. (SGM-05)

OPERATION
Side and Rear Flail Operation Section 3-25
© 2011 Alamo Group Inc.
OP
ER
AT
ION
Many varied objects, such as wire, cable, rope, or chains, can become entangled in the
operating parts of the mower head. These items could then swing outside the housing at
greater velocities than the blades. Such a situation is extremely hazardous and could result
in serious injury or even death. Inspect the cutting area for such objects before mowing.
Remove any like object from the site. Never allow the cutting blades to contact such items.(SGM-06)
10.1 Foreign Debris HazardsBefore mowing, inspect the area to make sure
there are no foreign objects that the mower blades
could hit or become entangled with. Remove all
foreign objects and debris. If objects are too big to
remove, mark them clearly and be sure to prevent
the mower blades from contacting them.
If you hit a solid object or foreign debris, stop the
mower and tractor at once. Immediately idle the
engine speed and disengage the PTO. Wait for all
mower rotating motion to stop, then raise the
mower and move the tractor and implement off the
object. Inspect the area and remove, or mark the
location of the debris. Inspect the condition of the
mower and make any needed repairs immediately.
Make sure the blades are not damaged and the
carrier is balanced before resuming operation.
Always wear your seat belt securely fastened and
only operate the tractor and mower with the ROPS
in the raised position. If the tractor or mower hits a
tree stump, rock, or bump, a sudden movement
could throw you off of the seat and under the
tractor and/or mower. The seat belt is your best
protection from falling off the tractor and the ROPS
provides protection from being crushed during a
tractor roll-over. OPS-F-0010
10.2 Bystanders/Passersby PrecautionsIf a bystander comes within 300 feet of the tractor while the mower is being operated, stop the tractor at once,
idle the engine and disengage the PTO. Do not engage the PTO again until all bystanders are well past the
300 foot distance. OPS-R-0024
OPERATION
Side and Rear Flail Operation Section 3-26
© 2011 Alamo Group Inc.
OP
ER
AT
ION
Flail Mowers are capable under adverse conditions of throwing
objects for great distances (300 feet or more) and causing serious
injury or death. Follow safety messages carefully.
STOP MOWING IF PASSERSBY ARE WITHIN 300 FEET UNLESS:
-Front and Rear Deflectors, Chain Guards, or Bands are installed and in good, workable
condition;
-Mower sections are running close to and parallel to the ground without exposed Blades;
-All areas have been thoroughly inspected and all foreign material such as rocks, cans,
glass, and general debris has been removed.
NOTE: Where there are grass and weeds high enough to hide debris that could bestruck by the blades, the area should be: inspected and large debris removed, mowed atan intermediate height, inspected closely with any remaining debris being removed, andmowed again at desired final height. (This will also reduce power required to mow,reduce wear and tear on the Mower drivetrain, spread cut material better, eliminate
10.3 Engaging the Power Take Off (PTO)Before engaging the PTO, make certain that the area is clear of bystanders and passersby. The implement
must be completely lowered and the deck positioned at a safe operating height. NEVER engage the PTO with
the implement in the raised position.
Set the tractor engine speed at approximately 1,000 RPM before engaging the PTO. Shift the PTO control to
the on position, and slowly increase the engine speed until the PTO is operating at the rated speed. If you
hear unusual noises or see or feel abnormal vibrations, disengage the PTO immediately. Inspect the
implement to determine the cause of the noise or vibration and repair the abnormality. OPS-U- 0027
Do not let the Blades turn when the Mower Deck is raised for any
reason, including clearance or for turning. Raising the Mower deck
exposes the Cutting Blades which creates a potentially serious hazard
and could cause serious injury or even death from objects thrown from
the Blades. (SRM-07)
Do not put hands or feet under mower decks. Blade Contact can result
in serious injury or even death. Stay away until all motion has stopped
and the decks are securely blocked up. (SGM-09)

OPERATION
Side and Rear Flail Operation Section 3-27
© 2011 Alamo Group Inc.
OP
ER
AT
ION
10.4 PTO RPM and Ground SpeedGround speed for mowing will depend upon the height, type, and density of vegetation to be cut.
Recommended speed for efficient mower performance is between 2 and 5 mph(3-8 kph). Operate the mower
at its full rated PTO speed to maintain blade speed for a clean cut. Refer to the tractor operator’s manual or
the tractor instrument panel for the engine speed and gear to provide the required PTO and desired ground
speed. Make sure that the mower is operating at its full rated speed before entering the vegetation to be cut.
If it becomes necessary to temporarily regulate engine speed, increase or decrease the throttle gradually.
Ground speed is achieved by transmission gear selection and not by the engine operating speed. The
operator may be required to experiment with several gear range combinations to determine the best gear and
range which provides the most ideal performance from the mower and most efficient tractor operation. As the
severity of cutting conditions increase, the ground speed should be decreased by selecting a lower gear to
maintain the proper operating PTO speed. OPS-R-0025
Do not exceed the rated PTO speed for the Implement. Excessive PTO speeds can cause
Implement driveline or blade failures resulting in serious injury or death. (SG-26)
Mow at the speed that you can safely operate and control the tractor and mower. The
correct mowing speed depends on terrain condition and grass type, density, and height of
cut. Normal ground speed range is from 2 to 5 mph(3-8 kph). Use slow mowing speeds
when operating on or near steep slopes, ditches, drop-offs, overhead obstructions, power
lines, or when debris and foreign objects are to be avoided. (SGM-07)
10.5 Operating the MowerOnly operate the mower from the tractor operator’s seat with the seatbelt securely fastened. The tractor must
be equipped with a ROPS in the raised position or a ROPS cab.
The mower is designed to cut vegetation up to 2” in diameter. Sharp blades will produce a cleaner cut and
require less power. Travel at a speed that allows the mower sufficient time to cut through the vegetation and
maintain the PTO operating speed to prevent overloading the mower and tractor. Choose a driving pattern
that provides the maximum pass length and minimizes turning.
Under certain conditions, tractor tires may roll some grasses down preventing them from being cut at the
same height as the surrounding area. When this occurs, reduce the tractor ground speed while maintaining
the operating speed of the mower. A slower ground speed will permit grasses to at least partially rebound and
be cut. Taking a partial cut and/or reversing the direction of travel may also help produce a cleaner cut.
Avoid mowing in the reverse direction when possible. In situations where the mower must be backed to
access areas to be cut, make sure there are no persons or other foreign debris behind the mower before
mowing in reverse. When mowing in reverse, operate the tractor and mower at a reduced ground speed to
ensure tractor and mower control is maintained. OPS-R-0026

OPERATION
Side and Rear Flail Operation Section 3-28
© 2011 Alamo Group Inc.
OP
ER
AT
ION
Do not mow with two machines in the same area except with Cab tractors with the windows
closed. (SGM-11)
Mow only in conditions where you have clear visibility in daylight or with adequate artificial
lighting. Never mow in darkness or foggy conditions where you cannot clearly see at least
300 feet (90 m) in front and to the sides of the tractor and mower. Make sure that you can
clearly see and identify passersby, steep slopes, ditches, drop-offs, overhead obstructions,
power lines, debris and foreign objects. If you are unable to clearly see these type of items
discontinue mowing. (SGM-01)
Avoid mowing in reverse direction when possible. Check to make sure there are no
persons behind the mower and use extreme care when mowing in reverse. Mow only at a
slow ground speed where you can safely operate and control the tractor and mower.
Never mow an area that you have not inspected and removed debris or foreign material.(SGM-08)
Follow these guidelines to reduce the risk of equipment and grass fires
while operating, servicing, and repairing the Mower and Tractor:
-Equip the Tractor with a fire extinguisher in an accesible location.
-Do Not operate the Mower on a Tractor with an underframe exhaust.
-Do Not smoke or have an open flame near the Mower and Tractor.
-Do Not drive into burning debris or freshly burnt areas.
-Ensure slip clutches are properly adjusted to prevent excessive slippage and plate heating.
-Never allow clippings or debris to collect near drivelines, slip clutches, and gearboxes.
Periodically shut down the Tractor and Mower and clean clippings and collected debris from
the mower deck. (SGM-12)

OPERATION
Side and Rear Flail Operation Section 3-29
© 2011 Alamo Group Inc.
OP
ER
AT
ION
10.6 Shutting Down the ImplementTo shut down the implement, first bring the tractor
to a complete stop. Then slow down the implement
by reducing the engine speed before disengaging
the PTO. Wait for all motion to stop before
proceeding to drive or shut down the tractor.
Park the tractor on a level surface, place the
transmission in park or neutral and apply the
parking brake, lower the attached implement to the
ground, shut down the engine, remove the key, and
wait for all motion to come to a complete stop
before exiting the tractor. OPS-F- 0011
11. DISCONNECTING THE MOWER FROM THE TRACTOR
Before disconnecting the mower, the PTO must be
disengaged and all motion at a complete stop.
Move the mower to a level storage location and
lower both side mowers to the ground. If the
mower will be stored with the sections in the raised
position, be sure that the travel locks are engaged.
If the mower is not resting securely on the ground,
block the mower up securely before attempting to
disconnect it from the tractor. Use extreme care to
keep feet and hands from under the mower and
clear of any pinch points. OPS-F-0012_A

OPERATION
Side and Rear Flail Operation Section 3-30
© 2011 Alamo Group Inc.
OP
ER
AT
ION
Never stand or allow another person to stand between a running Tractor and the Mower
when disconnecting the Implement from the Tractor 3-point hitch. Always shut the Tractor off
completely and set the parking brake before attempting to disconnect the Mower pins from
the Tractor hitch.
Always shut the Tractor completely down, place the transmission in park, and set the
parking brake before you or anyone else attempts to connect or disconnect the Implement
and Tractor hitches. (S3PT-15)
After disconnecting the 3 lift points, remove the
mower driveline from the tractor PTO shaft. Lay
the driveline down carefully to avoid damaging
the driveline or its shield. Do not let the driveline
fall into mud or dirt, which can contaminate the
bearing and shorten the life of the driveline.
OPS-F-0013
Never work under the Implement, the framework, or any lifted
component unless the Implement is securely supported or blocked up
to prevent sudden or inadvertent falling which could cause serious
injury or even death. (SG-14)

OPERATION
Side and Rear Flail Operation Section 3-31
© 2011 Alamo Group Inc.
OP
ER
AT
ION
12. MOWER STORAGE
It is recommended that the mower be stored with the center section and both side mowers fully lowered to
ground level. If the mower is stored with the side mowers in the raised position, select a level area and
engage travel locks and travel lock pins to prevent the side mowers from falling BEFORE disconnecting the
mower rear mower.
Properly preparing and storing the mower at the end of the season is critical to maintaining its appearance
and to help ensure years of dependable service. The following are suggested storage procedures:
• Thoroughly clean all debris off the mower to prevent damage from rotting grass and standing water.
• Lubricate all mower grease points and fill gearbox oil levels as detailed in the maintenance section.
• Tighten all bolts and pins to the recommended torque.
• Check the mower for worn and damaged parts. Perform repairs and make replacements immediately so that the mower will be ready for use at the start of the next season.
• Store the mower in a clean, dry place with the mower housing resting securely on blocks or at ground level.
• Keep the driveline yoke from sitting in water, dirt and other contaminants.
• Use spray touch-up enamel where necessary to prevent rust and maintain the appearance of the mower.
It is critical that driveline clutches slip when an obstacle or heavy load is encountered to avoid mower and/or
tractor damage. If the mower sits outside for an extended period of time or is exposed to rain and/or humid
air, the clutch lining plates must be inspected to ensure they are not frozen together from rust or corrosion. If
the mower has been exposed to such conditions, at the start of each mowing season, and any time it is
Never allow children to play on or around Tractor or Implement. Children can slip or fall off
the Equipment and be injured or killed. Children can cause the Implement to shift or fall
crushing themselves or others. (SG-25)

OPERATION
Side and Rear Flail Operation Section 3-32
© 2011 Alamo Group Inc.
OP
ER
AT
ION
13. TRANSPORTING THE TRACTOR AND IMPLEMENT
Inherent hazards of operating the tractor and implement and the possibility of accidents are not left behind
when you finish working in an area. Therefore, the operator must employ good judgement and safe operation
practices when transporting the tractor and implement between locations. By using good judgement and
following safe transport procedures, the possibility of accidents while moving between locations can be
substantially minimized. OPS-U- 0017
Never allow children or other persons to ride on the Tractor or Implement.
Falling off can result in serious injury or death. (SG-10)
Before transporting the tractor and mower, idle
the tractor engine, disengage the PTO and wait
for all mower moving parts to come to a
complete stop. Raise the mower sections and
ensure transport locks engage and install the
travel lock pins. OPS-F- 0021

OPERATION
Side and Rear Flail Operation Section 3-33
© 2011 Alamo Group Inc.
OP
ER
AT
ION
If the tractor’s hydraulic pump is not independent of the tractor PTO, or if the tractor PTO has to be run to have
hydraulic power, disconnect the mower driveline from the tractor PTO output shaft. Secure the driveline to the
mower deck to prevent driveline damage or loss during transport.
NOTE: Ensure that the mower sections are fully raised and that the transport locks are engaged for eachsection.
Before transporting the tractor on a public roadway
or boarding a trailer for transport, the tractor brake
pedals should be locked together. Locking the
pedals ensures that both wheels brake
simultaneously while stopping, especially when
making an emergency stop.
Use extreme caution and avoid hard applications of
the tractor brakes when carrying equipment at road
speeds. Never haul the implement at speeds
greater than 20 MPH (32 kph). OPS-U- 0018_A
13.1 Transporting on Public RoadwaysExtreme caution should be used when transporting the tractor and implement on public roadways. The tractor
must be equipped with all required safety warning features including a SMV emblem and flashing warning
lights to alert drivers of the tractor’s presence. Remember that roadways are primarily designed for
automotive drivers and most drivers will not be looking out for you, therefore, you must look out for them.
Check your side view mirrors frequently and remember that vehicles will approach quickly because of the
tractor’s slower speed. Be extremely cautious when the piece of equipment that you are carrying is wider than
the tractor tire width and/or extends beyond your lane of the road. OPS-U- 0019_A
Only carry the Implement behind a properly sized and equipped Tractor
which exceeds the weight of the Implement by at least 20%. DO NOT
carry the Implement behind a truck or other type of vehicle. Never carry
the Implement and another Implement connected in tandem. Never
carry the Implement at speeds over 20 MPH. (STI-06_A)
Never allow children or other persons to ride on the Tractor or Implement.
Falling off can result in serious injury or death. (SG-10)
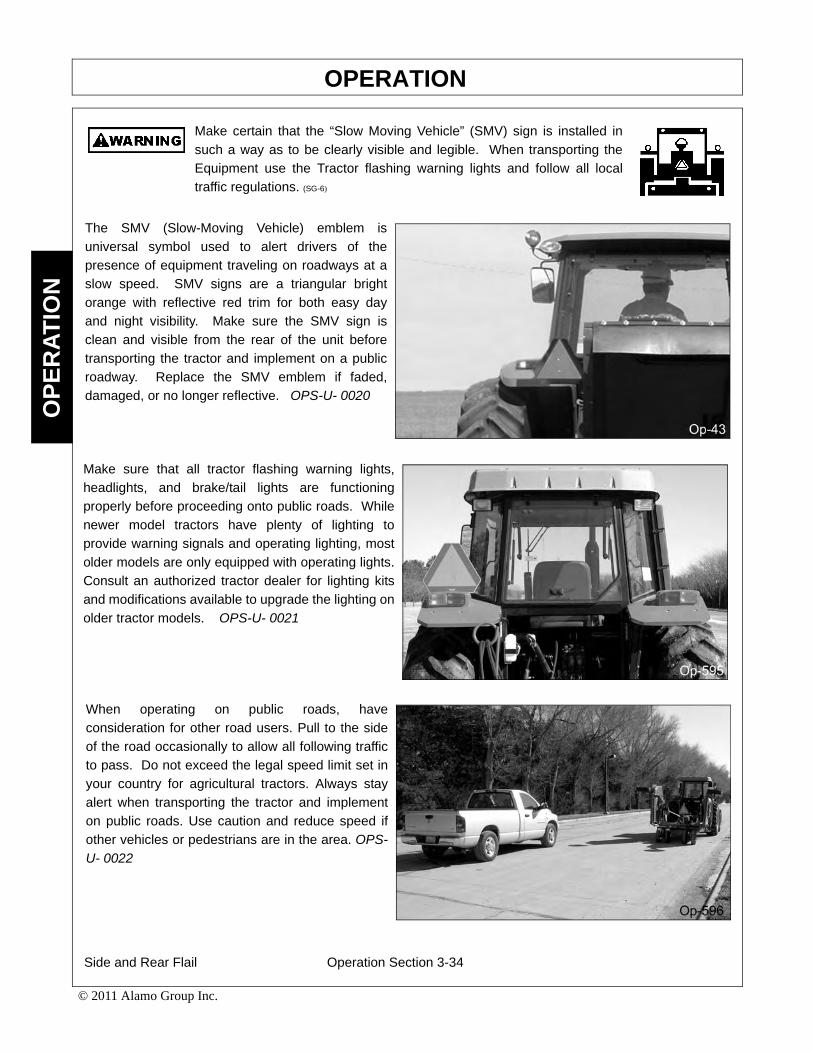
OPERATION
Side and Rear Flail Operation Section 3-34
© 2011 Alamo Group Inc.
OP
ER
AT
ION
Make certain that the “Slow Moving Vehicle” (SMV) sign is installed in
such a way as to be clearly visible and legible. When transporting the
Equipment use the Tractor flashing warning lights and follow all local
traffic regulations. (SG-6)
The SMV (Slow-Moving Vehicle) emblem is
universal symbol used to alert drivers of the
presence of equipment traveling on roadways at a
slow speed. SMV signs are a triangular bright
orange with reflective red trim for both easy day
and night visibility. Make sure the SMV sign is
clean and visible from the rear of the unit before
transporting the tractor and implement on a public
roadway. Replace the SMV emblem if faded,
damaged, or no longer reflective. OPS-U- 0020
Make sure that all tractor flashing warning lights,
headlights, and brake/tail lights are functioning
properly before proceeding onto public roads. While
newer model tractors have plenty of lighting to
provide warning signals and operating lighting, most
older models are only equipped with operating lights.
Consult an authorized tractor dealer for lighting kits
and modifications available to upgrade the lighting on
older tractor models. OPS-U- 0021
When operating on public roads, have
consideration for other road users. Pull to the side
of the road occasionally to allow all following traffic
to pass. Do not exceed the legal speed limit set in
your country for agricultural tractors. Always stay
alert when transporting the tractor and implement
on public roads. Use caution and reduce speed if
other vehicles or pedestrians are in the area. OPS-U- 0022

OPERATION
Side and Rear Flail Operation Section 3-35
© 2011 Alamo Group Inc.
OP
ER
AT
ION
Reduce speed before turning or applying the brakes.
Ensure that both brake pedals are locked together
when operating on public roads. OPS-U- 0023
13.2 Hauling the Tractor and ImplementBefore transporting a loaded tractor and implement,
measure the height and width dimensions and gross
weight of the complete loaded unit. Ensure that the
load will be in compliance with the legal limits set for
the areas that will be traveled through. OPS-U- 0024
Use adequately sized and rated trailers and
equipment to transport the tractor and implement.
Consult an authorized dealer to determine the proper
equipment required. Using adequately sized chains,
heavy duty straps, cables and/or binders, securely tie
down both the front and rear of the tractor utilizing the
proper tie down locations as specified by the tractor
manufacturer. OPS-U- 0025

OPERATION
Side and Rear Flail Operation Section 3-36
© 2011 Alamo Group Inc.
OP
ER
AT
ION

Maintenance Section 4-1
©2011 Alamo Group Inc.
MAINTENANCE SECTION

MAINTENANCE
Side and Rear Flail Maintenance Section 4-2
©2011 Alamo Group Inc.
MA
INT
EN
AN
CE
General InstructionsTiger Mowers are designed for high performance and rugged durability, yet with simplified maintenance. Thepurpose of this section of the manual is to help the operator in the regular servicing of the mower. Regularmaintenance at the intervals mentioned will result in the maximum efficiency and long life of the Tiger Mower.
When you purchase a Tiger Mower you also acquire another valuable asset, Tiger’s parts organization. Ourrapid and efficient service has guaranteed the customer satisfaction for many years. Tiger parts keep up withthe demands for efficiency, safety and endurance expected of the Tiger Mower.
Maintenance Precautions• Be sure end of grease gun and fittings are clean before using. Debris injected into bearings, etc. with
grease will cause immediate damage.• DO NOT use a power grease gun to lubricate bearings. These require very small and exact amounts of
lubrication. Refer to the detailed maintenance section for specific lubrication instructions. DO NOT over-grease bearings.
• Lexan windows should be washed with mild soap or detergent and luke warm water, using a soft clean sponge or soft cloth. DO NOT use abrasive or alkaline cleaners or metal scrapers on lexan windows!
• Be alert to maintenance indicators such as the in-tank filter pressure gauge, hydraulic reservoir sight gauge, etc. Take the required action to correct any problems immediately.
• Release of energy from pressurized systems may cause inadvertent actuation of cylinders, or sudden release of compressed springs. Before disconnecting any hoses relieve pressure by shutting tractor off, setting cutter on ground and actuating lift valve handles.
DO NOT use hands to check for suspected leaks in hydraulic hoses! Hydraulic fluidescaping under pressure can have sufficient force to penetrate skin and cause seriousinjury. If fluid is injected into skin, it must be surgically removed within a few hours organgrene may result. Use a small piece of wood or cardboard, not hands, to search forpin hose leaks. Be sure all connections are tight and hoses and lines are not damagedbefore applying pressure.
Break in PeriodIn addition to following the break in instructions for your particular tractor, the in-tank hydraulic fluid filter shouldbe replaced after the first 50 hours of service. Thereafter the filter should be replaced every 500 hours, oryearly, which ever comes first.
Re-torque wheel lugs after first five hours of operation and periodically thereafter. See torque specificationslisted in the tractor’s service manual for your particular model. Wheel lugs must always be re-torquedwhenever a wheel is removed and reinstalled.
Never work under the Implement, the framework, or any liftedcomponent unless the Implement is securely supported or blocked upto prevent sudden or inadvertent falling which could cause seriousinjury or even death. (SG-14)
Do not modify or alter this Implement. Do not permit anyone to modify or alter thisImplement, any of its components or any Implement function. (SG-8)

MAINTENANCE
Side and Rear Flail Maintenance Section 4-3
©2011 Alamo Group Inc.
MA
INT
EN
AN
CE
Regular Maintenance The intervals at which regular servicing should be done are based on hours of operation. Use the tractors hourmeter to determine when regular servicing is required.
Daily or Every 8 HoursITEM SERVICE COMMENTS
Drive Shaft Yoke, U-Joint Grease Grease as instructed in
& Stub Shaft detailed maint. section
Pump Drive Shaft Coupler Check and Lube Insure drive shaft end play
Crankshaft Adapter Check rubber grommets Replace grommets if
damaged or missing
Pivot Points Lubricate Inject grease until it
appears at ends
Hydraulic Fittings Check for leaks Tighten when needed.
Do Not use hands to
check for leaks, see
maintenance Precautions
Knives Check Inspect for missing or damaged
knives, change as needed.
Belts Check/Adjust Check if broken, tighten as required.
Main Frame and Check Retorque bolts to torque
Deck specifications in this section
Always disconnect the wire leads from the mower pump solenoidbefore performing service on the Tractor or Mower. Use caution whenworking on the Tractor or Mower. Tractor engine must be stopped
before working on Mower or Tractor. The Mower Blades could inadvertently be turned onwithout warning and cause immediate dismemberment, injury or death. (SBM-12a)

MAINTENANCE
Side and Rear Flail Maintenance Section 4-4
©2011 Alamo Group Inc.
MA
INT
EN
AN
CE
ITEM SERVICE COMMENTS
Hydraulic Fluid Level Check Add if required per
fluid recommendations
Rear Flail Drive (if applicable) Lubricate Grease as instructed in
Bearing Flange and detailed maintenance section
Shaft Coupler
Cutter Shaft Lubricate Grease as instructed in
detailed maintenance section
Ground Roller Bearings Lubricate Grease as instructed in
detailed maintenance section
WEEKLY OR EVERY 50 HOURSITEM SERVICE COMMENTS
In Tank Hyd. Fluid Change Change after first 50
Filter hours only, then every
(10 micron filter) 500 hours or yearly
In-Line High Pressure Change Change after first 50
Filter hours only, then every
(10 micron filter) 500 hours or yearly
MONTHLY OR EVERY 150 HOURSHydraulic Fluid Level Check Add as needed
Hyd. Tank Breather Clean/Check/Replace Clean or replace
Element as required
Rear Tire Type Max P.S.I.
480/80R38 29
18.4-34 26
18.4-38 26

MAINTENANCE
Side and Rear Flail Maintenance Section 4-5
©2011 Alamo Group Inc.
MA
INT
EN
AN
CE
YEARLY OR EVERY 500 HOURS
ITEM SERVICE COMMENTS
Hydraulic Tank Fluid Change
In Tank Hydraulic Fluid Filter Change(10 micron filter)
In-Line HP Filter Change or Change when indicated(10 micron filter) by restriction indicator.
Hydraulic Tank Breather Change

MAINTENANCE
Side and Rear Flail Maintenance Section 4-6
©2011 Alamo Group Inc.
MA
INT
EN
AN
CE
TROUBLESHOOTINGSYMPTOMS CAUSE REMEDY
Vibration 1. Loose Bolts 1. Check all bolts and tighten to
recommended torque specs.
2. Cutter assembly 2a. Check for damaged blades, disc
Unbalanced or cuttershaft. Replace if needed.
2b. Check for wire, rope, etc.
entangled in the cutter assembly
Mower will not lift 1. Hyd. Fluid Low 1. Check and refill hydraulic fluid
2. Leaks in line 2. Tighten or replace fittings and hoses
3. Faulty relief valve 3. Check pressure in line. Line
pressure should be at least 2500 PSI
4. Kinked or blocked 4. Clean or replace lines
5. Faulty cylinder 5. Inspect, repair or replace cylinder
Mower will not start 1. Blown fuse 1. Check fuse between mower switch
or run and ignition/replace
2. Ball valves closed 2. Make sure valves are open
3. Low oil level 3. Check hydraulic tank and fill
4. Line leak 4. Check all fittings and lines,
re-tighten or replace
5. Electronic 5a. Without the tractor running, turn
solenoid faulty the mower switch to on. A low
audible click is not heard if the
solenoid is engaging the solenoid
spool. If click is not heard, leave
switch in on position and with a
screwdriver or other steel object,
touch the small nut on the end of the
solenoid. If the metallic object is not
attracted to the nut, check the fuse
and wiring for an open circuit. If the
object is attracted but no “click” is
heard, replace the solenoid.
5b. Remove the four bolts holding the
small block to the main block. Lift
and remove small block being
careful not to damage O-rings/filter.
Clean filter and re-install.

MAINTENANCE
Side and Rear Flail Maintenance Section 4-7
©2011 Alamo Group Inc.
MA
INT
EN
AN
CE
5c. Remove large nut on side of large
valve block. Remove spring, and use
needle nose vise grip to pull spool
from block. Check block and spool
for contaminates and scratches.
Clean parts or replace if scratched.
Oil Temperature rises1. Belts 1. Low oil level 1. Bring oil to proper level.
above 200 deg. F 2. Kinked or blocked hose 2. Inspect, repair, or replace hoses.
3. Worn pump/motor 3. Disable and repair.
Motor runs but 1. Belts 1. Inspect belts and pulleys. Replace
will not cut. belts and repair as needed.
2. Tensioner 2. Adjust tensioner nut until flatwasher
is flush with top of guide.
Mower turns slowly 1. Contaminants 1. Remove large nut on side of large
or not at all. restricting spool valve block. Remove spring, and use
movement in needle nose vise grip to pull spool
valve body. from block. Check block and spool
for contaminates and scratches.
Clean parts or replace if scratched.
2. Suction lines 2. Check for kinks or obstruction in
obstructed suction hose.
3. Low oil level 3. Check Hyd. tank level and fill.
Pump will not work 1. Excessive wear 1. Disassemble and repair.
on internal parts
Motor will not work 1. Excessive wear 1. Disassemble and repair.
on internal parts
NOTE: If flow meter is available, check pressure and flow volume for all suspected hydraulic problems.
If the solution to your problem cannot be found in this section, call the Technical Servicerepresentative at the number shown on the front cover of this manual.

MAINTENANCE
Side and Rear Flail Maintenance Section 4-8
©2011 Alamo Group Inc.
MA
INT
EN
AN
CE
These are intended to be general specifications. See tractor operators or service manual for exactspecifications for your unit.
LUBRICATION RECOMMENDATIONSDescription Application General Specification Recommended
Mobil Lubricant
Tractor Hydraulics Reservoir JD-20C Mobilfluid®
Mower Hydraulics Reservoir
Cold Temperatures 0° F ISO 46 Anti-Wear/ Mobil DTE® 15M
Start-Up Low Temp
Normal Temperatures ISO 46 Anti-Wear Nuto® H46, Mobil DTE®25
15° F Start-Up
Flail Rear Gearbox Reservoir PAO Synthetic Extreme Mobil® 1 Synthetic Gear
Pressure Gear Lube Lubricant LS 75W-90
Mobil® Delvac Synthetic
75W-90
Cutter Shaft & Ground Grease Lithium-Complex Mobil Delvac® Xtreme Grease,
Roller Shaft(Flail) Gun NLGI 2 ISO 320 Mobilgrease CM-S
Drive Shaft Coupler Grease Lithium-Complex Mobil Delvac® Xtreme Grease,
(Flail and Rotary) Gun NLGI2-ISO 320 Mobilgrease CM-S
Drive Shaft Yoke, Grease Lithium-Complex Mobilgrease CM-S
U-joint & Stub Shaft Gun Extreme Pressure
NLGI2-ISO 320

MAINTENANCE
Side and Rear Flail Maintenance Section 4-9
©2011 Alamo Group Inc.
MA
INT
EN
AN
CE
TORQUE SPECIFICATIONS

MAINTENANCE
Side and Rear Flail Maintenance Section 4-10
©2011 Alamo Group Inc.
MA
INT
EN
AN
CE
RECOMMENDED FILLING INSTRUCTIONS FOR HYDRAULIC RESERVIORSWhen filling or checking the oil level, the unit shouldbe parked on a level surface., shut ”OFF”, and allowsufficient time to cool to ambient temperature. Usecaution when removing the pressurized breather.Do not place face over opening when removingbreather.
If your reservoir has two sight glasses: Thereservoir should be filled to the top of the lowersight glass on the side of the tank. Do not over-fill.The reservoir has been over-filled when oil is visiblein the upper sight glass. If tank has too much oil, theexcess may be expelled through the pressurizedbreather.
If your reservoir has one sight glass/temperaturegage: The reservoir should be filled to the center ofthe sight glass on the side of the tank. Do not over-fill. If the tank has too much oil, the excess may beexpelled through the pressurized breather.
REPLACEING IN-TANK HYDRAULIC FILTER:Loosen the four bolts on the top cover of the filterhousing. Turn cover counter-clockwise until cover isfree. Remove and replace filter. Replace top coverand cover bolts in opposite order as removed.

MAINTENANCE
Side and Rear Flail Maintenance Section 4-11
©2011 Alamo Group Inc.
MA
INT
EN
AN
CE
REPLACEING HIGH PRESSURE HYDRAULIC FILTER ELEMENT:Assure system has been shut down and de-pressurized. Locate High Pressure Filter housing.Confirm that the element that is about to be installedmatches the element p/n on the filter model tag.Example: V3.0510-06 (world line 100, HD049model) Locate the bottom of the High PressureBowl, and use the appropriate spanner wrench-or-ratchet and turning in a counterclockwise rotation,(looking at the bottom of the bowl) remove the bowlfrom the head, The first couple rotations will seemtight as the o-ring passes the sealing flats, once theo-ring has cleared the sealing flats the bowl shouldspin freely. Taking care not to drop the bowl, finishremoving the bowl from the head.
WARNING: bowl will be full of oil! Pour the oil from the bowl into a container, this oil should be consideredcontaminated due to the flow direction through the element is outside-in. Clean the inside of the bowl if “dirt” ispresent. Remove the old element from the filter head by pulling with a rotation motion. Dispose of the usedelement properly. Remove the new element from the packaging. Using your finger, dab and lubricate the o-ringin the top of the new element. Install the new element into and on the mounting boss within the head; assurethat the element is fully seated on the boss. Clean and inspect the o-ring that is affixed in the bowl, lubricatewith oil. Using a clockwise rotation, screw the bowl back into the head, assuring that the bowl has not beencross threaded into the head. Continue to “tighten” the bowl into the head, using the spanner wrench-or-ratchet, the rotation of the bowl will become tighter once the o-ring engages the sealing flats. Once the bowlhas bottomed out, “back-off” the bowl by 1/6 turn, this assures that the o-ring is seated properly with in thesealing flats. Element change out and re-assembly is now complete. Start the machine and inspect the filterarea checking that there is no oil leaking from the filter assembly. This is first to be done at 50 hours ofoperation, then yearly (500 hours) or when indicated by restriction indicator.
GREASING INNER AND OUTER DRAFT BEAM PIVOT POINTSLocate the grease zerks on the inner and outer draft beam pivot bosses. Inject Lithium-Complex ExtremePressure grease conforming to NLGI2-ISO 320 specifications into each zerk until grease protrudes from joints.Grease all pivots daily or every 8 hours of service.

MAINTENANCE
Side and Rear Flail Maintenance Section 4-12
©2011 Alamo Group Inc.
MA
INT
EN
AN
CE
GREASING THE UPPER AND LOWER SHEAVESLocate the grease zerks on the ends of the upperand lower sheave pins. Mnt-R-0018 Inject Lithium-Complex Extreme Pressure grease conforming toNLGI2-ISO 320 specifications into each pin until itprotrudes from the ends. These should also begreased daily or for every 8 hours of service.
GREASING P.T.O. SHAFTSAfter bringing the tractor to a complete stop, shut offthe engine and remove he PTO shaft from thetractor. Slide the shaft apart to expose the greasezerk. Grease the shaft with 5 pumps of grease andthe U-joints until grease protrudes from caps perthe scheduled interval in the maintenance section.
GREASING INNER AND OUTER DRAFT BEAM PIVOT POINTS
Locate the grease zerks on the inner and outer draft beam pivot bosses. Inject Lithium-Complex ExtremePressure grease conforming to NLGI2-ISO 320 specifications into each zerk until grease protrudes from joints.Grease all pivot points daily or every 8 hours of service.

MAINTENANCE
Side and Rear Flail Maintenance Section 4-13
©2011 Alamo Group Inc.
MA
INT
EN
AN
CE
With the cutter head lowered, locate the grease zerkson the linkage and pivot bosses. Inject Lithium-Complex Extreme Pressure grease conforming toNLG12-ISO 320 specifications until it protrudes fromthe ends. With the cutter head in this position it is alsopossible to grease the draft beam cylinder anchors andpins. Now raise the cutter head to expose theremaining zerks on the deck tilt linkages and on theother end of the cylinder.
GREASING THE REAR DRIVE BEARING AND EXTENSION COUPLER SHAFTLocate the grease zerks for the rear flail driveextension shaft. Make sure the zerks are cleanbefore injecting grease. One pump of grease intoflange zerk and shaft coupler once every day or forevery 8 hours of service.
GREASING PUMP DRIVE SHAFT COUPLERWith engine stopped, ensure drive shaft alignmentby grasping coupler and sliding back and forth.Coupler should slice freely with approximately 1/8”of end play. If coupler does not slide freely, inspectfor loose pump mount bolts, or damaged or loosecrank shaft adapter. Inject-Lithium ComplexExtreme Pressure grease conforming to NLGI2-ISO320 specifications into coupler until grease beginsto protrude from ends. Grease daily or every 8hours. Do not over grease.

MAINTENANCE
Side and Rear Flail Maintenance Section 4-14
©2011 Alamo Group Inc.
MA
INT
EN
AN
CE
DRIVE SHAFT YOKE, U-JOINT STUB SHAFTWith engine stopped, inject Lithium-Complex extreme pressure grease conforming to NLGI2-ISO 320specifications into universal joints and slip yoke until grease appears at the seal. Grease them daily or every 8hours.
ADJUSTING THE CABLE LIFTExtend the outboard cylinder until the mower decktouches its stop on the draft beam as shown.NOTE: Make sure the cable turnbuckle is looseenough to allow the cylinder to reach full extensionbefore the head reaches the stop. Now hold thehead against the stop and tighten the turnbuckleuntil the cable is tight. Lower and raise the head tocheck the adjustment. The head should touch itsstop at the same time the cylinder reaches fullextension. Tighten turnbuckle lock nuts securelyafter adjustment is complete.

MAINTENANCE
Side and Rear Flail Maintenance Section 4-15
©2011 Alamo Group Inc.
MA
INT
EN
AN
CE
ADJUSTING THE CUTTING HEIGHTLoosen the four ground roller bracket locknuts.Loosen the adjustment rod locknut and turn theadjustment rod to adjust the cutting height. Thecutting height is indicated by the end of theadjustment rod on the cutting height decal. Whencutting height has been achieved, tighten theground roller bracket locknuts and the adjustmentrod locknut securely. Be sure both sides of the flailare adjusted the same.
ADJUSTING STANDARD DUTY CUT HEIGHTTo adjust the cutting height of the standard duty flailhead the two nuts on the roller shaft brackets mustbe taken off and moved to the desired location/height. Be sure that both sides of the shaft areadjusted to corresponding holes so the shaftremains level.
BALL VALVESThe ball valve at the hydraulic reservoir may need to be closed during certain maintenance or repairprocedures. THE BALL VALVE MUST BE OPEN (handle parallel with valve) WHEN TRACTOR IS RE-STARTED OR PUMP IS COUPLED TO MOTOR OR P.T.O.! Failure to do so will result in component failure!

MAINTENANCE
Side and Rear Flail Maintenance Section 4-16
©2011 Alamo Group Inc.
MA
INT
EN
AN
CE
GREASING CUTTER SHAFT-FLAIL MOWERSLocate grease zerks on each end of cutter shaft(s).These are located on the bearing cover. Normalconditions require one or two pumps in eachbearing, using Lithium-Complex Extreme Pressuregrease conforming to NLGI2-ISO 320specifications. This is to be done with a standardgrease gun daily or at 8 hour intervals. CAUTION:Over greasing may cause premature sealfailure.
GREASING GROUND ROLLER SHAFT-FLAILLocate grease zerks on each end of roller tube atlower rear of head. Normal conditions require oneor two pumps in each bearing, using Lithium-Complex Extreme Pressure grease conforming toNLGI2-ISO 320 specifications. This is to be donewith a standard grease gun daily or at 8 hoursintervals. CAUTION: Over greasing may causepremature seal failure.
GREASING THE IDLER TENSION ARMSLocate the access holes and grease zerks in the belt shields of the side and rear flails. Normal conditionsrequire one pump daily or every 8 hours of service with multi purpose grease.

MAINTENANCE
Side and Rear Flail Maintenance Section 4-17
©2011 Alamo Group Inc.
MA
INT
EN
AN
CE
IDLER TENSIONLocate the idler tensioning rod for each flail. Loosenthe locking nut. Turn the adjusting nut until thewasher between the spring and nuts are flush withthe spring housing or guide. Tighten locking nutsecurely. For standard cut on side flail adjust untilthe spring washer is flush with the top of the springhousing. MntP-R-0094 Use the same method toadjust hydraulically driven rear flails.
For standard cut on the mechanically driven rearflail mower, adjust so that the spring washer is flushwith the spring guide. MntP-R-0095
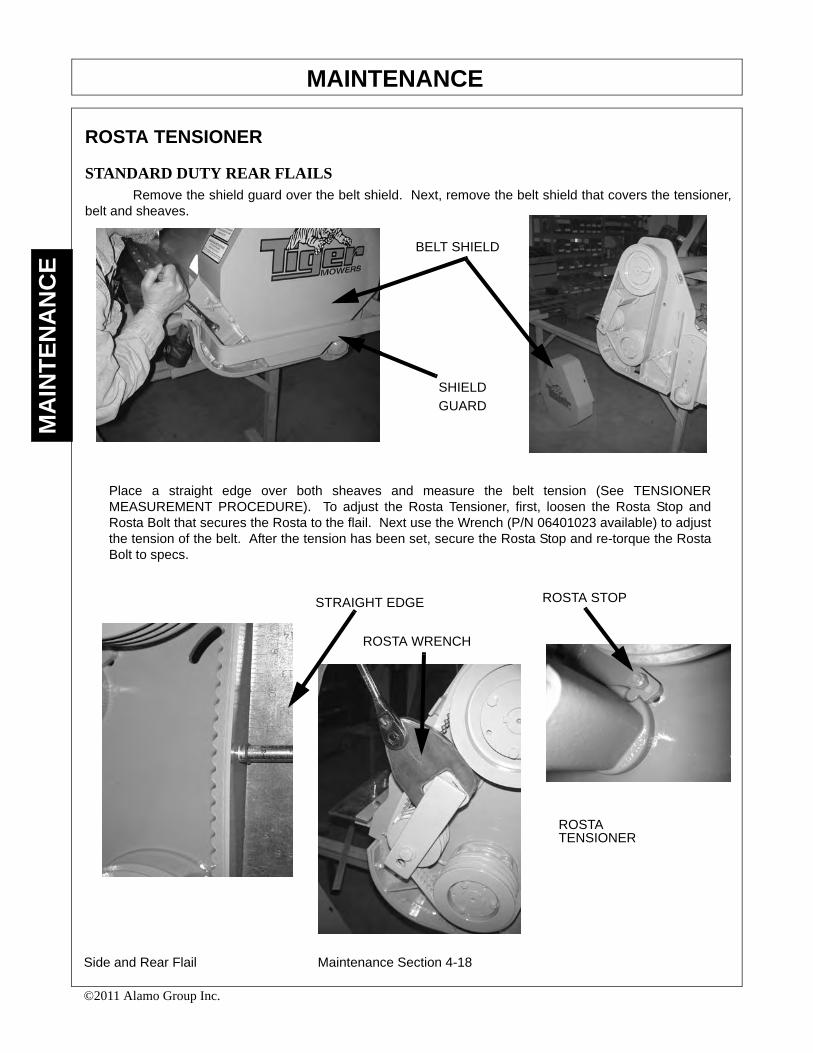
MAINTENANCE
Side and Rear Flail Maintenance Section 4-18
©2011 Alamo Group Inc.
MA
INT
EN
AN
CE
ROSTA TENSIONER
STANDARD DUTY REAR FLAILSRemove the shield guard over the belt shield. Next, remove the belt shield that covers the tensioner,
belt and sheaves.
BELT SHIELD
SHIELD
GUARD
Place a straight edge over both sheaves and measure the belt tension (See TENSIONERMEASUREMENT PROCEDURE). To adjust the Rosta Tensioner, first, loosen the Rosta Stop andRosta Bolt that secures the Rosta to the flail. Next use the Wrench (P/N 06401023 available) to adjustthe tension of the belt. After the tension has been set, secure the Rosta Stop and re-torque the RostaBolt to specs.
ROSTATENSIONER
ROSTA WRENCH
STRAIGHT EDGE ROSTA STOP

MAINTENANCE
Side and Rear Flail Maintenance Section 4-19
©2011 Alamo Group Inc.
MA
INT
EN
AN
CE
TENSIONER MEASUREMENT PROCEDURE1. Measure the Belt Span (SEE SKETCH).
2. Position the bottom of the Large “O” Ring on the Span Scale at the measured Belt Span.
3. Set the Small “O” Ring on the Deflection Force Scale to Zero.
4. Place the tension gauge squarely on the belt at the center of the belt span. Apply a force on the plunger perpendicular to the belt span until the bottom of the Large “O” Ring is even with the bottom of a straight edge laid across the sheaves.
5. Remove the tension gauge and read the force applied from the bottom of the Small “O” Ring on the Deflection Force Scale.
6. Compare the force denoted by the Small “O” Ring with the values shown. The force should be between the values given for either a New Belt or Used Belt.
7. Make sure to use the force values in pounds if the span is measured in inches. Use kilograms of force if the span is measured in centimeters.
8. NOTE: The ratio of the deflection to belt span is 1/64 in either units of measurements.
Deflection Force Values - Standard DutyNew Belt: 20 to 25 poundsUsed Belt: 12 to 20 pounds
Tension Guage
P/N 06520386

MAINTENANCE
Side and Rear Flail Maintenance Section 4-20
©2011 Alamo Group Inc.
MA
INT
EN
AN
CE
REVERSING MOWER ROTATION OF SIDE FLAIL MOWERSTo reverse the rotation of the side and hydraulicallydriven Heavy Duty rear flail, a different idler arm isneeded only for side flail. Part No. TF4346 is usedin standard rotation. Part No. TF4345 is used inreverse rotation.
Before attempting this procedure be sure all dirt iscleaned away from the motor and around all hoseconnections. This will prevent the oil from becomingcontaminated. 1-Start by removing the belt shieldfrom the flail mower. 2-Remove the locking andadjusting nut, spring washer and spring from theidler tensioning rod. 3-Disconnect the tensioningrod from the idler arm. 4-Remove the idler arm withthe pulley attached.
5-Remove the idler pulley from the idler arm and reinstall in the short end of the new idler arm.
Reinstall the idler arm and pivot pin. The pivot pin is installed into the hole in the pivot bracket closest to theidler pulley. When assembling for standard cut rotation, the idler arm is installed with the idler pulley toward thefront of the mower with the pivot pin in the front hole. When assembling for reverse rotation, with smooth cutknives, the idler arm is installed with the pulley toward the rear of the mower with the pivot pin in the rear hole.
Now disconnect the hoses and fittings from the motor and remove the taper-lock hub and pulley from the motorby removing the three hub bolts from the existing positions and inserting simultaneously into the threadedholes. Remove the four bolts holding the motor. Rotate the motor 180° so the hump is opposite the priorposition. Reinstall the motor bolts and torque to 75 ft. lbs. Reconnect the hoses and fittings to the motor in thesame configuration as before, i.e. the hose that was connected to the front port on the motor should now beconnected to the port that is now facing the front.
Reinstall the taper-lock hub and pulley on the motor by installing the hub bolts in the original holes andtightening until the hub just contacts the pulley. Then, position the pulley on the motor shaft approximately 3/16” beyond the idler pulley and tighten and torque the hub bolts to 18 ft. lbs. Be sure the pulleys are verticallyaligned when tight (see diagram on previous page), loosen and readjust if needed.
Reinstall the belts and idler tensioning rod. Tighten and lock the tensioning rod as shown previously in themaintenance section. Reinstall the belt shield.
With the motor rotation changed, now all of the knives on the cutter shaft must be changed as required. Thecutter shaft rotates in the same direction as the tractor tires when going forward for standard cut knives. Theshaft rotates opposite to standard rotation for smooth cut knives. Smooth cut knives should be installed so thecutting edge is forward.
When operating in standard rotation, the front shield must be removed and the baffle installed. When operatingin reverse rotation, remove the baffle and install the front shield. Finally, reposition the wear pads on thehosesand replace the zip ties as needed to prevent the hydraulic hoses from rubbing or chafing.

MAINTENANCE
Side and Rear Flail Maintenance Section 4-21
©2011 Alamo Group Inc.
MA
INT
EN
AN
CE
REVERSING MOWER ROTATION OF SD REAR FLAIL MOWERSRemove the shield guard and belt shield. Next, remove the Rosta stop and loosen the Rosta Tensioner(CAUTION: the Rosta Tensioner is under belt pressure. Sudden release of this pressure may cause seriousinjury). Remove the Rosta Tensioner and relocate to the Reverse Rotation Tensioner location. Using theRosta wrench, tention the belt, then tighten the Rosta bolt. Check the tension and adjust as needed. Whenthe correct tension is achieved install the Rosta stop and torque the bolts appropriately.
Reverse RotationTensioner location
RostaTensioner

MAINTENANCE
Side and Rear Flail Maintenance Section 4-22
©2011 Alamo Group Inc.
MA
INT
EN
AN
CE
REVERSING MOWER ROTATION REAR MECHANICAL DRIVEN FLAIL MOWERSRemove the rear shaft guard and disconnect thechain coupling to the shaft. Disconnect the P.T.O.drive shaft from the right angle gear box. Removethe gear box from the flail frame and lay down flatso that gear oil does not leak not.
Switch the top breather vent plug with the drain plugon the bottom. Remove the input shaft guard. Theinput shaft must be pressed through or turnedaround so the rear extension is equal to what theoriginal front dimension was. Turn the gear box180° and install on the flail frame so the frame sothe chain coupling sprockets are side be side andthe breather vent plug is on the top of the case.
The sprocket must be aligned and spacedapproximately 3/8” apart. When changing fromstandard cut to smooth cut rotation, a spacer platemay have to be installed between the gear box andthe frame. When changing from smooth cut tostandard cut rotation the spacer plate is to beomitted. Install the chain for the chain coupling. Ifthere is any binding, or not free movement in thechain, the bearing next to the coupler may beshimmed as required to eliminate the chain binding.
Change all the knives on the cutter shaft asrequired. The cutter shaft rotates in the samedirection as the tractor tires when going forward forstandard knives. The cutter shaft rotates oppositethe tractor tires for smooth cut knives.
Remove the belt shield. Then remove the adjustingnuts, washer and spring from the idler tensioningrod. Remove the clevis rod and small bushing from the idler arm. Remove the idler arm with the pulleyattached. Remove the idler pulley from the idler arm and install the pulley on the other end of the idler arm.Reinstall the idler arm in the pivot bracket. For standard cut rotation the pulley is toward the front, for reverserotation with smooth knives, the idler pulley is toward the rear. Install the small bushing in the idler arm andconnect the idler tensioning rod.
Tightening the adjusting nuts for the idler arm tensioner as shown previously in the maintenance section. Installthe belt shield, the shaft guard and P.T.O. shaft guards.
When operating the mower in reverse rotation with smooth cut knives, remove the baffle and install the frontshield. When operating the mower in standard rotation with standard cut knives, remove the front shield andinstall the baffle.

MAINTENANCE
Side and Rear Flail Maintenance Section 4-23
©2011 Alamo Group Inc.
MA
INT
EN
AN
CE
Flail Blades InspectionInspect the Blades daily for abnormal wear. REPLACE ALL BLADES on the carrier IMMEDIATELY if any blades have:
• Become bent or deformed from its original shape, or• Wear inside the blade bolt hole, or• Any cracks are visible, or • Deep gouges in the blade’s surface are present, or• Gouges or chipped areas in the cutting edge are larger than 1/4”(8mm), or • The material on the leading edge has been worn away by more than 1/4”(8mm)DO NOT straighten, sharpen, weld or hard-face blades
Failure to replace worn or damaged blades may lead to catastrophic failure of the blades and ejection of thebroken part with tremendous force which may cause serious bodily injury or death.
Always replace blades in sets
• Blades that are damaged may indicate severe service or abuse. If one blade is worn or damaged other blades on the same shaft will have been subjected to the same severe service or abuse.
• The Flail rotor turns at speeds exceeding 2000 RPM and is dynamically balanced at the factory. Differ-ences in blade weight between used blades with loss of material from gouges or wear as compared to new blades can cause severe vibration and damage to the Flail rotor. Always replace blades as complete sets.
Use only genuine Alamo Industrial replacement blades and fasteners. Other blades andfasteners may not meet the Alamo Industrial requirements and could fail during operationresulting in part being thrown out from under the mower.
Never attempt to sharpen blades. OPS-U-0044

MAINTENANCE
Side and Rear Flail Maintenance Section 4-24
©2011 Alamo Group Inc.
MA
INT
EN
AN
CE
Blade Pins and D-Ring InspectionBlade Pins and D-Rings daily for wear or damage as follows:
Inspect the Blade pins and D-Rings daily for abnormal wear. Make sure the cotter pins are in place and properly spread. REPLACE BLADE Pins and D-Rings IMMEDIATELY if they have:
• Visible cracks or• If a Pin or D-Ring has visible worn areas, or• If a Pin or D-Ring has gouges or chipped areasFailure to replace abnormally worn pins or D-Rings may lead to catastrophic failure and ejection of the brokenpart which may cause serious bodily injury or death.
Always replace the pins and D-Rings whenever excessive wear is noticed.
If the cotter pins are broken by contact with other flail blades, remove the pin and reversethe direction the pin is inserted through the D-Ring so that the cotter pin is on the oppositeside of the D-Ring. This will prevent the next set of blades from swinging back and hittingthe cotter pin. OPS-U-0045

MAINTENANCE
Side and Rear Flail Maintenance Section 4-25
©2011 Alamo Group Inc.
MA
INT
EN
AN
CE
Flail Axe Blades InspectionInspect the Blades daily for abnormal wear. REPLACE ALL BLADES on the carrier IMMEDIATELY if any blades have:
• Become bent or deformed from its original shape, or• Oval shape wear inside the blade bolt hole, or• Any cracks are visible, or • Deep gouges in the blade’s surface are present, or• Gouges or chipped areas in the cutting edge are larger than 1/4”(8mm), or • The material on the leading edge has been worn away by more than 1/4”(8mm)
Failure to replace worn or damaged blades may lead to catastrophic failure of the blades and ejection of thebroken part with tremendous force which may cause serious bodily injury or death.
Always replace blades in sets
• Blades that are damaged may indicate severe service or abuse. If one blade is worn or damaged other blades on the same shaft will have been subjected to the same severe service or abuse.
• The Flail Axe rotor turns at speeds exceeding 2000 RPM and is dynamically balanced at the factory. Dif-ferences in blade weight between used blades with loss of material from gouges or wear as compared to new blades can cause severe vibration and damage to the Flail Axe rotor. Always replace blades as com-plete sets.
Use only genuine Alamo Industrial replacement blades, blade bolts and fasteners. Otherblades and bolts may not meet the requirements of Alamo Industrial and fail duringoperation resulting in part failing and being thrown out from under the mower.
Never attempt to sharpen blades. OPS-U-0042

MAINTENANCE
Side and Rear Flail Maintenance Section 4-26
©2011 Alamo Group Inc.
MA
INT
EN
AN
CE
Flail Axe Blade Bolt InspectionInspect Blade Bolts daily for wear or damage as follows:
Inspect the Blade Bolt daily for abnormal wear. REPLACE ALL BLADE BOLTS on the carrier IMMEDIATELY if any bolts have:
• Visible cracks or• If the blade bolt is worn or any recessed area is visible on the bolt, or• If Blade Bolt has gouges or chipped areas. or• If Bushing fits loose in the Rotor Shaft.Failure to replace abnormally worn bolts or bushings may lead to catastrophic failure of the blades andejection of the broken part which may cause serious bodily injury or death.
Always replace Blade Bolts with new bolts and new bushings whenever replacing the Blades. To tighten boltsand nuts, first apply thread lock to nut. Make sure to tighten bolts and nuts just enough to allow the blades toswing freely, and not bend the cuttershaft lugs. If cuttershaft lugs are bent together because of over tighteningthe blades will not swing freely. OPS-U-0043

MAINTENANCE
Side and Rear Flail Maintenance Section 4-27
©2011 Alamo Group Inc.
MA
INT
EN
AN
CE
50” FLAIL KNIFE BLADE REPLACEMENT1. If knives are damaged or badly worn, they will need to be replaced as a set. Replacing a single knife
can cause severe knife can cause severe vibration and possible damage to the mower. The knifeshould not be welded on for any reason.
2. Always replace the knife bolts when replacing the knives. DO NOT REUSE THE KNIFE BOLTS ORNUTS.
3. Assemble knives, bushings, bolts and nuts as shown in part section of the manual.
4. Install the locking hex nut so that the flat face of the nut is towards the knife.
5. Apply loctite “271” or equivalent to threads.
6. Torque nut to 50 ft. lbs. Knife must swing freely.
DO NOT re-use the locking hex nuts for mounting the knives. If hex nut becomesloose, or required removal for knife replacement or any other reason, it must bediscarded and replaced with a new nut.
63” BOOM FLAIL KNIFE REPLACEMENT1. If knives are damaged or badly worn, they will need to be replaced as a set. Replacing a single knife
can cause severe vibration and possible damage to the mower.
2. Assemble knives, clevis, bolts and nuts as shown in part section of manual.
3. Install locking hex nut so that the flat face of nut is towards the knife.
4. Apply loctite “271” or equivalent to threads.
5. Torque nut to 35 FT. LBS. Knife must swing freely.
DO NOT re-use the locking hex nuts for mounting the knives. If hex nut becomeloose, or require removal for knife replacement or any other reason, they must bediscarded and replaced with new nuts.
Knives should not be welded on for any reason.
STANDARD OR HEAVY DUTY SIDE OR REAR FLAIL KNIFEREPLACEMENT
1. If knives are damaged or badly worn, they will need to be replaced as a set. Replacing a single knifecan cause severe vibration and possible damage to the mower.
2. Assemble knives, clevis, bolts and nuts as shown in parts manual.
3. Install locking hex nut so that the flat face of nut is towards the knife.
4. Apply loctite “271” or equivalent to threads.
5. Torque nut to 35 FT. LBS. Knife must swing freely.
DO NOT re-use the locking hex nuts for mounting the knives. If hex nut become loose, orrequire removal for knife replacement or any other reason, they must be discarded andreplaced with new nuts.
Knives should not be welded on for any reason.

MAINTENANCE
Side and Rear Flail Maintenance Section 4-28
©2011 Alamo Group Inc.
MA
INT
EN
AN
CE
RECOMMENDED FILLING INSTRUCTIONS FOR REAR FLAIL GEARBOXWhen filling or checking the fluid level, the unitshould be parked on a level surface with rear flaildown on surface, shut “OFF”, and cold, (at ambienttemperature).
Remove the fluid level plug located on the side ofthe gear box. The gear box should be filled to thebottom of the fluid level hole. If necessary, use 75-90 wt. PAO Synthetic Extreme Pressure Gear Lubeto raise level to bottom of the hole.
Do not over-fill. excessive gear oil will run back outof the hole. Reinstall fluid level plug into gearbox. Ifgearbox has been over-filled, the excess may beexpelled through the pressurized breather.

MAINTENANCE
Side and Rear Flail Maintenance Section 4-29
©2011 Alamo Group Inc.
MA
INT
EN
AN
CE
PAGE INTENSIONALLY LEFT BLANK

MAINTENANCE
Side and Rear Flail Maintenance Section 4-30
©2011 Alamo Group Inc.
MA
INT
EN
AN
CE
CUTTERSHAFT BEARING REPLACEMENT
1. Remove existing cuttershaft, bearings and string guards.
2. Make sure that the end knives on each end of the cuttershaft are orientated as shown.
3. Apply anti-seize on cuttershaft as shown on next page.
4. Install non-drive side bearing first.
5. Install the top of the string guard on the non-drive side first. Use loctite-271 or equvalent andtorque (95 ft-lb or 104ft-lb if you use an extension).
6. Install the bearing and top string guard on the drive side.
7. Center the cuttershaft between the string guards. Use loctite-271 or equivalent and torque(95ft-lb or 104ft-lb if you use an extension) the top string guard on the drive side.
8. Install, use loctite-271 or equivalent, and torque (95ft-lb or 104ft-lb if you use an extension)the bottom string guard on both sides.
9. Make sure the cuttershaft is centered. On the non-drive side, tighten one set-screw in the bearing ontothe cuttershaft.
10. Remove the other set-screw and drill a 5/16” hole into the cuttershaft 3/16” deep through the hole inthe bearing. BE CAREFULL NOT TO DAMAGE THE THREADS IN THE BEARING HOLE.
11. Replace the set-screw in the bearing, use loctite-271 or equivalent, and tighten onto the cuttershaftthrough the new hole.
12. Remove the other set-screw and repeat the drilling procedure (Step 10). Replace the set screw asstated in Step 11.
13. Repeat steps 9 through 12 on the drive side.
14. Grease both bearings properly.
See illustration on next page

MAINTENANCE
Side and Rear Flail Maintenance Section 4-31
©2011 Alamo Group Inc.
MA
INT
EN
AN
CE

MAINTENANCE
Side and Rear Flail Maintenance Section 4-32
©2011 Alamo Group Inc.
MA
INT
EN
AN
CE
DAILY MAINTENANCE SCHEDULEThe following services should be performed daily or every 8 hours of service, following the detailedmaintenance instructions in the operators manual.
_______ Pump Drive Shaft: Check for end play in driveshaft / coupler and lubricate at zerks.
_______ Crankshaft adapter: If equipped with rubber grommets check condition, replace if missing or damaged.
_______ Pivot points: Inject grease until it appears at ends.
_______ Hydraulic fittings: Check for leaks with paper or cardboard. Tighten fittings or replace hosesimmediately.
_______ Knives: Inspect for missing or damaged knives, change (only complete sets) as needed.
_______ Belts: Check/Tighten/Replace belts as needed.
_______ Main Frame/Deck: Unless otherwise specified retorque bolts according to torque specifications inthis section.
_______ Hydraulic Fluid Level: Add, if required, per fluid recommendations.
_______ Rear Flail Drive, Bearing Flange and Shaft Couplers (if applicable): Grease as instructed in thedetailed maintenance section.
_______ Cutter Shaft and Ground Roller: Grease as instructed in the detailed maintenance section.
Service performed by:_____________________________ Date:____/____/____ Hour
Meter:_________________
Maintenance Section
**This page may be copied and used as part of the daily maintenance routine.

PARTS SECTION
MF 2600 SIDE FLAIL

PART NAME INDEX
PARTS ORDERING GUIDE......................................................................................................................................................................... 3
TRACTOR MOUNT KIT.............................................................................................................................................................................. 4
TRACTOR MOUNT KIT - HYDRAULICS................................................................................................................................................. 6
MAIN FRAME ASSEMBLY........................................................................................................................................................................ 8
DRAFT BEAM ASSEMBLY...................................................................................................................................................................... 10
2 SPOOL CABLE CONTROL MOUNT..................................................................................................................................................... 12
CABLE (MANUAL) LIFT VALVE - 2 SPOOL......................................................................................................................................... 14
CABLE (MANUAL) LIFT VALVE BREAKDOWN - 24500................................................................................................................... 16
63IN SIDE FLAIL ASSEMBLY - STANDARD ROTATION................................................................................................................... 18
63IN SIDE FLAIL ASSEMBLY - REVERSE ROTATION....................................................................................................................... 20
75IN SIDE FLAIL - STANDARD ROTATION......................................................................................................................................... 22
75IN SIDE FLAIL - REVERSE ROTATION............................................................................................................................................. 24
SIDE FLAIL DRIVE ASSEMBLY............................................................................................................................................................. 26
3IN X 10IN TIE-ROD CYLINDER BREAKDOWN.................................................................................................................................. 28
3IN X 10IN WELDED CYLINDER BREAKDOWN................................................................................................................................. 29
3IN X 18IN TIE-ROD CYLINDER BREAKDOWN.................................................................................................................................. 30
PUMP AND GRILL GUARD OPTIONS.................................................................................................................................................... 31
RESERVOIR TANK FILTER ASSEMBLY............................................................................................................................................... 32
SIDE FLAIL TRAVEL LOCK.................................................................................................................................................................... 33
FRONT PUMP BREAKDOWN.................................................................................................................................................................. 34
FLAIL MOTOR BREAKDOWN................................................................................................................................................................ 36
BRAKE VALVE ASSEMBLY.................................................................................................................................................................... 38
BRAKE VALVE SCHEMATIC.................................................................................................................................................................. 39
SWITCH BOX............................................................................................................................................................................................. 40
SWITCH BOX SCHEMATIC..................................................................................................................................................................... 41
NOTES 1...................................................................................................................................................................................................... 42
FIRE SUPPRESSION SYSTEM................................................................................................................................................................. 43
FIRE SUPPRESSION 3-POINT MOUNT.................................................................................................................................................. 44
FIRE SUPPRESSION FRONT MOUNT.................................................................................................................................................... 46
FIRE SUPPRESSION SYSTEM ELECTRICAL SCHEMATIC................................................................................................................ 48
WETCUT..................................................................................................................................................................................................... 49
WETCUT 50 GALLON TANK - 3PNT MOUNT...................................................................................................................................... 50
WETCUT 100 OR 150 GALLON TANK - 3PNT MOUNT....................................................................................................................... 51
WETCUT 3PNT PLUMBING - 50IN MOWERS....................................................................................................................................... 52
WETCUT 3PNT PLUMBING - LARGE MOWERS.................................................................................................................................. 54
WETCUT 50IN SPRAYER HEAD ASSEMBLY....................................................................................................................................... 56
WETCUT 60IN SPRAYER HEAD ASSEMBLY....................................................................................................................................... 58
WETCUT FRONT PLUMBING - 50IN MOWERS................................................................................................................................... 60
WETCUT FRONT PLUMBING - LARGE MOWERS.............................................................................................................................. 62
WETCUT CABLES..................................................................................................................................................................................... 64
©2012 Alamo Group Inc. Parts Section 5-2
MF2660 BSF

PARTS ORDERING GUIDE
©2012 Alamo Group Inc. Parts Section 5-3
MF2660 BSF

TRACTOR MOUNT KIT
©2012 Alamo Group Inc. Parts Section 5-4
MF2660 BSF

TRACTOR MOUNT KIT
Continued...
ITEM PART NO. QTY. DESCRIPTION1 06700091 1 TANK,HYD,ASSY (ITEMS 1,3,4,5 & 6)
--- 06380015 1 TANK,WELDMENT
2 06505077 1 CAP,BREATHER
3 06505044 1 FILTER,HYDRAULIC
4 21627 8 NYLOCK NUT,3/8",NC
5 06505127 1 PLUG,SAE,#20
6 06505067 1 SIGHT GLASS
--- 06503136 1 SEAL KIT,SIGHT GLASS
7 33880 18 FLATWASHER,3/4",SAE
8 ------ - *EXISTING TRACTOR HARDWARE
9 06300180 1 AXLE BRACE,RIGHT,MF2660
10 06300183 1 MAIN FRAME,MF2660,TSF
11 22016 6 FLATWASHER,3/8"
12 21644 2 CAPSCREW,3/8" X 5",NC
13 21843 6 CAPSCREW,3/4" X 6",NC
14 21825 6 HEX NUT,3/4",NC
15 24937 4 FLATWASHER,7/16",SAE
16 21656 4 CAPSCREW,7/16" X 1-1/2",NF
17 21990 2 LOCKWASHER,1/2"
18 21731 2 CAPSCREW,1/2" X 1-1/2",NC
19 06504123 1 MOTOR
20 6T0375B 1 COUPLER - 4WD TRACTORS
--- 30269A 1 COUPLER - 2WD TRACTORS
21 06420133 1 DRIVESHAFT - 4WD TRACTORS
--- 06420148 1 DRIVESHAFT - 2WD TRACTORS
22 06700158 1 ADAPTER,CRANKSHAFT,COMPLETE (ITEMS 15,22 & 23)
--- 06700159 1 ASSY,ADAPTER,CRANKSHAFT
23 06537004 4 WASHER,NEOPRENE
24 06510083 1 BRAKE VALVE
25 21831 4 CAPSCREW,3/4" X 1-3/4",NC
26 21835 1 CAPSCREW,3/4" X 2-3/4",NC
27 21832 1 CAPSCREW,3/4" X 2",NC
28 06300184 1 AXLE BRACE,LEFT,MF2660,TSF
29 21639 2 CAPSCREW,3/8" X 3-1/4",NC
©2012 Alamo Group Inc. Parts Section 5-5
MF2660 BSF

TRACTOR MOUNT KIT - HYDRAULICS
©2012 Alamo Group Inc. Parts Section 5-6
MF2660 BSF

TRACTOR MOUNT KIT - HYDRAULICS
Continued...
ITEM PART NO. QTY. DESCRIPTION1 ------ - AXLE BRACE *REFER TO TRACTOR MOUNT KIT PAGE
2 06503084 1 ELBOW,1-1/2"FOR X 1-1/2"FOR
3 06503083 1 ADAPTER,1-1/2"MOR X 1-1/2"MOR
4 34309 1 BALL VALVE,1-1/2"
5 06503085 1 ADAPTER,1-1/2"MOR X 1-1/4"MJ
6 32382 3 BRACKET,HOSE
7 33880 3 FLATWASHER,3/4",SAE
8 21843 1 CAPSCREW,3/4" X 6",NC
9 21835 1 CAPSCREW,3/4" X 2-3/4",NC
10 ------ - FLATWASHER *EXISTING TRACTOR HARDWARE
11 06411374 2 BRACKET,HOSE
12 30255 3 SPACER,1-1/4"OD X 3/4"
13 33892 2 CAPSCREW,5/8" X 2-3/4",NC
14 06500612 1 HOSE,1-1/4" X 106" (SUCTION)
15 06506038 1 TUBE,PREFORMED
16 TF4852 2 KIT,FLANGE,#20
17 ------ - PUMP *REFER TO TRACTOR MOUNT KIT PAGE
18 06500608 1 HOSE,1" X 61" (PRESSURE TO BRAKE)
19 21832 1 CAPSCREW,3/4" X 2,NC
20 34117 3 ELBOW,1"MOR X 1"MJ,90º
21 33554 1 ELBOW,1"MOR X 1"MJ,45º
22 ------ - BRAKE VALVE *REFER TO TRACTOR MOUNT KIT PAGE
23 24724 2 ADAPTER,1"MOR X 1"FJX,45º
24 ------ 1 HOSE *REFER TO SIDE FLAIL DRIVE PAGE (RETURN)
25 ------ 1 HOSE *REFER TO SIDE FLAIL DRIVE PAGE (PRESSURE)
26 06500239 1 HOSE,1" X 124" (RETURN TO TANK)
27 ------ - HYD RESERVOIR *REFER TO TRACTOR MOUNT KIT PAGE
28 34064 1 ADPATER,1-1/4"MOR X 1"MJ
©2012 Alamo Group Inc. Parts Section 5-7
MF2660 BSF

MAIN FRAME ASSEMBLY
©2012 Alamo Group Inc. Parts Section 5-8
MF2660 BSF

MAIN FRAME ASSEMBLY
Continued...
ITEM PART NO. QTY. DESCRIPTION1 ------ - DRAFT BEAM *REFER TO DRAFT BEAM ASSY PAGE
2 06700095 1 SPACER,CYLINDER
3 6T0151R 1 CYLINDER,3" X 10"
4 6T4258 1 CAP,BREATHER,1/2"
5 34396 1 RESTRICTOR
6 34244 1 ELBOW
7 06537021 2 ROLLPIN,5MM
8 TB1033 1 PIN,CLEVIS
9 6T2614 1 FLATWASHER,1",SAE
10 ------ - MAIN FRAME *REFER TO TRACTOR MOUNT KIT
11 6T3004 1 R-CLIP
12 6T3005 1 PIN,1",CAPPED
13 21688 1 CAPSCREW,7/16" X 3-1/4",NC
14 6T3001 1 PIN,1-1/2"
15 21677 1 NYLOCK NUT,7/16",NC
16 35176 1 U-NUT,1/4"
17 21530 1 CAPSCREW,1/4" X 1",NC
18 22014 1 FLATWASHER,1/4"
19 06360003 1 PIN,TANG
20 ------ - CYLINDER *REFER TO DRAFT BEAM ASSY
©2012 Alamo Group Inc. Parts Section 5-9
MF2660 BSF

DRAFT BEAM ASSEMBLY
©2012 Alamo Group Inc. Parts Section 5-10
MF2660 BSF

DRAFT BEAM ASSEMBLY
Continued...
ITEM PART NO. QTY. DESCRIPTION1 ------ - FLAIL MOWER *REFER TO MOWER ASSY PAGE
2 6T3207 5 GREASE ZERK,1/4"
3 06537021 6 ROLLPIN,5MM
4 TB1033 2 PIN,CLEVIS
5 6T0150 1 CYLINDER,3" X 18"
6 6T4158 1 CAP,BREATHER,1/2"
7 06502036 1 CHECK VALVE
8 34244 1 ELBOW
9 06350013 1 CABLE,BOLT-ON
10 21727 5 NYLOCK NUT,1/2",NC
11 06520482 1 SPRING,PUSHOFF
12 27938 1 BUSHING,MACH
13 22784 1 CAPSCREW,1/2" X 8-1/2",NC
14 21688 2 CAPSCREW,7/16" X 3-1/4",NC
15 TF4514A 2 PIN,1-1/2",CAPPED
16 21677 2 NYLOCK NUT,7/16",NC
17 6T2614 2 FLATWASHER,1",SAE
18 06420131 1 PIN,1"
19 06520435 2 HAMMERLOCK
20 06499017 1 CHAIN
21 06350011 1 DRAFT BEAM,INNER
22 6T3211 1 GREASE ZERK,1/8"
23 TB3010 2 BUSHING,1"
24 06520077 2 BEARING,2.50"
25 06501021 1 CYLINDER,3" X 10"
26 ------ - HOSE *REFER TO CABLE LIFT VALVE PAGE
27 06420017 1 PIN,2"
28 21691 1 CAPSCREW,7/16" X 4",NC
29 31577 4 CAPSCREW,1/2" X 1-3/4",NC
30 06350012 1 DRAFT BEAM,OUTER
©2012 Alamo Group Inc. Parts Section 5-11
MF2660 BSF

2 SPOOL CABLE CONTROL MOUNT
©2012 Alamo Group Inc. Parts Section 5-12
MF2660 BSF

2 SPOOL CABLE CONTROL MOUNT
Continued...
ITEM PART NO. QTY. DESCRIPTION1 21627 3 NYLOCK NUT,3/8",NC
2 22016 3 FLATWASHER,3/8"
3 27082B 3 SPACER
4 21636 3 CAPSCREW,3/8" X 2-1/2",NC
5 34623 2 CBL,CNTRL,122"
6 6T1251 2 CABLE CONTROL BOX
7 31923 1 BRKT,CTRL,CBL
8 21542 3 CAPSCREW,1/4" X 4",NC
9 22014 5 FLATWASHER,1/4"
10 21525 3 HEX NUT,1/4",NC
11 21527 1 NYLOCK NUT,1/4",NC
12 06370046 1 MOUNT,SWITCH BOX
13 35206 2 HEX NUT,JAMB,3/8",NC
14 35205 2 SETSCREW,3/8" X 2"
15 32359 2 SCREW,MACHINE,8-32 X 3/4"
16 21530 1 CAPSCREW,1/4" X 1",NC
17 34496 1 BRKT,SWITCH BOX,UNI
18 06510102 1 SWITCHBOX,SIDE,GND
©2012 Alamo Group Inc. Parts Section 5-13
MF2660 BSF

CABLE (MANUAL) LIFT VALVE - 2 SPOOL
ITEM PART NO. QTY. DESCRIPTION1 24500 1 VALVE,2 SPOOL,OC
2 21631 4 CAPSCREW,3/8" X 1-1/4",NC
3 34622 1 PLATE,VALVE,REAR MOUNT
4 06340040 1 VALVE MOUNT
5 22016 14 FLATWASHER,3/8"
6 21627 14 NYLOCK NUT,3/8",NC
©2012 Alamo Group Inc. Parts Section 5-14
MF2660 BSF

CABLE (MANUAL) LIFT VALVE - 2 SPOOL
Continued...
ITEM PART NO. QTY. DESCRIPTION7 33294 1 ELBOW,3/4"MOR X 1/2"MJ
8 33486 1 HOSE,1" X 45" (PRESSURE FROM TRACTOR)
9 06505029 1 FILTER,HP,ASSY
--- 06505039 1 ELEMENT,FILTER
---- 06505081 1 INDICATOR,FILTER
10 33591 1 ADAPTER,3/4"MOR X 1/2"MJ
11 33486 1 HOSE,1" X 45" (HP FILTER TO VALVE PRESSURE)
12 21579 2 CAPSCREW,5/16" X 3/4",NC
13 6T3017 2 ROLLPIN,3/16" X 1"
14 34623 2 CABLE CONTROL,122"
15 6T4411 2 CLEVIS,CABLE CONTROL
16 21500 2 HEX NUT,1/4",NF
17 21632 4 CAPSCREW,3/8" X 1-1/2",NC
18 33271 5 ADAPTER,1/2"MOR X 3/8"MJ
19 34631 2 HOSE,1/4" X 126"
20 33493 1 HOSE,1/4" X 196"
21 33382 1 ELBOW,1/2"MOR X 1/2"MJ
22 32678 1 ADAPTER,5/8"MOR X 1/2"FOR
23 33383 1 ELBOW,5/8"MOR X 1/2"MJ
24 06500606 1 HOSE,1/2" X 43" (RETURN)
25 ------ - TEE *EXISTING TRACTOR PART
26 ------ - HOSE *EXISTING TRACTOR PART
27 ------ - TUBE *EXITSTING TRACTOR PART
28 ------ - ELBOW *EXISTING TRACTOR PART
29 ------ - ADAPTER *EXISTING TRACTOR PART
30 6207263M91 1 SLEEVE,POWER BEYOND
31 33463 1 ADAPTER,22MM MOR X 1/2"MJ
32 21630 6 CAPSCREW,3/8" X 1",NC
33 32900 2 QUICK COUPLER,MALE
34 06500622 1 HOSE,1/4" X 29"
35 06500413 1 HOSE,1/4" X 31"
36 22015 2 FLATWASHER,5/16"
37 21584 1 CAPSCREW,5/16" X 2",NC
38 06502125 1 MANIFOLD,BREAKAWAY
39 32901 3 ADAPTER,3/8"MOR X 3/8"MJ
40 06503030 1 ELBOW,3/8"MJ X 3/8"FJX
41 33665 1 HOSE,1/4" X 132"
42 32902 1 ELBOW,3/8"MOR X 3/8"MJ
43 06500621 1 HOSE,1/4" X 143"
44 21577 1 NYLOCK NUT,5/16",NC
©2012 Alamo Group Inc. Parts Section 5-15
MF2660 BSF
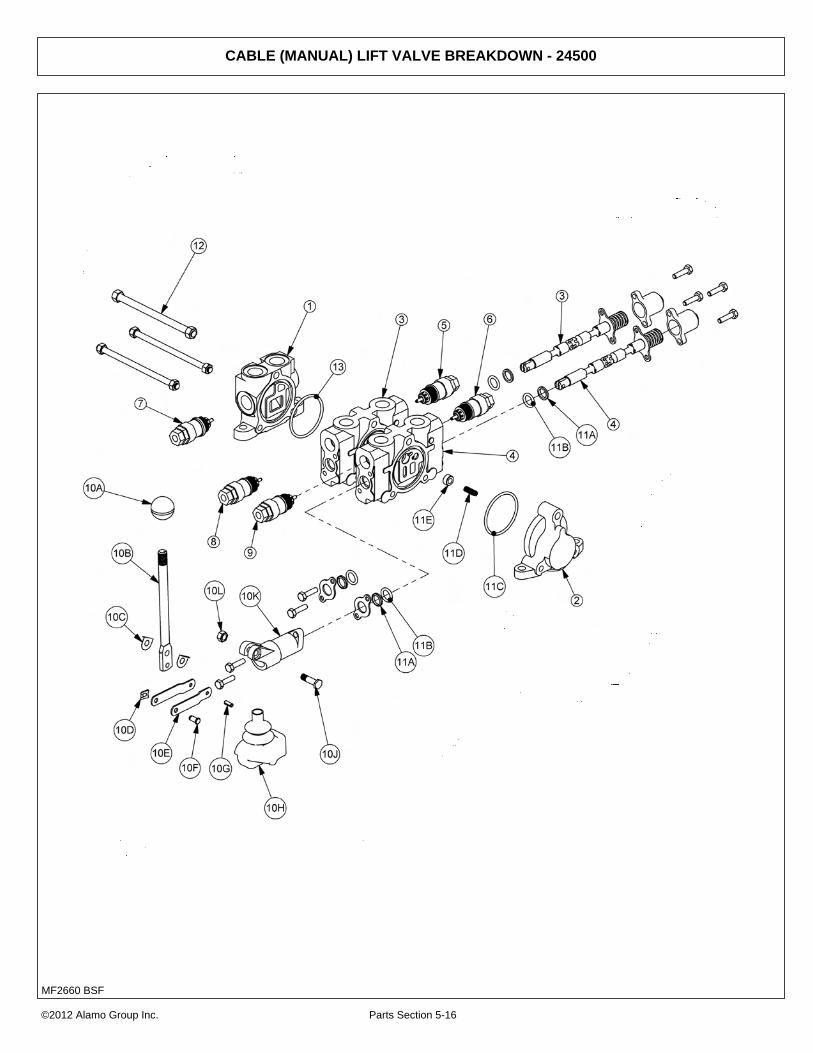
CABLE (MANUAL) LIFT VALVE BREAKDOWN - 24500
©2012 Alamo Group Inc. Parts Section 5-16
MF2660 BSF

CABLE (MANUAL) LIFT VALVE BREAKDOWN - 24500
Continued...
ITEM PART NO. QTY. DESCRIPTION1 TB1017S 1 INLET END COVER
2 TB1701 1 END COVER, OPEN CENTER
3 TB1017P 1 VALVE SECTION (SINGLE ACTING, CENTER SPRING)
4 TB1017P 1 VALVE SECTION (SINGLE ACTING, CENTER SPRING)
5 N/A - N/A
6 N/A - N/A
7 TB1017E 1 RELIEF VALVE,2250 PSI
8 TB1017M 1 SHUT-OFF PLUG
9 TB1017M 1 SHUT-OFF PLUG
10 TB1017L 2 LEVER KIT (FOR ONE SECTION)
10A ------ 1 LEVER KNOB
10B ------ 1 LEVER
10C ------ 2 LEVER WASHER
10D ------ 1 LEVER CLIP
10E ------ 2 LINKAGE
10F ------ 1 LEVER PIN
10G ------ 1 ROLL PIN
10H ------ 1 LEVER BOOT
10J ------ 1 LEVER BOLT
10K ------ 1 LEVER DUST COVER
10L ------ 1 LEVER NUT
11 TB1017A 2 VALVE SEAL KIT (FOR ONE SECTION)
11A ------ 2 WIPER
11B ------ 2 O-RING SMALL
11C ------ 1 O-RING LARGE
11D ------ 1 SPRING
11E ------ 1 PUCKET
12 TB1017X 1 TIE ROD KIT
13 24214 1 O-RING, LARGE
©2012 Alamo Group Inc. Parts Section 5-17
MF2660 BSF
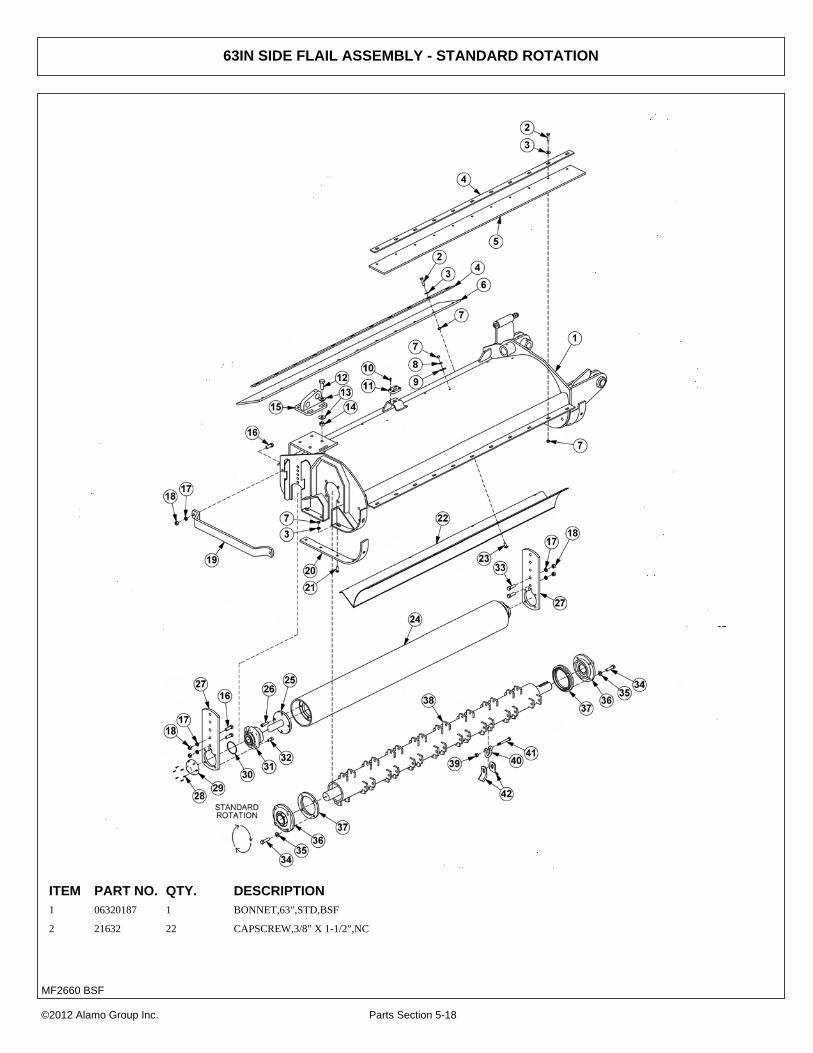
63IN SIDE FLAIL ASSEMBLY - STANDARD ROTATION
ITEM PART NO. QTY. DESCRIPTION1 06320187 1 BONNET,63",STD,BSF
2 21632 22 CAPSCREW,3/8" X 1-1/2",NC
©2012 Alamo Group Inc. Parts Section 5-18
MF2660 BSF

63IN SIDE FLAIL ASSEMBLY - STANDARD ROTATION
Continued...
ITEM PART NO. QTY. DESCRIPTION3 22016 32 FLATWASHER,3/8"
4 28700 2 BAR,FLAP,TSF/TBF,63"
5 06520241 1 FLAP,63",FRONT
6 28701 1 FLAP,DEFLECTOR,TSF,63"
7 21625 40 HEX NUT,3/8",NC
8 21988 8 LOCKWASHER,3/8"
9 6T2615 8 WASHER,FENDER 3/8"
10 24889 4 SCREW,MACHINE,10-24 X 3/4"
11 32998 1 GROMMET
12 6T1027 4 CAPSCREW,1/2" X 1-3/4",NC
13 06533004 8 FLATWASHER,1/2",SAE
14 21727 4 NYLOCK NUT,1/2",NC
15 06350014 1 TANG,CYL,BSF
16 21731 4 CAPSCREW,1/2" X 1-1/2",NC
17 21990 6 LOCKWASHER,1/2"
18 21725 6 HEX NUT,1/2",NC
19 27975A 1 GUARD,CUTTERSHAFT
20 28086A 2 SKID SHOE,STD DUTY REAR FLAIL
21 30013 10 PLOW BOLT,3/8" X 1-1/4",NC,GR5
22 28665A 1 BAFFLE,63",STD ROT
23 6T2283 8 CARRIAGE BOLT,3/8" X 1",NC
24 28650A 1 GROUND ROLLER,63"
25 TF1045B 2 STUB SHAFT,GROUND ROLLER
26 6T2330 8 CAPSCREW,SKT HD,7/16" X 1-1/2",NC
27 28735 2 GROUND ROLLER ADJ BRKT,STD DTY
28 06530001 12 CAPSCREW,SKT HD,8-32 X 1/2",SS
29 06520027 2 CAP,BEARING,GRNDRLR
30 06520029 2 O-RING,2-3/4" X 3/32",AS568A-148
31 06520028 2 BEARING,FLANGE,1-3/8",GRNDRLR
32 6T2331 8 CAPSCREW,SKT HD,7/16" X 1",NC
33 21732 2 CAPSCREW,1/2" X 1-3/4",NC
34 06530217 8 CAPSCREW,1/2" X 2",NC,L9
35 06533006 8 FLATWASHER,1/2",SAE,L9
36 28683 2 BEARING,FLANGE,1-15/16",STD,TSF
37 33863 2 STRING GUARD,STD
38 28743 1 CUTTERSHAFT ASSY,STANDARD
--- 28642C 1 CUTTERSHAFT,WELDMENT,63"
39 21677 32 NYLOCK NUT,7/16",NC
40 TF1020 32 KNIFE MTG CLEVIS,FLAIL
41 34011 32 CAPSCREW,7/16" X 3-7/16",NC,GR8
42 33713 64 KNIFE,FLAIL (STANDARD CUT)
©2012 Alamo Group Inc. Parts Section 5-19
MF2660 BSF

63IN SIDE FLAIL ASSEMBLY - REVERSE ROTATION
©2012 Alamo Group Inc. Parts Section 5-20
MF2660 BSF

63IN SIDE FLAIL ASSEMBLY - REVERSE ROTATION
Continued...
ITEM PART NO. QTY. DESCRIPTION1 06320187 1 BONNET,63",STD,BSF
2 21632 22 CAPSCREW,3/8" X 1-1/2",NC
3 22016 43 FLATWASHER,3/8"
4 28700 2 BAR,FLAP,TSF/TBF,63"
5 28701 1 FLAP,DEFLECTOR,TSF,63"
6 21625 40 HEX NUT,3/8",NC
7 24889 4 SCREW,MACHINE,10-24 X 3/4"
8 32998 1 GROMMET
9 6T1027 4 CAPSCREW,1/2" X 1-3/4",NC
10 06533004 8 FLATWASHER,1/2",SAE
11 21727 4 NYLOCK NUT,1/2",NC
12 06350014 1 TANG,CYL,BSF
13 21731 6 CAPSCREW,1/2" X 1-1/2",NC
14 21990 8 LOCKWASHER,1/2"
15 21725 8 HEX NUT,1/2",NC
16 27975A 1 GUARD,CUTTERSHAFT
17 28086A 2 SKID SHOE,STD DUTY REAR FLAIL
18 30013 10 PLOW BOLT,3/8" X 1-1/4",NC,GR5
19 28969A 1 TRASH GUARD,63"
20 28650A 1 GROUND ROLLER,63"
21 TF1045B 2 STUB SHAFT,GROUND ROLLER
22 6T2330 8 CAPSCREW,SKT HD,7/16" X 1-1/2",NC
23 28735 2 GROUND ROLLER ADJ BRKT,STD DTY
24 06530001 12 CAPSCREW,SKT HD,8-32 X 1/2",SS
25 06520027 2 CAP,BEARING,GRNDRLR
26 06520029 2 O-RING,2-3/4" X 3/32",AS568A-148
27 06520028 2 BEARING,FLANGE,1-3/8",GRNDRLR
28 6T2331 8 CAPSCREW,SKT HD,7/16" X 1",NC
29 21732 2 CAPSCREW,1/2" X 1-3/4",NC
30 06530217 8 CAPSCREW,1/2" X 2",NC,L9
31 06533006 8 FLATWASHER,1/2",SAE,L9
32 28683 2 BEARING,FLANGE,1-15/16",STD,TSF
33 33863 2 STRING GUARD,STD
34 28743 1 CUTTERSHAFT ASSY,STANDARD
--- 28642C 1 CUTTERSHAFT,WELDMENT,63"
35 21677 32 NYLOCK NUT,7/16",NC
36 TF1020 32 KNIFE MTG CLEVIS,FLAIL
37 34011 32 CAPSCREW,7/16" X 3-7/16",NC,GR8
38 33713 64 KNIFE,FLAIL (STANDARD CUT)
39 28184A 32 KNIFE,FLAIL (SMOOTH CUT)
©2012 Alamo Group Inc. Parts Section 5-21
MF2660 BSF

75IN SIDE FLAIL - STANDARD ROTATION
ITEM PART NO. QTY. DESCRIPTION1 06320188 1 BONNET,75",STD,BSF
2 21632 36 CAPSCREW,3/8" X 1-1/2",NC
©2012 Alamo Group Inc. Parts Section 5-22
MF2660 BSF

75IN SIDE FLAIL - STANDARD ROTATION
Continued...
ITEM PART NO. QTY. DESCRIPTION3 22016 36 FLATWASHER,3/8"
4 TF1029 2 BAR,FLAP,TSF/TBF,75"
5 06520242 1 FLAP,75",FRONT
6 TF1016 1 FLAP,DEFLECTOR,TSF,75"
7 21625 46 HEX NUT,3/8",NC
8 21988 10 LOCKWASHER,3/8"
9 6T2615 10 WASHER,FENDER 3/8"
10 24889 4 SCREW,MACHINE,10-24 X 3/4"
11 32998 1 GROMMET
12 6T1027 4 CAPSCREW,1/2" X 1-3/4",NC
13 06533004 8 FLATWASHER,1/2",SAE
14 21727 4 NYLOCK NUT,1/2",NC
15 06350014 1 TANG,CYL,BSF
16 21731 4 CAPSCREW,1/2" X 1-1/2",NC
17 21990 6 LOCKWASHER,1/2"
18 21725 6 HEX NUT,1/2",NC
19 27975A 1 GUARD,CUTTERSHAFT
20 28086A 2 SKID SHOE,STD DUTY REAR FLAIL
21 30013 10 PLOW BOLT,3/8" X 1-1/4",NC,GR5
22 28737 1 BAFFLE,75",STD ROT
23 6T2283 10 CARRIAGE BOLT,3/8" X 1",NC
24 28738 1 GROUND ROLLER,75"
25 TF1045B 2 STUB SHAFT,GROUND ROLLER
26 6T2330 8 CAPSCREW,SKT HD,7/16" X 1-1/2",NC
27 28735 2 GROUND ROLLER ADJ BRKT,STD DTY
28 06530001 12 CAPSCREW,SKT HD,8-32 X 1/2",SS
29 06520027 2 CAP,BEARING,GRNDRLR
30 06520029 2 O-RING,2-3/4" X 3/32",AS568A-148
31 06520028 2 BEARING,FLANGE,1-3/8",GRNDRLR
32 6T2331 8 CAPSCREW,SKT HD,7/16" X 1",NC
33 21732 2 CAPSCREW,1/2" X 1-3/4",NC
34 06530217 8 CAPSCREW,1/2" X 2",NC,L9
35 06533006 8 FLATWASHER,1/2",SAE,L9
36 28683 2 BEARING,FLANGE,1-15/16",STD,TSF
37 33863 2 STRING GUARD,STD
38 28747 1 CUTTERSHAFT ASSY,STANDARD
--- 28643B 1 CUTTERSHAFT,WELDMENT,63"
39 21677 40 NYLOCK NUT,7/16",NC
40 TF1020 40 KNIFE MTG CLEVIS,FLAIL
41 34011 40 CAPSCREW,7/16" X 3-7/16",NC,GR8
42 33713 80 KNIFE,FLAIL (STANDARD CUT)
©2012 Alamo Group Inc. Parts Section 5-23
MF2660 BSF
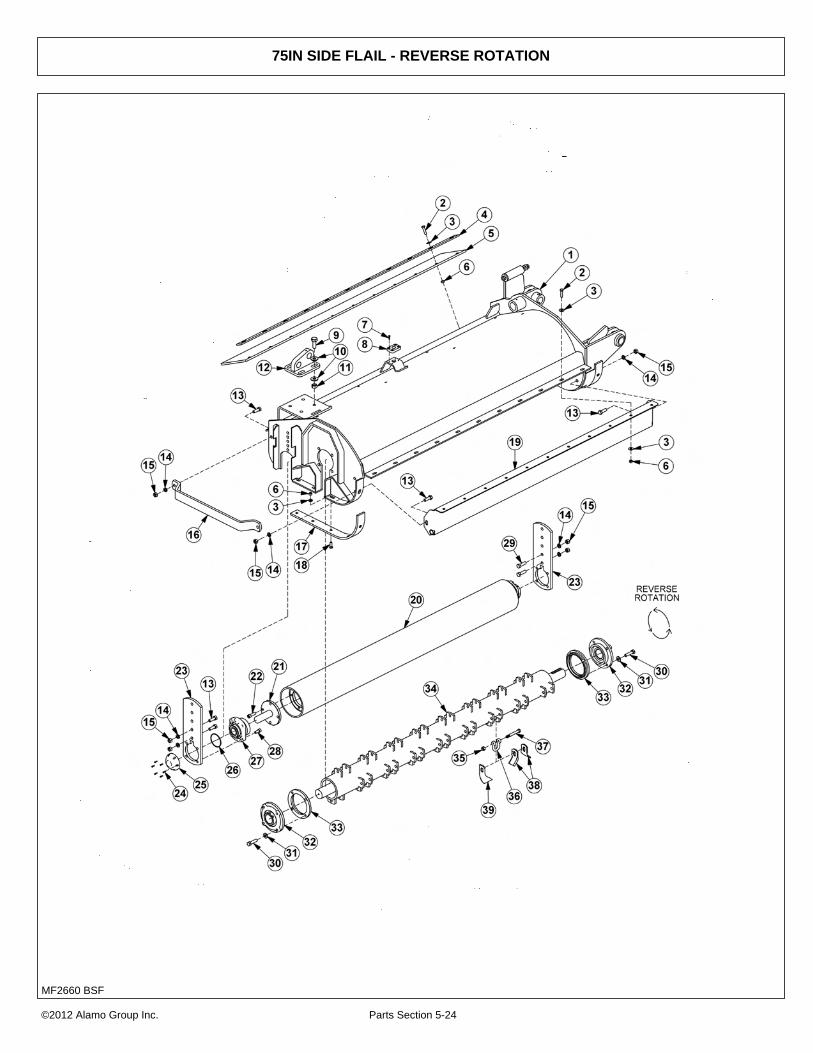
75IN SIDE FLAIL - REVERSE ROTATION
©2012 Alamo Group Inc. Parts Section 5-24
MF2660 BSF

75IN SIDE FLAIL - REVERSE ROTATION
Continued...
ITEM PART NO. QTY. DESCRIPTION1 06320188 1 BONNET,75",STD,BSF
2 21632 26 CAPSCREW,3/8" X 1-1/2",NC
3 22016 49 FLATWASHER,3/8"
4 TF1029 2 BAR,FLAP,TSF/TBF,75"
5 28701 1 FLAP,DEFLECTOR,TSF,63"
6 21625 44 HEX NUT,3/8",NC
7 24889 4 SCREW,MACHINE,10-24 X 3/4"
8 32998 1 GROMMET
9 6T1027 4 CAPSCREW,1/2" X 1-3/4",NC
10 06533004 8 FLATWASHER,1/2",SAE
11 21727 4 NYLOCK NUT,1/2",NC
12 06350014 1 TANG,CYL,BSF
13 21731 6 CAPSCREW,1/2" X 1-1/2",NC
14 21990 8 LOCKWASHER,1/2"
15 21725 8 HEX NUT,1/2",NC
16 27975A 1 GUARD,CUTTERSHAFT
17 28086A 2 SKID SHOE,STD DUTY REAR FLAIL
18 30013 10 PLOW BOLT,3/8" X 1-1/4",NC,GR5
19 28968A 1 TRASH GUARD,75"
20 28738 1 GROUND ROLLER,75"
21 TF1045B 2 STUB SHAFT,GROUND ROLLER
22 6T2330 8 CAPSCREW,SKT HD,7/16" X 1-1/2",NC
23 28735 2 GROUND ROLLER ADJ BRKT,STD DTY
24 06530001 12 CAPSCREW,SKT HD,8-32 X 1/2",SS
25 06520027 2 CAP,BEARING,GRNDRLR
26 06520029 2 O-RING,2-3/4" X 3/32",AS568A-148
27 06520028 2 BEARING,FLANGE,1-3/8",GRNDRLR
28 6T2331 8 CAPSCREW,SKT HD,7/16" X 1",NC
29 21732 2 CAPSCREW,1/2" X 1-3/4",NC
30 06530217 8 CAPSCREW,1/2" X 2",NC,L9
31 06533006 8 FLATWASHER,1/2",SAE,L9
32 28683 2 BEARING,FLANGE,1-15/16",STD,TSF
33 33863 2 STRING GUARD,STD
34 28747 1 CUTTERSHAFT ASSY,STANDARD CUT
--- 28748 1 CUTTERSHAFT ASSY,SMOOTH CUT
---- 28643B 1 CUTTERSHAFT,WELDMENT,63"
35 21677 40 NYLOCK NUT,7/16",NC
36 TF1020 40 KNIFE MTG CLEVIS,FLAIL
37 34011 40 CAPSCREW,7/16" X 3-7/16",NC,GR8
38 33713 80 KNIFE,FLAIL (STANDARD CUT)
39 28184A 40 KNIFE,FLAIL (SMOOTH CUT)
©2012 Alamo Group Inc. Parts Section 5-25
MF2660 BSF

SIDE FLAIL DRIVE ASSEMBLY
©2012 Alamo Group Inc. Parts Section 5-26
MF2660 BSF

SIDE FLAIL DRIVE ASSEMBLY
Continued...
ITEM PART NO. QTY. DESCRIPTION1 ------ - BONNET *REFER TO HEAD PARTS
2 28679B 1 MOTOR CHANNEL
3 21700 2 HEX NUT,1/2",NF
4 TF3620A 1 SPRING,TENSIONER
5 27938 1 BUSHING,MACH,1"OD X 1/2"ID X 14GA.
6 40496 1 ROD,THREADED,1/2"NF X 8"
7 PT3611A 1 CLEVIS,6"
8 06504013 1 MOTOR,M350-1-3/4" GEAR
9 TF3044 1 SHEAVE,8.0"
10 TF3013 1 BUSHING,QD,SK 1-1/4",1/4" KEY
11 TF3040 1 SHEAVE,6.3"
12 28702 2 V-BELT,(500)
13 28723 1 BUSHING,QD,SK 1-15/16"
14 28703B 1 GUARD,BELT,TSF,STD
15 21584 6 CAPSCREW,5/16" X 2",NC
16 21987 6 LOCKWASHER,5/16"
17 06504028 1 KEY (KEY FROM MOTOR)
18 26142A 1 KEY,1/2" X 1/2" X 2"
19 21732 5 CAPSCREW,1/2" X 1-3/4",NC
20 21990 5 LOCKWASHER,1/2"
21 21725 5 HEX NUT,1/2",NC
22 21630 3 CAPSCREW,3/8" X 1",NC
23 22016 3 FLATWASHER,3/8"
24 21988 2 LOCKWASHER,3/8"
25 27580 2 BEARING,DX,1-1/2",GRM
26 28682 1 RETAINING,WASHER 2-1/2" X 5/16"
27 TF4852 2 KIT,FLANGE,#20
28 06506038 1 PREFORMED TUBE
29 06500624 1 HOSE,1" X 156" (RETURN FOR STANDARD ROTATION)
30 06500623 1 HOSE,1" X 151" (PRESSURE FOR STANDARD ROTATION)
31 TB3031 1 CLAMP,HOSE
32 21640 1 CAPSCREW,3/8" X 3-1/2",NC
33 21627 1 NYLOCK NUT,3/8",NC
©2012 Alamo Group Inc. Parts Section 5-27
MF2660 BSF

3IN X 10IN TIE-ROD CYLINDER BREAKDOWN
ITEM PART NO. QTY. DESCRIPTION--- 6T0151R 1 CYLINDER,3IN X 10IN,TIE-ROD
1 6T0167 1 CYLINDER BUTT
2 6T0170 1 CYLINDER GLAND
3 6T0178 1 CLEVIS END
4 6T0164 1 CYLINDER TUBE
5 6T0161 1 PISTON ROD
6 6T0173 1 PISTON
7 6T0179 1 LOCKNUT
8 6T0176 4 TIE ROD ASY
------ 6T0187 1 SEAL KIT
9 ------ 2 O - RING
10 ------ 2 BACK - UP WASHER
11 ------ 1 O - RING
12 ------ 2 BACK - UP WASHER
13 ------ 1 O - RING
14 ------ 1 U - CUP
15 ------ 1 WIPER
©2012 Alamo Group Inc. Parts Section 5-28
MF2660 BSF

3IN X 10IN WELDED CYLINDER BREAKDOWN
ITEM PART NO. QTY. DESCRIPTION------ 06501021 1 HYDRAULIC CYLINDER COMPLETE
1 06501550 1 ROD
2 06501551 1 TUBE WELDMENT
3 06501552 1 PISTON
4 06501553 1 CYLINDER HEAD
5 06501554 1 CLEVIS
------ 06501555 1 SEAL REPAIR KIT (ITEMS 6 THROUGH 12)
©2012 Alamo Group Inc. Parts Section 5-29
MF2660 BSF

3IN X 18IN TIE-ROD CYLINDER BREAKDOWN
ITEM PART NO. QTY. DESCRIPTION------ 6T0150 1 CYLINDER 3" X 18"
1 6T0167 1 CYLINDER BUTT
2 6T0170 1 CYLINDER GLAND
3 6T0178 1 CLEVIS END
4 6T0165 1 CYLINDER TUBE
5 6T0162 1 PISTON ROD
6 6T0173 1 PISTON
7 6T0179 1 LOCKNUT
8 6T0177 4 TIE ROD ASY
------ 6T0187 1 SEAL KIT
9 ------ 2 O - RING
10 ------ 2 BACK - UP WASHER
11 ------ 1 O - RING
12 ------ 2 BACK - UP WASHER
13 ------ 1 O - RING
14 ------ 1 U - CUP
15 ------ 1 WIPER
16 N/A - N/A
©2012 Alamo Group Inc. Parts Section 5-30
MF2660 BSF

PUMP AND GRILL GUARD OPTIONS
ITEM PART NO. QTY. DESCRIPTION1 32430 1 UNIVERSAL PUMP GUARD
2 32737 1 UNIVERSAL GRILL GUARD
3 21833 4 CAPSCREW,3/4" X 2-1/4",NC
4 22021 2 FLATWASHER,3/4"
5 21993 4 LOCKWASHER,3/4"
6 21825 4 HEX NUT,3/4",NC
©2012 Alamo Group Inc. Parts Section 5-31
MF2660 BSF
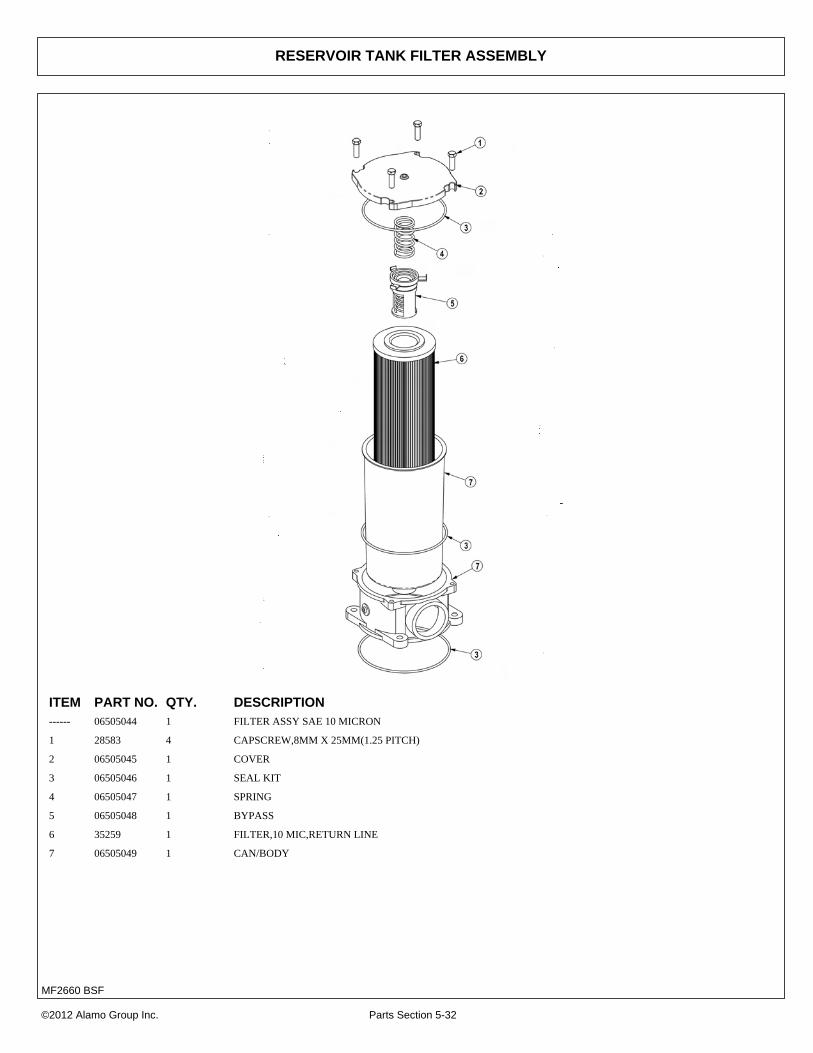
RESERVOIR TANK FILTER ASSEMBLY
ITEM PART NO. QTY. DESCRIPTION------ 06505044 1 FILTER ASSY SAE 10 MICRON
1 28583 4 CAPSCREW,8MM X 25MM(1.25 PITCH)
2 06505045 1 COVER
3 06505046 1 SEAL KIT
4 06505047 1 SPRING
5 06505048 1 BYPASS
6 35259 1 FILTER,10 MIC,RETURN LINE
7 06505049 1 CAN/BODY
©2012 Alamo Group Inc. Parts Section 5-32
MF2660 BSF

SIDE FLAIL TRAVEL LOCK
ITEM PART NO. QTY. DESCRIPTION1 ------ - BONNET *REFER TO FLAIL ASSEMBLY
2 28276 1 BRACKET,TRAVEL LOCK
3 TF4248 1 PLATE,TRAVEL LOCK
4 23745 1 TRAVEL LOCK HOOK
5 21783 2 CAPSCREW,5/8” X 2”,NC
6 21992 2 LOCKWASHER,5/8”
7 21775 2 HEX NUT,5/8”,NC
8 TF4250 1 PIN,TRAVEL LOCK
©2012 Alamo Group Inc. Parts Section 5-33
MF2660 BSF

FRONT PUMP BREAKDOWN
©2012 Alamo Group Inc. Parts Section 5-34
MF2660 BSF

FRONT PUMP BREAKDOWN
Continued...
ITEM PART NO. QTY. DESCRIPTION--- 06504123 1 PUMP ASSEMBLY,COMPLETE
1 24731 1 SHAFT END COVER
2 22779 1 PORT END COVER
3 22774 1 GEAR HOUSING
4 22771 1 GEAR SET
5 23824 4 CAPSCREW
6 06504078 2 SCREW,DRIVE
7 22773 4 DOWEL PINS
8 06504077 1 NAMEPLATE
9 22770 2 THRUST PLATE
10 22767 1 PLUG
11 06504075 2 SEAL,BK-UP
12 06504074 2 SEAL,CHAN
13 22765 1 SEAL,LIP
14 06504076 2 SEAL,SQ-R
15 02961917 4 WASHER
--- 24150 1 SEAL KIT (INCLUDES 11, 12, 13 & 14)
©2012 Alamo Group Inc. Parts Section 5-35
MF2660 BSF

FLAIL MOTOR BREAKDOWN
©2012 Alamo Group Inc. Parts Section 5-36
MF2660 BSF

FLAIL MOTOR BREAKDOWN
Continued...
ITEM PART NO. QTY. DESCRIPTION------ 06504013 1 MOTOR ASSEMBLY 350 - TSF
1 06504039 1 SHAFT END COVER
2 06504040 1 PORT END COVER
3 06504041 1 GEAR HOUSING
4 06504042 1 MATCHED GEAR SET
5 TF4402 1 BALL BEARING
6 06504043 4 CAP SCREW
7 06504044 2 SET SCREW
8 06504028 1 KEY
9 06504045 4 DOWEL PIN
10 ------ 1 NAMEPLATE
11 763759 2 THRUSTPLATE
12 02961940 1 HEX PLUG
13 TF4401 1 SNAP RING
14 06504049 1 LIP SEAL (INCLUDED IN SEAL KIT)
15 TF4410 2 GASKET SEAL (INCLUDED IN SEAL KIT)
16 06504046 4 SIDE SEAL (INCLUDED IN SEAL KIT)
17 06504047 4 END SEAL (INCLUDED IN SEAL KIT)
18 TF4407 2 BACK-UP SEAL (INCLUDED IN SEAL KIT)
19 06504048 1 SEAL RETAINER
20 6T5809 2 CHECK ASSEMBLY
21 02961917 4 WASHER
------ 06504023 1 SEAL KIT (INCLUDES 14, 15, 16, 17, AND 18)
©2012 Alamo Group Inc. Parts Section 5-37
MF2660 BSF

BRAKE VALVE ASSEMBLY
ITEM PART NO. QTY. DESCRIPTION--- 06510083 1 BRAKE VALVE, ASSY
1 34092 1 BRAKE VALVE, BLANK
2 34094 2 LOGIC ELEMENT
3 34095 1 RELIEF VALVE, 3000 PSI
4 06510095 1 METRI PAK COIL
5 34093 1 CARTRIDGE, 2 POSITION, 3 WAY (WITH NUT & WASHER)
6 34091 1 RELIEF VALVE, 2600 PSI
--- 34096 2 RELIEF SEAL KIT
---- 34097 1 SOLENOID SEAL KIT
--- 34098 2 ELEMENT SEAL KIT
©2012 Alamo Group Inc. Parts Section 5-38
MF2660 BSF

BRAKE VALVE SCHEMATIC
©2012 Alamo Group Inc. Parts Section 5-39
MF2660 BSF

SWITCH BOX
ITEM PART NO. QTY. DESCRIPTION1 06514013 1 SWBX,ALUM,BLK,06510102
2 35226 1 SWITCH,MOWER,COLEHERSEE
3 33811 1 SWITCH,MASTER/DECK FLOAT
4 6T3923 1 INDICTATOR LIGHT,ON,RED
5 06514014 1 BREAKER,10A,SWBX
6 34540 1 STRAIN RELIEF,3/4",BLACK,NYLON
7 06550018 1 DECAL,SWTCHBX,TM/TSF,CG
8 35227 1 RELAY,DP,DT,12V,LY2F,35226
©2012 Alamo Group Inc. Parts Section 5-40
MF2660 BSF

SWITCH BOX SCHEMATIC
©2012 Alamo Group Inc. Parts Section 5-41
MF2660 BSF

NOTES 1
©2012 Alamo Group Inc. Parts Section 5-42
MF2660 BSF

FIRE SUPPRESSION SYSTEM
©2012 Alamo Group Inc. Parts Section 5-43
MF2660 BSF

FIRE SUPPRESSION 3-POINT MOUNT
©2012 Alamo Group Inc. Parts Section 5-44
MF2660 BSF

FIRE SUPPRESSION 3-POINT MOUNT
Continued...
ITEM PART NO. QTY. DESCRIPTION1 06370137 1 MOUNT,3PNT,FIRE SYS
2 06503108 1 FITTING,1/2"BARB X 1/2"MP
3 35091 6 CLAMP,HOSE,#6
4 06520469 5 HOSE,1/2",BULK (FEET)
5 06503168 2 SWIVEL,1/2"STR,POLY
6 06520359 1 PUMP,LARGE
7 35176 4 U-NUT,1/4"
8 06520367 2 ELBOW,1/2"BARB X 1/2"MP,POLY
9 27329 1 U-BOLT,1/4"
10 06520361 1 FILTER
--- 06520351 1 ELEMENT,FILTER
11 06520349 1 FITTING,BARB,HOSE
12 06503169 1 REDUCER,BUSHING (100 & 150 GALLON TANKS ONLY)
13 06520346 1 FITTING,BULKHEAD (50 GALLON TANKS ONLY)
14 21632 4 CAPSCREW,3/8" X 1-1/2",NC
15 21988 4 LOCKWASHER,3/8"
16 06520360 1 HOSE REEL
17 22016 4 FLATWASHER,3/8"
18 21627 4 NYLOCK NUT,3/8",NC
19 21529 2 CAPSCREW,1/4" X 3/4",NC
20 06510258 1 CLAMP,3/4"
21 22014 1 FLATWASHER,1/4"
22 21986 1 LOCKWASHER,1/4"
23 21525 2 HEX NUT,1/4",NC
24 06370121 1 HOLSTER
25 06430090 1 SLEEVE
26 06520366 1 GUN,FIRE SYS
27 6T3222 1 DECAL
28 21527 1 NYLOCK NUT,1/4",NC
29 06510257 1 CLAMP,3/8"
30 28055 5 WIRE,BLACK,14GA (FEET)
31 24200 5 WIRE,RED,14GA (FEET)
32 22802 5 WIRE WRAP (FEET)
33 PT3905A 1 SWITCH
34 06510256 4 CABLE,14GA,4WIRE (FEET)
35 06510255 1 PLUG,7PIN,TRCTR
©2012 Alamo Group Inc. Parts Section 5-45
MF2660 BSF

FIRE SUPPRESSION FRONT MOUNT
©2012 Alamo Group Inc. Parts Section 5-46
MF2660 BSF

FIRE SUPPRESSION FRONT MOUNT
Continued...
ITEM PART NO. QTY. DESCRIPTION1 06520342 1 TANK,50 GALLON
2 06370204 1 MNT,TANK,FRNT,50 GALLON
3 35176 4 U-NUT,1/4,3/4 TO CENTER
4 35091 6 CLAMP,HOSE,#6
5 06503168 2 SWIVEL,1/2 STR,POLY
6 06520469 8 HOSE,1/2,SPRAYER
7 06520359 1 PUMP,FIRE KIT
8 06503108 1 FITTING,1/2"BARB X 1/2"MP
9 06520367 2 ELBOW,1/2MPX1/2BARB,POLY
10 27329 1 U-BOLT,1/4X2X1
11 06520361 1 FILTER,FIRE KIT,RAILKUT
--- 06520351 1 STRAINER,40 MESH
12 06520349 1 FITTING,BARB,HOSE,WETCUT
13 06520346 1 FITTING,BULKHEAD
14 21627 8 NYLOCK NUT,3/8 NC
15 22016 16 FLATWASHER,3/8,GR8
16 06510255 1 PLUG,7PIN,TRCTR
17 06510256 22 WIRE,14GA,4WIRE (FEET)
18 21631 8 CAPSCREW,3/8X1 1/4, NC,GR8
19 06370207 1 MNT,FIRE SUPPRESSION
20 21527 3 NYLOCK NUT,1/4 NC
21 06510257 2 CLAMP,3/8X1/4,INS
22 21529 2 CAPSCREW,1/4 X 3/4 NC
23 6T3222 1 DECAL,CONTROL,ON-OFF SWITCH
24 PT3905A 1 SWITCH,MOWER
25 06520360 1 HOSE REEL,FIRE KIT,RAILKUT
26 06520366 1 GUN,FIRE KIT,RAILKUT
27 06430090 1 SLEEVE,GUN,FIRE SYS
28 06370121 1 HOLSTER,FIRESYS,RAILKUT
©2012 Alamo Group Inc. Parts Section 5-47
MF2660 BSF

FIRE SUPPRESSION SYSTEM ELECTRICAL SCHEMATIC
©2012 Alamo Group Inc. Parts Section 5-48
MF2660 BSF

WETCUT
©2012 Alamo Group Inc. Parts Section 5-49
MF2660 BSF

WETCUT 50 GALLON TANK - 3PNT MOUNT
ITEM PART NO. QTY. DESCRIPTION1 06370128 1 MNT,3PNT,UNI
2 06370136 1 MNT,TANK,50GAL,WETCUT
4 06520342 1 TANK,50GA.,WETCUT
7 RD1032 3 PIN,LYNCH 1/4" X 2"
8 TB1036 1 PIN,SEC BOOM SWIV 1X4-11/16"
9 06520343 4 ANCHOR,STRAP,WETCUT
10 06520344 4 BOLT,STRAP,TANK,WETCUT
11 06520345 2 STRAP,TANK,WETCUT
©2012 Alamo Group Inc. Parts Section 5-50
MF2660 BSF

WETCUT 100 OR 150 GALLON TANK - 3PNT MOUNT
ITEM PART NO. QTY. DESCRIPTION1 06370128 1 MNT,3PNT,UNI
2 06370138 1 MNT,TANK,100GAL,WETCUT
--- 06370139 1 MNT,TANK,150GAL,WETCUT
4 06520372 1 TANK,100GA.,WETCUT
--- 06520373 1 TANK,150GA.,WETCUT
5 21527 2 HEX NUT,NYLOCK,1/4" NC
6 21530 2 CAPSCREW,1/4" X 1" NC
7 RD1032 3 PIN,LYNCH 1/4" X 2"
8 TB1036 1 PIN,SEC BOOM SWIV 1X4-11/16"
9 06520345 2 STRAP,TANK,WETCUT
10 06520344 4 BOLT,STRAP,TANK,WETCUT
11 06520343 4 ANCHOR,STRAP,WETCUT
©2012 Alamo Group Inc. Parts Section 5-51
MF2660 BSF

WETCUT 3PNT PLUMBING - 50IN MOWERS
©2012 Alamo Group Inc. Parts Section 5-52
MF2660 BSF

WETCUT 3PNT PLUMBING - 50IN MOWERS
Continued...
ITEM PART NO. QTY. DESCRIPTION1 06370128 1 MNT,3PNT,UNI
2 06520336 1 CNTRLR,SENSOR,06520333
3 06520341 1 PUMP,WETCUT
4 06520346 1 FITTING,BULKHEAD,WETCUT (50 GALLON TANKS ONLY)
5 06520347 1 FITTING,ELBOW,WETCUT
6 06520348 1 VLV,BALL,WETCUT
7 06520349 4 FITTING,BARB,HOSE,WETCUT
8 06503173 4 FITTING,1/2MP X 3/8"BARB
9 06520353 1 FITTING,TEE,WETCUT
10 06520367 1 ELBOW,1/2" X 1/2"BARB,POLY
11 06520361 1 FILTER,FIRE KIT,RAILKUT
12 06520400 2 QUIK CPLR,MALE,1/2",WETCUT
13 06520401 2 QUIK CPLR,FEM,1/2",WETCUT
14 27329 2 U-BOLT,1/4" X 1" X 2"
15 35176 4 U-NUT,1/4",3/4" TO CENTER
16 35091 13 CLAMP, HOSE #6
17 - 20 06520469 5 1/2" HOSE (FEET)
21 - 23 06520316 - 3/8" HOSE (INCLUDED WITH SPRAYER)
24 06510051 4 SEAL,16-18GA,METPAK
25 06510052 1 CONN.,BODY,MALE,METRIPACK 150
26 06510053 1 CONN.,BODY,FEM,METRIPACK 150
27 06510054 2 TERMINAL,MALE,16/18GA.METPAK
28 06510055 2 TERMINAL,FEM,16/18GA.METPAK
29 06510056 2 TPA
30 06520337 1 INCLUDED WITH CONTROLLER
31 06401133 1 SPACER,Ø.31" X 1.75" X .38"
32 06503165 1 ELBOW,1/2"MP X 3/8"BARB
33 06520354 1 BUSHING,REDUCER,WETCUT
34 06503169 1 BUSHING,1"MP X 1/2"FP (100 & 150 GALLON TANKS ONLY)
35 06503176 2 FITTING,BARB,3/8"MP X 1/2"BARB
©2012 Alamo Group Inc. Parts Section 5-53
MF2660 BSF

WETCUT 3PNT PLUMBING - LARGE MOWERS
©2012 Alamo Group Inc. Parts Section 5-54
MF2660 BSF

WETCUT 3PNT PLUMBING - LARGE MOWERS
Continued...
ITEM PART NO. QTY. DESCRIPTION1 06370128 1 MNT,3PNT,UNI
2 35176 4 U-NUT,1/4,3/4 TO CENTER
3 06520336 1 CNTRLR,SENSOR,06520333
4 06520354 1 BUSHING,REDUCER,WETCUT
5 27329 2 U-BOLT,1/4" X 1" X 2"
6 06520353 1 FITTING,TEE,WETCUT
7 06520349 4 FITTING,BARB,HOSE,WETCUT
8 35091 13 CLAMP, HOSE #6
9 06520469 5 1/2" HOSE (FEET)
10 06503168 2 SWIVEL,1/2" STR
11 06520359 1 PUMP,LARGE
12 06520361 1 FILTER,FIRE KIT,RAILKUT
--- 06520351 1 STRAINER,40MESH
13 06520367 1 ELBOW,1/2X1/2BARB,POLY
14 06401133 1 SPACER,Ø.31X1.75X.38
15 06520348 1 VLV,BALL,WETCUT
16 06520347 1 FITTING,ELBOW,WETCUT
17 06503169 1 BUSHING,1MPX1/2FP (100 & 150 GALLON TANKS ONLY)
18 06520346 1 FITTING,BULKHEAD,WETCUT (50 GALLON TANKS ONLY)
19 06503173 4 FITTING,BARB,1/2X3/8,WETCUT
20 06520401 2 QUIK CPLR,FEM,1/2,WETCUT
21 06520400 2 QUIK CPLR,MALE,1/2,WETCUT
22 06520316 - 3/8" HOSE (INCLUDED WITH SPRAYER)
23 06503165 1 ELBOW,1/2X3/8BARB,POLY
24 06510052 1 CONN.,BODY,MALE,METRIPACK 150
25 06510056 2 TPA
26 06510054 2 TERMINAL,MALE,16/18GA.METPAK
27 06510051 4 SEAL,16-18GA,METPAK
28 06510055 2 TERMINAL,FEM,16/18GA.METPAK
29 06510053 1 CONN.,BODY,FEM,METRIPACK 150
©2012 Alamo Group Inc. Parts Section 5-55
MF2660 BSF

WETCUT 50IN SPRAYER HEAD ASSEMBLY
©2012 Alamo Group Inc. Parts Section 5-56
MF2660 BSF

WETCUT 50IN SPRAYER HEAD ASSEMBLY
Continued...
ITEM PART NO. QTY. DESCRIPTION1 06370105 1 HOOD,SPRAYER
2 06370106 1 HINGE,LH,SPRAYER
3 06370107 1 HINGE,RH,SPRAYER
4 06370108 1 HINGE,CNTR,SPRAYER
5 06410668 1 GUARD,SPRAYER,WETCUT
6 06410753 1 MNT,RH,WET CUT (FLAIL)
--- 06410942 1 MNT,RH,WET CUT (ROTARY)
7 06410754 1 MNT,LH,WET CUT (FLAIL)
--- 06410943 1 MNT,LH,WET CUT (ROTARY)
8 06410796 1 GUARD,HOSE,WETCUT
9 06420069 3 PIN,HINGE,WET CUT
10 06497003 1 TUBE,LG,SPRAYER
11 06499012 1 SKIRT,ANTI SPRAY,50
12 06499013 2 SKIRT,ANTI SPRAY,7
13 06520314 2 TUBE,CAP,SPRAYER
14 06520316 15 HOSE,SPRAYER (FEET)
15 06520317 5 NOZZLE,SPRAYER
16 06520319 4 TIP,NOZZLE,SPRAYER
17 06520320 4 FILTER,NOZZLE,SPRAYER
18 06520321 4 NUT,NOZZLE,SPRAYER
19 06520322 49 CHAIN,.18" X 1.31" X 13LINKS
20 06520381 1 ADAPTER,1/4"NPT,WETCUT
21 06520382 1 ELBOW,BARB,3/8" X 1/4"NPT
22 06520383 8 SPACER,.50"O.D. X .252"I.D. X .38",NYLON
23 32550 4 U-BOLT,1/4" X 1" X 1" X 1-3/4"
24 21527 29 HEX NUT,NYLOCK,1/4",NC
25 21528 12 CAPSCREW,1/4" X 1/2",NC
26 21529 13 CAPSCREW,1/4" X 3/4",NC
27 21625 11 HEX NUT,3/8",NC
28 21630 2 CAPSCREW,3/8" X 1",NC
29 21634 7 CAPSCREW,3/8" X 2",NC
30 21632 2 CAPSCREW,3/8" X 1-1/2",NC
31 21986 4 LOCKWASHER,1/4"
32 22014 15 FLATWASHER,1/4"
33 22016 9 FLATWASHER,3/8",GR8
34 34698 6 ROLL PIN, PLAIN, 3/16" X 7/8"
35 35091 1 CLAMP,HOSE #6
36 35176 4 U-NUT,1/4",3/4" TO CENTER
37 06520376 5 CABLE,3/16"
38 06537022 2 U-BOLT,CABLE,3/16"
©2012 Alamo Group Inc. Parts Section 5-57
MF2660 BSF

WETCUT 60IN SPRAYER HEAD ASSEMBLY
©2012 Alamo Group Inc. Parts Section 5-58
MF2660 BSF

WETCUT 60IN SPRAYER HEAD ASSEMBLY
Continued...
ITEM PART NO. QTY. DESCRIPTION1 06370210 1 HOOD,SPRAYER
2 06370106 1 HINGE,LH,SPRAYER
3 06370107 1 HINGE,RH,SPRAYER
4 06370108 1 HINGE,CNTR,SPRAYER
5 06411234 1 GUARD,SPRAYER,WETCUT
6 06410753 1 MNT,RH,WET CUT (FLAIL)
--- 06410942 1 MNT,RH,WET CUT (ROTARY)
7 06410754 1 MNT,LH,WET CUT (FLAIL)
--- 06410943 1 MNT,LH,WET CUT (ROTARY)
8 06410796 1 GUARD,HOSE,WETCUT
9 06420069 3 PIN,HINGE,WET CUT
10 06497009 1 TUBE,LG,SPRAYER
11 06499018 1 SKIRT,ANTI SPRAY,60
12 06499013 2 SKIRT,ANTI SPRAY,7
13 06520314 2 TUBE,CAP,SPRAYER
14 06520316 15 HOSE,SPRAYER (FEET)
15 06520317 6 NOZZLE,SPRAYER
16 06520319 5 TIP,NOZZLE,SPRAYER
17 06520320 5 FILTER,NOZZLE,SPRAYER
18 06520321 5 NUT,NOZZLE,SPRAYER
19 06520322 61 CHAIN,.18" X 1.31" X 13LINKS
20 06520381 1 ADAPTER,1/4"NPT,WETCUT
21 06520382 1 ELBOW,BARB,3/8" X 1/4"NPT
22 06520383 10 SPACER,.50"O.D. X .252"I.D. X .38",NYLON
23 32550 5 U-BOLT,1/4" X 1" X 1" X 1-3/4"
24 21527 33 HEX NUT,NYLOCK,1/4",NC
25 21528 15 CAPSCREW,1/4" X 1/2",NC
26 21529 13 CAPSCREW,1/4" X 3/4",NC
27 21625 13 HEX NUT,3/8",NC
28 21630 2 CAPSCREW,3/8" X 1",NC
29 21634 7 CAPSCREW,3/8" X 2",NC
30 21632 4 CAPSCREW,3/8" X 1-1/2",NC
31 21986 4 LOCKWASHER,1/4"
32 22014 33 FLATWASHER,1/4"
33 22016 11 FLATWASHER,3/8",GR8
34 34698 6 ROLL PIN, PLAIN, 3/16" X 7/8"
35 35091 1 CLAMP,HOSE #6
36 35176 4 U-NUT,1/4",3/4" TO CENTER
37 06520376 6 CABLE,3/16" (FEET)
38 06537022 2 U-BOLT,CABLE,3/16"
©2012 Alamo Group Inc. Parts Section 5-59
MF2660 BSF

WETCUT FRONT PLUMBING - 50IN MOWERS
©2012 Alamo Group Inc. Parts Section 5-60
MF2660 BSF

WETCUT FRONT PLUMBING - 50IN MOWERS
Continued...
ITEM PART NO. QTY. DESCRIPTION1 06370204 1 MNT,FRONT,UNI
2 06520336 1 CNTRLR,SENSOR,06520333
3 06520341 1 PUMP,WETCUT
4 06520346 1 FITTING,BULKHEAD,WETCUT
5 06520347 1 FITTING,ELBOW,WETCUT
6 06520348 1 VLV,BALL,WETCUT
7 06520349 4 FITTING,BARB,HOSE,WETCUT
8 06503173 4 FITTING,1/2"MP X 3/8"BARB
9 06520353 1 FITTING,TEE,WETCUT
10 06520367 1 ELBOW,1/2"MP X 1/2"BARB,POLY
11 06520361 1 FILTER,FIRE KIT,RAILKUT
--- 06520351 1 STRAINER,40MESH
12 06520400 2 QUIK CPLR,MALE,1/2",WETCUT
13 06520401 2 QUIK CPLR,FEM,1/2",WETCUT
14 27329 2 U-BOLT,1/4" X 1" X 2"
15 35176 4 U-NUT,1/4",3/4" TO CENTER
16 35091 13 CLAMP,HOSE #6
17 - 20 06520469 5 1/2" HOSE (FEET)
21 - 23 06520316 - 3/8" HOSE (INCLUDED WITH SPRAYER)
24 06510051 4 SEAL,16-18GA,METPAK
25 06510052 1 CONN.,BODY,MALE,METRIPACK 150
26 06510053 1 CONN.,BODY,FEM,METRIPACK 150
27 06510054 2 TERMINAL,MALE,16/18GA.METPAK
28 06510055 2 TERMINAL,FEM,16/18GA.METPAK
29 06510056 2 TPA
30 06520337 1 INCLUDED WITH CONTROLLER
31 06401133 1 SPACER,Ø.31" X 1.75" X .38"
32 06503165 1 ELBOW,1/2"MP X 3/8"BARB,POLY
33 06520354 1 BUSHING,REDUCER,WETCUT
34 06503176 2 FITTING,3/8"MP X 1/2"BARB
©2012 Alamo Group Inc. Parts Section 5-61
MF2660 BSF
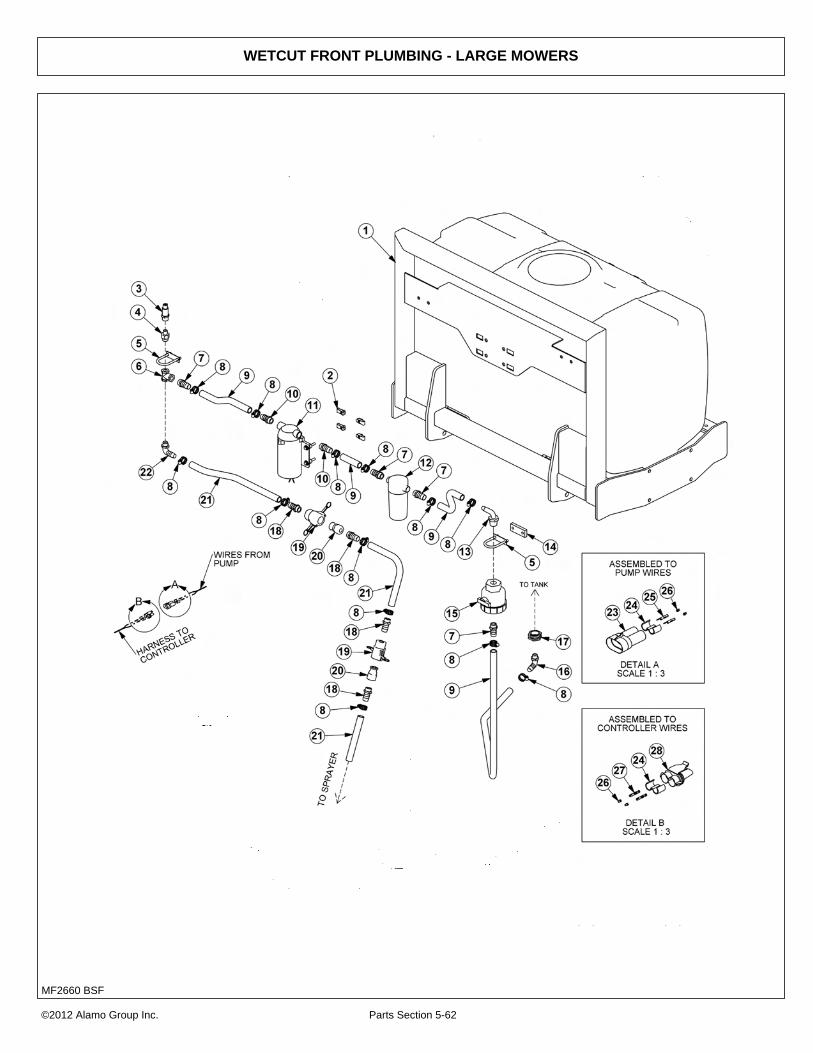
WETCUT FRONT PLUMBING - LARGE MOWERS
©2012 Alamo Group Inc. Parts Section 5-62
MF2660 BSF

WETCUT FRONT PLUMBING - LARGE MOWERS
Continued...
ITEM PART NO. QTY. DESCRIPTION1 06370204 1 MNT,FRONT,UNIV
2 35176 4 U-NUT,1/4,3/4 TO CENTER
3 06520336 1 CNTRLR,SENSOR,06520333
4 06520354 1 BUSHING,REDUCER,WETCUT
5 27329 2 U-BOLT,1/4" X 1" X 2"
6 06520353 1 FITTING,TEE,WETCUT
7 06520349 4 FITTING,BARB,HOSE,WETCUT
8 35091 13 CLAMP, HOSE #6
9 06520469 5 1/2" HOSE (FEET)
10 06503168 2 SWIVEL,1/2" STR
11 06520359 1 PUMP,LARGE
12 06520361 1 FILTER,FIRE KIT,RAILKUT
--- 06520351 1 STRAINER,40MESH
13 06520367 1 ELBOW,1/2X1/2BARB,POLY
14 06401133 1 SPACER,Ø.31X1.75X.38
15 06520348 1 VLV,BALL,WETCUT
16 06520347 1 FITTING,ELBOW,WETCUT
17 06520346 1 FITTING,BULKHEAD,WETCUT
18 06503173 4 FITTING,BARB,1/2X3/8,WETCUT
19 06520401 2 QUIK CPLR,FEM,1/2,WETCUT
20 06520400 2 QUIK CPLR,MALE,1/2,WETCUT
21 06520316 - 3/8" HOSE (INCLUDED WITH SPRAYER)
22 06503165 1 ELBOW,1/2X3/8BARB,POLY
23 06510052 1 CONN.,BODY,MALE,METRIPACK 150
24 06510056 2 TPA
25 06510054 2 TERMINAL,MALE,16/18GA.METPAK
26 06510051 4 SEAL,16-18GA,METPAK
27 06510055 2 TERMINAL,FEM,16/18GA.METPAK
28 06510053 1 CONN.,BODY,FEM,METRIPACK 150
©2012 Alamo Group Inc. Parts Section 5-63
MF2660 BSF

WETCUT CABLES
©2012 Alamo Group Inc. Parts Section 5-64
MF2660 BSF

WARRANTYSECTION
Warranty Section 7-1

.

WARRANTY INFORMATION
Tiger Corporation, 3301 N. Louise, Sioux Falls, South Dakota, warrants to theoriginal Retail Customer, the new Tiger equipment is free of defects in material andworkmanship. Any part of equipment that in Tiger’s judgement, show evidence ofsuch defects will be repaired or replaced without charge, provided that the failure ofpart(s) shall have occurred within twelve (12) months from the date of delivery ofsaid equipment to the Retail Customer. Expendable components such as knives,oil, chain sprockets, skid shoes, knife mounting disks and the like are excluded butnot limited to this warranty.
The Retail Customer must pay the transportation cost to and from the TigerDealer’s service shop for warranty service. Warranty service will be performed bythe Tiger Dealer from whom the equipment was purchased, during service shopregularly scheduled days and hours of operation.
All Tiger obligation under this warranty shall be terminated if the equipment ismodified or altered in ways not approved in writing by Tiger, if repair parts other thangenuine Tiger repair parts have been used, or if the equipment has been subject tomisuse, neglect, accident, improper maintenance or improper operation.
Tiger Corporation reserves the right to make improvements in design orchanges in specification at any time without incurring any obligation to owners ofequipment previously sold.
No agent or person has authority to alter, add to or waive the above warrantieswhich are agreed to be in the only warranties, representations or promises,expressed or implied, as to the quality or performance of the products covered andwhich do not include any implied warranty of merchantability or fitness. In no eventwill Tiger be liable for incidental or consequential damages or injuries, including, butnot limited to, loss of profits, rental or substitute equipment or other commercialloss.
THERE ARE NO WARRANTIES WHICH EXTENDBEYOND THOSE EXPRESSED HEREIN.
It is the Purchasers obligation to sign the warranty registration form AFTER he /she has Read and Understands the Operation and Safety Instructions statedwithin this manual.

ONE LAST WORDThis manual cannot possibly cover all of the
potentially hazardous situations you willencounter. By being familiar with the
safety rules, operating and maintenanceinstructions in this manual you can help preventaccidents. The objective of this manual is to
help make you a better operator. Remember,SAFETY IS YOU!
Your safety and the safety of those around youdepends on YOU. Common sense should
play a large role in the operation of this machine.
Since we at Tiger Corporation are constantly striving to improve out products, wereserve the right to change specifications or design at any time.

TO THE OWNER / OPERATOR / DEALER
To keep your implement running efficiently and safely, read your manual thoroughly and followthese directions and the Safety Messages in this manual and on the machine. The table ofcontents clearly identifies each section where you can easily find the information you need.
The Occupational Safety and Health Act (OSHA 1928.51 subpart C) makes the followingminimum requirements for tractor operators.
OWNER REQUIREMENTS:
1. Provide a Roll-Over-Protective Structure that meets the requirements of this Standard; and2. Provide Seatbelts that meet the requirements of this Standard and SAE J3C; and3. Ensure that each employee uses such Seatbelt while the tractor is moving; and4. Ensure that each employee tightens the Seatbelt sufficiently to confine the employee to the
protected area provided by the ROPS.
OPERATOR REQUIREMENTS:
1. Securely fasten seatbelt it the tractor has a ROPS.2. Where possible, avoid operating the tractor near steep ditches, embankments, and holes.3. Reduce speed when turning, crossing slopes, and on rough, slick, or muddy surfaces.4. Stay off slopes too steep for safe operation.5. Watch where you are going – especially at row ends, on roads, and around trees.6. Do Not permit others to ride.7. Operate the tractor smoothly – no jerky turns, starts, or stops.8. Hitch only to the draw-bar and hitch points recommended by the tractor manufacturer.9. When the tractor is stopped, set brakes securely and use park lock, if available

Printed in USA© Tiger Corporation