Embed Size (px)
Citation preview

O R A C L E ® E N T E R P R I S E P E R F O R M A N C EM A N A G E M E N T W O R K S P A C E , F U S I O N E D I T I O N
R E L E A S E 1 1 . 1 . 1 . 3
A D M I N I S T R A T O R ’ S G U I D E

EPM Workspace Administrator’s Guide, 11.1.1.3
Copyright © 1989, 2009, Oracle and/or its affiliates. All rights reserved.
Authors: EPM Information Development Team
This software and related documentation are provided under a license agreement containing restrictions on use anddisclosure and are protected by intellectual property laws. Except as expressly permitted in your license agreement orallowed by law, you may not use, copy, reproduce, translate, broadcast, modify, license, transmit, distribute, exhibit,perform, publish or display any part, in any form, or by any means. Reverse engineering, disassembly, or decompilationof this software, unless required by law for interoperability, is prohibited.
The information contained herein is subject to change without notice and is not warranted to be error-free. If you findany errors, please report them to us in writing.
If this software or related documentation is delivered to the U.S. Government or anyone licensing it on behalf of the U.S.Government, the following notice is applicable: U.S. GOVERNMENT RIGHTS: Programs, software, databases, and relateddocumentation and technical data delivered to U.S. Government customers are "commercial computer software" or"commercial technical data" pursuant to the applicable Federal Acquisition Regulation and agency-specific supplementalregulations. As such, the use, duplication, disclosure, modification, and adaptation shall be subject to the restrictions andlicense terms set forth in the applicable Government contract, and, to the extent applicable by the terms of the Governmentcontract, the additional rights set forth in FAR 52.227-19, Commercial Computer Software License (December 2007).Oracle USA, Inc., 500 Oracle Parkway, Redwood City, CA 94065.
This software is developed for general use in a variety of information management applications. It is not developed orintended for use in any inherently dangerous applications, including applications which may create a risk of personalinjury. If you use this software in dangerous applications, then you shall be responsible to take all appropriate fail-safe,backup, redundancy and other measures to ensure the safe use of this software. Oracle Corporation and its affiliates disclaimany liability for any damages caused by use of this software in dangerous applications.
This software and documentation may provide access to or information on content, products and services from thirdparties. Oracle Corporation and its affiliates are not responsible for and expressly disclaim all warranties of any kind withrespect to third party content, products and services. Oracle Corporation and its affiliates will not be responsible for anyloss, costs, or damages incurred due to your access to or use of third party content, products or services.
Contents
Documentation Accessibility . . . . . . . . . . . . . . . . . . . . . . . . . . . . . . . . . . . . . . . . . . . . . . 11
Chapter 1. Reporting and Analysis Architecture Overview . . . . . . . . . . . . . . . . . . . . . . . . . . . . . . . . . . . . . . 13
Enterprise Performance Management . . . . . . . . . . . . . . . . . . . . . . . . . . . . . . . . . . . . . . 13
About EPM Workspace . . . . . . . . . . . . . . . . . . . . . . . . . . . . . . . . . . . . . . . . . . . . . . . . . 13
Reporting and Analysis Architecture . . . . . . . . . . . . . . . . . . . . . . . . . . . . . . . . . . . . . . . 14
Client Layer . . . . . . . . . . . . . . . . . . . . . . . . . . . . . . . . . . . . . . . . . . . . . . . . . . . . . . 15
Application Layer . . . . . . . . . . . . . . . . . . . . . . . . . . . . . . . . . . . . . . . . . . . . . . . . . . 17
Database Layer . . . . . . . . . . . . . . . . . . . . . . . . . . . . . . . . . . . . . . . . . . . . . . . . . . . . 22
Chapter 2. Administration Tools and Tasks . . . . . . . . . . . . . . . . . . . . . . . . . . . . . . . . . . . . . . . . . . . . . . . . 25
Understanding Oracle Home and Install Home . . . . . . . . . . . . . . . . . . . . . . . . . . . . . . . 25
Setting Up Microsoft Reports Integration with EPM Workspace . . . . . . . . . . . . . . . . . . . 26
Administration Tools . . . . . . . . . . . . . . . . . . . . . . . . . . . . . . . . . . . . . . . . . . . . . . . . . . 27
EPM Workspace Configuration Information . . . . . . . . . . . . . . . . . . . . . . . . . . . . . . 27
Administer Module . . . . . . . . . . . . . . . . . . . . . . . . . . . . . . . . . . . . . . . . . . . . . . . . . 28
Interactive Reporting Services Manager . . . . . . . . . . . . . . . . . . . . . . . . . . . . . . . . . . 29
Impact Manager Module . . . . . . . . . . . . . . . . . . . . . . . . . . . . . . . . . . . . . . . . . . . . . 29
Job Utilities Calendar Manager . . . . . . . . . . . . . . . . . . . . . . . . . . . . . . . . . . . . . . . . 29
Service Configurators . . . . . . . . . . . . . . . . . . . . . . . . . . . . . . . . . . . . . . . . . . . . . . . 29
Starting and Stopping Services . . . . . . . . . . . . . . . . . . . . . . . . . . . . . . . . . . . . . . . . . . . . 30
Before Starting Services . . . . . . . . . . . . . . . . . . . . . . . . . . . . . . . . . . . . . . . . . . . . . . 30
Starting Reporting and Analysis Services . . . . . . . . . . . . . . . . . . . . . . . . . . . . . . . . . . 31
Starting Subsets of Services . . . . . . . . . . . . . . . . . . . . . . . . . . . . . . . . . . . . . . . . . . . 32
Starting Interactive Reporting Services Manager . . . . . . . . . . . . . . . . . . . . . . . . . . . . 33
Stopping Services . . . . . . . . . . . . . . . . . . . . . . . . . . . . . . . . . . . . . . . . . . . . . . . . . . 33
Service Start-up Dependencies . . . . . . . . . . . . . . . . . . . . . . . . . . . . . . . . . . . . . . . . . 34
Changing Service Port Assignments . . . . . . . . . . . . . . . . . . . . . . . . . . . . . . . . . . . . . . . . 34
Starting the EPM Workspace Servlet . . . . . . . . . . . . . . . . . . . . . . . . . . . . . . . . . . . . . . . 34
Configuring Interactive Reporting Services Manager . . . . . . . . . . . . . . . . . . . . . . . . . . . . 35
Interactive Reporting Services Manager Event Thresholds . . . . . . . . . . . . . . . . . . . . . 35
Configuring Interactive Reporting Services . . . . . . . . . . . . . . . . . . . . . . . . . . . . . . . . 37
Contents iii
Securing Your EPM Workspace Production Environment . . . . . . . . . . . . . . . . . . . . . . . . 37
EPM System Lifecycle Management . . . . . . . . . . . . . . . . . . . . . . . . . . . . . . . . . . . . . . . . 38
Customizing the Help Menu . . . . . . . . . . . . . . . . . . . . . . . . . . . . . . . . . . . . . . . . . . . . . 38
Quick Guide to Common Administrative Tasks . . . . . . . . . . . . . . . . . . . . . . . . . . . . . . . 40
Chapter 3. Administer Module . . . . . . . . . . . . . . . . . . . . . . . . . . . . . . . . . . . . . . . . . . . . . . . . . . . . . . . . . 43
Overview . . . . . . . . . . . . . . . . . . . . . . . . . . . . . . . . . . . . . . . . . . . . . . . . . . . . . . . . . . . 43
Setting General Properties . . . . . . . . . . . . . . . . . . . . . . . . . . . . . . . . . . . . . . . . . . . . . . . 44
General Properties . . . . . . . . . . . . . . . . . . . . . . . . . . . . . . . . . . . . . . . . . . . . . . . . . 44
User Interface Properties . . . . . . . . . . . . . . . . . . . . . . . . . . . . . . . . . . . . . . . . . . . . . 45
Authenticating Users- Host Authentication . . . . . . . . . . . . . . . . . . . . . . . . . . . . . . . . . . 45
Managing Users . . . . . . . . . . . . . . . . . . . . . . . . . . . . . . . . . . . . . . . . . . . . . . . . . . . . . . 45
Assigning Reporting and Analysis Default Preferences . . . . . . . . . . . . . . . . . . . . . . . . . . . 46
Exploring and Managing Annotations . . . . . . . . . . . . . . . . . . . . . . . . . . . . . . . . . . . . . . 47
Searching for Annotations . . . . . . . . . . . . . . . . . . . . . . . . . . . . . . . . . . . . . . . . . . . . 47
Viewing Reports Associated with Annotations . . . . . . . . . . . . . . . . . . . . . . . . . . . . . 49
Replying to Annotations . . . . . . . . . . . . . . . . . . . . . . . . . . . . . . . . . . . . . . . . . . . . . 49
Deleting Annotations . . . . . . . . . . . . . . . . . . . . . . . . . . . . . . . . . . . . . . . . . . . . . . . 50
Changing the Source for Annotations . . . . . . . . . . . . . . . . . . . . . . . . . . . . . . . . . . . . 50
Changing Context Elements . . . . . . . . . . . . . . . . . . . . . . . . . . . . . . . . . . . . . . . . . . 51
Modifying Permissions . . . . . . . . . . . . . . . . . . . . . . . . . . . . . . . . . . . . . . . . . . . . . . 51
Managing Physical Resources . . . . . . . . . . . . . . . . . . . . . . . . . . . . . . . . . . . . . . . . . . . . 52
Viewing Physical Resources . . . . . . . . . . . . . . . . . . . . . . . . . . . . . . . . . . . . . . . . . . . 52
Access Permissions for Physical Resources . . . . . . . . . . . . . . . . . . . . . . . . . . . . . . . . 52
Adding Physical Resources . . . . . . . . . . . . . . . . . . . . . . . . . . . . . . . . . . . . . . . . . . . 52
Modifying Physical Resources . . . . . . . . . . . . . . . . . . . . . . . . . . . . . . . . . . . . . . . . . 53
Deleting Physical Resources . . . . . . . . . . . . . . . . . . . . . . . . . . . . . . . . . . . . . . . . . . . 53
Printer Properties . . . . . . . . . . . . . . . . . . . . . . . . . . . . . . . . . . . . . . . . . . . . . . . . . . 53
Output Directory Properties . . . . . . . . . . . . . . . . . . . . . . . . . . . . . . . . . . . . . . . . . . 54
Managing MIME Types . . . . . . . . . . . . . . . . . . . . . . . . . . . . . . . . . . . . . . . . . . . . . . . . . 54
Defining MIME Types . . . . . . . . . . . . . . . . . . . . . . . . . . . . . . . . . . . . . . . . . . . . . . . 55
Modifying MIME Types . . . . . . . . . . . . . . . . . . . . . . . . . . . . . . . . . . . . . . . . . . . . . 55
Inactivating or Re-activating MIME Types . . . . . . . . . . . . . . . . . . . . . . . . . . . . . . . . 55
Deleting MIME Types . . . . . . . . . . . . . . . . . . . . . . . . . . . . . . . . . . . . . . . . . . . . . . . 56
Managing Notifications . . . . . . . . . . . . . . . . . . . . . . . . . . . . . . . . . . . . . . . . . . . . . . . . . 56
Understanding Subscriptions and Notifications . . . . . . . . . . . . . . . . . . . . . . . . . . . . 56
Modifying Notification Properties . . . . . . . . . . . . . . . . . . . . . . . . . . . . . . . . . . . . . . 58
Managing SmartCuts . . . . . . . . . . . . . . . . . . . . . . . . . . . . . . . . . . . . . . . . . . . . . . . . . . 58
Managing Row-Level Security . . . . . . . . . . . . . . . . . . . . . . . . . . . . . . . . . . . . . . . . . . . . 59
iv Contents
Tracking System Usage . . . . . . . . . . . . . . . . . . . . . . . . . . . . . . . . . . . . . . . . . . . . . . . . . 60
Managing Usage Tracking . . . . . . . . . . . . . . . . . . . . . . . . . . . . . . . . . . . . . . . . . . . . 61
Tracking Events and Documents . . . . . . . . . . . . . . . . . . . . . . . . . . . . . . . . . . . . . . . 61
Sample Usage Tracking Reports . . . . . . . . . . . . . . . . . . . . . . . . . . . . . . . . . . . . . . . . 62
Usage Tracking with Different Database Schema . . . . . . . . . . . . . . . . . . . . . . . . . . . . 62
Changing Ownership of All Objects . . . . . . . . . . . . . . . . . . . . . . . . . . . . . . . . . . . . . . . . 63
BI Presentation Services . . . . . . . . . . . . . . . . . . . . . . . . . . . . . . . . . . . . . . . . . . . . . . . . 64
Chapter 4. Integrating Search Services with External Applications . . . . . . . . . . . . . . . . . . . . . . . . . . . . . . . . 65
About Search Services . . . . . . . . . . . . . . . . . . . . . . . . . . . . . . . . . . . . . . . . . . . . . . . . . . 65
Configuring Hyperion System 9 Connector and Identity Plug-ins for Oracle SecureEnterprise Search . . . . . . . . . . . . . . . . . . . . . . . . . . . . . . . . . . . . . . . . . . . . . . . . . . . . . 65
Deploying Plug-in JAR Files . . . . . . . . . . . . . . . . . . . . . . . . . . . . . . . . . . . . . . . . . . 65
Configuring the Identity Plug-in . . . . . . . . . . . . . . . . . . . . . . . . . . . . . . . . . . . . . . . 66
Configuring the Connector Plug-in . . . . . . . . . . . . . . . . . . . . . . . . . . . . . . . . . . . . . 66
Searching . . . . . . . . . . . . . . . . . . . . . . . . . . . . . . . . . . . . . . . . . . . . . . . . . . . . . . . . 67
Configuring Google OneBox to Use System 9 Search Service Data in its Results . . . . . . . . 68
Overview of Operation . . . . . . . . . . . . . . . . . . . . . . . . . . . . . . . . . . . . . . . . . . . . . . 68
Configuring the Google Search Appliance to Call the System 9 OneBox Module . . . . . 68
Configuring the System 9 OneBox Module . . . . . . . . . . . . . . . . . . . . . . . . . . . . . . . . 69
Chapter 5. Using Impact Management Services . . . . . . . . . . . . . . . . . . . . . . . . . . . . . . . . . . . . . . . . . . . . . 71
Introduction . . . . . . . . . . . . . . . . . . . . . . . . . . . . . . . . . . . . . . . . . . . . . . . . . . . . . . . . . 71
About Impact Management Services . . . . . . . . . . . . . . . . . . . . . . . . . . . . . . . . . . . . . . . 72
Impact Management Assessment Services . . . . . . . . . . . . . . . . . . . . . . . . . . . . . . . . . . . . 72
About Impact Management Metadata . . . . . . . . . . . . . . . . . . . . . . . . . . . . . . . . . . . 72
Impact Management Update Services . . . . . . . . . . . . . . . . . . . . . . . . . . . . . . . . . . . . . . . 73
Update Data Models Transformation . . . . . . . . . . . . . . . . . . . . . . . . . . . . . . . . . . . . 73
Link Between Data Models and Queries . . . . . . . . . . . . . . . . . . . . . . . . . . . . . . . . . . 73
Update Data Models Workflow . . . . . . . . . . . . . . . . . . . . . . . . . . . . . . . . . . . . . . . . 73
JavaScript Update Workflow . . . . . . . . . . . . . . . . . . . . . . . . . . . . . . . . . . . . . . . . . . 74
Custom Update Workflow . . . . . . . . . . . . . . . . . . . . . . . . . . . . . . . . . . . . . . . . . . . . 74
Impact Manager Module Size and Time Guidelines . . . . . . . . . . . . . . . . . . . . . . . . . . . . . 75
Running the Update Services . . . . . . . . . . . . . . . . . . . . . . . . . . . . . . . . . . . . . . . . . . . . . 75
Script Logging Levels . . . . . . . . . . . . . . . . . . . . . . . . . . . . . . . . . . . . . . . . . . . . . . . . 76
Access to Impact Management Services . . . . . . . . . . . . . . . . . . . . . . . . . . . . . . . . . . . . . 77
Synchronize Metadata Feature . . . . . . . . . . . . . . . . . . . . . . . . . . . . . . . . . . . . . . . . . . . . 77
Using the Run Now Option . . . . . . . . . . . . . . . . . . . . . . . . . . . . . . . . . . . . . . . . . . . 77
Using the Schedule Option . . . . . . . . . . . . . . . . . . . . . . . . . . . . . . . . . . . . . . . . . . . 78
Update Data Models Feature . . . . . . . . . . . . . . . . . . . . . . . . . . . . . . . . . . . . . . . . . . . . . 79
Contents v
Specifying Data Models . . . . . . . . . . . . . . . . . . . . . . . . . . . . . . . . . . . . . . . . . . . . . . 79
Viewing Candidates to Update . . . . . . . . . . . . . . . . . . . . . . . . . . . . . . . . . . . . . . . . . 80
Using Scheduling Options . . . . . . . . . . . . . . . . . . . . . . . . . . . . . . . . . . . . . . . . . . . . 81
Reviewing the Confirmation Dialog Box . . . . . . . . . . . . . . . . . . . . . . . . . . . . . . . . . . 82
JavaScript Update Feature . . . . . . . . . . . . . . . . . . . . . . . . . . . . . . . . . . . . . . . . . . . . . . . 82
Using JavaScript Update . . . . . . . . . . . . . . . . . . . . . . . . . . . . . . . . . . . . . . . . . . . . . 83
Selecting Parameters . . . . . . . . . . . . . . . . . . . . . . . . . . . . . . . . . . . . . . . . . . . . . . . . 83
Using Scheduling Options . . . . . . . . . . . . . . . . . . . . . . . . . . . . . . . . . . . . . . . . . . . . 84
Verifying Updated JavaScript . . . . . . . . . . . . . . . . . . . . . . . . . . . . . . . . . . . . . . . . . . 85
Custom Update Feature . . . . . . . . . . . . . . . . . . . . . . . . . . . . . . . . . . . . . . . . . . . . . . . . 85
Using the SortDataModelTopics Script . . . . . . . . . . . . . . . . . . . . . . . . . . . . . . . . . . . . . . 85
Performing a Custom Update . . . . . . . . . . . . . . . . . . . . . . . . . . . . . . . . . . . . . . . . . 86
Selecting Parameters . . . . . . . . . . . . . . . . . . . . . . . . . . . . . . . . . . . . . . . . . . . . . . . . 87
Using Scheduling Options . . . . . . . . . . . . . . . . . . . . . . . . . . . . . . . . . . . . . . . . . . . . 88
Verifying the Custom Update . . . . . . . . . . . . . . . . . . . . . . . . . . . . . . . . . . . . . . . . . 89
Advanced Scripting . . . . . . . . . . . . . . . . . . . . . . . . . . . . . . . . . . . . . . . . . . . . . . . . . . . . 89
EPM Workspace Custom Scripting Environment . . . . . . . . . . . . . . . . . . . . . . . . . . . 89
Script Parameters . . . . . . . . . . . . . . . . . . . . . . . . . . . . . . . . . . . . . . . . . . . . . . . . . . 90
The Scripting Environment . . . . . . . . . . . . . . . . . . . . . . . . . . . . . . . . . . . . . . . . . . . 90
Document Object Model Tree Structure . . . . . . . . . . . . . . . . . . . . . . . . . . . . . . . . . . 92
Accessing Properties . . . . . . . . . . . . . . . . . . . . . . . . . . . . . . . . . . . . . . . . . . . . . . . . 96
Accessing the File System . . . . . . . . . . . . . . . . . . . . . . . . . . . . . . . . . . . . . . . . . . . . . 97
General Java Code in Scripts . . . . . . . . . . . . . . . . . . . . . . . . . . . . . . . . . . . . . . . . . . 97
Using Batch Input Files . . . . . . . . . . . . . . . . . . . . . . . . . . . . . . . . . . . . . . . . . . . . . . 97
References . . . . . . . . . . . . . . . . . . . . . . . . . . . . . . . . . . . . . . . . . . . . . . . . . . . . . . . 98
Connecting Interactive Reports . . . . . . . . . . . . . . . . . . . . . . . . . . . . . . . . . . . . . . . . . . 102
Step 1—Configuring Hyperion Interactive Reporting Data Access Service . . . . . . . . 102
Step 2—Creating Interactive Reporting Database Connections . . . . . . . . . . . . . . . . 103
Step 3—Importing Interactive Reporting Database Connections into EPMWorkspace . . . . . . . . . . . . . . . . . . . . . . . . . . . . . . . . . . . . . . . . . . . . . . . . . . . . . . 103
Step 4—Associating Interactive Reporting Database Connections with InteractiveReports . . . . . . . . . . . . . . . . . . . . . . . . . . . . . . . . . . . . . . . . . . . . . . . . . . . . . . . . 104
Using Show Task Status Interactive Report . . . . . . . . . . . . . . . . . . . . . . . . . . . . . . . . . . 104
UTC Offset Option . . . . . . . . . . . . . . . . . . . . . . . . . . . . . . . . . . . . . . . . . . . . . . . . 106
Managing Tasks . . . . . . . . . . . . . . . . . . . . . . . . . . . . . . . . . . . . . . . . . . . . . . . . . . . . . 106
Using the Undo Feature . . . . . . . . . . . . . . . . . . . . . . . . . . . . . . . . . . . . . . . . . . . . 107
Using Show Actions of a Task . . . . . . . . . . . . . . . . . . . . . . . . . . . . . . . . . . . . . . . . 107
Using Show Impact of Change Interactive Report . . . . . . . . . . . . . . . . . . . . . . . . . . . . . 109
Generating Parameter Files . . . . . . . . . . . . . . . . . . . . . . . . . . . . . . . . . . . . . . . . . . 110
vi Contents
Creating New Data Models . . . . . . . . . . . . . . . . . . . . . . . . . . . . . . . . . . . . . . . . . . . . . 111
Renaming Tables or Columns . . . . . . . . . . . . . . . . . . . . . . . . . . . . . . . . . . . . . . . . 112
Using Normalized and Denormalized Data Models . . . . . . . . . . . . . . . . . . . . . . . . . 114
Deleting Columns . . . . . . . . . . . . . . . . . . . . . . . . . . . . . . . . . . . . . . . . . . . . . . . . . 114
Changing Column Data Types . . . . . . . . . . . . . . . . . . . . . . . . . . . . . . . . . . . . . . . . . . . 116
Compatible Replacement Data Model and Document Character Sets . . . . . . . . . . . . . . . 117
Changing User Names and Passwords for Interactive Reporting Documents . . . . . . . . . . 118
Service Configuration Parameters . . . . . . . . . . . . . . . . . . . . . . . . . . . . . . . . . . . . . . . . 118
Polling Interval . . . . . . . . . . . . . . . . . . . . . . . . . . . . . . . . . . . . . . . . . . . . . . . . . . . 118
Max Request Log Time . . . . . . . . . . . . . . . . . . . . . . . . . . . . . . . . . . . . . . . . . . . . . 119
Using the Impact of Change Report . . . . . . . . . . . . . . . . . . . . . . . . . . . . . . . . . . . . . . . 119
Chapter 6. Automating Activities . . . . . . . . . . . . . . . . . . . . . . . . . . . . . . . . . . . . . . . . . . . . . . . . . . . . . . 121
Managing Calendars . . . . . . . . . . . . . . . . . . . . . . . . . . . . . . . . . . . . . . . . . . . . . . . . . . 121
Viewing Calendar Manager . . . . . . . . . . . . . . . . . . . . . . . . . . . . . . . . . . . . . . . . . . 121
Creating Calendars . . . . . . . . . . . . . . . . . . . . . . . . . . . . . . . . . . . . . . . . . . . . . . . . 122
Deleting Calendars . . . . . . . . . . . . . . . . . . . . . . . . . . . . . . . . . . . . . . . . . . . . . . . . 122
Modifying Calendars . . . . . . . . . . . . . . . . . . . . . . . . . . . . . . . . . . . . . . . . . . . . . . . 122
Calendar Manager Properties . . . . . . . . . . . . . . . . . . . . . . . . . . . . . . . . . . . . . . . . . 123
Viewing the Job Log . . . . . . . . . . . . . . . . . . . . . . . . . . . . . . . . . . . . . . . . . . . . . . . 123
Deleting Job Log Entries . . . . . . . . . . . . . . . . . . . . . . . . . . . . . . . . . . . . . . . . . . . . 125
Managing Time Events . . . . . . . . . . . . . . . . . . . . . . . . . . . . . . . . . . . . . . . . . . . . . . . . 125
Managing Public Recurring Time Events . . . . . . . . . . . . . . . . . . . . . . . . . . . . . . . . 125
Creating Externally Triggered Events . . . . . . . . . . . . . . . . . . . . . . . . . . . . . . . . . . . 125
Triggering Externally Triggered Events . . . . . . . . . . . . . . . . . . . . . . . . . . . . . . . . . . 126
Administering Public Job Parameters . . . . . . . . . . . . . . . . . . . . . . . . . . . . . . . . . . . . . . 126
Managing Interactive Reporting Database Connections . . . . . . . . . . . . . . . . . . . . . . . . . 126
Managing Pass-Through for Jobs and Interactive Reporting Documents . . . . . . . . . . . . . 127
Managing Job Queuing . . . . . . . . . . . . . . . . . . . . . . . . . . . . . . . . . . . . . . . . . . . . . . . . 127
Scheduled Jobs . . . . . . . . . . . . . . . . . . . . . . . . . . . . . . . . . . . . . . . . . . . . . . . . . . . 127
Background Jobs . . . . . . . . . . . . . . . . . . . . . . . . . . . . . . . . . . . . . . . . . . . . . . . . . . 128
Foreground Jobs . . . . . . . . . . . . . . . . . . . . . . . . . . . . . . . . . . . . . . . . . . . . . . . . . . 128
Disabling the Job Service . . . . . . . . . . . . . . . . . . . . . . . . . . . . . . . . . . . . . . . . . . . . 128
Job Limit . . . . . . . . . . . . . . . . . . . . . . . . . . . . . . . . . . . . . . . . . . . . . . . . . . . . . . . 129
Acquiring Jobs . . . . . . . . . . . . . . . . . . . . . . . . . . . . . . . . . . . . . . . . . . . . . . . . . . . 129
Jobs Only Intelligence Service . . . . . . . . . . . . . . . . . . . . . . . . . . . . . . . . . . . . . . . . 129
Interactive Reporting Services Availability and Jobs . . . . . . . . . . . . . . . . . . . . . . . . . 130
Running Jobs in Parallel . . . . . . . . . . . . . . . . . . . . . . . . . . . . . . . . . . . . . . . . . . . . . . . 130
Contents vii
Chapter 7. Administering Content . . . . . . . . . . . . . . . . . . . . . . . . . . . . . . . . . . . . . . . . . . . . . . . . . . . . . 131
Customizing the User Interface . . . . . . . . . . . . . . . . . . . . . . . . . . . . . . . . . . . . . . . . . . 131
Changing the Default Language Selection . . . . . . . . . . . . . . . . . . . . . . . . . . . . . . . . 131
Replacing the Logon Panel Image . . . . . . . . . . . . . . . . . . . . . . . . . . . . . . . . . . . . . . 131
Removing Access to Java Client Installers . . . . . . . . . . . . . . . . . . . . . . . . . . . . . . . . 132
Redirecting URLs after Users Log Off . . . . . . . . . . . . . . . . . . . . . . . . . . . . . . . . . . . 132
Organizing Items and Folders . . . . . . . . . . . . . . . . . . . . . . . . . . . . . . . . . . . . . . . . . . . 132
Maintaining Shared Workspace Pages Folder . . . . . . . . . . . . . . . . . . . . . . . . . . . . . 133
Administrating Pushed Content . . . . . . . . . . . . . . . . . . . . . . . . . . . . . . . . . . . . . . . . . . 133
Administering Personal Pages . . . . . . . . . . . . . . . . . . . . . . . . . . . . . . . . . . . . . . . . . . . 133
Configuring the Generated Personal Page . . . . . . . . . . . . . . . . . . . . . . . . . . . . . . . . 134
Understanding Broadcast Messages . . . . . . . . . . . . . . . . . . . . . . . . . . . . . . . . . . . . 135
Providing Optional Personal Page Content to Users . . . . . . . . . . . . . . . . . . . . . . . . 136
Displaying HTML Files as File Content Windows . . . . . . . . . . . . . . . . . . . . . . . . . . 137
Configuring Graphics for Bookmarks . . . . . . . . . . . . . . . . . . . . . . . . . . . . . . . . . . . 137
Configuring Exceptions . . . . . . . . . . . . . . . . . . . . . . . . . . . . . . . . . . . . . . . . . . . . . 137
Viewing Personal Pages . . . . . . . . . . . . . . . . . . . . . . . . . . . . . . . . . . . . . . . . . . . . . 138
Publishing Personal Pages . . . . . . . . . . . . . . . . . . . . . . . . . . . . . . . . . . . . . . . . . . . 138
Configuring Other Personal Pages Properties . . . . . . . . . . . . . . . . . . . . . . . . . . . . . 138
Chapter 8. Configuring RSC Services . . . . . . . . . . . . . . . . . . . . . . . . . . . . . . . . . . . . . . . . . . . . . . . . . . . 139
About RSC . . . . . . . . . . . . . . . . . . . . . . . . . . . . . . . . . . . . . . . . . . . . . . . . . . . . . . . . . 139
Starting RSC . . . . . . . . . . . . . . . . . . . . . . . . . . . . . . . . . . . . . . . . . . . . . . . . . . . . . 139
Logging On to RSC . . . . . . . . . . . . . . . . . . . . . . . . . . . . . . . . . . . . . . . . . . . . . . . . 140
Using RSC . . . . . . . . . . . . . . . . . . . . . . . . . . . . . . . . . . . . . . . . . . . . . . . . . . . . . . 140
Managing Services . . . . . . . . . . . . . . . . . . . . . . . . . . . . . . . . . . . . . . . . . . . . . . . . . . . 140
Pinging RSC Services . . . . . . . . . . . . . . . . . . . . . . . . . . . . . . . . . . . . . . . . . . . . . . . 141
Modifying RSC Service Properties . . . . . . . . . . . . . . . . . . . . . . . . . . . . . . . . . . . . . . . . 141
Common RSC Properties . . . . . . . . . . . . . . . . . . . . . . . . . . . . . . . . . . . . . . . . . . . 142
Repository Service Dynamic Properties . . . . . . . . . . . . . . . . . . . . . . . . . . . . . . . . . 143
Job Service Properties . . . . . . . . . . . . . . . . . . . . . . . . . . . . . . . . . . . . . . . . . . . . . . 143
Job Service Application Properties . . . . . . . . . . . . . . . . . . . . . . . . . . . . . . . . . . . . . 145
Adding Applications for Job Service . . . . . . . . . . . . . . . . . . . . . . . . . . . . . . . . . . . . 145
Executable Job Service Properties . . . . . . . . . . . . . . . . . . . . . . . . . . . . . . . . . . . . . . 147
Managing Hosts . . . . . . . . . . . . . . . . . . . . . . . . . . . . . . . . . . . . . . . . . . . . . . . . . . . . . 147
Adding Hosts . . . . . . . . . . . . . . . . . . . . . . . . . . . . . . . . . . . . . . . . . . . . . . . . . . . . 148
Modifying Hosts . . . . . . . . . . . . . . . . . . . . . . . . . . . . . . . . . . . . . . . . . . . . . . . . . . 148
Deleting Hosts . . . . . . . . . . . . . . . . . . . . . . . . . . . . . . . . . . . . . . . . . . . . . . . . . . . 148
Managing Production Reporting Database Servers . . . . . . . . . . . . . . . . . . . . . . . . . . . . 149
viii Contents
Defining Database Servers . . . . . . . . . . . . . . . . . . . . . . . . . . . . . . . . . . . . . . . . . . . 149
Managing Jobs . . . . . . . . . . . . . . . . . . . . . . . . . . . . . . . . . . . . . . . . . . . . . . . . . . . . . . 151
Optimizing Enterprise-Reporting Applications Performance . . . . . . . . . . . . . . . . . . 152
From Adding Job Services to Running Jobs . . . . . . . . . . . . . . . . . . . . . . . . . . . . . . . 152
Chapter 9. Configuring Services Using CMC . . . . . . . . . . . . . . . . . . . . . . . . . . . . . . . . . . . . . . . . . . . . . . 153
About CMC . . . . . . . . . . . . . . . . . . . . . . . . . . . . . . . . . . . . . . . . . . . . . . . . . . . . . . . . 153
Starting CMC . . . . . . . . . . . . . . . . . . . . . . . . . . . . . . . . . . . . . . . . . . . . . . . . . . . . . . . 154
Using CMC . . . . . . . . . . . . . . . . . . . . . . . . . . . . . . . . . . . . . . . . . . . . . . . . . . . . . . . . 155
CMC Views . . . . . . . . . . . . . . . . . . . . . . . . . . . . . . . . . . . . . . . . . . . . . . . . . . . . . . . . 156
Service Configuration View . . . . . . . . . . . . . . . . . . . . . . . . . . . . . . . . . . . . . . . . . . 156
Web Application Configuration View . . . . . . . . . . . . . . . . . . . . . . . . . . . . . . . . . . . 157
Agent Configuration View . . . . . . . . . . . . . . . . . . . . . . . . . . . . . . . . . . . . . . . . . . . 158
Modifying Properties in CMC . . . . . . . . . . . . . . . . . . . . . . . . . . . . . . . . . . . . . . . . . . . 158
Modifying Service Configuration Properties . . . . . . . . . . . . . . . . . . . . . . . . . . . . . . 159
Modifying Web Application Configuration Properties . . . . . . . . . . . . . . . . . . . . . . . 164
Modifying Agent Configuration Properties . . . . . . . . . . . . . . . . . . . . . . . . . . . . . . . 176
Chapter 10. Troubleshooting . . . . . . . . . . . . . . . . . . . . . . . . . . . . . . . . . . . . . . . . . . . . . . . . . . . . . . . . . 177
Overview . . . . . . . . . . . . . . . . . . . . . . . . . . . . . . . . . . . . . . . . . . . . . . . . . . . . . . . . . . 177
Logging Architecture . . . . . . . . . . . . . . . . . . . . . . . . . . . . . . . . . . . . . . . . . . . . . . . . . . 177
Log4j . . . . . . . . . . . . . . . . . . . . . . . . . . . . . . . . . . . . . . . . . . . . . . . . . . . . . . . . . . 178
Logging Service . . . . . . . . . . . . . . . . . . . . . . . . . . . . . . . . . . . . . . . . . . . . . . . . . . . 178
Log Management Helper . . . . . . . . . . . . . . . . . . . . . . . . . . . . . . . . . . . . . . . . . . . . 178
Server Synchronization . . . . . . . . . . . . . . . . . . . . . . . . . . . . . . . . . . . . . . . . . . . . . 179
Log File Basics . . . . . . . . . . . . . . . . . . . . . . . . . . . . . . . . . . . . . . . . . . . . . . . . . . . . . . 179
Log File Location . . . . . . . . . . . . . . . . . . . . . . . . . . . . . . . . . . . . . . . . . . . . . . . . . 179
Hyperion Interactive Reporting Service and Hyperion Interactive Reporting DataAccess Service Local Log Files . . . . . . . . . . . . . . . . . . . . . . . . . . . . . . . . . . . . . . . . 179
Log File Naming Convention . . . . . . . . . . . . . . . . . . . . . . . . . . . . . . . . . . . . . . . . . 179
Log Message File Format . . . . . . . . . . . . . . . . . . . . . . . . . . . . . . . . . . . . . . . . . . . . 181
Configuration Log . . . . . . . . . . . . . . . . . . . . . . . . . . . . . . . . . . . . . . . . . . . . . . . . 181
Configuring Log Properties for Troubleshooting . . . . . . . . . . . . . . . . . . . . . . . . . . . . . . 182
Configuration Files . . . . . . . . . . . . . . . . . . . . . . . . . . . . . . . . . . . . . . . . . . . . . . . . 182
Configuring Logging Levels . . . . . . . . . . . . . . . . . . . . . . . . . . . . . . . . . . . . . . . . . . 183
Configuring Appenders . . . . . . . . . . . . . . . . . . . . . . . . . . . . . . . . . . . . . . . . . . . . . 184
Configuring Log Rotation . . . . . . . . . . . . . . . . . . . . . . . . . . . . . . . . . . . . . . . . . . . 185
Analyzing Log Files . . . . . . . . . . . . . . . . . . . . . . . . . . . . . . . . . . . . . . . . . . . . . . . . . . . 187
Viewing Log Files . . . . . . . . . . . . . . . . . . . . . . . . . . . . . . . . . . . . . . . . . . . . . . . . . 187
Standard Console Log File . . . . . . . . . . . . . . . . . . . . . . . . . . . . . . . . . . . . . . . . . . . 187
Contents ix
Logs for Importing General Content . . . . . . . . . . . . . . . . . . . . . . . . . . . . . . . . . . . 187
Logs for Importing Interactive Reporting Content . . . . . . . . . . . . . . . . . . . . . . . . . 188
Logs for Running Jobs . . . . . . . . . . . . . . . . . . . . . . . . . . . . . . . . . . . . . . . . . . . . . . 188
Logs for Logon and Logoff Errors . . . . . . . . . . . . . . . . . . . . . . . . . . . . . . . . . . . . . . 189
Logs for Access Control . . . . . . . . . . . . . . . . . . . . . . . . . . . . . . . . . . . . . . . . . . . . . 189
Logs for Configuration . . . . . . . . . . . . . . . . . . . . . . . . . . . . . . . . . . . . . . . . . . . . . 190
Information Needed by Customer Support . . . . . . . . . . . . . . . . . . . . . . . . . . . . . . . . . . 190
Chapter 11. Ghostscript Custom Parameters . . . . . . . . . . . . . . . . . . . . . . . . . . . . . . . . . . . . . . . . . . . . . . 191
Implementation Overview . . . . . . . . . . . . . . . . . . . . . . . . . . . . . . . . . . . . . . . . . . . . . . 191
Ghostscript Documentation . . . . . . . . . . . . . . . . . . . . . . . . . . . . . . . . . . . . . . . . . . . . 191
Default Behavior . . . . . . . . . . . . . . . . . . . . . . . . . . . . . . . . . . . . . . . . . . . . . . . . . . . . . 192
Postscript to PDF Conversion . . . . . . . . . . . . . . . . . . . . . . . . . . . . . . . . . . . . . . . . . . . 192
Postscript to JPEG Conversion . . . . . . . . . . . . . . . . . . . . . . . . . . . . . . . . . . . . . . . . . . . 193
Specifying Custom Parameters . . . . . . . . . . . . . . . . . . . . . . . . . . . . . . . . . . . . . . . . . . . 193
Custom Parameters for Postscript to PDF Conversion . . . . . . . . . . . . . . . . . . . . . . 193
Custom Parameters for Postscript to JPEG Conversion . . . . . . . . . . . . . . . . . . . . . . 194
Mandatory Parameters . . . . . . . . . . . . . . . . . . . . . . . . . . . . . . . . . . . . . . . . . . . . . 194
General Guidelines . . . . . . . . . . . . . . . . . . . . . . . . . . . . . . . . . . . . . . . . . . . . . . . . 195
Turning Off Custom Parameters . . . . . . . . . . . . . . . . . . . . . . . . . . . . . . . . . . . . . . 195
Examples . . . . . . . . . . . . . . . . . . . . . . . . . . . . . . . . . . . . . . . . . . . . . . . . . . . . . . . 195
Appendix A. Checking Access Privileges for EPM Workspace Artifacts . . . . . . . . . . . . . . . . . . . . . . . . . . . . 199
Overview . . . . . . . . . . . . . . . . . . . . . . . . . . . . . . . . . . . . . . . . . . . . . . . . . . . . . . . . . . 199
Access Privilege Checking for Items . . . . . . . . . . . . . . . . . . . . . . . . . . . . . . . . . . . . . . . 199
Access Privilege Checking on Services . . . . . . . . . . . . . . . . . . . . . . . . . . . . . . . . . . . . . . 200
Denying Access . . . . . . . . . . . . . . . . . . . . . . . . . . . . . . . . . . . . . . . . . . . . . . . . . . . . . . 201
Additional Access Privilege Checking Examples . . . . . . . . . . . . . . . . . . . . . . . . . . . . . . 202
Glossary . . . . . . . . . . . . . . . . . . . . . . . . . . . . . . . . . . . . . . . . . . . . . . . . . . . . . . . . . . . 205
Index . . . . . . . . . . . . . . . . . . . . . . . . . . . . . . . . . . . . . . . . . . . . . . . . . . . . . . . . . . . . . 229
x Contents
Documentation Accessibility
Our goal is to make Oracle products, services, and supporting documentation accessible, withgood usability, to the disabled community. To that end, our documentation includes featuresthat make information available to users of assistive technology. This documentation is availablein HTML format, and contains markup to facilitate access by the disabled community.Accessibility standards will continue to evolve over time, and Oracle is actively engaged withother market-leading technology vendors to address technical obstacles so that ourdocumentation can be accessible to all of our customers. For more information, visit the OracleAccessibility Program Web site at http://www.oracle.com/accessibility/.
Accessibility of Code Examples in DocumentationScreen readers may not always correctly read the code examples in this document. Theconventions for writing code require that closing braces should appear on an otherwise emptyline; however, some screen readers may not always read a line of text that consists solely of abracket or brace.
Accessibility of Links to External Web Sites in DocumentationThis documentation may contain links to Web sites of other companies or organizations thatOracle does not own or control. Oracle neither evaluates nor makes any representationsregarding the accessibility of these Web sites.
TTY Access to Oracle Support ServicesOracle provides dedicated Text Telephone (TTY) access to Oracle Support Services within theUnited States of America 24 hours a day, seven days a week. For TTY support, call 800.446.2398.
11

12 Documentation Accessibility
1Reporting and AnalysisArchitecture Overview
In This Chapter
Enterprise Performance Management.. . . . . . . . . . . . . . . . . . . . . . . . . . . . . . . . . . . . . . . . . . . . . . . . . . . . . . . . . . . . . . . . . . . . . . . . . . . . . . . . . . . . . . . . . . .13
About EPM Workspace ... . . . . . . . . . . . . . . . . . . . . . . . . . . . . . . . . . . . . . . . . . . . . . . . . . . . . . . . . . . . . . . . . . . . . . . . . . . . . . . . . . . . . . . . . . . . . . . . . . . . . . . . . .13
Reporting and Analysis Architecture ... . . . . . . . . . . . . . . . . . . . . . . . . . . . . . . . . . . . . . . . . . . . . . . . . . . . . . . . . . . . . . . . . . . . . . . . . . . . . . . . . . . . . . . . . . .14
Enterprise Performance ManagementOracle offers a comprehensive Enterprise Performance Management (EPM) system that consistsof these products:
l Oracle's Hyperion Reporting and Analysis—Management reporting including query andanalysis in one coordinated environment
l Oracle's Hyperion Applications—Coordinated planning, consolidation, scorecardingapplications, Oracle Hyperion Profitability and Cost Management, Fusion Edition, OracleBusiness Intelligence Enterprise Edition, and Oracle Business Intelligence Publisher.
l Oracle's Hyperion® Foundation Services—Used to ease installation and configuration,provide metadata management, and support a common Microsoft Office interface
About EPM WorkspaceOracle Enterprise Performance Management Workspace, Fusion Edition, a modular businessintelligence platform, provides management reporting, query, and analysis capabilities for a widevariety of data sources in a single coordinated environment. EPM Workspace is also a zero-footprint client that provides the user interface for viewing and interacting with content createdusing Reporting and Analysis authoring studios, financial applications, and Oracle BusinessIntelligence products.
EPM Workspace provides access to the following content:
l Oracle Hyperion Financial Reporting, Fusion Edition—for scheduled or on-demand highlyformatted financial and operational reporting from almost any data source, including OracleHyperion Planning, Fusion Edition, Oracle Hyperion Financial Management, FusionEdition, Profitability and Cost Management, Oracle BI Answers, Oracle BI Dashboards,Oracle BI Delivers, and BI Publisher
l Oracle's Hyperion® Interactive Reporting—for ad hoc, relational query, self-servicereporting and dashboards against any ODBC data source
Enterprise Performance Management 13
Oracle's Hyperion® Impact Management Services module is used to replace InteractiveReporting data models.
l Oracle's Hyperion® SQR® Production Reporting—for high volume, enterprise-wideproduction reporting
l Oracle's Hyperion® Web Analysis—for interactive ad hoc analysis, presentation, andreporting of multidimensional data
l Oracle Hyperion Performance Scorecard, Fusion Edition—a Web-based solution thatenables your organization to set goals, and to use scorecarding methodologies to measureand monitor business performance
l Financial Management and Planning—for consolidation and planning application tasks
l Profitability and Cost Management—for managing cost and revenue allocations that arenecessary to compute profitability for a business segment
l Oracle BI Answers—Oracle BI Answers provides true end user ad hoc capabilities in a pureWeb architecture
l Oracle BI Dashboards—Oracle BI Dashboards provides intuitive, interactive access toinformation that is actionable and dynamically personalized based on the individual's roleand identity
l Oracle BI Delivers—Oracle BI Delivers provides business activity monitoring and alertingthat can reach users through multiple channels such as email, dashboards, and mobiledevices
l BI Publisher—BI Publisher (formerly known as XML Publisher) offers efficient; scalablereporting solution available for complex, distributed environments
EPM Workspace, which includes Reporting and Analysis and Oracle Essbase, is part of acomprehensive EPM system that integrates this business intelligence platform with Oracle'sHyperion financial applications, Performance Scorecard, Oracle Hyperion Profitability and CostManagement, Fusion Edition, Oracle BI EE, and Oracle Business Intelligence Publisherproducts.
Note: Studio refers to Java or Windows components that have a rich authoring environment.EPM Workspace refers to the user thin client (UTC) or common user interface of theproduct.
Reporting and Analysis ArchitectureThe Reporting and Analysis environment is organized into three layers:
l “Client Layer” on page 15
l “Application Layer” on page 17
l “Database Layer” on page 22
14 Reporting and Analysis Architecture Overview
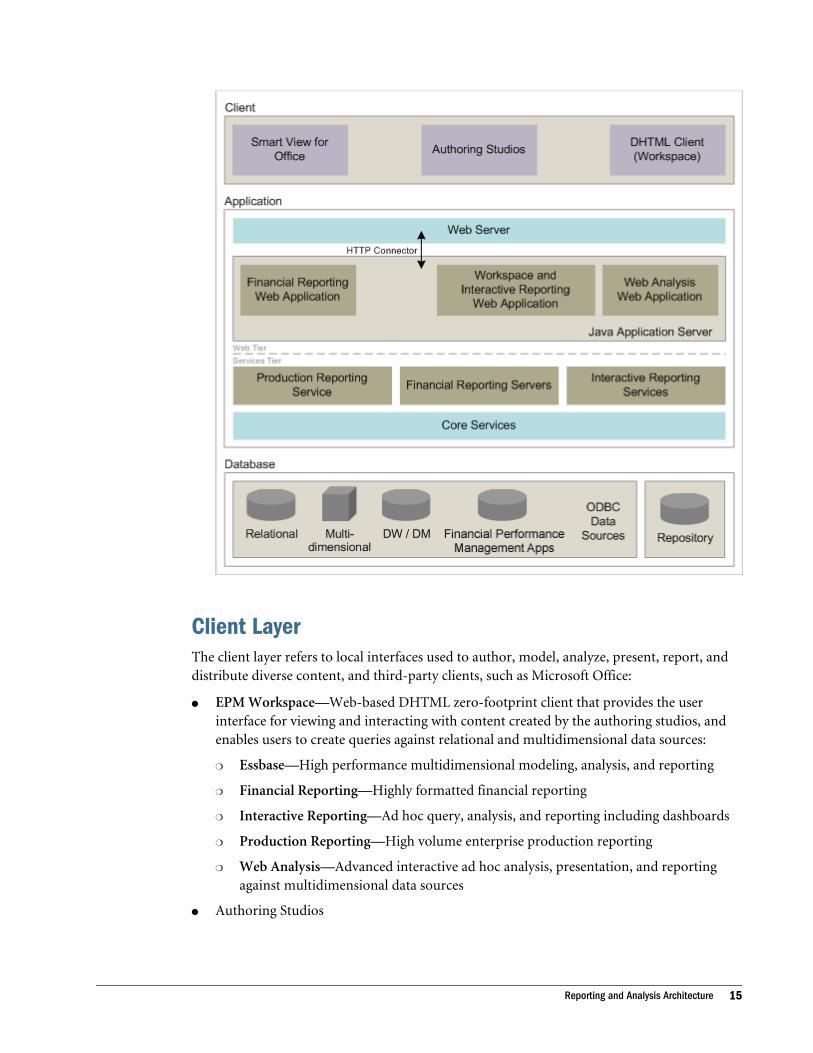
Client LayerThe client layer refers to local interfaces used to author, model, analyze, present, report, anddistribute diverse content, and third-party clients, such as Microsoft Office:
l EPM Workspace—Web-based DHTML zero-footprint client that provides the userinterface for viewing and interacting with content created by the authoring studios, andenables users to create queries against relational and multidimensional data sources:
m Essbase—High performance multidimensional modeling, analysis, and reporting
m Financial Reporting—Highly formatted financial reporting
m Interactive Reporting—Ad hoc query, analysis, and reporting including dashboards
m Production Reporting—High volume enterprise production reporting
m Web Analysis—Advanced interactive ad hoc analysis, presentation, and reportingagainst multidimensional data sources
l Authoring Studios
Reporting and Analysis Architecture 15
m Oracle's Hyperion® Interactive Reporting Studio—Highly intuitive and easy-to-navigate environment for data exploration and decision making. A consistent designparadigm and robust formatting tools enable users to easily build free-form,presentation-quality reports for broad-scale publishing across their organization.
m Oracle's Hyperion® Interactive Reporting Web Client—Read-only Web plug-in forviewing Interactive Reporting documents.
m Oracle Hyperion Financial Reporting Studio, Fusion Edition—Windows client forauthoring highly formatted financial reports from multidimensional data sources,which features easy, drag and drop, reusable components to build and distribute HTML,PDF, and hardcopy output.
m Oracle's Hyperion® Web Analysis Studio—Java applet that enables you to create,analyze, present, and report multidimensional content. The studio offers the completeWeb Analysis feature set to designers creating content, including dashboards forinformation consumers.
m Oracle's Hyperion® SQR® Production Reporting Studio—Windows client thatprovides the design environment for creating reports from a wide variety of data sources.Reports can be processed in one pass to produce a diverse array of pixel-perfect output.Processing can be scheduled and independently automated, or designed to use formtemplates that prompt dynamic user input.
m Oracle's Hyperion® Dashboard Development Services—Enables creation ofdashboards:
o Dashboard Studio—Windows client that utilizes extensible and customizabletemplates to create interactive, analytical dashboards without the need to codeprogramming logic.
o Dashboard Architect—Windows-based integrated development environment thatenables programmers to swiftly code, test, and debug components utilized byDashboard Studio.
o Performance Scorecard—Web-based solution for setting goals and monitoringbusiness performance using recognized scorecarding methodologies. Provides toolsthat enable users to formulate and communicate organizational strategy andaccountability structures:
l Key Performance Indicators (KPIs)—Create tasks and achievements thatindicate progress toward key goals
l Performance indicators—Indicate good, acceptable, or poor performance ofaccountability teams and employees
l Strategy maps—Relate high-level mission and vision statements to lower-levelactionable strategy elements
l Accountability maps—Identify those responsible for actionable objectives
l Cause and Effect maps—Depict interrelationships of strategy elements andmeasure the impact of changing strategies and performance
l Oracle Hyperion Smart View for Office, Fusion Edition—Oracle-specific Microsoft add-in and toolbar from which users can query Oracle data sources including Essbase, Financial
16 Reporting and Analysis Architecture Overview

Management, and Planning. Users can use this environment to interact with FinancialManagement and Planning forms for data input, and can browse the Reporting and Analysisrepository and embed documents in the office environment. Documents are updated byuser request.
Application LayerThe application layer—a middle tier that retrieves requested information and manages security,communication, and integration—contains two components:
l “Application Layer Web Tier” on page 17
l “Application Layer Services Tier” on page 17
Because the business intelligence platform is modular, it may consist of various combinationsof components, configured in numerous ways. The end result is a comprehensive, flexiblearchitecture that accommodates implementation and business needs.
Application Layer Web TierThe application layer relies upon a J2EE application server and Web server to send and receivecontent from Web clients. An HTTP connector is required to link the Web server and theapplication server.
The Web tier hosts the EPM Workspace, Interactive Reporting, Financial Reporting, and WebAnalysis Web applications.
For a complete description of supported Web tier hardware and software, review the OracleHyperion Enterprise Performance Management System Certification Matrix for informationon system requirements. You can find it at http://www.oracle.com/technology/products/bi/hyperion-supported-platforms.html. Also review the Oracle Hyperion Enterprise PerformanceManagement System Installation Start Here for information about release compatibility,prerequisites, default ports, and other information needed to plan a successful installation.
Application Layer Services TierThe application layer services tier contains services and servers that control functionality ofvarious Web applications and clients:
l “Core Services” on page 18
l “Interactive Reporting Services” on page 19
l “Financial Reporting Servers” on page 20
l “SQR Production Reporting Service” on page 20
l “Assistive EPM System Services” on page 21
Most services fall into two main groups, depending on the tool used to configure their properties:
l Local services–Services in the local Install Home that are configured using the Configurationand Management Console. See Chapter 9, “Configuring Services Using CMC.”
Reporting and Analysis Architecture 17
l Remote services–Services on a local or remote host that are configured using the RemoteService Configurator (RSC). Referred to as RSC services.
Because most of these services are replicable, you may encounter multiple instances of a servicein a system.
Core Services
Core Services are mandatory for authorization, session management, and documentpublication:
l Repository Service—Stores Oracle system data in supported relational database tables,known collectively as the repository. Repository Service is replicable; if replicated, it mustbe replicated and co-located with Publisher Service.
l Publisher Service—Handles repository communication for other CMC services and someWeb application requests; forwards repository requests to Repository Service and passesreplies back to initiating services. Publisher Service is replicable; if replicated, it must bereplicated and co-located with Repository Service.
l Global Service Manager (GSM)—Tracks system configuration information and monitorsregistered services in the system. A System can have several GSM. A GSM can be replicatedso that all GSMs have the same comprehensive information about the services registered inthe system.
l Local Service Manager (LSM)—Created for every instance of a CMC or RSC service,including GSM. When system servers start, they register their services and configurationinformation with GSM, which supplies and maintains references to all other registeredservices.
l Authentication Service—Checks user credentials at logon time and determines whetherthey can connect; determines group memberships, which, along with roles, affects whatcontent and other system artifacts (resources) users can view and modify. AuthenticationService is replicable and does not need to be co-located with other services.
l Authorization Service—Provides security at the level of resources and actions; managesroles and their associations with operations, users, groups, and other roles. A system musthave at least one Authorization Service.
l Session Manager Service—Monitors and maintains the number of simultaneous systemusers. Monitors all current sessions and terminates sessions that are idle for more than aspecified time period. While Session Manager is replicable, each instance independentlymanages a set of sessions.
l Service Broker—Supports GSM and LSMs by routing client requests and managing loadbalancing for RSC services. A system can have multiple Service Brokers.
l Management services—Core Services that collect and distribute system messages and eventsfor troubleshooting and usage analysis:
m Logging Service—Centralized service for recording system messages to log files. Asystem can have only one Logging Service.
18 Reporting and Analysis Architecture Overview
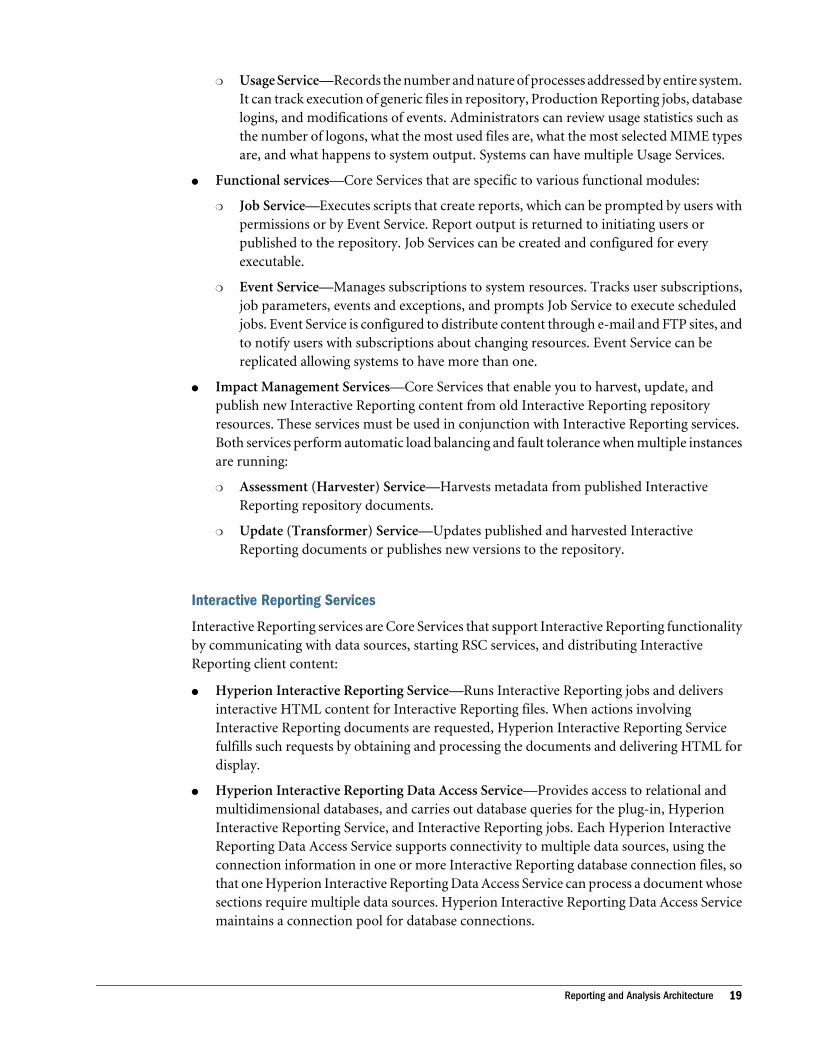
m Usage Service—Records the number and nature of processes addressed by entire system.It can track execution of generic files in repository, Production Reporting jobs, databaselogins, and modifications of events. Administrators can review usage statistics such asthe number of logons, what the most used files are, what the most selected MIME typesare, and what happens to system output. Systems can have multiple Usage Services.
l Functional services—Core Services that are specific to various functional modules:
m Job Service—Executes scripts that create reports, which can be prompted by users withpermissions or by Event Service. Report output is returned to initiating users orpublished to the repository. Job Services can be created and configured for everyexecutable.
m Event Service—Manages subscriptions to system resources. Tracks user subscriptions,job parameters, events and exceptions, and prompts Job Service to execute scheduledjobs. Event Service is configured to distribute content through e-mail and FTP sites, andto notify users with subscriptions about changing resources. Event Service can bereplicated allowing systems to have more than one.
l Impact Management Services—Core Services that enable you to harvest, update, andpublish new Interactive Reporting content from old Interactive Reporting repositoryresources. These services must be used in conjunction with Interactive Reporting services.Both services perform automatic load balancing and fault tolerance when multiple instancesare running:
m Assessment (Harvester) Service—Harvests metadata from published InteractiveReporting repository documents.
m Update (Transformer) Service—Updates published and harvested InteractiveReporting documents or publishes new versions to the repository.
Interactive Reporting Services
Interactive Reporting services are Core Services that support Interactive Reporting functionalityby communicating with data sources, starting RSC services, and distributing InteractiveReporting client content:
l Hyperion Interactive Reporting Service—Runs Interactive Reporting jobs and deliversinteractive HTML content for Interactive Reporting files. When actions involvingInteractive Reporting documents are requested, Hyperion Interactive Reporting Servicefulfills such requests by obtaining and processing the documents and delivering HTML fordisplay.
l Hyperion Interactive Reporting Data Access Service—Provides access to relational andmultidimensional databases, and carries out database queries for the plug-in, HyperionInteractive Reporting Service, and Interactive Reporting jobs. Each Hyperion InteractiveReporting Data Access Service supports connectivity to multiple data sources, using theconnection information in one or more Interactive Reporting database connection files, sothat one Hyperion Interactive Reporting Data Access Service can process a document whosesections require multiple data sources. Hyperion Interactive Reporting Data Access Servicemaintains a connection pool for database connections.
Reporting and Analysis Architecture 19
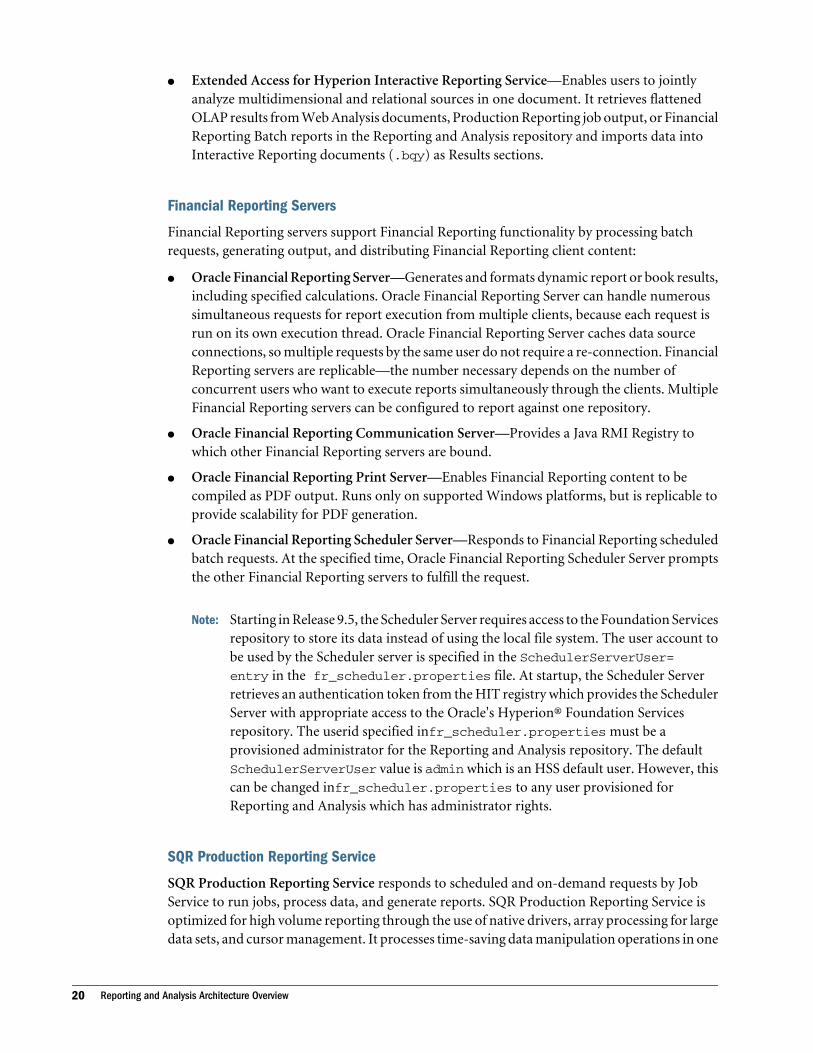
l Extended Access for Hyperion Interactive Reporting Service—Enables users to jointlyanalyze multidimensional and relational sources in one document. It retrieves flattenedOLAP results from Web Analysis documents, Production Reporting job output, or FinancialReporting Batch reports in the Reporting and Analysis repository and imports data intoInteractive Reporting documents (.bqy) as Results sections.
Financial Reporting Servers
Financial Reporting servers support Financial Reporting functionality by processing batchrequests, generating output, and distributing Financial Reporting client content:
l Oracle Financial Reporting Server—Generates and formats dynamic report or book results,including specified calculations. Oracle Financial Reporting Server can handle numeroussimultaneous requests for report execution from multiple clients, because each request isrun on its own execution thread. Oracle Financial Reporting Server caches data sourceconnections, so multiple requests by the same user do not require a re-connection. FinancialReporting servers are replicable—the number necessary depends on the number ofconcurrent users who want to execute reports simultaneously through the clients. MultipleFinancial Reporting servers can be configured to report against one repository.
l Oracle Financial Reporting Communication Server—Provides a Java RMI Registry towhich other Financial Reporting servers are bound.
l Oracle Financial Reporting Print Server—Enables Financial Reporting content to becompiled as PDF output. Runs only on supported Windows platforms, but is replicable toprovide scalability for PDF generation.
l Oracle Financial Reporting Scheduler Server—Responds to Financial Reporting scheduledbatch requests. At the specified time, Oracle Financial Reporting Scheduler Server promptsthe other Financial Reporting servers to fulfill the request.
Note: Starting in Release 9.5, the Scheduler Server requires access to the Foundation Servicesrepository to store its data instead of using the local file system. The user account tobe used by the Scheduler server is specified in the SchedulerServerUser=entry in the fr_scheduler.properties file. At startup, the Scheduler Serverretrieves an authentication token from the HIT registry which provides the SchedulerServer with appropriate access to the Oracle's Hyperion® Foundation Servicesrepository. The userid specified infr_scheduler.properties must be aprovisioned administrator for the Reporting and Analysis repository. The defaultSchedulerServerUser value is admin which is an HSS default user. However, thiscan be changed infr_scheduler.properties to any user provisioned forReporting and Analysis which has administrator rights.
SQR Production Reporting Service
SQR Production Reporting Service responds to scheduled and on-demand requests by JobService to run jobs, process data, and generate reports. SQR Production Reporting Service isoptimized for high volume reporting through the use of native drivers, array processing for largedata sets, and cursor management. It processes time-saving data manipulation operations in one
20 Reporting and Analysis Architecture Overview
pass of the data source and produces large quantities of reports in online and printed formats.SQR Production Reporting Service is a replicable service.
Assistive EPM System Services
l Performance Scorecard Services—Support Performance Scorecard client functionality usedin conjunction with Reporting and Analysis.
l Oracle's Hyperion® Shared Services—Supports authentication and user provisioning forall Oracle products. See the Shared Services documentation set.
l Smart View Services—Provide a common Microsoft Office interface for Oracle products.See the Smart View documentation set.
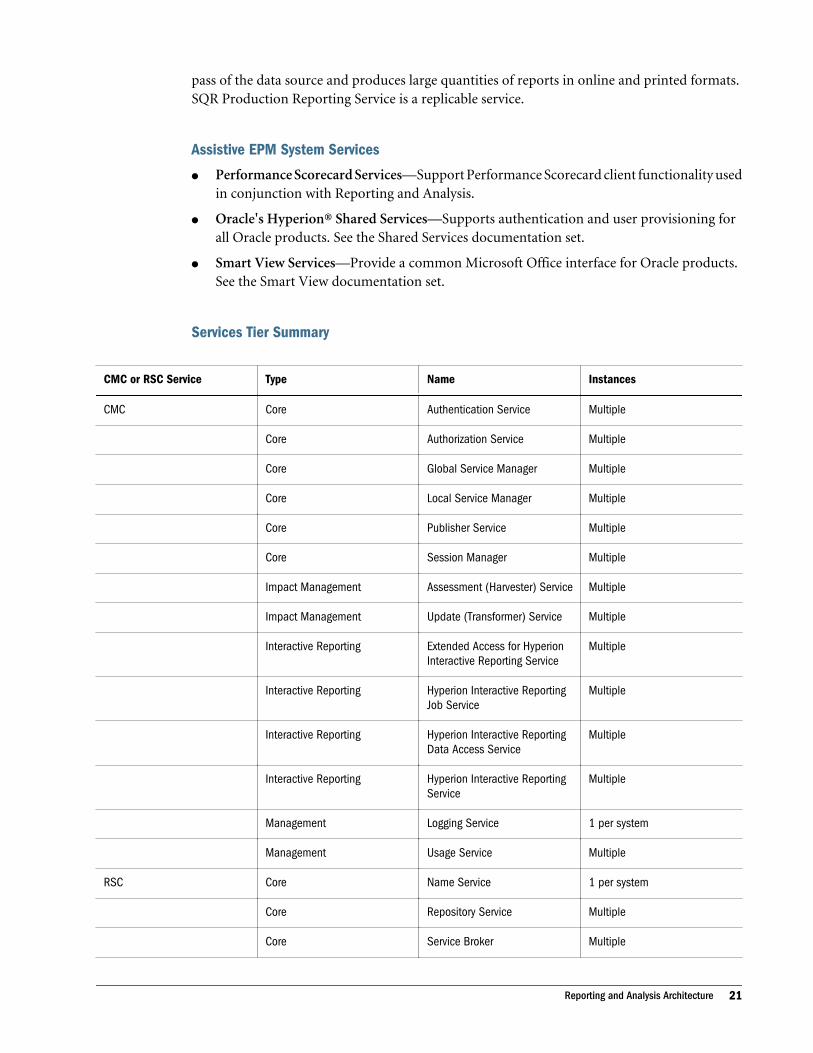
Services Tier Summary
CMC or RSC Service Type Name Instances
CMC Core Authentication Service Multiple
Core Authorization Service Multiple
Core Global Service Manager Multiple
Core Local Service Manager Multiple
Core Publisher Service Multiple
Core Session Manager Multiple
Impact Management Assessment (Harvester) Service Multiple
Impact Management Update (Transformer) Service Multiple
Interactive Reporting Extended Access for HyperionInteractive Reporting Service
Multiple
Interactive Reporting Hyperion Interactive ReportingJob Service
Multiple
Interactive Reporting Hyperion Interactive ReportingData Access Service
Multiple
Interactive Reporting Hyperion Interactive ReportingService
Multiple
Management Logging Service 1 per system
Management Usage Service Multiple
RSC Core Name Service 1 per system
Core Repository Service Multiple
Core Service Broker Multiple
Reporting and Analysis Architecture 21
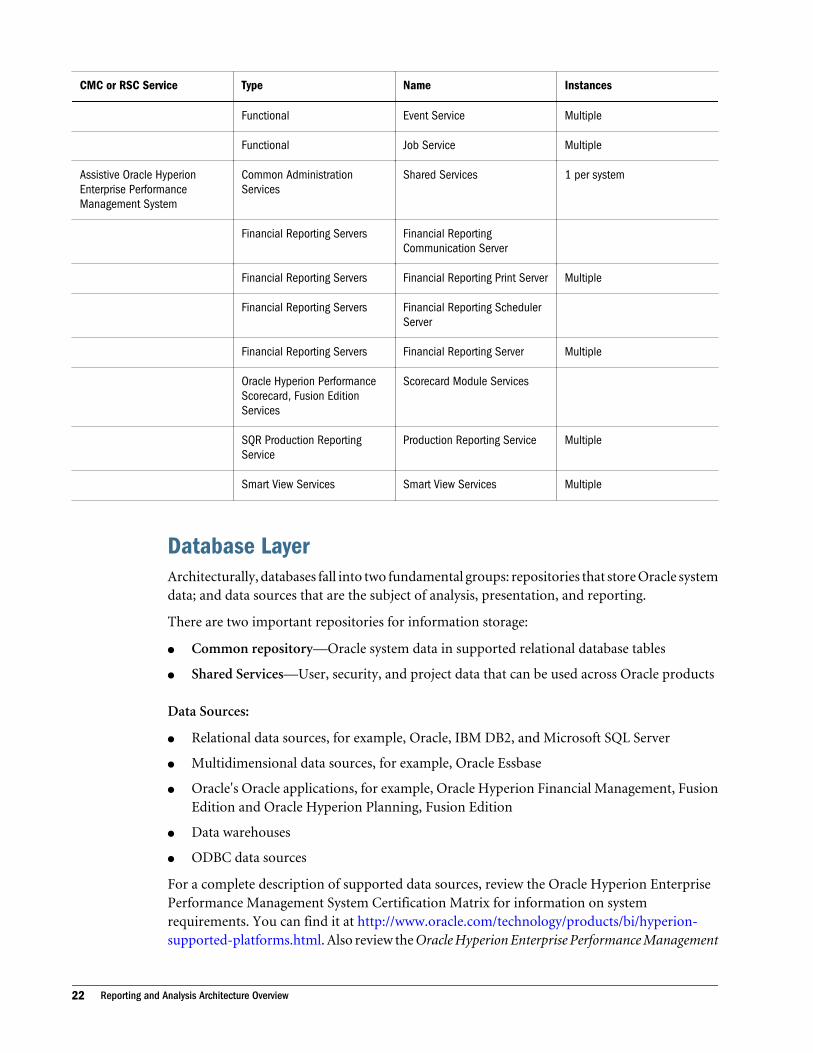
CMC or RSC Service Type Name Instances
Functional Event Service Multiple
Functional Job Service Multiple
Assistive Oracle HyperionEnterprise PerformanceManagement System
Common AdministrationServices
Shared Services 1 per system
Financial Reporting Servers Financial ReportingCommunication Server
Financial Reporting Servers Financial Reporting Print Server Multiple
Financial Reporting Servers Financial Reporting SchedulerServer
Financial Reporting Servers Financial Reporting Server Multiple
Oracle Hyperion PerformanceScorecard, Fusion EditionServices
Scorecard Module Services
SQR Production ReportingService
Production Reporting Service Multiple
Smart View Services Smart View Services Multiple
Database LayerArchitecturally, databases fall into two fundamental groups: repositories that store Oracle systemdata; and data sources that are the subject of analysis, presentation, and reporting.
There are two important repositories for information storage:
l Common repository—Oracle system data in supported relational database tables
l Shared Services—User, security, and project data that can be used across Oracle products
Data Sources:
l Relational data sources, for example, Oracle, IBM DB2, and Microsoft SQL Server
l Multidimensional data sources, for example, Oracle Essbase
l Oracle's Oracle applications, for example, Oracle Hyperion Financial Management, FusionEdition and Oracle Hyperion Planning, Fusion Edition
l Data warehouses
l ODBC data sources
For a complete description of supported data sources, review the Oracle Hyperion EnterprisePerformance Management System Certification Matrix for information on systemrequirements. You can find it at http://www.oracle.com/technology/products/bi/hyperion-supported-platforms.html. Also review the Oracle Hyperion Enterprise Performance Management
22 Reporting and Analysis Architecture Overview

System Installation Start Here for information about release compatibility, prerequisites, defaultports, and other information needed to plan a successful installation.
Reporting and Analysis Architecture 23

24 Reporting and Analysis Architecture Overview
2Administration Tools and Tasks
In This Chapter
Understanding Oracle Home and Install Home ... . . . . . . . . . . . . . . . . . . . . . . . . . . . . . . . . . . . . . . . . . . . . . . . . . . . . . . . . . . . . . . . . . . . . . . . . . . . . . .25
Setting Up Microsoft Reports Integration with EPM Workspace ... . . . . . . . . . . . . . . . . . . . . . . . . . . . . . . . . . . . . . . . . . . . . . . . . . . . . . . . . . . . .26
Administration Tools .. . . . . . . . . . . . . . . . . . . . . . . . . . . . . . . . . . . . . . . . . . . . . . . . . . . . . . . . . . . . . . . . . . . . . . . . . . . . . . . . . . . . . . . . . . . . . . . . . . . . . . . . . . . . . .27
Starting and Stopping Services... . . . . . . . . . . . . . . . . . . . . . . . . . . . . . . . . . . . . . . . . . . . . . . . . . . . . . . . . . . . . . . . . . . . . . . . . . . . . . . . . . . . . . . . . . . . . . . . .30
Changing Service Port Assignments... . . . . . . . . . . . . . . . . . . . . . . . . . . . . . . . . . . . . . . . . . . . . . . . . . . . . . . . . . . . . . . . . . . . . . . . . . . . . . . . . . . . . . . . . . . .34
Starting the EPM Workspace Servlet .. . . . . . . . . . . . . . . . . . . . . . . . . . . . . . . . . . . . . . . . . . . . . . . . . . . . . . . . . . . . . . . . . . . . . . . . . . . . . . . . . . . . . . . . . . . .34
Configuring Interactive Reporting Services Manager.. . . . . . . . . . . . . . . . . . . . . . . . . . . . . . . . . . . . . . . . . . . . . . . . . . . . . . . . . . . . . . . . . . . . . . . . . . .35
Securing Your EPM Workspace Production Environment .. . . . . . . . . . . . . . . . . . . . . . . . . . . . . . . . . . . . . . . . . . . . . . . . . . . . . . . . . . . . . . . . . . . . . .37
EPM System Lifecycle Management .. . . . . . . . . . . . . . . . . . . . . . . . . . . . . . . . . . . . . . . . . . . . . . . . . . . . . . . . . . . . . . . . . . . . . . . . . . . . . . . . . . . . . . . . . . . .38
Customizing the Help Menu... . . . . . . . . . . . . . . . . . . . . . . . . . . . . . . . . . . . . . . . . . . . . . . . . . . . . . . . . . . . . . . . . . . . . . . . . . . . . . . . . . . . . . . . . . . . . . . . . . . . .38
Quick Guide to Common Administrative Tasks ... . . . . . . . . . . . . . . . . . . . . . . . . . . . . . . . . . . . . . . . . . . . . . . . . . . . . . . . . . . . . . . . . . . . . . . . . . . . . . . .40
Understanding Oracle Home and Install HomeWhen multiple Oracle products are installed on one computer, common internal and third-party components are installed to a central location, called Oracle Home.
On Windows platforms, the Oracle Home location is defined in the system environment variablecalled HYPERION_HOME and the default location is C:\Hyperion.
On UNIX platforms, the Oracle Home value is stored in .hyperion.<hostname> in thehome directory, and the default location is $HOME/Hyperion.
See the Oracle Hyperion Enterprise Performance Management System Installation andConfiguration Guide for information on changing the Hyperion Home location.
Oracle Home contains a \common directory. A EPM Workspace installation adds a \products\Foundation\workspace directory to Oracle Home, which is the default installation locationor Install Home for EPM Workspace (that is, C:\HYPERION_HOME\products\Foundation\workspace on Windows, or $HOME/Hyperion/products/Foundation/Workspace onUNIX).
It is possible to have multiple Install Homes on one physical host. All Java services in an InstallHome run in one process space and share a GSM (not necessarily on one host). If a host hasmultiple Install Homes, each Install Home requires its own separate services process space andis managed by its own GSM. Services in an Install Home are referred to collectively as an InstallHome.
Understanding Oracle Home and Install Home 25
Setting Up Microsoft Reports Integration with EPM WorkspaceIn order to import Microsoft reports to EPM Workspace, you must do the following:
l Establish single sign on, see Prerequisites below.
l Install and Configure Workspace Server
l Install Microsoft Report server or use an existing installation
l Configure the Internet Information Services (IIS) server hosting the Microsoft Reports WebServices
Prerequisites
In order for EPM Workspace to communicate with the Microsoft Report server, single sign onmust be established. To accomplish single sign on:
l Microsoft Reporting Services must be setup to use Windows Integrated Authentication—This allows Microsoft Internet Explorer to authenticate the user using the Windows Domaincredentials that the user used to log on to Windows desktop.
l The machine on which Microsoft Internet Explorer is running and the IIS server hostingMicrosoft Reporting Web services must be in the same Windows domain similar to anIntranet environment.
EPM Workspace uses the Web services provided by Microsoft Reports server directly from theMicrosoft Internet Explorer browser for listing the contents of the Microsoft Report serverrepository. It also uses URL API’s provided by Microsoft reports server to render reports.
Note: The server from which EPM Workspace was launched must be proxied by the same IISserver as the one hosting the Microsoft Reports Web services for the integration to work.This integration is not supported on Firefox browser.
ä To setup Microsoft Reports integration with EPM Workspace perform the following steps:
1 Install and Configure Workspace Server.
2 Install Microsoft Report server or use an existing installation.
3 On the IIS server hosting the Microsoft Reports Web Services, configure the appropriate IIS Proxy plugins(depending on the app server on which EPM Workspace is deployed) for accessing EPM Workspace.
Note: The detailed documentation for the steps above can be found in the Oracle HyperionEnterprise Performance Management System Manual Deployment Guide.
4 After performing the above steps, EPM Workspace should be accessible through the URL: http://iisserver/workspace where iisserver is the server on which IIS hosting the Microsoft ReportsWeb service is running.
5 Log on to the CMC module (http://workspaceserver:55000/cmc).
6 From the Properties dialog for EPM Workspace Web Application under the User Interface tab, select theEnable Microsoft Reports Integration checkbox.
26 Administration Tools and Tasks
7 Access EPM Workspace through the URL: http://iisserver/workspace. EPM Workspace users withContent Publisher role should be able to see the Import then Microsoft Reports option from the context menufor a folder in Explore module. All users should be able to double click a URL object in the repository containinga link to a Microsoft report and view it within a tab in EPM Workspace. For details on Importing a MicrosoftReport, see Oracle Enterprise Performance Management Workspace User's Guide.
Administration ToolsTopics that describe EPM Workspace and Reporting and Analysis administration tools:
l “EPM Workspace Configuration Information” on page 27
l “Administer Module” on page 28
l “Interactive Reporting Services Manager” on page 29
l Impact Management Services:“Impact Manager Module” on page 29
l “Job Utilities Calendar Manager” on page 29
l “Service Configurators” on page 29
EPM Workspace Configuration InformationConfiguration information about your EPM Workspace installation, including GSM and SharedServices information, is available at this URL:
http://hostname:port/workspace/browse/configInfo
where hostname is the name of the EPM Workspace server, and port is the TCP port on whichthe HTTP or application server is listening. The default port for EPM Workspace is 19000 ifusing Apache Tomcat. 19000 is the default TCP port on which HTTP server, for example, ApacheHTTP Server is listening. This port number does not depend on used application server or servletcontainer (including Apache Tomcat).
EPM Workspace timeout settings:
l Application server session timeout— Time in minutes after which the application servertimes out a session if no requests are received for that session
m In \name of deployment folder\WEB-INF\web.xml:
<session-config><session-timeout>60 </session-timeout></session-config>
m Default is 60 minutes
Note: All Reporting and Analysis Web applications session timeouts should be greaterthan 10 minutes.
Administration Tools 27
EPM Workspace TimeoutsEPM Workspace uses two mechanisms to manage the users active session. First, EPM Workspacesends keep alive requests to all application servers (including its own) which have been used inthe users current session. The keep alive maintains the session between the browser and theapplication server so that the application server does not invalidate the session. For example,once a Financial Reporting report has been opened, EPM Workspace sends keep alive requeststo the Financial Reporting server so that the user can open more Financial Reporting reportswithout having to reopen the session with the Financial Reporting application server. Theinterval for sending these requests is configured by the KeepAliveInterval property. This propertymust be set to less then the timeout value for any application server used by EPM Workspace,if it is set to a higher value, the user may receive error messages due to application server timeouts.The second mechanism is designed to close the users session when the user has stopped usingEPM Workspace but has not closed the browser. If there is no activity in EPM Workspace perthe SessionTimeout property, the user is warned that the session is about to end. If the user doesnot take action within five minutes, the user is logged out.
l To modify the values, make changes in CMC in General Workspace Web ApplicationProperties. For more information, see “General Workspace Web Application Properties”on page 171.
l The units are in minutes. The defaults, shown above, are 10 minutes for KeepAliveIntervaland 30 minutes for SessionTimeout.
For information on disabling the configuration URL, see “Securing Your EPM WorkspaceProduction Environment” on page 37.
Administer ModuleProperties managed using the Administer module (accessed using Navigate):
l General properties
l Authentication
l Shared Services Console— Your organization, including adding and modifying users,groups, and roles, through the Oracle's Hyperion® Shared Services Console
l Configuration Console
l Annotations
l Physical resources including printers and output directories
l MIME types
l Notifications
l SmartCuts
l Row-level security
l Usage tracking
l Event tracking
l Change Ownership
28 Administration Tools and Tasks
l BI Presentation Services
For detailed information on managing these items, see “Administer Module” on page 43.
Interactive Reporting Services ManagerInteractive Reporting Services Manager enhances the process monitoring capabilities for theseInteractive Reporting services and processes:
l Hyperion Interactive Reporting Service
l Hyperion Interactive Reporting Data Access Service
l Hyperion Interactive Reporting Job Service
l Hyperion Interactive Reporting Service Helper Process—Manages logging and usagetracking for all Interactive Reporting services
Interactive Reporting Services Manager eliminates the need for using separate process monitorsto manage multiple Interactive Reporting services.
See “Configuring Interactive Reporting Services Manager” on page 35.
Impact Manager ModuleImpact Manager module enables users to replace Interactive Reporting data models. Changingthe data model enables global changes across all Interactive Reporting documents, withoutrequiring that every document which references a data source be edited individually.
See “Using Impact Management Services” on page 71.
Job Utilities Calendar ManagerYou create, modify, and delete custom calendars using Job Utilities Calendar Manager. You cancreate calendars to schedule jobs based on fiscal or other internal or organizational calendars.
See “Viewing Calendar Manager” on page 121.
Service ConfiguratorsAll Reporting and Analysis services have configurable properties that you modify usingConfiguration and Management Console (CMC)or Remote Service Configurator (RSC). CMCand RSC handle different services.
RSCRSC provides a graphical interface to manage a subset of Reporting and Analysis service typesreferred to as code (or remote) services. You use RSC to configure services on all hosts in thesystem:
Administration Tools 29
l Modify or view RSC service properties
l Ping services
l Add, modify, or delete hosts for Production Reporting job factories
l Add, modify, or delete database servers in the system
l Delete services
See “Configuring RSC Services” on page 139.
CMCCMC enables you to manage a subset of Reporting and Analysis services on a local host, referredto as CMC (or local) services:
l View or modify properties of CMC services
l View or modify properties of the local Install Home
l Configure pass-through settings
See “Configuring Services Using CMC” on page 153.
Starting and Stopping ServicesTo start EPM Workspace, you start services in each Install Home, and start each installation ofEPM Workspace servlets (usually on a Web server).
This section focuses on how to start services of an Install Home, except for a discussion at theend about starting various Install Home services and hosts of a distributed system.
In an Install Home, you can start all installed services, a subset of them, or an individual service.Interactive Reporting Services Manager always should be started separately.
How you start services depends on your operating system, Reporting and Analysis systemconfiguration, and objectives. How you stop services depends on how you started them.
Topics that explain prerequisites and methods for starting and stopping services:
l “Before Starting Services” on page 30
l “Starting Reporting and Analysis Services” on page 31
l “Starting Subsets of Services” on page 32
l “Stopping Services” on page 33
l “Service Start-up Dependencies” on page 34
Before Starting ServicesBefore starting services, ensure that all required network resources are available to the services.For example, Interactive Reporting services may need to create job output on printers or file
30 Administration Tools and Tasks
directories belonging to network hosts other than where the services are running. Theseconnections must be established before Interactive Reporting services can start.
For Windows, a service may need to log on as a user account rather than as the local systemaccount to establish connections to shared resources on the network. ODBC data sources mustbe configured as system data sources rather than user data sources. Consult with the site’s networkadministrators to configure the correct environment.
For UNIX platforms, all necessary environmental settings should be made prior to startingservices. Consult with the site’s network administrators to create the necessary softwareconfiguration.
Regardless of your method for starting Reporting and Analysis services, you must first start therepository database.
Starting Reporting and Analysis ServicesRegardless of whether you installed the complete set of services in an Install Home, a few services,or one service, the methods presented in these topics can be used to start Reporting and Analysisservices of a given Install Home:
l “Windows Service Methods (Windows Only)” on page 31
l “Start Agent Method” on page 31
l “startCommonServices Method” on page 32
For a usable system, all Core Services must be started (see “Core Services” on page 18).
Note: Interactive Reporting Services Manager must be started separately (see “StartingInteractive Reporting Services Manager” on page 33). Oracle recommends that yourestart your Web server after restarting Reporting and Analysis services. If you do notrestart the Web server, a delay of several minutes occurs before users can log on.
Windows Service Methods (Windows Only)On Windows, the preferred method for starting Core Services is from the Agent or from theStart menu.
ä To start Core Services, use one method:
l Select Start, then All Programs, then Oracle EPM System, then Workspace, then StartWorkspace Agent Services.
l From Administrative Tools, select Services, select Hyperion S9 BI+ x.x Core Services n, andclick Start.
Start Agent MethodTo start all Reporting and Analysis services (that is, Core Services, Interactive Reporting services,Financial Reporting services) and Web applications (EPM Workspace, Financial Reporting, and
Starting and Stopping Services 31
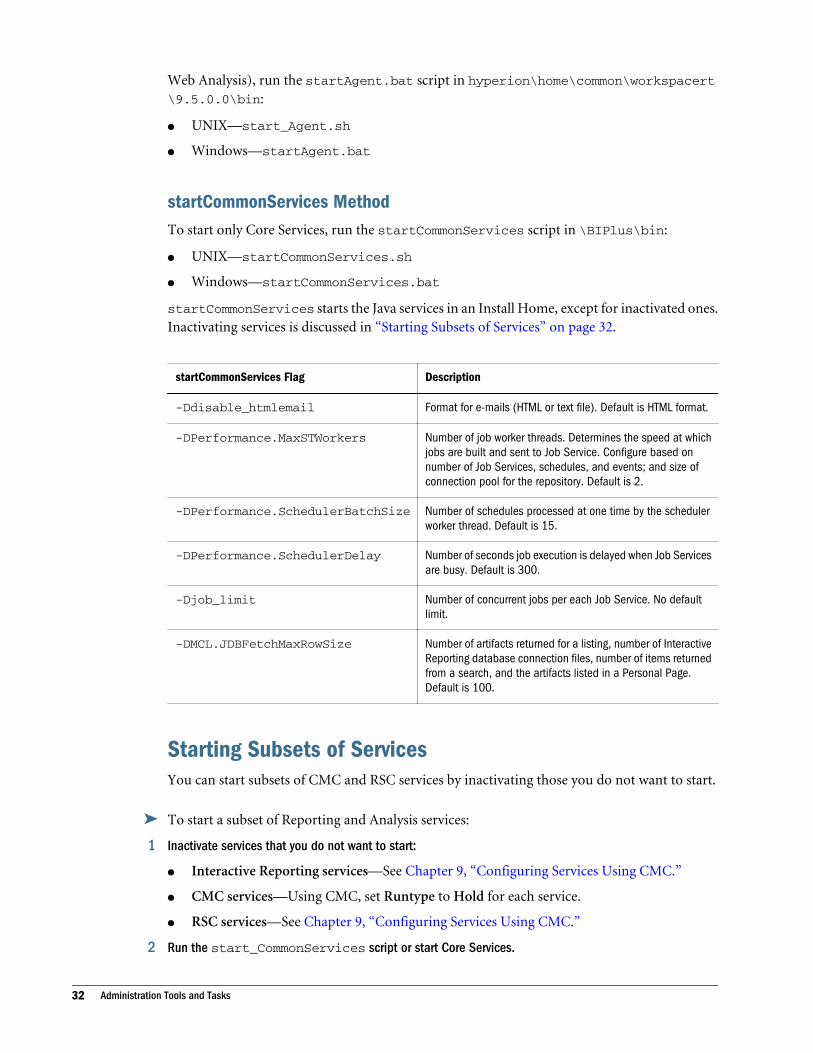
Web Analysis), run the startAgent.bat script in hyperion\home\common\workspacert\9.5.0.0\bin:
l UNIX—start_Agent.sh
l Windows—startAgent.bat
startCommonServices MethodTo start only Core Services, run the startCommonServices script in \BIPlus\bin:
l UNIX—startCommonServices.sh
l Windows—startCommonServices.bat
startCommonServices starts the Java services in an Install Home, except for inactivated ones.Inactivating services is discussed in “Starting Subsets of Services” on page 32.
startCommonServices Flag Description
-Ddisable_htmlemail Format for e-mails (HTML or text file). Default is HTML format.
-DPerformance.MaxSTWorkers Number of job worker threads. Determines the speed at whichjobs are built and sent to Job Service. Configure based onnumber of Job Services, schedules, and events; and size ofconnection pool for the repository. Default is 2.
-DPerformance.SchedulerBatchSize Number of schedules processed at one time by the schedulerworker thread. Default is 15.
-DPerformance.SchedulerDelay Number of seconds job execution is delayed when Job Servicesare busy. Default is 300.
-Djob_limit Number of concurrent jobs per each Job Service. No defaultlimit.
-DMCL.JDBFetchMaxRowSize Number of artifacts returned for a listing, number of InteractiveReporting database connection files, number of items returnedfrom a search, and the artifacts listed in a Personal Page.Default is 100.
Starting Subsets of ServicesYou can start subsets of CMC and RSC services by inactivating those you do not want to start.
ä To start a subset of Reporting and Analysis services:
1 Inactivate services that you do not want to start:
l Interactive Reporting services—See Chapter 9, “Configuring Services Using CMC.”
l CMC services—Using CMC, set Runtype to Hold for each service.
l RSC services—See Chapter 9, “Configuring Services Using CMC.”
2 Run the start_CommonServices script or start Core Services.
32 Administration Tools and Tasks
See “Starting Reporting and Analysis Services” on page 31.
Starting Interactive Reporting Services ManagerYou must start Interactive Reporting Services Manager individually. This is true whether theservices are installed in an Install Home with the Reporting and Analysis services or alone in itsown Install Home.
Note: When you connect to a computer to start Interactive Reporting Services Manager onWindows, make sure the color property setting for the display is 16 bits or higher. If thecolor property setting is less than 16 bits, users may encounter extremely long responsetimes when opening Chart sections of Interactive Reporting documents in EPMWorkspace. This is an important prerequisite, especially when starting the servicesremotely (for example using VNC, Terminal Services, Remote Administrator orTimbuktu, and so on), because many remote administration clients connect with only 8-bit colors by default.
ä To start Interactive Reporting Services Manager:
1 In CMC, verify that Run Type for Interactive Reporting Services Manager is set to Start.
2 Start Core Services.
3 Start Interactive Reporting Services Manager.
Stopping ServicesYou stop all Reporting and Analysis services and services started individually by stopping theirprocesses. Do so at each service’s host computer. In all cases, stopping the services constitutes ahard shutdown and causes the services to stop immediately. In the event of a hard shutdown,all work in progress stops.
The method for stopping a service must match how it was started:
l Services started with a start script—Run its stop script.
Caution! Use a stop script only if the service was started with its start script. A stop scriptcannot be used to terminate one service within a multi-service process. The stopscript stops all services running in that process.
Note: On Windows systems, for Interactive Reporting Services Manager, type shutdownin the Interactive Reporting Services Manager console to stop Interactive Reportingservices.
l Process running in a console window—Use a shut down command, such as shutdown orCtrl+C on Windows. Using an operating system kill command (such as kill on UNIX) to
Starting and Stopping Services 33
stop the Reporting and Analysis services does not cause damage to the system; however, donot use kill -9.
l Windows service—Use the Stop command in the Services tool.
If you are running services as different servers (that is, as separate processes), you must stopRepository Service last.
Service Start-up DependenciesCore Services, when launched using Windows Services, try for two minutes to launch; however,Core Services depend on other EPM System components for normal startup in this order:
l Database
l Shared Services
Because of this order dependency, and because Windows imposes a two-mininute maximumtime limit for service startup, if your repository database runs on the same computer as CoreServices, you may not want to validate service startup to avoid a system shut-down.
You select whether to validate service startup by setting the CHECK_SERVICE_STARTUPproperty in the \BIPlus\common\config\RMService8.properties file. Default is true.
If Core Services do not start, check stdout_console.log in \BIPlus\logs for informationto help identify which dependent object is not available.
Changing Service Port AssignmentsReview the Oracle Hyperion Enterprise Performance Management System Certification Matrixfor information on system requirements. You can find it at http://www.oracle.com/technology/products/bi/hyperion-supported-platforms.html. Also review the Oracle Hyperion EnterprisePerformance Management System Installation Start Here for information about releasecompatibility, prerequisites, default ports, and other information needed to plan a successfulinstallation.
Starting the EPM Workspace ServletStart the EPM Workspace servlet according to the instructions given in your Web serverdocumentation. Make the URL available to your system’s end-users.
For EPM Workspace, enter the following URL:
http://hostname:port/workspace
where hostname is the name of the EPM Workspace server, and port is the TCP port on whichthe application server is listening. The default port for EPM Workspace is 19000 if using ApacheTomcat. 19000 is the default TCP port on which HTTP server, for example Apache HTTP Server,is listening. This port number does not depend on used application server or servlet container(including Apache Tomcat).
34 Administration Tools and Tasks
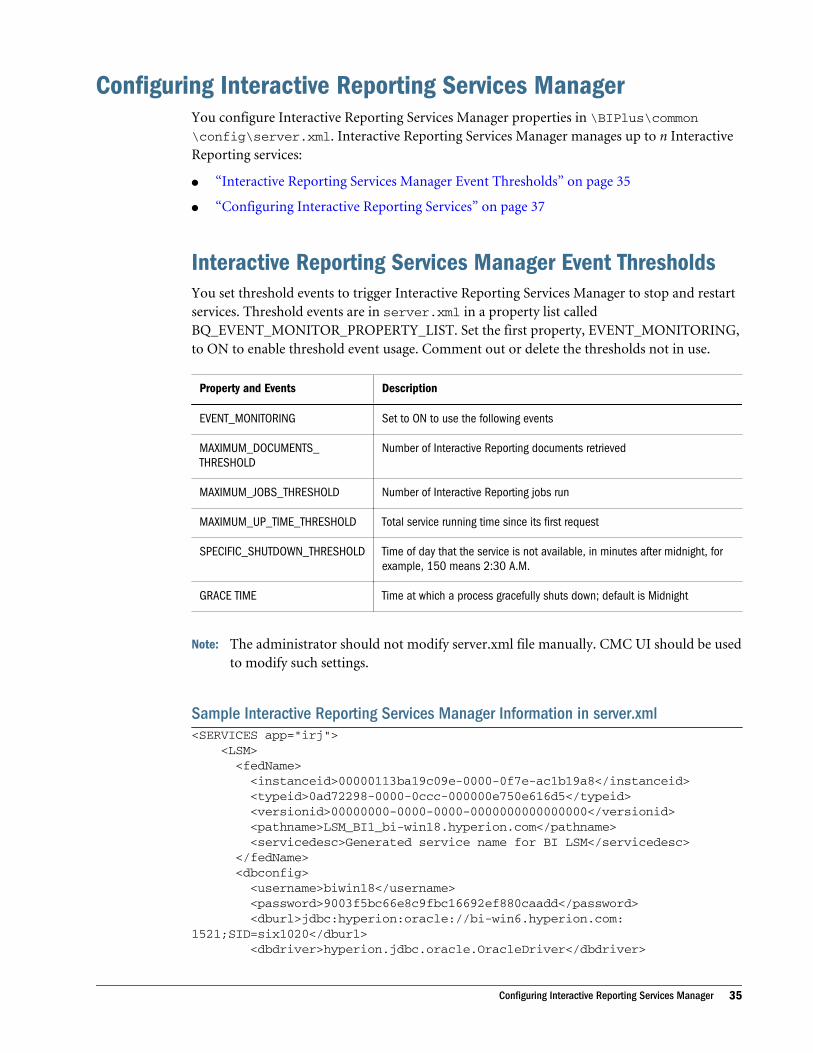
Configuring Interactive Reporting Services ManagerYou configure Interactive Reporting Services Manager properties in \BIPlus\common\config\server.xml. Interactive Reporting Services Manager manages up to n InteractiveReporting services:
l “Interactive Reporting Services Manager Event Thresholds” on page 35
l “Configuring Interactive Reporting Services” on page 37
Interactive Reporting Services Manager Event ThresholdsYou set threshold events to trigger Interactive Reporting Services Manager to stop and restartservices. Threshold events are in server.xml in a property list calledBQ_EVENT_MONITOR_PROPERTY_LIST. Set the first property, EVENT_MONITORING,to ON to enable threshold event usage. Comment out or delete the thresholds not in use.
Property and Events Description
EVENT_MONITORING Set to ON to use the following events
MAXIMUM_DOCUMENTS_THRESHOLD
Number of Interactive Reporting documents retrieved
MAXIMUM_JOBS_THRESHOLD Number of Interactive Reporting jobs run
MAXIMUM_UP_TIME_THRESHOLD Total service running time since its first request
SPECIFIC_SHUTDOWN_THRESHOLD Time of day that the service is not available, in minutes after midnight, forexample, 150 means 2:30 A.M.
GRACE TIME Time at which a process gracefully shuts down; default is Midnight
Note: The administrator should not modify server.xml file manually. CMC UI should be usedto modify such settings.
Sample Interactive Reporting Services Manager Information in server.xml<SERVICES app="irj"> <LSM> <fedName> <instanceid>00000113ba19c09e-0000-0f7e-ac1b19a8</instanceid> <typeid>0ad72298-0000-0ccc-000000e750e616d5</typeid> <versionid>00000000-0000-0000-0000000000000000</versionid> <pathname>LSM_BI1_bi-win18.hyperion.com</pathname> <servicedesc>Generated service name for BI LSM</servicedesc> </fedName> <dbconfig> <username>biwin18</username> <password>9003f5bc66e8c9fbc16692ef880caadd</password> <dburl>jdbc:hyperion:oracle://bi-win6.hyperion.com:1521;SID=six1020</dburl> <dbdriver>hyperion.jdbc.oracle.OracleDriver</dbdriver>
Configuring Interactive Reporting Services Manager 35
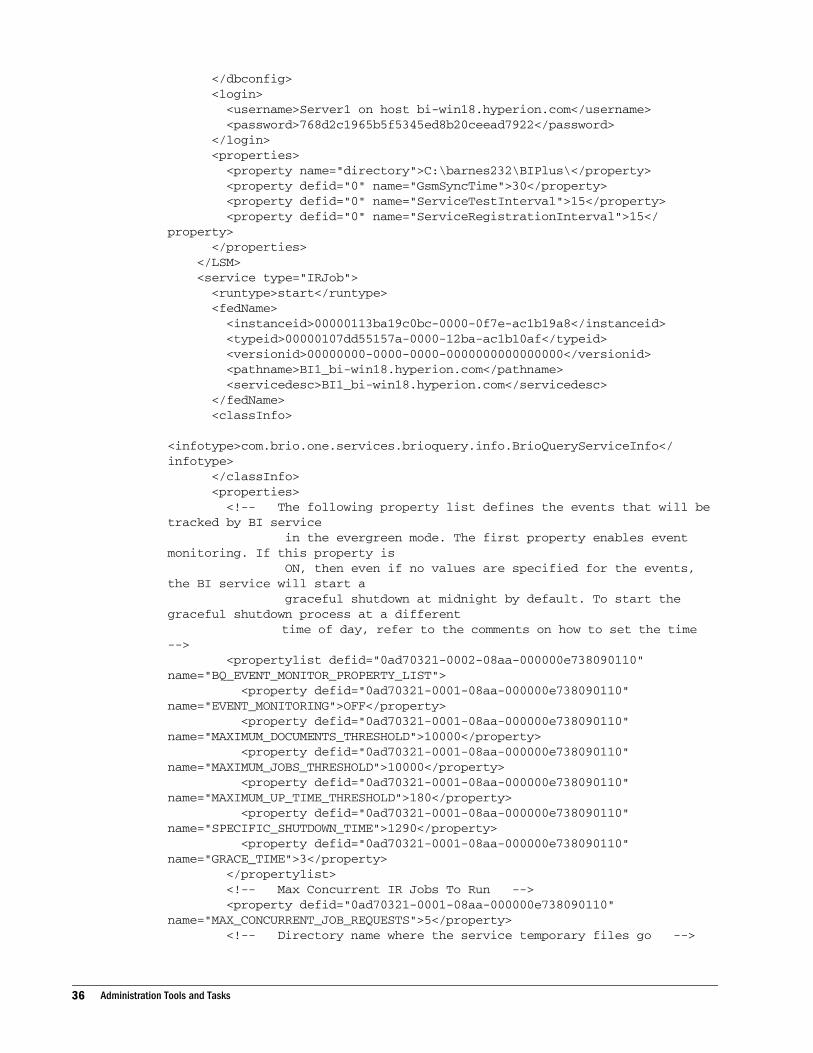
</dbconfig> <login> <username>Server1 on host bi-win18.hyperion.com</username> <password>768d2c1965b5f5345ed8b20ceead7922</password> </login> <properties> <property name="directory">C:\barnes232\BIPlus\</property> <property defid="0" name="GsmSyncTime">30</property> <property defid="0" name="ServiceTestInterval">15</property> <property defid="0" name="ServiceRegistrationInterval">15</property> </properties> </LSM> <service type="IRJob"> <runtype>start</runtype> <fedName> <instanceid>00000113ba19c0bc-0000-0f7e-ac1b19a8</instanceid> <typeid>00000107dd55157a-0000-12ba-ac1b10af</typeid> <versionid>00000000-0000-0000-0000000000000000</versionid> <pathname>BI1_bi-win18.hyperion.com</pathname> <servicedesc>BI1_bi-win18.hyperion.com</servicedesc> </fedName> <classInfo> <infotype>com.brio.one.services.brioquery.info.BrioQueryServiceInfo</infotype> </classInfo> <properties> <!-- The following property list defines the events that will be tracked by BI service in the evergreen mode. The first property enables event monitoring. If this property is ON, then even if no values are specified for the events, the BI service will start a graceful shutdown at midnight by default. To start the graceful shutdown process at a different time of day, refer to the comments on how to set the time --> <propertylist defid="0ad70321-0002-08aa-000000e738090110" name="BQ_EVENT_MONITOR_PROPERTY_LIST"> <property defid="0ad70321-0001-08aa-000000e738090110" name="EVENT_MONITORING">OFF</property> <property defid="0ad70321-0001-08aa-000000e738090110" name="MAXIMUM_DOCUMENTS_THRESHOLD">10000</property> <property defid="0ad70321-0001-08aa-000000e738090110" name="MAXIMUM_JOBS_THRESHOLD">10000</property> <property defid="0ad70321-0001-08aa-000000e738090110" name="MAXIMUM_UP_TIME_THRESHOLD">180</property> <property defid="0ad70321-0001-08aa-000000e738090110" name="SPECIFIC_SHUTDOWN_TIME">1290</property> <property defid="0ad70321-0001-08aa-000000e738090110" name="GRACE_TIME">3</property> </propertylist> <!-- Max Concurrent IR Jobs To Run --> <property defid="0ad70321-0001-08aa-000000e738090110" name="MAX_CONCURRENT_JOB_REQUESTS">5</property> <!-- Directory name where the service temporary files go -->
36 Administration Tools and Tasks
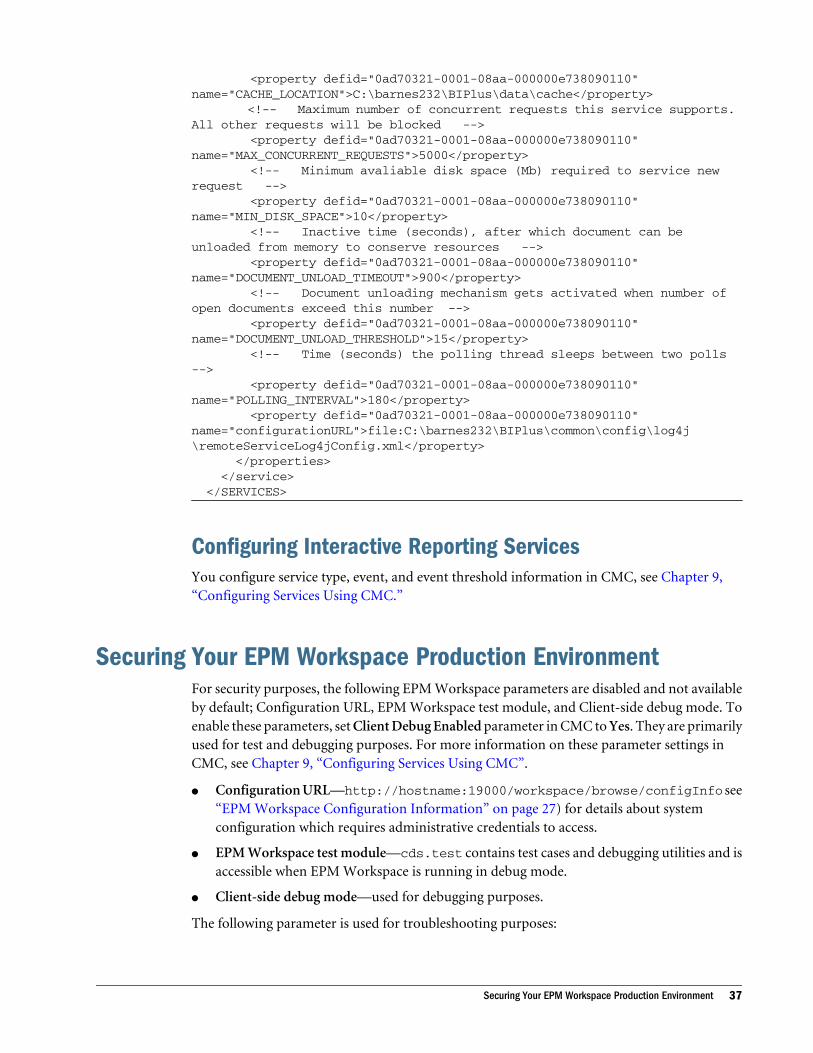
<property defid="0ad70321-0001-08aa-000000e738090110" name="CACHE_LOCATION">C:\barnes232\BIPlus\data\cache</property> <!-- Maximum number of concurrent requests this service supports. All other requests will be blocked --> <property defid="0ad70321-0001-08aa-000000e738090110" name="MAX_CONCURRENT_REQUESTS">5000</property> <!-- Minimum avaliable disk space (Mb) required to service new request --> <property defid="0ad70321-0001-08aa-000000e738090110" name="MIN_DISK_SPACE">10</property> <!-- Inactive time (seconds), after which document can be unloaded from memory to conserve resources --> <property defid="0ad70321-0001-08aa-000000e738090110" name="DOCUMENT_UNLOAD_TIMEOUT">900</property> <!-- Document unloading mechanism gets activated when number of open documents exceed this number --> <property defid="0ad70321-0001-08aa-000000e738090110" name="DOCUMENT_UNLOAD_THRESHOLD">15</property> <!-- Time (seconds) the polling thread sleeps between two polls --> <property defid="0ad70321-0001-08aa-000000e738090110" name="POLLING_INTERVAL">180</property> <property defid="0ad70321-0001-08aa-000000e738090110" name="configurationURL">file:C:\barnes232\BIPlus\common\config\log4j\remoteServiceLog4jConfig.xml</property> </properties> </service> </SERVICES>
Configuring Interactive Reporting ServicesYou configure service type, event, and event threshold information in CMC, see Chapter 9,“Configuring Services Using CMC.”
Securing Your EPM Workspace Production EnvironmentFor security purposes, the following EPM Workspace parameters are disabled and not availableby default; Configuration URL, EPM Workspace test module, and Client-side debug mode. Toenable these parameters, set Client Debug Enabled parameter in CMC to Yes. They are primarilyused for test and debugging purposes. For more information on these parameter settings inCMC, see Chapter 9, “Configuring Services Using CMC”.
l Configuration URL—http://hostname:19000/workspace/browse/configInfo see“EPM Workspace Configuration Information” on page 27) for details about systemconfiguration which requires administrative credentials to access.
l EPM Workspace test module—cds.test contains test cases and debugging utilities and isaccessible when EPM Workspace is running in debug mode.
l Client-side debug mode—used for debugging purposes.
The following parameter is used for troubleshooting purposes:
Securing Your EPM Workspace Production Environment 37
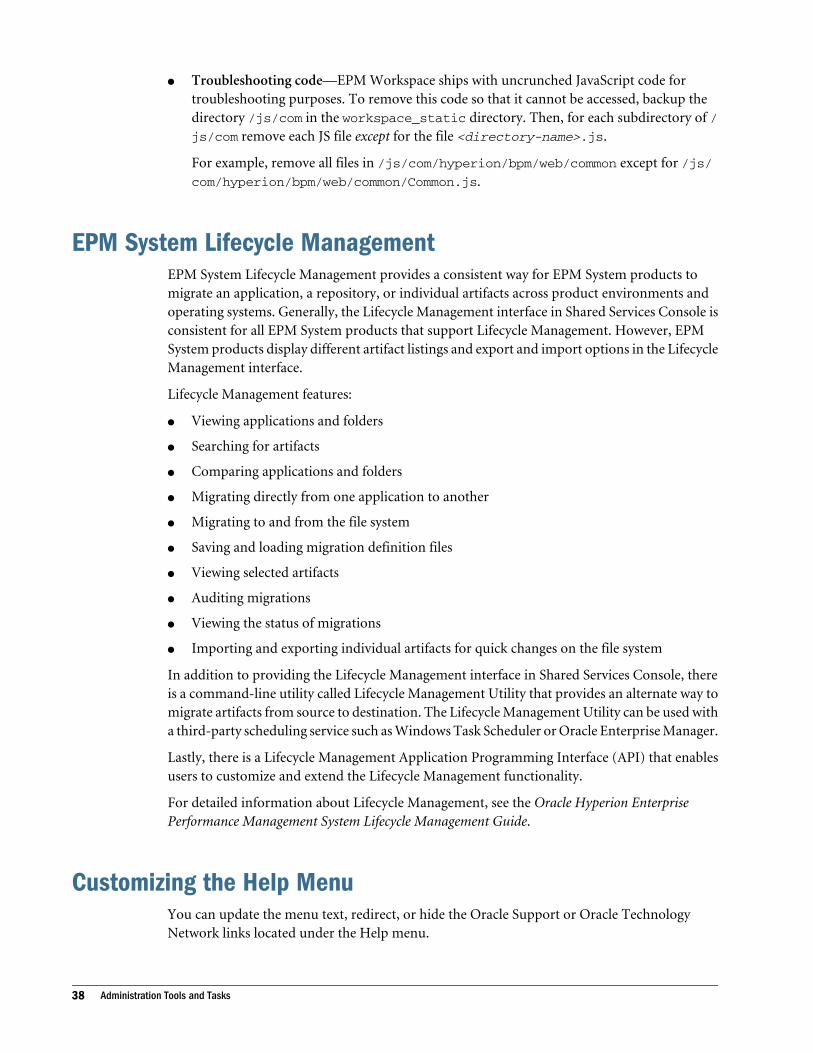
l Troubleshooting code—EPM Workspace ships with uncrunched JavaScript code fortroubleshooting purposes. To remove this code so that it cannot be accessed, backup thedirectory /js/com in the workspace_static directory. Then, for each subdirectory of /js/com remove each JS file except for the file <directory-name>.js.
For example, remove all files in /js/com/hyperion/bpm/web/common except for /js/com/hyperion/bpm/web/common/Common.js.
EPM System Lifecycle ManagementEPM System Lifecycle Management provides a consistent way for EPM System products tomigrate an application, a repository, or individual artifacts across product environments andoperating systems. Generally, the Lifecycle Management interface in Shared Services Console isconsistent for all EPM System products that support Lifecycle Management. However, EPMSystem products display different artifact listings and export and import options in the LifecycleManagement interface.
Lifecycle Management features:
l Viewing applications and folders
l Searching for artifacts
l Comparing applications and folders
l Migrating directly from one application to another
l Migrating to and from the file system
l Saving and loading migration definition files
l Viewing selected artifacts
l Auditing migrations
l Viewing the status of migrations
l Importing and exporting individual artifacts for quick changes on the file system
In addition to providing the Lifecycle Management interface in Shared Services Console, thereis a command-line utility called Lifecycle Management Utility that provides an alternate way tomigrate artifacts from source to destination. The Lifecycle Management Utility can be used witha third-party scheduling service such as Windows Task Scheduler or Oracle Enterprise Manager.
Lastly, there is a Lifecycle Management Application Programming Interface (API) that enablesusers to customize and extend the Lifecycle Management functionality.
For detailed information about Lifecycle Management, see the Oracle Hyperion EnterprisePerformance Management System Lifecycle Management Guide.
Customizing the Help MenuYou can update the menu text, redirect, or hide the Oracle Support or Oracle TechnologyNetwork links located under the Help menu.
38 Administration Tools and Tasks
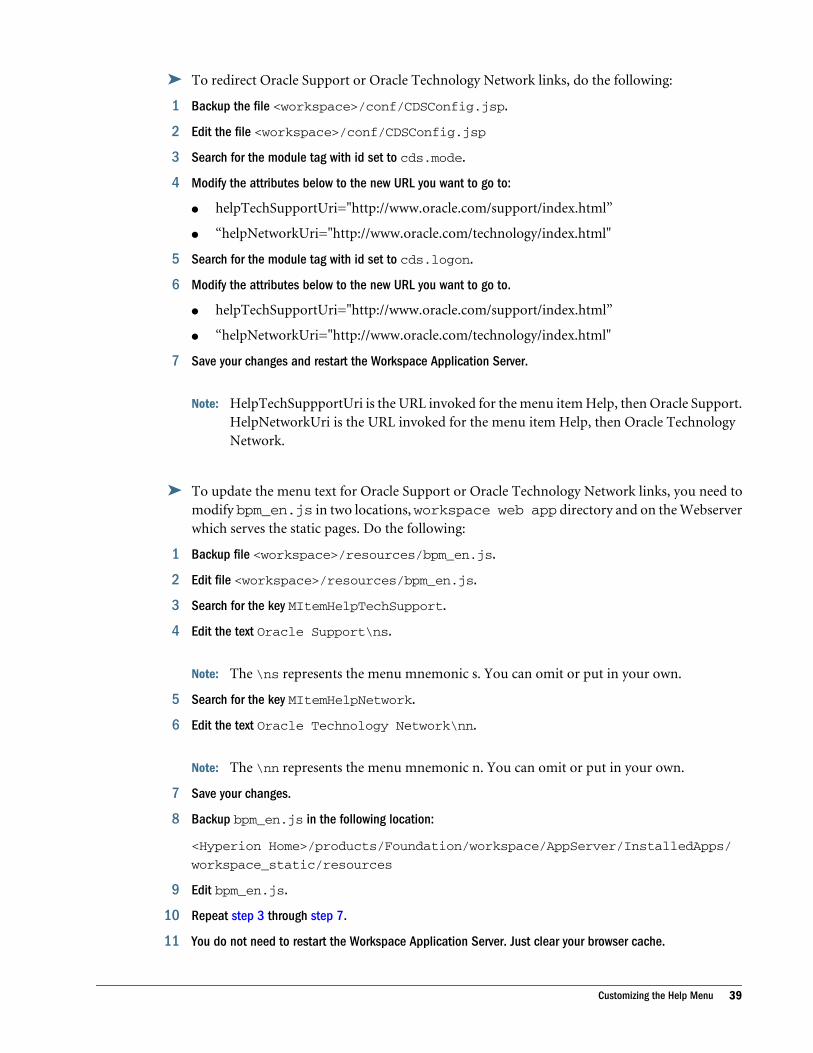
ä To redirect Oracle Support or Oracle Technology Network links, do the following:
1 Backup the file <workspace>/conf/CDSConfig.jsp.
2 Edit the file <workspace>/conf/CDSConfig.jsp
3 Search for the module tag with id set to cds.mode.
4 Modify the attributes below to the new URL you want to go to:
l helpTechSupportUri="http://www.oracle.com/support/index.html”
l “helpNetworkUri="http://www.oracle.com/technology/index.html"
5 Search for the module tag with id set to cds.logon.
6 Modify the attributes below to the new URL you want to go to.
l helpTechSupportUri="http://www.oracle.com/support/index.html”
l “helpNetworkUri="http://www.oracle.com/technology/index.html"
7 Save your changes and restart the Workspace Application Server.
Note: HelpTechSuppportUri is the URL invoked for the menu item Help, then Oracle Support.HelpNetworkUri is the URL invoked for the menu item Help, then Oracle TechnologyNetwork.
ä To update the menu text for Oracle Support or Oracle Technology Network links, you need tomodify bpm_en.js in two locations, workspace web app directory and on the Webserverwhich serves the static pages. Do the following:
1 Backup file <workspace>/resources/bpm_en.js.
2 Edit file <workspace>/resources/bpm_en.js.
3 Search for the key MItemHelpTechSupport.
4 Edit the text Oracle Support\ns.
Note: The \ns represents the menu mnemonic s. You can omit or put in your own.
5 Search for the key MItemHelpNetwork.
6 Edit the text Oracle Technology Network\nn.
Note: The \nn represents the menu mnemonic n. You can omit or put in your own.
7 Save your changes.
8 Backup bpm_en.js in the following location:
<Hyperion Home>/products/Foundation/workspace/AppServer/InstalledApps/
workspace_static/resources
9 Edit bpm_en.js.
10 Repeat step 3 through step 7.
11 You do not need to restart the Workspace Application Server. Just clear your browser cache.
Customizing the Help Menu 39
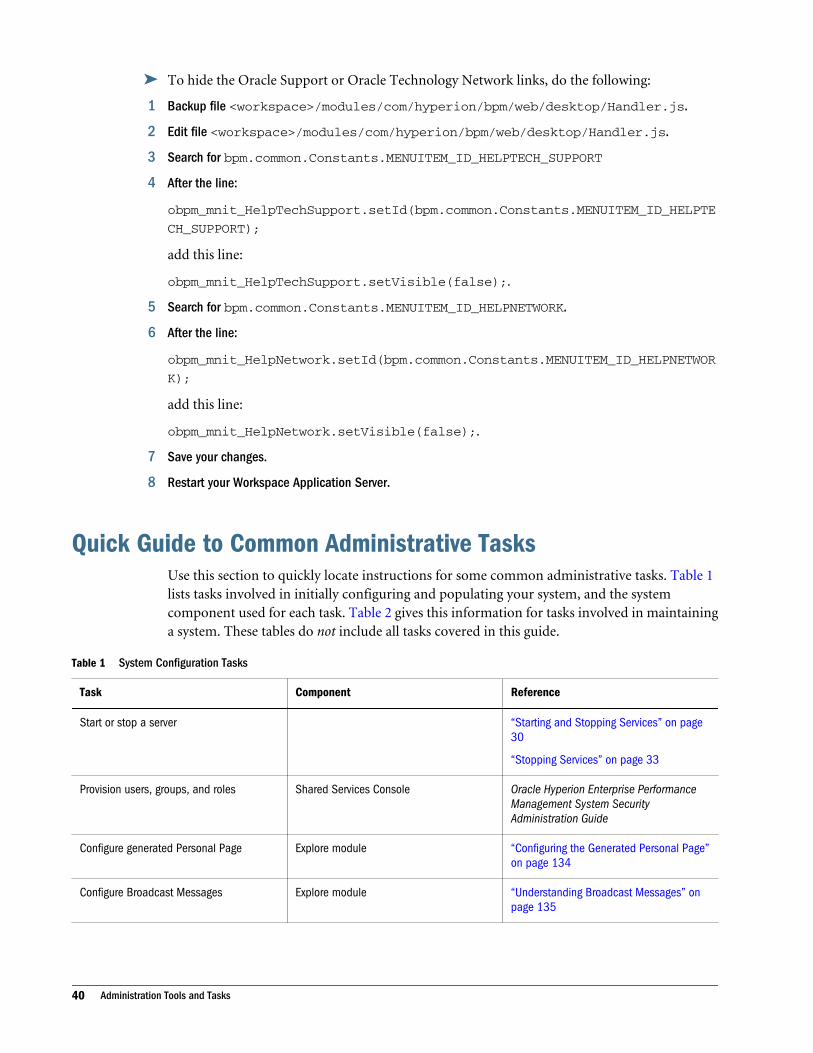
ä To hide the Oracle Support or Oracle Technology Network links, do the following:
1 Backup file <workspace>/modules/com/hyperion/bpm/web/desktop/Handler.js.
2 Edit file <workspace>/modules/com/hyperion/bpm/web/desktop/Handler.js.
3 Search for bpm.common.Constants.MENUITEM_ID_HELPTECH_SUPPORT
4 After the line:
obpm_mnit_HelpTechSupport.setId(bpm.common.Constants.MENUITEM_ID_HELPTE
CH_SUPPORT);
add this line:
obpm_mnit_HelpTechSupport.setVisible(false);.
5 Search for bpm.common.Constants.MENUITEM_ID_HELPNETWORK.
6 After the line:
obpm_mnit_HelpNetwork.setId(bpm.common.Constants.MENUITEM_ID_HELPNETWOR
K);
add this line:
obpm_mnit_HelpNetwork.setVisible(false);.
7 Save your changes.
8 Restart your Workspace Application Server.
Quick Guide to Common Administrative TasksUse this section to quickly locate instructions for some common administrative tasks. Table 1lists tasks involved in initially configuring and populating your system, and the systemcomponent used for each task. Table 2 gives this information for tasks involved in maintaininga system. These tables do not include all tasks covered in this guide.
Table 1 System Configuration Tasks
Task Component Reference
Start or stop a server “Starting and Stopping Services” on page30
“Stopping Services” on page 33
Provision users, groups, and roles Shared Services Console Oracle Hyperion Enterprise PerformanceManagement System SecurityAdministration Guide
Configure generated Personal Page Explore module “Configuring the Generated Personal Page”on page 134
Configure Broadcast Messages Explore module “Understanding Broadcast Messages” onpage 135
40 Administration Tools and Tasks
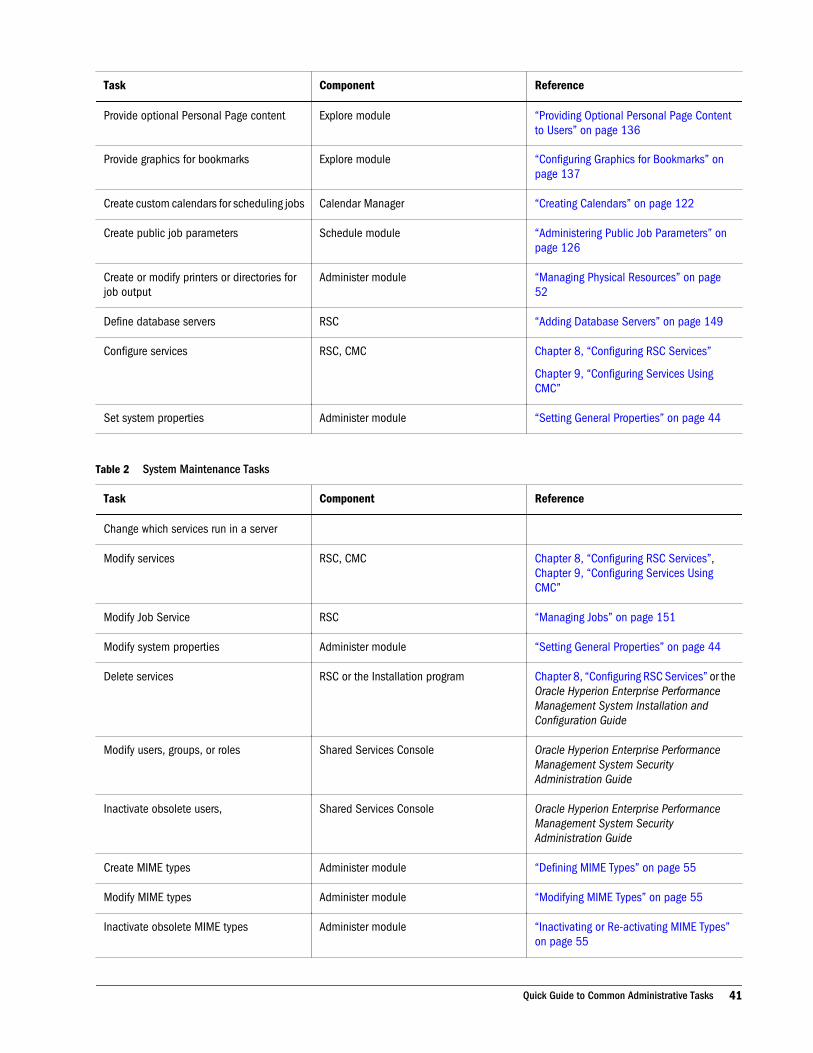
Task Component Reference
Provide optional Personal Page content Explore module “Providing Optional Personal Page Contentto Users” on page 136
Provide graphics for bookmarks Explore module “Configuring Graphics for Bookmarks” onpage 137
Create custom calendars for scheduling jobs Calendar Manager “Creating Calendars” on page 122
Create public job parameters Schedule module “Administering Public Job Parameters” onpage 126
Create or modify printers or directories forjob output
Administer module “Managing Physical Resources” on page52
Define database servers RSC “Adding Database Servers” on page 149
Configure services RSC, CMC Chapter 8, “Configuring RSC Services”
Chapter 9, “Configuring Services UsingCMC”
Set system properties Administer module “Setting General Properties” on page 44
Table 2 System Maintenance Tasks
Task Component Reference
Change which services run in a server
Modify services RSC, CMC Chapter 8, “Configuring RSC Services”,Chapter 9, “Configuring Services UsingCMC”
Modify Job Service RSC “Managing Jobs” on page 151
Modify system properties Administer module “Setting General Properties” on page 44
Delete services RSC or the Installation program Chapter 8, “Configuring RSC Services” or theOracle Hyperion Enterprise PerformanceManagement System Installation andConfiguration Guide
Modify users, groups, or roles Shared Services Console Oracle Hyperion Enterprise PerformanceManagement System SecurityAdministration Guide
Inactivate obsolete users, Shared Services Console Oracle Hyperion Enterprise PerformanceManagement System SecurityAdministration Guide
Create MIME types Administer module “Defining MIME Types” on page 55
Modify MIME types Administer module “Modifying MIME Types” on page 55
Inactivate obsolete MIME types Administer module “Inactivating or Re-activating MIME Types”on page 55
Quick Guide to Common Administrative Tasks 41
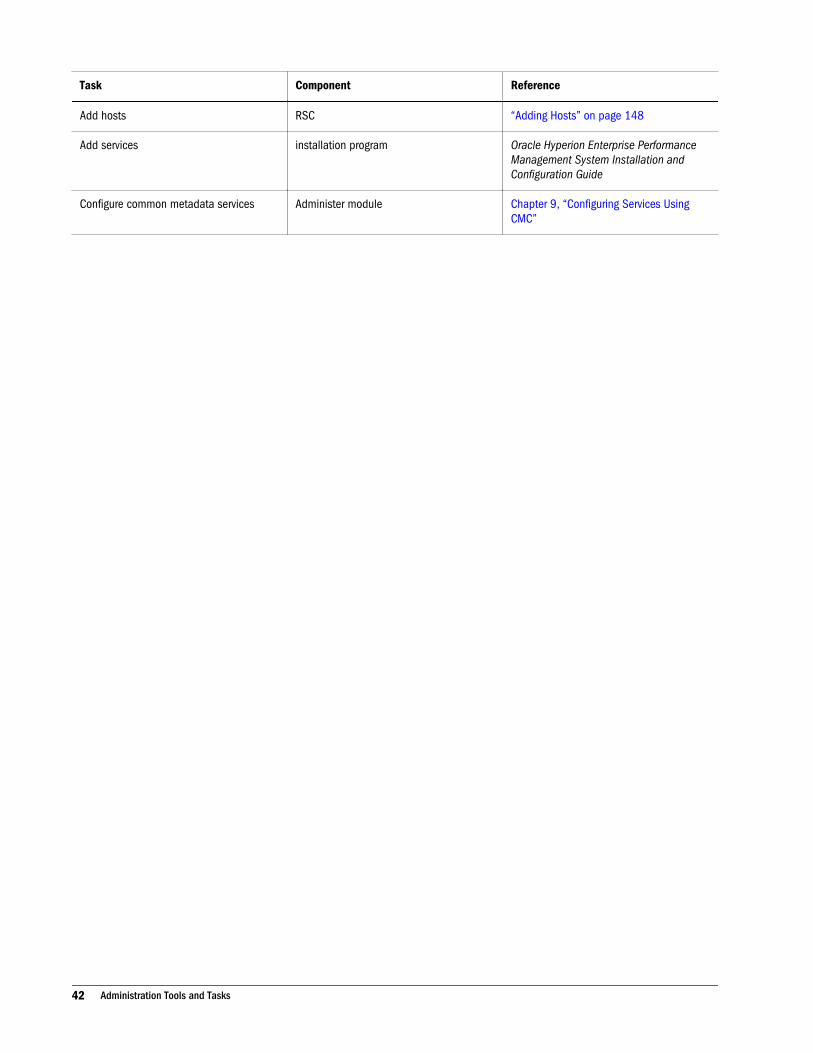
Task Component Reference
Add hosts RSC “Adding Hosts” on page 148
Add services installation program Oracle Hyperion Enterprise PerformanceManagement System Installation andConfiguration Guide
Configure common metadata services Administer module Chapter 9, “Configuring Services UsingCMC”
42 Administration Tools and Tasks
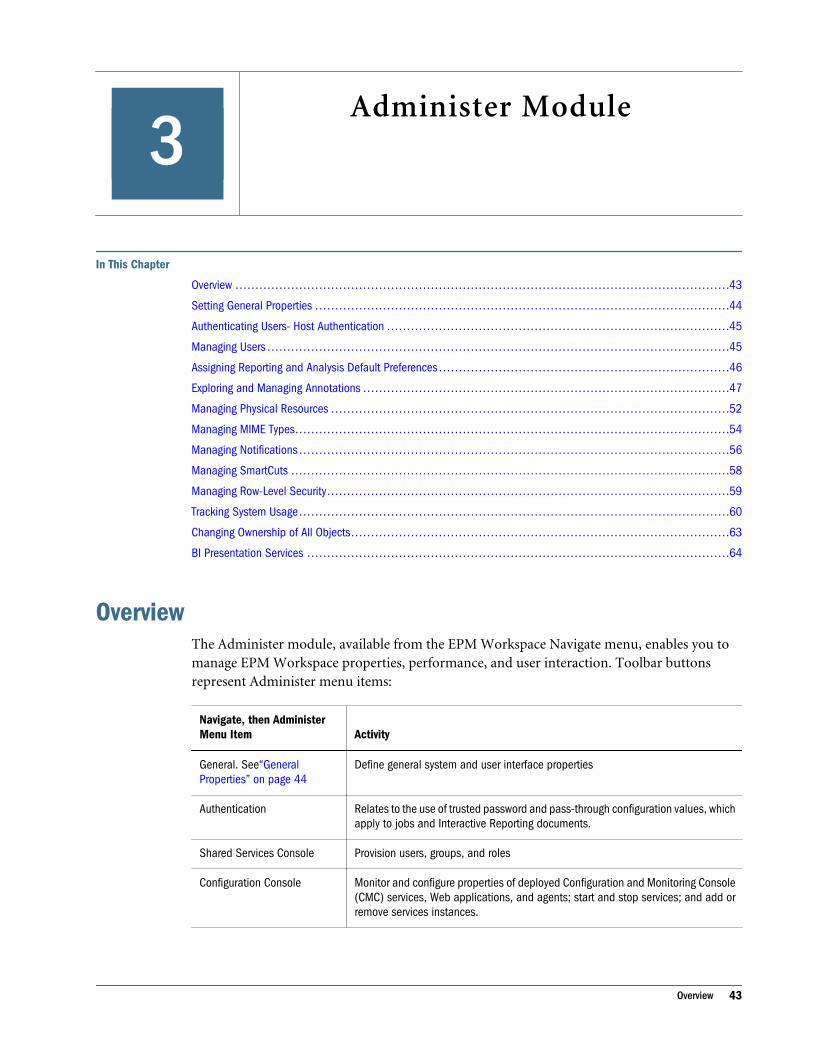
3Administer Module
In This Chapter
Overview ... . . . . . . . . . . . . . . . . . . . . . . . . . . . . . . . . . . . . . . . . . . . . . . . . . . . . . . . . . . . . . . . . . . . . . . . . . . . . . . . . . . . . . . . . . . . . . . . . . . . . . . . . . . . . . . . . . . . . . . . . .43
Setting General Properties .. . . . . . . . . . . . . . . . . . . . . . . . . . . . . . . . . . . . . . . . . . . . . . . . . . . . . . . . . . . . . . . . . . . . . . . . . . . . . . . . . . . . . . . . . . . . . . . . . . . . . . .44
Authenticating Users- Host Authentication ... . . . . . . . . . . . . . . . . . . . . . . . . . . . . . . . . . . . . . . . . . . . . . . . . . . . . . . . . . . . . . . . . . . . . . . . . . . . . . . . . . . .45
Managing Users .. . . . . . . . . . . . . . . . . . . . . . . . . . . . . . . . . . . . . . . . . . . . . . . . . . . . . . . . . . . . . . . . . . . . . . . . . . . . . . . . . . . . . . . . . . . . . . . . . . . . . . . . . . . . . . . . . . .45
Assigning Reporting and Analysis Default Preferences ... . . . . . . . . . . . . . . . . . . . . . . . . . . . . . . . . . . . . . . . . . . . . . . . . . . . . . . . . . . . . . . . . . . . . . .46
Exploring and Managing Annotations ... . . . . . . . . . . . . . . . . . . . . . . . . . . . . . . . . . . . . . . . . . . . . . . . . . . . . . . . . . . . . . . . . . . . . . . . . . . . . . . . . . . . . . . . . .47
Managing Physical Resources ... . . . . . . . . . . . . . . . . . . . . . . . . . . . . . . . . . . . . . . . . . . . . . . . . . . . . . . . . . . . . . . . . . . . . . . . . . . . . . . . . . . . . . . . . . . . . . . . . .52
Managing MIME Types... . . . . . . . . . . . . . . . . . . . . . . . . . . . . . . . . . . . . . . . . . . . . . . . . . . . . . . . . . . . . . . . . . . . . . . . . . . . . . . . . . . . . . . . . . . . . . . . . . . . . . . . . . .54
Managing Notifications ... . . . . . . . . . . . . . . . . . . . . . . . . . . . . . . . . . . . . . . . . . . . . . . . . . . . . . . . . . . . . . . . . . . . . . . . . . . . . . . . . . . . . . . . . . . . . . . . . . . . . . . . . .56
Managing SmartCuts .. . . . . . . . . . . . . . . . . . . . . . . . . . . . . . . . . . . . . . . . . . . . . . . . . . . . . . . . . . . . . . . . . . . . . . . . . . . . . . . . . . . . . . . . . . . . . . . . . . . . . . . . . . . . .58
Managing Row-Level Security.. . . . . . . . . . . . . . . . . . . . . . . . . . . . . . . . . . . . . . . . . . . . . . . . . . . . . . . . . . . . . . . . . . . . . . . . . . . . . . . . . . . . . . . . . . . . . . . . . . . .59
Tracking System Usage ... . . . . . . . . . . . . . . . . . . . . . . . . . . . . . . . . . . . . . . . . . . . . . . . . . . . . . . . . . . . . . . . . . . . . . . . . . . . . . . . . . . . . . . . . . . . . . . . . . . . . . . . . .60
Changing Ownership of All Objects.. . . . . . . . . . . . . . . . . . . . . . . . . . . . . . . . . . . . . . . . . . . . . . . . . . . . . . . . . . . . . . . . . . . . . . . . . . . . . . . . . . . . . . . . . . . . . .63
BI Presentation Services ... . . . . . . . . . . . . . . . . . . . . . . . . . . . . . . . . . . . . . . . . . . . . . . . . . . . . . . . . . . . . . . . . . . . . . . . . . . . . . . . . . . . . . . . . . . . . . . . . . . . . . . .64
OverviewThe Administer module, available from the EPM Workspace Navigate menu, enables you tomanage EPM Workspace properties, performance, and user interaction. Toolbar buttonsrepresent Administer menu items:
Navigate, then AdministerMenu Item Activity
General. See“GeneralProperties” on page 44
Define general system and user interface properties
Authentication Relates to the use of trusted password and pass-through configuration values, whichapply to jobs and Interactive Reporting documents.
Shared Services Console Provision users, groups, and roles
Configuration Console Monitor and configure properties of deployed Configuration and Monitoring Console(CMC) services, Web applications, and agents; start and stop services; and add orremove services instances.
Overview 43
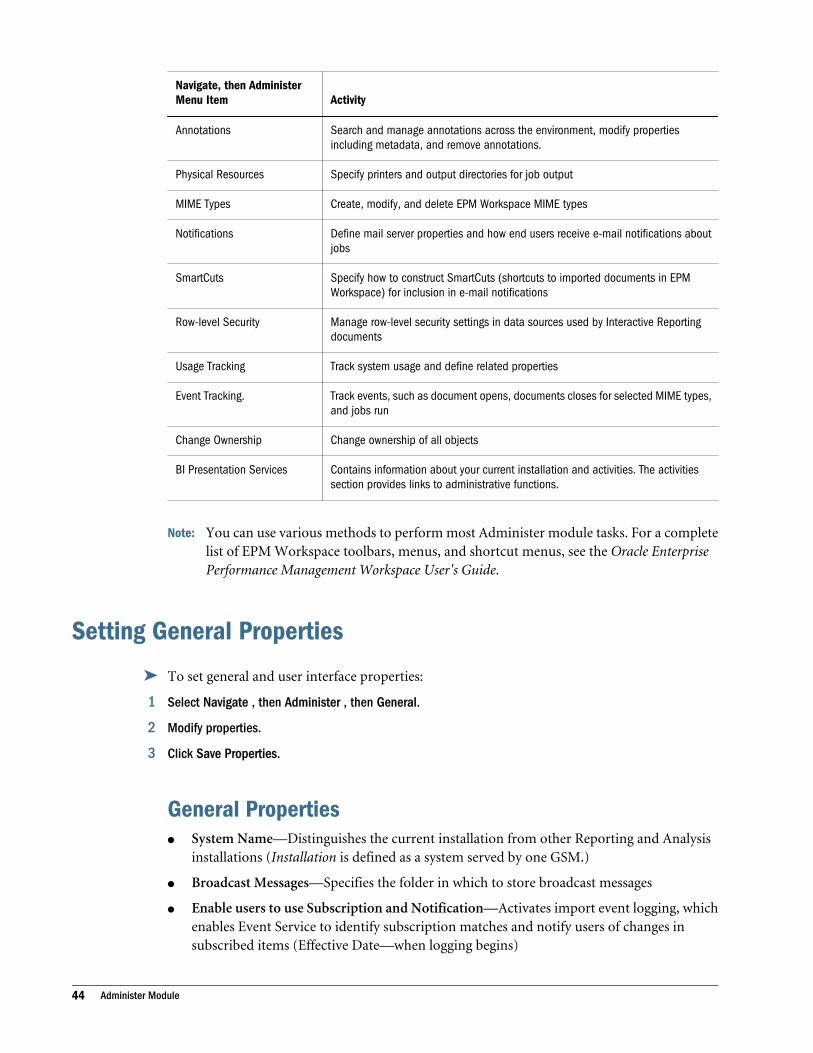
Navigate, then AdministerMenu Item Activity
Annotations Search and manage annotations across the environment, modify propertiesincluding metadata, and remove annotations.
Physical Resources Specify printers and output directories for job output
MIME Types Create, modify, and delete EPM Workspace MIME types
Notifications Define mail server properties and how end users receive e-mail notifications aboutjobs
SmartCuts Specify how to construct SmartCuts (shortcuts to imported documents in EPMWorkspace) for inclusion in e-mail notifications
Row-level Security Manage row-level security settings in data sources used by Interactive Reportingdocuments
Usage Tracking Track system usage and define related properties
Event Tracking. Track events, such as document opens, documents closes for selected MIME types,and jobs run
Change Ownership Change ownership of all objects
BI Presentation Services Contains information about your current installation and activities. The activitiessection provides links to administrative functions.
Note: You can use various methods to perform most Administer module tasks. For a completelist of EPM Workspace toolbars, menus, and shortcut menus, see the Oracle EnterprisePerformance Management Workspace User's Guide.
Setting General Properties
ä To set general and user interface properties:
1 Select Navigate , then Administer , then General.
2 Modify properties.
3 Click Save Properties.
General Propertiesl System Name—Distinguishes the current installation from other Reporting and Analysis
installations (Installation is defined as a system served by one GSM.)
l Broadcast Messages—Specifies the folder in which to store broadcast messages
l Enable users to use Subscription and Notification—Activates import event logging, whichenables Event Service to identify subscription matches and notify users of changes insubscribed items (Effective Date—when logging begins)
44 Administer Module
l Enable Priority Ratings—Enables users to set priority ratings on items imported to theExplore module.
l Enable Harvesting—Activates Harvester Service, which enables users to use ImpactManager to extract and save Interactive Reporting metadata to relational data sources foruse in other formats (see Chapter 5, “Using Impact Management Services”)
l Default Open Format for Interactive Reporting—Specifies whether Interactive Reportingdocuments open in EPM Workspace (HTML) or Interactive Reporting Web Client bydefault
User Interface Propertiesl Display all users/groups/roles in the system—Lists all available users, groups, and roles
when end users set access permissions on repository items. Selecting this option may impactsystem performance.
l List up to nn users/groups/roles—Number of users, groups, or roles displayed when endusers set access permissions on repository items; default is 100. Specifying too low a numbermay prevent end users from seeing all users, groups, and roles to which they have access.
Authenticating Users- Host AuthenticationHost authentication properties relate to the use of trusted password and pass-throughconfiguration values, which apply to jobs and Interactive Reporting documents. For additionalinformation on pass-through settings, see “Managing Pass-Through for Jobs and InteractiveReporting Documents” on page 127. The following explains the settings for the trusted passwordand pass-through configuration of Authentication option from Administer module.
l Enable trusted password—Enables the use of a trusted password
l Use users’ login credentials for pass-through—Enables pass-through using the user’s logoncredentials which include Password and Confirm Password fields
l Allow users to specify credentials for pass-through—Enables pass-through using thecredentials the user specifies in Preferences
If no credentials are specified in Preferences, an error message displays each time users attemptto open Interactive Reporting documents or run jobs.
Note: Changes to Authentication requires restart of both services and application server (UI)and user is notified accordingly.
Managing UsersFor information on managing users, groups, and roles, see the Oracle Hyperion EnterprisePerformance Management System Security Administration Guide.
Authenticating Users- Host Authentication 45
Assigning Reporting and Analysis Default PreferencesOracle's Hyperion® Shared Services Console enables users with Provisioning Manager andExplorer roles to set the default folder, new document folder, and start page applicationpreferences for users and groups. Individual and group preferences have precedence over defaultpreferences.
For default preferences to succeed, users and groups must have the roles and permissionsnecessary to access specified folders and interface elements.
Provisioning Manager is a Shared Services role that enables you to provisions users and groupsto applications. It is also required for setting default user preferences for Reporting and Analysis.For more information, see the Oracle Hyperion Enterprise Performance Management SystemSecurity Administration Guide.
ä To assign default preferences for Reporting and Analysis:
1 Select Navigate, then Administer, and then Shared Services Console.
2 Expand the Application Groups node until a Reporting and Analysis application is displayed.
3 Right-click the application name and select Assign Preferences.
A three-step wizard is displayed in the Process bar.
4 For step 1 of the Wizard, Select Users, select Available Users or Available Groups.
5 From the left panel, select user names or group names and click the right arrow.
To select consecutive names, select the first name, press and hold down Shift, and select the lastname. To select names that are not consecutive, press and hold down Ctrl, and select each item.Use Add All to select all names.
6 Repeat steps 5 and 6 to select a combination of users and groups.
7 When all user and group names are displayed in Selected Users and Groups, click Next.
8 For step 2 of the Wizard, Manage Preferences, specify these default preferences for the selected users andgroups:
l Default Folder—Repository location of the default folder.
l New Document Folder—Default folder in which the new document wizard searches forvalid data sources, that is, Web Analysis database connection files and Interactive Reportingdocuments.
l Start Page—Reporting and Analysis interface displayed after logging on. Select None,Explore, Document, or Scorecard.
If you select Explore or Document for Start Page, you must specify a repository location.
9 From Enable Accessibility Mode, do the following:
l Select Enable Screen Reader Support
l From Select Theme select High Contrast
10 When all preferences are specified, click Next.
11 For step 3 of the Wizard, Finish, choose between three tasks:
46 Administer Module
l To configure options for another application, select one from the View pane.
l To change preferences for currently selected users and groups, click Back.
l To specify another set of users and groups and set their preferences, click Continue.
Exploring and Managing AnnotationsAdministrators have access to all annotations on the annotation server.
Tasks you can perform
l Search for annotations. See “Searching for Annotations” on page 47.
l View reports associated with annotations. See “Viewing Reports Associated withAnnotations” on page 49.
l Reply to annotations. See “Replying to Annotations” on page 49.
l Delete annotations. See “Deleting Annotations” on page 50.
l Change the source. See “Changing the Source for Annotations” on page 50.
l Change context elements. See “Changing Context Elements” on page 51.
l Modify permissions. See “Modifying Permissions” on page 51.
Note: In fr_global.properties, a designer can control whether a report willautomatically query for, and return Cell Text, Planning Unit Annotations and/ordocument attachments as annotations for a given report. For information, see thetopic Showing Cell Text, Planning Unit Annotations and Financial ReportingDocuments in Annotations, in the Oracle Hyperion Financial Reporting Studio User’sGuide.
Searching for AnnotationsThe Search option returns a list of annotation based on specified criteria.
ä To search for annotations
1. From EPM Workspace, select Navigate, then Administer, then Annotations. As a default,the Annotation Manager has no annotations displayed.
2. From the Search drop-down, select a search method.
l All — A search based on text located in Title, Author, Category, Description, or Context.Case-insensitive text, trailing asterisks and wildcard strings are acceptable.
l Title — A search based on text located in Title. Case-insensitive text, trailing asterisksand wildcard strings are acceptable.
l Author — A search based on text located in Author.
l Category — Search on category. Click the Search lookup to select a category.
Exploring and Managing Annotations 47
l Description — A search based on text located in Description. Case-insensitive text,trailing asterisks and wildcard strings are acceptable.
l Context — Search on context. The Search lookup displays the Context Lookup dialogbox where you can define your search based on a data source, element name and,optionally, an element value. See “Context Lookup” on page 48
l Advanced Search — The Search lookup displays the Advanced Search dialog box whereyou can define your search based on a combination of Title, Author, Description, PostedDate Range, Category or Context. See “Advanced Search” on page 48
3. To view annotation content, click the annotation. The content is displayed in the annotationpanel located at the bottom of the screen.
Note: Reports that have previously deleted annotations, will display with a warning (!) icon.
Context LookupYou can refine your search based on a data source, element name, and element values.
ä To define your search in Context Lookup:
1. In the Data Source drop-down, select a data source.
Note: Data sources are displayed for existing annotations. The “fr:” data source is displayedif annotations are set on an object. “fr:” preceded by a data source indicatesannotations set for a particular report.
2. In the Element Name drop-down, select an element.
Note: The selected element is removed from the list and cannot be re-selected.
3. In Element Values, specify the value. To specify multiple values, separate each value with acomma (,).
Note: Only one of the multiple values need to be met.
4. To add additional search criteria, repeat steps 2 and 3.
Note: When you specify multiple element names, a value for each element name must bemet.
Advanced Searchyou can refine your search for annotations based on a combination of criteria:
ä To use the Advanced search:
1. From the search drop-down, select Advanced Search.
2. in the Advanced Search dialog box, enter search criteria:
48 Administer Module
l Title — Annotation title.
l Author — Annotation author.
l Description — Annotation description.
l Posted Date Range From/To — The inclusive beginning and end past dates of annotations.Calendar lookup selections are provided in the From and To drop-downs.
l Category — The topic, or subject, associated with the annotations. Select a category fromthe Category drop-down.
l Context — Select a data source, element name and element values using the Context Lookup.Click the Lookup icon to display the Context Lookup dialog box. See “Context Lookup” onpage 48.
Viewing Reports Associated with AnnotationsYou can view a report and their attachments associated with an annotation. An annotationsummary row is displayed for each annotation in a report.
Note: If an error occurs when attempting to view a report, the data source for the report mayhave change, you need to match the data source for the annotations as well. See “Changingthe Source for Annotations” on page 50
Note: If the report name has changed in EPM Workspace through the Rename menu option,then any object-level annotations will remain associated with the renamed report.However, if the name is changed through the Save As… menu within Financial ReportingStudio, then the duplicated report and any object-level annotations on the original reportare not copied to the report with the new name.
ä To View Reports
1. Open Annotation Manager and search for annotations. See “Searching for Annotations” onpage 47.
2. Right-click an annotation and select Show Reports/Documents.
Note: If an error occurs, check whether the reports' data source has changed.
3. The report(s) are displayed. Annotation icons on the report indicate the location of theannotation references.
Note: An eye icon displays for annotations associated with read-only reports/documents.
Replying to AnnotationsAdministrators can reply to all annotations, regardless of permission settings.
Exploring and Managing Annotations 49
ä To reply to annotations:
1. Open Annotation Manager and search for annotations. See “Searching for Annotations” onpage 47.
2. Perform an option:
l Right-click an annotation and select Reply.
l Double-click an annotation.
l Highlight an annotation and click the Reply icon.
3. The Reply Annotation dialog box is displayed.
Deleting AnnotationsAdministrators can delete any annotations, regardless of permission settings.
ä To delete annotations:
1. Open Annotation Manager and search for annotations. See “Searching for Annotations” onpage 47.
2. Perform an option:
l Right-click an annotation and select Delete.
l Highlight an annotation and click the Delete icon
3. Click Yes to confirm.
Changing the Source for AnnotationsYou can optionally change any source element associated with annotations. Data sourceelements consist of Type, Server, Application, and Database. The data source can be applied toa selected annotations or all annotations that meet the original data source criteria.
ä To change the source for annotations:
1. Open Annotation Manager and search for annotations. See “Searching for Annotations” onpage 47.
2. Right-click an annotation and select Change Source. The Change Source dialog box displaysthe current data source.
3. Enter your data source options. All fields are optional:
l In the Data Source drop-down, select a new data source. Proceed to change any datasource element.
l In Replace Type, enter a new data source type.
l In Replace Server, enter a new server.
l In Replace Application, enter a new application.
l In Replace Database, enter a new database
50 Administer Module
4. In Apply to All Annotations, to apply the source change to all annotations that meet theoriginal data source criteria, select the check box. To apply the source change to thehighlighted annotations, clear the check box.
5. Click OK. A confirmation message presents the number of changed documents. Thechanged documents are highlighted in the list.
Changing Context ElementsYou can change the dimension or dimension member value for annotations associated with aspecific data source.
ä To change the context elements for annotations:
1. Open Annotation Manager and search for annotations. See “Searching for Annotations” onpage 47.
2. Right-click an annotation and select Change Element. The Change Element dialog box isdisplayed with the current data source.
3. Optional. In the Data Source drop-down, select a data source.
4. Select an option:
l Change Element. Select this option to change the dimension. Then, in Replace, select adimension from the drop-down, and in With, enter a new dimension.
l Change Element Value For: Select this option to change a dimension and member. Thenselect a dimension you want replaced from the drop-down. list. In Replace select a newdimension, and in With, enter a member.
5. Select Apply to All Annotations to apply the element change to all annotations that meetthe data source criteria; clear Apply to all Annotations to apply the element change to thehighlighted annotations only.
6. Click OK. A confirmation message presents the number of annotations changed to the newelement . The changed documents are highlighted in the list.
Modifying PermissionsAnnotation permissions define the level of access based on users, groups or roles. The followingpermissions may be set in the Annotation List Panel:
l No Access — User cannot see the annotation.
l View — User can view the annotation.
l Modify — User can respond to an annotation but not delete.
l Full Control — User can view, respond, delete, and set permissions to an annotation.
ä To access the Permissions dialog:
1. Right-click an annotation and select Permissions.
Exploring and Managing Annotations 51
2. In the Permissions dialog box highlight the users, groups, or roles to which you want toapply permissions, then click on the right-facing arrow to move them to the Selected Users,Groups and Roles panel.
3. From the Access drop-down, select the permissions, and click OK. For additionalinformation on setting permissions, see the Oracle Enterprise Performance ManagementWorkspace Developer's Guide.
Managing Physical ResourcesPhysical resources, such as printers and directories, are used as destinations for InteractiveReporting and Production Reporting job output. Physical resources must be accessible to eachserver that is running Hyperion Interactive Reporting Service.
You should assign access permissions and notify end users about which physical resources touse. Users should see only the physical resources that they can use.
Viewing Physical Resources
ä To view physical resources defined for EPM Workspace:
1 Select Navigate , then Administer , then Physical Resources.
2 From Display drop down, select All, Only Printer, or Only Output Directory as a resource and click UpdateList.
ä To view properties settings for physical resources, click a resource name. For more informationon the Properties dialog, see the Oracle Enterprise Performance Management Workspace User'sGuide.
Access Permissions for Physical ResourcesReporting and AnalysisPhysical resources has three access levels: No Access, View, and FullControl.
You add roles, groups, or users and set their access permissions as you do for other artifacts. Seethe Oracle Enterprise Performance Management Workspace User's Guide for instructions onsetting access permissions.
Adding Physical Resources
ä To add physical resources:
1 Select Navigate , then Administer , then Physical Resources.
2 In the Content pane, click Go next to Add Printer or Add Output Directory.
52 Administer Module
3 Specify required properties and optional properties.
See “Printer Properties” on page 53 and “Output Directory Properties” on page 54.
Note: Physical resources must be accessible to each server on which Hyperion InteractiveReporting Service is running.
4 Click Next to set access permissions.
Set access Permissions for this resource (see “Access Permissions for Physical Resources” onpage 52.
5 Click Finish.
Modifying Physical Resources
ä To modify physical resources:
1 Select Navigate , then Administer , then Physical Resources.
2 Click Modify next to a resource name or select the resource name.
3 Make changes and click OK.
See “Access Permissions for Physical Resources” on page 52, “Printer Properties” on page 53and “Output Directory Properties” on page 54.
Deleting Physical Resources
ä To delete physical resources:
1 Select Navigate , then Administer , then Physical Resources.
2 Click Delete next to a resource name.
3 Confirm the deletion when prompted.
Printer PropertiesPrinters are used for Interactive Reporting job output.
ä To create a printer:
1 Complete the following:
l Type—Read-only property; set as Printer
l Name—Name for the printer; visible to end users
l Description—Helps administrators and end users identify the printer
l Printer Address—Network address of the printer (for example, \\f3prt\techpubs); notvisible to end users
Managing Physical Resources 53
l Owner—User can change ownership by selecting the Change Owner button.
2 Select Next to assign permissions. See the Oracle Enterprise Performance Management Workspace User'sGuide for more information.
3 Select Finish.
Output Directory PropertiesOutput directories are used for Interactive Reporting and Production Reporting job output.They can be located locally or on a network and can be FTP directories.
ä To create an output directory:
1 Complete the following for General properties:
l Type—Read-only property; set as Output Directory
l Name—Name for the output directory; visible to end users
l Description—Helps administrators and end users identify the directory
l Path—Directory’s full network path (for example, \\apollo\Inventory_Reports)
l Owner—User can change ownership by selecting the Change Owner button.
2 FTP properties:
l Directory is on FTP Server—Enable if the output directory is located on an FTP server, andset these options:
l FTP server address—Address of the FTP server where the output directory is located (forexample, ftp2.hyperion.com)
l FTP User Name—User name to access the FTP output directory
l FTP Password—Password for FTP user name
l Confirm Password—Retype the password entered for FTP password
3 Select Next to assign permissions. See the Oracle Enterprise Performance Management Workspace User'sGuide for more information.
4 Select Finish.
Managing MIME TypesBefore you can import items into the repository, their MIME types must be defined in EPMWorkspace. Although EPM Workspace has many built-in MIME types, you may need to defineothers.
You can associate a MIME type with multiple file extensions. For example, you can associate theextensions .txt, .bat, and .dat with the text MIME type.
Multiple MIME types can use one extension. For example, if your organization uses multipleversions of a program, you can define a MIME type for each version; however, file names of all
54 Administer Module
versions use the same extension. When users opens files with extensions that belong to multipleMIME types, they are prompted to select a program executable.
In the MIME type list, traffic-light icons indicate active (green) or inactive (red); see “Inactivatingor Re-activating MIME Types” on page 55.
Defining MIME Types
ä To define MIME types:
1 Select Navigate , then Administer , then MIME Types.
2 At the bottom of the content pane, click Go (to the right of Add MIME Type).
3 Supply a name and description.
4 In the file extensions box, enter an extension and click .
When entering extensions, type only the extension letters. Do not include a period (.).
5 Select Active to make it selectable.
6 Optional: Under Advanced Options, click Change Icon, and select from the available images or browse toadd an image to the repository, then click OK.
7 Click Finish.
Note: Newly defined MIME types are active by default.
Modifying MIME Types
ä To modify MIME types:
1 Select Navigate , then Administer , then MIME Types.
2 In the listing of MIME types, click Modify.
3 Change properties.
To remove a file extension, select it in the <Extensions> list and click .
4 Click OK.
Inactivating or Re-activating MIME TypesTo prevent items from being imported to the repository, inactive their MIME types. Althoughrepository items with inactive MIME types are still accessible, end users must specify whichprograms to use when opening them.
You can re-activate an inactive MIME type at any time.
Managing MIME Types 55
ä To inactivate or re-activate MIME types:
1 Select Navigate , then Administer , then MIME Types.
2 In the MIME type list, click Modify Properties.
3 Change the Active setting:
l To inactivate a MIME type, clear Active and click OK. Its traffic-light icon changes to red.
l To re-activate a MIME type, select Active and click OK. Its traffic-light icon changes to green.
Deleting MIME TypesUnlike inactivating MIME types, deletion is permanent and affects associated items. You cannotimport files that have extensions associated with a deleted MIME type.
For items associated with a deleted MIME type, the text “unknown file type” is displayed insteadof MIME type icons. When users open these items, they are prompted to select a programexecutable.
You can delete MIME types that you define; however, you cannot delete built-in EPM WorkspaceMIME types.
ä To delete MIME types:
1 Select Navigate , then Administer , then MIME Types.
2 Click Delete next to a MIME type.
Managing NotificationsNotification properties control how users receive notifications about the jobs and documentsto which they subscribe:
l “Understanding Subscriptions and Notifications” on page 56
l “Modifying Notification Properties” on page 58
Understanding Subscriptions and NotificationsSubscriptions and notifications are handled by Event Service.
Topics that discuss how Event Service handles subscriptions and notifications:
l “Subscription Types” on page 56
l “How Event Service Obtains Information” on page 57
l “Notification Mechanisms” on page 57
Subscription TypesSubscription types that users can subscribe to and receive notifications about:
56 Administer Module
l New or updated versions of items
l Changed content in folders
l Job completion
l Job exceptions
Independent of subscriptions, Event Service sends notifications to these users:
l Owners of scheduled jobs, when job execution finishes
l Users who run background jobs, when job execution finishes
How Event Service Obtains InformationWhen users subscribe to items or folders, EPM Workspace sends subscription informationthrough LSM to Event Service, which adds the subscriptions to its subscriptions list.
Repository Service maintains a list of imported and updated artifacts, which includes allimported items, folders, and job output; modified item properties; updated versions; and artifactmetadata.
Repository Service includes in its list both imported or modified items or folders, and the foldersthat contain them.
Every 60 seconds, Event Service obtains the Repository Service’s list of new and modified items,and compares them to the subscription list. Event Service then sends notifications to subscribedusers.
Repository Service discards its list after giving it to Event Service, which, in turn, discards thelist after it notifies subscribers of changes.
Other services notify Event Service when they complete actions that may trigger subscriptions,such as successful job execution. Event Service checks these events against the subscription listand sends notifications to subscribers.
Notification MechanismsWays in which Event Service notifies users:
l Send e-mails with embedded SmartCuts to notify users about changes to items, folders, newreport output, job completion, or exception occurrences
Optionally, Event Service may send file attachments, based on how users chose to be notifiedon the Subscribe page.
l Display notifications of completed scheduled jobs or background jobs in the Schedulemodule
l Display notification of job completion after a job runs in the foreground
l Display a redlight icon in Exceptions Dashboard when output.properties indicates thatexceptions occurred
Managing Notifications 57
When exceptions occur, the importer of the file sets properties to indicate the presence ofexceptions and to specify exception messages. The importer is usually Job Service, and thefile is usually job output.
Exceptions can be flagged by any of these methods:
m Production Reporting code
m Manually by users who import files or job output
m APIs that set exception properties on files or output
Hyperion Interactive Reporting Service does not support exceptions, but you can setexceptions on Interactive Reporting documents using the API or manual methods.
Users choose whether to include the Exceptions Dashboard on Personal Pages and whichjobs to include on the Exceptions Dashboard.
Modifying Notification Properties
ä To modify Notification properties:
1 Select Navigate , then Administer , then Notifications.
2 Modify Notification properties and mail server options:
Note: If you change the “Enable email attachment” or “Maximum attachment size” property,you must restart Core Services for the setting to take effect. For information on startingservices, see “Starting Reporting and Analysis Services” on page 31.
l Notifications
m Enable email attachment—Allows end users to send file attachments with their e-mailnotifications. If jobs generate only one output file, that file is attached to the e-mail. Ifjobs generate multiple output files including PDF files, the PDF files are attached to e-mails; otherwise, no files are attached.
m Maximum attachment size—Maximum allowed size for attachments, in bytes.
m Time to live for entries in the notification log—Number of minutes after which eventsare removed from the notification log and are no longer displayed in the Exploremodule. Expiration times for scheduled jobs and background jobs.
3 Click Save Properties.
Note: To change the mail server, an Administrator should use the Configuration Tool.
Managing SmartCutsSmartCuts are shortcuts in URL form to imported documents in EPM Workspace. SmartCutproperties are used to construct SmartCuts that are included in e-mail notifications.
58 Administer Module
URLs for SmartCuts:
http://hostname:port/workspace/browse/get/Smartcut
For Example:
http://pasts402:19000/workspace/browse/get/Patty/Avalanche_CUI_Style_Guidelines.pdf/
(Alternatively, a SmartCut may start with https instead of http.)
ä To modify SmartCut properties:
1 Select Navigate , then Administer , then SmartCuts.
2 Modify SmartCut properties:
Note: If you change SmartCut properties, you must restart the EPM Workspace server and JobService for the settings to take effect.
l Name—Web component for the SmartCut
l Description—EPM Workspace description
l Host—Host on which UI Services reside
l IP Port—Port number on which EPM Workspace runs
l Root—Web application deployment name for EPM Workspace, as set in your Web serversoftware
Typically, this is workspace/browse. The last segment (browse) must match the servletname specified during installation.
l Protocol for SmartCuts generated in email notifications—HTTP or HTTPS
3 Click Save Properties.
Managing Row-Level SecurityRow-level security enables users to view only those records that match their security profile, nomatter what their search criteria. It enables administrators to tag data in the row level of adatabase, thus controlling who has read access to information. Row-level security is critical toapplications that display sensitive data such as employee salaries, sales commissions, or customerdetails. Lack of row-level security could be a big detriment to organizations that want todistribute information to their user community using the Internet and intranets.
If you want to implement row-level security in Reporting and Analysis, keep these points inmind:
l At least one Hyperion Interactive Reporting Data Access Service instance must be configuredto access the data source storing your row-level security information.
l The database client library should be installed on the computer where the HyperionInteractive Reporting Data Access Service is running.
Managing Row-Level Security 59
l The data source for the Reporting and Analysis repository that has the row-level securitytable information should be configured.
l For security reasons, the user name and password to access the data source should differfrom that used for the Reporting and Analysis user account.
See the Hyperion Interactive Reporting Studio User's Guide for information about implementingrow-level security in Interactive Reporting documents.
Row-level security properties are stored in the repository; however, the rules about how to giveaccess to the data are stored in the data source.
ä To modify row-level security properties:
1 Select Navigate , then Administer , then Row Level Security.
2 Modify these row-level-security properties:
l Enable Row Level Security—Row-level security is disabled by default.
l Connectivity—Database connectivity information for reports’ source data.
l Database Type—Type of database that you are using. Database types available depend onconnectivity selection.
l Data Source Name—Host of the data source database.
l User Name—Default database user name used by Job Service for running ProductionReporting jobs on this database server; used for jobs that were imported with no databaseuser name and password specified.
l Password—Valid password for user name.
l Confirm Password—reenter password.
3 Click Save Properties.
Tracking System UsageUsage tracking records information about EPM Workspace activities as they occur and providesa historical view of system usage. This information answers questions like:
l Who logged in yesterday?
l Which EPM Workspace reports are accessed most frequently?
You can configure your system to track numerous activities. For example, you can track opening,closing, and processing Interactive Reporting documents or you can track only openingInteractive Reporting documents.
Activities are recorded as events in the repository database. Events are recorded with pertinentdetails and information that distinguishes them from each other. Event times are stored in GMT.Events are deleted from the database in a configurable time frame.
Usage Service must be running to track events set in the user interface. Usage Service can bereplicated and all Usage Services access one database.
60 Administer Module

The user name and password to access the usage tracking information may differ from that usedfor EPM Workspace. Oracle recommends that Usage Tracking use its own schema in therepository database; however, an alternate schema is not required. For more information aboutconfiguring Usage Tracking schema, see the Oracle Hyperion Enterprise PerformanceManagement System Installation and Configuration Guide.
Topics that provide detailed information about tracking usage and events:
l “Managing Usage Tracking” on page 61
l “Tracking Events and Documents” on page 61
l “Sample Usage Tracking Reports” on page 62
Managing Usage TrackingUsage tracking is managed through the Administer module and CMC. All configurableproperties, except run type, are managed in the Administer module. To modify the run type,see “Modifying Properties in CMC” on page 158.
ä To manage usage tracking:
1 Select Navigate , then Administer , then Usage Tracking.
2 Change these properties:
l General preferences
m Usage Tracking Active—Select to turn on usage tracking.
m Mark records ready for deletion after_days—Number of days after which usage trackingevents should be marked for deletion by the garbage collection utility. Default is 30.
m Delete records every_days—Number of days after which the garbage collection utilityshould be run. Default is 7.
l Connectivity preferences—User name and password are populated from the usage trackingdatabase and should only be changed if the database is moved.
3 Select Apply.
Tracking Events and DocumentsUsage Service keeps records about logon instances, document opens, documents closes for selectMIME types, jobs run, job output views, and queries processed by Reporting and Analysis. UsageService must be running to track events. By default, events are not tracked.
ä To track events:
1 Select Navigate , then Administer , then Event Tracking.
2 Select an event to track it:
l System Logons
l Database Logons
Tracking System Usage 61
l Timed Query Event
l Open Interactive Reporting Document
l Process Interactive Reporting Document
l Close Interactive Reporting Document
l Run Interactive Reporting Job
l View Interactive Reporting Job Output
l Run Production Reporting Job
l View Production Reporting Job Output
l Run Generic Job
l View Generic Job Output
l Change ownership Event
l Copy Event
3 To track documents, move one or more available MIME types to the Selected MIME Types list.
Tracking occurs each time a document of a selected MIME type is opened.
4 Click Apply.
Sample Usage Tracking ReportsSample usage tracking reports provide immediate access to standard EPM Workspace usagereports. You can modify standard reports or create your own reports.
The Interactive Reporting document, sample_usage_tracking.bqy, which generates usagetracking reports, is in the \Root\Administration\Usage Tracking folder in Explore.
ä To view the Administration folder, from Explore, select View, then Show Hidden.
Caution! The sample reports could contain sensitive company information when used withyour data. Use access permissions when importing the reports so only the intendedaudience has access.
Usage Tracking with Different Database SchemaNormally, Usage Tracking tables and views are in the same database schema as Reporting andAnalysis repository tables. However, Usage Tracking tables can also be configured in a differentlocation. Create base Usage Tracking tables for new schema and views using CreateUT.sql,CreateUTViews.sql, and populateUsageEventData.sql scripts from the installation package.
ä To create a Usage Tracking table in a new database schema in a different location:
1 Install base tables for new schema using CreateUT.sql, CreateUTViews.sql, and populateUsageEventData.sqlscripts from the installation package.
62 Administer Module
2 For base schema table, assign access rights for new user.
Note: This is required for next step.
3 Provide additional data view required for usage tracking mechanism using the following example:
Note: This example is one possible solution for providing data access for a source schema user.A database administrator may want to use their own solution for example, creating aliasfor tables.
a. CREATE view V8_RESOURCE_BUNDLE AS SELECT * from
source_schema.V8_RESOURCE_BUNDLE.
b. CREATE view V8_PROP_TYPE AS SELECT * from source_schema.V8_PROP_TYPE
c. CREATE view V8_PROP_VALIDATOR AS SELECT * from
source_schema.V8_PROP_VALIDATOR
d. CREATE view V8_PROP_ENUM_VALUE AS SELECT * from
source_schema.V8_PROP_ENUM_VALUE
e. CREATE view V8_PROP_DEFN AS SELECT * from source_schema.V8_PROP_DEFN
f. CREATE view V8_PROP_DEFN_CHILD AS SELECT * from
source_schema.V8_PROP_DEFN_CHILD
g. CREATE view V8_PROP_DEFN_ATTR AS SELECT * from
source_schema.V8_PROP_DEFN_ATTR
h. CREATE view V8_PROP_INTERNAL AS SELECT * from source_schema.
V8_PROP_INTERNAL
i. CREATE view V8_PROP_VALUE AS SELECT * from
source_schema.V8_PROP_VALUE
j. CREATE view V8_AUTHEN_CONFIG AS SELECT * from
source_schema.V8_AUTHEN_CONFIG
k. CREATE view V8_CSS_USER AS SELECT * from source_schema.V8_CSS_USER
where Source_schema is schema used by installed application.
This script is only one example of many possible ways to provide access for a base schema table'sdata. Usage Tracking mechanism connects to V8_RESOURCE_BUNDLE table data using"V8_RESOURCE_BUNDLE" alias and new connection.
4 Select Navigate , then Administer , then Usage Tracking to setup new schema connection in Administrationmodule.
Changing Ownership of All ObjectsChange Owner enables an administrator to change the owner of all objects from one user toanother. For example, if a user leaves the company you can now use this feature to re-assign
Changing Ownership of All Objects 63
ownership of all objects previously assigned to this user to a new user. Objects include files,folders, jobs, job outputs, schedules, events, and physical resources.
ä To change ownership of all objects:
1 Select Navigate, then then Administer, then then Change Ownership.
2 Select the name of the current owner by selecting Select User.
3 Select the user from the Change Owner dialog and select OK.
4 Select the name of the new owner by selecting Select User. Repeat previous step.
5 Select OK to apply changes.
BI Presentation ServicesThe Oracle BI Presentation Services Administration screen provides information regarding theinstalled Oracle BI EE products and administrative activities you can perform on the installedproducts. Product Information and Activities are provided in two separate areas of the OracleBI Presentation Services Administration screen. Product information includes currentinstallation, such as the product version in use, the path to the current Presentation Catalog,and a link to a list of features licensed by your organization. Additional information is alsoprovided for Windows such as available paging memory and available virtual address space.Activities section provides links to administrative functions.
For additional information, see the Oracle BI Presentation Services Administration Guide and theOracle Business Intelligence Enterprise Edition New Features Guide.
64 Administer Module
4Integrating Search Services with
External Applications
In This Chapter
About Search Services ... . . . . . . . . . . . . . . . . . . . . . . . . . . . . . . . . . . . . . . . . . . . . . . . . . . . . . . . . . . . . . . . . . . . . . . . . . . . . . . . . . . . . . . . . . . . . . . . . . . . . . . . . .65
Configuring Hyperion System 9 Connector and Identity Plug-ins for Oracle Secure Enterprise Search ... . . . . . . . . . . . . . . . . .65
Configuring Google OneBox to Use System 9 Search Service Data in its Results .. . . . . . . . . . . . . . . . . . . . . . . . . . . . . . . . . . . . . . . . . .68
About Search ServicesSearch Services enables users to search for and retrieve documents, reports, and dashboards fromany repository in EPM Workspace. The search operation returns a list of results based on locatingthe user’s keywords in document-specific metadata; for example, document name, date createdor author (for Oracle Hyperion Financial Reporting, Fusion Edition Word or PDF documentsonly), and extracting content-based information from documents.
Search Services can integrate with external applications and services. Connectors are availablefor Oracle Secure Enterprise Search and Google OneBox.
For detailed information on using Search Services, see “Using Search Services” in the OracleEnterprise Performance Management Workspace User's Guide.
Configuring Hyperion System 9 Connector and Identity Plug-insfor Oracle Secure Enterprise Search
See the following topics covered in this section:
“Deploying Plug-in JAR Files” on page 65
“Configuring the Identity Plug-in” on page 66
“Configuring the Connector Plug-in” on page 66
“Searching” on page 67
Deploying Plug-in JAR Files
ä To deploy the plug-in .jar files for Oracle Secure Enterprise Search:
1 Do a default installation of Oracle Secure Enterprise Search.
About Search Services 65
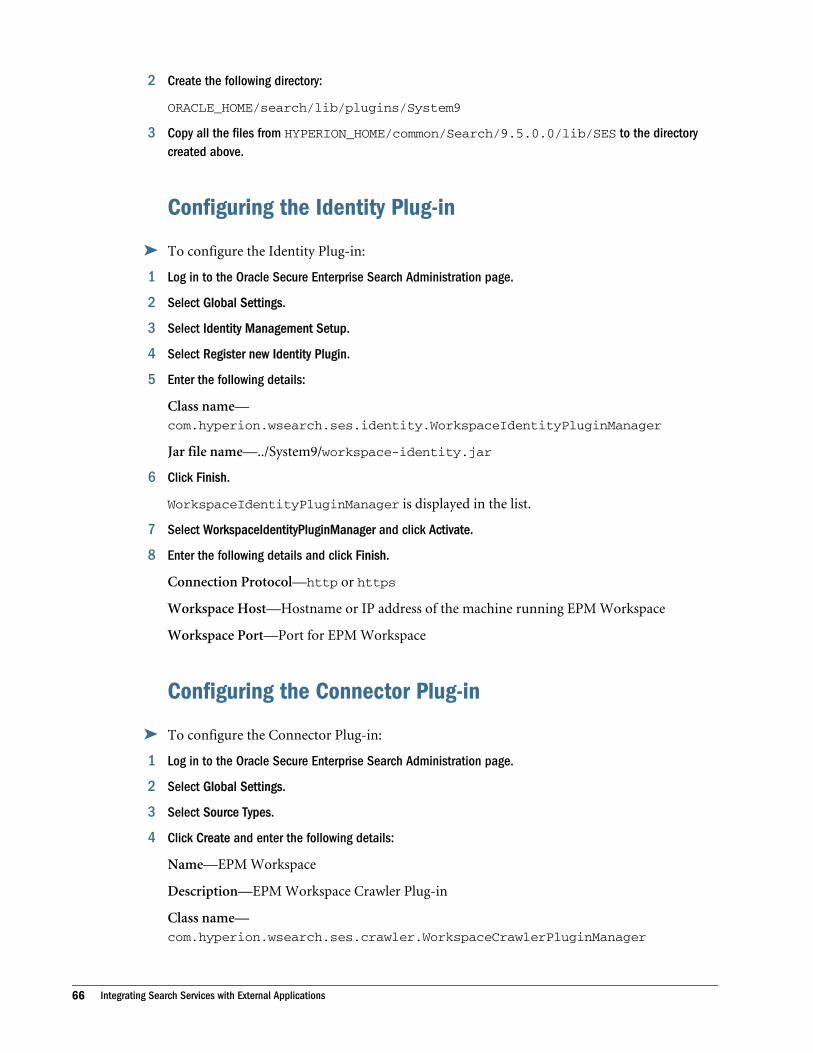
2 Create the following directory:
ORACLE_HOME/search/lib/plugins/System9
3 Copy all the files from HYPERION_HOME/common/Search/9.5.0.0/lib/SES to the directorycreated above.
Configuring the Identity Plug-in
ä To configure the Identity Plug-in:
1 Log in to the Oracle Secure Enterprise Search Administration page.
2 Select Global Settings.
3 Select Identity Management Setup.
4 Select Register new Identity Plugin.
5 Enter the following details:
Class name—com.hyperion.wsearch.ses.identity.WorkspaceIdentityPluginManager
Jar file name—../System9/workspace-identity.jar
6 Click Finish.
WorkspaceIdentityPluginManager is displayed in the list.
7 Select WorkspaceIdentityPluginManager and click Activate.
8 Enter the following details and click Finish.
Connection Protocol—http or https
Workspace Host—Hostname or IP address of the machine running EPM Workspace
Workspace Port—Port for EPM Workspace
Configuring the Connector Plug-in
ä To configure the Connector Plug-in:
1 Log in to the Oracle Secure Enterprise Search Administration page.
2 Select Global Settings.
3 Select Source Types.
4 Click Create and enter the following details:
Name—EPM Workspace
Description—EPM Workspace Crawler Plug-in
Class name—com.hyperion.wsearch.ses.crawler.WorkspaceCrawlerPluginManager
66 Integrating Search Services with External Applications
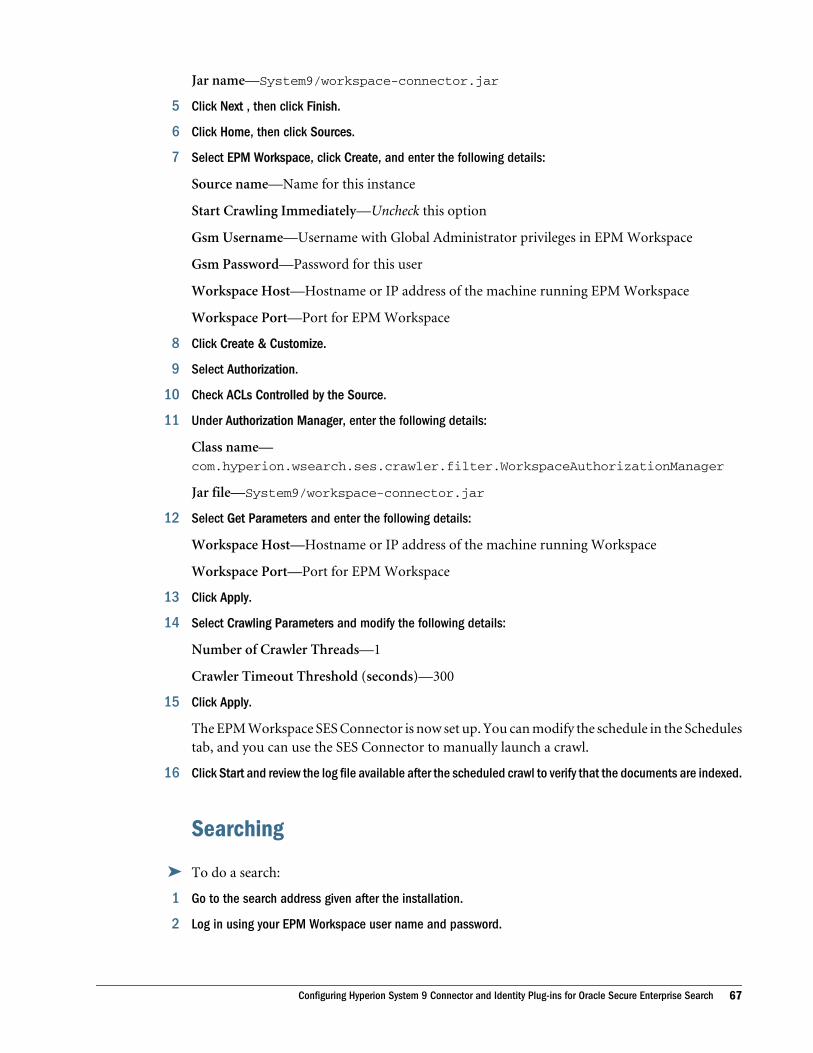
Jar name—System9/workspace-connector.jar
5 Click Next , then click Finish.
6 Click Home, then click Sources.
7 Select EPM Workspace, click Create, and enter the following details:
Source name—Name for this instance
Start Crawling Immediately—Uncheck this option
Gsm Username—Username with Global Administrator privileges in EPM Workspace
Gsm Password—Password for this user
Workspace Host—Hostname or IP address of the machine running EPM Workspace
Workspace Port—Port for EPM Workspace
8 Click Create & Customize.
9 Select Authorization.
10 Check ACLs Controlled by the Source.
11 Under Authorization Manager, enter the following details:
Class name—com.hyperion.wsearch.ses.crawler.filter.WorkspaceAuthorizationManager
Jar file—System9/workspace-connector.jar
12 Select Get Parameters and enter the following details:
Workspace Host—Hostname or IP address of the machine running Workspace
Workspace Port—Port for EPM Workspace
13 Click Apply.
14 Select Crawling Parameters and modify the following details:
Number of Crawler Threads—1
Crawler Timeout Threshold (seconds)—300
15 Click Apply.
The EPM Workspace SES Connector is now set up. You can modify the schedule in the Schedulestab, and you can use the SES Connector to manually launch a crawl.
16 Click Start and review the log file available after the scheduled crawl to verify that the documents are indexed.
Searching
ä To do a search:
1 Go to the search address given after the installation.
2 Log in using your EPM Workspace user name and password.
Configuring Hyperion System 9 Connector and Identity Plug-ins for Oracle Secure Enterprise Search 67
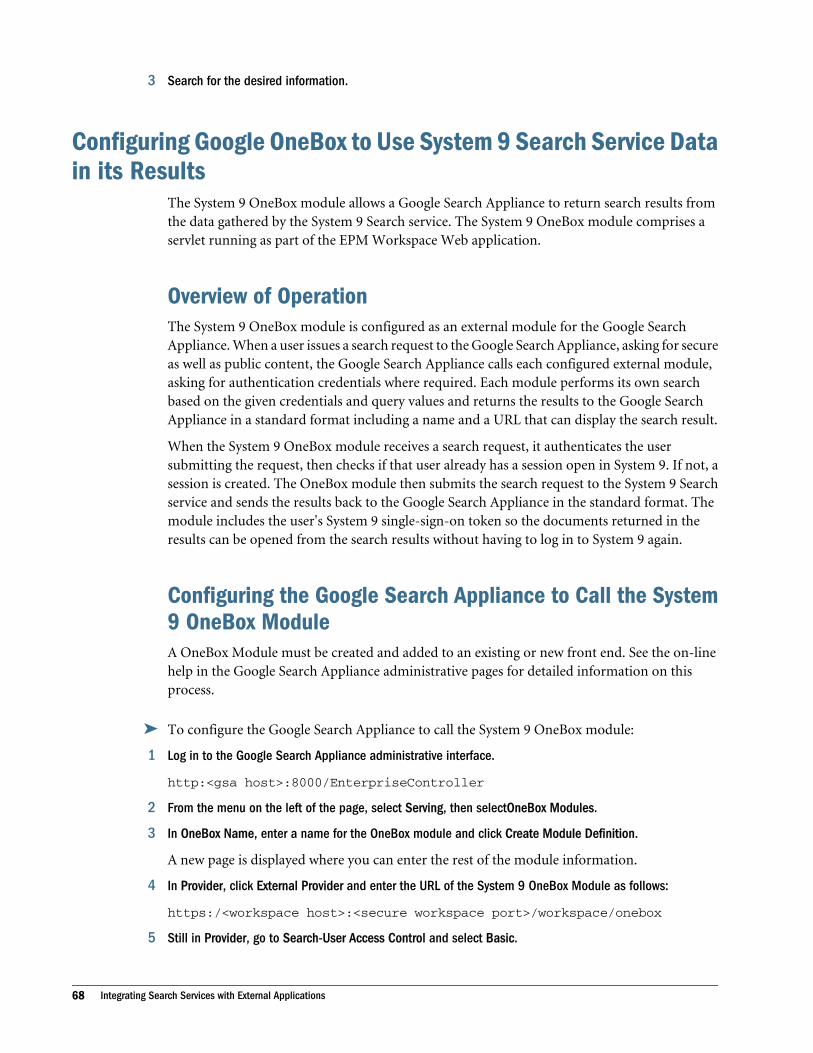
3 Search for the desired information.
Configuring Google OneBox to Use System 9 Search Service Datain its Results
The System 9 OneBox module allows a Google Search Appliance to return search results fromthe data gathered by the System 9 Search service. The System 9 OneBox module comprises aservlet running as part of the EPM Workspace Web application.
Overview of OperationThe System 9 OneBox module is configured as an external module for the Google SearchAppliance. When a user issues a search request to the Google Search Appliance, asking for secureas well as public content, the Google Search Appliance calls each configured external module,asking for authentication credentials where required. Each module performs its own searchbased on the given credentials and query values and returns the results to the Google SearchAppliance in a standard format including a name and a URL that can display the search result.
When the System 9 OneBox module receives a search request, it authenticates the usersubmitting the request, then checks if that user already has a session open in System 9. If not, asession is created. The OneBox module then submits the search request to the System 9 Searchservice and sends the results back to the Google Search Appliance in the standard format. Themodule includes the user's System 9 single-sign-on token so the documents returned in theresults can be opened from the search results without having to log in to System 9 again.
Configuring the Google Search Appliance to Call the System9 OneBox ModuleA OneBox Module must be created and added to an existing or new front end. See the on-linehelp in the Google Search Appliance administrative pages for detailed information on thisprocess.
ä To configure the Google Search Appliance to call the System 9 OneBox module:
1 Log in to the Google Search Appliance administrative interface.
http:<gsa host>:8000/EnterpriseController
2 From the menu on the left of the page, select Serving, then selectOneBox Modules.
3 In OneBox Name, enter a name for the OneBox module and click Create Module Definition.
A new page is displayed where you can enter the rest of the module information.
4 In Provider, click External Provider and enter the URL of the System 9 OneBox Module as follows:
https:/<workspace host>:<secure workspace port>/workspace/onebox
5 Still in Provider, go to Search-User Access Control and select Basic.
68 Integrating Search Services with External Applications
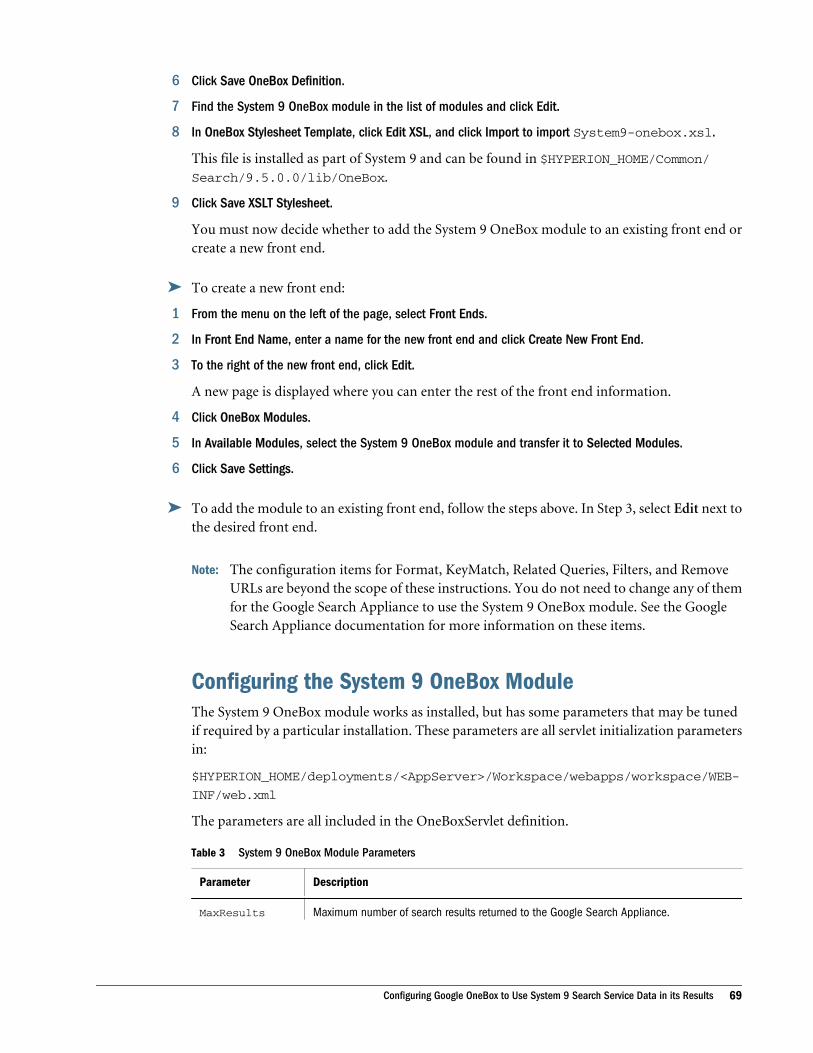
6 Click Save OneBox Definition.
7 Find the System 9 OneBox module in the list of modules and click Edit.
8 In OneBox Stylesheet Template, click Edit XSL, and click Import to import System9-onebox.xsl.
This file is installed as part of System 9 and can be found in $HYPERION_HOME/Common/Search/9.5.0.0/lib/OneBox.
9 Click Save XSLT Stylesheet.
You must now decide whether to add the System 9 OneBox module to an existing front end orcreate a new front end.
ä To create a new front end:
1 From the menu on the left of the page, select Front Ends.
2 In Front End Name, enter a name for the new front end and click Create New Front End.
3 To the right of the new front end, click Edit.
A new page is displayed where you can enter the rest of the front end information.
4 Click OneBox Modules.
5 In Available Modules, select the System 9 OneBox module and transfer it to Selected Modules.
6 Click Save Settings.
ä To add the module to an existing front end, follow the steps above. In Step 3, select Edit next tothe desired front end.
Note: The configuration items for Format, KeyMatch, Related Queries, Filters, and RemoveURLs are beyond the scope of these instructions. You do not need to change any of themfor the Google Search Appliance to use the System 9 OneBox module. See the GoogleSearch Appliance documentation for more information on these items.
Configuring the System 9 OneBox ModuleThe System 9 OneBox module works as installed, but has some parameters that may be tunedif required by a particular installation. These parameters are all servlet initialization parametersin:
$HYPERION_HOME/deployments/<AppServer>/Workspace/webapps/workspace/WEB-
INF/web.xml
The parameters are all included in the OneBoxServlet definition.
Table 3 System 9 OneBox Module Parameters
Parameter Description
MaxResults Maximum number of search results returned to the Google Search Appliance.
Configuring Google OneBox to Use System 9 Search Service Data in its Results 69
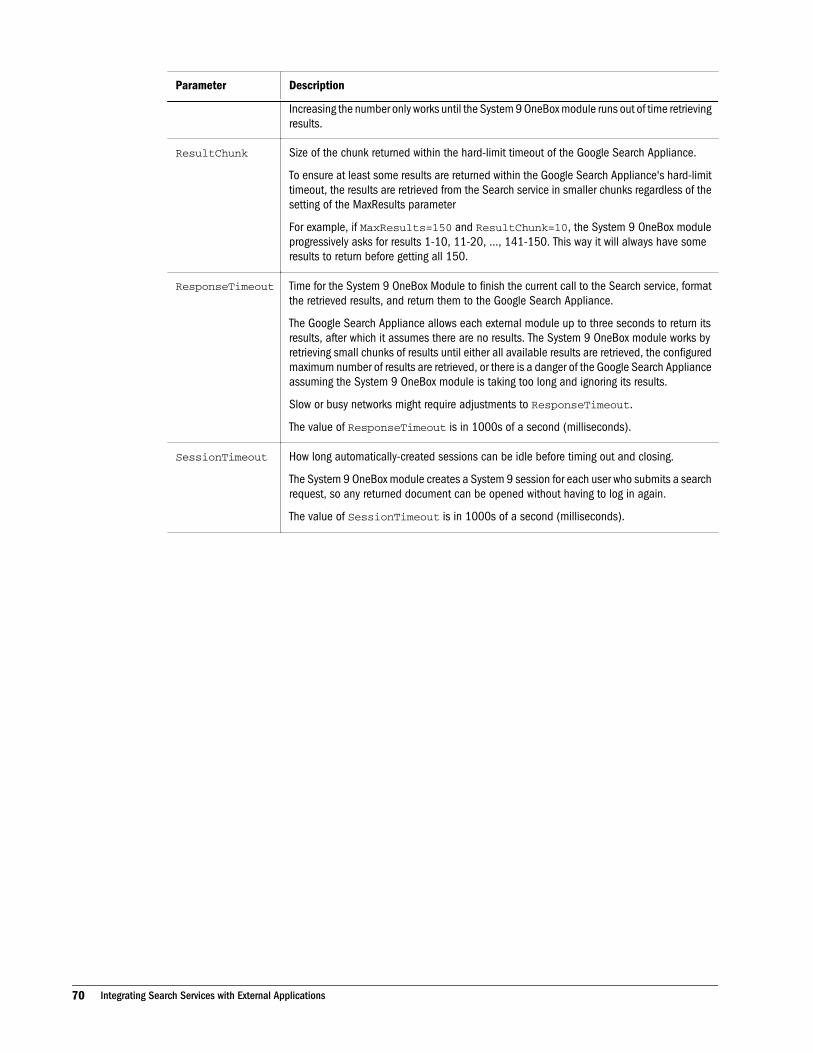
Parameter Description
Increasing the number only works until the System 9 OneBox module runs out of time retrievingresults.
ResultChunk Size of the chunk returned within the hard-limit timeout of the Google Search Appliance.
To ensure at least some results are returned within the Google Search Appliance's hard-limittimeout, the results are retrieved from the Search service in smaller chunks regardless of thesetting of the MaxResults parameter
For example, if MaxResults=150 and ResultChunk=10, the System 9 OneBox moduleprogressively asks for results 1-10, 11-20, ..., 141-150. This way it will always have someresults to return before getting all 150.
ResponseTimeout Time for the System 9 OneBox Module to finish the current call to the Search service, formatthe retrieved results, and return them to the Google Search Appliance.
The Google Search Appliance allows each external module up to three seconds to return itsresults, after which it assumes there are no results. The System 9 OneBox module works byretrieving small chunks of results until either all available results are retrieved, the configuredmaximum number of results are retrieved, or there is a danger of the Google Search Applianceassuming the System 9 OneBox module is taking too long and ignoring its results.
Slow or busy networks might require adjustments to ResponseTimeout.
The value of ResponseTimeout is in 1000s of a second (milliseconds).
SessionTimeout How long automatically-created sessions can be idle before timing out and closing.
The System 9 OneBox module creates a System 9 session for each user who submits a searchrequest, so any returned document can be opened without having to log in again.
The value of SessionTimeout is in 1000s of a second (milliseconds).
70 Integrating Search Services with External Applications
5Using Impact Management
Services
In This Chapter
Introduction... . . . . . . . . . . . . . . . . . . . . . . . . . . . . . . . . . . . . . . . . . . . . . . . . . . . . . . . . . . . . . . . . . . . . . . . . . . . . . . . . . . . . . . . . . . . . . . . . . . . . . . . . . . . . . . . . . . . . . .71
About Impact Management Services... . . . . . . . . . . . . . . . . . . . . . . . . . . . . . . . . . . . . . . . . . . . . . . . . . . . . . . . . . . . . . . . . . . . . . . . . . . . . . . . . . . . . . . . . . .72
Impact Management Assessment Services... . . . . . . . . . . . . . . . . . . . . . . . . . . . . . . . . . . . . . . . . . . . . . . . . . . . . . . . . . . . . . . . . . . . . . . . . . . . . . . . . . . .72
Impact Management Update Services ... . . . . . . . . . . . . . . . . . . . . . . . . . . . . . . . . . . . . . . . . . . . . . . . . . . . . . . . . . . . . . . . . . . . . . . . . . . . . . . . . . . . . . . . .73
Impact Manager Module Size and Time Guidelines ... . . . . . . . . . . . . . . . . . . . . . . . . . . . . . . . . . . . . . . . . . . . . . . . . . . . . . . . . . . . . . . . . . . . . . . . . .75
Running the Update Services ... . . . . . . . . . . . . . . . . . . . . . . . . . . . . . . . . . . . . . . . . . . . . . . . . . . . . . . . . . . . . . . . . . . . . . . . . . . . . . . . . . . . . . . . . . . . . . . . . . .75
Access to Impact Management Services ... . . . . . . . . . . . . . . . . . . . . . . . . . . . . . . . . . . . . . . . . . . . . . . . . . . . . . . . . . . . . . . . . . . . . . . . . . . . . . . . . . . . . .77
Synchronize Metadata Feature ... . . . . . . . . . . . . . . . . . . . . . . . . . . . . . . . . . . . . . . . . . . . . . . . . . . . . . . . . . . . . . . . . . . . . . . . . . . . . . . . . . . . . . . . . . . . . . . . .77
Update Data Models Feature ... . . . . . . . . . . . . . . . . . . . . . . . . . . . . . . . . . . . . . . . . . . . . . . . . . . . . . . . . . . . . . . . . . . . . . . . . . . . . . . . . . . . . . . . . . . . . . . . . . .79
JavaScript Update Feature ... . . . . . . . . . . . . . . . . . . . . . . . . . . . . . . . . . . . . . . . . . . . . . . . . . . . . . . . . . . . . . . . . . . . . . . . . . . . . . . . . . . . . . . . . . . . . . . . . . . . . .82
Custom Update Feature ... . . . . . . . . . . . . . . . . . . . . . . . . . . . . . . . . . . . . . . . . . . . . . . . . . . . . . . . . . . . . . . . . . . . . . . . . . . . . . . . . . . . . . . . . . . . . . . . . . . . . . . . .85
Using the SortDataModelTopics Script.. . . . . . . . . . . . . . . . . . . . . . . . . . . . . . . . . . . . . . . . . . . . . . . . . . . . . . . . . . . . . . . . . . . . . . . . . . . . . . . . . . . . . . . . . .85
Advanced Scripting ... . . . . . . . . . . . . . . . . . . . . . . . . . . . . . . . . . . . . . . . . . . . . . . . . . . . . . . . . . . . . . . . . . . . . . . . . . . . . . . . . . . . . . . . . . . . . . . . . . . . . . . . . . . . . .89
Connecting Interactive Reports .. . . . . . . . . . . . . . . . . . . . . . . . . . . . . . . . . . . . . . . . . . . . . . . . . . . . . . . . . . . . . . . . . . . . . . . . . . . . . . . . . . . . . . . . . . . . . . . . 102
Using Show Task Status Interactive Report. . . . . . . . . . . . . . . . . . . . . . . . . . . . . . . . . . . . . . . . . . . . . . . . . . . . . . . . . . . . . . . . . . . . . . . . . . . . . . . . . . . . 104
Managing Tasks ... . . . . . . . . . . . . . . . . . . . . . . . . . . . . . . . . . . . . . . . . . . . . . . . . . . . . . . . . . . . . . . . . . . . . . . . . . . . . . . . . . . . . . . . . . . . . . . . . . . . . . . . . . . . . . . . 106
Using Show Impact of Change Interactive Report. . . . . . . . . . . . . . . . . . . . . . . . . . . . . . . . . . . . . . . . . . . . . . . . . . . . . . . . . . . . . . . . . . . . . . . . . . . . . 109
Creating New Data Models.. . . . . . . . . . . . . . . . . . . . . . . . . . . . . . . . . . . . . . . . . . . . . . . . . . . . . . . . . . . . . . . . . . . . . . . . . . . . . . . . . . . . . . . . . . . . . . . . . . . . . 111
Changing Column Data Types... . . . . . . . . . . . . . . . . . . . . . . . . . . . . . . . . . . . . . . . . . . . . . . . . . . . . . . . . . . . . . . . . . . . . . . . . . . . . . . . . . . . . . . . . . . . . . . . . 116
Compatible Replacement Data Model and Document Character Sets .. . . . . . . . . . . . . . . . . . . . . . . . . . . . . . . . . . . . . . . . . . . . . . . . . . . . 117
Changing User Names and Passwords for Interactive Reporting Documents ... . . . . . . . . . . . . . . . . . . . . . . . . . . . . . . . . . . . . . . . . . . . 118
Service Configuration Parameters .. . . . . . . . . . . . . . . . . . . . . . . . . . . . . . . . . . . . . . . . . . . . . . . . . . . . . . . . . . . . . . . . . . . . . . . . . . . . . . . . . . . . . . . . . . . . . 118
Using the Impact of Change Report . . . . . . . . . . . . . . . . . . . . . . . . . . . . . . . . . . . . . . . . . . . . . . . . . . . . . . . . . . . . . . . . . . . . . . . . . . . . . . . . . . . . . . . . . . . . 119
IntroductionImpact Management Services, introduced with the Impact Manager module, enable you tocollect and report on metadata, and to update the data models that imported documents use.Impact Management Assessment Services and Impact Management Update Services performthese tasks. Task results are displayed in Show Task Status and Show Impact of Change interactivereports, and managed in the Manage Task List interactive report.
Introduction 71
About Impact Management ServicesThe Impact Manager module consists of two services: Impact Management AssessmentServices and Impact Management Update Services. It also provides three interactive reports:Show Task Status, Manage Task List, and Show Impact of Change.
Impact Management Services are fault tolerant. For example, they detect and finish tasks thatwere left incomplete following an unplanned system shutdown.
Deployment of Impact Management Services is flexible. For example, the feature can be installedon computers in a Oracle Hyperion Enterprise Performance Management System cluster, or ona computer recently added to the cluster.
Impact Management Services are scalable. For example, they can be run on one computer or onmultiple computers to accommodate escalating performance requirements.
Impact Management Assessment ServicesImpact Management Assessment Services parse imported documents to extract and storemetadata. Metadata includes sections that are in the document; tables and columns that are usedby each data model, query, and results section; and section dependencies (for example, ResultsA depends on Query B depends on Data Model C).
About Impact Management MetadataThe metadata managed by Impact Management is information about the structure ofdocuments. Examples include the queries in a document, and what tables and columns are usedin those queries. This metadata is gathered by the Impact Management Harvester and is storedin a set of tables alongside the System 9 repository tables.
The Impact Management Harvester can be set to run automatically or only when scheduled byan administrator. By default it is set to run only when scheduled by an administrator. To set theImpact Management Harvester to run automatically, change the Enable Harvesting setting inManage General Properties of the Administrator module.
If automatic harvesting is enabled, the Impact Management Harvester examines new andmodified files in the background with no manual interaction required. The metadata from thesedocuments is recorded after the document is published or modified.
If automatic harvesting is not enabled, then metadata from files published or changed since thelast time the harvester was run is not recorded until the Impact Management Harvester has beenrun again. See "Synchronize Metadata Feature" on page xx for instructions on how to run theImpact Management Harvester manually.
Note: In Release 9.5, only Interactive Reporting documents and Web Analysis reports areharvested.
72 Using Impact Management Services
Note: These default Harvester settings are defined in the Configuration and Monitoring Console(CMC): Enabled, Max Request Log Time, Thread Pool Size, Polling Interval, and MaxQueue Log Time. See Chapter 9, “Configuring Services Using CMC” for detailedinformation on these settings.
Impact Management Update ServicesImpact Management Update Services are responsible for updating imported documentsaccording to pre-written instructions, referred to as transformations.
Note: In Release 9.5, only Interactive Reporting documents are updated.
Update Data Models TransformationThe Update Data Models transformation is used to replace one or more data model sectionswith another data model. The transformation is most useful when a database changes, causingthe documents that use the database to break. Transformation can also reduce the number ofdistinct data models in use to accommodate future upgrades.
Link Between Data Models and QueriesData model sections are only referred to by query sections. Therefore, as long as the new datamodel can be attached to the query sections correctly, the rest of the document continues towork as expected.
The coupling between a query section and a data model section is through symbolic references,based on the names for the tables and columns exposed by the data model section. A smallnumber of more complex dependencies exist regarding filters, however coupling basically relieson names. If two data models expose the names required by a query; for example, those namesused in the Request and Filter lines, then either data model can support that query. If data modelA exposes equivalent or more names than data model B, A is a valid replacement for B.
The concept of logical names is vital. Data model sections translate database table and columnnames into logical names. The generated names are the database names with spaces replacingunderscores. The first letter of each word is capitalized by a default, however, the logical namescan be changed by users. If a table is used twice in a data model, the logical name generated forthe second instance appends a number. Therefore, if the Dept table is displayed twice in a datamodel, the second instance is called Dept2. The names referenced in a query are always the logicalnames of the data model.
The Update Data Models transformation leverages symbolic coupling, by using the logical namesthat are independent of the database names to perform tasks.
Update Data Models Workflow1. Original documents are imported.
Impact Management Update Services 73

2. Documents are harvested as part of import or through a synchronize operation.
3. Documents are used to perform daily tasks until the database requires change.
4. Use an Impact of Change report to identify the documents impacted by proposed changes.
5. Create data models to update the impacted imported documents.
6. Documents with replacement data models are harvested as part of import or through asynchronize operation.
7. Transformation parameters are specified.
a. Select an example document with a data model impacted by the database change.
b. Select a replacement data model.
c. The Impact Manager module displays all Interactive Reporting documents with a datamodel equivalent to the selection made in step 7a. This is the candidate document fortransformation.
d. A subset of the documents is selected and composed into a task that is queued fortransformation.
8. Transformation is applied to all documents of the Impact Manager task.
a. Documents are retrieved from the repository.
b. Transformation is performed.
c. Transformed documents are reimported as new versions of the original documents.
9. Documents are available for use against the new database definition.
JavaScript Update Workflow1. Create the documents to be updated.
2. Import the documents into the repository, including the newsections.bqy and theconfiguration file (if these two files are later versions than the defaults provided).
3. Select the imported documents, including the newsections.bqy and the configuration file,to be updated.
4. Update the documents. The documents are updated to create new versions of the originaldocuments and these are saved in the original folder.
Custom Update WorkflowCustom updates enable you to customize the update process, therefore the workflow may varydepending on the selected scripts and parameters.
1. Import documents and customized scripts, if applicable.
2. Specify a script. The remainder of the Custom Update is determined by the parametersrequired by the script.
3. Select and define parameters.
74 Using Impact Management Services
4. Monitor the execution of the scripts with associated parameters.
5. Documents are updated. A version or new document is added for each successfully updateddocument.
Impact Manager Module Size and Time GuidelinesThe Impact Manager module can only perform data model updates if it is allowed to harvestmetadata information out of the Interactive Reporting documents that are imported into thecommon repository. Information can be harvested as documents are imported, or harvestingcan take place when the administrator requests a synch operation. Harvested metadata is placedin a set of 28 tables that start with “V8_H_”.
A synch operation causes the Synchronize Metadata Feature to look at all imported documents.If metadata for a document does not exist in the V8_H_ tables, or if the document is more recentthan its metadata in the V8_H_ tables, then it needs to be harvested.
The time required to harvest an Interactive Reporting document and the amount of spacerequired to store the information, depend on the complexity of the structures in the InteractiveReporting document. As harvesting does not look at data, a very large but simple InteractiveReporting document (say with just a query and a result section) might only require a fractionof the time and space required for a small Interactive Reporting document that contains dozensof queries, results, pivots, charts, reports, and dashboard sections.
The following guidelines are indicative of what has been observed when harvesting a variety ofdocuments.
For a random set of around 800 documents:
l Average time to harvest a document—15 seconds
l Average space for a document—30 KB
For a complex set of documents:
l Average time to harvest a document—60 seconds
l Average space for a document—150 KB
To ensure there are no space shortage problems, it is recommended that 100K per importeddocument be allocated. Each version is a document, so it is important not to forget these whenallocating size.
A synch of a repository with 1,000 documents is likely to take over 4 hours to complete.
Running the Update ServicesThe user interface submits tasks to the Impact Management Services. On reception tasks arequeued in a central location and then dispatched according to the priority of the runninginstances of the service. Undoing tasks has a higher priority than all others and they areguaranteed to be executed first. See “Using the Undo Feature” on page 107.
Impact Manager Module Size and Time Guidelines 75
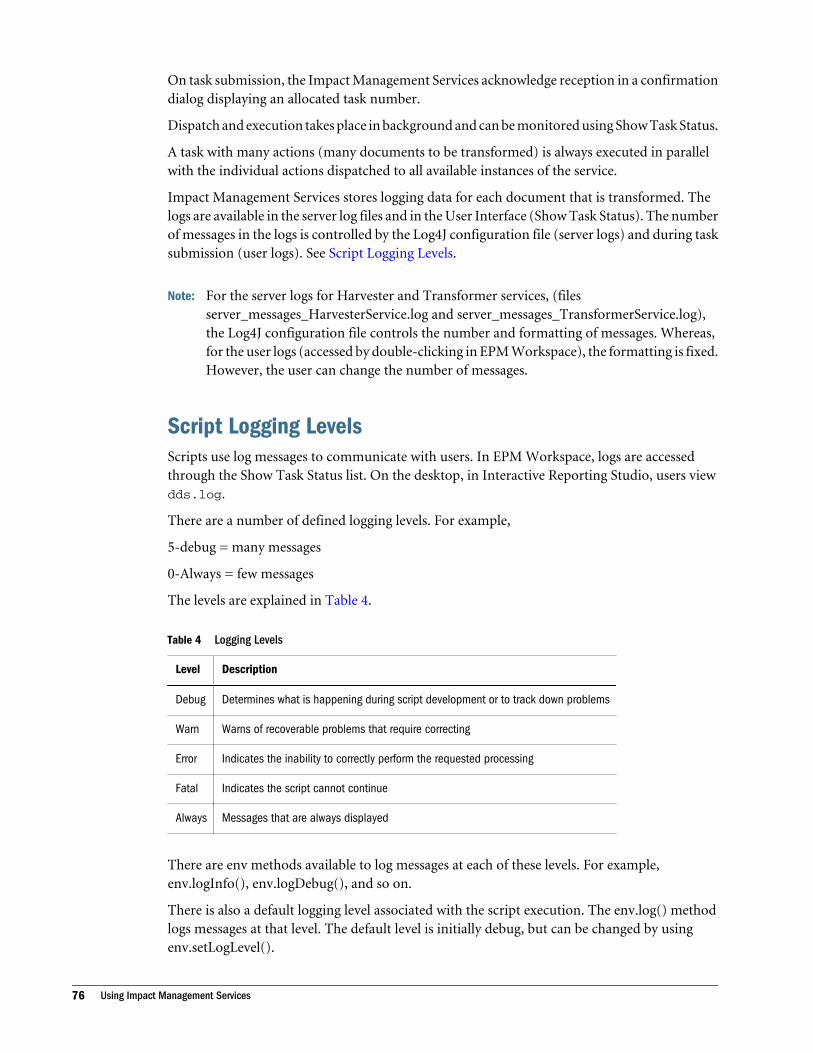
On task submission, the Impact Management Services acknowledge reception in a confirmationdialog displaying an allocated task number.
Dispatch and execution takes place in background and can be monitored using Show Task Status.
A task with many actions (many documents to be transformed) is always executed in parallelwith the individual actions dispatched to all available instances of the service.
Impact Management Services stores logging data for each document that is transformed. Thelogs are available in the server log files and in the User Interface (Show Task Status). The numberof messages in the logs is controlled by the Log4J configuration file (server logs) and during tasksubmission (user logs). See Script Logging Levels.
Note: For the server logs for Harvester and Transformer services, (filesserver_messages_HarvesterService.log and server_messages_TransformerService.log),the Log4J configuration file controls the number and formatting of messages. Whereas,for the user logs (accessed by double-clicking in EPM Workspace), the formatting is fixed.However, the user can change the number of messages.
Script Logging LevelsScripts use log messages to communicate with users. In EPM Workspace, logs are accessedthrough the Show Task Status list. On the desktop, in Interactive Reporting Studio, users viewdds.log.
There are a number of defined logging levels. For example,
5-debug = many messages
0-Always = few messages
The levels are explained in Table 4.
Table 4 Logging Levels
Level Description
Debug Determines what is happening during script development or to track down problems
Warn Warns of recoverable problems that require correcting
Error Indicates the inability to correctly perform the requested processing
Fatal Indicates the script cannot continue
Always Messages that are always displayed
There are env methods available to log messages at each of these levels. For example,env.logInfo(), env.logDebug(), and so on.
There is also a default logging level associated with the script execution. The env.log() methodlogs messages at that level. The default level is initially debug, but can be changed by usingenv.setLogLevel().
76 Using Impact Management Services

The env.logClassName() method provides information on the type of an object, because valuesreturned by methods are a combination of JavaScript and Java objects.
Access to Impact Management ServicesOnly users who are assigned the BI+ Administrator role and that hold appropriate licensing canaccess Impact Management Services.
After initially logging on to EPM Workspace, select Navigate, then Impact Manager, and selectan option.
Synchronize Metadata FeatureThe Synchronize Metadata feature ensures that metadata kept for Interactive Reportingdocuments in the repository is up-to-date. Only documents with discrepancies are re-harvested.The synchronize action is not required if Enable Harvesting is selected in Manage GeneralProperties of the Administer module. Select Navigate, then Administer, then General, and selectEnable Harvesting.
The only option available for the feature is when to perform a synchronization. Request asynchronization to run now or schedule the operation to occur later. See “Using the Run NowOption” on page 77 and “Using the Schedule Option” on page 78.
Note: Scheduling the synchronize operation with a date and time in the past, is equivalent torequesting the operation to run now.
Using the Run Now OptionThis option enables you to process the synchronization at the time of the request.
ä To run Synchronize Metadata immediately:
1 In EPM Workspace, perform an action:
l Import files into EPM Workspace to harvest the metadata
l Access files already imported into EPM Workspace
2 Select Navigate , then Impact Manager , then Synchronize Metadata.
Synchronize Metadata is displayed.
3 Select Run now.
4 Click Submit.
A confirmation dialog box is displayed with a task request number.
5 Click OK to close the dialog box.
6 Select Navigate , then Impact Manager , then Show Task Status.
Access to Impact Management Services 77
Ensure that synchronization is successful, by checking the status of the task request number.
7 Optional: To verify the status of the task request number, set a filter:
a. Select Task Number, enter the task request number, and select Harvester.
b. Click Process.
Show Task Status displays the task.
i. If Waiting is displayed, click Refresh.
Updating the task from Waiting may take time.
ii. If Success is displayed, select File , then Close , then Current.
iii. If Fail is displayed, double-click the task to check the log.
Using the Schedule OptionThis option enables you to process the synchronization at a specified date and time in the future.
ä To schedule the synchronization of the metadata:
1 In EPM Workspace, perform an action:
l Import files into EPM Workspace to harvest the metadata
l Access files already imported into EPM Workspace
2 Select Navigate , then Impact Manager , then Synchronize Metadata.
Synchronize Metadata is displayed.
3 Select Schedule.
The date and time drop-down lists are displayed.
4 Select a date.
A calendar control is displayed.
5 Select a time.
6 Click Submit.
A confirmation dialog box is displayed with a task request number.
7 Click OK to close the dialog box.
8 To monitor the status of the task request, select Navigate , then Impact Manager , then Show Task Status.
9 Optional: To refine the monitoring process, set a filter:
a. Select Task Number, enter the task request number, and select Harvester.
b. Click Process, to monitor the status of the synchronize operation.
Whether the metadata is run immediately or scheduled for the future, clicking Submit causesImpact Management Assessment Services to receive the request and return a numeric requestidentifier. The identifier is used to filter the Impact Management Assessment Services task log.See “Using Show Task Status Interactive Report” on page 104.
78 Using Impact Management Services
When Impact Management Assessment Services synchronize the metadata, only documents thathave changed since the last synchronization or have no metadata are harvested.
Update Data Models FeatureThe Update Data Models transformation feature enables data models in documents to beupdated to reflect changes in underlying databases. You must select which data models are tobe updated and supply new data models to replace the original. There are two ways in whichyou can update data models.
The first option, match the full data model, is restrictive and requires that the replacement datamodel contain all or more tables than the original data model. This is a complete data modelmatch.
The second option, match only the query request, is more flexible. The replacement data modelis only required to satisfy the queries that are associated with the original data model. For this,the replacement data model must only contain the tables and columns referenced in the queryrequest line, query filters and sort columns. If the original data model is a master data model,the replacement must satisfy the request line, filters and sort columns of all the queries associatedwith the master data model. This is a less stringent requirement than matching the full datamodel.
Specifying Data ModelsThis procedure enables you to specify original and replacement document data models,interactively (using the Impact Manager module screens) or from a pre-generated list.
Note: The documents that contain both data models must have been harvested. If a selecteddocument has not been harvested, an error is displayed. See “Synchronize MetadataFeature” on page 77.
ä To specify the documents and data models:
1 Select Navigate , then Impact Manager , then Update Data Models.
Specify Data Models is displayed.
2 Enter a Task Description, to identify the task in Show Task Status.
A default description is provided.
3 Perform an action:
a. Select Specify documents and data models interactively, and select an option.
i. Select Match the full data model.
l Click Browse (next to Select file containing original data model), and ensure thefile is an imported and synchronized Interactive Reporting document
Update Data Models Feature 79
l Select the original data model from drop-down list (Data model sections arecreated when a query section is created. Because the data model section is notvisible as a unique section, users may not be aware that data models are inseparate sections under default names. Use Promote to Master Data Model tomake a data model section visible, and enable the data model to be reused innew queries. To assist with specifying which data model is to be updated, querynames are displayed after the data model in the drop-down list. See “LinkBetween Data Models and Queries” on page 73)
l Click Browse (next to Select file containing replacement data model), and ensurethe file is an imported and synchronized Interactive Reporting document
l Select the replacement data model from the list (For example, select SupersetDataModel (Superset Query))
l Click Next to move to Candidates
ii. Select Match on the query request.
l Click Browse (next to Select file containing replacement data model), and ensurethe file is an imported and synchronized Interactive Reporting document
l Select the replacement data model from the list (For example, select SubsetDataModel (Subset Query) or Superset DataModel (Superset Query))
l Click Next to move to Candidates
b. Select Use a pre-generated list of documents and data models.
i. Click Browse (next to Select a Task Definition File).
The Task Definition File is a text file, that contains one line per document totransform. Therefore, to update 10 documents, the file would contain 10 lines. Eachline contains the raw parameters required to run the script separated by commas,that is; parameter1="value1", parameter2="value2". The values are the UUIDs anddata models for the transformation. Most files require many parameters per line.Users wanting to perform batch updates compile a list of documents using anInteractive Reporting document to generate the parameter file. See “GeneratingParameter Files” on page 110.
ii. Click Next to move to Schedule.
Viewing Candidates to UpdateThis procedure displays the documents and data models that are candidates for thetransformation. This is either data models equivalent to the specified original data model (fulldata model match) or data models supporting queries that are compatible with the replacementdata model (query request match).
Note: For convenience, the Update Data Models transformation service searches for allcompatible data models. Any or all of them can be updated simultaneously.
80 Using Impact Management Services
ä To use the candidate list to select data models for update:
1 Select a document in the list to be updated.
Other options for selecting data models for update are:
l Click Select All to update all candidates
l Use Ctrl+click or Shift+click to highlight and select individual or all documents in the list
At least one data model must be selected before clicking Next.
2 Optional: To activate the sort feature, in the candidate list table, click a column header.
For example, click Document to sort candidates by document title. The sort feature reorders theselected candidates to be updated.
3 Click Next to move to Schedule.
4 Optional: Click Finish to complete the update.
Using Scheduling OptionsThis procedure enables you to select when the data model update occurs. Request the update torun now or schedule the operation to occur later. The scheduling process operates in a similarmanner to synchronizing metadata.
ä To update immediately:
1 Select Run now.
2 Select the Script Logging Level.
For example, select Debug, to receive all script logs. See “Script Logging Levels” on page 76.
3 Click Finish.
A confirmation dialog box is displayed with a task request number.
4 Click OK to close the dialog box.
5 Select Navigate , then Impact Manager , then Show Task Status.
Ensure that the update is successful, by checking the status of the task request number.
a. Select Task Number, enter the task request number, and select Transformer.
b. Click Process.
Show Task Status displays the task.
i. If Waiting is displayed, click Refresh.
Updating the task from Waiting may take time.
ii. If Success is displayed, select File , then Close , then Current.
iii. If Fail is displayed, double-click the task to check the log.
Update Data Models Feature 81
ä To schedule the update:
1 Select Schedule.
The date and time drop-down lists are displayed.
2 Select a date.
A calendar control is displayed.
3 Select a time.
4 Select the Script Logging Level.
For example, select Debug, to receive all script logs. See “Script Logging Levels” on page 76.
5 Click Finish.
A confirmation dialog box is displayed with a task request number.
6 Click OK to close the dialog box.
7 To monitor the status of the task request, select Navigate , then Impact Manager , then Show Task Status.
8 Optional: To refine the monitoring process, set a filter:
a. Select Task Number, enter the task request number, and select Transformer.
b. Click Process, to monitor the status of the update.
Reviewing the Confirmation Dialog BoxThe dialog box provides a numeric request identifier or a task request number that can be usedto filter the Impact Management Update Services task log. See “Using Show Task StatusInteractive Report” on page 104.
To close the confirmation dialog box, click OK.
JavaScript Update FeatureThe Impact Manager module JavaScript Update feature is equivalent to the DashboardDevelopment Services Update Utility on the client. JavaScript Update enables users to use thelatest dashboard features without having to re-create documents from scratch.
The Impact Manager module includes a configuration file that determines the sections andcontrols, such as; text labels, drop-down lists and list values, to be updated, added, removed, ortransferred to the target file.
An Interactive Reporting document called newsections.bqy is available that contains the latestversion of the dashboard infrastructure. The JavaScript Update feature opens the nominatedtarget documents and performs a comparison of section names, by examining if sections existin newsections.bqy and the Interactive Reporting document to be updated. If sections exist inboth, the sections in the target document are removed and replaced by sections fromnewsections.bqy.
82 Using Impact Management Services
Using JavaScript UpdateThere are two options to run JavaScript Update.
1. Specify the parameters interactively.
2. Use a pre-generated definition file.
ä To perform a JavaScript update:
1 Select Navigate , then Impact Manager , then JavaScript Update.
Control Mode is displayed.
2 Enter a Task Description, to identify the task in Show Task Status.
A default description is provided.
3 Select an option:
a. Select Specify parameters interactively, and click Next to move to Parameters.
b. Select Use a definition file.
i. Click Browse (next to Select a Task Definition File).
The Task Definition File is a text file, that contains one line per document totransform. Therefore, to update 10 documents, the file would contain 10 lines. Eachline contains the raw parameters required to run the script separated by commas,that is; parameter1="value1", parameter2="value2". The values are the UUIDs anddata models for the transformation. Most files require many parameters per line.Users wanting to perform batch updates compile a list of documents using anInteractive Reporting document to generate the parameter file.
ii. Click Next to move to Schedule.
Selecting ParametersIf Specify parameters interactively was chosen in Control Mode, Parameters enables you to selectthe parameters to use in JavaScript Update.
ä To select parameters:
1 In Parameters, perform an action:
a. If the JavaScript Configuration file and New Sections file parameters are pre-filled:
i. Click Browse (next to Documents to update).
ii. From the multi-file picker, select the documents to update, click to move selecteditems, and click OK.
b. If no parameters are pre-filled or to change the parameters:
i. Click Browse (next to JavaScript Configuration file), navigate to and selectJavaScriptUpdateConfig_dds.js.
JavaScript Update Feature 83
The script is located under Administration\Impact Manager\Script Repository.
Optional: To show hidden script files, in Select, click .
ii. Click Browse (next to New Sections file), navigate to and select newsections.bqy.
The file is located under Administration\Impact Manager\Script Repository.
iii. Click Browse (next to Documents to update).
iv. From the multi-file picker, select the documents to update, click to move selecteditems and click OK.
2 Click Next to move to Schedule.
Using Scheduling OptionsThis procedure enables you to select when the JavaScript update occurs. Request the update torun now or schedule the operation to occur later. The scheduling process operates in a similarmanner to synchronizing metadata.
ä To update immediately:
1 Select Run now.
2 Select the Script Logging Level.
For example, select Debug, to receive all script logs. See “Script Logging Levels” on page 76.
3 Click Finish.
A confirmation dialog box is displayed with a task request number.
4 Click OK to close the dialog box.
5 Select Navigate , then Impact Manager , then Show Task Status.
Ensure that the update is successful, by checking the status of the task request number.
a. Select Task Number, enter the task request number, and select Transformer.
b. Click Process.
Show Task Status displays the task.
i. If Waiting is displayed, click Refresh.
Updating the task from Waiting may take time.
ii. If Success is displayed, select File , then Close , then Current.
iii. If Fail is displayed, double-click the task to check the log.
ä To schedule the update:
1 Select Schedule.
The date and time drop-down lists are displayed.
2 Select a date.
84 Using Impact Management Services
A calendar control is displayed.
3 Select a time.
4 Select the Script Logging Level.
For example, select Debug, to receive all script logs. See “Script Logging Levels” on page 76.
5 Click Finish.
A confirmation dialog box is displayed with a task request number.
6 Click OK to close the dialog box.
7 To monitor the status of the task request, select Navigate , then Impact Manager , then Show Task Status.
8 Optional: To refine the monitoring process, set a filter:
a. Select Task Number, enter the task request number, and select Transformer.
b. Click Process, to monitor the status of the update.
Verifying Updated JavaScriptWhen the status of the JavaScript update is Success, verify that the procedure is complete.
ä To verify the update is complete:
1 If a single document or a batch of documents were updated, open one document.
For example, from the Explore module, double-click an updated Interactive Reportingdocument.
2 From the top panel, click .
The document release number is updated to reflect the release specified in the new sections file.
3 Close the document without saving.
Custom Update FeatureThe Custom Update feature enables users to perform generic transformations depending on theupdate script provided. The parameters vary depending on the requirements of the script.SortDataModelTopics.js is included as a sample. It can be found in the repository underAdministration\Impact Manager\Script Repository with the two standard Impact ManagementServices scripts; UpdateDataModels.js and JavaScriptUpdate.js.
Using the SortDataModelTopics ScriptThe SortDataModelTopics script enables documents to be updated so the topics in any datamodels are displayed in EPM Workspace in a user-defined order or alphabetically.
Custom Update Feature 85
When an Interactive Reporting document is opened in EPM Workspace and a query is visible,a list of topics is displayed in the catalog pane under Tables. The topics are displayed in the orderin which they were added to the Interactive Reporting document, which makes locating topicsdifficult if there are many in the list.
The SortDataModelTopics script enables the user to specify the order in which the topics aredisplayed in these lists, using three parameters.
There are two ways to specify the sort order:
1. Use the first parameter to select a file containing a list of topic names, in the order preferredby the user.
2. Use the second parameter (true or false) to specify whether topics that are not included inthe sorted file should be ordered alphabetically.
Topics that are not mentioned in the sorted file are placed after topics that are mentioned, andare ordered according to the second parameter. Therefore, if you provide an empty file and thesecond parameter is true, all topics will be ordered alphabetically, making it easy to locate a topicin the list.
Note: The empty file should contain a blank line.
The third parameter enables selection from a set of files to be updated, through a multi-filepicker.
A version is added for each successfully updated file. Therefore, double-clicking a file in EPMWorkspace displays the updated content.
Performing a Custom Update
ä To use the Custom Update feature to sort documents in a user-defined order or alphabetically:
1 Select Navigate , then Impact Manager , then Custom Update.
Choose Script is displayed.
2 Enter a Task Description, to identify the task in Show Task Status.
A default description is provided.
3 Click Browse (next to Choose a Script), and select SortDataModelTopics.js.
The script file must be selected from /Administration/Impact Manager/Script Repository/ or asub-folder.
4 Optional: To reveal hidden files in the Script Repository, click .
5 Select an option:
a. Select Specify parameters interactively, and click Next to move to Parameters.
b. Select Use a definition file.
i. Click Browse (next to Select a Task Definition File).
86 Using Impact Management Services
The Task Definition File is a text file. Each line must contain three parameter values,separated by commas; orderings (The UUID of the file containing the sort orderlisting), sortUnknownTopics (true or false), and document (The UUID of adocument to be transformed).
For example,
orderings="/order.txt",sortUnknownTopics="true",document="/some.bqy".
Users wanting to perform batch updates compile a list of documents using anInteractive Reporting document to generate the parameter file.
ii. Click Next to move to Schedule.
Selecting ParametersIf Specify parameters interactively was chosen in Choose a Script, Parameters enables you toselect the parameters to use in the update.
ä To select parameters:
1 In Parameters, enter parameter values for the script.
a. Click Browse (next to The file containing the list of topics in the desired ordering).
For example, select the parameters file. See “Creating a Parameter Text File” on page87.
A multi-file picker is displayed. Select the documents to update, click to move theselected item, and click OK.
b. From Sort unspecified topic names in alphabetical order, select true or false.
c. Click Browse (next to The documents whose sections should be re-ordered).
For example, select an Interactive Reporting document.
2 Click Next to move to Schedule.
Creating a Parameter Text File
ä To create a parameter text file in Notepad:
1 In Notepad, create the file.
For example, if you are using the SortDataModelTopics script, list the topic names in the orderby which to sort. This list need only determine those names that you prefer to view first.
2 Save the text file.
3 Import the file into EPM Workspace.
Using the SortDataModelTopics Script 87
Using Scheduling OptionsThis procedure enables you to select when a custom update occurs. Request the update to runnow or schedule the operation to occur later. The scheduling process operates in a similar mannerto synchronizing metadata.
ä To update immediately:
1 Select Run now.
2 Select the Script Logging Level.
For example, select Debug, to receive all script logs. See “Script Logging Levels” on page 76.
3 Click Finish.
A confirmation dialog box is displayed with a task request number.
4 Click OK to close the dialog box.
5 Select Navigate , then Impact Manager , then Show Task Status.
Ensure that the update is successful, by checking the status of the task request number.
a. Select Task Number, enter the task request number, and select Transformer.
b. Click Process.
Show Task Status displays the task.
i. If Waiting is displayed, click Refresh.
Updating the task from Waiting may take time.
ii. If Success is displayed, select File , then Close , then Current.
iii. If Fail is displayed, double-click the task to check the log.
ä To schedule the update:
1 Select Schedule.
The date and time drop-down lists are displayed.
2 Select a date.
A calendar control is displayed.
3 Select a time.
4 Select the Script Logging Level.
For example, select Debug, to receive all script logs. See “Script Logging Levels” on page 76.
5 Click Finish.
A confirmation dialog box is displayed with a task request number.
6 Click OK to close the dialog box.
7 To monitor the status of the task request, select Navigate , then Impact Manager , then Show Task Status.
8 Optional: To refine the monitoring process, set a filter:
88 Using Impact Management Services
a. Select Task Number, enter the task request number, and select Transformer.
b. Click Process, to monitor the status of the update.
Verifying the Custom UpdateWhen the status of the update is Success, verify that the procedure is complete.
Verify the sort order has been modified, by navigating to the location of your files, and clicking
. If a single document was updated, a duplicate version of the Interactive Reportingdocument is displayed with information appended. For example, Custom_Updated_File(topicsreordered).bqy. Double-click to open the document, and select a query. From the catalog pane,expand Tables, and check the order of the topics. Close the document without saving.
If a batch of documents was updated, duplicate versions of the Interactive Reporting documentsare displayed. Double-click to open a document, and select a query. From the catalog pane, viewthe order of the topics. Close the document without saving.
Advanced ScriptingThis topic discusses customizing scripts to update documents in EPM Workspace or on thedesktop in Interactive Reporting Studio.
EPM Workspace Custom Scripting EnvironmentThe custom scripting environment of the Impact Management Services provides a mechanismfor manipulating the content and structure of an Interactive Reporting document through aDocument Object Model (DOM) and JavaScript. Although this environment is similar to thescripting environment in Interactive Reporting Studio, there are differences. For example, thecustom scripting environment of the Impact Management Services:
l Does not work in the context of an active Interactive Reporting document
l Provides access to all properties in the document
l Does not perform logical system-level integrity checks
l Is not contained inside the Interactive Reporting document
l Executes a script over multiple documents
The custom scripting environment performs arbitrary, common transformations on one ormore documents. This mechanism is used to implement the Update Data Models and UpdateJavaScript features of the Impact Management Services.
Scripts can be imported into EPM Workspace and then run using the Custom Update featureof the Impact Management Services to make changes to other imported documents. These scriptscan also be run on a desktop by the Dashboard Development Services Update Utility. From thedesktop, changes can only be made to files on disks visible from that desktop. The desktop istypically a development and test environment.
Advanced Scripting 89
Scripts in EPM Workspace run under the control of the Impact Management Services andconsequently can use the Undo feature. If a change made through scripts is unwanted, the taskthat used the script can be undone and the documents are returned to the pre-script state.
Script ParametersThe parameters required by a script are specified using comments in the header. These are similarin format to the JavaDoc comments used to document Java.
Note: Starting in Release 9.3, these parameters are only available in EPM Workspace.
The minimum that can be specified to define a parameter is the name, for example, @paramsourceLanguage.
This assumes that the input is a simple string and displays an (initially empty) text box on theUI.
Optional: An @inputType line enables more specific data input methods:
l file_picker_single_value—Select one file from the repository
l file_picker_multi_values—Select multiple files from the repository, all of which constituteone value
l file_picker_multi_values_parallel_execution—Select multiple files from the repository, allof which can be processed in parallel by separate instances of the script
l dropdown—Select from a predefined set of fixed values
Input types can be given a default value using @defaultValue. For file picker input types, thedefault value must be the UUID of a file in the repository.
Drop-down lists require a separate @comboValues line that specifies possible choices, separatedby commas.
Note: For custom scripts, parameter values are only validated when the script is executed, notat submission time. For example, if an unacceptable value is specified for a script, the useris not informed at the time of task submission. If a script cannot recover from invaliddata, it logs a message and throws an exception, causing the status to display as Fail (red)in Show Task Status, alerting the user to the problem.
The Scripting EnvironmentEach script has a global variable called env, that provides access to the environment within whichit runs.
These are frequently used env methods:
l getParameterValue()—Obtain the value of a single-valued parameter, given the name
90 Using Impact Management Services
l getParameterValues()—Obtain all of the values of a multi-valued parameter as an array,given the name
l isDesktopMode()—Returns true if the script is being run on the desktop
l isServerMode()—Returns true if the script is being run in EPM Workspace
l createTempFile()—Create a temporary file that is removed when the script exits
l getBqyDocument()—Retrieve a document from the repository, given the UUID
l getFileLines()—Retrieve the content of a file from the repository as an array of strings, giventhe UUID
l writeBqyDom()—Write a document to disk to be imported into the repository as a newversion of a document or as a new document
getParameterValue() and getParameterValues() determine how the script retrieves the valuesthe user provided for the parameters.
The two methods env.isDesktopMode() and env.isServerMode() provide information for thescript about the environment it is running inside, for example, in EPM Workspace or on adesktop.
Most scripts require access to documents stored within the repository. A pseudo-repository isimplemented on the desktop that provides identical methods, but that uses file system paths aspseudo-UUIDs.
The method env.getRepository() returns an object providing access to the repository. These aremethods provided by the returned object:
l retrieveFile()—Retrieve a file from the repository, given the UUID (This returns a Java Fileobject pointing at a temporary file that contains the content. The temporary file is deletedwhen the script completes execution)
l retrieveVersionedDocument()—Retrieve properties of the document stored in therepository
l addVersion()—Add a version of the specified document to the repository
l publishBqyFile()—Import a new document into the repository
l remapOCEs()—Set up the Interactive Reporting database connection (OCE extension)mappings for a document
ä To make a change to a document:
1 Retrieve the document using repository.retrieveFile().
This writes it to a temporary file, and returns a Java File object pointing to it.
2 Use env.getBqyDocument(), passing the File reference.
This returns a DOM representing the content of the document.
3 Modify the DOM.
4 To write the DOM back out to the disk, use env.writeBqyDocument().
5 Optional: To run in EPM Workspace, further steps are required:
Advanced Scripting 91
a. To gain access to the properties of the specific version of the document, use
retrieveVersionedDocument().
b. Use versionedDocument.sectionOCEPairInfos().
c. To retrieve the UUID of the parent folder that contains the document, callversionedDocument.getParentIdentity().
d. To retrieve section OCEs, use getSectionOCEMapping() on the versioned document.
e. Optional: To update the OCEs associated with data models, use remapOCEs().
f. Upload the modified document to the repository by using addVersion() to create a newversion of the original document, or publishBqyFile() to store it as a new document.
As an example, see “Using the SortDataModelTopics Script” on page 85.
Document Object Model Tree StructureEach document manipulated by a script is stored in the form of a Document Object Model(DOM), represented by a tree of nodes, each of which contains a set of associated properties.
The DOM for a document is acquired by retrieving the file and loading the content, for example,
var uuid = env.getParameterValue(“document”);var file = repository.retrieveFile(uuid);var dom = env.getBqyDocument(file, bqReadWriteDom, bqDashboardReportStrategy)
The first line retrieves the parameter that contains the document UUID. The second line is usedto copy the file from the repository to a temporary file which is deleted when the script ends.The third line loads the content of the file, providing a BqyDocument object that represents theDOM.
Note: The second parameter, bqReadWriteDom, specifies that the document is to be rewritten.If it is not to be rewritten, specify bqReadOnlyDom to reduce the amount of memoryrequired for the DOM. The third parameter is the document conversion strategy,bqDashboardReportStrategy. It determines how much of the underlying documentstructure is accessible to the script.
Using different strategies, the amount of memory required by a script can be reduced, as can thetime spent loading the document.
Document Conversion StrategiesWhen loading documents, memory can be saved by loading only those portions of the DOMthat are required by a given script. For example, if you only want to log a list of section namesin a document, you do not need to load the entire tree of nodes that lie beneath the sections.
These strategies are provided:
92 Using Impact Management Services
l bqDatamodelUpgradeStrategy—All data model and query sections
l bqJavascriptUpdateStrategy—Dashboard sections
l bqToolbarUpgradeStrategy—Image resources and all dashboard sections
l bqDashboardReportStrategy—All dashboard and report sections, plus theDocCompMoniker.Depend of other sections
l bqTopLevelSectionsStrategy—All sections and their user value nodes
l bqIndexingStrategy—A large subset of the nodes under queries, pivots, charts, reports, anddashboards
To load the entire document, use null for this parameter.
Traversing the Document Object ModelTo manipulate the content of a node in the DOM, you must locate the node.
The top-level nodes that represent the sections of a document can be accessed directly by usingthe Sections collection. The shapes within a dashboard are accessible through its Shapescollection. However, there is no collection for the children of a node.
Methods are provided to access the children of a node:
l getChildren()—Returns a complete list of children of a node
l getChildrenOfType()—Returns a list of children of a node that have a specific type
l addChild()—Adds a new child to the end of a list of children of a node
l removeChild()—Removes the specified node from a list of children of a node
l setChildren()—Replaces a list of children of a node with another list
l dump()—Dumps the DOM tree, starting at the given node, for debugging
To iterate over all subnodes of a given node, use getChildren() to retrieve a list that containsthem. Use getChildrenOfType() to limit this to the children of a particular type. For example,the Root.MyDocument node contains a Rpt.DocComp node for each section in the document,which can be located using this line:
var sections = root.getChildrenOfType(“Rpt.DocComp”);
A node is added as a child of another by using addChild(). Use this to copy a node from onepart of the DOM (or the DOM of another document) to another location.
To remove a child node, use removeChild().
Note: The list of children returned by getChildren() and getChildrenOfType() is read-only. Ifyou update the list by assigning a new value to an entry, this does not affect the node.However, the current list of nodes can be replaced using setChildren().
Advanced Scripting 93
The content of a sub-tree of the document can be written to the log using dump(). By default,this dumps the tree to standard output, but by supplying parameters, it can be written to anyprint stream.
XPath-Style SearchingWhile obtaining lists of child nodes enables access to the entire DOM, you can search for nodesthat satisfy a set of criteria.
For example, this code can be used to log the names of all shapes within a document:
for (var i = 0; i < dom.Sections.length; i++) { var section = dom.Sections[i];
if (section.Type == bqDashboard) { env.log(“Dashboard “ + section.AnnotName + “ has shapes”);
var shapes = section.Shapes;
for (var j = 0; j < shapes.length; j++) env.log(shapes[j].Name); }}
The DOM provides user-friendly collection names for both the Sections inside a document andthe Shapes inside a dashboard. However, in a complex search, for example, looking for allDataThreshold.DataThreshold nodes inside all ThreshFmt.ThreshFmt nodes, inside allColColl.Item nodes, inside all table sections, results in multiple nested loops.
The Impact Management Services scripting provides an alternative approach, through XPath-style searches. For example, this is the code to perform for the complex search example:
var items = dom.findNodesByPattern(“/BQY/Root.MyDocument/Rpt.DocComp” + “/ColColl.Item/ThreshFmt.ThreshFmt” + “/DataThreshold.Threshold”);
This single statement provides an array that contains the required nodes. Property matchingrequirements can be included to narrow down which nodes are to be returned.
For example, to limit the result to those nodes in the column named Drawn inside the tablenamed Rankings.
var items =dom.findNodesByPattern(“/BQY/Root.MyDocument” + “/Rpt.DocComp[AnnotName=’Rankings’]” + “/ColColl.Item[Label=’Drawn’]/ThreshFmt.ThreshFmt” + “/DataThreshold.Threshold”);
Searches need not begin at the root of the DOM. If a variable that contains a section node issearched, use a relative path to find other nodes beneath that section, as illustrated in thisexample:
94 Using Impact Management Services
var table = dom.findNodesByPattern(“/BQY/Root.MyDocument” + “/Rpt.DocComp[AnnotName=’Rankings’]”);
var items = table.findNodesByPattern(“ColColl.Item[Label=’Drawn’]” + “/ThreshFmt.ThreshFmt/DataThreshold.Threshold”);
Use getNodesByPattern() if there is a possibility that a node may not exist (that is, if documentsto be processed using a script may not contain this node) or where there can be many of thesenodes. In these cases, the length of the returned array is used to determine the situation.
However, if one node matching the pattern is guaranteed, use getNodeByPattern() which returnsone object, rather than an array.
The search mechanism provides two wildcard facilities. An asterisk (*) in place of a node name,represents any type of node. A pair of slashes (//) represents any number of intervening nodes.
For example, to find all images in a document, in dashboards or reports (in the body, header,footer, section header, or section footer), use this example code:
var pattern = “//Box.Item[RuntimeClassName='PictField']”;var pictures = dom.findNodesByPattern(pattern);
Differences Between the Impact Management Services and InteractiveReporting Studio Document Object ModelsThe DOMs available in the Impact Management Services scripting differ from those providedto event handlers in Interactive Reporting Studio scripting:
l All collection indices start at zero, rather than one
l The node names and properties match those stored in the underlying document, as displayedin the repository; there are fewer user-friendly names
l The event handlers for sections and shapes cannot be called to effect changes to the document
For example, display the SQL associated with all request line items in all queries by using thiscode:
var pattern = “//BQY/Qry.MyQry/QryCol.MyQryCol”;var nodes = dom.findNodesByPattern(pattern);
for (var i = 0; i < nodes.length; i++) env.log(nodes[i].SQL);
Note: Both loop indices start at zero and access to the name of the section is throughAnnotName, rather than Name.
Investigating the Impact Management Services DOM StructureThe Dashboard Studio Inspector Utility, included with the Interactive Reporting Studioinstallation, provides an explorer-style view of the DOM. See “Dashboard Studio Inspector
Advanced Scripting 95
Utility” in the Hyperion Interactive Reporting Object Model and Dashboard Development ServicesDeveloper's Guide Volume 5: Dashboard Studio.
The left pane displays the nodes contained within the document as a tree. The right pane displaysthe names of all properties of the selected node, and their current values and associated datatypes.
Use the Inspector Utility when writing scripts. The user can determine where in the DOM thedata resides that must be manipulated to achieve the intended change.
Accessing PropertiesAccess properties in Impact Management Services, as you do in Interactive Reporting Studio.The only difference is the DOM exported by Interactive Reporting Studio provides more user-friendly names for frequently used properties.
To learn the names of properties associated with a node in the DOM use the Dashboard StudioInspector Utility. See “Dashboard Studio Inspector Utility” in the in the Hyperion InteractiveReporting Object Model and Dashboard Development Services Developer's Guide Volume 5:Dashboard Studio.
For example, this code accesses the IsHidden property of a dashboard, making the section visibleif it is hidden.
var dashboard = dom.Sections[“Dashboard”];
if (dashboard.IsHidden) { env.log(“Making section “ + dashboard.Name + “ visible”);
dashboard.IsHidden = false;}
CollectionsAn important difference between the Interactive Reporting Studio scripting DOM and theImpact Management Services DOM is that all collections are zero-based, not one-based. Forexample, a loop that would have been coded as:
for (var i = 1; i <= collection.Count; i++) // some processing on collection[i]
is now written as:
for (var i = 0; i < collection.length; i++) // some processing on collection[i]
Property TypesEvery property of a DOM node has one of these datatypes:
l Byte
96 Using Impact Management Services
l DWord
l Long
l String
l Structure
l Word
Accessing the File SystemTo access the underlying file system from within a script, for example, where a large amount ofconfiguration information is needed that does not change from execution to execution, use thesemethods.
l env.getFileSystem()—Retrieve an object that provides access to the underlying file system
l env.createTempFile()—Create a temporary file that is cleaned up when the script completes
l fs.getFile()—Retrieve a Java File object that refers to the file with a given path within EPMWorkspace
l fs.writeBytesToStream()—Write the contents of a byte array to a file
General Java Code in ScriptsIt can be necessary to construct Java objects as part of processing a script. For example,RevertImageResources creates a FileOutputStream using the call:
var fos = new Packages.java.io.FileOutputStream(imageFile);
The call is of the form:
var object = new Packages.java.some.package.ClassName(necessary, parameters);
Using Batch Input FilesAll parameters for a transformation script can be entered interactively by using the user interface,or you can request the processing of many sets of parameters by providing them as a batch inputfile.
Each line of a batch input file contains a complete set of parameters, as a comma-separated listof name="value" specifications.
For example, to use the SortDataModelTopics script to transform the three documents “/some.bqy”, “/some/other.bqy” and “/yet/another/example.bqy”, using the topic orderings in “/order.txt”, and sorting unspecified topic names alphabetically, use this input file:
orderings="/order.txt",sortUnknownTopics="true",document="/some.bqy"orderings="/order.txt",sortUnknownTopics="true",document="/some/other.bqy"
Advanced Scripting 97
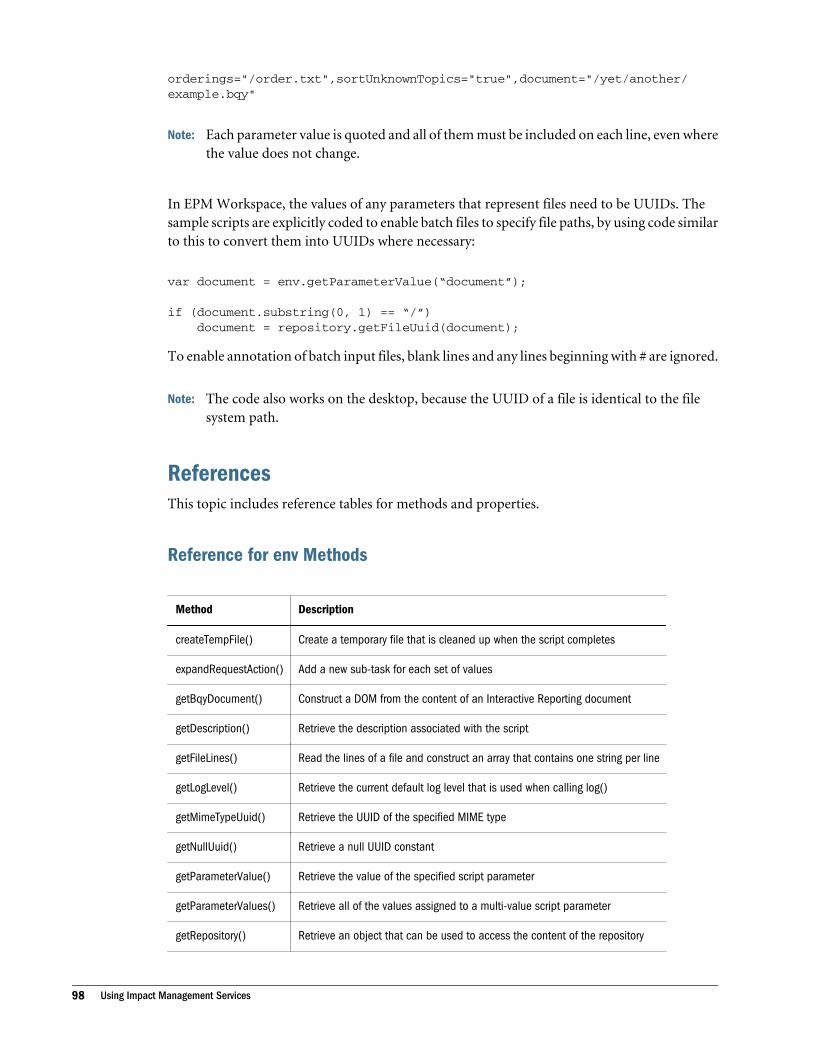
orderings="/order.txt",sortUnknownTopics="true",document="/yet/another/example.bqy"
Note: Each parameter value is quoted and all of them must be included on each line, even wherethe value does not change.
In EPM Workspace, the values of any parameters that represent files need to be UUIDs. Thesample scripts are explicitly coded to enable batch files to specify file paths, by using code similarto this to convert them into UUIDs where necessary:
var document = env.getParameterValue(“document”);
if (document.substring(0, 1) == “/”) document = repository.getFileUuid(document);
To enable annotation of batch input files, blank lines and any lines beginning with # are ignored.
Note: The code also works on the desktop, because the UUID of a file is identical to the filesystem path.
ReferencesThis topic includes reference tables for methods and properties.
Reference for env Methods
Method Description
createTempFile() Create a temporary file that is cleaned up when the script completes
expandRequestAction() Add a new sub-task for each set of values
getBqyDocument() Construct a DOM from the content of an Interactive Reporting document
getDescription() Retrieve the description associated with the script
getFileLines() Read the lines of a file and construct an array that contains one string per line
getLogLevel() Retrieve the current default log level that is used when calling log()
getMimeTypeUuid() Retrieve the UUID of the specified MIME type
getNullUuid() Retrieve a null UUID constant
getParameterValue() Retrieve the value of the specified script parameter
getParameterValues() Retrieve all of the values assigned to a multi-value script parameter
getRepository() Retrieve an object that can be used to access the content of the repository
98 Using Impact Management Services
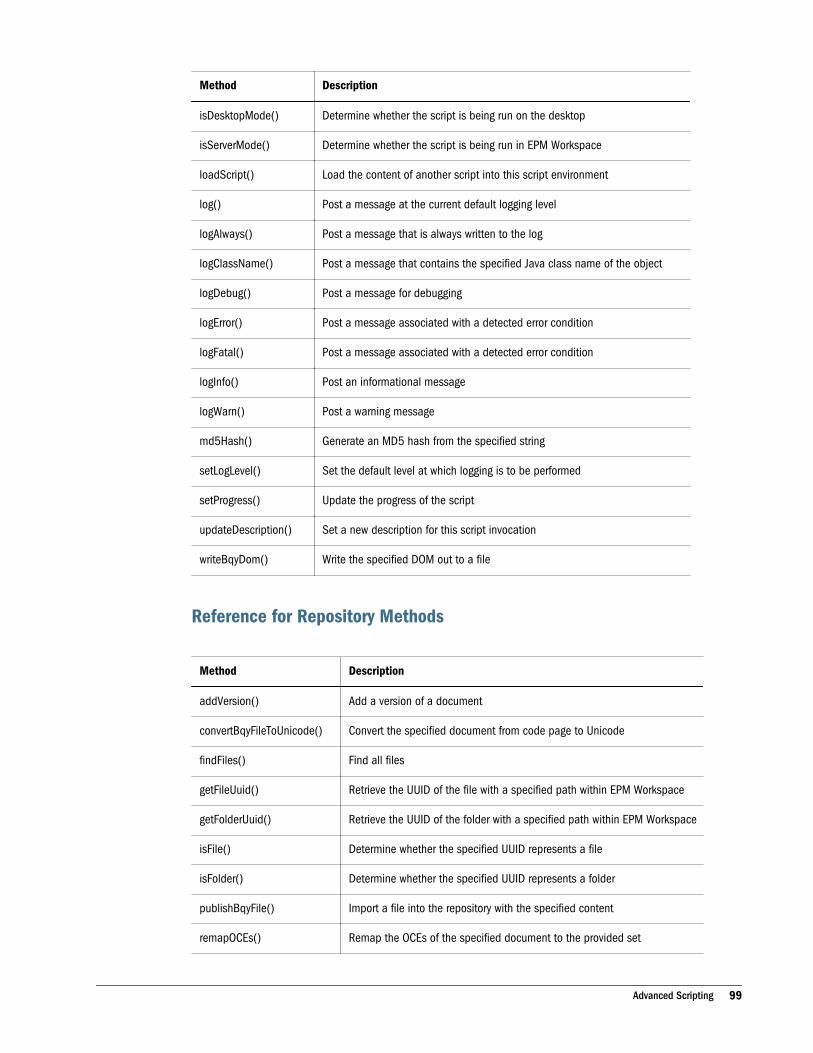
Method Description
isDesktopMode() Determine whether the script is being run on the desktop
isServerMode() Determine whether the script is being run in EPM Workspace
loadScript() Load the content of another script into this script environment
log() Post a message at the current default logging level
logAlways() Post a message that is always written to the log
logClassName() Post a message that contains the specified Java class name of the object
logDebug() Post a message for debugging
logError() Post a message associated with a detected error condition
logFatal() Post a message associated with a detected error condition
logInfo() Post an informational message
logWarn() Post a warning message
md5Hash() Generate an MD5 hash from the specified string
setLogLevel() Set the default level at which logging is to be performed
setProgress() Update the progress of the script
updateDescription() Set a new description for this script invocation
writeBqyDom() Write the specified DOM out to a file
Reference for Repository Methods
Method Description
addVersion() Add a version of a document
convertBqyFileToUnicode() Convert the specified document from code page to Unicode
findFiles() Find all files
getFileUuid() Retrieve the UUID of the file with a specified path within EPM Workspace
getFolderUuid() Retrieve the UUID of the folder with a specified path within EPM Workspace
isFile() Determine whether the specified UUID represents a file
isFolder() Determine whether the specified UUID represents a folder
publishBqyFile() Import a file into the repository with the specified content
remapOCEs() Remap the OCEs of the specified document to the provided set
Advanced Scripting 99

Method Description
retrieveFile() Retrieve the document with the specified UUID as a temporary file
retrieveVersionedDocument() Retrieve the versioned document associated with the specified UUID
EPM Workspace-Specific Repository Methods
Method Description
changeToFolder() Change the logical position within EPM Workspace to the specified folder path
folderExists() Determine whether a folder with the specified path exists in EPM Workspace
getCurrentFolder() Retrieve the path to the current folder where this script is located in EPM Workspace
getFolderContentsFor() Retrieve the UUIDs of all files in the folder
getPathForUuid() Get the path in EPM Workspace represented by the specified UUID
getSubfolderPathsFor() Retrieve the UUIDs of all subfolders of the folder
makeFolder() Create a subfolder with the specified name
Reference for Node Methods
Method Description
addChild() Add a child under this node
addProperty() Add the specified property to this node
dump() Dump the content of the node and the children of the node to standard output
findNodeByPattern() Find one node that matches the specified pattern
findNodesByPattern() Find all nodes that match the specified pattern
getChildren() Retrieve a list of all the children of this node
getChildrenOfType() Retrieve a list of all the children of this node with the specified node type
getContextualName() Retrieve the logical name of this node
getNodeType() Retrieve the type of this node
getPathWithContext() Retrieve a string that represents the location of this node in the document, includingcontextual information to make the path unique
getProperties() Retrieve a list of properties for this node
getProperty() Retrieve the property of this node with the specified name
100 Using Impact Management Services
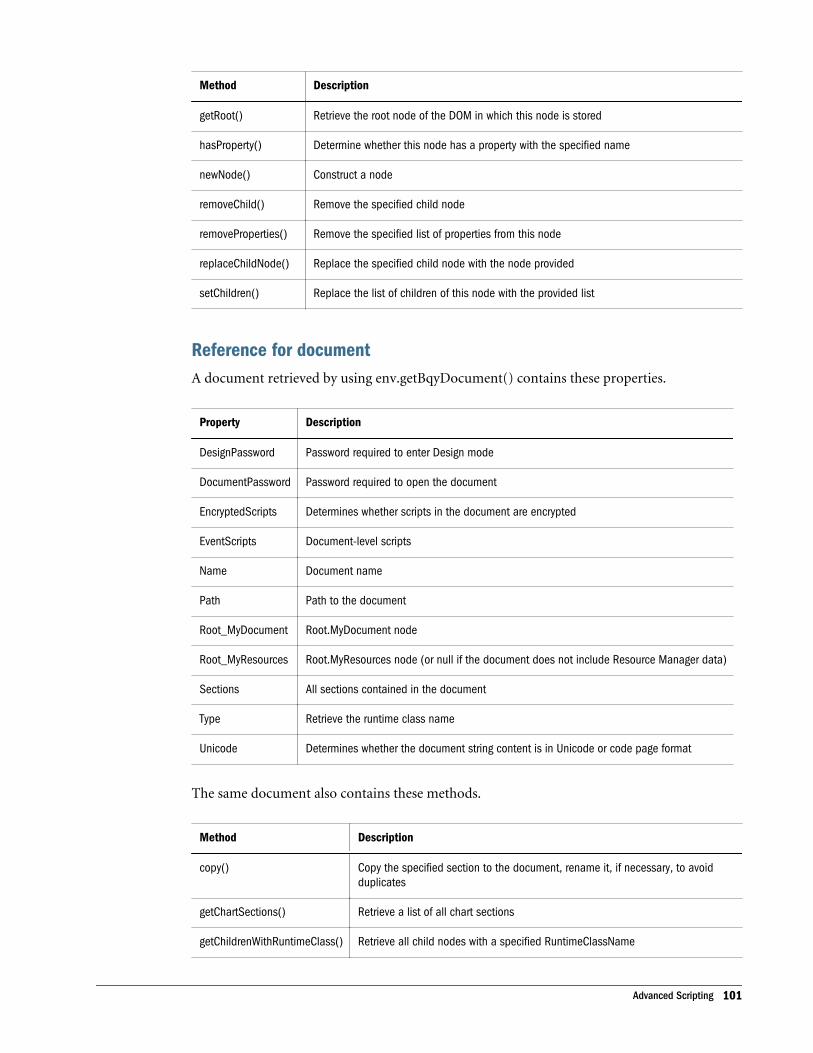
Method Description
getRoot() Retrieve the root node of the DOM in which this node is stored
hasProperty() Determine whether this node has a property with the specified name
newNode() Construct a node
removeChild() Remove the specified child node
removeProperties() Remove the specified list of properties from this node
replaceChildNode() Replace the specified child node with the node provided
setChildren() Replace the list of children of this node with the provided list
Reference for documentA document retrieved by using env.getBqyDocument() contains these properties.
Property Description
DesignPassword Password required to enter Design mode
DocumentPassword Password required to open the document
EncryptedScripts Determines whether scripts in the document are encrypted
EventScripts Document-level scripts
Name Document name
Path Path to the document
Root_MyDocument Root.MyDocument node
Root_MyResources Root.MyResources node (or null if the document does not include Resource Manager data)
Sections All sections contained in the document
Type Retrieve the runtime class name
Unicode Determines whether the document string content is in Unicode or code page format
The same document also contains these methods.
Method Description
copy() Copy the specified section to the document, rename it, if necessary, to avoidduplicates
getChartSections() Retrieve a list of all chart sections
getChildrenWithRuntimeClass() Retrieve all child nodes with a specified RuntimeClassName
Advanced Scripting 101
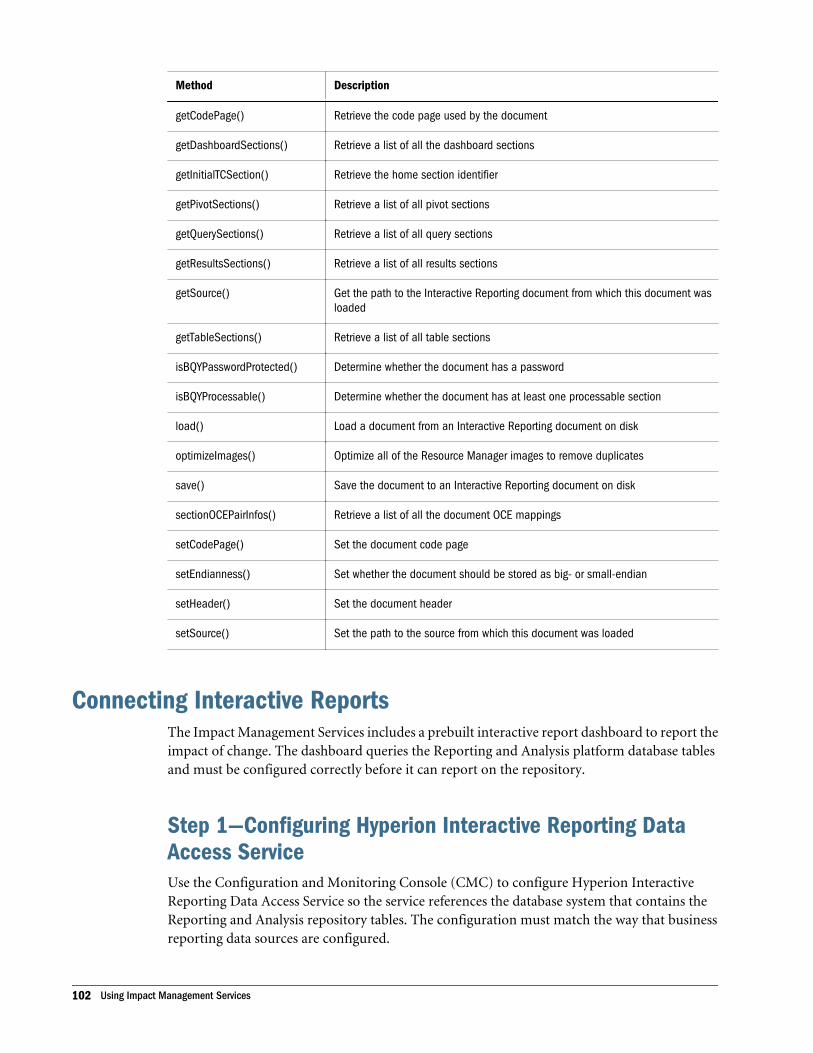
Method Description
getCodePage() Retrieve the code page used by the document
getDashboardSections() Retrieve a list of all the dashboard sections
getInitialTCSection() Retrieve the home section identifier
getPivotSections() Retrieve a list of all pivot sections
getQuerySections() Retrieve a list of all query sections
getResultsSections() Retrieve a list of all results sections
getSource() Get the path to the Interactive Reporting document from which this document wasloaded
getTableSections() Retrieve a list of all table sections
isBQYPasswordProtected() Determine whether the document has a password
isBQYProcessable() Determine whether the document has at least one processable section
load() Load a document from an Interactive Reporting document on disk
optimizeImages() Optimize all of the Resource Manager images to remove duplicates
save() Save the document to an Interactive Reporting document on disk
sectionOCEPairInfos() Retrieve a list of all the document OCE mappings
setCodePage() Set the document code page
setEndianness() Set whether the document should be stored as big- or small-endian
setHeader() Set the document header
setSource() Set the path to the source from which this document was loaded
Connecting Interactive ReportsThe Impact Management Services includes a prebuilt interactive report dashboard to report theimpact of change. The dashboard queries the Reporting and Analysis platform database tablesand must be configured correctly before it can report on the repository.
Step 1—Configuring Hyperion Interactive Reporting DataAccess ServiceUse the Configuration and Monitoring Console (CMC) to configure Hyperion InteractiveReporting Data Access Service so the service references the database system that contains theReporting and Analysis repository tables. The configuration must match the way that businessreporting data sources are configured.
102 Using Impact Management Services
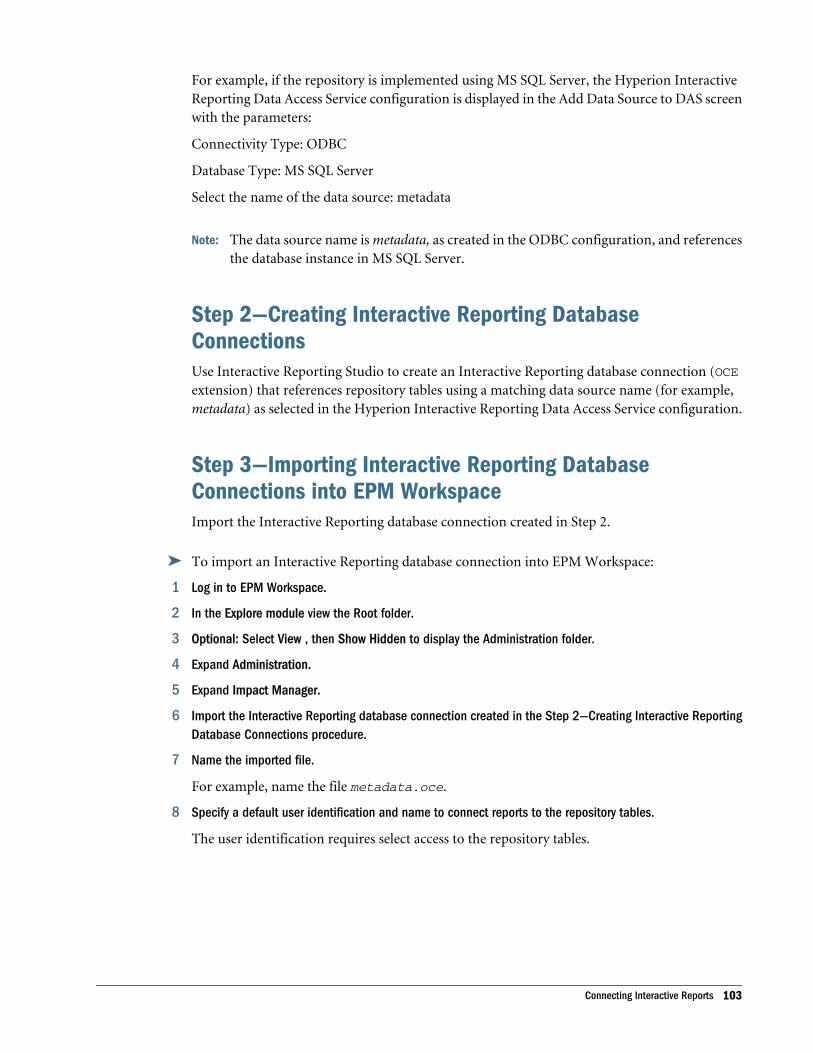
For example, if the repository is implemented using MS SQL Server, the Hyperion InteractiveReporting Data Access Service configuration is displayed in the Add Data Source to DAS screenwith the parameters:
Connectivity Type: ODBC
Database Type: MS SQL Server
Select the name of the data source: metadata
Note: The data source name is metadata, as created in the ODBC configuration, and referencesthe database instance in MS SQL Server.
Step 2—Creating Interactive Reporting DatabaseConnectionsUse Interactive Reporting Studio to create an Interactive Reporting database connection (OCEextension) that references repository tables using a matching data source name (for example,metadata) as selected in the Hyperion Interactive Reporting Data Access Service configuration.
Step 3—Importing Interactive Reporting DatabaseConnections into EPM WorkspaceImport the Interactive Reporting database connection created in Step 2.
ä To import an Interactive Reporting database connection into EPM Workspace:
1 Log in to EPM Workspace.
2 In the Explore module view the Root folder.
3 Optional: Select View , then Show Hidden to display the Administration folder.
4 Expand Administration.
5 Expand Impact Manager.
6 Import the Interactive Reporting database connection created in the Step 2—Creating Interactive ReportingDatabase Connections procedure.
7 Name the imported file.
For example, name the file metadata.oce.
8 Specify a default user identification and name to connect reports to the repository tables.
The user identification requires select access to the repository tables.
Connecting Interactive Reports 103
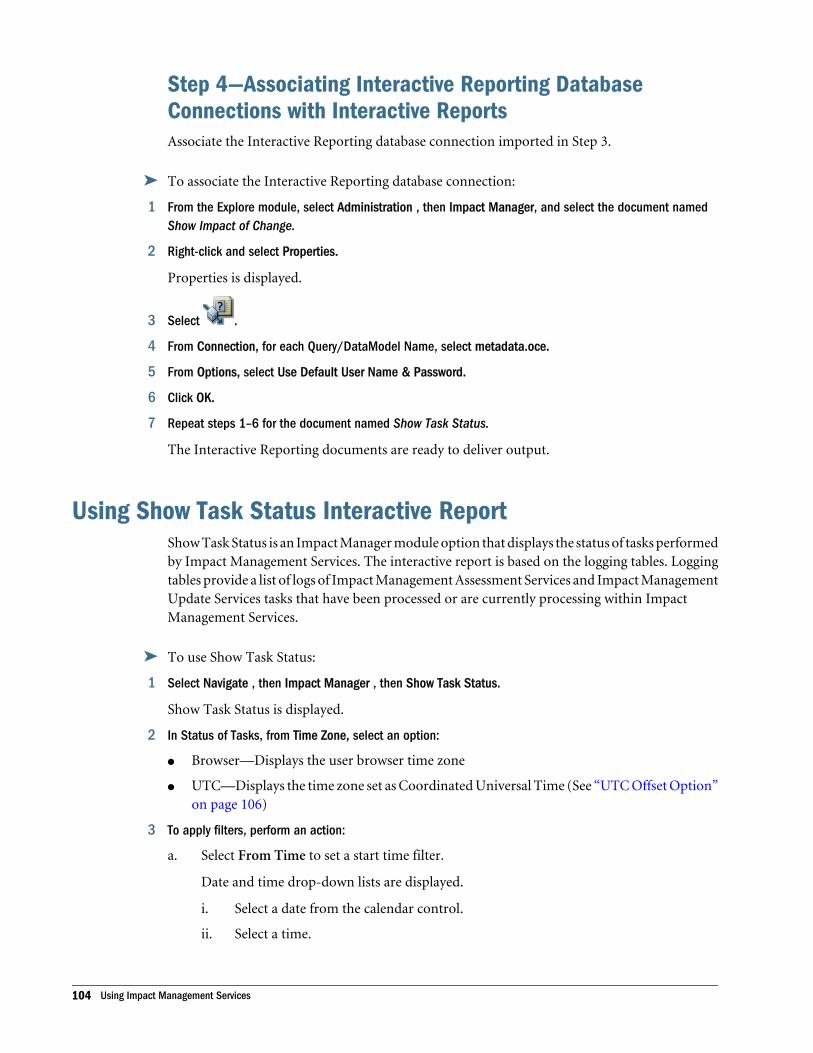
Step 4—Associating Interactive Reporting DatabaseConnections with Interactive ReportsAssociate the Interactive Reporting database connection imported in Step 3.
ä To associate the Interactive Reporting database connection:
1 From the Explore module, select Administration , then Impact Manager, and select the document namedShow Impact of Change.
2 Right-click and select Properties.
Properties is displayed.
3 Select .
4 From Connection, for each Query/DataModel Name, select metadata.oce.
5 From Options, select Use Default User Name & Password.
6 Click OK.
7 Repeat steps 1–6 for the document named Show Task Status.
The Interactive Reporting documents are ready to deliver output.
Using Show Task Status Interactive ReportShow Task Status is an Impact Manager module option that displays the status of tasks performedby Impact Management Services. The interactive report is based on the logging tables. Loggingtables provide a list of logs of Impact Management Assessment Services and Impact ManagementUpdate Services tasks that have been processed or are currently processing within ImpactManagement Services.
ä To use Show Task Status:
1 Select Navigate , then Impact Manager , then Show Task Status.
Show Task Status is displayed.
2 In Status of Tasks, from Time Zone, select an option:
l Browser—Displays the user browser time zone
l UTC—Displays the time zone set as Coordinated Universal Time (See “UTC Offset Option”on page 106)
3 To apply filters, perform an action:
a. Select From Time to set a start time filter.
Date and time drop-down lists are displayed.
i. Select a date from the calendar control.
ii. Select a time.
104 Using Impact Management Services
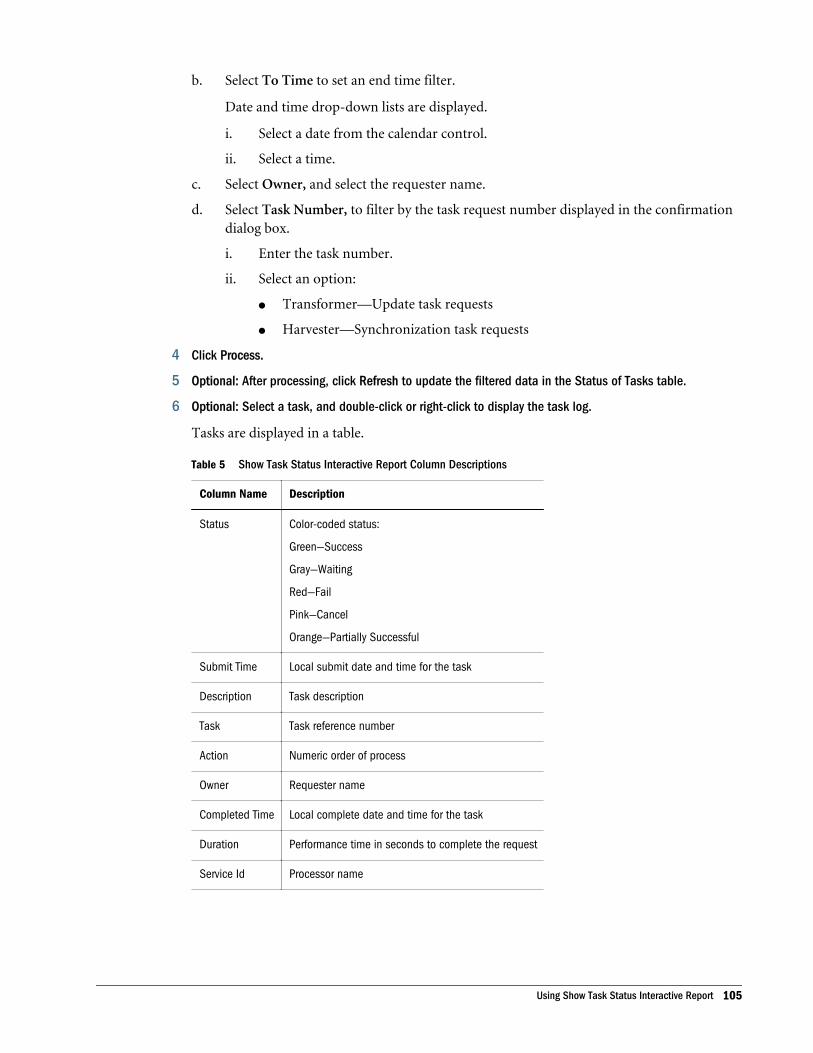
b. Select To Time to set an end time filter.
Date and time drop-down lists are displayed.
i. Select a date from the calendar control.
ii. Select a time.
c. Select Owner, and select the requester name.
d. Select Task Number, to filter by the task request number displayed in the confirmationdialog box.
i. Enter the task number.
ii. Select an option:
l Transformer—Update task requests
l Harvester—Synchronization task requests
4 Click Process.
5 Optional: After processing, click Refresh to update the filtered data in the Status of Tasks table.
6 Optional: Select a task, and double-click or right-click to display the task log.
Tasks are displayed in a table.
Table 5 Show Task Status Interactive Report Column Descriptions
Column Name Description
Status Color-coded status:
Green—Success
Gray—Waiting
Red—Fail
Pink—Cancel
Orange—Partially Successful
Submit Time Local submit date and time for the task
Description Task description
Task Task reference number
Action Numeric order of process
Owner Requester name
Completed Time Local complete date and time for the task
Duration Performance time in seconds to complete the request
Service Id Processor name
Using Show Task Status Interactive Report 105

UTC Offset OptionThe Coordinated Universal Time is based on the time zone of the application server. The UTCoffset is a computed item that extracts the time zone offset from a time string. The offset is usedto translate the display of the Submit Time and Completed Time columns into local time. Theassumption is that the server and client share a time zone. If this is not the case, the computeditem can be edited to reflect the time zone difference between server and clients.
A UTC Offset option has been added to the Show Task Status interactive report that enablesusers in a different location to the thin client application server to manually select a time zone.Selecting a time zone interprets dates and times in the log entries accordingly.
Note: Users in the locality of the application server are not required to change this setting.
Managing TasksThe Manage Task List is an Impact Manager module option that enables you to manage taskrequests. The interactive report is based on the logging tables, and includes a function to undoa request that has run.
ä To use the Manage Task List:
1 Select Navigate , then Impact Manager , then Manage Task List.
Manage Task List is displayed.
2 In Task List, from Time Zone, select an option:
l Browser—Displays the user browser time zone
l UTC—Displays the time zone set as Coordinated Universal Time (See “UTC Offset Option”on page 106)
3 To apply filters, perform an action:
a. Select From Time to set a start time filter.
Date and time drop-down lists are displayed.
i. Select a date from the calendar control.
ii. Select a time.
b. Select To Time to set an end time filter.
Date and time drop-down lists are displayed.
i. Select a date from the calendar control.
ii. Select a time.
c. Select Owner, and select the requester name.
4 Click Process.
5 Optional: After processing, click Refresh to update the filtered data in the Task List table.
106 Using Impact Management Services
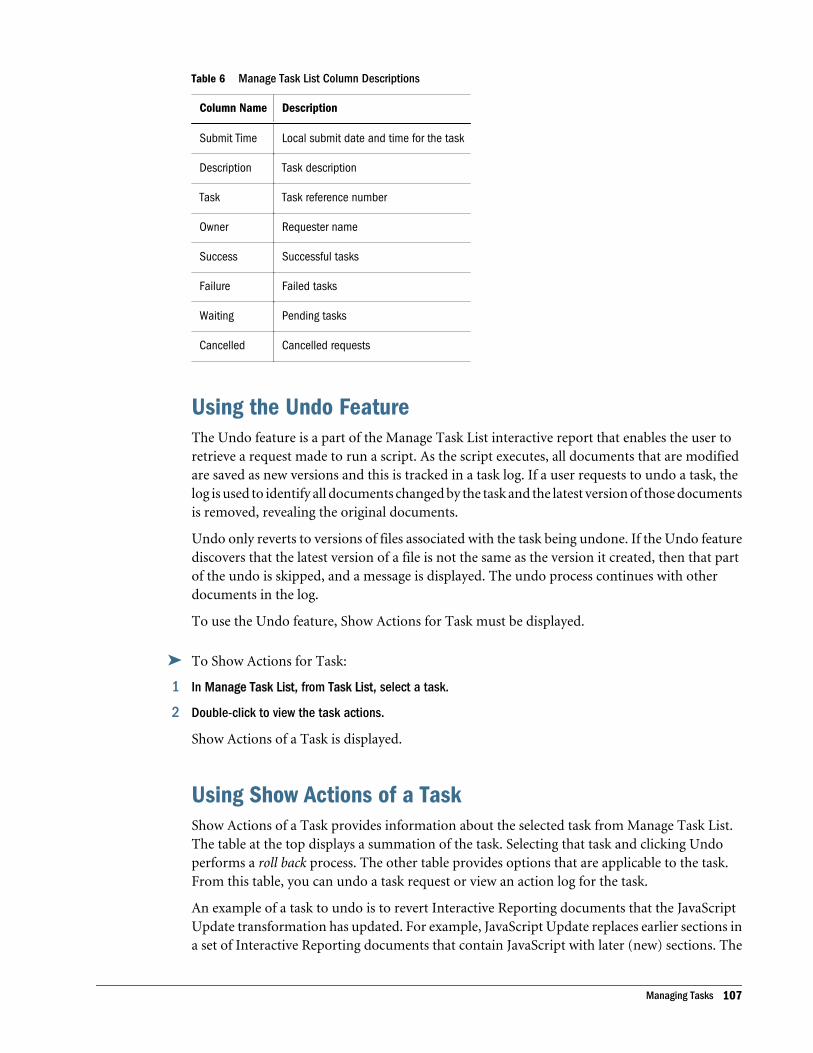
Table 6 Manage Task List Column Descriptions
Column Name Description
Submit Time Local submit date and time for the task
Description Task description
Task Task reference number
Owner Requester name
Success Successful tasks
Failure Failed tasks
Waiting Pending tasks
Cancelled Cancelled requests
Using the Undo FeatureThe Undo feature is a part of the Manage Task List interactive report that enables the user toretrieve a request made to run a script. As the script executes, all documents that are modifiedare saved as new versions and this is tracked in a task log. If a user requests to undo a task, thelog is used to identify all documents changed by the task and the latest version of those documentsis removed, revealing the original documents.
Undo only reverts to versions of files associated with the task being undone. If the Undo featurediscovers that the latest version of a file is not the same as the version it created, then that partof the undo is skipped, and a message is displayed. The undo process continues with otherdocuments in the log.
To use the Undo feature, Show Actions for Task must be displayed.
ä To Show Actions for Task:
1 In Manage Task List, from Task List, select a task.
2 Double-click to view the task actions.
Show Actions of a Task is displayed.
Using Show Actions of a TaskShow Actions of a Task provides information about the selected task from Manage Task List.The table at the top displays a summation of the task. Selecting that task and clicking Undoperforms a roll back process. The other table provides options that are applicable to the task.From this table, you can undo a task request or view an action log for the task.
An example of a task to undo is to revert Interactive Reporting documents that the JavaScriptUpdate transformation has updated. For example, JavaScript Update replaces earlier sections ina set of Interactive Reporting documents that contain JavaScript with later (new) sections. The
Managing Tasks 107
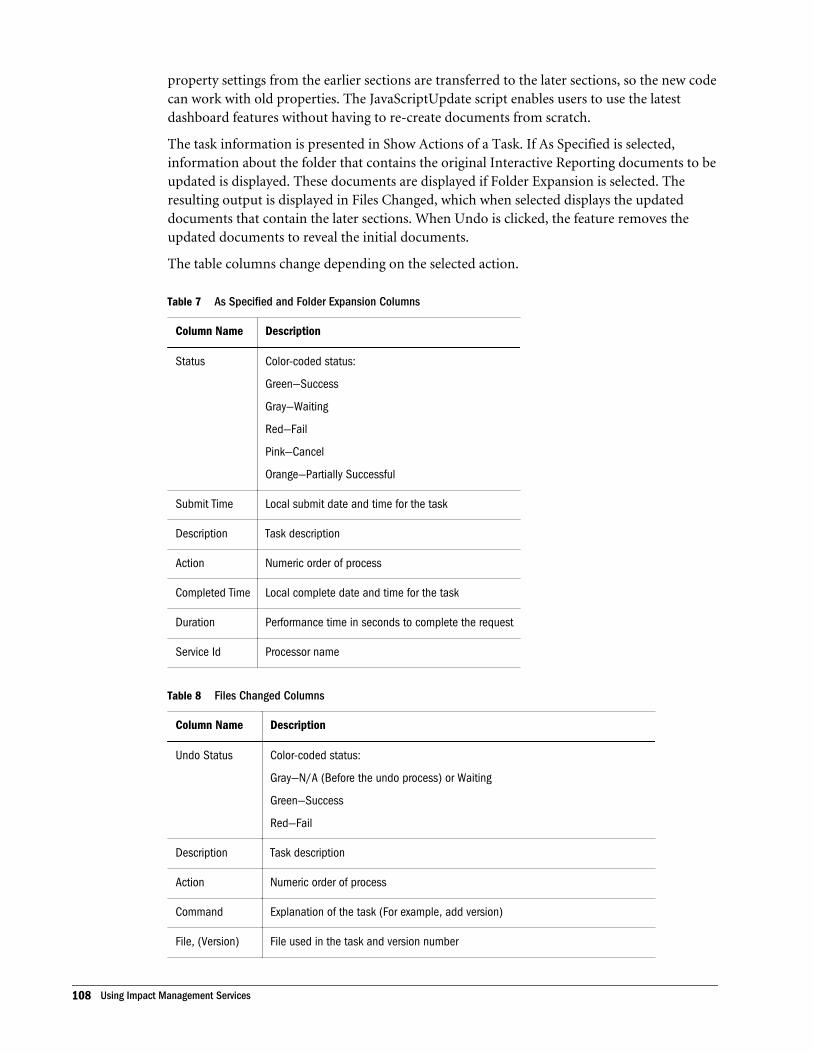
property settings from the earlier sections are transferred to the later sections, so the new codecan work with old properties. The JavaScriptUpdate script enables users to use the latestdashboard features without having to re-create documents from scratch.
The task information is presented in Show Actions of a Task. If As Specified is selected,information about the folder that contains the original Interactive Reporting documents to beupdated is displayed. These documents are displayed if Folder Expansion is selected. Theresulting output is displayed in Files Changed, which when selected displays the updateddocuments that contain the later sections. When Undo is clicked, the feature removes theupdated documents to reveal the initial documents.
The table columns change depending on the selected action.
Table 7 As Specified and Folder Expansion Columns
Column Name Description
Status Color-coded status:
Green—Success
Gray—Waiting
Red—Fail
Pink—Cancel
Orange—Partially Successful
Submit Time Local submit date and time for the task
Description Task description
Action Numeric order of process
Completed Time Local complete date and time for the task
Duration Performance time in seconds to complete the request
Service Id Processor name
Table 8 Files Changed Columns
Column Name Description
Undo Status Color-coded status:
Gray—N/A (Before the undo process) or Waiting
Green—Success
Red—Fail
Description Task description
Action Numeric order of process
Command Explanation of the task (For example, add version)
File, (Version) File used in the task and version number
108 Using Impact Management Services
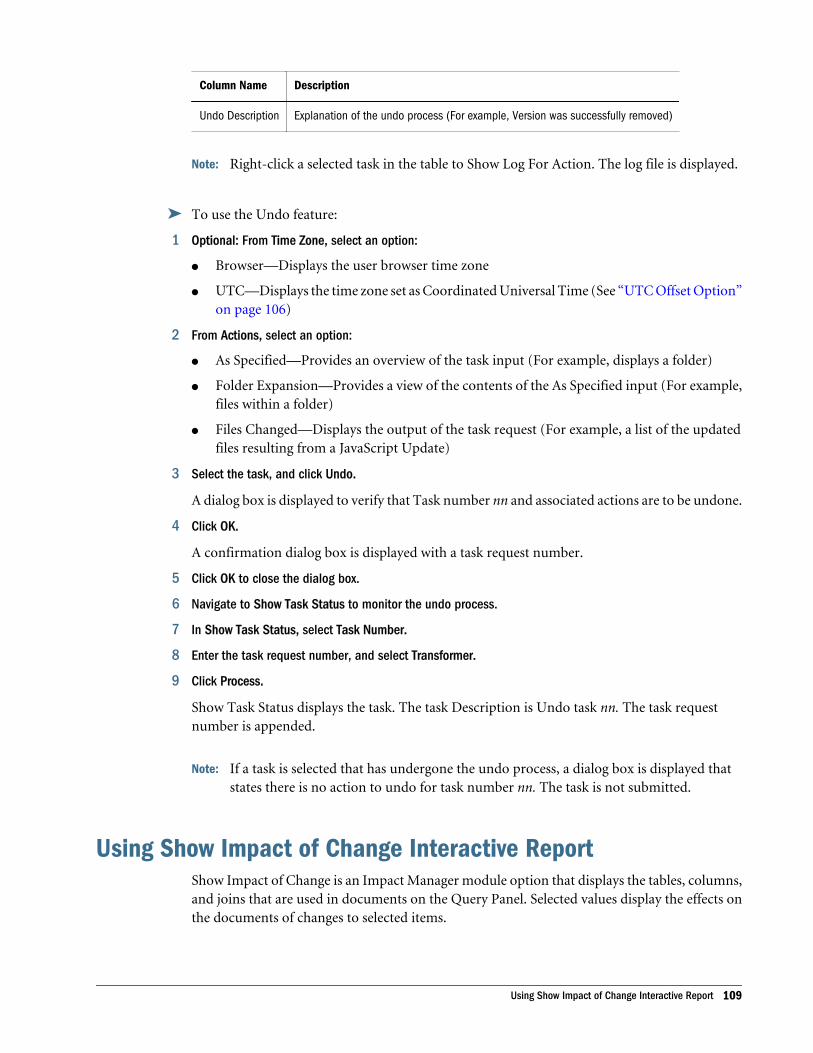
Column Name Description
Undo Description Explanation of the undo process (For example, Version was successfully removed)
Note: Right-click a selected task in the table to Show Log For Action. The log file is displayed.
ä To use the Undo feature:
1 Optional: From Time Zone, select an option:
l Browser—Displays the user browser time zone
l UTC—Displays the time zone set as Coordinated Universal Time (See “UTC Offset Option”on page 106)
2 From Actions, select an option:
l As Specified—Provides an overview of the task input (For example, displays a folder)
l Folder Expansion—Provides a view of the contents of the As Specified input (For example,files within a folder)
l Files Changed—Displays the output of the task request (For example, a list of the updatedfiles resulting from a JavaScript Update)
3 Select the task, and click Undo.
A dialog box is displayed to verify that Task number nn and associated actions are to be undone.
4 Click OK.
A confirmation dialog box is displayed with a task request number.
5 Click OK to close the dialog box.
6 Navigate to Show Task Status to monitor the undo process.
7 In Show Task Status, select Task Number.
8 Enter the task request number, and select Transformer.
9 Click Process.
Show Task Status displays the task. The task Description is Undo task nn. The task requestnumber is appended.
Note: If a task is selected that has undergone the undo process, a dialog box is displayed thatstates there is no action to undo for task number nn. The task is not submitted.
Using Show Impact of Change Interactive ReportShow Impact of Change is an Impact Manager module option that displays the tables, columns,and joins that are used in documents on the Query Panel. Selected values display the effects onthe documents of changes to selected items.
Using Show Impact of Change Interactive Report 109
Note: The example uses Microsoft Access database software and the Sample Database. TheInteractive Reporting database connection must be configured, see “ConnectingInteractive Reports” on page 102.
ä To use Show Impact of Change:
1 Select Navigate , then Impact Manager , then Show Impact of Change.
The Query Panel of the Show Impact of Change interactive report is displayed.
2 From the lists, select items, and click to apply the selections.
For example, if MSAccess and the Sample Database are used, from Rdbms Table Name, selectPCW_CUSTOMERS and PCW_SALES. Selections are displayed in Currently Selected QueryLimits.
3 Click to process the query.
The items selected in the Query Panel are displayed. For example, the table tabs in Documentwith RDBMS tables selected display PCW_CUSTOMERS and PCW_SALES.
The Show Impact of Change interactive report contains information that helps identify what todo in anticipation of a change to a schema:
l Documents with RDBMS tables selected—Impacted documents that use the selected tablesand columns
l RDBMS/Topic column mappings—Interactive Reporting document topics or itemsmapped to RDBMS tables or columns
l Topic/RDBMS column mappings—Reverse map of RDBMS tables or columns toInteractive Reporting document topics or items
l Data Models with topics in common—Common data models where impacted tables orcolumns are used (For example, how many Interactive Reporting documents are updatedwith one replacement data model)
l RDBMS table usage details—Documents and sections in which tables and columns are used
l Custom request items—Custom SQL in request items that Update Data Models, JavaScriptUpdate, or a Custom Update may impact
l Custom query limits—Custom SQL in filter items that Update Data Models, JavaScriptUpdate, or a Custom Update may impact
Generating Parameter FilesA parameter file for updating data models can be created by any convenient mechanism, forexample, in the Show Impact of Change interactive report. To generate a parameter file, click
, from the top panel of the dashboard.
There are two scenarios to create a parameter file, dependent upon in which environment theShow Impact of Change interactive report is running.
110 Using Impact Management Services
ä To generate a parameter file in EPM Workspace:
1 In Show Impact of Change, from the top panel, click .
EPM Workspace Export is displayed.
2 From Section Names, select IM_DMU_PARAM_FILE.
3 From File format, select Text (tab-delimited).
4 Click Export.
Another Web browser window is activated displaying the tab separated parameter file.
5 Select File , then Save As.
Save Web Page is displayed.
6 Name the parameter file IM_DMU_PARAM_FILE.txt, and click Save.
ä To generate a parameter file on the desktop or a Web plug-in:
1 In Show Impact of Change, from the top panel, click .
A drop-down list is displayed.
2 Select Export as Impact Manager parameter file.
Export Section is displayed.
3 In File name, enter IM_DMU_PARAM_FILE.txt.
4 From Save as type:, select Text (tab-delimited) (*.txt), and click Save.
5 Click again, to hide the drop-down list.
The generated parameter file contains these three entries per row that you must edit, (there aresix altogether). Replace the entries to suit your requirements.
l replacementDmName='$RDN$'—Replace $RDN$ with the name of the new data modelsection that replaces the old data model
l replacementDocUuid='$RDU$'—Replace $RDU$ with the UUID of the document thatcontains the new data model section
l replacementDocVersion='$RDV$'—Replace $RDV$ with the version of the document thatcontains the new data model section
Creating New Data ModelsYou must create a new data model and ensure that it exposes all internal table and column nameswhich are exposed by the replaced data model.
Creating New Data Models 111
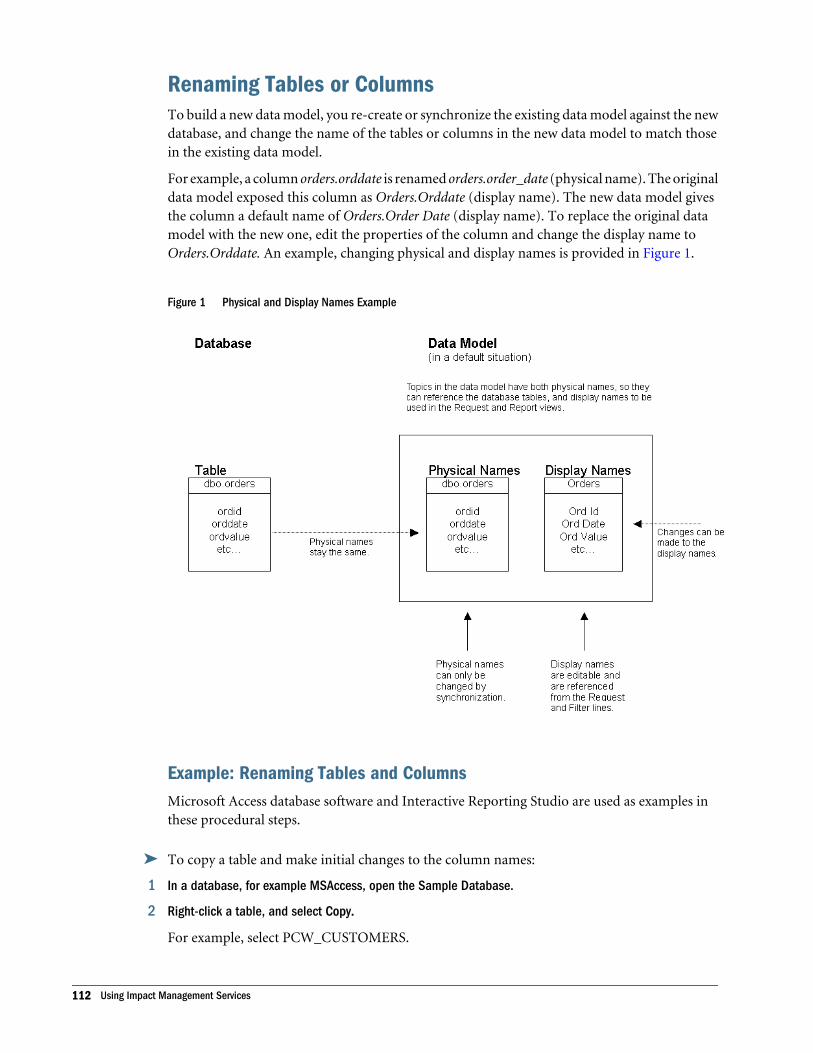
Renaming Tables or ColumnsTo build a new data model, you re-create or synchronize the existing data model against the newdatabase, and change the name of the tables or columns in the new data model to match thosein the existing data model.
For example, a column orders.orddate is renamed orders.order_date (physical name). The originaldata model exposed this column as Orders.Orddate (display name). The new data model givesthe column a default name of Orders.Order Date (display name). To replace the original datamodel with the new one, edit the properties of the column and change the display name toOrders.Orddate. An example, changing physical and display names is provided in Figure 1.
Figure 1 Physical and Display Names Example
Example: Renaming Tables and ColumnsMicrosoft Access database software and Interactive Reporting Studio are used as examples inthese procedural steps.
ä To copy a table and make initial changes to the column names:
1 In a database, for example MSAccess, open the Sample Database.
2 Right-click a table, and select Copy.
For example, select PCW_CUSTOMERS.
112 Using Impact Management Services
3 Right-click again, and select Paste.
4 In Paste Table As, enter a Table Name.
For example, type Outlets. Ensure that Structure and Data is selected.
5 Click OK.
A copy of PCW_CUSTOMERS called Outlets is created.
6 Right-click Outlets, and select Design View.
The table is opened in design mode.
7 Overwrite Field Name to change the column names.
For example, overwrite STORE_ID with outlet_id, STORE with outlet, and STORE_TYPE withoutlet_type.
8 Close the Outlets table, and click Yes to save changes.
ä To change the physical name of a table:
1 Open Interactive Reporting Studio, select Sample.oce, and click OK.
2 On the Sample.oce Host User and Host Password dialog box, click OK, without entering any text.
3 From the catalog pane, expand Tables, and drag a topic onto the content area.
For example, select PCW_CUSTOMERS.
4 Right-click the topic header, and select Properties.
Topic Properties is displayed.
5 Enter a new Physical Name.
For example, type outlets to replace PCW_CUSTOMERS.
6 Click OK.
ä To synchronize the data model with the database:
1 In Interactive Reporting Studio, select the topic with the new physical name, for example Pcw Customers,and select DataModel , then Sync with Database.
Data Model Synchronization is displayed. If Show Detail Information is selected, this dialog boxprovides information on changes that were made with the synchronization.
2 Click OK.
ä To change the display names of columns:
1 In Interactive Reporting Studio, using the topic in the content area, right-click a column name, and selectProperties.
Topic Item Properties is displayed.
2 Change the column name, and click OK.
For example, change Outlet Id to Store Id.
Creating New Data Models 113

3 Repeat steps 1–2 to change the other column names.
For example, change Outlet to Store and Outlet Type to Store Type.
The display names of the columns are renamed.
4 Optional: Alternatively, to achieve an equivalent end result of changing the display names, perform theseactions:
a. Drag a topic, for example Orders, onto the Interactive Reporting Studio content area.
b. Rename the display names of the renamed columns and the topic.
For example, a data model is created that can replace another data model that uses onlythe Pcw Customers topic. The edited topic now exposes names matching the original topicand is a valid replacement.
Using Normalized and Denormalized Data ModelsIf a data model requires change because tables are being consolidated or divided, the creationof the new data model involves additional steps. To create a data model that is a superset of theoriginal table structure use metatopics. You must give metatopics and the columns correctnames, so the new data model is a true superset of the original data model. When names arecorrect, use the new data model in place of the original.
See “Metatopics” in the Hyperion Interactive Reporting Studio User's Guide.
Deleting ColumnsDeleted columns are replaced by a computed item with a constant value. For example, stringcolumns may return n/a, and numeric columns may return 0. These replacements enable reportsto continue working and display the constant value (for example, n/a) for the deleted columns.
Note: If an entire table is deleted, it is treated as if the table has all columns deleted.
These procedures describe creating a computed item to mask the deletion of columns. Beforecreating the computed item, a series of processes; such as copying tables, changing names, andsynchronizing data models, must be performed.
ä To copy a table and make initial changes to the column names:
1 In a database, for example MSAccess, open the Sample Database.
2 Right-click a table, and select Copy.
For example, select PCW_Items.
3 Right-click again, and select Paste.
4 In Paste Table As, enter a Table Name.
For example, type Goods. Ensure that Structure and Data is selected.
114 Using Impact Management Services
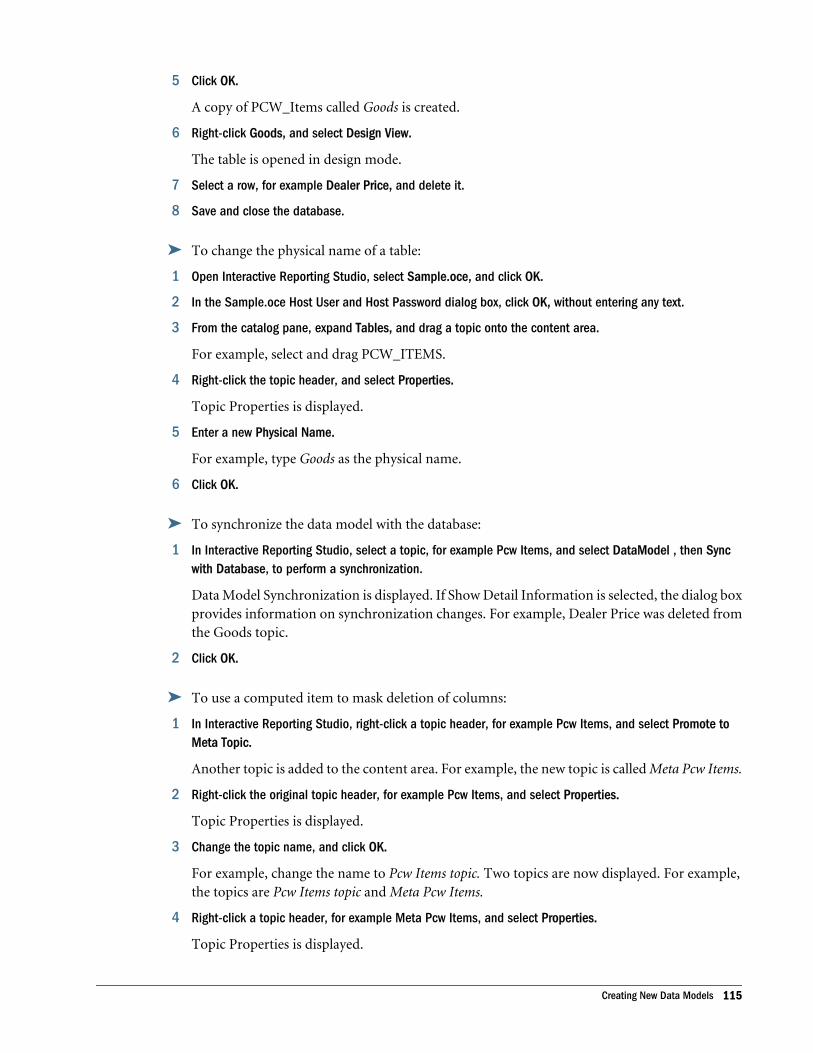
5 Click OK.
A copy of PCW_Items called Goods is created.
6 Right-click Goods, and select Design View.
The table is opened in design mode.
7 Select a row, for example Dealer Price, and delete it.
8 Save and close the database.
ä To change the physical name of a table:
1 Open Interactive Reporting Studio, select Sample.oce, and click OK.
2 In the Sample.oce Host User and Host Password dialog box, click OK, without entering any text.
3 From the catalog pane, expand Tables, and drag a topic onto the content area.
For example, select and drag PCW_ITEMS.
4 Right-click the topic header, and select Properties.
Topic Properties is displayed.
5 Enter a new Physical Name.
For example, type Goods as the physical name.
6 Click OK.
ä To synchronize the data model with the database:
1 In Interactive Reporting Studio, select a topic, for example Pcw Items, and select DataModel , then Syncwith Database, to perform a synchronization.
Data Model Synchronization is displayed. If Show Detail Information is selected, the dialog boxprovides information on synchronization changes. For example, Dealer Price was deleted fromthe Goods topic.
2 Click OK.
ä To use a computed item to mask deletion of columns:
1 In Interactive Reporting Studio, right-click a topic header, for example Pcw Items, and select Promote toMeta Topic.
Another topic is added to the content area. For example, the new topic is called Meta Pcw Items.
2 Right-click the original topic header, for example Pcw Items, and select Properties.
Topic Properties is displayed.
3 Change the topic name, and click OK.
For example, change the name to Pcw Items topic. Two topics are now displayed. For example,the topics are Pcw Items topic and Meta Pcw Items.
4 Right-click a topic header, for example Meta Pcw Items, and select Properties.
Topic Properties is displayed.
Creating New Data Models 115

5 Remove Meta from Topic Name, and click OK.
6 Select the topic from step 5, for example Pcw Items, and select DataModel , then Add Meta Topic Item ,then Server.
Modify Item is displayed.
7 Enter the Name of the row that was deleted in the database, and enter a definition.
For example, type Dealer Price in Name, and type 0 as the Definition.
8 Click OK.
The computed item is added to the topic. For example, Dealer Price is added to Pcw Items.
9 Select the topic with the computed item added, for example Pcw Items, and select DataModel , then DataModel View , then Meta.
The selected topic is displayed in Meta View, and other topics are removed.
Changing Column Data TypesChanges to a database schema may result in changes to the data types of columns. For example,strings become integers, or conversely integers become strings. When this occurs additionalactions may be required to complete the migration of an Interactive Reporting document to thenew schema.
If the type change affects a filter, the data type of the data model column is applied to the filterin the Interactive Reporting document. The filter type in an Interactive Reporting document iscopied from the data model when it is created and cannot be accessed by developers or users.
Some data type changes require no action and are unaffected. Those changes are marked asOK in Table 9. The changes marked as Warn require attention because values cached in theInteractive Reporting document may not be migrated correctly.
Table 9 Data Type Changes
Data Types
From/To string int real date time timestamp
string OK Warn Warn Warn Warn Warn
int OK OK OK Warn Warn Warn
real OK Warn OK Warn Warn Warn
date Warn Warn Warn OK Warn OK
time Warn Warn Warn Warn OK Warn
timestamp Warn Warn Warn Warn Warn OK
If the type change affects a Request line item, no action is taken because request item data typesare accessed by clicking Option in Item Properties. If the Impact Manager module changes the
116 Using Impact Management Services
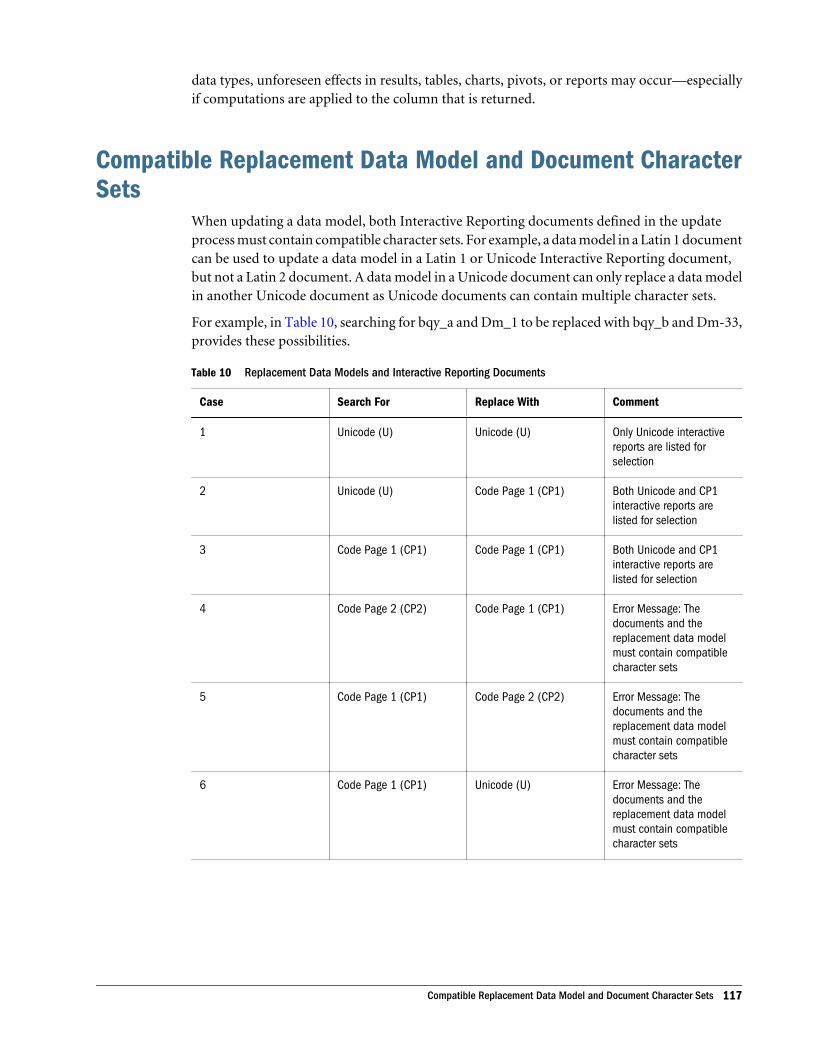
data types, unforeseen effects in results, tables, charts, pivots, or reports may occur—especiallyif computations are applied to the column that is returned.
Compatible Replacement Data Model and Document CharacterSets
When updating a data model, both Interactive Reporting documents defined in the updateprocess must contain compatible character sets. For example, a data model in a Latin 1 documentcan be used to update a data model in a Latin 1 or Unicode Interactive Reporting document,but not a Latin 2 document. A data model in a Unicode document can only replace a data modelin another Unicode document as Unicode documents can contain multiple character sets.
For example, in Table 10, searching for bqy_a and Dm_1 to be replaced with bqy_b and Dm-33,provides these possibilities.
Table 10 Replacement Data Models and Interactive Reporting Documents
Case Search For Replace With Comment
1 Unicode (U) Unicode (U) Only Unicode interactivereports are listed forselection
2 Unicode (U) Code Page 1 (CP1) Both Unicode and CP1interactive reports arelisted for selection
3 Code Page 1 (CP1) Code Page 1 (CP1) Both Unicode and CP1interactive reports arelisted for selection
4 Code Page 2 (CP2) Code Page 1 (CP1) Error Message: Thedocuments and thereplacement data modelmust contain compatiblecharacter sets
5 Code Page 1 (CP1) Code Page 2 (CP2) Error Message: Thedocuments and thereplacement data modelmust contain compatiblecharacter sets
6 Code Page 1 (CP1) Unicode (U) Error Message: Thedocuments and thereplacement data modelmust contain compatiblecharacter sets
Compatible Replacement Data Model and Document Character Sets 117
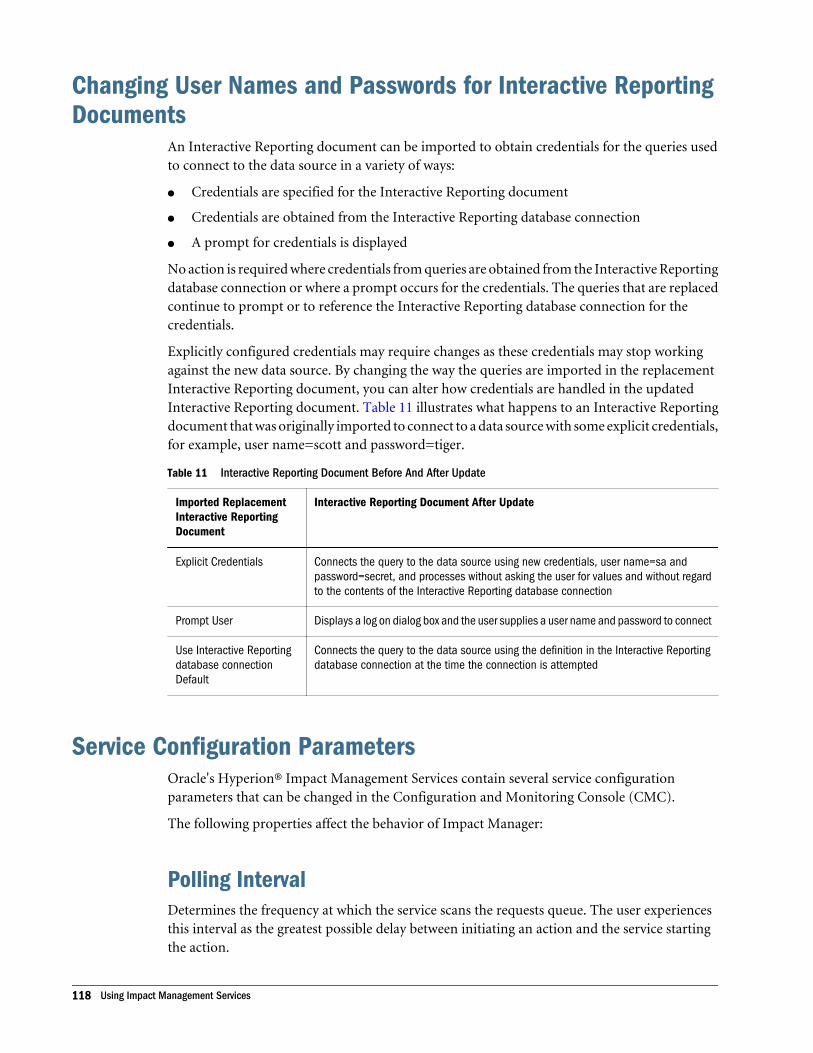
Changing User Names and Passwords for Interactive ReportingDocuments
An Interactive Reporting document can be imported to obtain credentials for the queries usedto connect to the data source in a variety of ways:
l Credentials are specified for the Interactive Reporting document
l Credentials are obtained from the Interactive Reporting database connection
l A prompt for credentials is displayed
No action is required where credentials from queries are obtained from the Interactive Reportingdatabase connection or where a prompt occurs for the credentials. The queries that are replacedcontinue to prompt or to reference the Interactive Reporting database connection for thecredentials.
Explicitly configured credentials may require changes as these credentials may stop workingagainst the new data source. By changing the way the queries are imported in the replacementInteractive Reporting document, you can alter how credentials are handled in the updatedInteractive Reporting document. Table 11 illustrates what happens to an Interactive Reportingdocument that was originally imported to connect to a data source with some explicit credentials,for example, user name=scott and password=tiger.
Table 11 Interactive Reporting Document Before And After Update
Imported ReplacementInteractive ReportingDocument
Interactive Reporting Document After Update
Explicit Credentials Connects the query to the data source using new credentials, user name=sa andpassword=secret, and processes without asking the user for values and without regardto the contents of the Interactive Reporting database connection
Prompt User Displays a log on dialog box and the user supplies a user name and password to connect
Use Interactive Reportingdatabase connectionDefault
Connects the query to the data source using the definition in the Interactive Reportingdatabase connection at the time the connection is attempted
Service Configuration ParametersOracle's Hyperion® Impact Management Services contain several service configurationparameters that can be changed in the Configuration and Monitoring Console (CMC).
The following properties affect the behavior of Impact Manager:
Polling IntervalDetermines the frequency at which the service scans the requests queue. The user experiencesthis interval as the greatest possible delay between initiating an action and the service startingthe action.
118 Using Impact Management Services
Max Request Log TimeCan affect the Task Status report of the Impact Manager module functions. Actions older thanthe value of the parameter may be purged from the repository. The Undo feature can only operateusing information found in the log. Actions with purged log entries cannot be undone. See“Using the Undo Feature” on page 107.
Note: For additional information on CMC, see Chapter 9, “Configuring Services Using CMC”
Using the Impact of Change ReportImpact Manager uses an Interactive Reporting document to report which documents are affectedif tables, columns or hierarchies change. This report identifies Interactive Reporting and WebAnalysis documents. The Impact of Change Report is deployed as a hidden file in workspace /Administration/Impact Manager/Impact of Change.bqy. As with all InteractiveReports that are imported to EPM Workspace, a four step process is required before the reportcan retrieve metadata from the data source
1. Define the data source in the EPM Workspace Data Access Service (DAS).
In the Configuration and Monitoring Console (CMC), select the DAS service and use theData Sources tab to add a new service.
2. Create a connection file (OCE) that references the data source in DAS.
Use the Interactive Reporting Designer to create a connection file that references theHostname/Provider of the DAS data source.
3. Publish the connection file in EPM Workspace.
Log onto EPM Workspace with an Administrator role and publish the connection file
4. Associate the Impact of change dashboard’s data model sections with the publishedconnection file.
Set your View options to show hidden folders and files. Navigate to /Administration/Impact Manager and select Impact of Change.bqy. Select the Interactive Reportingoptions and set every Query / Data Model use of the connection file imported later.
Note: To make running the Impact of Change report easier, configure the connections to use adefault user id and provide a password for automatic logon. If automatic logon is notenabled, users will have to supply the database user id and password every time they runthe report.
Using the Impact of Change Report 119

120 Using Impact Management Services
6Automating Activities
In This Chapter
Managing Calendars.. . . . . . . . . . . . . . . . . . . . . . . . . . . . . . . . . . . . . . . . . . . . . . . . . . . . . . . . . . . . . . . . . . . . . . . . . . . . . . . . . . . . . . . . . . . . . . . . . . . . . . . . . . . . 121
Managing Time Events.. . . . . . . . . . . . . . . . . . . . . . . . . . . . . . . . . . . . . . . . . . . . . . . . . . . . . . . . . . . . . . . . . . . . . . . . . . . . . . . . . . . . . . . . . . . . . . . . . . . . . . . . . . 125
Administering Public Job Parameters .. . . . . . . . . . . . . . . . . . . . . . . . . . . . . . . . . . . . . . . . . . . . . . . . . . . . . . . . . . . . . . . . . . . . . . . . . . . . . . . . . . . . . . . . . 126
Managing Interactive Reporting Database Connections... . . . . . . . . . . . . . . . . . . . . . . . . . . . . . . . . . . . . . . . . . . . . . . . . . . . . . . . . . . . . . . . . . . . 126
Managing Pass-Through for Jobs and Interactive Reporting Documents ... . . . . . . . . . . . . . . . . . . . . . . . . . . . . . . . . . . . . . . . . . . . . . . . . 127
Managing Job Queuing ... . . . . . . . . . . . . . . . . . . . . . . . . . . . . . . . . . . . . . . . . . . . . . . . . . . . . . . . . . . . . . . . . . . . . . . . . . . . . . . . . . . . . . . . . . . . . . . . . . . . . . . . 127
Running Jobs in Parallel . . . . . . . . . . . . . . . . . . . . . . . . . . . . . . . . . . . . . . . . . . . . . . . . . . . . . . . . . . . . . . . . . . . . . . . . . . . . . . . . . . . . . . . . . . . . . . . . . . . . . . . . . 130
Managing CalendarsYou can create, modify, and delete custom calendars using Calendar Manager. You can createcalendars to schedule jobs based on fiscal or other internal or organizational calendars. Jobsscheduled with custom calendars resolve dates and variable date limits against quarterly andmonthly dates specified in the custom calendars, rather than the default calendar.
Topics that provide information on Calendar Manager:
l “Viewing Calendar Manager” on page 121
l “Creating Calendars” on page 122
l “Deleting Calendars” on page 122
l “Modifying Calendars” on page 122
l “Calendar Manager Properties” on page 123
l “Viewing the Job Log” on page 123
Viewing Calendar Manager
You launch Calendar Manager by clicking from the Job Utilities toolbar. At the Job UtilitiesLogon screen, supply a user name, password, Reporting and Analysis host, and port number.
After the system confirms these values, Calendar Manager is displayed. It lists the default calendarand custom calendars with the years for each calendar in subfolders. You choose a calendar nameor year to modify or delete it.
Managing Calendars 121
Selecting Calendars displays a blank Calendar Property tab. Selecting a calendar name displaysthe Calendar Properties tab with the selected calendar record. Selecting a year displays thecalendar Periods and Years tab with the selected calendar and year.
You need the Job Manager role (see the Oracle Hyperion Enterprise Performance ManagementSystem Security Administration Guide) to create, modify, or delete calendars.
Creating CalendarsCalendar Manager uses the standard Gregorian calendar, which cannot be modified except forholiday designations and start week day, by default.
ä To create a calendar:
1 In Calendar Manager, select Calendars from the left navigation pane.
2 Enter a name for the calendar.
3 Enter information as requested; click Save on each dialog box.
You must select New Year and enter a year before you can save the calendar. For fieldinformation, see “Calendar Manager Properties” on page 123.
Deleting Calendars
ä To delete whole calendars or individual years:
1 In Calendar Manager, navigate to a calendar or year.
2 Click .
3 When prompted, verify deletion of the calendar or year.
You cannot delete the calendar last year. To delete the calendar last year, you must delete theentire calendar.
Modifying Calendars
ä To modify or add years to calendars:
1 In Calendar Manager, navigate to a calendar.
l Select a calendar name to view calendar properties.
l Select a year to modify periods or years and non-working days.
When modifying periods or years be sure the dates for weeks or periods are consecutive.
For field information, see “Calendar Manager Properties” on page 123.
2 Select New Year to add a year to this calendar, and modify properties.
3 Click Save.
122 Automating Activities
Calendar Manager PropertiesTopics that present properties available in Calendar Manager:
l “Calendar Properties” on page 123
l “Custom Calendar Periods and Years Properties” on page 123
l “Custom Calendar Non-Working Days Properties” on page 123
Calendar Propertiesl Calendar Name—Name cannot be changed after it is saved.
l User Defined Weeks—Enables selection of week start day. The default week contains sevendays and is not associated with other time periods. User-defined weeks can be associatedwith periods, quarters, or months, but cannot span multiple periods. Start and end datescannot overlap and must be sequential.
l Week Start—If using user-defined weeks, select a starting day for the week.
Custom Calendar Periods and Years Propertiesl New Year—Any year is valid if no other years are defined. If this is not the first year defined,
the year entered must be sequential.
l Quarter/Period/Week—The system automatically assigns sequential numbers to quarters.All calendars contain 12 periods.
l Start and End—Enter initial Start and End dates. The system automatically populates theremaining periods and start and end dates, and assigns quarters logically. After the fields arepopulated, you can edit start and end dates, which cannot overlap and must be sequential.
Custom Calendar Non-Working Days Propertiesl Days of the week—Selecting days of a week populates the calendar automatically.
You can select non-working days by day or by day of the week.
l Calendar—The calendar reflects the day starting the week as previously selected. Clickingthe arrows moves the calendar forward or back one month. You indicate working and non-working days on a day-by-day basis by selecting and deselecting days.
Viewing the Job LogCalendar Manager keeps a job log in text format that contains information about scheduleexecution including job names, start and stop times, names of users who executed jobs, reasonswhy jobs were executed, whether output was viewed, and directories where output is located.Jobs that are not complete have no stop time value.
A scheduled Interactive Reporting job generates an HTML log file rather than a text file.
Managing Calendars 123
ä To view the Job Log:
1 Click (View Job Execution Log Entries).
The Job Log Retrieval Criteria dialog box is displayed.
2 Optional: Specify start and end dates and user information.
You can choose to view all log entries or only those for specific dates or users. See “Job LogRetrieval Criteria” on page 124.
3 Click OK to retrieve the log (see “Job Log Entries” on page 124).
Job Log Retrieval Criteria
ä To limit Job Log entries:
1 Select Start Date or End Date.
A calendar is displayed from which you can select a date.
If you omit a start date, Calendar Manager retrieves those entries with the defined end date, andvice versa.
2 Select All users or select User and enter a user name.
3 Click OK.
Job Log EntriesThe Job Log Entries window contains information about the execution of schedules, includingschedule name, job name, start time, and user name who executed the job.
Users can view only those log portions that pertain to their schedules. Administrators can viewall log entries, but can limit their log view by requesting to view only those entries related tospecific users.
Log entries are initially sorted in ascending order by schedule name. You can sort by columns(Schedule Name, Job Name, Start Time, User, Mark for Deletion) by selecting a column heading.To sort a column in descending order, press Shift+click on a column heading.
To change the column display order, select a column heading and drag it to the desired location.
Job Log Entry Details
ä To view Job Log entry details, select a log entry and click Detail.
Information displayed includes schedule name, job name, output artifact, start time, stop time,user, and times executed.
124 Automating Activities

Deleting Job Log Entries
ä To delete job log entries:
1 In Job Log Entries, select a log entry, and select Mark for Deletion.
To select multiple log entries, use the Shift or Ctrl key.
2 Click Yes when prompted to confirm the deletion.
Entries marked for deletion are not deleted until the next EPM Workspace server cycle, whichis a recurring event where Reporting and Analysis performs routine maintenance tasks.
Managing Time EventsPublic recurring time events and externally triggered events, both of which can be viewed andaccessed by users, are managed only by users with the Schedule Manager role (see the OracleHyperion Enterprise Performance Management System Security Administration Guide.
Topics that provide information on managing time events:
l “Managing Public Recurring Time Events” on page 125
l “Creating Externally Triggered Events” on page 125
l “Triggering Externally Triggered Events” on page 126
Managing Public Recurring Time EventsTo create, modify, and delete public recurring time events, follow the procedures for personalrecurring time events described in the Oracle Enterprise Performance Management WorkspaceUser's Guide.
Creating Externally Triggered EventsExternally triggered events are non-time events against which jobs are scheduled. Jobs scheduledagainst externally triggered events run after the event is triggered.
ä To create an externally triggered event:
1 Select Navigate , then Schedule , then Manage Events.
2 Select Externally Triggered Event from Add Another and click Go.
3 From Create Externally Triggered Event, perform these tasks:
a. Enter a unique name and description for the event.
b. Make sure Active is selected.
If the Active option is not selected, the externally triggered event does not work.
c. Optional: Select an Effective starting date and ScheduleTimeAt.
Managing Time Events 125
The default is the current date and time.
d. Optional: Select Inactive after and select a date and ScheduleTimeAt.
4 Set access permissions (see the Oracle Enterprise Performance Management Workspace User's Guide) toenable roles, users, or groups to view and use the public recurring time event.
5 Click Finish.
Triggering Externally Triggered EventsExternally triggered events are non-time events that are triggered manually through the Schedulemodule. You can trigger an external event programmatically using the triggerETE() methodspecified for Externally Triggered Event interface of Interactive Reporting SDK (see the OracleEnterprise Performance Management Workspace Developer's Guide).
ä To trigger externally triggered events:
1 Select Navigate , then Schedule , then Manage Events.
2 Select Modify next to an event, and click Trigger Now.
A message is displayed verifying that the event triggered.
3 Click OK to close the verification message.
4 Click OK.
Administering Public Job ParametersPublic job parameters are managed by users with the Schedule Manager role (see the OracleHyperion Enterprise Performance Management System Security Administration Guide.
To create, modify, and delete public job parameters, follow the procedures for personal jobparameters described in the Oracle Enterprise Performance Management Workspace User'sGuide, except save the parameters as public instead of personal. Apply access permissions toallow roles, groups, and users to use public job parameters.
Managing Interactive Reporting Database ConnectionsInteractive Reporting documents use Interactive Reporting database connections to connect todatabases. Separate Interactive Reporting database connections can be specified for each queryin Interactive Reporting documents. If no Interactive Reporting database connection is specifiedfor a query when a document is imported, users cannot process that query unless it uses onlylocal results. It is, therefore, important that you import and allow access to Interactive Reportingdatabase connections by users who import Interactive Reporting documents.
To process Interactive Reporting documents in EPM Workspace, no explicit access to the Interactive Reporting database connections is required when the SC_ENABLE flag is set to true(this is the default). When the SC_ENABLE flag is set to false, only users given explicit access by
126 Automating Activities
the importer to the Interactive Reporting database connection associated with the InteractiveReporting document have access. See Chapter 9, “Configuring Services Using CMC” for moreinformation.
Managing Pass-Through for Jobs and Interactive ReportingDocuments
Pass-through enables users to log on once to EPM Workspace and access their reports’ databaseswithout additional authentication.
As the administrator, you can provide transparent access to databases for foreground jobs andfor Interactive Reporting documents by enabling pass-through globally. When pass-through isenabled globally, item owners can enable or disable pass-through for jobs and InteractiveReporting documents.
You can configure pass-through with user logon credentials or credentials set in Preferences, oryou can leave the credential choice up to item owners (see “Modifying Service ConfigurationProperties” on page 159.
Managing Job QueuingJob queueing occurs when no Job Service is available to process a job. Administrators can controlJob Service availability using the Job Limit and Hold properties (see “Job Service DynamicProperties” on page 144)
Topics that explain how job queueing works in specific job types:
l “Scheduled Jobs” on page 127
l “Background Jobs” on page 128
l “Foreground Jobs” on page 128
l “Disabling the Job Service” on page 128
l “Job Limit” on page 129
l “Acquiring Jobs” on page 129
l “Jobs Only Intelligence Service” on page 129
l “Interactive Reporting Services Availability and Jobs” on page 130
Scheduled JobsScheduled jobs are queued when all Job Services are processing the maximum concurrent jobsdefined. The queue is maintained by Event Service. Schedules in the queue are sorted based onpriority and by the order in which they are triggered.
When a schedule is ready for processing, Event Service builds the job and submits it to ServiceBroker. Service Broker gets a list of all Job Services that can process the job and checks availability
Managing Pass-Through for Jobs and Interactive Reporting Documents 127
based on the number of concurrent jobs that each Job Service is processing. This informationis obtained dynamically from each Job Service.
If Service Broker cannot find a Job Service to process a job, it gives a Job Limit Reached exception,which enables queuing in Event Service. The schedule is added to the queue and job data(including job application and executable information) for selecting a Job Service is cached.
When the next schedule is ready for processing, Event Service builds the job and determines ifthat job type is in the queue (based on cached job data). If job type matches, the job is added tothe queue. If not, the job is submitted to Service Broker for processing.
When Event Service queuing is enabled, a Job Service polling thread is initialized that checks foravailable Job Services. If one is available, then Job Service processes the first schedule it can,based on job data cached in Event Service. Scheduled job data is removed from cache after theschedule is submitted to Job Service. Job properties that are modified are used only if the changeswere made after the schedule is activated and added to the queue.
Scheduled jobs are managed through Schedule module (see the Oracle Enterprise PerformanceManagement Workspace User's Guide).
Background JobsIf a Job Service is not available to process a background job (which means job limits are reached),a command is issued to Event Service to create a schedule with a custom event that runs at thattime. This command persists schedule information in the database. The schedule uses jobparameters associated with the background job, and Event Service processes the job as it doesother scheduled jobs.
Foreground JobsIf Job Service is not available to process a foreground job, an exception occurs notifying the userthat Job Service is busy. The user is given the option to queue the job for processing by the nextavailable Job Service. If the user decides to queue the job, a schedule is created with a customevent that runs at that time, and Event Service processes the job as it does other scheduled jobs.The schedule and event are deleted after the job is submitted to Job Service.
Users can select to run Production Reporting foreground jobs without persisting output in therepository. After the job runs, the output is kept in a client-side temporary space, and then isremoved after the user is done viewing the output.
Disabling the Job ServiceThe Hold property on the new Dynamic tab of the Properties of Job Service dialog box enablesthe user to place the Job Service on hold. When the Job Service is on hold, no new job is processed,but the Job Service continues to process any jobs that are already running.
128 Automating Activities
Job LimitThe JOB_LIMIT property on the new Dynamic tab of the Properties of Job Service dialog boxenables an administrator to modify the number of concurrent jobs that can be run by a JobService. The job limit can be modified at runtime. When the job limit has been modified, JobService properties are updated by way of the Name Service, which in turn notifies the Job Serviceabout the change in the job limit. This property can be changed without restarting the Job Service.
Acquiring JobsThe ACQUIRE_ONLY_JOB-ONLY_BI_SERVICES property has been added to the newDynamic tab of the Properties of Job Service dialog box. When this property is enabled, the JobService acquires Intelligence Services that are configured to process only jobs. If this property isdisabled, the Job Service acquires Intelligence Services that process both BQY jobs and interactiverequests (including publishing BQY files and jobs, modifying BQY files and jobs). The defaultvalue for this property is disabled. When this property is enabled for Job Service, make sure thatthere is at least one Intelligence Service capable of handling interactive requests, and at least onecapable of handling BQY Jobs only.
Jobs Only Intelligence ServiceThe Intelligence Service can be flagged to process only BQY jobs by adding the SERVICE_ROLEproperty with a value of JOB_REQUEST_PROCESSOR to the server.xml file in the<BrioPlatform>/etc folder. For example, type:
<property
defid="0ad70321-0001-08aa-000000e738090110”name="SERVICE_ROLE”>JOB_REQU
EST_PROCESSORJOB_REQUEST_PROCESSOR</property>
The Default value for SERVICE_ROLE is GENERAL_REQUEST_PROCESSOR.
The Intelligence Service can be configured to limit the number of concurrent BQY jobs when itis flagged to run only jobs. To limit the number of concurrent BQY jobs, add theMAX_CONCURRENT_JOB_REQUESTS property to the server.xml file in the<BrioPlatform>/etc folder.
In the example below, Intelligence Service has been set to run up to ten concurrent jobs:
<property
defid="0ad70321-0001-08aa-000000e738090110”name="MAX_CONCURRENT_JOB_REQ
UESTS”>10</property>
The Default value for the MAX_CONCURRENT_JOBS property is 0 (zero).
At least one Intelligence Service must be configured with the default service role(GENERAL_REQUEST_PROCESSOR) to handle: Interactive requests including publishingand modifying BQY jobs and documents and all requests from the .ihtml client.
If you use the JOB_REQUEST_PROCESSOR role for the Intelligence Service, Job Servicesshould be configured with the ACQUIRE_ONLY_JOB-ONLY_BI_SERVICES property.
Managing Job Queuing 129
Interactive Reporting Services Availability and JobsAs long as the number of job requests being concurrently processed is less than a specifiedmaximum limit, Hyperion Interactive Reporting Service accepts additional requests to processjobs from a Job Service client. If the maximum limit is reached, Hyperion Interactive ReportingService does not accept further requests to process jobs until at least one of the jobs in progresscompletes. Some of the job requests are blocked until the number of concurrent job requestsbeing processed drops below the configured maximum limit. It is unspecified which jobs areblocked and when they are allowed to begin processing.
Running Jobs in ParallelTo enable job cycles to run in parallel, use RSC to change the value ofPARALLEL_CYCLE_LIMIT, a Job Service dynamic property.
By default, PARALLEL_CYCLE_LIMIT is set to 1, and job cycles are executed sequentially, oneafter another.
To take advantage of the performance improvements in execution time, you must run multipleHyperion Interactive Reporting Services such that Job Service can acquire two or more HyperionInteractive Reporting Services as required by the PARALLEL_CYCLE_LIMIT dynamicparameter. The number of Hyperion Interactive Reporting Services for processing onlyInteractive Reporting jobs (type JOB_ONLY_BI_SERVICE) is specified in BIPlus/common/config/irmconfig.xml.
Set the PARALLEL_CYCLE_LIMIT value to be less than or equal to the value ofMAX_NUMBER_OF_MANAGED_SERVICES for IRJob Service types; The default for IRJobservice type MAX_NUMBER_OF_MANAGED_SERVICES = 1.
Set the MAX_NUMBER_OF_MANAGED_SERVICES value for IRJob Service type to be lessthan the value for BI Service type. The default for BI service typeMAX_NUMBER_OF_MANAGED_SERVICES = 2
130 Automating Activities
7Administering Content
In This Chapter
Customizing the User Interface ... . . . . . . . . . . . . . . . . . . . . . . . . . . . . . . . . . . . . . . . . . . . . . . . . . . . . . . . . . . . . . . . . . . . . . . . . . . . . . . . . . . . . . . . . . . . . . . 131
Organizing Items and Folders .. . . . . . . . . . . . . . . . . . . . . . . . . . . . . . . . . . . . . . . . . . . . . . . . . . . . . . . . . . . . . . . . . . . . . . . . . . . . . . . . . . . . . . . . . . . . . . . . . . 132
Administrating Pushed Content.. . . . . . . . . . . . . . . . . . . . . . . . . . . . . . . . . . . . . . . . . . . . . . . . . . . . . . . . . . . . . . . . . . . . . . . . . . . . . . . . . . . . . . . . . . . . . . . . 133
Administering Personal Pages ... . . . . . . . . . . . . . . . . . . . . . . . . . . . . . . . . . . . . . . . . . . . . . . . . . . . . . . . . . . . . . . . . . . . . . . . . . . . . . . . . . . . . . . . . . . . . . . . 133
Customizing the User Interfacel “Changing the Default Language Selection” on page 131
l “Replacing the Logon Panel Image” on page 131
l “Removing Access to Java Client Installers” on page 132
l “Redirecting URLs after Users Log Off” on page 132
Changing the Default Language SelectionEPM Workspace reads locale information from a user's Web browser and selects the languageto use based on browser locale settings. In certain cases, users may want to view content in alanguage other than that determined by the browser locale. End-users can override locale-basedlanguage selection by adding languages to their Web browser language options and moving thelanguage they want the browser to use to the top of the list.
EPM Workspace automatically selects the supported language in order of priority. EPMWorkspace attempts an exact match between language and locale code. If a close match is notfound, EPM Workspace attempts to match based only on language code and ignores the countrycode.
Note: The settings that are selected by EPM Workspace also apply to the Reporting and Analysisand applications within EPM Workspace.
Replacing the Logon Panel Image
ä To replace the image that is displayed on the logon panel:
1 Create an image file named logon_panel.gif that has a pixel width of 298 and height of 423.
Customizing the User Interface 131
2 Rename the installed version of logon_panel.gif to logon_panel.gif.original in \BIPlus\AppServer\InstalledApps\workspace_static\themes\theme_tadpole
\images_global\. Move the logon_panel.gif file that you created in step 1 to this directory.
3 Rename the installed version of logon_panel.gif to logon_panel.gif.original in \BIPlus\AppServer\InstalledApps\WebLogic\8.1\Workspace\applications\workspace
\themes\theme_tadpole\images_global\. Move the logon_panel.gif file that you createdin step 1 to this directory.
4 Restart your application and Web servers.
Removing Access to Java Client InstallersAdministrators can hide the EPM Workspace Tools menu option that enables end-users to installOracle's Hyperion® Interactive Reporting Web Client and Smart View. You can also disable orhide the Interactive Reporting installer link and leave Oracle Hyperion Smart View for Office,Fusion Edition in the Tools menu.
ä To remove the Tools menu Install option:
1 Using CMC: CMC\Web Application Configuration\User Interface\Enable Installer Menu Items in EPMWorkspace.
2 Change the value of the IncludeJavaClientItems parameter to false; for example:
<module …… …… <param name="IncludeJavaClientItems" value="true" /></module>
ä To remove the Interactive Reporting client and leave Smart View in the Tools menu: Fromproperty WebClient.Applications.DAServlet.ZAC change the value in file<workspace deployment>/WEB-INF/config/ws.conf to False.
Redirecting URLs after Users Log OffTo facilitate integration with custom portals, administrators can redirect Web browsers to anarbitrary static URL after users log off EPM Workspace. This can be configurated in CMC\WebApplication Configuration\User Interface\Post logoff URL.
Organizing Items and FoldersFor efficient EPM Workspace functioning, structure folders so users can access items quicklyand easily. Within the folder hierarchy, balance folder size against hierarchy depth. Foldersshould not contain large number of items or excessive number of levels in the folder hierarchy.Certain folders should not be deleted, for example Shared Workspace Pages. See “MaintainingShared Workspace Pages Folder” on page 133 for more information.
132 Administering Content
Note: If you frequently import content into EPM Workspace, run a virus scan regularly on theroot folder.
A hidden folder named System is designed for administrator use. It is visible only toadministrators, and only when hidden items are revealed. Use System to store files you do notwant users to see, such as icon files for MIME types. You can rename, delete, or move theSystem folder. Administrators can not add anything to System folder. New versions of theexisting objects may be created. Administrator can delete objects in SYSTEM folder.
ä To view the System folder, in Explore, select View, then Show Hidden.
The System folder is now displayed in the folder list.
The import function enables you to import Web Analysis files into the repository. You must useOracle's Hyperion® Web Analysis Studio.
Maintaining Shared Workspace Pages FolderShared Workspace Pages folder should not be deleted. If the folder is inadvertently deleted, itshould be recreated with the name of Shared Workspace Pages in the root of the repository. Thefolder can be renamed, however Shared Pages are not shown if the folder was renamed.
Administrating Pushed ContentYou can push content to add it to users Favorites.
For example, Chris, the marketing manager, wants everyone in marketing to access themarketing schedule document easily. Chris imports the schedule and pushes this item to themarketing group. Now members of the marketing group can view the schedule from Favoritesrather than having to navigate through Explore to view the document.
For instructions on how to push items, see the Oracle Enterprise Performance ManagementWorkspace User's Guide.
Administering Personal PagesAdministrators configure the generated Personal Page and content for users’ Personal Pages.For information about using the Personal Pages, see the Oracle Enterprise PerformanceManagement Workspace User's Guide. For details about the configuration properties of thePersonal Pages servlet, see Chapter 9, “Configuring Services Using CMC.”
Tasks involved with administering personal pages:
l “Configuring the Generated Personal Page” on page 134
l “Understanding Broadcast Messages” on page 135
l “Providing Optional Personal Page Content to Users” on page 136
Administrating Pushed Content 133
l “Displaying HTML Files as File Content Windows” on page 137
l “Configuring Graphics for Bookmarks” on page 137
l “Configuring Exceptions” on page 137
l “Viewing Personal Pages” on page 138
l “Publishing Personal Pages” on page 138
l “Configuring Other Personal Pages Properties” on page 138
Configuring the Generated Personal PageWhen users first log on to EPM Workspace, a default generated Personal Page is listed underFavorites, which EPM Workspace automatically creates and saves the page as part of the user’sPersonal Pages. Changes the administrator makes do not affect users who previously logged on.Therefore, the exact content of a user’s generated Personal Page depends on when that user firstlogs on.
After logging on initially, users modify their own Personal Pages. They can also create additionalPersonal Pages.
Due to access permissions, the generated page may differ between users. By carefully settingaccess permissions on files used for the generated page, you can arrange, for example, for usersin the Sales department to see different content on the generated page than users in theProduction department.
Items included on the generated Personal Page by default:
l One Broadcast Messages content window with links to all items in /BroadcastMessages
l One Broadcast Messages file content window for each displayable item in BroadcastMessages
l One content window for each of the first two preconfigured folders
l The first (as sorted) displayable HTML item in any preconfigured folder
l My Bookmarks content window
l Exceptions Dashboard content window
You can customize items included by default by setting Generated Personal Page properties in“Personal Pages Properties” on page 173
ä To configure the Impact Management ServicesDashboard Development ServicesgeneratedPersonal Page, do any or all of these tasks:
l Set Generated Personal Page properties in “Personal Pages Properties” on page 173.
l Populate Broadcast Messages with combinations of nondisplayable items for which linksdisplay on the generated Personal Page, and displayable HTML files or external links, whosecontent displays there.
134 Administering Content

All these items appear as links and constitute one content window under the BroadcastMessages heading. Some displayable items may be displayed as file content windows,depending on configuration settings in Generated Personal Page properties.
l In Broadcast Messages, create preconfigured subfolders that are displayed when usersfirst log on. Populate these folders with displayable HTML items and nondisplayable items.Each preconfigured folder has a corresponding content window that contains links to allitems in the folder. Each displayable item is displayed as a file content window.
Tip: As with any content, only users with required access permissions can see items andfolders in Broadcast Messages and other preconfigured folders. To tailor thegenerated page for groups, put folders and items intended for those groups inBroadcast Messages and preconfigured folders, and assign access permissions tothe target groups. For example, if each group accesses different subsets of preconfiguredfolders, then users in each group see different content windows when they first log on.
Understanding Broadcast MessagesThe Broadcast Messages folder disseminates messages to all system users, except as restrictedby access permissions granted on individual content items. Put announcements and documentsfor wide distribution in this folder.
The terms Broadcast Messages content windows and Broadcast Messages refer only to the contentof the Broadcast Messages folder itself, excluding the content of its subfolders (thepreconfigured folders).
Broadcast Messages include:
l One content window that displays links to all items in Broadcast Messages
l File content windows for each displayable item in Broadcast Messages
Unlike other content window types, Broadcast Messages cannot be deleted from users PersonalPages.
If users makes another page their default Personal Page, Broadcast Messages remain on theoriginally generated Personal Page. User can delete the generated page only if they added theBroadcast Messages folder to another Personal Page. (A user can acquire multiple pagescontaining the Broadcast Messages by copying pushed Personal Pages.)
Configuring Content for Broadcast MessagesBroadcast Messages is your vehicle for customizing what users see according to enterpriseor administration needs. By including content for various groups and setting access permissionson each item or folder to ensure that only its intended group has access, you push content tousers' browsers.
Administering Personal Pages 135
Configuring Preconfigured FoldersTo configure preconfigured folders for Broadcast Messages, add them to theBroadcastMessages folder.
ä To add folders to Broadcast Messages:
1 In Explore, select Broadcast Messages.
Tip: To view the Broadcast Messages folder, select View , then Show Hidden.
2 Select File , then New, then Folder.
3 Enter a folder name and click OK.
The folder you created is displayed in Broadcast Messages in Explore.
Configuring Folder Items
ä To configure folder items:
1 In Explore, select a folder in Broadcast Messages.
2 Select File , then Import , then Item.
3 Select Favorites then Manage Personal Pages.
4 Select My Personal Page, and click PersonalizeContent.
5 Move the Broadcast Message subfolder from Select Content to My Personal Page Content, and click SaveSettings.
6 Select Favorites , then My Personal Page to view the added content.
Follow the directions for adding content to Personal Pages in the Oracle Enterprise PerformanceManagement Workspace User's Guide.
Renaming Broadcast Messages FoldersWhen you rename the Broadcast Messages folder, the changed folder name is displayed inthe title bar of the Broadcast Messages content window in Explore and on users’ Personal Pages.The system property Folder containing broadcast messages automatically reflects the changedname. After renaming Broadcast Messages or its subfolder, PersonalPage Content, youmust manually change another property, Location. The Location property is found in thePersonal Pages Properties section (see “Personal Pages Properties” on page 173).
Providing Optional Personal Page Content to UsersBeyond what you configure for the generated Personal Page, you can configure optional contentfor users to include on their Personal Pages.
136 Administering Content
All preconfigured folders are optional content for users and are displayed on the Content pagefor users to add to Personal Pages. A preconfigured folder is displayed on a Personal Page as acontent window when added, with links to the items it contains.
Import all content to preconfigured folders using Explore (see the Oracle Enterprise PerformanceManagement Workspace User's Guide).
Displaying HTML Files as File Content WindowsEPM Workspace allows users to display HTML files on their Personal Pages as file contentwindows. This means that, rather than having links to HTML files, the file contents are displayedon Personal Pages.
By default, the first displayable item in a preconfigured folder automatically displays as a filecontent window on each user’s generated Personal Page. As an administrator, you ensure thatusers with the required access permissions see the content HTML items by subscribing to them.
See the Oracle Enterprise Performance Management Workspace User's Guide for information ondisplaying HTML files as file content windows.
Configuring Graphics for BookmarksTo provide graphics that users can use for image bookmarks, place graphic files in /media/personalize in the servlets deployment directory.
You can add customized icon files for users upon request. Add these image files to /media orfolders that are within the scope of the Context root (/workspace) and give the user a URL thatpoints to that file; for example, /wsmedia/sqr/vcr.gif. Custom graphics can also beimported into the repository and then used as custom icon using the bookmark dialog.
Note: Icons do not display on Personal Pages if the file names or directory contains double-bytecharacter set (DBCS) characters.
Configuring ExceptionsTo enable exceptions to be added to the Exceptions Dashboard, select the Advanced OptionAllow users to add this file to the Exceptions Dashboard when importing through Explore.
For information on how users can add exception-enabled jobs or items to their ExceptionsDashboard, see the Oracle Enterprise Performance Management Workspace User's Guide.
To give jobs exceptions capability, you must design jobs (usually, Production Reportingprograms or Interactive Reporting jobs) to write exceptions to the output.properties file.See the Oracle Enterprise Performance Management Workspace User's Guide.
For programmers’ information about supporting exceptions in jobs, see the Oracle EnterprisePerformance Management Workspace User's Guide.
Administering Personal Pages 137
Viewing Personal PagesContent that you defined in Explore is displayed in the Personal Page generated by EPMWorkspace for first-time users.
Publishing Personal PagesYou can publish Personal Pages so that users can copy them to their own Personal Pages, andyou can change the default Publish properties for publishing Personal Pages (see Chapter 9,“Configuring Services Using CMC”.
When Personal Pages are published, they are added to the Personal Page Content folder inBroadcast Messages (default folder location is root/Broadcast Messages/PersonalPage Content).
Users with modify access to /Personal Page Content can publish Personal Pages (see theOracle Enterprise Performance Management Workspace User's Guide).
Note: Make sure that users understand that even though two users can copy a published page,they are not guaranteed identical results. Access permissions on items included on thepublished page determine what users see.
Configuring Other Personal Pages PropertiesSee Chapter 9, “Configuring Services Using CMC” to set Personal Page configuration propertiesfor example:
l Color schemes
l Maximum number of Personal Pages
l Visibility of content window headings (colored bars that resemble title bars)
138 Administering Content
8Configuring RSC Services
In This Chapter
About RSC ... . . . . . . . . . . . . . . . . . . . . . . . . . . . . . . . . . . . . . . . . . . . . . . . . . . . . . . . . . . . . . . . . . . . . . . . . . . . . . . . . . . . . . . . . . . . . . . . . . . . . . . . . . . . . . . . . . . . . . 139
Managing Services... . . . . . . . . . . . . . . . . . . . . . . . . . . . . . . . . . . . . . . . . . . . . . . . . . . . . . . . . . . . . . . . . . . . . . . . . . . . . . . . . . . . . . . . . . . . . . . . . . . . . . . . . . . . . 140
Modifying RSC Service Properties .. . . . . . . . . . . . . . . . . . . . . . . . . . . . . . . . . . . . . . . . . . . . . . . . . . . . . . . . . . . . . . . . . . . . . . . . . . . . . . . . . . . . . . . . . . . . . 141
Managing Hosts .. . . . . . . . . . . . . . . . . . . . . . . . . . . . . . . . . . . . . . . . . . . . . . . . . . . . . . . . . . . . . . . . . . . . . . . . . . . . . . . . . . . . . . . . . . . . . . . . . . . . . . . . . . . . . . . . . 147
Managing Production Reporting Database Servers .. . . . . . . . . . . . . . . . . . . . . . . . . . . . . . . . . . . . . . . . . . . . . . . . . . . . . . . . . . . . . . . . . . . . . . . . . . 149
Managing Jobs ... . . . . . . . . . . . . . . . . . . . . . . . . . . . . . . . . . . . . . . . . . . . . . . . . . . . . . . . . . . . . . . . . . . . . . . . . . . . . . . . . . . . . . . . . . . . . . . . . . . . . . . . . . . . . . . . . 151
About RSCRSC is a utility that enables you to manage remote code services. See also:
l “Starting RSC” on page 139
l “Logging On to RSC” on page 140
l “Using RSC” on page 140
RSC configures services on all hosts of a distributed Reporting and Analysis system. You can runRSC from all server hosts in the system.
In addition to modifying services, you can use RSC for these tasks:
l Adding, deleting, and modifying hosts for Production Reporting job factories
l Adding, deleting, and modifying database servers
Starting RSC
ä To start RSC:
1 Start Service Configurator.
l Windows: Select Start , then Programs , then Oracle EPM System, then Workspace, thenUtilities and Administration , then Service Configurator. Or from <Hyperion_Home>\products\Foundation\workspace\bin, run ServcieConfig.bat.
l UNIX: Run ServiceConfigurator.sh, installed in /products/Foundation/workspace/bin.
About RSC 139
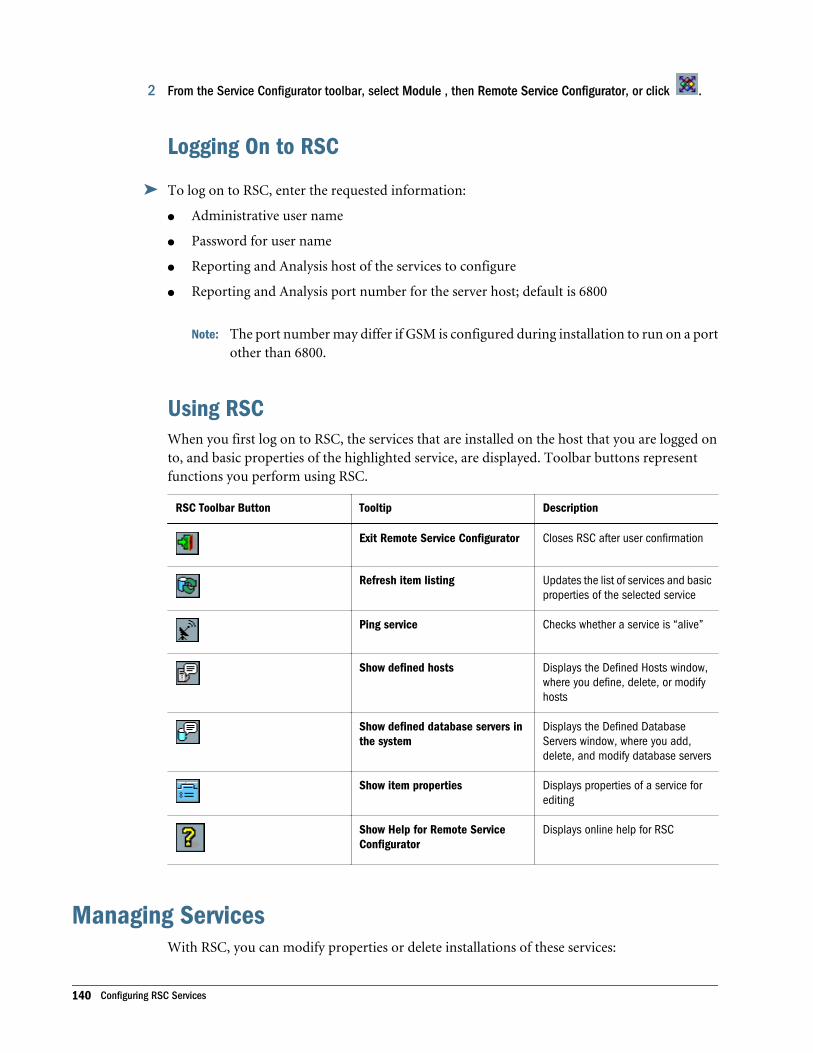
2 From the Service Configurator toolbar, select Module , then Remote Service Configurator, or click .
Logging On to RSC
ä To log on to RSC, enter the requested information:
l Administrative user name
l Password for user name
l Reporting and Analysis host of the services to configure
l Reporting and Analysis port number for the server host; default is 6800
Note: The port number may differ if GSM is configured during installation to run on a portother than 6800.
Using RSCWhen you first log on to RSC, the services that are installed on the host that you are logged onto, and basic properties of the highlighted service, are displayed. Toolbar buttons representfunctions you perform using RSC.
RSC Toolbar Button Tooltip Description
Exit Remote Service Configurator Closes RSC after user confirmation
Refresh item listing Updates the list of services and basicproperties of the selected service
Ping service Checks whether a service is “alive”
Show defined hosts Displays the Defined Hosts window,where you define, delete, or modifyhosts
Show defined database servers inthe system
Displays the Defined DatabaseServers window, where you add,delete, and modify database servers
Show item properties Displays properties of a service forediting
Show Help for Remote ServiceConfigurator
Displays online help for RSC
Managing ServicesWith RSC, you can modify properties or delete installations of these services:
140 Configuring RSC Services
l Event Service (ES)
l Job Service (JF)
l Repository Service (RM)
l Service Broker (SB)
For information about working with services, see “Pinging RSC Services” on page 141.
See also “Modifying RSC Service Properties” on page 141.
Pinging RSC ServicesErrors sometime occur because services did not start correctly or stopped working properly. Aneasy way to test service availability is to ping it; that is, to send a message and see if it responds.
ä To ping a service from RSC, select the service and click .
If the service is responsive, a message is displayed; for example:
Service ES1_stardust is alive.
If the service is not responsive, a message is displayed indicating that ping could not connect tothe service; for example:
A Brio.Portal error occurred in Ping:ConnectionException: Connection refused: connect
This indicates that the service is not running. If you receive this error, refer to the service log fileto investigate why the error occurred.
Modifying RSC Service PropertiesWhen you modify service properties, the service receives notification of changes andimmediately updates its configuration. Most properties are used while the service is running andtake effect immediately. Examples of such properties are Max Connections and Logging Levels.
Properties that are only used at start time, however, do not take effect until the next time theservice starts. Such properties include Host and Log File.
Not every service has all property groups. The groups of properties that all or most RSC serviceshave, and other properties of each service, are described in these topics:
l “Common RSC Properties” on page 142
l “Job Service Properties” on page 143
Note: RSC services not mentioned explicitly in this section have only common properties.
ä To view or modify service properties:
1 Double-click the service name or select the service name and click .
Modifying RSC Service Properties 141
A properties page is displayed.
2 Select a tab to view or modify a group of properties.
For example, select the Storage tab to modify properties that define where persistent storage ofbusiness data is located.
Common RSC PropertiesAll RSC services have general and advanced properties and most have storage properties:
l “General RSC Properties” on page 142
l “Advanced RSC Properties” on page 142
l “RSC Storage Properties” on page 142
l “Repository Service Dynamic Properties” on page 143
General RSC PropertiesGeneral properties of all RSC services:
l Description—Brief description of the service.
l Host—Host on which the service resides. You can select or define a host. If you define ahost, enter a name that makes the service easily identifiable within your organization. Themaximum number of characters allowed is 64. See “Managing Hosts” on page 147.
Advanced RSC PropertiesAdvanced properties describe the service’s logging level and the maximum number ofconnections the service supports. All services have advanced properties.
l Log Levels—Level at which service errors are logged. See “Configuring Logging Levels” onpage 183.
A change to this property takes effect immediately. Therefore, when errors occur and youwant more debugging information, you can change the logging level without restarting theservice.
l Max Connections—Maximum number of connections allowed. Consider memoryallocation for the connections you allow. You must increase the maximum number of filedescriptors on some systems, such as UNIX.
A change to this property takes effect immediately. Changing the Max Connections settingwithout restarting the service is useful to dynamically tune the service at run time.
RSC Storage PropertiesStorage properties are used by a service to connect to the database where it stores its data. Theseservices store data of their own:
142 Configuring RSC Services
l Repository Service—Reporting and Analysis content metadata
Caution! When replicating Respository Service, the file system used for storing physicalfiles must be shared between systems for it to work. The file system is locatedwith the first Repository Service, and remote Repository Services need read/writeaccess to it.
l Event Service—Schedules and subscriptions
Service Broker and Job Service do not have storage properties.
Storage property settings rarely should be changed. The circumstances that would requirechanges include, for example, assignment of host names on your network, changes to a databaseuser account (name or password), or changes to database type (as from Oracle to Sybase). Suchchanges require extensive changes to external systems configuration as well.
Repository Service Dynamic PropertiesDynamic properties enable Repository Service to issue warnings when disk space is running low.
l DISK_SPACE_USAGE_LIMIT—Determines when Repository Service should issuewarnings about file system storage disk space limit (% used); default is 90
l DISK_SPACE_NOTIF_EMAIL—E-mail address to which notifications are sent when thespecified disk space usage limit is reached; separate multiple e-mail addresses with semi-colons (;)
Job Service PropertiesTopics that describe properties unique to Job Service and other tasks that start from the JobService’s Properties dialog box.
l “Job Service Dynamic Properties” on page 144
l “Job Service Database Properties” on page 144
l “Job Service Production Reporting Properties” on page 145
l “Job Service Application Properties” on page 145
l “Executable Job Service Properties” on page 147
When you modify properties of Job Service, the service receives change notifications and updatesits configuration immediately. Properties used while the service is running take effectimmediately. Such properties include Max Connections, Logging Levels, and all properties onthe Database, Production Reporting, Application, and Executable tabs.
Properties only used at start time, however, do not take effect until the next time Job Servicestarts. This applies to the Log File property.
Modifying RSC Service Properties 143
Job Service Dynamic PropertiesDynamic properties provide information about how Job Service processes jobs:
l Acquire Only Job-Only BI Services—Determines wether this Job Service runs as a dedicatedjob processor or as an interactive processor that processes both Interactive Reporting jobsand interactive reports
l Support BQY—Determines whether Job Services can process Interactive Reporting jobs
If set to true, than Job Service can run Interactive Reporting jobs; otherwise, it cannot. IfJob Service is installed with Interactive Reporting services, then this property is set to trueby default.
l Job Limit—Maximum number of concurrent jobs to be run by Job Service
If this value is 0 or -1, an unlimited number of concurrent jobs can be run. Job Limit canbe modified at runtime. Changes made to Job Limit are picked up by Job Service dynamically.
l Hold—Determines whether Job Service can accept jobs for processing
When set to true, Job Service continues to process jobs that are running, but does not processany new jobs.
l Parallel Cycle Limit—Determines the number of job cycles that can be executedsimultaneously using different Interactive Reporting services if the number of InteractiveReporting services is greater than one; default is 1
All properties can be changed without restarting Job Service.
Job Service Database PropertiesDatabase properties provide information needed for Job Service to connect to the databasesagainst which it runs job, including Server Name, Type, and Location of the host where thedatabase server resides.
Adding connectivity to local database servers enables Job Service to run programs that connectdirectly to local databases. (See “Adding Database Servers” on page 149.)
ä To define connectivity between Job Service and an additional database:
1 Click Add.
A list of Reporting and Analysis database servers is displayed.
2 Select a database and define connection strings or environment variables.
ä To delete a database’s connectivity from Job Service, click Delete.
ä To modify the connectivity properties of a database:
1 Select a database from the list and click Modify.
2 Modify or create environment variables using Name and Value.
For example, name=ORACLE_SID, value=PAYROLL.
144 Configuring RSC Services
Note: The Database Servers list combined with the Production Reporting servers list is used toconstruct data sources for importing Production Reporting documents.
Job Service Production Reporting PropertiesThe Production Reporting page lists Production Reporting servers that are currently definedand available on the same host as Job Service. Production Reporting properties define theProduction Reporting servers in the system that are used to run Production Reporting jobs.
You can add and delete Production Reporting servers, and modify the path of ProductionReporting servers by clicking the corresponding button.
Note: Production Reporting property modifications do not require service restart.
Job Service Application PropertiesApplication properties describe the applications used by Job Service. You can configure JobService to run combinations of three job types: Production Reporting, Interactive Reporting,and generic.
l Application—Name of the application. Select an application or add one. All applicationsdefined in Reporting and Analysis are listed. Applications can have multiple executables,each on a different Job Service to distribute the load.
l Description—Optional read-only description of the application. Click Modify to changethe description.
l Command String—Read-only command string to pass to the application when it runs. ClickModify to change the command string.
You can add applications to Job Service, delete applications that have no associated executables,and modify application properties by clicking the corresponding button. The Add button isavailable only when you must define executables for applications (see “Adding Applications forJob Service” on page 145).
After you add applications, you must define their executable properties (see “Executable JobService Properties” on page 147).
Adding Applications for Job ServiceWhen adding applications, you must specify the application and an executable. An applicationmay be installed on multiple hosts. Each installation of the application has a different executable,or program file and path, which you define on the Executable page.
For example, Oracle Reports (an application) might be installed on two hosts, apollo and zeus.The Job Services on apollo and zeus might have identical application properties, but theirexecutables would differ, because each host has its own executable file. For more informationabout Executable properties, see “Executable Job Service Properties” on page 147.
Modifying RSC Service Properties 145

ä To add applications:
1 Click to view Job Service application properties.
2 Click Add to open Application Properties.
3 Supply a name and description.
4 Enter a command string to pass to the application when it runs.
Use one method:
l Select a predefined template.
l Enter a command string in the field provided.
l Build a command string using command tokens.
5 Click OK, then click the Executable tab to define the executable properties for the application.
See “Executable Job Service Properties” on page 147.
Command TokensYou can use command tokens to build command strings to pass to applications when they run:
l $CMD—Full path and name of the executable.
l $PARAMS—Parameters defined for the program. You can set prompt and default values forindividual parameters in program properties.
l $PROGRAM—Program to run. Examples of programs include shell scripts, SQL scripts, orOracle Reports.
l $BPROGRAM—Program name with the file extension removed. Use this in combination withhardcoded text to specify a name for an error file, a log file, or another such file. An examplewould be log=$BPROGRAM.log.
l $FLAGS—Flags associated with the program.
l $EFLAGS—Flags associated with the executable or an instance of it. All jobs associated withthis executable use these flags.
l $DBCONNECT—Database connect string associated with the program. If set, end users cannotspecify a connect string at runtime.
l $DBUSERNAME—Database user name associated with the program. If set, end users cannotspecify a user name at runtime.
l $DBPASSWORD—Database password associated with the program. If set, ends users cannotspecify a password at runtime.
l $BPUSERNAME—User name. If the user name is required as an input parameter to the job,specifying this token instructs the system to include the user name in the command lineautomatically, rather than prompting the user.
146 Configuring RSC Services
Command String Examples
Example command string template that runs Oracle Reports:
$CMD userid=$DBUSERNAME/$DBPASSWORD@$DBCONNECT report=$PROGRAM destype=file desname=$BPROGRAM.html batch=yes errfile=$BPROGRAM.err desformat=html
When the tokens in the above command string for Oracle Reports are replaced with values, thecommand executed in Job Service looks like this:
r30run32 userid=scott/tiger@Brio8 report=inventory destype=file desname=inventory.html batch=yes errfile=inventory.err desformat=html
Example command string template that runs shell scripts on a Job Service running on UNIX:
$CMD $PROGRAM $PARAMS
When the tokens in the above command string for running shell scripts are replaced with values,the command executed in Job Service looks like this:
sh runscript.sh p1 p2 p3
Example command string template that runs batch files on Job Service running on a Windowssystem:
$PROGRAM $PARAMS
When the tokens in the above command string for running batch files are replaced with values,the command executed in the Job Service looks like this:
Runbat.bat p1 p2 p3
Executable Job Service PropertiesExecutable properties provide information about running applications used by Job Service:
l Executable—Location of the executable program for the application (full path andexecutable name); must be co-located with Job Service.
l Flags—Value used in the command line for the token $EFLAGS, which represents the flagsassociated with the program.
l Environment Variables—Environment variables associated with the application, forexample, $PATH, $ORACLE_HOME.
Only Job Service has executable properties.
Managing HostsThe Defined Hosts dialog box lists the currently defined hosts in Reporting and Analysis andidentifies the host name and platform.
Topics that describe how to add, modify, and delete hosts:
Managing Hosts 147
l “Adding Hosts” on page 148
l “Modifying Hosts” on page 148
l “Deleting Hosts” on page 148
Adding HostsAfter you install services on a computer, you must add the computer as a host in EPM Workspace.
ä To add hosts:
1 Click , and click Add.
2 Supply a host name and the platform used by the host.
Caution! The host name cannot start with numerals. Hyperion Interactive Reporting DataAccess Service and Hyperion Interactive Reporting Service do not work if host namesstart with numerals.
3 Click OK.
Reporting and Analysis pings the host to make sure it is on the network. If the ping fails, an errormessage is displayed.
After Reporting and Analysis successfully pings the host and validates the host name, Reportingand Analysis adds the host and lists it in the Defined Hosts dialog box.
4 Click OK.
Note: If you change the host name, you must restart Reporting and Analysis services and JobService in order for the host to take effect.
Modifying HostsYou modify a host to change its platform designation.
ä To modify hosts:
1 Click .
2 Select a host from the list, and click Modify.
3 Select a platform for the host, and click OK.
Deleting HostsYou cannot delete a host if services are installed on it.
148 Configuring RSC Services
ä To delete hosts:
1 Click .
2 Select a host from the list and click Delete.
3 When prompted, click Yes to delete the host, and click OK.
Managing Production Reporting Database ServersReporting and Analysis uses Production Reporting databases to store and manage applicationmetadata.
Defining Database ServersThe Defined Database Servers dialog box lists the currently defined Reporting and AnalysisProduction Reporting database servers, identifying the database server name, type, and location(host) of each.
Topics that describe how to manage database servers using RSC:
l “Database Server Properties” on page 149
l “Adding Database Servers” on page 149
l “Adding Job Service Database Connectivity” on page 150
l “Modifying Database Servers” on page 150
l “Deleting Database Servers” on page 151
Database Server PropertiesProperties for all repository database servers are Database type, User name, and Password, whereuser name is the default user name used by Job Service for running Production Reportingprograms on the database server (used when a database user name and password are not suppliedwhen storing jobs in the repository).
Adding Database Servers
ä To add database servers:
1 Click .
2 Click Add.
3 Supply this information:
l Name—Alphanumeric name for the database server you want to add that is at least fivecharacters.
Managing Production Reporting Database Servers 149
l Database type—Type of database server you are using.
l Host—Host where the database server resides.
l User name—Default user name used by the Job Service for running Production Reportingprograms on the database server. Used if the job owner does not supply a database user nameand password when importing a given job.
l Password—Valid password for user name.
4 Click OK.
Adding Job Service Database ConnectivityTo facilitate database connectivity, after you add a database server, you must associate it with Job Service. Doing so enables Job Service to eliminate network traffic by running a program thatconnects directly to a local database.
Multiple Job Services can access the same database. For example, you can define three JobServices within one Reporting and Analysis domain, and each Job Service can point to a givenXYZ database loaded on a large UNIX server.
When asked to run a given report that uses data on the XYZ database, Service Broker dispatchesthe job to one of three Job Services associated with the database. Should a computer hosting oneJob Service go down, Service Broker automatically routes the job to another Job Service.
ä To associate database servers with Job Service:
1 Select a Job Service to associate with the database server.
2 Click .
3 Select the Database tab, and click Add.
4 Select the database server to associate with Job Service, and click OK.
5 Supply this information:
l Connectivity information—Information needed depends on the database type. Forexample, for an Oracle database, enter a connect string.
Environment variables—Required only to execute Production Reporting jobs against thedatabase. Used to specify database information and shared library information that may berequired by Production Reporting.
For example: name = ORACLE_SID, value = PAYROLL
6 Click OK.
Modifying Database Servers
ä To modify database servers:
1 Click .
150 Configuring RSC Services
2 Select a database server from the list and click Modify.
3 Make changes as necessary (see “Database Server Properties” on page 149), and click OK.
Deleting Database Servers
ä To delete database servers:
1 Click .
2 Select a database server from the list and click Delete.
3 When prompted, click Yes to verify database deletion, and click OK.
Managing JobsJob Service compiles and executes content-creation programs or jobs. Job Service listens for EPMWorkspace job requests (such as requests initiated by users from the Scheduler module),manages program execution, returns the results to the requester, and stores the results in therepository.
Three job types that EPM Workspace can store and run:
l Interactive Reporting—Jobs created with Oracle's Hyperion® Interactive Reporting Studio.
l Production Reporting—Secure or nonsecure jobs created with Production Reportingstudio.
l Generic—Jobs created using other applications (for example, Oracle or Crystal Reports)through a command line interface.
For Interactive Reporting jobs, no special configuration is necessary. Every Job Service ispreconfigured to run Interactive Reporting jobs.
For users to run Production Reporting or generic jobs, you must configure a Job Service to runthe report engine or application program. One Job Service can run multiple types of jobs, aslong as it is configured for each type (except Interactive Reporting).
Topics that explain how to configure Job Service to run jobs.
l “Optimizing Enterprise-Reporting Applications Performance” on page 152
l “From Adding Job Services to Running Jobs” on page 152
See also “Adding Applications for Job Service” on page 145 and “Executable Job ServiceProperties” on page 147.
Note: The system automatically creates a textual log file (listed beneath the job) for every job itruns. You can suppress all job log files by adding the Java system property,-Dbqlogfile_isprimary=false, to the common services startup script. You muststop and restart all services. See Chapter 2, “Administration Tools and Tasks”, for moreinformation on stopping and starting the services.
Managing Jobs 151
Optimizing Enterprise-Reporting Applications PerformanceThe Reporting and Analysis architecture is designed for distributed, enterprise implementations.For optimum performance:
l Replicate Job Services (multiple Job Services assigned to a given data source on differentcomputers) to increase overall reliability and decrease job turn-around time.
l Install Job Service on the same computer as the database to conserve valuable networkresources.
Note: Normally, there should be one Job Service on a given host. You can configure a JobService to run multiple applications.
To run jobs against an enterprise application, configure these parameters:
l Host—Physical computer identified to the system by host name.
l Job Service—Job Service on the host using RSC.
l Application—Third-party vendor application designed to run in the background.Application examples include Production Reporting, Oracle Reports, or public domainapplication shells such as PERL.
l Program—Source used to drive an invocation of an application. For example, a user mightsubmit a Production Reporting program that generates a Sales report to a ProductionReporting application on a given host through Job Service.
From Adding Job Services to Running JobsThis topic synthesizes the configuration process for running jobs into one set of steps, takingyou from service installation to successful job execution.
To run jobs in EPM Workspace, complete these steps, which are explained in detail in othertopics throughout this document:
1. Install the report application’s executable on the host where you run Job Service. Use theinstallation program that comes with the report application.
2. On the host, install Job Service software from the Reporting and Analysis services installationDVD.
3. Configure Job Service using RSC.
4. Start Job Service.
5. For generic jobs, add an application and executable. For Production Reporting jobs, add aProduction Reporting executable, and define a database server and database connectivityproperties. Interactive Reporting jobs do not need special configuration.
6. Import a job (a report or program) to run against the application.
This can be an Interactive Reporting, Oracle's Hyperion® SQR® Production Reporting, orgeneric job.
7. Users can now run the job from Explore.
152 Configuring RSC Services
9Configuring Services Using CMC
In This Chapter
About CMC.... . . . . . . . . . . . . . . . . . . . . . . . . . . . . . . . . . . . . . . . . . . . . . . . . . . . . . . . . . . . . . . . . . . . . . . . . . . . . . . . . . . . . . . . . . . . . . . . . . . . . . . . . . . . . . . . . . . . . 153
Starting CMC .... . . . . . . . . . . . . . . . . . . . . . . . . . . . . . . . . . . . . . . . . . . . . . . . . . . . . . . . . . . . . . . . . . . . . . . . . . . . . . . . . . . . . . . . . . . . . . . . . . . . . . . . . . . . . . . . . . 154
Using CMC .... . . . . . . . . . . . . . . . . . . . . . . . . . . . . . . . . . . . . . . . . . . . . . . . . . . . . . . . . . . . . . . . . . . . . . . . . . . . . . . . . . . . . . . . . . . . . . . . . . . . . . . . . . . . . . . . . . . . . 155
CMC Views... . . . . . . . . . . . . . . . . . . . . . . . . . . . . . . . . . . . . . . . . . . . . . . . . . . . . . . . . . . . . . . . . . . . . . . . . . . . . . . . . . . . . . . . . . . . . . . . . . . . . . . . . . . . . . . . . . . . . . 156
Modifying Properties in CMC .... . . . . . . . . . . . . . . . . . . . . . . . . . . . . . . . . . . . . . . . . . . . . . . . . . . . . . . . . . . . . . . . . . . . . . . . . . . . . . . . . . . . . . . . . . . . . . . . . 158
About CMCThe Configuration and Monitoring Console (CMC) enables you to monitor and configureproperties of deployed CMC services, web applications, and agents; start and stop services; andadd or remove services instances.
Using CMC, you can monitor, configure, and maintain services, web applications, and agentsacross different boxes. You can run multiple services from one Hyperion Home.
Configuration information is stored in the Oracle's Hyperion Shared Services Registry. Duringinitial configuration, Oracle's Hyperion Enterprise Performance Management SystemConfigurator populates the Shared Services Registry with default values for all the properties inCMC.
Note: When moving the Repository Service data directory to an alternate drive letter using CMC,the data is not moved. You must restart services and copy the root directory and childobjects to the new folder. For example, copy c:\storage\root to c:\repdata\root.This is not the case if moving to the same drive letter as the initial setup.
The following services and web applications can be modified using CMC:
l Analytic Bridge Service (ABS)—Also known as Extended Access for Hyperion InteractiveReporting Service
l Annotation Service
l Authentication Service (AN)
l Authorization Service (AZ)
l Global Service Manager (GSM)
l Harvester Service (HAR)
About CMC 153
l Hyperion Interactive Reporting Service (BI)
l Hyperion Interactive Reporting Data Access Service (DAS)
l Hyperion Interactive Reporting Job Service (BI)
l Local Service Manager (LSM)
l Logging Service (LS)
l Publisher Service (PUB)
l Search Indexing
l Search Keyword Provider
l Search Monitor
l Session Manager (SM)
l Super Service (BPS)
l Update (Transformer) Service (TFM)
l Usage Service (UT)
l Web Analysis Web Application
l Workspace Web Application
Starting CMCCMC consists of the CMC Agent and the CMC UI.
ä To start CMC in UNIX:
1 Go to the following directory:
Hyperion Home/commmon/workspacert/9.5.0.0/bin
2 Start the CMC Agent by running startAgent.sh.
3 Start the CMC UI by running startUI.sh.
ä To start CMC in Windows:
1 Start the CMC Agent by doing one of the following:
l Run startAgent.bat found in Hyperion Home/commmon/workspacert/9.5.0.0/bin
l Click Hyperion Workspace - Agent Service in the Services Control Panel.
2 Start the CMC UI by doing one of the following:
l Run startUI.bat found in Hyperion Home/commmon/workspacert/9.5.0.0/bin
l Click Hyperion Workspace - UI Service in the Services Control Panel.
154 Configuring Services Using CMC

ä To start CMC from Workspace, select Navigate, then Administer, then ConfigurationConsole.
Note: startAgent.bat/startAgent.sh starts all services that are enabled.stopAgent.bat/stopAgent.sh stops all services that are running. Once an Agent is upand running, you can use the CMC UI to stop, start, and restart individual services.
Using CMC
ä To use CMC:
1 Select a view. (See “CMC Views” on page 156)
2 Select a service, web application, or agent.
3 Perform an action.
l Right click a service, web application, or agent and select an option from the menu.
l Click a toolbar button.
CMC Toolbar Button Menu Option Description
Start Starts a service
Stop Stops a service or agent
Restart Restarts a service after it has beenstopped
Copy Copies a service to a newconfiguration
Delete Deletes a service configuration (Onlynon-default configurations can bedeleted.)
Enable Configuration Enables the current configuration
Disable Configuration Disables the current configuration
Refresh Current View Refreshes the current view.
Properties Displays the properties of theselected service, web application oragent
Log Off Logs off CMC
Using CMC 155
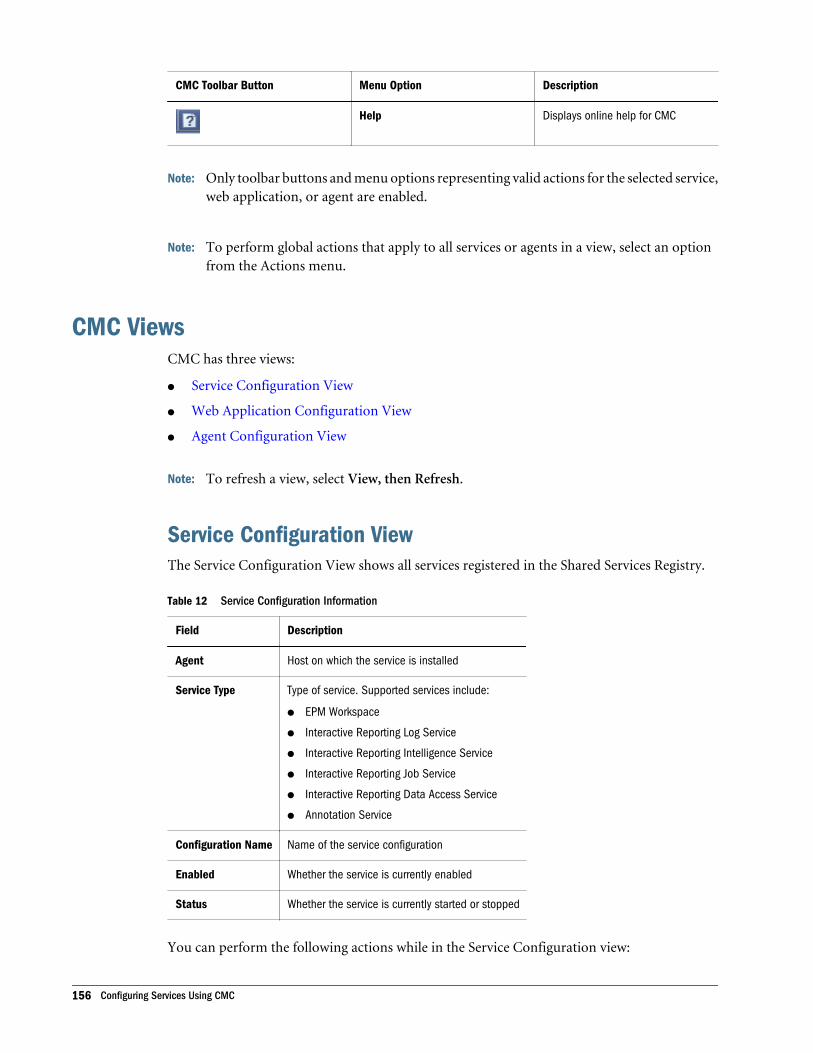
CMC Toolbar Button Menu Option Description
Help Displays online help for CMC
Note: Only toolbar buttons and menu options representing valid actions for the selected service,web application, or agent are enabled.
Note: To perform global actions that apply to all services or agents in a view, select an optionfrom the Actions menu.
CMC ViewsCMC has three views:
l Service Configuration View
l Web Application Configuration View
l Agent Configuration View
Note: To refresh a view, select View, then Refresh.
Service Configuration ViewThe Service Configuration View shows all services registered in the Shared Services Registry.
Table 12 Service Configuration Information
Field Description
Agent Host on which the service is installed
Service Type Type of service. Supported services include:
l EPM Workspace
l Interactive Reporting Log Service
l Interactive Reporting Intelligence Service
l Interactive Reporting Job Service
l Interactive Reporting Data Access Service
l Annotation Service
Configuration Name Name of the service configuration
Enabled Whether the service is currently enabled
Status Whether the service is currently started or stopped
You can perform the following actions while in the Service Configuration view:
156 Configuring Services Using CMC

l Start a service
l Stop a service
l Restart a service
l Delete a service
l Enable a service
l Disable a service
l Review the properties of a service
l Refresh the log configurations
l Stop all services
l Restart all services
l Start the remaining services
l Replicate a service (see Replicating Services)
Replicating ServicesYou can use CMC to create a copy of a service or group of services (for example, WorkspaceCommon Services).
ä To replicate a service:
1 In the Service Configuration View, select a service and click .
2 Enter the name and port range for the new configuration in the dialog box that appears.
3 Start the service.
Note: Only one annotation service is allowed per box. The default configuration cannot bedeleted; it can only be disabled.
Web Application Configuration ViewThe Web Application Configuration View shows all web applications registered in the SharedServices Registry.
Table 13 Web Application Configuration Information
Field Description
Name Name of the web application
Type Type of web application. Supported web applications include:
l EPM Workspace Web Application
l WebAnalysis Web Application
CMC Views 157
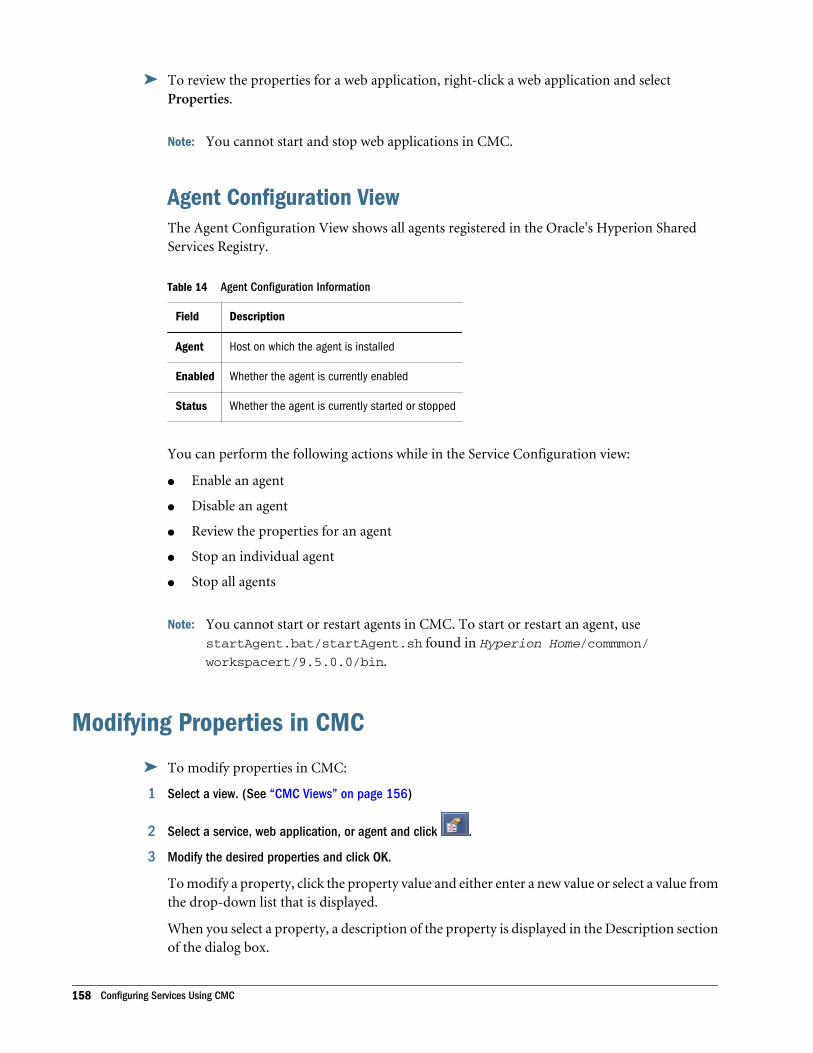
ä To review the properties for a web application, right-click a web application and selectProperties.
Note: You cannot start and stop web applications in CMC.
Agent Configuration ViewThe Agent Configuration View shows all agents registered in the Oracle's Hyperion SharedServices Registry.
Table 14 Agent Configuration Information
Field Description
Agent Host on which the agent is installed
Enabled Whether the agent is currently enabled
Status Whether the agent is currently started or stopped
You can perform the following actions while in the Service Configuration view:
l Enable an agent
l Disable an agent
l Review the properties for an agent
l Stop an individual agent
l Stop all agents
Note: You cannot start or restart agents in CMC. To start or restart an agent, usestartAgent.bat/startAgent.sh found in Hyperion Home/commmon/workspacert/9.5.0.0/bin.
Modifying Properties in CMC
ä To modify properties in CMC:
1 Select a view. (See “CMC Views” on page 156)
2 Select a service, web application, or agent and click .
3 Modify the desired properties and click OK.
To modify a property, click the property value and either enter a new value or select a value fromthe drop-down list that is displayed.
When you select a property, a description of the property is displayed in the Description sectionof the dialog box.
158 Configuring Services Using CMC
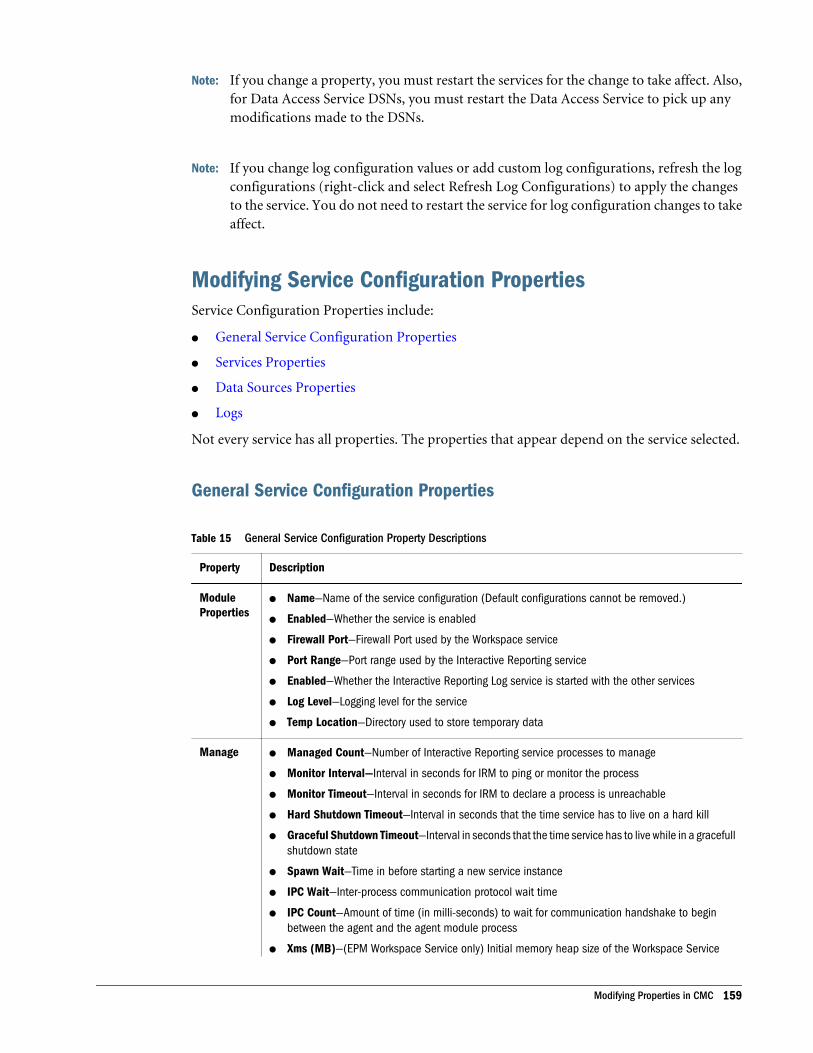
Note: If you change a property, you must restart the services for the change to take affect. Also,for Data Access Service DSNs, you must restart the Data Access Service to pick up anymodifications made to the DSNs.
Note: If you change log configuration values or add custom log configurations, refresh the logconfigurations (right-click and select Refresh Log Configurations) to apply the changesto the service. You do not need to restart the service for log configuration changes to takeaffect.
Modifying Service Configuration PropertiesService Configuration Properties include:
l General Service Configuration Properties
l Services Properties
l Data Sources Properties
l Logs
Not every service has all properties. The properties that appear depend on the service selected.
General Service Configuration Properties
Table 15 General Service Configuration Property Descriptions
Property Description
ModuleProperties
l Name—Name of the service configuration (Default configurations cannot be removed.)
l Enabled—Whether the service is enabled
l Firewall Port—Firewall Port used by the Workspace service
l Port Range—Port range used by the Interactive Reporting service
l Enabled—Whether the Interactive Reporting Log service is started with the other services
l Log Level—Logging level for the service
l Temp Location—Directory used to store temporary data
Managel Managed Count—Number of Interactive Reporting service processes to manage
l Monitor Interval—Interval in seconds for IRM to ping or monitor the process
l Monitor Timeout—Interval in seconds for IRM to declare a process is unreachable
l Hard Shutdown Timeout—Interval in seconds that the time service has to live on a hard kill
l Graceful Shutdown Timeout—Interval in seconds that the time service has to live while in a gracefullshutdown state
l Spawn Wait—Time in before starting a new service instance
l IPC Wait—Inter-process communication protocol wait time
l IPC Count—Amount of time (in milli-seconds) to wait for communication handshake to beginbetween the agent and the agent module process
l Xms (MB)—(EPM Workspace Service only) Initial memory heap size of the Workspace Service
Modifying Properties in CMC 159
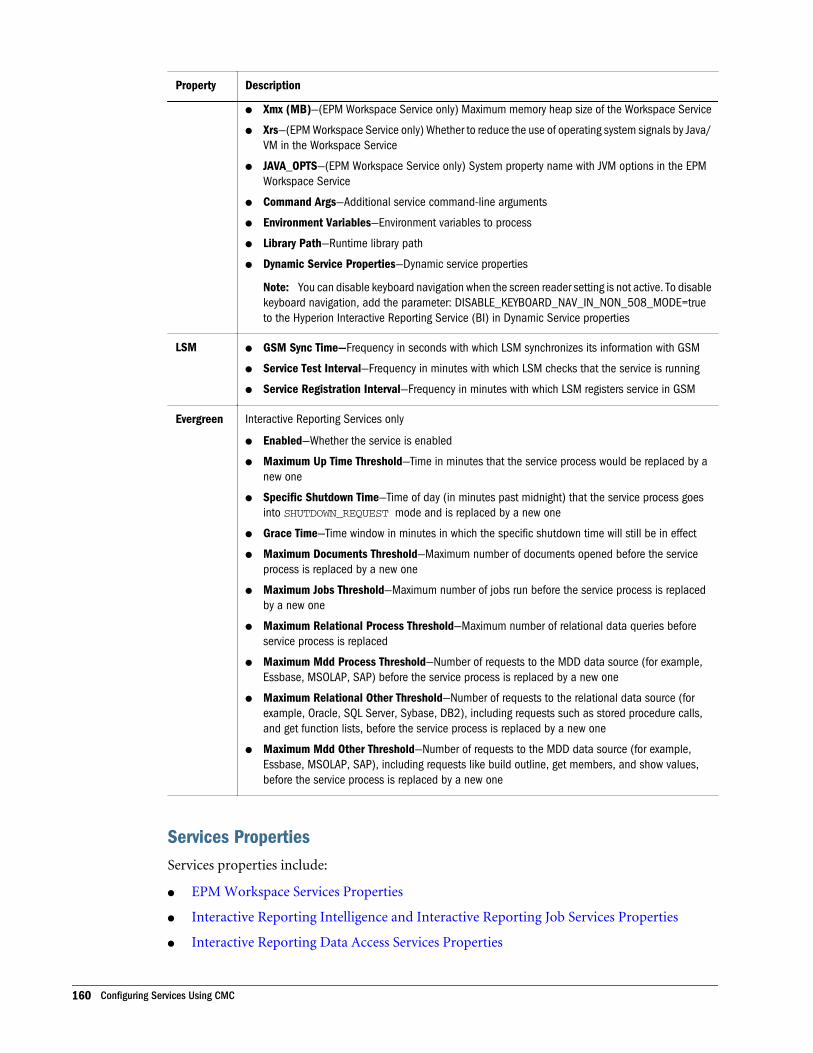
Property Description
l Xmx (MB)—(EPM Workspace Service only) Maximum memory heap size of the Workspace Service
l Xrs—(EPM Workspace Service only) Whether to reduce the use of operating system signals by Java/VM in the Workspace Service
l JAVA_OPTS—(EPM Workspace Service only) System property name with JVM options in the EPMWorkspace Service
l Command Args—Additional service command-line arguments
l Environment Variables—Environment variables to process
l Library Path—Runtime library path
l Dynamic Service Properties—Dynamic service properties
Note: You can disable keyboard navigation when the screen reader setting is not active. To disablekeyboard navigation, add the parameter: DISABLE_KEYBOARD_NAV_IN_NON_508_MODE=trueto the Hyperion Interactive Reporting Service (BI) in Dynamic Service properties
LSMl GSM Sync Time—Frequency in seconds with which LSM synchronizes its information with GSM
l Service Test Interval—Frequency in minutes with which LSM checks that the service is running
l Service Registration Interval—Frequency in minutes with which LSM registers service in GSM
Evergreen Interactive Reporting Services only
l Enabled—Whether the service is enabled
l Maximum Up Time Threshold—Time in minutes that the service process would be replaced by anew one
l Specific Shutdown Time—Time of day (in minutes past midnight) that the service process goesinto SHUTDOWN_REQUEST mode and is replaced by a new one
l Grace Time—Time window in minutes in which the specific shutdown time will still be in effect
l Maximum Documents Threshold—Maximum number of documents opened before the serviceprocess is replaced by a new one
l Maximum Jobs Threshold—Maximum number of jobs run before the service process is replacedby a new one
l Maximum Relational Process Threshold—Maximum number of relational data queries beforeservice process is replaced
l Maximum Mdd Process Threshold—Number of requests to the MDD data source (for example,Essbase, MSOLAP, SAP) before the service process is replaced by a new one
l Maximum Relational Other Threshold—Number of requests to the relational data source (forexample, Oracle, SQL Server, Sybase, DB2), including requests such as stored procedure calls,and get function lists, before the service process is replaced by a new one
l Maximum Mdd Other Threshold—Number of requests to the MDD data source (for example,Essbase, MSOLAP, SAP), including requests like build outline, get members, and show values,before the service process is replaced by a new one
Services PropertiesServices properties include:
l EPM Workspace Services Properties
l Interactive Reporting Intelligence and Interactive Reporting Job Services Properties
l Interactive Reporting Data Access Services Properties
160 Configuring Services Using CMC

EPM Workspace Services Properties
Table 16 EPM Workspace Services Property Descriptions
EPM WorkspaceService
Property Descriptions
GSM, ServiceBroker, SQR JobFactory, Eventservice, andRepository
l Enabled—Whether the service is started with other services
l Port—Communication port used by the service
l Home Directory—Directory to store internal data
Usage, Logging Enabled—Whether the service is started with other services
Session Managerl Enabled—Whether the service is started with other services
l Session Idle Time—Time period (in seconds) during which, if a user is idle, the session isclosed
Publisher,Authentication,Authorization,and AnalyticBridge
l Enabled—Whether the service is started with other services
Harvester andTransformer
l Enabled—Whether the service is started with other services
l Max Request Log Time—Maximum time (in hours) to keep request log entries for ImpactManager transformations. Used primarily for the Undo task in Impact Manager. The defaultvalue of 336 hours is two weeks. This means that for two weeks you can Undo atransformation. After that, the logs are purged and it is no longer possible to Undo thetransformation.
l Thread Pool Size—Number of threads used by the service
l Polling Interval—Time (in seconds) that the polling thread sleeps between two polls
l Max Queue Lock Time—Maximum time (in seconds) that a worker thread can hold a lockbefore it is considered a stale lock. After this time, the lock is forcibly released allowinganother worker thread to process the request.
Search Indexingl Enabled—Whether the service is started with other services
l Merge Factor—Affects the size of segments in the searchable index. Valid values are 2through 10.
l Max Optimize Time—Maximum time (in seconds) before the Searchable Index is re-optimized. Optimizing the index is similar in concept to defragmenting a file system.
l Max Buffered Docs—Maximum number of documents cached in memory before flushingthem to disk
l Home Directory—Services home directory to store internal data
Search KeywordProvider
l Enabled—Whether the service is started with other services
l Worker Count—Number of threads used by the service
l Poll Period Worker—Period (in seconds) for polling the indexing request queue. This definesthe longest time before new or updated docments are indexed or re-indexed by Search.
Search Monitorl Enabled—Whether the service is started with other services
l Poll Period—Polling period (in seconds) for monitoring searchable sources
Modifying Properties in CMC 161
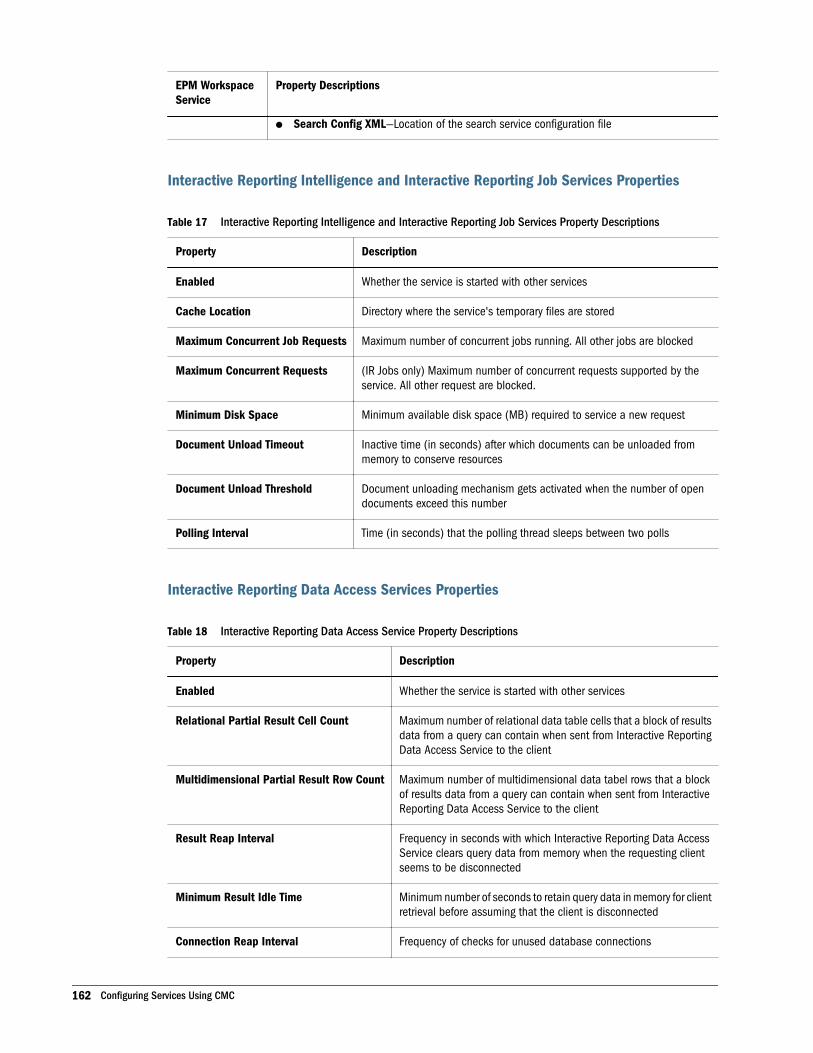
EPM WorkspaceService
Property Descriptions
l Search Config XML—Location of the search service configuration file
Interactive Reporting Intelligence and Interactive Reporting Job Services Properties
Table 17 Interactive Reporting Intelligence and Interactive Reporting Job Services Property Descriptions
Property Description
Enabled Whether the service is started with other services
Cache Location Directory where the service's temporary files are stored
Maximum Concurrent Job Requests Maximum number of concurrent jobs running. All other jobs are blocked
Maximum Concurrent Requests (IR Jobs only) Maximum number of concurrent requests supported by theservice. All other request are blocked.
Minimum Disk Space Minimum available disk space (MB) required to service a new request
Document Unload Timeout Inactive time (in seconds) after which documents can be unloaded frommemory to conserve resources
Document Unload Threshold Document unloading mechanism gets activated when the number of opendocuments exceed this number
Polling Interval Time (in seconds) that the polling thread sleeps between two polls
Interactive Reporting Data Access Services Properties
Table 18 Interactive Reporting Data Access Service Property Descriptions
Property Description
Enabled Whether the service is started with other services
Relational Partial Result Cell Count Maximum number of relational data table cells that a block of resultsdata from a query can contain when sent from Interactive ReportingData Access Service to the client
Multidimensional Partial Result Row Count Maximum number of multidimensional data tabel rows that a blockof results data from a query can contain when sent from InteractiveReporting Data Access Service to the client
Result Reap Interval Frequency in seconds with which Interactive Reporting Data AccessService clears query data from memory when the requesting clientseems to be disconnected
Minimum Result Idle Time Minimum number of seconds to retain query data in memory for clientretrieval before assuming that the client is disconnected
Connection Reap Interval Frequency of checks for unused database connections
162 Configuring Services Using CMC
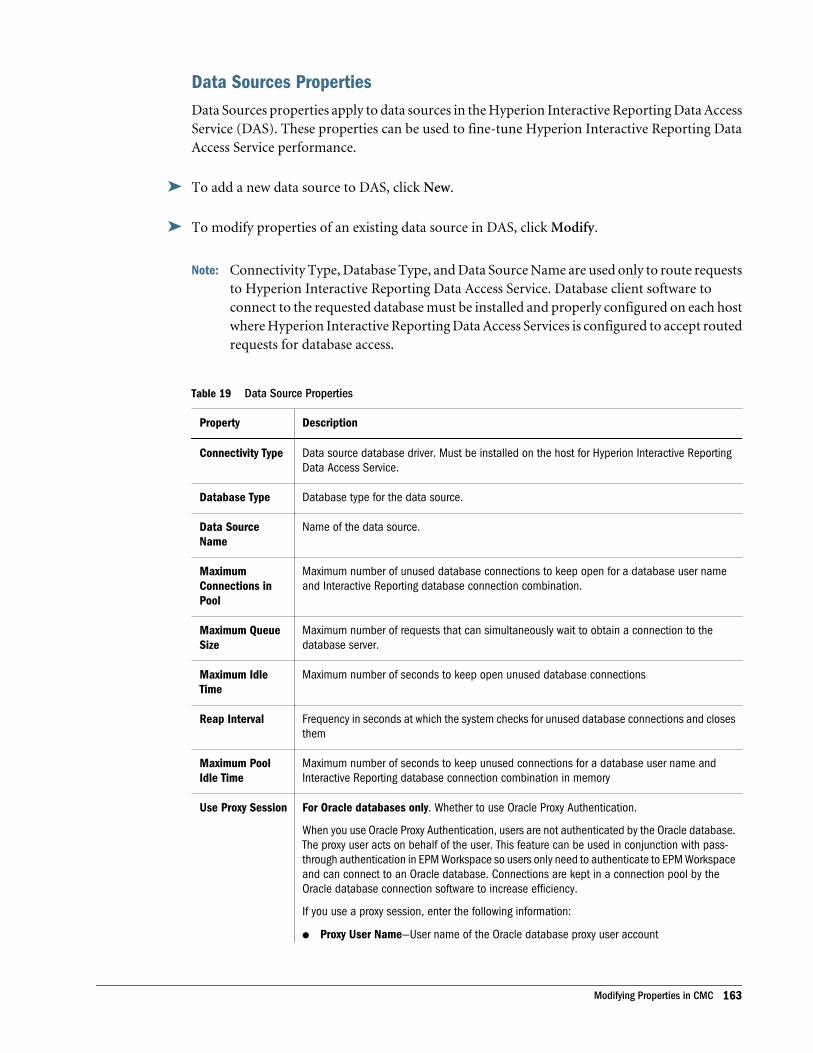
Data Sources PropertiesData Sources properties apply to data sources in the Hyperion Interactive Reporting Data AccessService (DAS). These properties can be used to fine-tune Hyperion Interactive Reporting DataAccess Service performance.
ä To add a new data source to DAS, click New.
ä To modify properties of an existing data source in DAS, click Modify.
Note: Connectivity Type, Database Type, and Data Source Name are used only to route requeststo Hyperion Interactive Reporting Data Access Service. Database client software toconnect to the requested database must be installed and properly configured on each hostwhere Hyperion Interactive Reporting Data Access Services is configured to accept routedrequests for database access.
Table 19 Data Source Properties
Property Description
Connectivity Type Data source database driver. Must be installed on the host for Hyperion Interactive ReportingData Access Service.
Database Type Database type for the data source.
Data SourceName
Name of the data source.
MaximumConnections inPool
Maximum number of unused database connections to keep open for a database user nameand Interactive Reporting database connection combination.
Maximum QueueSize
Maximum number of requests that can simultaneously wait to obtain a connection to thedatabase server.
Maximum IdleTime
Maximum number of seconds to keep open unused database connections
Reap Interval Frequency in seconds at which the system checks for unused database connections and closesthem
Maximum PoolIdle Time
Maximum number of seconds to keep unused connections for a database user name andInteractive Reporting database connection combination in memory
Use Proxy Session For Oracle databases only. Whether to use Oracle Proxy Authentication.
When you use Oracle Proxy Authentication, users are not authenticated by the Oracle database.The proxy user acts on behalf of the user. This feature can be used in conjunction with pass-through authentication in EPM Workspace so users only need to authenticate to EPM Workspaceand can connect to an Oracle database. Connections are kept in a connection pool by theOracle database connection software to increase efficiency.
If you use a proxy session, enter the following information:
l Proxy User Name—User name of the Oracle database proxy user account
Modifying Properties in CMC 163
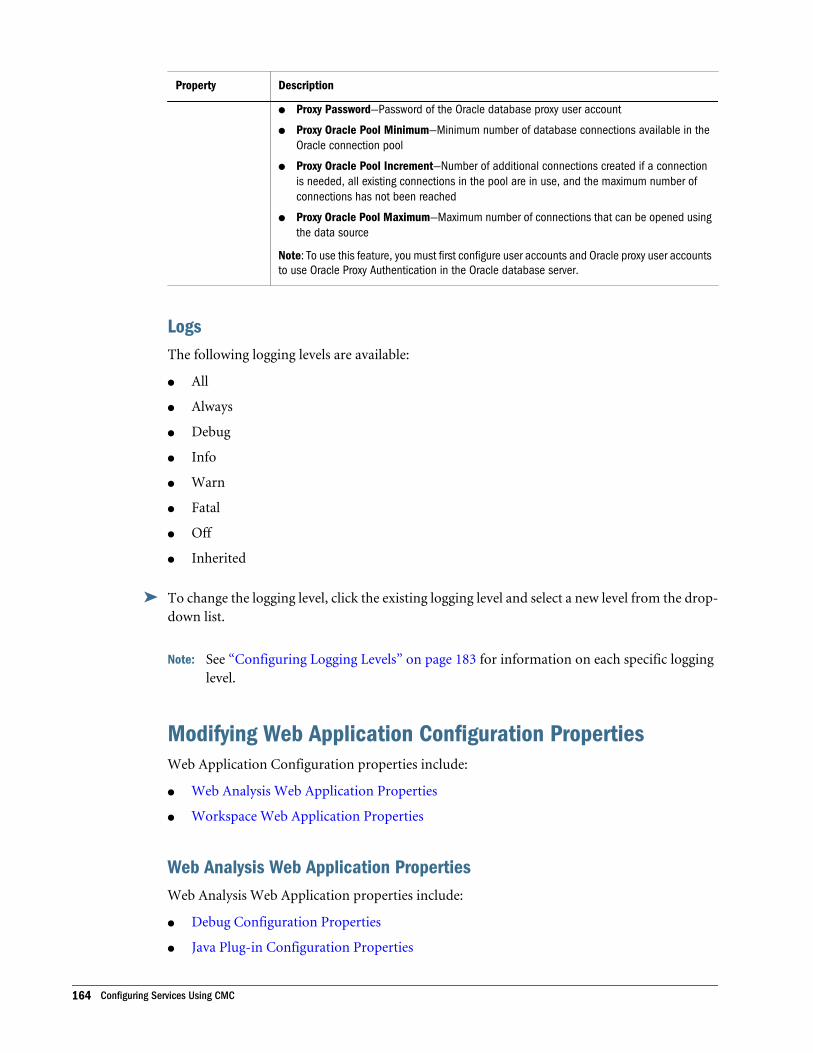
Property Description
l Proxy Password—Password of the Oracle database proxy user account
l Proxy Oracle Pool Minimum—Minimum number of database connections available in theOracle connection pool
l Proxy Oracle Pool Increment—Number of additional connections created if a connectionis needed, all existing connections in the pool are in use, and the maximum number ofconnections has not been reached
l Proxy Oracle Pool Maximum—Maximum number of connections that can be opened usingthe data source
Note: To use this feature, you must first configure user accounts and Oracle proxy user accountsto use Oracle Proxy Authentication in the Oracle database server.
LogsThe following logging levels are available:
l All
l Always
l Debug
l Info
l Warn
l Fatal
l Off
l Inherited
ä To change the logging level, click the existing logging level and select a new level from the drop-down list.
Note: See “Configuring Logging Levels” on page 183 for information on each specific logginglevel.
Modifying Web Application Configuration PropertiesWeb Application Configuration properties include:
l Web Analysis Web Application Properties
l Workspace Web Application Properties
Web Analysis Web Application PropertiesWeb Analysis Web Application properties include:
l Debug Configuration Properties
l Java Plug-in Configuration Properties
164 Configuring Services Using CMC
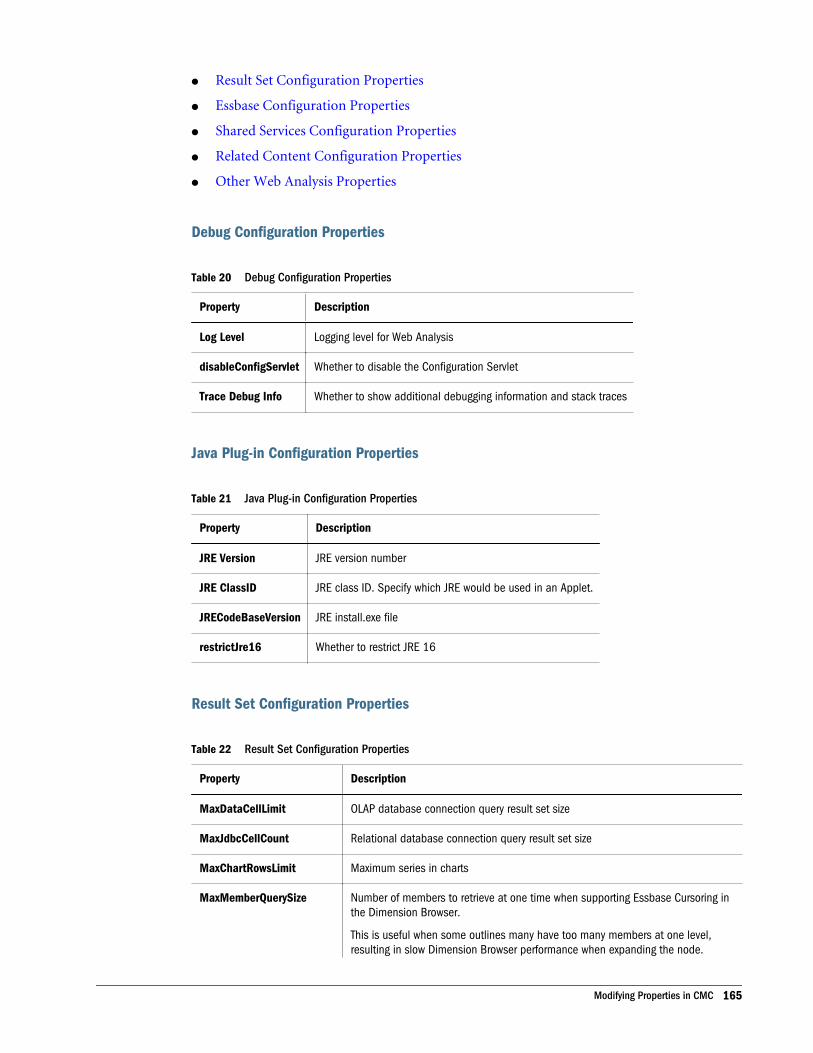
l Result Set Configuration Properties
l Essbase Configuration Properties
l Shared Services Configuration Properties
l Related Content Configuration Properties
l Other Web Analysis Properties
Debug Configuration Properties
Table 20 Debug Configuration Properties
Property Description
Log Level Logging level for Web Analysis
disableConfigServlet Whether to disable the Configuration Servlet
Trace Debug Info Whether to show additional debugging information and stack traces
Java Plug-in Configuration Properties
Table 21 Java Plug-in Configuration Properties
Property Description
JRE Version JRE version number
JRE ClassID JRE class ID. Specify which JRE would be used in an Applet.
JRECodeBaseVersion JRE install.exe file
restrictJre16 Whether to restrict JRE 16
Result Set Configuration Properties
Table 22 Result Set Configuration Properties
Property Description
MaxDataCellLimit OLAP database connection query result set size
MaxJdbcCellCount Relational database connection query result set size
MaxChartRowsLimit Maximum series in charts
MaxMemberQuerySize Number of members to retrieve at one time when supporting Essbase Cursoring inthe Dimension Browser.
This is useful when some outlines many have too many members at one level,resulting in slow Dimension Browser performance when expanding the node.
Modifying Properties in CMC 165
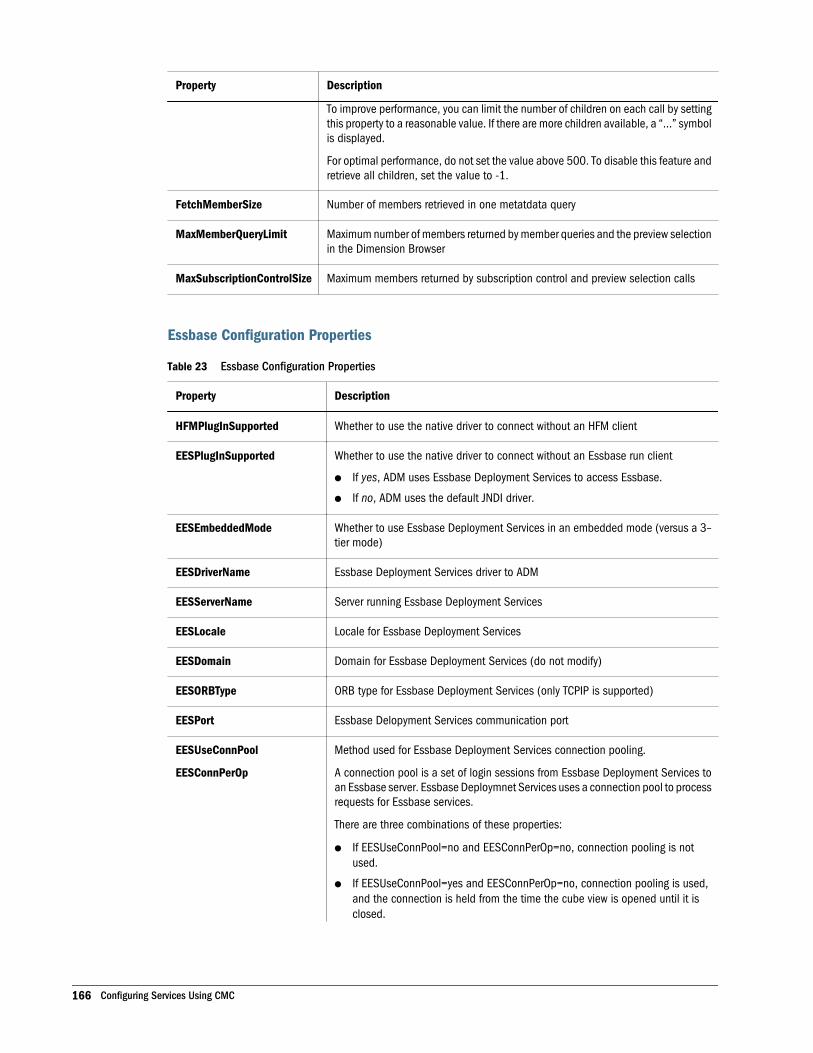
Property Description
To improve performance, you can limit the number of children on each call by settingthis property to a reasonable value. If there are more children available, a “...” symbolis displayed.
For optimal performance, do not set the value above 500. To disable this feature andretrieve all children, set the value to -1.
FetchMemberSize Number of members retrieved in one metatdata query
MaxMemberQueryLimit Maximum number of members returned by member queries and the preview selectionin the Dimension Browser
MaxSubscriptionControlSize Maximum members returned by subscription control and preview selection calls
Essbase Configuration Properties
Table 23 Essbase Configuration Properties
Property Description
HFMPlugInSupported Whether to use the native driver to connect without an HFM client
EESPlugInSupported Whether to use the native driver to connect without an Essbase run client
l If yes, ADM uses Essbase Deployment Services to access Essbase.
l If no, ADM uses the default JNDI driver.
EESEmbeddedMode Whether to use Essbase Deployment Services in an embedded mode (versus a 3–tier mode)
EESDriverName Essbase Deployment Services driver to ADM
EESServerName Server running Essbase Deployment Services
EESLocale Locale for Essbase Deployment Services
EESDomain Domain for Essbase Deployment Services (do not modify)
EESORBType ORB type for Essbase Deployment Services (only TCPIP is supported)
EESPort Essbase Delopyment Services communication port
EESUseConnPool
EESConnPerOp
Method used for Essbase Deployment Services connection pooling.
A connection pool is a set of login sessions from Essbase Deployment Services toan Essbase server. Essbase Deploymnet Services uses a connection pool to processrequests for Essbase services.
There are three combinations of these properties:
l If EESUseConnPool=no and EESConnPerOp=no, connection pooling is notused.
l If EESUseConnPool=yes and EESConnPerOp=no, connection pooling is used,and the connection is held from the time the cube view is opened until it isclosed.
166 Configuring Services Using CMC
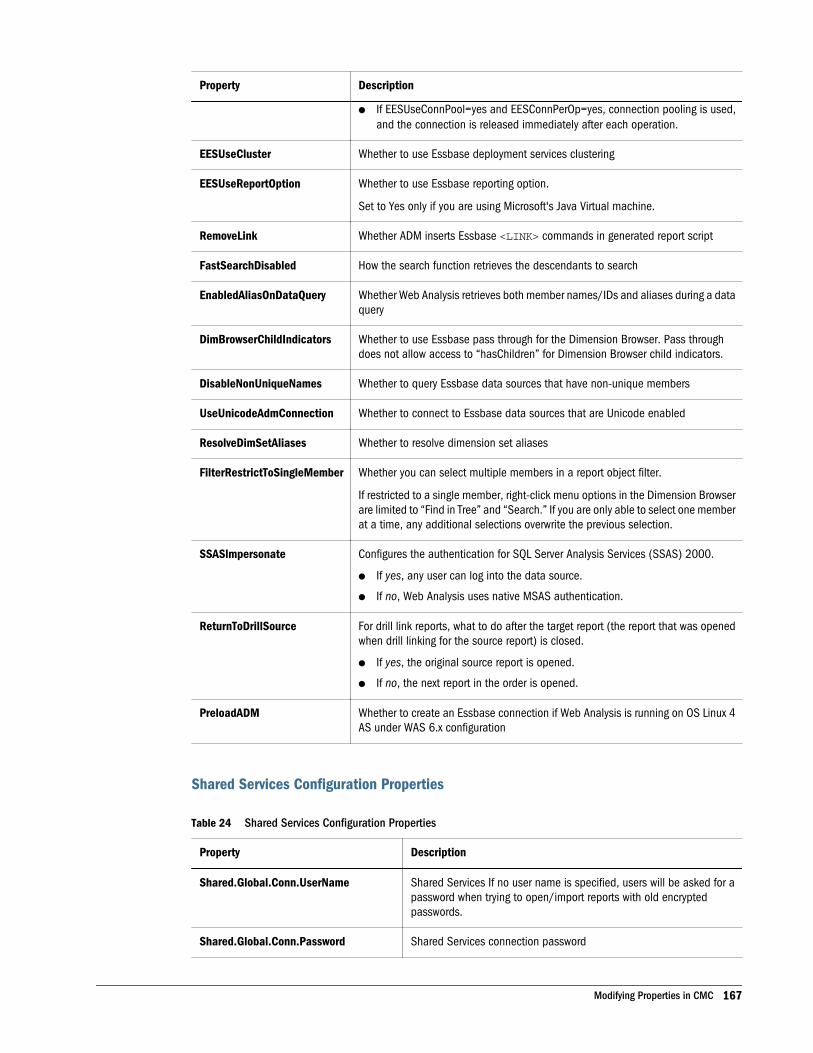
Property Description
l If EESUseConnPool=yes and EESConnPerOp=yes, connection pooling is used,and the connection is released immediately after each operation.
EESUseCluster Whether to use Essbase deployment services clustering
EESUseReportOption Whether to use Essbase reporting option.
Set to Yes only if you are using Microsoft's Java Virtual machine.
RemoveLink Whether ADM inserts Essbase <LINK> commands in generated report script
FastSearchDisabled How the search function retrieves the descendants to search
EnabledAliasOnDataQuery Whether Web Analysis retrieves both member names/IDs and aliases during a dataquery
DimBrowserChildIndicators Whether to use Essbase pass through for the Dimension Browser. Pass throughdoes not allow access to “hasChildren” for Dimension Browser child indicators.
DisableNonUniqueNames Whether to query Essbase data sources that have non-unique members
UseUnicodeAdmConnection Whether to connect to Essbase data sources that are Unicode enabled
ResolveDimSetAliases Whether to resolve dimension set aliases
FilterRestrictToSingleMember Whether you can select multiple members in a report object filter.
If restricted to a single member, right-click menu options in the Dimension Browserare limited to “Find in Tree” and “Search.” If you are only able to select one memberat a time, any additional selections overwrite the previous selection.
SSASlmpersonate Configures the authentication for SQL Server Analysis Services (SSAS) 2000.
l If yes, any user can log into the data source.
l If no, Web Analysis uses native MSAS authentication.
ReturnToDrillSource For drill link reports, what to do after the target report (the report that was openedwhen drill linking for the source report) is closed.
l If yes, the original source report is opened.
l If no, the next report in the order is opened.
PreloadADM Whether to create an Essbase connection if Web Analysis is running on OS Linux 4AS under WAS 6.x configuration
Shared Services Configuration Properties
Table 24 Shared Services Configuration Properties
Property Description
Shared.Global.Conn.UserName Shared Services If no user name is specified, users will be asked for apassword when trying to open/import reports with old encryptedpasswords.
Shared.Global.Conn.Password Shared Services connection password
Modifying Properties in CMC 167
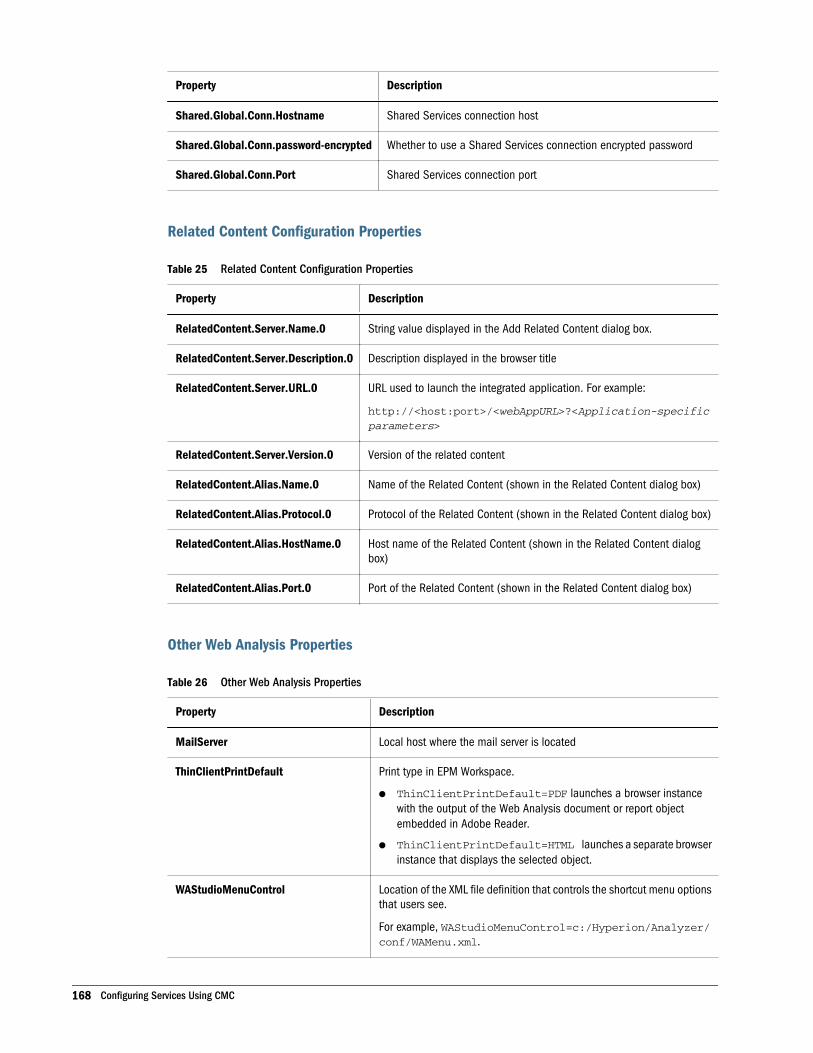
Property Description
Shared.Global.Conn.Hostname Shared Services connection host
Shared.Global.Conn.password-encrypted Whether to use a Shared Services connection encrypted password
Shared.Global.Conn.Port Shared Services connection port
Related Content Configuration Properties
Table 25 Related Content Configuration Properties
Property Description
RelatedContent.Server.Name.0 String value displayed in the Add Related Content dialog box.
RelatedContent.Server.Description.0 Description displayed in the browser title
RelatedContent.Server.URL.0 URL used to launch the integrated application. For example:
http://<host:port>/<webAppURL>?<Application-specificparameters>
RelatedContent.Server.Version.0 Version of the related content
RelatedContent.Alias.Name.0 Name of the Related Content (shown in the Related Content dialog box)
RelatedContent.Alias.Protocol.0 Protocol of the Related Content (shown in the Related Content dialog box)
RelatedContent.Alias.HostName.0 Host name of the Related Content (shown in the Related Content dialogbox)
RelatedContent.Alias.Port.0 Port of the Related Content (shown in the Related Content dialog box)
Other Web Analysis Properties
Table 26 Other Web Analysis Properties
Property Description
MailServer Local host where the mail server is located
ThinClientPrintDefault Print type in EPM Workspace.
l ThinClientPrintDefault=PDF launches a browser instancewith the output of the Web Analysis document or report objectembedded in Adobe Reader.
l ThinClientPrintDefault=HTML launches a separate browserinstance that displays the selected object.
WAStudioMenuControl Location of the XML file definition that controls the shortcut menu optionsthat users see.
For example, WAStudioMenuControl=c:/Hyperion/Analyzer/conf/WAMenu.xml.
168 Configuring Services Using CMC
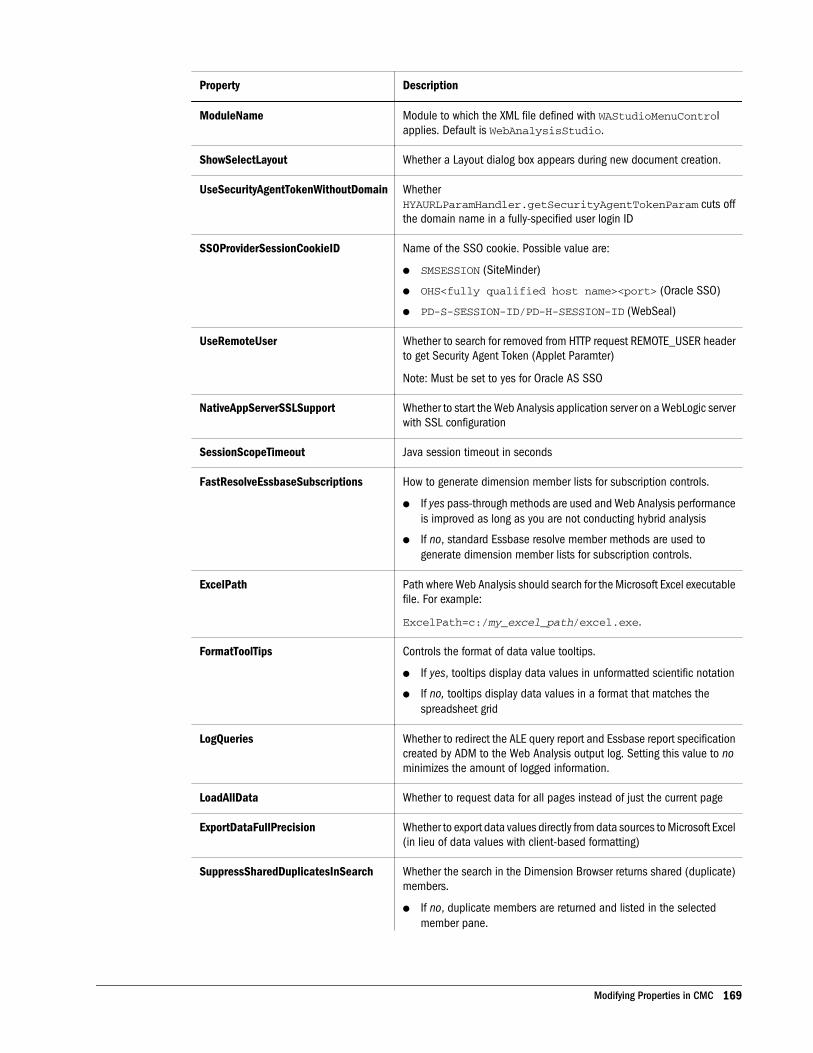
Property Description
ModuleName Module to which the XML file defined with WAStudioMenuControlapplies. Default is WebAnalysisStudio.
ShowSelectLayout Whether a Layout dialog box appears during new document creation.
UseSecurityAgentTokenWithoutDomain WhetherHYAURLParamHandler.getSecurityAgentTokenParam cuts offthe domain name in a fully-specified user login ID
SSOProviderSessionCookieID Name of the SSO cookie. Possible value are:
l SMSESSION (SiteMinder)
l OHS<fully qualified host name><port> (Oracle SSO)
l PD-S-SESSION-ID/PD-H-SESSION-ID (WebSeal)
UseRemoteUser Whether to search for removed from HTTP request REMOTE_USER headerto get Security Agent Token (Applet Paramter)
Note: Must be set to yes for Oracle AS SSO
NativeAppServerSSLSupport Whether to start the Web Analysis application server on a WebLogic serverwith SSL configuration
SessionScopeTimeout Java session timeout in seconds
FastResolveEssbaseSubscriptions How to generate dimension member lists for subscription controls.
l If yes pass-through methods are used and Web Analysis performanceis improved as long as you are not conducting hybrid analysis
l If no, standard Essbase resolve member methods are used togenerate dimension member lists for subscription controls.
ExcelPath Path where Web Analysis should search for the Microsoft Excel executablefile. For example:
ExcelPath=c:/my_excel_path/excel.exe.
FormatToolTips Controls the format of data value tooltips.
l If yes, tooltips display data values in unformatted scientific notation
l If no, tooltips display data values in a format that matches thespreadsheet grid
LogQueries Whether to redirect the ALE query report and Essbase report specificationcreated by ADM to the Web Analysis output log. Setting this value to nominimizes the amount of logged information.
LoadAllData Whether to request data for all pages instead of just the current page
ExportDataFullPrecision Whether to export data values directly from data sources to Microsoft Excel(in lieu of data values with client-based formatting)
SuppressSharedDuplicatesInSearch Whether the search in the Dimension Browser returns shared (duplicate)members.
l If no, duplicate members are returned and listed in the selectedmember pane.
Modifying Properties in CMC 169
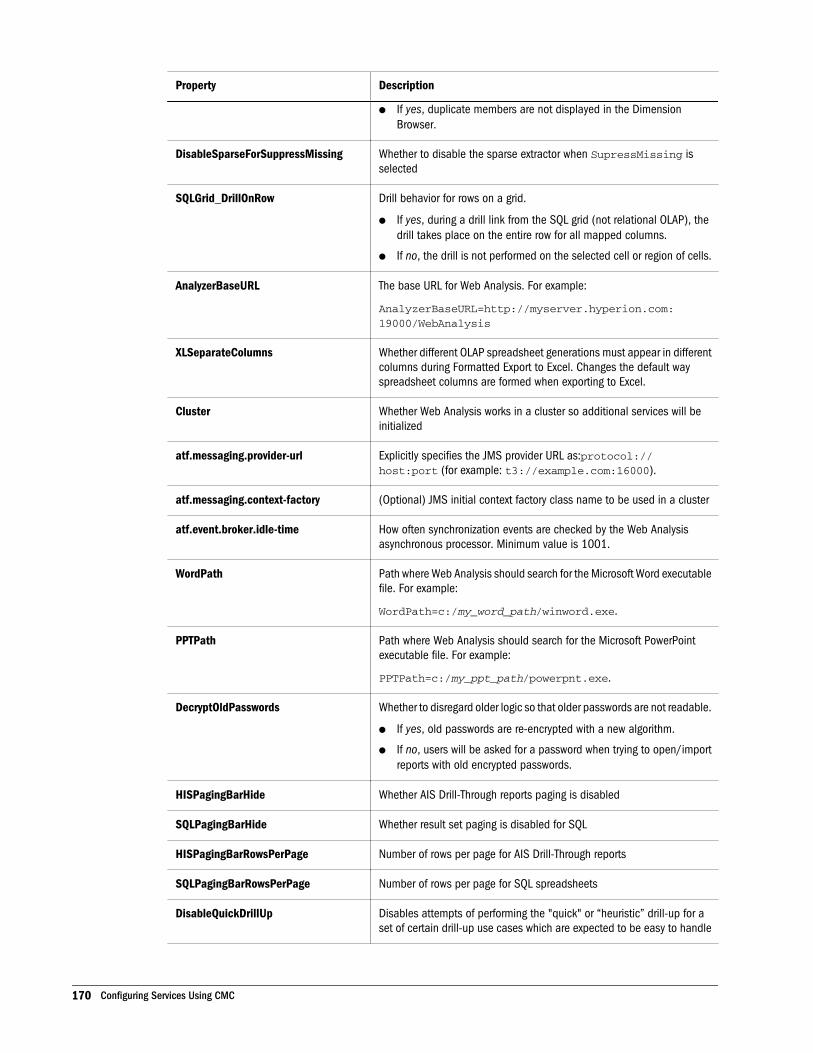
Property Description
l If yes, duplicate members are not displayed in the DimensionBrowser.
DisableSparseForSuppressMissing Whether to disable the sparse extractor when SupressMissing isselected
SQLGrid_DrillOnRow Drill behavior for rows on a grid.
l If yes, during a drill link from the SQL grid (not relational OLAP), thedrill takes place on the entire row for all mapped columns.
l If no, the drill is not performed on the selected cell or region of cells.
AnalyzerBaseURL The base URL for Web Analysis. For example:
AnalyzerBaseURL=http://myserver.hyperion.com:19000/WebAnalysis
XLSeparateColumns Whether different OLAP spreadsheet generations must appear in differentcolumns during Formatted Export to Excel. Changes the default wayspreadsheet columns are formed when exporting to Excel.
Cluster Whether Web Analysis works in a cluster so additional services will beinitialized
atf.messaging.provider-url Explicitly specifies the JMS provider URL as:protocol://host:port (for example: t3://example.com:16000).
atf.messaging.context-factory (Optional) JMS initial context factory class name to be used in a cluster
atf.event.broker.idle-time How often synchronization events are checked by the Web Analysisasynchronous processor. Minimum value is 1001.
WordPath Path where Web Analysis should search for the Microsoft Word executablefile. For example:
WordPath=c:/my_word_path/winword.exe.
PPTPath Path where Web Analysis should search for the Microsoft PowerPointexecutable file. For example:
PPTPath=c:/my_ppt_path/powerpnt.exe.
DecryptOldPasswords Whether to disregard older logic so that older passwords are not readable.
l If yes, old passwords are re-encrypted with a new algorithm.
l If no, users will be asked for a password when trying to open/importreports with old encrypted passwords.
HISPagingBarHide Whether AIS Drill-Through reports paging is disabled
SQLPagingBarHide Whether result set paging is disabled for SQL
HISPagingBarRowsPerPage Number of rows per page for AIS Drill-Through reports
SQLPagingBarRowsPerPage Number of rows per page for SQL spreadsheets
DisableQuickDrillUp Disables attempts of performing the "quick" or “heuristic” drill-up for aset of certain drill-up use cases which are expected to be easy to handle
170 Configuring Services Using CMC
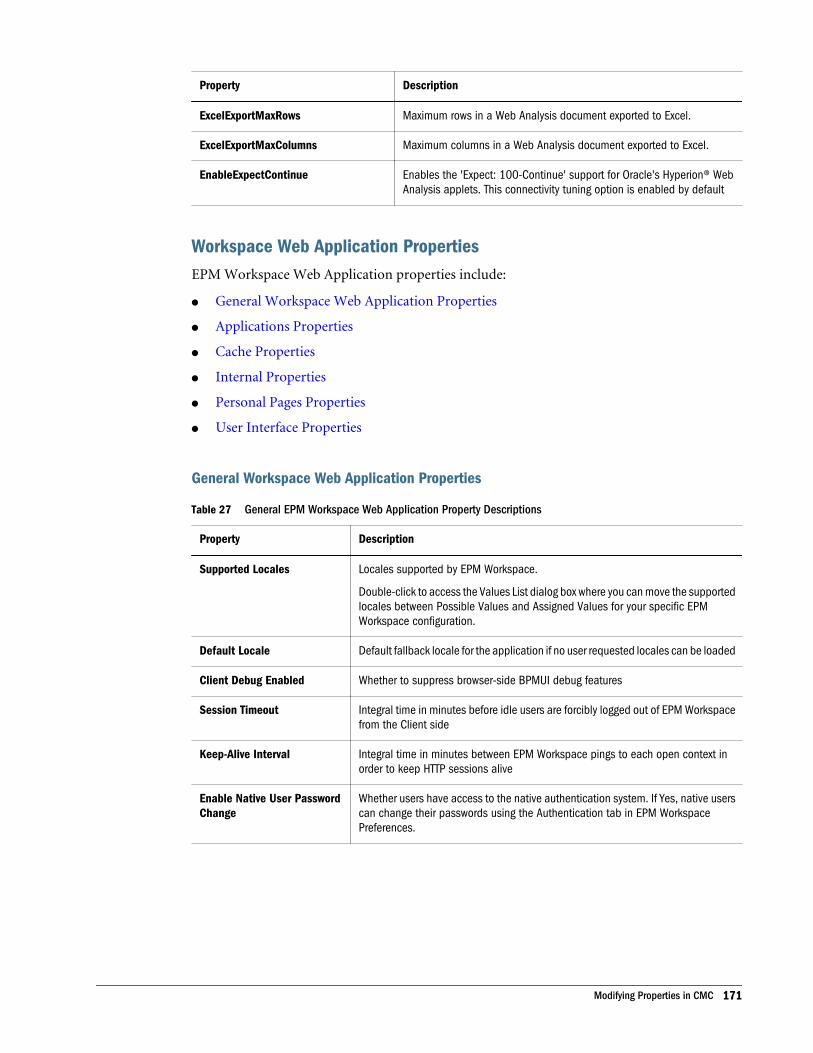
Property Description
ExcelExportMaxRows Maximum rows in a Web Analysis document exported to Excel.
ExcelExportMaxColumns Maximum columns in a Web Analysis document exported to Excel.
EnableExpectContinue Enables the 'Expect: 100-Continue' support for Oracle's Hyperion® WebAnalysis applets. This connectivity tuning option is enabled by default
Workspace Web Application PropertiesEPM Workspace Web Application properties include:
l General Workspace Web Application Properties
l Applications Properties
l Cache Properties
l Internal Properties
l Personal Pages Properties
l User Interface Properties
General Workspace Web Application Properties
Table 27 General EPM Workspace Web Application Property Descriptions
Property Description
Supported Locales Locales supported by EPM Workspace.
Double-click to access the Values List dialog box where you can move the supportedlocales between Possible Values and Assigned Values for your specific EPMWorkspace configuration.
Default Locale Default fallback locale for the application if no user requested locales can be loaded
Client Debug Enabled Whether to suppress browser-side BPMUI debug features
Session Timeout Integral time in minutes before idle users are forcibly logged out of EPM Workspacefrom the Client side
Keep-Alive Interval Integral time in minutes between EPM Workspace pings to each open context inorder to keep HTTP sessions alive
Enable Native User PasswordChange
Whether users have access to the native authentication system. If Yes, native userscan change their passwords using the Authentication tab in EPM WorkspacePreferences.
Modifying Properties in CMC 171

Applications Properties
Table 28 Applications Property Descriptions
Application Property Description
iHtmll Clear Disk Cache After—Number of seconds after which the disk cache for iHTML documents is
cleared
l Terminate Idle ihtml Session After—Number of seconds after which Idle iHTML sessions areterminated
l IHTML Polling Period—Number of seconds in the iHTML polling time period
Data AccessServlet
l DAS Response Timeout—Number of seconds after which to time out the Data Access Servlet
l Enable Zero Administration—Whether to enable zero administration
l Hyperion Intelligence Client Polling Time—Polling time in seconds for the Hyperion IntelligenceClient
l Allow Multiple Browser Windows for Interactive Reporting Web Client—Whether to allowmultiple browser windows for the Interactive Reporting Web Client
Cache Properties
Table 29 Cache Property Descriptions
Cache Type Property Description
Objectsl Number of Folders Cached—Number of folders to cache
l Cache Folders For—Number of seconds to cache folders
l Cache Browse Queries For—Number of seconds to browse queries
l Cache Jobs For—Number of seconds to cache jobs
l Cache Parameter Lists For—Number of seconds to cache parameter lists
l Cache Published Personal Pages For—Number of seconds to cache published personal pages
l Cache Content Windows on Personal Pages For—Number of seconds to cache content windowson personal pages
l Cache Content Windows Being Modified For—Number of seconds to modify cache contentwindows
l Cache List Items For—Number of seconds to cache list items
l Max Items to Cache For Listings—Maximum number of items to cache for listings
Systeml Cache System Properties For—Number of seconds to cache system properties
Notificationsl Refresh Notifications Every—Number of seconds before refreshing notifications
Browserl Max IR Job Outputs Listed for Modification—Maximum number of Interactive Reporting job
outputs that are listed for modification
172 Configuring Services Using CMC

Internal Properties
Table 30 Internal Property Descriptions
PropertyType
Property Description
Generall Pass Data Using Streams Instead of Files—Alters the way data is transmitted between services
and the web application
l Max File Size Allowed for Publish—Maximum file size in megabytes allowed for publishing
l Temp Location—Temporary directory for the EPM Workspace web application
l Logging Configuration—Logging configuration file
Redirectl Redirect URLs Using—Controls the way browsers are redirected from page to page
Cookiesl Keep Cookies Between Browser Sessions—Whether to keep cookies between browser sessions
l Encrypt Cookies—Whether cookie encryption is enabled
Personal Pages Properties
Table 31 Personal Pages Property Descriptions
PersonalPageProperty
Property Description
Generall Maximum Personal Pages Per User—Maximum number of Personal Pages allowed for every user
in the system
l Maximum Initial Published Personal Pages—Maximum number of Personal Pages initiallypublished for every user in the system
l Show Headings of Content Window on Personal Page—Whether to show the headings of theContent window on Personal Pages
Publishl Location—Directory where Personal Page content is published
GeneratedPersonalPage
l Show my Bookmarks—Whether to show bookmarks on generated Personal Pages
l Show Exceptions Dashboard—Whether to show the Execptions Dashboard on generated PersonalPages
l Number of Folders—Number of foldes to appear on the generated Personal Page
l Number of File Content Windows—Number of file contents windows to appear on the generatedPersonal Page
l Default Color Scheme—Default color scheme to appear on the generated Personal Page (Colorschemes are defined below.)
ColorScheme
l Name—Name to identify the color scheme
l Headings Color—Color to appear on Personal Page headings
l Background Color—Color to appear as the background for Personal Pages
l Text Color—Color for the text on Personal Page
l Link Color—Color for the links on Personal Pages
l Broadcast Messages Color—Color in which broadcast message will appear on Personal Pages
Modifying Properties in CMC 173
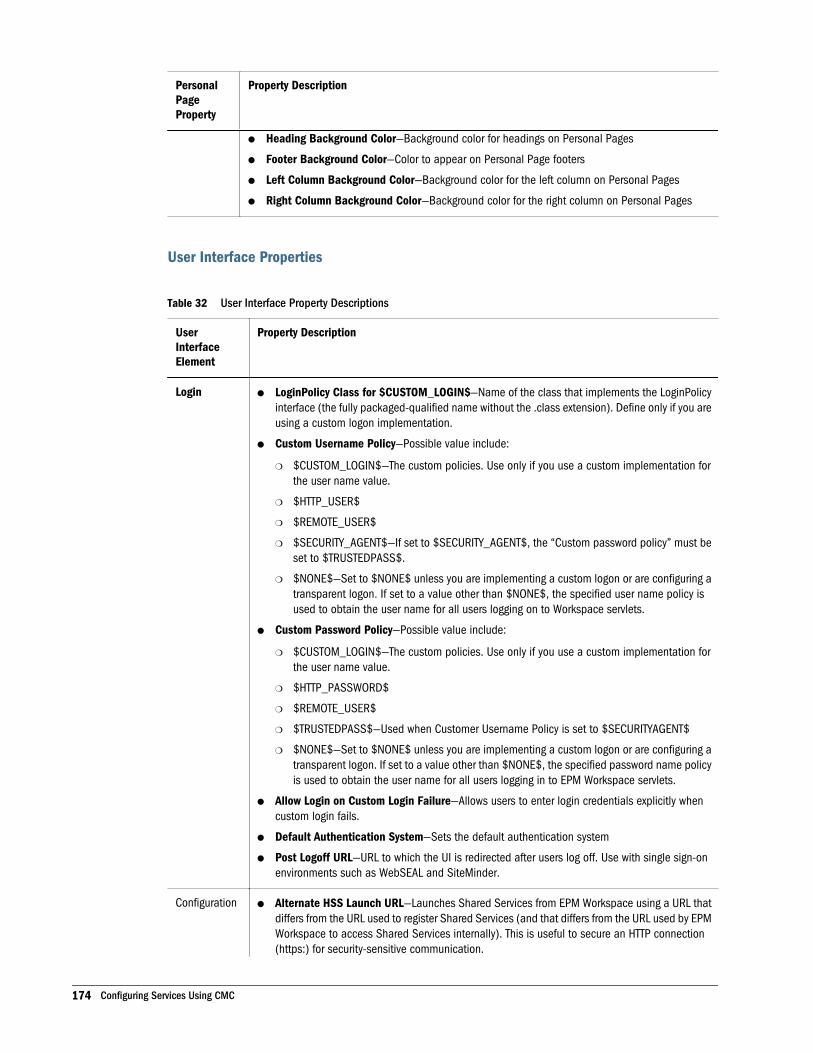
PersonalPageProperty
Property Description
l Heading Background Color—Background color for headings on Personal Pages
l Footer Background Color—Color to appear on Personal Page footers
l Left Column Background Color—Background color for the left column on Personal Pages
l Right Column Background Color—Background color for the right column on Personal Pages
User Interface Properties
Table 32 User Interface Property Descriptions
UserInterfaceElement
Property Description
Loginl LoginPolicy Class for $CUSTOM_LOGIN$—Name of the class that implements the LoginPolicy
interface (the fully packaged-qualified name without the .class extension). Define only if you areusing a custom logon implementation.
l Custom Username Policy—Possible value include:
m $CUSTOM_LOGIN$—The custom policies. Use only if you use a custom implementation forthe user name value.
m $HTTP_USER$
m $REMOTE_USER$
m $SECURITY_AGENT$—If set to $SECURITY_AGENT$, the “Custom password policy” must beset to $TRUSTEDPASS$.
m $NONE$—Set to $NONE$ unless you are implementing a custom logon or are configuring atransparent logon. If set to a value other than $NONE$, the specified user name policy isused to obtain the user name for all users logging on to Workspace servlets.
l Custom Password Policy—Possible value include:
m $CUSTOM_LOGIN$—The custom policies. Use only if you use a custom implementation forthe user name value.
m $HTTP_PASSWORD$
m $REMOTE_USER$
m $TRUSTEDPASS$—Used when Customer Username Policy is set to $SECURITYAGENT$
m $NONE$—Set to $NONE$ unless you are implementing a custom logon or are configuring atransparent logon. If set to a value other than $NONE$, the specified password name policyis used to obtain the user name for all users logging in to EPM Workspace servlets.
l Allow Login on Custom Login Failure—Allows users to enter login credentials explicitly whencustom login fails.
l Default Authentication System—Sets the default authentication system
l Post Logoff URL—URL to which the UI is redirected after users log off. Use with single sign-onenvironments such as WebSEAL and SiteMinder.
Configurationl Alternate HSS Launch URL—Launches Shared Services from EPM Workspace using a URL that
differs from the URL used to register Shared Services (and that differs from the URL used by EPMWorkspace to access Shared Services internally). This is useful to secure an HTTP connection(https:) for security-sensitive communication.
174 Configuring Services Using CMC
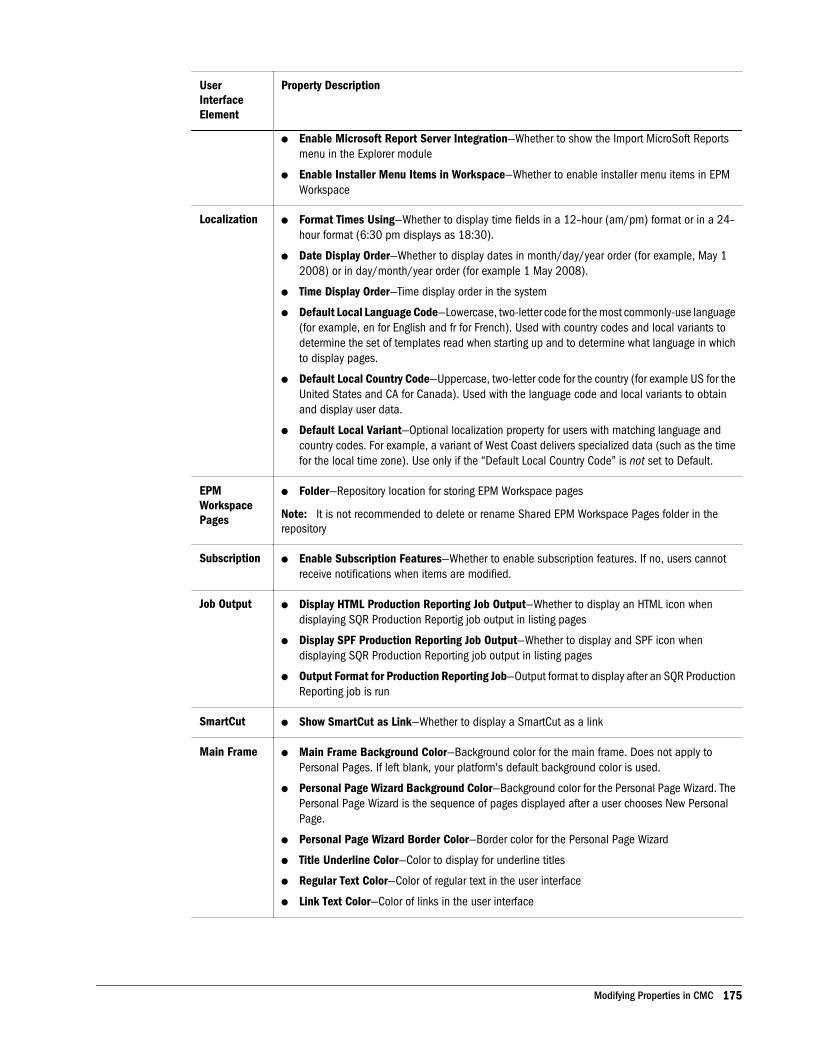
UserInterfaceElement
Property Description
l Enable Microsoft Report Server Integration—Whether to show the Import MicroSoft Reportsmenu in the Explorer module
l Enable Installer Menu Items in Workspace—Whether to enable installer menu items in EPMWorkspace
Localizationl Format Times Using—Whether to display time fields in a 12–hour (am/pm) format or in a 24–
hour format (6:30 pm displays as 18:30).
l Date Display Order—Whether to display dates in month/day/year order (for example, May 12008) or in day/month/year order (for example 1 May 2008).
l Time Display Order—Time display order in the system
l Default Local Language Code—Lowercase, two-letter code for the most commonly-use language(for example, en for English and fr for French). Used with country codes and local variants todetermine the set of templates read when starting up and to determine what language in whichto display pages.
l Default Local Country Code—Uppercase, two-letter code for the country (for example US for theUnited States and CA for Canada). Used with the language code and local variants to obtainand display user data.
l Default Local Variant—Optional localization property for users with matching language andcountry codes. For example, a variant of West Coast delivers specialized data (such as the timefor the local time zone). Use only if the “Default Local Country Code” is not set to Default.
EPMWorkspacePages
l Folder—Repository location for storing EPM Workspace pages
Note: It is not recommended to delete or rename Shared EPM Workspace Pages folder in therepository
Subscriptionl Enable Subscription Features—Whether to enable subscription features. If no, users cannot
receive notifications when items are modified.
Job Outputl Display HTML Production Reporting Job Output—Whether to display an HTML icon when
displaying SQR Production Reportig job output in listing pages
l Display SPF Production Reporting Job Output—Whether to display and SPF icon whendisplaying SQR Production Reporting job output in listing pages
l Output Format for Production Reporting Job—Output format to display after an SQR ProductionReporting job is run
SmartCutl Show SmartCut as Link—Whether to display a SmartCut as a link
Main Framel Main Frame Background Color—Background color for the main frame. Does not apply to
Personal Pages. If left blank, your platform's default background color is used.
l Personal Page Wizard Background Color—Background color for the Personal Page Wizard. ThePersonal Page Wizard is the sequence of pages displayed after a user chooses New PersonalPage.
l Personal Page Wizard Border Color—Border color for the Personal Page Wizard
l Title Underline Color—Color to display for underline titles
l Regular Text Color—Color of regular text in the user interface
l Link Text Color—Color of links in the user interface
Modifying Properties in CMC 175
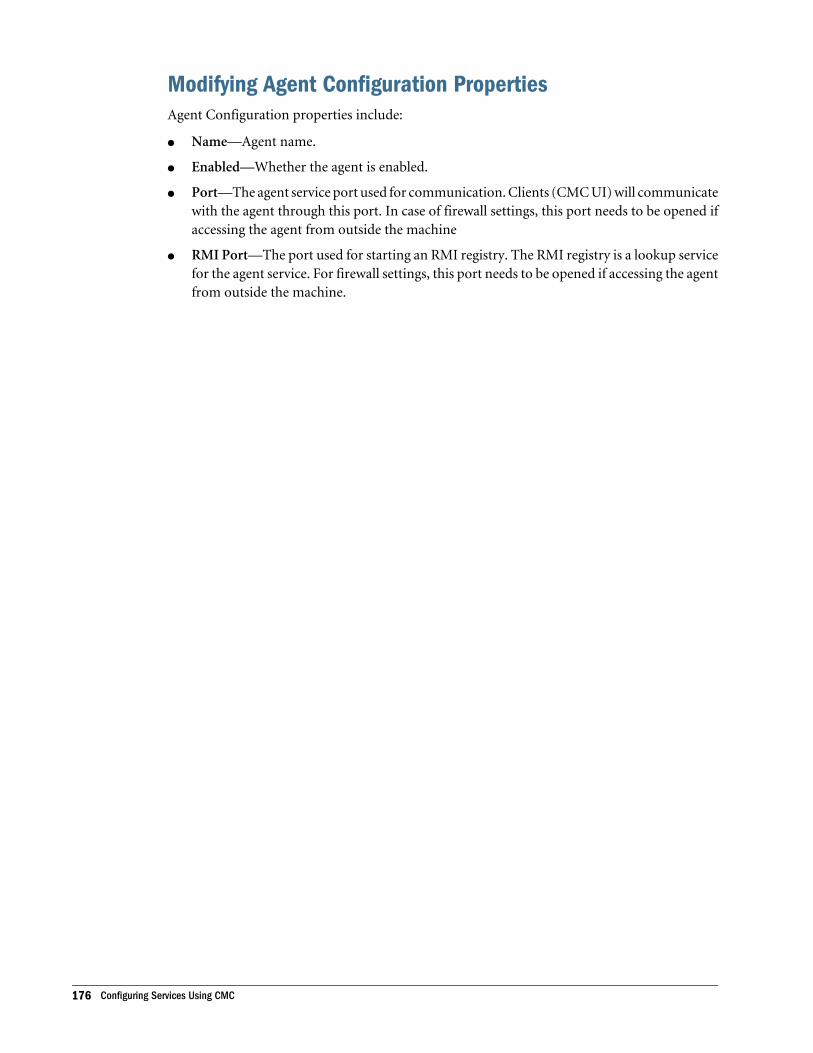
Modifying Agent Configuration PropertiesAgent Configuration properties include:
l Name—Agent name.
l Enabled—Whether the agent is enabled.
l Port—The agent service port used for communication. Clients (CMC UI) will communicatewith the agent through this port. In case of firewall settings, this port needs to be opened ifaccessing the agent from outside the machine
l RMI Port—The port used for starting an RMI registry. The RMI registry is a lookup servicefor the agent service. For firewall settings, this port needs to be opened if accessing the agentfrom outside the machine.
176 Configuring Services Using CMC
10Troubleshooting
In This Chapter
Overview ... . . . . . . . . . . . . . . . . . . . . . . . . . . . . . . . . . . . . . . . . . . . . . . . . . . . . . . . . . . . . . . . . . . . . . . . . . . . . . . . . . . . . . . . . . . . . . . . . . . . . . . . . . . . . . . . . . . . . . . . 177
Logging Architecture ... . . . . . . . . . . . . . . . . . . . . . . . . . . . . . . . . . . . . . . . . . . . . . . . . . . . . . . . . . . . . . . . . . . . . . . . . . . . . . . . . . . . . . . . . . . . . . . . . . . . . . . . . . . 177
Log File Basics ... . . . . . . . . . . . . . . . . . . . . . . . . . . . . . . . . . . . . . . . . . . . . . . . . . . . . . . . . . . . . . . . . . . . . . . . . . . . . . . . . . . . . . . . . . . . . . . . . . . . . . . . . . . . . . . . . 179
Configuring Log Properties for Troubleshooting ... . . . . . . . . . . . . . . . . . . . . . . . . . . . . . . . . . . . . . . . . . . . . . . . . . . . . . . . . . . . . . . . . . . . . . . . . . . . . 182
Analyzing Log Files .. . . . . . . . . . . . . . . . . . . . . . . . . . . . . . . . . . . . . . . . . . . . . . . . . . . . . . . . . . . . . . . . . . . . . . . . . . . . . . . . . . . . . . . . . . . . . . . . . . . . . . . . . . . . . . 187
Information Needed by Customer Support .. . . . . . . . . . . . . . . . . . . . . . . . . . . . . . . . . . . . . . . . . . . . . . . . . . . . . . . . . . . . . . . . . . . . . . . . . . . . . . . . . . . 190
OverviewAdministrators can generate log files throughout Reporting and Analysis to help techniciansidentify system or environmental problems or to help developers debug reports or API programs.
Complete configuration information about your EPM Workspace installation, including GSMand Oracle's Hyperion® Shared Services information, is available at this URL:
http://hostname:port/workspace/browse/configInfo
where hostname is the name of the EPM Workspace server, and port is the TCP port on whichthe application server is listening.
If using IIS as the Web server, EPM Workspace is served through that web server’s port whichis 80 by default. The default port for EPM Workspace is 19000 if using Apache Web server.
Logging ArchitectureAll log messages are routed through Logging Service and stored in HYPERION_HOME\logs\BIPlus and in \hyperion\products\Foundation\workspace\logs. By default, theLogging Service runs on the same computer as the EPM Workspace Agent services. LoggingService writes log messages to one or more files, which can be read using a viewer.
Log4j (version 1.2) is used as the basis for the logging framework and configuration files. LogManagement Helper is used by C++ services (Hyperion Interactive Reporting Service andHyperion Interactive Reporting Data Access Service) in conjunction with the log4j frameworkand Logging Service.
Reporting and Analysis comes with preconfigured loggers and appenders. Loggers correspondto areas in code (class) where log messages originated. Appenders correspond to output
Overview 177
destinations of log messages. You can troubleshoot system components by setting the logginglevel of loggers.
Log4jThe log4j package enables logging statements to remain in shipped code without incurring heavyperformance costs. As part of the Jakarta project, log4j is distributed under the Apache SoftwareLicense, a popular open source license certified by the Open Source Initiative. Logging behavioris controlled through XML configuration files at runtime. In configuration files, log statementscan be turned on and off per service or class (through the loggers) and logging levels for eachlogger can be set, which provide the ability to diagnose problems down to the class level. Multipledestinations can be configured for each logger.
Main components of log4j:
l Loggers—Control which logging statements are enabled or disabled. Loggers may beassigned levels ALL, DEBUG, INFO, WARN, ERROR, FATAL, or INHERIT.
l Appenders—Send formatted output to their destinations.
Go to www.apache.org or see The complete log4j manual by Ceki Gülcü (QOS.ch, 2003).
Logging ServiceAll log messages are routed through Logging Service and stored in HYPERION_HOME\logs\BIPlus and in \hyperion\products\Foundation\workspace\logs. By default, theLogging Service runs on the same computer as the EPM Workspace Agent services. If LoggingService is unavailable, log messages are sent to backup log files. When Logging Service is restored,messages in backup files are automatically sent to Logging Service, which stores them in log filesand deletes the backup files.
Logging Service cannot be replicated.
Log Management HelperLog Management Helper (LMH) consolidates all logs from Hyperion Interactive Reporting DataAccess Service or Hyperion Interactive Reporting Service and sends them to Logging Service.
One LMH process exists for each Hyperion Interactive Reporting Data Access Service and foreach Hyperion Interactive Reporting Service per Install Home.
Logging Service consolidates all log messages in separate log files for Hyperion InteractiveReporting Data Access Service and Hyperion Interactive Reporting Service per Reporting andAnalysis.
178 Troubleshooting
Server SynchronizationBecause log files are time-stamped and written in chronological order, time synchronizationbetween servers, which is the responsibility of the administrator, is important. Many products,free and commercial, are available to manage server clock synchronization.
Log File BasicsTopics that provide information about using log files for troubleshooting:
l “Log File Location” on page 179
l “Log File Naming Convention” on page 179
l “Log Message File Format” on page 181
Log File LocationAll log files are in HYPERION_HOME\logs\BIPlus and in hyperion\products\Foundation\workspace\logson the computer where Logging Service is running. By default, the LoggingService runs on the same computer as the EPM Workspace Agent services.
Services, servlets, process monitors, and Web services log messages centrally using LoggingService.
CMC, RSC, and Calendar Manager log messages locally.
Hyperion Interactive Reporting Service and HyperionInteractive Reporting Data Access Service Local Log FilesHyperion Interactive Reporting Service and Hyperion Interactive Reporting Data Access Servicehave additional log files that are stored in \BIPlus\logs, and which collect log messages beforethese services connect to Logging Service. Log messages in these files are not routed to LoggingService log files. Start-up problems are collected in BIStartup.log and DASStartup.log.
Log File Naming ConventionEach service or servlet has its own log file. In a multiple Install Home installation, all services ofone type log their messages to one file. Separate log files are generated for license information,configuration and/or environment information, and stdout messages.
Services and servlets log filenames format:
server_messages_OriginatorType.log
where
OriginatorType is one of these components:
l Servlets
Log File Basics 179
m BrowseServlet
m AdministrationServlet
m PersonalPagesServlet
m DataAccessServlet
m iHTMLServlet
l Services:
m AnalyticBridgeService
m AuthenticationService
m AuthorizationService
m CommonServices
m DataAccessService
m EventService
m GSM
m HarvesterService
m IntelligenceService
m IRJobService
m IRServiceHelper
m JobService
m LSM
m NameService
m PublisherService
m RepositoryService
m SessionManager
m ServiceBroker
m TransformerService
m Usage Service
l Miscellaneous
m CalendarManager
m WebService
m SDK
m EventComponent
m LocalServiceConfigurator
m RemoteServiceConfigurator
m Installer
Special log files are:
180 Troubleshooting
l license_messages.log—Contains license information
l configuration_messages.log—Contains basic environment and configurationinformation
l name_backupMessages_host_domain__port.log (where name is the process name)—Contains logging messages when Logging Service is unavailable (for example,BI_PM_sla1_backupMessages_myserver_hyperion_com_6800.log).
l stdout_console.log—Contains messages sent to stdout and stderr.
Log Message File FormatAll log messages contain this information in the order shown:
l Logger—Name of the logger that generated the logging message
l Time stamp—Time stamp in coordinated universal time (UTC); ensures that messages fromdiffering time zones can be correlated
The administrator is responsible for time synchronization between servers.
l Level—Logging level
l Thread—Thread name
l Sequence number—Unique number to identify messages with matching time stamps
l Time—Time the log message was generated
l Context—Information about which component generated the log message
m Subject—User name
m Session ID—UUID of the session
m Originator Type—Component type name
m Originator Name—Component name
m Host—Hose name
l Message—Log message
l Throwable—Stack trace of a throwable error
The format for backup log files match the format for regular log files.
Configuration LogBasic configuration information is logged to configuration_messages.log inFoundation/Workspace/logs. The file format matches service and servlet log file formats.
This log file contains Java system property information, JAR file version information, anddatabase information.
Log File Basics 181
Configuring Log Properties for TroubleshootingTo troubleshoot Reporting and Analysis, you can configure these logging properties:
l Logging levels
l Loggers
l Appenders
l Log rotation
Loggers, logging levels, and appenders are configured in XML files. The log rotation property isa Java system property and is configured in startcommonservices.bat. Logging levels forCMC services, RSC services, and the root logger are configured using CMC and RSC. All otherconfiguration changes are made by editing XML files.
Configuration FilesConfiguration file types are main and imported: Imported files are used by main files andorganize the loggers and appenders into separate XML files.
Main configuration files:
l serviceLog4jConfig.xml—Main configuration file for services; in \BIPlus\common\config\log4jSee Chapter 9, “Configuring Services Using CMC” for more informationon how to configure using the EPM Workspace option of CMC.
l remoteServiceLog4jConfig.xml—Main configuration file for Hyperion InteractiveReporting Service and Hyperion Interactive Reporting Data Access Service, and for RSCservices when started remotely; in \BIPlus\common\config\log4j See Chapter 9,“Configuring Services Using CMC” for more information on how to configure using CMCas part of Interactive Reporting and Hyperion Interactive Reporting Data Access Service.
l adminLog4jConfig.xml—Main configuration file for RSC, and Calendar Manager
l servletLog4JConfig.xml—Main configuration file for the servlets; in \WEB-INF\config of the servlet engine deployment
Note: If you change the location of serviceLog4jConfig.xml orremoteServiceLog4jConfig.xml, you must update the path information storedin server.xml. If you change the location of servletLog4jConfig.xml, youmust update the path information in ws.conf.
Imported configuration files:
l appenders.xml—Imported by serviceLog4jConfig.xml,servletLog4JConfig.xml, and remoteServiceLog4jConfig.xml
Appenders can be added by referencing them in <logger> and <root> elements using<appender-ref> elements.
l serviceloggers.xml—Imported by serviceLog4jConfig.xml andremoteServiceLog4jConfig.xml; configure through CMC
182 Troubleshooting
l debugLoggers.xml—Contains definitions for loggers that can be enabled to debugproblems in the services; imported by serviceLog4jConfig.xml file andremoteServiceLog4jConfig.xml; in \BIPlus\common\config\log4
l debugLoggers.xml—Contains definitions for loggers that can be enabled to debugproblems in the servlets; imported by servletLog4jConfig.xml; in the \WEB-INF\config folder of your servlet engine deployment
Configuring Logging LevelsLogging levels specify the amount and type of information to write to log files. Except for theinherit level, levels in Table 33 are listed from most verbose to least verbose, and logging levelsare cumulative. The default logging level, which is set on root, is WARN; therefore, messages atthat level or lower (ERROR, FATAL) appear in the log. You can change this for the entire systemor per service or servlet. If a given logger is not assigned a level (or its level is set to INHERIT),it inherits the level from its closest ancestor with an assigned level. The root logger resides at thetop of the logger hierarchy and always has an assigned level.
Table 33 Logging Levels
Level Description
INHERIT Uses the logging level set at its closest ancestor with an assigned level; not available at the root level
ALL All messages levels
DEBUG Minor and frequently occurring normal events; use only when troubleshooting
INFO Normal significant events of the application
WARN Minor problems caused by factors external to the application
ERROR Usually, Java exceptions that do not necessarily cause the application to crash; the application maycontinue to service subsequent requests
FATAL Implies the imminent crash of the application or the relevant sub-component; rarely used
Configuring LoggersUse RSC to configure RSC service logging levels, which are stored in the database (see “AdvancedRSC Properties” on page 142).
Use CMC to configure CMC service logging levels (stored inserviceLoggers.xml) and theroot logger (see “Logs” on page 164).
Configure the servlet root logger level in servletLog4JConfig.xml. Configure other servletloggers in the servlet debug configuration file (debugLoggers.xml).
ä To configure the servlet root logger:
1 Open \WEB_INF\config\servletLog4JConfig.xml
2 Scroll to the end of the file and change the root logging level.
Configuring Log Properties for Troubleshooting 183
For example, change WARN to INFO:
<root><level value="WARN"/><appender-ref ref="LOG_REMOTELY"/></root>
3 Save the file.
Configuring Debug LoggersDebug loggers are activated by changing the logging level from INHERITED to DEBUG. Usethese loggers only with help from Oracle Customer Support.
Note: Some Java properties, such as print_config, print_query debug, and echo, aremapped to debug loggers in \BIPlus\common\config\log4j\debugLoggers.xml.
Configuring AppendersYou can send log messages to multiple destinations by adding appenders, defined inappenders.xml, to loggers.
ä To add appenders to loggers:
1 Locate an appender in appenders.xml and copy its name.
2 Open the XML file of the logger to which you want to add this appender.
3 Paste the name of the appender after <appender-ref ref= under the logger to which you want to addthis appender.
For example:
<appender-ref ref="LOG_LOCALLY_BY_LOGGING_SERVICE"/>
4 Save the file.
Configuring Synchronous or Asynchronous MessagingLog messages can be sent synchronously (the default) or asynchronously. Asynchronous modeoffers performance advantages, while synchronous mode provides reliability in that all messagesget logged. You can change the BufferSize parameter to limit message loss.
ä To enable asynchronous messaging:
1 Open appenders.xml and locate the asynchronous appender.
<appender name="SEND_TO_LOGGING_SERVICE_ASYNC" class="org.apache.log4j.AsyncAppender">
2 Optional: Change BufferSize.
<param name="BufferSize" value="128" />
184 Troubleshooting
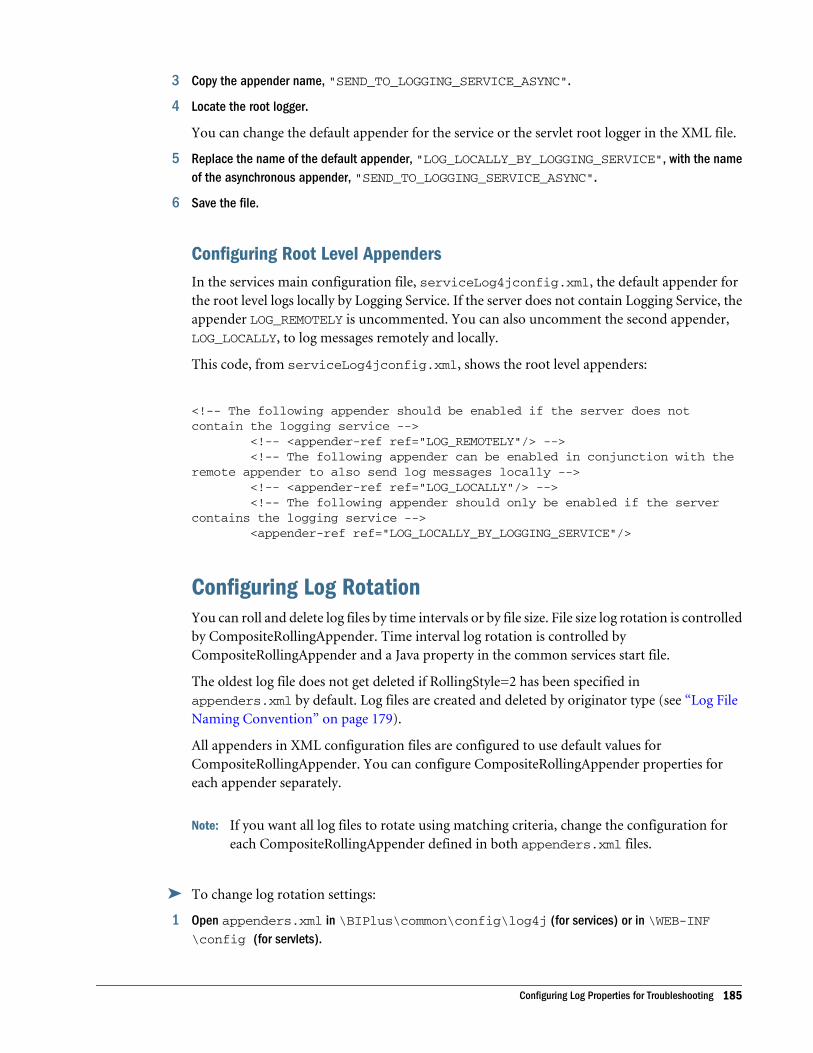
3 Copy the appender name, "SEND_TO_LOGGING_SERVICE_ASYNC".
4 Locate the root logger.
You can change the default appender for the service or the servlet root logger in the XML file.
5 Replace the name of the default appender, "LOG_LOCALLY_BY_LOGGING_SERVICE", with the nameof the asynchronous appender, "SEND_TO_LOGGING_SERVICE_ASYNC".
6 Save the file.
Configuring Root Level AppendersIn the services main configuration file, serviceLog4jconfig.xml, the default appender forthe root level logs locally by Logging Service. If the server does not contain Logging Service, theappender LOG_REMOTELY is uncommented. You can also uncomment the second appender,LOG_LOCALLY, to log messages remotely and locally.
This code, from serviceLog4jconfig.xml, shows the root level appenders:
<!-- The following appender should be enabled if the server does not contain the logging service --> <!-- <appender-ref ref="LOG_REMOTELY"/> --> <!-- The following appender can be enabled in conjunction with the remote appender to also send log messages locally --> <!-- <appender-ref ref="LOG_LOCALLY"/> --> <!-- The following appender should only be enabled if the server contains the logging service --> <appender-ref ref="LOG_LOCALLY_BY_LOGGING_SERVICE"/>
Configuring Log RotationYou can roll and delete log files by time intervals or by file size. File size log rotation is controlledby CompositeRollingAppender. Time interval log rotation is controlled byCompositeRollingAppender and a Java property in the common services start file.
The oldest log file does not get deleted if RollingStyle=2 has been specified inappenders.xml by default. Log files are created and deleted by originator type (see “Log FileNaming Convention” on page 179).
All appenders in XML configuration files are configured to use default values forCompositeRollingAppender. You can configure CompositeRollingAppender properties foreach appender separately.
Note: If you want all log files to rotate using matching criteria, change the configuration foreach CompositeRollingAppender defined in both appenders.xml files.
ä To change log rotation settings:
1 Open appenders.xml in \BIPlus\common\config\log4j (for services) or in \WEB-INF\config (for servlets).
Configuring Log Properties for Troubleshooting 185
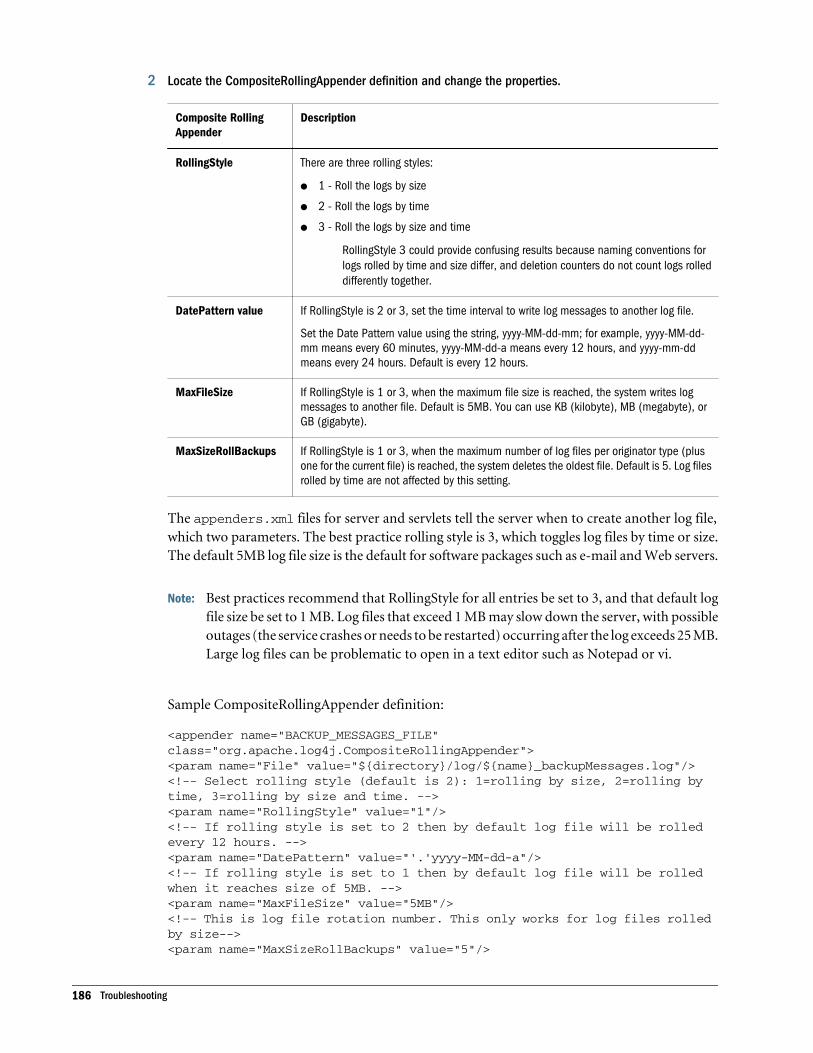
2 Locate the CompositeRollingAppender definition and change the properties.
Composite RollingAppender
Description
RollingStyle There are three rolling styles:
l 1 - Roll the logs by size
l 2 - Roll the logs by time
l 3 - Roll the logs by size and time
RollingStyle 3 could provide confusing results because naming conventions forlogs rolled by time and size differ, and deletion counters do not count logs rolleddifferently together.
DatePattern value If RollingStyle is 2 or 3, set the time interval to write log messages to another log file.
Set the Date Pattern value using the string, yyyy-MM-dd-mm; for example, yyyy-MM-dd-mm means every 60 minutes, yyyy-MM-dd-a means every 12 hours, and yyyy-mm-ddmeans every 24 hours. Default is every 12 hours.
MaxFileSize If RollingStyle is 1 or 3, when the maximum file size is reached, the system writes logmessages to another file. Default is 5MB. You can use KB (kilobyte), MB (megabyte), orGB (gigabyte).
MaxSizeRollBackups If RollingStyle is 1 or 3, when the maximum number of log files per originator type (plusone for the current file) is reached, the system deletes the oldest file. Default is 5. Log filesrolled by time are not affected by this setting.
The appenders.xml files for server and servlets tell the server when to create another log file,which two parameters. The best practice rolling style is 3, which toggles log files by time or size.The default 5MB log file size is the default for software packages such as e-mail and Web servers.
Note: Best practices recommend that RollingStyle for all entries be set to 3, and that default logfile size be set to 1 MB. Log files that exceed 1 MB may slow down the server, with possibleoutages (the service crashes or needs to be restarted) occurring after the log exceeds 25 MB.Large log files can be problematic to open in a text editor such as Notepad or vi.
Sample CompositeRollingAppender definition:
<appender name="BACKUP_MESSAGES_FILE" class="org.apache.log4j.CompositeRollingAppender"><param name="File" value="${directory}/log/${name}_backupMessages.log"/><!-- Select rolling style (default is 2): 1=rolling by size, 2=rolling by time, 3=rolling by size and time. --><param name="RollingStyle" value="1"/><!-- If rolling style is set to 2 then by default log file will be rolled every 12 hours. --><param name="DatePattern" value="'.'yyyy-MM-dd-a"/><!-- If rolling style is set to 1 then by default log file will be rolled when it reaches size of 5MB. --><param name="MaxFileSize" value="5MB"/><!-- This is log file rotation number. This only works for log files rolled by size--><param name="MaxSizeRollBackups" value="5"/>
186 Troubleshooting
<layout class="com.brio.one.mgmt.logging.xml.XMLFileLayout"></layout></appender>
3 If RollingStyle is 2 or 3, set the maximum log rotation number in /BIPlus/bin/startcommonservices.bat.
set BP_ROTATIONNUM=-Dlog_rotation_num=5
Analyzing Log FilesThis section details how to view log files, log files that are always generated, and log files to lookat for troubleshooting.
For information about logs for Shared Services, users, groups, or roles, see the Oracle HyperionEnterprise Performance Management System Installation and Configuration TroubleshootingGuide.
Viewing Log FilesYou can view log messages directly in log files or by using a log viewer. This version of Oracle'sHyperion Reporting and Analysis contains the log4j viewer, LogFactor5, which provides a wayto filter and sort log messages.
ä To use LogFactor5:
1 Copy the name of the LogFactor5 appender, <appender-ref ref="LF5APPENDER"/>.
2 Paste the copied codeline under the logger in which to use LogFactor5.
<root><level value="WARN"/><appender-ref ref="LF5APPENDER"/><appender-ref ref="LOG_REMOTELY"/></root>
LogFactor5 starts automatically when the component to which you added the appender isstarted. If the component is ongoing, LogFactor5 starts in 30 seconds. The LogFactor5 screen isdisplayed when logging initializes. Log messages are displayed as they are posted.
Standard Console Log FileThe stdout_console.log is always generated regardless of the operation being performed orlogging level, and represents standard output and standard errors (console output). Some errorsthat are caught by the application are logged here, as are start-up failures.
Logs for Importing General ContentWhen creating, modifying, and deleting files or folders, use these logs to analyze errors:
Analyzing Log Files 187

l Server logs
m server_messages_PublisherService.log
m server_messages_RepositoryService.log
m server_messages_ServiceBroker.log
l Client log—server_messages_BrowseServlet.log
Logs for Importing Interactive Reporting ContentWhen creating, modifying, and deleting Oracle's Hyperion® Interactive Reporting documentsor jobs, use these logs to analyze errors:
l Logs for importing general content
l Server logs
m hostname_DAS1_LSM.log
m N_BIService.log
m N_das.log
m N_IRJob.log
m N_bi_stderr.txt
m N_bi_stout.txt
m N_bijobs_sterr.txt
m N_bijobs_stout.txt
m N_das_sterr.txt
m N_das_stout.txt
m N_logutil_sterr.txt
m N_logutil_stout.txt
m server_DataAccessService.log
m server_IntelligenceService.log
l Client logs
m server_messages_DataAccessServlet.log
m server_messages_iHTMLServlet.log
Logs for Running JobsJob Service runs jobs directly or through Event Service. Use these logs to analyze errors:
l Server logs
m server_messages_EventService.log
m server_messages_JobService.log
188 Troubleshooting
m server_messages_ServiceBoker.log
m server_messages_DataAccessService.log
m server_messages_IntelligenceService.log
m server_messages_IRJobService.log
l Client logs
m server_messages_BrowseServlet.log
m server_messages_JobManager.log
Logs for Logon and Logoff ErrorsUser logon instances requires information from multiple areas in the system, each of which cancause errors and logon attempts to fail. Use these logs to analyze logon and logoff errors:
l Server logs
m server_messages_SessionManager.log
m server_messages_GSM.log
m server_messages_LSM.log
m server_messages_Authentication.log
m server_messages_Authorization.log
m server_messages_Publisher.log
m server_messages_ServiceBroker.log
m server_messages_RepositoryService.log
l Client logs (servlet)
m server_messages_BrowseServlet.log
m server_messages_AdministrationServlet.log
m server_messages_PersonalPagesServlet.log
Logs for Access ControlAccess control is maintained by Authorization Service. Use these logs to analyze accesspermission errors:
l Server logs
m server_messages_Authorization.log
m Logs for the service involved in the operation being performed
l Client logs (servlet)
m server_messages_BrowseServlet.log
m server_messages_AdministrationServlet.log
Analyzing Log Files 189
m server_messages_PersonalPagesServlet.log
Logs for ConfigurationConfiguration errors for RSC services show at startup in stdout_console.log orserver_messages_NameService.log; configuration_messages.log might be helpful.
Information Needed by Customer SupportIf a problem occurs and you need help from Oracle Customer Support, send all applicationserver logs for the instance being used. If applicable, compress the log directory.
For services and servlets, compress and send all logs under \Foundation\Workspace\logs.
190 Troubleshooting
11Ghostscript Custom Parameters
In This Chapter
Implementation Overview ... . . . . . . . . . . . . . . . . . . . . . . . . . . . . . . . . . . . . . . . . . . . . . . . . . . . . . . . . . . . . . . . . . . . . . . . . . . . . . . . . . . . . . . . . . . . . . . . . . . . . 191
Ghostscript Documentation ... . . . . . . . . . . . . . . . . . . . . . . . . . . . . . . . . . . . . . . . . . . . . . . . . . . . . . . . . . . . . . . . . . . . . . . . . . . . . . . . . . . . . . . . . . . . . . . . . . . 191
Default Behavior .. . . . . . . . . . . . . . . . . . . . . . . . . . . . . . . . . . . . . . . . . . . . . . . . . . . . . . . . . . . . . . . . . . . . . . . . . . . . . . . . . . . . . . . . . . . . . . . . . . . . . . . . . . . . . . . . 192
Postscript to PDF Conversion ... . . . . . . . . . . . . . . . . . . . . . . . . . . . . . . . . . . . . . . . . . . . . . . . . . . . . . . . . . . . . . . . . . . . . . . . . . . . . . . . . . . . . . . . . . . . . . . . . 192
Postscript to JPEG Conversion ... . . . . . . . . . . . . . . . . . . . . . . . . . . . . . . . . . . . . . . . . . . . . . . . . . . . . . . . . . . . . . . . . . . . . . . . . . . . . . . . . . . . . . . . . . . . . . . . 193
Specifying Custom Parameters .. . . . . . . . . . . . . . . . . . . . . . . . . . . . . . . . . . . . . . . . . . . . . . . . . . . . . . . . . . . . . . . . . . . . . . . . . . . . . . . . . . . . . . . . . . . . . . . . 193
Implementation OverviewThe Financial Reporting Print Server uses Ghostscript to convert a report's output fromPostscript (PS) file to Portable Document Format (PDF) or to an image format (JPG).Ghostscript provides numerous options (parameters) for the conversion process. FinancialReporting previously passed these parameters directly to Ghostscript; which prevented the usersfrom modifying or specifying custom parameters. However, the ability to provide customGhostscript parameters is now available.
When it is necessary to convert a postscript output into Portable Document Format or JPG usingGhostscript, the Financial Reporting Print Server queries the Windows registry. If a specific entryis found, it uses the user provided Ghostscript parameters from the registry rather than thedefault parameters to generate the PDF (Portable Document Format) or JPG. A user only needsto modify the registry entry to obtain the desired output. This can include higher outputresolution, the use of custom conversion devices, and changing the default paper size.
Existing Financial Reporting installations are not affected by this change. Users should befamiliar with Ghostscript in general and particularly with parameters that are used byGhostscript. This is an advanced feature that can cause Portable Document Format or JPGoutput to fail or become corrupted if not implemented correctly.
Ghostscript DocumentationTo understand how to use the custom Ghostscript parameters feature in Financial Reporting, itis important to become familiar with the various documented parameters and how they affectthe output. The following links provide the most relevant documentation:
Implementation Overview 191

l How to use Ghostscript: http://pages.cs.wisc.edu/~ghost/doc/cvs/Use.htm. This linkprovides a comprehensive description of the general Ghostscript parameters.
l PostScript-to-PDF converter: http://pages.cs.wisc.edu/~ghost/doc/cvs/Ps2pdf.htm. Thislink provides the parameters unique for PostScript to PDF conversion.
l Ghostscript output devices (JPEG): http://pages.cs.wisc.edu/~ghost/doc/cvs/Devices.htm.This link provides the parameters unique for PostScript to JPG conversion. This linkcontains details about other image output formats.
l Ghostscript Overview (main page): http://pages.cs.wisc.edu/~ghost/doc/cvs/Readme.htm
Default BehaviorThe new custom Ghostscript parameter feature is not enabled by default. The install andconfiguration tool does not add the registry entries to enable this feature. It requiresadministrators to manually add the appropriate registry entries (described below) in order toenable the feature.
The next two sections document the current default Ghostscript parameters that are currentlyused to generate PDF and JPG from a report's postscript.
Postscript to PDF ConversionThe routine that uses Ghostscript to convert postscript output into PDF uses the following 12parameters
1. ps2pdf (name of GS instance, always ignored)
2. -dNOPAUSE
3. -dBATCH
4. -dSAFER
5. -sDEVICE=pdfwrite
6. -dAutoFilterColorImages=false
7. -dColorImageFilter=/FlateEncode
8. -sOutputFile=[postscript file path]
9. -c
10. setpdfwrite
11. -f
12. [PDF output file path]
where:
l [postscript file path] is the path of the postscript file, and
l [PDF output file path] is the path of the PDF output file
See the Ghostscript Usage documentation for details on the above parameters.
192 Ghostscript Custom Parameters

Postscript to JPEG ConversionThe routine that uses Ghostscript to convert postscript output into JPEG uses the following 7parameters:
1. ps2jpg (name of Ghostscript instance, always ignored)
2. -dNOPAUSE
3. -r200 (default resolution of 200 pixels per inch)
4. -dJPEGQ=75 (jpeg quality level)
5. -sDEVICE=jpeg
6. -sOutputFile=[postscript file path]
7. [PDF output file path]
where:
l [postscript file path] is the path of the postscript file, and
l [PDF output file path] is the path of the PDF output file
When the report is set to landscape orientation, the following parameters are also included:
1. -c
2. <</Orientation 3>> setpagedevice
3. -f
See the Ghostscript Usage and JPEG File Format documentation for details on the aboveparameters.
Specifying Custom ParametersIn order to override the default Ghostscript parameters the administrator must add registry keyswith values that represent the custom parameters. The administrator must add the appropriateregistry keys and make sure that the parameters produce the desired results.
The following sub-sections describe the process to add the custom parameters.
Custom Parameters for Postscript to PDF ConversionIn order to enable the use of custom parameters for the postscript to PDF conversion routine,the following steps should be taken:
1. Run the Windows Registry Editor (regedit.exe).
2. Navigate to the following key: HKEY_LOCAL_MACHINE\SOFTWARE\Hyperion Solutions\Hyperion Reports\HyS9FRPrint.
3. Add a new Multi-String Value (REG_MULTI_SZ) named GSPDFOptions.
4. Double click the new value, or select Edit, and then Modify from the menu to display theEdit Multi-String dialog.
Postscript to JPEG Conversion 193

5. Add one parameter per line. Do not enter multiple parameters on the same line.
6. Click OK.
Note: It is not necessary to restart the Financial Reporting Print Server in order for the customparameters to be read. The Financial Reporting Print Server reads the most recentinformation from the registry every time the postscript conversion routine is run.
Custom Parameters for Postscript to JPEG ConversionIn order to enable the use of custom parameters for the postscript to JPEG conversion routine,the following steps should be taken:
1. Run the Windows Registry Editor (regedit.exe).
2. Navigate to the following key: HKEY_LOCAL_MACHINE\SOFTWARE\Hyperion Solutions\Hyperion Reports\ HyS9FRPrint.
3. Add a new Multi-String Value (for example, REG_MULTI_SZ) named GSImageOptions.
4. Double click the new value, or select Edit, and then Modify from the menu to display theEdit Multi-String dialog.
5. Add one parameter per line. Do not add multiple parameters on the same line.
6. Click OK.
Note: It is not necessary to restart the Financial Reporting Print Server in order for the customparameters to be read. Financial Reporting Print Server reads the most recent informationfrom the registry every time the postscript conversion routine is run.
Mandatory ParametersCertain parameters are required by the Ghostscript conversion routine. If, after querying theregistry they are not found, Financial Reporting will always add them. However, it is advisedthat the following parameters be indicated when using custom Ghostscript parameters:
l -dNOPAUSE: This parameter disables the prompt and pause of Ghostscript. Since theFinancial Reporting print server is a service there should never be any user interaction.
l -dBATCH: This parameter is used for the PostScript (PS) to Portable Document Format(PDF) conversion only. It compliments the "-dNOPAUSE" parameter.
l -sDEVICE=: A device must be specified. If this parameter is not found, it defaults to pdfwritefor the PostScript (PS) to Portable Document Format (PDF) conversion and jpeg for thePostScript (PS) to JPEG conversion.
l –c <</Orientation 3>> setpagedevice -f:: These parameters are used for thePostScript to JPEG conversion when a report is set to print in landscape orientation. It isnot recommended that these parameters be added to the GSImageOptions registry entry.
194 Ghostscript Custom Parameters
General GuidelinesConsider following guidelines when using the custom Ghostscript parameter feature:
l Never use the -sOutputFile parameter. This parameter is always added by the FinancialReporting conversion routines. The output file cannot be hard-coded because it isdynamically generated by the Financial Reporting Print Server.
l Performance versus. Quality: It is important to weigh the benefits of higher quality versusthe performance for producing the converted output. There are several Ghostscriptparameters that can affect the output quality, however the -r### (resolution) parameter ismost commonly used. In general, the higher the resolution, the more time it takes forGhostscript to produce the output and the bigger the output file becomes. For example,using -r200 on a 180KB PostScript file produces a 204KB jpeg file; using -r400 (samePostScript file) produces a 563KB jpeg file.
l If the -c parameter is used, it must be closed with the -f parameter. Failing to do this mayresult in the postscript file name to be interpreted incorrectly.
l The -c parameter and the subsequent PS commands should be entered at the end of allother parameters (except for -f).
l It is not necessary to add both JPEG and Portable Document Format (PDF) customparameters. Users can indicate one or other, both, or none.
Turning Off Custom ParametersTo turn off the custom Ghostscript parameters, rename the registry entries (GSPDFOptions orGSImageOptions). For example, renaming GSPDFOptions to _GSPDFOptions forces thePostScript (PS) to Portable Document Format (PDF) routine to use the default parameters.
Alternately, the registry names can be kept intact, but their values can be empty. Even thoughthe Ghostscript conversion routine finds the registry entry, it still uses the default parameters ifthe entry is empty.
ExamplesThe following section provides valid examples of using the custom GS parameters from theregistry.
Mimicking the Default ParametersTo mimic the default Ghostscript parameters by using the registry, the following parameterswould be entered:
Default entries for GSPDFOptions would be:
-dNOPAUSE
-dBATCH
-dSAFER
Specifying Custom Parameters 195
-sDEVICE=pdfwrite
-dAutoFilterColorImages=false
-dColorImageFilter=/FlateEncode
-c
.setpdfwrite
-f
Default entries for GSImageOptions would be:
-dNOPAUSE
-r200
-dJPEGQ=75
-sDEVICE=jpeg
Turning off DSC CommentsDSC Comments sometimes cause an error in the rotation of landscape pages. To turn off DSCComments use the following parameters in the Registry.
GSPDFOptions registry value to turn off DSC Comments:
-dNOPAUSE
-dBATCH
-dSAFER
-sDEVICE=pdfwrite
-dAutoFilterColorImages=false
-dParseDSCComments=false
-dColorImageFilter=/FlateEncode
-c
.setpdfwrite
-f
Changing the Resolution for Image OutputThe default image resolution for the "export to Word / PowerPoint" feature is set to 200 pixelsper inch. The resolution can be changed using the registry parameters.
Note: Warning: changing the resolution to a large value produces a larger image file and degradesperformance of the conversion process.
GSImageOptions registry value to increase the resolution to 400 pixels per inch:
196 Ghostscript Custom Parameters

-dNOPAUSE
-r400
-dJPEGQ=75
-sDEVICE=jpeg
Specifying Custom Parameters 197

198 Ghostscript Custom Parameters
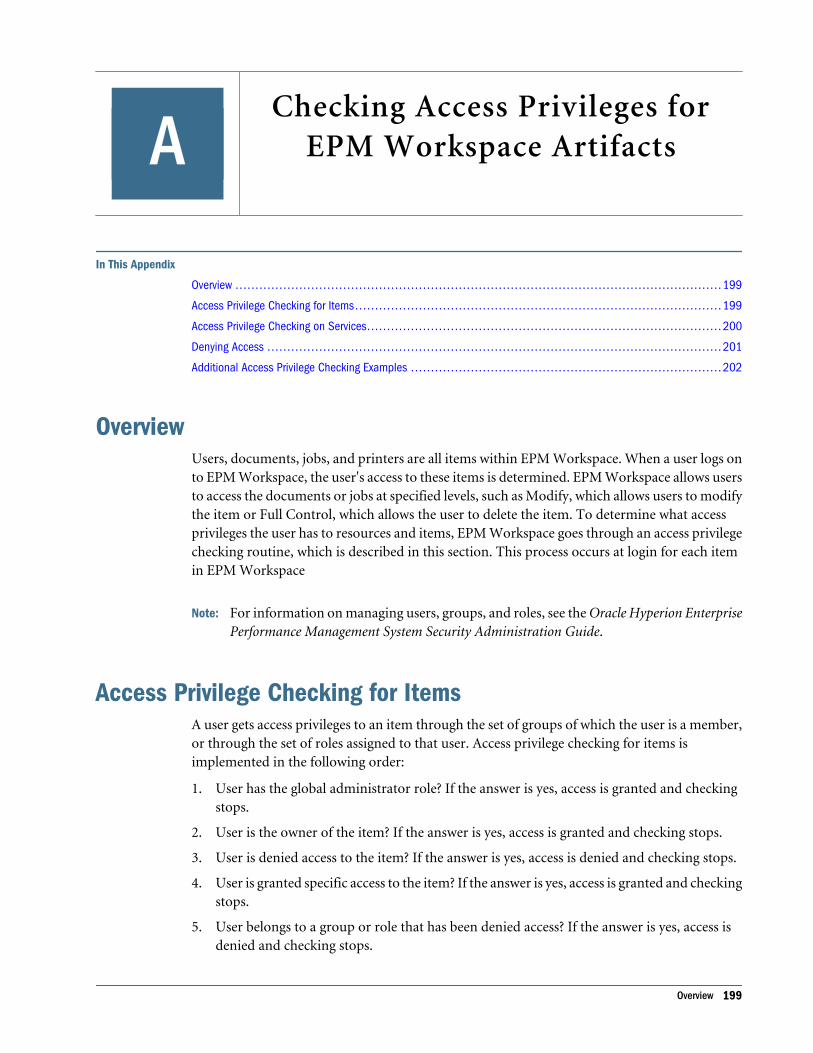
AChecking Access Privileges for
EPM Workspace Artifacts
In This Appendix
Overview ... . . . . . . . . . . . . . . . . . . . . . . . . . . . . . . . . . . . . . . . . . . . . . . . . . . . . . . . . . . . . . . . . . . . . . . . . . . . . . . . . . . . . . . . . . . . . . . . . . . . . . . . . . . . . . . . . . . . . . . . 199
Access Privilege Checking for Items... . . . . . . . . . . . . . . . . . . . . . . . . . . . . . . . . . . . . . . . . . . . . . . . . . . . . . . . . . . . . . . . . . . . . . . . . . . . . . . . . . . . . . . . . . 199
Access Privilege Checking on Services... . . . . . . . . . . . . . . . . . . . . . . . . . . . . . . . . . . . . . . . . . . . . . . . . . . . . . . . . . . . . . . . . . . . . . . . . . . . . . . . . . . . . . . 200
Denying Access ... . . . . . . . . . . . . . . . . . . . . . . . . . . . . . . . . . . . . . . . . . . . . . . . . . . . . . . . . . . . . . . . . . . . . . . . . . . . . . . . . . . . . . . . . . . . . . . . . . . . . . . . . . . . . . . . 201
Additional Access Privilege Checking Examples ... . . . . . . . . . . . . . . . . . . . . . . . . . . . . . . . . . . . . . . . . . . . . . . . . . . . . . . . . . . . . . . . . . . . . . . . . . . . 202
OverviewUsers, documents, jobs, and printers are all items within EPM Workspace. When a user logs onto EPM Workspace, the user's access to these items is determined. EPM Workspace allows usersto access the documents or jobs at specified levels, such as Modify, which allows users to modifythe item or Full Control, which allows the user to delete the item. To determine what accessprivileges the user has to resources and items, EPM Workspace goes through an access privilegechecking routine, which is described in this section. This process occurs at login for each itemin EPM Workspace
Note: For information on managing users, groups, and roles, see the Oracle Hyperion EnterprisePerformance Management System Security Administration Guide.
Access Privilege Checking for ItemsA user gets access privileges to an item through the set of groups of which the user is a member,or through the set of roles assigned to that user. Access privilege checking for items isimplemented in the following order:
1. User has the global administrator role? If the answer is yes, access is granted and checkingstops.
2. User is the owner of the item? If the answer is yes, access is granted and checking stops.
3. User is denied access to the item? If the answer is yes, access is denied and checking stops.
4. User is granted specific access to the item? If the answer is yes, access is granted and checkingstops.
5. User belongs to a group or role that has been denied access? If the answer is yes, access isdenied and checking stops.
Overview 199
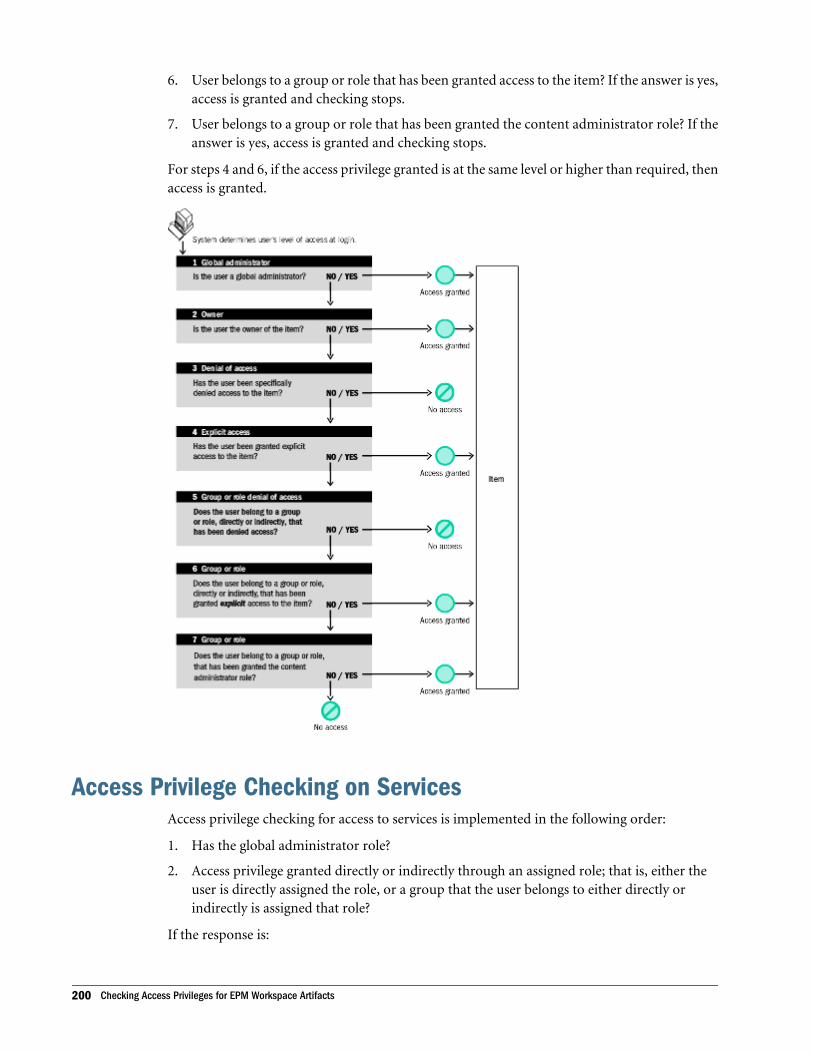
6. User belongs to a group or role that has been granted access to the item? If the answer is yes,access is granted and checking stops.
7. User belongs to a group or role that has been granted the content administrator role? If theanswer is yes, access is granted and checking stops.
For steps 4 and 6, if the access privilege granted is at the same level or higher than required, thenaccess is granted.
Access Privilege Checking on ServicesAccess privilege checking for access to services is implemented in the following order:
1. Has the global administrator role?
2. Access privilege granted directly or indirectly through an assigned role; that is, either theuser is directly assigned the role, or a group that the user belongs to either directly orindirectly is assigned that role?
If the response is:
200 Checking Access Privileges for EPM Workspace Artifacts
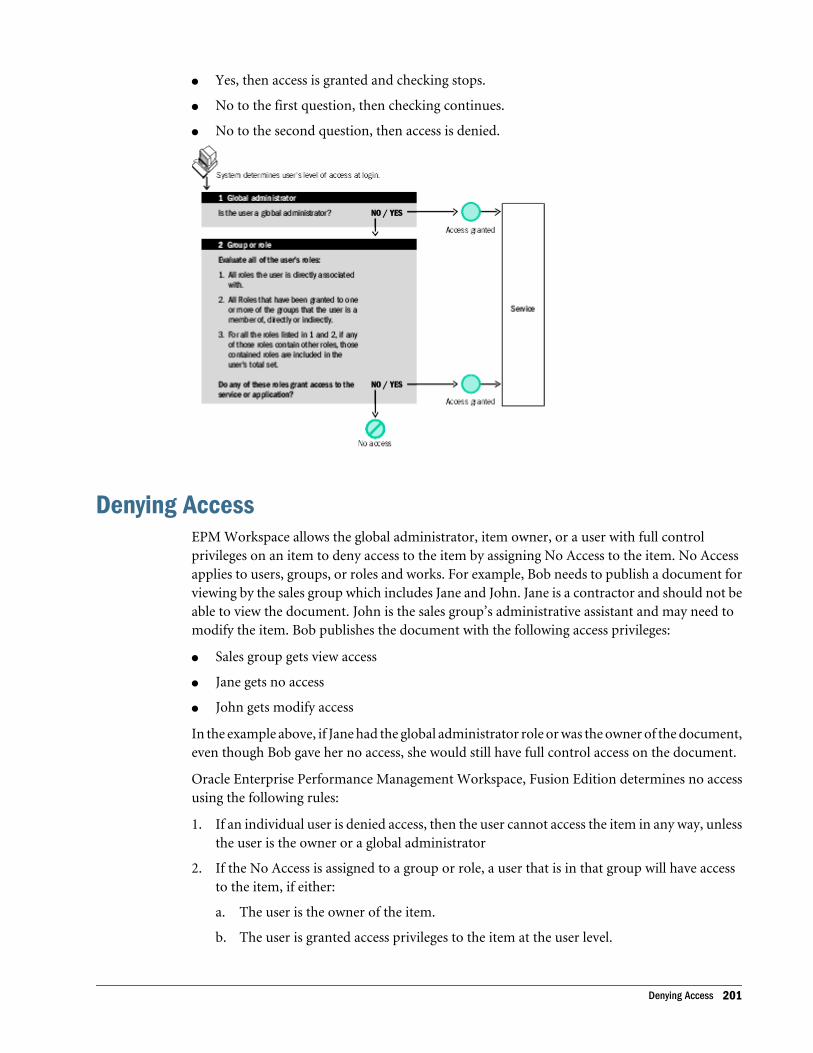
l Yes, then access is granted and checking stops.
l No to the first question, then checking continues.
l No to the second question, then access is denied.
Denying AccessEPM Workspace allows the global administrator, item owner, or a user with full controlprivileges on an item to deny access to the item by assigning No Access to the item. No Accessapplies to users, groups, or roles and works. For example, Bob needs to publish a document forviewing by the sales group which includes Jane and John. Jane is a contractor and should not beable to view the document. John is the sales group’s administrative assistant and may need tomodify the item. Bob publishes the document with the following access privileges:
l Sales group gets view access
l Jane gets no access
l John gets modify access
In the example above, if Jane had the global administrator role or was the owner of the document,even though Bob gave her no access, she would still have full control access on the document.
Oracle Enterprise Performance Management Workspace, Fusion Edition determines no accessusing the following rules:
1. If an individual user is denied access, then the user cannot access the item in any way, unlessthe user is the owner or a global administrator
2. If the No Access is assigned to a group or role, a user that is in that group will have accessto the item, if either:
a. The user is the owner of the item.
b. The user is granted access privileges to the item at the user level.
Denying Access 201
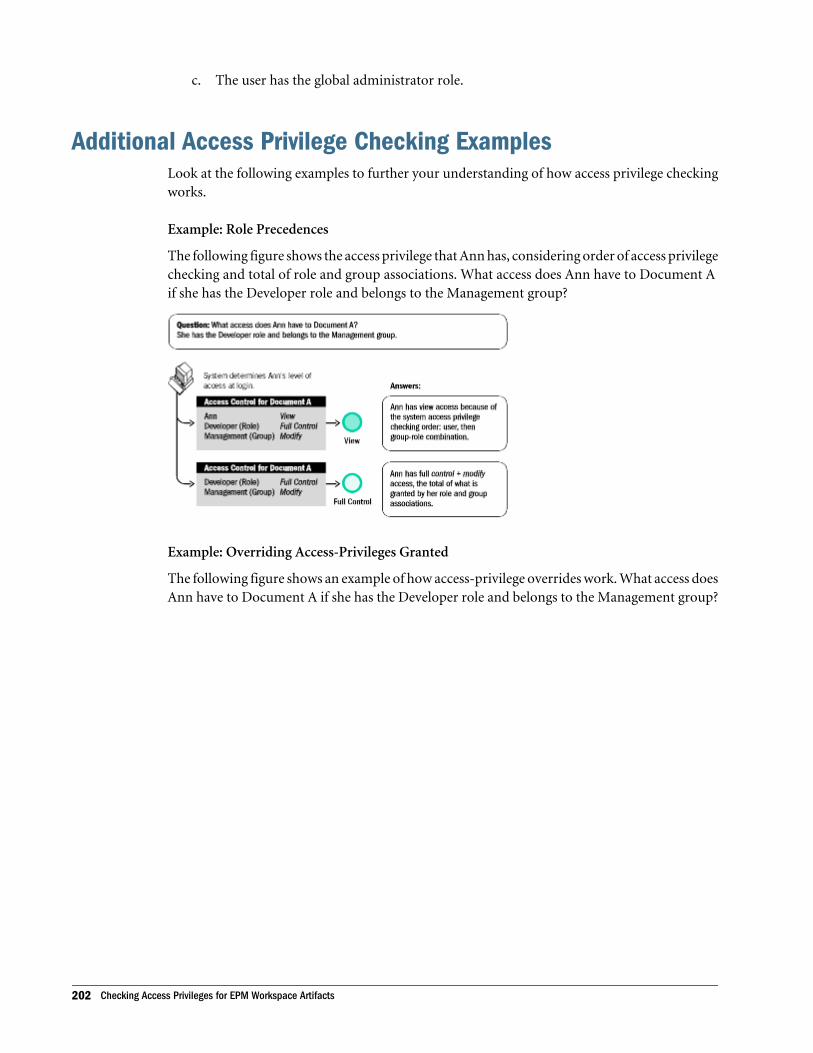
c. The user has the global administrator role.
Additional Access Privilege Checking ExamplesLook at the following examples to further your understanding of how access privilege checkingworks.
Example: Role Precedences
The following figure shows the access privilege that Ann has, considering order of access privilegechecking and total of role and group associations. What access does Ann have to Document Aif she has the Developer role and belongs to the Management group?
Example: Overriding Access-Privileges Granted
The following figure shows an example of how access-privilege overrides work. What access doesAnn have to Document A if she has the Developer role and belongs to the Management group?
202 Checking Access Privileges for EPM Workspace Artifacts
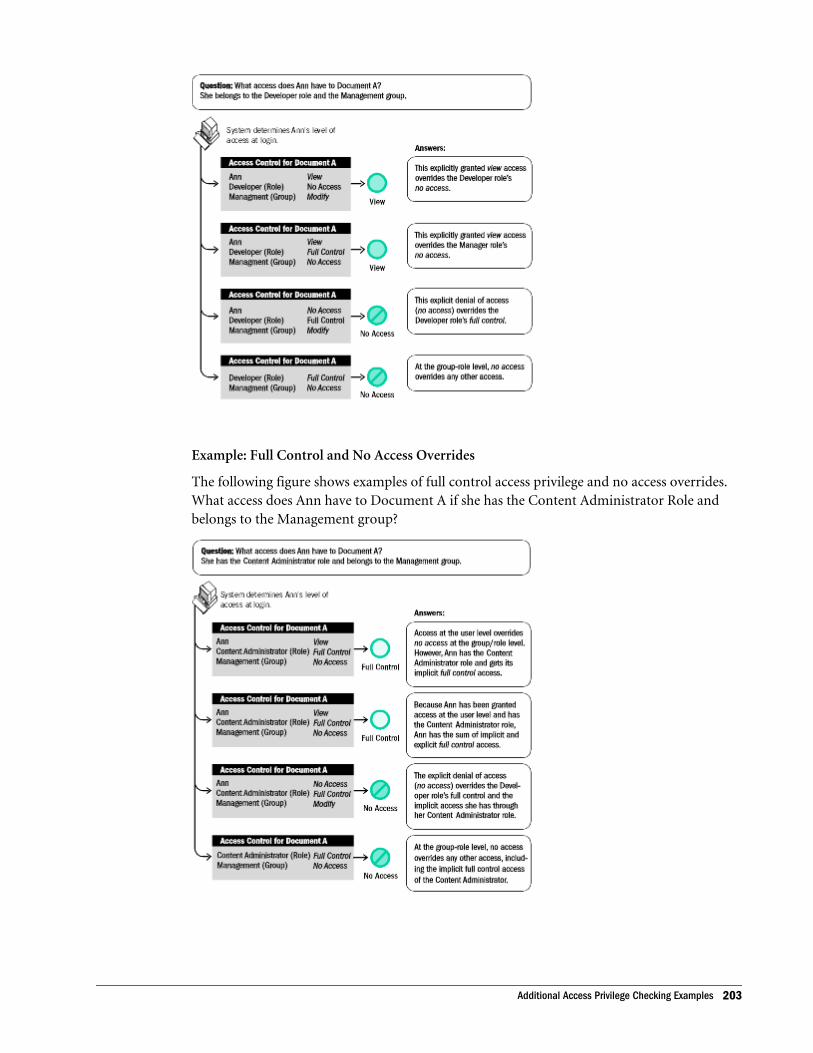
Example: Full Control and No Access Overrides
The following figure shows examples of full control access privilege and no access overrides.What access does Ann have to Document A if she has the Content Administrator Role andbelongs to the Management group?
Additional Access Privilege Checking Examples 203

204 Checking Access Privileges for EPM Workspace Artifacts
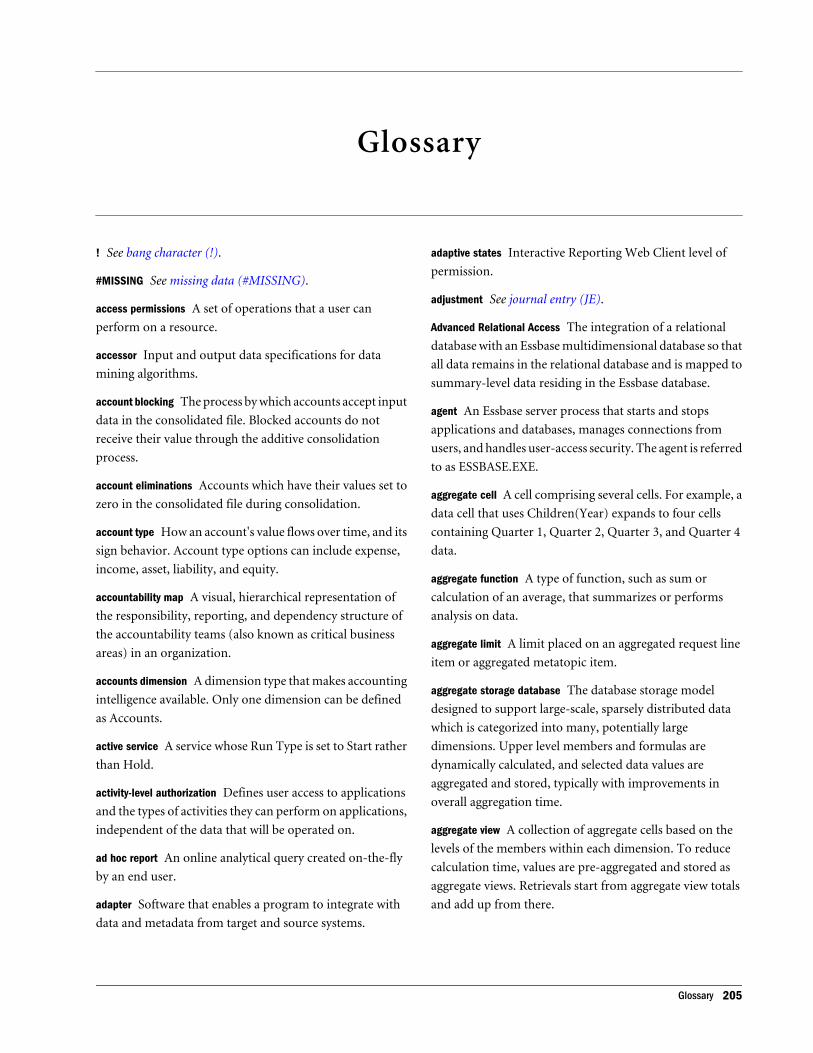
Glossary
! See bang character (!).
#MISSING See missing data (#MISSING).
access permissions A set of operations that a user can
perform on a resource.
accessor Input and output data specifications for data
mining algorithms.
account blocking The process by which accounts accept input
data in the consolidated file. Blocked accounts do not
receive their value through the additive consolidation
process.
account eliminations Accounts which have their values set to
zero in the consolidated file during consolidation.
account type How an account's value flows over time, and its
sign behavior. Account type options can include expense,
income, asset, liability, and equity.
accountability map A visual, hierarchical representation of
the responsibility, reporting, and dependency structure of
the accountability teams (also known as critical business
areas) in an organization.
accounts dimension A dimension type that makes accounting
intelligence available. Only one dimension can be defined
as Accounts.
active service A service whose Run Type is set to Start rather
than Hold.
activity-level authorization Defines user access to applications
and the types of activities they can perform on applications,
independent of the data that will be operated on.
ad hoc report An online analytical query created on-the-fly
by an end user.
adapter Software that enables a program to integrate with
data and metadata from target and source systems.
adaptive states Interactive Reporting Web Client level of
permission.
adjustment See journal entry (JE).
Advanced Relational Access The integration of a relational
database with an Essbase multidimensional database so that
all data remains in the relational database and is mapped to
summary-level data residing in the Essbase database.
agent An Essbase server process that starts and stops
applications and databases, manages connections from
users, and handles user-access security. The agent is referred
to as ESSBASE.EXE.
aggregate cell A cell comprising several cells. For example, a
data cell that uses Children(Year) expands to four cells
containing Quarter 1, Quarter 2, Quarter 3, and Quarter 4
data.
aggregate function A type of function, such as sum or
calculation of an average, that summarizes or performs
analysis on data.
aggregate limit A limit placed on an aggregated request line
item or aggregated metatopic item.
aggregate storage database The database storage model
designed to support large-scale, sparsely distributed data
which is categorized into many, potentially large
dimensions. Upper level members and formulas are
dynamically calculated, and selected data values are
aggregated and stored, typically with improvements in
overall aggregation time.
aggregate view A collection of aggregate cells based on the
levels of the members within each dimension. To reduce
calculation time, values are pre-aggregated and stored as
aggregate views. Retrievals start from aggregate view totals
and add up from there.
Glossary 205
aggregation The process of rolling up and storing values in
an aggregate storage database; the stored result of the
aggregation process.
aggregation script In aggregate storage databases only, a file
that defines a selection of aggregate views to be built into an
aggregation.
alias An alternative name. For example, for a more easily
identifiable column descriptor you can display the alias
instead of the member name.
alias table A table that contains alternate names for
members.
alternate hierarchy A hierarchy of shared members. An
alternate hierarchy is based upon an existing hierarchy in a
database outline, but has alternate levels in the dimension.
An alternate hierarchy allows the same data to be seen from
different points of view.
ancestor A branch member that has members below it. For
example, the members Qtr2 and 2006 are ancestors of the
member April.
appender A Log4j term for destination.
application (1) A software program designed to run a specific
task or group of tasks such as a spreadsheet program or
database management system. (2) A related set of
dimensions and dimension members that are used to meet
a specific set of analytical and/or reporting requirements.
application currency The default reporting currency for the
application.
area A predefined set of members and values that makes up
a partition.
arithmetic data load A data load that performs operations on
values in the database, such as adding 10 to each value.
artifact An individual application or repository item; for
example, scripts, forms, rules files, Interactive Reporting
documents, and financial reports. Also known as an object.
assemblies Installation files for EPM System products or
components.
asset account An account type that stores values that
represent a company's assets.
assignment The association of a source and destination in
the allocation model that controls the direction of allocated
costs or revenue flow within Profitability and Cost
Management.
attribute Characteristic of a dimension member. For
example, Employee dimension members may have
attributes of Name, Age, or Address. Product dimension
members can have several attributes, such as a size and
flavor.
attribute association A relationship in a database outline
whereby a member in an attribute dimension describes a
characteristic of a member of its base dimension. For
example, if product 100-10 has a grape flavor, the product
100-10 has the Flavor attribute association of grape. Thus,
the 100-10 member of the Product dimension is associated
with the Grape member of the Flavor attribute dimension.
Attribute Calculations dimension A system-defined dimension
that performs these calculation operations on groups of
members: Sum, Count, Avg, Min, and Max. This dimension
is calculated dynamically and is not visible in the database
outline. For example, using the Avg member, you can
calculate the average sales value for Red products in New
York in January.
attribute dimension A type of dimension that enables analysis
based on the attributes or qualities of dimension members.
attribute reporting A reporting process based on the attributes
of the base dimension members. See also base dimension.
attribute type A text, numeric, Boolean, date, or linked-
attribute type that enables different functions for grouping,
selecting, or calculating data. For example, because the
Ounces attribute dimension has the type numeric, the
number of ounces specified as the attribute of each product
can be used to calculate the profit per ounce for that
product.
authentication Verification of identity as a security measure.
Authentication is typically based on a user name and
password. Passwords and digital signatures are forms of
authentication.
authentication service A core service that manages one
authentication system.
auto-reversing journal A journal for entering adjustments that
you want to reverse in the next period.
206 Glossary
automated stage A stage that does not require human
intervention, for example, a data load.
axis (1) A straight line that passes through a graphic used
for measurement and categorization. (2) A report aspect
used to arrange and relate multidimensional data, such as
filters, pages, rows, and columns. For example, for a data
query in Simple Basic, an axis can define columns for values
for Qtr1, Qtr2, Qtr3, and Qtr4. Row data would be retrieved
with totals in the following hierarchy: Market, Product.
backup A duplicate copy of an application instance.
balance account An account type that stores unsigned values
that relate to a particular point in time.
balanced journal A journal in which the total debits equal the
total credits.
bang character (!) A character that terminates a series of
report commands and requests information from the
database. A report script must be terminated with a bang
character; several bang characters can be used within a
report script.
bar chart A chart that can consist of one to 50 data sets, with
any number of values assigned to each data set. Data sets are
displayed as groups of corresponding bars, stacked bars, or
individual bars in separate rows.
base currency The currency in which daily business
transactions are performed.
base dimension A standard dimension that is associated with
one or more attribute dimensions. For example, assuming
products have flavors, the Product dimension is the base
dimension for the Flavors attribute dimension.
base entity An entity at the bottom of the organization
structure that does not own other entities.
batch calculation Any calculation on a database that is done
in batch; for example, a calculation script or a full database
calculation. Dynamic calculations are not considered to be
batch calculations.
batch file An operating system file that can call multiple
ESSCMD scripts and run multiple sessions of ESSCMD. On
Windows-based systems, batch files have BAT file
extensions. On UNIX, batch files are written as a shell script.
batch loader An FDM component that enables the
processing of multiple files.
batch POV A collection of all dimensions on the user POV of
every report and book in the batch. While scheduling the
batch, you can set the members selected on the batch POV.
batch processing mode A method of using ESSCMD to write
a batch or script file that can be used to automate routine
server maintenance and diagnostic tasks. ESSCMD script
files can execute multiple commands and can be run from
the operating system command line or from within
operating system batch files. Batch files can be used to call
multiple ESSCMD scripts or run multiple instances of
ESSCMD.
block The primary storage unit which is a multidimensional
array representing the cells of all dense dimensions.
block storage database The Essbase database storage model
categorizing and storing data based on the sparsity of data
values defined in sparse dimensions. Data values are stored
in blocks, which exist only for sparse dimension members
for which there are values.
Blocked Account An account that you do not want calculated
in the consolidated file because you want to enter it
manually.
book A container that holds a group of similar Financial
Reporting documents. Books may specify dimension
sections or dimension changes.
book POV The dimension members for which a book is run.
bookmark A link to a reporting document or a Web site,
displayed on a personal page of a user. The two types of
bookmarks are My Bookmarks and image bookmarks.
bounding rectangle The required perimeter that encapsulates
the Interactive Reporting document content when
embedding Interactive Reporting document sections in a
personal page, specified in pixels for height and width or
row per page.
broadcast message A simple text message sent by an
administrator to a user who is logged on to a Planning
application. The message displays information to the user
such as system availability, notification of application
refresh, or application backups.
budget administrator A person responsible for setting up,
configuring, maintaining, and controlling an application.
Has all application privileges and data access permissions.
Glossary 207
build method A method used to modify database outlines.
Choice of a build method is based on the format of data in
data source files.
business process A set of activities that collectively
accomplish a business objective.
business rules Logical expressions or formulas that are
created within an application to produce a desired set of
resulting values.
cache A buffer in memory that holds data temporarily.
calc script A set of commands that define how a database is
consolidated or aggregated. A calculation script may also
contain commands that specify allocation and other
calculation rules separate from the consolidation process.
calculated member in MaxL DML A member designed for
analytical purposes and defined in the optional WITH
section of a MaxL DML query.
calculated member in MaxL DML A member designed for
analytical purposes and defined in the optional WITH
section of a MaxL DML query.
calculation The process of aggregating data, or of running a
calculation script on a database.
Calculation Manager A calculation module with which
Planning, Financial Management, and Essbase users can
design, validate, and administer business rules in a graphical
environment.
calculation status A consolidation status that indicates that
some values or formula calculations have changed. You
must reconsolidate to get the correct values for the affected
entity.
calendar User-defined time periods and their relationship
to each other. Q1, Q2, Q3, and Q4 comprise a calendar or
fiscal year.
cascade The process of creating multiple reports for a subset
of member values.
Catalog pane Displays a list of elements available to the active
section. If Query is the active section, a list of database tables
is displayed. If Pivot is the active section, a list of results
columns is displayed. If Dashboard is the active section, a
list of embeddable sections, graphic tools, and control tools
are displayed.
categories Groupings by which data is organized. For
example, Month.
cause and effect map Depicts how the elements that form
your corporate strategy relate and how they work together
to meet your organization's strategic goals. A Cause and
Effect map tab is automatically created for each Strategy
map.
CDF See custom-defined function (CDF).
CDM See custom-defined macro (CDM).
cell (1) The data value at the intersection of dimensions in
a multidimensional database; the intersection of a row and
a column in a worksheet. (2) A logical group of nodes
belonging to one administrative domain.
cell note A text annotation for a cell in an Essbase database.
Cell notes are a type of LRO.
CHANGED status Consolidation status that indicates data for
an entity has changed.
chart A graphical representation of spreadsheet data. The
visual nature expedites analysis, color-coding, and visual
cues that aid comparisons.
chart template A template that defines the metrics to display
in Workspace charts.
child A member with a parent above it in the database
outline.
choice list A list of members that a report designer can
specify for each dimension when defining the report's point
of view. A user who wants to change the point of view for a
dimension that uses a choice list can select only the members
specified in that defined member list or those members that
meet the criteria defined in the function for the dynamic list.
clean block A data block that where the database is fully
calculated, if a calculation script calculates all dimensions at
once, or if the SET CLEARUPDATESTATUS command is
used in a calculation script.
cluster An array of servers or databases that behave as a
single resource which share task loads and provide failover
support; eliminates one server or database as a single point
of failure in a system.
clustered bar charts Charts in which categories are viewed
side-by-side; useful for side-by-side category analysis; used
only with vertical bar charts.
208 Glossary
code page A mapping of bit combinations to a set of text
characters. Different code pages support different sets of
characters. Each computer contains a code page setting for
the character set requirements of the language of the
computer user. In the context of this document, code pages
map characters to bit combinations for non-Unicode
encodings. See also encoding.
column A vertical display of information in a grid or table.
A column can contain data from one field, derived data from
a calculation, or textual information.
committed access An Essbase Kernel Isolation Level setting
that affects how Essbase handles transactions. Under
committed access, concurrent transactions hold long-term
write locks and yield predictable results.
computed item A virtual column (as opposed to a column
that is physically stored in the database or cube) that can be
calculated by the database during a query, or by Interactive
Reporting Studio in the Results section. Computed items
are calculations of data based on functions, data items, and
operators provided in the dialog box and can be included in
reports or reused to calculate other data.
configuration file The security platform relies on XML
documents to be configured by the product administrator
or software installer. The XML document must be modified
to indicate meaningful values for properties, specifying
locations and attributes pertaining to the corporate
authentication scenario.
connection file See Interactive Reporting connection file
(.oce).
consolidated file (Parent) A file into which all of the business
unit files are consolidated; contains the definition of the
consolidation.
consolidation The process of aggregating data from
dependent entities to parent entities. For example, if the
dimension Year consists of the members Qtr1, Qtr2, Qtr3,
and Qtr4, its consolidation is Year.
consolidation file (*.cns) The consolidation file is a graphical
interface that enables you to add, delete or move Strategic
Finance files in the consolidation process using either a
Chart or Tree view. It also enables you to define and modify
the consolidation.
consolidation rule Identifies the rule that is executed during
the consolidation of the node of the hierarchy. This rule can
contain customer specific formulas appropriate for the
correct consolidation of parent balances. Elimination
processing can be controlled within these rules.
content Information stored in the repository for any type of
file.
content browser A Component that allows users to Browse
and select content to be placed in a Workspace Page .
context variable A variable that is defined for a particular task
flow to identify the context of the taskflow instance.
contribution The value added to a parent from a child entity.
Each child has a contribution to its parent.
controls group Used in FDM to maintain and organize
certification and assessment information, especially helpful
for meeting Sarbanes-Oxley requirements.
conversion rate See exchange rate.
cookie A segment of data placed on your computer by a Web
site.
correlated subqueries Subqueries that are evaluated once for
every row in the parent query; created by joining a topic item
in the subquery with a topic in the parent query.
critical business area (CBA) An individual or a group
organized into a division, region, plant, cost center, profit
center, project team, or process; also called accountability
team or business area.
critical success factor (CSF) A capability that must be
established and sustained to achieve a strategic objective;
owned by a strategic objective or a critical process and is a
parent to one or more actions.
crosstab reporting Categorizes and summarizes data in table
format. The table cells contain summaries of the data that
fit within the intersecting categories. For example, a crosstab
report of product sales information could show size
attributes, such as Small and Large, as column headings and
color attributes, such as Blue and Yellow, as row headings.
The cell in the table where Large and Blue intersect could
contain the total sales of all Blue products that are sized
Large.
cube A block of data that contains three or more
dimensions. An Essbase database is a cube.
Glossary 209
cube deployment In Essbase Studio, the process of setting load
options for a model to build an outline and load data into
an Essbase application and database.
cube schema In Essbase Studio, the metadata elements, such
as measures and hierarchies, representing the logical model
of a cube.
currency conversion A process that converts currency values
in a database from one currency into another. For example,
to convert one U. S. dollar into the European euro, the
exchange rate (for example, 0.923702) is multiplied with the
dollar (1* 0.923702). After conversion, the European euro
amount is .92.
Currency Overrides In any input period, the selected input
method can be overridden to enable input of that period's
value as Default Currency/Items. To override the input
method, enter a pound sign (#) either before or after the
number.
currency partition A dimension type that separates local
currency members from a base currency, as defined in an
application. Identifies currency types, such as Actual,
Budget, and Forecast.
custom calendar Any calendar created by an administrator.
custom dimension A dimension created and defined by users.
Channel, product, department, project, or region could be
custom dimensions.
custom property A property of a dimension or dimension
member that is created by a user.
custom report A complex report from the Design Report
module, composed of any combination of components.
custom-defined function (CDF) Essbase calculation functions
developed in Java and added to the standard Essbase
calculation scripting language using MaxL. See also custom-
defined macro (CDM).
custom-defined macro (CDM) Essbase macros written with
Essbase calculator functions and special macro functions.
Custom-defined macros use an internal Essbase macro
language that enables the combination of calculation
functions and they operate on multiple input parameters.
See also custom-defined function (CDF).
cycle through To perform multiple passes through a database
while calculating it.
dashboard A collection of metrics and indicators that
provide an interactive summary of your business.
Dashboards enable you to build and deploy analytic
applications.
data cache A buffer in memory that holds uncompressed
data blocks.
data cell See cell.
data file cache A buffer in memory that holds compressed
data (PAG) files.
data form A grid display that enables users to enter data into
the database from an interface such as a Web browser, and
to view and analyze data or related text. Certain dimension
member values are fixed, giving users a specific view into
the data.
data function That computes aggregate values, including
averages, maximums, counts, and other statistics, that
summarize groupings of data.
data load location In FDM, a reporting unit responsible for
submitting source data into the target system. Typically,
there is one FDM data load location for each source file
loaded to the target system.
data load rules A set of criteria that determines how to load
data from a text-based file, a spreadsheet, or a relational data
set into a database.
data lock Prevents changes to data according to specified
criteria, such as period or scenario.
data mining The process of searching through an Essbase
database for hidden relationships and patterns in a large
amount of data.
data model A representation of a subset of database tables.
data value See cell.
database connection File that stores definitions and
properties used to connect to data sources and enables
database references to be portable and widely used.
210 Glossary
date measure In Essbase, a member tagged as “Date” in the
dimension where measures are represented. The cell values
are displayed as formatted dates. Dates as measures can be
useful for types of analysis that are difficult to represent
using the Time dimension. For example, an application may
need to track acquisition dates for a series of capital assets,
but the acquisition dates span too large a period to allow for
feasible Time dimension modeling. See also typed measure.
Default Currency Units Define the unit scale of data. For
example, if you select to define your analysis in Thousands,
and enter “10”, this is interpreted as “10,000”.
dense dimension In block storage databases, a dimension
likely to contain data for every combination of dimension
members. For example, time dimensions are often dense
because they can contain all combinations of all members.
Contrast with sparse dimension.
dependent entity An entity that is owned by another entity in
the organization.
derived text measure In Essbase Studio, a text measure whose
values are governed by a predefined rule expressed as a
range. For example, a derived text measure, called "Sales
Performance Index," based on a measure Sales, could
consist of the values "High," "Medium," and "Low." This
derived text measure is defined to display "High,"
"Medium," and "Low" depending on the range in which the
corresponding sales values fall. See also text measure.
descendant Any member below a parent in the database
outline. In a dimension that includes years, quarters, and
months, the members Qtr2 and April are descendants of the
member Year.
Design Report An interface in Web Analysis Studio for
designing custom reports, from a library of components.
destination (1) For Business Rules and Calculation Manager,
an intersection within the database where allocated values
are stored. (2) Within a Profitability and Cost Management
assignment, the receiving point for allocated values.
destination currency The currency to which balances are
converted. You enter exchange rates and convert from the
source currency to the destination currency. For example,
when you convert from EUR to USD, the destination
currency is USD.
detail chart A chart that provides the detailed information
that you see in a Summary chart. Detail charts appear in the
Investigate Section in columns below the Summary charts.
If the Summary chart shows a Pie chart, then the Detail
charts below represent each piece of the pie.
dimension A data category used to organize business data for
retrieval and preservation of values. Dimensions usually
contain hierarchies of related members grouped within
them. For example, a Year dimension often includes
members for each time period, such as quarters and months.
dimension build The process of adding dimensions and
members to an Essbase outline.
dimension build rules Specifications, similar to data load rules,
that Essbase uses to modify an outline. The modification is
based on data in an external data source file.
dimension tab In the Pivot section, the tab that enables you
to pivot data between rows and columns.
dimension table (1) A table that includes numerous attributes
about a specific business process. (2) In Essbase Integration
Services, a container in the OLAP model for one or more
relational tables that define a potential dimension in
Essbase.
dimension type A dimension property that enables the use of
predefined functionality. Dimensions tagged as time have a
predefined calendar functionality.
dimensionality In MaxL DML, the represented dimensions
(and the order in which they are represented) in a set. For
example, the following set consists of two tuples of the same
dimensionality because they both reflect the dimensions
(Region, Year): { (West, Feb), (East, Mar) }
direct rate A currency rate that you enter in the exchange
rate table. The direct rate is used for currency conversion.
For example, to convert balances from JPY to USD, In the
exchange rate table, enter a rate for the period/scenario
where the source currency is JPY and the destination
currency is USD.
dirty block A data block containing cells that have been
changed since the last calculation. Upper level blocks are
marked as dirty if their child blocks are dirty (that is, they
have been updated).
display type One of three Web Analysis formats saved to the
repository: spreadsheet, chart, and pinboard.
Glossary 211
dog-ear The flipped page corner in the upper right corner of
the chart header area.
domain In data mining, a variable representing a range of
navigation within data.
drill-down Navigation through the query result set using the
dimensional hierarchy. Drilling down moves the user
perspective from aggregated data to detail. For example,
drilling down can reveal hierarchical relationships between
years and quarters or quarters and months.
drill-through The navigation from a value in one data source
to corresponding data in another source.
driver A driver is an allocation method that describes the
mathematical relationship between the sources that utilize
the driver, and the destinations to which those sources
allocate cost or revenue.
duplicate alias name A name that occurs more than once in
an alias table and that can be associated with more than one
member in a database outline. Duplicate alias names can be
used with duplicate member outlines only.
duplicate member name The multiple occurrence of a member
name in a database, with each occurrence representing a
different member. For example, a database has two
members named “New York.” One member represents New
York state and the other member represents New York city.
duplicate member outline A database outline containing
duplicate member names.
Dynamic Calc and Store members A member in a block storage
outline that Essbase calculates only upon the first retrieval
of the value. Essbase then stores the calculated value in the
database. Subsequent retrievals do not require calculating.
Dynamic Calc members A member in a block storage outline
that Essbase calculates only at retrieval time. Essbase
discards calculated values after completing the retrieval
request.
dynamic calculation In Essbase, a calculation that occurs only
when you retrieve data on a member that is tagged as
Dynamic Calc or Dynamic Calc and Store. The member's
values are calculated at retrieval time instead of being
precalculated during batch calculation.
dynamic hierarchy In aggregate storage database outlines
only, a hierarchy in which members are calculated at
retrieval time.
dynamic member list A system-created named member set
that is based on user-defined criteria. The list is refreshed
automatically whenever it is referenced in the application.
As dimension members are added and deleted, the list
automatically reapplies the criteria to reflect the changes.
dynamic reference A pointer in the rules file to header records
in a data source.
dynamic report A report containing data that is updated when
you run the report.
Dynamic Time Series A process that performs period-to-date
reporting in block storage databases.
dynamic view account An account type indicating that
account values are calculated dynamically from the data that
is displayed.
Eliminated Account An account that does not appear in the
consolidated file.
elimination The process of zeroing out (eliminating)
transactions between entities within an organization.
employee A user responsible for, or associated with, specific
business objects. Employees need not work for an
organization; for example, they can be consultants.
Employees must be associated with user accounts for
authorization purposes.
encoding A method for mapping bit combinations to
characters for creating, storing, and displaying text. Each
encoding has a name; for example, UTF-8. Within an
encoding, each character maps to a specific bit combination;
for example, in UTF-8, uppercase A maps to HEX41. See
also code page and locale.
ending period A period enabling you to adjust the date range
in a chart. For example, an ending period of “month”,
produces a chart showing information through the end of
the current month.
Enterprise View An Administration Services feature that
enables management of the Essbase environment from a
graphical tree view. From Enterprise View, you can operate
directly on Essbase artifacts.
entity A dimension representing organizational units.
Examples: divisions, subsidiaries, plants, regions, products,
or other financial reporting units.
212 Glossary
Equity Beta The riskiness of a stock, measured by the
variance between its return and the market return, indicated
by an index called “beta”. For example, if a stock's return
normally moves up or down 1.2% when the market moves
up or down 1%, the stock has a beta of 1.2.
essbase.cfg An optional configuration file for Essbase.
Administrators may edit this file to customize Essbase
Server functionality. Some configuration settings may also
be used with Essbase clients to override Essbase Server
settings.
EssCell A function entered into a cell in Essbase Spreadsheet
Add-in to retrieve a value representing an intersection of
specific Essbase database members.
ESSCMD A command-line interface for performing Essbase
operations interactively or through batch script files.
ESSLANG The Essbase environment variable that defines the
encoding used to interpret text characters. See also
encoding.
ESSMSH See MaxL Shell.
exceptions Values that satisfy predefined conditions. You
can define formatting indicators or notify subscribing users
when exceptions are generated.
exchange rate A numeric value for converting one currency
to another. For example, to convert 1 USD into EUR, the
exchange rate of 0.8936 is multiplied with the U.S. dollar.
The European euro equivalent of $1 is 0.8936.
exchange rate type An identifier for an exchange rate.
Different rate types are used because there may be multiple
rates for a period and year. Users traditionally define rates
at period end for the average rate of the period and for the
end of the period. Additional rate types are historical rates,
budget rates, forecast rates, and so on. A rate type applies to
one point in time.
expense account An account that stores periodic and year-
to-date values that decrease net worth if they are positive.
Extensible Markup Language (XML) A language comprising a set
of tags used to assign attributes to data that can be
interpreted between applications according to a schema.
external authentication Logging on to Oracle's Hyperion
applications with user information stored outside the
applications, typically in a corporate directory such as
MSAD or NTLM.
externally triggered events Non-time-based events for
scheduling job runs.
Extract, Transform, and Load (ETL) Data source-specific
programs for extracting data and migrating it to
applications.
extraction command An Essbase reporting command that
handles the selection, orientation, grouping, and ordering
of raw data extracted from a database; begins with the less
than (<) character.
fact table The central table in a star join schema,
characterized by a foreign key and elements drawn from a
dimension table. This table typically contains numeric data
that can be related to all other tables in the schema.
Favorites gadget Contains links to Reporting and Analysis
documents and URLs.
field An item in a data source file to be loaded into an
Essbase database.
file delimiter Characters, such as commas or tabs, that
separate fields in a data source.
filter A constraint on data sets that restricts values to specific
criteria; for example, to exclude certain tables, metadata, or
values, or to control access.
flow account An unsigned account that stores periodic and
year-to-date values.
folder A file containing other files for the purpose of
structuring a hierarchy.
footer Text or images at the bottom of report pages,
containing dynamic functions or static text such as page
numbers, dates, logos, titles or file names, and author
names.
format Visual characteristics of documents or report
objects.
format string In Essbase, a method for transforming the way
cell values are displayed.
formula A combination of operators, functions, dimension
and member names, and numeric constants calculating
database members.
frame An area on the desktop. There are two main areas: the
navigation and Workspace frames.
Glossary 213
free-form grid An object for presenting, entering, and
integrating data from different sources for dynamic
calculations.
free-form reporting Creating reports by entering dimension
members or report script commands in worksheets.
function A routine that returns values or database members.
gadget Simple, specialized, lightweight applications that
provide easy viewing of EPM content and enable access to
core Reporting and Analysis functionality.
genealogy data Additional data that is optionally generated
after allocation calculations. This data enables reporting on
all cost or revenue flows from start to finish through all
allocation steps.
generation A layer in a hierarchical tree structure that defines
member relationships in a database. Generations are
ordered incrementally from the top member of the
dimension (generation 1) down to the child members. Use
the unique generation name to identify a layer in the
hierarchical tree structure.
generic jobs Non-SQR Production Reporting or non-
Interactive Reporting jobs.
global report command A command in a running report script
that is effective until replaced by another global command
or the file ends.
grid POV A means for specifying dimension members on a
grid without placing dimensions in rows, columns, or page
intersections. A report designer can set POV values at the
grid level, preventing user POVs from affecting the grid. If
a dimension has one grid value, you put the dimension into
the grid POV instead of the row, column, or page.
group A container for assigning similar access permissions
to multiple users.
GUI Graphical user interface
head up display A mode that shows your loaded Smart Space
desktop including the background image above your
Windows desktop.
highlighting Depending on your configuration, chart cells or
ZoomChart details may be highlighted, indicating value
status: red (bad), yellow (warning), or green (good).
Historical Average An average for an account over a number
of historical periods.
holding company An entity that is part of a legal entity group,
with direct or indirect investments in all entities in the
group.
host A server on which applications and services are
installed.
host properties Properties pertaining to a host, or if the host
has multiple Install_Homes, to an Install_Home. The host
properties are configured from the CMC.
Hybrid Analysis An analysis mapping low-level data stored in
a relational database to summary-level data stored in
Essbase, combining the mass scalability of relational systems
with multidimensional data.
hyperlink A link to a file, Web page, or an intranet HTML
page.
Hypertext Markup Language (HTML) A programming language
specifying how Web browsers display data.
identity A unique identification for a user or group in
external authentication.
image bookmarks Graphic links to Web pages or repository
items.
IMPACTED status Indicates changes in child entities
consolidating into parent entities.
implied share A member with one or more children, but only
one is consolidated, so the parent and child share a value.
import format In FDM, defines the structure of the source file
which enables the loading of a source data file to an FDM
data load location.
inactive group A group for which an administrator has
deactivated system access.
inactive service A service suspended from operating.
INACTIVE status Indicates entities deactivated from
consolidation for the current period.
inactive user A user whose account has been deactivated by
an administrator.
income account An account storing periodic and year-to-
date values that, if positive, increase net worth.
index (1) A method where Essbase uses sparse-data
combinations to retrieve data in block storage databases. (2)
The index file.
214 Glossary
index cache A buffer containing index pages.
index entry A pointer to an intersection of sparse dimensions.
Index entries point to data blocks on disk and use offsets to
locate cells.
index file An Essbase file storing block storage data retrieval
information, residing on disk, and containing index pages.
index page A subdivision in an index file. Contains pointers
to data blocks.
input data Data loaded from a source rather than calculated.
Install_Home A variable for the directory where EPM System
products are installed. Refers to one instance of an EPM
System product when multiple applications are installed on
the same computer.
integration Process that is run to move data between EPM
System products using Shared Services. Data integration
definitions specify the data moving between a source
application and a destination application, and enable the
data movements to be grouped, ordered, and scheduled.
intelligent calculation A calculation method tracking updated
data blocks since the last calculation.
Interactive Reporting connection file (.oce) Files encapsulating
database connection information, including: the database
API (ODBC, SQL*Net, etc.), database software, the
database server network address, and database user name.
Administrators create and publish Interactive Reporting
connection files (.oce).
intercompany elimination See elimination.
intercompany matching The process of comparing balances
for pairs of intercompany accounts within an application.
Intercompany receivables are compared to intercompany
payables for matches. Matching accounts are used to
eliminate intercompany transactions from an
organization's consolidated totals.
intercompany matching report A report that compares
intercompany account balances and indicates if the
accounts are in, or out, of balance.
interdimensional irrelevance A situation in which a dimension
does not intersect with other dimensions. Because the data
in the dimension cannot be accessed from the non-
intersecting dimensions, the non-intersecting dimensions
are not relevant to that dimension.
intersection A unit of data representing the intersection of
dimensions in a multidimensional database; also, a
worksheet cell.
intrastage assignment Assignments in the financial flow that
are assigned to objects within the same stage.
introspection A deep inspection of a data source to discover
hierarchies based on the inherent relationships in the
database. Contrast with scraping.
Investigation See drill-through.
isolation level An Essbase Kernel setting that determines the
lock and commit behavior of database operations. Choices
are: committed access and uncommitted access.
iteration A “pass” of the budget or planning cycle in which
the same version of data is revised and promoted.
Java Database Connectivity (JDBC) A client-server
communication protocol used by Java based clients and
relational databases. The JDBC interface provides a call-
level API for SQL-based database access.
job output Files or reports produced from running a job.
jobs Documents with special properties that can be
launched to generate output. A job can contain Interactive
Reporting, SQR Production Reporting, or generic
documents.
join A link between two relational database tables or topics
based on common content in a column or row. A join
typically occurs between identical or similar items within
different tables or topics. For example, a record in the
Customer table is joined to a record in the Orders table
because the Customer ID value is the same in each table.
journal entry (JE) A set of debit/credit adjustments to account
balances for a scenario and period.
JSP Java Server Pages.
KeyContacts gadget Contains a group of Smart Space users
and provides access to Smart Space Collaborator. For
example, you can have a KeyContacts gadget for your
marketing team and another for your development team.
latest A Spreadsheet key word used to extract data values
from the member defined as the latest time period.
Glossary 215
layer (1) The horizontal location of members in a
hierarchical structure, specified by generation (top down)
or level (bottom up). (2) Position of objects relative to other
objects. For example, in the Sample Basic database, Qtr1 and
Qtr4 are in the same layer, so they are also in the same
generation, but in a database with a ragged hierarchy, Qtr1
and Qtr4 might not be in same layer, though they are in the
same generation.
layout area Used to designate an area on a Workspace Page
where content can be placed.
legend box A box containing labels that identify the data
categories of a dimension.
level A layer in a hierarchical tree structure that defines
database member relationships. Levels are ordered from the
bottom dimension member (level 0) up to the parent
members.
level 0 block A data block for combinations of sparse, level 0
members.
level 0 member A member that has no children.
liability account An account type that stores “point in time”
balances of a company's liabilities. Examples of liability
accounts include accrued expenses, accounts payable, and
long term debt.
life cycle management The process of managing application
information from inception to retirement.
Lifecycle Management Utility A command-line utility for
migrating applications and artifacts.
line chart A chart that displays one to 50 data sets, each
represented by a line. A line chart can display each line
stacked on the preceding ones, as represented by an absolute
value or a percent.
line item detail The lowest level of detail in an account.
lineage The relationship between different metadata
elements showing how one metadata element is derived
from one or more other metadata elements, ultimately
tracing the metadata element to its physical source. In
Essbase Studio, a lineage viewer displays the relationships
graphically. See also traceability.
link (1) A reference to a repository object. Links can
reference folders, files, shortcuts, and other links. (2) In a
task flow, the point where the activity in one stage ends and
another begins.
link condition A logical expression evaluated by the taskflow
engine to determine the sequence of launching taskflow
stages.
linked data model Documents that are linked to a master copy
in a repository.
linked partition A shared partition that enables you to use a
data cell to link two databases. When a user clicks a linked
cell in a worksheet, Essbase opens a new sheet displaying the
dimensions in the linked database. The user can then drill
down those dimensions.
linked reporting object (LRO) A cell-based link to an external
file such as cell notes, URLs, or files with text, audio, video,
or pictures. (Only cell notes are supported for Essbase LROs
in Financial Reporting.) Contrast with local report object.
local currency An input currency type. When an input
currency type is not specified, the local currency matches
the entity's base currency.
local report object A report object that is not linked to a
Financial Reporting report object in Explorer. Contrast with
linked reporting object (LRO).
local results A data model's query results. Results can be used
in local joins by dragging them into the data model. Local
results are displayed in the catalog when requested.
locale A computer setting that specifies a location's
language, currency and date formatting, data sort order, and
the character set encoding used on the computer. Essbase
uses only the encoding portion. See also encoding and
ESSLANG.
locale header record A text record at the beginning of some
non-Unicode-encoded text files, such as scripts, that
identifies the encoding locale.
location alias A descriptor that identifies a data source. The
location alias specifies a server, application, database, user
name, and password. Location aliases are set by DBAs at the
database level using Administration Services Console,
ESSCMD, or the API.
locked A user-invoked process that prevents users and
processes from modifying data.
216 Glossary
locked data model Data models that cannot be modified by a
user.
LOCKED status A consolidation status indicating that an
entity contains data that cannot be modified.
Log Analyzer An Administration Services feature that enables
filtering, searching, and analysis of Essbase logs.
logic group In FDM, contains one or more logic accounts
that are generated after a source file is loaded into FDM.
Logic accounts are calculated accounts that are derived from
the source data.
LRO See linked reporting object (LRO).
managed server An application server process running in its
own Java Virtual Machine (JVM).
manual stage A stage that requires human intervention to
complete.
Map File Used to store the definition for sending data to or
retrieving data from an external database. Map files have
different extensions (.mps to send data; .mpr to retrieve
data).
Map Navigator A feature that displays your current position
on a Strategy, Accountability, or Cause and Effect map,
indicated by a red outline.
Marginal Tax Rate Used to calculate the after-tax cost of debt.
Represents the tax rate applied to the last earned income
dollar (the rate from the highest tax bracket into which
income falls) and includes federal, state and local taxes.
Based on current level of taxable income and tax bracket,
you can predict marginal tax rate.
Market Risk Premium The additional rate of return paid over
the risk-free rate to persuade investors to hold “riskier”
investments than government securities. Calculated by
subtracting the risk-free rate from the expected market
return. These figures should closely model future market
conditions.
master data model An independent data model that is
referenced as a source by multiple queries. When used,
“Locked Data Model” is displayed in the Query section's
Content pane; the data model is linked to the master data
model displayed in the Data Model section, which an
administrator may hide.
mathematical operator A symbol that defines how data is
calculated in formulas and outlines. Can be any of the
standard mathematical or Boolean operators; for example,
+, -, *, /, and %.
MaxL The multidimensional database access language for
Essbase, consisting of a data definition language (MaxL
DDL) and a data manipulation language (MaxL DML). See
also MaxL DDL, MaxL DML, and MaxL Shell.
MaxL DDL Data definition language used by Essbase for batch
or interactive system-administration tasks.
MaxL DML Data manipulation language used in Essbase for
data query and extraction.
MaxL Perl Module A Perl module (essbase.pm) that is part of
Essbase MaxL DDL. This module can be added to the Perl
package to provide access to Essbase databases from Perl
programs.
MaxL Script Editor A script-development environment in
Administration Services Console. MaxL Script Editor is an
alternative to using a text editor and the MaxL Shell for
administering Essbase with MaxL scripts.
MaxL Shell An interface for passing MaxL statements to
Essbase Server. The MaxL Shell executable file is located in
the Essbase bin directory (UNIX: essmsh, Windows:
essmsh.exe).
MDX (multidimensional expression) The language that give
instructions to OLE DB for OLAP- compliant databases, as
SQL is used for relational databases. When you build the
OLAPQuery section's Outliner, Interactive Reporting
Clients translate requests into MDX instructions. When you
process the query, MDX is sent to the database server, which
returns records that answer your query. See also SQL
spreadsheet.
measures Numeric values in an OLAP database cube that are
available for analysis. Measures are margin, cost of goods
sold, unit sales, budget amount, and so on. See also fact
table.
member A discrete component within a dimension. A
member identifies and differentiates the organization of
similar units. For example, a time dimension might include
such members as Jan, Feb, and Qtr1.
Glossary 217
member list A named group, system- or user-defined, that
references members, functions, or member lists within a
dimension.
member load In Integration Services, the process of adding
dimensions and members (without data) to Essbase
outlines.
member selection report command A type of Report Writer
command that selects member ranges based on outline
relationships, such as sibling, generation, and level.
member-specific report command A type of Report Writer
formatting command that is executed as it is encountered
in a report script. The command affects only its associated
member and executes the format command before
processing the member.
merge A data load option that clears values only from the
accounts specified in the data load file and replaces them
with values in the data load file.
metadata A set of data that defines and describes the
properties and attributes of the data stored in a database or
used by an application. Examples of metadata are
dimension names, member names, properties, time
periods, and security.
metadata elements Metadata derived from data sources and
other metadata that is stored and cataloged for Essbase
Studio use.
metadata sampling The process of retrieving a sample of
members in a dimension in a drill-down operation.
metadata security Security set at the member level to restrict
users from accessing certain outline members.
metaoutline In Integration Services, a template containing
the structure and rules for creating an Essbase outline from
an OLAP model.
metric A numeric measurement computed from business
data to help assess business performance and analyze
company trends.
migration The process of copying applications, artifacts, or
users from one environment or computer to another; for
example, from a testing environment to a production
environment.
migration audit report A report generated from the migration
log that provides tracking information for an application
migration.
migration definition file (.mdf) A file that contains migration
parameters for an application migration, enabling batch
script processing.
migration log A log file that captures all application migration
actions and messages.
migration snapshot A snapshot of an application migration
that is captured in the migration log.
MIME Type (Multipurpose Internet Mail Extension) An
attribute that describes the data format of an item, so that
the system knows which application should open the object.
A file's mime type is determined by the file extension or
HTTP header. Plug-ins tell browsers what mime types they
support and what file extensions correspond to each mime
type.
mining attribute In data mining, a class of values used as a
factor in analysis of a set of data.
minireport A report component that includes layout,
content, hyperlinks, and the query or queries to load the
report. Each report can include one or more minireports.
minischema A graphical representation of a subset of tables
from a data source that represents a data modeling context.
missing data (#MISSING) A marker indicating that data in the
labeled location does not exist, contains no value, or was
never entered or loaded. For example, missing data exists
when an account contains data for a previous or future
period but not for the current period.
model (1) In data mining, a collection of an algorithm's
findings about examined data. A model can be applied
against a wider data set to generate useful information about
that data. (2) A file or content string containing an
application-specific representation of data. Models are the
basic data managed by Shared Services, of two major types:
dimensional and non-dimensional application objects. (3)
In Business Modeling, a network of boxes connected to
represent and calculate the operational and financial flow
through the area being examined.
monetary A money-related value.
218 Glossary
multidimensional database A method of organizing, storing,
and referencing data through three or more dimensions. An
individual value is the intersection point for a set of
dimensions. Contrast with relational database.
multiload An FDM feature that allows the simultaneous
loading of multiple periods, categories, and locations.
My Workspace Page A page created with content from
multiple sources including documents, URL, and other
content types. Enables a user to aggregate content from
Oracle and non-Oracle sources.
named set In MaxL DML, a set with its logic defined in the
optional WITH section of a MaxL DML query. The named
set can be referenced multiple times in the query.
native authentication The process of authenticating a user
name and password from within the server or application.
nested column headings A report column heading format that
displays data from multiple dimensions. For example, a
column heading that contains Year and Scenario members
is a nested column. The nested column heading shows Q1
(from the Year dimension) in the top line of the heading,
qualified by Actual and Budget (from the Scenario
dimension) in the bottom line of the heading.
NO DATA status A consolidation status indicating that this
entity contains no data for the specified period and account.
non-dimensional model A Shared Services model type that
includes application objects such as security files, member
lists, calculation scripts, and Web forms.
non-unique member name See duplicate member name.
note Additional information associated with a box,
measure, scorecard or map element.
Notifications gadget Shows notification message history
received from other users or systems.
null value A value that is absent of data. Null values are not
equal to zero.
numeric attribute range A feature used to associate a base
dimension member that has a discrete numeric value with
an attribute that represents a value range. For example, to
classify customers by age, an Age Group attribute dimension
can contain members for the following age ranges: 0-20,
21-40, 41-60, and 61-80. Each Customer dimension
member can be associated with an Age Group range. Data
can be retrieved based on the age ranges rather than on
individual age values.
ODBC Open Database Connectivity. A database access
method used from any application regardless of how the
database management system (DBMS) processes the
information.
OK status A consolidation status indicating that an entity has
already been consolidated, and that data has not changed
below it in the organization structure.
OLAP Metadata Catalog In Integration Services, a relational
database containing metadata describing the nature, source,
location, and type of data that is pulled from the relational
data source.
OLAP model In Integration Services, a logical model (star
schema) that is created from tables and columns in a
relational database. The OLAP model is then used to
generate the structure of a multidimensional database.
online analytical processing (OLAP) A multidimensional,
multiuser, client-server computing environment for users
who analyze consolidated enterprise data in real time. OLAP
systems feature drill-down, data pivoting, complex
calculations, trend analysis, and modeling.
Open Database Connectivity (ODBC) Standardized application
programming interface (API) technology that allows
applications to access multiple third-party databases.
organization An entity hierarchy that defines each entity and
their relationship to others in the hierarchy.
origin The intersection of two axes.
outline The database structure of a multidimensional
database, including all dimensions, members, tags, types,
consolidations, and mathematical relationships. Data is
stored in the database according to the structure defined in
the outline.
Glossary 219
outline synchronization For partitioned databases, the process
of propagating outline changes from one database to
another database.
P&L accounts (P&L) Profit and loss accounts. Refers to a
typical grouping of expense and income accounts that
comprise a company's income statement.
page A display of information in a grid or table often
represented by the Z-axis. A page can contain data from one
field, derived data from a calculation, or text.
page file Essbase data file.
page heading A report heading type that lists members
represented on the current page of the report. All data values
on the page have the members in the page heading as a
common attribute.
page member A member that determines the page axis.
palette A JASC compliant file with a .PAL extension. Each
palette contains 16 colors that complement each other and
can be used to set the dashboard color elements.
parallel calculation A calculation option. Essbase divides a
calculation into tasks and calculates some tasks
simultaneously.
parallel data load In Essbase, the concurrent execution of
data load stages by multiple process threads.
parallel export The ability to export Essbase data to multiple
files. This may be faster than exporting to a single file, and
it may resolve problems caused by a single data file
becoming too large for the operating system to handle.
parent adjustments The journal entries that are posted to a
child in relation to its parent.
parents The entities that contain one or more dependent
entities that report directly to them. Because parents are
both entities and associated with at least one node, they have
entity, node, and parent information associated with them.
partition area A sub cube within a database. A partition is
composed of one or more areas of cells from a portion of
the database. For replicated and transparent partitions, the
number of cells within an area must be the same for the data
source and target to ensure that the two partitions have the
same shape. If the data source area contains 18 cells, the data
target area must also contain 18 cells to accommodate the
number of values.
partitioning The process of defining areas of data that are
shared or linked between data models. Partitioning can
affect the performance and scalability of Essbase
applications.
pattern matching The ability to match a value with any or all
characters of an item entered as a criterion. Missing
characters may be represented by wild card values such as a
question mark (?) or an asterisk (*). For example, “Find all
instances of apple” returns apple, but “Find all instances of
apple*” returns apple, applesauce, applecranberry, and so
on.
percent consolidation The portion of a child's values that is
consolidated to its parent.
percent control Identifies the extent to which an entity is
controlled within the context of its group.
percent ownership Identifies the extent to which an entity is
owned by its parent.
performance indicator An image file used to represent
measure and scorecard performance based on a range you
specify; also called a status symbol. You can use the default
performance indicators or create an unlimited number of
your own.
periodic value method (PVA) A process of currency conversion
that applies the periodic exchange rate values over time to
derive converted results.
permission A level of access granted to users and groups for
managing data or other users and groups.
persistence The continuance or longevity of effect for any
Essbase operation or setting. For example, an Essbase
administrator may limit the persistence of user name and
password validity.
personal pages A personal window to repository
information. You select what information to display and its
layout and colors.
personal recurring time events Reusable time events that are
accessible only to the user who created them.
personal variable A named selection statement of complex
member selections.
220 Glossary
perspective A category used to group measures on a
scorecard or strategic objectives within an application. A
perspective can represent a key stakeholder (such as a
customer, employee, or shareholder/financial) or a key
competency area (such as time, cost, or quality).
pie chart A chart that shows one data set segmented in a pie
formation.
pinboard One of the three data object display types.
Pinboards are graphics, composed of backgrounds and
interactive icons called pins. Pinboards require traffic
lighting definitions.
pins Interactive icons placed on graphic reports called
pinboards. Pins are dynamic. They can change images and
traffic lighting color based on the underlying data values and
analysis tools criteria.
pivot The ability to alter the perspective of retrieved data.
When Essbase first retrieves a dimension, it expands data
into rows. You can then pivot or rearrange the data to obtain
a different viewpoint.
planner Planners, who comprise the majority of users, can
input and submit data, use reports that others create,
execute business rules, use task lists, enable e-mail
notification for themselves, and use Smart View.
planning unit A data slice at the intersection of a scenario,
version, and entity; the basic unit for preparing, reviewing,
annotating, and approving plan data.
plot area The area bounded by X, Y, and Z axes; for pie
charts, the rectangular area surrounding the pie.
plug account An account in which the system stores any out
of balance differences between intercompany account pairs
during the elimination process.
post stage assignment Assignments in the allocation model
that are assigned to locations in a subsequent model stage.
POV (point of view) A feature for setting data focus by selecting
members that are not already assigned to row, column, or
page axes. For example, selectable POVs in FDM could
include location, period, category, and target category. In
another example, using POV as a filter in Smart View, you
could assign the Currency dimension to the POV and select
the Euro member. Selecting this POV in data forms displays
data in Euro values.
precalculation Calculating the database prior to user
retrieval.
precision Number of decimal places displayed in numbers.
predefined drill paths Paths used to drill to the next level of
detail, as defined in the data model.
presentation A playlist of Web Analysis documents, enabling
reports to be grouped, organized, ordered, distributed, and
reviewed. Includes pointers referencing reports in the
repository.
preserve formulas User-created formulas kept within a
worksheet while retrieving data.
primary measure A high-priority measure important to your
company and business needs. Displayed in the Contents
frame.
process monitor report Displays a list of locations and their
positions within the FDM data conversion process. You can
use the process monitor report to monitor the status of the
closing process. The report is time-stamped. Therefore, it
can be used to determine to which locations at which time
data was loaded.
product In Shared Services, an application type, such as
Planning or Performance Scorecard.
Production Reporting See SQR Production Reporting.
project An instance of EPM System products grouped
together in an implementation. For example, a Planning
project may consist of a Planning application, an Essbase
cube, and a Financial Reporting server instance.
property A characteristic of an artifact, such as size, type, or
processing instructions.
provisioning The process of granting users and groups
specific access permissions to resources.
proxy server A server acting as an intermediary between
workstation users and the Internet to ensure security.
public job parameters Reusable, named job parameters
created by administrators and accessible to users with
requisite access privileges.
public recurring time events Reusable time events created by
administrators and accessible through the access control
system.
PVA See periodic value method (PVA).
Glossary 221
qualified name A member name in a qualified format that
differentiates duplicate member names in a duplicate
member outline. For example, [Market].[East].[State].
[New York] or [Market].[East].[City].[New York]
query Information requests from data providers. For
example, used to access relational data sources.
query governor An Essbase Integration server parameter or
Essbase server configuration setting that controls the
duration and size of queries made to data sources.
range A set of values including upper and lower limits, and
values falling between limits. Can contain numbers,
amounts, or dates.
reciprocal assignment An assignment in the financial flow
that also has the source as one of its destinations.
reconfigure URL URL used to reload servlet configuration
settings dynamically when users are already logged on to the
Workspace.
record In a database, a group of fields making up one
complete entry. For example, a customer record may
contain fields for name, address, telephone number, and
sales data.
recurring template A journal template for making identical
adjustments in every period.
recurring time event An event specifying a starting point and
the frequency for running a job.
redundant data Duplicate data blocks that Essbase retains
during transactions until Essbase commits updated blocks.
regular journal A feature for entering one-time adjustments
for a period. Can be balanced, balanced by entity, or
unbalanced.
Related Accounts The account structure groups all main and
related accounts under the same main account number. The
main account is distinguished from related accounts by the
first suffix of the account number.
relational database A type of database that stores data in
related two-dimensional tables. Contrast with
multidimensional database.
replace A data load option that clears existing values from
all accounts for periods specified in the data load file, and
loads values from the data load file. If an account is not
specified in the load file, its values for the specified periods
are cleared.
replicated partition A portion of a database, defined through
Partition Manager, used to propagate an update to data
mastered at one site to a copy of data stored at another site.
Users can access the data as though it were part of their local
database.
Report Extractor An Essbase component that retrieves report
data from the Essbase database when report scripts are run.
report object In report designs, a basic element with
properties defining behavior or appearance, such as text
boxes, grids, images, and charts.
report script A text file containing Essbase Report Writer
commands that generate one or more production reports.
Report Viewer An Essbase component that displays complete
reports after report scripts are run.
reporting currency The currency used to prepare financial
statements, and converted from local currencies to
reporting currencies.
repository Stores metadata, formatting, and annotation
information for views and queries.
resources Objects or services managed by the system, such
as roles, users, groups, files, and jobs.
restore An operation to reload data and structural
information after a database has been damaged or
destroyed, typically performed after shutting down and
restarting the database.
restructure An operation to regenerate or rebuild the
database index and, in some cases, data files.
result frequency The algorithm used to create a set of dates to
collect and display results.
review level A Process Management review status indicator
representing the process unit level, such as Not Started, First
Pass, Submitted, Approved, and Published.
Risk Free Rate The rate of return expected from “safer”
investments such as long-term U.S. government securities.
222 Glossary
role The means by which access permissions are granted to
users and groups for resources.
roll-up See consolidation.
root member The highest member in a dimension branch.
RSC services Services that are configured with Remote
Service Configurator, including Repository Service, Service
Broker, Name Service, Event Service, and Job Service.
runtime prompt A variable that users enter or select before a
business rule is run.
sampling The process of selecting a representative portion
of an entity to determine the entity's characteristics. See also
metadata sampling.
saved assumptions User-defined Planning assumptions that
drive key business calculations (for example, the cost per
square foot of office floor space).
scaling Scaling determines the display of values in whole
numbers, tens, hundreds, thousands, millions, and so on.
scenario A dimension for classifying data (for example,
Actuals, Budget, Forecast1, and Forecast2).
scope The area of data encompassed by any Essbase
operation or setting; for example, the area of data affected
by a security setting. Most commonly, scope refers to three
levels of granularity, where higher levels encompass lower
levels. From highest to lowest, these levels are as follows: the
entire system (Essbase Server), applications on Essbase
servers, or databases within Essbase server applications. See
also persistence.
score The level at which targets are achieved, usually
expressed as a percentage of the target.
scorecard Business object that represents the progress of an
employee, strategy element, or accountability element
toward goals. Scorecards ascertain this progress based on
data collected for each measure and child scorecard added
to the scorecard.
scraping An inspection of a data source to derive the most
basic metadata elements from it. Contrast with
introspection.
Search gadget Searches the Reporting and Analysis
repository. The Search gadget looks for a match in the
document keywords and description, which are set when
you import a document.
secondary measure A low-priority measure, less important
than primary measures. Secondary measures do not have
Performance reports but can be used on scorecards and to
create dimension measure templates.
security agent A Web access management provider (for
example, Netegrity SiteMinder) that protects corporate
Web resources.
security platform A framework enabling EPM System
products to use external authentication and single sign-on.
serial calculation The default calculation setting. Divides a
calculation pass into tasks and calculates one task at a time.
services Resources that enable business items to be
retrieved, changed, added, or deleted. Examples:
Authorization and Authentication.
servlet A piece of compiled code executable by a Web server.
shared member A member that shares storage space with
another member of the same name, preventing duplicate
calculation of members that occur multiple times in an
Essbase outline.
Shared Services Registry Part of the Shared Services database,
the Shared Services Registry stores and re-uses information
for most installed EPM System products, including
installation directories, database settings, deployment
settings, computer names, ports, servers, URLs, and
dependent service data.
Shared Workspace Page Workspace Pages shared across an
organization which are stored in a special System folder and
can be accessed by authorized users from the Shared
Workspace Pages Navigate menu.
sibling A child member at the same generation as another
child member and having the same immediate parent. For
example, the members Florida and New York are children
of East and each other's siblings.
single sign-on Ability to access multiple EPM System
products after a single login using external credentials.
smart slice In Smart View, a reusable perspective of a data
source that contains a restricted set of dimensions or
dimension members.
Glossary 223
Smart Space client software Runs on the client's computer and
provides gadgets, instant collaboration and access to the
Reporting and Analysis repository. It is composed of the
Smart Space framework and gadgets.
Smart Space Collaborator A service that enables users or
systems to send messages and share Reporting and Analysis
repository content. The message can take many forms,
including instant message style discussions, meetings, and
toast messages.
smart tags Keywords in Microsoft Office applications that
are associated with predefined actions available from the
Smart Tag menu. In EPM System products, smart tags can
also be used to import Reporting and Analysis content, and
access Financial Management and Essbase functions.
SmartBook gadget Contains documents from the Reporting
and Analysis repository or URLs. All documents are loaded
when the SmartBook is opened so you can access all content
immediately.
SmartCut A link to a repository item, in URL form.
snapshot Read-only data from a specific time.
source currency The currency from which values originate
and are converted through exchange rates to the destination
currency.
sparse dimension In block storage databases, a dimension
unlikely to contain data for all member combinations when
compared to other dimensions. For example, not all
customers have data for all products. Contrast with dense
dimension.
SPF files Printer-independent files created by an SQR
Production Reporting server, containing a representation
of the actual formatted report output, including fonts,
spacing, headers, footers, and so on.
Spotlighter A tool that enables color coding based on selected
conditions.
SQL spreadsheet A data object that displays the result set of
a SQL query.
SQR Production Reporting A specialized programming
language for data access, data manipulation, and creating
SQR Production Reporting documents.
stage A task description that forms one logical step within
a taskflow, usually performed by an individual. A stage can
be manual or automated.
stage action For automated stages, the invoked action that
executes the stage.
staging area A database that you create to meet the needs of
a specific application. A staging area is a snapshot or
restructured version of one or more RDBMSs.
standard dimension A dimension that is not an attribute
dimension.
standard journal template A journal function used to post
adjustments that have common adjustment information for
each period. For example, you can create a standard
template that contains the common account IDs, entity IDs,
or amounts, then use the template as the basis for many
regular journals.
Status bar The status bar at the bottom of the screen displays
helpful information about commands, accounts, and the
current status of your data file.
stored hierarchy In aggregate storage databases outlines only.
A hierarchy in which the members are aggregated according
to the outline structure. Stored hierarchy members have
certain restrictions, for example, they cannot contain
formulas.
strategic objective (SO) A long-term goal defined by
measurable results. Each strategic objective is associated
with one perspective in the application, has one parent, the
entity, and is a parent to critical success factors or other
strategic objectives.
Strategy map Represents how the organization implements
high-level mission and vision statements into lower-level,
constituent strategic goals and objectives.
structure view Displays a topic as a simple list of component
data items.
Structured Query Language A language used to process
instructions to relational databases.
Subaccount Numbering A system for numbering subaccounts
using non-sequential, whole numbers.
subscribe Flags an item or folder to receive automatic
notification whenever the item or folder is updated.
224 Glossary
Summary chart In the Investigates Section, rolls up detail
charts shown below in the same column, plotting metrics at
the summary level at the top of each chart column.
super service A special service used by the
startCommonServices script to start the RSC services.
supervisor A user with full access to all applications,
databases, related files, and security mechanisms for a
server.
supporting detail Calculations and assumptions from which
the values of cells are derived.
suppress rows Excludes rows containing missing values, and
underscores characters from spreadsheet reports.
symmetric multiprocessing (SMP) A server architecture that
enables multiprocessing and multithreading. Performance
is not significantly degraded when a large number of users
connect to an single instance simultaneously.
sync Synchronizes Shared Services and application models.
synchronized The condition that exists when the latest
version of a model resides in both the application and in
Shared Services. See also model.
system extract Transfers data from an application's metadata
into an ASCII file.
tabs Navigable views of accounts and reports in Strategic
Finance.
target Expected results of a measure for a specified period
of time (day, quarter, and so on).
task list A detailed status list of tasks for a particular user.
taskflow The automation of a business process in which
tasks are passed from one taskflow participant to another
according to procedural rules.
taskflow definition Represents business processes in the
taskflow management system. Consists of a network of
stages and their relationships; criteria indicating the start
and end of the taskflow; and information about individual
stages, such as participants, associated applications,
associated activities, and so on.
taskflow instance Represents a single instance of a taskflow
including its state and associated data.
taskflow management system Defines, creates, and manages
the execution of a taskflow including: definitions, user or
application interactions, and application executables.
taskflow participant The resource who performs the task
associated with the taskflow stage instance for both manual
and automated stages.
Taxes - Initial Balances Strategic Finance assumes that the
Initial Loss Balance, Initial Gain Balance and the Initial
Balance of Taxes Paid entries have taken place in the period
before the first Strategic Finance time period.
TCP/IP See Transmission Control Protocol/Internet Protocol
(TCP/IP).
template A predefined format designed to retrieve particular
data consistently.
text list In Essbase, an object that stores text values mapped
to numeric identifiers. Text Lists enable the use of text
measures.
text measure A data type that allows measure values to be
expressed as text. In Essbase, a member tagged as “Text” in
the dimension where measures are represented. The cell
values are displayed as predefined text. For example, the text
measure "Satisfaction Index" may have the values Low,
Medium, and High. See also typed measure, text list, derived
text measure.
time dimension Defines the time period that the data
represents, such as fiscal or calendar periods.
time events Triggers for execution of jobs.
time line viewer An FDM feature that allows a user to view
dates and times of completed process flow steps for specific
locations.
time scale Displays metrics by a specific period in time, such
as monthly or quarterly.
time series reporting A process for reporting data based on a
calendar date (for example, year, quarter, month, or week).
Title bar Displays the Strategic Finance name, the file name,
and the scenario name Version box.
toast message Messages that appear in the lower right corner
of the screen and fade in and out.
token An encrypted identification of one valid user or group
on an external authentication system.
Glossary 225
top and side labels Column and row headings on the top and
sides of a Pivot report.
top-level member A dimension member at the top of the tree
in a dimension outline hierarchy, or the first member of the
dimension in sort order if there is no hierarchical
relationship among dimension members. The top-level
member name is generally the same as the dimension name
if a hierarchical relationship exists.
trace allocations A feature of Profitability and Cost
Management that enables you to visually follow the flow of
financial data, either forwards or backwards, from a single
intersection throughout the model.
trace level Defines the level of detail captured in the log file.
traceability The ability to track a metadata element to its
physical source. For example, in Essbase Studio, a cube
schema can be traced from its hierarchies and measure
hierarchies, to its dimension elements, date/time elements,
and measures, and ultimately, to its physical source
elements.
traffic lighting Color-coding of report cells, or pins based on
a comparison of two dimension members, or on fixed limits.
transformation (1) Transforms artifacts so that they function
properly in the destination environment after application
migration. (2) In data mining, modifies data
(bidirectionally) flowing between the cells in the cube and
the algorithm.
translation See currency conversion.
Transmission Control Protocol/Internet Protocol (TCP/IP) A
standard set of communication protocols linking
computers with different operating systems and internal
architectures. TCP/IP utilities are used to exchange files,
send mail, and store data to various computers that are
connected to local and wide area networks.
transparent login Logs in authenticated users without
launching the login screen.
transparent partition A shared partition that enables users to
access and change data in a remote database as though it is
part of a local database
triangulation A means of converting balances from one
currency to another via a third common currency. In
Europe, this is the euro for member countries. For example,
to convert from French franc to Italian lira, the common
currency is defined as European euro. Therefore, in order
to convert balances from French franc to Italian lira,
balances are converted from French franc to European euro
and from European euro to Italian lira.
triggers An Essbase feature whereby data is monitored
according to user-specified criteria which when met cause
Essbase to alert the user or system administrator.
trusted password A password that enables users
authenticated for one product to access other products
without reentering their passwords.
trusted user Authenticated user.
tuple MDX syntax element that references a cell as an
intersection of a member from each dimension. If a
dimension is omitted, its top member is implied. Examples:
(Jan); (Jan, Sales); ( [Jan], [Sales], [Cola], [Texas], [Actual] )
two-pass An Essbase property that is used to recalculate
members that are dependent on the calculated values of
other members. Two-pass members are calculated during a
second pass through the outline.
typed measure In Essbase, a member tagged as “Text” or
“Date” in the dimension where measures are represented.
The cell values are displayed as predefined text or dates.
unary operator A mathematical indicator (+, -, *, /, %)
associated with an outline member. The unary operator
defines how the member is calculated during a database roll-
up.
Unicode-mode application An Essbase application wherein
character text is encoded in UTF-8, enabling users with
computers set up for different languages to share
application data.
Uniform Resource Locator The address of a resource on the
Internet or an intranet.
unique member name A non-shared member name that exists
only once in a database outline.
unique member outline A database outline that is not enabled
for duplicate member names.
226 Glossary
upgrade The process of replacing an earlier software release
with a current release or replacing one product with
another.
upper-level block A type of data block wherein at least one of
the sparse members is a parent-level member.
user directory A centralized location for user and group
information. Also known as a repository or provider.
user variable Dynamically renders data forms based on a
user's member selection, displaying only the specified
entity. For example, user variable named Department
displays specific departments and employees.
user-defined attribute (UDA) User-defined attribute,
associated with members of an outline to describe a
characteristic of the members. Users can use UDAs to return
lists of members that have the specified UDA associated with
them.
user-defined member list A named, static set of members
within a dimension defined by the user.
validation A process of checking a business rule, report
script, or partition definition against the outline to make
sure that the object being checked is valid. For example, in
FDM, validation rules ensure that certain conditions are
met after data is loaded from FDM to the target application.
value dimension Used to define input value, translated value,
and consolidation detail.
variance Difference between two values (for example,
planned and actual value).
varying attribute An attribute association that changes over
one or more dimensions. It can be used to track a value in
relation to these dimensions; for example, the varying
attribute Sales Representative, associated with the Product
dimension, can be used to track the value Customer Sales
of several different sales representatives in relation to the
Time dimension. Varying attributes can also be used for
member selection, such as finding the Products that a Sales
Representative was responsible for in May.
version Possible outcome used within the context of a
scenario of data. For example, Budget - Best Case and
Budget - Worst Case where Budget is scenario and Best Case
and Worst Case are versions.
view Representation of either a year-to-date or periodic
display of data.
visual cue A formatted style, such as a font or a color, that
highlights specific types of data values. Data values may be
dimension members; parent, child, or shared members;
dynamic calculations; members containing a formula; read
only data cells; read and write data cells; or linked objects.
Web server Software or hardware hosting intranet or
Internet Web pages or Web applications.
weight Value assigned to an item on a scorecard that
indicates the relative importance of that item in the
calculation of the overall scorecard score. The weighting of
all items on a scorecard accumulates to 100%. For example,
to recognize the importance of developing new features for
a product, the measure for New Features Coded on a
developer's scorecard would be assigned a higher weighting
than a measure for Number of Minor Defect Fixes.
wild card Character that represents any single character or
group of characters (*) in a search string.
WITH section In MaxL DML, an optional section of the query
used for creating re-usable logic to define sets or members.
Sets or custom members can be defined once in the WITH
section, and then referenced multiple times during a query.
work flow The steps required to process data from start to
finish in FDM. The workflow consists of Import (loading
data from the GL file), Validate (ensures all members are
mapped to a valid account), Export (loads the mapped
members to the target application), and Check (verifies
accuracy of data by processing data with user-defined
validation rules).
workbook An entire spreadsheet file with many worksheets.
Workspace Page A page created with content from multiple
sources including documents, URL, and other content
types. Enables a user to aggregate content from Oracle and
non-Oracle sources.
write-back The ability for a retrieval client, such as a
spreadsheet, to update a database value.
ws.conf A configuration file for Windows platforms.
wsconf_platform A configuration file for UNIX platforms.
XML See Extensible Markup Language (XML).
Glossary 227
XOLAP An Essbase multidimensional database that stores
only the outline metadata and retrieves all data from a
relational database at query time. XOLAP supports
aggregate storage databases and applications that contain
duplicate member names.
Y axis scale Range of values on Y axis of charts displayed in
Investigate Section. For example, use a unique Y axis scale
for each chart, the same Y axis scale for all Detail charts, or
the same Y axis scale for all charts in the column. Often,
using a common Y axis improves your ability to compare
charts at a glance.
Zero Administration Software tool that identifies version
number of the most up-to-date plug-in on the server.
zoom Sets the magnification of a report. For example,
magnify a report to fit whole page, page width, or percentage
of magnification based on 100%.
ZoomChart Used to view detailed information by enlarging
a chart. Enables you to see detailed numeric information on
the metric that is displayed in the chart.
228 Glossary
Index
Aaccess file system, script, 97access permissions, physical resources and, 52access privileges:checking, 199Administer Module
BI Presentation Services, 64Administer module, 43
priority settings in, 45common tasks, 40introduced, 28
administering public job parameters, 126advanced scripting
access file system, 97batch input files, 97custom scripting environment, EPM Workspace,
89document object model
access properties, 96collections, 96Dashboard Studio Inspector Utility, 95described, 92differences, 95document conversion strategy, 92Impact Management Services, EPM Workspace,
95property types, 96traverse, 93xpath-style searching, 94
Impact Manager module, 89Java code, 97logging, 76references
document, 101env methods, 98methods and properties, 98node methods, 100repository methods, 99
repository methods, EPM Workspace-specific,100
script environment, 90script parameters, 90
agentsconfiguring, 158
Apache, 178APIs
exceptions, 58triggering events with, 126
appenders, 178applications
command strings, 147enterprise-reporting, 152running jobs against enterprise applications, 152
Applications properties, 172associating interactive reports with Interactive
Reporting database connections, 104attachments
enabling, 58maximum size, 58
Authentication Service, defined, 18Authorization Service, defined, 18
Bbatch files, and application command strings, 147batch input files
scripts, 97using, 97
bookmarksgenerated Personal Page and, 134setting up graphics for, 137
Broadcast Messageschanging default Personal Pages and, 135generated Personal Page and, 134overview, 135pushed content, 135
A B C D E F G H I J K L M N O P R S T U V W
Index 229
renaming folder, 44renaming folders, 136specifying categories for, 44subfolders, 135understanding, 135
Browse servletPersonal Page preconfiguration, 134, 135Web application deployment name, 59
buttons, toolbarView Job Execution Log Entries, 124
CCache properties, 172Calendar Manager, launching, 121calendars
creating, 122deleting, 122end dates, 124managing, 121modifying, 122non-working days, 123periods and years, 123properties, 123user-defined weeks, 123week start, 123
client-side debug mode, disabling, 37CMC
about, 153Agent Configuration properties, 176Agent Configuration View, 158described, 30modifying properties, 158Service Configuration properties, 159Service Configuration View, 156services, 153starting, 154using, 155Web Application Configuration properties, 164Web Application Configuration View, 157
CMC servicesdefined, 17
color schemescustomizing on Personal Pages, 138
columndata type changes, 116delete, 114rename, 112
command strings for applicationsdescribed, 147example, 147
configInfo.jsp, 27, 177Configuration and Monitoring Console. See CMC.configuration files
output.properties, 57RMService8.properties, 34
configuration information, 27, 177configuration URL, disabling, 37Confirmation dialog box, 82connectivity, defining for database servers, 150content windows, headings, 138content, optional, Personal Pages, providing to users,
136copying Personal Pages, 138Core Services, 18creating
data models, 111Interactive Reporting database connections, 103
custom scripting environment, EPM Workspace, 89custom update, 85
choose script, 86create parameter file, 87parameters, 87scheduling options, 88sort data model topics script, 85verifying, 89workflow, 74
customizations, user interface, 131
DDashboard Studio Inspector Utility (advanced
scripting)document object model access properties, 96document object model collections, 96document object model investigate, 95document object model property types, 96
Data Access Services properties, 162data model, character sets, replacement, Unicode,
117data models
creating, 111normalized and denormalized, 114
data sourcesname, 60
Data Sources properties, 163
A B C D E F G H I J K L M N O P R S T U V W
230 Index
data type column changes, 116database servers
adding, 149associating with Job Service, 150deleting, 151environmental variables for Production Reporting,
150managing, 149
databasesconnectivity, 60types, 60
debug configuration properties, 165default language selections, changing, 131default Personal Pages, changing, 135default preferences, assigning for users and groups,
46deleting
MIME types, 56directories. See output directories.displayable items. See file content windows.displaying HTML files on Personal Pages, 137document object model
access propertiesImpact Management Services, EPM Workspace,
96Interactive Reporting Studio, 96
collectionsImpact Management Services, EPM Workspace,
96Interactive Reporting Studio, 96
differences, Impact Management Services, EPMWorkspace, 95
differences, Interactive Reporting Studio, 95document conversion strategy, 92investigate structure, Impact Management Services,
EPM Workspace, 95property types
Impact Management Services, EPM Workspace,96
Interactive Reporting Studio, 96traversing, 93tree structure, 92xpath-style searching, 94
Interactive Reporting documents, changing user nameand password in, 118
documents, tracking, 62DOM
access propertiesImpact Management Services, EPM Workspace,
96Interactive Reporting Studio, 96
collectionsImpact Management Services, EPM Workspace,
96Interactive Reporting Studio, 96
differences, Impact Management Services, EPMWorkspace, 95
differences, Interactive Reporting Studio, 95document conversion strategy, 92investigate structure, Impact Management Services,
EPM Workspace, 95property types
Impact Management Services, EPM Workspace,96
Interactive Reporting Studio, 96traversing, 93tree structure, 92xpath-style searching, 94
EEssbase configuration properties, 166Event Service
defined, 19event logs, 44
eventsexternally triggered, creating, 125time, managing, 125tracking, 61triggering, 126triggering with APIs, 126
exceptionsconfiguring, 137described, 57
Exceptions Dashboarddescribed, 57generated Personal Page and, 134
expiration times, 58Extended Access for Hyperion Interactive Reporting
Service, 20externally triggered events
creating, 125
A B C D E F G H I J K L M N O P R S T U V W
Index 231
Ffile content window, 137file size, of e-mail attachments, 58file systems
accessing within script, 97files
adding to folders, 136in e-mail attachments, 58
Financial Reporting servers, defined, 20folders
administrator-only System folder, 133Broadcast Messages, 44importing items in, 136organizing, 132preconfigured, 136
foreground jobs, 128functional services, 19
Ggenerate parameter files, show impact of change,
interactive reports, 110Global Service Manager. See GSM.graphics. See images.group preferences, default, assigning, 46GSM
defined, 18guidelines, size and time, Impact Manager module,
75
HHarvester properties, 161headings (within Personal Pages), 138hosts
adding, 148deleting, 148managing, 147, 148modifying, 148
HTML filescustomizing generated Personal Page with, 134displaying on Personal Pages, 137
HTTP protocol, SmartCuts for e-mail notificationsand, 59
HTTPS protocol, 59Hyperion Home, 25Hyperion Interactive Reporting Data Access Service
configuring, 102
defined, 19Hyperion Interactive Reporting Service
defined, 19physical resources and, 53
Iicons
changing MIME type, 55DBCS and, 137MIME types and, 55files, 133on Exceptions Dashboard, 57
imagesfor bookmarks, setting up, 137replacing in logon panel, 131
Impact Management Assessment Service, 72Impact Management Assessment Service, metadata,
72Impact Management Harvester, 72Impact Management metadata, 72Impact Management Services
about, 72accessing, 77Impact of Change Report, 119
Impact Management Update Service, 73running, 75
Impact Management Update servicescript logging levels, 76
Impact Manager module, time and size guidelines,75
importing Interactive Reporting databaseconnections, 103
inactivatingMIME types, 55
IncludeJavaClientItems parameter, 132Install Home, 25, 30installation
installed services, 30installed system, 44location of components, 139new hosts, 148
installation program, 41, 42installed services
deleting host with, 148Interactive Reporting services, 33recommendations for Job Service, 152replicating Job Service, 152
A B C D E F G H I J K L M N O P R S T U V W
232 Index
RSC toolbar, 140Interactive Reporting database connections
associating with interactive reports, 104creating, 103explicit access property, 126importing, 103managing, 126
interactive reports, connecting, 102Internal properties, 173IP ports. See ports.items
generated Personal Page and, 134headings on, 138organizing in folders, 132, 136
JJava client installers, removing access to, 132Java code in scripts, 97java plug-in configuration properties, 165JavaScript update, 82
choose control mode, 83parameters, 83scheduling options, 84verifying, 85workflow, 74
job execution, job process explained, 152Job Log
columns in, 124dates, 124deleting entries, 125marking entries for deletion, 125sorting, 124start dates and times, 124suppressing, 151user displays for, 124
job parameters, public, administering, 126Job Service
applicationsadding, 145configuring, 145properties, 145
defined, 19executable of application, 145properties
Application, 145database, 144Executable, 147
Production Reporting, 145running jobs against enterprise applications, 152user name for running SQR Production Reporting
jobs, 60jobs
e-mail file attachments, 58Job Log, 123
Kkill commands, 33
Llanguages, changing default selection of, 131Lifecycle Management, 38locale-based language selection, overriding, 131log files
analyzing, 187configuration, 182configuration log, 181file formats, 181location, 179naming convention, 179notification log, 58
Log Management Helper, 178log4j, 178loggers, 178logging
Interactive Reporting Studio, 76EPM Workspace, 76
logging events, 123logging levels, 183Logging Service
configuration, 182defined, 18usage, 178
logon panel, replacing image in, 131logon_panel.gif, 131LSM, 18
Mmanage task list, interactive report, 106
undo, 107undo, show actions, 107
management services, 18managing
Interactive Reporting database connections, 126
A B C D E F G H I J K L M N O P R S T U V W
Index 233
time events, 125methods and properties references
document, 101env methods, 98node methods, 100repository methods, 99repository methods, EPM Workspace-specific, 100
MIME type icons, changing, 55MIME types
creating, 55deleting, 56inactivating, 55modifying, 55reactivating, 55working with, 54
modulesAdminister, 43Impact Manager, 29, 75
Nnative user password change, 171notifications and subscriptions
e-mailenabling attachments, 58
events that trigger, 57expiration times, 58file attachments, 58other, 56types, 57understanding, 56
OOCEs. See Interactive Reporting database
connections.Oracle Reports, command string example, 147organizing items and folders, 132output directories
adding, 52deleting, 53modifying, 53purpose, 52
output.properties file, 57
Pparameters, job, public, administering, 126pass-through
credentials, 127defined, 127
passwordsInteractive Reporting, changing, 118enabling password changes for native users, 171Job Service, for running SQR Production Reporting
jobs, 60Personal Pages
Broadcast Messages on, 135configuration tool, 138customized graphics, 137default, 135generated
customizing, 134setting up, 134
graphic files on, 137importing, 138importing other pages, 138multiple, 135optional content, providing to users, 136properties, configuring, 138setting up items in folders, 136viewing new user's, 138
Personal Pages properties, 173physical resources
access permissions on, 52, 53adding, 52deleting, 53modifying, 53
pinging services, 141port assignments, services, changing, 34ports, Browse servlet, 59preconfigured folders, setting up, 136printers
adding, 52deleting, 53modifying, 53properties, 53purpose, 52
priority settings, in Administer module, 45programs, running jobs against enterprise
applications, 152properties
Agent Configuration properties, 176Applications properties, 172Cache properties, 172configuring Personal Pages, 138
A B C D E F G H I J K L M N O P R S T U V W
234 Index
DAS properties, 162Data Sources properties, 163debug configuration properties, 165Essbase configuration properties, 166general service configuration properties, 159generated Personal Page, 134, 135Internal properties, 173IR Intelligence properties, 162IR Job Services properties, 162java plug-in configuration properties, 165Job Service, 143modifying in CMC, 158Personal Pages properties, 173related content configuration properties, 168result set configuration properties, 165Service Configuration properties, 159services properties, 160Shared Services configuration properties, 167User Interface properties, 174Web Analysis properties, 168Web Analysis Web Application properties, 164Workspace Services properties, 161Workspace Web Application properties, 171
protocols for SmartCuts, 59Provisioning Manager Shared Services role, 46Publisher Service, defined, 18publishing Personal Pages, 138pushed content, 133, 135pushing content. See Broadcast Messages.
RRDBMS
starting, 31reactivating MIME types, 55redirectiry URLs, after users log off, 132references
document, 101env methods, 98methods and properties, 98node methods, 100repository methods, 99repository methods, EPM Workspace-specific, 100
related content configuration properties, 168renaming Broadcast Messages folders, 136replicating Repository Service, 143replicating services, 157Repository Service
defined, 18replicating, 143stopping, 34
result set configuration properties, 165RMService8.properties file, 34root directories, 59row-level security, 59RSC
described, 29pinging services, 141what it does, 139
RSC servicesconfiguring, 29
run now, synchronizing, 77Run Type property of services, 32
Sschedules, synchronizing, 78script environment
Interactive Reporting Studio, 90EPM Workspace, 90
script logging levels, 76script parameters, EPM Workspace, 90scripting, advanced, 89scripts
batch input files, 97Java code, 97sort data model topics, 85start_BIPlus, 32startCommon Services, 32for stopping services, 33
Search Servicesabout, 65configuring for Google OneBox, 68configuring for SES, 65configuring the connector plugin, 66configuring the identity plugin, 66configuring the OneBox module, 69configuring to call the OneBox module, 68deploying required JAR files, 65integrating with external applications, 65OneBox module parameters, 69
server-side software components. See services.Service Broker
defined, 18service configuration parameters, Impact Manager
module and, 118
A B C D E F G H I J K L M N O P R S T U V W
Index 235
service port assignments, changing, 34services
common tasks, 40configuring, 156Core, 18defined, 18functional, 19modifying properties, 141pinging, 141properties
Advanced, 142General, 142
replicating, 143, 157Run type property, 32running as separate processes, 34starting on UNIX, 31starting on Windows, 31starting subsets of, 32, 33stopping, with scripts, 33summary, 21viewing properties, 141
Session Manager Service, 18settings, priority, 45Shared Services configuration properties, 167show actions, undo, 107Show Impact of Change
generate parameter files, 110Show Impact of Change,
interactive report, 109Show Task Status
interactive report, 104UTC offset, 106
shutting down services, 33size guideline, 75SmartCuts
e-mail notifications, 44, 58in notifications, 57system properties, 58
Production Reportingenvironment variables for, 150jobs, data sources for, 145persisting job output, 128server properties, 145
start scripts, 31, 32start_BIPlus scripts, 32startCommonServices script, 32starting on UNIX, 31
starting RDBMS, 31starting system or components
administrative toolsCMC, 154RSC, 139
servicesdependencies, 34starting on UNIX, 31starting on Windows, 31starting subsets of, 32, 33
servlets, 34Subscribe page, 57subscriptions and notifications, 56synchronize metadata, 77
run now, 77schedule, 78
system configuration information, 27, 177System folder
administrator only, described, 133viewing, 133
system propertiesin Administer module, 45
system usage, 60
Ttable, rename, 112time events, managing, 125time guideline, 75timeout settings
EPM Workspace, 27titles on items, 138toolbar buttons
RSC, 140toolbars
Service Configurator, 140tracking
documents, 62events, 61
Transformer properties, 161triggering events, 126troubleshooting, 177troubleshooting code, disabling, 38
Uundo
manage task list, interactive report, 107
A B C D E F G H I J K L M N O P R S T U V W
236 Index
show actions, 107Unicode, data model, character sets, replacement,
117UNIX systems
kill commands and, 33maximum number of file descriptors, 142starting Service Configurator, 139
unknown file type messages, 56update data models
link data models and queries, 73scheduling options, 81specify data model, 79transformation, 73view candidates to update, 80workflow, 73
update JavaScriptchoose control mode, 83parameters, 83scheduling options, 84verifying, 85
updating, data models, 79updating, JavaScript, 82URLs, redirecting after users log off, 132Usage Service
defined, 19, 60managing, 61reports, 62
usage trackingaccessing Organization tab, 61properties, 61
user interface customizations, 131User Interface properties, 174user names, Interactive Reporting, changing, 118user preferences, default, assigning, 46users
common tasks, 40Job Log displays for, 124
UTC offset option, in Show Task Status interactivereports, 106
VView Manager, pushed content, 133virus protection, 133
WWeb Analysis properties, 168
Web Analysis Web Application properties, 164web applications
configuring, 157EPM Workspace configuration information, 27, 177Workspace Services properties, 161Workspace test module, disabling, 37Workspace Web Application properties, 171
A B C D E F G H I J K L M N O P R S T U V W
Index 237

A B C D E F G H I J K L M N O P R S T U V W
238 Index