Embed Size (px)
Citation preview
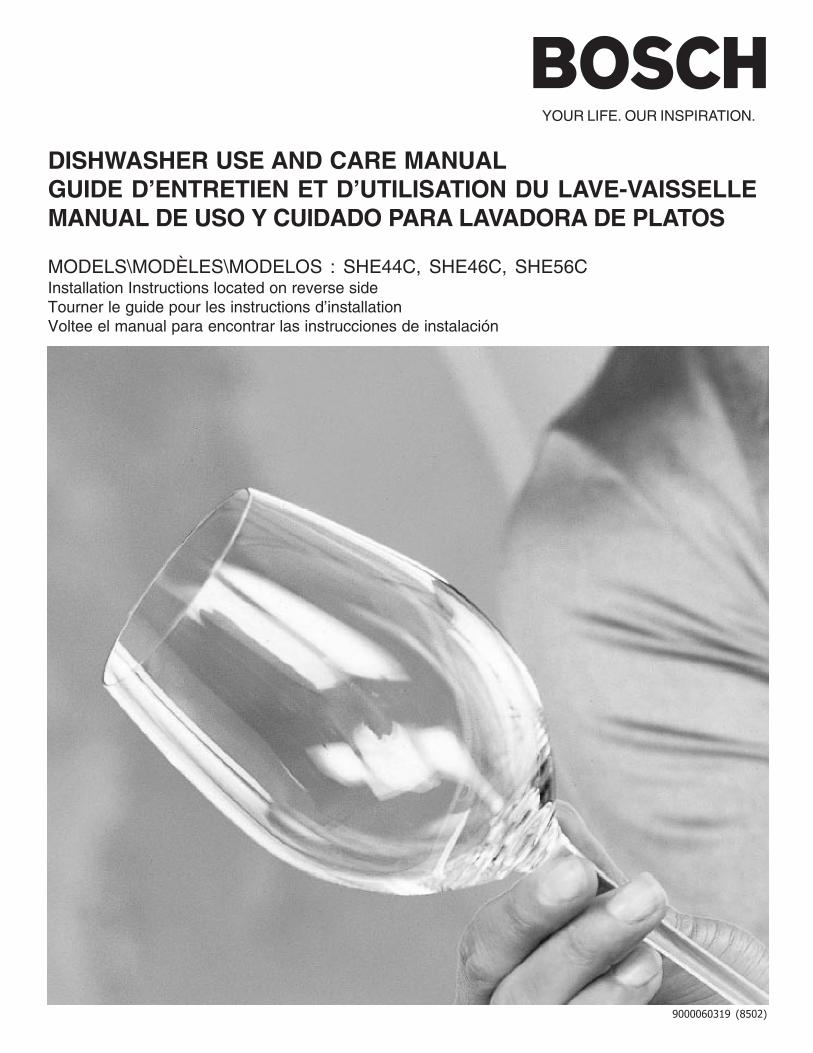
DISHWASHER USE AND CARE MANUALGUIDE D’ENTRETIEN ET D’UTILISATION DU LAVE-VAISSELLEMANUAL DE USO Y CUIDADO PARA LAVADORA DE PLATOS
MODELS\MODÈLES\MODELOS : SHE44C, SHE46C, SHE56CInstallation Instructions located on reverse sideTourner le guide pour les instructions d’installationVoltee el manual para encontrar las instrucciones de instalación
YOUR LIFE. OUR INSPIRATION.
9000060319 (8502)
1
Congratulations, and Thank You from Bosch!
Thank you for selecting a Bosch dishwasher. You have joined the many consumers who demandquiet and superior performance from their dishwashers.
This manual was written with your safety and convenience in mind, and the information containedherein is very important. We highly recommend that you read this manual before you use yourdishwasher for the first time.
To learn even more about your dishwasher and available accessories, as well as many other top-quality Bosch appliances, visit our website at www.boschappliances.com.Please contact us if you have any questions or comments. You can call us at 1-800-944-2904, oryou can write us at
BSH Home Appliances, Corp.5551 McFadden AvenueHuntington Beach, CA 92649
Enjoy!
IMPORTANT SAFETY INSTRUCTIONS ....................... 2
Dishwasher Components, Features and Options............. 3
Dishware Materials .......................................................... 4
Preparing and Loading the Dishware ........................... 4-9
Dishware Preparation ................................................ 4
Loading the Dishwasher.......................................... 4-9
Adding Detergent and Rinse Agent .......................... 10-11
Operating the Dishwasher ........................................12-13
Dishware Drying....................................................... 13
Unloading the Dishwasher ........................................ 13
Care and Maintenance .............................................14-16
Self Help ........................................................................ 17
Wash Cycle Information/Sanitized .................................. 18
Statement of Warranties ................................................ 19
Customer Service .......................................................... 20
TABLE OF CONTENTS
2
SAVE THESE INSTRUCTIONS!
• Use this dishwasher only for its intendedfunction, which is the washing of householddishware and kitchenware.
• This dishwasher is provided with a manual setwhich includes Installation Instructions andUse and Care Manual. Read and understandall instructions before using the dishwasher.
• Use only detergents or wetting agentsrecommended for use in a dishwasher, andkeep them out of the reach of childen.
• When loading items to be washed: - Locate sharp items so that they are
not likely to damage the door seal. - Load knives and other sharp utensils
with their HANDLES UP to reduce therisk of cut-type injuries.
• Do not wash plastic items unless they aremarked “dishwasher safe” or the equivalent.
Important Safety Instructions
Misuse of the dishwasher can resultin serious injury or death. Do not use thedishwasher in any way not covered in thismanual or for any purpose other than thoseexplained on the following pages.
GROUNDING INSTRUCTIONSThis appliance must be grounded to a metal,permanent wiring system, or an equipmentgrounding conductor must be run with the circuitconductors and connected to the equipmentgrounding terminal or lead on the dishwasher.See the Installation Instructions included withthis dishwasher for more information on electricalrequirements.
For plastic items not so marked, check themanufacturer’s recommendations.
• Do not operate your dishwasher unless allenclosure panels are in place.
• Do not tamper with or override controls andinterlocks.
• Do not abuse, sit on, or stand on the door ordish racks of the dishwasher.
• To reduce the risk of injury, do not allowchildren to play in or on the dishwasher.
• Under certain conditions, hydrogen gas maybe produced in a hot water system that hasnot been used for two weeks or more.Hydrogen gas is explosive. Before using adishwasher that is connected to a hot watersystem that has been unused for two weeksor longer, turn on all hot water faucets and letthe water flow from each for several minutes.This will release any accumulated hydrogengas. As the gas is explosive, do not smoke oruse an open flame during this time.
• Remove the door to the washingcompartment when removing an olddishwasher from service or discarding.
• To avoid floor damage and possible moldgrowth, do not allow wet areas to remainaround or under the dishwasher.
• Protect your dishwasher from the elements.Protect against freezing to avoid possibledamage to the fill valve. Damage caused byfreezing is not covered by the warranty.
Electrical shock could result if theelectrical supply for the dishwashercovered in this manual is incorrectlyinstalled or if the dishwasher has beenimproperly grounded. Do not use thedishwasher covered in this manual if youare not certain the electrical supply hasbeen correctly installed or the dishwasherhas been properly grounded.
Severe product damage and/or injury couldresult from the use of unqualified servicetechnicians or non-original replacementparts. All repairs must be performed by aqualified service technician using onlyoriginal equipment factory replacementparts.
Never use harsh chemicals to clean yourdishwasher. Some chloride-containingcleaning products can damage yourdishwasher and may present health hazards!
Never use steam cleaning product to cleanyour dishwasher. The manufacturer will notbe liable for possible damages orconsequences.
WARNING
WARNING
CAUTION
WARNING
3
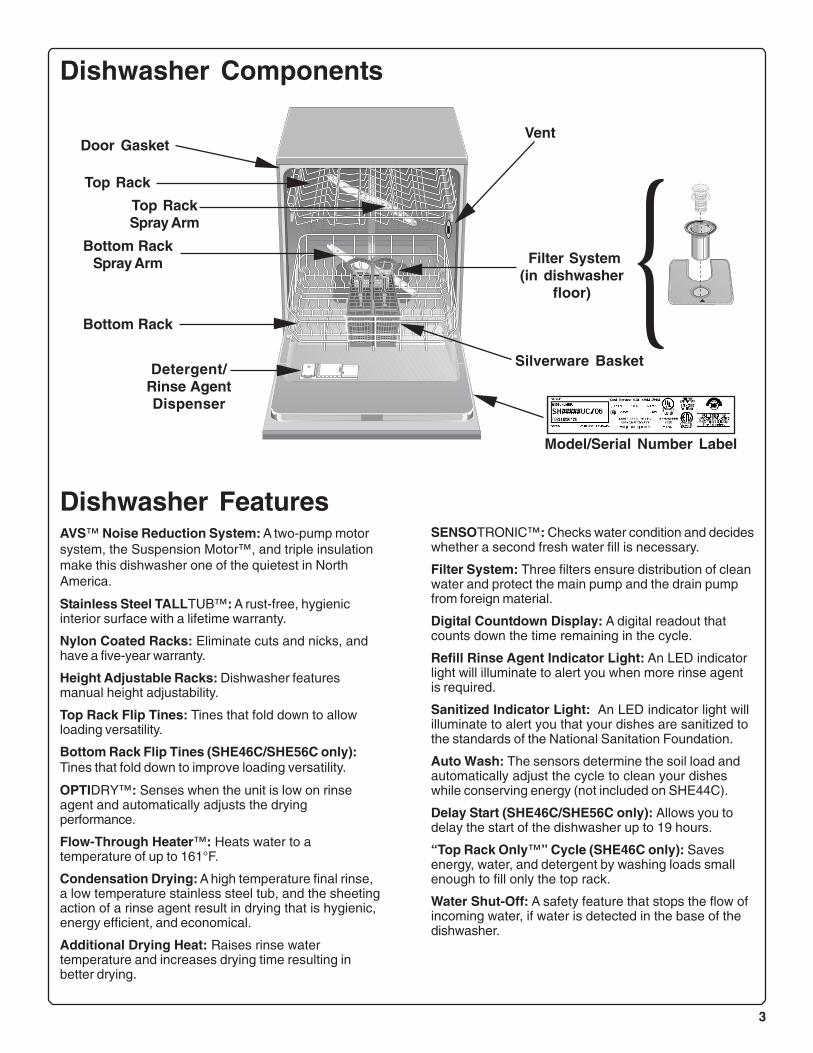
Dishwasher Components
Door Gasket
Top RackSpray Arm
Bottom Rack
Bottom RackSpray Arm
Detergent/Rinse AgentDispenser
Model/Serial Number Label
Filter System(in dishwasher
floor)
Silverware Basket
Top Rack
Vent
Dishwasher FeaturesAVS™ Noise Reduction System: A two-pump motorsystem, the Suspension Motor™, and triple insulationmake this dishwasher one of the quietest in NorthAmerica.
Stainless Steel TALLTUB™: A rust-free, hygienicinterior surface with a lifetime warranty.
Nylon Coated Racks: Eliminate cuts and nicks, andhave a five-year warranty.
Height Adjustable Racks: Dishwasher featuresmanual height adjustability.
Top Rack Flip Tines: Tines that fold down to allowloading versatility.
Bottom Rack Flip Tines (SHE46C/SHE56C only):Tines that fold down to improve loading versatility.
OPTIDRY™: Senses when the unit is low on rinseagent and automatically adjusts the dryingperformance.
Flow-Through Heater™: Heats water to atemperature of up to 161°F.
Condensation Drying: A high temperature final rinse,a low temperature stainless steel tub, and the sheetingaction of a rinse agent result in drying that is hygienic,energy efficient, and economical.
Additional Drying Heat: Raises rinse watertemperature and increases drying time resulting inbetter drying.
SENSOTRONIC™: Checks water condition and decideswhether a second fresh water fill is necessary.
Filter System: Three filters ensure distribution of cleanwater and protect the main pump and the drain pumpfrom foreign material.
Digital Countdown Display: A digital readout thatcounts down the time remaining in the cycle.
Refill Rinse Agent Indicator Light: An LED indicatorlight will illuminate to alert you when more rinse agentis required.
Sanitized Indicator Light: An LED indicator light willilluminate to alert you that your dishes are sanitized tothe standards of the National Sanitation Foundation.
Auto Wash: The sensors determine the soil load andautomatically adjust the cycle to clean your disheswhile conserving energy (not included on SHE44C).
Delay Start (SHE46C/SHE56C only): Allows you todelay the start of the dishwasher up to 19 hours.
“Top Rack Only™” Cycle (SHE46C only): Savesenergy, water, and detergent by washing loads smallenough to fill only the top rack.
Water Shut-Off: A safety feature that stops the flow ofincoming water, if water is detected in the base of thedishwasher.
4
Dishware PreparationDo not pre-wash items having loosely-attachedsoiling.
Remove large food particles, bones, seeds,toothpicks, and excessive grease.
Items having burned-on, baked-on or starchysoils may require pre-treatment.
Loading the Dishwasher
Check the Materials section of this manual if youare unsure about an item’s dishwasher suitability.
Load only dishwasher-safe items into thedishwasher.
Load dishes in the dishwasher racks so that theinsides of bowls, pots, and pans are facing thespray arms. Avoid nesting and contact pointsbetween dishes.
Separate items of dissimilar metals.
RecommendedAluminum: Colored anodized aluminum may fadeover time. Minerals in your water may cause thealuminum to darken or spot. This can usually beremoved by using a soap-filled steel wool pad.
China, Crystal, Stoneware: Somehand-painted pieces may discolor, fade, or spot.Hand-wash these pieces. Position fragile glass-ware so that it will not topple over orcontact other pieces during the wash cycle.
Glass: Milk glass may yellow.
Non-Stick Coatings: Apply a light coating ofvegetable oil to non-stick surfaces after drying.
Plastics: Make sure the piece is dishwasher safe.
Stainless Steel, Sterling Silver, and SilverPlate: Place these pieces so that they do notcontact dissimilar metals.
Not RecommendedAcrylic: Crazing (small cracks throughout theacrylic) may occur.
Adhesive-Joined Pieces: Adhesives that joinmaterials such as plastic, wood, bone, steelcopper, tin, etc. may loosen.
Bone-Handled Utensils: Handles may separate.
Iron: Iron will rust. Hand-wash and dry immedi-ately.
Non-Dishware Items: Your dishwasher is in-tended for use in cleaning ONLY standard house-hold dishware and kitchenware.
Pewter, Brass, Bronze: Pewter will tarnish.Hand-wash and dry immediately.
Tin: Tin will rust. Hand-wash and dry immediately.
Wood: Wooden bowls, wooden utensils, andwood-handled utensils can crack, warp, and losetheir finish.
NOTE: Before using your dishwasher for the firsttime, check the information in this section. Someitems are not dishwasher safe and should behand-washed; others require special loading.Contact the item’s manufacturer if you are unsureabout the item’s dishwasher suitability.
Dishware Materials Preparing and Loadingthe Dishware
To avoid dishwasher damage, do not loadthe dishwasher with objects such as paperproducts, plastic bags, packing materials,or anything other than normal dishware andkitchenware. Do not load the dishwasherwith anything other than dishwasher-safedishware and kitchenware.
5
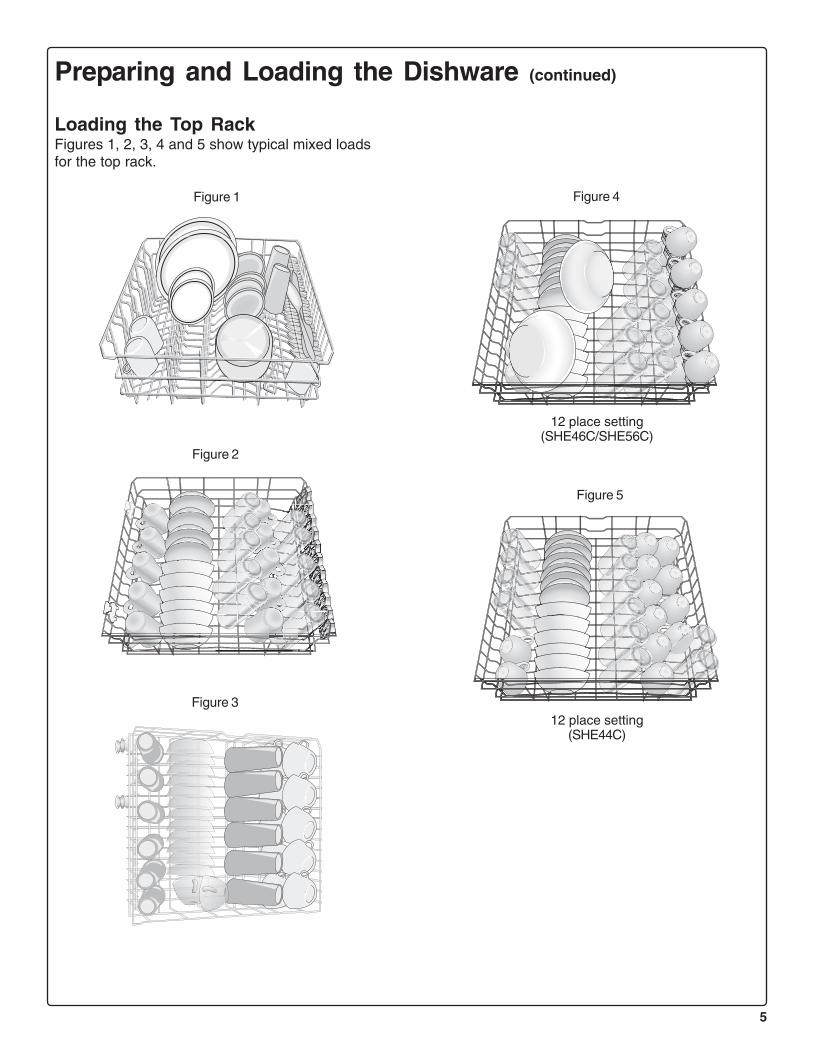
Loading the Top RackFigures 1, 2, 3, 4 and 5 show typical mixed loadsfor the top rack.
Figure 1
Figure 2
Figure 3
Figure 4
Figure 5
Preparing and Loading the Dishware (continued)
12 place setting(SHE46C/SHE56C)
12 place setting(SHE44C)
6
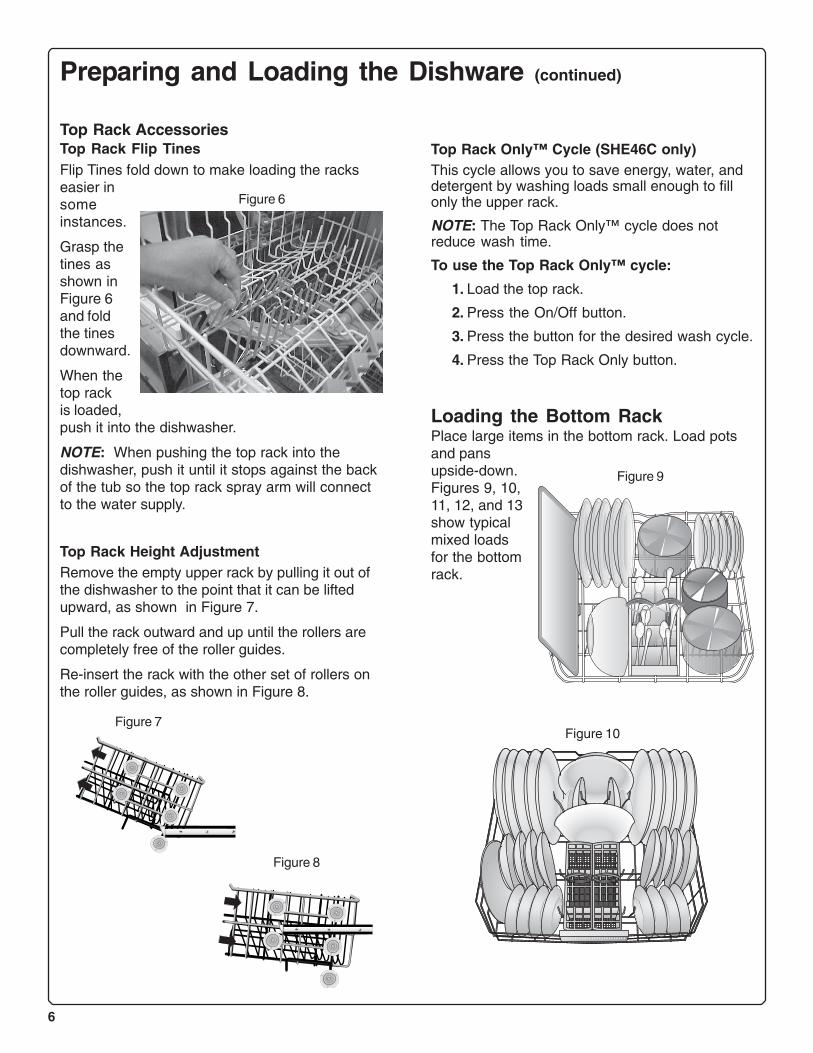
Top Rack AccessoriesTop Rack Flip TinesFlip Tines fold down to make loading the rackseasier insomeinstances.
Grasp thetines asshown inFigure 6and foldthe tinesdownward.
When thetop rackis loaded,push it into the dishwasher.
NOTE: When pushing the top rack into thedishwasher, push it until it stops against the backof the tub so the top rack spray arm will connectto the water supply.
Top Rack Height AdjustmentRemove the empty upper rack by pulling it out ofthe dishwasher to the point that it can be liftedupward, as shown in Figure 7.
Pull the rack outward and up until the rollers arecompletely free of the roller guides.
Re-insert the rack with the other set of rollers onthe roller guides, as shown in Figure 8.
Preparing and Loading the Dishware (continued)
Figure 6
Figure 7
Figure 8
Top Rack Only™ Cycle (SHE46C only)This cycle allows you to save energy, water, anddetergent by washing loads small enough to fillonly the upper rack.
NOTE: The Top Rack Only™ cycle does notreduce wash time.
To use the Top Rack Only™ cycle:
1. Load the top rack.
2. Press the On/Off button.
3. Press the button for the desired wash cycle.
4. Press the Top Rack Only button.
Loading the Bottom RackPlace large items in the bottom rack. Load potsand pansupside-down.Figures 9, 10,11, 12, and 13show typicalmixed loadsfor the bottomrack.
Figure 9
Figure 10
7
Preparing and Loading the Dishware (continued)
Figure 11
Figure 12
Figure 13
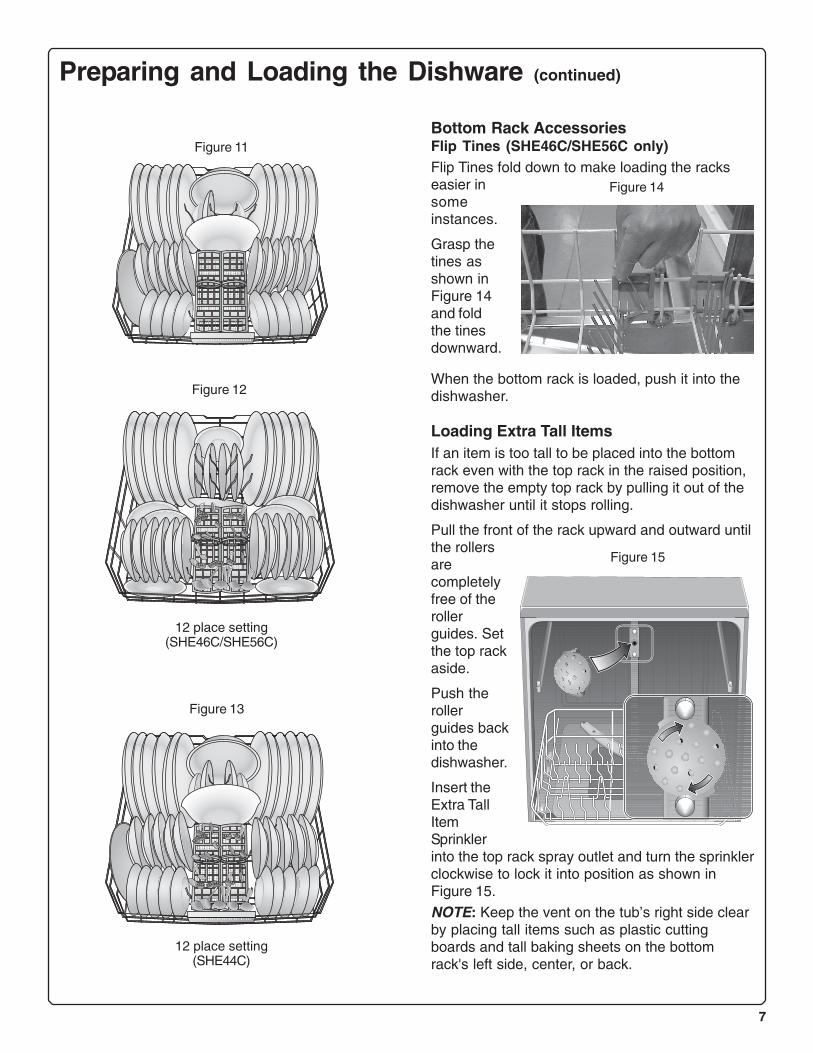
Bottom Rack AccessoriesFlip Tines (SHE46C/SHE56C only)Flip Tines fold down to make loading the rackseasier insomeinstances.
Grasp thetines asshown inFigure 14and foldthe tinesdownward.
When the bottom rack is loaded, push it into thedishwasher.
Loading Extra Tall ItemsIf an item is too tall to be placed into the bottomrack even with the top rack in the raised position,remove the empty top rack by pulling it out of thedishwasher until it stops rolling.
Pull the front of the rack upward and outward untilthe rollersarecompletelyfree of therollerguides. Setthe top rackaside.
Push therollerguides backinto thedishwasher.
Insert theExtra TallItemSprinklerinto the top rack spray outlet and turn the sprinklerclockwise to lock it into position as shown inFigure 15.
NOTE: Keep the vent on the tub’s right side clearby placing tall items such as plastic cuttingboards and tall baking sheets on the bottomrack's left side, center, or back.
Figure 14
Figure 15
12 place setting(SHE46C/SHE56C)
12 place setting(SHE44C)
8
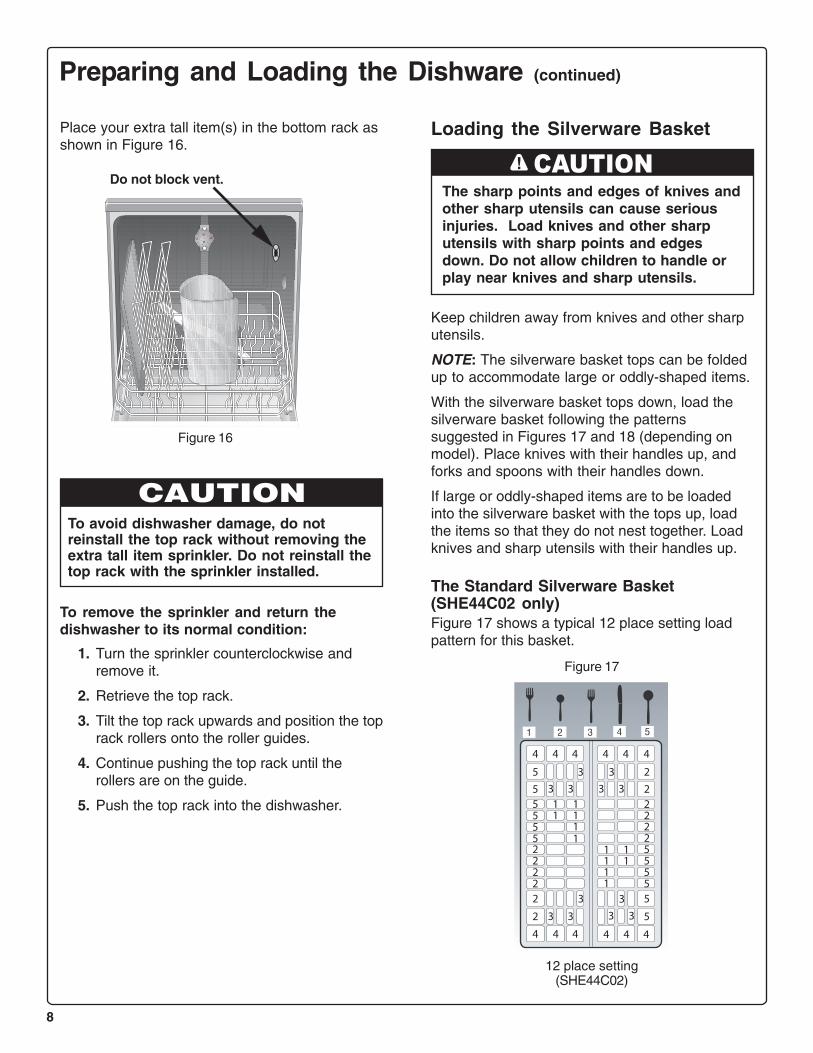
Keep children away from knives and other sharputensils.
NOTE: The silverware basket tops can be foldedup to accommodate large or oddly-shaped items.
With the silverware basket tops down, load thesilverware basket following the patternssuggested in Figures 17 and 18 (depending onmodel). Place knives with their handles up, andforks and spoons with their handles down.
If large or oddly-shaped items are to be loadedinto the silverware basket with the tops up, loadthe items so that they do not nest together. Loadknives and sharp utensils with their handles up.
The Standard Silverware Basket(SHE44C02 only)Figure 17 shows a typical 12 place setting loadpattern for this basket.
To remove the sprinkler and return thedishwasher to its normal condition:
1. Turn the sprinkler counterclockwise andremove it.
2. Retrieve the top rack.
3. Tilt the top rack upwards and position the toprack rollers onto the roller guides.
4. Continue pushing the top rack until therollers are on the guide.
5. Push the top rack into the dishwasher.
Place your extra tall item(s) in the bottom rack asshown in Figure 16.
Loading the Silverware Basket
Figure 16
Do not block vent.
Preparing and Loading the Dishware (continued)
To avoid dishwasher damage, do notreinstall the top rack without removing theextra tall item sprinkler. Do not reinstall thetop rack with the sprinkler installed.
The sharp points and edges of knives andother sharp utensils can cause seriousinjuries. Load knives and other sharputensils with sharp points and edgesdown. Do not allow children to handle orplay near knives and sharp utensils.
Figure 17
12 place setting(SHE44C02)
4
5
55 1 1
1 111
11
11
11
55522222
2
2
2222255555
5
4 4 4
3 3
3 3
3
3 3 3 3
3
3 3
4 4 44 4
44 4
CAUTION
9
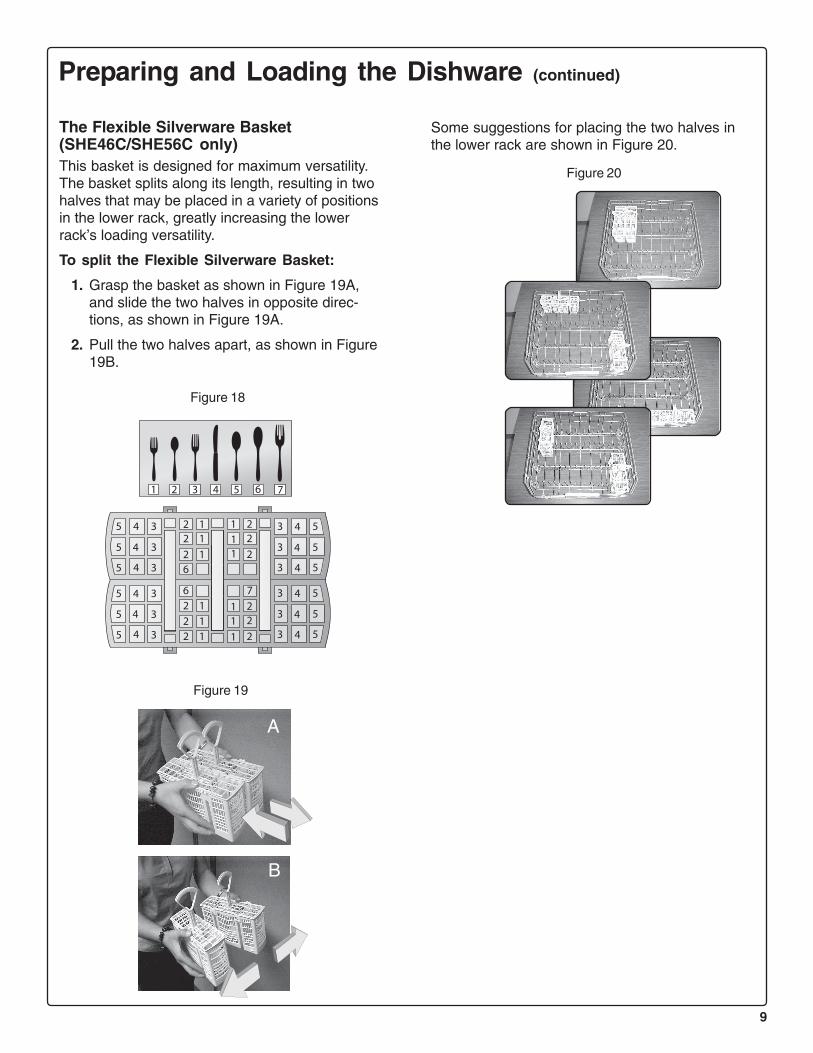
The Flexible Silverware Basket(SHE46C/SHE56C only)This basket is designed for maximum versatility.The basket splits along its length, resulting in twohalves that may be placed in a variety of positionsin the lower rack, greatly increasing the lowerrack’s loading versatility.
To split the Flexible Silverware Basket:
1. Grasp the basket as shown in Figure 19A,and slide the two halves in opposite direc-tions, as shown in Figure 19A.
2. Pull the two halves apart, as shown in Figure19B.
Figure 19
Figure 18
5 4 3
5 3
5 3
5 3
5 3
5 3
3
4
2 1
1 2 3 4 5
2 1
2 16
762 1
2 12 1
5
3 5
3 5
3 5
3 5
3 5
6 7
4
4
4
4
111
11
1
22
2
22
2
4
4
4
4
4
4
Figure 20
Preparing and Loading the Dishware (continued)
A
B
Some suggestions for placing the two halves inthe lower rack are shown in Figure 20.
10
NOTE: If you do not know the hardness of yourwater supply, use 15ml of detergent. Increase theamount of detergent, if necessary, to the leastamount required to get your dishware andkitchenware clean.
Use the measuring lines in the detergentdispenser cup as a guide to measure the amountof detergent recommended in Table 1.
Adding Detergent and Rinse Agent
To avoid dishware damage, do not use toomuch detergent if your water supply is soft.Using too much detergent in soft water maycause etching in glassware. Rinse Agents
To achieve proper drying, always use a liquidrinse agent, even if your detergent contains arinse agent or drying additive.
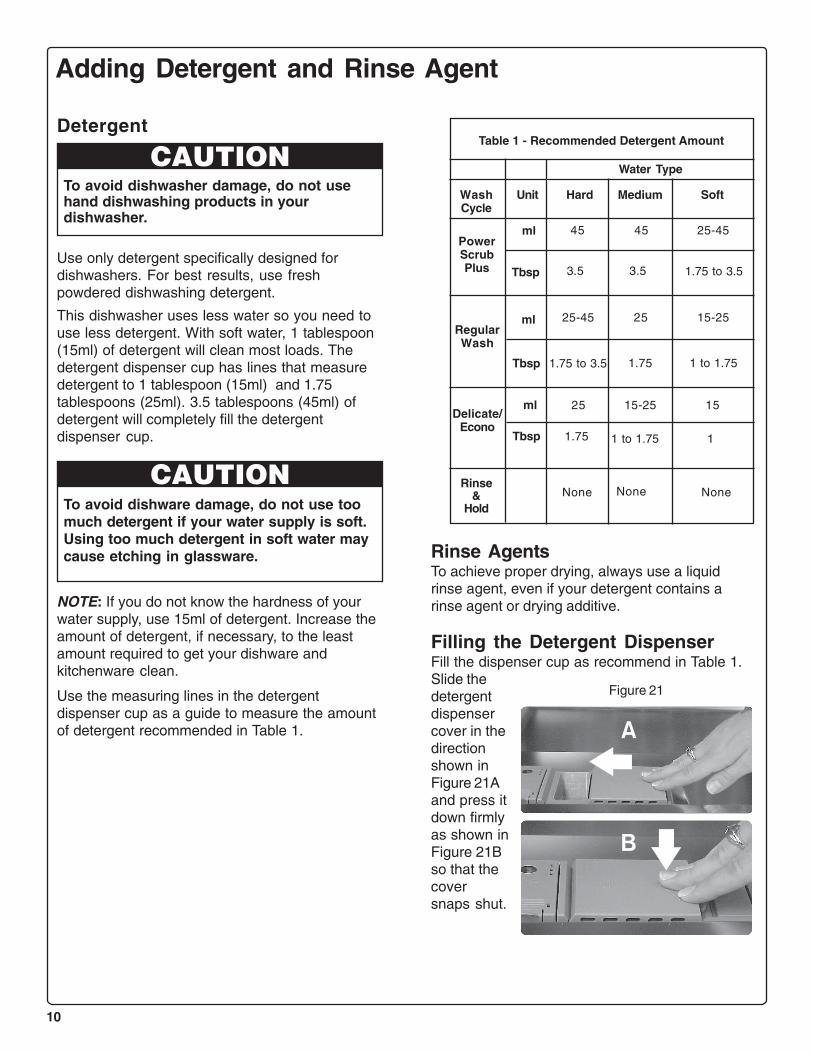
Filling the Detergent DispenserFill the dispenser cup as recommend in Table 1.Slide thedetergentdispensercover in thedirectionshown inFigure 21Aand press itdown firmlyas shown inFigure 21Bso that thecoversnaps shut.
Use only detergent specifically designed fordishwashers. For best results, use freshpowdered dishwashing detergent.
This dishwasher uses less water so you need touse less detergent. With soft water, 1 tablespoon(15ml) of detergent will clean most loads. Thedetergent dispenser cup has lines that measuredetergent to 1 tablespoon (15ml) and 1.75tablespoons (25ml). 3.5 tablespoons (45ml) ofdetergent will completely fill the detergentdispenser cup.
Detergent
To avoid dishwasher damage, do not usehand dishwashing products in yourdishwasher.
WashCycle
PowerScrubPlus
RegularWash
Delicate/Econo
Rinse&
Hold
Table 1 - Recommended Detergent Amount
Hard Medium Soft
45 25-45
None
Unit
None None
ml
ml
ml
Tbsp
Tbsp
Tbsp
45
25-45 25 15-25
25 15-25 15
3.5 3.5 1.75 to 3.5
1.75 to 3.5 1.75 1 to 1.75
1.75 1 to 1.75 1
Water Type
Figure 21
A
B
11
Adding Detergent and Rinse Agent (continued)
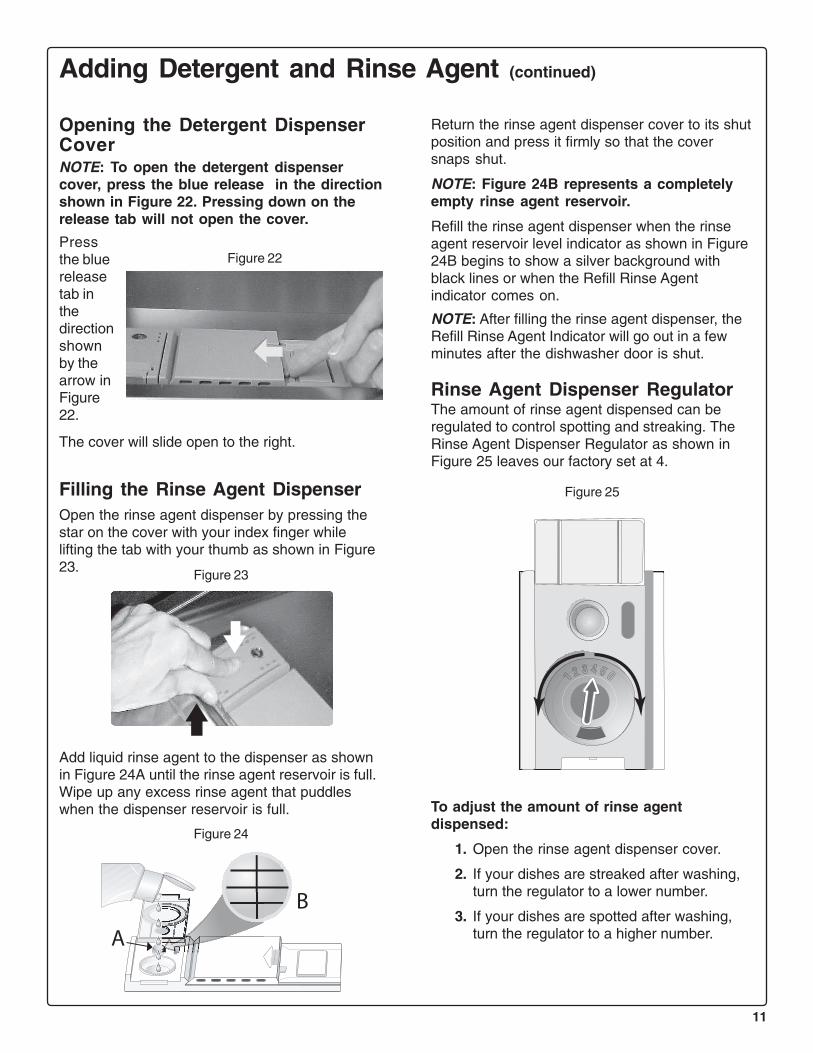
Opening the Detergent DispenserCoverNOTE: To open the detergent dispensercover, press the blue release in the directionshown in Figure 22. Pressing down on therelease tab will not open the cover.
Pressthe bluereleasetab inthedirectionshownby thearrow inFigure22.
Return the rinse agent dispenser cover to its shutposition and press it firmly so that the coversnaps shut.
NOTE: Figure 24B represents a completelyempty rinse agent reservoir.
Refill the rinse agent dispenser when the rinseagent reservoir level indicator as shown in Figure24B begins to show a silver background withblack lines or when the Refill Rinse Agentindicator comes on.
The cover will slide open to the right.
Filling the Rinse Agent DispenserOpen the rinse agent dispenser by pressing thestar on the cover with your index finger whilelifting the tab with your thumb as shown in Figure23.
Figure 23
Add liquid rinse agent to the dispenser as shownin Figure 24A until the rinse agent reservoir is full.Wipe up any excess rinse agent that puddleswhen the dispenser reservoir is full.
B
Figure 24
Figure 25
NOTE: After filling the rinse agent dispenser, theRefill Rinse Agent Indicator will go out in a fewminutes after the dishwasher door is shut.
Rinse Agent Dispenser RegulatorThe amount of rinse agent dispensed can beregulated to control spotting and streaking. TheRinse Agent Dispenser Regulator as shown inFigure 25 leaves our factory set at 4.
Figure 22
To adjust the amount of rinse agentdispensed:
1. Open the rinse agent dispenser cover.
2. If your dishes are streaked after washing,turn the regulator to a lower number.
3. If your dishes are spotted after washing,turn the regulator to a higher number.
12
Figure 26
Wait at least ten seconds or until water noisesstop before opening the dishwasher door.
To resume the cycle, press the On/Off button andshut the dishwasher door.
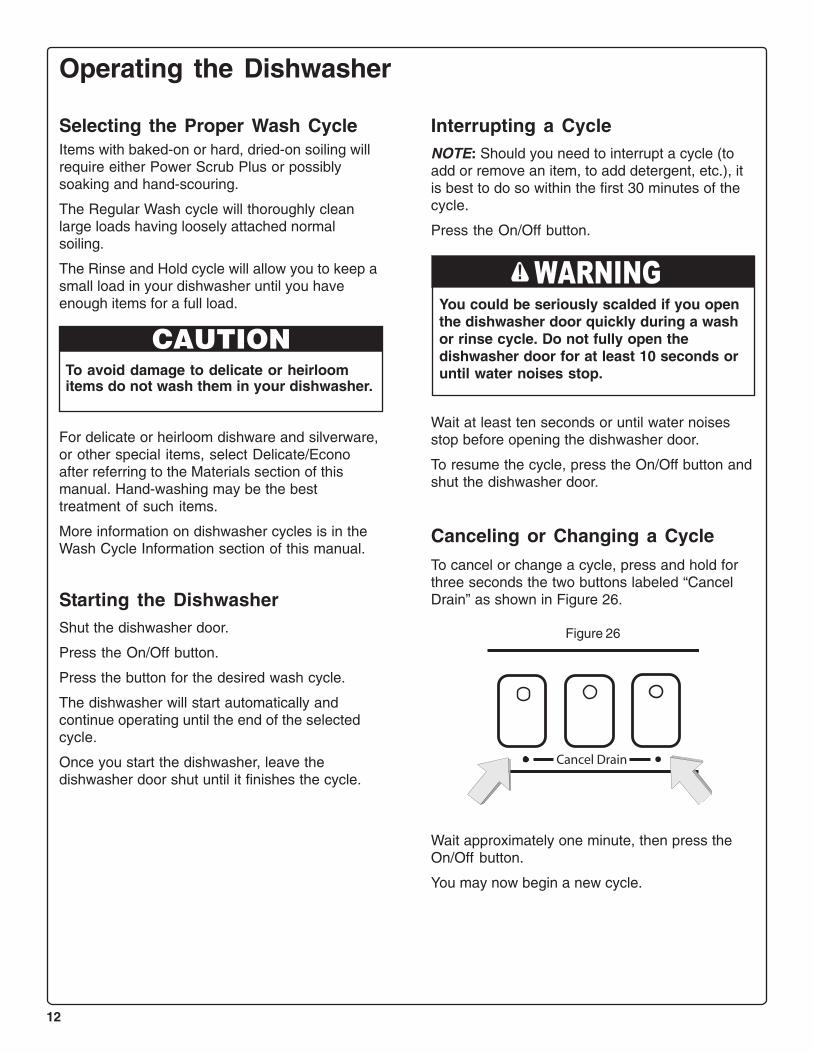
Canceling or Changing a CycleTo cancel or change a cycle, press and hold forthree seconds the two buttons labeled “CancelDrain” as shown in Figure 26.
For delicate or heirloom dishware and silverware,or other special items, select Delicate/Econoafter referring to the Materials section of thismanual. Hand-washing may be the besttreatment of such items.
More information on dishwasher cycles is in theWash Cycle Information section of this manual.
Starting the DishwasherShut the dishwasher door.
Press the On/Off button.
Press the button for the desired wash cycle.
The dishwasher will start automatically andcontinue operating until the end of the selectedcycle.
Once you start the dishwasher, leave thedishwasher door shut until it finishes the cycle.
Selecting the Proper Wash CycleItems with baked-on or hard, dried-on soiling willrequire either Power Scrub Plus or possiblysoaking and hand-scouring.
The Regular Wash cycle will thoroughly cleanlarge loads having loosely attached normalsoiling.
The Rinse and Hold cycle will allow you to keep asmall load in your dishwasher until you haveenough items for a full load.
Operating the Dishwasher
To avoid damage to delicate or heirloomitems do not wash them in your dishwasher.
Interrupting a CycleNOTE: Should you need to interrupt a cycle (toadd or remove an item, to add detergent, etc.), itis best to do so within the first 30 minutes of thecycle.
Press the On/Off button.
You could be seriously scalded if you openthe dishwasher door quickly during a washor rinse cycle. Do not fully open thedishwasher door for at least 10 seconds oruntil water noises stop.
Wait approximately one minute, then press theOn/Off button.
You may now begin a new cycle.
Cancel Drain
WARNING
13
Unloading the DishwasherUnload the bottom rack first.
Unload the silverware basket(s). They are easilyremoved for unloading.
Unload the top rack.
If the Extra Tall Item Sprinkler was installed, returnthe dishwasher to its normal condition (see theLoading Extra Tall Items instructions in the“Loading the Dishwasher” section of this manual).
Dishware DryingAt the end of the cycle the dishwasher will stopand a period of condensation drying will follow.After 12 - 15 minutes of drying:
• the cycle countdown display will read “0”.
• the “Sanitized” light may appear (except inthe Rinse and Hold cycle). See section onSanitization for more information.
NOTE: If your household water supply is too hot,your dishwasher’s heating time may be reducedand the “Sanitized” light may not illuminate. YourBosch Dishwasher Installation Manual hasinformation on the recommended temperature foryour household hot water supply.
NOTE: To accelerate and enhance drying, openthe dishwasher door, pull the top rack a fewinches out of the dishwasher, and prop thedishwasher door against the top rack.
OPTIDRY™This feature senses when the unit is low on rinseagent and automatically adjusts the dryingperformance.
Additional Drying HeatWith this option you can raise the temperature ofthe rinse water and increase the drying time,which will result in improved drying.
Press and hold the left “Cancel Drain” button,then press and hold the On/Off button.
When the LED display shows a “0” or a “1”,release both buttons.
To enable the Additional Drying Heat, press theleft “Cancel Drain” button until the LED displayshows a “1”.
To disable the Additional Drying Heat, press theleft “Cancel Drain” button until the LED displayshows a “0”.
Press the On/Off button to save the setting.
Operating the Dishwasher (continued)
“Sanitized” LightWhen the “Sanitized” light appears, it means thatthe dishware and kitchenware that was justwashed has been sanitized according to therequirements of the National Sanitation Foundation(NSF). For more information on NSF certification,go to the Wash Cycle Information section of thismanual.
14
Maintenance TasksCertain areas of your Bosch dishwasher requireoccasional maintenance. The maintenance tasksare easy to do and will ensure continued superiorperformance from your Bosch dishwasher. Thesetasks are:
• Winterizing Your Bosch Dishwasher
• Wiping up Spills and Splash-out
• Clean the Stainless Steel Inner Door and Tub
• Check/Clean the Spray Arm Nozzles
• Check/Clean the Filter System
• Clean the Exterior Door Panel
• Clean the Door Gasket
Winterizing Your BoschDishwasherIf your dishwasher will be unused for an extendedperiod of time in a location that experiencesfreezing temperatures (e.g., in a holiday home orthrough a vacation period), have your dishwasherwinterized by an authorized service center.
Care and Maintenance
To avoid dishwasher damage, do not allowwater to remain in your dishwasher systemsthrough extended periods of freezingtemperatures. Freezing temperatures candamage your dishwasher.
Wiping Up Spills and Splash-outWater may occasionally splash out of your Boschdishwasher, especially if you interrupt a cycle oropen the dishwasher door during a cycle. Toavoid floor damage and possible mold growth, donot allow wet areas to remain around or under thedishwasher.
Check/Clean the Stainless SteelInner Door and TubClean the outer edges of the inside door panelregularly to remove debris that might collect therefrom normal loading.
If spots begin to appear on the stainless steel tubor inner door, make sure the rinse agent reservoiris full.
Check/Clean the Spray ArmNozzlesOccasionally check the spray arms to ensure thatthe spray arm nozzles (holes) are unobstructed.You must remove the spray arms to check themfor obstruction.
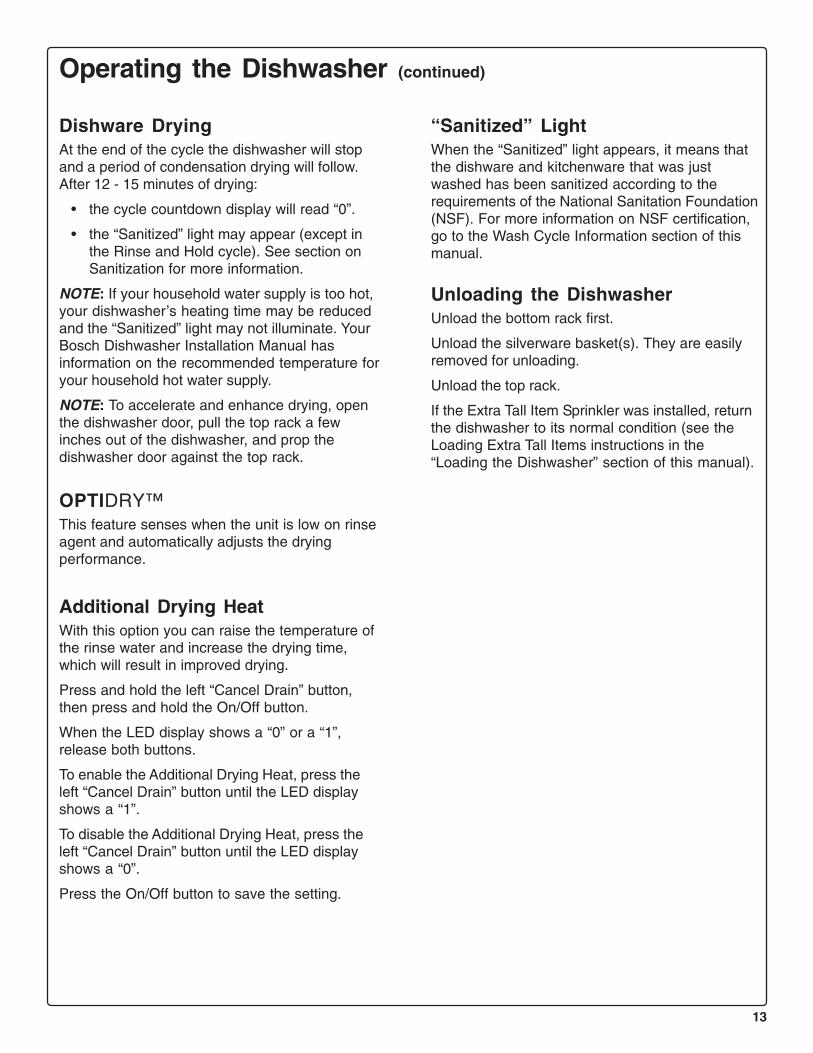
To remove the top spray arm:
1. Remove theempty toprack fromthedishwasher.
2. Turn therack upside-down. Thetop sprayarm is heldin positionby a lockingnut asshown inFigure 27A.Turn thelocking nutcounter-clockwise1/8 turn and remove it, as shown in Figure27B to release the spray arm.
3. Removethe sprayarm asshown inFigure 28.
4. Look forobstructionin thespraynozzles.
5. If the spray nozzles need cleaning, flushthem under running water.
Figure 27
A
B
Figure 28
15
Care and Maintenance (continued)
To reinstall the top spray arm:
1. Return the top spray arm to its installedposition.
2. Return the locking nut to its installedposition and turn it 1/8 turn clockwise.
3. Return the top rack to the top rack rollerguides.
To remove the bottom spray arm:
1. Remove the empty bottom rack from thedishwasher tub.
2. Grasp and lift the bottom spray arm asshown in Figure 29.
Figure 29
Figure 30
To reinstall the bottom spray arm:
1. Return the bottom spray arm to its installedposition and press it so that it snaps intoplace.
2. Return the bottom rack to its installedposition.
Check/Clean the Filter SystemYour Bosch dishwashers has a filter system thatis made up of a Large Object Trap/Cylinder Filterassembly and a Fine Filter. The filter system islocated on the dishwasher floor and is easilyaccessible.
During normal use the filter system is self-cleaning, but you should occasionally inspect itfor foreign objects and clean it when necessary.
3. Look for obstruction in the spray nozzles.
4. If the spray nozzles need cleaning, flushthem under running water.
Figure 31Large
Object TrapCylinderFilter
Assembly
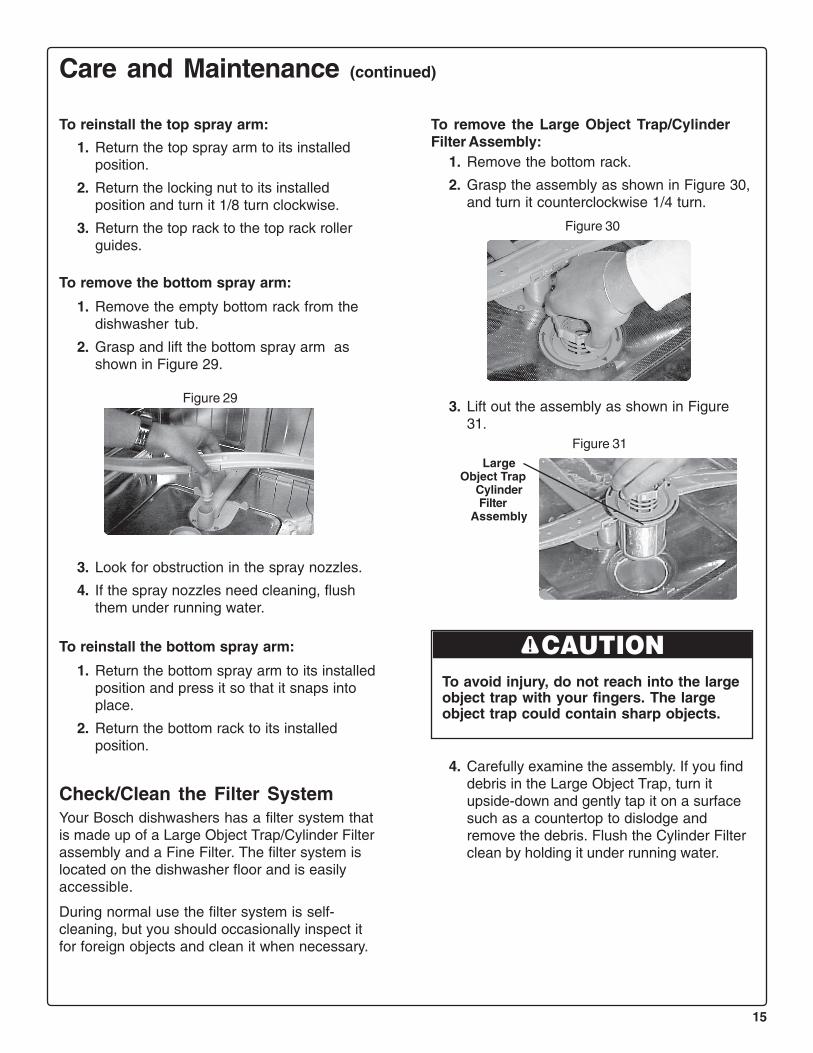
To remove the Large Object Trap/CylinderFilter Assembly:
1. Remove the bottom rack.
2. Grasp the assembly as shown in Figure 30,and turn it counterclockwise 1/4 turn.
3. Lift out the assembly as shown in Figure31.
To avoid injury, do not reach into the largeobject trap with your fingers. The largeobject trap could contain sharp objects.
4. Carefully examine the assembly. If you finddebris in the Large Object Trap, turn itupside-down and gently tap it on a surfacesuch as a countertop to dislodge andremove the debris. Flush the Cylinder Filterclean by holding it under running water.
16
Care and Maintenance (continued)
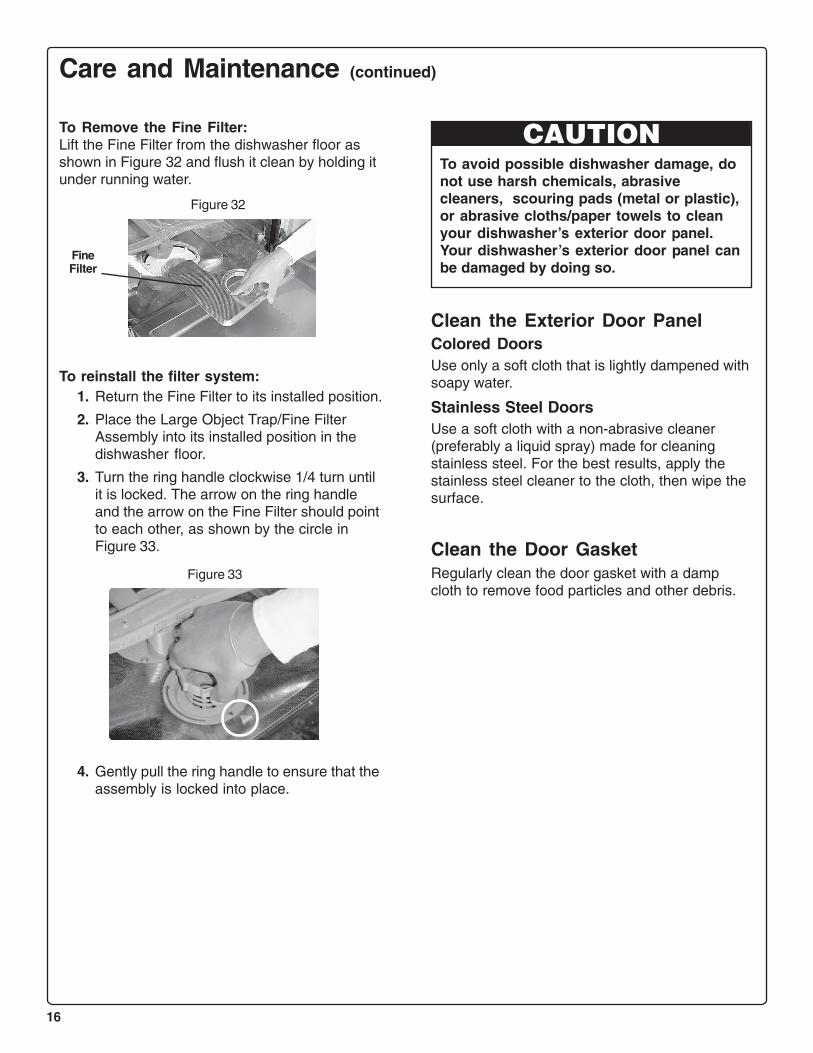
To Remove the Fine Filter:Lift the Fine Filter from the dishwasher floor asshown in Figure 32 and flush it clean by holding itunder running water.
Figure 32
FineFilter
To reinstall the filter system:1. Return the Fine Filter to its installed position.
2. Place the Large Object Trap/Fine FilterAssembly into its installed position in thedishwasher floor.
3. Turn the ring handle clockwise 1/4 turn untilit is locked. The arrow on the ring handleand the arrow on the Fine Filter should pointto each other, as shown by the circle inFigure 33.
Figure 33
Clean the Exterior Door Panel
4. Gently pull the ring handle to ensure that theassembly is locked into place.
To avoid possible dishwasher damage, donot use harsh chemicals, abrasivecleaners, scouring pads (metal or plastic),or abrasive cloths/paper towels to cleanyour dishwasher’s exterior door panel.Your dishwasher’s exterior door panel canbe damaged by doing so.
Colored DoorsUse only a soft cloth that is lightly dampened withsoapy water.
Stainless Steel DoorsUse a soft cloth with a non-abrasive cleaner(preferably a liquid spray) made for cleaningstainless steel. For the best results, apply thestainless steel cleaner to the cloth, then wipe thesurface.
Clean the Door GasketRegularly clean the door gasket with a dampcloth to remove food particles and other debris.

17
Water not pumped from dishwasherMake certain the drain hose isn’t kinked, clogged,or improperly installed. Make certain a portion ofthe drain hose is at least 20 inches above thedishwasher’s enclosure floor (see the InstallationManual). Filters may be clogged. Make certain thefilter system isn’t clogged (see the Care andMaintenance section of this manual). The kitchensink drain may be clogged; you may need aplumber rather than a serviceman for thedishwasher. If an air gap is installed at sink, itmay be clogged.
Detergent dispenser cover will not shutYou may not be correctly shutting the detergentdispenser cover, or a cycle was not finished andshould be cancelled. Go to the Adding Detergentand Rinse Agent section of this manual forinstructions on shutting the detergent dispensercover. Go to the Operating the Dishwashersection of this manual for instructions oncanceling a cycle.
Streaks on glasswareToo much rinse agent is being dispensed. Go tothe Adding Detergent and Rinse Agent section ofthis manual for instructions on decreasing theamount of rinse agent dispensed.
Rattling noisesUtensils may not be properly arranged.
Suds in dishwasherYou may have used the wrong type ofdishwashing detergent. Use only automaticdishwasher detergents.
Unsatisfactory washing results• Incorrect amount of detergent.• Utensils incorrectly arranged or rack
overloaded.• Spray arm rotation blocked by utensils.• Spray arm nozzles need cleaning.• Filters not properly fitted into position.• Unsuitable cycle selected.
Dishwashers may occasionally exhibit problemsthat are unrelated to a malfunction of thedishwasher itself. The following information mayhelp you with a dishwasher problem without yourhaving to call a repair person.
Dishes do not dryThe rinse agent dispenser may be empty. Checkthe rinse-aid dispenser and refill it if necessary.Dishware drying can be accelerated andenhanced by opening the dishwasher door slightlyand propping it open with the top rack.
Indicator light(s) do not come onA fuse may have blown or a circuit breakertripped. Check the fuse or circuit breaker at yourfuse box/breaker box and replace the fuse orreset the breaker if necessary.
Dishwasher does not startThe dishwasher door may not be properly shut.Make certain the dishwasher door is shut andlatched.
Dishwasher runs a long timeIf the dishwasher completes the cycle, but the runtime seems exceptionally long, it may be due tocold incoming water. Before starting thedishwasher, open the hot water faucet at the sinknearest the dishwasher. Run the water until itruns hot, then turn off the water and start thedishwasher.
Machine cycle does not advance to rinseNOTE: The Installation Manual that came withyour Bosch dishwasher will help you with thefollowing instructions. The water supply line maybe shut off. Check the water supply valve andopen it if it’s shut.
White spots left on dishesMore rinse agent is needed. Go to the AddingDetergent and Rinse Agent section of this manualfor instructions on increasing the amount of rinseagent dispensed.
Self Help
18
THE NSF SYMBOL
A dishwasher or a dishwasher cycle that has the NSF symbol has been certified by the NSF International tomeet very strict requirements of wash time and water temperature to ensure dishware and kitchenwaresanitization. These requirements are explained in the document NSF/ANSI 184, Residential Dishwashers.More information on NSF Certification is available at the NSF website, http://www.nsfconsumer.org/home/appliances.asp.
Your Bosch dishwasher is NSF certified. The Bosch dishwasher cycles that are NSF certified are shown inthe chart above. When these cycles are complete, the “Sanitized” indicator on your dishwasher controlpanel will illuminate.
NOTE: If your household water supply is too hot, your dishwasher’s heating time may be reduced and the“Sanitized” light or symbol may not illuminate. Your Bosch Dishwasher Installation Manual has informationon the recommended temperature for your household hot water supply.
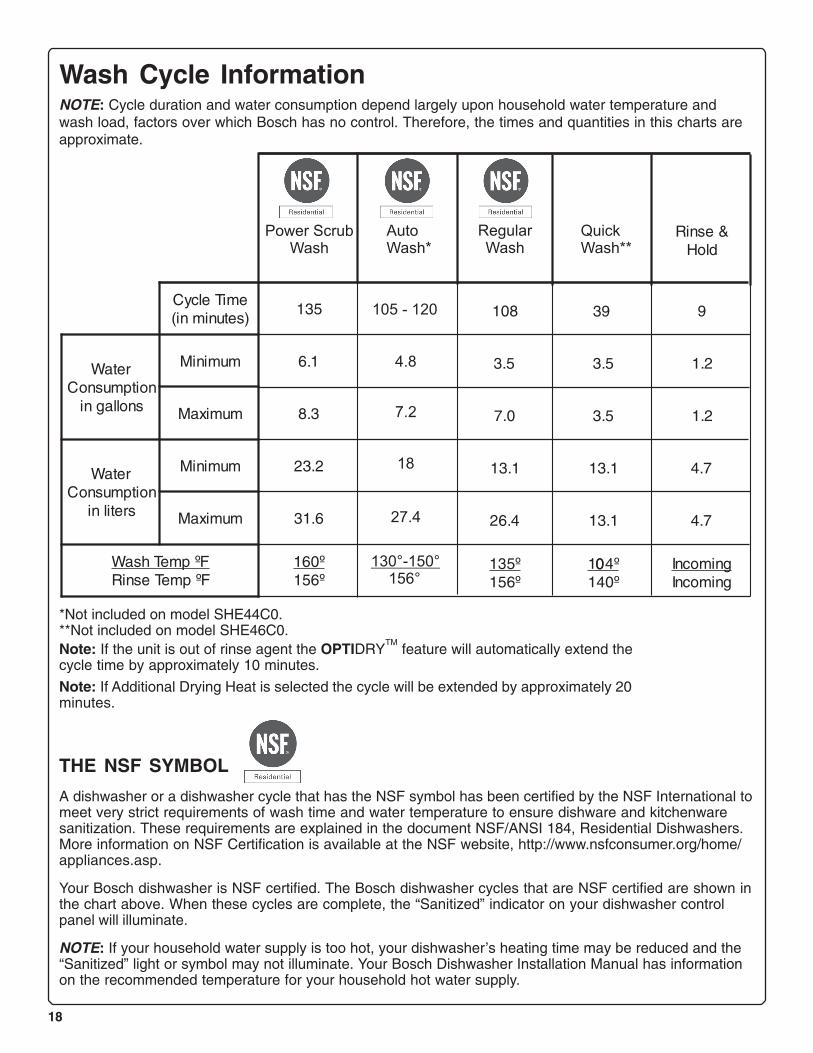
NOTE: Cycle duration and water consumption depend largely upon household water temperature andwash load, factors over which Bosch has no control. Therefore, the times and quantities in this charts areapproximate.
Wash Cycle Information
*Not included on model SHE44C0.**Not included on model SHE46C0.Note: If the unit is out of rinse agent the OPTIDRY
TM feature will automatically extend thecycle time by approximately 10 minutes.
Note: If Additional Drying Heat is selected the cycle will be extended by approximately 20minutes.
19
The warranties provided by BSH Home Appliances (“Bosch”) in this Statement of Warranties apply only to BoschDishwashers sold to the first using purchaser by Bosch or its authorized dealers, retailers, or service centers in theUnited Sates or Canada. The Warranties provided herein are not transferrable. TO OBTAIN WARRANTY SERVICE,CONTACT THE NEAREST BOSCH AUTHORIZED SERVICE CENTER OR CALL 1-800-944-2904 OR WRITE BSHHOME APPLIANCES CORP. DIRECTLY AT 5551 McFADDEN AVENUE, HUNTINGTON BEACH, CA 92649. BE SURETO PROVIDE YOUR DISHWASHER’S MODEL, SERIAL NUMBER, PURCHASE DATE, AND THE SELLER’S NAMEAND ADDRESS.
*Date of installation shall refer to the earlier of the date the dishwasher is installed or ten business days after the deliverydate.
1 Year Full Limited Warranty from Date of Installation*: Bosch will repair or replace any component part that provesdefective under conditions of normal home use free of charge, labor and shipping costs included. Repair service must beperformed by an Authorized Bosch Service Center (All cosmetic defects must be reported within 30 days of installation).
2 Year Limited Warranty from Date of Installation*: Bosch will provide replacement parts free of charge for anycomponent part that proves defective under conditions of normal home use, labor charges excluded.
5 Year Limited Warranty on Electronics from Date of Installation*: Bosch will repair or replace any microprocessor orprinted circuit boards that prove defective under conditions of normal home use during the second through the fifth yearfrom the date of installation, labor charges excluded.
5 Year Limited Warranty from Date of Installation*: Bosch will replace the upper or lower dish rack (excluding rackcomponents) free of charge, if the rack proves defective in materials or workmanship under conditions of normal homeuse during the second through the fifth year, labor charges excluded.
Lifetime Warranty against Stainless Steel Rust Through from Date of Installation: Bosch will replace yourdishwasher with the same model or a current model that is equivalent or better in functionality if the inner liner shouldrust through under conditions of normal home use, labor charges excluded. Bosch will replace the stainless steel doorof any dishwasher if the door should rust through under conditions of normal home use, labor charges excluded.
EXCLUSIONS: This warranty does not cover service calls or repairs to correct the installation of the dishwasher, toprovide instructions on the use of your dishwasher, to replace fuses or to correct plumbing or the electric wiring in yourhome or to repair any dishwasher the use of which was in a manner other than what is normal and customary for homeuse. In addition, the warranties provided in this Statement exclude any defects or damage arising from accident,alteration, misuse, abuse, improper installation, unauthorized service work, external forces beyond Bosch’s control,such as fire, flood, and other acts of God, or installation not in accordance with local electrical or plumbing codes. Laborcharges incurred in the repair or replacement of any dishwasher more than one year from date of installation shall not becovered by this warranty. Any and all replaced and/or repaired parts shall assume the identity of the original for purposesof the applicable warranty period.
TO THE EXTENT PERMITTED BY LAW, THIS WARRANTY IS IN LIEU OF ALL OTHER EXPRESS AND IMPLIEDWARRANTIES, INCLUDING THE IMPLIED WARRANTIES OF MERCHANTIBILITY AND FITNESS FOR A PARTICULARPURPOSE. BOSCH DOES NOT ASSUME ANY RESPONSIBILITY FOR INCIDENTAL OR CONSEQUENTIALDAMAGES.
Statement of Warranties - Bosch Dishwashers
20
Your Bosch dishwasher requires no special care other than that described in the Care and Maintenancesection. If you are having a problem with your dishwasher, before calling for service please refer to the SelfHelp section. If service is necessary, contact your dealer or installer or an authorized service center. Do notattempt to repair the appliance yourself. Any work performed by unauthorized personnel may void thewarranty.
If you are having a problem with your Bosch dishwasher and are not pleased with the service you havereceived, please take the following steps (in the order listed below) until the problem is corrected to yoursatisfaction:
1. Contact your installer or the Bosch Authorized Service Contractor in your area.2. E-mail us from the customer service section of our website, www.boschappliances.com.3. Write us at the address below:
BSH Home Appliances, Corp.5551 McFadden Avenue Huntington Beach, CA 92649
4. Call us at 1-800-944-2904.
Please be sure to include (if you are writing), or have available (if you are calling), the following information:• Model number• Serial number• Date of original purchase• Date the problem originated• Explanation of the problem
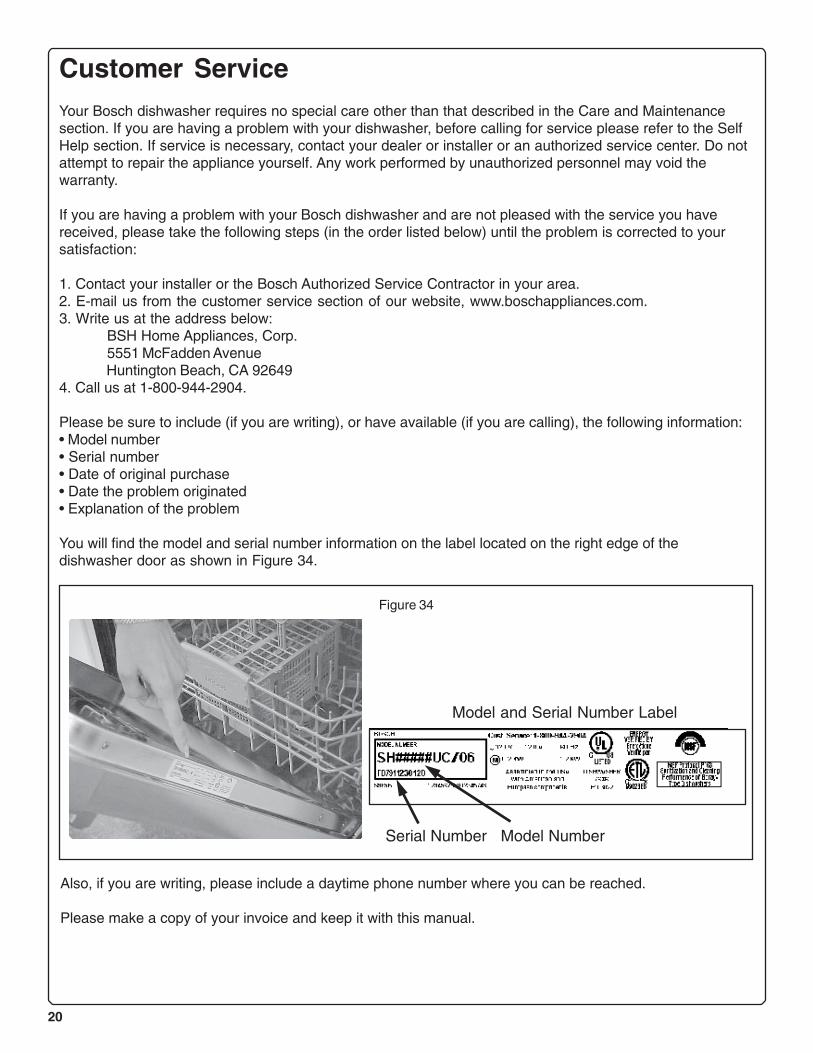
You will find the model and serial number information on the label located on the right edge of thedishwasher door as shown in Figure 34.
Also, if you are writing, please include a daytime phone number where you can be reached.
Please make a copy of your invoice and keep it with this manual.
Figure 34
Serial Number Model Number
Model and Serial Number Label
Customer Service