Embed Size (px)
Citation preview
Bills of Material and
Engineering Training Labs
February 27, 2007 11:04 AM
Authors: Anthony Shahen Richard Coleman
Oracle Corporation2007
Bills of Material, Engineering Labs Page 1 of 39
Table of Contents
Introduction .................................................................................................................................................. 3 Oracle Applications Navigation HOT KEYS - Release 11i....................................................................... 4 Lab 1 - Create Items............................................................................................................................... 5 Lab 2 - Create Standard Bills of Material............................................................................................ 7 Lab 3 - Create Resources and Departments....................................................................................... 11 Lab 4 - Create Routings ....................................................................................................................... 12 Lab 5 - Calculate Lead Times.............................................................................................................. 14 Lab 6 - Transfer from Engineering to Manufacturing...................................................................... 16 Lab 7 - Create Workday Calendars.................................................................................................... 17 Lab 8 - Create a New Bill Using BMCOIN and then Update ........................................................... 19 Lab 9 - Create a New Bill Using the BOM Business Object (API) and then Update...................... 21 Lab 10 - Create a New Bill Using the ECO Business Object (API).................................................... 23 Lab 11 - Explode a Bill Using the Exploder_Userexit ......................................................................... 25 Lab 12 - Implode a Bill Using the Imploder_Userexit......................................................................... 26 Lab 13 - Export a Bill and Routing....................................................................................................... 27 Lab 14 - Manual ECO Approval and Implementation ....................................................................... 28 Lab 15 - ECO Alerts and Approval Notifications................................................................................ 29 Lab 16 - Approve an ECO via Workflow............................................................................................. 31
STANDARD WORKFLOW PROCESS............................................................................................................................. 31 SECTION I - SETTING UP ORACLE ENGINEERING ..................................................................................................... 31 SECTION II - MODIFY THE STANDARD APPROVAL PROCESS IN ORACLE WORKFLOW BUILDER ............................. 31 SECTION III – CREATE THE ECO AND LAUNCH THE WORKFLOW PROCESS ........................................................... 33
Lab 17 - Use Up ECO............................................................................................................................. 35 SECTION I – CREATE THE PLANNER, USE-UP ITEMS AND BILL OF MATERIAL......................................................... 35 SECTION II – CREATE ON-HAND QUANTITY FOR THE USE UP COMPONENT ........................................................... 36 SECTION III – CREATE THE MRP PLAN................................................................................................................... 36 SECTION IV – CREATE THE USE UP ECO ................................................................................................................ 37 SECTION IV – SET UP THE ECO USE UP ALERT....................................................................................................... 38 SECTION V – REVISE TEST PARAMETERS................................................................................................................. 38
Bills of Material, Engineering Labs Page 2 of 39
Introduction
The following labs are designed to illustrate basic functionality within the Oracle Bills of Material and Oracle Engineering applications as well as some of the more advanced topics that may not be well documented or require a fair amount of setup. The labs build upon each other so they usually must be completed in order. Some labs utilize provided SQL scripts. The scripts can be used as a starting point for developing more advanced versions. These are provided in a single ZIP file that is included as an attachment of MetaLink Note 416802.1. Unzip the file to a location that can be accessed via SQL*Plus or SQL Developer. The requirements for using the labs are:
1. Access to an Oracle Vision Demo instance. Although any test environment can be used, all the examples reference entities within a Vision Demo instance.
2. Oracle SQL*Plus or Oracle SQL Developer. These are free downloads from the Oracle Technology Network (OTN) website: (http://otn.oracle.com). Click the Downloads link to access all downloads. Only one of these is needed to run the SQL scripts.
3. Oracle Workflow Client Release 2.6.3.5 for Microsoft Windows. This is a free download from the Oracle Technology Network Website. Note: It is recommended that you install Workflow Builder in a new oracle home. Not doing this may cause your existing oracle home to stop functioning properly. Change the Destination Name to a new oracle home name. Change the Destination Path as needed. Click the Next button when complete.
4. Oracle SQL*Net Client. This is a free download from the Oracle Technology Network website as part of the Oracle Client software. This is needed by SQL*Plus, SQL Developer and Workflow Client software to connect to an instance. SQL*Net Client is automatically installed when you install SQL*Plus.
Bills of Material, Engineering Labs Page 3 of 39
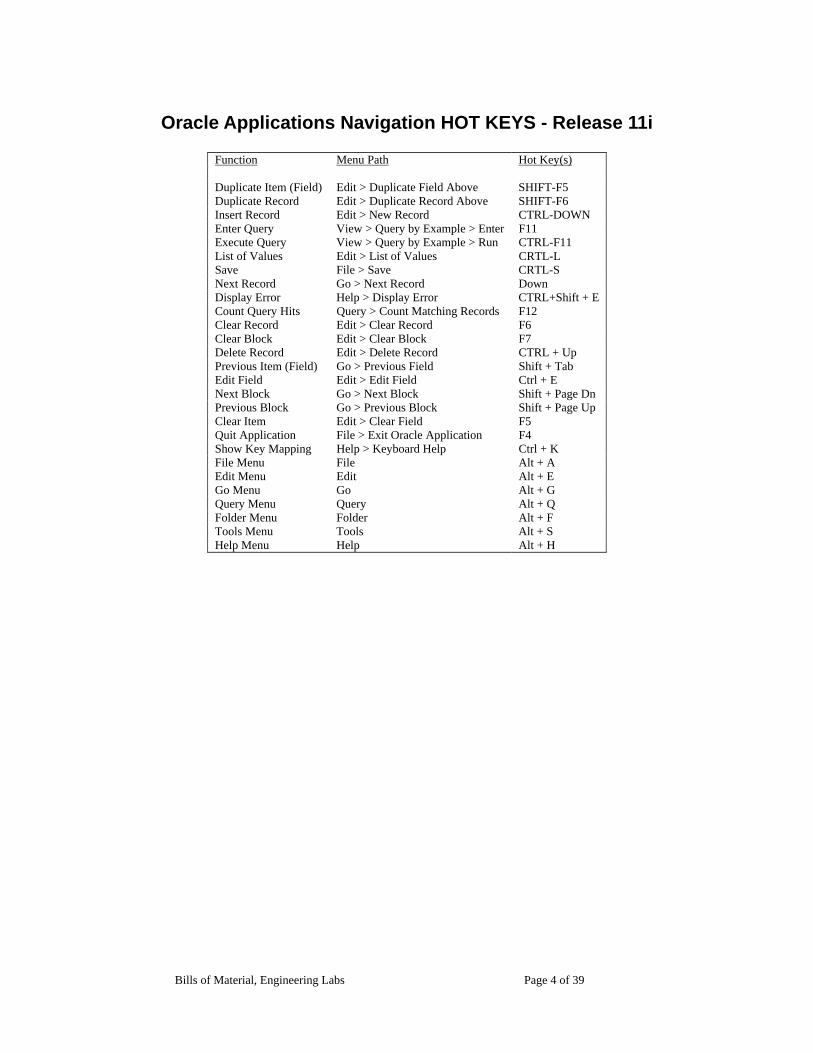
Oracle Applications Navigation HOT KEYS - Release 11i
Function Menu Path Hot Key(s) Duplicate Item (Field) Edit > Duplicate Field Above SHIFT-F5 Duplicate Record Edit > Duplicate Record Above SHIFT-F6 Insert Record Edit > New Record CTRL-DOWN Enter Query View > Query by Example > Enter F11 Execute Query View > Query by Example > Run CTRL-F11 List of Values Edit > List of Values CRTL-L Save File > Save CRTL-S Next Record Go > Next Record Down Display Error Help > Display Error CTRL+Shift + E Count Query Hits Query > Count Matching Records F12 Clear Record Edit > Clear Record F6 Clear Block Edit > Clear Block F7 Delete Record Edit > Delete Record CTRL + Up Previous Item (Field) Go > Previous Field Shift + Tab Edit Field Edit > Edit Field Ctrl + E Next Block Go > Next Block Shift + Page Dn Previous Block Go > Previous Block Shift + Page Up Clear Item Edit > Clear Field F5 Quit Application File > Exit Oracle Application F4 Show Key Mapping Help > Keyboard Help Ctrl + K File Menu File Alt + A Edit Menu Edit Alt + E Go Menu Go Alt + G Query Menu Query Alt + Q Folder Menu Folder Alt + F Tools Menu Tools Alt + S Help Menu Help Alt + H
Bills of Material, Engineering Labs Page 4 of 39
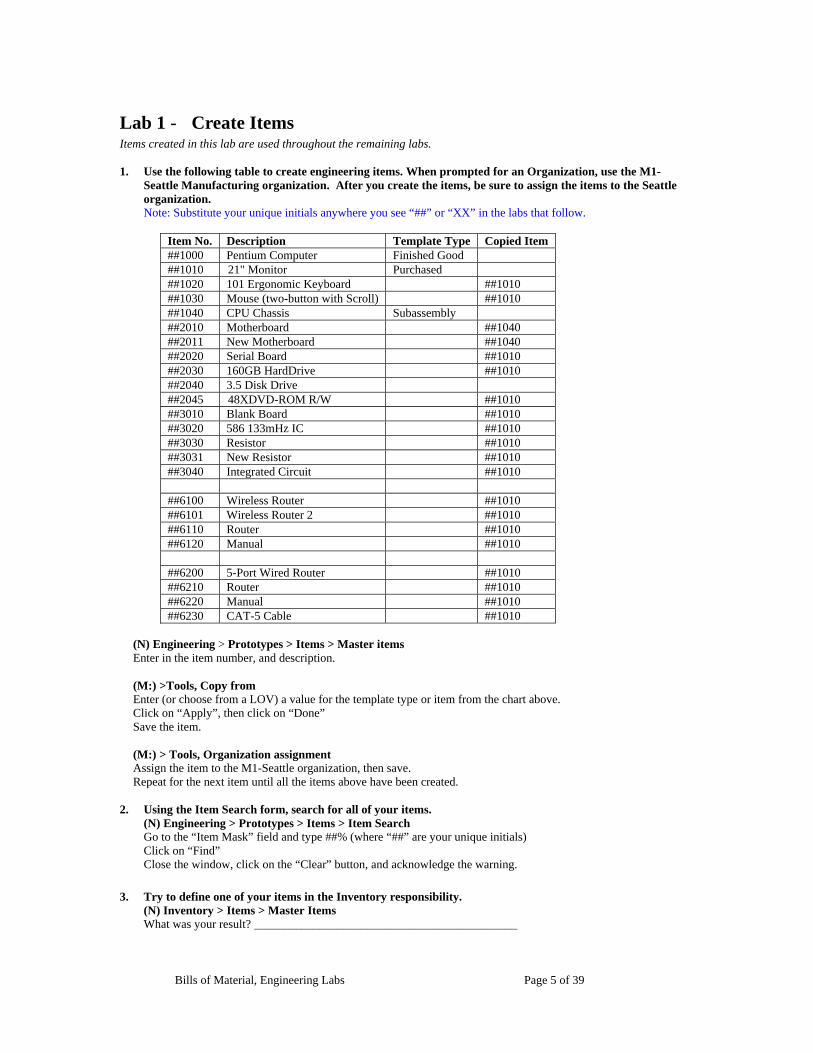
Lab 1 - Create Items Items created in this lab are used throughout the remaining labs. 1. Use the following table to create engineering items. When prompted for an Organization, use the M1-
Seattle Manufacturing organization. After you create the items, be sure to assign the items to the Seattle organization. Note: Substitute your unique initials anywhere you see “##” or “XX” in the labs that follow.
Item No. Description Template Type Copied Item ##1000 Pentium Computer Finished Good ##1010 21" Monitor Purchased ##1020 101 Ergonomic Keyboard ##1010 ##1030 Mouse (two-button with Scroll) ##1010 ##1040 CPU Chassis Subassembly ##2010 Motherboard ##1040 ##2011 New Motherboard ##1040 ##2020 Serial Board ##1010 ##2030 160GB HardDrive ##1010 ##2040 3.5 Disk Drive ##2045 48XDVD-ROM R/W ##1010 ##3010 Blank Board ##1010 ##3020 586 133mHz IC ##1010 ##3030 Resistor ##1010 ##3031 New Resistor ##1010 ##3040 Integrated Circuit ##1010 ##6100 Wireless Router ##1010 ##6101 Wireless Router 2 ##1010 ##6110 Router ##1010 ##6120 Manual ##1010 ##6200 5-Port Wired Router ##1010 ##6210 Router ##1010 ##6220 Manual ##1010 ##6230 CAT-5 Cable ##1010
(N) Engineering > Prototypes > Items > Master items Enter in the item number, and description. (M:) >Tools, Copy from Enter (or choose from a LOV) a value for the template type or item from the chart above. Click on “Apply”, then click on “Done” Save the item. (M:) > Tools, Organization assignment Assign the item to the M1-Seattle organization, then save. Repeat for the next item until all the items above have been created.
2. Using the Item Search form, search for all of your items. (N) Engineering > Prototypes > Items > Item Search Go to the “Item Mask” field and type ##% (where “##” are your unique initials) Click on “Find” Close the window, click on the “Clear” button, and acknowledge the warning.
3. Try to define one of your items in the Inventory responsibility.
(N) Inventory > Items > Master Items What was your result? ____________________________________________
Bills of Material, Engineering Labs Page 5 of 39

Why? _________________________________________________________ Close form and return to the Navigator form.
Bills of Material, Engineering Labs Page 6 of 39
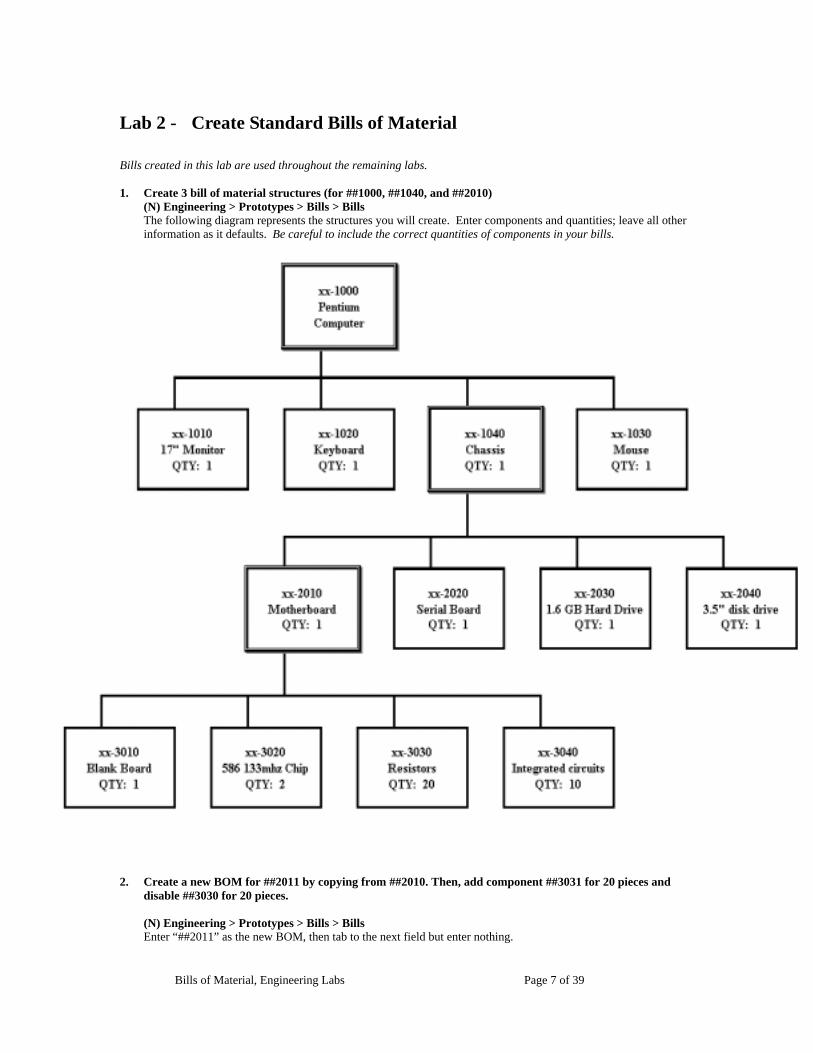
Lab 2 -
Create Standard Bills of Material Bills created in this lab are used throughout the remaining labs. 1. Create 3 bill of material structures (for ##1000, ##1040, and ##2010)
(N) Engineering > Prototypes > Bills > Bills The following diagram represents the structures you will create. Enter components and quantities; leave all other information as it defaults. Be careful to include the correct quantities of components in your bills.
2. Create a new BOM for ##2011 by copying from ##2010. Then, add component ##3031 for 20 pieces and
disable ##3030 for 20 pieces. (N) Engineering > Prototypes > Bills > Bills Enter “##2011” as the new BOM, then tab to the next field but enter nothing.
Bills of Material, Engineering Labs Page 7 of 39
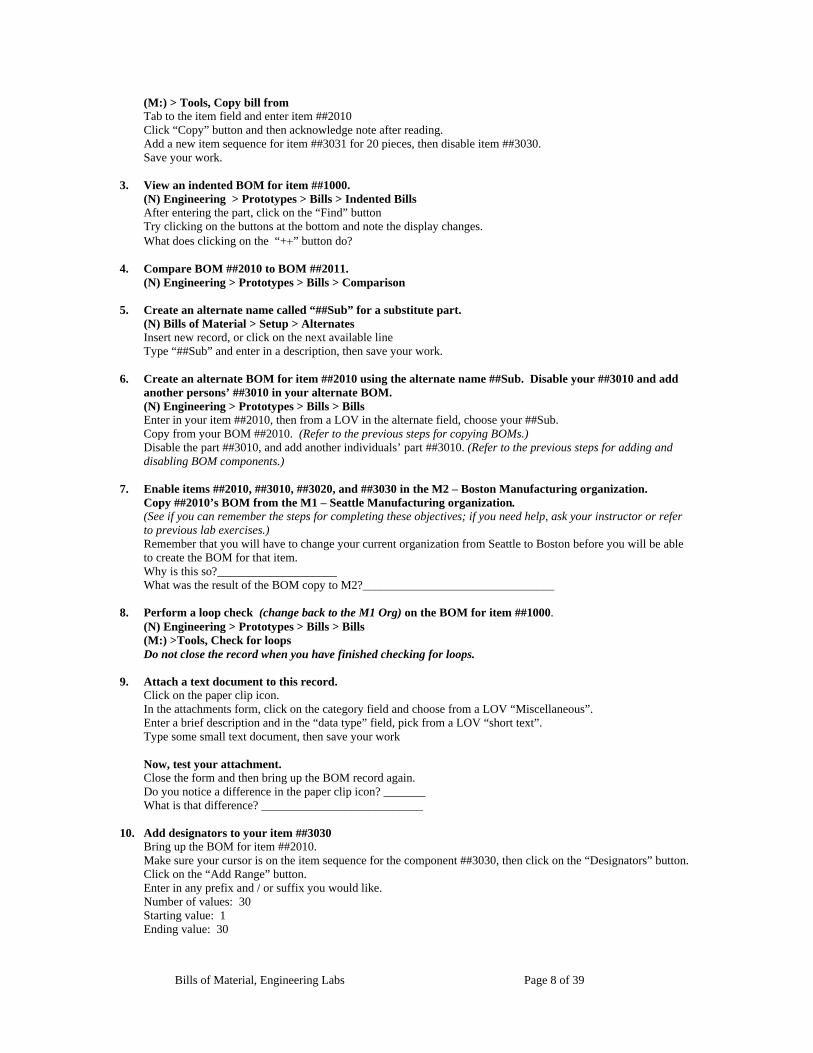
(MTab to the item field and enter item ##2010 Click “Copy” button and then acknowledge nAdd a new item sequence for item ##3031 for 20 pieces, then diSave your work.
:) > Tools, Copy bill from
ote after reading. sable item ##3030.
. View an indented BOM for item ##1000.
dented Bills
he display changes.
. Compare BOM ##2010 to BOM ##2011.
mparison . Create an alternate name called “##Sub” for a substitute part.
le line .
. Create an alternate BOM for item ##2010 using the alternate name ##Sub. Disable your ##3010 and add
the alternate field, choose your ##Sub.
revious steps for adding and
. Enable items ##2010, ##3010, ##3020, and ##3030 in the M2 – Boston Manufacturing organization.
help, ask your instructor or refer
ve to change your current organization from Seattle to Boston before you will be able
_____ 2?________________________________
. Perform a loop check (change back to the M1 Org) on the BOM for item ##1000.
u have finished checking for loops.
. Attach a text document to this record.
on the category field and choose from a LOV “Miscellaneous”.
ow, test your attachment. up the BOM record again.
0. Add designators to your item ##3030
sequence for the component ##3030, then click on the “Designators” button.
like.
3(N) Engineering > Prototypes > Bills > InAfter entering the part, click on the “Find” button Try clicking on the buttons at the bottom and note tWhat does clicking on the “++” button do?
4(N) Engineering > Prototypes > Bills > Co
5(N) Bills of Material > Setup > Alternates Insert new record, or click on the next availabType “##Sub” and enter in a description, then save your work
6another persons’ ##3010 in your alternate BOM. (N) Engineering > Prototypes > Bills > Bills Enter in your item ##2010, then from a LOV inCopy from your BOM ##2010. (Refer to the previous steps for copying BOMs.) Disable the part ##3010, and add another individuals’ part ##3010. (Refer to the pdisabling BOM components.)
7Copy ##2010’s BOM from the M1 – Seattle Manufacturing organization. (See if you can remember the steps for completing these objectives; if you needto previous lab exercises.) Remember that you will hato create the BOM for that item. Why is this so?_______________What was the result of the BOM copy to M
8(N) Engineering > Prototypes > Bills > Bills (M:) >Tools, Check for loops Do not close the record when yo
9Click on the paper clip icon. In the attachments form, clickEnter a brief description and in the “data type” field, pick from a LOV “short text”. Type some small text document, then save your work NClose the form and then bringDo you notice a difference in the paper clip icon? _______What is that difference? ___________________________
1Bring up the BOM for item ##2010. Make sure your cursor is on the item Click on the “Add Range” button. Enter in any prefix and / or suffix you wouldNumber of values: 30 Starting value: 1 Ending value: 30
Bills of Material, Engineering Labs Page 8 of 39

Click on the “Add” button and acknowledge the note. Save your work.
Bills of Material, Engineering Labs Page 9 of 39

11. Use the following queries to view item, bill and component information.
To find the item data: SELECT * FROM mtl_item_flexfields WHERE item_number = ‘##1000’;
Use the inventory_item_id from the above query to find the bill of material data:
SELECT * FROM bom_bill_of_materials WHERE assembly_item_id = &inventory_item_id AND organization_id = &organization_id;
Use the bill_sequence_id from the above query to find the bill component data:
SELECT * FROM bom_inventory_components WHERE bill_sequence_id = &bill_sequence_id;
Bills of Material, Engineering Labs Page 10 of 39
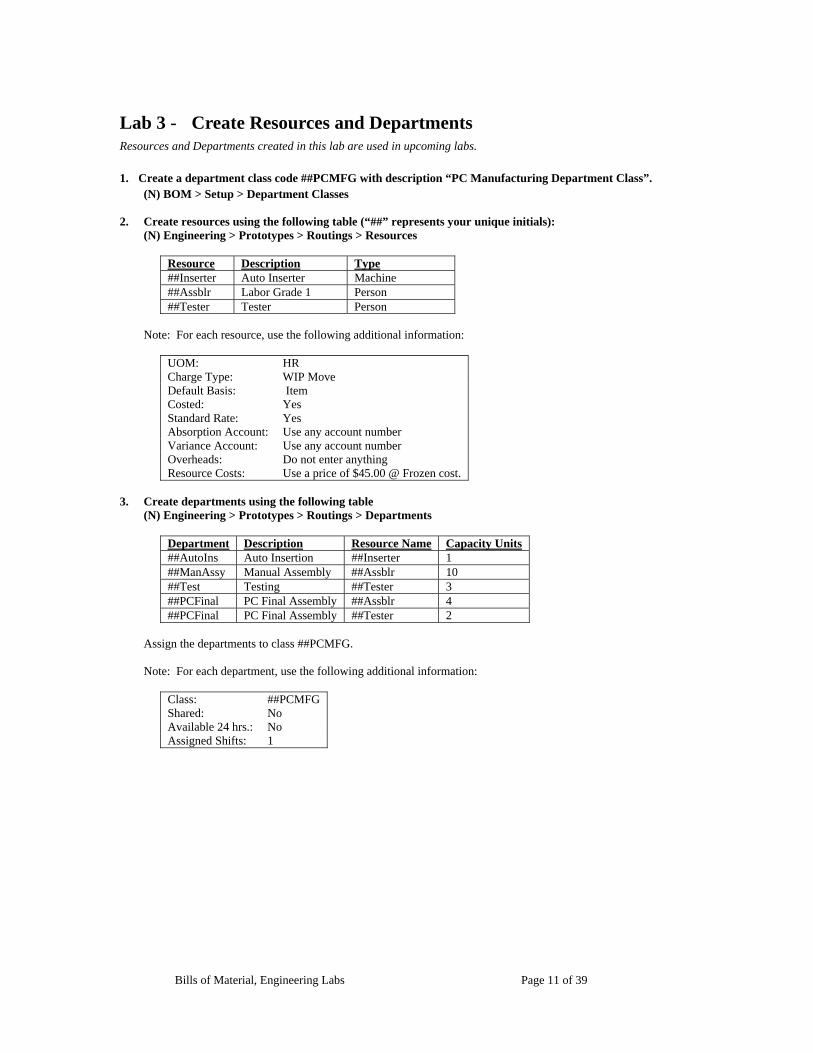
Lab 3 - Create Resources and Departments Resources and Departments created in this lab are used in upcoming labs.
1. Create a department class code ##PCMFG with description “PC Manufacturing Department Class”.
(N) BOM > Setup > Department Classes 2. Create resources using the following table (“##” represents your unique initials):
(N) Engineering > Prototypes > Routings > Resources
Resource Description Type ##Inserter Auto Inserter Machine ##Assblr Labor Grade 1 Person ##Tester Tester Person
Note: For each resource, use the following additional information:
UOM: HR Charge Type: WIP Move Default Basis: Item Costed: Yes Standard Rate: Yes Absorption Account: Use any account number Variance Account: Use any account number Overheads: Do not enter anything Resource Costs: Use a price of $45.00 @ Frozen cost.
3. Create departments using the following table
(N) Engineering > Prototypes > Routings > Departments
Department Description Resource Name Capacity Units ##AutoIns Auto Insertion ##Inserter 1 ##ManAssy Manual Assembly ##Assblr 10 ##Test Testing ##Tester 3 ##PCFinal PC Final Assembly ##Assblr 4 ##PCFinal PC Final Assembly ##Tester 2
Assign the departments to class ##PCMFG. Note: For each department, use the following additional information:
Class: ##PCMFG Shared: No Available 24 hrs.: No Assigned Shifts: 1
Bills of Material, Engineering Labs Page 11 of 39
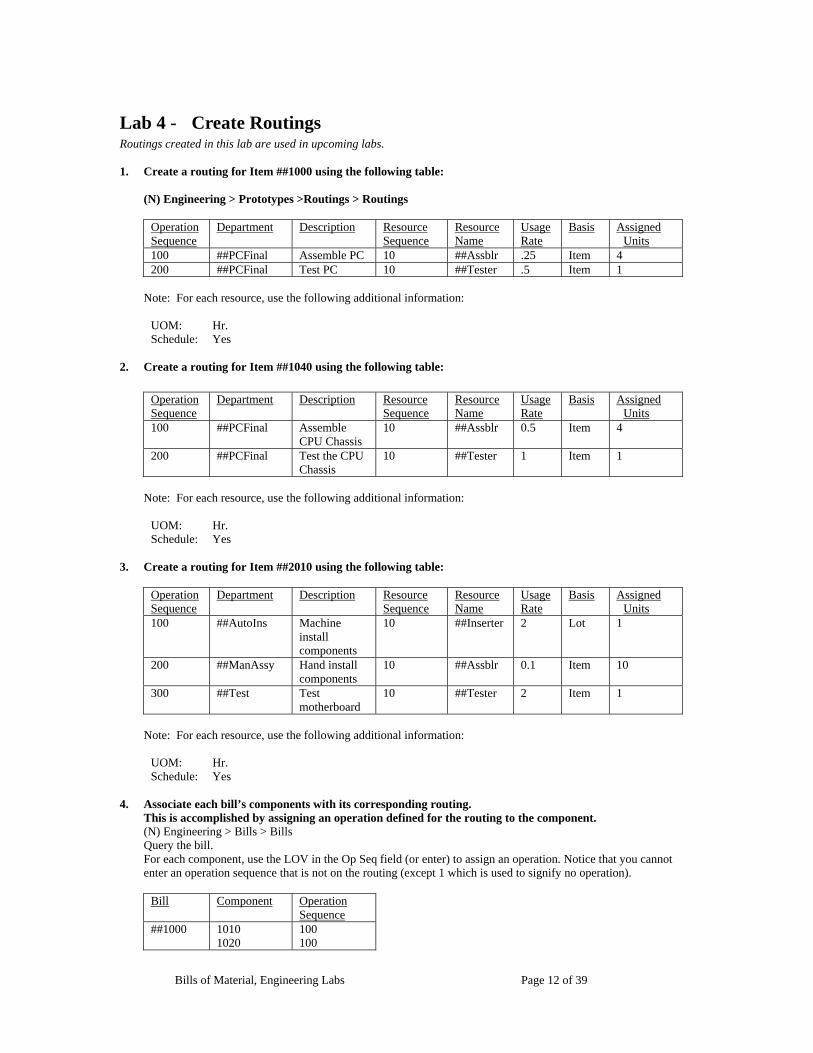
Lab 4 - Create Routings Routings created in this lab are used in upcoming labs. 1. Create a routing for Item ##1000 using the following table:
(N) Engineering > Prototypes >Routings > Routings
Operation Sequence
Department Description Resource Sequence
Resource Name
Usage Rate
Basis Assigned Units
100 ##PCFinal Assemble PC 10 ##Assblr .25 Item 4 200 ##PCFinal Test PC 10 ##Tester .5 Item 1
Note: For each resource, use the following additional information:
UOM: Hr. Schedule: Yes
2. Create a routing for Item ##1040 using the following table:
Operation Sequence
Department Description Resource Sequence
Resource Name
Usage Rate
Basis Assigned Units
100 ##PCFinal Assemble CPU Chassis
10 ##Assblr 0.5 Item 4
200 ##PCFinal Test the CPU Chassis
10 ##Tester 1 Item 1
Note: For each resource, use the following additional information:
UOM: Hr. Schedule: Yes
3. Create a routing for Item ##2010 using the following table:
Operation Sequence
Department Description Resource Sequence
Resource Name
Usage Rate
Basis Assigned Units
100 ##AutoIns Machine install components
10 ##Inserter 2 Lot 1
200 ##ManAssy Hand install components
10 ##Assblr 0.1 Item 10
300 ##Test Test motherboard
10 ##Tester 2 Item 1
Note: For each resource, use the following additional information:
UOM: Hr. Schedule: Yes
4. Associate each bill’s components with its corresponding routing.
This is accomplished by assigning an operation defined for the routing to the component. (N) Engineering > Bills > Bills Query the bill. For each component, use the LOV in the Op Seq field (or enter) to assign an operation. Notice that you cannot enter an operation sequence that is not on the routing (except 1 which is used to signify no operation).
Bill Component Operation
Sequence ##1000 1010
1020 100 100
Bills of Material, Engineering Labs Page 12 of 39
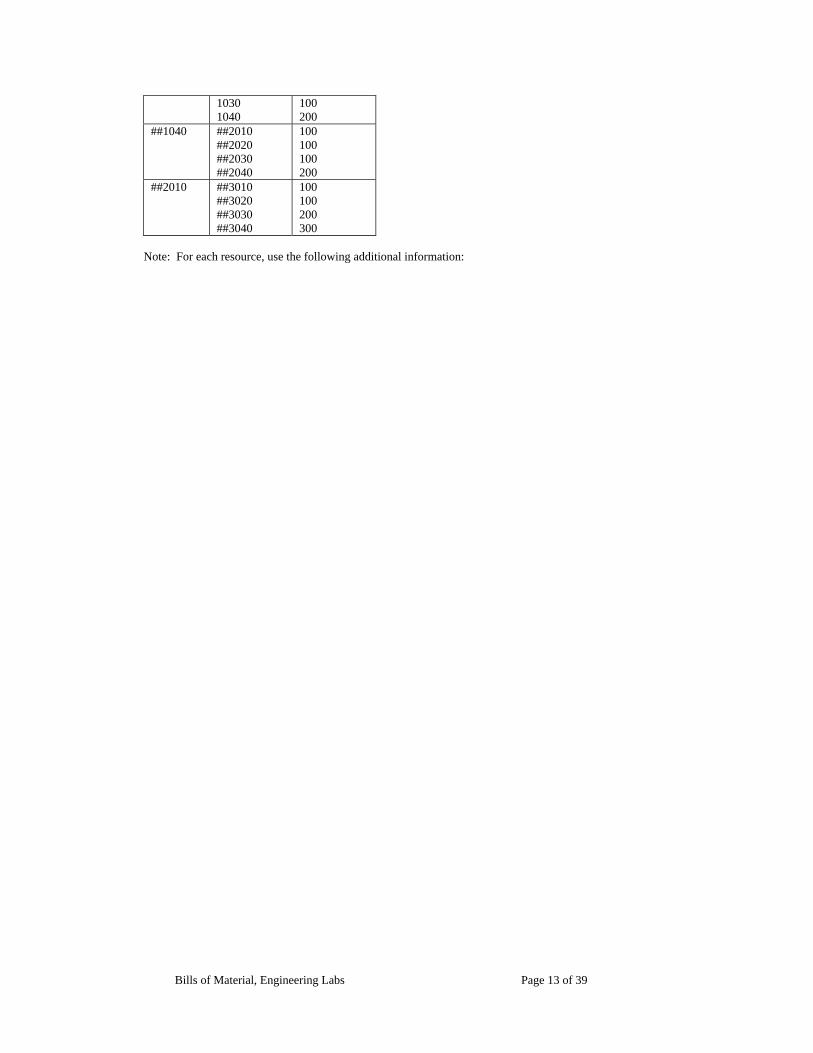
1030 1040
100 200
##1040 ##2010 ##2020 ##2030 ##2040
100 100 100 200
##2010 ##3010 ##3020 ##3030 ##3040
100 100 200 300
Note: For each resource, use the following additional information:
Bills of Material, Engineering Labs Page 13 of 39
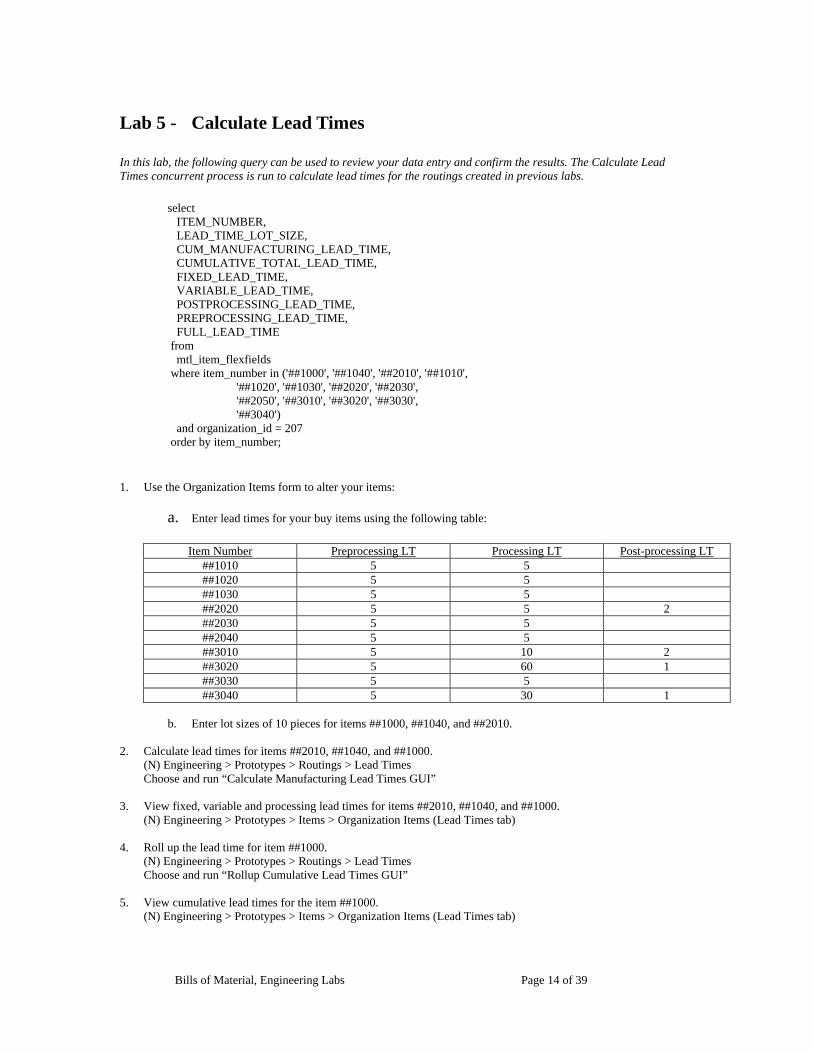
Lab 5 - Calculate Lead Times In this lab, the following query can be used to review your data entry and confirm the results. The Calculate Lead Times concurrent process is run to calculate lead times for the routings created in previous labs.
select ITEM_NUMBER, LEAD_TIME_LOT_SIZE, CUM_MANUFACTURING_LEAD_TIME, CUMULATIVE_TOTAL_LEAD_TIME, FIXED_LEAD_TIME, VARIABLE_LEAD_TIME, POSTPROCESSING_LEAD_TIME, PREPROCESSING_LEAD_TIME, FULL_LEAD_TIME from mtl_item_flexfields where item_number in ('##1000', '##1040', '##2010', '##1010', '##1020', '##1030', '##2020', '##2030', '##2050', '##3010', '##3020', '##3030', '##3040') and organization_id = 207 order by item_number;
1. Use the Organization Items form to alter your items:
a. Enter lead times for your buy items using the following table:
Item Number Preprocessing LT Processing LT Post-processing LT
##1010 5 5 ##1020 5 5 ##1030 5 5 ##2020 5 5 2 ##2030 5 5 ##2040 5 5 ##3010 5 10 2 ##3020 5 60 1 ##3030 5 5 ##3040 5 30 1
b. Enter lot sizes of 10 pieces for items ##1000, ##1040, and ##2010.
2. Calculate lead times for items ##2010, ##1040, and ##1000.
(N) Engineering > Prototypes > Routings > Lead Times Choose and run “Calculate Manufacturing Lead Times GUI”
3. View fixed, variable and processing lead times for items ##2010, ##1040, and ##1000.
(N) Engineering > Prototypes > Items > Organization Items (Lead Times tab)
4. Roll up the lead time for item ##1000. (N) Engineering > Prototypes > Routings > Lead Times Choose and run “Rollup Cumulative Lead Times GUI”
5. View cumulative lead times for the item ##1000. (N) Engineering > Prototypes > Items > Organization Items (Lead Times tab)
Bills of Material, Engineering Labs Page 14 of 39
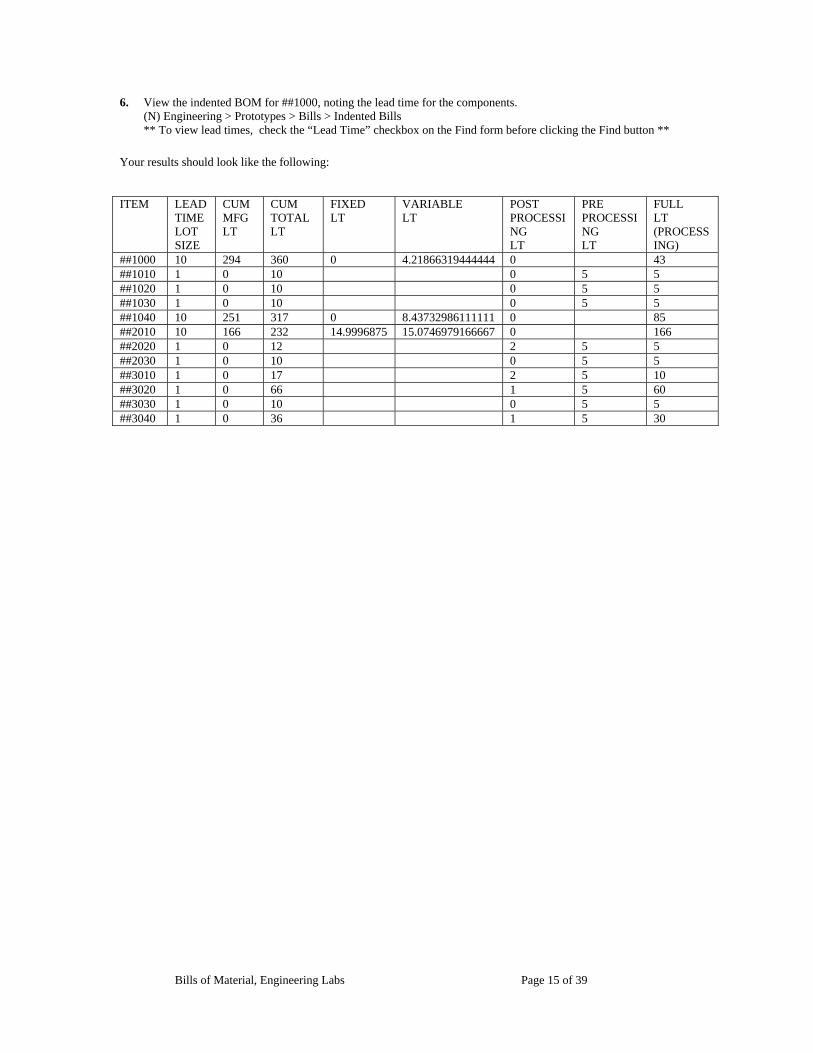
6. View the indented BOM for ##1000, noting the lead time for the components. (N) Engineering > Prototypes > Bills > Indented Bills ** To view lead times, check the “Lead Time” checkbox on the Find form before clicking the Find button **
Your results should look like the following: ITEM LEAD
TIME LOT SIZE
CUM MFG LT
CUM TOTALLT
FIXED LT
VARIABLE LT
POST PROCESSING LT
PRE PROCESSING LT
FULL LT (PROCESSING)
##1000 10 294 360 0 4.21866319444444 0 43 ##1010 1 0 10 0 5 5 ##1020 1 0 10 0 5 5 ##1030 1 0 10 0 5 5 ##1040 10 251 317 0 8.43732986111111 0 85 ##2010 10 166 232 14.9996875 15.0746979166667 0 166 ##2020 1 0 12 2 5 5 ##2030 1 0 10 0 5 5 ##3010 1 0 17 2 5 10 ##3020 1 0 66 1 5 60 ##3030 1 0 10 0 5 5 ##3040 1 0 36 1 5 30
Bills of Material, Engineering Labs Page 15 of 39
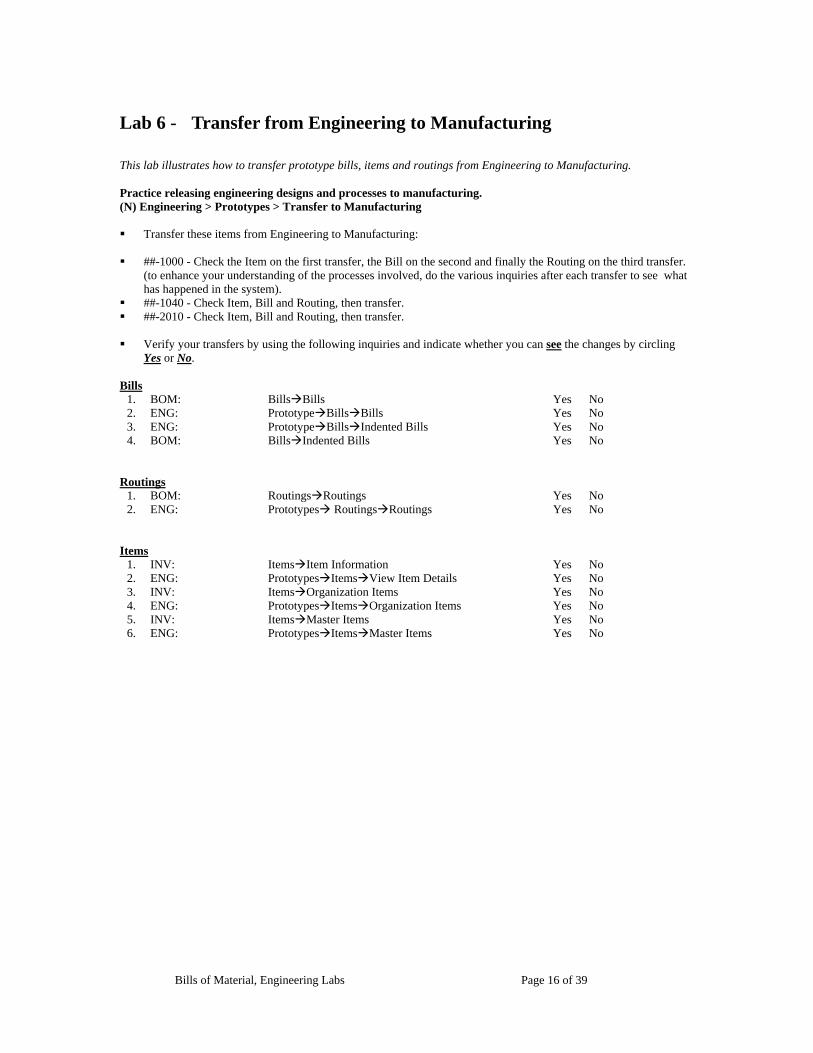
Lab 6 - Transfer from Engineering to Manufacturing This lab illustrates how to transfer prototype bills, items and routings from Engineering to Manufacturing. Practice releasing engineering designs and processes to manufacturing. (N) Engineering > Prototypes > Transfer to Manufacturing ! Transfer these items from Engineering to Manufacturing:
! ##-1000 - Check the Item on the first transfer, the Bill on the second and finally the Routing on the third transfer.
(to enhance your understanding of the processes involved, do the various inquiries after each transfer to see what has happened in the system).
! ##-1040 - Check Item, Bill and Routing, then transfer. ! ##-2010 - Check Item, Bill and Routing, then transfer. ! Verify your transfers by using the following inquiries and indicate whether you can see the changes by circling
Yes or No. Bills
1. BOM: Bills#Bills Yes No 2. ENG: Prototype#Bills#Bills Yes No 3. ENG: Prototype#Bills#Indented Bills Yes No 4. BOM: Bills#Indented Bills Yes No
Routings
1. BOM: Routings#Routings Yes No 2. ENG: Prototypes# Routings#Routings Yes No
Items
1. INV: Items#Item Information Yes No 2. ENG: Prototypes#Items#View Item Details Yes No 3. INV: Items#Organization Items Yes No 4. ENG: Prototypes#Items#Organization Items Yes No 5. INV: Items#Master Items Yes No 6. ENG: Prototypes#Items#Master Items Yes No
Bills of Material, Engineering Labs Page 16 of 39

Lab 7 -
1.
2.
Create Workday Calendars In this lab, you create a workday calendar (also know as the Manufacturing calendar). **Note: Calendars can also be built in the Inventory responsibility
Define a workday exception set. We are simply giving it a name. (N) Bill of Materials > Setup > Exception template Name: (##)-Except Description: Exception Set for your (##) Calendar Click in “Dates” Field and press (CRTL-L) LOV Key or the LOV Icon Type in at least 3 exception dates. If it is an Exception Day On, check the box! (M:) Action > Save (M:) Action > Close Window Using the “Define Workday Calendar” function, define a calendar. You will define a calendar workday pattern, exceptions to that pattern and build your calendar. (N) Bill of Material > Setup > Calendars In the Workday Calendar Window, fill in the following: Name: (##)-Cal Description: Calendar for (##) Quarterly Type: 4/4/5 weekly quarter pattern Calendar Date Ranges: From: 02-Jan-2006 & To: 31-Dec-2006 Click on “Workday Patterns” Sequence: 1 Days on: 5 Days off: 2 Description: Regular workweek (M:) > Action > Save
3. 4.
5.
6.
(M:) > Action > Close Window (once) After you have closed the window, click on the “Dates” button. You should see the days of your work week blacked out. Click on “Exception List” then click on “Load” Put your cursor in the “Template” field and click on LOV Icon of (CRTL-L) LOV Key, then select the template you just created above. Click on “OK” (until you are back to your calendar with blacked out days) You should see your calendar with the exceptions on it. (M) > Tools > Build (This enables the calendar to be functional) A concurrent process is run to build your calendar/exceptions. Note the concurrent process number __________________ and click on “OK”. Verify that your concurrent process has completed normally. (M:) > Help > View My Requests Click on the “Find” button When the View Requests screen appears, press Refresh (CTRL-F11) until with your ID# shows "completed". This is your indication that your calendar has been successfully built. (M:) > Action > Close form View your new calendar in the Inventory responsibility. (N) Click on the “Hat” to bring up the list of responsibilities Choose: “Inventory, Vision Operations (N) Setup > Organizations > Calendars Query your calendar. Using the “Find” button on the button bar, select your calendar. Note: If you used your initials to name your calendar, use the “enter query / run query” option to find your calendar
Bills of Material, Engineering Labs Page 17 of 39
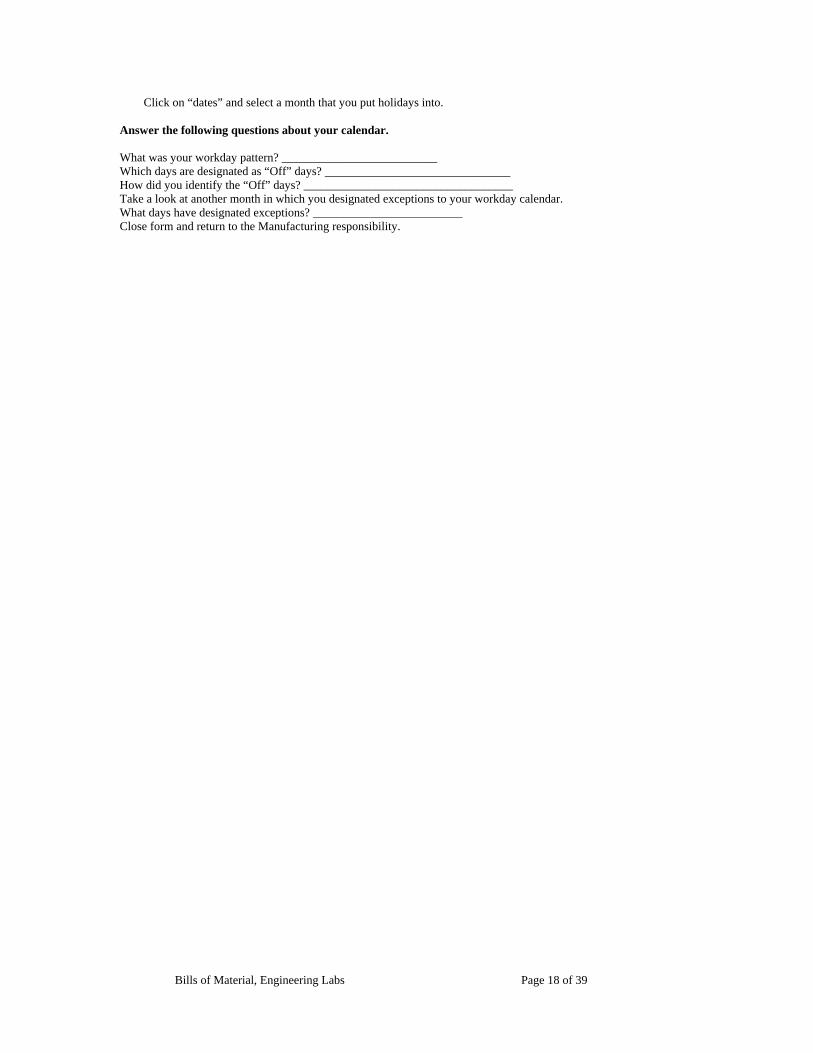
Click on “dates” and select a month that you put holidays into.
Answer the following questions about your calendar. What was your workday pattern? __________________________ Which days are designated as “Off” days? _______________________________ How did you identify the “Off” days? ___________________________________ Take a look at another month in which you designated exceptions to your workday calendar. What days have designated exceptions? _________________________ Close form and return to the Manufacturing responsibility.
Bills of Material, Engineering Labs Page 18 of 39
Lab 8 - Create a New Bill Using BMCOIN and then Update The 2 scripts in this lab illustrate the use of the Bills of Material Open Interface (BMCOIN) to create a new bill (BMCOIN_Create_Bill.sql) and then update it (BMCOIN_Update_Bill.sql). 1. Locate the folder you where you unzipped the lab SQL scripts and access the BMCOIN subfolder (see
Introduction).
2. Edit BMCOIN_Create_Bill.sql and update the section as shown to reflect the items you created in Lab 1: ------------------------------------------------------------------ -- Change these as needed define PARENT_ITEM = '##6200' define COMPONENT_ITEM1 = '##6210' define COMPONENT_ITEM2 = '##6220' define COMPONENT_ITEM3 = '##6230' define ORG_CODE = 'M1' define USER_NAME = 'YOUR_USER_NAME' ------------------------------------------------------------------ Examine the script and review the insert statements
3. Start SQL*Plus
4. Run BMCOIN_Create_Bill.sql This inserts 1 record into the BOM_BILL_OF_MTLS_INTERFACE table (the parent) and 3 component records into the BOM_INVENTORY_COMPS_INTERFACE table.
5. Run the Bill and Routing Open Interface (BMCOIN) (N)Bills > Import Run with the following parameters: Run for All Orgs=No Import Routings=No Delete Processed Rows=No Review the request log for success: (M)View > Requests
6. Query your bill in the Bill Define form (N) Bills > Bills
7. Edit BMCOIN_Update_Bill.sql and update the section as shown to reflect the items you created in Lab 1: ------------------------------------------------------------------ -- Change these as needed define PARENT_ITEM = '##6200' define COMPONENT_ITEM = '##6230' define ORG_CODE = 'M1' define USER_NAME = 'YOUR_USER_NAME' define COMPONENT_EFFECTIVITY_DATE = 'XX-MAY-2006 00:00:00' -- must match exactly ------------------------------------------------------------------ Examine the script and review the insert statements
8. Start SQL*Plus
9. Run BMCOIN_Update_Bill.sql This inserts 1 component record into the BOM_INVENTORY_COMPS_INTERFACE table to change the
Bills of Material, Engineering Labs Page 19 of 39
quantity of component ‘##6230' from 1 to 5.
10. Run the Bill and Routing Open Interface (BMCOIN) (N)Bills > Import Run with the following parameters: Run for All Orgs=No Import Routings=No Delete Processed Rows=No Review the request log for success: (M)View > Requests
11. Query your bill in the Bill Define form (N) Bills > Bills The quantity for component ##6230 is now 5
Bills of Material, Engineering Labs Page 20 of 39
Lab 9 -
1.
Create a New Bill Using the BOM Business Object (API) and then Update The 2 scripts in this lab illustrate the use of the BOM Business Object Application Programming Interface (API) to create a new bill (BOMBO_Create.sql) and then update it (BOMBO_Update.sql).
Locate the folder you where you unzipped the lab SQL scripts and access the BOMBO subfolder (see Introduction).
2.
3.
4.
5.
6.
7.
8.
9.
10.
Edit BOMBO_Create.sql and update the section as shown to reflect the items you created in Lab 1: ------------------------------------------------------------------ -- Change these as needed define ORG_CODE = 'M1' define PARENT_ITEM = '##6101' define COMPONENT_ITEM_1 = '##6110' define COMPONENT_ITEM_2 = '##6120' define ALTERNATE_BOM_CODE = '' ------------------------------------------------------------------ Examine the script and review the script Start SQL*Plus Run BOMBO_Create.sql The script calls the BOM Business Object to create a single alternate bill with 2 components. When the script runs successfully, edit the script and uncomment the following line so the bill will be created permanently. --commit; -- uncomment this if you want to commit the change...leave commented for testing Query your bill in the Bill Define form (N) Bills > Bills Query Bill = ##6100, Alternate = ## Edit BOMBO_Update.sql and update the section as shown to reflect the bill you created above: ------------------------------------------------------------------ define ORG_CODE = 'M1' define PARENT_ITEM = '##6101' define COMPONENT_ITEM = '##6110' define OPERATION_SEQ_NUM = 60; -- When updating, Start_Effective_Date needs to be set -- to the EXACT effectivity date of the component define START_EFFECTIVE_DATE = 'DD-MON-YYYY HH:MI:SS' define ALTERNATE_BOM_CODE = '' define QUANTITY_PER_ASSEMBLY = 99 Start SQL*Plus Run BOMBO_Update.sql The script calls to BOM Business Object to update one component of the alternate bill created above. It changes the quantity to 99. When the script runs successfully, edit the script and uncomment the following line so the bill will be created permanently.
Bills of Material, Engineering Labs Page 21 of 39

--commit; -- uncomment this if you want to commit the change...leave commented for testing Query your bill in the Bill Define form (N) Bills > Bills The quantity for component ##6110' is now 99.
11.
Bills of Material, Engineering Labs Page 22 of 39
Lab 10 - Create a New Bill Using the ECO Business Object (API) This example of the ECOBO is a bit more complex. It stages data in some of the interface tables. A custom procedure is defined and loaded into the database. This custom procedure is then called. The custom procedure reads the staged interface data and passes it to the Process_ECO procedure call (the ECO API). This example creates a new ECO that creates a new bill by creating the ECO with a single revised item and component. Since this is a new item with no defined bill yet, the act of adding the component to the revised item on the ECO will cause the bill to be created automatically under ECO control. All run time output is spooled to the file “runall.txt” in the current directory on your PC and Process_ECO debug output is turned on for your review (see step 5). 1. Locate the folder you where you unzipped the lab SQL scripts and access the ECOBO subfolder (see
Introduction). There are 8 files in all:
Name Description runall.bat Run to process all (Windows) runall.sh Run to process all (UNIX) runall.sql Called by runall.bat or runall.sh to run all SQL scripts DefineParameters.sql Define the processing variables to pass to the your custom procedure. LoadProcedure.sql Defines and loads a custom procedure which (when called) will:
read the BOM and ENG interface tables data (loaded next) load the interface data into ECO API table variables call the ECO API to process the data
LoadData(Create).sql Loads data into the BOM and ENG interface tables. This example utilizes the BOM and ENG interface tables to store the data being imported.
CallProcedure.sql Calls your custom procedure loaded by LoadProcedure.sql DisplayEco.sql Displays the created ECO
2. Create a new manufacturing item ##1002
(N) Inventory > Items > Master Items Description = Pentium Computer (Chassis Only) Copy from item ##1000 Assign to organization M1
3. Edit DefineParameters.sql and update the highlighted variables. Note that the v_commit variable should be changed only at the very end of testing after your script is running successfully. Leave with a value of FALSE until that time. -- ************************************************************************** -- *** CHANGE THESE VALUES AS NEEDED ** -- ************************************************************************** -- Identity define v_user_name = '########' -- your application user name define v_initials = '###' -- your initials define v_resp_name = 'Manufacturing and Distribution Manager' define v_today = trunc(SYSDATE) define v_prog_appid = NULL -- ECO header define v_eco_name = '#########'; -- ECO name define v_org_code = 'M1' -- 3 letter code of the org to create ECO in define v_change_type = '###-Type' -- ECO change type define v_priority = '' -- ECO priority define v_hierarchy = '' -- Revised Item (RI) define v_new_revised_item_revision = ''; -- new item revision
Bills of Material, Engineering Labs Page 23 of 39
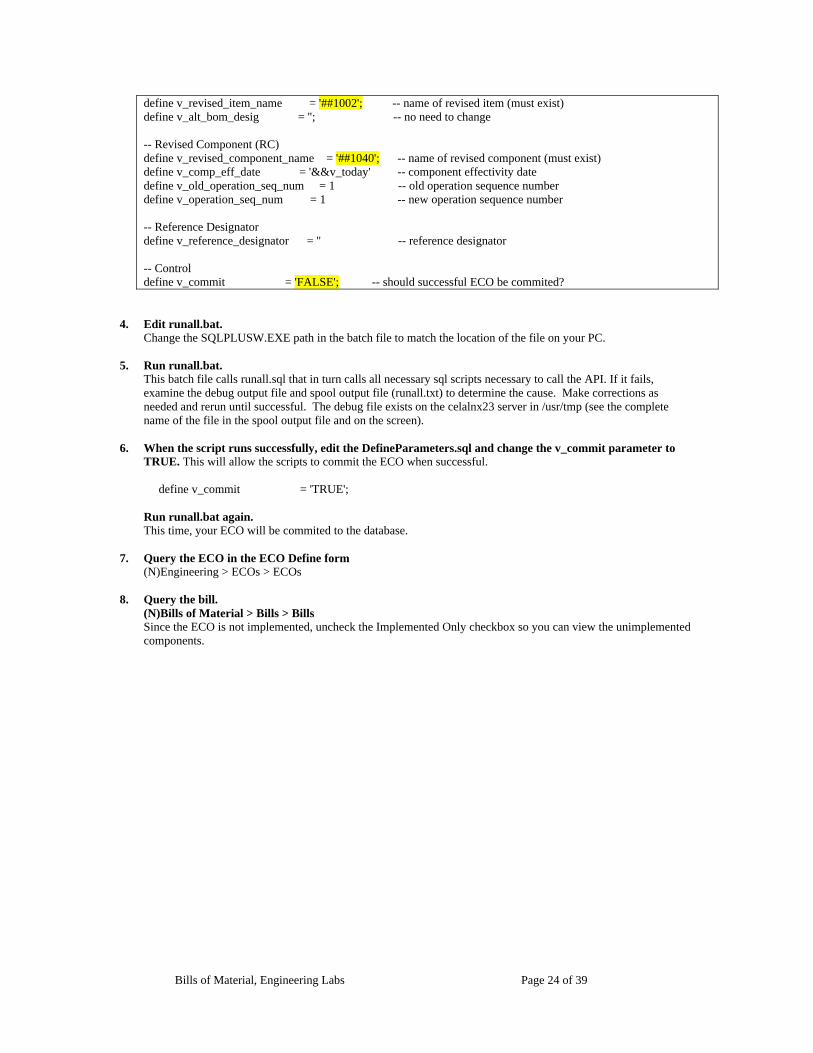
define v_revised_item_name = '##1002'; -- name of revised item (must exist) define v_alt_bom_desig = ''; -- no need to change -- Revised Component (RC) define v_revised_component_name = '##1040'; -- name of revised component (must exist) define v_comp_eff_date = '&&v_today' -- component effectivity date define v_old_operation_seq_num = 1 -- old operation sequence number define v_operation_seq_num = 1 -- new operation sequence number -- Reference Designator define v_reference_designator = '' -- reference designator -- Control define v_commit = 'FALSE'; -- should successful ECO be commited?
4. Edit runall.bat. Change the SQLPLUSW.EXE path in the batch file to match the location of the file on your PC.
5. Run runall.bat.
This batch file calls runall.sql that in turn calls all necessary sql scripts necessary to call the API. If it fails, examine the debug output file and spool output file (runall.txt) to determine the cause. Make corrections as needed and rerun until successful. The debug file exists on the celalnx23 server in /usr/tmp (see the complete name of the file in the spool output file and on the screen).
6. When the script runs successfully, edit the DefineParameters.sql and change the v_commit parameter to TRUE. This will allow the scripts to commit the ECO when successful. define v_commit = 'TRUE'; Run runall.bat again. This time, your ECO will be commited to the database.
7. Query the ECO in the ECO Define form (N)Engineering > ECOs > ECOs
8. Query the bill. (N)Bills of Material > Bills > Bills Since the ECO is not implemented, uncheck the Implemented Only checkbox so you can view the unimplemented components.
Bills of Material, Engineering Labs Page 24 of 39

Lab 11 -
1.
Explode a Bill Using the Exploder_Userexit Note: The exploder userexit is an Oracle supplied procedure to explode a bill. It writes the explosion data to the BOM_EXPLOSIONS_TEMP table. This is a Global Temporary table, meaning data written to the table is automatically deleted once the SQL*Plus session ends. You must copy the exploded data to a custom table if they wish to save the results.
Locate the folder you where you unzipped the lab SQL scripts and access the Explode_Bill subfolder (see Introduction).
2.
3.
4.
Start SQL*Plus Run Exploder_Userexit.sql Enter an organization_code and item name at the prompt. Verify the output against the application. (N)Bills of Material > BOM > Indented Bills Select organization=M1 Enter item = <same item you entered for the exploder script> The script results should agree with the form query results.
Bills of Material, Engineering Labs Page 25 of 39
Lab 12 -
1.
Implode a Bill Using the Imploder_Userexit Note: The imploder userexit is an Oracle supplied procedure to implode a bill. It writes data to the BOM_SMALL_IMPL_TEMP table. This is a Global Temporary table, meaning data written to the table is automatically deleted once the SQL*Plus session ends. You must copy the imploded data to a custom table if they wish to save the results.
Locate the folder you where you unzipped the lab SQL scripts and access the Implode_Bill subfolder (see Introduction).
2.
3.
4.
Start SQL*Plus Run Exploder_Userexit.sql Enter an organization_code and item name at the prompt. Verify the output against the application. (N)Bills of Material > BOM > Item Whereused Select organization=M1 Enter item = <same item you entered for the imploder script> The script results should agree with the form query results.
Bills of Material, Engineering Labs Page 26 of 39
Lab 13 - Export a Bill and Routing The scripts Export_BOM.sql and Export_RTG.sql in this lab illustrate the use of the BOMPXINQ.Export_BOM and BOM_RTG_EXP.Export_RTG procedure calls. The procedures explode a bill or routing using a single API. Each procedure populates table type variables that can be looped through for reporting or other processing. 1. Locate the folder you where you unzipped the lab SQL scripts and access the Export_Bill and Export_RTG
subfolders (see Introduction). There are 2 scripts to run: Export_BOM.sql and Export_RTG.sql.
2. Start SQL*Plus 3. Run Export_BOM.sql - the script will prompt for 2 values:
Enter organization_code = M1 Enter assembly_item_name = <choose one of your already created bills> Examine the output
4. Run Export_RTG.sql - the script will prompt for 2 values: Enter organization_code = M1 Enter assembly_item_name = <choose one of your already created routings> Examine the output
Bills of Material, Engineering Labs Page 27 of 39
Lab 14 - Manual ECO Approval and Implementation This lab illustrates how to manually create an ECO, approve it and then implement. 1. Create item ##2510 by copying from ##2010. You will have to do this in the Inventory Master item form since
you transferred ##2010 to manufacturing. (N) Inventory > Items > Master Items Assign the item to Organization M1
2. Create a bill for item ##2510 by copying the components from bill ##2010. (N) Bills of Material > Bills > Bills Enter the item name then choose Tools > Copy Bill From to copy bill ##2010
3. Create an engineering change order as follows: (N) Engineering > ECOs > ECOs
• ECO Name: Your choice or tab through and accept the system default • Type: Prod Chg
Click the Revised Items button
• Enter item ##2510 • Create a new revision by entering a value in the “Item Rev” field • Set the effective date one month from today • For the revised components, disable ##3010 and add (replace it with) item ##6110.
Click the Components button to enter the component changes:
• Disable component ##3010 • Replace it with component ##6110
Save the ECO. It should have an approval status of “Approved”. Choose Tools > Release to change the status to “Released”. This will save the ECO with the new status.
4. View bill ##2510 note the pending change (hint: use Future and Current and uncheck the Implemented Only
checkbox) (N) Bills of Material > Bills > Bills
5. Now go back to the ECO form and Implement the ECO (Tools > Implement)
6. Look at any other inquiries you care to as time allows
Bills of Material, Engineering Labs Page 28 of 39
Lab 15 - ECO Alerts and Approval Notifications This lab illustrates how to use Oracle Alerts to send ECO approval notifications. 1. Create an HR employee for yourself and associate with your application user name.
Your user account must be associated with a valid HR employee account in order to use alerts and workflow. The employee record must also have a valid email address. You want to create your own unique employee record since associating 2 apps user names to the same employee record can cause problems in workflow. Use the following to do this if you have not already done so. You will need the “Human Resources, Vision Enterprises” responsibility. a. Create the HR employee record
(N) Human Resources, Vision Enterprises > People > Enter and Maintain Click the New button Enter:
Last Name (Your last name) First Name (Your first name) Gender (Choose) Birth Date Social Security (enter any numbers using the format XXX-XX-XXXX) Action = Create Employment Person Type or Action = Employee
Click the Office Details tab Enter your Oracle email address in the Email field Save Click the Assignment button Enter:
Organization = Vision Operations (Click the “Correct” button if prompted) Job = MGR500.MANAGER
Save b. Associate the HR employee record with your application user account
(N) System Administrator > Security > User > Define Query your user name Place your cursor in the Person field and use the LOV to find and choose your HR employee record. Confirm that the E-Mail gets populated with the email address you defined in HR. Save.
2. Add the Alert Manager responsibility to your current user. (N) System Administrator > Security > User > Define Query your user. Add the responsibility: Alert Manager, Vision Enterprises. Save.
3. Create an Approval List (N) Engineering > Setup > Approval Lists Enter unique name for the approval list, ###-List Enter description, ### Approval List Enter Sequence = 10 Enter your Employee Name <Last Name%> to query for the name> Save
4. Create an ECO for item xx-2010 to increase the quantity for item xx-3040 to a quantity of 25 (N) Engineering > ECOs > ECOs If no organization has been set, choose the M1 - Seattle Manufacturing organization. With the cursor in the ECO field, tab to accept the ECO auto number. Set ECO Type to Prod Chg (Product change). Tab out of the ECO Type field and the creation date will populate and the Status will default to ‘Open’. Enter your user name as the Requestor Note: Requestor is a required field when using the ECO Approval alert. If one is not entered, the Alert will not be sent.
Bills of Material, Engineering Labs Page 29 of 39
In the Approval List field; enter the approval list you created previously. Tab out of the Approval List field and the ECO Approval Status will default to ‘Not submitted for approval’. Save and take note of the ECO number. Click on the ‘Revised Items’ button. ‘Revised Items’ Form Enter item ##2010 and the tab out. Item ##2010 was created in the Create Standard Bills of Material lab. Click on the ‘Components’ button. ‘Revised Components’ Form Set Action = ‘Change’ Place your cursor in the Component field, enter a percent (%) and tab out. The LOV will open and display only those components defined for this revised item. Enter or select component “##3040”. Tab out of the component field and the component information will populate into the form. Change the component ‘New’ quantity to 25. Save Close the Revised Components form. Close the Revised Items form. On the Engineering Change Orders form, update the ECO Approval Status to ‘Ready to approve’ (place your cursor in the field and choose ‘Ready to approve’ from the LOV). Save.
5. Verify that the ECO Approval alert is defined and enabled. (N) Alert Manager, Vision Enterprises > Alert > Define Query:
Application = Engineering Name = ECO Approvals
Confirm that the ‘Enabled’ box is checked. 6. Launch the ECO Approval Alert concurrent program.
(N) Alert Manager, Vision Enterprises > Request > Check Enter Application = Engineering, Alert = ECO Approvals Submit. (M:) > View > Requests Confirm radio button for ‘All My Requests’ is enabled. Click the ‘Find’ button to find all requests. Confirm that the request, ECO Approvals (Check Periodic Alert), completes successfully. Click the ‘View Log’ button to confirm that the ALECDC module: Check Periodic Alert shows rows updated. Click the ‘View Output’ button to confirm that actions defined in the ECO Approval Alert have completed.
7. Confirm that the ECO Approval Status has been updated.
(N) Engineering > ECOs > ECOs Query the ECO created in step #4 and observe that the Approval Status has been updated to ‘Approval Requested’.
8. Confirm that email is received at the email address specified for your employee.
Observe that the requestor name in the email is the same as that specified on the ECO.
Bills of Material, Engineering Labs Page 30 of 39

Lab 16 - Approve an ECO via Workflow This lab illustrates how to use Oracle Workflow for ECO Approvals. Most organizations have some form of approval process before engineering change orders (ECOs) are implemented. By using Oracle Workflow, the approval process can be customized to meet each organization’s needs. When Workflow is in control of the approval process, the ECO approval status is set to Approval Requested. Before the approval status is changed, the workflow approval process can be aborted. Workflow manages the approval process until the entire approval flow is complete. Only then is the ECO approval status updated to either Approved or Rejected. If an error occurs during the Workflow approval process, the approval status is set to Processing Error. Standard Workflow Process One workflow process, named “Standard Approval Process," is predefined when Engineering is installed, regardless of whether or not the entire Oracle Workflow product is installed. If the entire Workflow product is installed, you can modify this process or create new processes. If you use the Standard Workflow Process, you must assign a role to the “Standard Approval Notification" activity. Otherwise, the process will fail. If the Workflow product is not fully installed, you can alter only the Standard Approval Process. Section I - Setting Up Oracle Engineering 1. Create an Approval List if you have not already done so.
(N) Engineering > Setup > Approval Lists Enter unique name for the approval list, ###-List Enter description, ### Approval List Enter a unique sequence Enter your Employee Name <Last Name%> to query for the name Save
2. Create ECO Priorities (N) Engineering> Setup > Priorities Enter a unique priority alphanumeric name, ###-Priority. Enter a priority sequence. This is a number between 0 and 9 to denote highest to lowest priority. Enter a description for the priority. Save.
3. Create an ECO Type that includes the 'Standard Approval Process' as its workflow process.
Attach the Standard Approval Process for each priority you want to use. (N) Engineering> Setup > Change Types Enter a unique change type, ###-Type Uncheck the Engineering Also flag to indicate this change type can be used in both manufacturing and engineering. Enter a description for the change order type. To associate this ECO type with a Workflow process, click the Processes button. In the Priority column, choose 'Standard' from the list of values. In the Process column, choose 'Standard Approval Process' from the list of values. Save.
Section II - Modify the Standard Approval Process in Oracle Workflow Builder 1. Ensure you have Oracle Workflow Builder installed (see Introduction).
Bills of Material, Engineering Labs Page 31 of 39
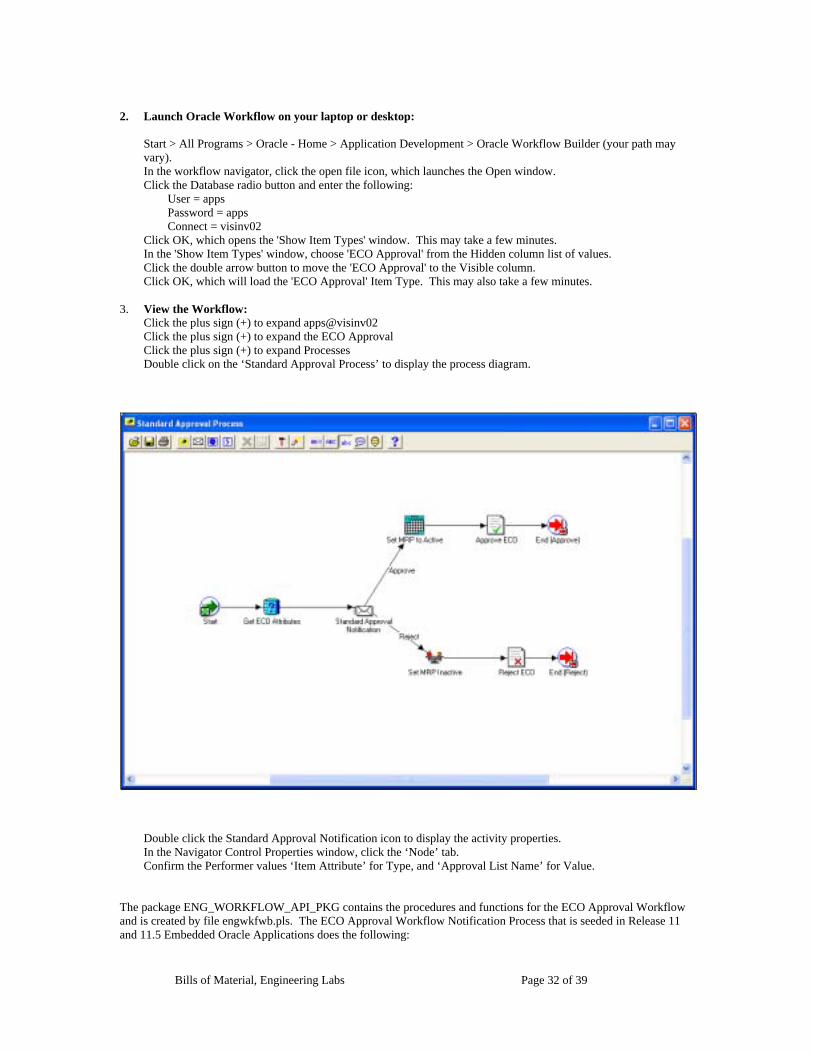
2. Launch Oracle Workflow on your laptop or desktop:
Start > All Programs > Oracle - Home > Application Development > Oracle Workflow Builder (your path may vary). In the workflow navigator, click the open file icon, which launches the Open window. Click the Database radio button and enter the following:
User = apps Password = apps Connect = visinv02
Click OK, which opens the 'Show Item Types' window. This may take a few minutes. In the 'Show Item Types' window, choose 'ECO Approval' from the Hidden column list of values. Click the double arrow button to move the 'ECO Approval' to the Visible column. Click OK, which will load the 'ECO Approval' Item Type. This may also take a few minutes.
3. View the Workflow: Click the plus sign (+) to expand apps@visinv02 Click the plus sign (+) to expand the ECO Approval Click the plus sign (+) to expand Processes Double click on the ‘Standard Approval Process’ to display the process diagram.
Double click the Standard Approval Notification icon to display the activity properties. In the Navigator Control Properties window, click the ‘Node’ tab. Confirm the Performer values ‘Item Attribute’ for Type, and ‘Approval List Name’ for Value.
The package ENG_WORKFLOW_API_PKG contains the procedures and functions for the ECO Approval Workflow and is created by file engwkfwb.pls. The ECO Approval Workflow Notification Process that is seeded in Release 11 and 11.5 Embedded Oracle Applications does the following:
Bills of Material, Engineering Labs Page 32 of 39
Function Description ------------------------ ----------------------------------------------------------------------------------------------------------- Start * Mark start of process. Get ECO Attributes * This activity, which is seeded by the Oracle Engineering product, sets pre-defined ECO
attributes that can be used by this item type. * Gets the data from Eng_Engineering_Changes for the ECO Number (Change_Notice), Organization Id (Org_id).
Standard Approval * This is the standard ECO Approval Notification seeded for Oracle Engineering.
* Sends the Notification with the ECO Attributes collected above to the individuals in the Approval List using Workflow Notification Mailer.
If Approved: Set MRP to Active * This function sets MRP Active to ‘Yes’ for all "Open" or "Scheduled" revised items
belonging to the ECO. * Updates Mrp_Active to 1 (Yes) in Eng_Revised_Items for Change_Notice, Org_Id and having a Status_Type of 1 (Open) or 4 (Scheduled).
Approve ECO * This function sets the ECO's Approval Status to "Approved", sets the Approval Date to
the current date and sets all "Open" revised items belonging to this ECO to Scheduled". * Updates Approval_Status_Type to 5 (Approved) and Approve_Date to Sysdate in Eng_Engineering_Changes table for Change_Notice, Org_Id. * Updates Status_Type = 4 (Scheduled) in Eng_Revised_Items table for Change_Notice, Org_Id.
End *Marks the end of the process. If Rejected: Set MRP to Inactive * This function sets MRP Active to ‘No’ for all "Open" or "Scheduled" revised items
belonging to the ECO. * Updates Mrp_Active to 2 (No) in Eng_Revised_Items for Change_Notice, Org_Id and having a status_type of 1 (Open) or 4 (Scheduled).
Reject ECO * This function sets the ECO's Approval Status to "Rejected" and clears out the Approval
Date. * Updates Approval_Status_Type to 4 (Rejected) and Approval_Date to NULL in Eng_Engineering_Changes for Change_Notice, Org_Id.
End *Marks the end of the process. Section III – Create the ECO and Launch the Workflow Process 1. Create item ##Super1010 by copying from ##1010.
Be sure to also enable it in the M1 organization. You will have to do this in the Inventory Master Item form since you transferred ##1010 to manufacturing.
2. Create an Engineering Change Order
(N) Engineering > ECOs > ECOs Tab to accept default ECO number. Make note of the ECO number: ________________________ Enter the ECO Type (###-Type), created earlier, which uses the standard workflow. The status will default to ‘Open’. Enter the Priority, which you associated with the ECO type (Standard). Enter your Approval List (###-List) The Approval Process should default to ‘Standard’; the process associated with your ECO Type and Priority.
Bills of Material, Engineering Labs Page 33 of 39
The Approval Status should default to ‘Not submitted for approval’. Save. Click the Revised Items button Use ##1000 as the revised item Set the change Effectivity Date one month from today using the LOV. For the revised components, disable ##1010 and add (replace it with) the ##Super1010. For the Add line, enter the same operation sequence and item sequence in the “Op Seq New” and “Item Seq” fields as the disabled line. Save. Launch the Workflow Process by clicking the Submit button. The Approval Status will change to ‘Approval Requested. NOTE: Once submitted, you cannot change the ECO. You can abort the approval by selecting the Special Menu option and Abort Approval. When you abort, you can then make changes and resubmit.
3. Review the Notification
(N) Engineering > ECOs > Notification Click the link in the Subject of the notification (‘ECO Approval Notification’). Note the message, at top left of the form. ‘ECO <eco number> is awaiting your approval. At the top right of the form, you will see the buttons Approve, Reject, Reassign and Request Information. There is also a ‘ECO Form’ link, which would take you back to the application ECO form and open the ECO from which the notification was sent. Click the ‘Approve’ button. NOTE: Notifications are sent when using the Standard Approval Process. Emails are only sent when using the Voting Approval Process.
4. Query the ECO to Check Current Status. (N) Engineering > ECOs > ECOs The ECO Status should now show ‘Scheduled’ The Approval Status should now show ‘Approved’. To view the Approval History: Tools > View Approvals Click the ‘Status’ button to view the Activity History
Bills of Material, Engineering Labs Page 34 of 39
Lab 17 - Use Up ECO This lab provides an example use of the Engineering “Use Up” functionality. Section I – Create the Planner, Use-up Items and Bill of Material 1. Create a Manufacturing Planner
Change organizations to M1 Seattle Manufacturing organization. (N) Manufacturing and Distribution Manager > Inventory > Setup > Planners Enter Name, Description, Employee and Electronic Mail Address. Use the email address that was entered during your employee definition. A list of defined planners can be viewed using the following query:
SELECT p.PLANNER_CODE, p.DESCRIPTION, p.ELECTRONIC_MAIL_ADDRESS, p.DISABLE_DATE, p.ORGANIZATION_ID, p.EMPLOYEE_ID, E.FULL_NAME FROM MTL_PLANNERS p, HR_EMPLOYEES e, MTL_PARAMETERS mp WHERE mp.organization_code = 'M1' and mp.organization_id = p.organization_id and p.employee_id = e.employee_id ORDER BY planner_code;
2. Create Manufacturing Items (N) Manufacturing and Distribution Manager > Inventory > Items > Master Items Create the following new items:
• ##-FG1000 – Copy the Finished Goods template.
MPS/MRP Planning Tab: Enter MRP Planning for the Planning Method. Accept all other default values and save. Assign to the M1 Seattle Manufacturing organization.
• ##-Useup Component 1 – Copy the Purchased Item template.
MPS/MRP Planning Tab: Enter MRP Planning for the Planning Method. Accept all other default values and save. Assign to the M1 Seattle Manufacturing organization.
• ##-Useup Component 2 – Copy the Purchased Item template.
MPS/MRP Planning Tab: Enter MRP Planning for the Planning Method. Accept all other default values and save. Assign to the M1 Seattle Manufacturing organization.
3. Assign planner to all three items at the child organization level.
Change organizations to the M1 Seattle Manufacturing organization. (N) Manufacturing and Distribution Manager > Inventory > Items > Organization Items Query each of the three items. For each item, click the General Tab: Enter the planner created in step #1.
4. Create Bill of Material (N) Manufacturing and Distribution Manager > Bills of Material > Bills > Bills Enter your finished good item, ##-FG1000, as the top assembly item.
Bills of Material, Engineering Labs Page 35 of 39
Enter the component ##-Useup Component 1. In the component Main tab, enter component Quantity = 2. This means that each assembly will require 2 components. Save.
Section II – Create On-Hand Quantity for the Use Up Component 1. Change Organizations to M1 Seattle Manufacturing organization.
(N) Mfg and Distribution Manager > Inventory > Transactions > Miscellaneous Transactions The date will default to sysdate. Enter Miscellaneous Receipt for the Type Click the ‘Transaction Lines’ button. In the Miscellaneous Receipt form, enter the use up component, ##-Useup Component 1 Choose the ‘Stores’ subinventory. UOM will default to Each Enter a quantity of 60 and tab to the Account field. In the Account field, click Ctrl-L for a list of values. In the Operations Accounting Flex form, enter ‘Miscellaneous’ into the Account Alias field and click OK. Save.
2. Confirm Use Up Component On-Hand Quantity (N) Mfg and Distribution Manager > Inventory > On-hand, Availability > On-hand Quantity Confirm M1 Seattle Manufacturing as the organization. Enter the use up component, ##-Useup Component 1, into the Item / Revision field. Click the Find button. Confirm the quantity of 60 in the Stores subinventory.
Section III – Create the MRP Plan 1. Create a Master Demand Schedule in the M1 Seattle Manufacturing organization.
(N) Manufacturing and Distribution Manager > Material Planning > MDS > Names Enter an MDS Name: ##-MDS Enter Description: ##-MDS Use-up Plan Click the Items button. In the Master Demand Schedule Items form, enter your assembly item ##-FG1000 Save. Click the Detail button. In the Master Demand Schedule Entries form, enter a date from the list of values, 4 weeks in the future. Enter a value of 10 for the Current Quantity. Click date field on the second line. Original and Total fields will default the value of 10 for the previous line. In the second line, enter date from the list of values, 5 weeks in the future. Enter a value of 10 for the Current Quantity. Click date field on the third line. Original and Total fields will default the value of 10 for the previous line. Repeat this process three more times for the dates 6, 7, and 8 weeks into the future. The plan will total 50. Save.
2. Create and Launch the Material Requirements Plan (N) Manufacturing and Distribution Manager > Material Planning > MRP > Names Enter a unique MRP Name: ##-MRP1 Enter Description: ##-MDS Use-up Plan (Try to relate the description back to the MDS plan) With the cursor in your plan name field, click the Options button to open the Plan Options. Plan Name: Should default to your MRP plan name. Schedule field: Choose your MDS plan from the list of values. Overwrite: Choose ‘All’ from the list of values. Planned Items (At bottom of the form): Choose ‘Demand Schedule Items Only’ from the list of values. Accept all other default values. Save and close the Plan Options form. Back in the MRP Names form, with the cursor in your plan name field, click the Launch button to launch the concurrent process. Accept the default Parameter values for the concurrent request and click the submit button.
Bills of Material, Engineering Labs Page 36 of 39
View Requests to confirm all processes complete normal. All processes must complete normal prior to the next step. You cannot confirm MRP demand until all processes have completed. About 21 processes will run as a result of launching the concurrent process.
3. Confirm Demand for the MRP Plan.
(N) Manufacturing and Distribution Manager > Material Planning > MRP > Workbench Choose your MRP plan from the list of values. Click the Supply/Demand button. In the Find Supply/Demand form, click the Find button without entering any values. In the Supply/Demand form, confirm that there is demand created for both the finished assembly, ##-FG1000, and the bill component, ##-Useup Component 1, for each planned order.
4. Review MRP Table Information.
SELECT compile_designator mrp_plan_name, organization_id orgid, organization_code org, inventory_item_id item_id, planner_code planner, inventory_use_up_date use_up_date, description item_description FROM mrp_system_items WHERE compile_designator = '&MRP_PLAN_NAME';
At this point, you should see 2 lines, one for the top assembly and one for the component. Make note of the component inventory_use_up_date: ______________________________________
Section IV – Create the Use Up ECO 1. (N) Engineering > ECOs > ECOs
Tab to accept default ECO number. Make note of the ECO number: ________________________ Type: Prod Chg Status should default to Open. Approval Status should default to Approved. Click the Revised Items button. In the Revised Items form, enter your assembly item ##-FG1000 as the revised item. The Effectivity Date will default to sysdate. Save. Click the Components button. In the Revised Components window, enter the following values:
Line 1: Action = Disable, Component = ##-Useup Component 1. Tab until the Quantity for ##-Useup Component 1 defaults to 2. The ‘Effective To’ date will default to the Effectivity Date of the Revised Item.
Line 2: Action = Add, Component = ##-Useup Component 2. Tab to the Quantity field, enter a value of 2 for the Quantity. The Item Sequence should default to 20.
Save and close the Revised Components window. 2. Back on the Revised Items form.
Click on the Effective Date field LOV, which will now contain a list of MRP plans. Choose the MRP plan, which has the use up component, ##-Useup Component 1, as the item. Save.
Bills of Material, Engineering Labs Page 37 of 39
Note: The contents of the effectivity date LOV can be queries using the following query: Make note of the Revised Item Effective Date: ___________________________________ This should match the use up date seen in the query of the MRP_SYSTEM_ITEMS table. Click on the Use Up Details tab. The Use-up Item and Plan name should now be populated with the use up item, description and plan name.
Section IV – Set up the ECO Use Up Alert
1. Verify that the ECO Use Up Approval alert is defined and enabled.
(N) Alert Manager, Vision Enterprises > Alert > Define Query Application = Engineering Name = ECO Use Up Alert Confirm that the ‘Enabled’ box is checked.
Click the ‘Action Sets’ button. The Input Name should default to the value INPUT_ORG_CODE. Enter the organization code M1 into the Value field. Save and close the form. Click the ‘Alert Details’ button. The Input Name should default to the value INPUT_ORG_CODE. Enter the organization code M1 into the Value field. Save and close the form. Adding the organization codes sets the default used by the Alert Select Statement.
2. Activate the Periodic Alert Scheduler.
(N) Alert Manager, Vision Enterprises >Request > Schedule With cursor in the Program field Periodic Alert Scheduler, click the Activate button. In the date parameter form, enter current date and click OK.
Section V – Revise Test Parameters 1. Reduce on-hand quantity in order to change the MRP component use up date.
Change Organizations to M1 Seattle Manufacturing organization. (N) Mfg and Distribution Manager > Inventory > Transactions > Miscellaneous Transactions Perform Miscellaneous Issue transaction for a quantity of 40 for item ##-Useup Component 1 from Subinvenory Stores. Confirm On-hand quantity is decreased by 40. Current On-hand quantity should now be 20.
2. Launch MRP plan to generate new use up date.
(N) Manufacturing and Distribution Manager > Material Planning > MRP > Names In the MRP Names form, with the cursor in your plan name field, click the Launch button to launch the concurrent process. Accept the default Parameter values for the concurrent request and click the submit button. View Requests to confirm all processes complete normal. All processes must complete normal prior to the next step. You cannot confirm MRP demand until all processes have completed.
3. Confirm Demand for the MRP Plan.
(N) Manufacturing and Distribution Manager > Material Planning > MRP > Workbench Choose your MRP plan from the list of values. Click the Supply/Demand button. In the Find Supply/Demand form, click the Find button without entering any values. In the Supply/Demand form, confirm that there is demand created for the finished assembly, ##-FG1000, and both
Bills of Material, Engineering Labs Page 38 of 39

bill components, ##-Useup Component 1 and ##-Useup Component 2.
4. Review MRP Table Information. Select * From MRP_SYSTEM_ITEMS Where COMPILE_DESIGNATOR = ‘&MRP_Plan_Name’;
At this point, you should see 3 lines, one for the top assembly and one for each component. Why are there now 3 lines? Make note of the inventory_use_up_date for ##-Useup Component 1: _____________________________ Has it changed? If so, why?
Launch the Periodic Alert Scheduler, then View Requests (N) Alert Manager, Vision Enterprises >Request > Schedule View > Requests Click the radio button for ‘Specific Requests’. In the Name field, enter %Alert%. Click the ‘Find’ button. You should see the Periodic Alert Scheduler in a Pending Scheduled status. Click the ‘View Details’ button. On the Request Detail page, click the ‘Schedule’ button. Choose ‘As soon as possible’ and click OK.
5. Check your email for the Oracle Alert.
You were defined as the planner on the items for this test. When the use up date is changed to an earlier date, the ECO Use Up Alert will send an email to the planner to review the new use up date. Modifying the effective date on the ECO is a manual process done after receiving the alert.
Bills of Material, Engineering Labs Page 39 of 39