Embed Size (px)
Citation preview
Copyright © 2011 BNI, All Rights Reserved
BNI Connect® Training
Chapter Website Content Management Solution (CMS) Manual
Version 1.0 – 12/4/2011
BNI Connect® Chapter CMS Manual P a g e | 1 V1.0 12/4/2011
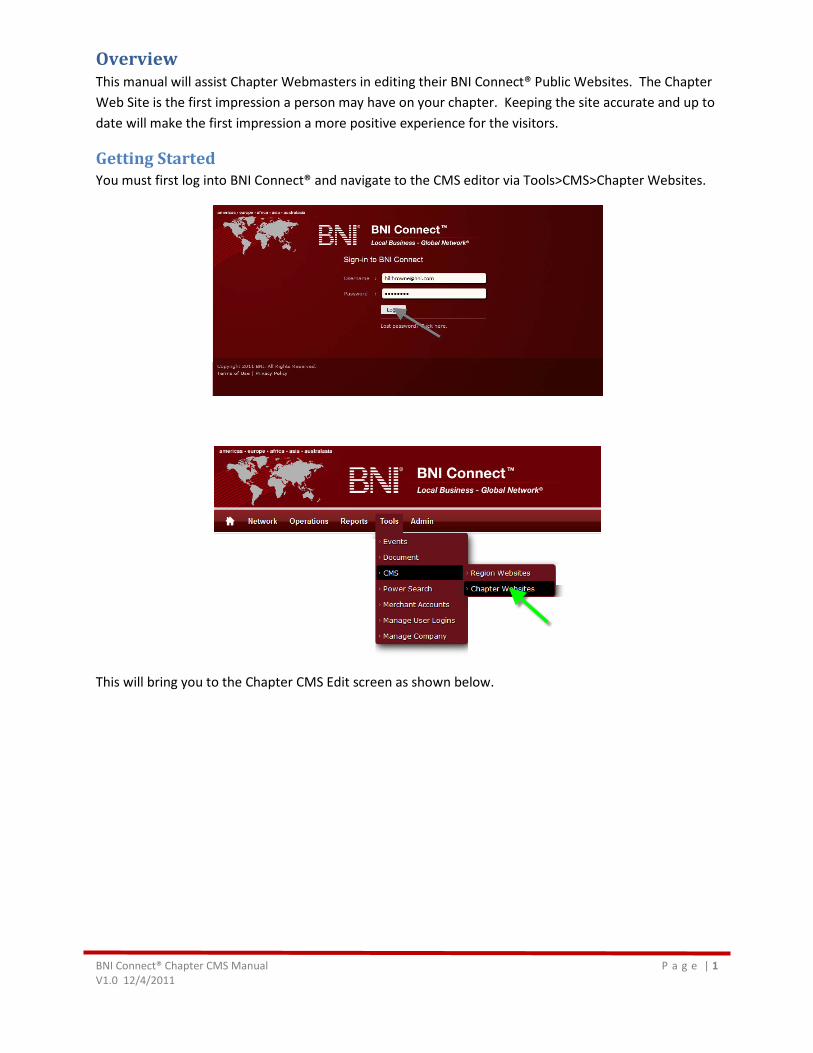
Overview This manual will assist Chapter Webmasters in editing their BNI Connect® Public Websites. The Chapter Web Site is the first impression a person may have on your chapter. Keeping the site accurate and up to date will make the first impression a more positive experience for the visitors.
Getting Started You must first log into BNI Connect® and navigate to the CMS editor via Tools>CMS>Chapter Websites.
This will bring you to the Chapter CMS Edit screen as shown below.
BNI Connect® Chapter CMS Manual P a g e | 2 V1.0 12/4/2011
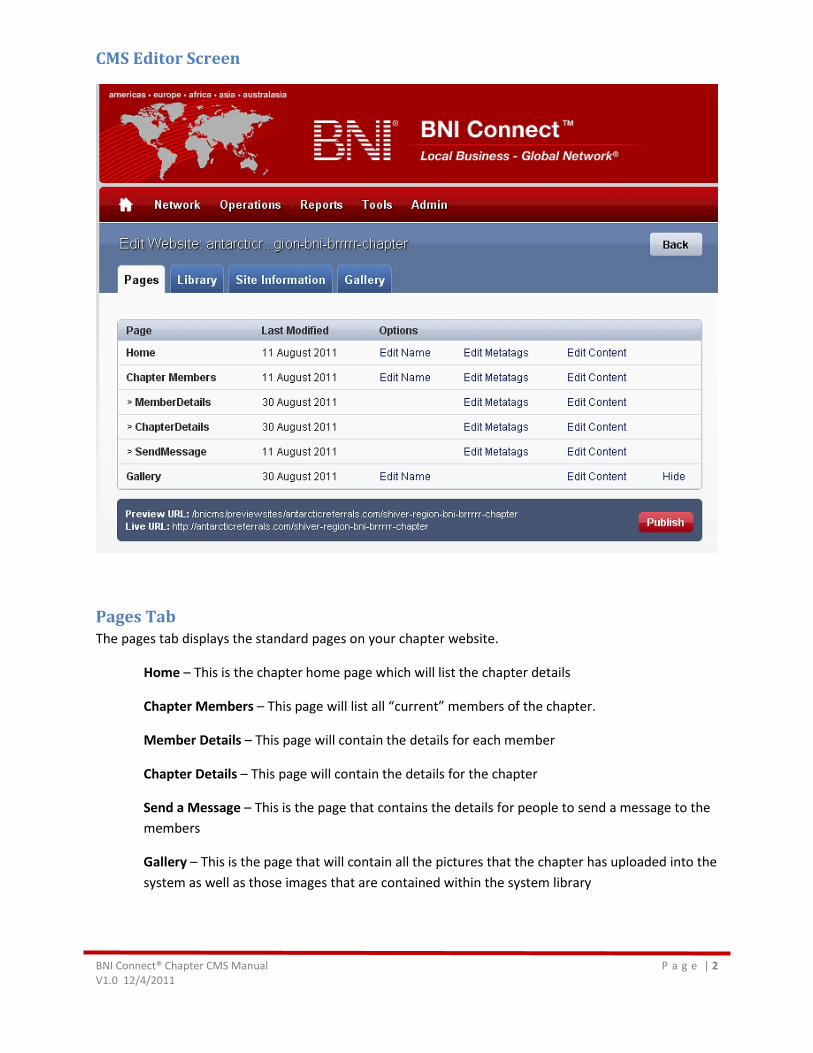
CMS Editor Screen
Pages Tab The pages tab displays the standard pages on your chapter website.
Home – This is the chapter home page which will list the chapter details
Chapter Members – This page will list all “current” members of the chapter.
Member Details – This page will contain the details for each member
Chapter Details – This page will contain the details for the chapter
Send a Message – This is the page that contains the details for people to send a message to the members
Gallery – This is the page that will contain all the pictures that the chapter has uploaded into the system as well as those images that are contained within the system library
BNI Connect® Chapter CMS Manual P a g e | 3 V1.0 12/4/2011
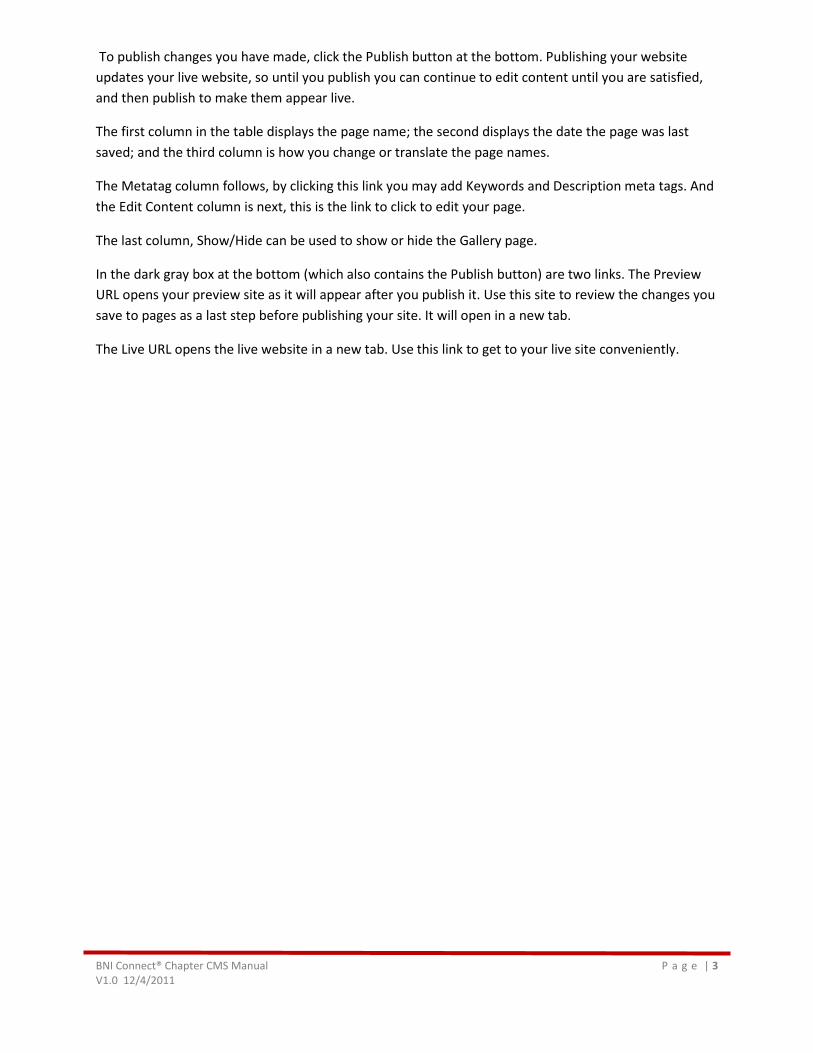
To publish changes you have made, click the Publish button at the bottom. Publishing your website updates your live website, so until you publish you can continue to edit content until you are satisfied, and then publish to make them appear live.
The first column in the table displays the page name; the second displays the date the page was last saved; and the third column is how you change or translate the page names.
The Metatag column follows, by clicking this link you may add Keywords and Description meta tags. And the Edit Content column is next, this is the link to click to edit your page.
The last column, Show/Hide can be used to show or hide the Gallery page.
In the dark gray box at the bottom (which also contains the Publish button) are two links. The Preview URL opens your preview site as it will appear after you publish it. Use this site to review the changes you save to pages as a last step before publishing your site. It will open in a new tab.
The Live URL opens the live website in a new tab. Use this link to get to your live site conveniently.
BNI Connect® Chapter CMS Manual P a g e | 4 V1.0 12/4/2011
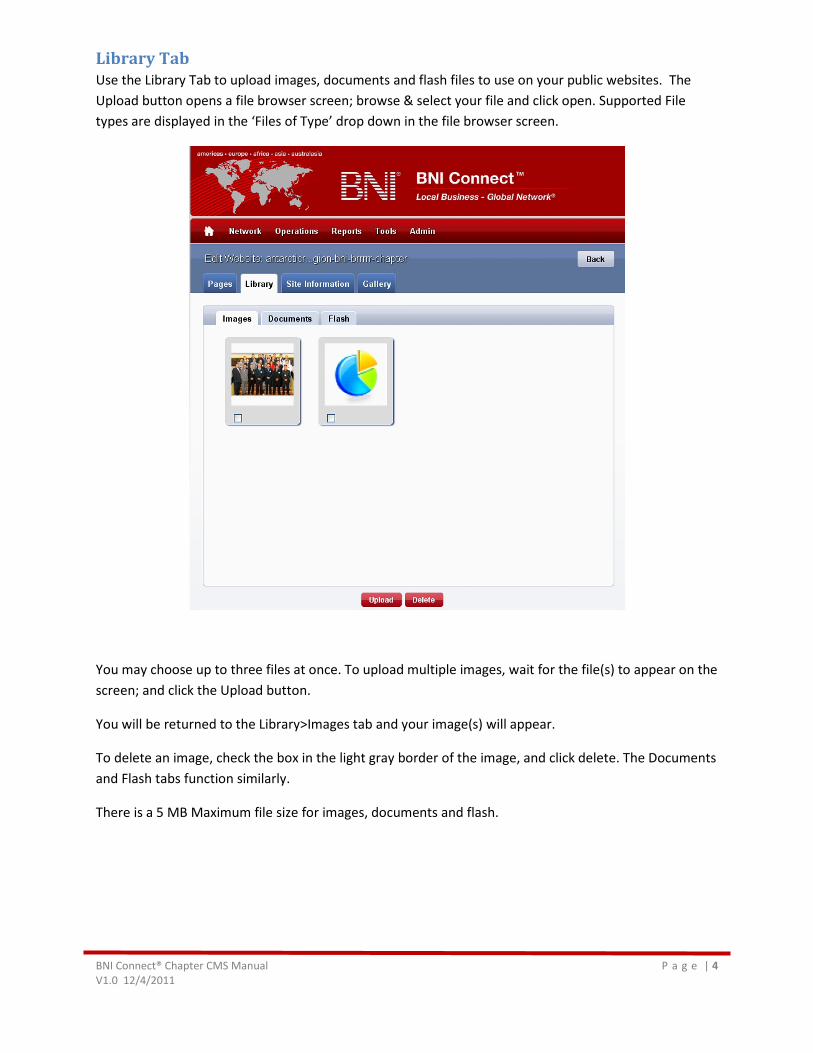
Library Tab Use the Library Tab to upload images, documents and flash files to use on your public websites. The Upload button opens a file browser screen; browse & select your file and click open. Supported File types are displayed in the ‘Files of Type’ drop down in the file browser screen.
You may choose up to three files at once. To upload multiple images, wait for the file(s) to appear on the screen; and click the Upload button.
You will be returned to the Library>Images tab and your image(s) will appear.
To delete an image, check the box in the light gray border of the image, and click delete. The Documents and Flash tabs function similarly.
There is a 5 MB Maximum file size for images, documents and flash.
BNI Connect® Chapter CMS Manual P a g e | 5 V1.0 12/4/2011
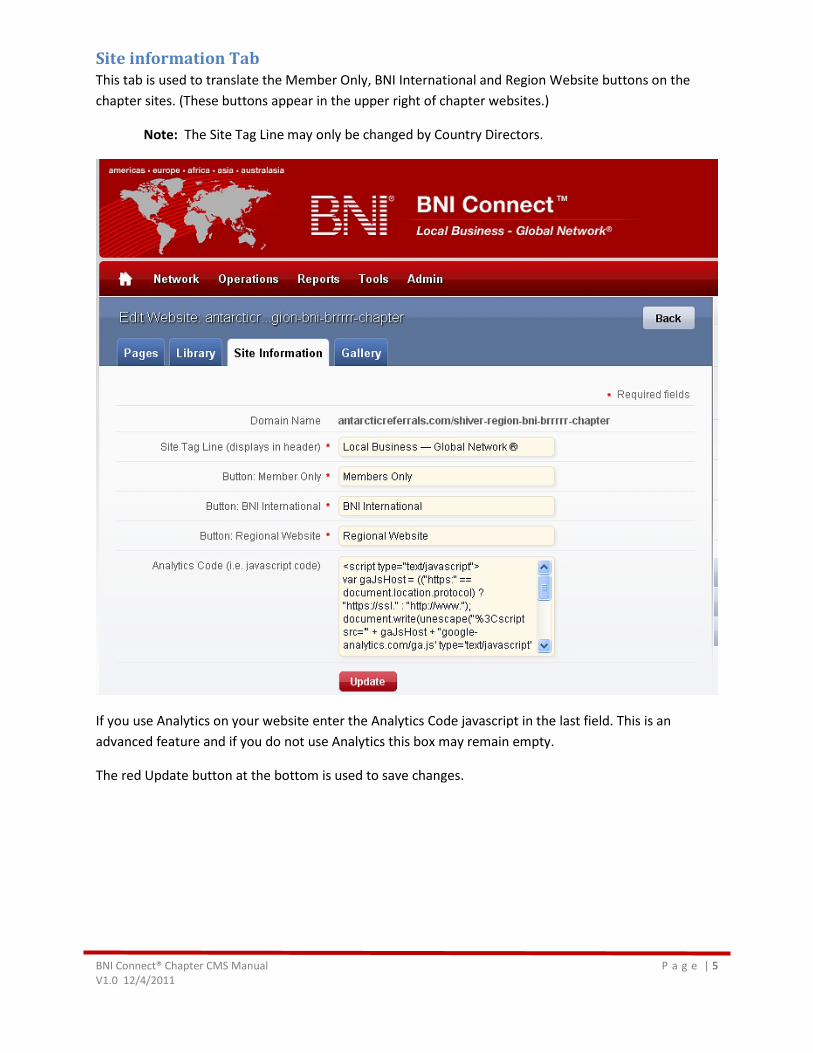
Site information Tab This tab is used to translate the Member Only, BNI International and Region Website buttons on the chapter sites. (These buttons appear in the upper right of chapter websites.)
Note: The Site Tag Line may only be changed by Country Directors.
If you use Analytics on your website enter the Analytics Code javascript in the last field. This is an advanced feature and if you do not use Analytics this box may remain empty.
The red Update button at the bottom is used to save changes.
BNI Connect® Chapter CMS Manual P a g e | 6 V1.0 12/4/2011
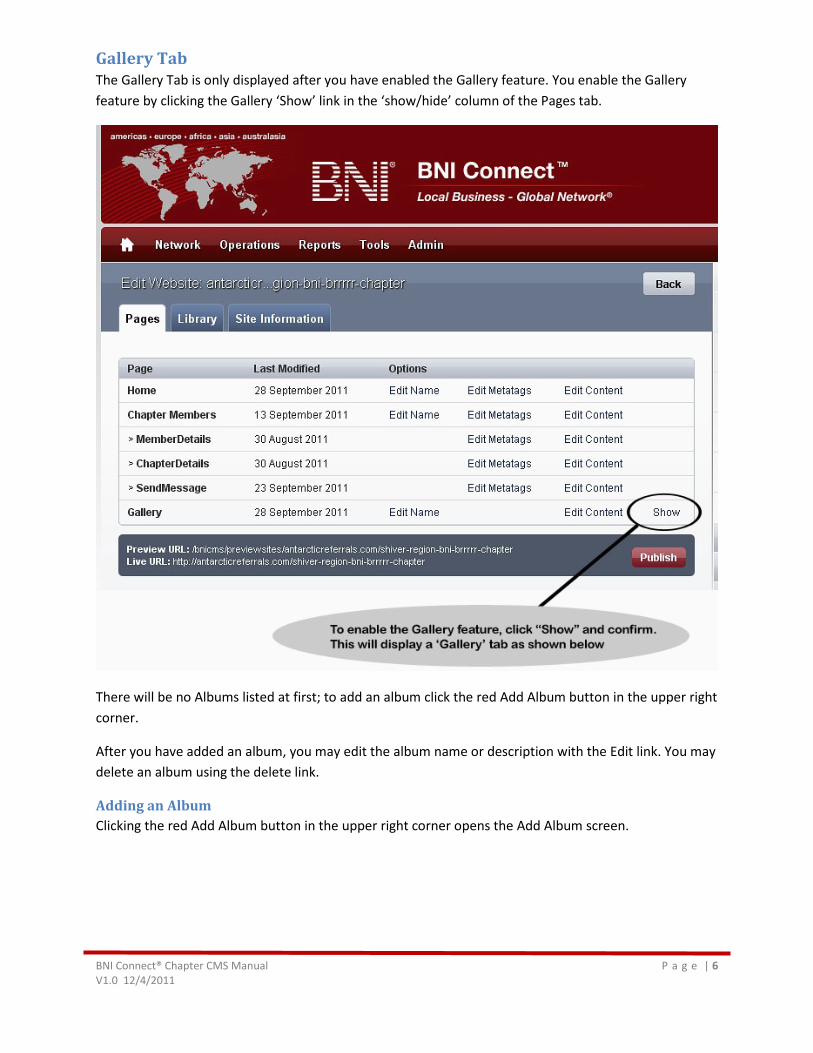
Gallery Tab The Gallery Tab is only displayed after you have enabled the Gallery feature. You enable the Gallery feature by clicking the Gallery ‘Show’ link in the ‘show/hide’ column of the Pages tab.
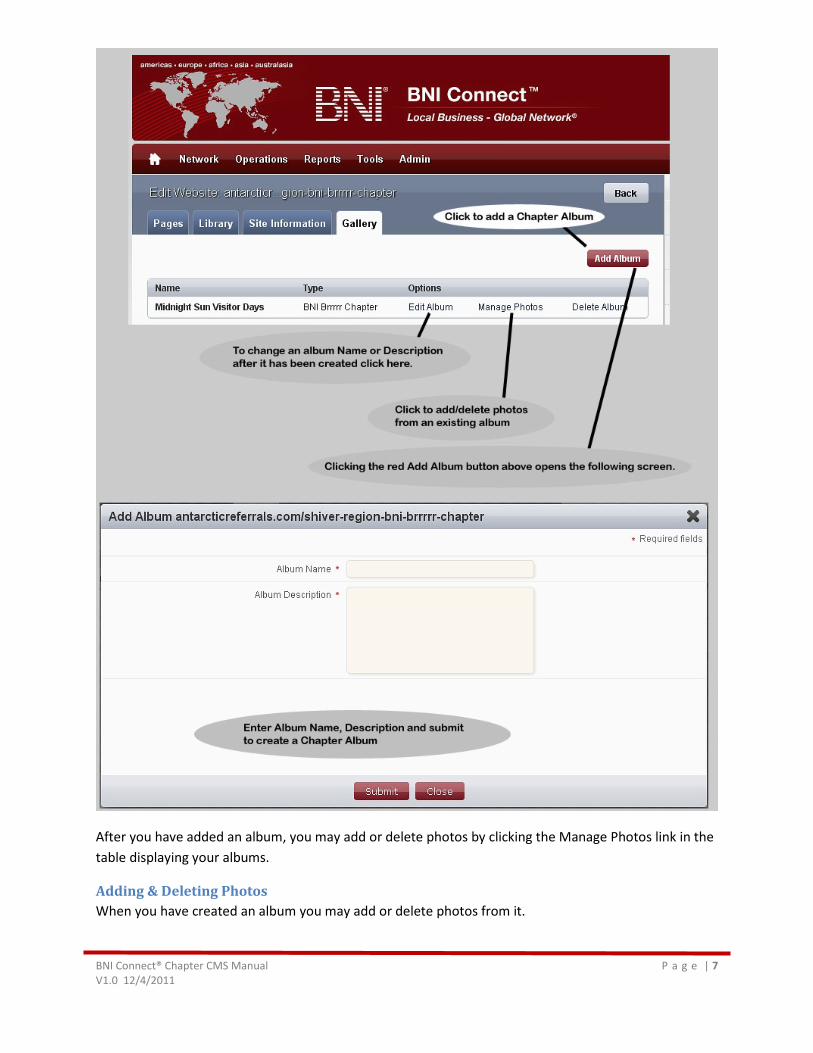
There will be no Albums listed at first; to add an album click the red Add Album button in the upper right corner.
After you have added an album, you may edit the album name or description with the Edit link. You may delete an album using the delete link.
Adding an Album Clicking the red Add Album button in the upper right corner opens the Add Album screen.
BNI Connect® Chapter CMS Manual P a g e | 7 V1.0 12/4/2011
After you have added an album, you may add or delete photos by clicking the Manage Photos link in the table displaying your albums.
Adding & Deleting Photos When you have created an album you may add or delete photos from it.

BNI Connect® Chapter CMS Manual P a g e | 8 V1.0 12/4/2011
To add a photo click the Add Photo button and complete the Upload Images screen as shown below.
BNI Connect® Chapter CMS Manual P a g e | 9 V1.0 12/4/2011
One photo may be uploaded at a time. After you have uploaded a photo, you may Edit the title of the image, or delete the image by using the appropriate links in the Manage Photos screen.
(Refer to the Gallery page section below for details on the Gallery feature.)
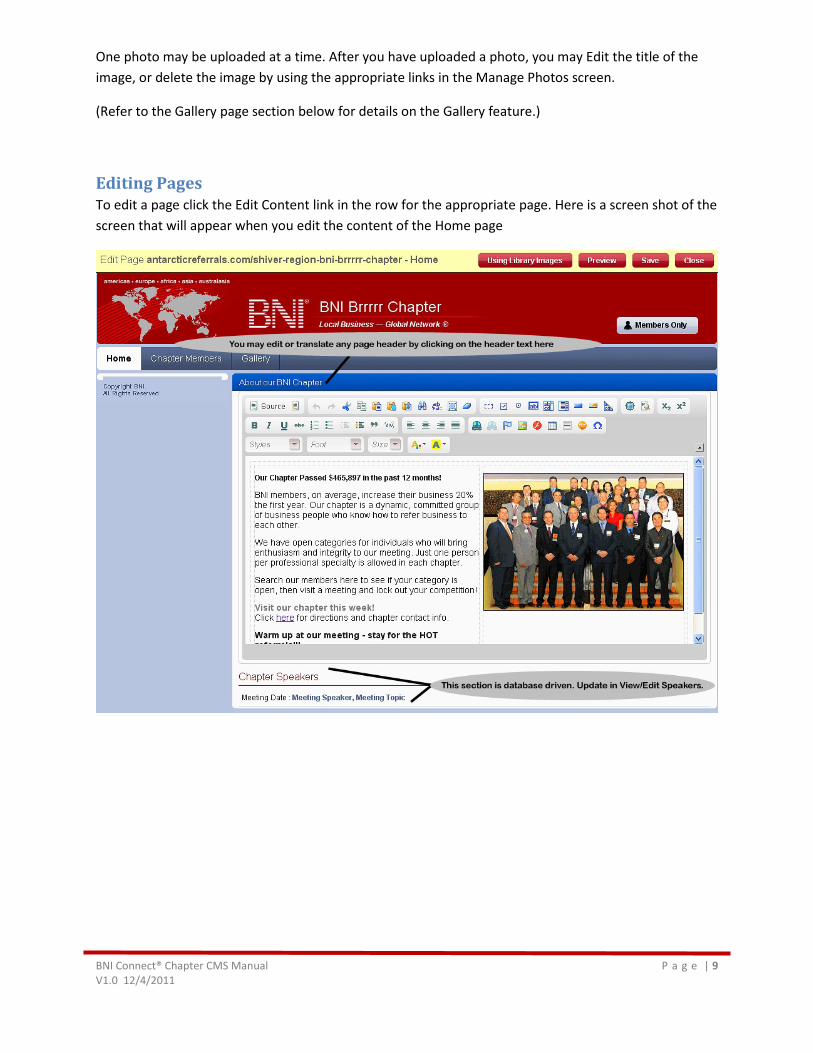
Editing Pages To edit a page click the Edit Content link in the row for the appropriate page. Here is a screen shot of the screen that will appear when you edit the content of the Home page
BNI Connect® Chapter CMS Manual P a g e | 10 V1.0 12/4/2011
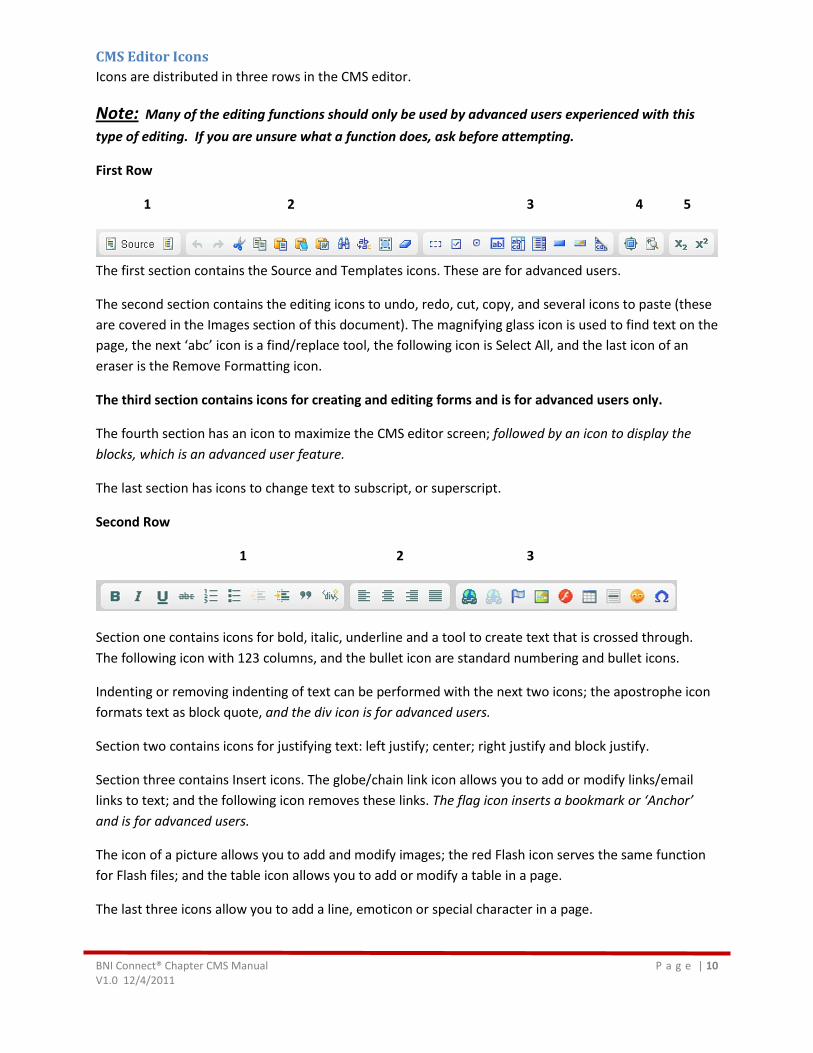
CMS Editor Icons Icons are distributed in three rows in the CMS editor.
Note:
First Row
Many of the editing functions should only be used by advanced users experienced with this type of editing. If you are unsure what a function does, ask before attempting.
1 2 3 4 5
The first section contains the Source and Templates icons. These are for advanced users.
The second section contains the editing icons to undo, redo, cut, copy, and several icons to paste (these are covered in the Images section of this document). The magnifying glass icon is used to find text on the page, the next ‘abc’ icon is a find/replace tool, the following icon is Select All, and the last icon of an eraser is the Remove Formatting icon.
The third section contains icons for creating and editing forms and is for advanced users only.
The fourth section has an icon to maximize the CMS editor screen; followed by an icon to display the blocks, which is an advanced user feature.
The last section has icons to change text to subscript, or superscript.
Second Row
1 2 3
Section one contains icons for bold, italic, underline and a tool to create text that is crossed through. The following icon with 123 columns, and the bullet icon are standard numbering and bullet icons.
Indenting or removing indenting of text can be performed with the next two icons; the apostrophe icon formats text as block quote, and the div icon is for advanced users.
Section two contains icons for justifying text: left justify; center; right justify and block justify.
Section three contains Insert icons. The globe/chain link icon allows you to add or modify links/email links to text; and the following icon removes these links. The flag icon inserts a bookmark or ‘Anchor’ and is for advanced users.
The icon of a picture allows you to add and modify images; the red Flash icon serves the same function for Flash files; and the table icon allows you to add or modify a table in a page.
The last three icons allow you to add a line, emoticon or special character in a page.
BNI Connect® Chapter CMS Manual P a g e | 11 V1.0 12/4/2011
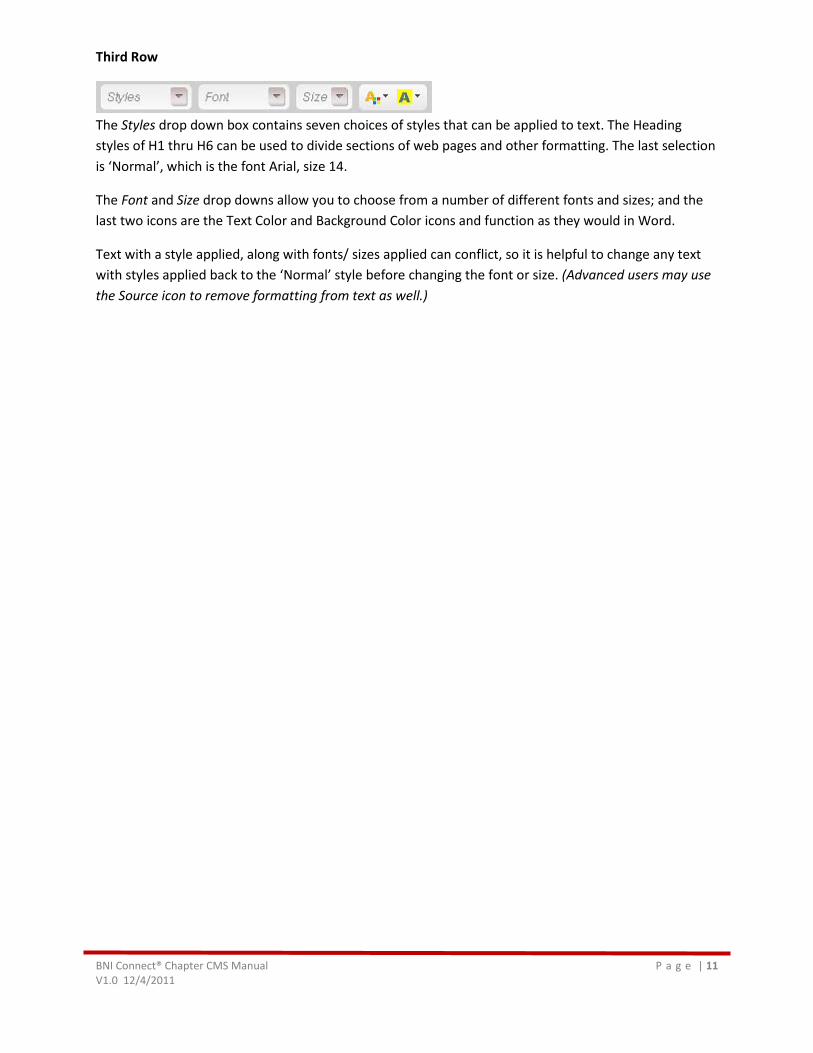
Third Row
The Styles drop down box contains seven choices of styles that can be applied to text. The Heading styles of H1 thru H6 can be used to divide sections of web pages and other formatting. The last selection is ‘Normal’, which is the font Arial, size 14.
The Font and Size drop downs allow you to choose from a number of different fonts and sizes; and the last two icons are the Text Color and Background Color icons and function as they would in Word.
Text with a style applied, along with fonts/ sizes applied can conflict, so it is helpful to change any text with styles applied back to the ‘Normal’ style before changing the font or size. (Advanced users may use the Source icon to remove formatting from text as well.)
BNI Connect® Chapter CMS Manual P a g e | 12 V1.0 12/4/2011
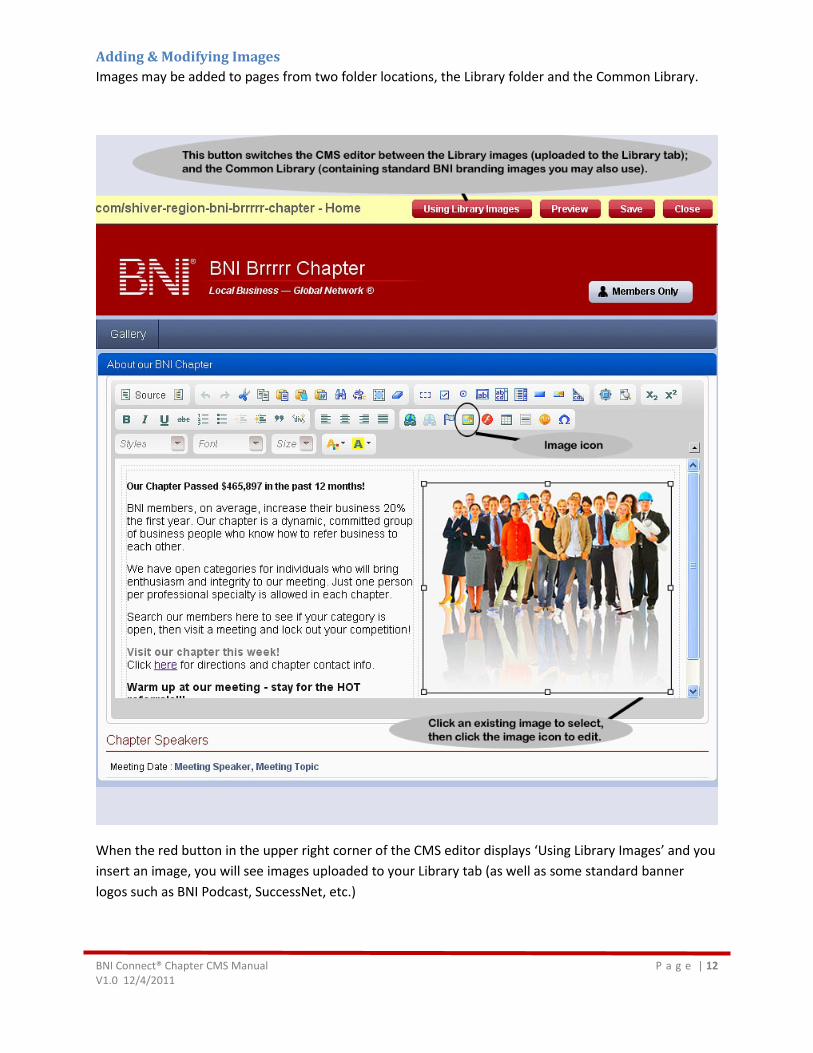
Adding & Modifying Images Images may be added to pages from two folder locations, the Library folder and the Common Library.
When the red button in the upper right corner of the CMS editor displays ‘Using Library Images’ and you insert an image, you will see images uploaded to your Library tab (as well as some standard banner logos such as BNI Podcast, SuccessNet, etc.)
BNI Connect® Chapter CMS Manual P a g e | 13 V1.0 12/4/2011
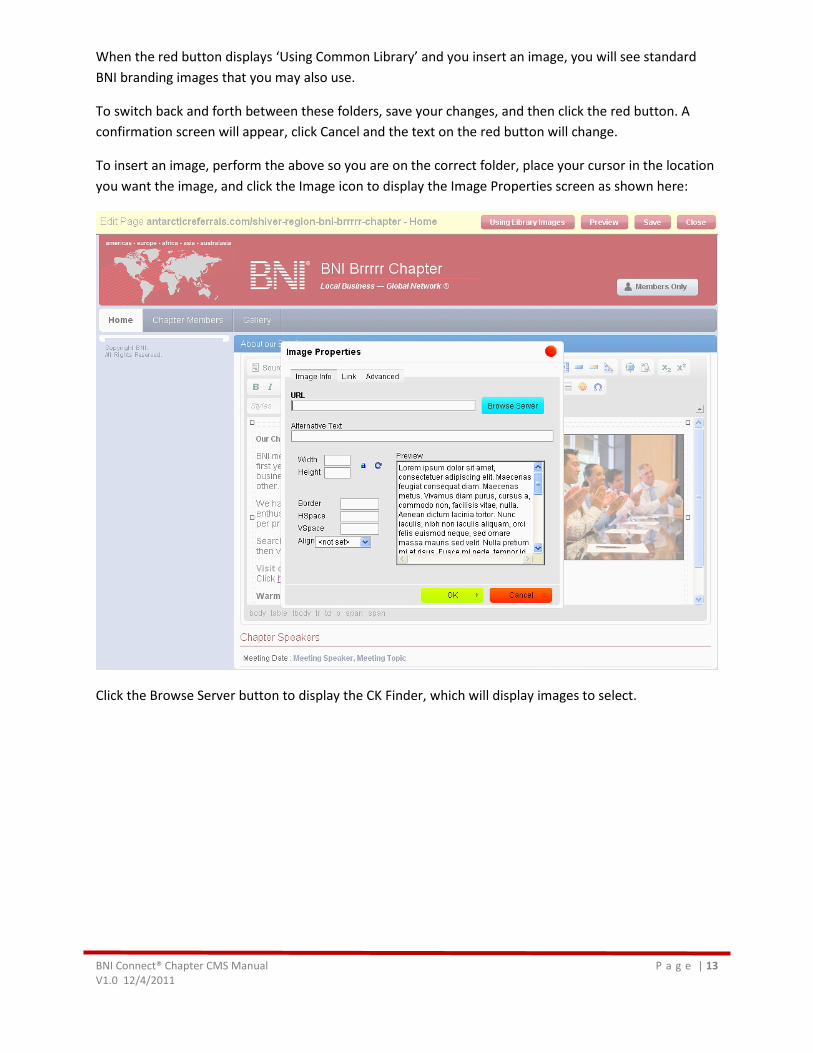
When the red button displays ‘Using Common Library’ and you insert an image, you will see standard BNI branding images that you may also use.
To switch back and forth between these folders, save your changes, and then click the red button. A confirmation screen will appear, click Cancel and the text on the red button will change.
To insert an image, perform the above so you are on the correct folder, place your cursor in the location you want the image, and click the Image icon to display the Image Properties screen as shown here:
Click the Browse Server button to display the CK Finder, which will display images to select.
BNI Connect® Chapter CMS Manual P a g e | 14 V1.0 12/4/2011
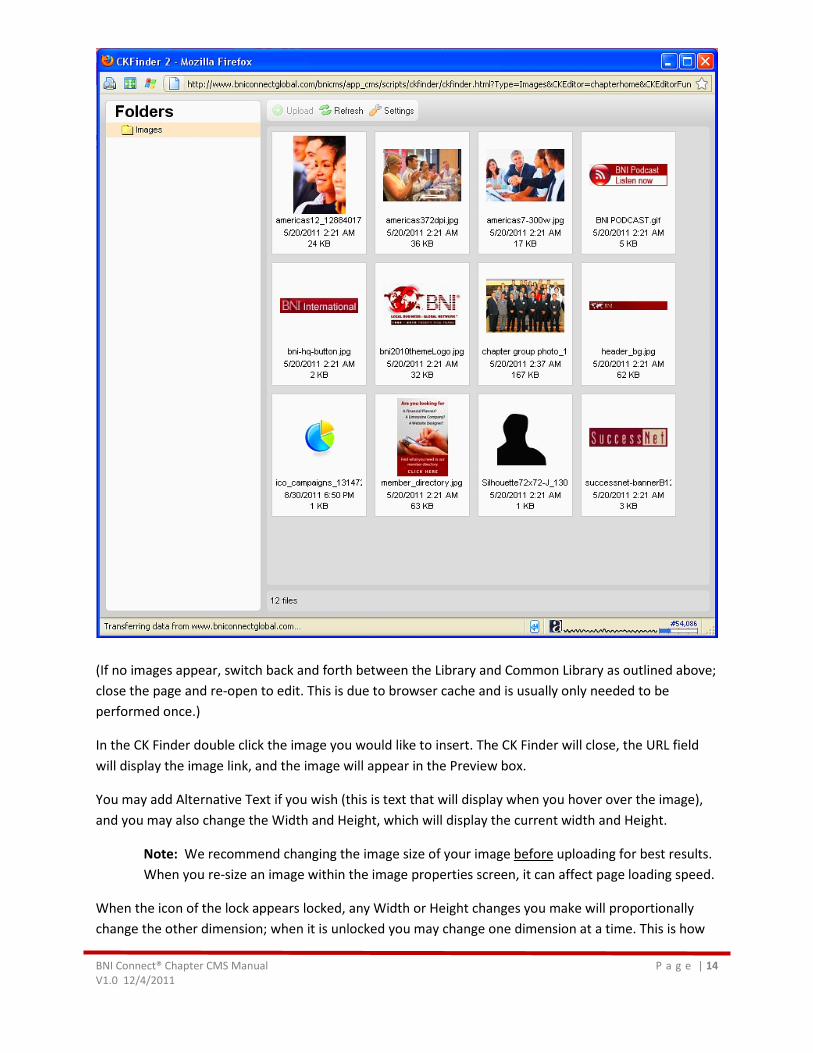
(If no images appear, switch back and forth between the Library and Common Library as outlined above; close the page and re-open to edit. This is due to browser cache and is usually only needed to be performed once.)
In the CK Finder double click the image you would like to insert. The CK Finder will close, the URL field will display the image link, and the image will appear in the Preview box.
You may add Alternative Text if you wish (this is text that will display when you hover over the image), and you may also change the Width and Height, which will display the current width and Height.
Note: We recommend changing the image size of your image before
When the icon of the lock appears locked, any Width or Height changes you make will proportionally change the other dimension; when it is unlocked you may change one dimension at a time. This is how
uploading for best results. When you re-size an image within the image properties screen, it can affect page loading speed.
BNI Connect® Chapter CMS Manual P a g e | 15 V1.0 12/4/2011
you would distort a picture (stretch or shrink it in one dimension.) To revert the image to the original size, click the icon of the blue arrow circle.
Borders can be added to any image. To add a border, insert the number of pixels in the Border field. Adding a border can be helpful to distinguish the image from the background, such as when you are using a light image on a light background.
A setting of 1 pixel wide produces a thin black line around your image; increase the pixel size for wider borders.
Set the border to ‘0’ if you are going to add a hyperlink to the image and you do not
HSpace and VSpace can be set to give your image white area on the sides (HSpace or Horizontal Space) or above and below the image (VSpace or Vertical Space). We recommend starting at 20 for both HSpace and VSpace and modifying them until it looks good.
want a blue hyperlink border around your image.
Align the image Left if you would like text to appear to the right of the image; or Right to make text appear to the left of the image.
If you do not want text to the left or right of the image, select <not set>. When you have <not set> selected, you may use the Align Paragraph icons of Align Left, Align Center or Align Right to position the image.
You may manage an image link here as well. Choose the Link tab and complete the steps as outlined in the Links section of this document. The blue Browse Server button allows you to make the image a hyperlink to another image (an example would be if you wanted a thumbnail of a poster on a page, and when a visitor clicks the thumbnail it takes them to a bigger image of the poster.) To do this, resize your image to a thumbnail size and upload both sizes to your Library tab. Use the Browse Server button to link the smaller image to the bigger image.
The Advanced tab is for advanced users.
BNI Connect® Chapter CMS Manual P a g e | 16 V1.0 12/4/2011
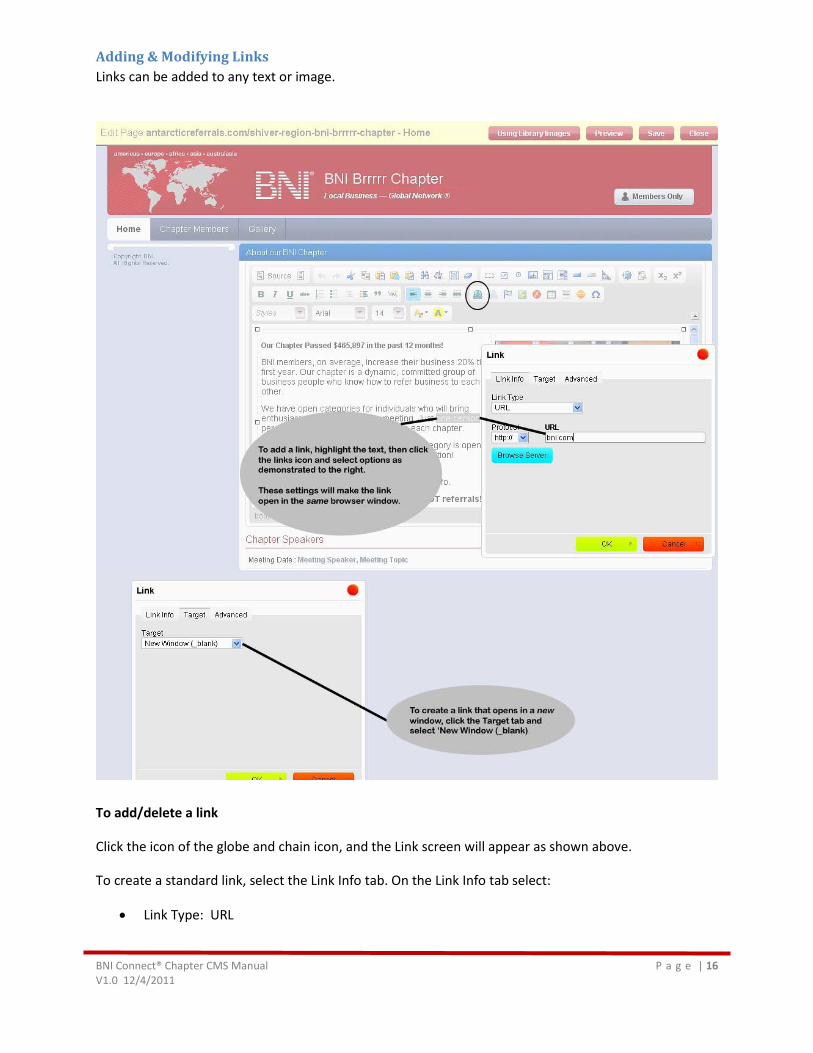
Adding & Modifying Links Links can be added to any text or image.
To add/delete a link
Click the icon of the globe and chain icon, and the Link screen will appear as shown above.
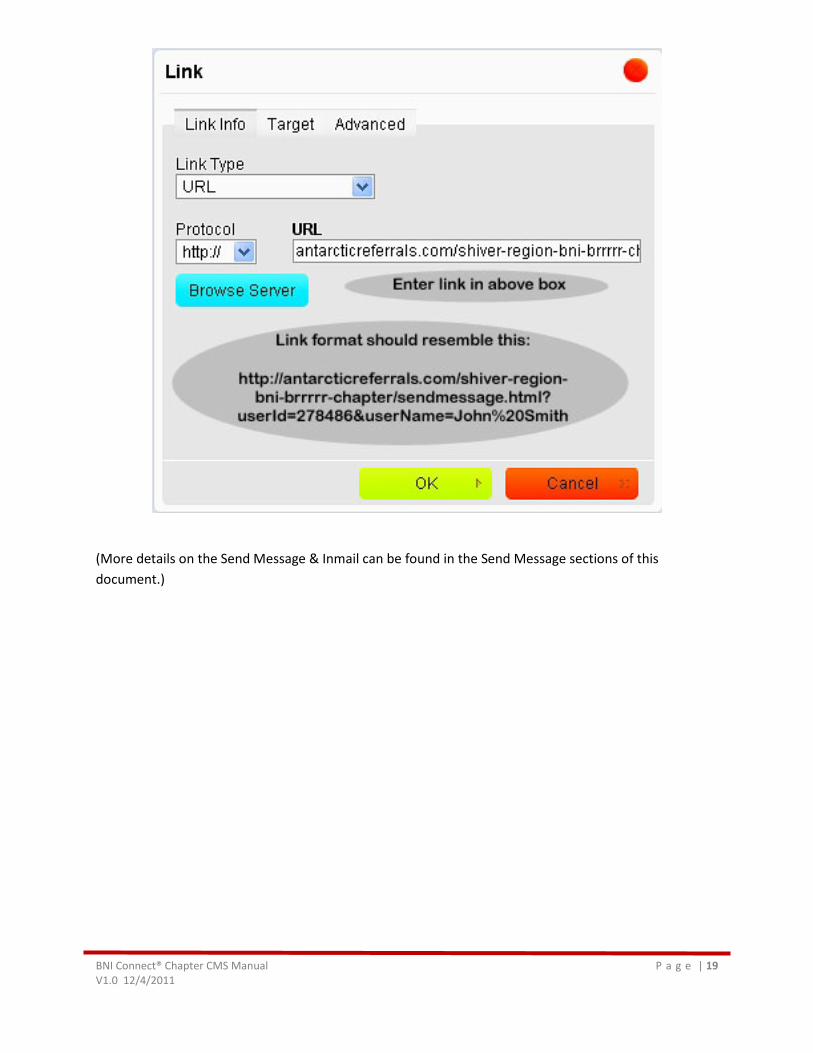
To create a standard link, select the Link Info tab. On the Link Info tab select:
• Link Type: URL
BNI Connect® Chapter CMS Manual P a g e | 17 V1.0 12/4/2011
• Protocol: http:// • And enter the link into the URL field.
To make your link open in a new window instead of the same screen, select the Target tab and New Window (_blank) in the Target drop down.
To delete a link, highlight the link and click the icon of the globe with broken chain link, which is to the right of the Add Link icon.
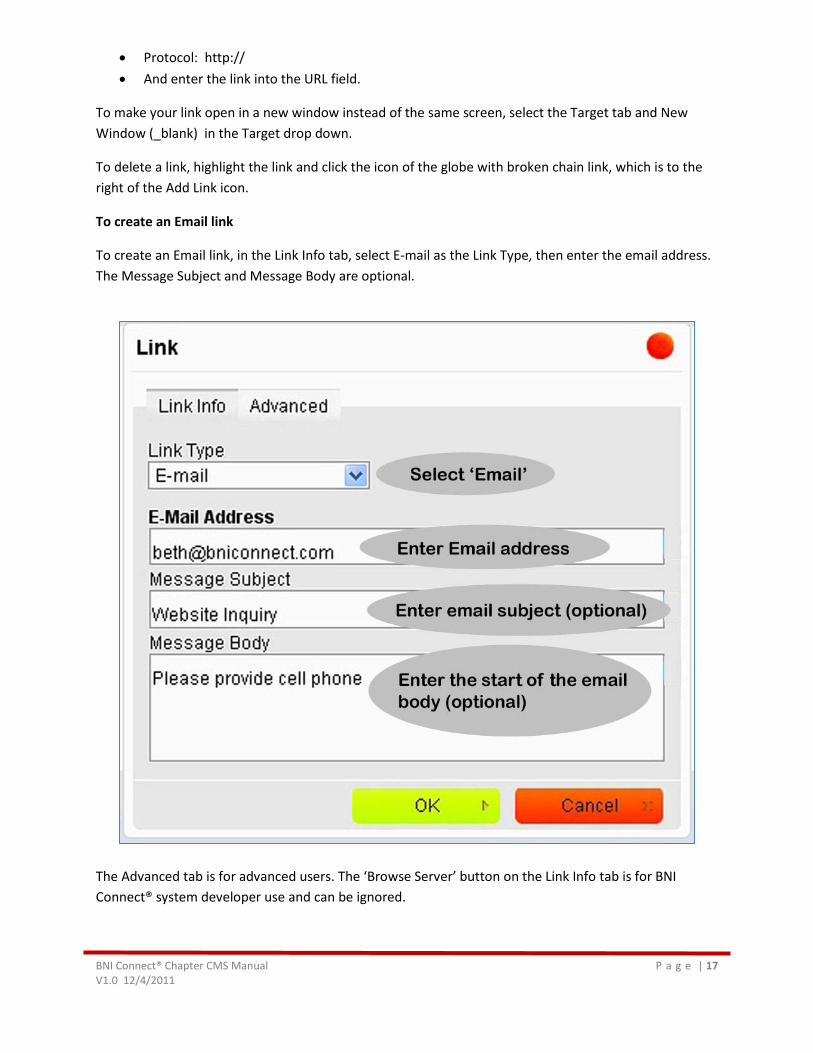
To create an Email link
To create an Email link, in the Link Info tab, select E-mail as the Link Type, then enter the email address. The Message Subject and Message Body are optional.
The Advanced tab is for advanced users. The ‘Browse Server’ button on the Link Info tab is for BNI Connect® system developer use and can be ignored.
BNI Connect® Chapter CMS Manual P a g e | 18 V1.0 12/4/2011
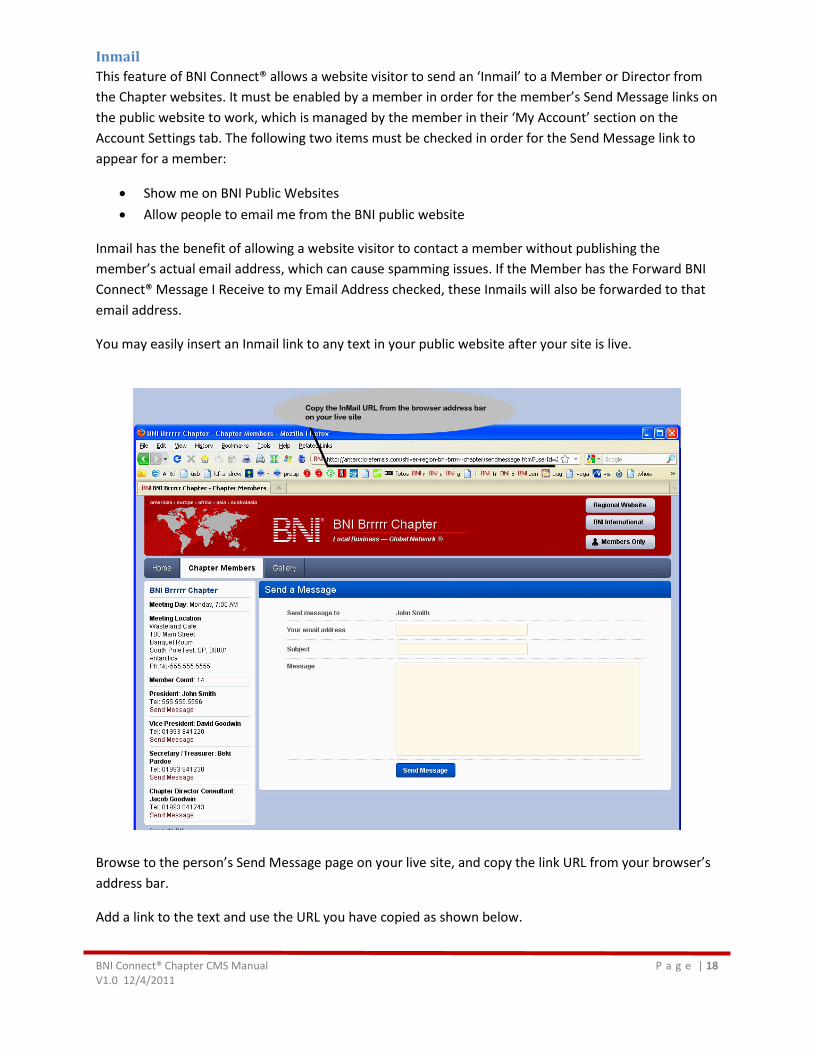
Inmail This feature of BNI Connect® allows a website visitor to send an ‘Inmail’ to a Member or Director from the Chapter websites. It must be enabled by a member in order for the member’s Send Message links on the public website to work, which is managed by the member in their ‘My Account’ section on the Account Settings tab. The following two items must be checked in order for the Send Message link to appear for a member:
• Show me on BNI Public Websites • Allow people to email me from the BNI public website
Inmail has the benefit of allowing a website visitor to contact a member without publishing the member’s actual email address, which can cause spamming issues. If the Member has the Forward BNI Connect® Message I Receive to my Email Address checked, these Inmails will also be forwarded to that email address.
You may easily insert an Inmail link to any text in your public website after your site is live.
Browse to the person’s Send Message page on your live site, and copy the link URL from your browser’s address bar.
Add a link to the text and use the URL you have copied as shown below.
BNI Connect® Chapter CMS Manual P a g e | 19 V1.0 12/4/2011
(More details on the Send Message & Inmail can be found in the Send Message sections of this document.)
BNI Connect® Chapter CMS Manual P a g e | 20 V1.0 12/4/2011
PAGES
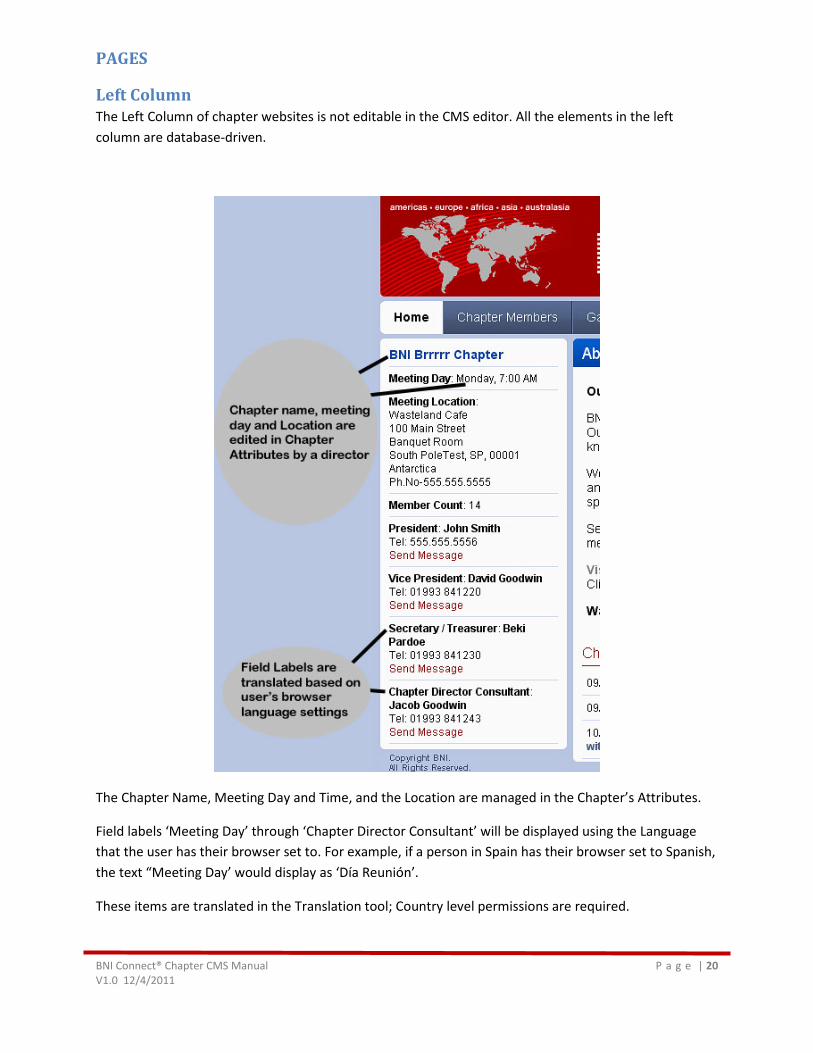
Left Column The Left Column of chapter websites is not editable in the CMS editor. All the elements in the left column are database-driven.
The Chapter Name, Meeting Day and Time, and the Location are managed in the Chapter’s Attributes.
Field labels ‘Meeting Day’ through ‘Chapter Director Consultant’ will be displayed using the Language that the user has their browser set to. For example, if a person in Spain has their browser set to Spanish, the text “Meeting Day’ would display as ‘Día Reunión’.
These items are translated in the Translation tool; Country level permissions are required.
BNI Connect® Chapter CMS Manual P a g e | 21 V1.0 12/4/2011
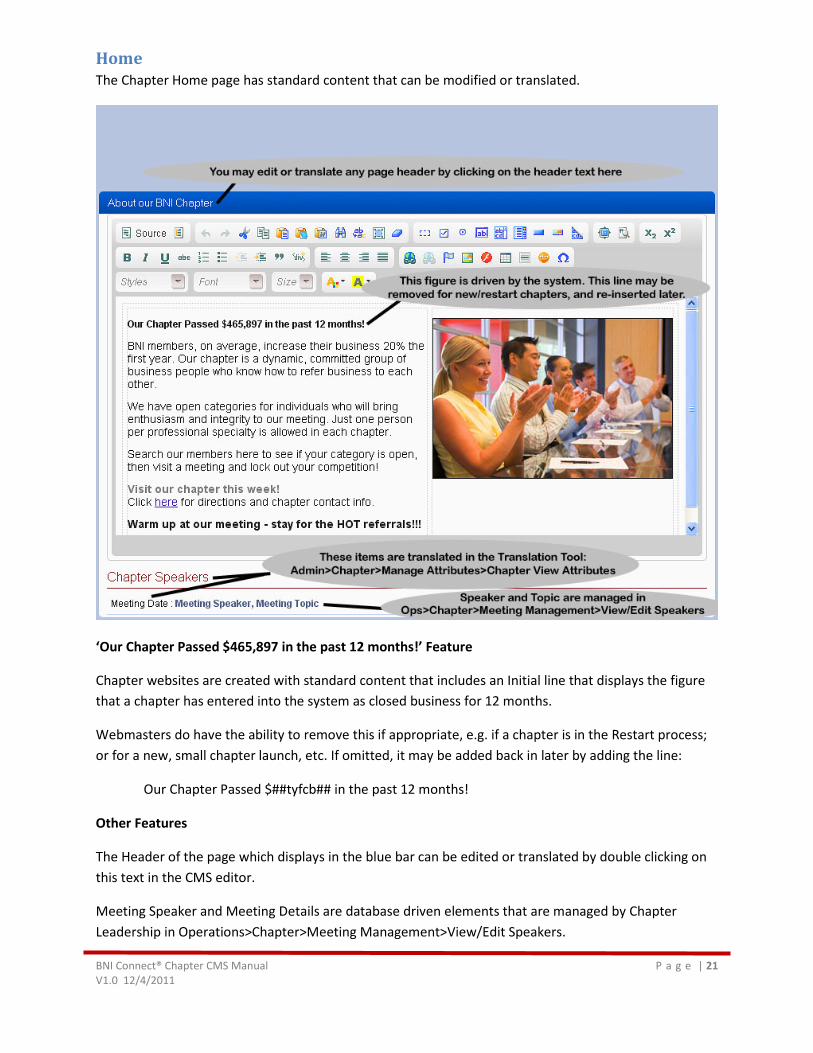
Home The Chapter Home page has standard content that can be modified or translated.
‘Our Chapter Passed $465,897 in the past 12 months!’ Feature
Chapter websites are created with standard content that includes an Initial line that displays the figure that a chapter has entered into the system as closed business for 12 months.
Webmasters do have the ability to remove this if appropriate, e.g. if a chapter is in the Restart process; or for a new, small chapter launch, etc. If omitted, it may be added back in later by adding the line:
Our Chapter Passed $##tyfcb## in the past 12 months!
Other Features
The Header of the page which displays in the blue bar can be edited or translated by double clicking on this text in the CMS editor.
Meeting Speaker and Meeting Details are database driven elements that are managed by Chapter Leadership in Operations>Chapter>Meeting Management>View/Edit Speakers.
BNI Connect® Chapter CMS Manual P a g e | 22 V1.0 12/4/2011
Note: The Speaker Topic is a required field when entering a speaker, and sometimes the Topic is not available to Leadership at the time they add a speaker to the system.
Some Regions have been training their Chapter Leaders to enter the speaker’s Company Name as the topic, if it is unknown at that time (not ‘TBD’).
The Date format in Chapter Speakers is set by your browser’s language settings.
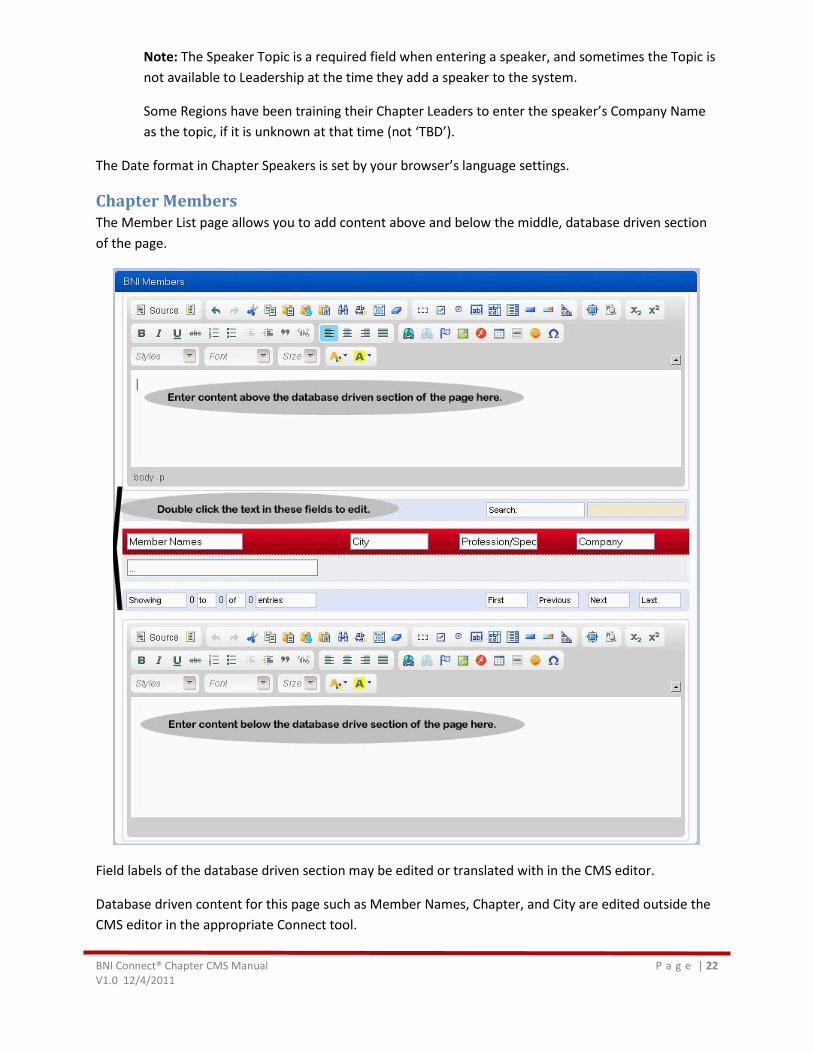
Chapter Members The Member List page allows you to add content above and below the middle, database driven section of the page.
Field labels of the database driven section may be edited or translated with in the CMS editor.
Database driven content for this page such as Member Names, Chapter, and City are edited outside the CMS editor in the appropriate Connect tool.
BNI Connect® Chapter CMS Manual P a g e | 23 V1.0 12/4/2011
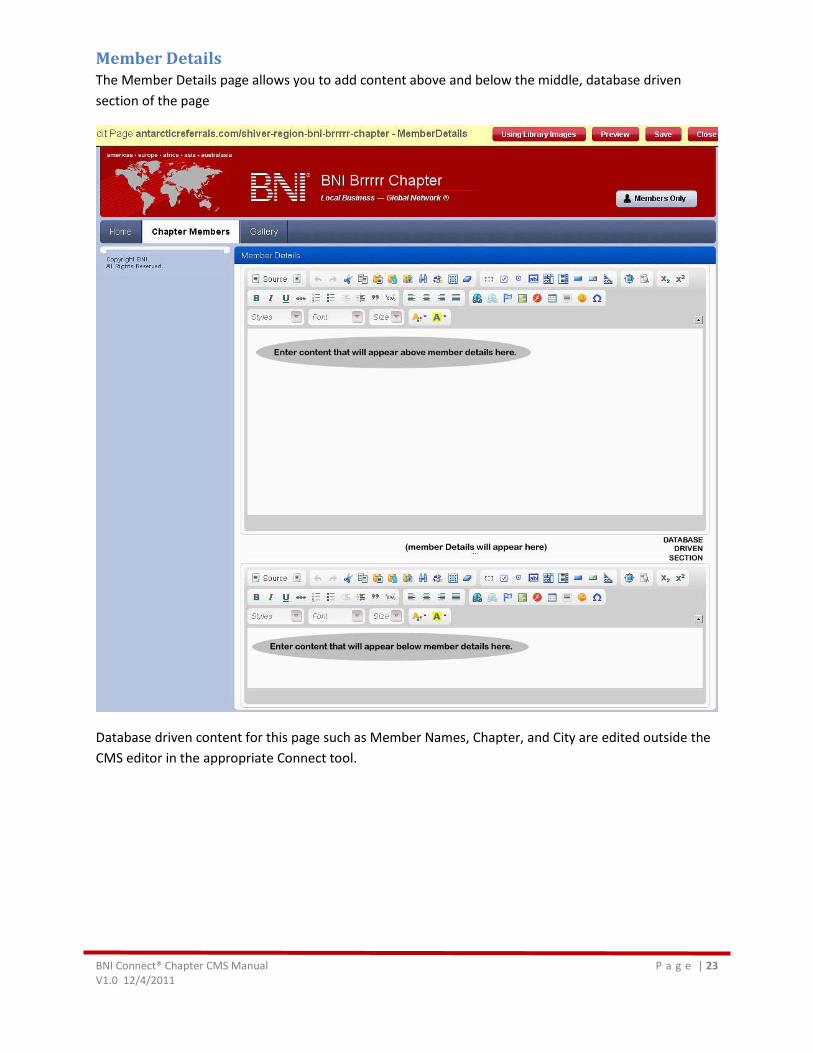
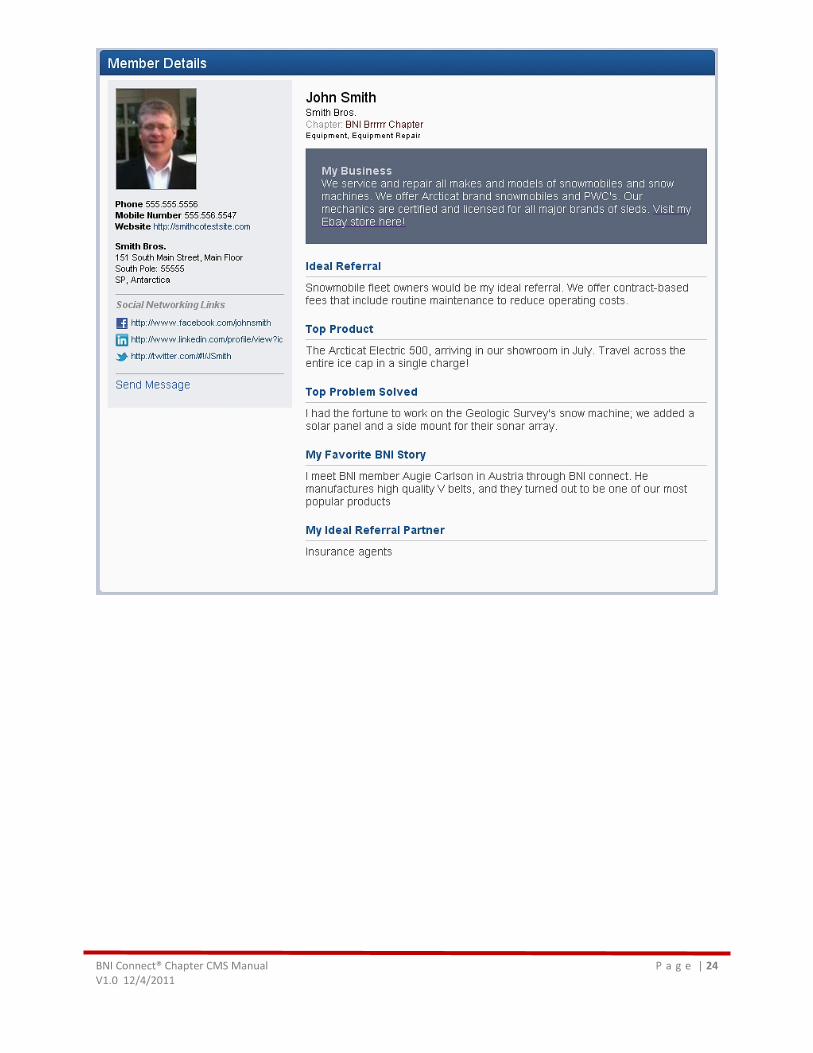
Member Details The Member Details page allows you to add content above and below the middle, database driven section of the page
Database driven content for this page such as Member Names, Chapter, and City are edited outside the CMS editor in the appropriate Connect tool.
BNI Connect® Chapter CMS Manual P a g e | 24 V1.0 12/4/2011

BNI Connect® Chapter CMS Manual P a g e | 25 V1.0 12/4/2011
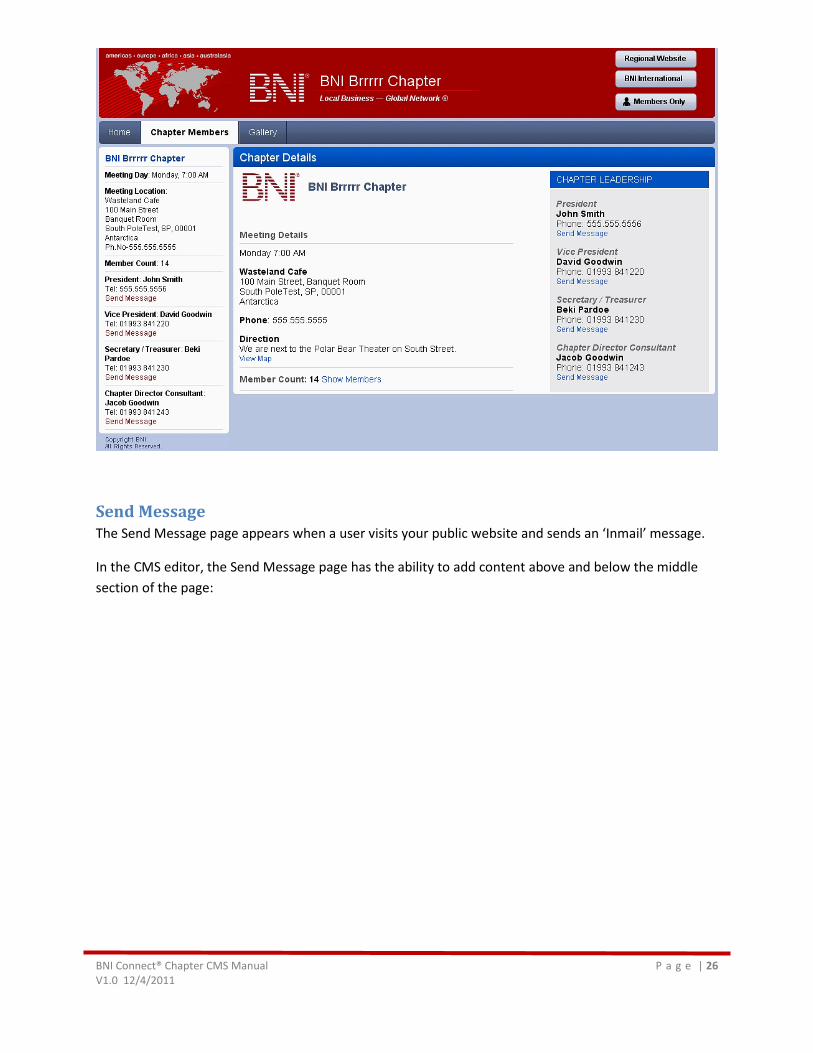
Chapter Details The Chapter Details page allows you to add content above or below the database driven section of this page.
Database driven information, such as Chapter Meeting Location, Leadership Teams, Chapter Directors and Chapter Attributes is edited outside the CMS editor in the appropriate Connect tool.
BNI Connect® Chapter CMS Manual P a g e | 26 V1.0 12/4/2011
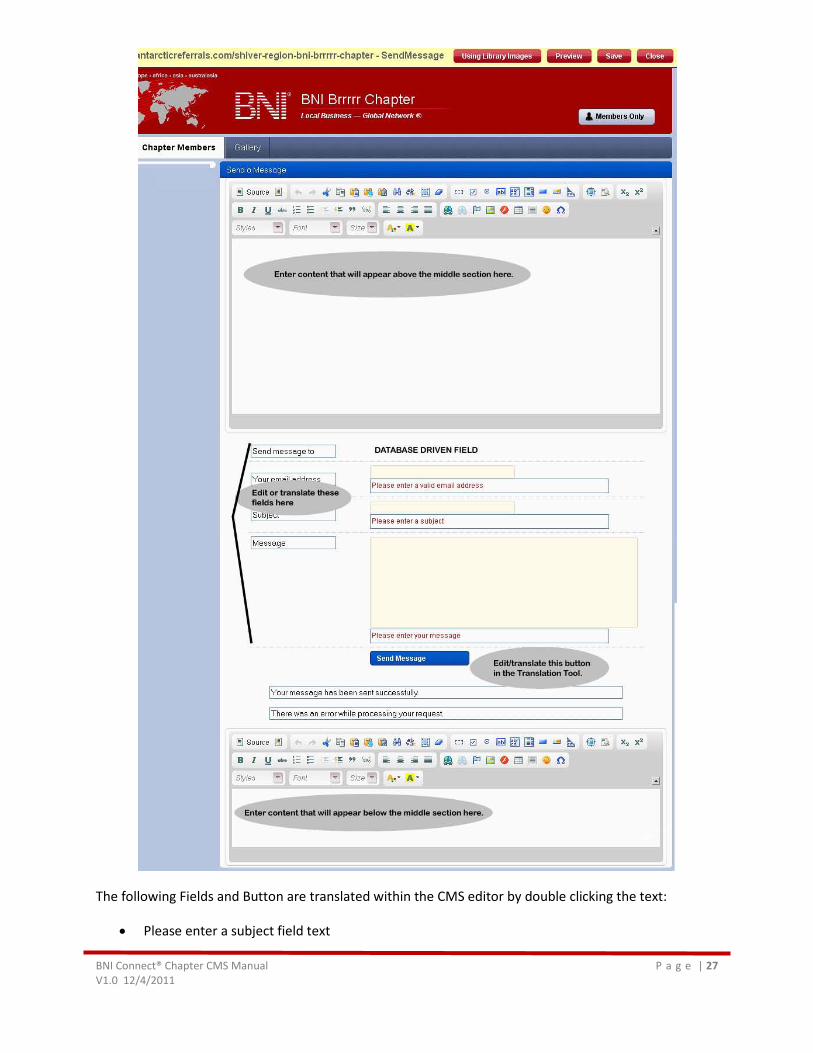
Send Message The Send Message page appears when a user visits your public website and sends an ‘Inmail’ message.
In the CMS editor, the Send Message page has the ability to add content above and below the middle section of the page:
BNI Connect® Chapter CMS Manual P a g e | 27 V1.0 12/4/2011
The following Fields and Button are translated within the CMS editor by double clicking the text:
• Please enter a subject field text
BNI Connect® Chapter CMS Manual P a g e | 28 V1.0 12/4/2011
• Please enter your message field text • Blue Send Message button • Send message to field label • Your email address field label
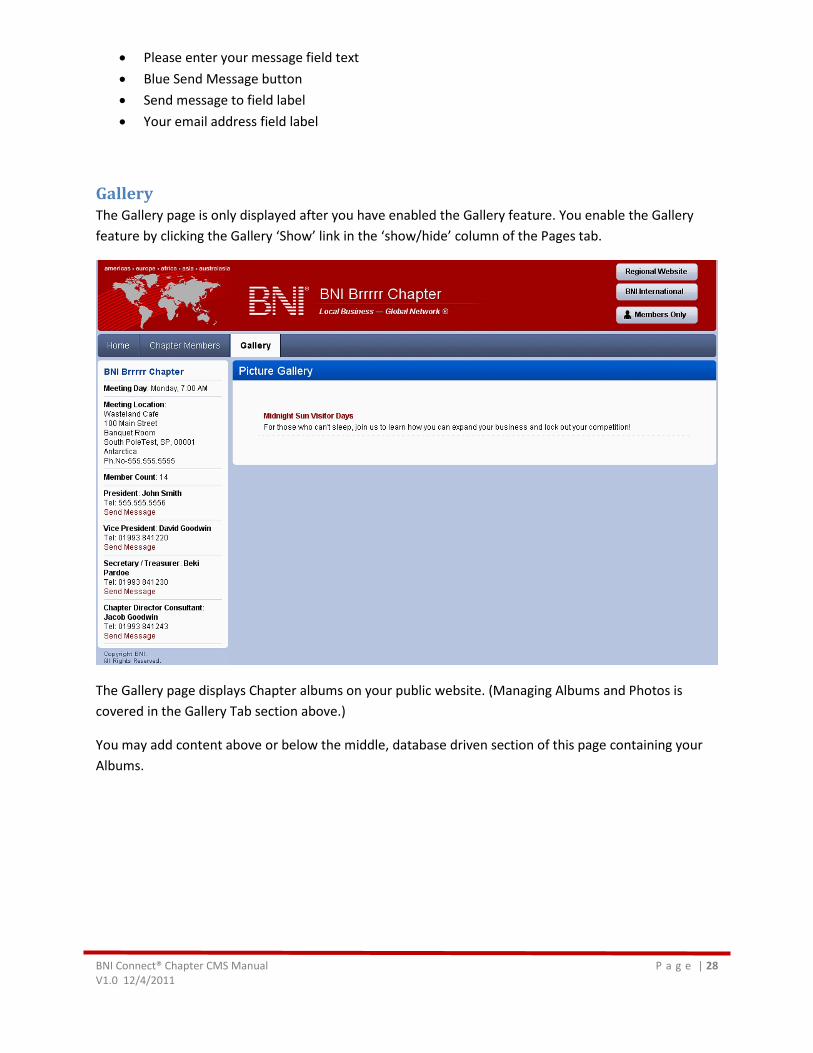
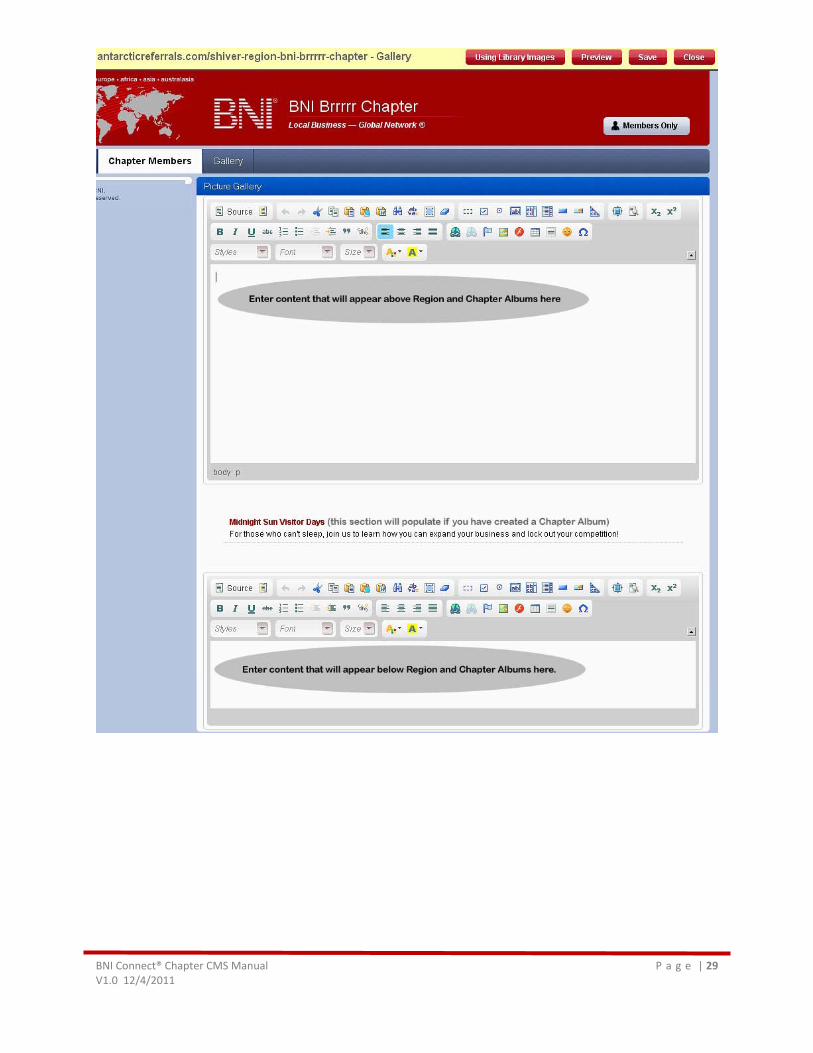
Gallery The Gallery page is only displayed after you have enabled the Gallery feature. You enable the Gallery feature by clicking the Gallery ‘Show’ link in the ‘show/hide’ column of the Pages tab.
The Gallery page displays Chapter albums on your public website. (Managing Albums and Photos is covered in the Gallery Tab section above.)
You may add content above or below the middle, database driven section of this page containing your Albums.
BNI Connect® Chapter CMS Manual P a g e | 29 V1.0 12/4/2011