Embed Size (px)
Citation preview

BMC REMEDY 8.1 –
CHANGE MANAGEMENT
USER GUIDE
Process Owner: Change Manager Version: 1.0

BMC REMEDY 8.1 – CHANGE MANAGEMENT USER GUIDE
6/25/2015 Page i
DOCUMENT REVISION HISTORY
Revision Number
Description Date Approved by
V1.0 Initial Release 6/25/2015

BMC REMEDY 8.1 – CHANGE MANAGEMENT USER GUIDE
6/25/2015 Page ii
Contents
1 Accessing The Change Management Console ...................................................................................... 1
2 Requests For Change ............................................................................................................................ 2
2.1 Creating A Request For Change .................................................................................................... 2
2.1.1 Creating a New RFC from the Applications List .................................................................... 2
2.1.2 Creating a New RFC from the Change Management Console .............................................. 2
2.2 Request For Change Fields ............................................................................................................ 4
2.3 Change Type .................................................................................................................................. 6
2.3.1 Normal RFC ........................................................................................................................... 6
2.3.2 Emergency RFC ...................................................................................................................... 6
2.3.3 Expedited RFC ....................................................................................................................... 6
2.4 Searching For A Request For Change ............................................................................................ 6
2.4.1 Searching for an RFC from the Applications List ................................................................... 6
2.4.2 Searching for an RFC from the Change Management Console ............................................. 7
2.4.3 Searching for an RFC by the Change ID ................................................................................. 7
2.5 Updating A Request For Change ................................................................................................... 9
2.5.1 Adding Work Info .................................................................................................................. 9
2.5.2 Viewing Work Info ............................................................................................................... 11
2.5.3 Adding an Attachment ........................................................................................................ 12
2.5.4 Viewing an Attachment ....................................................................................................... 14
2.5.5 Moving an RFC to the Next Stage ....................................................................................... 16
2.5.6 Reverting an RFC to Draft.................................................................................................... 16
2.5.7 Cancelling an RFC ................................................................................................................ 16
2.6 Approving A Request For Change ............................................................................................... 17
2.6.1 First Level Approval ............................................................................................................. 17
2.6.2 Change Advisory Board Approval ....................................................................................... 17
2.6.3 Change Manager Approval ................................................................................................. 18
2.6.4 CAB Report .......................................................................................................................... 18
2.6.5 Approve within the RFC ...................................................................................................... 18
2.6.6 Approve within Approval Central........................................................................................ 21
2.6.7 Reject within the RFC .......................................................................................................... 25
2.6.8 Reject within Approval Central ........................................................................................... 27

BMC REMEDY 8.1 – CHANGE MANAGEMENT USER GUIDE
6/25/2015 Page iii
2.7 Completing A Request For Change ............................................................................................. 30
3 Tasks .................................................................................................................................................... 32
3.1 Creating A Task............................................................................................................................ 32
3.2 Adding Work Info ........................................................................................................................ 35
3.3 Viewing Work Info....................................................................................................................... 37
3.4 Adding An Attachment ................................................................................................................ 38
3.5 Viewing An Attachment .............................................................................................................. 41
3.6 Sending An Email Via Work Info In Task ..................................................................................... 42
3.7 Searching For A Task By Task ID .................................................................................................. 51
3.8 Changing The Status of A Task .................................................................................................... 53
3.9 Closing a Task .............................................................................................................................. 54
4 Calendars ............................................................................................................................................ 55
4.1 Change Calendar ......................................................................................................................... 55
4.2 Critical Events Calendar .............................................................................................................. 56

BMC REMEDY 8.1 – CHANGE MANAGEMENT USER GUIDE
6/25/2015 Page 1
1 ACCESSING THE CHANGE MANAGEMENT CONSOLE
To access BMC Remedy 8.1, go to https://remedy.uncg.edu/ and log in with your username and
password.
Click on the Applications List and hover over Change Management. Select Change Management Console
from the drop down menu.
The Change Management Console is used to create Requests for Change (RFCs), approve Changes, and
monitor the progress of a Change to ensure it is closed in a timely manner.

BMC REMEDY 8.1 – CHANGE MANAGEMENT USER GUIDE
6/25/2015 Page 2
2 REQUESTS FOR CHANGE
2.1 CREATING A REQUEST FOR CHANGE
2.1.1 Creating a New RFC from the Applications List
Click on the Applications list, hover over Change Management, and click on New Change.
2.1.2 Creating a New RFC from the Change Management Console
There are two options for creating a new RFC if you are in the Change Management Console.
A. Click on New Change in the Functions menu.

BMC REMEDY 8.1 – CHANGE MANAGEMENT USER GUIDE
6/25/2015 Page 3
B. Click on the Create icon in the Tool Bar.

BMC REMEDY 8.1 – CHANGE MANAGEMENT USER GUIDE
6/25/2015 Page 4
2.2 REQUEST FOR CHANGE FIELDS
A. CAB Date: Remedy will automatically enter the next Change Advisory Board meeting date (which
for UNCG ITS has historically fallen on Thursday afternoons at 3 pm).
B. Change ID: A unique number for the Change generated automatically by Remedy.
C. Status: The current status of the Request for Change (RFC). There are seven statuses in Change:
Draft, Request for Authorization, Scheduled for Approval, Scheduled, Rejected, Completed, and
Cancelled.

BMC REMEDY 8.1 – CHANGE MANAGEMENT USER GUIDE
6/25/2015 Page 5
D. Requested By Group: Remedy will automatically select your primary Remedy group. The drop
down menu will display all of the Remedy groups that you are a member of. Select the
appropriate Remedy group for the RFC.
E. Requested By: Remedy will automatically display your name, the person who is logged into
Remedy and submitting the RFC.
F. Change Type: There are three Change Types: Normal, Emergency, and Expedited.
G. Summary: Select a brief description of the RFC from the drop down menu. This is a read only
field.
H. Notes: A complete description of the RFC.
I. Change Reason: There are five Change Reasons: Fix/Repair, New Functionality, Maintenance,
Upgrade, and Other.
J. Timing Reason: There are four Timing Reasons: Customer/Business Need, Insufficient Lead-
Time, Known Error Correction, and Scheduling Conflict.
K. Risk Level: The assessed risk level of the Change. There are four Risk Levels: 1-Critical, 2-High, 3-
Medium, and 4-Low.
L. Impact: The assessed impact of the Change. There are four Impact levels: 1-
Extensive/Widespread, 2 - Significant/Large, 3 - Moderate/Limited, and 4- Minor/Localized.
M. Bldg #: The number assigned to a campus building.
N. Bldg Name: The name of the campus building.
O. Scheduled Start Date: The date that the Change will begin implementation.
P. Scheduled End Date: The date that the Change will be completed.
Q. Describe Backout Plan: Description of the back out plan if the Change fails.
R. Systems / Services Impacted: List the systems and services that will be impacted by the Change.
S. Clients Impacted: List the client populations that will be impacted by the Change.
T. Procedures Documented for the SOC/SD: Verify that new procedures associated with this
Change have been documented for the Service Operations Center (SOC) and the Service Desk
(SD).
U. Testing Completed: Verify that testing has been completed for the Change.
V. Critical Events Calendar Free: Verify that the Critical Events Calendar has an opening for the
scheduled Change.
W. Client Notification: Select one of the three Client Notification options: Client Notification Form
Completed, Not Required, or Need to Submit Client Notification Form.
X. Client Notification Detail: Description of the notification to the clients.
Y. Critical Events Calendar: A link to the Critical Events Calendar.
Z. Client Notification Form: A link to the Client Notification Form.
AA. First Level Approver: The first level approval is usually sent to the Change Approver, who is the
manager of the Change Assignee (the owner of the RFC). If that is not possible, the Change
Approver can be any ITS manager or above.
BB. CAB Manager: The Change Manager is responsible for the overall facilitation of the Change
Management process and performs the last level of approval for an RFC.

BMC REMEDY 8.1 – CHANGE MANAGEMENT USER GUIDE
6/25/2015 Page 6
2.3 CHANGE TYPE
2.3.1 Normal RFC
Any Change that is scheduled and receives approval for execution from the Change Advisory Board
(CAB) prior to its execution.
2.3.2 Emergency RFC
Any Change that has a level of urgency that requires its execution to take place prior to the CAB having
an opportunity to review and approve it. Emergency Changes must have a valid business justification
and must receive approval from an ITS Manager and a Director (or above) prior to its execution.
2.3.3 Expedited RFC
A Normal Change that needs to be implemented before the next CAB meeting, but is not urgent in
nature. Expedited RFCs typically are routine maintenance and have no client impact. Expedited RFCs are
required to include a Timing Reason: Customer/Business Need, Insufficient Lead-Time, Known Error
Correction, or Scheduling Conflict.
2.4 SEARCHING FOR A REQUEST FOR CHANGE
2.4.1 Searching for an RFC from the Applications List
Click on the Applications List, hover over Change Management, and click on Search Change.
BMC REMEDY 8.1 – CHANGE MANAGEMENT USER GUIDE
6/25/2015 Page 7
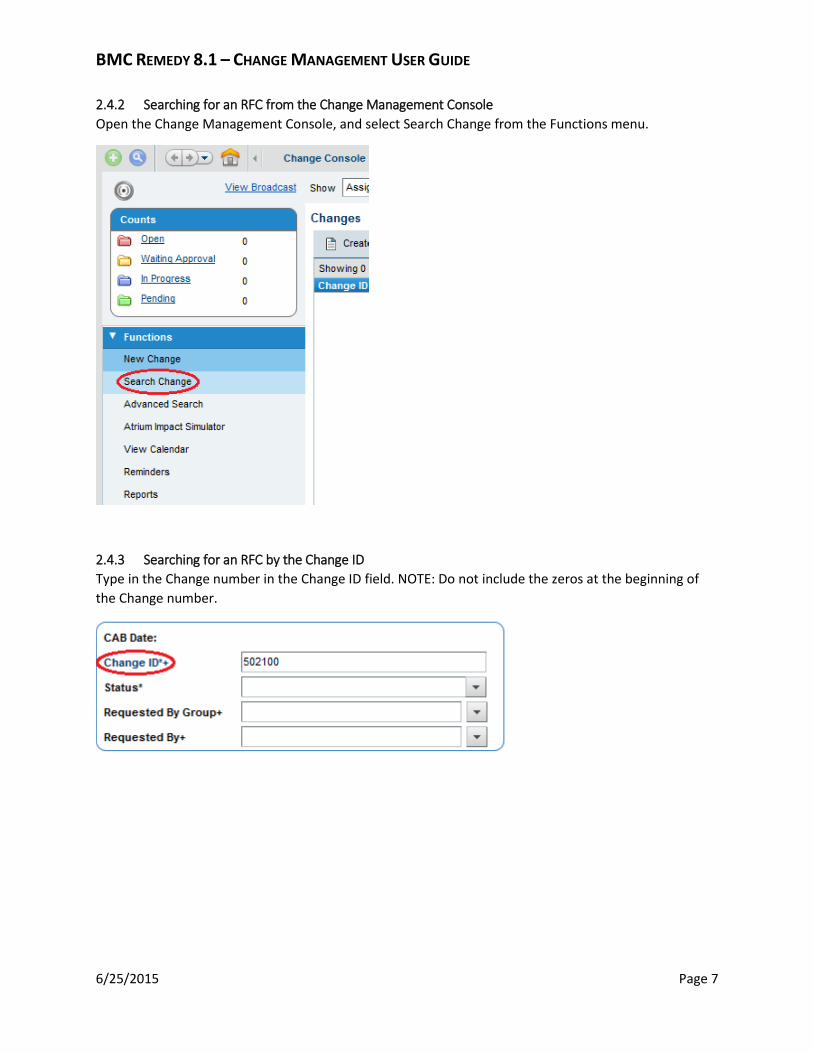
2.4.2 Searching for an RFC from the Change Management Console
Open the Change Management Console, and select Search Change from the Functions menu.
2.4.3 Searching for an RFC by the Change ID
Type in the Change number in the Change ID field. NOTE: Do not include the zeros at the beginning of
the Change number.

BMC REMEDY 8.1 – CHANGE MANAGEMENT USER GUIDE
6/25/2015 Page 8
Press Enter after typing in the Change number. The top of the screen will display the search results.

BMC REMEDY 8.1 – CHANGE MANAGEMENT USER GUIDE
6/25/2015 Page 9
2.5 UPDATING A REQUEST FOR CHANGE
2.5.1 Adding Work Info
The Work Info tab is visible in an open RFC on the right hand side of the screen.

BMC REMEDY 8.1 – CHANGE MANAGEMENT USER GUIDE
6/25/2015 Page 10
Click in the Notes field to type the Work Info entry.
Click on the Add button to save the Work Info entry.
The Work Info entry will be listed in the Work Info tab.

BMC REMEDY 8.1 – CHANGE MANAGEMENT USER GUIDE
6/25/2015 Page 11
2.5.2 Viewing Work Info
Click on the Work Info tab on the right hand side of the screen.
Click on the Work Info entry that you wish to view.
The Work Info entry will appear in the area below the list of Work Info entries.

BMC REMEDY 8.1 – CHANGE MANAGEMENT USER GUIDE
6/25/2015 Page 12
2.5.3 Adding an Attachment
Open the Work Info tab on the RFC. Click in the Notes field to type the Work Info entry.
Click on the folder icon to browse for the file you wish to attach.
Click on the Browse button to search for your file.

BMC REMEDY 8.1 – CHANGE MANAGEMENT USER GUIDE
6/25/2015 Page 13
Select the file you wish to upload and click on the Open button.
Click on Ok to add the attachment.

BMC REMEDY 8.1 – CHANGE MANAGEMENT USER GUIDE
6/25/2015 Page 14
Click on the Add button to save the Work Info entry.
The Work Info entry will be listed in the Work Info tab and the number of attached files will be listed
under the Files column.
2.5.4 Viewing an Attachment
Double click on the Work Info entry that has an attachment you wish to view.

BMC REMEDY 8.1 – CHANGE MANAGEMENT USER GUIDE
6/25/2015 Page 15
Click on the eye glasses icon to view the attachment.
You may choose to open the file or save the file. Click on Ok to continue.

BMC REMEDY 8.1 – CHANGE MANAGEMENT USER GUIDE
6/25/2015 Page 16
2.5.5 Moving an RFC to the Next Stage
To move an RFC to the next stage, click on the Save / Next Stage button at the bottom left of the screen
.
2.5.6 Reverting an RFC to Draft
To revert an RFC to draft, click on the Revert to Draft button at the bottom of the screen.
2.5.7 Cancelling an RFC
To cancel an RFC, click on the Cancel Change button at the bottom of the screen.

BMC REMEDY 8.1 – CHANGE MANAGEMENT USER GUIDE
6/25/2015 Page 17
A window will pop up asking you to confirm that you want to cancel the RFC. Select Yes. NOTE: Cancelling a change request is not reversible.
The RFC’s status will be changed to Cancelled.
2.6 APPROVING A REQUEST FOR CHANGE
2.6.1 First Level Approval
The first level approval is usually sent to the Change Approver, who is the manager of the Change
Assignee (the owner of the RFC). Each Change Approver has an alternate if they are not available to
review the RFC. The Change Manager may also do the first level approval. When the Change Approver is
notified of a pending RFC, they will review the RFC to ensure the appropriate actions have taken place,
and then approve or reject the RFC.
2.6.2 Change Advisory Board Approval
The Change Advisory Board (CAB) is a group of individuals that represent various ITS and Client
communities. The CAB is responsible for final review and approval/rejection of all standard RFCs. All
pending RFCs are reviewed at a weekly scheduled meeting. The CAB has the authority to: cancel or
reject changes, approve RFCs as presented, reassess the risk level of a Change, reassess the impact level
of a Change, and request additional information prior to approval. Emergency RFCs, due to their urgent

BMC REMEDY 8.1 – CHANGE MANAGEMENT USER GUIDE
6/25/2015 Page 18
nature, may be performed without prior review by the CAB only if written approval from an ITS
Associate Vice Chancellor has been received.
2.6.3 Change Manager Approval
The Change Manager is responsible for the overall facilitation of the Change Management process and
performs the last level of approval for an RFC. The Change Manager is responsible for: coordinating and
chairing the weekly meetings of the CAB, sending the CAB Report to all members of ITS prior to the CAB
meeting start time, facilitating the resolution of any schedule conflicts that may arise, maintaining the
policies and procedures necessary to carry Change Management functions, granting access to the
Change Management Database, and ensuring that any non-standard notification of user communities or
point of contact is performed.
2.6.4 CAB Report
As stated above, the Change Manager is responsible for sending the CAB Report to all members of ITS
prior to the CAB meeting start time. The CAB Report summarizes all RFCs received prior to the meeting.
The report must contain sufficient information for each RFC to ensure that Board members understand
and can evaluate the Change being proposed. The CAB Report will be distributed to all members of the
CAB prior the scheduled meeting in an Excel spreadsheet. The CAB Report spreadsheet will be sortable
by Group and Person, and will include RFCs that are in: Draft, Request for Authorization, Scheduled for
Approval, and Scheduled.
2.6.5 Approve within the RFC
In the Change Console, click on the drop down menu for the Show field.

BMC REMEDY 8.1 – CHANGE MANAGEMENT USER GUIDE
6/25/2015 Page 19
Select Assigned To All My Groups from the drop down menu.
The Counts section on the upper left of the screen will display the number of RFCs that are Open,
Waiting Approval, In Progress, and Pending. You may also click on Waiting Approval to display the RFCs
waiting to be approved.
Double click on the RFC that you wish to review for approval.

BMC REMEDY 8.1 – CHANGE MANAGEMENT USER GUIDE
6/25/2015 Page 20
Once you have reviewed the RFC, click on the Approve button to approve the Change.
Type in comments for the approval in the pop up window. Click Ok.

BMC REMEDY 8.1 – CHANGE MANAGEMENT USER GUIDE
6/25/2015 Page 21
A Work Info entry will be added for the Change Assessment.
2.6.6 Approve within Approval Central
Click on the Applications List and hover over Quick Links. Select Approval Central from the drop down
menu.

BMC REMEDY 8.1 – CHANGE MANAGEMENT USER GUIDE
6/25/2015 Page 22
A new web browser tab will open Approval Central.
Select the drop down menu in the Show field to view RFCs that are set as: Pending, Approved, Rejected,
Hold, More Information, Cancelled, Error, and Closed.

BMC REMEDY 8.1 – CHANGE MANAGEMENT USER GUIDE
6/25/2015 Page 23
The Summary menu on the left side of the Approval Central also shows the number of Pending
Approvals and My Approval History.
Select the RFC you wish to review from the Pending Approvals list.
Click on the Request ID number to open and review the RFC.

BMC REMEDY 8.1 – CHANGE MANAGEMENT USER GUIDE
6/25/2015 Page 24
Select the RFC from the Pending Approvals list in Approval Central. Click on the Approve Selected
button.
The status of the RFC will change to Approved in the Pending Approvals list.

BMC REMEDY 8.1 – CHANGE MANAGEMENT USER GUIDE
6/25/2015 Page 25
2.6.7 Reject within the RFC
In the Change Console, click on the drop down menu for the Show field.
Select Assigned To All My Groups from the drop down menu.
The Counts section on the upper left of the screen will display the number of RFCs that are Open,
Waiting Approval, In Progress, and Pending. Click on Waiting Approval.

BMC REMEDY 8.1 – CHANGE MANAGEMENT USER GUIDE
6/25/2015 Page 26
Double click on the RFC that you wish to review for approval.
Once you have reviewed the RFC and it does not meet the appropriate standards, click on the Reject
button to reject the Change.

BMC REMEDY 8.1 – CHANGE MANAGEMENT USER GUIDE
6/25/2015 Page 27
The status of the RFC will change to Rejected.
2.6.8 Reject within Approval Central
Click on the Applications List and hover over Quick Links. Select Approval Central from the drop down
menu.

BMC REMEDY 8.1 – CHANGE MANAGEMENT USER GUIDE
6/25/2015 Page 28
A new web browser tab will open Approval Central.
Select the drop down menu in the Show field to view RFCs that are set as: Pending, Approved, Rejected,
Hold, More Information, Cancelled, Error, and Closed.

BMC REMEDY 8.1 – CHANGE MANAGEMENT USER GUIDE
6/25/2015 Page 29
The Summary menu on the left side of the Approval Central also shows the number of Pending
Approvals and My Approval History.
Select the RFC you wish to review from the Pending Approvals list.
Click on the Request ID number to open and review the RFC.

BMC REMEDY 8.1 – CHANGE MANAGEMENT USER GUIDE
6/25/2015 Page 30
Select the RFC from the Pending Approvals list in Approval Central. If the RFC does not meet the
appropriate standards, click on the Reject Selected button.
The status of the RFC will change to Rejected in the Pending Approvals list.
2.7 COMPLETING A REQUEST FOR CHANGE Once an RFC has been approved by the Change Manager, the status of the RFC will be set to Scheduled.

BMC REMEDY 8.1 – CHANGE MANAGEMENT USER GUIDE
6/25/2015 Page 31
Once the scheduled work for the RFC has been documented and completed, the RFC’s status can be
updated to Completed. Click on the Date/System tab.
Enter an Actual Start Date and an Actual End Date.
Click on the Complete Change button at the bottom of the screen.

BMC REMEDY 8.1 – CHANGE MANAGEMENT USER GUIDE
6/25/2015 Page 32
The RFC’s status will be updated to Completed.
3 TASKS
3.1 CREATING A TASK Click on the Tasks tab in the Incident.
Click on the Create button to create a new Task.

BMC REMEDY 8.1 – CHANGE MANAGEMENT USER GUIDE
6/25/2015 Page 33
The Task window will open to create the new Task.
Type in a short description of the Task in the Summary field.
Type in a full description of the Task in the Notes field.

BMC REMEDY 8.1 – CHANGE MANAGEMENT USER GUIDE
6/25/2015 Page 34
Click on the drop down menu to select the Assignee Group.
Select the appropriate group from the list that populates.
Click on Save to save the Task.

BMC REMEDY 8.1 – CHANGE MANAGEMENT USER GUIDE
6/25/2015 Page 35
The Task window will close, and you will see the new Task in the Tasks tab.
3.2 ADDING WORK INFO The Work Info tab is automatically visible in an open Task on the upper right hand side of the screen.
BMC REMEDY 8.1 – CHANGE MANAGEMENT USER GUIDE
6/25/2015 Page 36
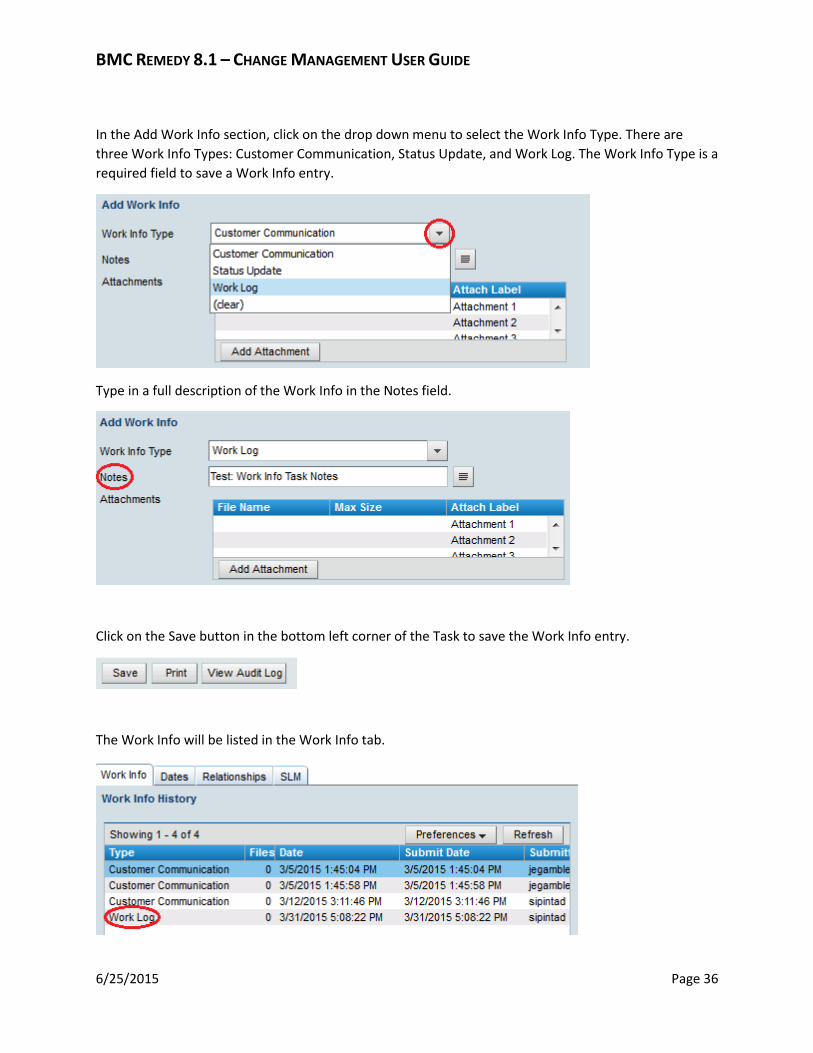
In the Add Work Info section, click on the drop down menu to select the Work Info Type. There are
three Work Info Types: Customer Communication, Status Update, and Work Log. The Work Info Type is a
required field to save a Work Info entry.
Type in a full description of the Work Info in the Notes field.
Click on the Save button in the bottom left corner of the Task to save the Work Info entry.
The Work Info will be listed in the Work Info tab.

BMC REMEDY 8.1 – CHANGE MANAGEMENT USER GUIDE
6/25/2015 Page 37
3.3 VIEWING WORK INFO The Work Info tab is automatically visible in an open Task on the upper right hand side of the screen.
Double click on the Work Info entry that you wish to view.
Alternatively you may also click on the View button to open the Work Info entry.

BMC REMEDY 8.1 – CHANGE MANAGEMENT USER GUIDE
6/25/2015 Page 38
A Work Info window will pop up with the Work Info entry.
Click on the Close button when you are done reviewing the Work Info entry.
3.4 ADDING AN ATTACHMENT Click on the Add Attachment button to upload an attachment with the Work Info entry.

BMC REMEDY 8.1 – CHANGE MANAGEMENT USER GUIDE
6/25/2015 Page 39
The Add Attachment window will pop up. Click on Browse to select the file you wish to upload.
Select the file you wish to upload and click on the Open button.

BMC REMEDY 8.1 – CHANGE MANAGEMENT USER GUIDE
6/25/2015 Page 40
Click on Ok to add the attachment.
Click on the Save button in the bottom left corner of the Task to save the Work Info entry.
The Work Info will be listed in the Work Info tab and the number of attached files will be listed under
the Files column.

BMC REMEDY 8.1 – CHANGE MANAGEMENT USER GUIDE
6/25/2015 Page 41
3.5 VIEWING AN ATTACHMENT Double click on the Work Info entry that has an attachment you wish to view. Alternatively you may also
click on the View button.
Select the file you wish to open in the Work Info, and click on the Display button.

BMC REMEDY 8.1 – CHANGE MANAGEMENT USER GUIDE
6/25/2015 Page 42
You may choose to open or save the file. Click on Ok to continue.
3.6 SENDING AN EMAIL VIA WORK INFO IN TASK To send an email to the client via Work Info, you may select either the Send “Requested By” Email or
Send “Requested For” Email.

BMC REMEDY 8.1 – CHANGE MANAGEMENT USER GUIDE
6/25/2015 Page 43
You may also use the mail buttons beside the Parent Assignee name or Login IDs of either the Requested
For or Requested By. The Parent Assignee is the person who owns the RFC.

BMC REMEDY 8.1 – CHANGE MANAGEMENT USER GUIDE
6/25/2015 Page 44
A new web browser tab will open with the email template form.
This email template will not automatically CC any other recipients. You will have to manually type in
additional email addresses in the field. The email template will automatically BCC you, the sender.

BMC REMEDY 8.1 – CHANGE MANAGEMENT USER GUIDE
6/25/2015 Page 45
You may edit the Subject field if necessary.
Type into the body of the email the message you wish to send.
Click on the Attachments tab if you need to add an attachment to the email.

BMC REMEDY 8.1 – CHANGE MANAGEMENT USER GUIDE
6/25/2015 Page 46
Click on Add Attachment.

BMC REMEDY 8.1 – CHANGE MANAGEMENT USER GUIDE
6/25/2015 Page 47
An Attachment Information window will pop up for you to add the attachment. Type a brief description
of the attachment in the Attachment Name field. Click on the Add button.
An Add Attachment window will pop up. Click on Browse to search your file.

BMC REMEDY 8.1 – CHANGE MANAGEMENT USER GUIDE
6/25/2015 Page 48
Select the file you wish to upload and click on the Open button.
Click the Ok button in the Add Attachment window.
BMC REMEDY 8.1 – CHANGE MANAGEMENT USER GUIDE
6/25/2015 Page 49
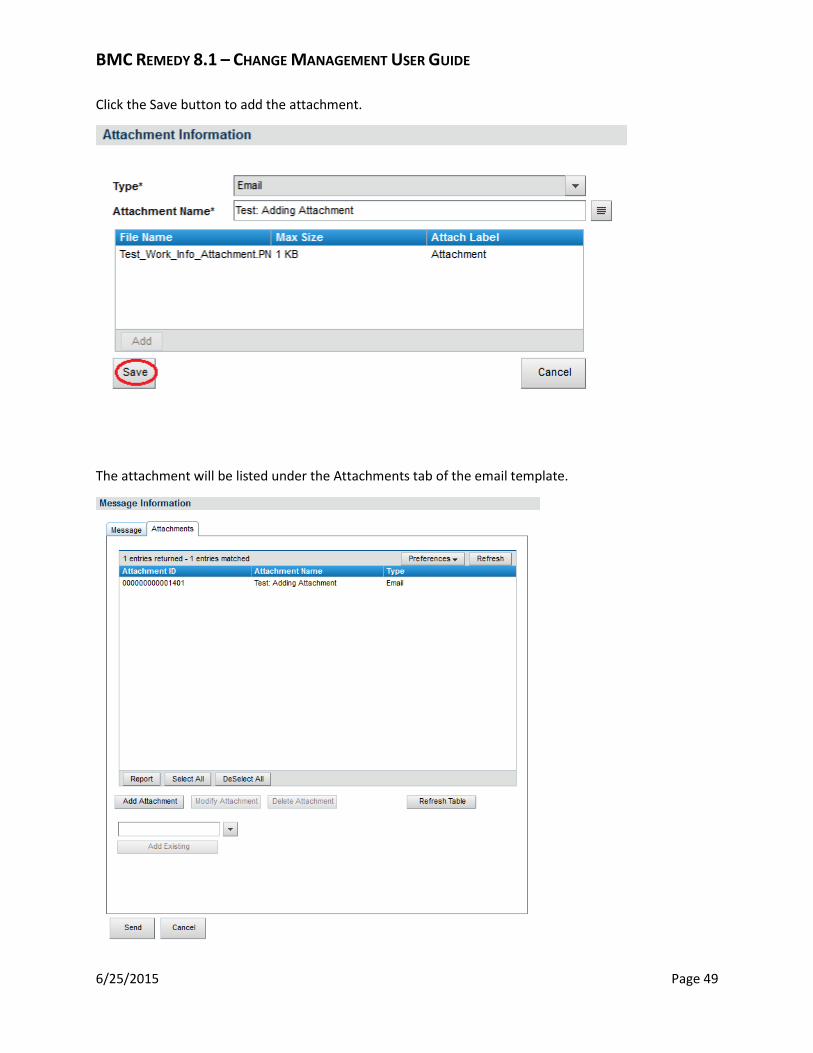
Click the Save button to add the attachment.
The attachment will be listed under the Attachments tab of the email template.

BMC REMEDY 8.1 – CHANGE MANAGEMENT USER GUIDE
6/25/2015 Page 50
Click on the Send button to send your email message.
Your email message will be recorded in the Work Info tab of the Task.
BMC REMEDY 8.1 – CHANGE MANAGEMENT USER GUIDE
6/25/2015 Page 51
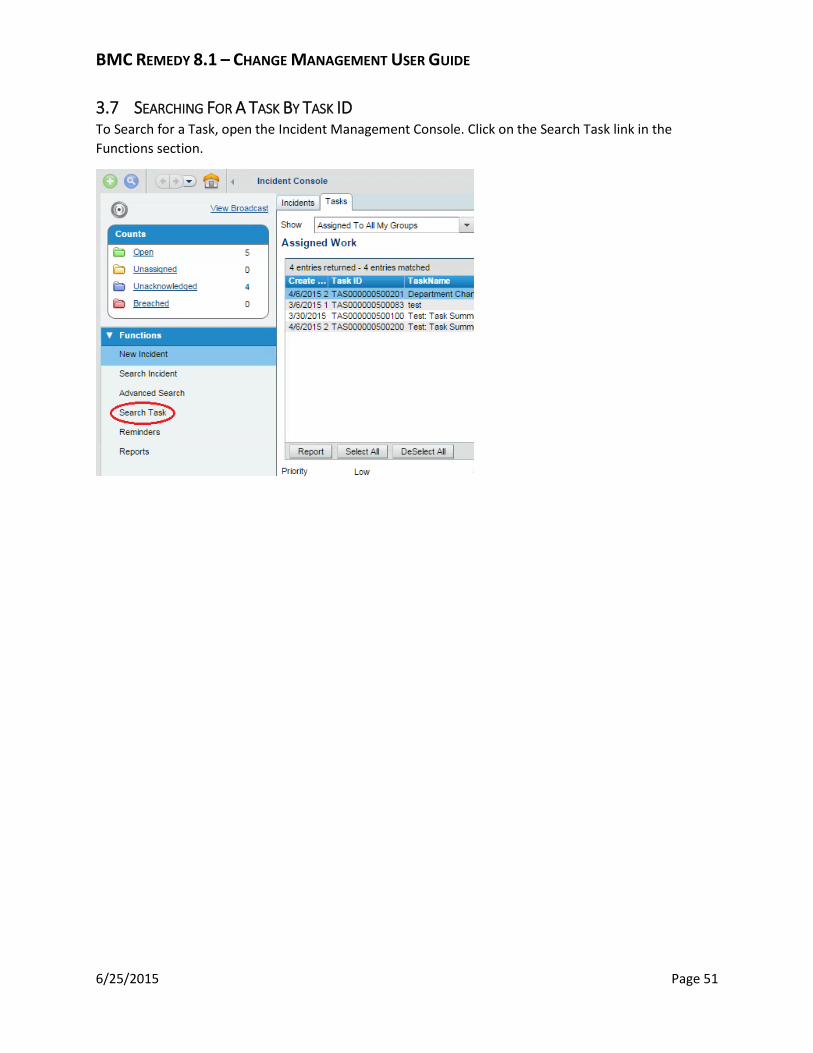
3.7 SEARCHING FOR A TASK BY TASK ID To Search for a Task, open the Incident Management Console. Click on the Search Task link in the
Functions section.

BMC REMEDY 8.1 – CHANGE MANAGEMENT USER GUIDE
6/25/2015 Page 52
A web browser tab will open with the Task Search fields. Type in the Task ID number and click Search.
The top of the screen will display the search results.

BMC REMEDY 8.1 – CHANGE MANAGEMENT USER GUIDE
6/25/2015 Page 53
3.8 CHANGING THE STATUS OF A TASK Click on the drop down menu next to the Status field. Select a Status.
Task Statuses
Status Description
Staged These are automated tasks created by Kinetic or Remedy Workflow. Do not manually update tasks with a Staged status.
Assigned Once the task is assigned to an individual in a group, the Task Assignee, then the task will automatically change to the Assigned status.
Pending Once the task is assigned to a group, but has not been assigned to an individual, it will automatically go into the Pending status. Once the task has been assigned to an individual, it will then go into the Assigned status. This status can also be set manually by the Task Assignee, and can be used for tasks that are waiting for the following status reasons: Assigned, Error, Parts, or More Info.
Work in Progress Once the task is assigned to an individual and a Work Info entry has been logged, then the task’s status will automatically change to Work in Progress.
Waiting This status is not in use. Do not select this status.
Closed This status is manually set by the Task Assignee, and is for tasks that have been resolved for the following status reasons: Success, Failed, or Canceled.
Bypassed This status is not in use. Do not select this status.

BMC REMEDY 8.1 – CHANGE MANAGEMENT USER GUIDE
6/25/2015 Page 54
3.9 CLOSING A TASK Click on the drop down menu next to the Status field. Select the Closed status from the drop down
menu.
The Status Reason field will auto populate to Success.
Click on the Save button on the bottom left corner of the screen to save the changes.

BMC REMEDY 8.1 – CHANGE MANAGEMENT USER GUIDE
6/25/2015 Page 55
4 CALENDARS
4.1 CHANGE CALENDAR To view the Change Calendar, hover over Change Management in the Applications list. Click on Calendar
from the drop down menu.

BMC REMEDY 8.1 – CHANGE MANAGEMENT USER GUIDE
6/25/2015 Page 56
The Change Calendar will open in a new web browser tab, showing all proposed RFCs.
4.2 CRITICAL EVENTS CALENDAR To view the Critical Events Calendar, click on the Critical Events Calendar link towards the bottom left of
the RFC.

BMC REMEDY 8.1 – CHANGE MANAGEMENT USER GUIDE
6/25/2015 Page 57
The Critical Events Calendar will open in a new web browser tab, showing all scheduled System Time and
other critical events.