Embed Size (px)
Citation preview
Blood Glucose Monitoring System
Owner’s Booklet
ART25785-110_rev-B.indd 1 9/9/14 10:36 AM

Test strip port and light
Insert a test strip here. The meter powers on when you insert a test strip.
Touch screen
Displays your test results and other important information. Use touch screen buttons to work with your meter.
FreeStyle InsuLinx at a Glance
Sample areas
Apply blood or control solution to one sample area only.
Meter Home button
This button is used to turn the meter on and off, control the backlight and to go back to the Home screen.
Test strip
Insert strip into the meter with printed side up.
USB port
Plug in your micro USB cable here to download test results.
ART25785-110_rev-B.indd 2-3 9/9/14 10:36 AM
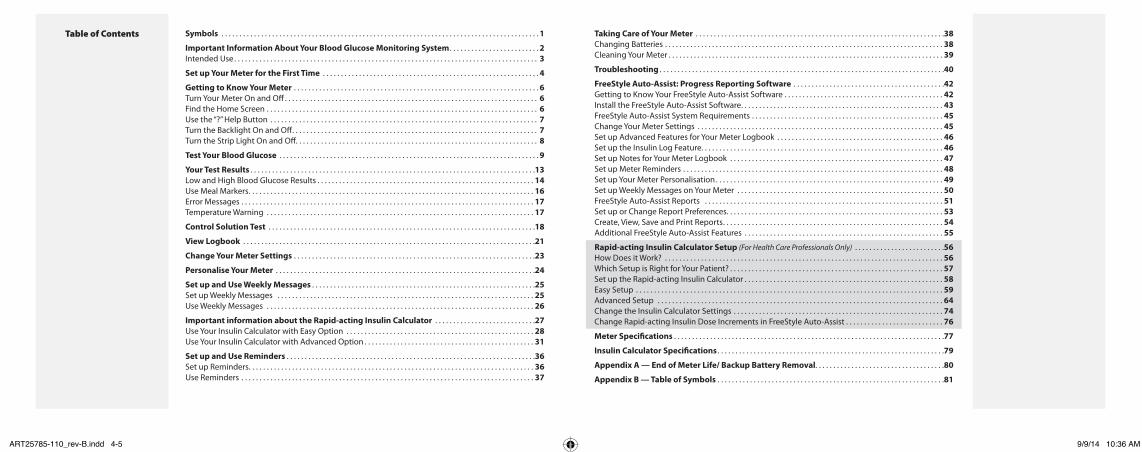
Symbols . . . . . . . . . . . . . . . . . . . . . . . . . . . . . . . . . . . . . . . . . . . . . . . . . . . . . . . . . . . . . . . . . . . . . . . . . . . . . . . . . . . . . . . . 1
Important Information About Your Blood Glucose Monitoring System. . . . . . . . . . . . . . . . . . . . . . . . . 2Intended Use. . . . . . . . . . . . . . . . . . . . . . . . . . . . . . . . . . . . . . . . . . . . . . . . . . . . . . . . . . . . . . . . . . . . . . . . . . . . . . . . . . . . 3
Set up Your Meter for the First Time . . . . . . . . . . . . . . . . . . . . . . . . . . . . . . . . . . . . . . . . . . . . . . . . . . . . . . . . . . . . 4
Getting to Know Your Meter . . . . . . . . . . . . . . . . . . . . . . . . . . . . . . . . . . . . . . . . . . . . . . . . . . . . . . . . . . . . . . . . . . . . 6Turn Your Meter On and Off . . . . . . . . . . . . . . . . . . . . . . . . . . . . . . . . . . . . . . . . . . . . . . . . . . . . . . . . . . . . . . . . . . . . . . 6Find the Home Screen . . . . . . . . . . . . . . . . . . . . . . . . . . . . . . . . . . . . . . . . . . . . . . . . . . . . . . . . . . . . . . . . . . . . . . . . . . . 6Use the “?” Help Button . . . . . . . . . . . . . . . . . . . . . . . . . . . . . . . . . . . . . . . . . . . . . . . . . . . . . . . . . . . . . . . . . . . . . . . . . . 7Turn the Backlight On and Off. . . . . . . . . . . . . . . . . . . . . . . . . . . . . . . . . . . . . . . . . . . . . . . . . . . . . . . . . . . . . . . . . . . . 7Turn the Strip Light On and Off. . . . . . . . . . . . . . . . . . . . . . . . . . . . . . . . . . . . . . . . . . . . . . . . . . . . . . . . . . . . . . . . . . . 8
Test Your Blood Glucose . . . . . . . . . . . . . . . . . . . . . . . . . . . . . . . . . . . . . . . . . . . . . . . . . . . . . . . . . . . . . . . . . . . . . . . . 9
Your Test Results . . . . . . . . . . . . . . . . . . . . . . . . . . . . . . . . . . . . . . . . . . . . . . . . . . . . . . . . . . . . . . . . . . . . . . . . . . . . . . .13Low and High Blood Glucose Results . . . . . . . . . . . . . . . . . . . . . . . . . . . . . . . . . . . . . . . . . . . . . . . . . . . . . . . . . . . . 14Use Meal Markers. . . . . . . . . . . . . . . . . . . . . . . . . . . . . . . . . . . . . . . . . . . . . . . . . . . . . . . . . . . . . . . . . . . . . . . . . . . . . . . 16Error Messages . . . . . . . . . . . . . . . . . . . . . . . . . . . . . . . . . . . . . . . . . . . . . . . . . . . . . . . . . . . . . . . . . . . . . . . . . . . . . . . . . 17Temperature Warning . . . . . . . . . . . . . . . . . . . . . . . . . . . . . . . . . . . . . . . . . . . . . . . . . . . . . . . . . . . . . . . . . . . . . . . . . . 17
Control Solution Test . . . . . . . . . . . . . . . . . . . . . . . . . . . . . . . . . . . . . . . . . . . . . . . . . . . . . . . . . . . . . . . . . . . . . . . . . .18
View Logbook . . . . . . . . . . . . . . . . . . . . . . . . . . . . . . . . . . . . . . . . . . . . . . . . . . . . . . . . . . . . . . . . . . . . . . . . . . . . . . . . .21
Change Your Meter Settings . . . . . . . . . . . . . . . . . . . . . . . . . . . . . . . . . . . . . . . . . . . . . . . . . . . . . . . . . . . . . . . . . . .23
Personalise Your Meter . . . . . . . . . . . . . . . . . . . . . . . . . . . . . . . . . . . . . . . . . . . . . . . . . . . . . . . . . . . . . . . . . . . . . . . .24
Set up and Use Weekly Messages . . . . . . . . . . . . . . . . . . . . . . . . . . . . . . . . . . . . . . . . . . . . . . . . . . . . . . . . . . . . . .25Set up Weekly Messages . . . . . . . . . . . . . . . . . . . . . . . . . . . . . . . . . . . . . . . . . . . . . . . . . . . . . . . . . . . . . . . . . . . . . . . 25Use Weekly Messages . . . . . . . . . . . . . . . . . . . . . . . . . . . . . . . . . . . . . . . . . . . . . . . . . . . . . . . . . . . . . . . . . . . . . . . . . . 26
Important information about the Rapid-acting Insulin Calculator . . . . . . . . . . . . . . . . . . . . . . . . . . . .27Use Your Insulin Calculator with Easy Option . . . . . . . . . . . . . . . . . . . . . . . . . . . . . . . . . . . . . . . . . . . . . . . . . . . . 28Use Your Insulin Calculator with Advanced Option . . . . . . . . . . . . . . . . . . . . . . . . . . . . . . . . . . . . . . . . . . . . . . . 31
Set up and Use Reminders . . . . . . . . . . . . . . . . . . . . . . . . . . . . . . . . . . . . . . . . . . . . . . . . . . . . . . . . . . . . . . . . . . . . .36Set up Reminders. . . . . . . . . . . . . . . . . . . . . . . . . . . . . . . . . . . . . . . . . . . . . . . . . . . . . . . . . . . . . . . . . . . . . . . . . . . . . . . 36Use Reminders . . . . . . . . . . . . . . . . . . . . . . . . . . . . . . . . . . . . . . . . . . . . . . . . . . . . . . . . . . . . . . . . . . . . . . . . . . . . . . . . . 37
Taking Care of Your Meter . . . . . . . . . . . . . . . . . . . . . . . . . . . . . . . . . . . . . . . . . . . . . . . . . . . . . . . . . . . . . . . . . . . . .38Changing Batteries . . . . . . . . . . . . . . . . . . . . . . . . . . . . . . . . . . . . . . . . . . . . . . . . . . . . . . . . . . . . . . . . . . . . . . . . . . . . . 38Cleaning Your Meter . . . . . . . . . . . . . . . . . . . . . . . . . . . . . . . . . . . . . . . . . . . . . . . . . . . . . . . . . . . . . . . . . . . . . . . . . . . . 39
Troubleshooting . . . . . . . . . . . . . . . . . . . . . . . . . . . . . . . . . . . . . . . . . . . . . . . . . . . . . . . . . . . . . . . . . . . . . . . . . . . . . . .40
FreeStyle Auto-Assist: Progress Reporting Software . . . . . . . . . . . . . . . . . . . . . . . . . . . . . . . . . . . . . . . . . .42Getting to Know Your FreeStyle Auto-Assist Software . . . . . . . . . . . . . . . . . . . . . . . . . . . . . . . . . . . . . . . . . . . . 42Install the FreeStyle Auto-Assist Software. . . . . . . . . . . . . . . . . . . . . . . . . . . . . . . . . . . . . . . . . . . . . . . . . . . . . . . . 43FreeStyle Auto-Assist System Requirements . . . . . . . . . . . . . . . . . . . . . . . . . . . . . . . . . . . . . . . . . . . . . . . . . . . . . 45Change Your Meter Settings . . . . . . . . . . . . . . . . . . . . . . . . . . . . . . . . . . . . . . . . . . . . . . . . . . . . . . . . . . . . . . . . . . . . 45Set up Advanced Features for Your Meter Logbook . . . . . . . . . . . . . . . . . . . . . . . . . . . . . . . . . . . . . . . . . . . . . . 46Set up the Insulin Log Feature. . . . . . . . . . . . . . . . . . . . . . . . . . . . . . . . . . . . . . . . . . . . . . . . . . . . . . . . . . . . . . . . . . . 46Set up Notes for Your Meter Logbook . . . . . . . . . . . . . . . . . . . . . . . . . . . . . . . . . . . . . . . . . . . . . . . . . . . . . . . . . . . 47Set up Meter Reminders . . . . . . . . . . . . . . . . . . . . . . . . . . . . . . . . . . . . . . . . . . . . . . . . . . . . . . . . . . . . . . . . . . . . . . . . 48Set up Your Meter Personalisation. . . . . . . . . . . . . . . . . . . . . . . . . . . . . . . . . . . . . . . . . . . . . . . . . . . . . . . . . . . . . . . 49Set up Weekly Messages on Your Meter . . . . . . . . . . . . . . . . . . . . . . . . . . . . . . . . . . . . . . . . . . . . . . . . . . . . . . . . . 50FreeStyle Auto-Assist Reports . . . . . . . . . . . . . . . . . . . . . . . . . . . . . . . . . . . . . . . . . . . . . . . . . . . . . . . . . . . . . . . . . . 51Set up or Change Report Preferences. . . . . . . . . . . . . . . . . . . . . . . . . . . . . . . . . . . . . . . . . . . . . . . . . . . . . . . . . . . . 53Create, View, Save and Print Reports. . . . . . . . . . . . . . . . . . . . . . . . . . . . . . . . . . . . . . . . . . . . . . . . . . . . . . . . . . . . . 54Additional FreeStyle Auto-Assist Features . . . . . . . . . . . . . . . . . . . . . . . . . . . . . . . . . . . . . . . . . . . . . . . . . . . . . . . 55
Rapid-acting Insulin Calculator Setup (For Health Care Professionals Only) . . . . . . . . . . . . . . . . . . . . . . . . .56How Does it Work? . . . . . . . . . . . . . . . . . . . . . . . . . . . . . . . . . . . . . . . . . . . . . . . . . . . . . . . . . . . . . . . . . . . . . . . . . . . . . 56Which Setup is Right for Your Patient? . . . . . . . . . . . . . . . . . . . . . . . . . . . . . . . . . . . . . . . . . . . . . . . . . . . . . . . . . . . 57Set up the Rapid-acting Insulin Calculator . . . . . . . . . . . . . . . . . . . . . . . . . . . . . . . . . . . . . . . . . . . . . . . . . . . . . . . 58Easy Setup . . . . . . . . . . . . . . . . . . . . . . . . . . . . . . . . . . . . . . . . . . . . . . . . . . . . . . . . . . . . . . . . . . . . . . . . . . . . . . . . . . . . . 59Advanced Setup . . . . . . . . . . . . . . . . . . . . . . . . . . . . . . . . . . . . . . . . . . . . . . . . . . . . . . . . . . . . . . . . . . . . . . . . . . . . . . . 64Change the Insulin Calculator Settings . . . . . . . . . . . . . . . . . . . . . . . . . . . . . . . . . . . . . . . . . . . . . . . . . . . . . . . . . . 74Change Rapid-acting Insulin Dose Increments in FreeStyle Auto-Assist . . . . . . . . . . . . . . . . . . . . . . . . . . . 76
Meter Specifications . . . . . . . . . . . . . . . . . . . . . . . . . . . . . . . . . . . . . . . . . . . . . . . . . . . . . . . . . . . . . . . . . . . . . . . . . . .77
Insulin Calculator Specifications . . . . . . . . . . . . . . . . . . . . . . . . . . . . . . . . . . . . . . . . . . . . . . . . . . . . . . . . . . . . . . .79
Appendix A — End of Meter Life/ Backup Battery Removal. . . . . . . . . . . . . . . . . . . . . . . . . . . . . . . . . . . .80
Appendix B — Table of Symbols . . . . . . . . . . . . . . . . . . . . . . . . . . . . . . . . . . . . . . . . . . . . . . . . . . . . . . . . . . . . . . .81
Table of Contents
ART25785-110_rev-B.indd 4-5 9/9/14 10:36 AM
1 2
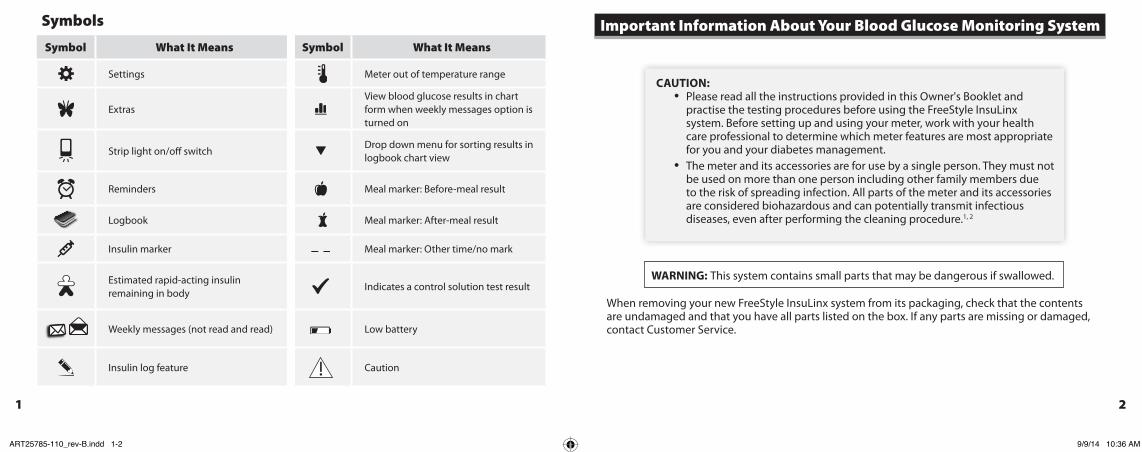
Symbols
Symbol What It Means Symbol What It Means
Settings Meter out of temperature range
Extras View blood glucose results in chart form when weekly messages option is turned on
Strip light on/off switchDrop down menu for sorting results in logbook chart view
Reminders Meal marker: Before-meal result
Logbook Meal marker: After-meal result
Insulin marker Meal marker: Other time/no mark
Estimated rapid-acting insulin remaining in body
Indicates a control solution test result
Weekly messages (not read and read) Low battery
Insulin log feature Caution
Important Information About Your Blood Glucose Monitoring System
When removing your new FreeStyle InsuLinx system from its packaging, check that the contents are undamaged and that you have all parts listed on the box. If any parts are missing or damaged, contact Customer Service.
CAUTION: • Please read all the instructions provided in this Owner's Booklet and
practise the testing procedures before using the FreeStyle InsuLinx system. Before setting up and using your meter, work with your health care professional to determine which meter features are most appropriate for you and your diabetes management.
• The meter and its accessories are for use by a single person. They must not be used on more than one person including other family members due to the risk of spreading infection. All parts of the meter and its accessories are considered biohazardous and can potentially transmit infectious diseases, even after performing the cleaning procedure.1, 2
WARNING: This system contains small parts that may be dangerous if swallowed.
ART25785-110_rev-B.indd 1-2 9/9/14 10:36 AM
3 4
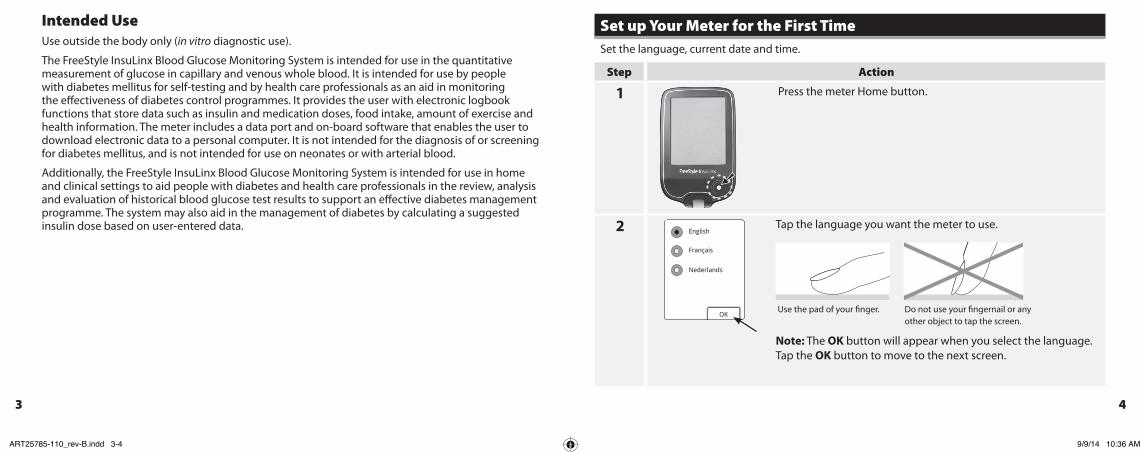
Intended UseUse outside the body only (in vitro diagnostic use).
The FreeStyle InsuLinx Blood Glucose Monitoring System is intended for use in the quantitative measurement of glucose in capillary and venous whole blood. It is intended for use by people with diabetes mellitus for self-testing and by health care professionals as an aid in monitoring the effectiveness of diabetes control programmes. It provides the user with electronic logbook functions that store data such as insulin and medication doses, food intake, amount of exercise and health information. The meter includes a data port and on-board software that enables the user to download electronic data to a personal computer. It is not intended for the diagnosis of or screening for diabetes mellitus, and is not intended for use on neonates or with arterial blood.
Additionally, the FreeStyle InsuLinx Blood Glucose Monitoring System is intended for use in home and clinical settings to aid people with diabetes and health care professionals in the review, analysis and evaluation of historical blood glucose test results to support an effective diabetes management programme. The system may also aid in the management of diabetes by calculating a suggested insulin dose based on user-entered data.
Set up Your Meter for the First TimeSet the language, current date and time.
Step Action
1 Press the meter Home button.
2 English
Français
Nederlands
OK
Tap the language you want the meter to use.
Do not use your fingernail or any other object to tap the screen.
Use the pad of your finger.
Note: The OK button will appear when you select the language.Tap the OK button to move to the next screen.
ART25785-110_rev-B.indd 3-4 9/9/14 10:36 AM
5 6
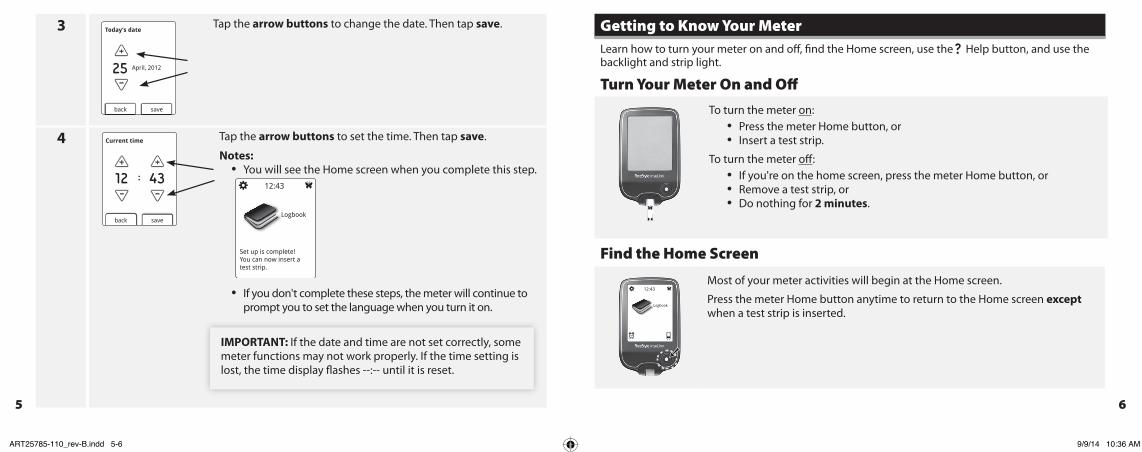
3
saveback
Today’s date
April, 201225
Tap the arrow buttons to change the date. Then tap save.
4
saveback
Current time
12 43:
Tap the arrow buttons to set the time. Then tap save.
Notes: • You will see the Home screen when you complete this step.
12:43
Set up is complete!You can now insert atest strip.
Logbook
• If you don't complete these steps, the meter will continue to prompt you to set the language when you turn it on.
IMPORTANT: If the date and time are not set correctly, some meter functions may not work properly. If the time setting is lost, the time display flashes --:-- until it is reset.
Getting to Know Your MeterLearn how to turn your meter on and off, find the Home screen, use the Help button, and use the backlight and strip light.
Turn Your Meter On and Off
To turn the meter on: • Press the meter Home button, or • Insert a test strip.
To turn the meter off: • If you're on the home screen, press the meter Home button, or • Remove a test strip, or• Do nothing for 2 minutes.
Find the Home Screen
12:43
Logbook
Most of your meter activities will begin at the Home screen.
Press the meter Home button anytime to return to the Home screen except when a test strip is inserted.
ART25785-110_rev-B.indd 5-6 9/9/14 10:36 AM

7 8
Use the “?” Help Button
?
nextback
Enter targetrange in mmol/L
3.9 7.2to
Tap the Help button anytime you see it and want more information.
Turn the Backlight On and Off
The backlight can help you view the screen in low light. To turn the backlight on:
• Press and hold the meter Home button for 3 seconds. To turn the backlight off:
• Wait for 15 seconds, or• Press and hold the meter Home button for 3 seconds.
Turn the Strip Light On and Off
12:43
Logbook
To turn the strip light on:
• If a test strip is inserted, press and hold the meter Home button for 3 seconds.
• If a test strip is not inserted, turn the backlight on, then tap the strip light symbol on the home screen.
To turn the strip light off:
• Tap the strip light symbol .
ART25785-110_rev-B.indd 7-8 9/9/14 10:36 AM
9 10
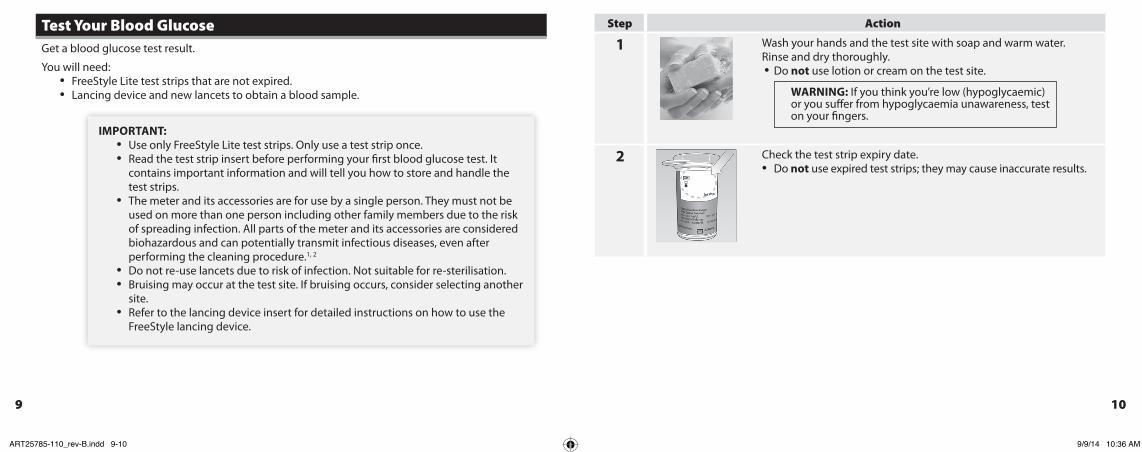
Test Your Blood GlucoseGet a blood glucose test result.
You will need: • FreeStyle Lite test strips that are not expired.• Lancing device and new lancets to obtain a blood sample.
IMPORTANT: • Use only FreeStyle Lite test strips. Only use a test strip once. • Read the test strip insert before performing your first blood glucose test. It
contains important information and will tell you how to store and handle the test strips.
• The meter and its accessories are for use by a single person. They must not be used on more than one person including other family members due to the risk of spreading infection. All parts of the meter and its accessories are considered biohazardous and can potentially transmit infectious diseases, even after performing the cleaning procedure.1, 2
• Do not re-use lancets due to risk of infection. Not suitable for re-sterilisation.• Bruising may occur at the test site. If bruising occurs, consider selecting another
site.• Refer to the lancing device insert for detailed instructions on how to use the
FreeStyle lancing device.
Step Action
1 Wash your hands and the test site with soap and warm water. Rinse and dry thoroughly.• Do not use lotion or cream on the test site.
WARNING: If you think you’re low (hypoglycaemic) or you suffer from hypoglycaemia unawareness, test on your fingers.
2 Check the test strip expiry date.• Do not use expired test strips; they may cause inaccurate results.
ART25785-110_rev-B.indd 9-10 9/9/14 10:36 AM

11 12
3 Perform the test.
a. Insert a test strip and close the test strip vial. b. Use your lancing device to obtain a blood drop.c. Apply blood to the test strip as shown in the picture.d. The meter will beep once to let you know that you have applied
enough blood.Notes:
• Once you start applying blood, you have 60 seconds to fill the test strip on the same side of the test strip only. The time you have left is shown as a countdown on the screen.
• The time that the meter takes to display a result depends on your blood glucose level. The higher your blood glucose level, the longer it takes to get a result.
• The meter turns off after 2 minutes of inactivity. Remove and reinsert the unused test strip to restart the meter.
IMPORTANT: After performing a blood glucose test, wash your hands and the test site with soap and water. Thoroughly dry your hands and the test site.
407:30
mmolL5.8
View the test result.
a. A butterfly will appear on the screen while you wait for your result. The meter will beep twice when your result is ready.
b. Remove and discard the test strip and lancet appropriately. Contact your health care professional regarding local waste disposal requirements.
Refer to the Your Test Results section to learn how to understand and mark your test results.
Note: Your result is now stored in your logbook.
ART25785-110_rev-B.indd 11-12 9/9/14 10:36 AM

13 14
Your Test ResultsView, understand and mark your test results; know what to do if you receive an error message.Note: The meter displays results in mmol/L. This unit of measure is set and cannot be changed.
IMPORTANT: • The meter displays results from 1.1 mmol/L to 27.8 mmol/L. Low or high
blood glucose results can indicate a potentially serious medical condition. Contact your health care professional before taking any action based on an unclear message or result.
• The expected normal fasting blood glucose level for an adult without diabetes is less than 6.1 mmol/L.3
• Two hours after meals, the blood glucose level for an adult without diabetes should be less than 7.8 mmol/L.3
• Consult your health care professional to determine the blood glucose levels that are appropriate for you.
• Consult your health care professional before changing your diabetes management programme.
Low and High Blood Glucose ResultsDisplay What To Do
Low glucose
Appears when result is: lower than 3.9 mmol/L
Follow your health care professional's advice to treat low blood glucose.
High glucose
Appears when result is: higher than 13.3 mmol/L
Follow your health care professional's advice to treat high blood glucose.
ART25785-110_rev-B.indd 13-14 9/9/14 10:36 AM
15 16
Display What To Do
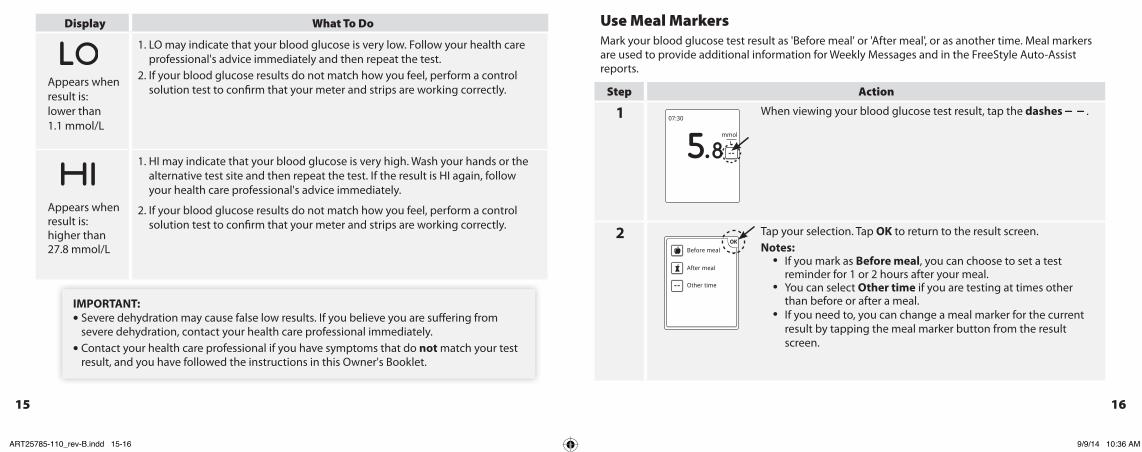
Appears when result is: lower than 1.1 mmol/L
1. LO may indicate that your blood glucose is very low. Follow your health care professional's advice immediately and then repeat the test.
2. If your blood glucose results do not match how you feel, perform a control solution test to confirm that your meter and strips are working correctly.
Appears when result is:higher than 27.8 mmol/L
1. HI may indicate that your blood glucose is very high. Wash your hands or the alternative test site and then repeat the test. If the result is HI again, follow your health care professional's advice immediately.
2. If your blood glucose results do not match how you feel, perform a control solution test to confirm that your meter and strips are working correctly.
IMPORTANT: • Severe dehydration may cause false low results. If you believe you are suffering from
severe dehydration, contact your health care professional immediately. • Contact your health care professional if you have symptoms that do not match your test
result, and you have followed the instructions in this Owner's Booklet.
Use Meal MarkersMark your blood glucose test result as 'Before meal' or 'After meal', or as another time. Meal markers are used to provide additional information for Weekly Messages and in the FreeStyle Auto-Assist reports.
Step Action
1 07:30
mmolL5.8
When viewing your blood glucose test result, tap the dashes .
2
Other time
After meal
Before mealOK
Tap your selection. Tap OK to return to the result screen.Notes:
• If you mark as Before meal, you can choose to set a test reminder for 1 or 2 hours after your meal.
• You can select Other time if you are testing at times other than before or after a meal.
• If you need to, you can change a meal marker for the current result by tapping the meal marker button from the result screen.
ART25785-110_rev-B.indd 15-16 9/9/14 10:36 AM

17 18
Error Messages
OK
There is a problemwith the meter.
Call customer servicefor help and referenceError 1, or get moreinformation below.
1 of 5
Example of an Error Message
Your meter will explain what an error message means, its possible causes, and what to do about it.
Notes: • Remember to tap the arrow button to see all of the important
information.• Tap OK to return to the Home screen.
Temperature WarningThis symbol may appear after inserting a test strip. It will include a message saying the meter is either too hot or too cold to use right now. Blood glucose tests taken outside of the operating temperature range may not be accurate.Tap OK to clear the screen and test again later.
Control Solution TestA control solution test should be performed when you are not sure of your results and want to confirm that your meter and test strips are working correctly.
IMPORTANT: • Control solution results should fall within the control solution range printed on the test
strip vial.• Do not use control solution past its expiry date. Discard control solution 3 months after
opening or on the expiry date printed on the bottle, whichever comes first. (Example: open April 15, discard July 15; write the discard date on the side of the bottle.)
• The control solution range is a target range for control solution only, not for your blood glucose level.
• Use only FreeStyle control solution with this meter.• Replace the cap securely on the bottle immediately after use.• Do not add water or other liquid to control solution.• Contact Customer Service for information on how to obtain control solution.
ART25785-110_rev-B.indd 17-18 9/9/14 10:36 AM

19 20
Step Action
112:43
LogbookSettings
Time and date
Sounds
Language
Perform controlsolution test
At the Home screen, tap Settings . Then tap Perform control solution test.
2 Apply controlsolution to strip
Perform the control solution test.a. Insert a test strip and close the test strip vial. b. Apply control solution to the test strip as shown in
the picture.c. The meter will beep once to let you know that you
have applied enough control solution.d. A butterfly will appear on the screen while you wait
for the result. The meter will beep twice when the result is ready.
3 Compare the control solution result to the range printed on the test strip vial. The result should fall within the range.
Notes: • If you see an error message on the screen, your meter will explain what it means,
its possible causes, and what to do next.• The result will be marked as a control solution test in your logbook. It will not be
included in your charts and reports.• You may also mark a control solution test after it is performed by following these
steps:a. At the Home screen, tap Logbook .b. Tap your most recent test. You can only modify this result.c. Tap the down arrow. Then tap add or edit notes. d. Tap the option for control solution test. Then tap OK.e. You can now see your most recent result marked as a control solution test.
• Do not use the insulin calculator when you perform a control solution test.
Out of Range Control Solution Results• Repeat the test if control solution results are outside the range printed on the test
strip vial.• Stop using the meter if control solution results are consistently outside the range
printed on the test strip vial. Contact Customer Service.
ART25785-110_rev-B.indd 19-20 9/9/14 10:36 AM

21 22
View LogbookReview blood glucose history; review and log meals, insulin doses, notes about your test results and control solution tests.
Step Action
1 12:43
Logbook
At the Home screen, tap Logbook .
2 Review your results.Notes:
• Use the down arrow to scroll through logbook entries.• Tap any entry to see details of results, calculations and notes, if any.
23 Feb
22 Feb
22 Feb
mmol/L
Logbook
5.87.95.3
07:30
22:33
11:42
23 Feb 07:30
add or edit notes
mmol/L5.8
OK
Continued on next page
2(Continued)
Notes (Continued):• If you turned on the Notes feature through FreeStyle Auto-Assist, you can tap
the add or edit notes button to add or edit notes to your most recent result. Refer to the FreeStyle Auto-Assist Set up Advanced Features for Your Meter Logbook section for how to set up this feature.
• If you turned on the Insulin Log feature through FreeStyle Auto-Assist, you will see the at the top left of the screen. Tap it to enter your insulin dose. Refer to the FreeStyle Auto-Assist Set up Advanced Features for Your Meter Logbook section for how to set up this feature.
• If you turned on Weekly Messages, you will see the chart symbol at the top right of the screen. Tap it to review your results for up to 14 days. To learn more about weekly messages, refer to the Set up and Use Weekly Messages section.
• A LO result (under 1.1 mmol/L) is included in the memory as LO.• A HI result (over 27.8 mmol/L) is included in the memory as HI.
ART25785-110_rev-B.indd 21-22 9/9/14 10:36 AM

23 24
Change Your Meter SettingsChange time and date, sounds or language.
Step Action
112:43
LogbookSettings
Time and date
Sounds
Language
Perform controlsolution test
At the Home screen, tap Settings . Then tap the setting you want to change.
Note: Tap Sounds to change Notification and Button sounds.
• Notification sound On: Meter will beep when the test strip is filled, the result appears on the screen, an error occurs, and when you get a reminder.
• Button sound On: Meter will beep each time you tap a button.
2 Press the meter Home button to return to the Home screen.Note: You can change your meter settings anytime by simply repeating Step 1.
Personalise Your MeterChange the picture you see when you perform a blood glucose test.
Step Action
112:43
Logbook
Personalisation
Weekly Messages
Rapid-actingInsulin Calculator
Extras:I want to set up...
At the Home screen, tap Extras . Then tap Personalisation.
2 ?
cancel
mypicture
none
Pictures
more
Select your picture and tap yes to confirm the change.Notes:
• You can also use my picture to select a personal picture such as a family member or pet. Refer to the FreeStyle Auto-Assist Set up Your Meter Personalisation section for how to upload your picture.
• You can change your picture anytime by simply repeating Steps 1 and 2.
ART25785-110_rev-B.indd 23-24 9/9/14 10:36 AM
25 26
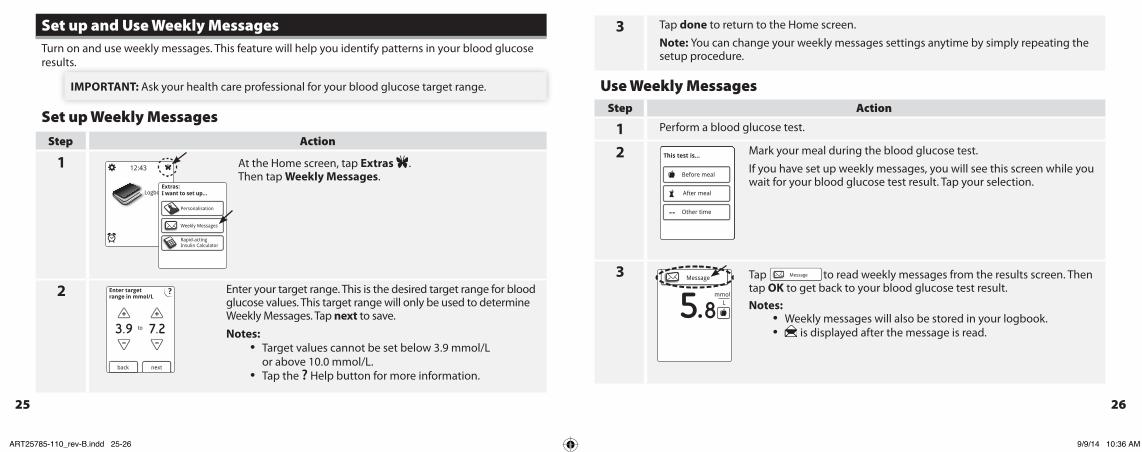
Set up and Use Weekly MessagesTurn on and use weekly messages. This feature will help you identify patterns in your blood glucose results.
IMPORTANT: Ask your health care professional for your blood glucose target range.
Set up Weekly Messages
Step Action
1 12:43
Logbook
Personalisation
Weekly Messages
Rapid-actingInsulin Calculator
Extras:I want to set up...
At the Home screen, tap Extras .Then tap Weekly Messages.
2 ?
nextback
Enter targetrange in mmol/L
3.9 7.2to
Enter your target range. This is the desired target range for blood glucose values. This target range will only be used to determine Weekly Messages. Tap next to save.
Notes: • Target values cannot be set below 3.9 mmol/L
or above 10.0 mmol/L.• Tap the ? Help button for more information.
3 Tap done to return to the Home screen.
Note: You can change your weekly messages settings anytime by simply repeating the setup procedure.
Use Weekly Messages Step Action
1 Perform a blood glucose test.
2 This test is...
Other time
After meal
Before meal
Mark your meal during the blood glucose test.
If you have set up weekly messages, you will see this screen while you wait for your blood glucose test result. Tap your selection.
3 Message
mmolL5.8
Tap Message to read weekly messages from the results screen. Then tap OK to get back to your blood glucose test result.Notes:
• Weekly messages will also be stored in your logbook.• is displayed after the message is read.
ART25785-110_rev-B.indd 25-26 9/9/14 10:36 AM
27 28
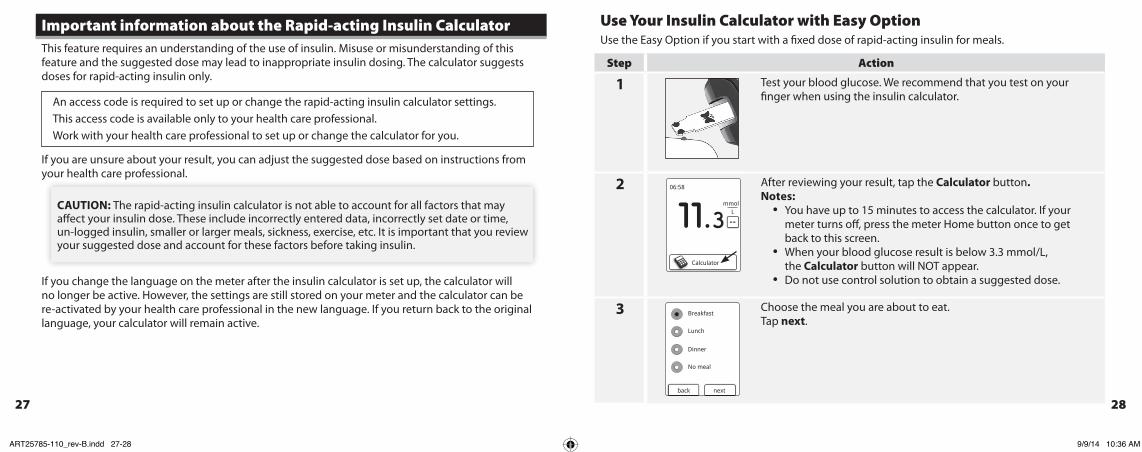
Important information about the Rapid-acting Insulin CalculatorThis feature requires an understanding of the use of insulin. Misuse or misunderstanding of this feature and the suggested dose may lead to inappropriate insulin dosing. The calculator suggests doses for rapid-acting insulin only.
An access code is required to set up or change the rapid-acting insulin calculator settings.This access code is available only to your health care professional.Work with your health care professional to set up or change the calculator for you.
If you are unsure about your result, you can adjust the suggested dose based on instructions from your health care professional.
CAUTION: The rapid-acting insulin calculator is not able to account for all factors that may affect your insulin dose. These include incorrectly entered data, incorrectly set date or time, un-logged insulin, smaller or larger meals, sickness, exercise, etc. It is important that you review your suggested dose and account for these factors before taking insulin.
If you change the language on the meter after the insulin calculator is set up, the calculator will no longer be active. However, the settings are still stored on your meter and the calculator can be re-activated by your health care professional in the new language. If you return back to the original language, your calculator will remain active.
Use Your Insulin Calculator with Easy Option Use the Easy Option if you start with a fixed dose of rapid-acting insulin for meals.
Step Action
1 Test your blood glucose. We recommend that you test on your finger when using the insulin calculator.
2 06:58
Calculator
mmolL11.3
After reviewing your result, tap the Calculator button.Notes:
• You have up to 15 minutes to access the calculator. If your meter turns off, press the meter Home button once to get back to this screen.
• When your blood glucose result is below 3.3 mmol/L, the Calculator button will NOT appear.
• Do not use control solution to obtain a suggested dose.
3 Breakfast
Lunch
Dinner
No meal
nextback
Choose the meal you are about to eat. Tap next.
ART25785-110_rev-B.indd 27-28 9/9/14 10:36 AM
29 30
5
log doseback
Suggested dose
Adjust if needed
uUser change: +212
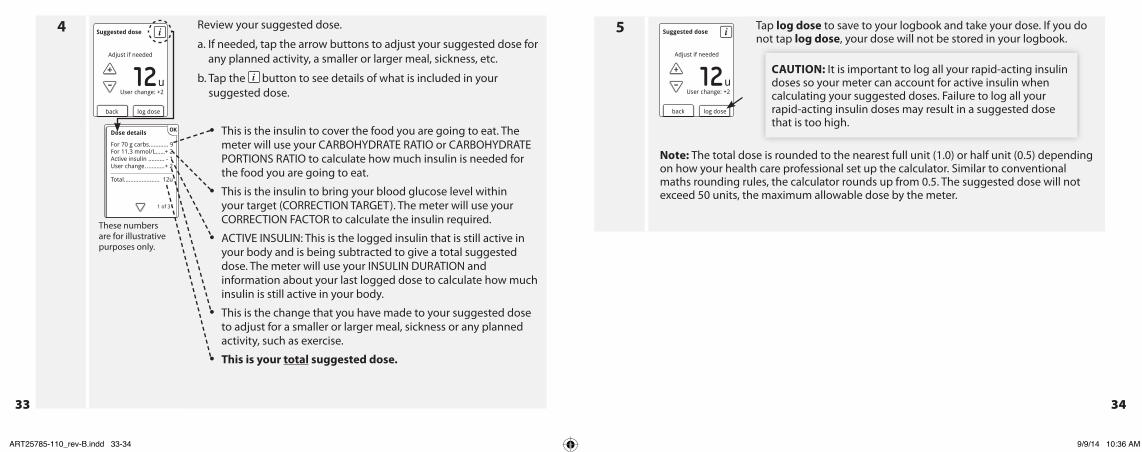
Tap log dose to save to your logbook and take your dose. If you do not tap log dose, your dose will not be stored in your logbook.
CAUTION: It is important to log all your rapid-acting insulin doses so your meter can account for active insulin when calculating your suggested doses. Failure to log all your rapid-acting insulin doses may result in a suggested dose that is too high.
Note: The total dose is rounded to the nearest full unit (1.0) or half unit (0.5) depending on how your health care professional set up the calculator. Similar to conventional maths rounding rules, the calculator rounds up from 0.5. The suggested dose will not exceed 50 units, the maximum allowable dose by the meter.
4
OKDose details
For breakfast ............ 9For 11.3 mmol/L......+ 2Active insulin .......... - 1User change............+ 2
Total...................... 12u
1 of 3
log doseback
Suggested dose
Adjust if needed
uUser change: +212
These numbers are for illustrative purposes only.
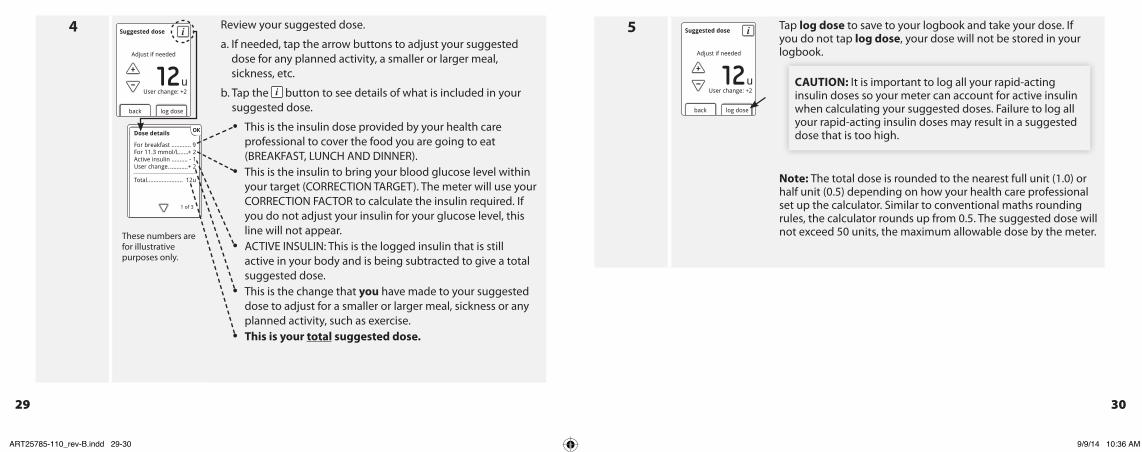
Review your suggested dose.
a. If needed, tap the arrow buttons to adjust your suggested dose for any planned activity, a smaller or larger meal, sickness, etc.
b. Tap the button to see details of what is included in your suggested dose.
• This is the insulin dose provided by your health care professional to cover the food you are going to eat (BREAKFAST, LUNCH AND DINNER).
• This is the insulin to bring your blood glucose level within your target (CORRECTION TARGET). The meter will use your CORRECTION FACTOR to calculate the insulin required. If you do not adjust your insulin for your glucose level, this line will not appear.
• ACTIVE INSULIN: This is the logged insulin that is still active in your body and is being subtracted to give a total suggested dose.
• This is the change that you have made to your suggested dose to adjust for a smaller or larger meal, sickness or any planned activity, such as exercise.
• This is your total suggested dose.
ART25785-110_rev-B.indd 29-30 9/9/14 10:36 AM

31 32
Use Your Insulin Calculator with Advanced OptionUse the Advanced Option if you count carbohydrates (in grams or carbohydrate portions) to adjust your rapid-acting insulin dose for meals.
Step Action
1 Test your blood glucose. We recommend that you test on your finger when using the insulin calculator.
2 06:58
Calculator
mmolL11.3
noyes
Have you taken any rapid-acting insulinsince 05:00?
After reviewing your result, tap the Calculator button and confirm your last logged rapid-acting insulin dose if needed (you will be asked this if your health care professional turned on Active Insulin). The time displayed in the confirmation screen will be the current time minus the insulin duration or the time of the last logged dose, whichever is most recent. This is to ensure an accurate accounting of active insulin.Notes:
• Rapid-acting insulin entered here will be added to the active insulin tracking.
• You have up to 15 minutes to access the calculator. If your meter turns off, press the meter Home button once to get back to this screen.
• When your blood glucose result is below 3.3 mmol/L, the Calculator button will NOT appear.
• Do not use control solution to obtain a suggested dose.
3 ?
back
Enter carbs
done
0grams
?
back
Enter carb portions
done
carb portions0OR
Use the arrow buttons to enter the grams of carbs or carbohydrate portions you are about to eat. Tap done.
ART25785-110_rev-B.indd 31-32 9/9/14 10:36 AM
33 34
4
OKDose details
For 70 g carbs............ 9For 11.3 mmol/L......+ 2Active insulin .......... - 1User change............+ 2
Total...................... 12u
1 of 3
log doseback
Suggested dose
Adjust if needed
uUser change: +212
These numbers are for illustrative purposes only.
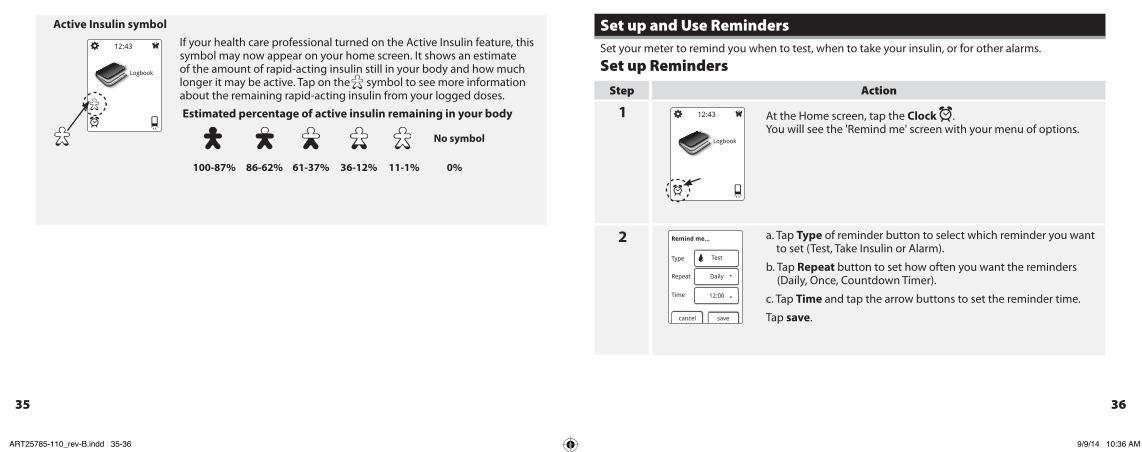
Review your suggested dose.
a. If needed, tap the arrow buttons to adjust your suggested dose for any planned activity, a smaller or larger meal, sickness, etc.
b. Tap the button to see details of what is included in your suggested dose.
• This is the insulin to cover the food you are going to eat. The meter will use your CARBOHYDRATE RATIO or CARBOHYDRATE PORTIONS RATIO to calculate how much insulin is needed for the food you are going to eat.
• This is the insulin to bring your blood glucose level within your target (CORRECTION TARGET). The meter will use your CORRECTION FACTOR to calculate the insulin required.
• ACTIVE INSULIN: This is the logged insulin that is still active in your body and is being subtracted to give a total suggested dose. The meter will use your INSULIN DURATION and information about your last logged dose to calculate how much insulin is still active in your body.
• This is the change that you have made to your suggested dose to adjust for a smaller or larger meal, sickness or any planned activity, such as exercise.
• This is your total suggested dose.
5
log doseback
Suggested dose
Adjust if needed
uUser change: +212
Tap log dose to save to your logbook and take your dose. If you do not tap log dose, your dose will not be stored in your logbook.
CAUTION: It is important to log all your rapid-acting insulin doses so your meter can account for active insulin when calculating your suggested doses. Failure to log all your rapid-acting insulin doses may result in a suggested dose that is too high.
Note: The total dose is rounded to the nearest full unit (1.0) or half unit (0.5) depending on how your health care professional set up the calculator. Similar to conventional maths rounding rules, the calculator rounds up from 0.5. The suggested dose will not exceed 50 units, the maximum allowable dose by the meter.
ART25785-110_rev-B.indd 33-34 9/9/14 10:36 AM
35 36
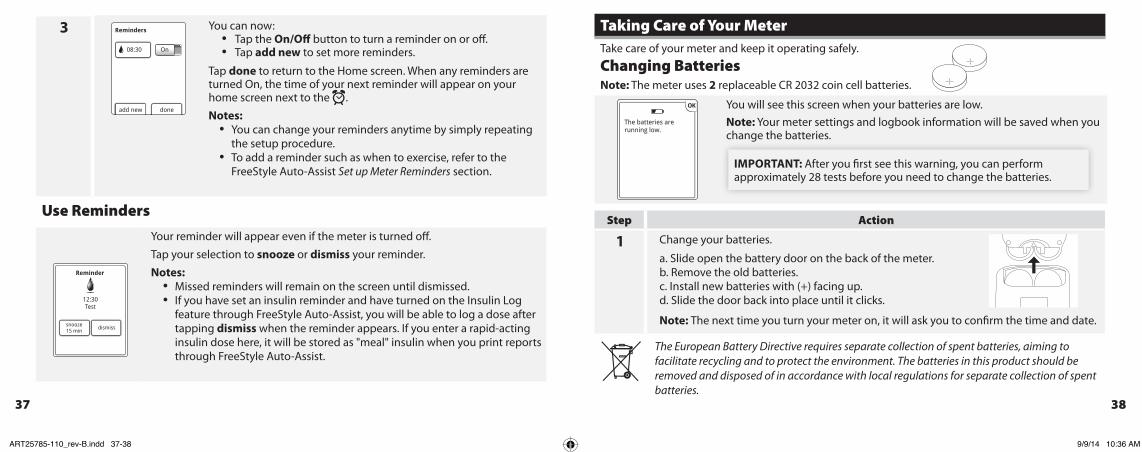
Active Insulin symbol
12:43
Logbook
If your health care professional turned on the Active Insulin feature, this symbol may now appear on your home screen. It shows an estimate of the amount of rapid-acting insulin still in your body and how much longer it may be active. Tap on the symbol to see more information about the remaining rapid-acting insulin from your logged doses.
Estimated percentage of active insulin remaining in your body
100-87% 86-62% 61-37% 36-12% 11-1% 0%
No symbol
Set up and Use RemindersSet your meter to remind you when to test, when to take your insulin, or for other alarms.
Set up Reminders
Step Action
1 12:43
Logbook
At the Home screen, tap the Clock .You will see the 'Remind me' screen with your menu of options.
2
cancel save
Type
Repeat
Time
Remind me...
Test
Daily
12:00
a. Tap Type of reminder button to select which reminder you want to set (Test, Take Insulin or Alarm).
b. Tap Repeat button to set how often you want the reminders (Daily, Once, Countdown Timer).
c. Tap Time and tap the arrow buttons to set the reminder time.
Tap save.
ART25785-110_rev-B.indd 35-36 9/9/14 10:36 AM
37 38
3
add new done
Reminders
08:30 On
You can now:• Tap the On/Off button to turn a reminder on or off.• Tap add new to set more reminders.
Tap done to return to the Home screen. When any reminders are turned On, the time of your next reminder will appear on your home screen next to the .
Notes: • You can change your reminders anytime by simply repeating
the setup procedure.• To add a reminder such as when to exercise, refer to the
FreeStyle Auto-Assist Set up Meter Reminders section.
Use Reminders
12:30Test
dismisssnooze15 min
Reminder
Your reminder will appear even if the meter is turned off.
Tap your selection to snooze or dismiss your reminder.
Notes: • Missed reminders will remain on the screen until dismissed.• If you have set an insulin reminder and have turned on the Insulin Log
feature through FreeStyle Auto-Assist, you will be able to log a dose after tapping dismiss when the reminder appears. If you enter a rapid-acting insulin dose here, it will be stored as "meal" insulin when you print reports through FreeStyle Auto-Assist.
Taking Care of Your MeterTake care of your meter and keep it operating safely.
Changing BatteriesNote: The meter uses 2 replaceable CR 2032 coin cell batteries.
OK
The batteries arerunning low.
You will see this screen when your batteries are low. Note: Your meter settings and logbook information will be saved when you change the batteries.
IMPORTANT: After you first see this warning, you can perform approximately 28 tests before you need to change the batteries.
Step Action
1 Change your batteries.
a. Slide open the battery door on the back of the meter.b. Remove the old batteries.c. Install new batteries with (+) facing up. d. Slide the door back into place until it clicks.
Note: The next time you turn your meter on, it will ask you to confirm the time and date.
The European Battery Directive requires separate collection of spent batteries, aiming to facilitate recycling and to protect the environment. The batteries in this product should be removed and disposed of in accordance with local regulations for separate collection of spent batteries.
ART25785-110_rev-B.indd 37-38 9/9/14 10:36 AM
39 40
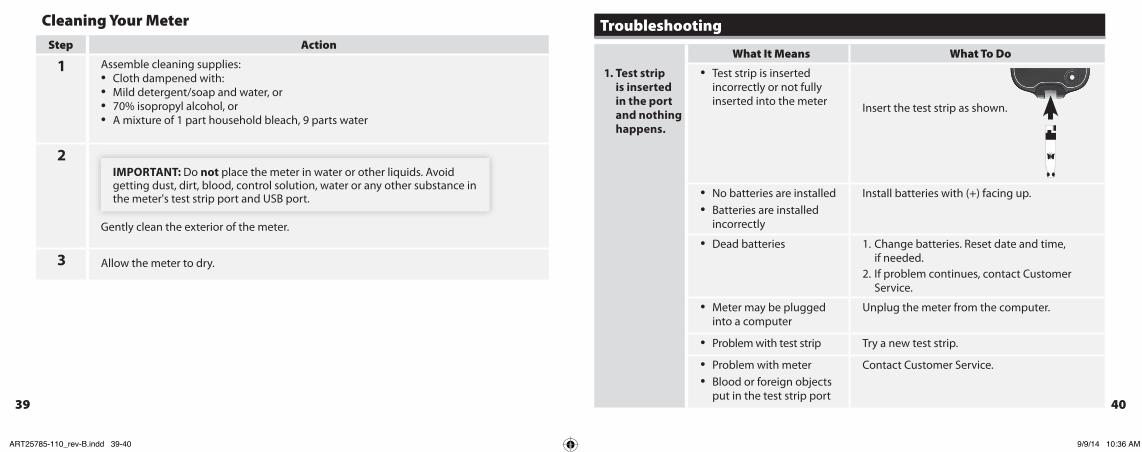
Cleaning Your Meter
Step Action
1 Assemble cleaning supplies:• Cloth dampened with:• Mild detergent/soap and water, or• 70% isopropyl alcohol, or• A mixture of 1 part household bleach, 9 parts water
2IMPORTANT: Do not place the meter in water or other liquids. Avoid getting dust, dirt, blood, control solution, water or any other substance in the meter's test strip port and USB port.
Gently clean the exterior of the meter.
3 Allow the meter to dry.
Troubleshooting
What It Means What To Do
1. Test strip is inserted in the port and nothing happens.
• Test strip is inserted incorrectly or not fully inserted into the meter Insert the test strip as shown.
• No batteries are installed• Batteries are installed
incorrectly
Install batteries with (+) facing up.
• Dead batteries 1. Change batteries. Reset date and time, if needed.
2. If problem continues, contact Customer Service.
• Meter may be plugged into a computer
Unplug the meter from the computer.
• Problem with test strip Try a new test strip.
• Problem with meter• Blood or foreign objects
put in the test strip port
Contact Customer Service.
ART25785-110_rev-B.indd 39-40 9/9/14 10:36 AM
41 42
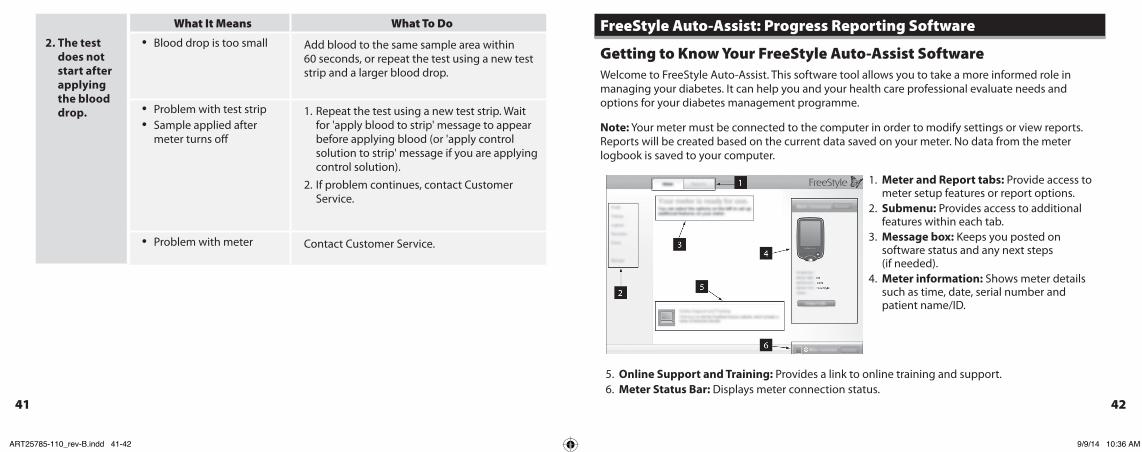
What It Means What To Do
2. The test does not start after applying the blood drop.
• Blood drop is too small Add blood to the same sample area within 60 seconds, or repeat the test using a new test strip and a larger blood drop.
• Problem with test strip• Sample applied after
meter turns off
1. Repeat the test using a new test strip. Wait for 'apply blood to strip' message to appear before applying blood (or 'apply control solution to strip' message if you are applying control solution).
2. If problem continues, contact Customer Service.
• Problem with meter Contact Customer Service.
FreeStyle Auto-Assist: Progress Reporting Software
Getting to Know Your FreeStyle Auto-Assist SoftwareWelcome to FreeStyle Auto-Assist. This software tool allows you to take a more informed role in managing your diabetes. It can help you and your health care professional evaluate needs and options for your diabetes management programme.
Note: Your meter must be connected to the computer in order to modify settings or view reports. Reports will be created based on the current data saved on your meter. No data from the meter logbook is saved to your computer.
1. Meter and Report tabs: Provide access to meter setup features or report options.
2. Submenu: Provides access to additional features within each tab.
3. Message box: Keeps you posted on software status and any next steps (if needed).
4. Meter information: Shows meter details such as time, date, serial number and patient name/ID.
5. Online Support and Training: Provides a link to online training and support.6. Meter Status Bar: Displays meter connection status.
ART25785-110_rev-B.indd 41-42 9/9/14 10:36 AM
43 44
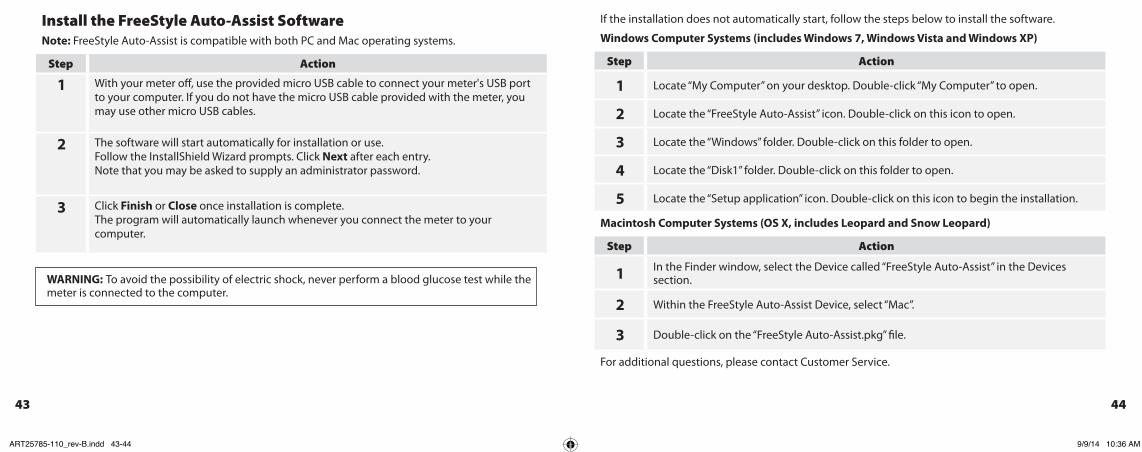
Install the FreeStyle Auto-Assist SoftwareNote: FreeStyle Auto-Assist is compatible with both PC and Mac operating systems.
Step Action
1 With your meter off, use the provided micro USB cable to connect your meter's USB port to your computer. If you do not have the micro USB cable provided with the meter, you may use other micro USB cables.
2 The software will start automatically for installation or use. Follow the InstallShield Wizard prompts. Click Next after each entry. Note that you may be asked to supply an administrator password.
3 Click Finish or Close once installation is complete. The program will automatically launch whenever you connect the meter to your computer.
WARNING: To avoid the possibility of electric shock, never perform a blood glucose test while the meter is connected to the computer.
If the installation does not automatically start, follow the steps below to install the software.
Windows Computer Systems (includes Windows 7, Windows Vista and Windows XP)
Step Action
1 Locate “My Computer” on your desktop. Double-click “My Computer” to open.
2 Locate the “FreeStyle Auto-Assist” icon. Double-click on this icon to open.
3 Locate the “Windows” folder. Double-click on this folder to open.
4 Locate the “Disk1” folder. Double-click on this folder to open.
5 Locate the “Setup application” icon. Double-click on this icon to begin the installation.
Macintosh Computer Systems (OS X, includes Leopard and Snow Leopard)
Step Action
1 In the Finder window, select the Device called “FreeStyle Auto-Assist” in the Devices section.
2 Within the FreeStyle Auto-Assist Device, select “Mac”.
3 Double-click on the “FreeStyle Auto-Assist.pkg” file.
For additional questions, please contact Customer Service.
ART25785-110_rev-B.indd 43-44 9/9/14 10:36 AM
45 46
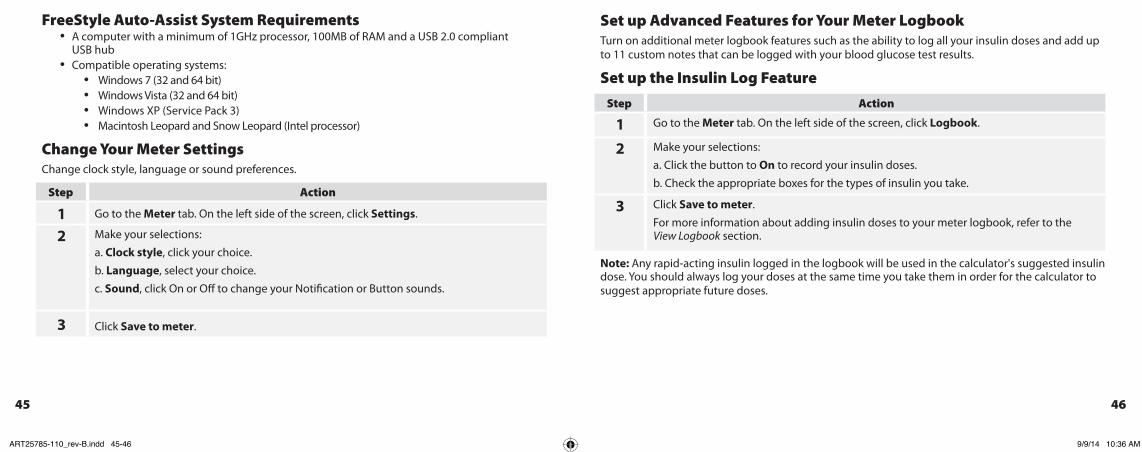
FreeStyle Auto-Assist System Requirements• A computer with a minimum of 1GHz processor, 100MB of RAM and a USB 2.0 compliant
USB hub• Compatible operating systems:
• Windows 7 (32 and 64 bit)• Windows Vista (32 and 64 bit)• Windows XP (Service Pack 3)• Macintosh Leopard and Snow Leopard (Intel processor)
Change Your Meter SettingsChange clock style, language or sound preferences.
Step Action
1 Go to the Meter tab. On the left side of the screen, click Settings.
2 Make your selections:
a. Clock style, click your choice.
b. Language, select your choice.
c. Sound, click On or Off to change your Notification or Button sounds.
3 Click Save to meter.
Set up Advanced Features for Your Meter LogbookTurn on additional meter logbook features such as the ability to log all your insulin doses and add up to 11 custom notes that can be logged with your blood glucose test results.
Set up the Insulin Log Feature
Step Action
1 Go to the Meter tab. On the left side of the screen, click Logbook.
2 Make your selections:
a. Click the button to On to record your insulin doses.
b. Check the appropriate boxes for the types of insulin you take.
3 Click Save to meter.
For more information about adding insulin doses to your meter logbook, refer to the View Logbook section.
Note: Any rapid-acting insulin logged in the logbook will be used in the calculator's suggested insulin dose. You should always log your doses at the same time you take them in order for the calculator to suggest appropriate future doses.
ART25785-110_rev-B.indd 45-46 9/9/14 10:36 AM
47 48
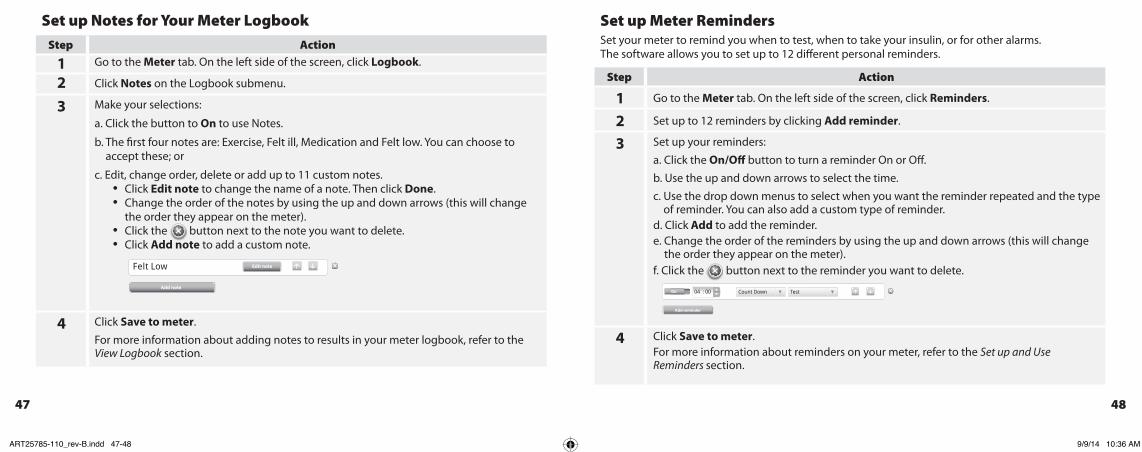
Set up Notes for Your Meter Logbook
Step Action
1 Go to the Meter tab. On the left side of the screen, click Logbook.
2 Click Notes on the Logbook submenu.
3 Make your selections:
a. Click the button to On to use Notes.
b. The first four notes are: Exercise, Felt ill, Medication and Felt low. You can choose to accept these; or
c. Edit, change order, delete or add up to 11 custom notes.• Click Edit note to change the name of a note. Then click Done.• Change the order of the notes by using the up and down arrows (this will change
the order they appear on the meter).• Click the button next to the note you want to delete.• Click Add note to add a custom note.
Felt Low Edit note
Add note
4 Click Save to meter.
For more information about adding notes to results in your meter logbook, refer to the View Logbook section.
Set up Meter RemindersSet your meter to remind you when to test, when to take your insulin, or for other alarms. The software allows you to set up to 12 different personal reminders.
Step Action
1 Go to the Meter tab. On the left side of the screen, click Reminders.
2 Set up to 12 reminders by clicking Add reminder.
3 Set up your reminders:
a. Click the On/Off button to turn a reminder On or Off.
b. Use the up and down arrows to select the time.
c. Use the drop down menus to select when you want the reminder repeated and the type of reminder. You can also add a custom type of reminder.
d. Click Add to add the reminder.e. Change the order of the reminders by using the up and down arrows (this will change
the order they appear on the meter). f. Click the button next to the reminder you want to delete.
4 Click Save to meter.For more information about reminders on your meter, refer to the Set up and Use Reminders section.
04 : 00 Count Down Test
Add reminder
On
ART25785-110_rev-B.indd 47-48 9/9/14 10:36 AM
49 50
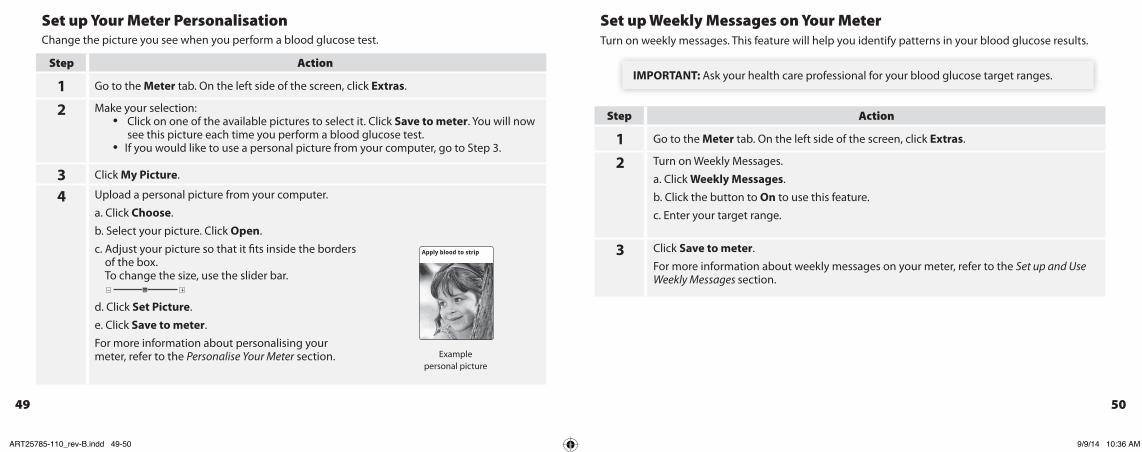
Set up Your Meter PersonalisationChange the picture you see when you perform a blood glucose test.
Step Action
1 Go to the Meter tab. On the left side of the screen, click Extras.
2 Make your selection:• Click on one of the available pictures to select it. Click Save to meter. You will now
see this picture each time you perform a blood glucose test.• If you would like to use a personal picture from your computer, go to Step 3.
3 Click My Picture.
4 Upload a personal picture from your computer.
a. Click Choose.
b. Select your picture. Click Open.
c. Adjust your picture so that it fits inside the borders of the box. To change the size, use the slider bar.
d. Click Set Picture.
e. Click Save to meter.
For more information about personalising your meter, refer to the Personalise Your Meter section.
Apply blood to strip
Example personal picture
Set up Weekly Messages on Your MeterTurn on weekly messages. This feature will help you identify patterns in your blood glucose results.
IMPORTANT: Ask your health care professional for your blood glucose target ranges.
Step Action
1 Go to the Meter tab. On the left side of the screen, click Extras.
2 Turn on Weekly Messages.
a. Click Weekly Messages.
b. Click the button to On to use this feature.
c. Enter your target range.
3 Click Save to meter.
For more information about weekly messages on your meter, refer to the Set up and Use Weekly Messages section.
ART25785-110_rev-B.indd 49-50 9/9/14 10:36 AM
51 52
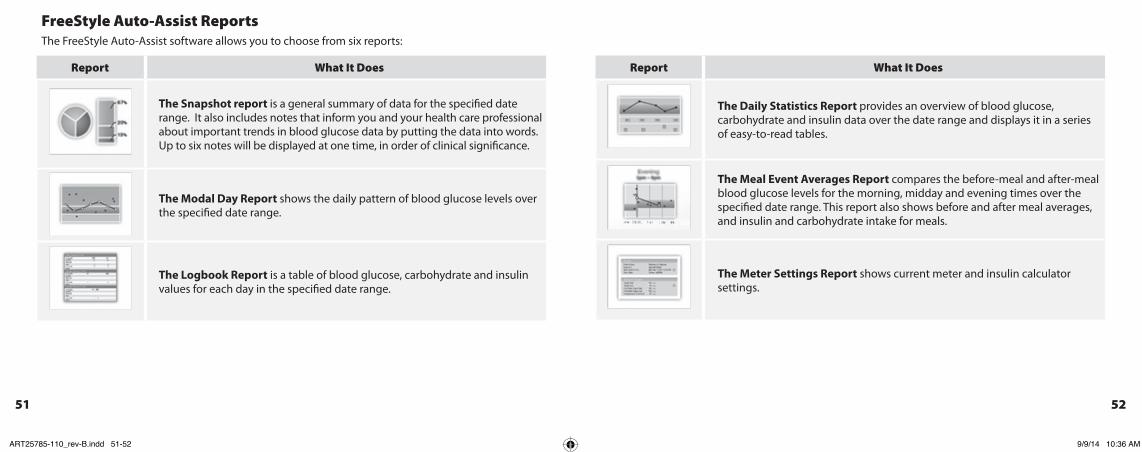
FreeStyle Auto-Assist Reports The FreeStyle Auto-Assist software allows you to choose from six reports:
Report What It Does
The Snapshot report is a general summary of data for the specified date range. It also includes notes that inform you and your health care professional about important trends in blood glucose data by putting the data into words. Up to six notes will be displayed at one time, in order of clinical significance.
The Modal Day Report shows the daily pattern of blood glucose levels over the specified date range.
The Logbook Report is a table of blood glucose, carbohydrate and insulin values for each day in the specified date range.
Report What It Does
The Daily Statistics Report provides an overview of blood glucose, carbohydrate and insulin data over the date range and displays it in a series of easy-to-read tables.
The Meal Event Averages Report compares the before-meal and after-meal blood glucose levels for the morning, midday and evening times over the specified date range. This report also shows before and after meal averages, and insulin and carbohydrate intake for meals.
The Meter Settings Report shows current meter and insulin calculator settings.
ART25785-110_rev-B.indd 51-52 9/9/14 10:36 AM
53 54
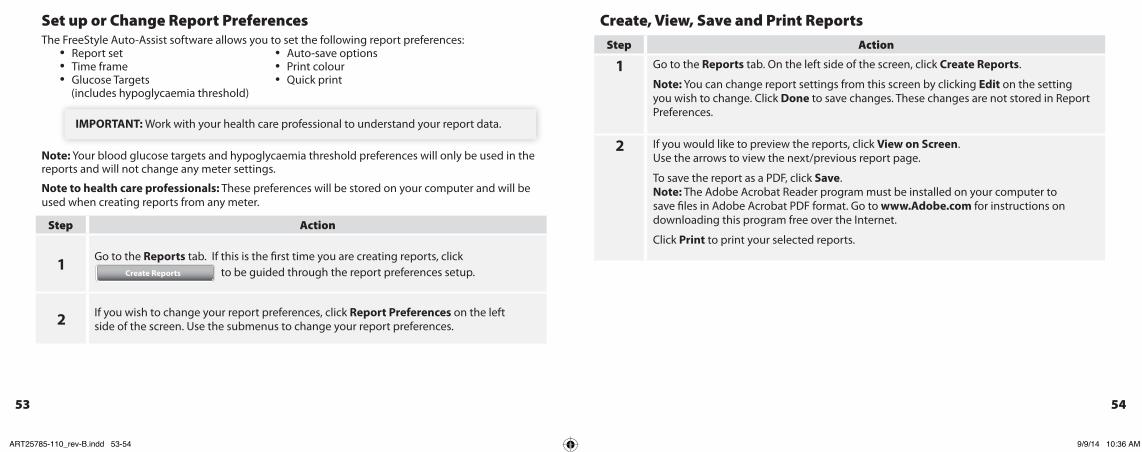
Set up or Change Report PreferencesThe FreeStyle Auto-Assist software allows you to set the following report preferences:
• Report set • Auto-save options• Time frame • Print colour• Glucose Targets • Quick print
(includes hypoglycaemia threshold)
IMPORTANT: Work with your health care professional to understand your report data.
Note: Your blood glucose targets and hypoglycaemia threshold preferences will only be used in the reports and will not change any meter settings.
Note to health care professionals: These preferences will be stored on your computer and will be used when creating reports from any meter.
Step Action
1 Go to the Reports tab. If this is the first time you are creating reports, click Create Reports to be guided through the report preferences setup.
2 If you wish to change your report preferences, click Report Preferences on the left side of the screen. Use the submenus to change your report preferences.
Create, View, Save and Print Reports
Step Action
1 Go to the Reports tab. On the left side of the screen, click Create Reports.
Note: You can change report settings from this screen by clicking Edit on the setting you wish to change. Click Done to save changes. These changes are not stored in Report Preferences.
2 If you would like to preview the reports, click View on Screen. Use the arrows to view the next/previous report page.
To save the report as a PDF, click Save. Note: The Adobe Acrobat Reader program must be installed on your computer to save files in Adobe Acrobat PDF format. Go to www.Adobe.com for instructions on downloading this program free over the Internet.
Click Print to print your selected reports.
ART25785-110_rev-B.indd 53-54 9/9/14 10:36 AM

55 56
Additional FreeStyle Auto-Assist FeaturesFeature What It Does How To Access
First time Meter Setup
Sets your meter's language, date and time.
If you have not yet set up your meter, plug it into your computer and click Set up Meter from the Welcome screen.
Export Data Exports meter data to a text file.
From the menu bar at the top of the screen, click File. From the drop down, click Export data.
UpdateSoftware
Installs updates to your FreeStyle Auto-Assist software and meter.
Your FreeStyle Auto-Assist software will alert you when updates are ready.
Backup Meter Files
Saves a backup file containing your current meter settings and preferences.
Go to the Meter tab. On the left side of the screen, click Backups. Click Save backup file.
Restore Meter Files
Replaces your current meter settings with settings from a backup file.
Go to the Meter tab. On the left side of the screen, click Backups. Click Restore Settings.
IMPORTANT: Make sure you choose the proper file to restore. If the incorrect file is chosen, the meter may be set with the wrong settings (such as insulin settings or blood glucose targets).
Rapid-acting Insulin Calculator SetupThis feature can assist your patients with calculating their rapid-acting insulin doses based on meal and blood glucose level information.
CAUTION: This feature requires an understanding of the use of insulin. Misuse or misunderstanding of this feature and the suggested dose may lead to inappropriate insulin dosing. The calculator suggests doses for rapid-acting insulin only.
How Does it Work?
ONE-time setup
Complete the setup to store your patient‘s individual insulin settings in the meter. (Setup includes entering meal and correction insulin settings.)
Use the calculator after a blood glucose test 06:58
Calculator
mmolL11.3
The calculator will use the blood glucose result and the stored settings to calculate a suggested insulin dose based on:
Total suggested
dose
Blood glucose correction (if needed)
Meal/Carbohydrate intake
Active Insulin (if present)
FOR H
EALTH
CARE PRO
FESSION
ALS O
NLY
ART25785-110_rev-B.indd 55-56 9/9/14 10:36 AM
57 58
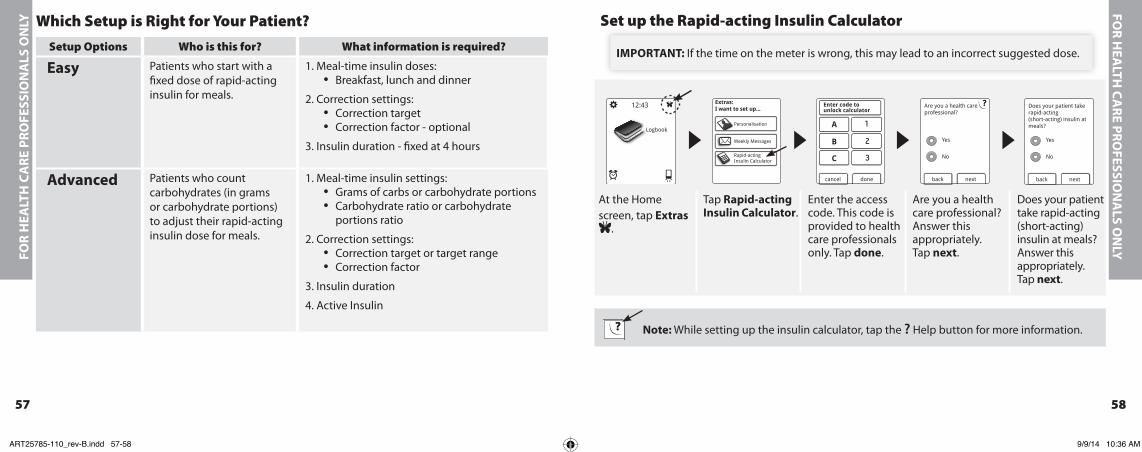
Which Setup is Right for Your Patient?
Setup Options Who is this for? What information is required?
Easy Patients who start with a fixed dose of rapid-acting insulin for meals.
1. Meal-time insulin doses: • Breakfast, lunch and dinner
2. Correction settings: • Correction target• Correction factor - optional
3. Insulin duration - fixed at 4 hours
Advanced Patients who count carbohydrates (in grams or carbohydrate portions) to adjust their rapid-acting insulin dose for meals.
1. Meal-time insulin settings: • Grams of carbs or carbohydrate portions• Carbohydrate ratio or carbohydrate
portions ratio
2. Correction settings: • Correction target or target range• Correction factor
3. Insulin duration
4. Active Insulin
Set up the Rapid-acting Insulin Calculator
IMPORTANT: If the time on the meter is wrong, this may lead to an incorrect suggested dose.
12:43
LogbookPersonalisation
Weekly Messages
Rapid-actingInsulin Calculator
Extras:I want to set up...
cancel done
Enter code to unlock calculator
A 1
B 2
C 3
??
nextback
Are you a health careprofessional?
Yes
No
nextback
Does your patient take rapid-acting(short-acting) insulin atmeals?
Yes
No
At the Home screen, tap Extras
.
Tap Rapid-acting Insulin Calculator.
Enter the access code. This code is provided to health care professionals only. Tap done.
Are you a health care professional? Answer this appropriately. Tap next.
Does your patient take rapid-acting (short-acting) insulin at meals? Answer this appropriately. Tap next.
?? Note: While setting up the insulin calculator, tap the ? Help button for more information.
FOR
HEA
LTH
CA
RE P
ROFE
SSIO
NA
LS O
NLY
FOR H
EALTH
CARE PRO
FESSION
ALS O
NLY
ART25785-110_rev-B.indd 57-58 9/9/14 10:36 AM

59 60
Easy Setup
IMPORTANT: You must complete all the steps in the insulin calculator setup in order to use the insulin calculator.
Step Action
1
nextback
Choose setup option
For patients who start with a fixed dose of rapid-acting insulin at meals.
Easy
To use the Easy Setup, tap next. For Advanced Setup, refer to the Advanced Setup section.
2 ?
back
Breakfast
units of insulin3
next
?
back
Lunch
units of insulin4
next
?
back
Dinner
units of insulin5
next
Enter the meal-time rapid-acting insulin doses. Tap next after each entry.
Note: If you require dosing in 0.5-unit increments, this can be changed through the FreeStyle Auto-Assist software application.
3 ?
nextback
Correction targetin mmol/L
5.6 7.8to
Enter the blood glucose correction target. Tap next.
This is the desired target range for blood glucose values before meals.
Note: If you want to set just one target value instead of a range, set both the low and high values to the same number.
4 ?
back
Correction factor
next
1 u insulin formmol
L2.8
Enter the correction factor (for example: if 1 unit of insulin lowers blood glucose 2.8 mmol/L, then the correction factor is 2.8). If the blood glucose value is outside the blood glucose target, the calculator will use the correction target and factor to calculate a correction dose. Tap next.
Notes: • If no correction insulin is taken, continue to tap the down arrow button past 1 to
set no correction insulin. If you set no correction insulin, the calculator will ONLY include a meal dose, not a correction dose. Additionally, if no correction insulin is set, active insulin is not tracked or calculated.
• The average value of the target range is used to calculate the correction portion of the suggested dose.
FOR
HEA
LTH
CA
RE P
ROFE
SSIO
NA
LS O
NLY
FOR H
EALTH
CARE PRO
FESSION
ALS O
NLY
ART25785-110_rev-B.indd 59-60 9/9/14 10:36 AM
61 62
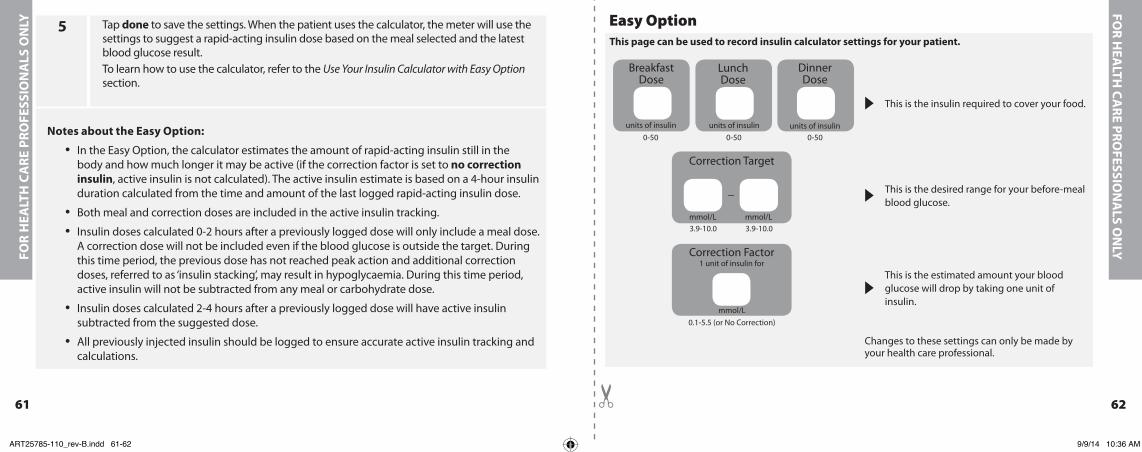
5 Tap done to save the settings. When the patient uses the calculator, the meter will use the settings to suggest a rapid-acting insulin dose based on the meal selected and the latest blood glucose result.To learn how to use the calculator, refer to the Use Your Insulin Calculator with Easy Option section.
Notes about the Easy Option:
• In the Easy Option, the calculator estimates the amount of rapid-acting insulin still in the body and how much longer it may be active (if the correction factor is set to no correction insulin, active insulin is not calculated). The active insulin estimate is based on a 4-hour insulin duration calculated from the time and amount of the last logged rapid-acting insulin dose.
• Both meal and correction doses are included in the active insulin tracking.
• Insulin doses calculated 0-2 hours after a previously logged dose will only include a meal dose. A correction dose will not be included even if the blood glucose is outside the target. During this time period, the previous dose has not reached peak action and additional correction doses, referred to as ‘insulin stacking’, may result in hypoglycaemia. During this time period, active insulin will not be subtracted from any meal or carbohydrate dose.
• Insulin doses calculated 2-4 hours after a previously logged dose will have active insulin subtracted from the suggested dose.
• All previously injected insulin should be logged to ensure accurate active insulin tracking and calculations.
Easy OptionThis page can be used to record insulin calculator settings for your patient.
Breakfast Dose
units of insulin
Lunch Dose
units of insulin
Dinner Dose
units of insulin0-50 0-50 0-50
This is the insulin required to cover your food.
Correction Target
_
mmol/Lmmol/L3.9-10.0 3.9-10.0
This is the desired range for your before-meal blood glucose.
Correction Factor1 unit of insulin for
mmol/L0.1-5.5 (or No Correction)
This is the estimated amount your blood glucose will drop by taking one unit of insulin.
Changes to these settings can only be made by your health care professional.
✂
FOR
HEA
LTH
CA
RE P
ROFE
SSIO
NA
LS O
NLY
FOR H
EALTH
CARE PRO
FESSION
ALS O
NLY
ART25785-110_rev-B.indd 61-62 9/9/14 10:36 AM

64
Advanced Setup
IMPORTANT: You must complete all the steps in the insulin calculator setup in order to use the insulin calculator.
Step Action
1
nextback
Choose setup option
For patients who count carbs (in grams or carb portions) to adjust their rapid-acting insulin dose at meals.
Advanced
To use the Advanced Setup, tap the button to choose Advanced. Tap next.
2 ??
nextback
Grams of carbs
Carb portions
Enter food by: Tap the selection to choose how meal/carbohydrate information will be entered. Tap next.
If you selected Grams of carbs, go to Step 3.If you selected Carb portions, go to Step 4.
FOR H
EALTH
CARE PRO
FESSION
ALS O
NLY
ART25785-110_rev-B.indd 63-64 9/9/14 10:36 AM
65 66
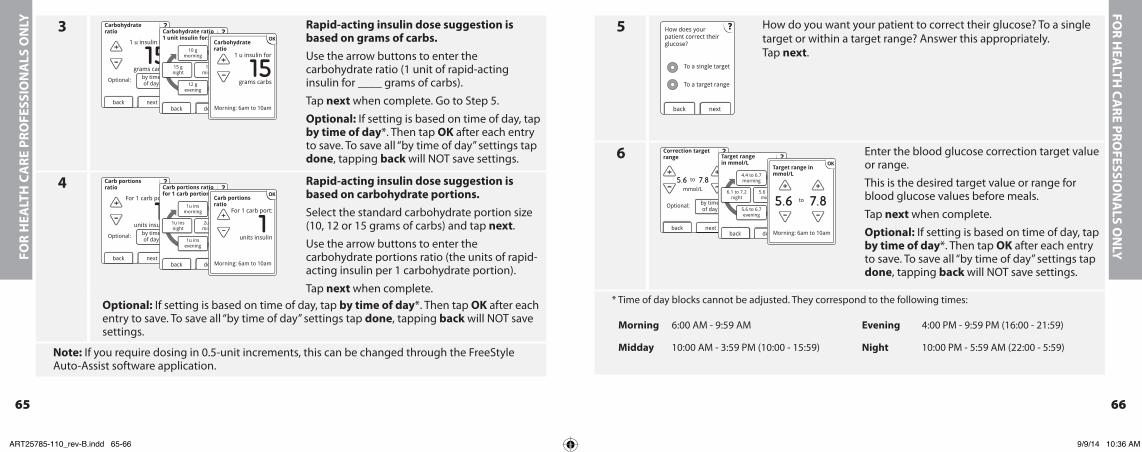
3 ?
back
Carbohydrateratio
next
1 u insulin for
grams carbs
Optional: by timeof day
15?
back
Carbohydrate ratio1 unit insulin for:
done
10 gmorning
15 gnight
12 gmidday
12 gevening
Carbohydrateratio
1 u insulin for
grams carbs
Morning: 6am to 10am
15OK
Rapid-acting insulin dose suggestion is based on grams of carbs.Use the arrow buttons to enter the carbohydrate ratio (1 unit of rapid-acting insulin for ____ grams of carbs).
Tap next when complete. Go to Step 5.
Optional: If setting is based on time of day, tap by time of day*. Then tap OK after each entry to save. To save all “by time of day” settings tap done, tapping back will NOT save settings.
4 ?
back
Carb portions ratio
next
For 1 carb port:
units insulin
Optional: by timeof day
1?
back
Carb portions ratiofor 1 carb portion:
done
1u insmorning
1u insnight
2u insmidday
1u insevening
Carb portionsratio
For 1 carb port:
units insulin
Morning: 6am to 10am
1OK
Rapid-acting insulin dose suggestion is based on carbohydrate portions. Select the standard carbohydrate portion size (10, 12 or 15 grams of carbs) and tap next.
Use the arrow buttons to enter the carbohydrate portions ratio (the units of rapid-acting insulin per 1 carbohydrate portion).
Tap next when complete.Optional: If setting is based on time of day, tap by time of day*. Then tap OK after each entry to save. To save all “by time of day” settings tap done, tapping back will NOT save settings.
Note: If you require dosing in 0.5-unit increments, this can be changed through the FreeStyle Auto-Assist software application.
5 ??
nextback
How does yourpatient correct theirglucose?
To a single target
To a target range
How do you want your patient to correct their glucose? To a single target or within a target range? Answer this appropriately. Tap next.
6 ?
back
Correction targetrange
next
Optional: by timeof day
5.6 7.8to
mmol/L
?
back
Target rangein mmol/L
done
4.4 to 6.7morning
6.1 to 7.2night
5.6 to 6.7midday
5.6 to 6.7evening
Target range inmmol/L
5.6 7.8to
OK
Morning: 6am to 10am
Enter the blood glucose correction target value or range.
This is the desired target value or range for blood glucose values before meals.
Tap next when complete.
Optional: If setting is based on time of day, tap by time of day*. Then tap OK after each entry to save. To save all “by time of day” settings tap done, tapping back will NOT save settings.
* Time of day blocks cannot be adjusted. They correspond to the following times:
Morning 6:00 AM - 9:59 AM Evening 4:00 PM - 9:59 PM (16:00 - 21:59)
Midday 10:00 AM - 3:59 PM (10:00 - 15:59) Night 10:00 PM - 5:59 AM (22:00 - 5:59)
FOR
HEA
LTH
CA
RE P
ROFE
SSIO
NA
LS O
NLY
FOR H
EALTH
CARE PRO
FESSION
ALS O
NLY
ART25785-110_rev-B.indd 65-66 9/9/14 10:36 AM
67 68
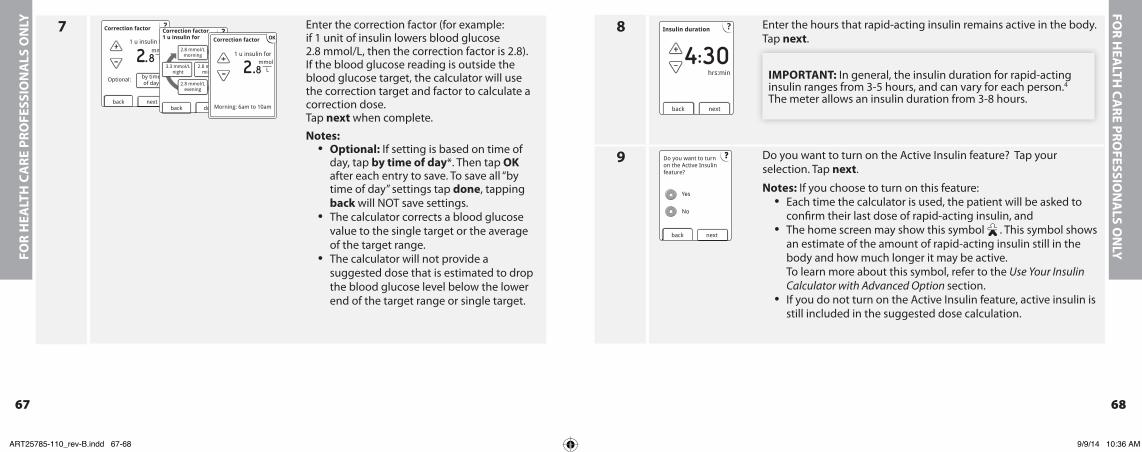
7 ?
back next
1 u insulin for
Optional: by timeof day
Correction factor
mmolL2.8
?
back
Correction factor1 u insulin for
done
2.8 mmol/Lmorning
3.3 mmol/Lnight
2.8 mmol/Lmidday
2.8 mmol/Levening
Morning: 6am to 10am
OKCorrection factor
1 u insulin formmol
L2.8
Enter the correction factor (for example: if 1 unit of insulin lowers blood glucose 2.8 mmol/L, then the correction factor is 2.8). If the blood glucose reading is outside the blood glucose target, the calculator will use the correction target and factor to calculate a correction dose. Tap next when complete.
Notes: • Optional: If setting is based on time of
day, tap by time of day*. Then tap OK after each entry to save. To save all “by time of day” settings tap done, tapping back will NOT save settings.
• The calculator corrects a blood glucose value to the single target or the average of the target range.
• The calculator will not provide a suggested dose that is estimated to drop the blood glucose level below the lower end of the target range or single target.
8 ?
back
Insulin duration
next
hrs:min
4:30Enter the hours that rapid-acting insulin remains active in the body. Tap next.
IMPORTANT: In general, the insulin duration for rapid-acting insulin ranges from 3-5 hours, and can vary for each person.4 The meter allows an insulin duration from 3-8 hours.
9 ??
nextback
Do you want to turnon the Active Insulinfeature?
Yes
No
Do you want to turn on the Active Insulin feature? Tap your selection. Tap next.
Notes: If you choose to turn on this feature:• Each time the calculator is used, the patient will be asked to
confirm their last dose of rapid-acting insulin, and• The home screen may show this symbol . This symbol shows
an estimate of the amount of rapid-acting insulin still in the body and how much longer it may be active. To learn more about this symbol, refer to the Use Your Insulin Calculator with Advanced Option section.
• If you do not turn on the Active Insulin feature, active insulin is still included in the suggested dose calculation.
FOR
HEA
LTH
CA
RE P
ROFE
SSIO
NA
LS O
NLY
FOR H
EALTH
CARE PRO
FESSION
ALS O
NLY
ART25785-110_rev-B.indd 67-68 9/9/14 10:36 AM
69 70
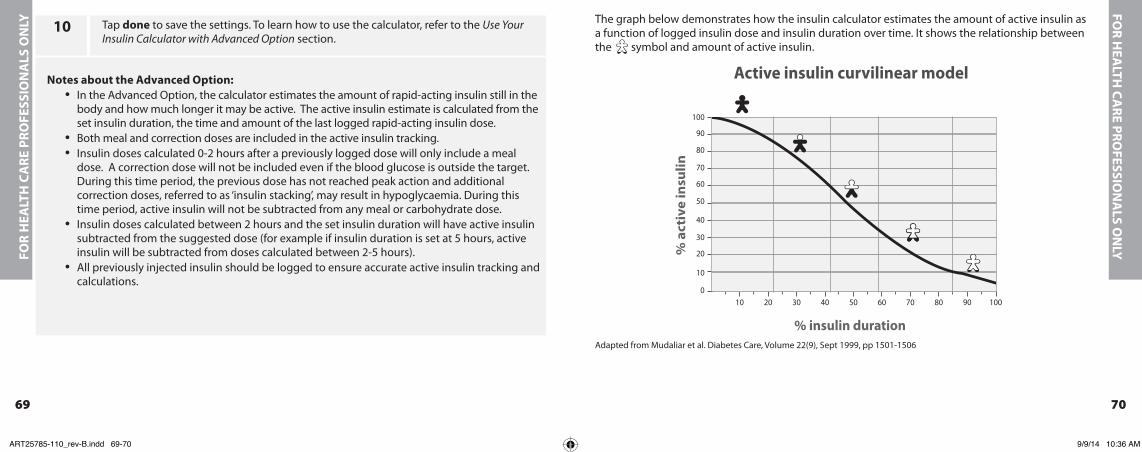
10 Tap done to save the settings. To learn how to use the calculator, refer to the Use Your Insulin Calculator with Advanced Option section.
Notes about the Advanced Option:
• In the Advanced Option, the calculator estimates the amount of rapid-acting insulin still in the body and how much longer it may be active. The active insulin estimate is calculated from the set insulin duration, the time and amount of the last logged rapid-acting insulin dose.
• Both meal and correction doses are included in the active insulin tracking. • Insulin doses calculated 0-2 hours after a previously logged dose will only include a meal
dose. A correction dose will not be included even if the blood glucose is outside the target. During this time period, the previous dose has not reached peak action and additional correction doses, referred to as ‘insulin stacking’, may result in hypoglycaemia. During this time period, active insulin will not be subtracted from any meal or carbohydrate dose.
• Insulin doses calculated between 2 hours and the set insulin duration will have active insulin subtracted from the suggested dose (for example if insulin duration is set at 5 hours, active insulin will be subtracted from doses calculated between 2-5 hours).
• All previously injected insulin should be logged to ensure accurate active insulin tracking and calculations.
The graph below demonstrates how the insulin calculator estimates the amount of active insulin as a function of logged insulin dose and insulin duration over time. It shows the relationship between the symbol and amount of active insulin.
Active insulin curvilinear model
% insulin duration
10 20 30 40 50 60 70 80 90 100
100
0
90
80
70
60
50
40
30
20
10
% a
ctiv
e in
sulin
Adapted from Mudaliar et al. Diabetes Care, Volume 22(9), Sept 1999, pp 1501-1506
FOR
HEA
LTH
CA
RE P
ROFE
SSIO
NA
LS O
NLY
FOR H
EALTH
CARE PRO
FESSION
ALS O
NLY
ART25785-110_rev-B.indd 69-70 9/9/14 10:36 AM
72
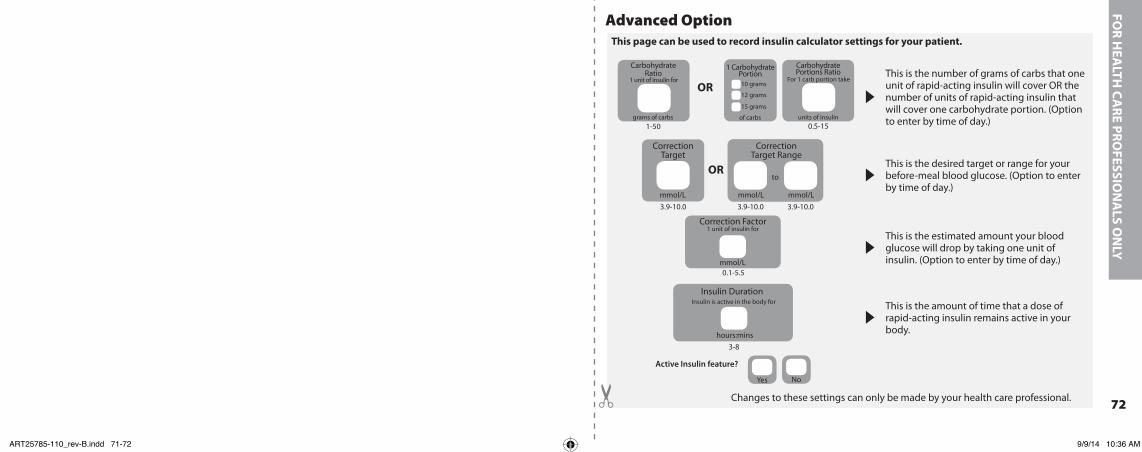
Advanced OptionThis page can be used to record insulin calculator settings for your patient.
1-50 0.5-15
1 Carbohydrate Portion
of carbs
Carbohydrate Portions Ratio
units of insulin
10 grams
12 grams
15 grams
For 1 carb portion takeOR
Carbohydrate Ratio
grams of carbs
1 unit of insulin forThis is the number of grams of carbs that one unit of rapid-acting insulin will cover OR the number of units of rapid-acting insulin that will cover one carbohydrate portion. (Option to enter by time of day.)
3.9-10.0 3.9-10.0 3.9-10.0
Correction Target Range
to
mmol/Lmmol/L
Correction Target
mmol/L
OR This is the desired target or range for your before-meal blood glucose. (Option to enter by time of day.)
0.1-5.5
Correction Factor1 unit of insulin for
mmol/L
This is the estimated amount your blood glucose will drop by taking one unit of insulin. (Option to enter by time of day.)
3-8
Insulin DurationInsulin is active in the body for
hours:mins
This is the amount of time that a dose of rapid-acting insulin remains active in your body.
Yes No
Active Insulin feature?
Changes to these settings can only be made by your health care professional.✂
FOR H
EALTH
CARE PRO
FESSION
ALS O
NLY
ART25785-110_rev-B.indd 71-72 9/9/14 10:36 AM

74
Change the Insulin Calculator Settings
Step Action
112:43
Logbook
Personalisation
Weekly Messages
Rapid-actingInsulin Calculator
Extras:I want to set up...
At the Home screen, tap Extras . Then tap Rapid-acting Insulin Calculator.
FOR H
EALTH
CARE PRO
FESSION
ALS O
NLY
ART25785-110_rev-B.indd 73-74 9/9/14 10:36 AM
75 76
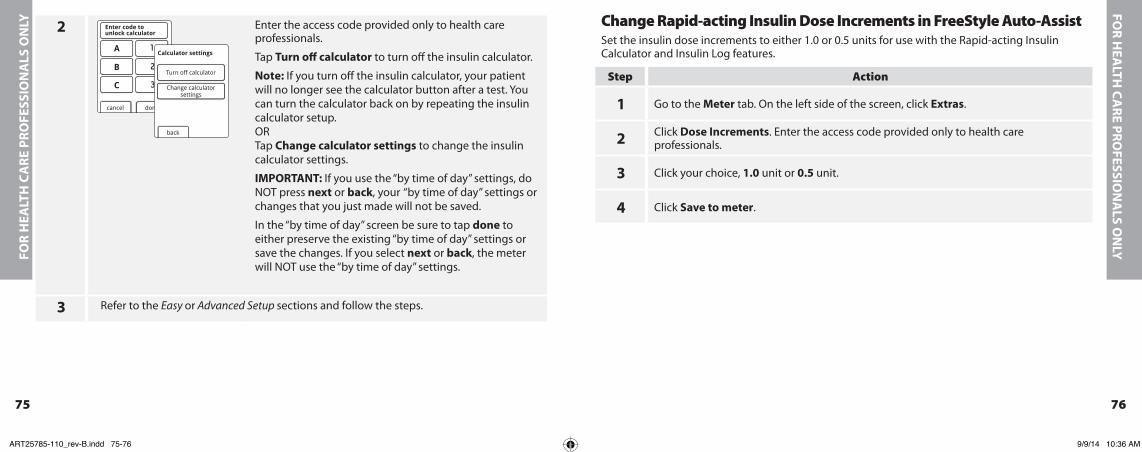
2
cancel done
Enter code to unlock calculator
A 1
B 2
C 3
Calculator settings
Turn off calculator
Change calculatorsettings
back
Enter the access code provided only to health care professionals.
Tap Turn off calculator to turn off the insulin calculator.
Note: If you turn off the insulin calculator, your patient will no longer see the calculator button after a test. You can turn the calculator back on by repeating the insulin calculator setup. ORTap Change calculator settings to change the insulin calculator settings.
IMPORTANT: If you use the “by time of day” settings, do NOT press next or back, your “by time of day” settings or changes that you just made will not be saved.
In the “by time of day” screen be sure to tap done to either preserve the existing “by time of day” settings or save the changes. If you select next or back, the meter will NOT use the “by time of day” settings.
3 Refer to the Easy or Advanced Setup sections and follow the steps.
Change Rapid-acting Insulin Dose Increments in FreeStyle Auto-AssistSet the insulin dose increments to either 1.0 or 0.5 units for use with the Rapid-acting Insulin Calculator and Insulin Log features.
Step Action
1 Go to the Meter tab. On the left side of the screen, click Extras.
2 Click Dose Increments. Enter the access code provided only to health care professionals.
3 Click your choice, 1.0 unit or 0.5 unit.
4 Click Save to meter.
FOR
HEA
LTH
CA
RE P
ROFE
SSIO
NA
LS O
NLY
FOR H
EALTH
CARE PRO
FESSION
ALS O
NLY
ART25785-110_rev-B.indd 75-76 9/9/14 10:36 AM

77 78
Meter Specifications
Altitude Up to 3,048 metres (10,000 feet) above sea level
Assay method Coulometric electrochemical sensor
Automatic shutoff Two minutes of inactivity
Battery life Up to 3000 tests
Calibration Plasma equivalent glucose values
Haematocrit 15% to 65%
Measurement unit mmol/L
Meter storage temperature -20 °C to 60 °C (-4 °F to 140 °F)
Memory Up to 165 days based on an average of 3 tests and 3 insulin logs per day
Minimum Computer Requirements
System must only be used with EN60950-1 rated computers. Use a USB certified cable.
Operating relative humidity 5% to 90% (non-condensing)
Operating temperature 4 °C to 40 °C (40 °F to 104 °F)
Power source Three CR 2032 3V lithium batteries, two of which are replaceable
Result range 1.1 mmol/L to 27.8 mmol/L
Sample Fresh capillary and venous whole blood samples
Sample size 0.3 microlitre (300 nanolitres)
Size 6.0 cm (w) x 9.5 cm (l) x 1.5 cm (d) 2.4 in (w) x 3.8 in (l) x 0.6 in (d)
Weight 59.4 to 65.6 g (2.1 to 2.3 oz.) including batteries
ART25785-110_rev-B.indd 77-78 9/9/14 10:36 AM

79 80
Insulin Calculator Specifications
Parameter Unit Range or Value
Blood Glucose Target Range mmol/L 3.9 – 10.0
Single Blood Glucose Target mmol/L 3.9 – 10.0
Carbohydrate Insulin Ratio 1 unit per X grams of carbs 1 – 50
Carbohydrate Portions Ratio Units of insulin per carbohydrate portion 0.5 – 15
Carbohydrate Portion Size Grams of carbs 10, 12, 15
Meal-time Insulin Doses (breakfast, lunch, dinner) Units of insulin 0 – 50
Correction Factor 1 unit per X mmol/L 0.1 – 5.5
Insulin Action Duration (Easy) Hours 4
Insulin Action Duration (Advanced) Hours 3 – 8
Dose Increments Units of insulin 0.5 or 1
Maximum Insulin Dose Units of insulin 50
Appendix A — End of Meter Life/ Backup Battery Removal
Note: Carry out this process only when you no longer intend to use the meter. The meter will no longer operate once opened to remove the backup battery.
Step Action
1 Remove battery door.
2 Insert small screwdriver blade between case above the USB port.
3 Pry case open with screwdriver. Continue prying around the case until the case separates.
4 Remove backup battery and dispose of battery and meter correctly.
ART25785-110_rev-B.indd 79-80 9/9/14 10:36 AM
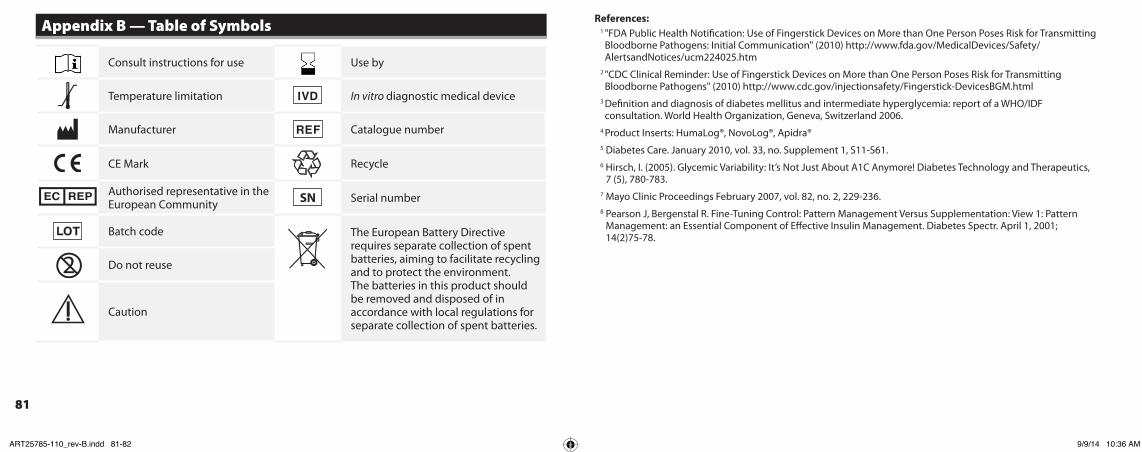
81
Appendix B — Table of Symbols
Consult instructions for use Use by
Temperature limitation In vitro diagnostic medical device
Manufacturer Catalogue number
CE Mark Recycle
Authorised representative in the European Community Serial number
Batch code The European Battery Directive requires separate collection of spent batteries, aiming to facilitate recycling and to protect the environment. The batteries in this product should be removed and disposed of in accordance with local regulations for separate collection of spent batteries.
Do not reuse
Caution
References: 1 "FDA Public Health Notification: Use of Fingerstick Devices on More than One Person Poses Risk for Transmitting Bloodborne Pathogens: Initial Communication" (2010) http://www.fda.gov/MedicalDevices/Safety/AlertsandNotices/ucm224025.htm
2 "CDC Clinical Reminder: Use of Fingerstick Devices on More than One Person Poses Risk for Transmitting Bloodborne Pathogens" (2010) http://www.cdc.gov/injectionsafety/Fingerstick-DevicesBGM.html
3 Definition and diagnosis of diabetes mellitus and intermediate hyperglycemia: report of a WHO/IDF consultation. World Health Organization, Geneva, Switzerland 2006.
4 Product Inserts: HumaLog®, NovoLog®, Apidra®5 Diabetes Care. January 2010, vol. 33, no. Supplement 1, S11-S61.6 Hirsch, I. (2005). Glycemic Variability: It’s Not Just About A1C Anymore! Diabetes Technology and Therapeutics,
7 (5), 780-783.7 Mayo Clinic Proceedings February 2007, vol. 82, no. 2, 229-236.8 Pearson J, Bergenstal R. Fine-Tuning Control: Pattern Management Versus Supplementation: View 1: Pattern
Management: an Essential Component of Effective Insulin Management. Diabetes Spectr. April 1, 2001; 14(2)75-78.
ART25785-110_rev-B.indd 81-82 9/9/14 10:36 AM
©2011-2014 Abbott ART25785-110 Rev. B 08/14
FreeStyle and related brand marks are trademarks of Abbott Diabetes Care Inc. in various jurisdictions.All other trademarks are the property of their respective owners.
This product(s) and/or its use are protected by one or more of the following patents: US6,071,391; US6,120,676; US6,143,164; US6,156,173; US6,299,757; US6,338,790; US6,503,381; US6,591,125; US6,616,819; US6,618,934; US6,676,816; US6,749,740; US6,893,545; US6,942,518; US7,058,437; US7,615,637; US7,713,406; US7,740,581; US7,802,467; US7,866,026; US7,895,740; US7,901,554; US7,918,012; US7,918,988; US7,996,988; US8,033,162; US5,822,715; US6,379,301; US7,167,818; US7,392,167; US7,941,308; US5,918,603; US5,601,435; US6,144,837; USD611,854S; USD613,190S; USD615,884S; USD646,787S; USD648,640S; EP2069771; EP1119637; EP1145000; EP0958495; CA2346415; CA2358993; CA2351796; CA2423837; and CA121137. Additional patents may be issued and/or pending.
Distributed by:Abbott Laboratories Ltd.
Abbott Diabetes CareAbbott House
Vanwall Business ParkVanwall RoadMaidenhead
BerkshireSL6 4UD UK
0500 467 466www.AbbottDiabetesCare.com
ART25785-110_rev-B.indd 83 9/9/14 10:36 AM