Embed Size (px)
DESCRIPTION
www . blackboard . com Item An Item is a file, folder, or other discrete piece of content. 650 Massachusetts Avenue, NW 6th Floor Washington, DC 20001-3796 1-800-424-9299 Copyright © 2010. Blackboard Inc. All rights reserved. Blackboard and the Blackboard logo are registered trademarks of Blackboard Inc. 1
Citation preview

www.blackboard.com650 Massachusetts Avenue, NW 6th Floor Washington, DC 20001-3796 1-800-424-9299
Copyright © 2010. Blackboard Inc. All rights reserved.Blackboard and the Blackboard logo are registered trademarks of Blackboard Inc.
Getting Started with . . . Course Content
1
Build Content The Build Content drop down list contains all the types of content you can create within your course. There are options to create content, create a new page, or create a Mashup. All of this content can be organized in folders to create a structure and flow through the Course.
Create Assessment
The types of Assessments that you can add to your Course include: Tests, Surveys, Assignments, and Self and Peer Assessments. All of these items will automatically generate a column in the Gradebook.
Add Interactive Tool
All of the interactive tools can be used to collaborate with the students in your course. The tools available in the menu include: Discussion Boards, Blogs, Journals, Wikis, Groups, Chat, and Virtual Classroom.
Assign Textbook The Assign Textbook feature allows you to add the textbooks that you use within your course as a piece of content.
Edit Mode The Edit Mode button allows you to change the view of content on screen from the instructor’s view (Edit Mode: On) to the student’s view (Edit Mode: Off).
Item An Item is a file, folder, or other discrete piece of content.
Folder A Folder is the storage area for files and other folders.
Assignment An Assignment is a defined type of content that allows the Instructor to give users instructions and ask them to upload files to be managed and graded.
Course Tool or Link
A Course Link is a shortcut from one place in a course to another location within the same course.
650 Massachusetts Avenue, NW 6th Floor Washington, DC 20001-3796 1-800-424-9299
Copyright © 2010. Blackboard Inc. All rights reserved.Blackboard and the Blackboard logo are registered trademarks of Blackboard Inc.
Getting Started with . . . Course Content
2
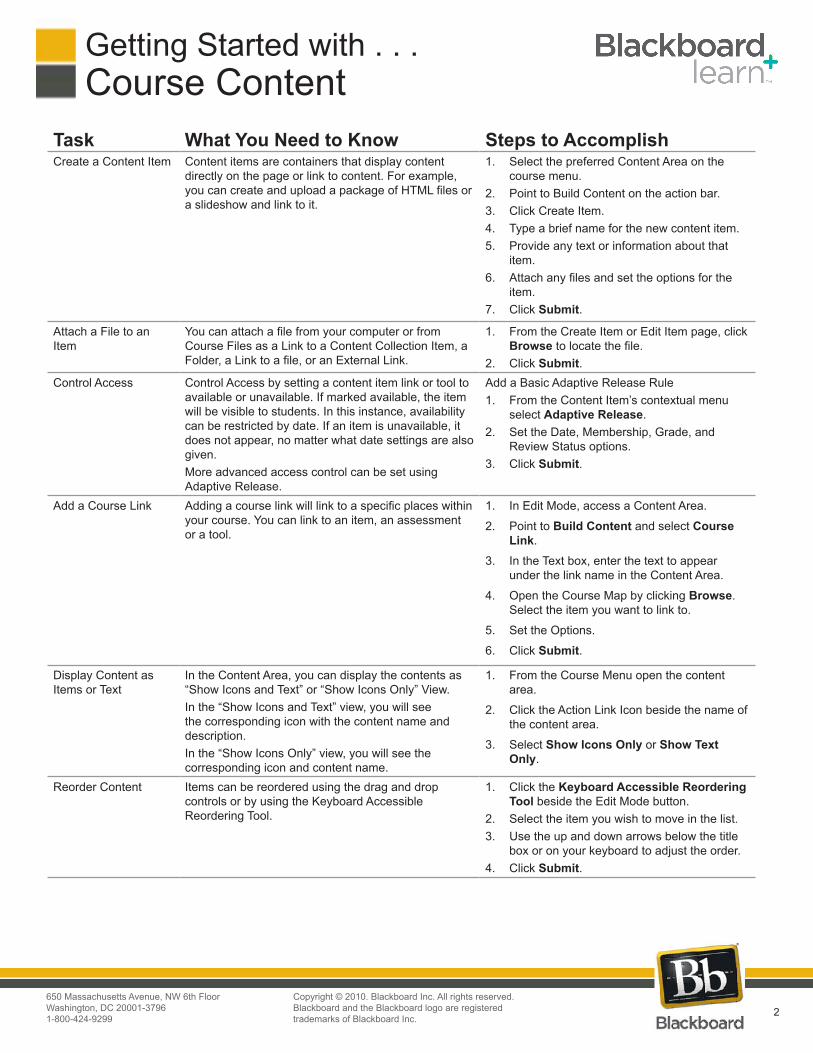
Task What You Need to Know Steps to AccomplishCreate a Content Item Content items are containers that display content
directly on the page or link to content. For example, you can create and upload a package of HTML files or a slideshow and link to it.
1. Select the preferred Content Area on the course menu.
2. Point to Build Content on the action bar.3. Click Create Item.4. Type a brief name for the new content item.5. Provide any text or information about that
item.6. Attach any files and set the options for the
item.7. Click Submit.
Attach a File to an Item
You can attach a file from your computer or from Course Files as a Link to a Content Collection Item, a Folder, a Link to a file, or an External Link.
1. From the Create Item or Edit Item page, click Browse to locate the file.
2. Click Submit.Control Access Control Access by setting a content item link or tool to
available or unavailable. If marked available, the item will be visible to students. In this instance, availability can be restricted by date. If an item is unavailable, it does not appear, no matter what date settings are also given.More advanced access control can be set using Adaptive Release.
Add a Basic Adaptive Release Rule1. From the Content Item’s contextual menu
select Adaptive Release.2. Set the Date, Membership, Grade, and
Review Status options.3. Click Submit.
Add a Course Link Adding a course link will link to a specific places within your course. You can link to an item, an assessment or a tool.
1. In Edit Mode, access a Content Area.
2. Point to Build Content and select Course Link.
3. In the Text box, enter the text to appear under the link name in the Content Area.
4. Open the Course Map by clicking Browse. Select the item you want to link to.
5. Set the Options.
6. Click Submit.
Display Content as Items or Text
In the Content Area, you can display the contents as “Show Icons and Text” or “Show Icons Only” View.In the “Show Icons and Text” view, you will see the corresponding icon with the content name and description. In the “Show Icons Only” view, you will see the corresponding icon and content name.
1. From the Course Menu open the content area.
2. Click the Action Link Icon beside the name of the content area.
3. Select Show Icons Only or Show Text Only.
Reorder Content Items can be reordered using the drag and drop controls or by using the Keyboard Accessible Reordering Tool.
1. Click the Keyboard Accessible Reordering Tool beside the Edit Mode button.
2. Select the item you wish to move in the list.3. Use the up and down arrows below the title
box or on your keyboard to adjust the order.4. Click Submit.

www.blackboard.com650 Massachusetts Avenue, NW 6th Floor Washington, DC 20001-3796 1-800-424-9299
Copyright © 2010. Blackboard Inc. All rights reserved.Blackboard and the Blackboard logo are registered trademarks of Blackboard Inc.
Getting Started with . . . Course Content
3
Track Usage Tracking Reports area can be used by instructors to generate reports on the course usage and activity. Instructors can view specific Student’s usage to determine if Students are actively using the course.
1. From the Course Menu select a Content Area.
2. Select the Content Item where you want to apply the Tracking Report.
3. From the Content Item’s contextual menu select Statistics Tracking.
4. Select On or Off.5. Click Submit.
Apply Metadata Content Metadata stores information about a piece of content.
1. From the Content Area select a Content Item.2. From the Content Item’s contextual menu
select Metadata. 3. Complete the necessary fields for the
General Information, Lifecycle Information, Technical Information, and Rights Management Information.
4. Click Submit.

www.blackboard.com650 Massachusetts Avenue, NW 6th Floor Washington, DC 20001-3796 1-800-424-9299
Copyright © 2010. Blackboard Inc. All rights reserved.Blackboard and the Blackboard logo are registered trademarks of Blackboard Inc.
Getting Started with . . . Course Content
4
GlossaryAdaptive Release Adaptive Release is a tool that customizes the release of content. With Adaptive Release you can control
when and to whom course content is available. You create rules based on criteria to control the availability of content items to users.
Advanced Adaptive Re-lease
Advanced Adaptive Release rules enable instructors to create an unlimited number of complex rules with multiple instances of the same criteria. Multiple rules can be applied to a single content item so that the same content can be released to students who meet the criteria for different rules.
Basic Adaptive Release Basic Adaptive Release rules enable the instructor to create and edit one rule that is based on a limited number of criteria used to control the availability of a single piece of content.
Blogs Blogs are a web-based communication tool for sharing thoughts and ideas with a broad audience. Blogs encourage feedback and discussion through comments.
Content Area A Content Area is a top-level folder. Content Areas appear in the Course Menu and can contain content items, links, and other folders.
Course Link Course links are shortcuts from one place in a course to another location within the same course.
Discussion Board Discussion Boards are a communication tool where users post and respond to messages in an open forum.
Edit Mode Edit Mode is a button that toggles between the Instructor View, where content can be created and changed, and the Student View, which can be used to preview the content you include in the course.
External Links External links link to Web sites outside the Blackboard Learn system.
Journals Journals are a private Web diary that can be shared with the instructor.
Metadata Metadata is descriptive information about an item, wherein you can assign metadata values to suit your course content and pedagogical requirements. You can add the following types of metadata: Categories, Topics, Levels of Difficulty, and Keywords.
Offline Content Offline Content is an instructor-created link from a course or organization which points to specific content on a CD-ROM or another external location, such as a Real Media server. The user viewing this content must have possession of the CD-ROM which contains the content or access rights to the external server.
Statistics Tracking Statistics Tracking enables the system to record every instance that a user interacts with an item.
Text Editor The Text Editor provides an interface resembling a word processor where you can format text, create tables, insert links to Web sites and files, add multimedia, and embed images.
Tool Link A Tool Link connects users to a tool from within a content folder.


