Embed Size (px)
Citation preview
BIOSECURITY AND
PATHOGEN CONTROL FOR PIG FARMS
JOHN CARR

2
3
Table of Contents Introduction ........................................................................................................................... 5 The major pathogens of pigs ................................................................................................. 7
Parasites of the pig ............................................................................................................... 7 Bacteria in the pig .............................................................................................................. 11 Viruses of the pig ............................................................................................................... 14 Major Disorders of the Pig by Age/Group .......................................................................... 17
How do pathogens get into your farm?............................................................................... 21 Threats to a Pig Unit .......................................................................................................... 21 Considerations in the design of the outer security perimeter ................................................ 26
Specific pathogen Free Farm Security ............................................................................. 26 Location: Pathogen Movement from a Farm ...................................................................... 28 Ensuring the incoming stock is of the correct health status ................................................. 30
Example of Routine Health Monitoring as carried out by a pig breeding company .......... 31 How many animals do we need to test? .......................................................................... 32 What may happen if there is a positive sample? ............................................................... 34 Selection of Specimens ................................................................................................... 35 Diagnostic Specimens and Tests ..................................................................................... 38 Health Alarm List ........................................................................................................... 40 Diseases of pigs which are notifiable to the OIE ............................................................. 41 Examination of Isolation Premises .................................................................................. 42 Gilt Introduction ............................................................................................................ 43 Boar Introduction........................................................................................................... 44 Use of Feed Back ........................................................................................................... 45 Isolation and Acclimatization.......................................................................................... 46 Pathogens that might be transmitted though semen ......................................................... 48 Disposal of Dead Pigs .................................................................................................... 49 Entry and Exit Procedures for Livestock ........................................................................ 50
Truck Routines .................................................................................................................. 51 Vermin Control Measures .................................................................................................. 55
Rodent Control .............................................................................................................. 55 Bird Control ................................................................................................................... 57 Fly and mosquito control ................................................................................................ 58
Reducing and controlling people risk .................................................................................. 59 Visitor Entry Procedures ................................................................................................ 59 Visitors Book ................................................................................................................. 60 Biosecurity – Visitor Dress Code ................................................................................... 61 Shower Room Protocols ................................................................................................ 62
Straw and Bedding ............................................................................................................. 66 Machine and Equipment Purchases ..................................................................................... 67 Biosecurity Checking ......................................................................................................... 68
Biosecurity Examination ................................................................................................. 71 Reducing pathogens on the farm ........................................................................................ 73
Controlling today’s number one risk – the compromised pig ............................................... 73 Hospital Pen Design ........................................................................................................... 74 Compromised pig pen from straw bales .............................................................................. 75 What to do with Compromised Pigs ................................................................................... 76 What to do with Compromised Adults ............................................................................... 79 All-in/All-out ..................................................................................................................... 81 Pig Flow ............................................................................................................................ 82 Disinfectant Management – Foot Baths .............................................................................. 83

4
Cleaning a Room between Batches ..................................................................................... 84 Fumigation ......................................................................................................................... 86 Application of Lime Wash .................................................................................................. 88 Medicine Control and Storage ............................................................................................ 89 Medicine Refrigerator set up .............................................................................................. 90 The use of Vaccines in Pigs ................................................................................................ 91 Feed Hygiene To Reduce Contamination ............................................................................ 92 Manager’s Weekly Report .................................................................................................. 94 Partial Depopulation - the Basics ....................................................................................... 95
Elimination of pathogens from farms ................................................................................. 97 Pathogen elimination through ........................................................................................... 102
Depopulation/Repopulation .......................................................................................... 102 Hysterectomy and move piglets to a new farm .............................................................. 106 Segregated Early Weaning ........................................................................................... 109 Partial Depopulation..................................................................................................... 111 Vaccination and Test and Remove ................................................................................ 113 Herd Closure and Pathogen Exposure .......................................................................... 114 Medication ................................................................................................................... 116
Index................................................................................................................................... 117
5
Introduction
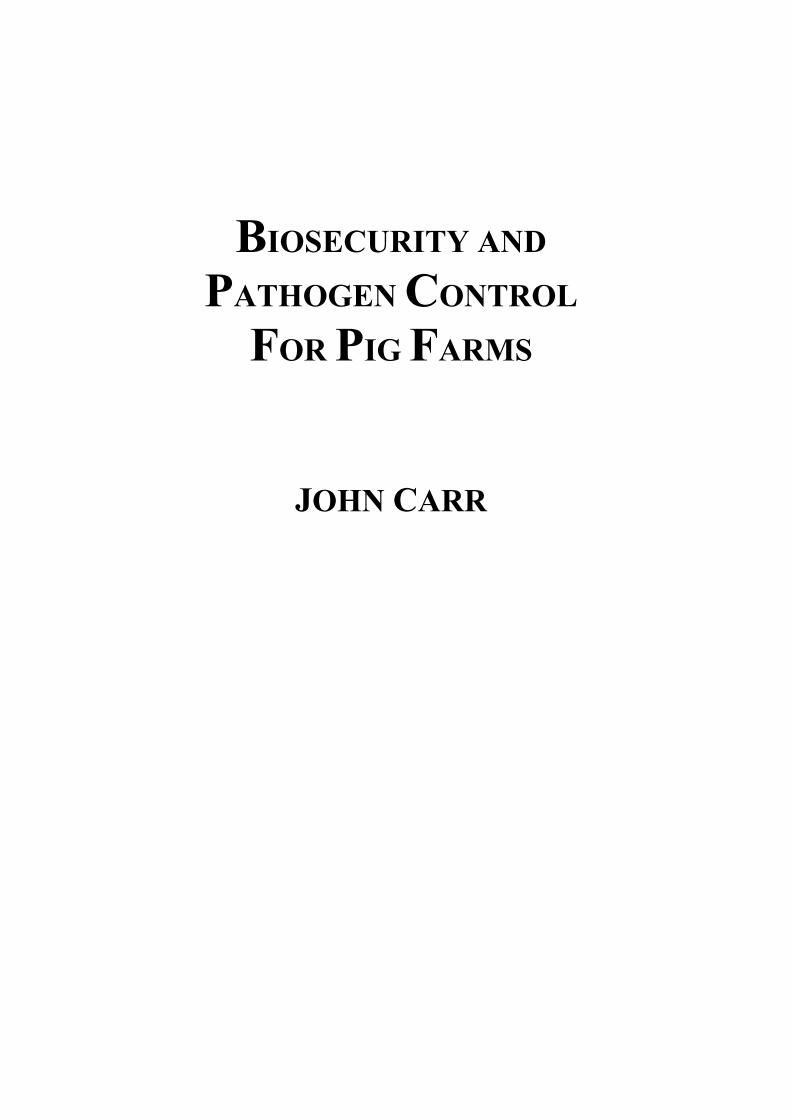
This guide is presented as a series of advice sheets, some of which can be used around the farm. The aim of the advice sheets is to provide rapid in formation in a format easily understood by all members of the farm team. There are sheets to aid the checking and auditing of Biosecurity standards. The notes are also presented on a CD format allowing the user to customise the advice sheets to suit their own personal situation and to take note of new advances as science provides. Biosecurity is the foundation stone to health on a pig farm. It can be difficult enough to control the effect of pathogens that are already on the farm, without the need to develop new strategies for invading pathogens. A pathogen’s effect on the pig can range from nothing to devastating. Many pathogens are under global watch through organisations like the World Organisation for Animal Health (www.oie.int). Consult with your local governmental veterinarian for a list of pathogens absent from your area. Biosecurity can be summarised by the photographs below. A 2000 sow nucleus farm infected with Foot and Mouth Virus, resulting in the necessary destruction of 20000 animals on the farm. While this was a disaster for the farm, the destruction saved many thousands of other pigs from suffering.
The picture on the left is an electronmicrograph of the Foot and Mouth Virus. The upper right picture demonstrates the ulcerated area on the feet of an infected pig. The bottom right picture graphically demonstrates the disaster of Foot and Mouth affecting a pig farm.

6
7
The major pathogens of pigs Pigs are typically affected by three major groups of pathogens – parasites, bacteria and viruses. Pigs can act as a host for a variety of other life forms, which range from the relatively large, Taenia solium worms can reach up to 7m long, to the extremely small Circovirus, which is only 17nm in diameter. Under normal circumstances, most pathogens do not want to harm the pig (host). Majority of the pathogens live in harmony with the pig. Pathogenic organisms are only a minor component of the normal flora living on and in the pig and its environment.
Parasites of the pig External Parasites
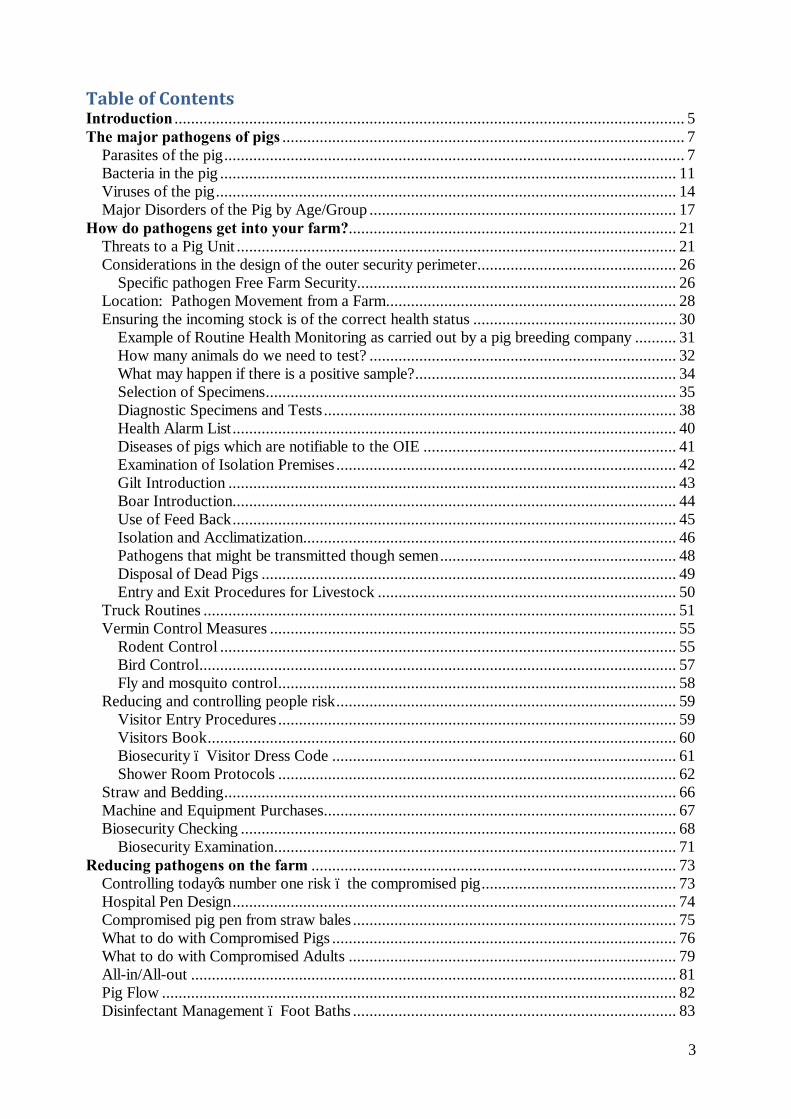
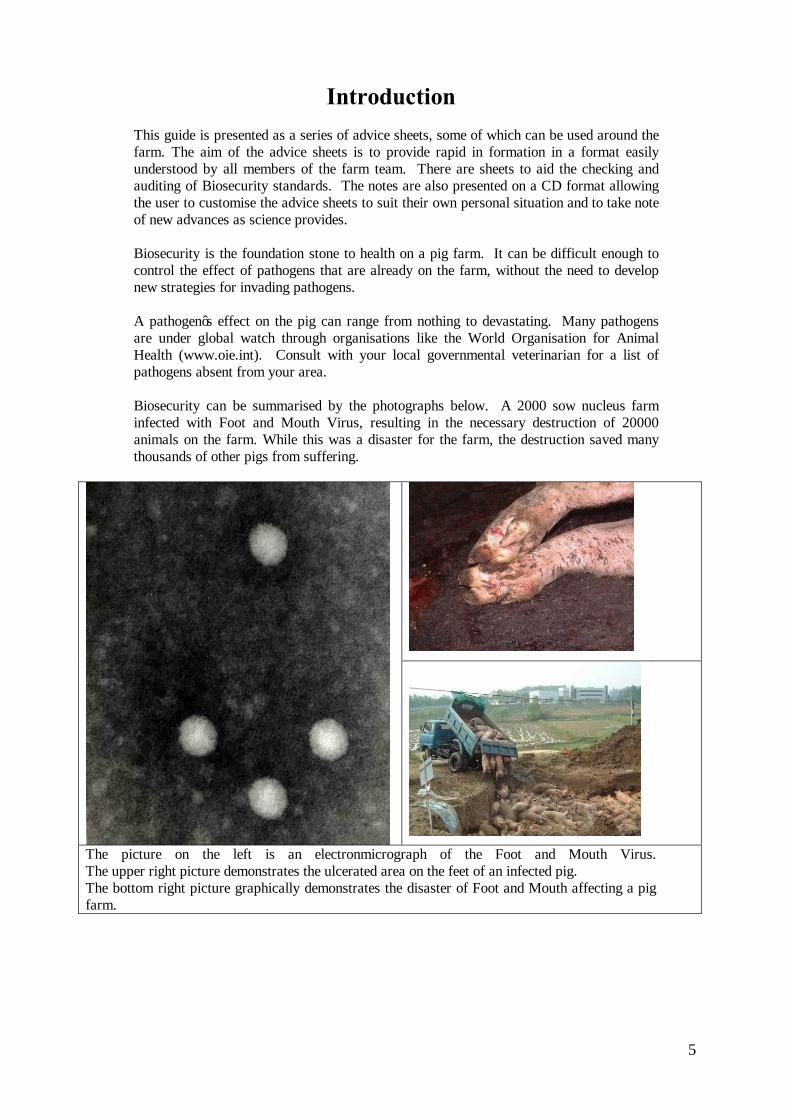
Mange Mange is caused by infestation with the microscopic burrowing mite Sarcoptes scabiei var suis. All parts of the its life cycle, the egg, larvae, nymph and adult develop below the surface of the skin and only require 15 days to complete. Experimentally the mite can live for up to 3 weeks off the pig, however, at ambient temperatures higher than 25°C the mite does not survive more than 3 days. The consistent clinical sign is rubbing and scratching. All ages can be affected from weaner to adult and the worse cases can be in the growing pig with PRRSv infections. Classical signs are excess wax in the ear from which the mites can be identified. The clinical signs may be exacerbated by the presence of other pathogens.
The Mange Mite
Dirty ears in an adult boar
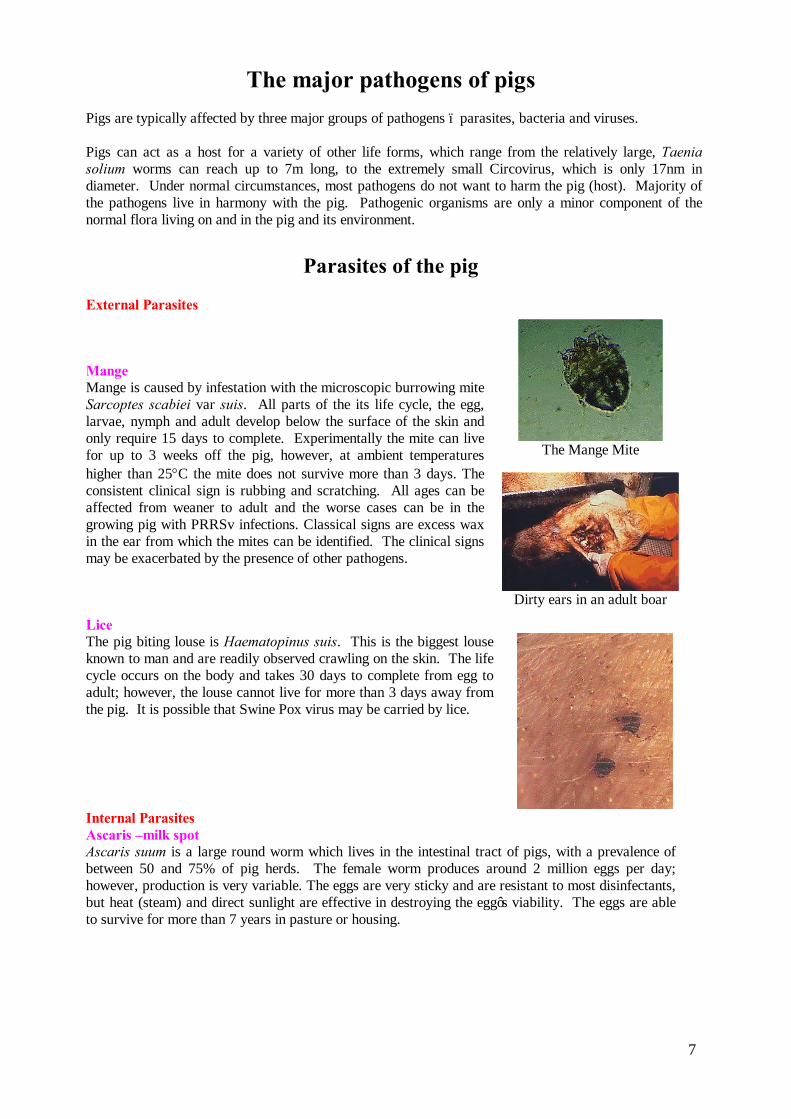
Lice The pig biting louse is Haematopinus suis. This is the biggest louse known to man and are readily observed crawling on the skin. The life cycle occurs on the body and takes 30 days to complete from egg to adult; however, the louse cannot live for more than 3 days away from the pig. It is possible that Swine Pox virus may be carried by lice.
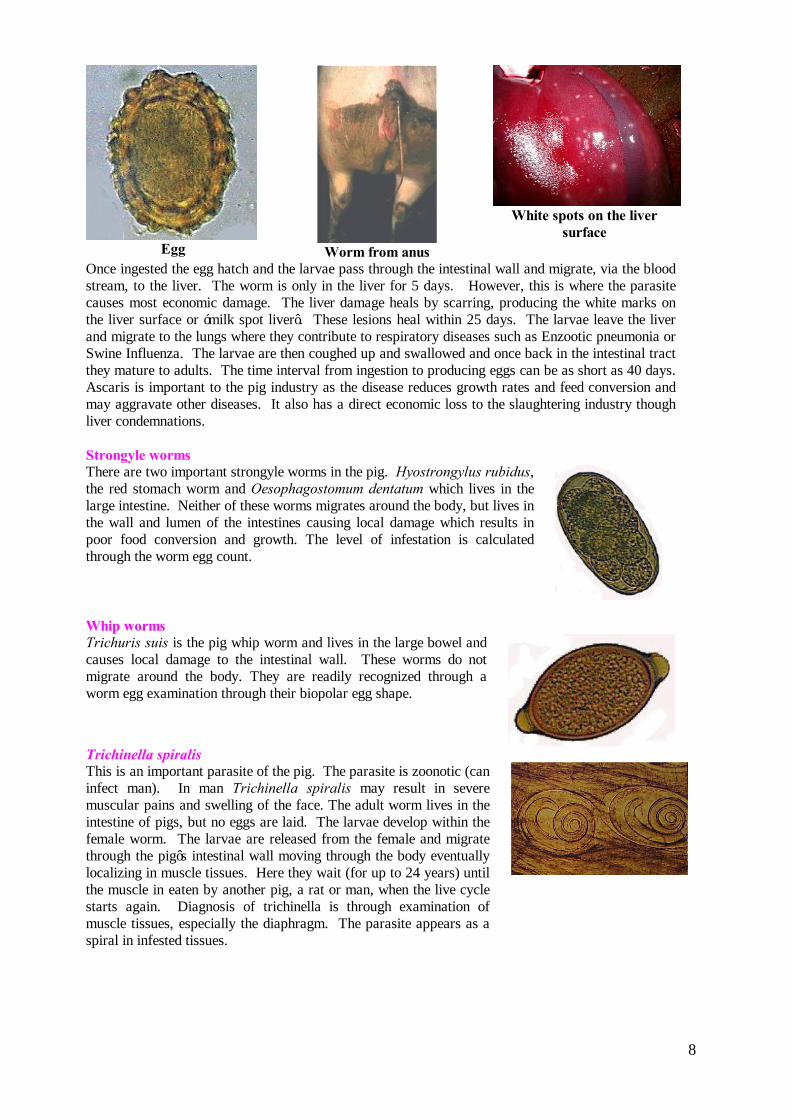
Internal Parasites Ascaris –milk spot Ascaris suum is a large round worm which lives in the intestinal tract of pigs, with a prevalence of between 50 and 75% of pig herds. The female worm produces around 2 million eggs per day; however, production is very variable. The eggs are very sticky and are resistant to most disinfectants, but heat (steam) and direct sunlight are effective in destroying the egg’s viability. The eggs are able to survive for more than 7 years in pasture or housing.
8
Egg
Worm from anus
White spots on the liver
surface
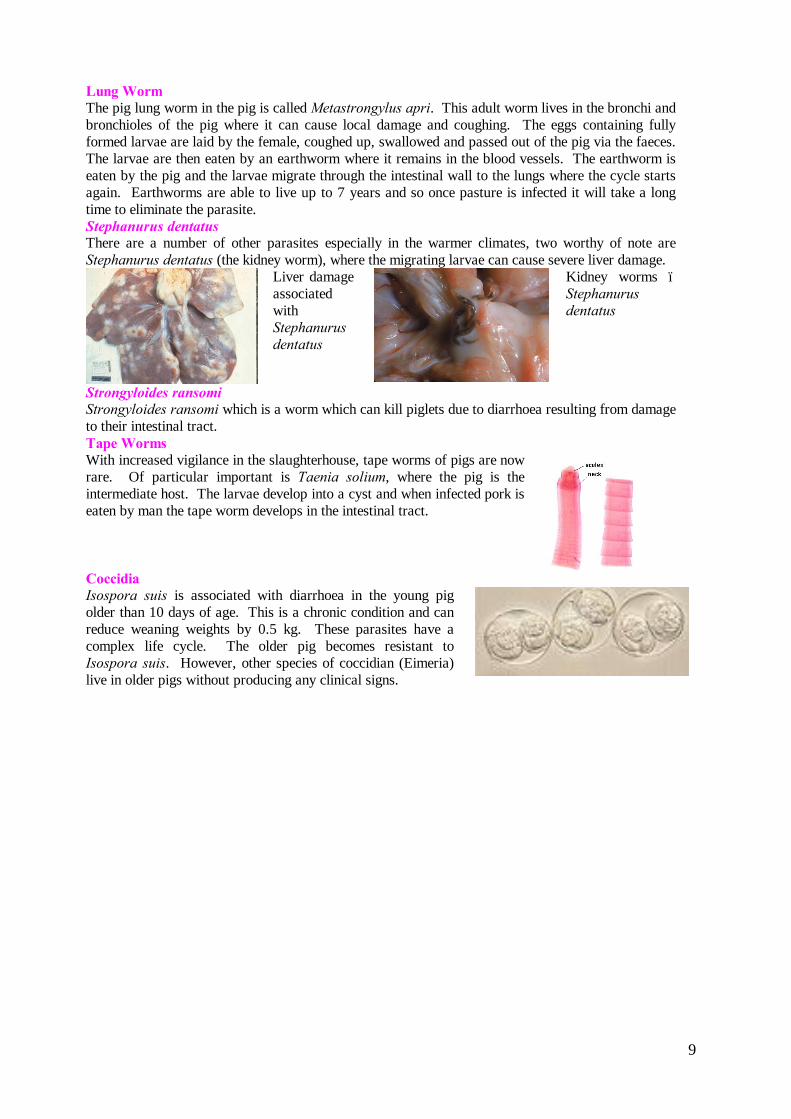
Once ingested the egg hatch and the larvae pass through the intestinal wall and migrate, via the blood stream, to the liver. The worm is only in the liver for 5 days. However, this is where the parasite causes most economic damage. The liver damage heals by scarring, producing the white marks on the liver surface or ‘milk spot liver’. These lesions heal within 25 days. The larvae leave the liver and migrate to the lungs where they contribute to respiratory diseases such as Enzootic pneumonia or Swine Influenza. The larvae are then coughed up and swallowed and once back in the intestinal tract they mature to adults. The time interval from ingestion to producing eggs can be as short as 40 days. Ascaris is important to the pig industry as the disease reduces growth rates and feed conversion and may aggravate other diseases. It also has a direct economic loss to the slaughtering industry though liver condemnations. Strongyle worms There are two important strongyle worms in the pig. Hyostrongylus rubidus, the red stomach worm and Oesophagostomum dentatum which lives in the large intestine. Neither of these worms migrates around the body, but lives in the wall and lumen of the intestines causing local damage which results in poor food conversion and growth. The level of infestation is calculated through the worm egg count.
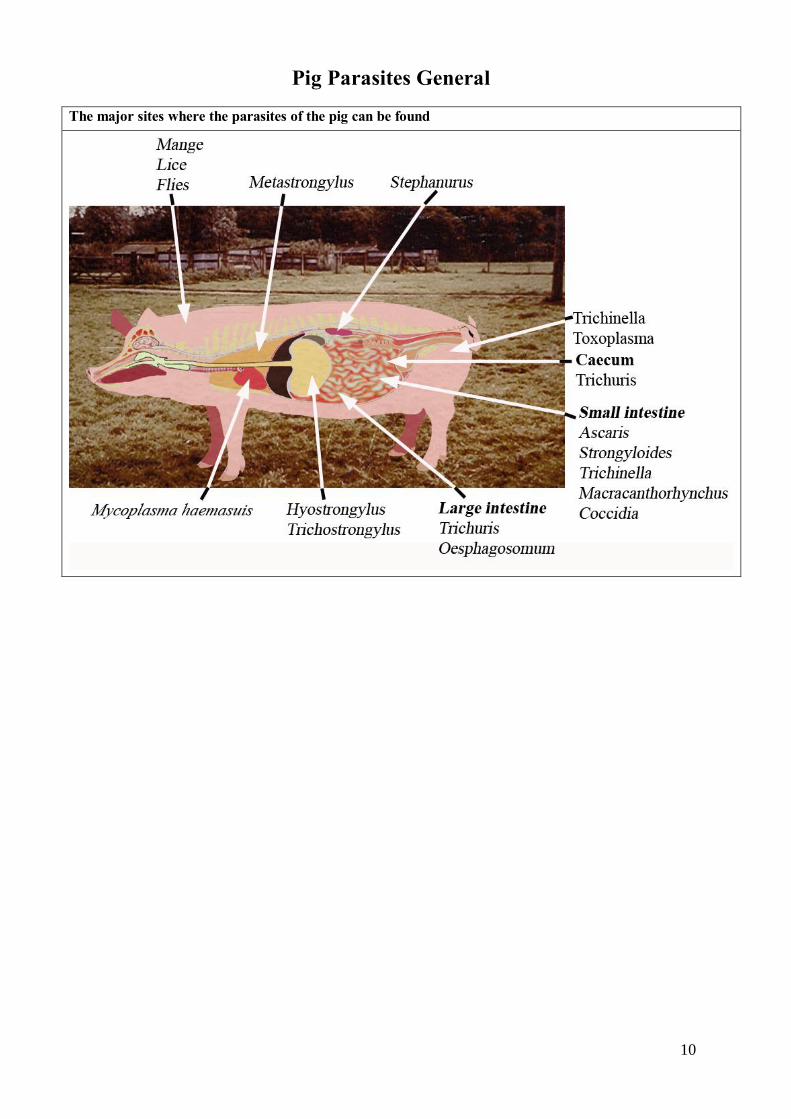
Whip worms Trichuris suis is the pig whip worm and lives in the large bowel and causes local damage to the intestinal wall. These worms do not migrate around the body. They are readily recognized through a worm egg examination through their biopolar egg shape.
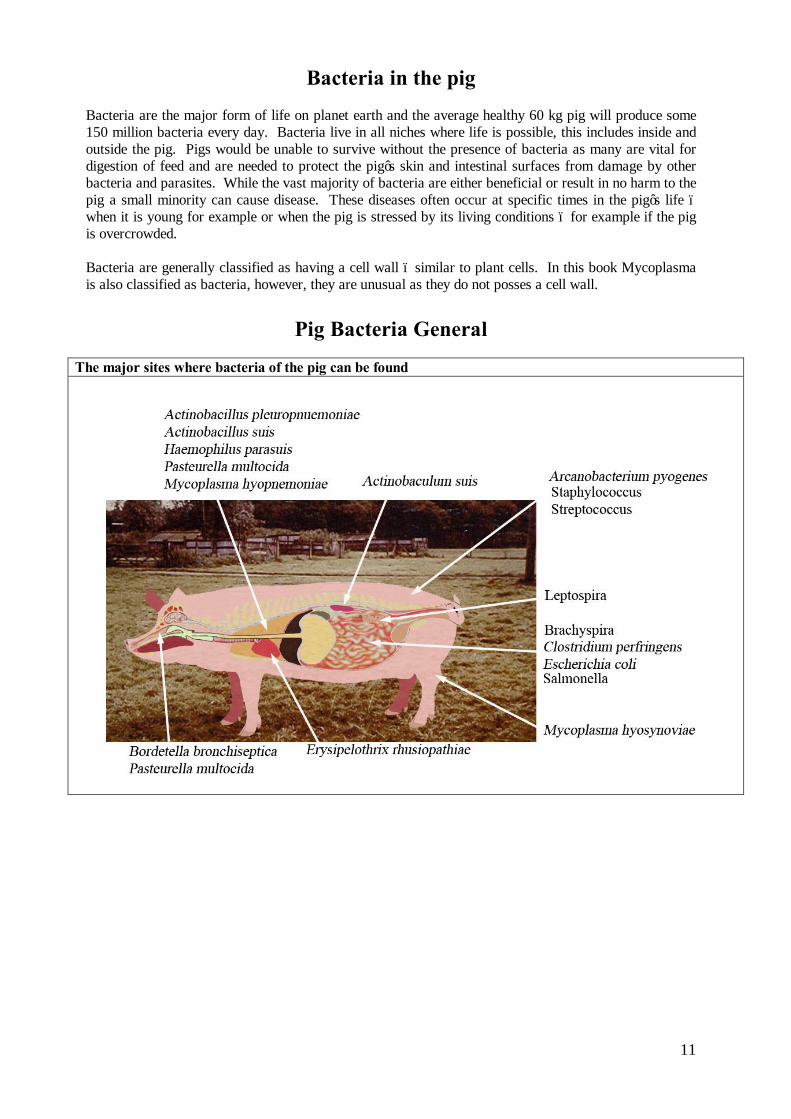
Trichinella spiralis This is an important parasite of the pig. The parasite is zoonotic (can infect man). In man Trichinella spiralis may result in severe muscular pains and swelling of the face. The adult worm lives in the intestine of pigs, but no eggs are laid. The larvae develop within the female worm. The larvae are released from the female and migrate through the pig’s intestinal wall moving through the body eventually localizing in muscle tissues. Here they wait (for up to 24 years) until the muscle in eaten by another pig, a rat or man, when the live cycle starts again. Diagnosis of trichinella is through examination of muscle tissues, especially the diaphragm. The parasite appears as a spiral in infested tissues.
9
Lung Worm The pig lung worm in the pig is called Metastrongylus apri. This adult worm lives in the bronchi and bronchioles of the pig where it can cause local damage and coughing. The eggs containing fully formed larvae are laid by the female, coughed up, swallowed and passed out of the pig via the faeces. The larvae are then eaten by an earthworm where it remains in the blood vessels. The earthworm is eaten by the pig and the larvae migrate through the intestinal wall to the lungs where the cycle starts again. Earthworms are able to live up to 7 years and so once pasture is infected it will take a long time to eliminate the parasite. Stephanurus dentatus There are a number of other parasites especially in the warmer climates, two worthy of note are Stephanurus dentatus (the kidney worm), where the migrating larvae can cause severe liver damage.
Liver damage associated with Stephanurus dentatus
Kidney worms – Stephanurus dentatus
Strongyloides ransomi Strongyloides ransomi which is a worm which can kill piglets due to diarrhoea resulting from damage to their intestinal tract. Tape Worms With increased vigilance in the slaughterhouse, tape worms of pigs are now rare. Of particular important is Taenia solium, where the pig is the intermediate host. The larvae develop into a cyst and when infected pork is eaten by man the tape worm develops in the intestinal tract.
Coccidia Isospora suis is associated with diarrhoea in the young pig older than 10 days of age. This is a chronic condition and can reduce weaning weights by 0.5 kg. These parasites have a complex life cycle. The older pig becomes resistant to Isospora suis. However, other species of coccidian (Eimeria) live in older pigs without producing any clinical signs.
10
Pig Parasites General
The major sites where the parasites of the pig can be found
11
Bacteria in the pig Bacteria are the major form of life on planet earth and the average healthy 60 kg pig will produce some 150 million bacteria every day. Bacteria live in all niches where life is possible, this includes inside and outside the pig. Pigs would be unable to survive without the presence of bacteria as many are vital for digestion of feed and are needed to protect the pig’s skin and intestinal surfaces from damage by other bacteria and parasites. While the vast majority of bacteria are either beneficial or result in no harm to the pig a small minority can cause disease. These diseases often occur at specific times in the pig’s life – when it is young for example or when the pig is stressed by its living conditions – for example if the pig is overcrowded. Bacteria are generally classified as having a cell wall – similar to plant cells. In this book Mycoplasma is also classified as bacteria, however, they are unusual as they do not posses a cell wall.
Pig Bacteria General
The major sites where bacteria of the pig can be found
12
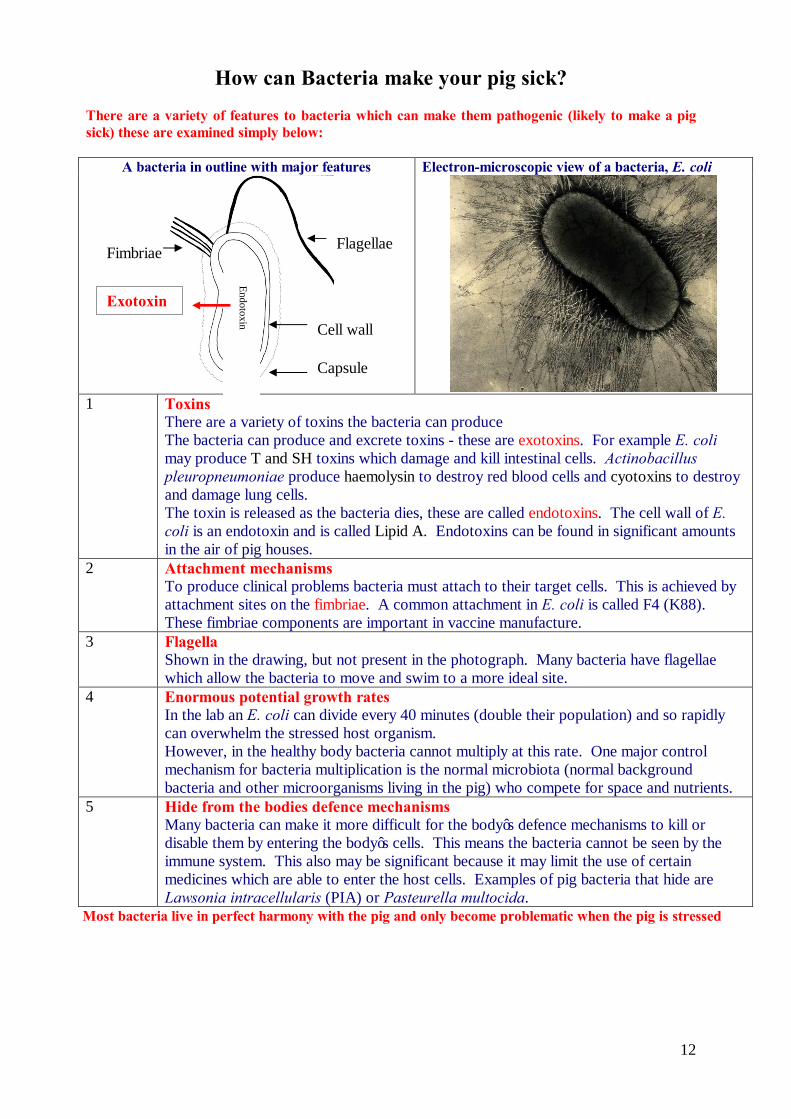
How can Bacteria make your pig sick?
There are a variety of features to bacteria which can make them pathogenic (likely to make a pig sick) these are examined simply below:
A bacteria in outline with major features Electron-microscopic view of a bacteria, E. coli
1 Toxins
There are a variety of toxins the bacteria can produce The bacteria can produce and excrete toxins - these are exotoxins. For example E. coli may produce T and SH toxins which damage and kill intestinal cells. Actinobacillus pleuropneumoniae produce haemolysin to destroy red blood cells and cyotoxins to destroy and damage lung cells. The toxin is released as the bacteria dies, these are called endotoxins. The cell wall of E. coli is an endotoxin and is called Lipid A. Endotoxins can be found in significant amounts in the air of pig houses.
2 Attachment mechanisms To produce clinical problems bacteria must attach to their target cells. This is achieved by attachment sites on the fimbriae. A common attachment in E. coli is called F4 (K88). These fimbriae components are important in vaccine manufacture.
3 Flagella Shown in the drawing, but not present in the photograph. Many bacteria have flagellae which allow the bacteria to move and swim to a more ideal site.
4 Enormous potential growth rates In the lab an E. coli can divide every 40 minutes (double their population) and so rapidly can overwhelm the stressed host organism. However, in the healthy body bacteria cannot multiply at this rate. One major control mechanism for bacteria multiplication is the normal microbiota (normal background bacteria and other microorganisms living in the pig) who compete for space and nutrients.
5 Hide from the bodies defence mechanisms Many bacteria can make it more difficult for the body’s defence mechanisms to kill or disable them by entering the body’s cells. This means the bacteria cannot be seen by the immune system. This also may be significant because it may limit the use of certain medicines which are able to enter the host cells. Examples of pig bacteria that hide are Lawsonia intracellularis (PIA) or Pasteurella multocida.
Most bacteria live in perfect harmony with the pig and only become problematic when the pig is stressed
Cell wall
Capsule
Flagellae Fimbriae
Endotoxin
Exotoxin
13
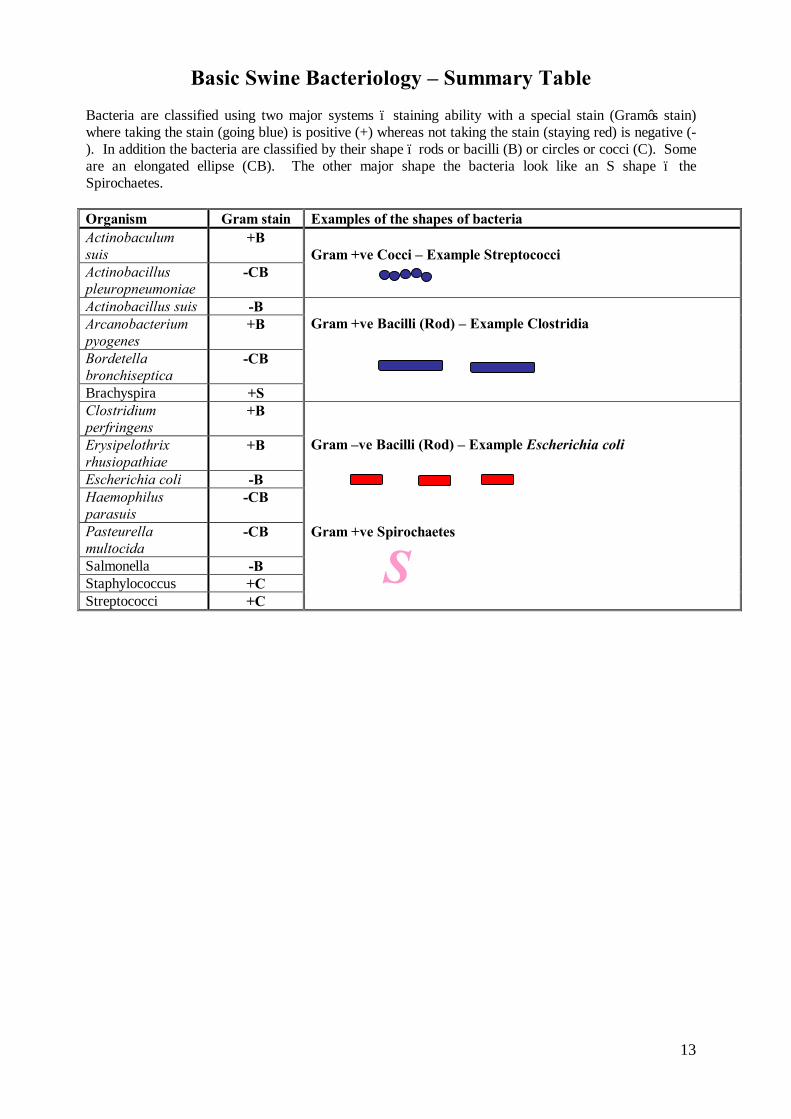
Basic Swine Bacteriology – Summary Table Bacteria are classified using two major systems – staining ability with a special stain (Gram’s stain) where taking the stain (going blue) is positive (+) whereas not taking the stain (staying red) is negative (-). In addition the bacteria are classified by their shape – rods or bacilli (B) or circles or cocci (C). Some are an elongated ellipse (CB). The other major shape the bacteria look like an S shape – the Spirochaetes. Organism Gram stain Examples of the shapes of bacteria Actinobaculum suis
+B Gram +ve Cocci – Example Streptococci
Actinobacillus pleuropneumoniae
-CB
Actinobacillus suis -B Gram +ve Bacilli (Rod) – Example Clostridia Arcanobacterium
pyogenes +B
Bordetella bronchiseptica
-CB
Brachyspira +S Clostridium perfringens
+B Gram –ve Bacilli (Rod) – Example Escherichia coli Erysipelothrix
rhusiopathiae +B
Escherichia coli -B Haemophilus parasuis
-CB
Pasteurella multocida
-CB Gram +ve Spirochaetes
S Salmonella -B Staphylococcus +C Streptococci +C

14
Viruses of the pig Viruses are extremely small – the word means filterable as the organism can pass through an extremely fine filter, whereas bacteria cannot. In the pig we recognise only a small number of viruses. However, there has to be many more waiting for identification. Similarly to bacteria majority of viruses cause no harm to the pig. A small number can cause extreme distress and even death within an extremely short period of time.
The major viruses of pigs Virus name Family Genetic Envelope Comments Adenovirus Adenoviridae DNA D + ve African Swine Fever Un-named DNA D Insect borne Aujeszky’s Disease Herpes Virus DNA + ve Pseudorabies Blue Eye Virus Paramyoxoviridae RNA + ve Circovirus Circoviridae DNA S - ve Two types I and II Classical Swine Fever Flaviviridae RNA + ve CSF Hog Cholera Note BVD and
Border’s can infect. Pestivirus Coronavirus Coronaviridae RNA +ve Several types, TGE, PRC, ED,
HEV Cytomegalovirus Herpesviridae DNA + ve Eastern Equine Encephalomyelitis
Togaviridae RNA S - ve Also similar West Nile Virus
Encephalomyocarditis virus Picornaviridae RNA - ve Enterovirus Picornaviridae RNA - ve Numerous types – Talfan,
Teshen, SMEDI Foot and mouth Picornaviridae RNA S - ve FMD Hepatitis E virus Caliciviridae? RNA S - ve Japanese Encephalomyelitis virus
Flaviviridae RNA + ve
Nipah virus Handra virus RNA S + ve Paramyoxoviridae Menangle Virus infection Paramyxovirus RNA + ve Parvovirus Parvovirus DNA S - ve Porcine Mycocarditis virus Bungowannah RNA +ve Related to Pestivirus Porcine Reproductive and Respiratory Syndrome Virus
Arterividae RNA + ve PRRSv
Rabies Rhabdoviridae RNA ± ve Reovirus Reoviridae RNA - ve Rinderpest Paramyxovirus RNA +ve Rotovirus Reoviridae RNA - ve Mainly type A Swine Influenza Orthomyxoviridae RNA
Segmented + ve SIV Several types based on H
and N antigens. Swine Vesicular Disease Picornaviridae RNA S - ve An enterovirus Swine Pox Poxviridae DNA D + ve Torovirus Torovirus RNA +ve Related to Coronavirus Torque Teno Virus Anellovirus DNA - ve Related to Circovirus Vesicular exanthema Caliciviridae RNA S - ve Vesicular stomatitis Rhadboviridae RNA S ± ve Affects horses as well West Nile Virus Flaviviridae RNA + ve Genetic – D= Double stranded. S= Single stranded
15
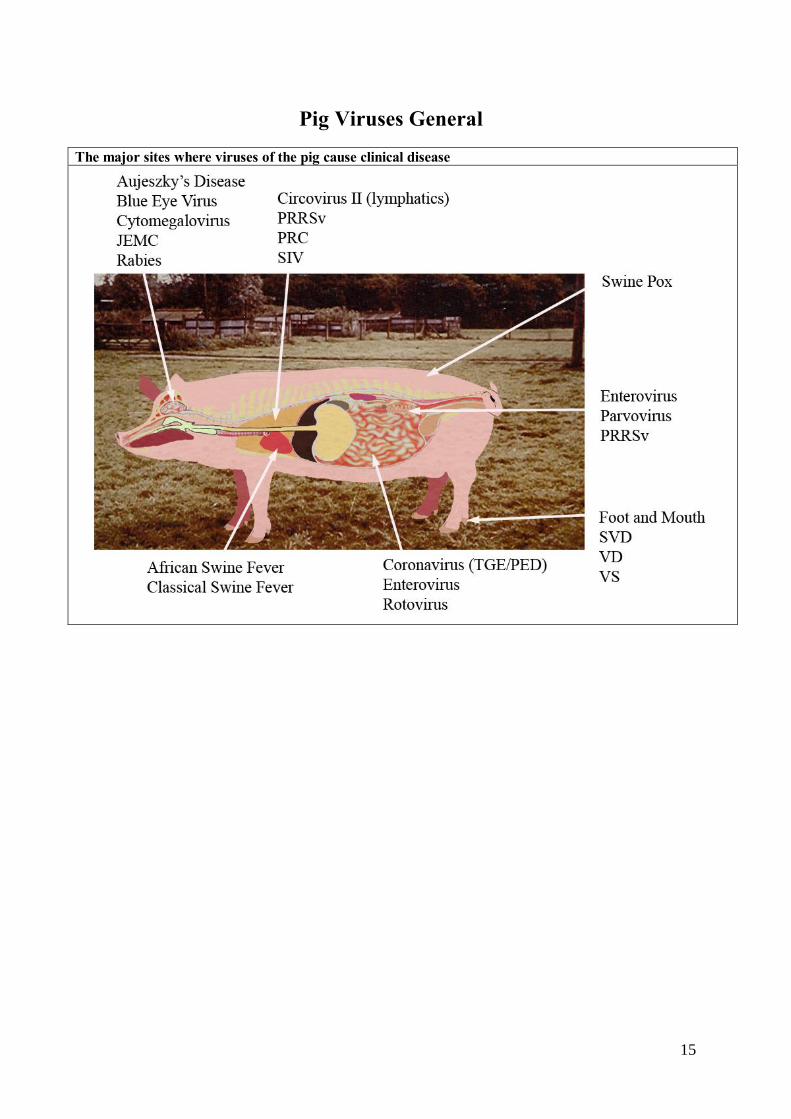
Pig Viruses General
The major sites where viruses of the pig cause clinical disease

16
Viruses – How do they cause disease? Background Viruses are very small and the word means ‘filterable’. Once bacteria were
recognised down the microscope by Pasteur many diseases became associated with particular bacteria such as Pasteurella or Salmonella (discovered by Dr Salmon). It soon became apparent that some diseases were not associated with the ‘new’ bacteria and the disease could still be transmitted after all bacteria were removed by filtration. These diseases were then called viral. Foot and Mouth was the first virus recognised. Viruses cannot replicate on their own, they require other living organisms (some even parasitize bacteria) to replicate. Viruses are classified into two main types depending on the type of genetic material: DNA viruses have their genetic material similar to our chromosomes (the genetic material needs to be transformed into RNA to make proteins) and RNA viruses which have their genetic material in the form from which proteins are made. After genetic material classification viruses may have an envelope of lipid (fat) materials. Those viruses with an envelope are more susceptible to disinfectants as the disinfectant removes the envelope rending the virus incapable of survival. The other characteristics of viruses are determined by their size or shape: Viruses that infect bacteria are called bacteriophages Parvovirus are very small and round (Parvo means small in Greek) Influenza viruses are very long Coronaviruses have protein projections that make them look like a crown or corona It is important to note, that the vast majority of viruses live quite harmlessly in our bodies’ cells and do not cause any significant or recognised problem.
Treatment Because viruses do not replicate on their own there is no specific treatment thorough antibiotics. Antibiotics work against bacteria because they will either kill the bacteria or affect their replication ability. There are a few antiviral medicines but they are very expensive and are not really available to pigs.
How to treat viral diseases – the basics
Keep the disease agent out through good biosecurity Use the bodies own difference mechanisms through vaccines and antibodies Reduce the stress on the animal by good management – pig flow and management of the water, food, floor and air systems. Treat any sick pig promptly and appropriately – classically through a hospital pen
Are there things smaller than viruses? The prion diseases (CJD of man and BSE in cattle for example) are diseases where
the infectious agent is without any nuclear material and appear composed for lipid and proteins only. These diseases have not been recognised anywhere in the world in farmed pigs.
17
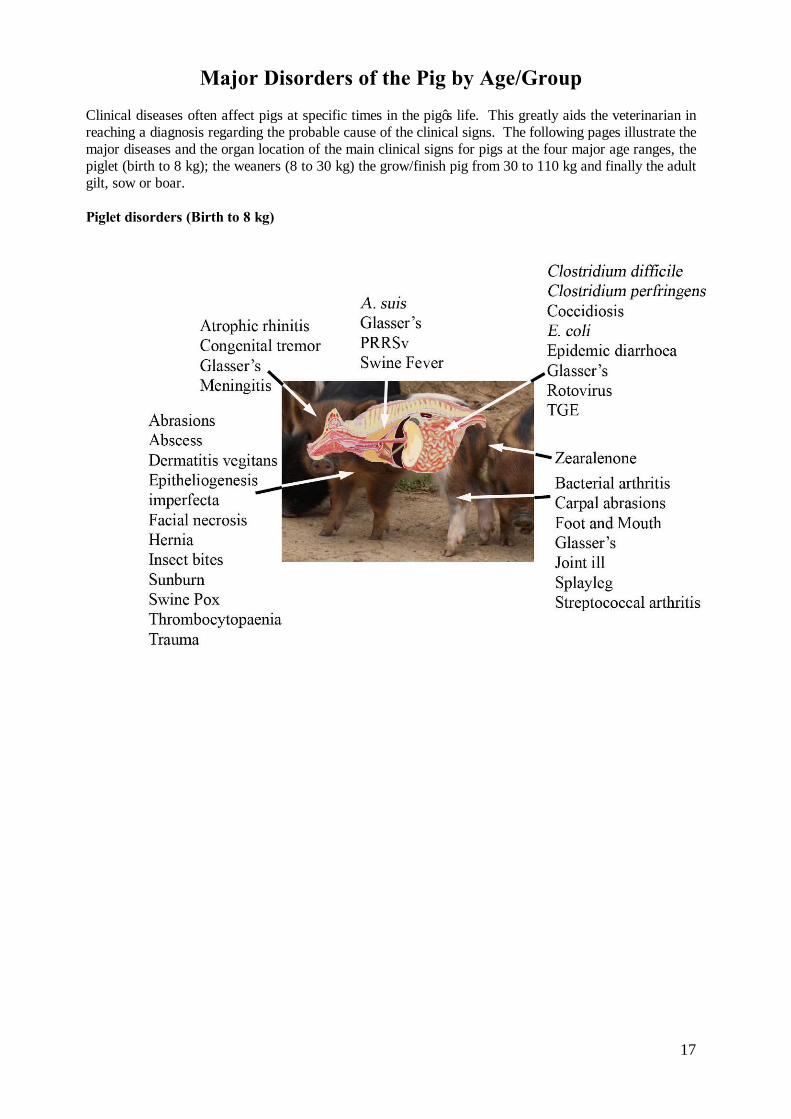
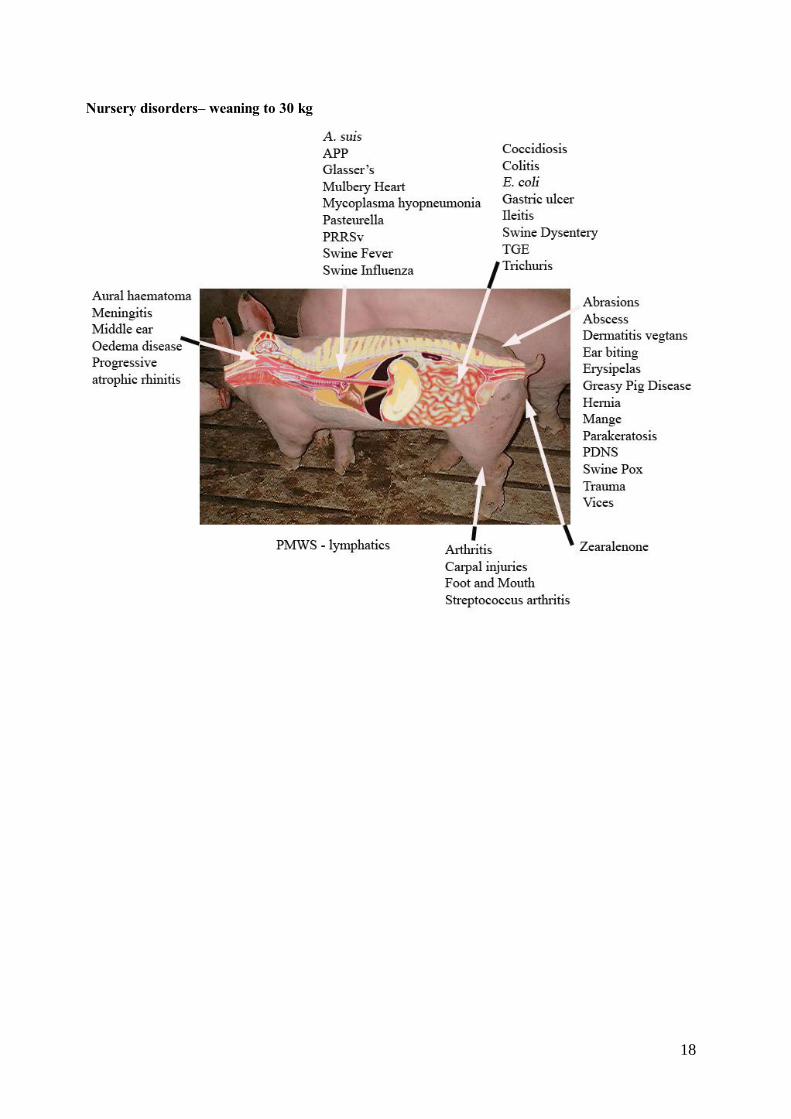
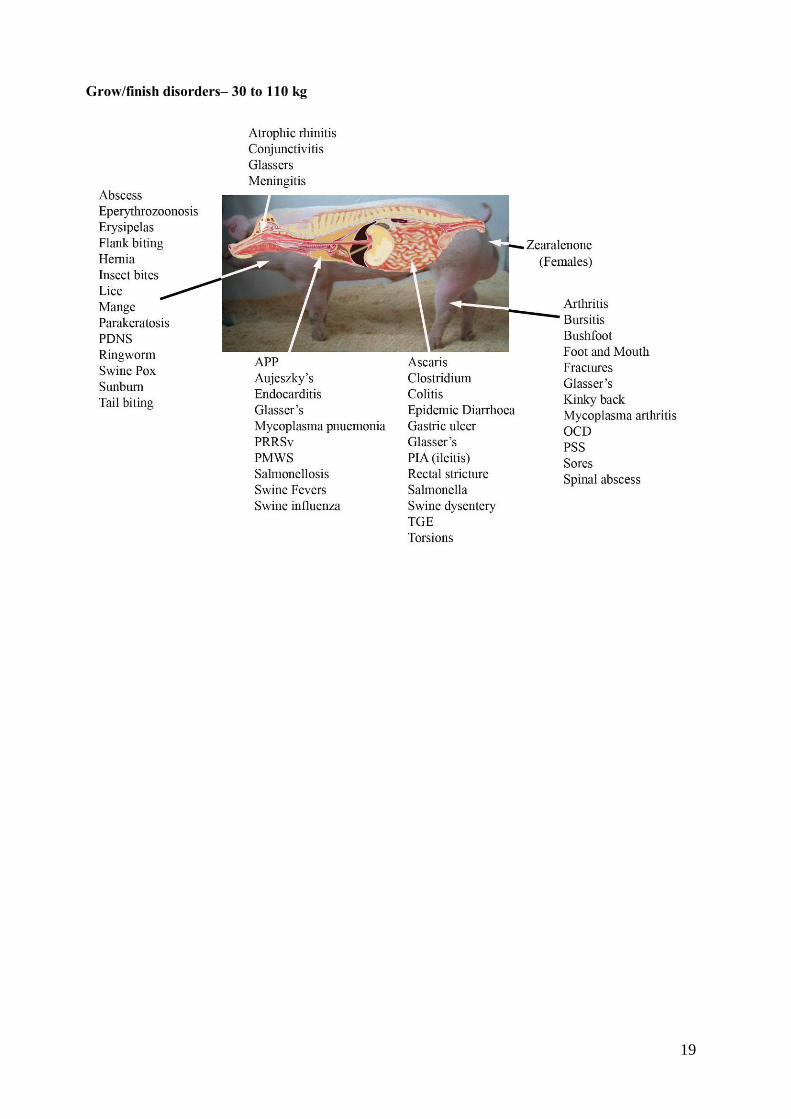
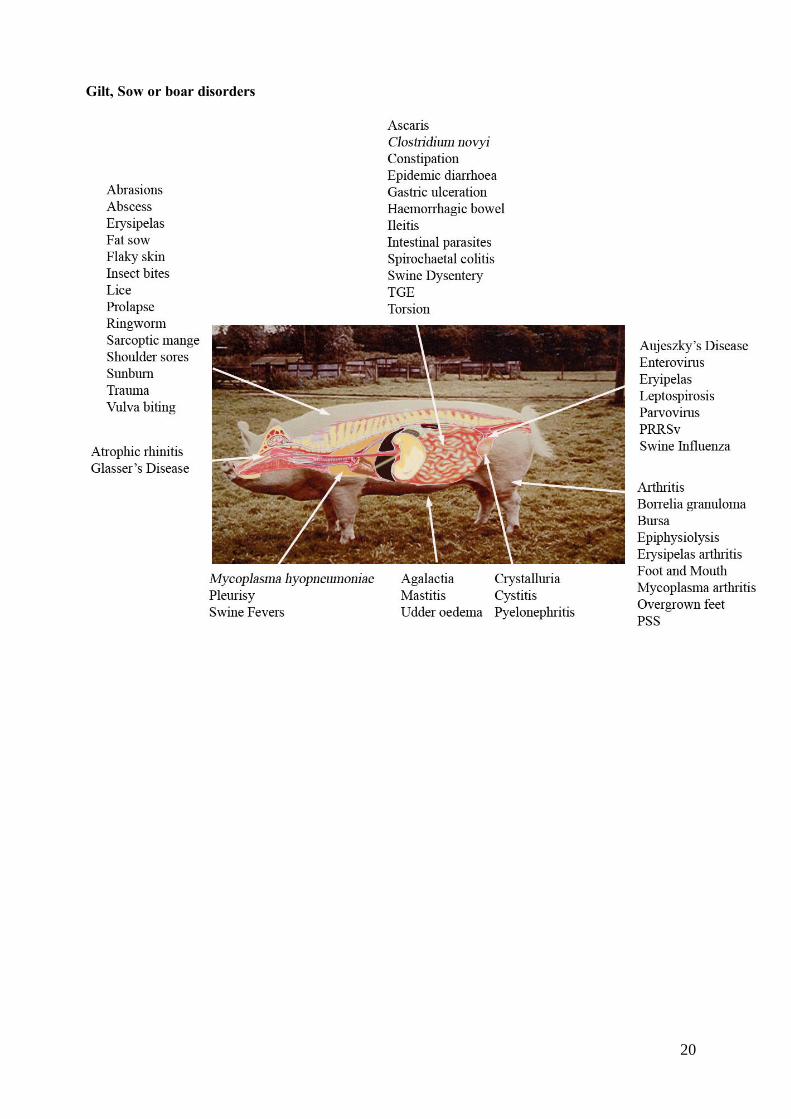
Major Disorders of the Pig by Age/Group Clinical diseases often affect pigs at specific times in the pig’s life. This greatly aids the veterinarian in reaching a diagnosis regarding the probable cause of the clinical signs. The following pages illustrate the major diseases and the organ location of the main clinical signs for pigs at the four major age ranges, the piglet (birth to 8 kg); the weaners (8 to 30 kg) the grow/finish pig from 30 to 110 kg and finally the adult gilt, sow or boar. Piglet disorders (Birth to 8 kg)
18
Nursery disorders– weaning to 30 kg
19
Grow/finish disorders– 30 to 110 kg
20
Gilt, Sow or boar disorders
21
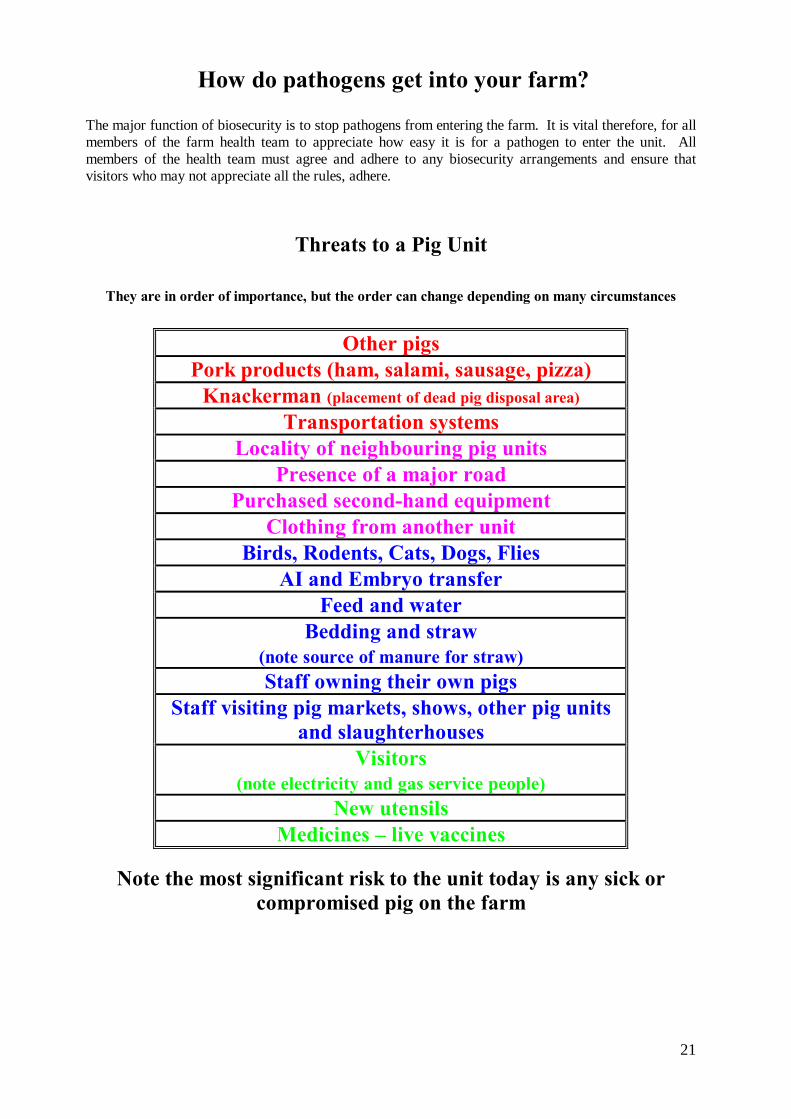
How do pathogens get into your farm? The major function of biosecurity is to stop pathogens from entering the farm. It is vital therefore, for all members of the farm health team to appreciate how easy it is for a pathogen to enter the unit. All members of the health team must agree and adhere to any biosecurity arrangements and ensure that visitors who may not appreciate all the rules, adhere.
Threats to a Pig Unit
They are in order of importance, but the order can change depending on many circumstances
Other pigs Pork products (ham, salami, sausage, pizza)
Knackerman (placement of dead pig disposal area) Transportation systems
Locality of neighbouring pig units Presence of a major road
Purchased second-hand equipment Clothing from another unit
Birds, Rodents, Cats, Dogs, Flies AI and Embryo transfer
Feed and water Bedding and straw
(note source of manure for straw) Staff owning their own pigs
Staff visiting pig markets, shows, other pig units and slaughterhouses
Visitors (note electricity and gas service people)
New utensils Medicines – live vaccines
Note the most significant risk to the unit today is any sick or
compromised pig on the farm
22
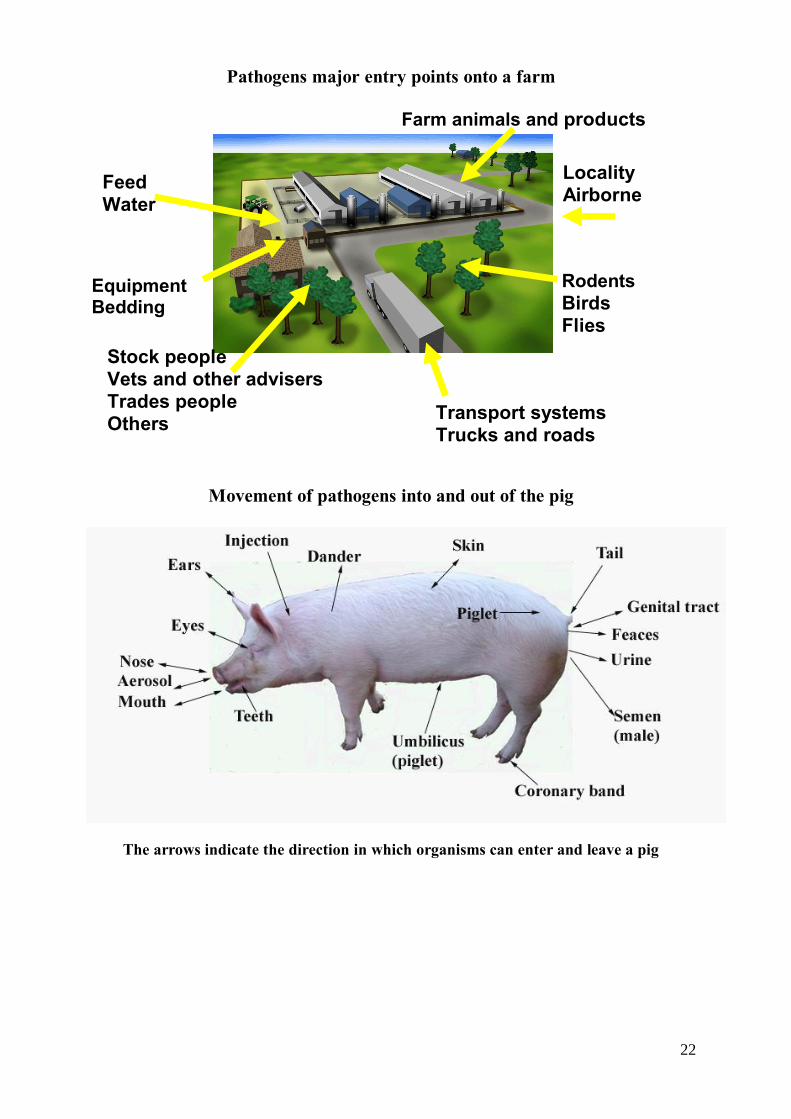
Pathogens major entry points onto a farm
Movement of pathogens into and out of the pig
The arrows indicate the direction in which organisms can enter and leave a pig
Transport systems Trucks and roads
Stock people Vets and other advisers Trades people Others
Feed Water
Locality Airborne
Rodents Birds Flies
Farm animals and products
Equipment Bedding
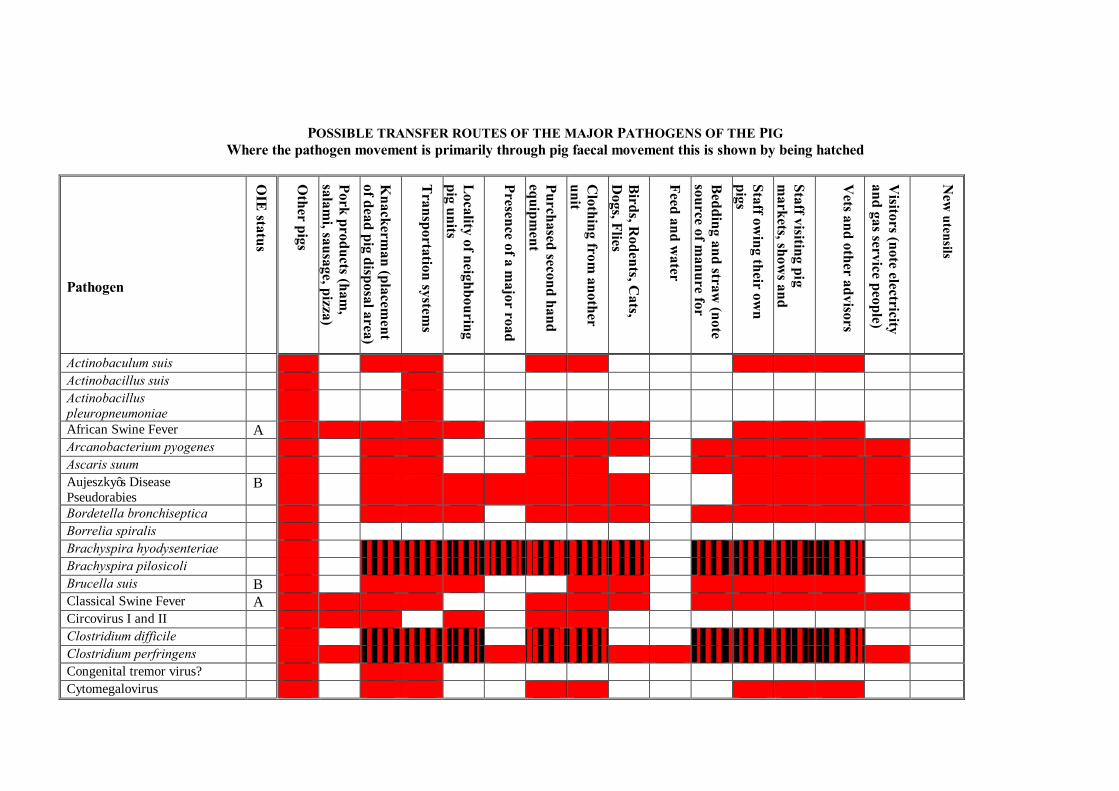
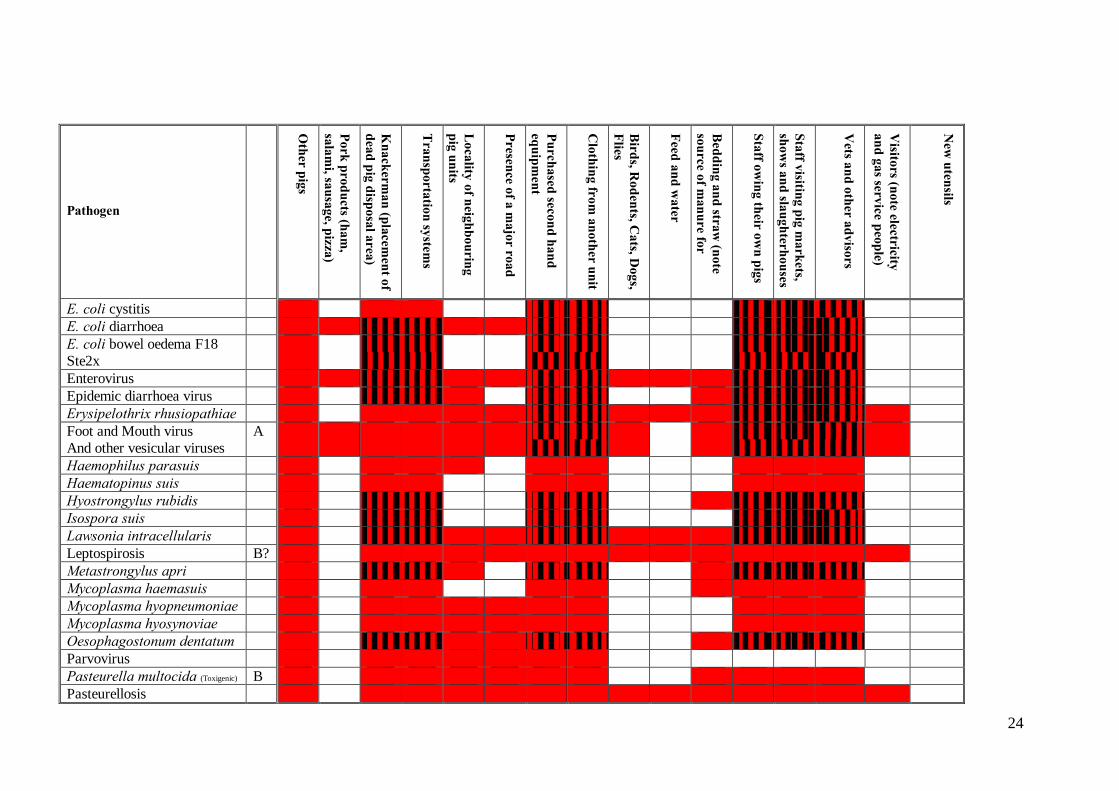
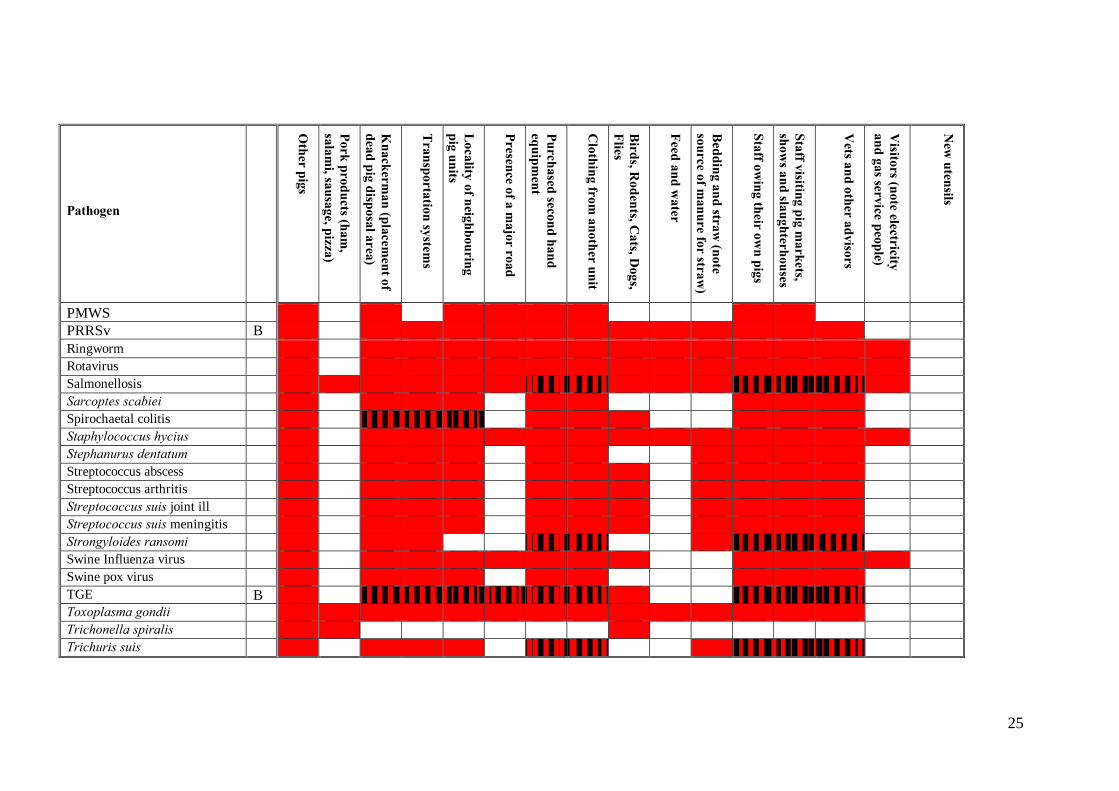
POSSIBLE TRANSFER ROUTES OF THE MAJOR PATHOGENS OF THE PIG Where the pathogen movement is primarily through pig faecal movement this is shown by being hatched
Pathogen
OIE
status
Other pigs
Pork products (ham,
salami, sausage, pizza)
Knackerm
an (placement
of dead pig disposal area)
Transportation system
s
Locality of neighbouring
pig units
Presence of a major road
Purchased second hand equipm
ent
Clothing from
another unit
Birds, R
odents, Cats,
Dogs, Flies
Feed and water
Bedding and straw
(note source of m
anure for
Staff owing their ow
n pigs
Staff visiting pig m
arkets, shows and
Vets and other advisors
Visitors (note electricity
and gas service people)
New
utensils
Actinobaculum suis Actinobacillus suis Actinobacillus pleuropneumoniae
African Swine Fever A Arcanobacterium pyogenes Ascaris suum Aujeszky’s Disease Pseudorabies
B
Bordetella bronchiseptica Borrelia spiralis Brachyspira hyodysenteriae Brachyspira pilosicoli Brucella suis B Classical Swine Fever A Circovirus I and II Clostridium difficile Clostridium perfringens Congenital tremor virus? Cytomegalovirus
24
Pathogen
Other pigs
Pork products (ham,
salami, sausage, pizza)
Knackerm
an (placement of
dead pig disposal area)
Transportation system
s
Locality of neighbouring
pig units
Presence of a major road
Purchased second hand equipm
ent
Clothing from
another unit
Birds, R
odents, Cats, D
ogs, Flies
Feed and water
Bedding and straw
(note source of m
anure for straw
)
Staff owing their ow
n pigs
Staff visiting pig markets,
shows and slaughterhouses
Vets and other advisors
Visitors (note electricity
and gas service people)
New
utensils
E. coli cystitis E. coli diarrhoea E. coli bowel oedema F18 Ste2x
Enterovirus Epidemic diarrhoea virus Erysipelothrix rhusiopathiae Foot and Mouth virus And other vesicular viruses
A
Haemophilus parasuis Haematopinus suis Hyostrongylus rubidis Isospora suis Lawsonia intracellularis Leptospirosis B? Metastrongylus apri Mycoplasma haemasuis Mycoplasma hyopneumoniae Mycoplasma hyosynoviae Oesophagostonum dentatum Parvovirus Pasteurella multocida (Toxigenic) B Pasteurellosis
25
Pathogen
Other pigs
Pork products (ham,
salami, sausage, pizza)
Knackerm
an (placement of
dead pig disposal area)
Transportation system
s
Locality of neighbouring
pig units
Presence of a major road
Purchased second hand equipm
ent
Clothing from
another unit
Birds, R
odents, Cats, D
ogs, Flies
Feed and water
Bedding and straw
(note source of m
anure for straw)
Staff owing their ow
n pigs
Staff visiting pig markets,
shows and slaughterhouses
Vets and other advisors
Visitors (note electricity
and gas service people)
New
utensils
PMWS PRRSv B Ringworm Rotavirus Salmonellosis Sarcoptes scabiei Spirochaetal colitis Staphylococcus hycius Stephanurus dentatum Streptococcus abscess Streptococcus arthritis Streptococcus suis joint ill Streptococcus suis meningitis Strongyloides ransomi Swine Influenza virus Swine pox virus TGE B Toxoplasma gondii Trichonella spiralis Trichuris suis

Considerations in the design of the outer security perimeter Specific pathogen Free Farm Security
Basic Design – ideal situation that farms should aim to achieve over time
1 The unit must be surrounded by a complete fence 2 The fence should be 2.5 metres high and 0.5 metres underground to stop pigs and
other mammals entering and leaving the unit 3 A car park should be sited away from the unit and appropriately marked 4 All entrances through the fence must be locked 6 All personal items including personal clothing, watches, cigarette lighters etc must
remain outside the entrance to the unit itself 7 Spectacles, cameras and other visitor equipment must be inspected by a member of
staff before being allowed onto the unit 8 Outside unit fence, all meters (electrical, gas and water) must be situated off-farm
and placed in a locked area 9 The farm manager's office should be situated near the entrance
10 A horn switch should be placed by the car park to attract staff attention to visitors. 11 None of the staff should own or come into contact with other pigs 12 No staff should visit animal markets, pig shows or slaughterhouses 13 No unauthorised pigs, pig products or pig faecal material must be allowed onto the
farm 14 Unit rules regarding last pig contact must be strictly adhered to and visitors book
signed 15 All entry and exit points should be well lit, ideally with proximity sensors
The following entrances/exits are permitted 1 Entrance via a locked door into staff shower facility 2 Entrance via a locked door into a visitor shower facility 3 Connector to the feed bins which pass through the fence 4 Exit via a raised ramp for livestock 5 Exit for dead animal disposal through a locked gate 6 The straw barn has an entrance from off-farm and an entrance on-farm. Both should
be kept locked. Staff are not allowed to leave the farm through the straw barn 7 Ensure you know the location of all the keys for the farm doors. Do not permit keys
to be copied without written permission 8 Slurry disposal through underground pipe to slurry store off-farm
27
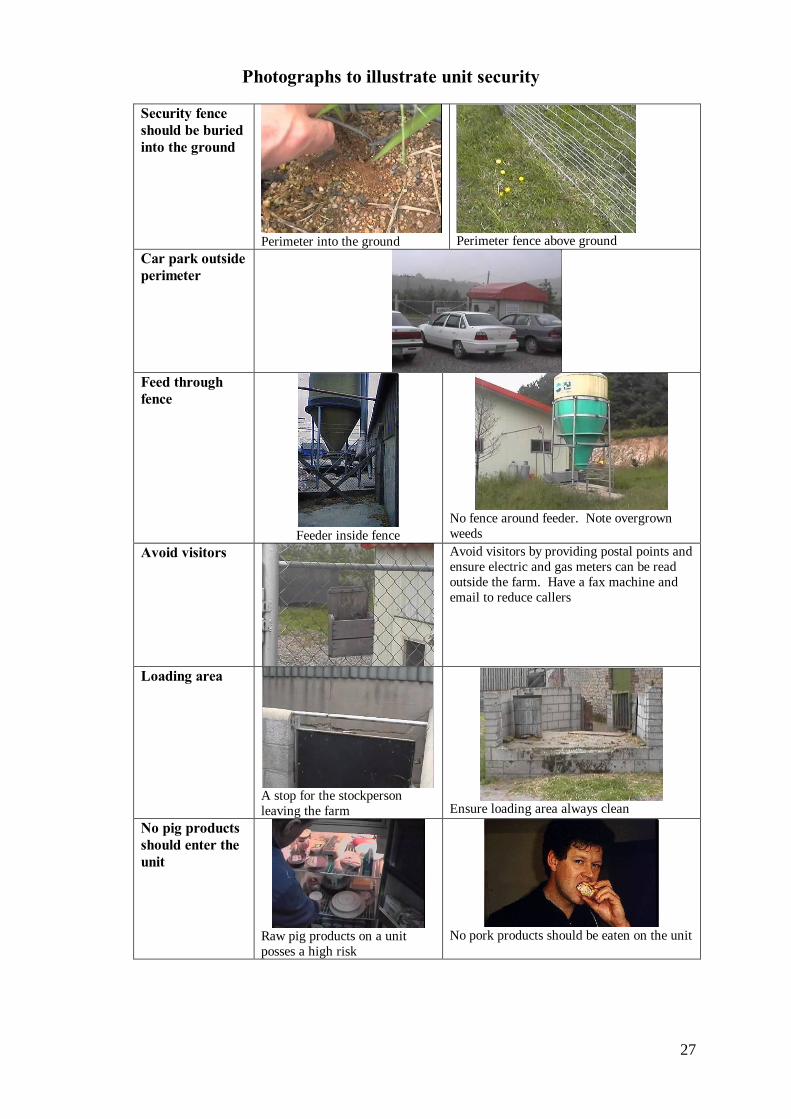
Photographs to illustrate unit security
Security fence should be buried into the ground
Perimeter into the ground
Perimeter fence above ground
Car park outside perimeter
Feed through fence
Feeder inside fence
No fence around feeder. Note overgrown weeds
Avoid visitors
Avoid visitors by providing postal points and ensure electric and gas meters can be read outside the farm. Have a fax machine and email to reduce callers
Loading area
A stop for the stockperson leaving the farm
Ensure loading area always clean
No pig products should enter the unit
Raw pig products on a unit posses a high risk
No pork products should be eaten on the unit
28
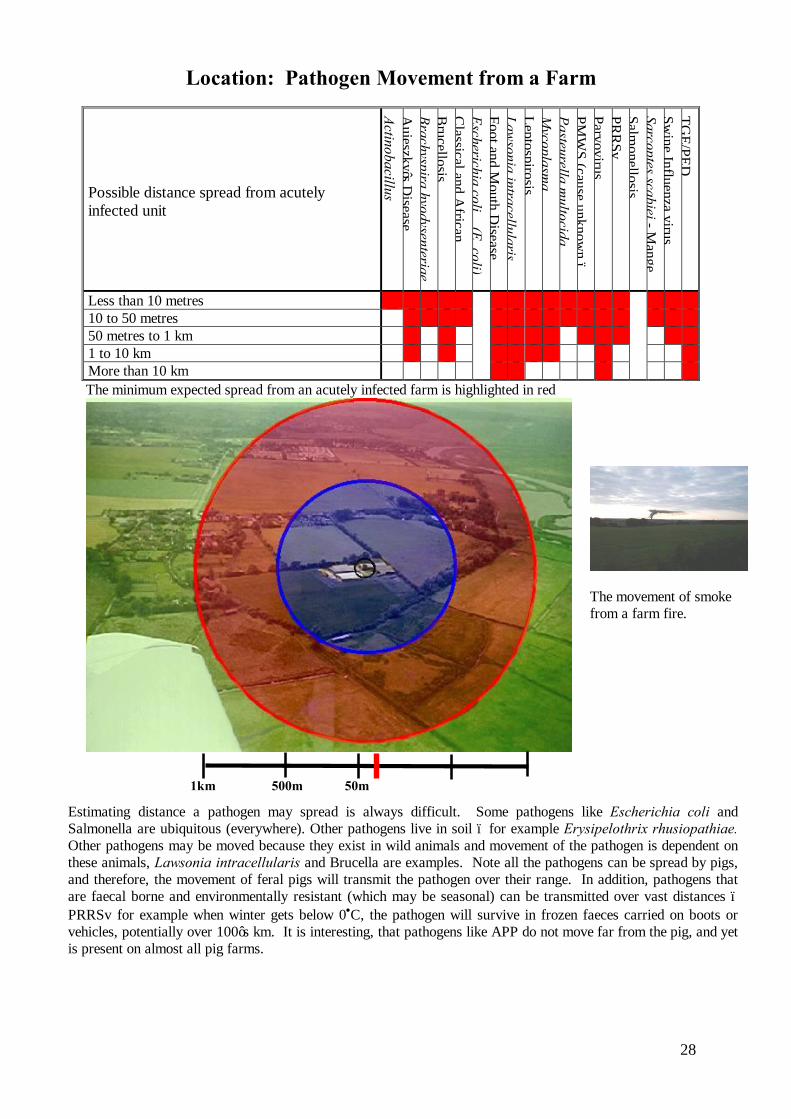
Location: Pathogen Movement from a Farm
Possible distance spread from acutely infected unit
Actinobacillus A
ujeszky’s Disease
Brachyspira hyodysenteriae B
rucellosis C
lassical and African
Escherichia coli _ (E. coli) Foot and M
outh Disease
Lawsonia intracellularis
Leptospirosis M
ycoplasma
Pasteurella multocida
PMW
S (cause unknown –
Parvovirus PR
RSv
Salmonellosis
Sarcoptes scabiei - Mange
Swine Influenza virus
TGE/PED
Less than 10 metres 10 to 50 metres 50 metres to 1 km 1 to 10 km More than 10 km The minimum expected spread from an acutely infected farm is highlighted in red
The movement of smoke from a farm fire.
Estimating distance a pathogen may spread is always difficult. Some pathogens like Escherichia coli and Salmonella are ubiquitous (everywhere). Other pathogens live in soil – for example Erysipelothrix rhusiopathiae. Other pathogens may be moved because they exist in wild animals and movement of the pathogen is dependent on these animals, Lawsonia intracellularis and Brucella are examples. Note all the pathogens can be spread by pigs, and therefore, the movement of feral pigs will transmit the pathogen over their range. In addition, pathogens that are faecal borne and environmentally resistant (which may be seasonal) can be transmitted over vast distances – PRRSv for example when winter gets below 0•C, the pathogen will survive in frozen faeces carried on boots or vehicles, potentially over 100’s km. It is interesting, that pathogens like APP do not move far from the pig, and yet is present on almost all pig farms.
1km 500m 50m

29
Internet programmes such as Google Earth can provide an extremely useful resource as the farm and the surrounds can be visualised. The two farms illustrated are only separated by 300 metres, significantly limiting the long term biosecurity of each farm.
In addition biosecurity maps can be created illustrating entrances and exits, weak points in the perimeter and rodent bait box positions.
30
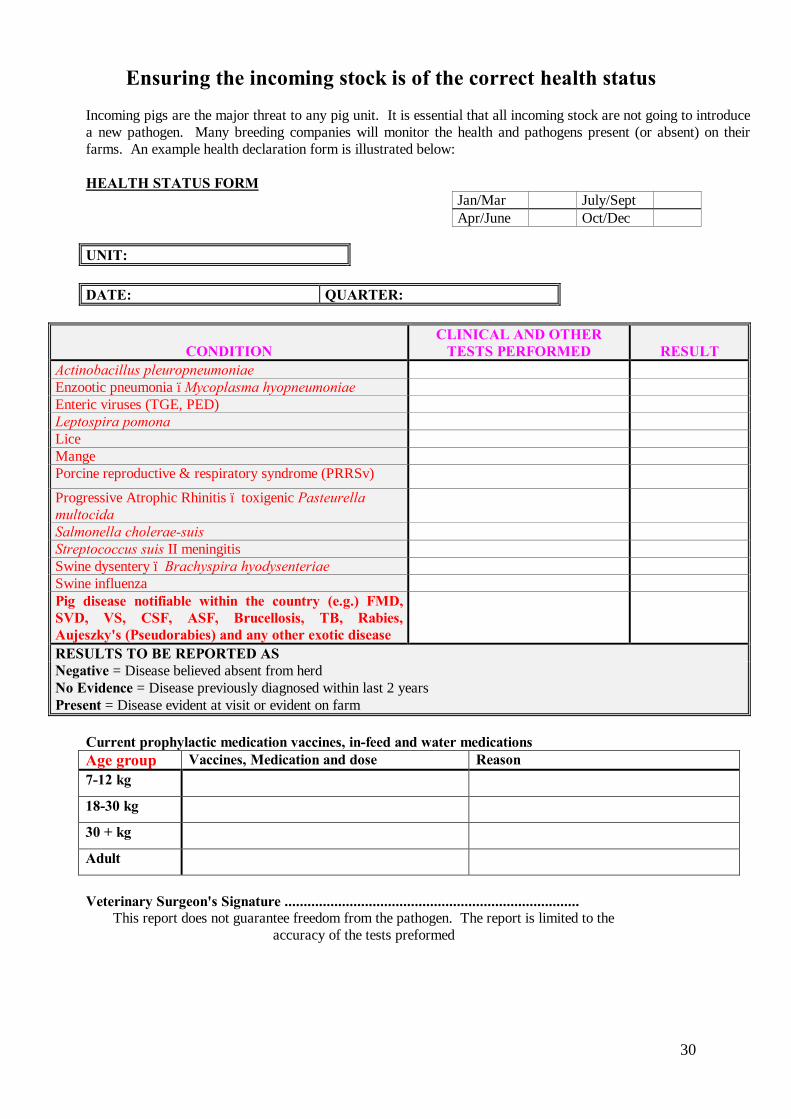
Ensuring the incoming stock is of the correct health status Incoming pigs are the major threat to any pig unit. It is essential that all incoming stock are not going to introduce a new pathogen. Many breeding companies will monitor the health and pathogens present (or absent) on their farms. An example health declaration form is illustrated below:
HEALTH STATUS FORM
Jan/Mar July/Sept Apr/June Oct/Dec
UNIT: DATE: QUARTER:
CONDITION
CLINICAL AND OTHER TESTS PERFORMED
RESULT
Actinobacillus pleuropneumoniae Enzootic pneumonia –Mycoplasma hyopneumoniae Enteric viruses (TGE, PED) Leptospira pomona Lice Mange Porcine reproductive & respiratory syndrome (PRRSv)
Progressive Atrophic Rhinitis – toxigenic Pasteurella multocida
Salmonella cholerae-suis Streptococcus suis II meningitis Swine dysentery – Brachyspira hyodysenteriae Swine influenza Pig disease notifiable within the country (e.g.) FMD, SVD, VS, CSF, ASF, Brucellosis, TB, Rabies, Aujeszky's (Pseudorabies) and any other exotic disease
RESULTS TO BE REPORTED AS Negative = Disease believed absent from herd No Evidence = Disease previously diagnosed within last 2 years Present = Disease evident at visit or evident on farm
Current prophylactic medication vaccines, in-feed and water medications Age group Vaccines, Medication and dose Reason 7-12 kg
18-30 kg
30 + kg
Adult
Veterinary Surgeon's Signature .............................................................................
This report does not guarantee freedom from the pathogen. The report is limited to the accuracy of the tests preformed
31
Example of Routine Health Monitoring as carried out by a pig breeding company
A variety of specific disease states are monitored quarterly on each of the units. The reporting form to be used by the unit veterinary surgeon is illustrated on the previous page. Monitoring will follow the specified scheme. Note the farms are inspected twice daily by training stockpeople. Weekly reports by the manager are submitted to the company veterinarian. The unit is examined quarterly by the company veterinarian. Other testing may be required depending in the pathogen. For example if the farm is Actinobacillus pleuropneumoniae free. Units Health Status A PRRSv –ve Mycoplasma hyopneumoniae –ve (Herd less than 500 sows) PRRSv 20 finishing pig’s minimum age 12 weeks at least once a quarter Mycoplasma hyopneumoniae 20 finishing pig’s minimum age 12 weeks at least once a quarter Progressive Atrophic Rhinitis – Toxigenic Pasteurella multocida Every 6 months nasal swabs 4 swabs from pigs at 4, 8 and 12 weeks of age pigs Internal parasites Every 6 months worm examination of faeces from boars, lactating and dry/gestating sows and finishing pigs Slaughterhouse Examination Every 6 months examination of 60 pig skins, 30 lungs and 20 snouts Note: This will only provide an assurance of 99% that less than 20% of the animals are positive to the organism. Any sample that is not 100% of the animals cannot rule out the possibility that positive animals exist within the population. Over time confidence increases in the accuracy of the statements. Unit Health Status B PRRSv –ve Mycoplasma hyopneumoniae +ve (Herd less than 500 sows) PRRSv 10 finishing pig’s minimum age 12 weeks bled at each quarter Progressive Atrophic Rhinitis – Toxigenic Pasteurella multocida Every 6 months nasal swabs 4 swabs from pigs at 4, 8 and 12 weeks of age pigs Internal parasites Every 6 months worm examination of faeces from boars, lactating and dry/gestating sows and finishing pigs Slaughterhouse Examination Every 6 months examination of 60 pig skins, 30 lungs and 20 snouts Unit Health Status C PRRSv +ve Mycoplasma hyopneumoniae +ve (Herd less than 500 sows) Progressive Atrophic Rhinitis – Toxigenic Pasteurella multocida Every 6 months nasal swabs 4 swabs from pigs at 4, 8 and 12 weeks of age pigs Internal parasites Every 6 months worm examination of faeces from boars, lactating and dry/gestating sows and finishing pigs Slaughterhouse Examination Every 6 months examination of 60 pig skins, 30 lungs and 20 snouts AI Stud PRRSv-ve Mycoplasma hyopneumoniae Vaccinated (AI stud less than 150 boars) 10 animals will be examined by serology for PRRSv. Where required, serum may be tested by various PCR techniques for PRRSv. Additional entry and exit tests may be required by governmental bodies.
32
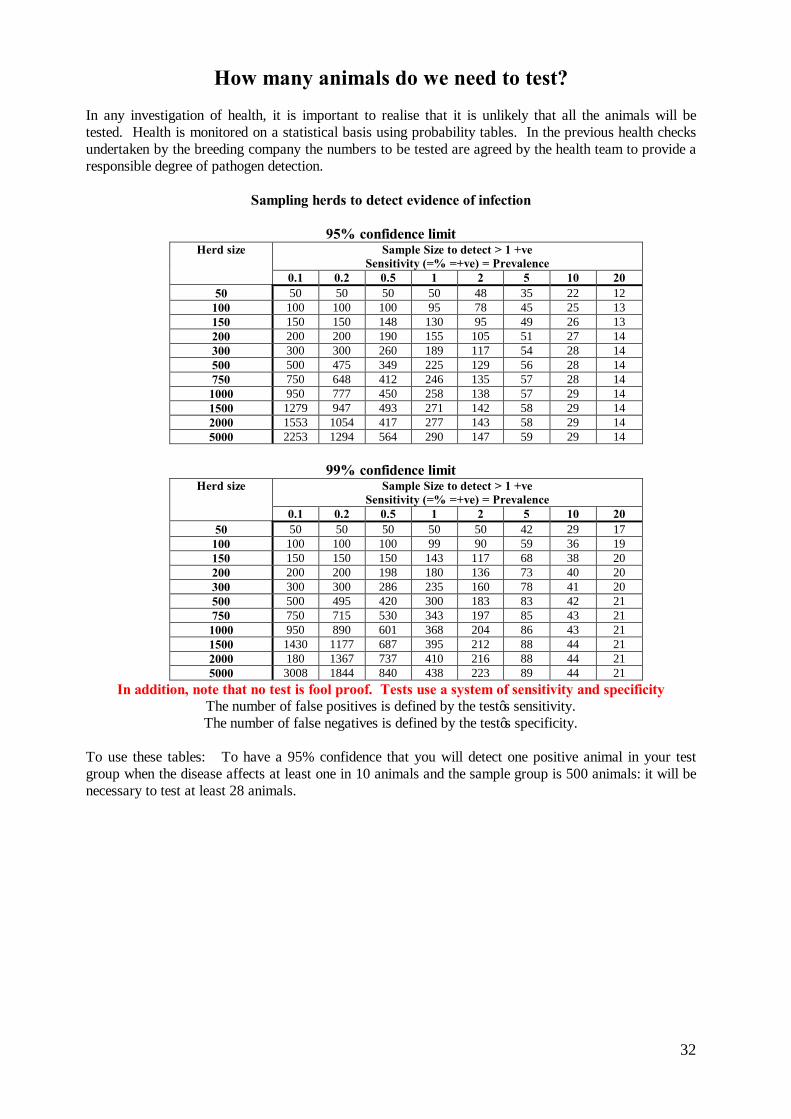
How many animals do we need to test? In any investigation of health, it is important to realise that it is unlikely that all the animals will be tested. Health is monitored on a statistical basis using probability tables. In the previous health checks undertaken by the breeding company the numbers to be tested are agreed by the health team to provide a responsible degree of pathogen detection.
Sampling herds to detect evidence of infection
95% confidence limit Herd size Sample Size to detect > 1 +ve
Sensitivity (=% =+ve) = Prevalence 0.1 0.2 0.5 1 2 5 10 20
50 50 50 50 50 48 35 22 12 100 100 100 100 95 78 45 25 13 150 150 150 148 130 95 49 26 13 200 200 200 190 155 105 51 27 14 300 300 300 260 189 117 54 28 14 500 500 475 349 225 129 56 28 14 750 750 648 412 246 135 57 28 14 1000 950 777 450 258 138 57 29 14 1500 1279 947 493 271 142 58 29 14 2000 1553 1054 417 277 143 58 29 14 5000 2253 1294 564 290 147 59 29 14
99% confidence limit
Herd size Sample Size to detect > 1 +ve Sensitivity (=% =+ve) = Prevalence
0.1 0.2 0.5 1 2 5 10 20 50 50 50 50 50 50 42 29 17
100 100 100 100 99 90 59 36 19 150 150 150 150 143 117 68 38 20 200 200 200 198 180 136 73 40 20 300 300 300 286 235 160 78 41 20 500 500 495 420 300 183 83 42 21 750 750 715 530 343 197 85 43 21 1000 950 890 601 368 204 86 43 21 1500 1430 1177 687 395 212 88 44 21 2000 180 1367 737 410 216 88 44 21 5000 3008 1844 840 438 223 89 44 21
In addition, note that no test is fool proof. Tests use a system of sensitivity and specificity The number of false positives is defined by the test’s sensitivity. The number of false negatives is defined by the test’s specificity.
To use these tables: To have a 95% confidence that you will detect one positive animal in your test group when the disease affects at least one in 10 animals and the sample group is 500 animals: it will be necessary to test at least 28 animals.

33
Determination of the sensitivity and specificity of a test
This simple table will allow the results of a test to be predicted Construct a table with four rows and two columns.
Animals which are going to test positive
Animals which are going to test negative
Actual results from the prevalence of the pathogen in the herd – ie 10% of animals have the pathogen
Thus – from a 100 animals the result will be 10 animals
Thus – from a 100 animals the result will be 90 animals
From the claimed sensitivity (accurate positives) of the test the number which will actually be positive. Ie test is 90% accurate in detecting positive animals
Thus – from the 10 true positive animals, the test will detect 90% of them – 9 animals will be found truly positive
Thus – from the true positive animals, the test will fail to detect 10% of them – 1 animal will be found to be falsely negative
From the claimed specificity (accurate negatives) of the test the number will accurately identified as negative. Ie test is 80% accurate in detecting negative animals
Thus – from the true negative animals, the test will identify 20% as false positive – thus 18 animals will be found positive.
Thus from the true negative animals, the test will fail to indicate they are negative 80% of the time – 72 animals will be found truly negative
Apparent result of the test This test will identify 9 animals truly negative and an additional 18 as false positive – thus 27 animals in total will be found positive
This test will identify 1 animal as a false negative and an additional 72 animals as truly negative, thus 73 animals in total will be found negative.
A simple spreadsheet can thus be constructed – this is an embedded excel on the CD.
Prevalence in the herd 10 %Sensitivity (positive) 90 %
Specificity (negative) 80 %
Calculation from 100 animals
Positive NegativeActual 10 10 90 animals
Sensitivity - true positive 9 1Specificity - true negative 18 72
Apparent results 27 73Total 100 animals
34
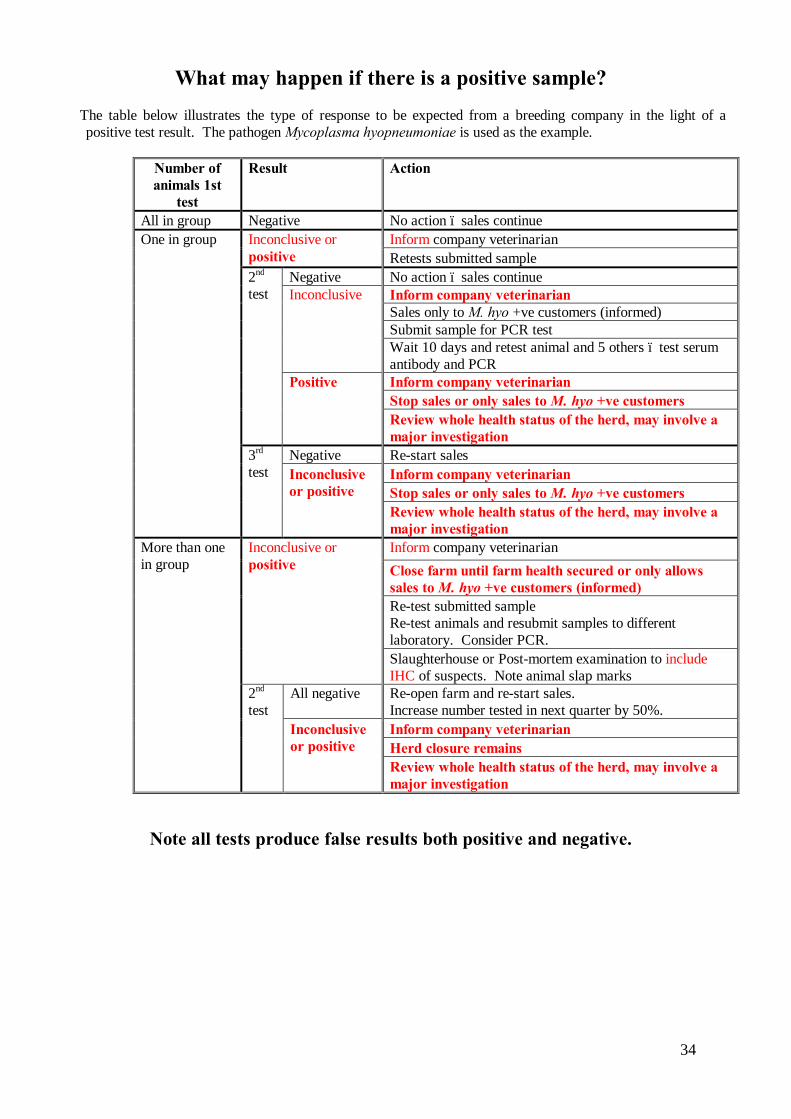
What may happen if there is a positive sample?
The table below illustrates the type of response to be expected from a breeding company in the light of a positive test result. The pathogen Mycoplasma hyopneumoniae is used as the example.
Number of animals 1st
test
Result Action
All in group Negative No action – sales continue One in group Inconclusive or
positive Inform company veterinarian Retests submitted sample
2nd test
Negative No action – sales continue Inconclusive Inform company veterinarian
Sales only to M. hyo +ve customers (informed) Submit sample for PCR test Wait 10 days and retest animal and 5 others – test serum antibody and PCR
Positive Inform company veterinarian Stop sales or only sales to M. hyo +ve customers Review whole health status of the herd, may involve a major investigation
3rd test
Negative Re-start sales Inconclusive or positive
Inform company veterinarian Stop sales or only sales to M. hyo +ve customers Review whole health status of the herd, may involve a major investigation
More than one in group
Inconclusive or positive
Inform company veterinarian Close farm until farm health secured or only allows sales to M. hyo +ve customers (informed) Re-test submitted sample Re-test animals and resubmit samples to different laboratory. Consider PCR. Slaughterhouse or Post-mortem examination to include IHC of suspects. Note animal slap marks
2nd test
All negative Re-open farm and re-start sales. Increase number tested in next quarter by 50%.
Inconclusive or positive
Inform company veterinarian Herd closure remains Review whole health status of the herd, may involve a major investigation
Note all tests produce false results both positive and negative.
35
Selection of Specimens Animals selected for laboratory analysis, ideally should be free from antimicrobial therapy and in an early or acute disease stage. Selected tissues should be collected as aseptically as possible. In addition, a meaningful history of the disease outbreak and a tentative diagnosis, based upon clinical evaluation, should be included. Laboratory tests results are directly affected by the selection, preparation, handling, and shipment of selected specimens. Identify tissue and samples: • Building or site • Animal identification number • Fluids, Exudate/Aspirates, Tracheal Washes, Urine
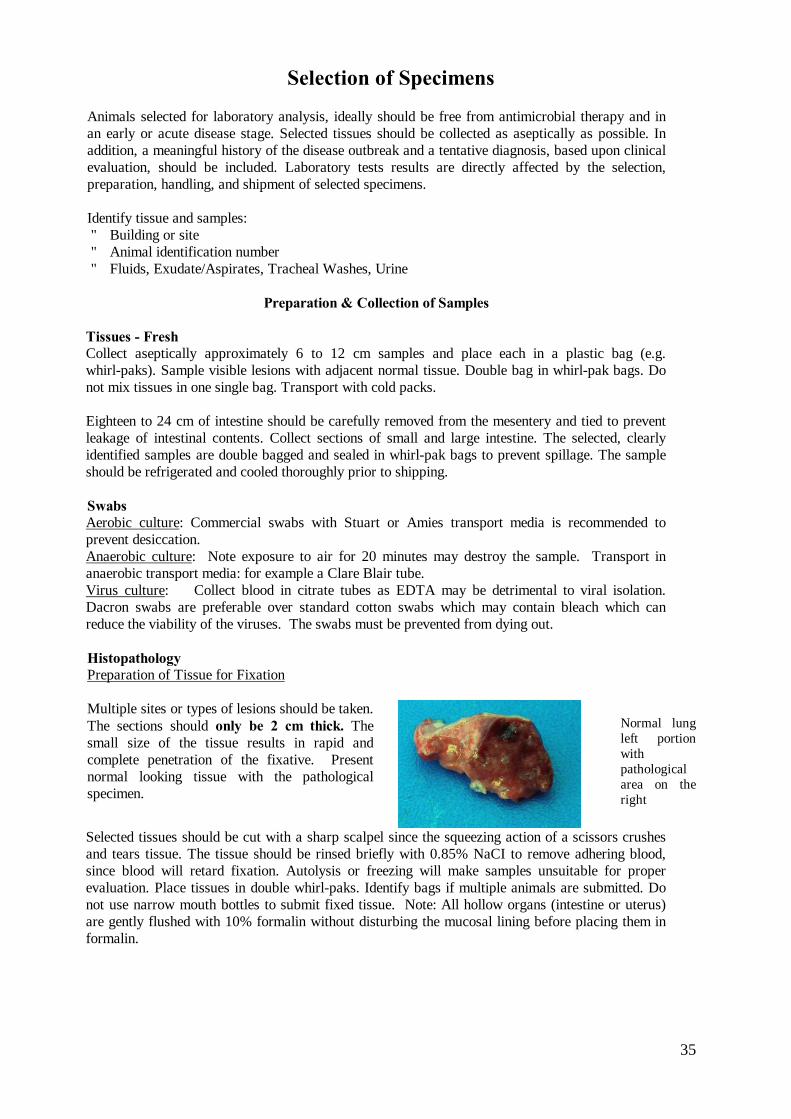
Preparation & Collection of Samples Tissues - Fresh Collect aseptically approximately 6 to 12 cm samples and place each in a plastic bag (e.g. whirl-paks). Sample visible lesions with adjacent normal tissue. Double bag in whirl-pak bags. Do not mix tissues in one single bag. Transport with cold packs. Eighteen to 24 cm of intestine should be carefully removed from the mesentery and tied to prevent leakage of intestinal contents. Collect sections of small and large intestine. The selected, clearly identified samples are double bagged and sealed in whirl-pak bags to prevent spillage. The sample should be refrigerated and cooled thoroughly prior to shipping. Swabs Aerobic culture: Commercial swabs with Stuart or Amies transport media is recommended to prevent desiccation. Anaerobic culture: Note exposure to air for 20 minutes may destroy the sample. Transport in anaerobic transport media: for example a Clare Blair tube. Virus culture: Collect blood in citrate tubes as EDTA may be detrimental to viral isolation. Dacron swabs are preferable over standard cotton swabs which may contain bleach which can reduce the viability of the viruses. The swabs must be prevented from dying out. Histopathology Preparation of Tissue for Fixation Multiple sites or types of lesions should be taken. The sections should only be 2 cm thick. The small size of the tissue results in rapid and complete penetration of the fixative. Present normal looking tissue with the pathological specimen.
Normal lung left portion with pathological area on the right
Selected tissues should be cut with a sharp scalpel since the squeezing action of a scissors crushes and tears tissue. The tissue should be rinsed briefly with 0.85% NaCI to remove adhering blood, since blood will retard fixation. Autolysis or freezing will make samples unsuitable for proper evaluation. Place tissues in double whirl-paks. Identify bags if multiple animals are submitted. Do not use narrow mouth bottles to submit fixed tissue. Note: All hollow organs (intestine or uterus) are gently flushed with 10% formalin without disturbing the mucosal lining before placing them in formalin.
36
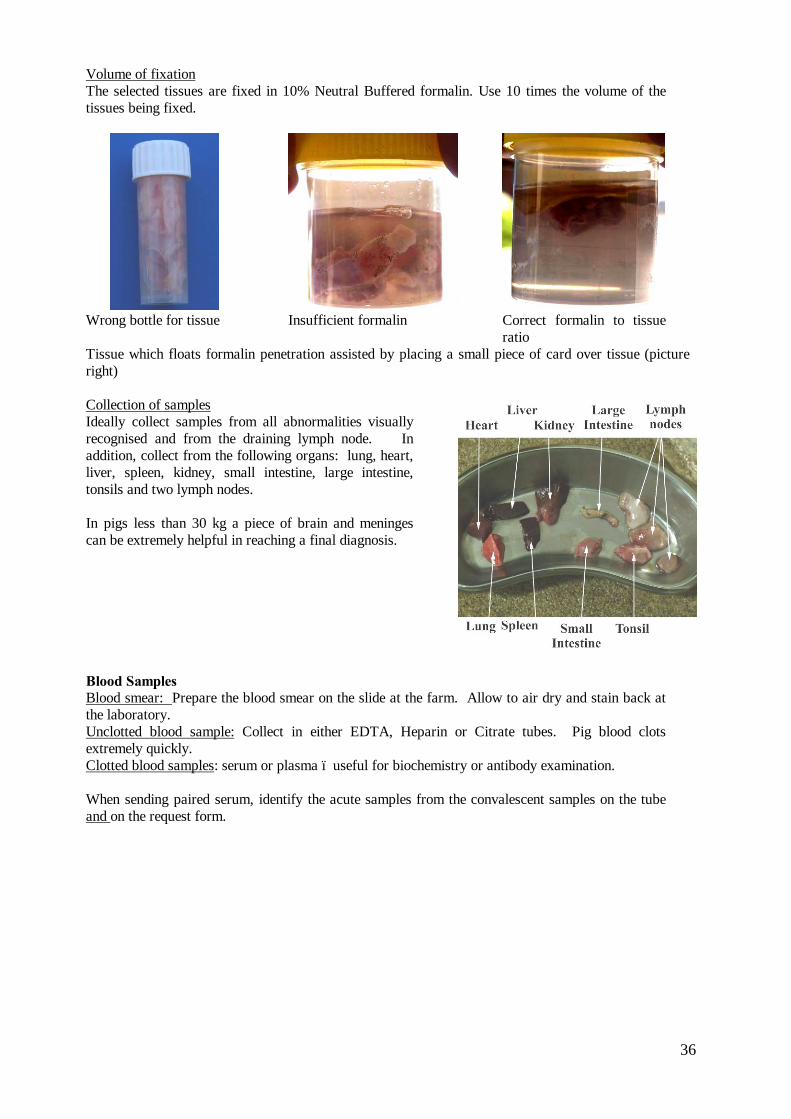
Volume of fixation The selected tissues are fixed in 10% Neutral Buffered formalin. Use 10 times the volume of the tissues being fixed.
Wrong bottle for tissue Insufficient formalin Correct formalin to tissue
ratio Tissue which floats formalin penetration assisted by placing a small piece of card over tissue (picture right) Collection of samples Ideally collect samples from all abnormalities visually recognised and from the draining lymph node. In addition, collect from the following organs: lung, heart, liver, spleen, kidney, small intestine, large intestine, tonsils and two lymph nodes. In pigs less than 30 kg a piece of brain and meninges can be extremely helpful in reaching a final diagnosis.
Blood Samples Blood smear: Prepare the blood smear on the slide at the farm. Allow to air dry and stain back at the laboratory. Unclotted blood sample: Collect in either EDTA, Heparin or Citrate tubes. Pig blood clots extremely quickly. Clotted blood samples: serum or plasma – useful for biochemistry or antibody examination. When sending paired serum, identify the acute samples from the convalescent samples on the tube and on the request form.
37
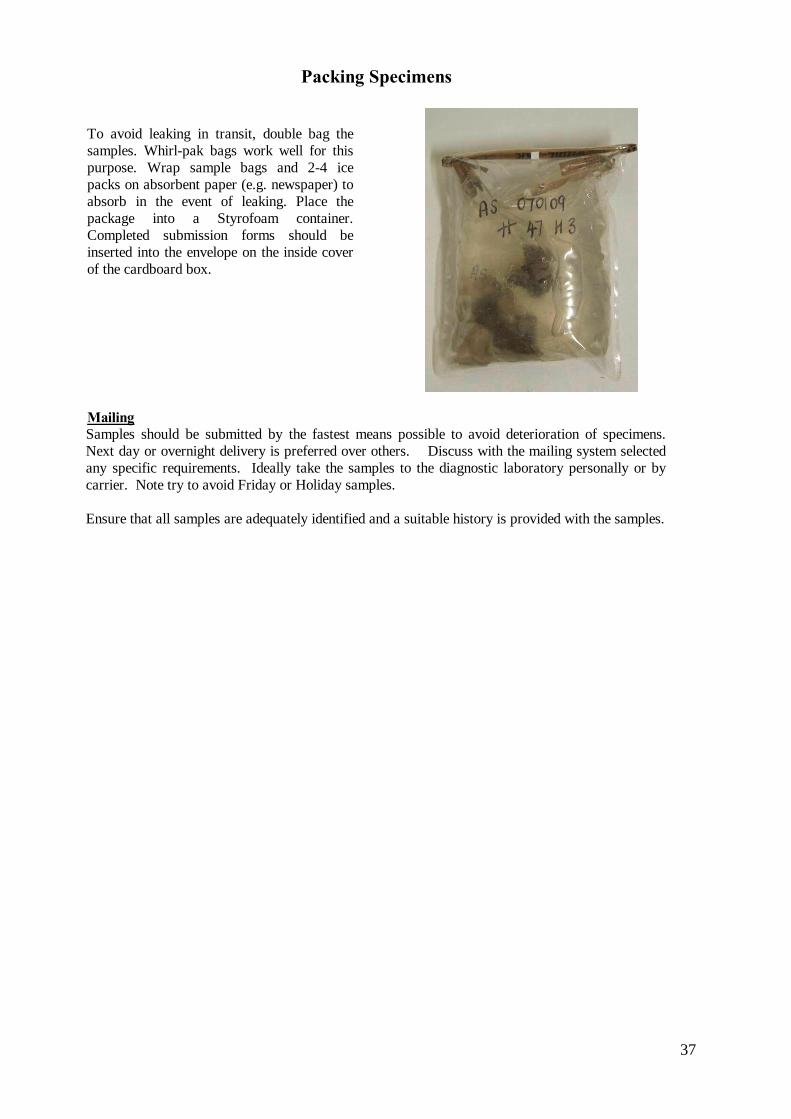
Packing Specimens
To avoid leaking in transit, double bag the samples. Whirl-pak bags work well for this purpose. Wrap sample bags and 2-4 ice packs on absorbent paper (e.g. newspaper) to absorb in the event of leaking. Place the package into a Styrofoam container. Completed submission forms should be inserted into the envelope on the inside cover of the cardboard box.
Mailing Samples should be submitted by the fastest means possible to avoid deterioration of specimens. Next day or overnight delivery is preferred over others. Discuss with the mailing system selected any specific requirements. Ideally take the samples to the diagnostic laboratory personally or by carrier. Note try to avoid Friday or Holiday samples. Ensure that all samples are adequately identified and a suitable history is provided with the samples.
38
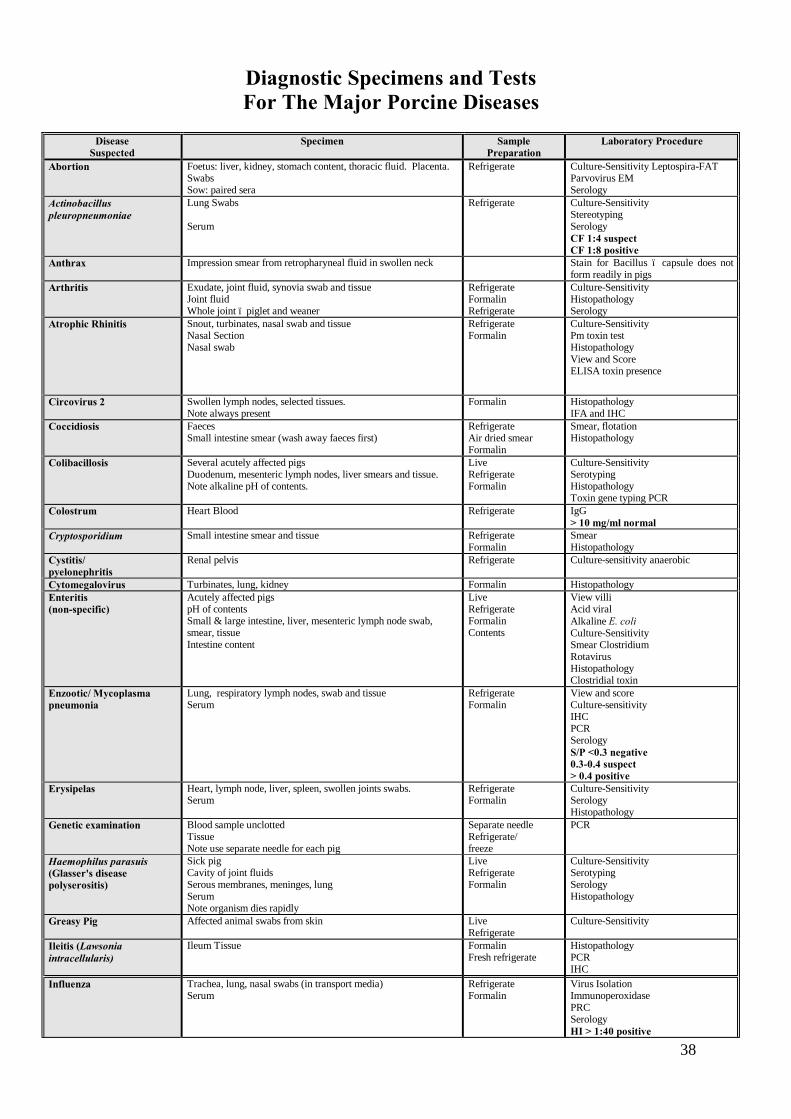
Diagnostic Specimens and Tests For The Major Porcine Diseases
Disease
Suspected Specimen Sample
Preparation Laboratory Procedure
Abortion Foetus: liver, kidney, stomach content, thoracic fluid. Placenta. Swabs Sow: paired sera
Refrigerate Culture-Sensitivity Leptospira-FAT Parvovirus EM Serology
Actinobacillus pleuropneumoniae
Lung Swabs Serum
Refrigerate Culture-Sensitivity Stereotyping Serology CF 1:4 suspect CF 1:8 positive
Anthrax Impression smear from retropharyneal fluid in swollen neck Stain for Bacillus – capsule does not form readily in pigs
Arthritis Exudate, joint fluid, synovia swab and tissue Joint fluid Whole joint – piglet and weaner
Refrigerate Formalin Refrigerate
Culture-Sensitivity Histopathology Serology
Atrophic Rhinitis Snout, turbinates, nasal swab and tissue Nasal Section Nasal swab
Refrigerate Formalin
Culture-Sensitivity Pm toxin test Histopathology View and Score ELISA toxin presence
Circovirus 2 Swollen lymph nodes, selected tissues. Note always present
Formalin Histopathology IFA and IHC
Coccidiosis Faeces Small intestine smear (wash away faeces first)
Refrigerate Air dried smear Formalin
Smear, flotation Histopathology
Colibacillosis Several acutely affected pigs Duodenum, mesenteric lymph nodes, liver smears and tissue. Note alkaline pH of contents.
Live Refrigerate Formalin
Culture-Sensitivity Serotyping Histopathology Toxin gene typing PCR
Colostrum Heart Blood Refrigerate IgG > 10 mg/ml normal
Cryptosporidium Small intestine smear and tissue Refrigerate Formalin
Smear Histopathology
Cystitis/ pyelonephritis
Renal pelvis Refrigerate Culture-sensitivity anaerobic
Cytomegalovirus Turbinates, lung, kidney Formalin Histopathology Enteritis (non-specific)
Acutely affected pigs pH of contents Small & large intestine, liver, mesenteric lymph node swab, smear, tissue Intestine content
Live Refrigerate Formalin Contents
View villi Acid viral Alkaline E. coli Culture-Sensitivity Smear Clostridium Rotavirus Histopathology Clostridial toxin
Enzootic/ Mycoplasma pneumonia
Lung, respiratory lymph nodes, swab and tissue Serum
Refrigerate Formalin
View and score Culture-sensitivity IHC PCR Serology S/P <0.3 negative 0.3-0.4 suspect > 0.4 positive
Erysipelas Heart, lymph node, liver, spleen, swollen joints swabs. Serum
Refrigerate Formalin
Culture-Sensitivity Serology Histopathology
Genetic examination Blood sample unclotted Tissue Note use separate needle for each pig
Separate needle Refrigerate/ freeze
PCR
Haemophilus parasuis (Glasser's disease polyserositis)
Sick pig Cavity of joint fluids Serous membranes, meninges, lung Serum Note organism dies rapidly
Live Refrigerate Formalin
Culture-Sensitivity Serotyping Serology Histopathology
Greasy Pig Affected animal swabs from skin Live Refrigerate
Culture-Sensitivity
Ileitis (Lawsonia intracellularis)
Ileum Tissue Formalin Fresh refrigerate
Histopathology PCR IHC
Influenza Trachea, lung, nasal swabs (in transport media) Serum
Refrigerate Formalin
Virus Isolation Immunoperoxidase PRC Serology HI > 1:40 positive
39
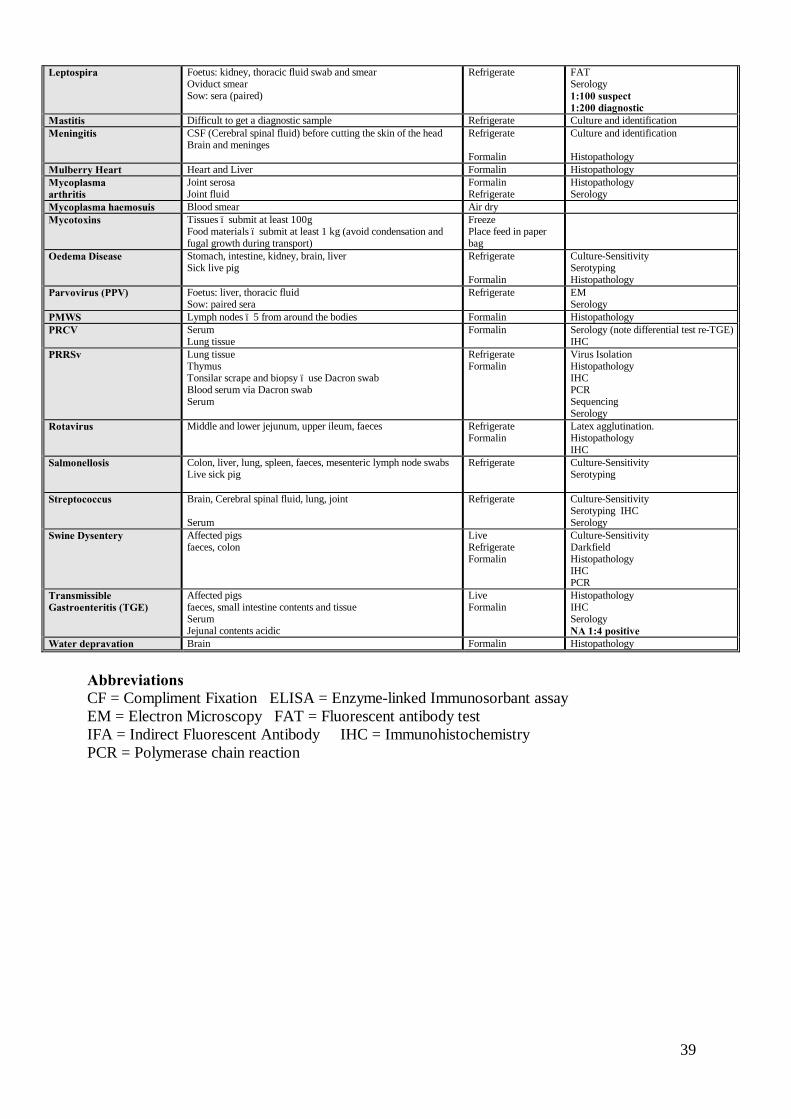
Leptospira Foetus: kidney, thoracic fluid swab and smear Oviduct smear Sow: sera (paired)
Refrigerate FAT Serology 1:100 suspect 1:200 diagnostic
Mastitis Difficult to get a diagnostic sample Refrigerate Culture and identification Meningitis CSF (Cerebral spinal fluid) before cutting the skin of the head
Brain and meninges Refrigerate Formalin
Culture and identification Histopathology
Mulberry Heart Heart and Liver Formalin Histopathology Mycoplasma arthritis
Joint serosa Joint fluid
Formalin Refrigerate
Histopathology Serology
Mycoplasma haemosuis Blood smear Air dry Mycotoxins Tissues – submit at least 100g
Food materials – submit at least 1 kg (avoid condensation and fugal growth during transport)
Freeze Place feed in paper bag
Oedema Disease Stomach, intestine, kidney, brain, liver Sick live pig
Refrigerate Formalin
Culture-Sensitivity Serotyping Histopathology
Parvovirus (PPV) Foetus: liver, thoracic fluid Sow: paired sera
Refrigerate EM Serology
PMWS Lymph nodes – 5 from around the bodies Formalin Histopathology PRCV Serum
Lung tissue Formalin Serology (note differential test re-TGE)
IHC PRRSv Lung tissue
Thymus Tonsilar scrape and biopsy – use Dacron swab Blood serum via Dacron swab Serum
Refrigerate Formalin
Virus Isolation Histopathology IHC PCR Sequencing Serology
Rotavirus Middle and lower jejunum, upper ileum, faeces Refrigerate Formalin
Latex agglutination. Histopathology IHC
Salmonellosis Colon, liver, lung, spleen, faeces, mesenteric lymph node swabs Live sick pig
Refrigerate
Culture-Sensitivity Serotyping
Streptococcus Brain, Cerebral spinal fluid, lung, joint Serum
Refrigerate Culture-Sensitivity Serotyping IHC Serology
Swine Dysentery Affected pigs faeces, colon
Live Refrigerate Formalin
Culture-Sensitivity Darkfield Histopathology IHC PCR
Transmissible Gastroenteritis (TGE)
Affected pigs faeces, small intestine contents and tissue Serum Jejunal contents acidic
Live Formalin
Histopathology IHC Serology NA 1:4 positive
Water depravation Brain Formalin Histopathology
Abbreviations CF = Compliment Fixation ELISA = Enzyme-linked Immunosorbant assay EM = Electron Microscopy FAT = Fluorescent antibody test IFA = Indirect Fluorescent Antibody IHC = Immunohistochemistry PCR = Polymerase chain reaction
40
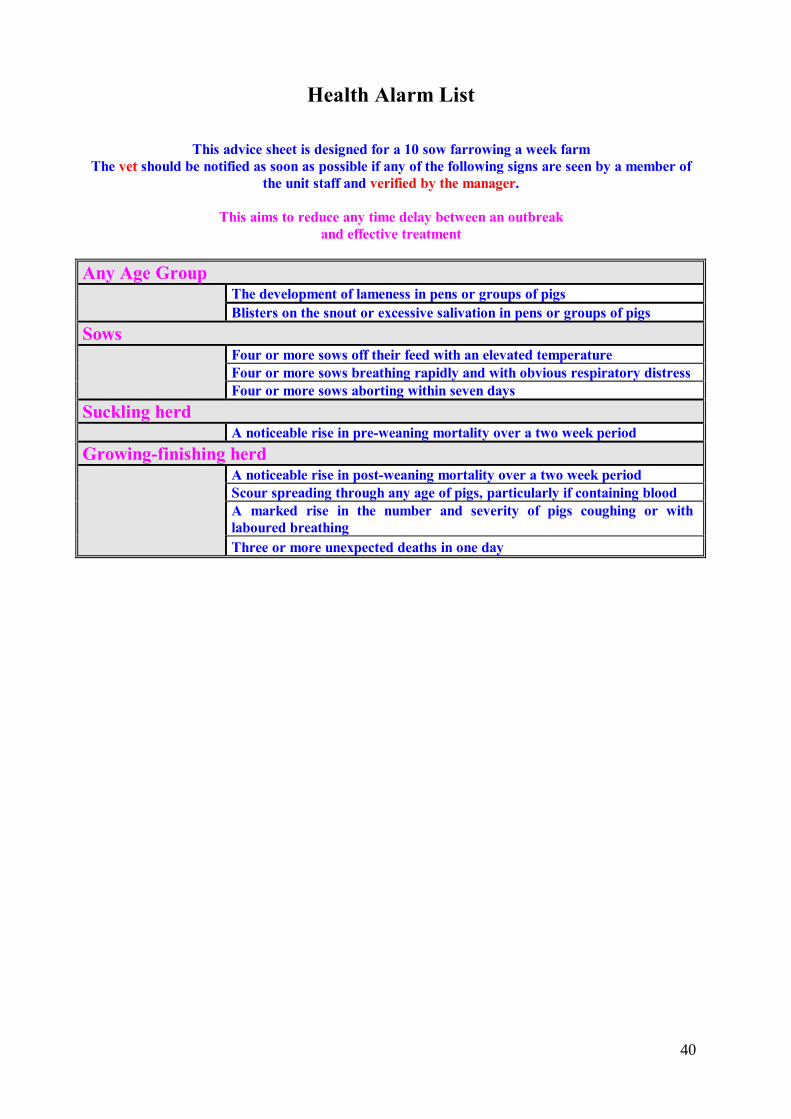
Health Alarm List
This advice sheet is designed for a 10 sow farrowing a week farm The vet should be notified as soon as possible if any of the following signs are seen by a member of
the unit staff and verified by the manager.
This aims to reduce any time delay between an outbreak and effective treatment
Any Age Group
The development of lameness in pens or groups of pigs Blisters on the snout or excessive salivation in pens or groups of pigs
Sows Four or more sows off their feed with an elevated temperature
Four or more sows breathing rapidly and with obvious respiratory distress Four or more sows aborting within seven days
Suckling herd A noticeable rise in pre-weaning mortality over a two week period
Growing-finishing herd A noticeable rise in post-weaning mortality over a two week period
Scour spreading through any age of pigs, particularly if containing blood A marked rise in the number and severity of pigs coughing or with laboured breathing Three or more unexpected deaths in one day
41
Diseases of pigs which are notifiable to the OIE List A
Transmissible diseases that have the potential for very serious and rapid spread, irrespective of national borders, that are of serious socio-economic or public health consequence and that are of major importance in the international trade of animals and animal products.
• African swine fever
• Classical swine fever
• Foot and mouth disease
• Rinderpest
• Swine vesicular disease
• Vesicular stomatitis List B Anthrax Aujeszky's disease / Pseudorabies Echinococcosis/hydatidosis Heartwater Leptospirosis New world screwworm (Cochliomyia hominivorax) Old world screwworm (Chrysomya bezziana) Paratuberculosis Q fever Rabies Trichinellosis Atrophic rhinitis of swine Enterovirus encephalomyelitis Porcine brucellosis Porcine cysticercosis Porcine reproductive and respiratory syndrome Transmissible gastroenteritis
42
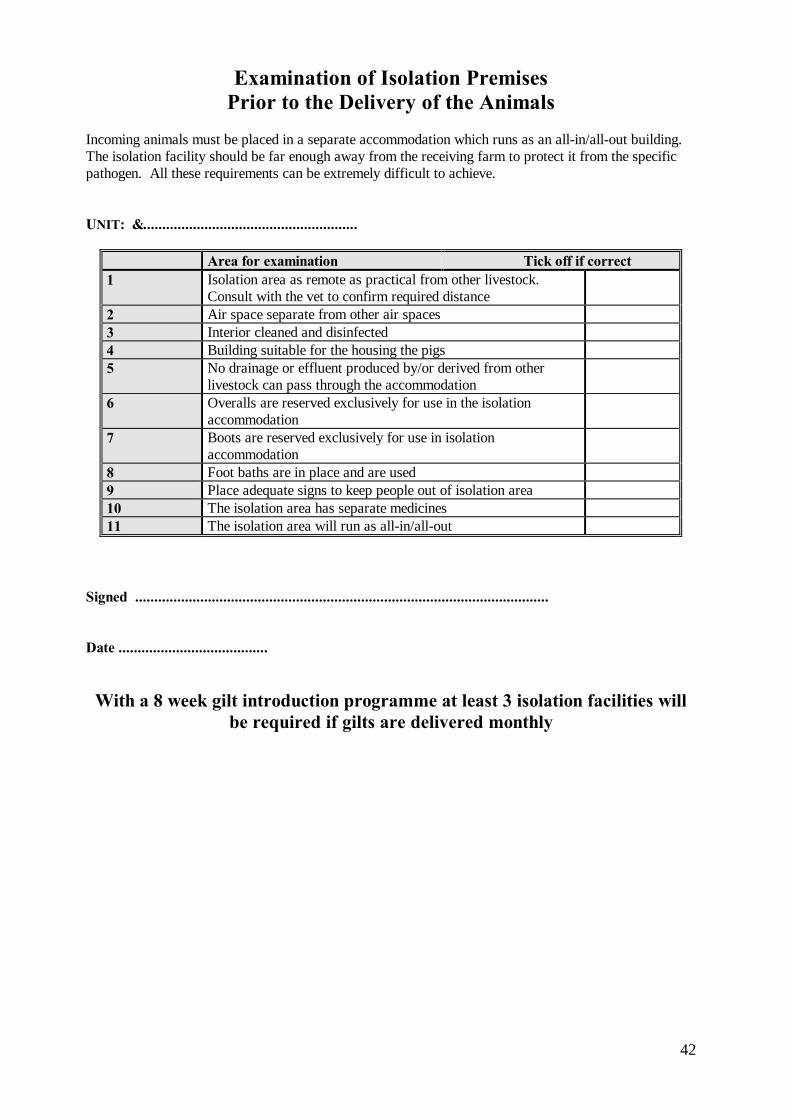
Examination of Isolation Premises Prior to the Delivery of the Animals
Incoming animals must be placed in a separate accommodation which runs as an all-in/all-out building. The isolation facility should be far enough away from the receiving farm to protect it from the specific pathogen. All these requirements can be extremely difficult to achieve. UNIT: …........................................................
Area for examination Tick off if correct 1 Isolation area as remote as practical from other livestock.
Consult with the vet to confirm required distance
2 Air space separate from other air spaces 3 Interior cleaned and disinfected 4 Building suitable for the housing the pigs 5 No drainage or effluent produced by/or derived from other
livestock can pass through the accommodation
6 Overalls are reserved exclusively for use in the isolation accommodation
7 Boots are reserved exclusively for use in isolation accommodation
8 Foot baths are in place and are used 9 Place adequate signs to keep people out of isolation area 10 The isolation area has separate medicines 11 The isolation area will run as all-in/all-out
Signed ............................................................................................................ Date .......................................
With a 8 week gilt introduction programme at least 3 isolation facilities will be required if gilts are delivered monthly
43
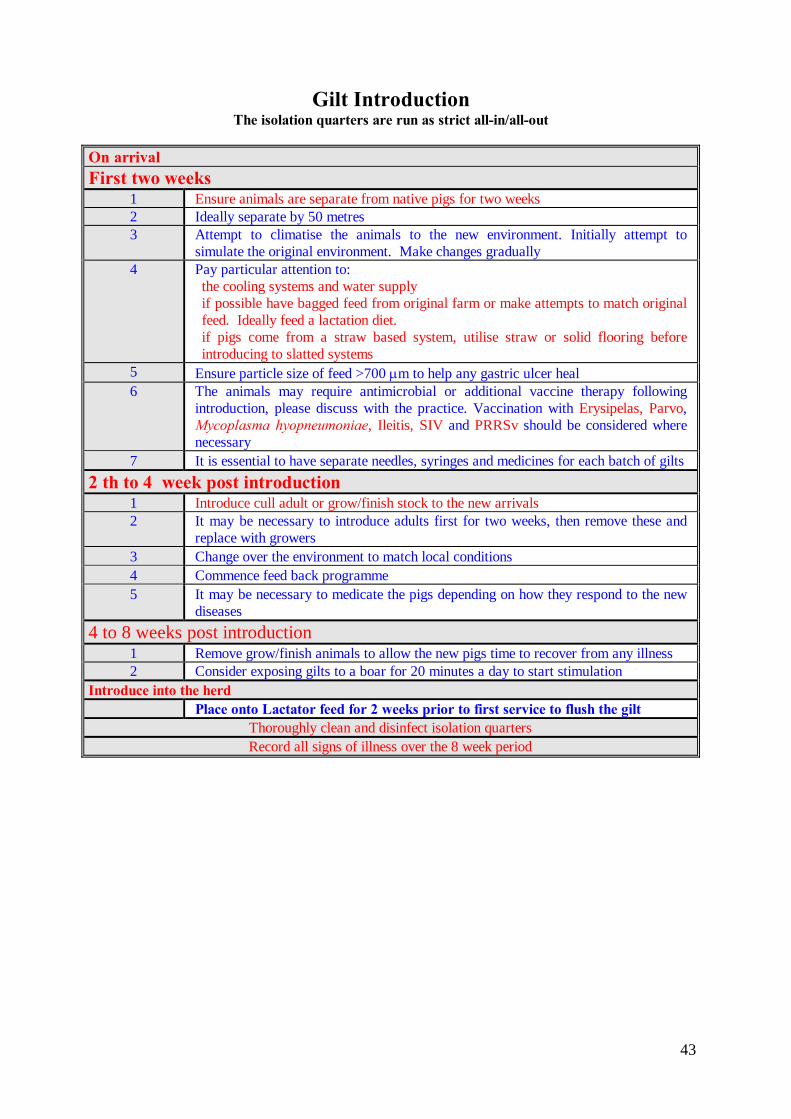
Gilt Introduction
The isolation quarters are run as strict all-in/all-out On arrival First two weeks
1 Ensure animals are separate from native pigs for two weeks 2 Ideally separate by 50 metres 3 Attempt to climatise the animals to the new environment. Initially attempt to
simulate the original environment. Make changes gradually 4 Pay particular attention to:
the cooling systems and water supply if possible have bagged feed from original farm or make attempts to match original feed. Ideally feed a lactation diet. if pigs come from a straw based system, utilise straw or solid flooring before introducing to slatted systems
5 Ensure particle size of feed >700 µm to help any gastric ulcer heal 6 The animals may require antimicrobial or additional vaccine therapy following
introduction, please discuss with the practice. Vaccination with Erysipelas, Parvo, Mycoplasma hyopneumoniae, Ileitis, SIV and PRRSv should be considered where necessary
7 It is essential to have separate needles, syringes and medicines for each batch of gilts 2 th to 4 week post introduction
1 Introduce cull adult or grow/finish stock to the new arrivals 2 It may be necessary to introduce adults first for two weeks, then remove these and
replace with growers 3 Change over the environment to match local conditions 4 Commence feed back programme 5 It may be necessary to medicate the pigs depending on how they respond to the new
diseases 4 to 8 weeks post introduction
1 Remove grow/finish animals to allow the new pigs time to recover from any illness 2 Consider exposing gilts to a boar for 20 minutes a day to start stimulation
Introduce into the herd Place onto Lactator feed for 2 weeks prior to first service to flush the gilt
Thoroughly clean and disinfect isolation quarters Record all signs of illness over the 8 week period
44
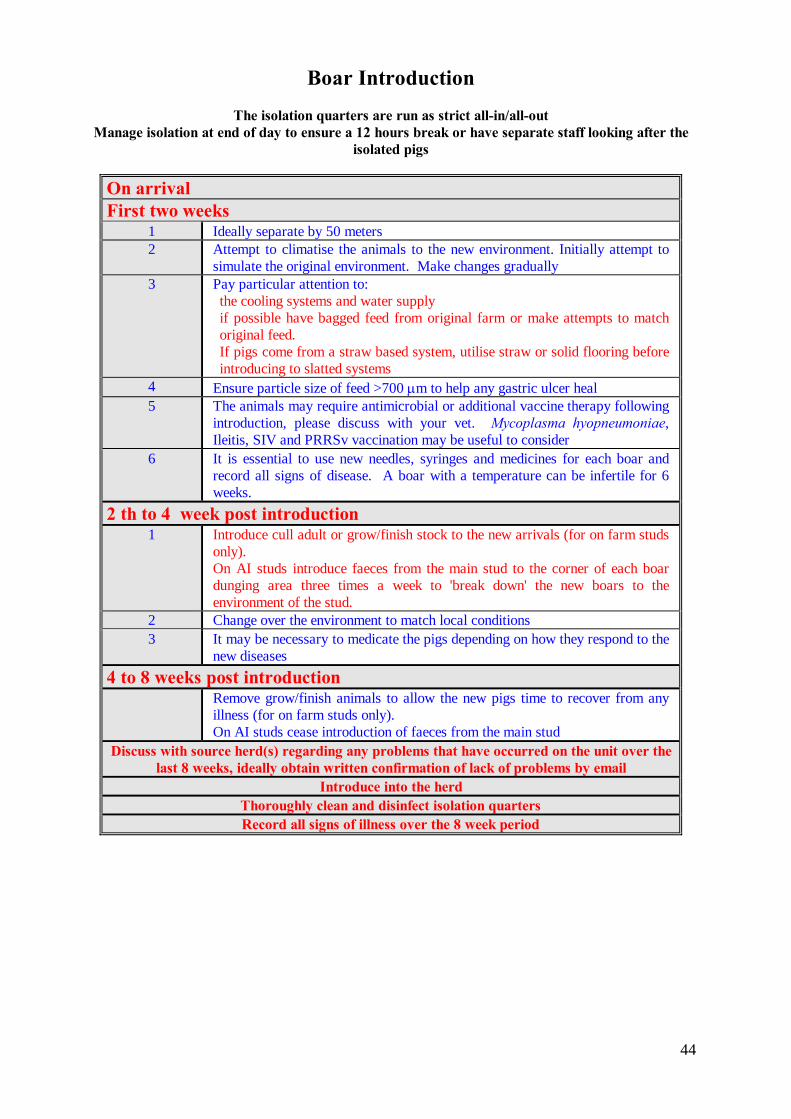
Boar Introduction
The isolation quarters are run as strict all-in/all-out Manage isolation at end of day to ensure a 12 hours break or have separate staff looking after the
isolated pigs
On arrival First two weeks
1 Ideally separate by 50 meters 2 Attempt to climatise the animals to the new environment. Initially attempt to
simulate the original environment. Make changes gradually 3 Pay particular attention to:
the cooling systems and water supply if possible have bagged feed from original farm or make attempts to match original feed. If pigs come from a straw based system, utilise straw or solid flooring before introducing to slatted systems
4 Ensure particle size of feed >700 µm to help any gastric ulcer heal 5 The animals may require antimicrobial or additional vaccine therapy following
introduction, please discuss with your vet. Mycoplasma hyopneumoniae, Ileitis, SIV and PRRSv vaccination may be useful to consider
6 It is essential to use new needles, syringes and medicines for each boar and record all signs of disease. A boar with a temperature can be infertile for 6 weeks.
2 th to 4 week post introduction 1 Introduce cull adult or grow/finish stock to the new arrivals (for on farm studs
only). On AI studs introduce faeces from the main stud to the corner of each boar dunging area three times a week to 'break down' the new boars to the environment of the stud.
2 Change over the environment to match local conditions 3 It may be necessary to medicate the pigs depending on how they respond to the
new diseases 4 to 8 weeks post introduction
Remove grow/finish animals to allow the new pigs time to recover from any illness (for on farm studs only). On AI studs cease introduction of faeces from the main stud
Discuss with source herd(s) regarding any problems that have occurred on the unit over the last 8 weeks, ideally obtain written confirmation of lack of problems by email
Introduce into the herd Thoroughly clean and disinfect isolation quarters Record all signs of illness over the 8 week period
45
Use of Feed Back
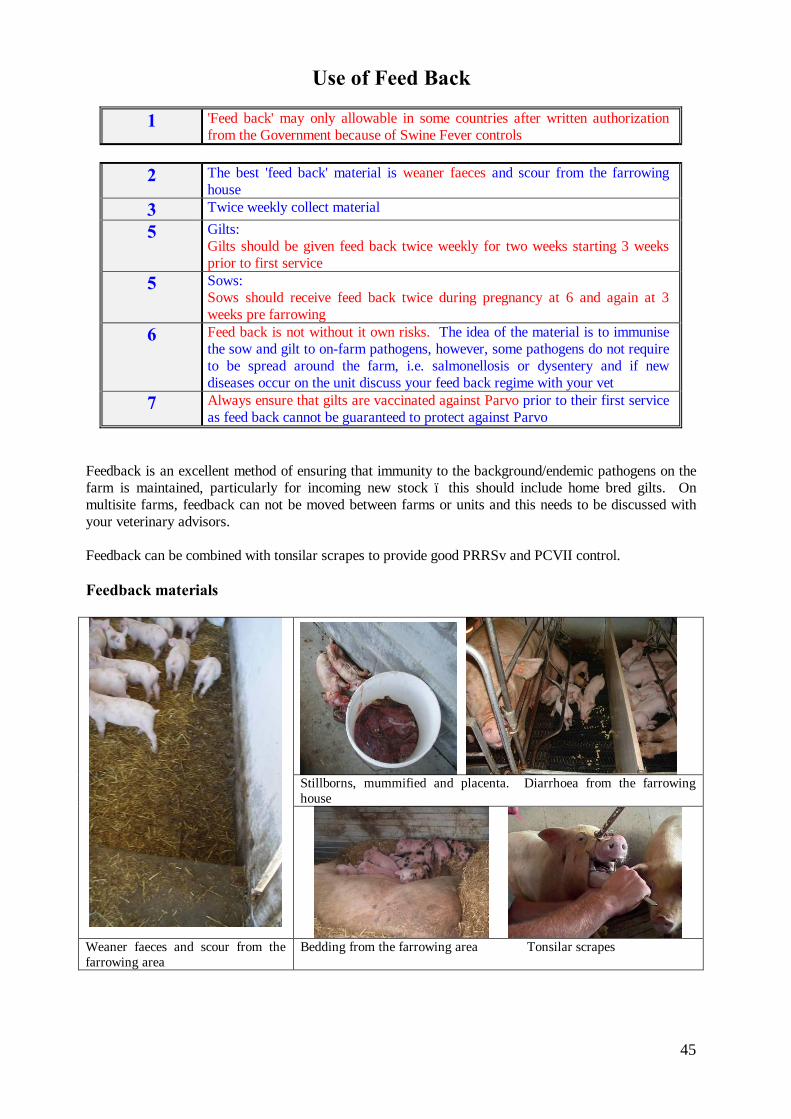
1 'Feed back' may only allowable in some countries after written authorization from the Government because of Swine Fever controls
2 The best 'feed back' material is weaner faeces and scour from the farrowing
house 3 Twice weekly collect material
5 Gilts: Gilts should be given feed back twice weekly for two weeks starting 3 weeks prior to first service
5 Sows: Sows should receive feed back twice during pregnancy at 6 and again at 3 weeks pre farrowing
6 Feed back is not without it own risks. The idea of the material is to immunise the sow and gilt to on-farm pathogens, however, some pathogens do not require to be spread around the farm, i.e. salmonellosis or dysentery and if new diseases occur on the unit discuss your feed back regime with your vet
7 Always ensure that gilts are vaccinated against Parvo prior to their first service as feed back cannot be guaranteed to protect against Parvo
Feedback is an excellent method of ensuring that immunity to the background/endemic pathogens on the farm is maintained, particularly for incoming new stock – this should include home bred gilts. On multisite farms, feedback can not be moved between farms or units and this needs to be discussed with your veterinary advisors. Feedback can be combined with tonsilar scrapes to provide good PRRSv and PCVII control. Feedback materials
Stillborns, mummified and placenta. Diarrhoea from the farrowing house
Weaner faeces and scour from the farrowing area
Bedding from the farrowing area Tonsilar scrapes

46
Isolation and Acclimatization What does all-in/all-out mean?
Proper functioning of an isolation/acclimatization area:
Isolation Acclimatization 2 weeks 2-4 weeks 4-8 weeks
Gilt arrive Wash and disinfect Gilts arrive All tests carried out gilts enter breeding unit
Typical problems
Basic commonsense issues
No isolation facilities Gilts are placed at the end of the breeding barn only. This poses a serious PRRSv risk.
No change of clothing Between the main farm and the isolation facilities.
No acclimatization The only acclimatization offered these gilts was from the passing sows.
Isolation too close to the farm Movement of needles between
groups No or poor cleaning between groups
Flow issues
Truck dirty Dirty entry/exit facilities Animals too old on entry
47
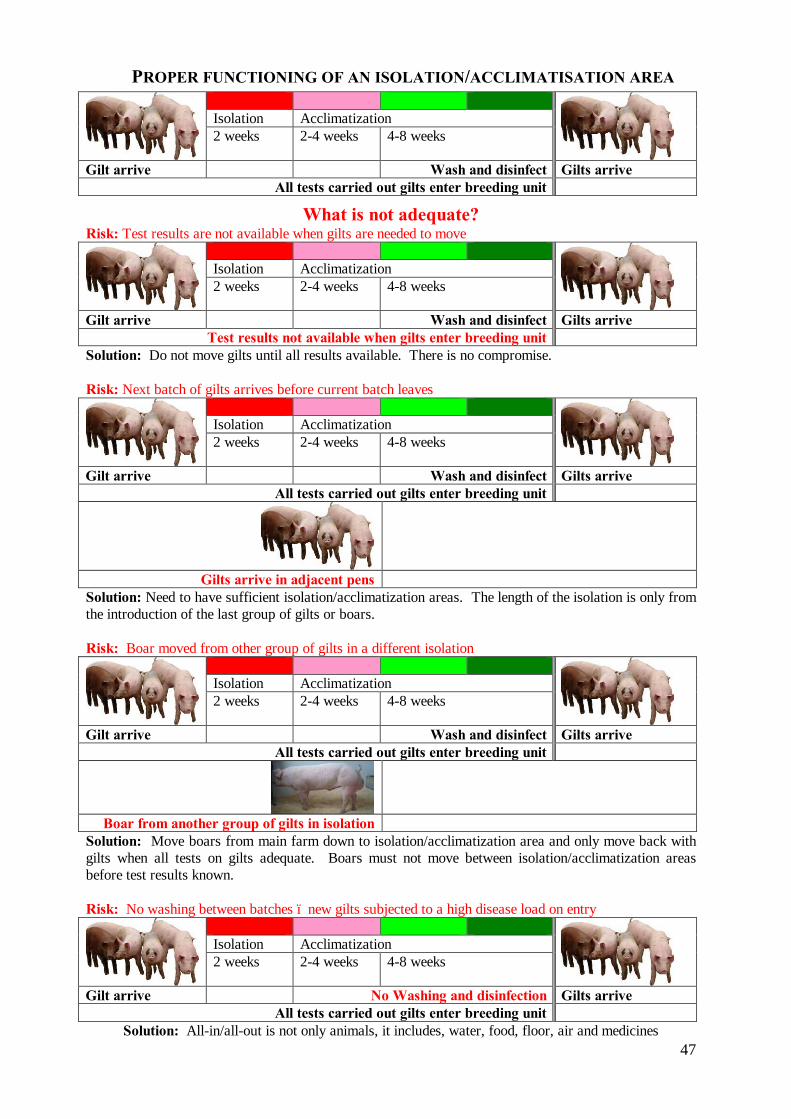
PROPER FUNCTIONING OF AN ISOLATION/ACCLIMATISATION AREA
Isolation Acclimatization 2 weeks 2-4 weeks 4-8 weeks
Gilt arrive Wash and disinfect Gilts arrive All tests carried out gilts enter breeding unit
What is not adequate? Risk: Test results are not available when gilts are needed to move
Isolation Acclimatization 2 weeks 2-4 weeks 4-8 weeks
Gilt arrive Wash and disinfect Gilts arrive Test results not available when gilts enter breeding unit
Solution: Do not move gilts until all results available. There is no compromise. Risk: Next batch of gilts arrives before current batch leaves
Isolation Acclimatization 2 weeks 2-4 weeks 4-8 weeks
Gilt arrive Wash and disinfect Gilts arrive All tests carried out gilts enter breeding unit
Gilts arrive in adjacent pens Solution: Need to have sufficient isolation/acclimatization areas. The length of the isolation is only from the introduction of the last group of gilts or boars. Risk: Boar moved from other group of gilts in a different isolation
Isolation Acclimatization 2 weeks 2-4 weeks 4-8 weeks
Gilt arrive Wash and disinfect Gilts arrive All tests carried out gilts enter breeding unit
Boar from another group of gilts in isolation Solution: Move boars from main farm down to isolation/acclimatization area and only move back with gilts when all tests on gilts adequate. Boars must not move between isolation/acclimatization areas before test results known. Risk: No washing between batches – new gilts subjected to a high disease load on entry
Isolation Acclimatization 2 weeks 2-4 weeks 4-8 weeks
Gilt arrive No Washing and disinfection Gilts arrive All tests carried out gilts enter breeding unit
Solution: All-in/all-out is not only animals, it includes, water, food, floor, air and medicines
48
Pathogens that might be transmitted though semen
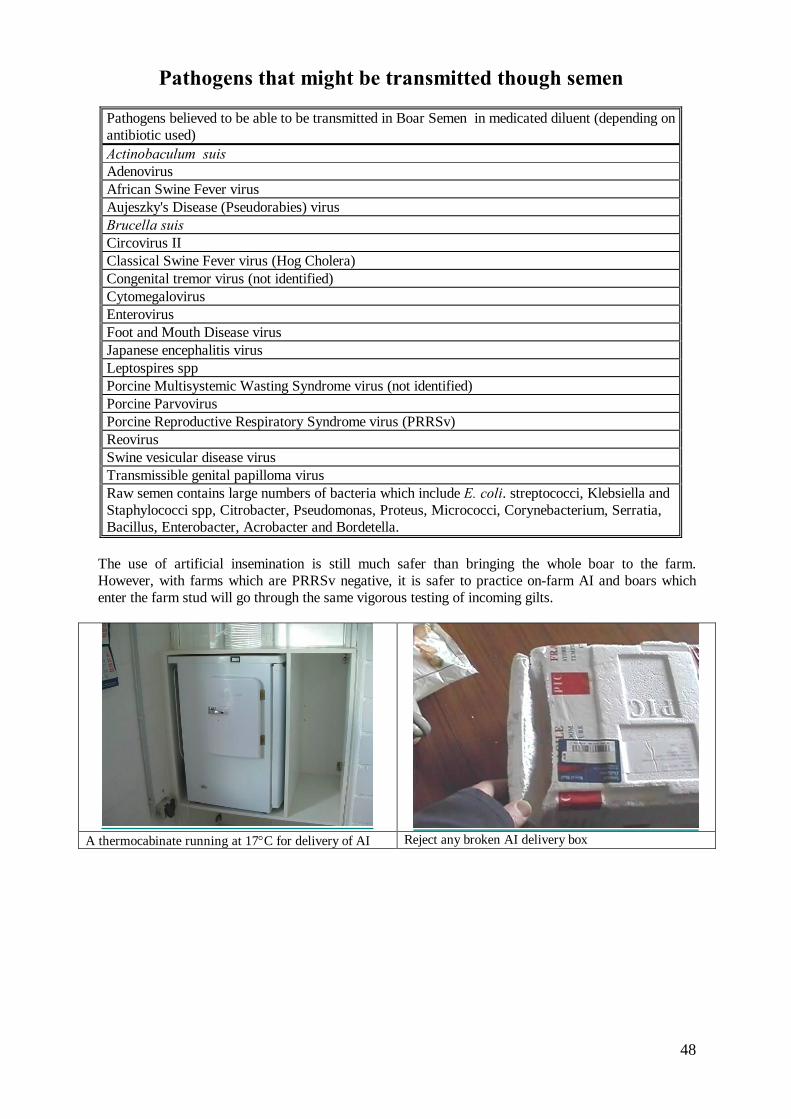
Pathogens believed to be able to be transmitted in Boar Semen in medicated diluent (depending on antibiotic used) Actinobaculum suis Adenovirus African Swine Fever virus Aujeszky's Disease (Pseudorabies) virus Brucella suis Circovirus II Classical Swine Fever virus (Hog Cholera) Congenital tremor virus (not identified) Cytomegalovirus Enterovirus Foot and Mouth Disease virus Japanese encephalitis virus Leptospires spp Porcine Multisystemic Wasting Syndrome virus (not identified) Porcine Parvovirus Porcine Reproductive Respiratory Syndrome virus (PRRSv) Reovirus Swine vesicular disease virus Transmissible genital papilloma virus Raw semen contains large numbers of bacteria which include E. coli. streptococci, Klebsiella and Staphylococci spp, Citrobacter, Pseudomonas, Proteus, Micrococci, Corynebacterium, Serratia, Bacillus, Enterobacter, Acrobacter and Bordetella.
The use of artificial insemination is still much safer than bringing the whole boar to the farm. However, with farms which are PRRSv negative, it is safer to practice on-farm AI and boars which enter the farm stud will go through the same vigorous testing of incoming gilts.
A thermocabinate running at 17°C for delivery of AI Reject any broken AI delivery box
49
Disposal of Dead Pigs
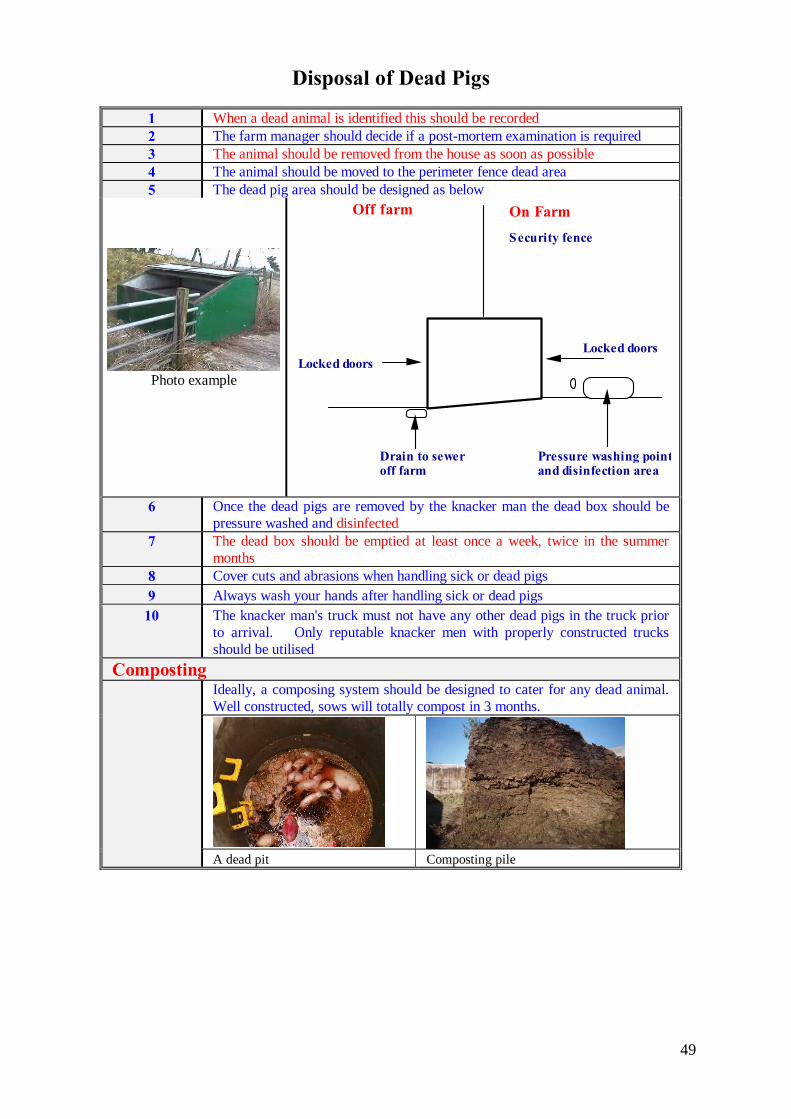
1 When a dead animal is identified this should be recorded 2 The farm manager should decide if a post-mortem examination is required 3 The animal should be removed from the house as soon as possible 4 The animal should be moved to the perimeter fence dead area 5 The dead pig area should be designed as below
Photo example
Security fence
Locked doors
Pressure washing point and disinfection area
Drain to sewer off farm
Locked doors
On FarmOff farm
6 Once the dead pigs are removed by the knacker man the dead box should be
pressure washed and disinfected 7 The dead box should be emptied at least once a week, twice in the summer
months 8 Cover cuts and abrasions when handling sick or dead pigs 9 Always wash your hands after handling sick or dead pigs
10 The knacker man's truck must not have any other dead pigs in the truck prior to arrival. Only reputable knacker men with properly constructed trucks should be utilised
Composting Ideally, a composing system should be designed to cater for any dead animal.
Well constructed, sows will totally compost in 3 months.
A dead pit Composting pile
50
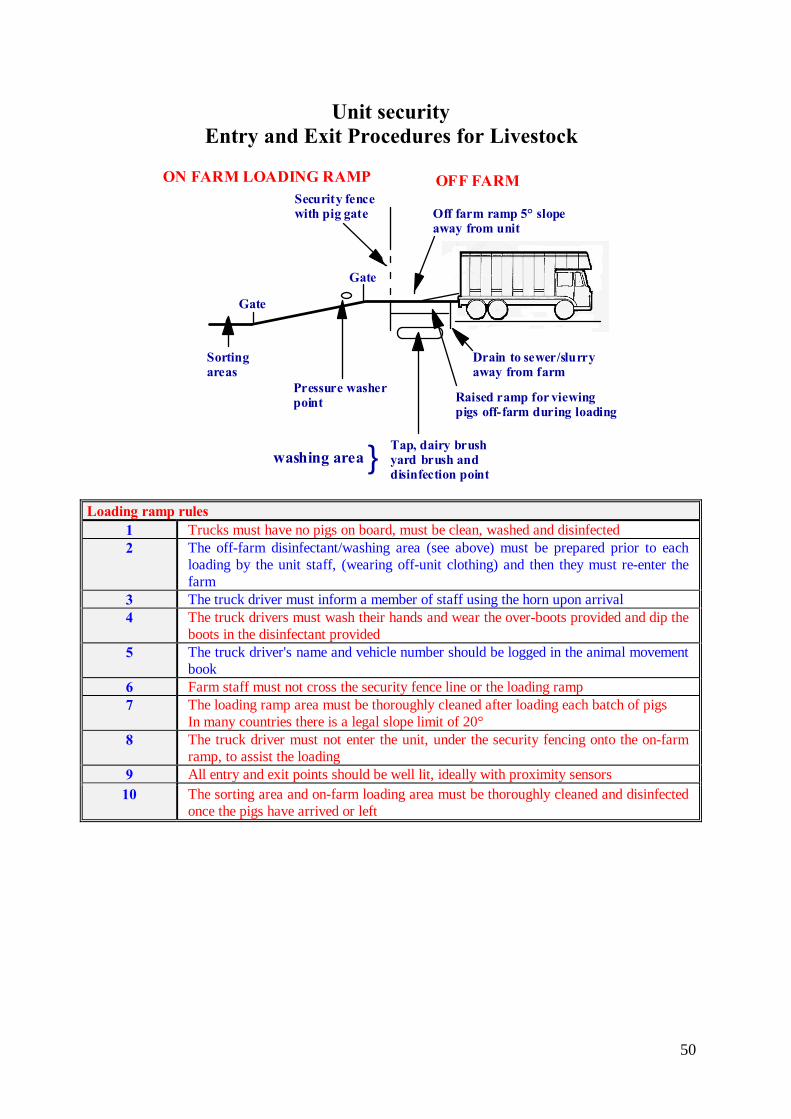
Unit security Entry and Exit Procedures for Livestock
Drain to sewer/slurry away from farm
Raised ramp for viewing pigs off-farm during loading
Tap, dairy brush yard brush and disinfection point
Security fence with pig gate
Pressure washer point
Gate
Gate
Sorting areas
ON FARM LOADING RAMP OFF FARM
Off farm ramp 5° slope away from unit
washing area }
Loading ramp rules
1 Trucks must have no pigs on board, must be clean, washed and disinfected 2 The off-farm disinfectant/washing area (see above) must be prepared prior to each
loading by the unit staff, (wearing off-unit clothing) and then they must re-enter the farm
3 The truck driver must inform a member of staff using the horn upon arrival 4 The truck drivers must wash their hands and wear the over-boots provided and dip the
boots in the disinfectant provided 5 The truck driver's name and vehicle number should be logged in the animal movement
book 6 Farm staff must not cross the security fence line or the loading ramp 7 The loading ramp area must be thoroughly cleaned after loading each batch of pigs
In many countries there is a legal slope limit of 20° 8 The truck driver must not enter the unit, under the security fencing onto the on-farm
ramp, to assist the loading 9 All entry and exit points should be well lit, ideally with proximity sensors
10 The sorting area and on-farm loading area must be thoroughly cleaned and disinfected once the pigs have arrived or left
51
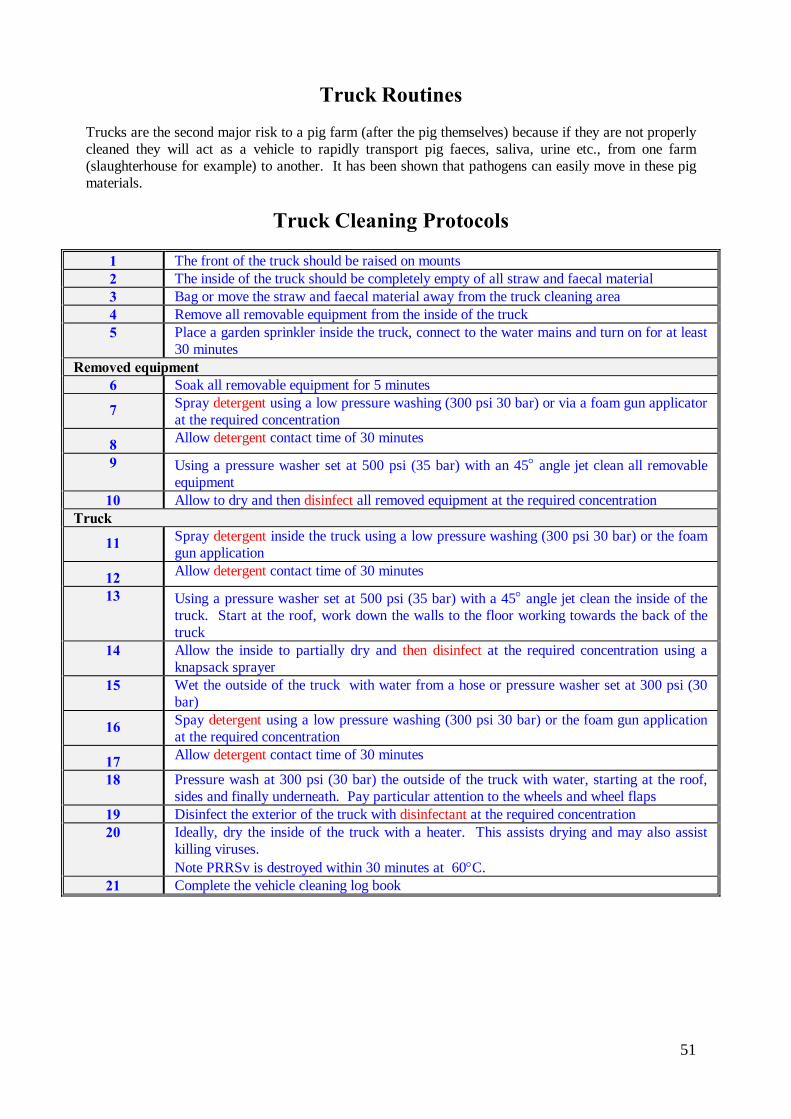
Truck Routines
Trucks are the second major risk to a pig farm (after the pig themselves) because if they are not properly cleaned they will act as a vehicle to rapidly transport pig faeces, saliva, urine etc., from one farm (slaughterhouse for example) to another. It has been shown that pathogens can easily move in these pig materials.
Truck Cleaning Protocols
1 The front of the truck should be raised on mounts 2 The inside of the truck should be completely empty of all straw and faecal material 3 Bag or move the straw and faecal material away from the truck cleaning area 4 Remove all removable equipment from the inside of the truck 5 Place a garden sprinkler inside the truck, connect to the water mains and turn on for at least
30 minutes Removed equipment
6 Soak all removable equipment for 5 minutes
7 Spray detergent using a low pressure washing (300 psi 30 bar) or via a foam gun applicator at the required concentration
8 Allow detergent contact time of 30 minutes
9 Using a pressure washer set at 500 psi (35 bar) with an 45° angle jet clean all removable equipment
10 Allow to dry and then disinfect all removed equipment at the required concentration Truck
11 Spray detergent inside the truck using a low pressure washing (300 psi 30 bar) or the foam gun application
12 Allow detergent contact time of 30 minutes
13 Using a pressure washer set at 500 psi (35 bar) with a 45° angle jet clean the inside of the truck. Start at the roof, work down the walls to the floor working towards the back of the truck
14 Allow the inside to partially dry and then disinfect at the required concentration using a knapsack sprayer
15 Wet the outside of the truck with water from a hose or pressure washer set at 300 psi (30 bar)
16 Spay detergent using a low pressure washing (300 psi 30 bar) or the foam gun application at the required concentration
17 Allow detergent contact time of 30 minutes
18 Pressure wash at 300 psi (30 bar) the outside of the truck with water, starting at the roof, sides and finally underneath. Pay particular attention to the wheels and wheel flaps
19 Disinfect the exterior of the truck with disinfectant at the required concentration 20 Ideally, dry the inside of the truck with a heater. This assists drying and may also assist
killing viruses. Note PRRSv is destroyed within 30 minutes at 60°C.
21 Complete the vehicle cleaning log book
52
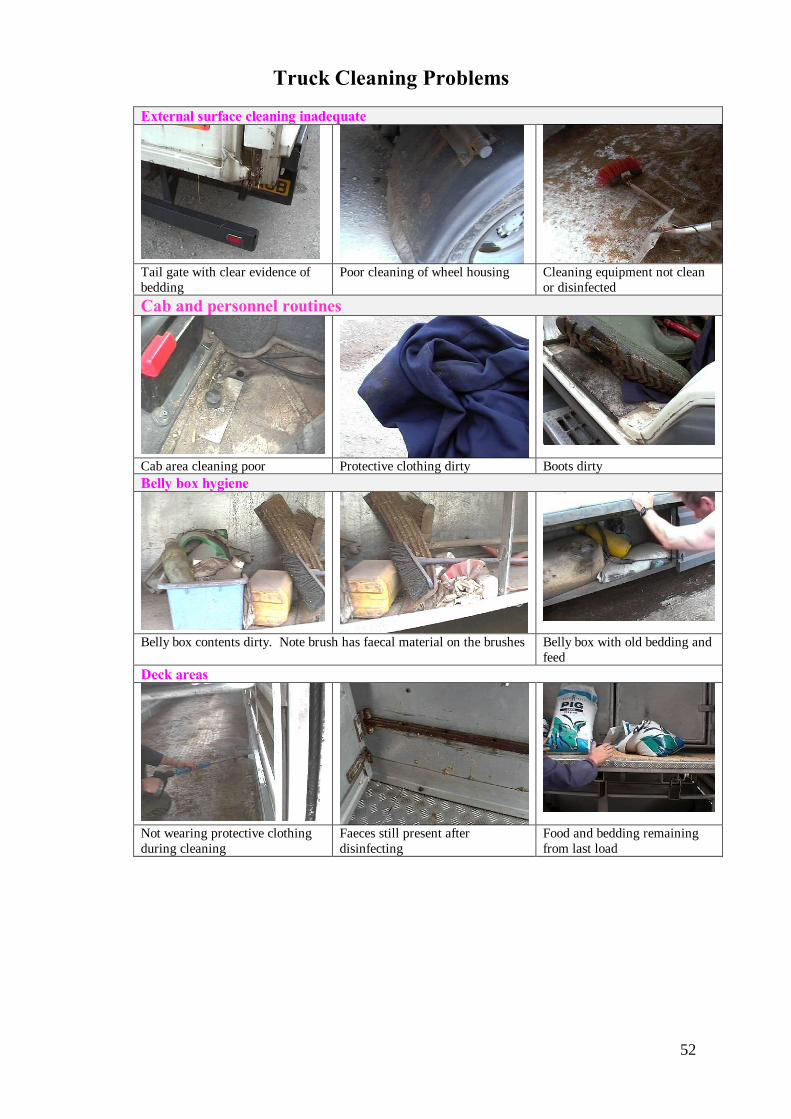
Truck Cleaning Problems
External surface cleaning inadequate
Tail gate with clear evidence of bedding
Poor cleaning of wheel housing Cleaning equipment not clean or disinfected
Cab and personnel routines
Cab area cleaning poor Protective clothing dirty Boots dirty Belly box hygiene
Belly box contents dirty. Note brush has faecal material on the brushes Belly box with old bedding and feed
Deck areas
Not wearing protective clothing during cleaning
Faeces still present after disinfecting
Food and bedding remaining from last load
53
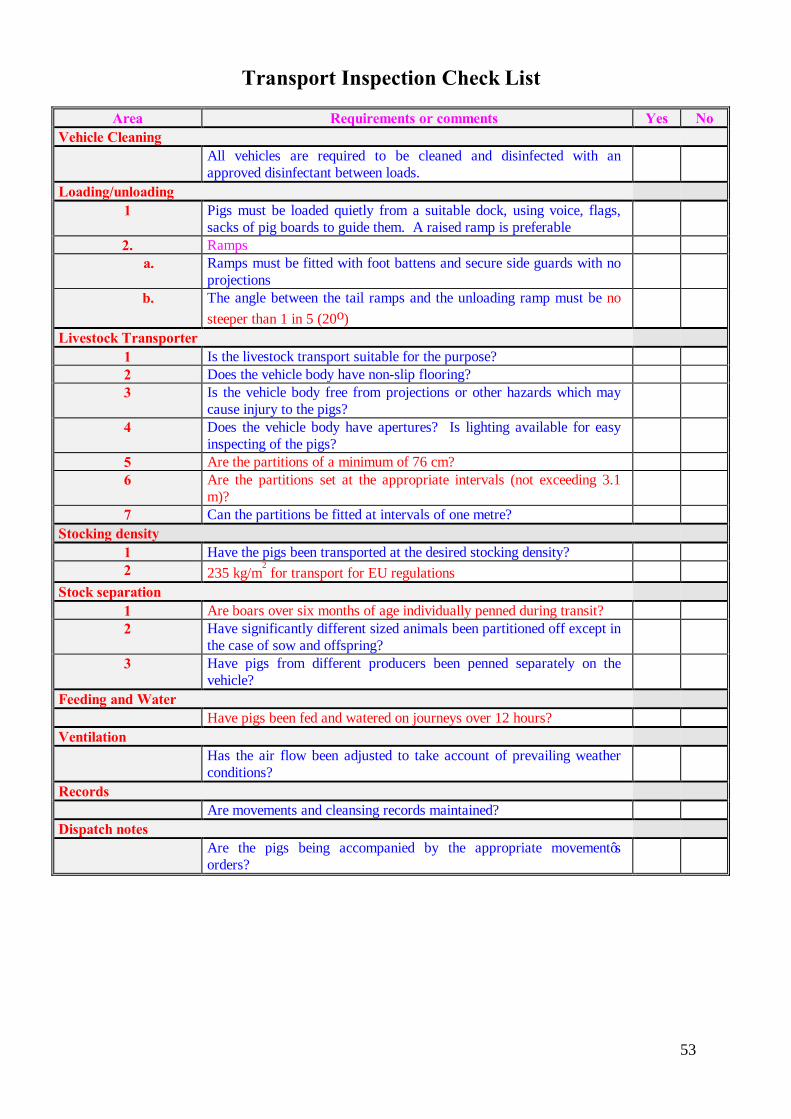
Transport Inspection Check List
Area Requirements or comments Yes No Vehicle Cleaning
All vehicles are required to be cleaned and disinfected with an approved disinfectant between loads.
Loading/unloading 1 Pigs must be loaded quietly from a suitable dock, using voice, flags,
sacks of pig boards to guide them. A raised ramp is preferable
2. Ramps a. Ramps must be fitted with foot battens and secure side guards with no
projections
b. The angle between the tail ramps and the unloading ramp must be no steeper than 1 in 5 (20o)
Livestock Transporter 1 Is the livestock transport suitable for the purpose? 2 Does the vehicle body have non-slip flooring? 3 Is the vehicle body free from projections or other hazards which may
cause injury to the pigs?
4 Does the vehicle body have apertures? Is lighting available for easy inspecting of the pigs?
5 Are the partitions of a minimum of 76 cm? 6 Are the partitions set at the appropriate intervals (not exceeding 3.1
m)?
7 Can the partitions be fitted at intervals of one metre? Stocking density
1 Have the pigs been transported at the desired stocking density? 2 235 kg/m
2 for transport for EU regulations
Stock separation 1 Are boars over six months of age individually penned during transit? 2 Have significantly different sized animals been partitioned off except in
the case of sow and offspring?
3 Have pigs from different producers been penned separately on the vehicle?
Feeding and Water Have pigs been fed and watered on journeys over 12 hours?
Ventilation Has the air flow been adjusted to take account of prevailing weather
conditions?
Records Are movements and cleansing records maintained?
Dispatch notes Are the pigs being accompanied by the appropriate movement’s
orders?
54
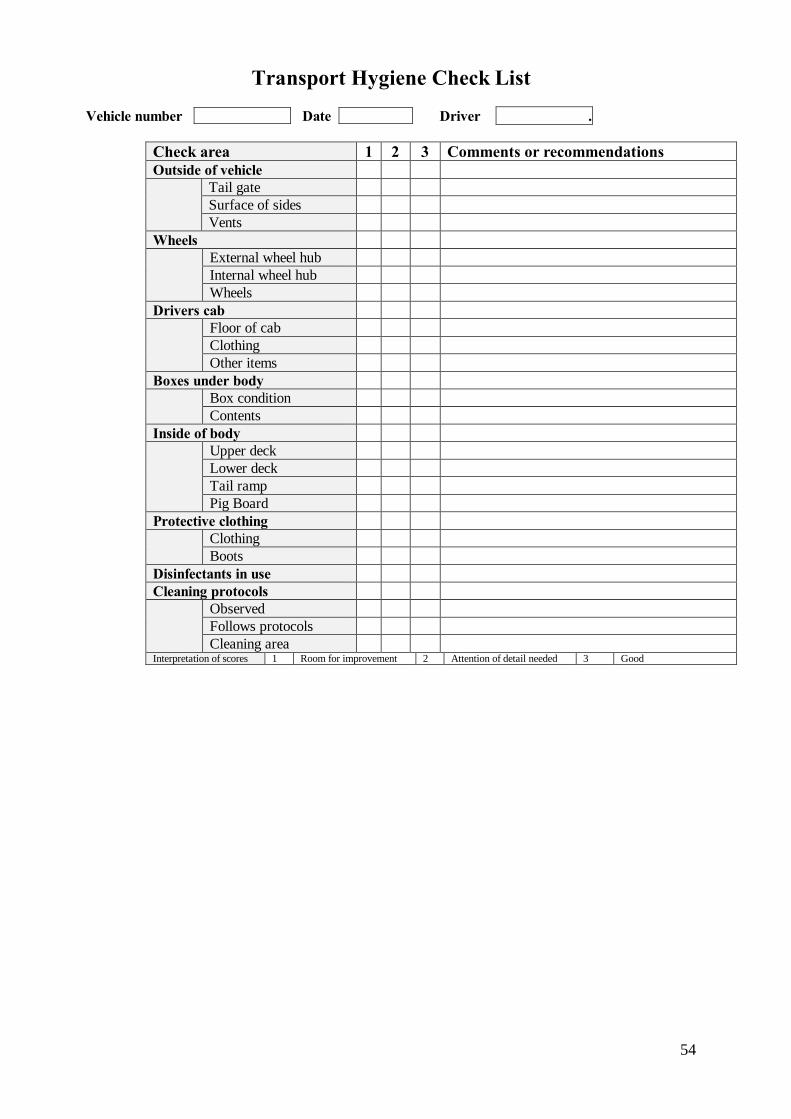
Transport Hygiene Check List Vehicle number Date Driver .
Check area 1 2 3 Comments or recommendations Outside of vehicle Tail gate
Surface of sides Vents
Wheels External wheel hub
Internal wheel hub Wheels
Drivers cab Floor of cab
Clothing Other items
Boxes under body Box condition
Contents Inside of body Upper deck
Lower deck Tail ramp Pig Board
Protective clothing Clothing
Boots Disinfectants in use Cleaning protocols Observed
Follows protocols Cleaning area
Interpretation of scores 1 Room for improvement 2 Attention of detail needed 3 Good
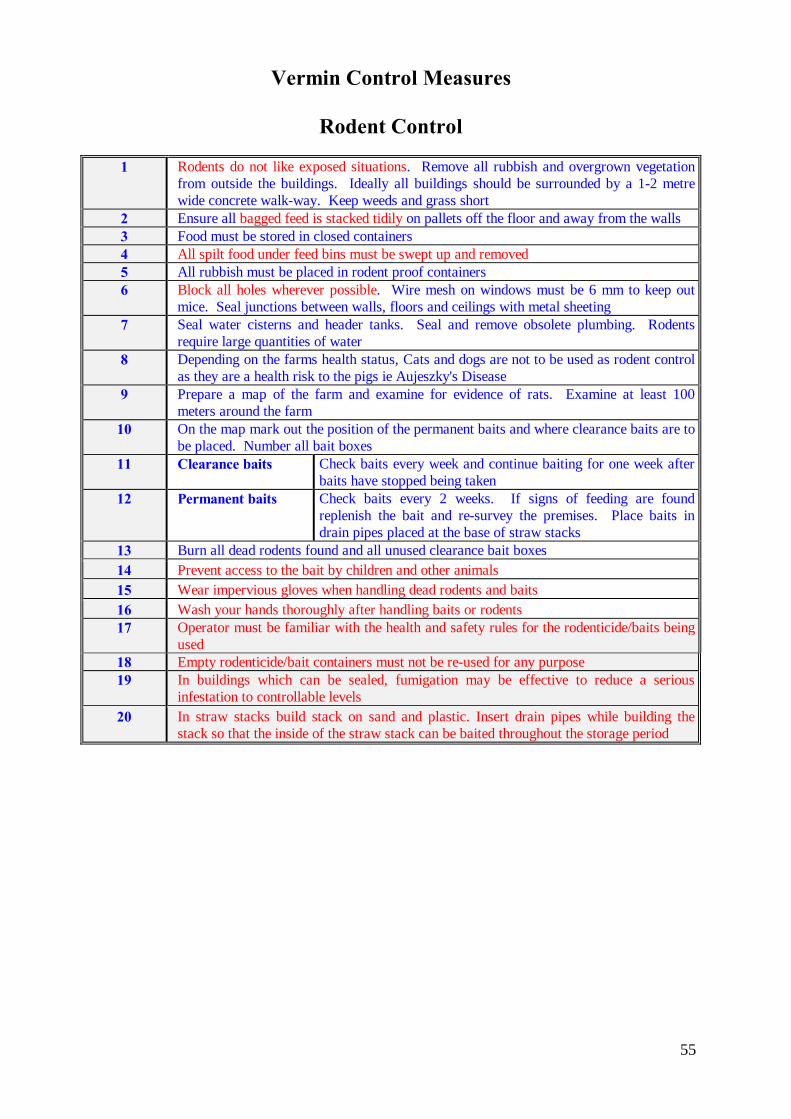
55
Vermin Control Measures
Rodent Control
1 Rodents do not like exposed situations. Remove all rubbish and overgrown vegetation from outside the buildings. Ideally all buildings should be surrounded by a 1-2 metre wide concrete walk-way. Keep weeds and grass short
2 Ensure all bagged feed is stacked tidily on pallets off the floor and away from the walls 3 Food must be stored in closed containers 4 All spilt food under feed bins must be swept up and removed 5 All rubbish must be placed in rodent proof containers 6 Block all holes wherever possible. Wire mesh on windows must be 6 mm to keep out
mice. Seal junctions between walls, floors and ceilings with metal sheeting 7 Seal water cisterns and header tanks. Seal and remove obsolete plumbing. Rodents
require large quantities of water 8 Depending on the farms health status, Cats and dogs are not to be used as rodent control
as they are a health risk to the pigs ie Aujeszky's Disease 9 Prepare a map of the farm and examine for evidence of rats. Examine at least 100
meters around the farm 10 On the map mark out the position of the permanent baits and where clearance baits are to
be placed. Number all bait boxes 11 Clearance baits Check baits every week and continue baiting for one week after
baits have stopped being taken 12 Permanent baits Check baits every 2 weeks. If signs of feeding are found
replenish the bait and re-survey the premises. Place baits in drain pipes placed at the base of straw stacks
13 Burn all dead rodents found and all unused clearance bait boxes 14 Prevent access to the bait by children and other animals 15 Wear impervious gloves when handling dead rodents and baits 16 Wash your hands thoroughly after handling baits or rodents 17 Operator must be familiar with the health and safety rules for the rodenticide/baits being
used 18 Empty rodenticide/bait containers must not be re-used for any purpose 19 In buildings which can be sealed, fumigation may be effective to reduce a serious
infestation to controllable levels 20 In straw stacks build stack on sand and plastic. Insert drain pipes while building the
stack so that the inside of the straw stack can be baited throughout the storage period
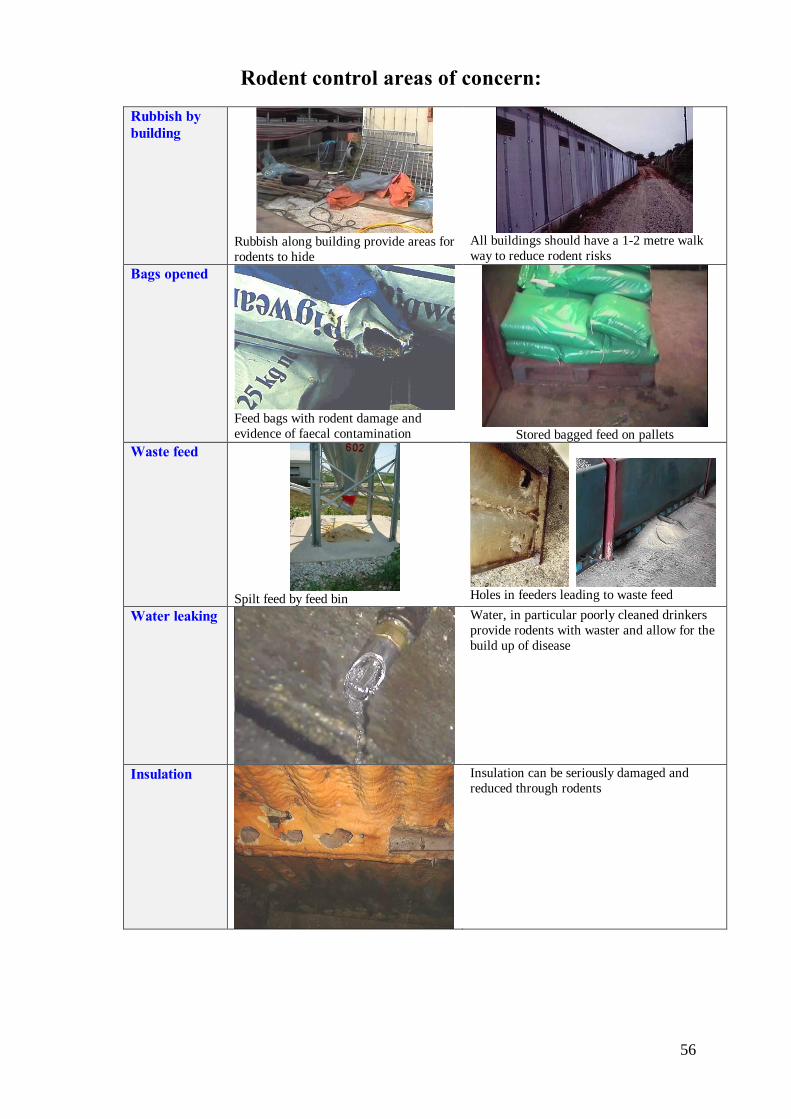
56
Rodent control areas of concern:
Rubbish by building
Rubbish along building provide areas for rodents to hide
All buildings should have a 1-2 metre walk way to reduce rodent risks
Bags opened
Feed bags with rodent damage and evidence of faecal contamination
Stored bagged feed on pallets
Waste feed
Spilt feed by feed bin
Holes in feeders leading to waste feed
Water leaking
Water, in particular poorly cleaned drinkers provide rodents with waster and allow for the build up of disease
Insulation
Insulation can be seriously damaged and reduced through rodents

57
Bird Control
1 Repair all broken windows
2 Ensure no waste feed remains under food bins
3 Clean up all spilt food in storage areas
4 Cover all feeders
5 Install strip curtains over all openings
6 Close off roof spaces by netting
7 Install window screens
8 Cover all eaves and ridge gaps with bird proof netting
9 Repair and seal all holes
10 All doors should be on spring hinges
11 If starlings are the major problem shooting may become necessary
12 Whilst unpleasant, the hanging of dead birds can may be effective
Waste feed under feeder which can encourage birds to the pig unit
Uncovered feed barrow allowing easy access for the birds
Bird contamination clearly evident on covered feeders. Without covers all this faeces would have entered the feed
Buildings should be bird proofed Some areas can be impossible to bird proof.
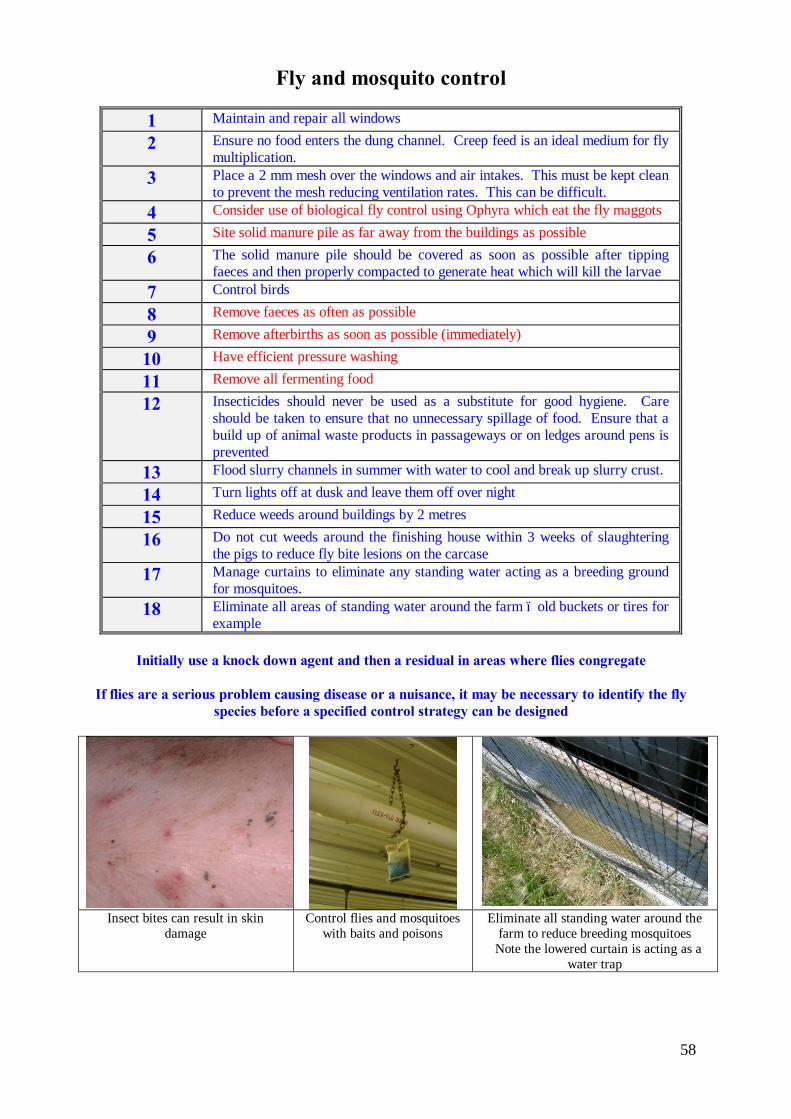
58
Fly and mosquito control
1 Maintain and repair all windows
2 Ensure no food enters the dung channel. Creep feed is an ideal medium for fly multiplication.
3 Place a 2 mm mesh over the windows and air intakes. This must be kept clean to prevent the mesh reducing ventilation rates. This can be difficult.
4 Consider use of biological fly control using Ophyra which eat the fly maggots
5 Site solid manure pile as far away from the buildings as possible
6 The solid manure pile should be covered as soon as possible after tipping faeces and then properly compacted to generate heat which will kill the larvae
7 Control birds
8 Remove faeces as often as possible
9 Remove afterbirths as soon as possible (immediately)
10 Have efficient pressure washing
11 Remove all fermenting food
12 Insecticides should never be used as a substitute for good hygiene. Care should be taken to ensure that no unnecessary spillage of food. Ensure that a build up of animal waste products in passageways or on ledges around pens is prevented
13 Flood slurry channels in summer with water to cool and break up slurry crust.
14 Turn lights off at dusk and leave them off over night
15 Reduce weeds around buildings by 2 metres
16 Do not cut weeds around the finishing house within 3 weeks of slaughtering the pigs to reduce fly bite lesions on the carcase
17 Manage curtains to eliminate any standing water acting as a breeding ground for mosquitoes.
18 Eliminate all areas of standing water around the farm – old buckets or tires for example
Initially use a knock down agent and then a residual in areas where flies congregate
If flies are a serious problem causing disease or a nuisance, it may be necessary to identify the fly
species before a specified control strategy can be designed
Insect bites can result in skin
damage Control flies and mosquitoes
with baits and poisons Eliminate all standing water around the
farm to reduce breeding mosquitoes Note the lowered curtain is acting as a
water trap
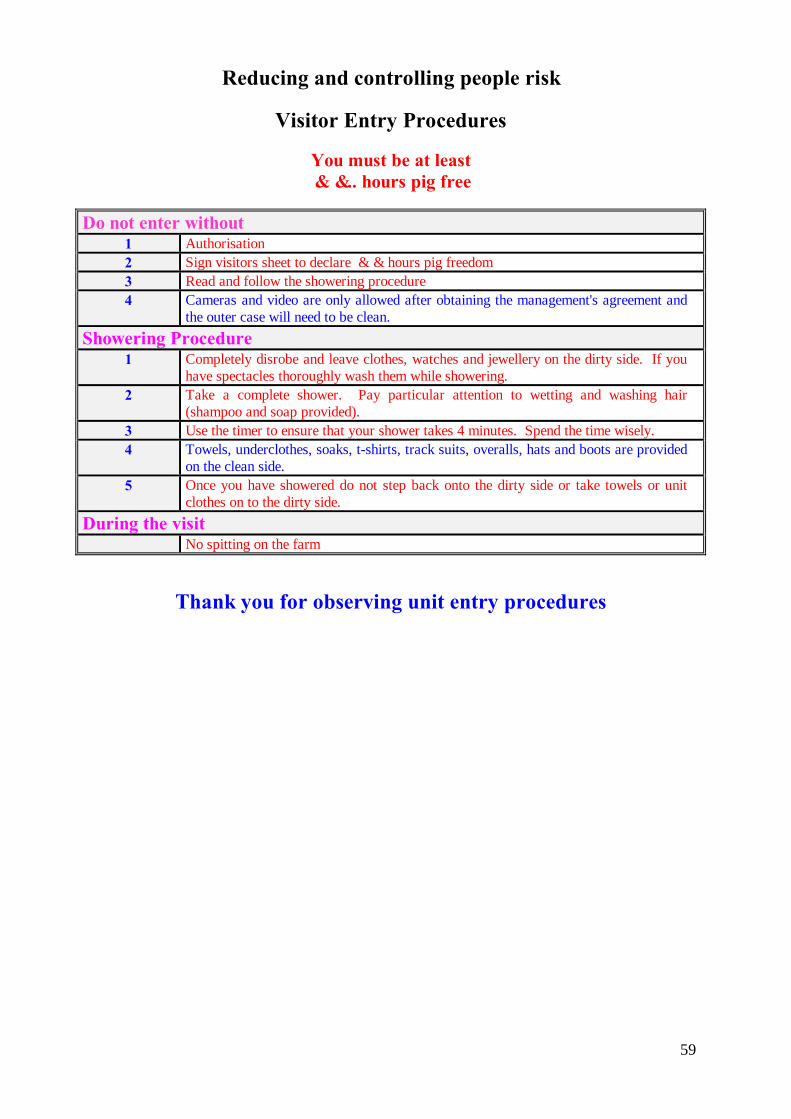
59
Reducing and controlling people risk
Visitor Entry Procedures
You must be at least …….. hours pig free
Do not enter without
1 Authorisation 2 Sign visitors sheet to declare …… hours pig freedom 3 Read and follow the showering procedure 4 Cameras and video are only allowed after obtaining the management's agreement and
the outer case will need to be clean. Showering Procedure
1 Completely disrobe and leave clothes, watches and jewellery on the dirty side. If you have spectacles thoroughly wash them while showering.
2 Take a complete shower. Pay particular attention to wetting and washing hair (shampoo and soap provided).
3 Use the timer to ensure that your shower takes 4 minutes. Spend the time wisely. 4 Towels, underclothes, soaks, t-shirts, track suits, overalls, hats and boots are provided
on the clean side. 5 Once you have showered do not step back onto the dirty side or take towels or unit
clothes on to the dirty side. During the visit
No spitting on the farm
Thank you for observing unit entry procedures
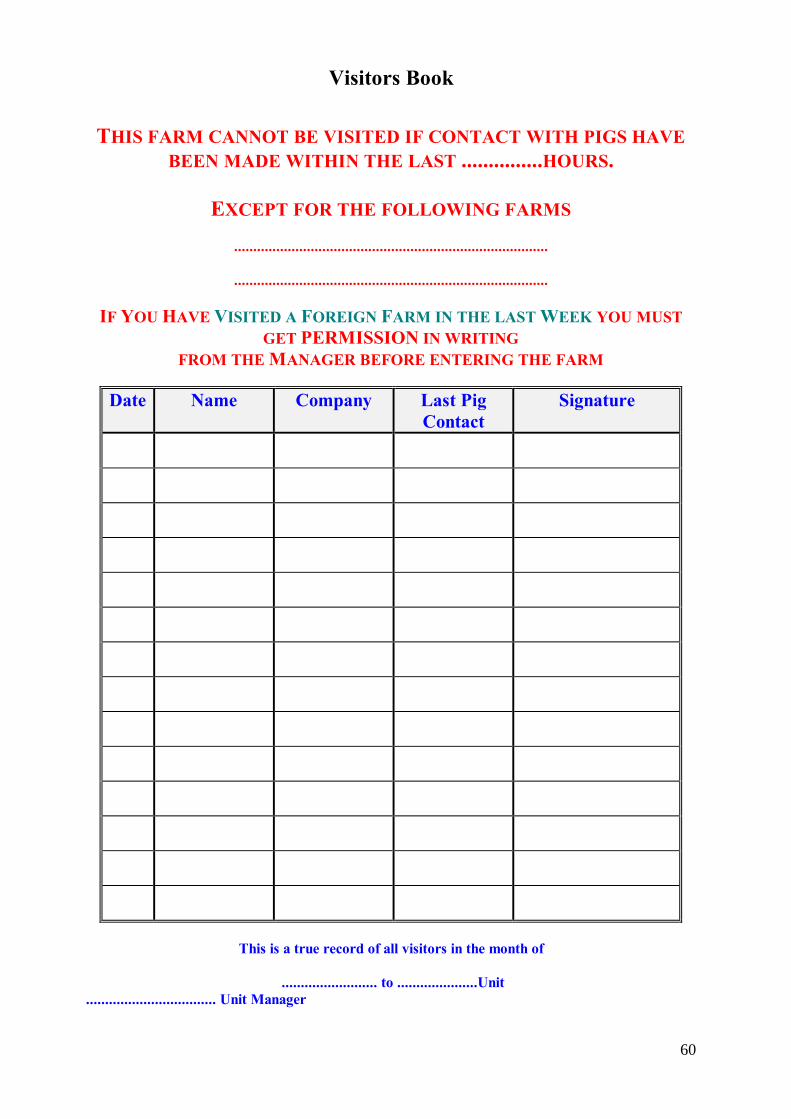
60
Visitors Book
THIS FARM CANNOT BE VISITED IF CONTACT WITH PIGS HAVE BEEN MADE WITHIN THE LAST ...............HOURS.
EXCEPT FOR THE FOLLOWING FARMS
..................................................................................
..................................................................................
IF YOU HAVE VISITED A FOREIGN FARM IN THE LAST WEEK YOU MUST
GET PERMISSION IN WRITING FROM THE MANAGER BEFORE ENTERING THE FARM
Date Name Company Last Pig
Contact Signature
This is a true record of all visitors in the month of
......................... to .....................Unit
.................................. Unit Manager
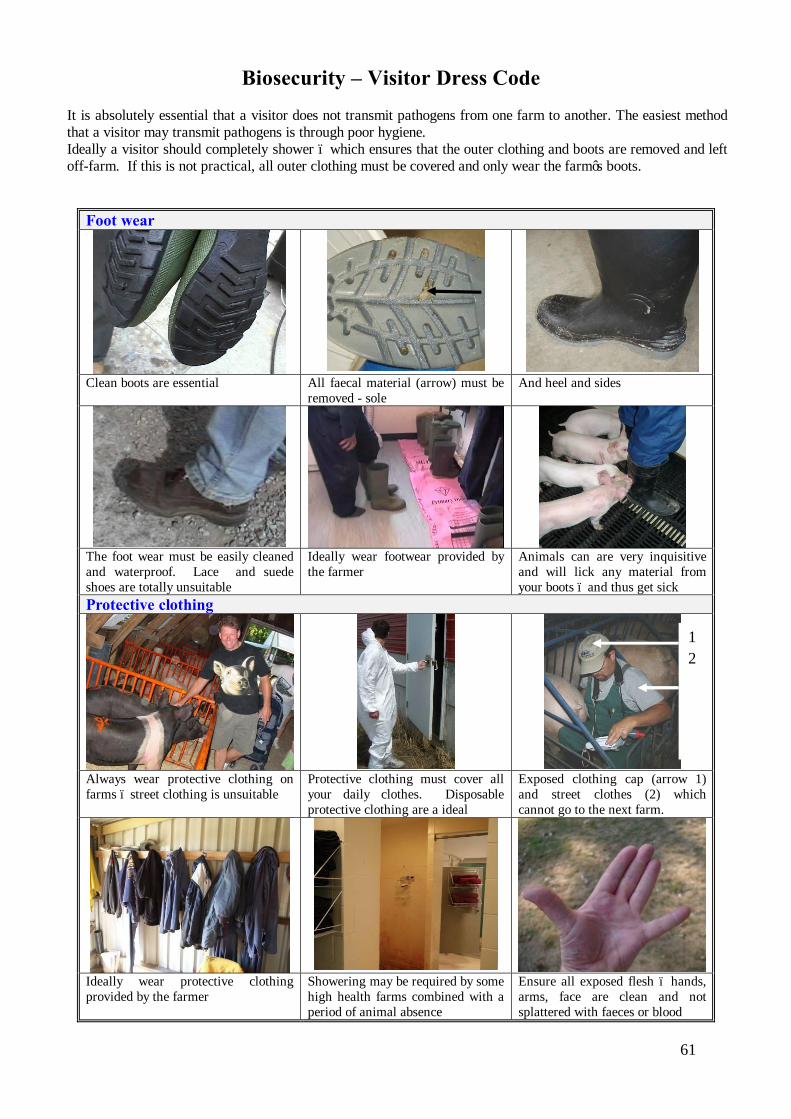
61
Biosecurity – Visitor Dress Code
It is absolutely essential that a visitor does not transmit pathogens from one farm to another. The easiest method that a visitor may transmit pathogens is through poor hygiene. Ideally a visitor should completely shower – which ensures that the outer clothing and boots are removed and left off-farm. If this is not practical, all outer clothing must be covered and only wear the farm’s boots.
Foot wear
Clean boots are essential All faecal material (arrow) must be
removed - sole And heel and sides
The foot wear must be easily cleaned and waterproof. Lace and suede shoes are totally unsuitable
Ideally wear footwear provided by the farmer
Animals can are very inquisitive and will lick any material from your boots – and thus get sick
Protective clothing
Always wear protective clothing on farms – street clothing is unsuitable
Protective clothing must cover all your daily clothes. Disposable protective clothing are a ideal
Exposed clothing cap (arrow 1) and street clothes (2) which cannot go to the next farm.
Ideally wear protective clothing provided by the farmer
Showering may be required by some high health farms combined with a period of animal absence
Ensure all exposed flesh – hands, arms, face are clean and not splattered with faeces or blood
1
2
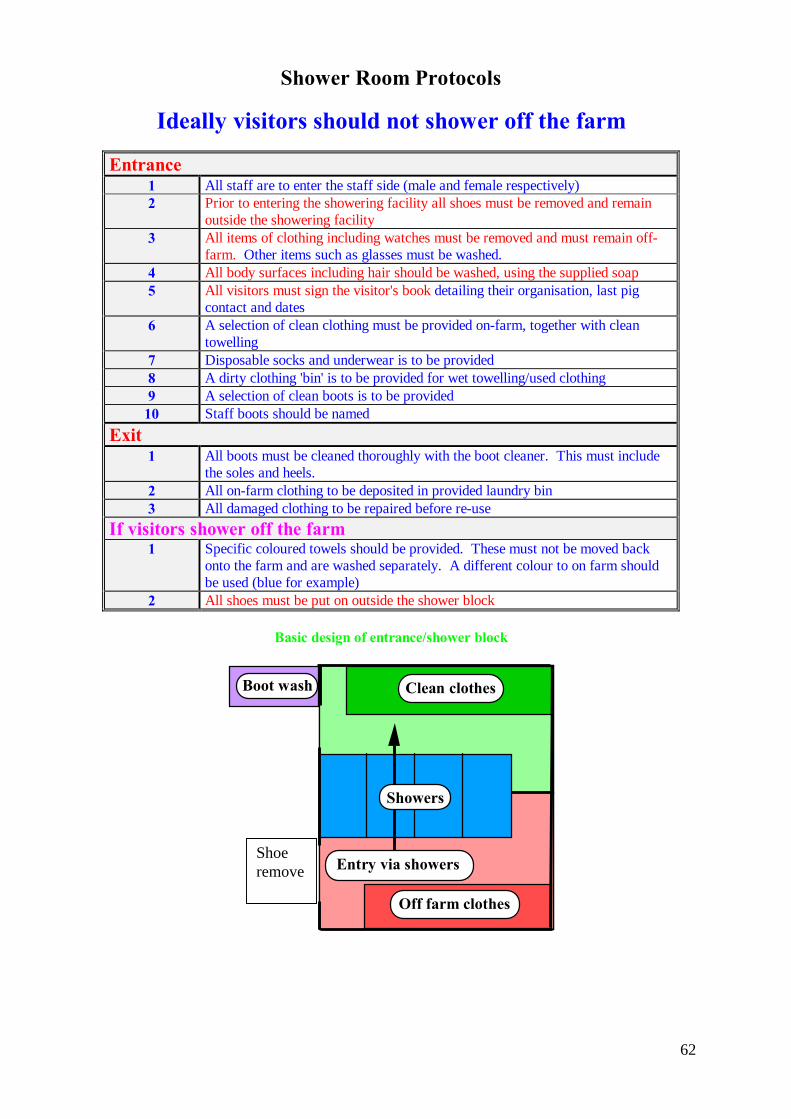
62
Shower Room Protocols
Ideally visitors should not shower off the farm
Entrance 1 All staff are to enter the staff side (male and female respectively) 2 Prior to entering the showering facility all shoes must be removed and remain
outside the showering facility 3 All items of clothing including watches must be removed and must remain off-
farm. Other items such as glasses must be washed. 4 All body surfaces including hair should be washed, using the supplied soap 5 All visitors must sign the visitor's book detailing their organisation, last pig
contact and dates 6 A selection of clean clothing must be provided on-farm, together with clean
towelling 7 Disposable socks and underwear is to be provided 8 A dirty clothing 'bin' is to be provided for wet towelling/used clothing 9 A selection of clean boots is to be provided
10 Staff boots should be named Exit
1 All boots must be cleaned thoroughly with the boot cleaner. This must include the soles and heels.
2 All on-farm clothing to be deposited in provided laundry bin 3 All damaged clothing to be repaired before re-use
If visitors shower off the farm 1 Specific coloured towels should be provided. These must not be moved back
onto the farm and are washed separately. A different colour to on farm should be used (blue for example)
2 All shoes must be put on outside the shower block
Basic design of entrance/shower block
Showers
Boot wash Clean clothes
Off farm clothes
Entry via showers Shoe remove
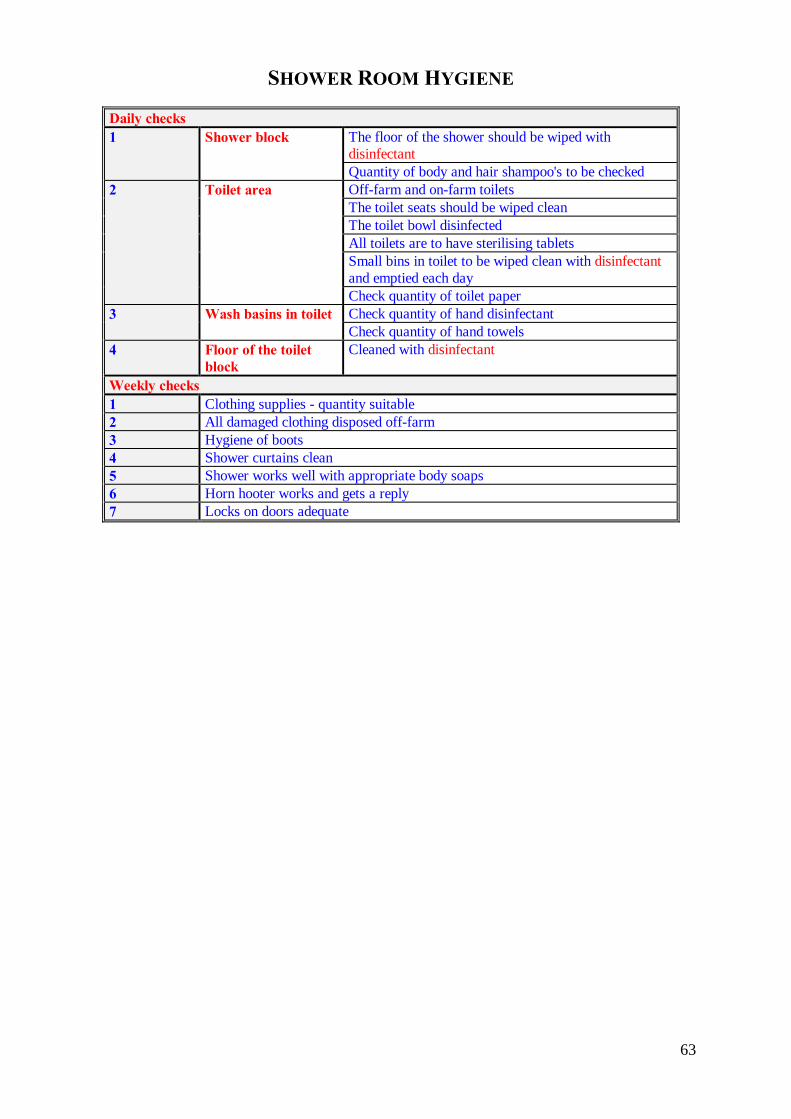
63
SHOWER ROOM HYGIENE
Daily checks 1 Shower block The floor of the shower should be wiped with
disinfectant Quantity of body and hair shampoo's to be checked
2 Toilet area Off-farm and on-farm toilets The toilet seats should be wiped clean The toilet bowl disinfected All toilets are to have sterilising tablets Small bins in toilet to be wiped clean with disinfectant and emptied each day Check quantity of toilet paper
3 Wash basins in toilet Check quantity of hand disinfectant Check quantity of hand towels
4 Floor of the toilet block
Cleaned with disinfectant
Weekly checks 1 Clothing supplies - quantity suitable 2 All damaged clothing disposed off-farm 3 Hygiene of boots 4 Shower curtains clean 5 Shower works well with appropriate body soaps 6 Horn hooter works and gets a reply 7 Locks on doors adequate

64
MANAGEMENT BOARD
SHOWER ROOM HYGIENE
Week 1 2 3 4 5 1 Shower curtain clean 2 Floor of shower clean 3 Plenty of body and
hair shampoo
4 Suitable clean clothing
5 Boot hygiene good 6 Floor of shower
room clean
7 Wash basin clean 8 Plenty of soap 9 Plenty of paper hand
towels
10 Toilet bowl clean 11 Plenty of toilet paper 12 Bins empty 13 Visitors book
completed
14 Sign on door clean 15 Klaxon hooter works 16 Klaxon hooter gets a
reply
17 Locks on doors adequate
Initials
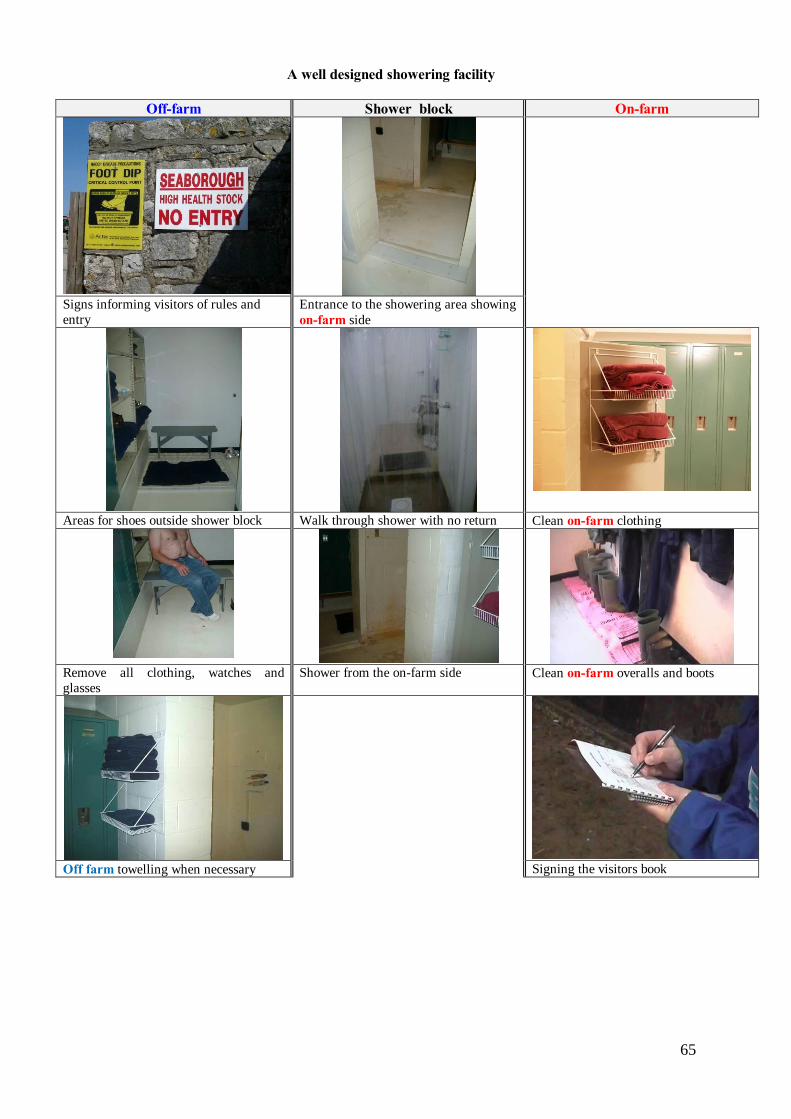
65
A well designed showering facility
Off-farm Shower block On-farm
Signs informing visitors of rules and entry
Entrance to the showering area showing on-farm side
Areas for shoes outside shower block Walk through shower with no return Clean on-farm clothing
Remove all clothing, watches and glasses
Shower from the on-farm side Clean on-farm overalls and boots
Off farm towelling when necessary Signing the visitors book
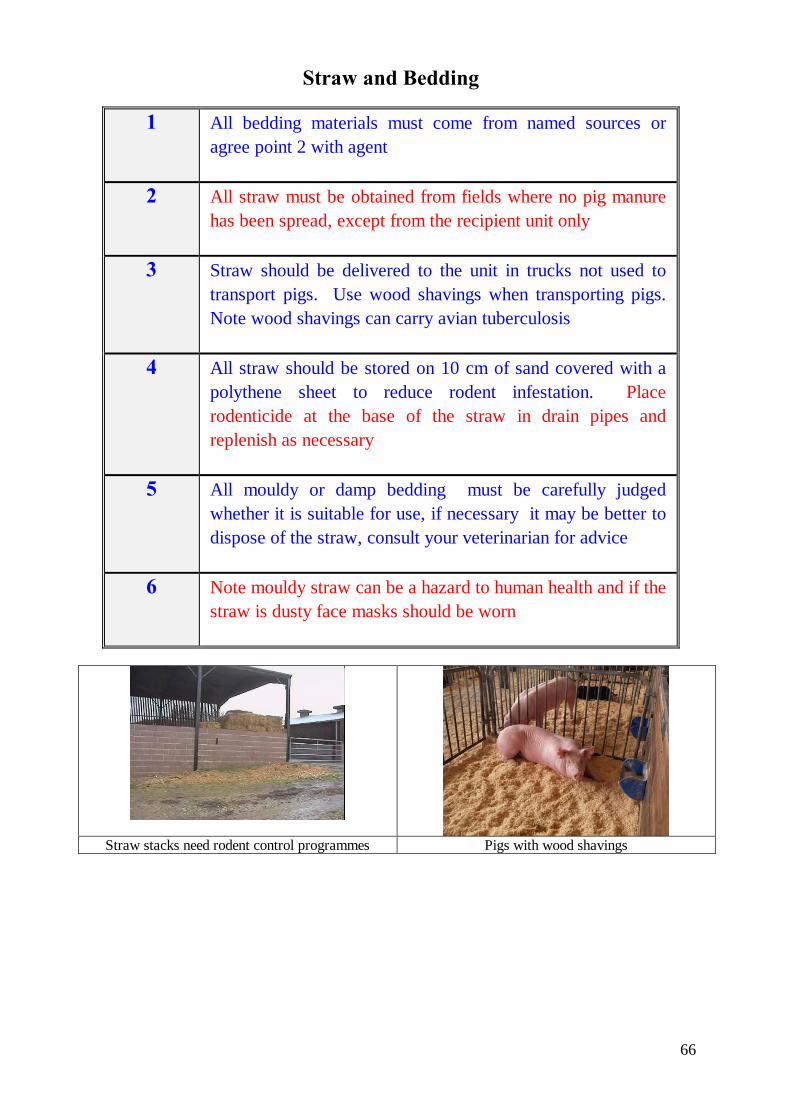
66
Straw and Bedding
1 All bedding materials must come from named sources or agree point 2 with agent
2 All straw must be obtained from fields where no pig manure has been spread, except from the recipient unit only
3 Straw should be delivered to the unit in trucks not used to transport pigs. Use wood shavings when transporting pigs. Note wood shavings can carry avian tuberculosis
4 All straw should be stored on 10 cm of sand covered with a polythene sheet to reduce rodent infestation. Place rodenticide at the base of the straw in drain pipes and replenish as necessary
5 All mouldy or damp bedding must be carefully judged whether it is suitable for use, if necessary it may be better to dispose of the straw, consult your veterinarian for advice
6 Note mouldy straw can be a hazard to human health and if the straw is dusty face masks should be worn
Straw stacks need rodent control programmes Pigs with wood shavings
67
Machine and Equipment Purchases
All equipment which is going to come into contact with the animals must be purchased new and without
any previous contact with other animals.
All equipment must look new on arrival and be clean otherwise entry to the farm must be refused.
ON NO ACCOUNT MUST EQUIPMENT BE
LOANED TO OTHER FARMS
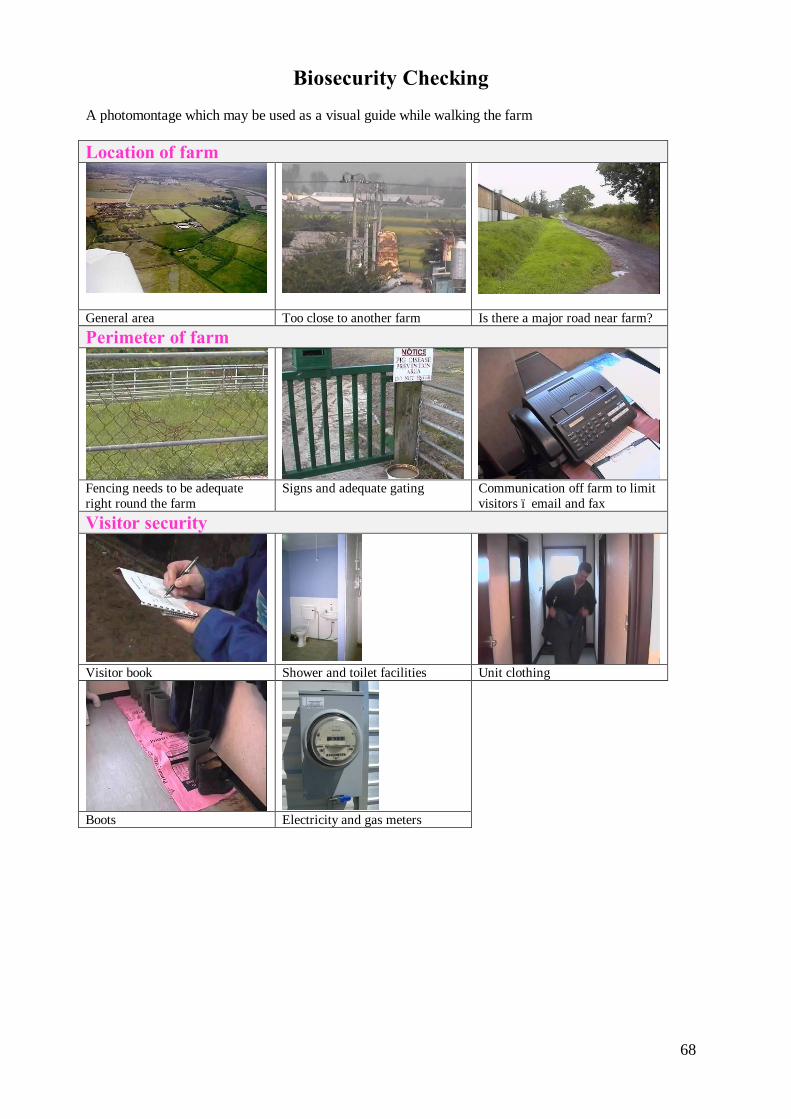
68
Biosecurity Checking A photomontage which may be used as a visual guide while walking the farm Location of farm
General area Too close to another farm Is there a major road near farm? Perimeter of farm
Fencing needs to be adequate right round the farm
Signs and adequate gating Communication off farm to limit visitors – email and fax
Visitor security
Visitor book Shower and toilet facilities Unit clothing
Boots Electricity and gas meters
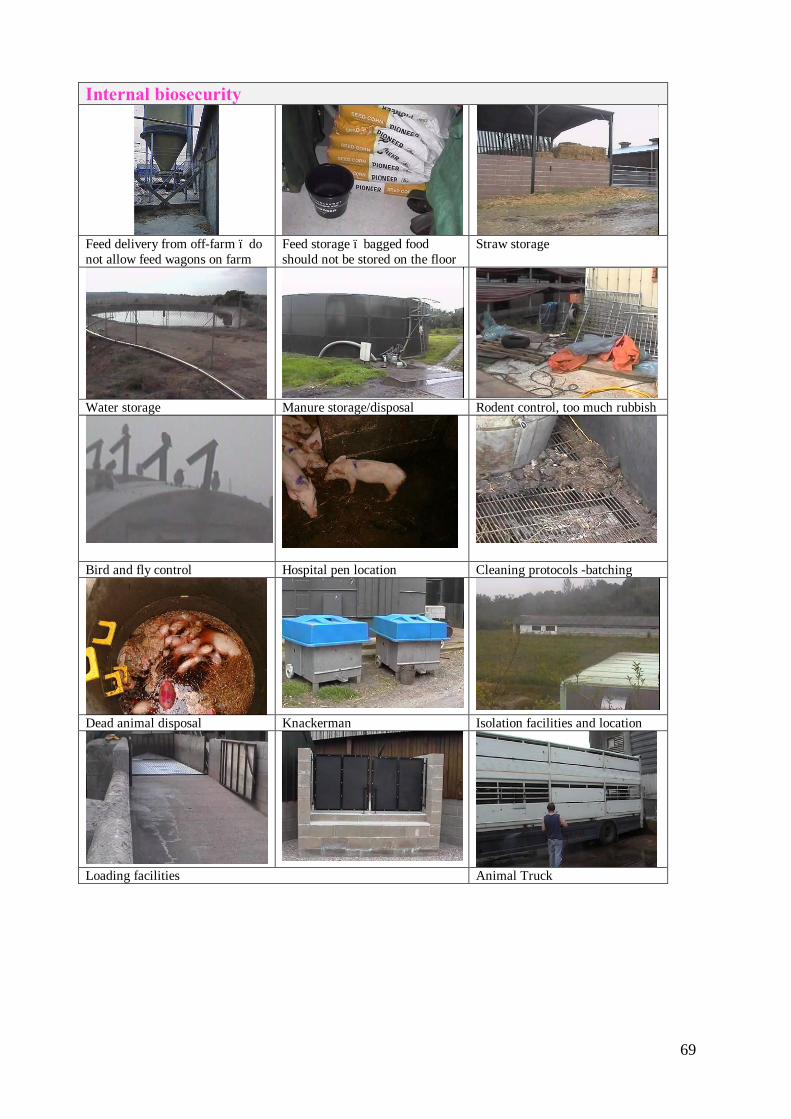
69
Internal biosecurity
Feed delivery from off-farm – do not allow feed wagons on farm
Feed storage – bagged food should not be stored on the floor
Straw storage
Water storage Manure storage/disposal Rodent control, too much rubbish
Bird and fly control Hospital pen location Cleaning protocols -batching
Dead animal disposal Knackerman Isolation facilities and location
Loading facilities Animal Truck
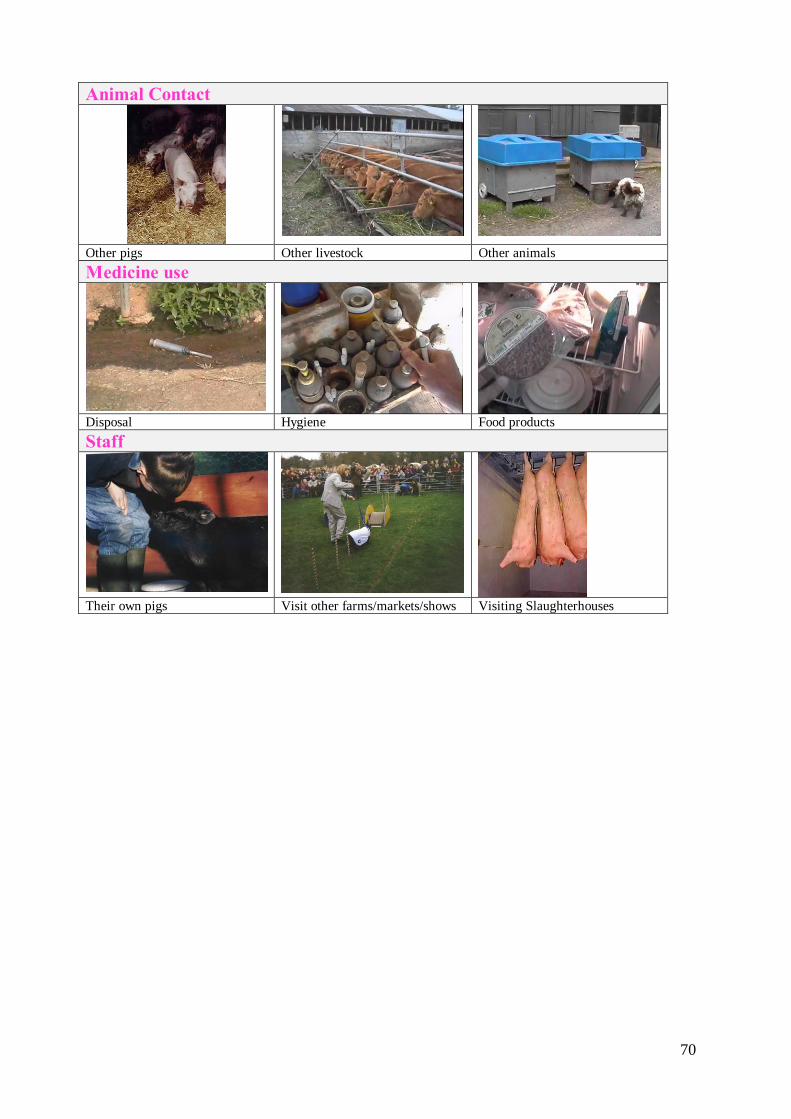
70
Animal Contact
Other pigs Other livestock Other animals Medicine use
Disposal Hygiene Food products Staff
Their own pigs Visit other farms/markets/shows Visiting Slaughterhouses
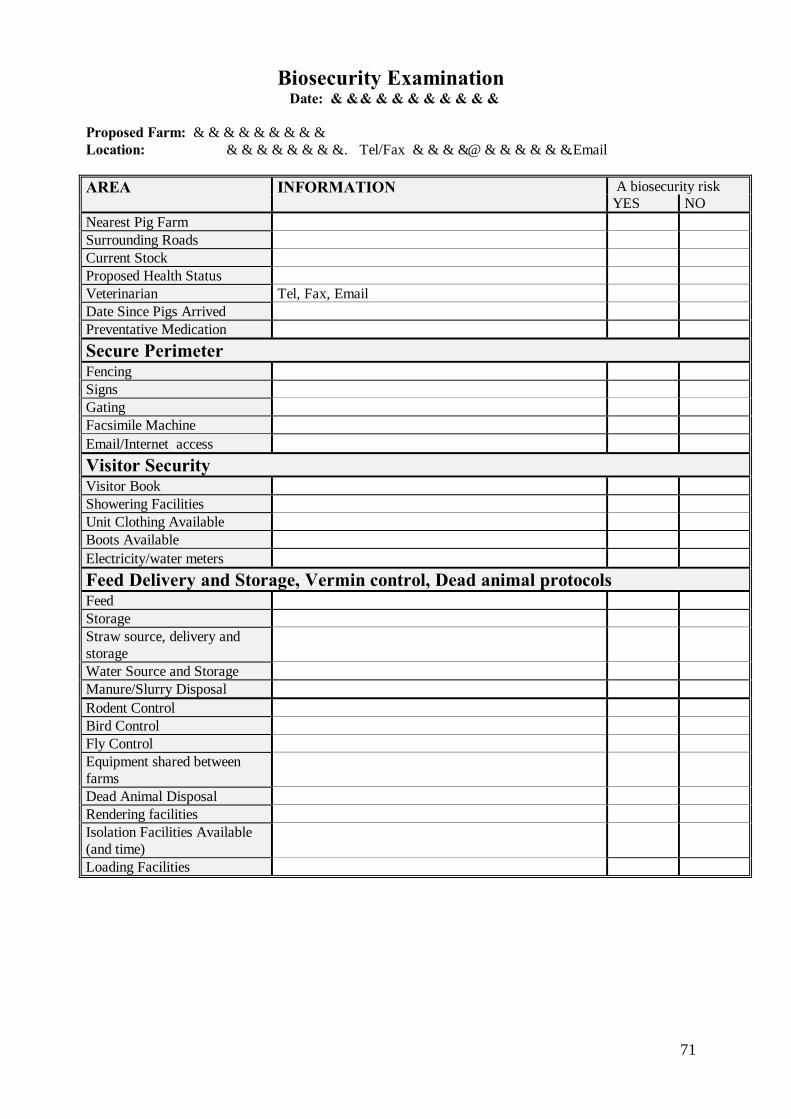
71
Biosecurity Examination Date: …………………………….
Proposed Farm: ……………………… Location: …………………….. Tel/Fax …………@……………….Email AREA INFORMATION A biosecurity risk
YES NO Nearest Pig Farm Surrounding Roads Current Stock Proposed Health Status Veterinarian Tel, Fax, Email Date Since Pigs Arrived Preventative Medication Secure Perimeter Fencing Signs Gating Facsimile Machine Email/Internet access Visitor Security Visitor Book Showering Facilities Unit Clothing Available Boots Available Electricity/water meters Feed Delivery and Storage, Vermin control, Dead animal protocols Feed Storage Straw source, delivery and storage
Water Source and Storage Manure/Slurry Disposal Rodent Control Bird Control Fly Control Equipment shared between farms
Dead Animal Disposal Rendering facilities Isolation Facilities Available (and time)
Loading Facilities
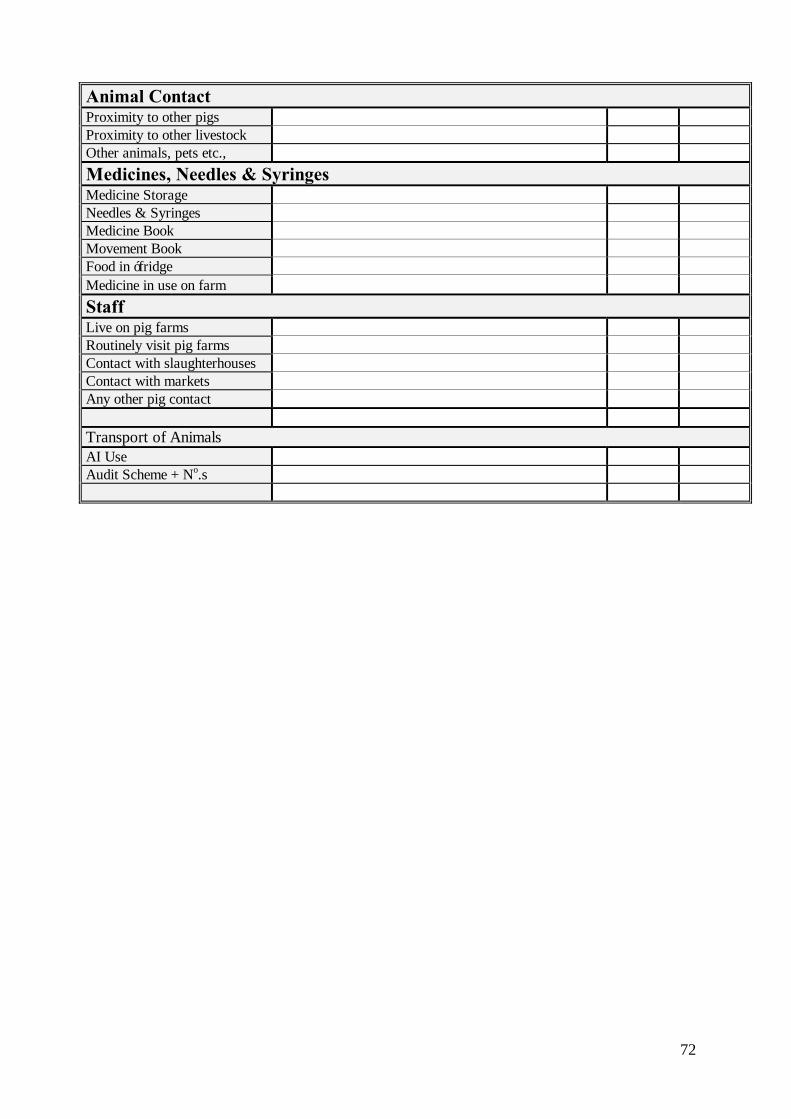
72
Animal Contact Proximity to other pigs Proximity to other livestock Other animals, pets etc., Medicines, Needles & Syringes Medicine Storage Needles & Syringes Medicine Book Movement Book Food in ‘fridge Medicine in use on farm Staff Live on pig farms Routinely visit pig farms Contact with slaughterhouses Contact with markets Any other pig contact Transport of Animals AI Use Audit Scheme + No.s
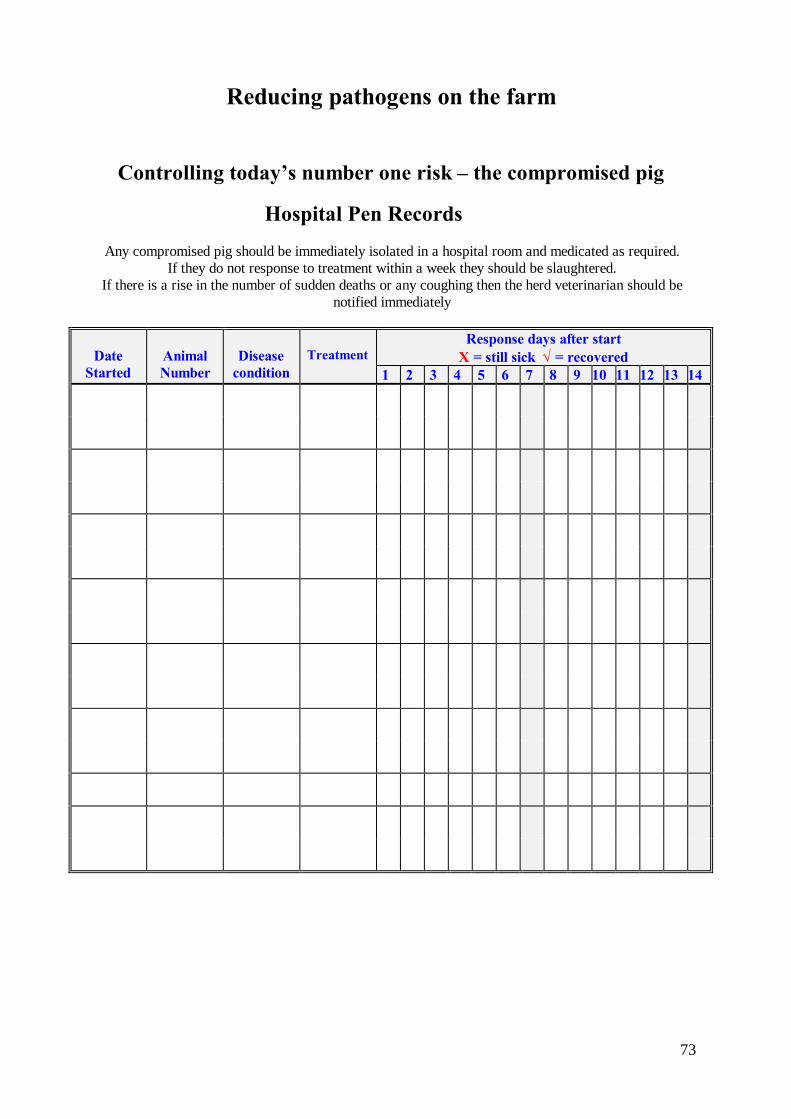
73
Reducing pathogens on the farm
Controlling today’s number one risk – the compromised pig
Hospital Pen Records
Any compromised pig should be immediately isolated in a hospital room and medicated as required. If they do not response to treatment within a week they should be slaughtered.
If there is a rise in the number of sudden deaths or any coughing then the herd veterinarian should be notified immediately
Date Started
Animal Number
Disease
condition
Treatment
Response days after start X = still sick √ = recovered
1 2 3 4 5 6 7 8 9 10 11 12 13 14
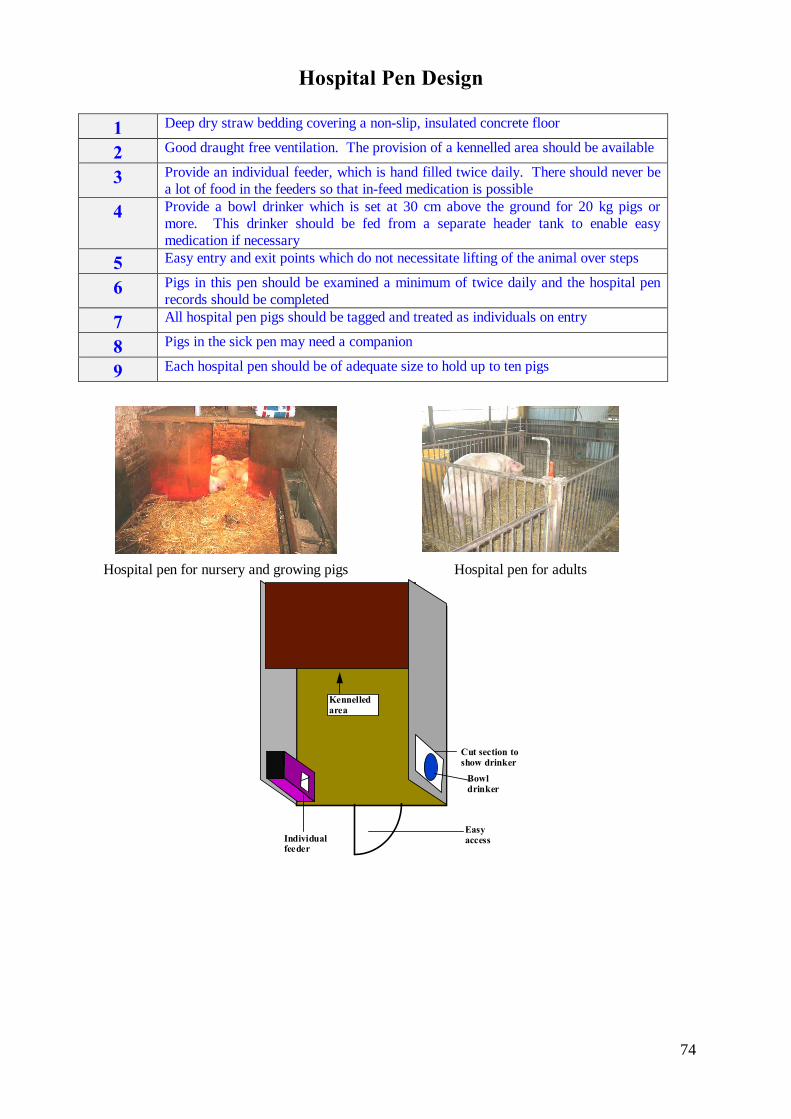
74
Hospital Pen Design
1 Deep dry straw bedding covering a non-slip, insulated concrete floor
2 Good draught free ventilation. The provision of a kennelled area should be available
3 Provide an individual feeder, which is hand filled twice daily. There should never be a lot of food in the feeders so that in-feed medication is possible
4 Provide a bowl drinker which is set at 30 cm above the ground for 20 kg pigs or more. This drinker should be fed from a separate header tank to enable easy medication if necessary
5 Easy entry and exit points which do not necessitate lifting of the animal over steps
6 Pigs in this pen should be examined a minimum of twice daily and the hospital pen records should be completed
7 All hospital pen pigs should be tagged and treated as individuals on entry
8 Pigs in the sick pen may need a companion
9 Each hospital pen should be of adequate size to hold up to ten pigs
Hospital pen for nursery and growing pigs Hospital pen for adults
Kennelled area
Bowl drinker
Individual feeder
Easy access
Cut section to show drinker

75
Compromised pig pen from straw bales There are times when it is required to provide emergency hospital care. In many places it is possible to provide hospital accommodation outside. The following gives an illustration of one such accommodation built between two finishing sheds. Straw based hospital pens will provide adequate protection from 0-40°C.
General view of hospital area – walls constructed from straw bales with a simple gate at one end. Floor space 1.4 m2 per pig. One bowl drinker per 20 pigs. Use high quality feed.
Hiding area Shade cloth is used to provide a lying area and protection from the sun. Sick and compromised pigs like to hide.
Good water supply Ideally in a trough or bowls as shown. Avoid nipples as these are more difficult for weak pigs. Dehydration is a common cause of death in compromised pigs.
Wallow If the climate is very hot, even newly weaned pigs will appreciate a shallow wallow.
Bedding comfort Sick and compromised pigs like to hide and burrow into straw. In the hot parts of the day, under the straw can be cooling.
Feeders Feed little and often. This way the feed is as fresh as possible and rapid changes to the feed can be made
Pig identity Do not lose the pig in the system – record the original pen number and date of entry into the hospital area.
Good records Record all pig entry and exit. Pigs should be marketed at the first possible weight. If the pig does not recover adopt a 7 and 14 day review programme. Euthanasia may be the best option for sick pigs which fail to rapidly recover
Proper care and attention Ensure that all the animals are checked at least 3 times a day and receive medication where appropriate. The water and feeding system should be capable of being an easy medication route when required.
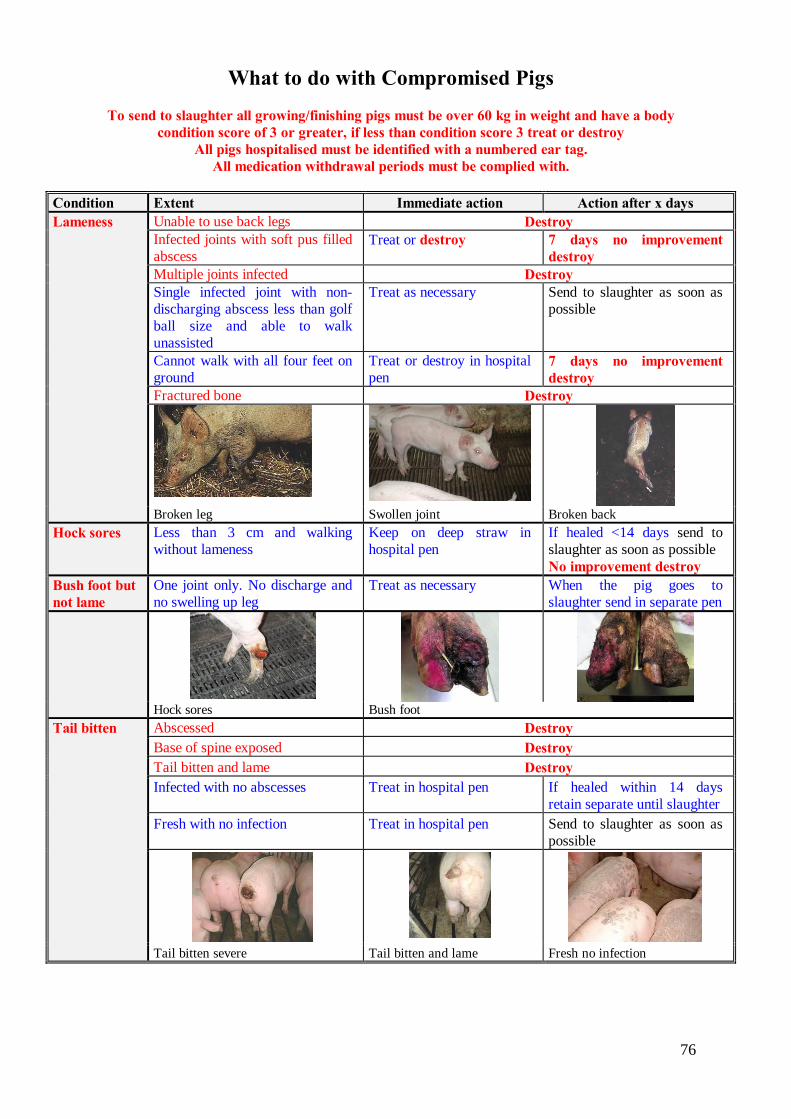
76
What to do with Compromised Pigs
To send to slaughter all growing/finishing pigs must be over 60 kg in weight and have a body condition score of 3 or greater, if less than condition score 3 treat or destroy
All pigs hospitalised must be identified with a numbered ear tag. All medication withdrawal periods must be complied with.
Condition Extent Immediate action Action after x days Lameness Unable to use back legs Destroy
Infected joints with soft pus filled abscess
Treat or destroy 7 days no improvement destroy
Multiple joints infected Destroy Single infected joint with non- discharging abscess less than golf ball size and able to walk unassisted
Treat as necessary Send to slaughter as soon as possible
Cannot walk with all four feet on ground
Treat or destroy in hospital pen
7 days no improvement destroy
Fractured bone Destroy
Broken leg Swollen joint Broken back
Hock sores Less than 3 cm and walking without lameness
Keep on deep straw in hospital pen
If healed <14 days send to slaughter as soon as possible No improvement destroy
Bush foot but not lame
One joint only. No discharge and no swelling up leg
Treat as necessary When the pig goes to slaughter send in separate pen
Hock sores Bush foot
Tail bitten Abscessed Destroy Base of spine exposed Destroy Tail bitten and lame Destroy Infected with no abscesses Treat in hospital pen If healed within 14 days
retain separate until slaughter Fresh with no infection Treat in hospital pen Send to slaughter as soon as
possible
Tail bitten severe Tail bitten and lame Fresh no infection
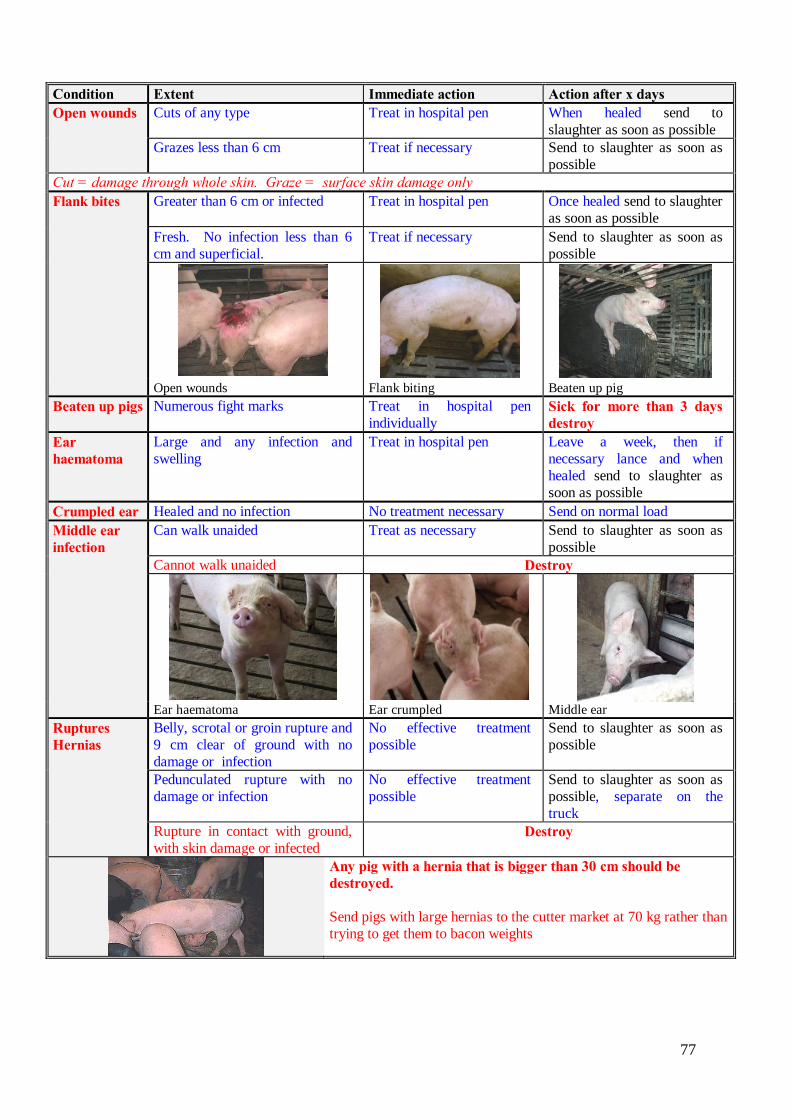
77
Condition Extent Immediate action Action after x days Open wounds Cuts of any type Treat in hospital pen When healed send to
slaughter as soon as possible Grazes less than 6 cm Treat if necessary Send to slaughter as soon as
possible Cut = damage through whole skin. Graze = surface skin damage only Flank bites Greater than 6 cm or infected Treat in hospital pen Once healed send to slaughter
as soon as possible Fresh. No infection less than 6 cm and superficial.
Treat if necessary Send to slaughter as soon as possible
Open wounds Flank biting Beaten up pig
Beaten up pigs Numerous fight marks Treat in hospital pen individually
Sick for more than 3 days destroy
Ear haematoma
Large and any infection and swelling
Treat in hospital pen Leave a week, then if necessary lance and when healed send to slaughter as soon as possible
Crumpled ear Healed and no infection No treatment necessary Send on normal load Middle ear infection
Can walk unaided Treat as necessary Send to slaughter as soon as possible
Cannot walk unaided Destroy
Ear haematoma Ear crumpled Middle ear
Ruptures Hernias
Belly, scrotal or groin rupture and 9 cm clear of ground with no damage or infection
No effective treatment possible
Send to slaughter as soon as possible
Pedunculated rupture with no damage or infection
No effective treatment possible
Send to slaughter as soon as possible, separate on the truck
Rupture in contact with ground, with skin damage or infected
Destroy
Any pig with a hernia that is bigger than 30 cm should be destroyed. Send pigs with large hernias to the cutter market at 70 kg rather than trying to get them to bacon weights
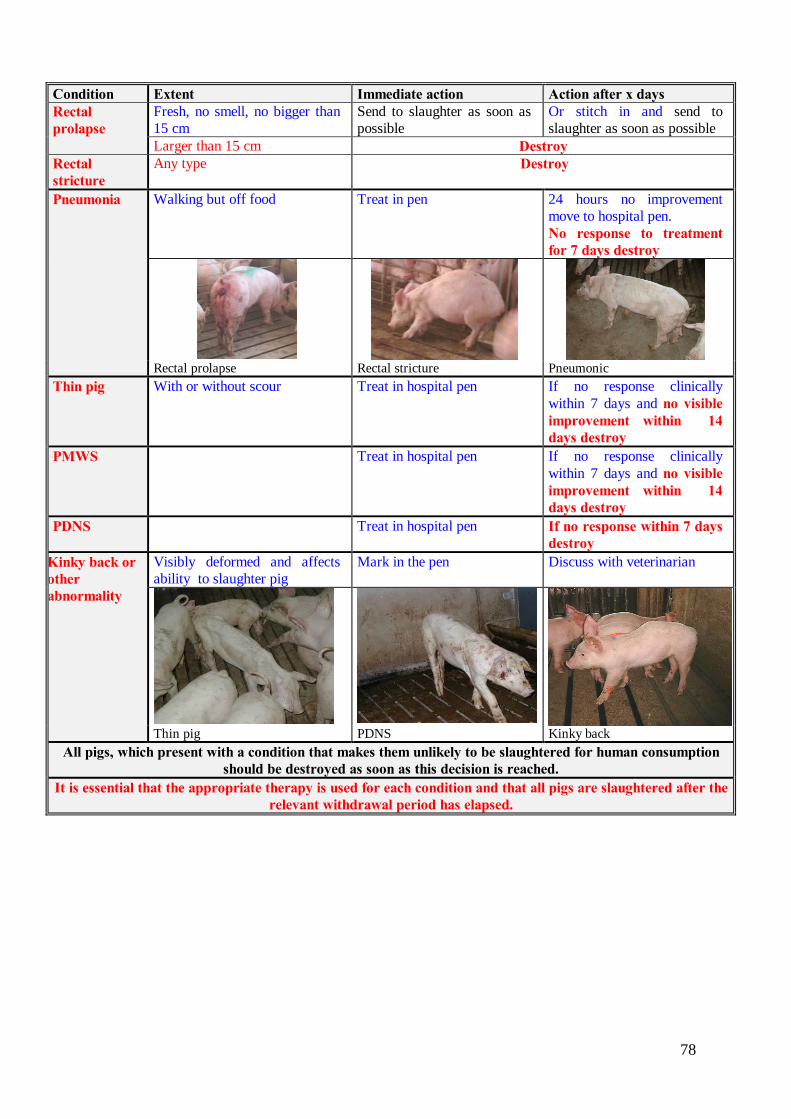
78
Condition Extent Immediate action Action after x days Rectal prolapse
Fresh, no smell, no bigger than 15 cm
Send to slaughter as soon as possible
Or stitch in and send to slaughter as soon as possible
Larger than 15 cm Destroy Rectal stricture
Any type Destroy
Pneumonia Walking but off food Treat in pen 24 hours no improvement move to hospital pen. No response to treatment for 7 days destroy
Rectal prolapse Rectal stricture Pneumonic
Thin pig With or without scour Treat in hospital pen If no response clinically within 7 days and no visible improvement within 14 days destroy
PMWS Treat in hospital pen If no response clinically within 7 days and no visible improvement within 14 days destroy
PDNS Treat in hospital pen If no response within 7 days destroy
Kinky back or other abnormality
Visibly deformed and affects ability to slaughter pig
Mark in the pen Discuss with veterinarian
Thin pig PDNS Kinky back
All pigs, which present with a condition that makes them unlikely to be slaughtered for human consumption should be destroyed as soon as this decision is reached.
It is essential that the appropriate therapy is used for each condition and that all pigs are slaughtered after the relevant withdrawal period has elapsed.
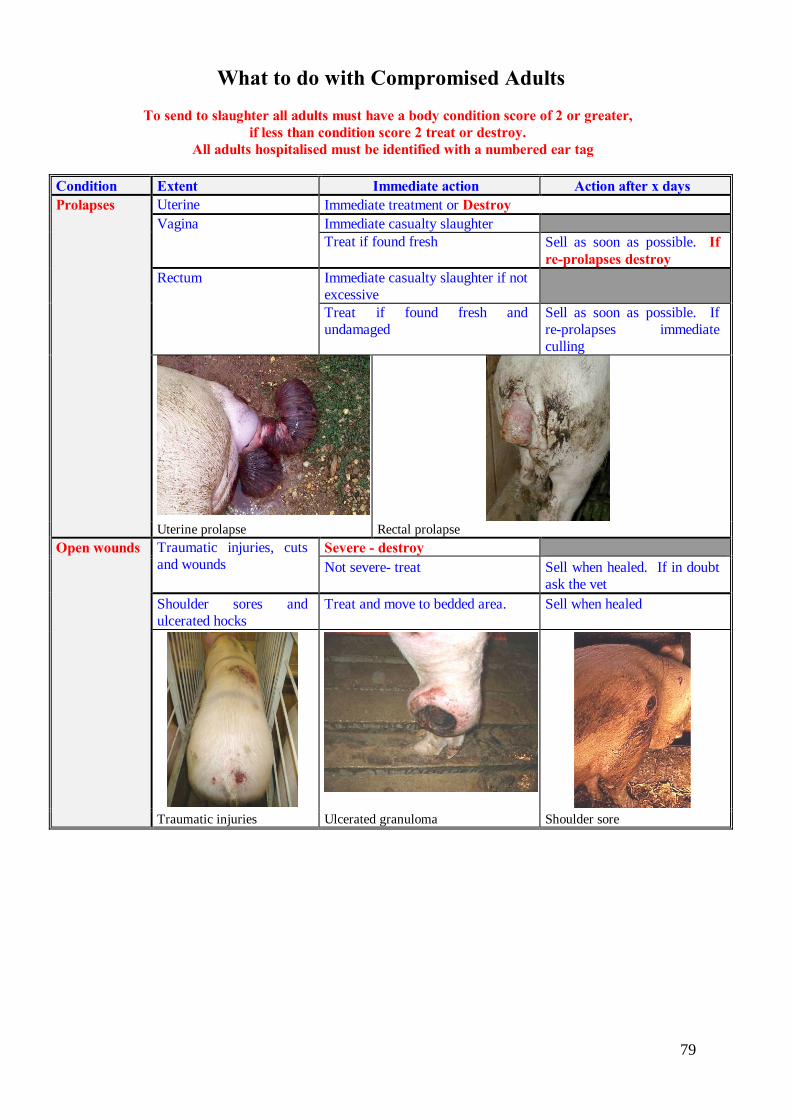
79
What to do with Compromised Adults
To send to slaughter all adults must have a body condition score of 2 or greater, if less than condition score 2 treat or destroy.
All adults hospitalised must be identified with a numbered ear tag
Condition Extent Immediate action Action after x days Prolapses Uterine Immediate treatment or Destroy
Vagina Immediate casualty slaughter Treat if found fresh Sell as soon as possible. If
re-prolapses destroy Rectum Immediate casualty slaughter if not
excessive
Treat if found fresh and undamaged
Sell as soon as possible. If re-prolapses immediate culling
Uterine prolapse Rectal prolapse
Open wounds Traumatic injuries, cuts and wounds
Severe - destroy Not severe- treat Sell when healed. If in doubt
ask the vet Shoulder sores and ulcerated hocks
Treat and move to bedded area. Sell when healed
Traumatic injuries Ulcerated granuloma Shoulder sore
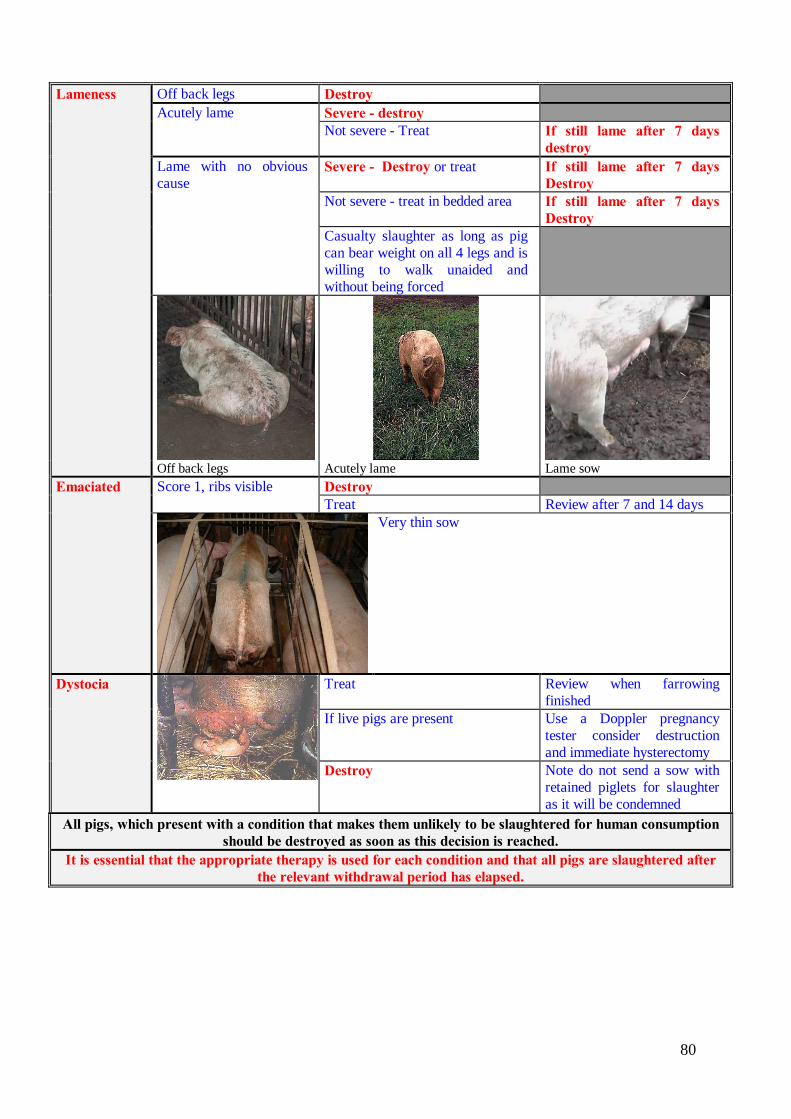
80
Lameness Off back legs Destroy
Acutely lame Severe - destroy Not severe - Treat If still lame after 7 days
destroy Lame with no obvious cause
Severe - Destroy or treat If still lame after 7 days Destroy
Not severe - treat in bedded area If still lame after 7 days Destroy
Casualty slaughter as long as pig can bear weight on all 4 legs and is willing to walk unaided and without being forced
Off back legs Acutely lame Lame sow
Emaciated Score 1, ribs visible Destroy Treat Review after 7 and 14 days
Very thin sow
Dystocia
Treat Review when farrowing finished
If live pigs are present Use a Doppler pregnancy tester consider destruction and immediate hysterectomy
Destroy Note do not send a sow with retained piglets for slaughter as it will be condemned
All pigs, which present with a condition that makes them unlikely to be slaughtered for human consumption should be destroyed as soon as this decision is reached.
It is essential that the appropriate therapy is used for each condition and that all pigs are slaughtered after the relevant withdrawal period has elapsed.
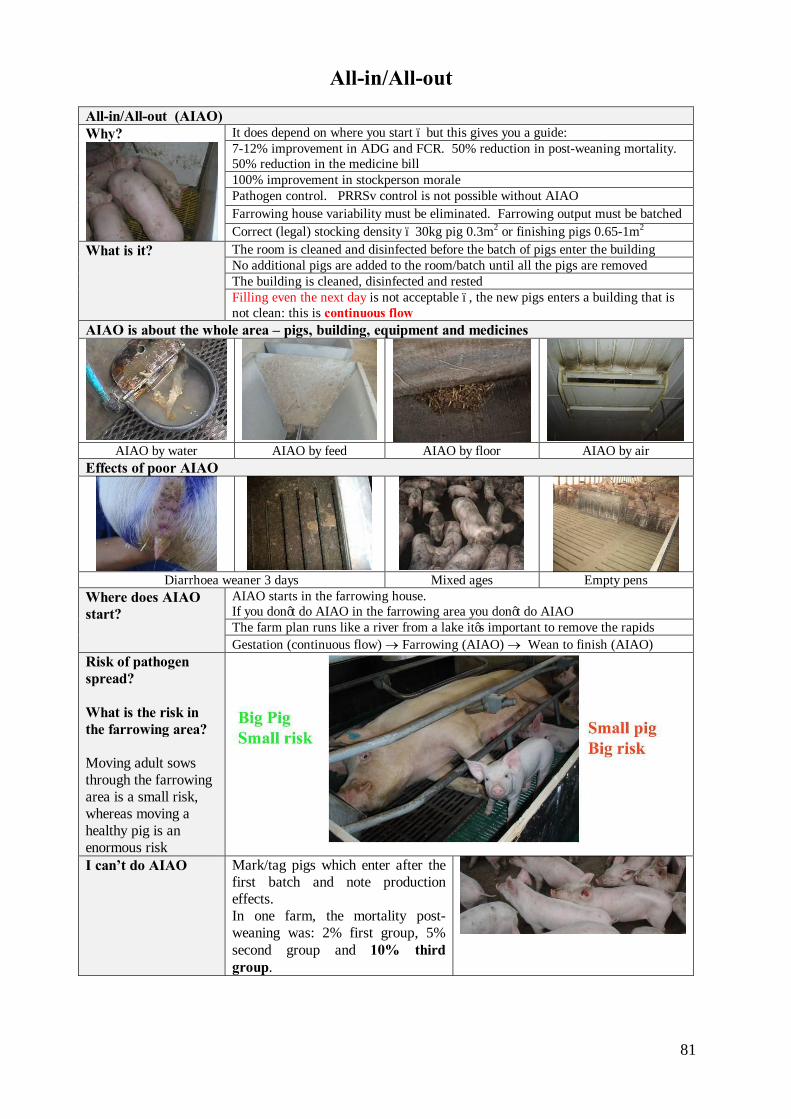
81
All-in/All-out All-in/All-out (AIAO) Why?
It does depend on where you start – but this gives you a guide: 7-12% improvement in ADG and FCR. 50% reduction in post-weaning mortality. 50% reduction in the medicine bill 100% improvement in stockperson morale Pathogen control. PRRSv control is not possible without AIAO Farrowing house variability must be eliminated. Farrowing output must be batched Correct (legal) stocking density – 30kg pig 0.3m2 or finishing pigs 0.65-1m2
What is it?
The room is cleaned and disinfected before the batch of pigs enter the building No additional pigs are added to the room/batch until all the pigs are removed The building is cleaned, disinfected and rested Filling even the next day is not acceptable –, the new pigs enters a building that is not clean: this is continuous flow
AIAO is about the whole area – pigs, building, equipment and medicines
AIAO by water AIAO by feed AIAO by floor AIAO by air
Effects of poor AIAO
Diarrhoea weaner 3 days Mixed ages Empty pens
Where does AIAO start?
AIAO starts in the farrowing house. If you don’t do AIAO in the farrowing area you don’t do AIAO The farm plan runs like a river from a lake it’s important to remove the rapids Gestation (continuous flow) → Farrowing (AIAO) → Wean to finish (AIAO)
Risk of pathogen spread? What is the risk in the farrowing area? Moving adult sows through the farrowing area is a small risk, whereas moving a healthy pig is an enormous risk
I can’t do AIAO Mark/tag pigs which enter after the first batch and note production effects. In one farm, the mortality post-weaning was: 2% first group, 5% second group and 10% third group.
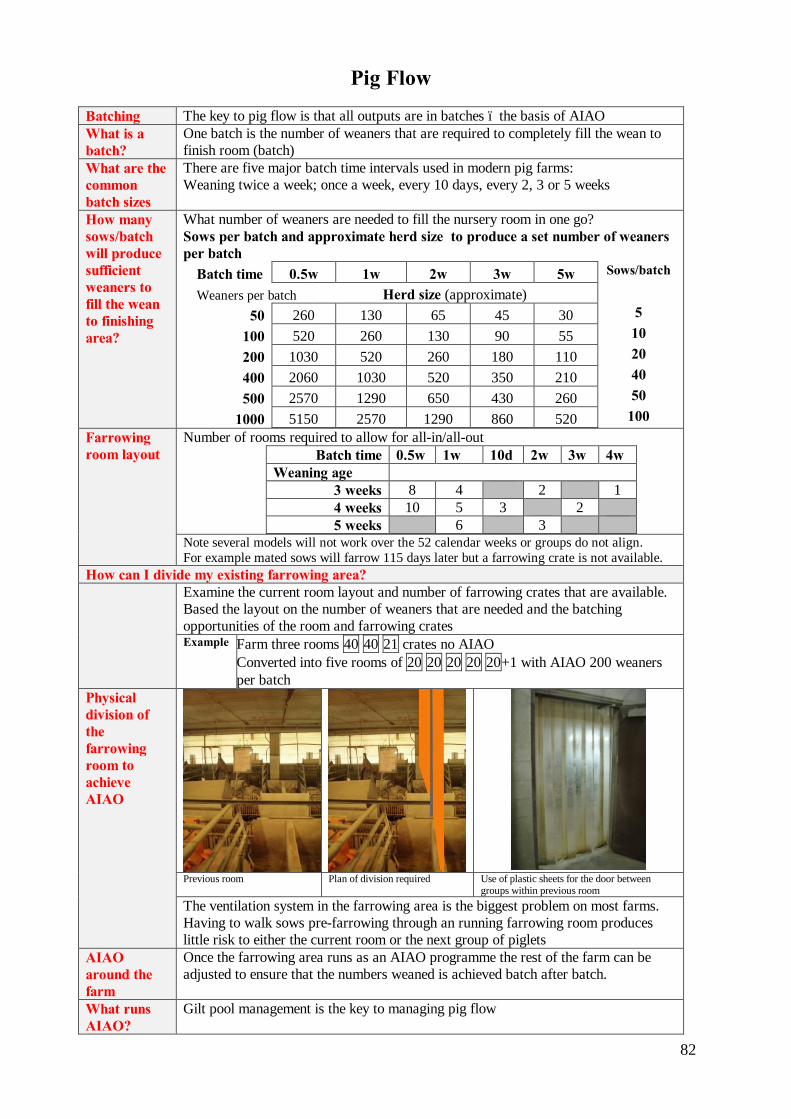
82
Pig Flow Batching The key to pig flow is that all outputs are in batches – the basis of AIAO What is a batch?
One batch is the number of weaners that are required to completely fill the wean to finish room (batch)
What are the common batch sizes
There are five major batch time intervals used in modern pig farms: Weaning twice a week; once a week, every 10 days, every 2, 3 or 5 weeks
How many sows/batch will produce sufficient weaners to fill the wean to finishing area?
What number of weaners are needed to fill the nursery room in one go? Sows per batch and approximate herd size to produce a set number of weaners per batch
Batch time 0.5w 1w 2w 3w 5w Sows/batch
Weaners per batch Herd size (approximate)
50 260 130 65 45 30 5 100 520 260 130 90 55 10 200 1030 520 260 180 110 20 400 2060 1030 520 350 210 40 500 2570 1290 650 430 260 50
1000 5150 2570 1290 860 520 100
Farrowing room layout
Number of rooms required to allow for all-in/all-out Batch time 0.5w 1w 10d 2w 3w 4w
Weaning age 3 weeks 8 4 2 1 4 weeks 10 5 3 2 5 weeks 6 3
Note several models will not work over the 52 calendar weeks or groups do not align. For example mated sows will farrow 115 days later but a farrowing crate is not available.
How can I divide my existing farrowing area? Examine the current room layout and number of farrowing crates that are available.
Based the layout on the number of weaners that are needed and the batching opportunities of the room and farrowing crates Example Farm three rooms 40 40 21 crates no AIAO
Converted into five rooms of 20 20 20 20 20+1 with AIAO 200 weaners per batch
Physical division of the farrowing room to achieve AIAO
Previous room Plan of division required Use of plastic sheets for the door between
groups within previous room The ventilation system in the farrowing area is the biggest problem on most farms. Having to walk sows pre-farrowing through an running farrowing room produces little risk to either the current room or the next group of piglets
AIAO around the farm
Once the farrowing area runs as an AIAO programme the rest of the farm can be adjusted to ensure that the numbers weaned is achieved batch after batch.
What runs AIAO?
Gilt pool management is the key to managing pig flow
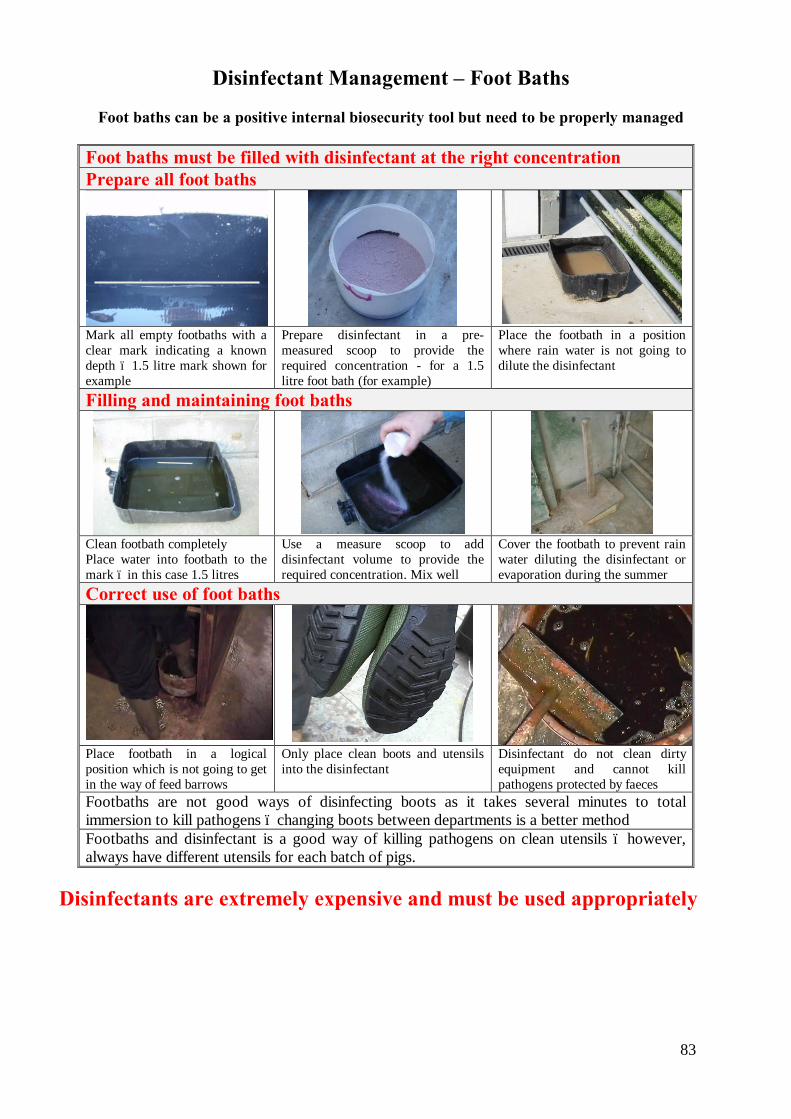
83
Disinfectant Management – Foot Baths
Foot baths can be a positive internal biosecurity tool but need to be properly managed Foot baths must be filled with disinfectant at the right concentration Prepare all foot baths
Mark all empty footbaths with a clear mark indicating a known depth – 1.5 litre mark shown for example
Prepare disinfectant in a pre-measured scoop to provide the required concentration - for a 1.5 litre foot bath (for example)
Place the footbath in a position where rain water is not going to dilute the disinfectant
Filling and maintaining foot baths
Clean footbath completely Place water into footbath to the mark – in this case 1.5 litres
Use a measure scoop to add disinfectant volume to provide the required concentration. Mix well
Cover the footbath to prevent rain water diluting the disinfectant or evaporation during the summer
Correct use of foot baths
Place footbath in a logical position which is not going to get in the way of feed barrows
Only place clean boots and utensils into the disinfectant
Disinfectant do not clean dirty equipment and cannot kill pathogens protected by faeces
Footbaths are not good ways of disinfecting boots as it takes several minutes to total immersion to kill pathogens – changing boots between departments is a better method Footbaths and disinfectant is a good way of killing pathogens on clean utensils – however, always have different utensils for each batch of pigs.
Disinfectants are extremely expensive and must be used appropriately
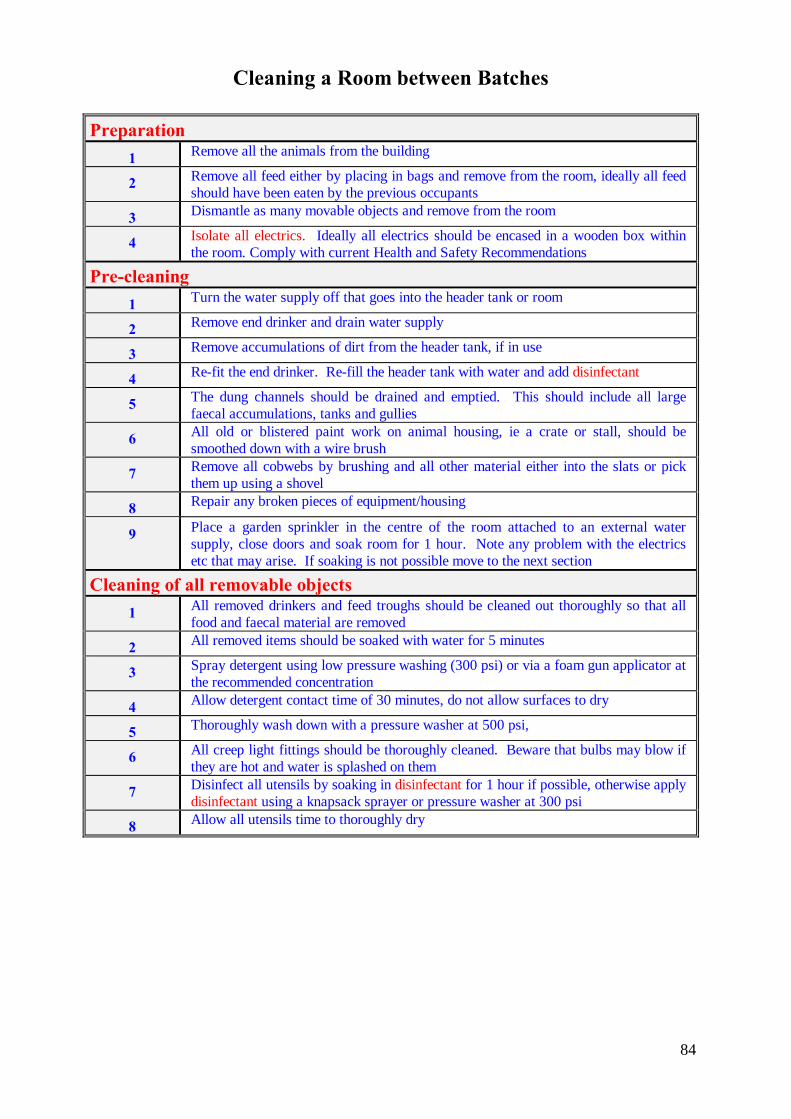
84
Cleaning a Room between Batches
Preparation 1 Remove all the animals from the building
2 Remove all feed either by placing in bags and remove from the room, ideally all feed should have been eaten by the previous occupants
3 Dismantle as many movable objects and remove from the room
4 Isolate all electrics. Ideally all electrics should be encased in a wooden box within the room. Comply with current Health and Safety Recommendations
Pre-cleaning 1 Turn the water supply off that goes into the header tank or room
2 Remove end drinker and drain water supply
3 Remove accumulations of dirt from the header tank, if in use
4 Re-fit the end drinker. Re-fill the header tank with water and add disinfectant
5 The dung channels should be drained and emptied. This should include all large faecal accumulations, tanks and gullies
6 All old or blistered paint work on animal housing, ie a crate or stall, should be smoothed down with a wire brush
7 Remove all cobwebs by brushing and all other material either into the slats or pick them up using a shovel
8 Repair any broken pieces of equipment/housing
9 Place a garden sprinkler in the centre of the room attached to an external water supply, close doors and soak room for 1 hour. Note any problem with the electrics etc that may arise. If soaking is not possible move to the next section
Cleaning of all removable objects 1 All removed drinkers and feed troughs should be cleaned out thoroughly so that all
food and faecal material are removed
2 All removed items should be soaked with water for 5 minutes
3 Spray detergent using low pressure washing (300 psi) or via a foam gun applicator at the recommended concentration
4 Allow detergent contact time of 30 minutes, do not allow surfaces to dry
5 Thoroughly wash down with a pressure washer at 500 psi,
6 All creep light fittings should be thoroughly cleaned. Beware that bulbs may blow if they are hot and water is splashed on them
7 Disinfect all utensils by soaking in disinfectant for 1 hour if possible, otherwise apply disinfectant using a knapsack sprayer or pressure washer at 300 psi
8 Allow all utensils time to thoroughly dry
85
Cleaning the room 1 When the room is ready, spray with detergent using a low pressure washer (300 psi) or
the foam gun application
2 Allow detergent contact time of 30 minutes, do not allow surfaces to dry
3 Pressure wash the house using a pressure washer set at 500 psi with a 45o angle jet. Pressure washing is a very labour intensive job and particular effort must be made on all surfaces below pig height. However, surfaces above pig height must also be washed. Using steam washing can reduce the time of the operation.
4 Prior to entering the room with a pressure washer, ensure that the operator is properly trained and clothed. Wearing waterproofs, goggles and gloves and any additional equipment as required by health and safety. Electrically operated pressure washers should not be connected in the room to be washed.
5 Start at the apex of the room and work down the walls to the floor paying particular attention to corners and other areas where dirt accumulates. Caked soiling should be brushed if necessary to aid removal
6 If the slats can be easily raised, wash the under-surface of the slats to ensure that faecal material does not remain underneath slats within reach of pigs' tongues.
7 Store pressure washer and equipment clean. Ensure that the washer is stored so that it is protected from frost during the winter months
Re-building the room 1 Remove end drinker and drain water supply
2 Re-fit the end drinker. Refill the header tank with water and check that all the drinkers work
3 Allow the house to dry for 2 hours, then disinfect using disinfectant using a knapsack sprayer or a pressure washer at 300 psi with a 45o spray head
4 Spray into the apex of the roof and work down the walls to the floors
5 Open up all the ventilation system and maximise air flow through the building for at least two hours to completely change the air in the building
6 Allow the room to dry completely, using additional heaters if necessary before pigs are placed in the room
7 Make sure that there are no residues of disinfectant around before re-housing pigs
8 Ensure room environment is satisfactory for the pigs before the pigs enter the room
9 Place a disinfectant footbath outside the house filled with disinfectant
All-in/all-out needs good pig flow and must have even pig numbers between each batch. All-in/all-
out is not only about pigs and floors, but also includes air, feed, water and medicine supplies
86
Fumigation
This is a highly dangerous operation. Read and understand the instructions before starting to fumigate
1 Always work accompanied 2 The ambient air temperature inside the building has to be above 18°C
preferably above 27°C 4 Wear water-proofs, gloves and chemical goggles and suitable respirator 5 Damp down the building including the roof and fan shafts 6 Per 100 m3 use: 200 ml formaldehyde (40%) and 90 gm Potassium
permanganate 7 Close off all air inlets and outlets 8 Place the required Potassium permanganate into metal containers 9 In large buildings several metal containers must be evenly distributed
throughout the house 10 Be prepared to get out of the room immediately the formaldehyde is added to
the Potassium permanganate as it is highly dangerous to inhale the fumes 11 Pour the required amount of 40% Formaldehyde into a wide necked container 12 Pour the 40% Formaldehyde on to the Potassium permanganate powder 13 Get out of the room and close the doors 14 Place sign over doors warning all others to stay out of the house 15 Do not re-enter the house for 24 hours 16 After 12 hours ventilate the house for an additional 12 hours before entering in
the building. Wear a suitable respirator when first entering the house to remove the containers
Chlorine Dioxide may be a substitute for Formalin
87
WARNING
FUMIGATION IN PROCESS
THIS IS HAZARDOUS TO HEALTH
KEEP OUT
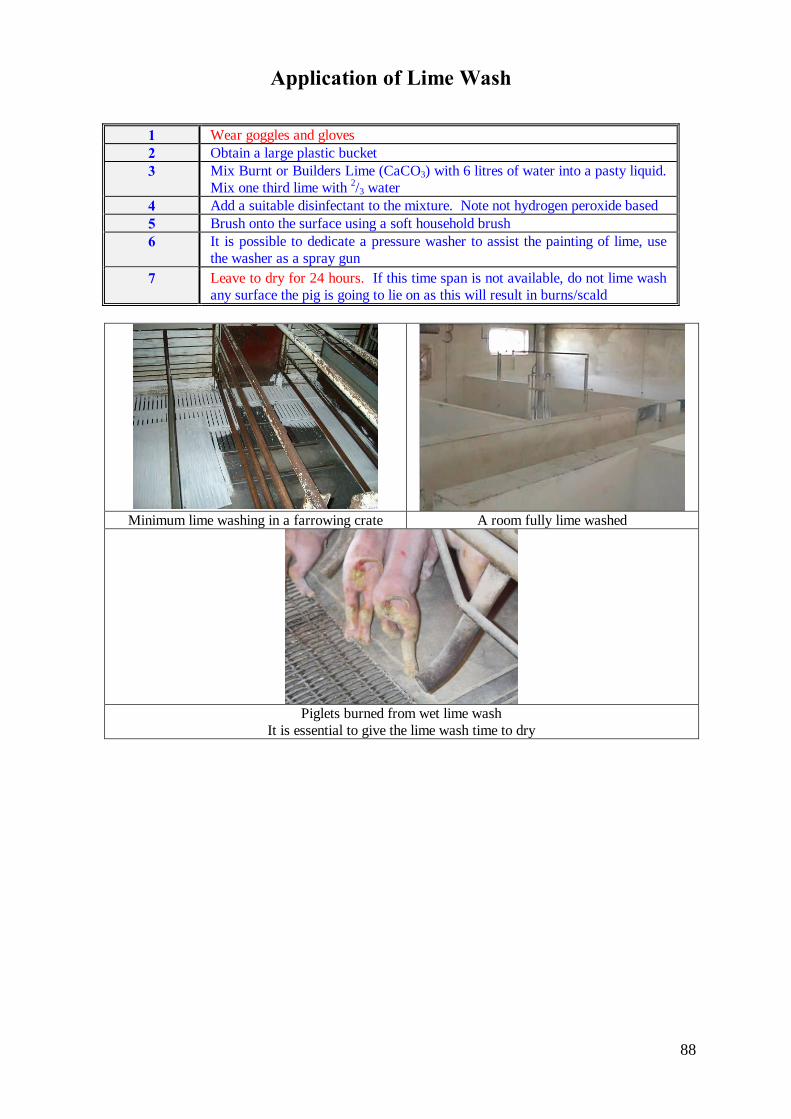
88
Application of Lime Wash
1 Wear goggles and gloves 2 Obtain a large plastic bucket 3 Mix Burnt or Builders Lime (CaCO3) with 6 litres of water into a pasty liquid.
Mix one third lime with 2/3 water 4 Add a suitable disinfectant to the mixture. Note not hydrogen peroxide based 5 Brush onto the surface using a soft household brush 6 It is possible to dedicate a pressure washer to assist the painting of lime, use
the washer as a spray gun 7 Leave to dry for 24 hours. If this time span is not available, do not lime wash
any surface the pig is going to lie on as this will result in burns/scald
Minimum lime washing in a farrowing crate A room fully lime washed
Piglets burned from wet lime wash
It is essential to give the lime wash time to dry
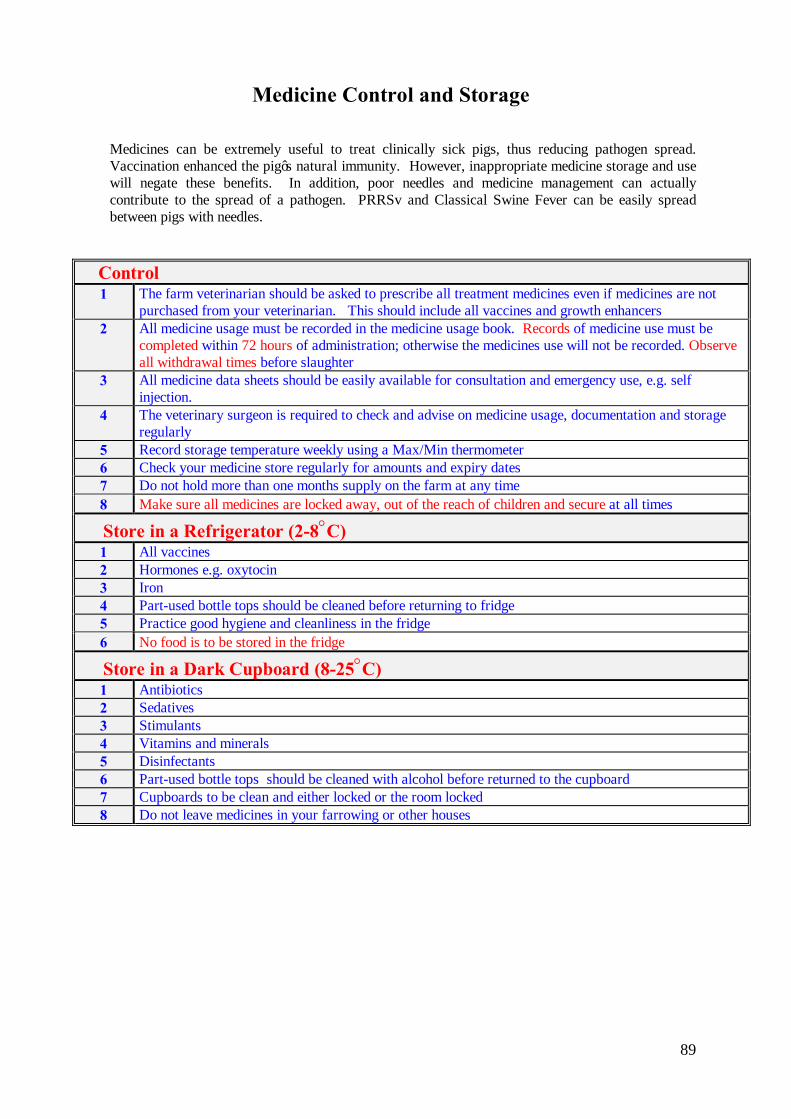
89
Medicine Control and Storage
Medicines can be extremely useful to treat clinically sick pigs, thus reducing pathogen spread. Vaccination enhanced the pig’s natural immunity. However, inappropriate medicine storage and use will negate these benefits. In addition, poor needles and medicine management can actually contribute to the spread of a pathogen. PRRSv and Classical Swine Fever can be easily spread between pigs with needles.
Control 1 The farm veterinarian should be asked to prescribe all treatment medicines even if medicines are not
purchased from your veterinarian. This should include all vaccines and growth enhancers 2 All medicine usage must be recorded in the medicine usage book. Records of medicine use must be
completed within 72 hours of administration; otherwise the medicines use will not be recorded. Observe all withdrawal times before slaughter
3 All medicine data sheets should be easily available for consultation and emergency use, e.g. self injection.
4 The veterinary surgeon is required to check and advise on medicine usage, documentation and storage regularly
5 Record storage temperature weekly using a Max/Min thermometer 6 Check your medicine store regularly for amounts and expiry dates 7 Do not hold more than one months supply on the farm at any time 8 Make sure all medicines are locked away, out of the reach of children and secure at all times
Store in a Refrigerator (2-8°C) 1 All vaccines 2 Hormones e.g. oxytocin 3 Iron 4 Part-used bottle tops should be cleaned before returning to fridge 5 Practice good hygiene and cleanliness in the fridge 6 No food is to be stored in the fridge
Store in a Dark Cupboard (8-25°C) 1 Antibiotics 2 Sedatives 3 Stimulants 4 Vitamins and minerals 5 Disinfectants 6 Part-used bottle tops should be cleaned with alcohol before returned to the cupboard 7 Cupboards to be clean and either locked or the room locked 8 Do not leave medicines in your farrowing or other houses
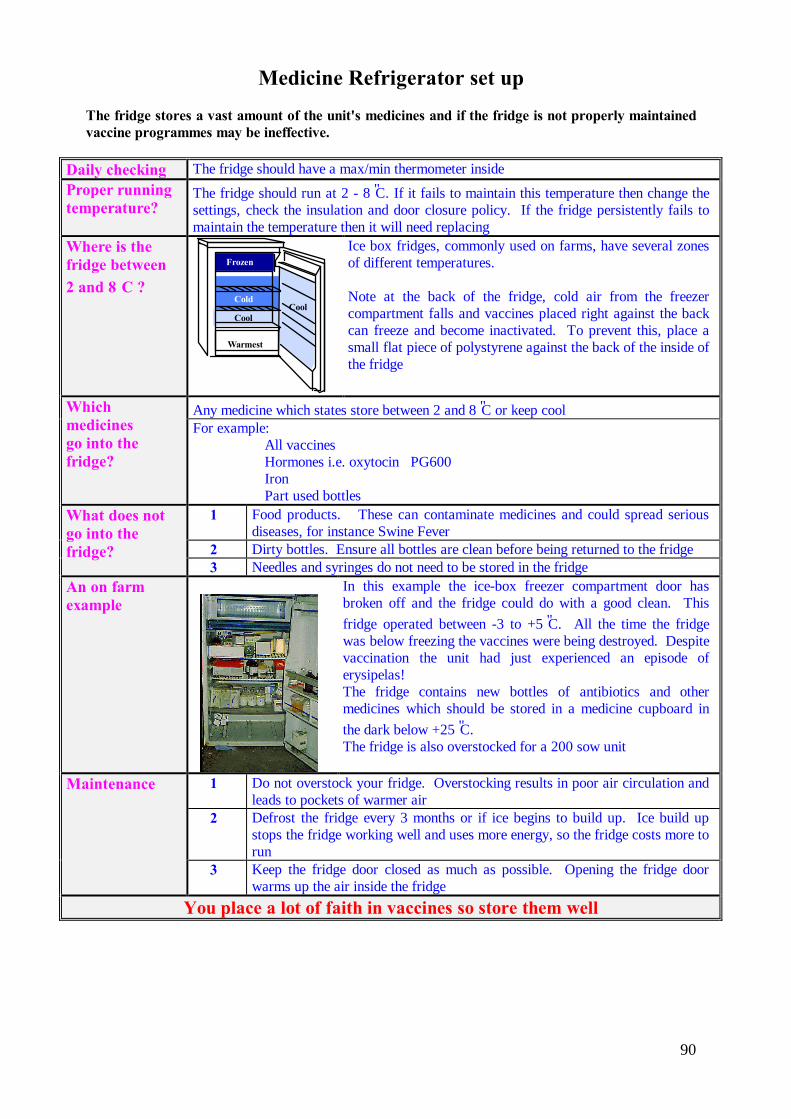
90
Medicine Refrigerator set up The fridge stores a vast amount of the unit's medicines and if the fridge is not properly maintained vaccine programmes may be ineffective.
Daily checking The fridge should have a max/min thermometer inside Proper running temperature?
The fridge should run at 2 - 8•C. If it fails to maintain this temperature then change the settings, check the insulation and door closure policy. If the fridge persistently fails to maintain the temperature then it will need replacing
Where is the fridge between 2 and 8•C ?
Frozen
Cold
CoolCool
Warmest
Ice box fridges, commonly used on farms, have several zones of different temperatures. Note at the back of the fridge, cold air from the freezer compartment falls and vaccines placed right against the back can freeze and become inactivated. To prevent this, place a small flat piece of polystyrene against the back of the inside of the fridge
Which medicines go into the fridge?
Any medicine which states store between 2 and 8•C or keep cool For example:
All vaccines Hormones i.e. oxytocin PG600 Iron Part used bottles
What does not go into the fridge?
1 Food products. These can contaminate medicines and could spread serious diseases, for instance Swine Fever
2 Dirty bottles. Ensure all bottles are clean before being returned to the fridge 3 Needles and syringes do not need to be stored in the fridge
An on farm example
In this example the ice-box freezer compartment door has broken off and the fridge could do with a good clean. This fridge operated between -3 to +5•C. All the time the fridge was below freezing the vaccines were being destroyed. Despite vaccination the unit had just experienced an episode of erysipelas! The fridge contains new bottles of antibiotics and other medicines which should be stored in a medicine cupboard in the dark below +25•C. The fridge is also overstocked for a 200 sow unit
Maintenance 1 Do not overstock your fridge. Overstocking results in poor air circulation and leads to pockets of warmer air
2 Defrost the fridge every 3 months or if ice begins to build up. Ice build up stops the fridge working well and uses more energy, so the fridge costs more to run
3 Keep the fridge door closed as much as possible. Opening the fridge door warms up the air inside the fridge
You place a lot of faith in vaccines so store them well
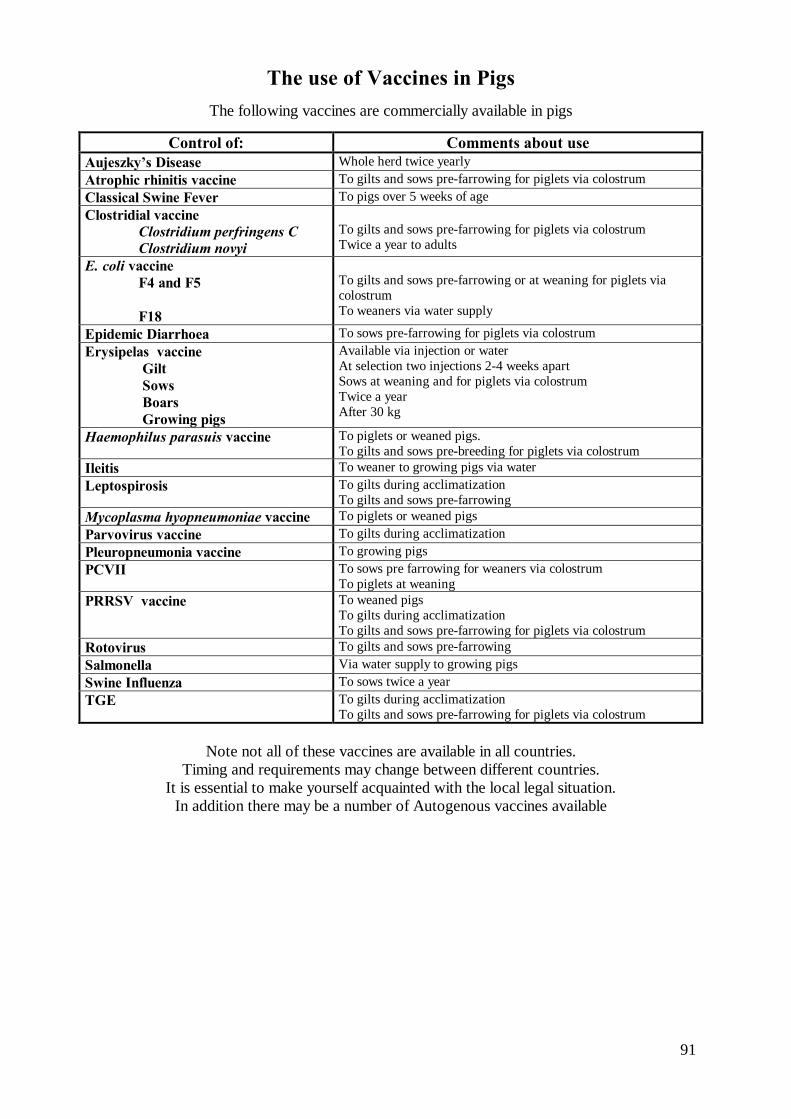
91
The use of Vaccines in Pigs
The following vaccines are commercially available in pigs
Control of: Comments about use Aujeszky’s Disease Whole herd twice yearly Atrophic rhinitis vaccine To gilts and sows pre-farrowing for piglets via colostrum Classical Swine Fever To pigs over 5 weeks of age Clostridial vaccine Clostridium perfringens C Clostridium novyi
To gilts and sows pre-farrowing for piglets via colostrum Twice a year to adults
E. coli vaccine F4 and F5 F18
To gilts and sows pre-farrowing or at weaning for piglets via colostrum To weaners via water supply
Epidemic Diarrhoea To sows pre-farrowing for piglets via colostrum Erysipelas vaccine Gilt Sows Boars Growing pigs
Available via injection or water At selection two injections 2-4 weeks apart Sows at weaning and for piglets via colostrum Twice a year After 30 kg
Haemophilus parasuis vaccine To piglets or weaned pigs. To gilts and sows pre-breeding for piglets via colostrum
Ileitis To weaner to growing pigs via water Leptospirosis To gilts during acclimatization
To gilts and sows pre-farrowing Mycoplasma hyopneumoniae vaccine To piglets or weaned pigs Parvovirus vaccine To gilts during acclimatization Pleuropneumonia vaccine To growing pigs PCVII To sows pre farrowing for weaners via colostrum
To piglets at weaning PRRSV vaccine To weaned pigs
To gilts during acclimatization To gilts and sows pre-farrowing for piglets via colostrum
Rotovirus To gilts and sows pre-farrowing Salmonella Via water supply to growing pigs Swine Influenza To sows twice a year TGE To gilts during acclimatization
To gilts and sows pre-farrowing for piglets via colostrum
Note not all of these vaccines are available in all countries. Timing and requirements may change between different countries.
It is essential to make yourself acquainted with the local legal situation. In addition there may be a number of Autogenous vaccines available
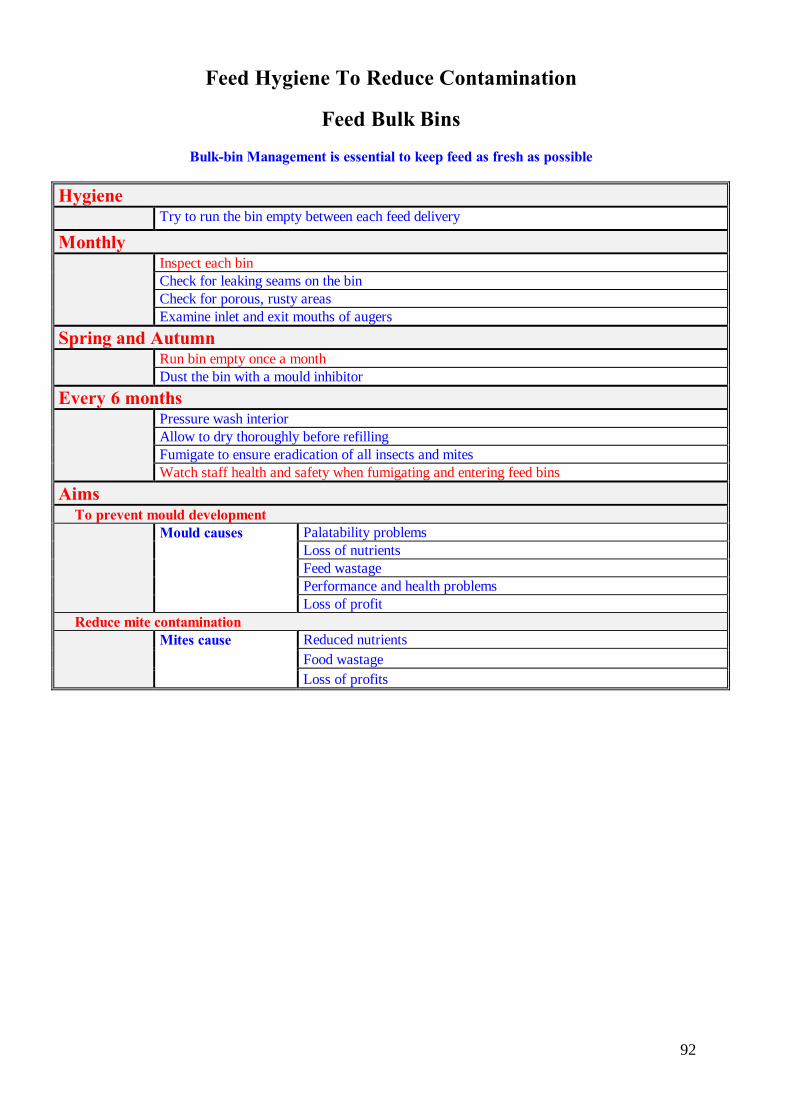
92
Feed Hygiene To Reduce Contamination
Feed Bulk Bins
Bulk-bin Management is essential to keep feed as fresh as possible
Hygiene Try to run the bin empty between each feed delivery
Monthly Inspect each bin
Check for leaking seams on the bin Check for porous, rusty areas Examine inlet and exit mouths of augers
Spring and Autumn Run bin empty once a month
Dust the bin with a mould inhibitor Every 6 months Pressure wash interior
Allow to dry thoroughly before refilling Fumigate to ensure eradication of all insects and mites Watch staff health and safety when fumigating and entering feed bins
Aims • To prevent mould development Mould causes Palatability problems
Loss of nutrients Feed wastage Performance and health problems Loss of profit
• Reduce mite contamination Mites cause Reduced nutrients
Food wastage Loss of profits
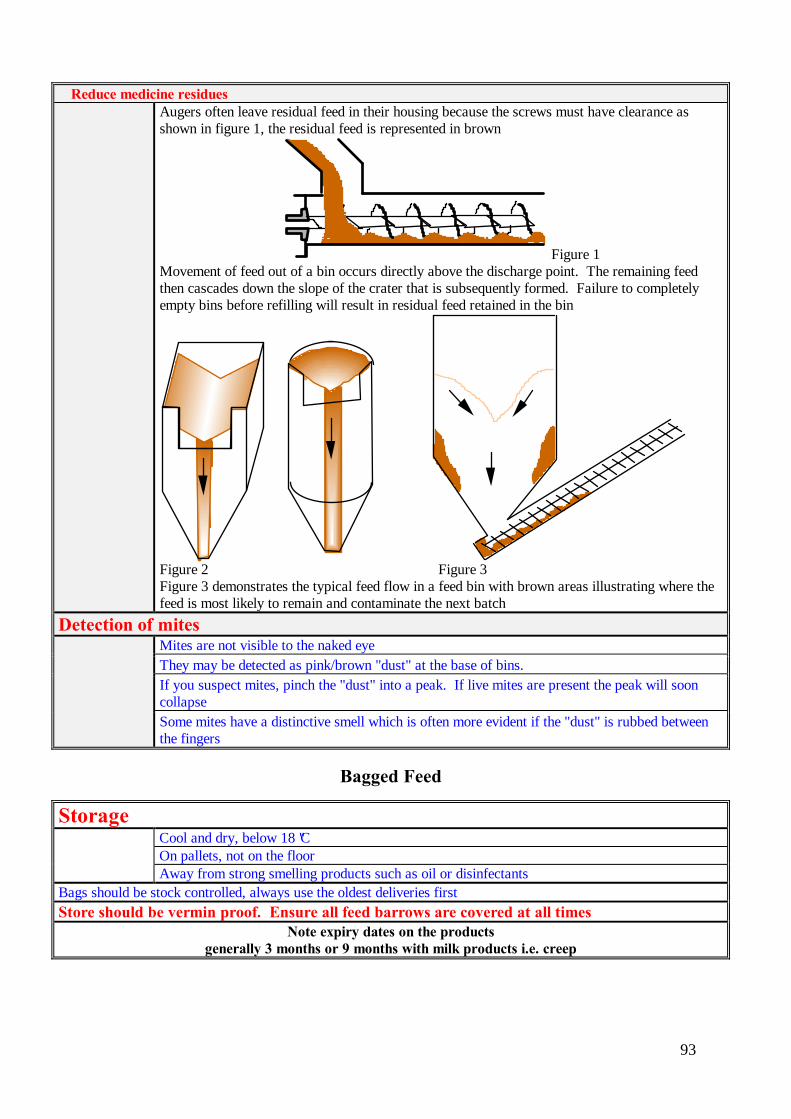
93
• Reduce medicine residues Augers often leave residual feed in their housing because the screws must have clearance as
shown in figure 1, the residual feed is represented in brown
Figure 1 Movement of feed out of a bin occurs directly above the discharge point. The remaining feed then cascades down the slope of the crater that is subsequently formed. Failure to completely empty bins before refilling will result in residual feed retained in the bin
Figure 2 Figure 3 Figure 3 demonstrates the typical feed flow in a feed bin with brown areas illustrating where the feed is most likely to remain and contaminate the next batch
Detection of mites Mites are not visible to the naked eye
They may be detected as pink/brown "dust" at the base of bins. If you suspect mites, pinch the "dust" into a peak. If live mites are present the peak will soon collapse Some mites have a distinctive smell which is often more evident if the "dust" is rubbed between the fingers
Bagged Feed
Storage Cool and dry, below 18•C
On pallets, not on the floor Away from strong smelling products such as oil or disinfectants
Bags should be stock controlled, always use the oldest deliveries first Store should be vermin proof. Ensure all feed barrows are covered at all times
Note expiry dates on the products generally 3 months or 9 months with milk products i.e. creep
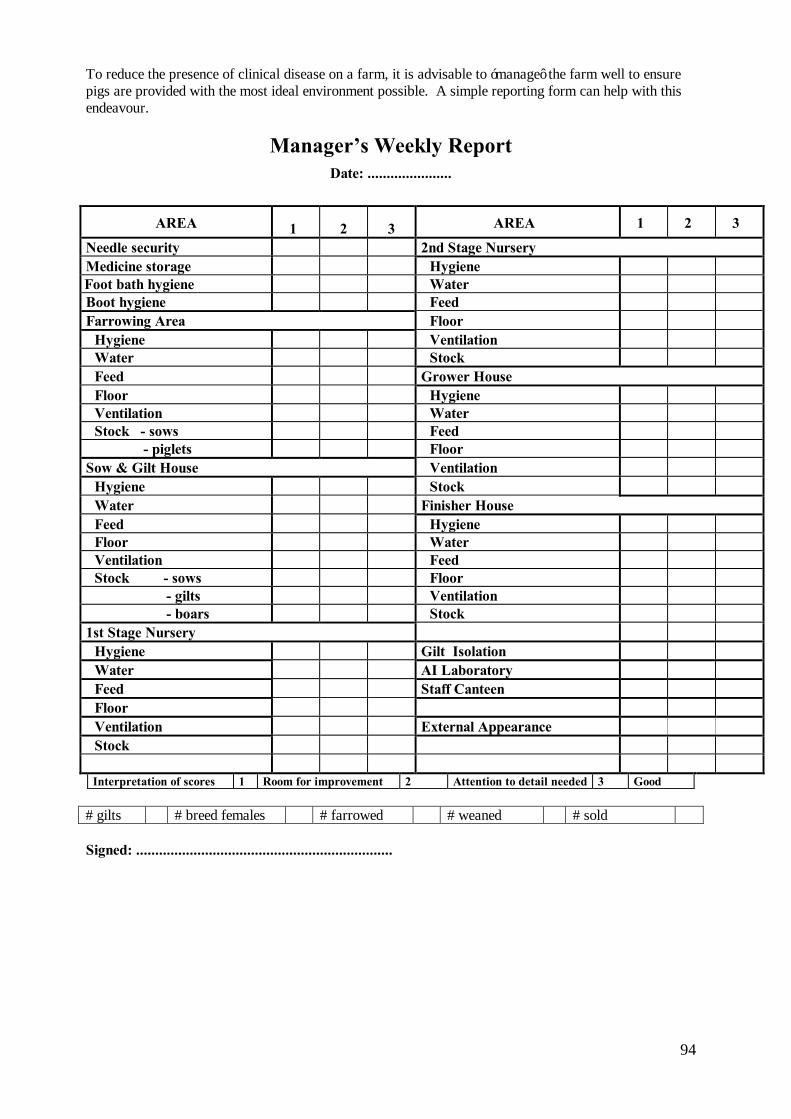
94
To reduce the presence of clinical disease on a farm, it is advisable to ‘manage’ the farm well to ensure pigs are provided with the most ideal environment possible. A simple reporting form can help with this endeavour.
Manager’s Weekly Report Date: ......................
AREA 1 2 3 AREA 1 2 3
Needle security 2nd Stage Nursery Medicine storage • Hygiene
Foot bath hygiene • Water Boot hygiene • Feed Farrowing Area • Floor • Hygiene • Ventilation • Water • Stock • Feed Grower House • Floor • Hygiene • Ventilation • Water • Stock - sows • Feed - piglets • Floor Sow & Gilt House • Ventilation • Hygiene • Stock • Water Finisher House • Feed • Hygiene • Floor • Water • Ventilation • Feed • Stock - sows • Floor - gilts • Ventilation - boars • Stock 1st Stage Nursery • Hygiene Gilt Isolation • Water AI Laboratory • Feed Staff Canteen • Floor • Ventilation External Appearance • Stock
Interpretation of scores 1 Room for improvement 2 Attention to detail needed 3 Good # gilts # breed females # farrowed # weaned # sold Signed: ...................................................................
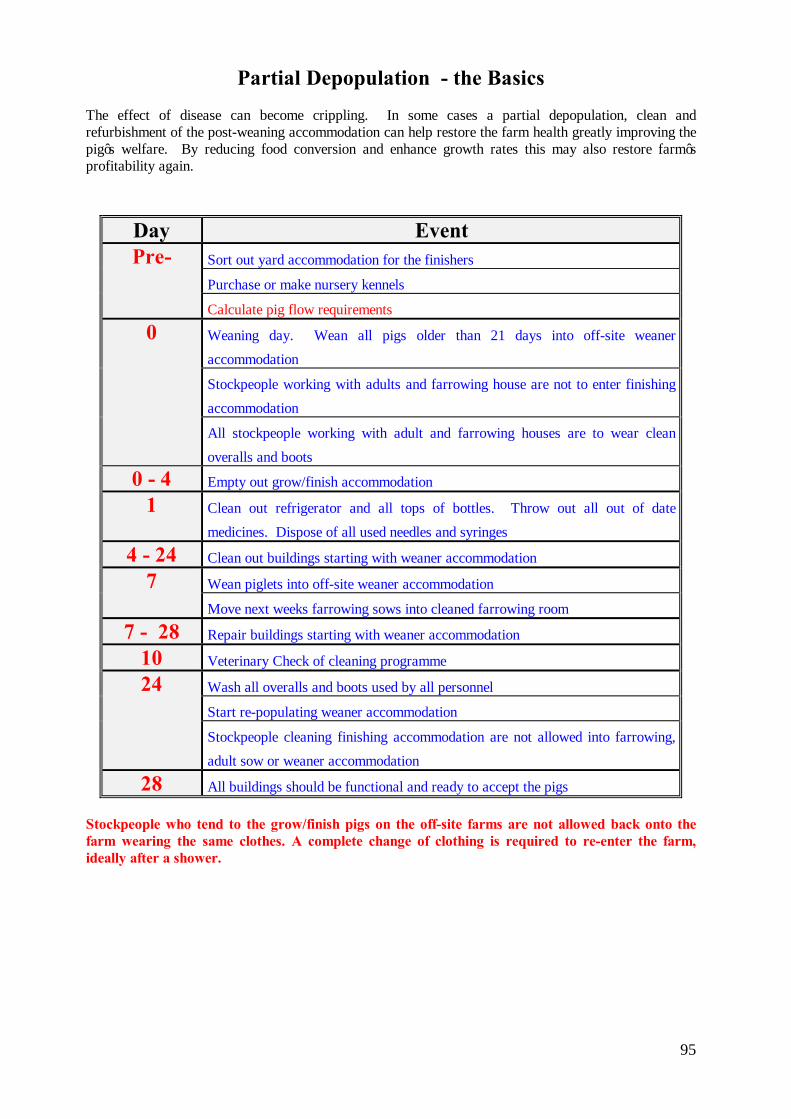
95
Partial Depopulation - the Basics The effect of disease can become crippling. In some cases a partial depopulation, clean and refurbishment of the post-weaning accommodation can help restore the farm health greatly improving the pig’s welfare. By reducing food conversion and enhance growth rates this may also restore farm’s profitability again.
Day Event Pre- Sort out yard accommodation for the finishers
Purchase or make nursery kennels
Calculate pig flow requirements
0 Weaning day. Wean all pigs older than 21 days into off-site weaner accommodation
Stockpeople working with adults and farrowing house are not to enter finishing accommodation
All stockpeople working with adult and farrowing houses are to wear clean overalls and boots
0 - 4 Empty out grow/finish accommodation
1 Clean out refrigerator and all tops of bottles. Throw out all out of date medicines. Dispose of all used needles and syringes
4 - 24 Clean out buildings starting with weaner accommodation
7 Wean piglets into off-site weaner accommodation
Move next weeks farrowing sows into cleaned farrowing room
7 - 28 Repair buildings starting with weaner accommodation
10 Veterinary Check of cleaning programme
24 Wash all overalls and boots used by all personnel
Start re-populating weaner accommodation
Stockpeople cleaning finishing accommodation are not allowed into farrowing, adult sow or weaner accommodation
28 All buildings should be functional and ready to accept the pigs Stockpeople who tend to the grow/finish pigs on the off-site farms are not allowed back onto the farm wearing the same clothes. A complete change of clothing is required to re-enter the farm, ideally after a shower.
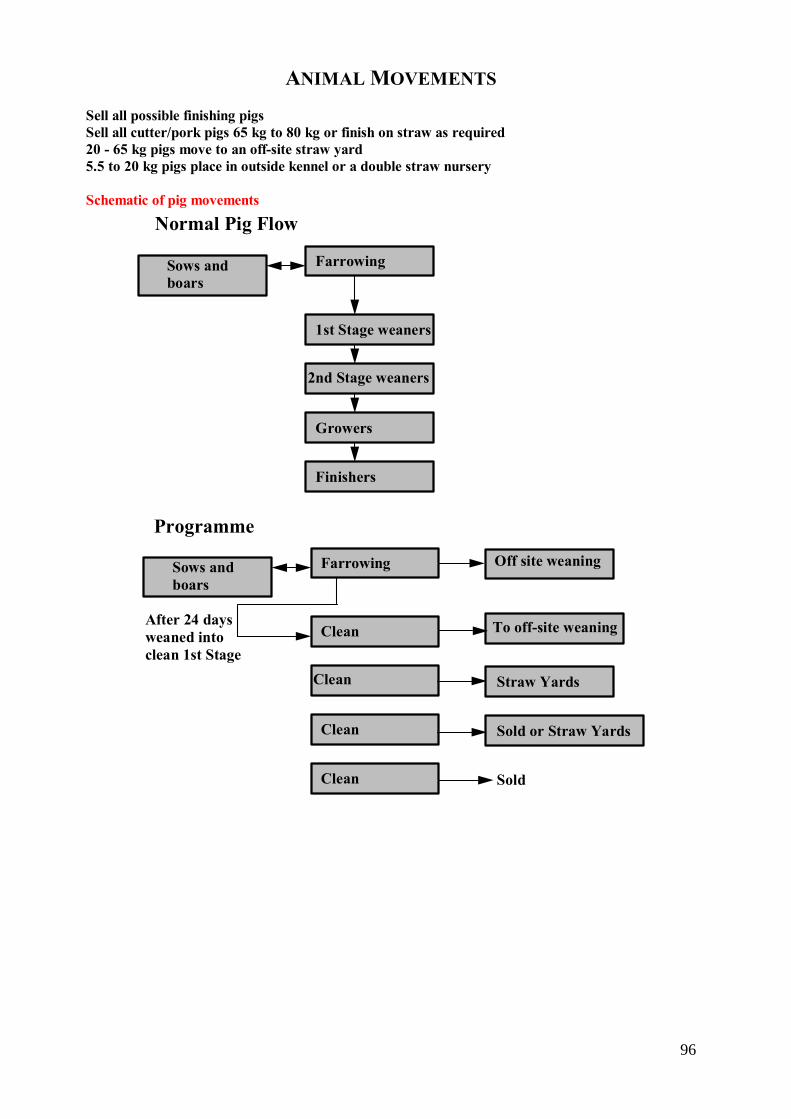
96
ANIMAL MOVEMENTS Sell all possible finishing pigs Sell all cutter/pork pigs 65 kg to 80 kg or finish on straw as required 20 - 65 kg pigs move to an off-site straw yard 5.5 to 20 kg pigs place in outside kennel or a double straw nursery Schematic of pig movements
Sows and boars
Farrowing
1st Stage weaners
2nd Stage weaners
Growers
Finishers
Sows and boars
Farrowing
Clean
Clean
Clean
Clean
Programme
After 24 days weaned into clean 1st Stage
Off site weaning
To off-site weaning
Straw Yards
Sold or Straw Yards
Sold
Normal Pig Flow
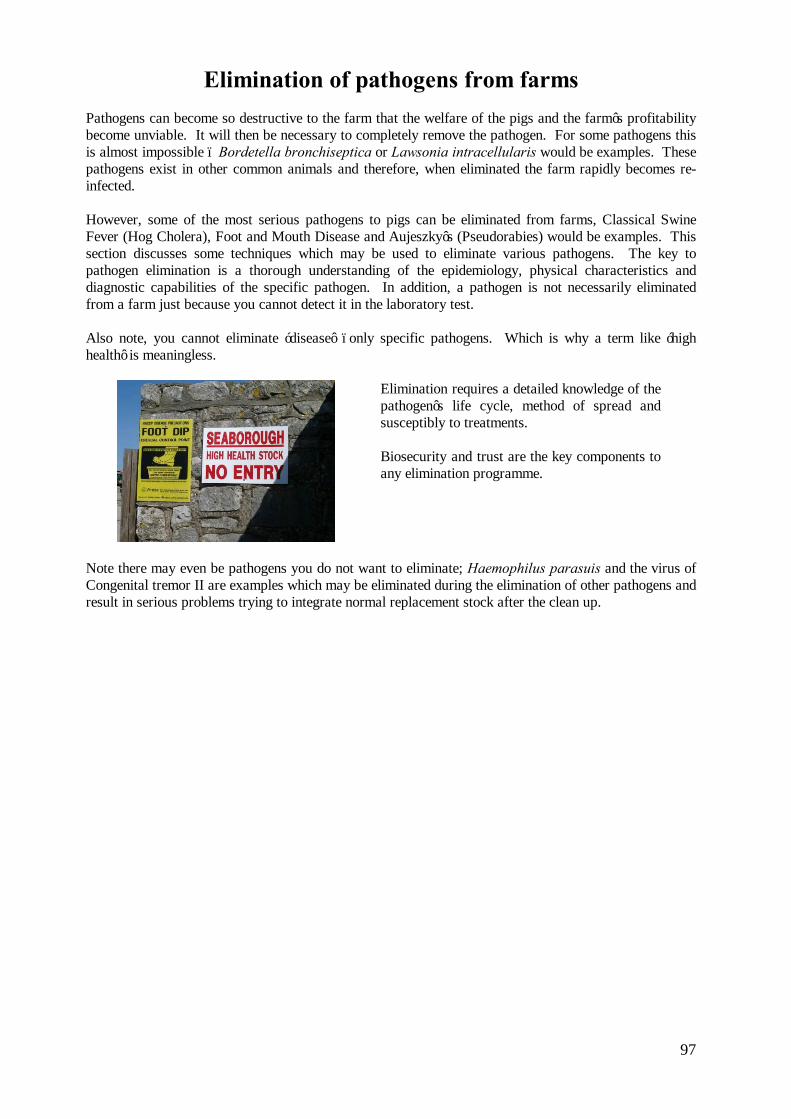
97
Elimination of pathogens from farms
Pathogens can become so destructive to the farm that the welfare of the pigs and the farm’s profitability become unviable. It will then be necessary to completely remove the pathogen. For some pathogens this is almost impossible – Bordetella bronchiseptica or Lawsonia intracellularis would be examples. These pathogens exist in other common animals and therefore, when eliminated the farm rapidly becomes re-infected. However, some of the most serious pathogens to pigs can be eliminated from farms, Classical Swine Fever (Hog Cholera), Foot and Mouth Disease and Aujeszky’s (Pseudorabies) would be examples. This section discusses some techniques which may be used to eliminate various pathogens. The key to pathogen elimination is a thorough understanding of the epidemiology, physical characteristics and diagnostic capabilities of the specific pathogen. In addition, a pathogen is not necessarily eliminated from a farm just because you cannot detect it in the laboratory test. Also note, you cannot eliminate ‘disease’ –only specific pathogens. Which is why a term like ‘high health’ is meaningless.
Elimination requires a detailed knowledge of the pathogen’s life cycle, method of spread and susceptibly to treatments. Biosecurity and trust are the key components to any elimination programme.
Note there may even be pathogens you do not want to eliminate; Haemophilus parasuis and the virus of Congenital tremor II are examples which may be eliminated during the elimination of other pathogens and result in serious problems trying to integrate normal replacement stock after the clean up.
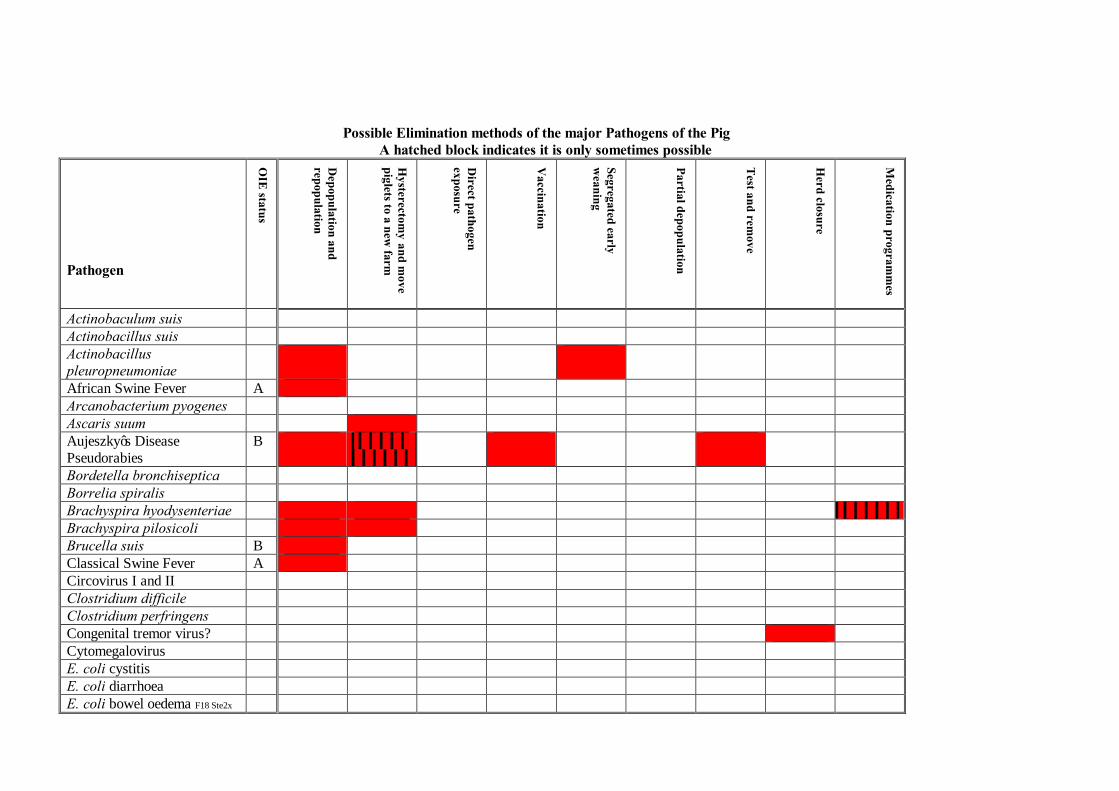
Possible Elimination methods of the major Pathogens of the Pig A hatched block indicates it is only sometimes possible
Pathogen
OIE
status
Depopulation and
repopulation
Hysterectom
y and move
piglets to a new farm
Direct pathogen
exposure
Vaccination
Segregated early w
eaning
Partial depopulation
Test and rem
ove
Herd closure
Medication program
mes
Actinobaculum suis Actinobacillus suis Actinobacillus pleuropneumoniae
African Swine Fever A Arcanobacterium pyogenes Ascaris suum Aujeszky’s Disease Pseudorabies
B
Bordetella bronchiseptica Borrelia spiralis Brachyspira hyodysenteriae Brachyspira pilosicoli Brucella suis B Classical Swine Fever A Circovirus I and II Clostridium difficile Clostridium perfringens Congenital tremor virus? Cytomegalovirus E. coli cystitis E. coli diarrhoea E. coli bowel oedema F18 Ste2x

99
Pathogen
OIE
status
Depopulation and
repopulation
Hysterectom
y and move
piglets to a new farm
Direct pathogen exposure
Vaccination
Segregated early weaning
Partial depopulation
Test and rem
ove
Herd closure
Medication program
mes
Enterovirus Epidemic diarrhoea virus Erysipelothrix rhusiopathiae Foot and Mouth virus And other vesicular viruses
A
Haemophilus parasuis Haematopinus suis Hyostrongylus rubidis Isospora suis Lawsonia intracellularis Leptospirosis B? Leptospira pomona Metastrongylus apri Mycoplasma haemasuis Mycoplasma hyopneumoniae Mycoplasma hyosynoviae Oesophagostonum dentatum Parvovirus Pasteurella multocida (Toxigenic)
B
Pasteurellosis PMWS PRRSv B Ringworm
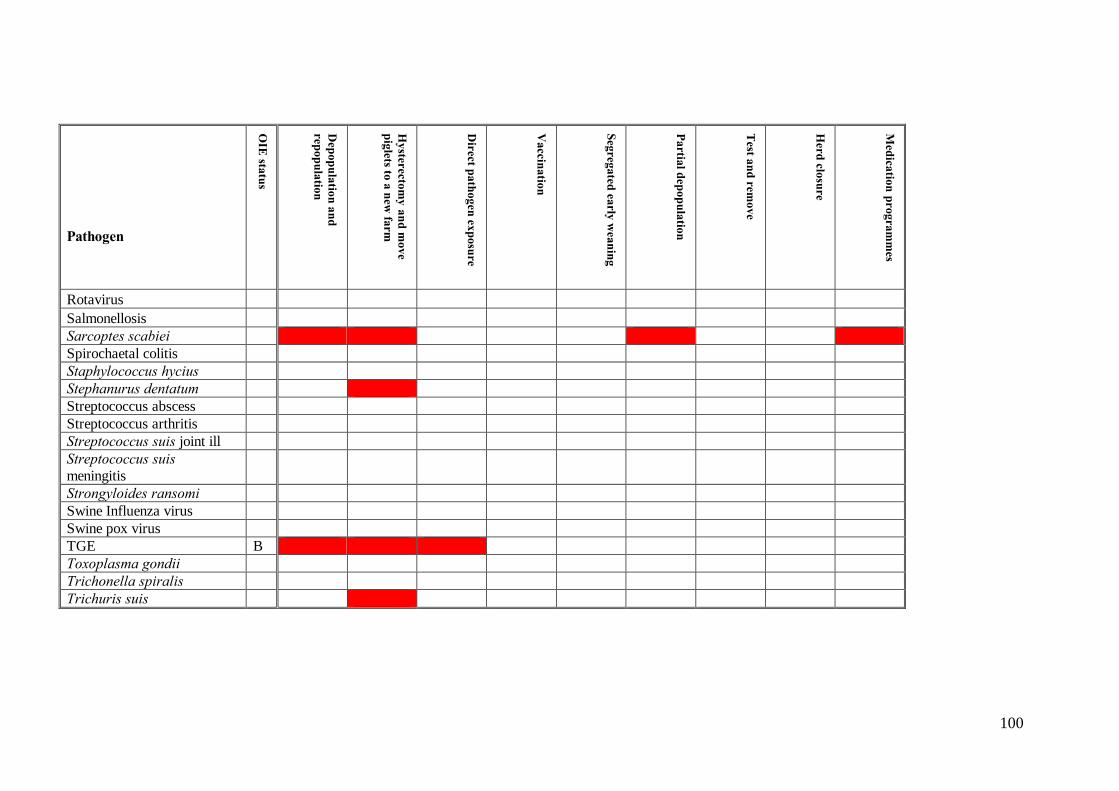
100
Pathogen
OIE
status
Depopulation and
repopulation
Hysterectom
y and move
piglets to a new farm
Direct pathogen exposure
Vaccination
Segregated early weaning
Partial depopulation
Test and rem
ove
Herd closure
Medication program
mes
Rotavirus Salmonellosis Sarcoptes scabiei Spirochaetal colitis Staphylococcus hycius Stephanurus dentatum Streptococcus abscess Streptococcus arthritis Streptococcus suis joint ill Streptococcus suis meningitis
Strongyloides ransomi Swine Influenza virus Swine pox virus TGE B Toxoplasma gondii Trichonella spiralis Trichuris suis
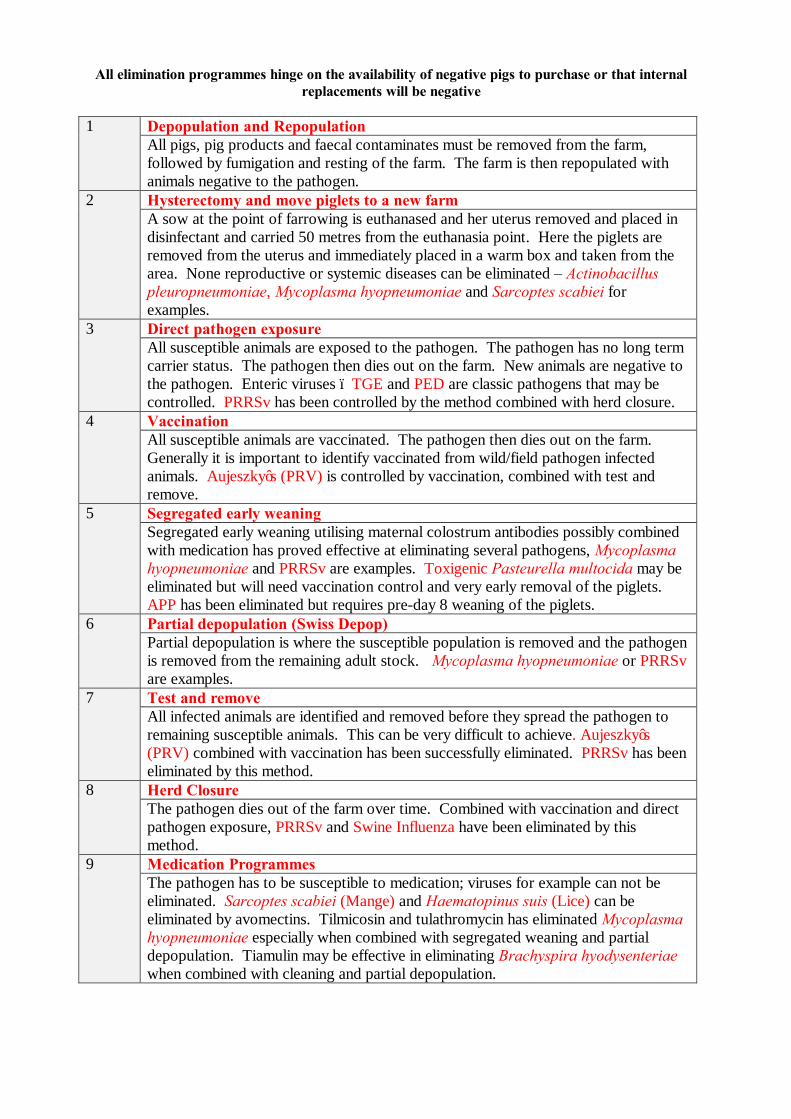
All elimination programmes hinge on the availability of negative pigs to purchase or that internal replacements will be negative
1 Depopulation and Repopulation
All pigs, pig products and faecal contaminates must be removed from the farm, followed by fumigation and resting of the farm. The farm is then repopulated with animals negative to the pathogen.
2 Hysterectomy and move piglets to a new farm A sow at the point of farrowing is euthanased and her uterus removed and placed in disinfectant and carried 50 metres from the euthanasia point. Here the piglets are removed from the uterus and immediately placed in a warm box and taken from the area. None reproductive or systemic diseases can be eliminated – Actinobacillus pleuropneumoniae, Mycoplasma hyopneumoniae and Sarcoptes scabiei for examples.
3 Direct pathogen exposure All susceptible animals are exposed to the pathogen. The pathogen has no long term carrier status. The pathogen then dies out on the farm. New animals are negative to the pathogen. Enteric viruses – TGE and PED are classic pathogens that may be controlled. PRRSv has been controlled by the method combined with herd closure.
4 Vaccination All susceptible animals are vaccinated. The pathogen then dies out on the farm. Generally it is important to identify vaccinated from wild/field pathogen infected animals. Aujeszky’s (PRV) is controlled by vaccination, combined with test and remove.
5 Segregated early weaning Segregated early weaning utilising maternal colostrum antibodies possibly combined with medication has proved effective at eliminating several pathogens, Mycoplasma hyopneumoniae and PRRSv are examples. Toxigenic Pasteurella multocida may be eliminated but will need vaccination control and very early removal of the piglets. APP has been eliminated but requires pre-day 8 weaning of the piglets.
6 Partial depopulation (Swiss Depop) Partial depopulation is where the susceptible population is removed and the pathogen is removed from the remaining adult stock. Mycoplasma hyopneumoniae or PRRSv are examples.
7 Test and remove All infected animals are identified and removed before they spread the pathogen to remaining susceptible animals. This can be very difficult to achieve. Aujeszky’s (PRV) combined with vaccination has been successfully eliminated. PRRSv has been eliminated by this method.
8 Herd Closure The pathogen dies out of the farm over time. Combined with vaccination and direct pathogen exposure, PRRSv and Swine Influenza have been eliminated by this method.
9 Medication Programmes The pathogen has to be susceptible to medication; viruses for example can not be eliminated. Sarcoptes scabiei (Mange) and Haematopinus suis (Lice) can be eliminated by avomectins. Tilmicosin and tulathromycin has eliminated Mycoplasma hyopneumoniae especially when combined with segregated weaning and partial depopulation. Tiamulin may be effective in eliminating Brachyspira hyodysenteriae when combined with cleaning and partial depopulation.
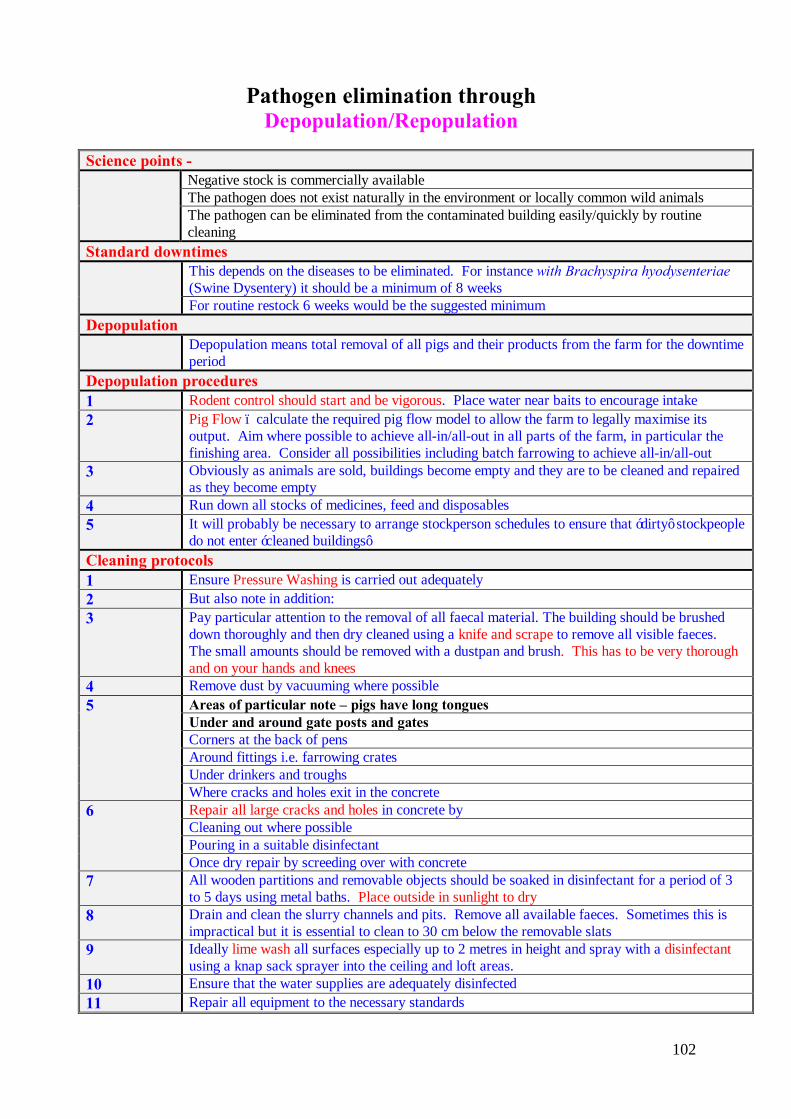
102
Pathogen elimination through
Depopulation/Repopulation Science points - Negative stock is commercially available
The pathogen does not exist naturally in the environment or locally common wild animals The pathogen can be eliminated from the contaminated building easily/quickly by routine cleaning
Standard downtimes This depends on the diseases to be eliminated. For instance with Brachyspira hyodysenteriae
(Swine Dysentery) it should be a minimum of 8 weeks For routine restock 6 weeks would be the suggested minimum
Depopulation Depopulation means total removal of all pigs and their products from the farm for the downtime
period Depopulation procedures 1 Rodent control should start and be vigorous. Place water near baits to encourage intake 2 Pig Flow – calculate the required pig flow model to allow the farm to legally maximise its
output. Aim where possible to achieve all-in/all-out in all parts of the farm, in particular the finishing area. Consider all possibilities including batch farrowing to achieve all-in/all-out
3 Obviously as animals are sold, buildings become empty and they are to be cleaned and repaired as they become empty
4 Run down all stocks of medicines, feed and disposables 5 It will probably be necessary to arrange stockperson schedules to ensure that ‘dirty’ stockpeople
do not enter ‘cleaned buildings’ Cleaning protocols 1 Ensure Pressure Washing is carried out adequately 2 But also note in addition: 3 Pay particular attention to the removal of all faecal material. The building should be brushed
down thoroughly and then dry cleaned using a knife and scrape to remove all visible faeces. The small amounts should be removed with a dustpan and brush. This has to be very thorough and on your hands and knees
4 Remove dust by vacuuming where possible 5 Areas of particular note – pigs have long tongues
Under and around gate posts and gates Corners at the back of pens Around fittings i.e. farrowing crates Under drinkers and troughs Where cracks and holes exit in the concrete
6 Repair all large cracks and holes in concrete by Cleaning out where possible Pouring in a suitable disinfectant Once dry repair by screeding over with concrete
7 All wooden partitions and removable objects should be soaked in disinfectant for a period of 3 to 5 days using metal baths. Place outside in sunlight to dry
8 Drain and clean the slurry channels and pits. Remove all available faeces. Sometimes this is impractical but it is essential to clean to 30 cm below the removable slats
9 Ideally lime wash all surfaces especially up to 2 metres in height and spray with a disinfectant using a knap sack sprayer into the ceiling and loft areas.
10 Ensure that the water supplies are adequately disinfected 11 Repair all equipment to the necessary standards
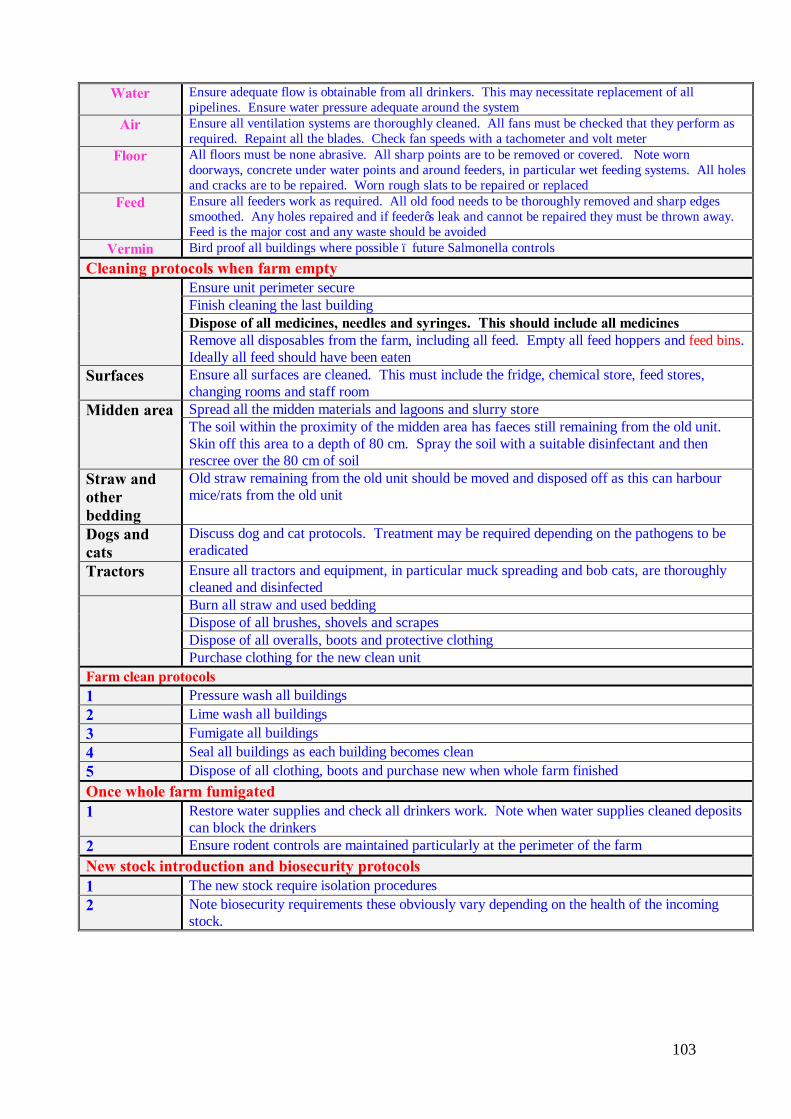
103
Water Ensure adequate flow is obtainable from all drinkers. This may necessitate replacement of all
pipelines. Ensure water pressure adequate around the system Air Ensure all ventilation systems are thoroughly cleaned. All fans must be checked that they perform as
required. Repaint all the blades. Check fan speeds with a tachometer and volt meter Floor All floors must be none abrasive. All sharp points are to be removed or covered. Note worn
doorways, concrete under water points and around feeders, in particular wet feeding systems. All holes and cracks are to be repaired. Worn rough slats to be repaired or replaced
Feed Ensure all feeders work as required. All old food needs to be thoroughly removed and sharp edges smoothed. Any holes repaired and if feeder’s leak and cannot be repaired they must be thrown away. Feed is the major cost and any waste should be avoided
Vermin Bird proof all buildings where possible – future Salmonella controls Cleaning protocols when farm empty Ensure unit perimeter secure
Finish cleaning the last building Dispose of all medicines, needles and syringes. This should include all medicines Remove all disposables from the farm, including all feed. Empty all feed hoppers and feed bins. Ideally all feed should have been eaten
Surfaces Ensure all surfaces are cleaned. This must include the fridge, chemical store, feed stores, changing rooms and staff room
Midden area Spread all the midden materials and lagoons and slurry store The soil within the proximity of the midden area has faeces still remaining from the old unit. Skin off this area to a depth of 80 cm. Spray the soil with a suitable disinfectant and then rescree over the 80 cm of soil
Straw and other bedding
Old straw remaining from the old unit should be moved and disposed off as this can harbour mice/rats from the old unit
Dogs and cats
Discuss dog and cat protocols. Treatment may be required depending on the pathogens to be eradicated
Tractors Ensure all tractors and equipment, in particular muck spreading and bob cats, are thoroughly cleaned and disinfected
Burn all straw and used bedding Dispose of all brushes, shovels and scrapes Dispose of all overalls, boots and protective clothing Purchase clothing for the new clean unit
Farm clean protocols 1 Pressure wash all buildings 2 Lime wash all buildings 3 Fumigate all buildings 4 Seal all buildings as each building becomes clean 5 Dispose of all clothing, boots and purchase new when whole farm finished Once whole farm fumigated 1 Restore water supplies and check all drinkers work. Note when water supplies cleaned deposits
can block the drinkers 2 Ensure rodent controls are maintained particularly at the perimeter of the farm New stock introduction and biosecurity protocols 1 The new stock require isolation procedures 2 Note biosecurity requirements these obviously vary depending on the health of the incoming
stock.
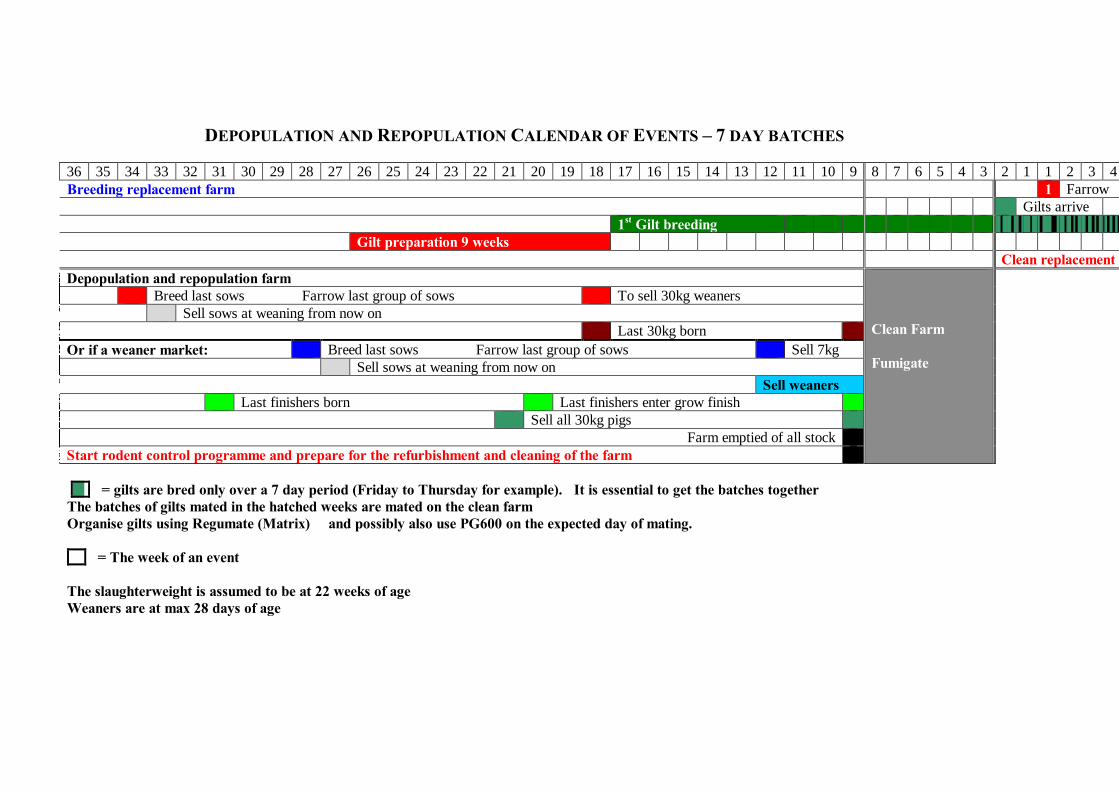
DEPOPULATION AND REPOPULATION CALENDAR OF EVENTS – 7 DAY BATCHES 36 35 34 33 32 31 30 29 28 27 26 25 24 23 22 21 20 19 18 17 16 15 14 13 12 11 10 9 8 7 6 5 4 3 2 1 1 2 3 4 Breeding replacement farm 1 Farrow Gilts arrive 1st Gilt breeding Gilt preparation 9 weeks Clean replacement Depopulation and repopulation farm
Clean Farm Fumigate
Breed last sows Farrow last group of sows To sell 30kg weaners Sell sows at weaning from now on Last 30kg born Or if a weaner market: Breed last sows Farrow last group of sows Sell 7kg Sell sows at weaning from now on Sell weaners Last finishers born Last finishers enter grow finish Sell all 30kg pigs
Farm emptied of all stock Start rodent control programme and prepare for the refurbishment and cleaning of the farm = gilts are bred only over a 7 day period (Friday to Thursday for example). It is essential to get the batches together The batches of gilts mated in the hatched weeks are mated on the clean farm Organise gilts using Regumate (Matrix)™ and possibly also use PG600 on the expected day of mating. = The week of an event The slaughterweight is assumed to be at 22 weeks of age Weaners are at max 28 days of age
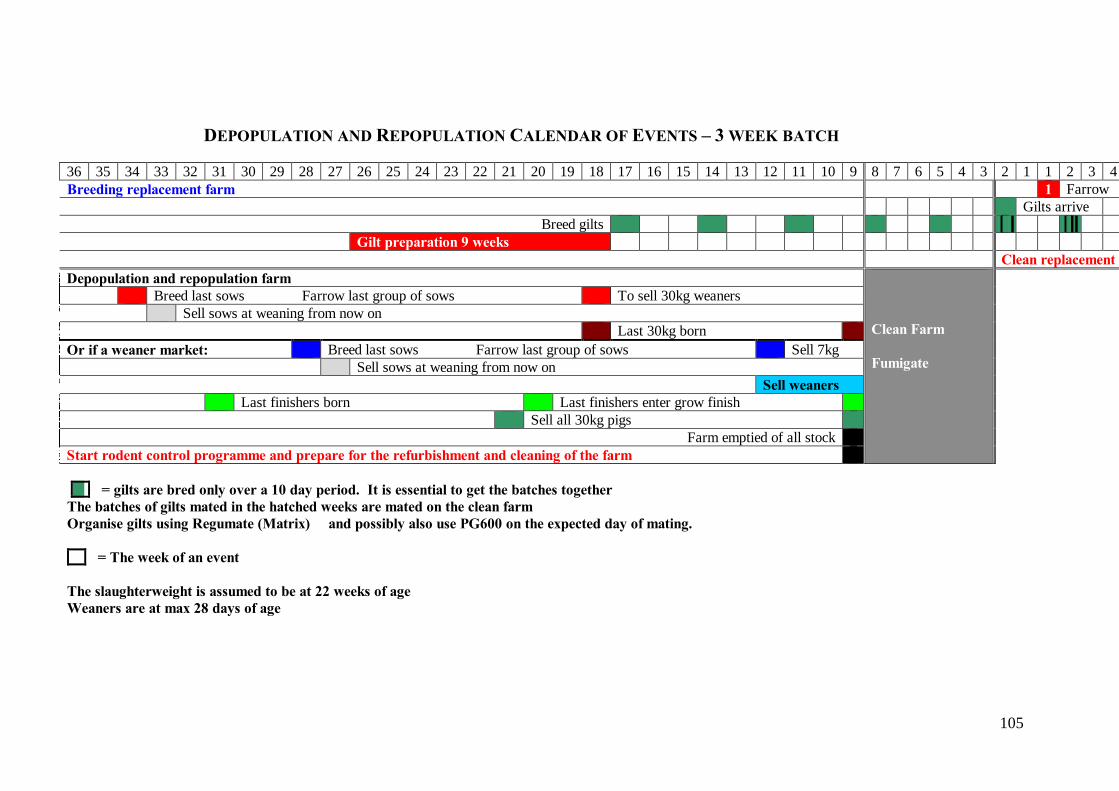
105
DEPOPULATION AND REPOPULATION CALENDAR OF EVENTS – 3 WEEK BATCH 36 35 34 33 32 31 30 29 28 27 26 25 24 23 22 21 20 19 18 17 16 15 14 13 12 11 10 9 8 7 6 5 4 3 2 1 1 2 3 4 Breeding replacement farm 1 Farrow Gilts arrive
Breed gilts Gilt preparation 9 weeks Clean replacement Depopulation and repopulation farm
Clean Farm Fumigate
Breed last sows Farrow last group of sows To sell 30kg weaners Sell sows at weaning from now on Last 30kg born Or if a weaner market: Breed last sows Farrow last group of sows Sell 7kg Sell sows at weaning from now on Sell weaners Last finishers born Last finishers enter grow finish Sell all 30kg pigs
Farm emptied of all stock Start rodent control programme and prepare for the refurbishment and cleaning of the farm = gilts are bred only over a 10 day period. It is essential to get the batches together The batches of gilts mated in the hatched weeks are mated on the clean farm Organise gilts using Regumate (Matrix)™ and possibly also use PG600 on the expected day of mating. = The week of an event The slaughterweight is assumed to be at 22 weeks of age Weaners are at max 28 days of age
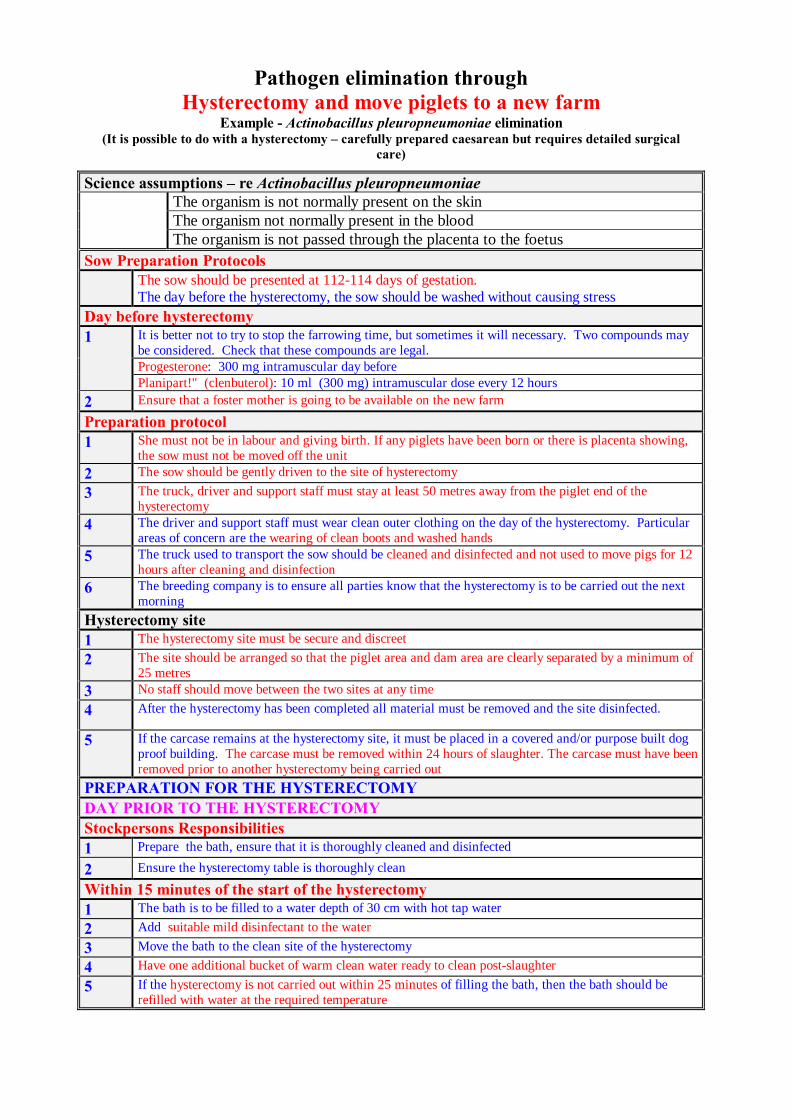
Pathogen elimination through Hysterectomy and move piglets to a new farm
Example - Actinobacillus pleuropneumoniae elimination (It is possible to do with a hysterectomy – carefully prepared caesarean but requires detailed surgical
care)
Science assumptions – re Actinobacillus pleuropneumoniae
The organism is not normally present on the skin The organism not normally present in the blood The organism is not passed through the placenta to the foetus
Sow Preparation Protocols The sow should be presented at 112-114 days of gestation.
The day before the hysterectomy, the sow should be washed without causing stress Day before hysterectomy 1 It is better not to try to stop the farrowing time, but sometimes it will necessary. Two compounds may
be considered. Check that these compounds are legal. Progesterone: 300 mg intramuscular day before Planipart™ (clenbuterol): 10 ml (300 mg) intramuscular dose every 12 hours
2 Ensure that a foster mother is going to be available on the new farm
Preparation protocol 1 She must not be in labour and giving birth. If any piglets have been born or there is placenta showing,
the sow must not be moved off the unit 2 The sow should be gently driven to the site of hysterectomy 3 The truck, driver and support staff must stay at least 50 metres away from the piglet end of the
hysterectomy 4 The driver and support staff must wear clean outer clothing on the day of the hysterectomy. Particular
areas of concern are the wearing of clean boots and washed hands 5 The truck used to transport the sow should be cleaned and disinfected and not used to move pigs for 12
hours after cleaning and disinfection 6 The breeding company is to ensure all parties know that the hysterectomy is to be carried out the next
morning Hysterectomy site 1 The hysterectomy site must be secure and discreet 2 The site should be arranged so that the piglet area and dam area are clearly separated by a minimum of
25 metres 3 No staff should move between the two sites at any time 4 After the hysterectomy has been completed all material must be removed and the site disinfected.
5 If the carcase remains at the hysterectomy site, it must be placed in a covered and/or purpose built dog proof building. The carcase must be removed within 24 hours of slaughter. The carcase must have been removed prior to another hysterectomy being carried out
PREPARATION FOR THE HYSTERECTOMY DAY PRIOR TO THE HYSTERECTOMY Stockpersons Responsibilities 1 Prepare the bath, ensure that it is thoroughly cleaned and disinfected
2 Ensure the hysterectomy table is thoroughly clean
Within 15 minutes of the start of the hysterectomy 1 The bath is to be filled to a water depth of 30 cm with hot tap water 2 Add suitable mild disinfectant to the water 3 Move the bath to the clean site of the hysterectomy 4 Have one additional bucket of warm clean water ready to clean post-slaughter 5 If the hysterectomy is not carried out within 25 minutes of filling the bath, then the bath should be
refilled with water at the required temperature
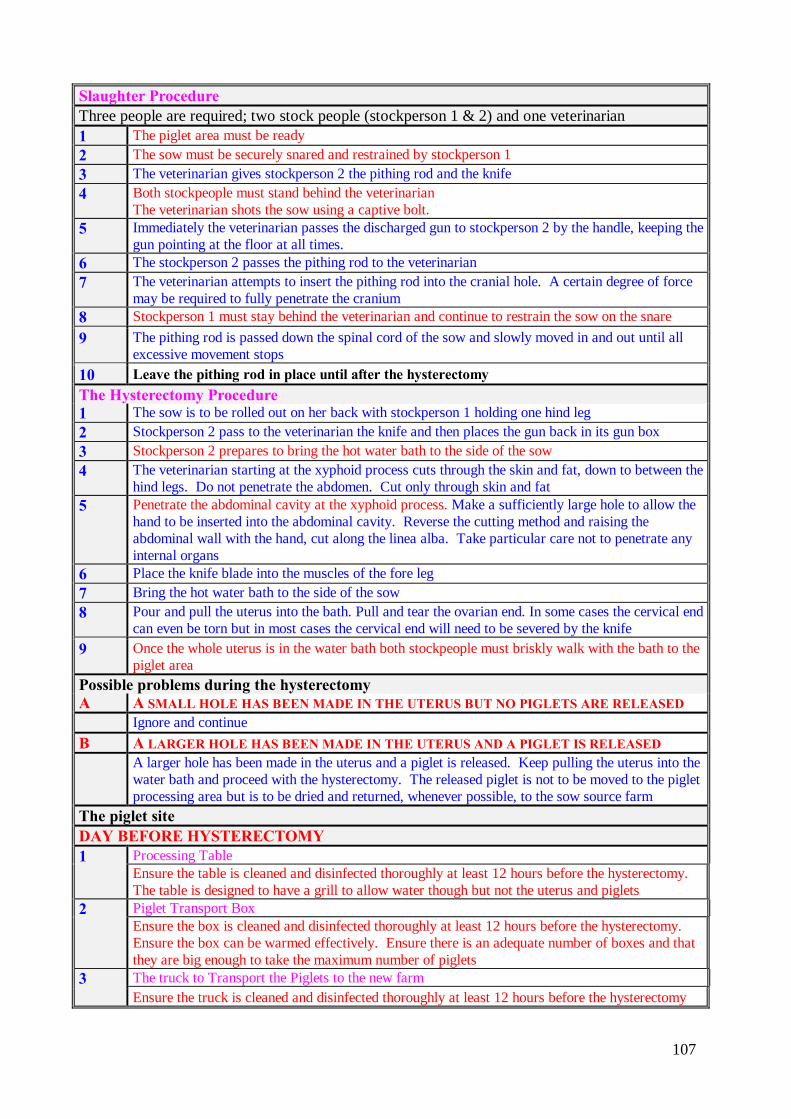
107
Slaughter Procedure Three people are required; two stock people (stockperson 1 & 2) and one veterinarian 1 The piglet area must be ready 2 The sow must be securely snared and restrained by stockperson 1 3 The veterinarian gives stockperson 2 the pithing rod and the knife 4 Both stockpeople must stand behind the veterinarian
The veterinarian shots the sow using a captive bolt. 5 Immediately the veterinarian passes the discharged gun to stockperson 2 by the handle, keeping the
gun pointing at the floor at all times. 6 The stockperson 2 passes the pithing rod to the veterinarian 7 The veterinarian attempts to insert the pithing rod into the cranial hole. A certain degree of force
may be required to fully penetrate the cranium 8 Stockperson 1 must stay behind the veterinarian and continue to restrain the sow on the snare 9 The pithing rod is passed down the spinal cord of the sow and slowly moved in and out until all
excessive movement stops 10 Leave the pithing rod in place until after the hysterectomy The Hysterectomy Procedure 1 The sow is to be rolled out on her back with stockperson 1 holding one hind leg 2 Stockperson 2 pass to the veterinarian the knife and then places the gun back in its gun box 3 Stockperson 2 prepares to bring the hot water bath to the side of the sow 4 The veterinarian starting at the xyphoid process cuts through the skin and fat, down to between the
hind legs. Do not penetrate the abdomen. Cut only through skin and fat 5 Penetrate the abdominal cavity at the xyphoid process. Make a sufficiently large hole to allow the
hand to be inserted into the abdominal cavity. Reverse the cutting method and raising the abdominal wall with the hand, cut along the linea alba. Take particular care not to penetrate any internal organs
6 Place the knife blade into the muscles of the fore leg 7 Bring the hot water bath to the side of the sow 8 Pour and pull the uterus into the bath. Pull and tear the ovarian end. In some cases the cervical end
can even be torn but in most cases the cervical end will need to be severed by the knife 9 Once the whole uterus is in the water bath both stockpeople must briskly walk with the bath to the
piglet area Possible problems during the hysterectomy A A SMALL HOLE HAS BEEN MADE IN THE UTERUS BUT NO PIGLETS ARE RELEASED Ignore and continue B A LARGER HOLE HAS BEEN MADE IN THE UTERUS AND A PIGLET IS RELEASED A larger hole has been made in the uterus and a piglet is released. Keep pulling the uterus into the
water bath and proceed with the hysterectomy. The released piglet is not to be moved to the piglet processing area but is to be dried and returned, whenever possible, to the sow source farm
The piglet site DAY BEFORE HYSTERECTOMY 1 Processing Table
Ensure the table is cleaned and disinfected thoroughly at least 12 hours before the hysterectomy. The table is designed to have a grill to allow water though but not the uterus and piglets
2 Piglet Transport Box Ensure the box is cleaned and disinfected thoroughly at least 12 hours before the hysterectomy. Ensure the box can be warmed effectively. Ensure there is an adequate number of boxes and that they are big enough to take the maximum number of piglets
3 The truck to Transport the Piglets to the new farm Ensure the truck is cleaned and disinfected thoroughly at least 12 hours before the hysterectomy
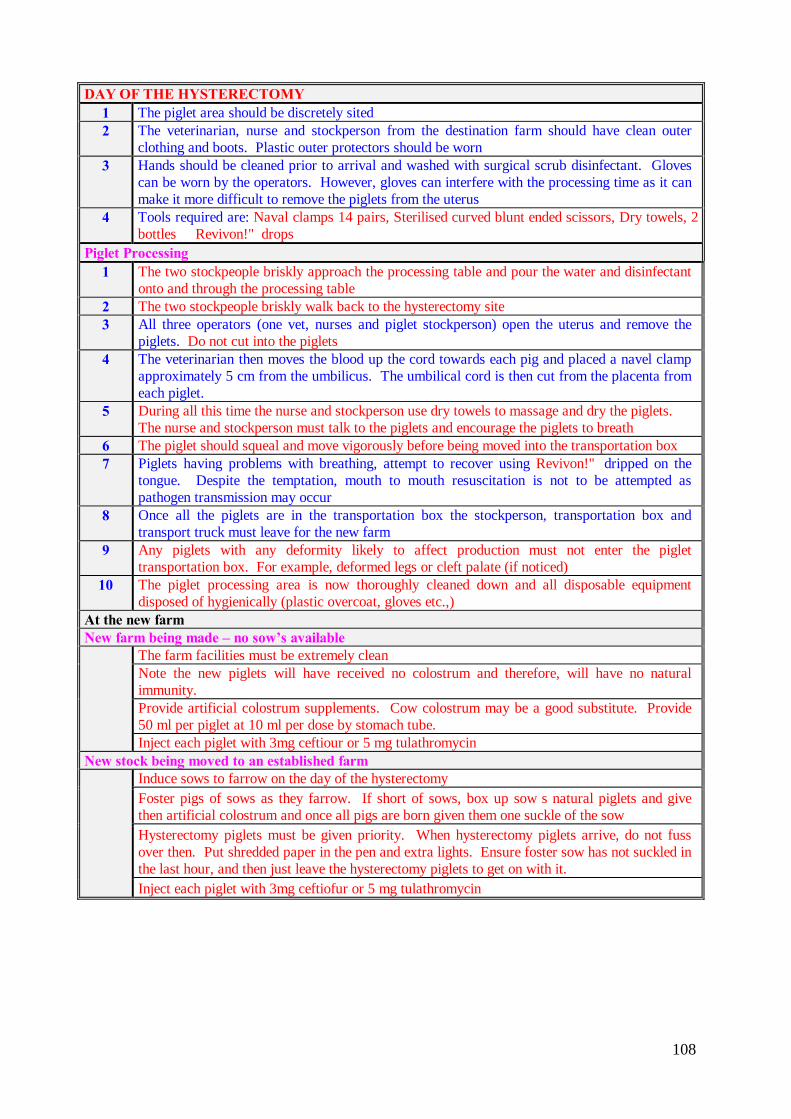
108
DAY OF THE HYSTERECTOMY
1 The piglet area should be discretely sited 2 The veterinarian, nurse and stockperson from the destination farm should have clean outer
clothing and boots. Plastic outer protectors should be worn 3 Hands should be cleaned prior to arrival and washed with surgical scrub disinfectant. Gloves
can be worn by the operators. However, gloves can interfere with the processing time as it can make it more difficult to remove the piglets from the uterus
4 Tools required are: Naval clamps 14 pairs, Sterilised curved blunt ended scissors, Dry towels, 2 bottles Revivon™ drops
Piglet Processing 1 The two stockpeople briskly approach the processing table and pour the water and disinfectant
onto and through the processing table 2 The two stockpeople briskly walk back to the hysterectomy site 3 All three operators (one vet, nurses and piglet stockperson) open the uterus and remove the
piglets. Do not cut into the piglets 4 The veterinarian then moves the blood up the cord towards each pig and placed a navel clamp
approximately 5 cm from the umbilicus. The umbilical cord is then cut from the placenta from each piglet.
5 During all this time the nurse and stockperson use dry towels to massage and dry the piglets. The nurse and stockperson must talk to the piglets and encourage the piglets to breath
6 The piglet should squeal and move vigorously before being moved into the transportation box 7 Piglets having problems with breathing, attempt to recover using Revivon™ dripped on the
tongue. Despite the temptation, mouth to mouth resuscitation is not to be attempted as pathogen transmission may occur
8 Once all the piglets are in the transportation box the stockperson, transportation box and transport truck must leave for the new farm
9 Any piglets with any deformity likely to affect production must not enter the piglet transportation box. For example, deformed legs or cleft palate (if noticed)
10 The piglet processing area is now thoroughly cleaned down and all disposable equipment disposed of hygienically (plastic overcoat, gloves etc.,)
At the new farm New farm being made – no sow’s available
The farm facilities must be extremely clean Note the new piglets will have received no colostrum and therefore, will have no natural immunity. Provide artificial colostrum supplements. Cow colostrum may be a good substitute. Provide 50 ml per piglet at 10 ml per dose by stomach tube. Inject each piglet with 3mg ceftiour or 5 mg tulathromycin
New stock being moved to an established farm Induce sows to farrow on the day of the hysterectomy
Foster pigs of sows as they farrow. If short of sows, box up sow’s natural piglets and give then artificial colostrum and once all pigs are born given them one suckle of the sow Hysterectomy piglets must be given priority. When hysterectomy piglets arrive, do not fuss over then. Put shredded paper in the pen and extra lights. Ensure foster sow has not suckled in the last hour, and then just leave the hysterectomy piglets to get on with it. Inject each piglet with 3mg ceftiofur or 5 mg tulathromycin
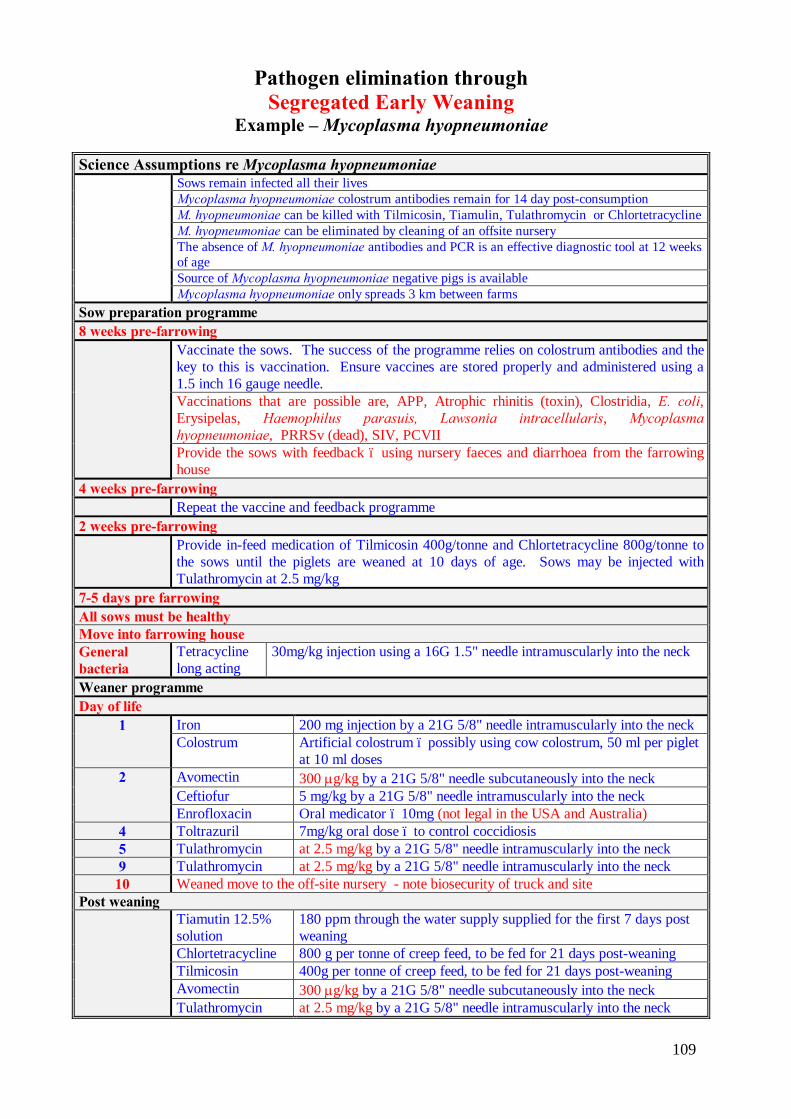
109
Pathogen elimination through Segregated Early Weaning
Example – Mycoplasma hyopneumoniae
Science Assumptions re Mycoplasma hyopneumoniae Sows remain infected all their lives
Mycoplasma hyopneumoniae colostrum antibodies remain for 14 day post-consumption M. hyopneumoniae can be killed with Tilmicosin, Tiamulin, Tulathromycin or Chlortetracycline M. hyopneumoniae can be eliminated by cleaning of an offsite nursery The absence of M. hyopneumoniae antibodies and PCR is an effective diagnostic tool at 12 weeks of age Source of Mycoplasma hyopneumoniae negative pigs is available Mycoplasma hyopneumoniae only spreads 3 km between farms
Sow preparation programme 8 weeks pre-farrowing Vaccinate the sows. The success of the programme relies on colostrum antibodies and the
key to this is vaccination. Ensure vaccines are stored properly and administered using a 1.5 inch 16 gauge needle. Vaccinations that are possible are, APP, Atrophic rhinitis (toxin), Clostridia, E. coli, Erysipelas, Haemophilus parasuis, Lawsonia intracellularis, Mycoplasma hyopneumoniae, PRRSv (dead), SIV, PCVII Provide the sows with feedback – using nursery faeces and diarrhoea from the farrowing house
4 weeks pre-farrowing Repeat the vaccine and feedback programme 2 weeks pre-farrowing Provide in-feed medication of Tilmicosin 400g/tonne and Chlortetracycline 800g/tonne to
the sows until the piglets are weaned at 10 days of age. Sows may be injected with Tulathromycin at 2.5 mg/kg
7-5 days pre farrowing All sows must be healthy Move into farrowing house General bacteria
Tetracycline long acting
30mg/kg injection using a 16G 1.5" needle intramuscularly into the neck
Weaner programme Day of life
1 Iron 200 mg injection by a 21G 5/8" needle intramuscularly into the neck Colostrum Artificial colostrum – possibly using cow colostrum, 50 ml per piglet
at 10 ml doses 2 Avomectin 300 µg/kg by a 21G 5/8" needle subcutaneously into the neck
Ceftiofur 5 mg/kg by a 21G 5/8" needle intramuscularly into the neck Enrofloxacin Oral medicator – 10mg (not legal in the USA and Australia)
4 Toltrazuril 7mg/kg oral dose – to control coccidiosis 5 Tulathromycin at 2.5 mg/kg by a 21G 5/8" needle intramuscularly into the neck 9 Tulathromycin at 2.5 mg/kg by a 21G 5/8" needle intramuscularly into the neck
10 Weaned move to the off-site nursery - note biosecurity of truck and site Post weaning
Tiamutin 12.5% solution
180 ppm through the water supply supplied for the first 7 days post weaning
Chlortetracycline 800 g per tonne of creep feed, to be fed for 21 days post-weaning Tilmicosin 400g per tonne of creep feed, to be fed for 21 days post-weaning Avomectin 300 µg/kg by a 21G 5/8" needle subcutaneously into the neck Tulathromycin at 2.5 mg/kg by a 21G 5/8" needle intramuscularly into the neck
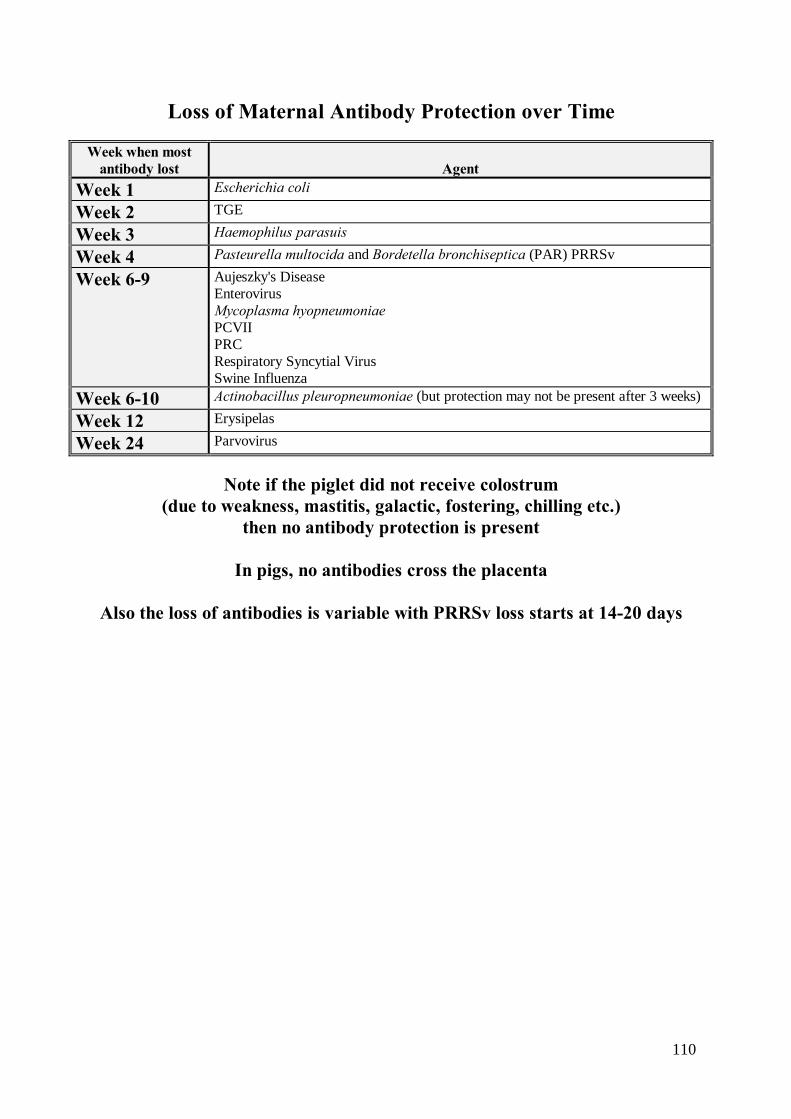
110
Loss of Maternal Antibody Protection over Time Week when most
antibody lost
Agent Week 1 Escherichia coli
Week 2 TGE
Week 3 Haemophilus parasuis
Week 4 Pasteurella multocida and Bordetella bronchiseptica (PAR) PRRSv
Week 6-9 Aujeszky's Disease Enterovirus Mycoplasma hyopneumoniae PCVII PRC Respiratory Syncytial Virus Swine Influenza
Week 6-10 Actinobacillus pleuropneumoniae (but protection may not be present after 3 weeks)
Week 12 Erysipelas
Week 24 Parvovirus
Note if the piglet did not receive colostrum
(due to weakness, mastitis, galactic, fostering, chilling etc.) then no antibody protection is present
In pigs, no antibodies cross the placenta
Also the loss of antibodies is variable with PRRSv loss starts at 14-20 days
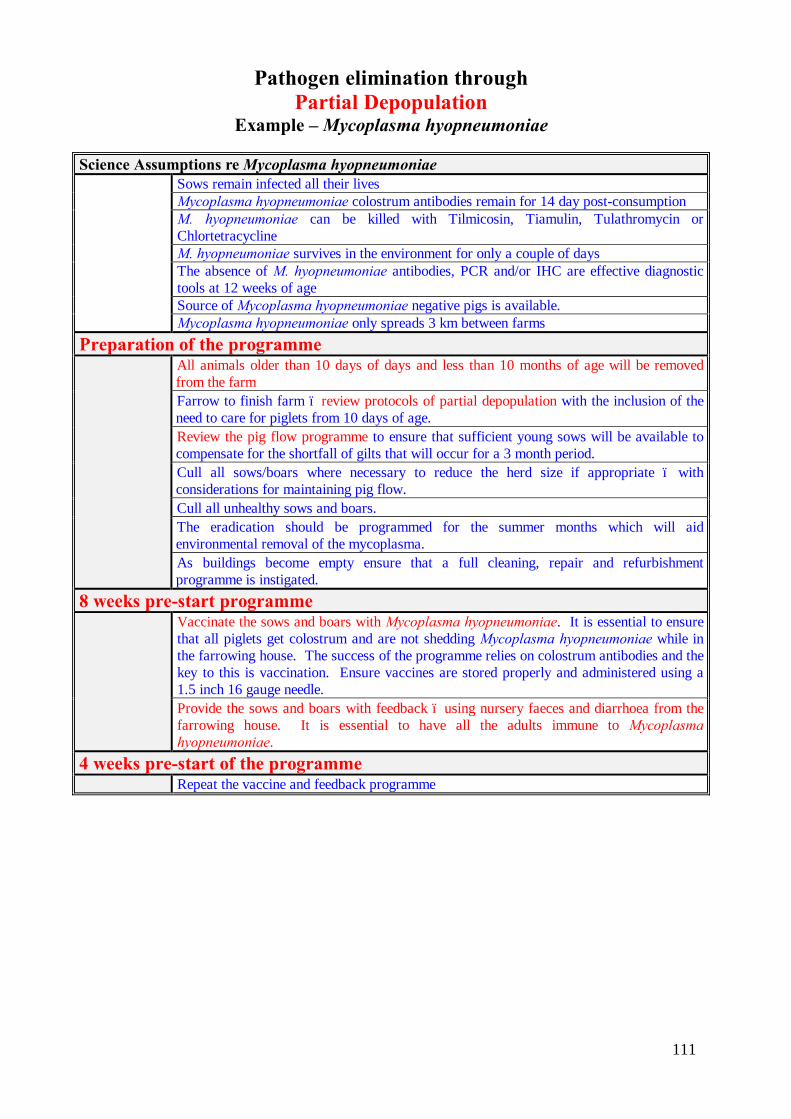
111
Pathogen elimination through Partial Depopulation
Example – Mycoplasma hyopneumoniae
Science Assumptions re Mycoplasma hyopneumoniae Sows remain infected all their lives
Mycoplasma hyopneumoniae colostrum antibodies remain for 14 day post-consumption M. hyopneumoniae can be killed with Tilmicosin, Tiamulin, Tulathromycin or Chlortetracycline M. hyopneumoniae survives in the environment for only a couple of days The absence of M. hyopneumoniae antibodies, PCR and/or IHC are effective diagnostic tools at 12 weeks of age Source of Mycoplasma hyopneumoniae negative pigs is available. Mycoplasma hyopneumoniae only spreads 3 km between farms
Preparation of the programme All animals older than 10 days of days and less than 10 months of age will be removed
from the farm Farrow to finish farm – review protocols of partial depopulation with the inclusion of the need to care for piglets from 10 days of age. Review the pig flow programme to ensure that sufficient young sows will be available to compensate for the shortfall of gilts that will occur for a 3 month period. Cull all sows/boars where necessary to reduce the herd size if appropriate – with considerations for maintaining pig flow. Cull all unhealthy sows and boars. The eradication should be programmed for the summer months which will aid environmental removal of the mycoplasma. As buildings become empty ensure that a full cleaning, repair and refurbishment programme is instigated.
8 weeks pre-start programme Vaccinate the sows and boars with Mycoplasma hyopneumoniae. It is essential to ensure
that all piglets get colostrum and are not shedding Mycoplasma hyopneumoniae while in the farrowing house. The success of the programme relies on colostrum antibodies and the key to this is vaccination. Ensure vaccines are stored properly and administered using a 1.5 inch 16 gauge needle. Provide the sows and boars with feedback – using nursery faeces and diarrhoea from the farrowing house. It is essential to have all the adults immune to Mycoplasma hyopneumoniae.
4 weeks pre-start of the programme Repeat the vaccine and feedback programme
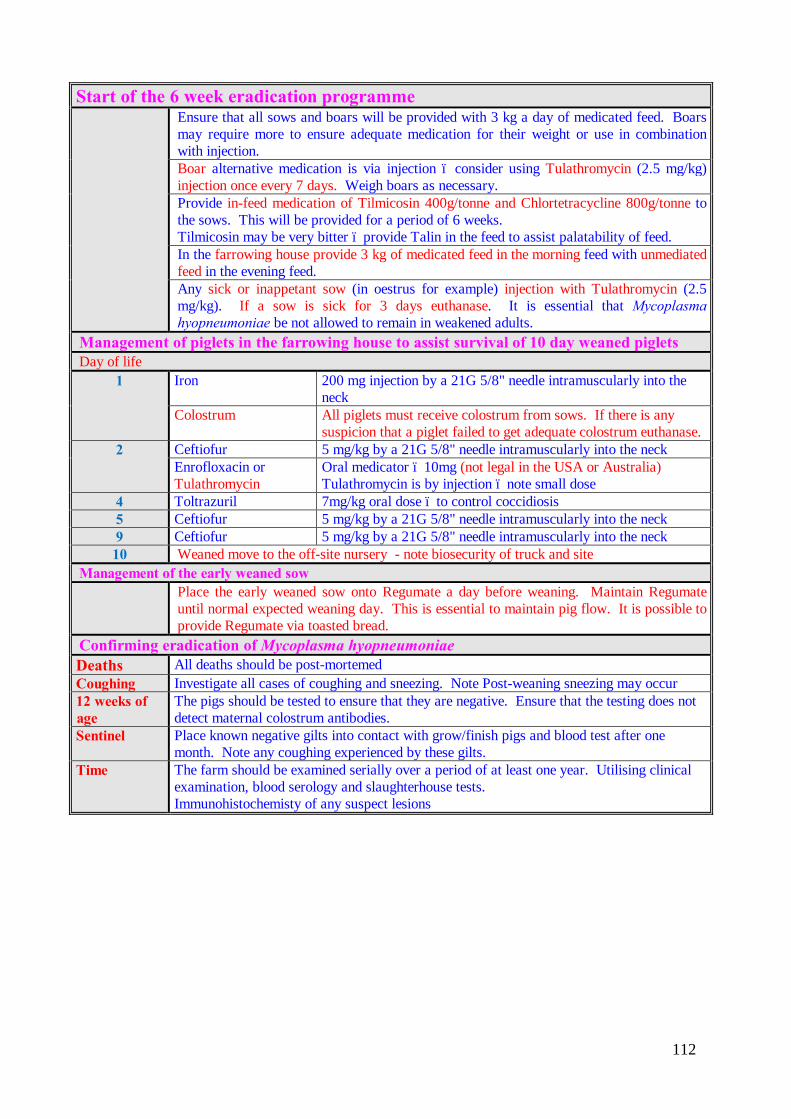
112
Start of the 6 week eradication programme Ensure that all sows and boars will be provided with 3 kg a day of medicated feed. Boars
may require more to ensure adequate medication for their weight or use in combination with injection. Boar alternative medication is via injection – consider using Tulathromycin (2.5 mg/kg) injection once every 7 days. Weigh boars as necessary. Provide in-feed medication of Tilmicosin 400g/tonne and Chlortetracycline 800g/tonne to the sows. This will be provided for a period of 6 weeks. Tilmicosin may be very bitter – provide Talin in the feed to assist palatability of feed. In the farrowing house provide 3 kg of medicated feed in the morning feed with unmediated feed in the evening feed. Any sick or inappetant sow (in oestrus for example) injection with Tulathromycin (2.5 mg/kg). If a sow is sick for 3 days euthanase. It is essential that Mycoplasma hyopneumoniae be not allowed to remain in weakened adults.
Management of piglets in the farrowing house to assist survival of 10 day weaned piglets Day of life
1 Iron 200 mg injection by a 21G 5/8" needle intramuscularly into the neck
Colostrum All piglets must receive colostrum from sows. If there is any suspicion that a piglet failed to get adequate colostrum euthanase.
2 Ceftiofur 5 mg/kg by a 21G 5/8" needle intramuscularly into the neck Enrofloxacin or Tulathromycin
Oral medicator – 10mg (not legal in the USA or Australia) Tulathromycin is by injection – note small dose
4 Toltrazuril 7mg/kg oral dose – to control coccidiosis 5 Ceftiofur 5 mg/kg by a 21G 5/8" needle intramuscularly into the neck 9 Ceftiofur 5 mg/kg by a 21G 5/8" needle intramuscularly into the neck 10 Weaned move to the off-site nursery - note biosecurity of truck and site
Management of the early weaned sow Place the early weaned sow onto Regumate a day before weaning. Maintain Regumate
until normal expected weaning day. This is essential to maintain pig flow. It is possible to provide Regumate via toasted bread.
Confirming eradication of Mycoplasma hyopneumoniae Deaths All deaths should be post-mortemed Coughing Investigate all cases of coughing and sneezing. Note Post-weaning sneezing may occur 12 weeks of age
The pigs should be tested to ensure that they are negative. Ensure that the testing does not detect maternal colostrum antibodies.
Sentinel Place known negative gilts into contact with grow/finish pigs and blood test after one month. Note any coughing experienced by these gilts.
Time The farm should be examined serially over a period of at least one year. Utilising clinical examination, blood serology and slaughterhouse tests. Immunohistochemisty of any suspect lesions
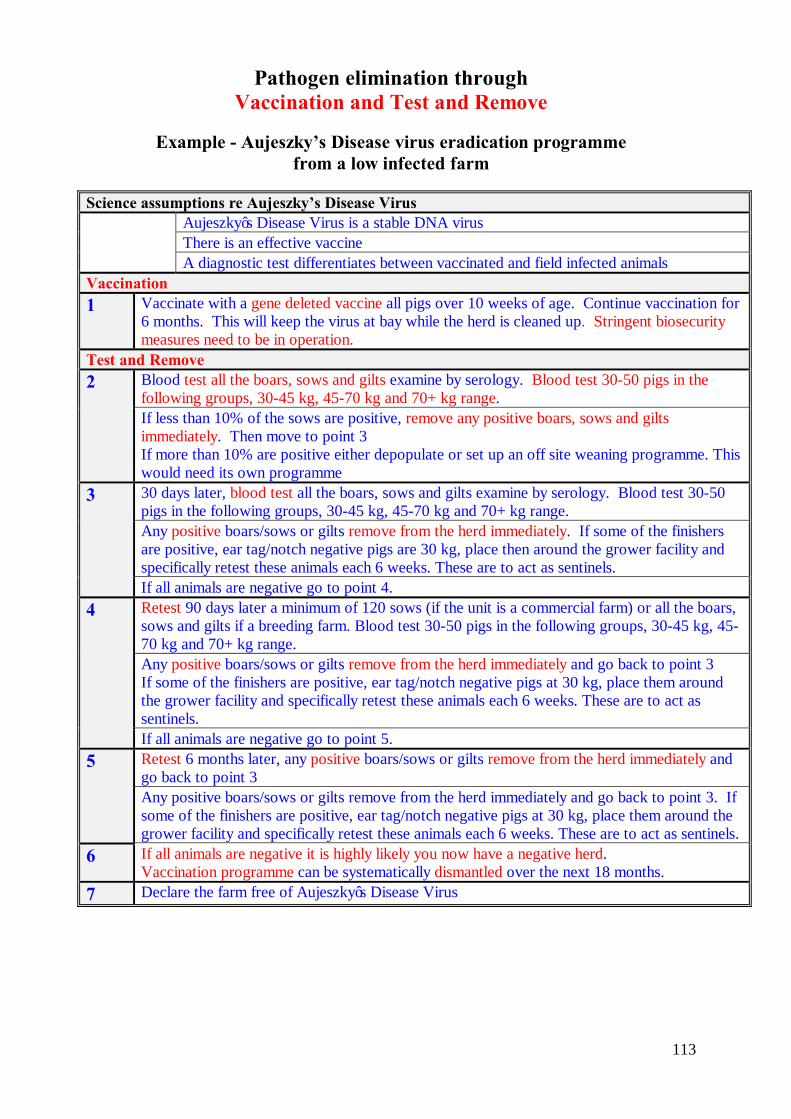
113
Pathogen elimination through Vaccination and Test and Remove
Example - Aujeszky’s Disease virus eradication programme
from a low infected farm Science assumptions re Aujeszky’s Disease Virus Aujeszky’s Disease Virus is a stable DNA virus
There is an effective vaccine A diagnostic test differentiates between vaccinated and field infected animals
Vaccination 1 Vaccinate with a gene deleted vaccine all pigs over 10 weeks of age. Continue vaccination for
6 months. This will keep the virus at bay while the herd is cleaned up. Stringent biosecurity measures need to be in operation.
Test and Remove 2 Blood test all the boars, sows and gilts examine by serology. Blood test 30-50 pigs in the
following groups, 30-45 kg, 45-70 kg and 70+ kg range. If less than 10% of the sows are positive, remove any positive boars, sows and gilts immediately. Then move to point 3 If more than 10% are positive either depopulate or set up an off site weaning programme. This would need its own programme
3 30 days later, blood test all the boars, sows and gilts examine by serology. Blood test 30-50 pigs in the following groups, 30-45 kg, 45-70 kg and 70+ kg range. Any positive boars/sows or gilts remove from the herd immediately. If some of the finishers are positive, ear tag/notch negative pigs are 30 kg, place then around the grower facility and specifically retest these animals each 6 weeks. These are to act as sentinels. If all animals are negative go to point 4.
4 Retest 90 days later a minimum of 120 sows (if the unit is a commercial farm) or all the boars, sows and gilts if a breeding farm. Blood test 30-50 pigs in the following groups, 30-45 kg, 45-70 kg and 70+ kg range. Any positive boars/sows or gilts remove from the herd immediately and go back to point 3 If some of the finishers are positive, ear tag/notch negative pigs at 30 kg, place them around the grower facility and specifically retest these animals each 6 weeks. These are to act as sentinels. If all animals are negative go to point 5.
5 Retest 6 months later, any positive boars/sows or gilts remove from the herd immediately and go back to point 3 Any positive boars/sows or gilts remove from the herd immediately and go back to point 3. If some of the finishers are positive, ear tag/notch negative pigs at 30 kg, place them around the grower facility and specifically retest these animals each 6 weeks. These are to act as sentinels.
6 If all animals are negative it is highly likely you now have a negative herd. Vaccination programme can be systematically dismantled over the next 18 months.
7 Declare the farm free of Aujeszky’s Disease Virus
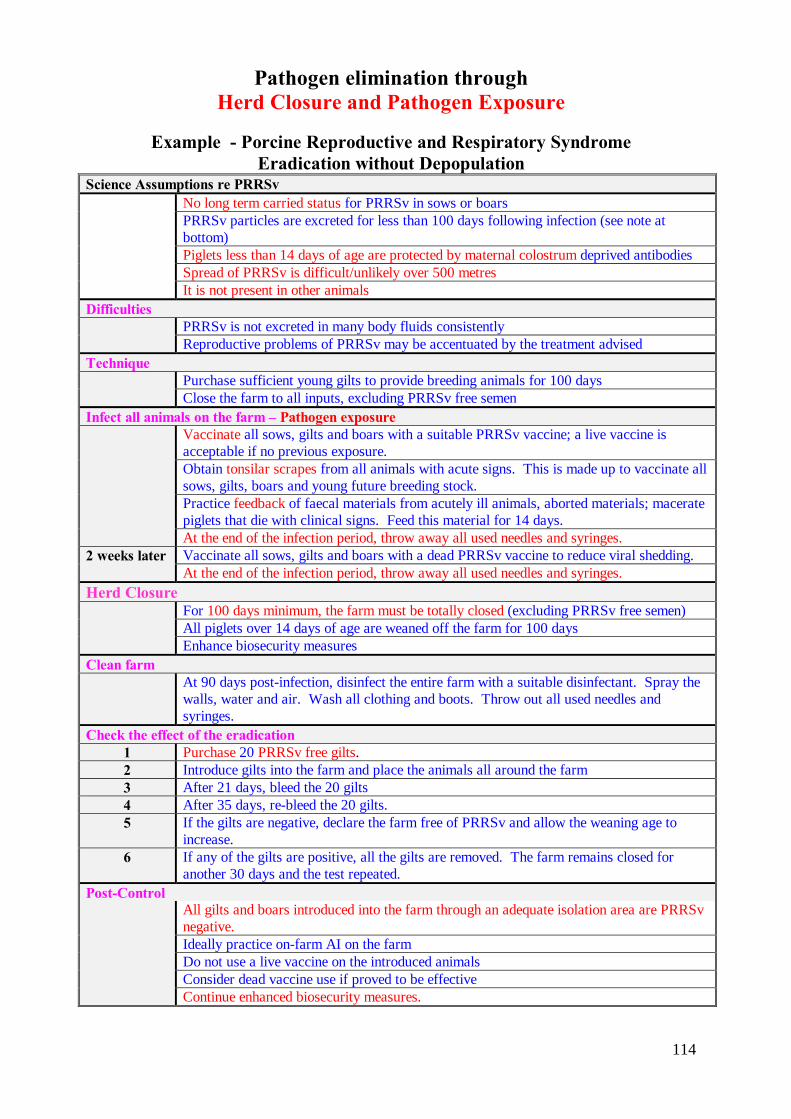
114
Pathogen elimination through Herd Closure and Pathogen Exposure
Example - Porcine Reproductive and Respiratory Syndrome
Eradication without Depopulation Science Assumptions re PRRSv
No long term carried status for PRRSv in sows or boars PRRSv particles are excreted for less than 100 days following infection (see note at bottom) Piglets less than 14 days of age are protected by maternal colostrum deprived antibodies Spread of PRRSv is difficult/unlikely over 500 metres It is not present in other animals
Difficulties PRRSv is not excreted in many body fluids consistently
Reproductive problems of PRRSv may be accentuated by the treatment advised Technique Purchase sufficient young gilts to provide breeding animals for 100 days
Close the farm to all inputs, excluding PRRSv free semen Infect all animals on the farm – Pathogen exposure Vaccinate all sows, gilts and boars with a suitable PRRSv vaccine; a live vaccine is
acceptable if no previous exposure. Obtain tonsilar scrapes from all animals with acute signs. This is made up to vaccinate all sows, gilts, boars and young future breeding stock. Practice feedback of faecal materials from acutely ill animals, aborted materials; macerate piglets that die with clinical signs. Feed this material for 14 days. At the end of the infection period, throw away all used needles and syringes.
2 weeks later Vaccinate all sows, gilts and boars with a dead PRRSv vaccine to reduce viral shedding. At the end of the infection period, throw away all used needles and syringes.
Herd Closure For 100 days minimum, the farm must be totally closed (excluding PRRSv free semen)
All piglets over 14 days of age are weaned off the farm for 100 days Enhance biosecurity measures
Clean farm At 90 days post-infection, disinfect the entire farm with a suitable disinfectant. Spray the
walls, water and air. Wash all clothing and boots. Throw out all used needles and syringes.
Check the effect of the eradication 1 Purchase 20 PRRSv free gilts. 2 Introduce gilts into the farm and place the animals all around the farm 3 After 21 days, bleed the 20 gilts 4 After 35 days, re-bleed the 20 gilts. 5 If the gilts are negative, declare the farm free of PRRSv and allow the weaning age to
increase. 6 If any of the gilts are positive, all the gilts are removed. The farm remains closed for
another 30 days and the test repeated. Post-Control All gilts and boars introduced into the farm through an adequate isolation area are PRRSv
negative. Ideally practice on-farm AI on the farm Do not use a live vaccine on the introduced animals Consider dead vaccine use if proved to be effective Continue enhanced biosecurity measures.
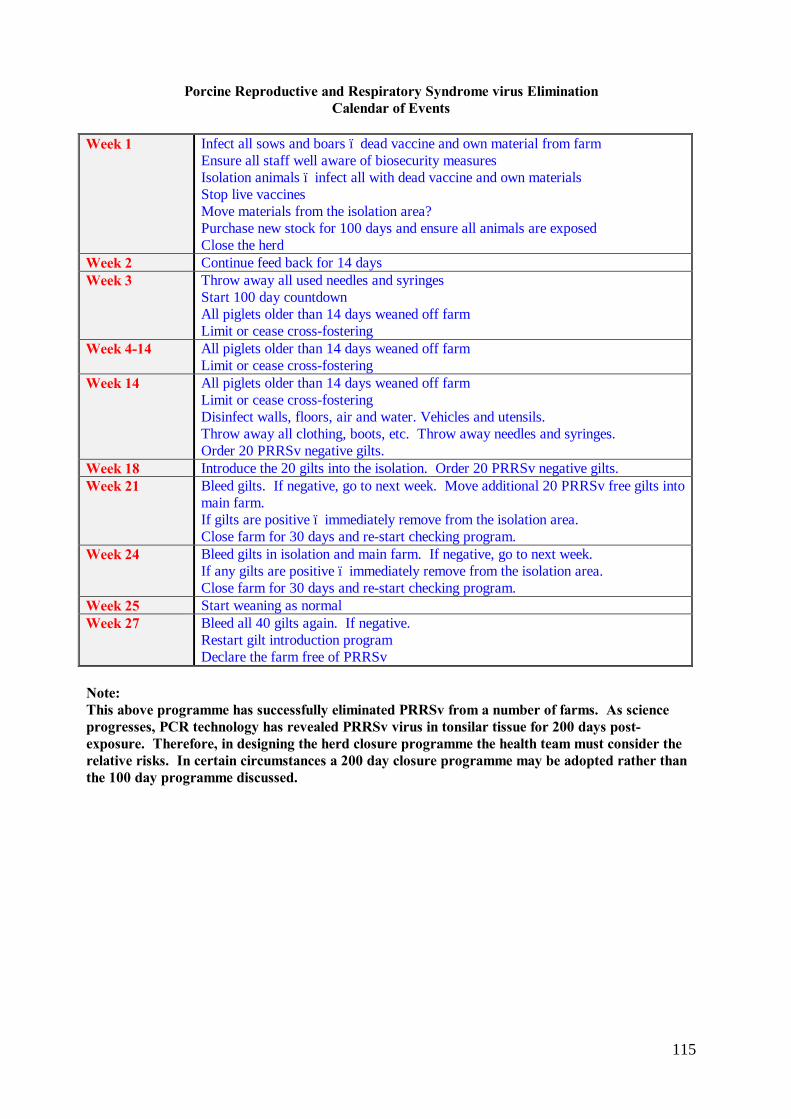
115
Porcine Reproductive and Respiratory Syndrome virus Elimination
Calendar of Events
Week 1 Infect all sows and boars – dead vaccine and own material from farm Ensure all staff well aware of biosecurity measures Isolation animals – infect all with dead vaccine and own materials Stop live vaccines Move materials from the isolation area? Purchase new stock for 100 days and ensure all animals are exposed Close the herd
Week 2 Continue feed back for 14 days Week 3 Throw away all used needles and syringes
Start 100 day countdown All piglets older than 14 days weaned off farm Limit or cease cross-fostering
Week 4-14 All piglets older than 14 days weaned off farm Limit or cease cross-fostering
Week 14 All piglets older than 14 days weaned off farm Limit or cease cross-fostering Disinfect walls, floors, air and water. Vehicles and utensils. Throw away all clothing, boots, etc. Throw away needles and syringes. Order 20 PRRSv negative gilts.
Week 18 Introduce the 20 gilts into the isolation. Order 20 PRRSv negative gilts. Week 21 Bleed gilts. If negative, go to next week. Move additional 20 PRRSv free gilts into
main farm. If gilts are positive – immediately remove from the isolation area. Close farm for 30 days and re-start checking program.
Week 24 Bleed gilts in isolation and main farm. If negative, go to next week. If any gilts are positive – immediately remove from the isolation area. Close farm for 30 days and re-start checking program.
Week 25 Start weaning as normal Week 27 Bleed all 40 gilts again. If negative.
Restart gilt introduction program Declare the farm free of PRRSv
Note: This above programme has successfully eliminated PRRSv from a number of farms. As science progresses, PCR technology has revealed PRRSv virus in tonsilar tissue for 200 days post-exposure. Therefore, in designing the herd closure programme the health team must consider the relative risks. In certain circumstances a 200 day closure programme may be adopted rather than the 100 day programme discussed.

116
Pathogen elimination through Medication
Example – Sarcoptes scabiei var suis – farrow to wean unit Science points re Sarcoptes scabiei var suis
Avomectin remain active in the pig for 7 days post-treatment Sarcoptic eggs are resistant to avomectins Sarcoptic eggs hatch in 5 days Sarcoptic mites may live off the host for 21 days, but in the summer months this is reduced to 5 days Boars are difficult to estimate their weight and are often underdosed – a major reason for the programme failure
Animal Programme Suckling pigs Inject with an avomectins at 300 µg/kg via a 21 gauge 5/8 " needle, using an insulin syringe
by injection in the neck Gilt pool In feed medication for 7 days, with an inclusion of avomectin in-feed at 100 µg/kg
bodyweight. Ensure all animals eat 2.75 kg per day. Breeding and pregnant sows
In feed medication for 7 days, with an inclusion of avomectin in-feed at 100 µg/kg bodyweight. Ensure all animals are fed 2.7 kg of feed per day ignore condition score
Lactating sows Feed 2.7 kg of the dry sow ration, with an inclusion of avomectin in-feed at 100 µg/kg bodyweight in the morning for 7 days. Feed lactator in the evening
Boars Feed dry sow ration, with an inclusion of avomectin in-feed at 100 µg/kg bodyweight. For large boars increase quantity feed. For instance a 200 kg boar feed 2.7 kg per day for 7 days; 250 kg boar feed 3.3 kg per day for 7 days and for a 300 kg boar feed 4 kg per day. Or inject with Avomectin 300 µg/kg
Hospital pens Inject all pigs with an avomectin at 300 µg/kg in the neck All adults off feed for more than 24 hours
Inject with avomectin at 300 µg/kg bodyweight in the neck. Note sows in oestrus
Buildings At the end of the 7 day animal treatment period spray all houses with amitraz 0.1% at 40 ml per 10 litres of water dilution using a knapsack sprayer
Clothing Stockpeople attending to the grow/finish herd should not wear the same overalls when attending to the breeding herd At the end of the 7 day animal treatment period all overalls and boots should be washed thoroughly, disinfected and re-washed in a amitraz 0.1% solution at 40 ml per 10 litres of water dilution
Repeat medication programme with another injection and 7 day medicated feed Feed bin management
All feed lines should be flushed with normal food after the 7 day period to remove any treated feed material.
If this programme is combined with a partial depopulation or a clean pen break system, mange can
be eliminated from a farrow to finish farm for more detail consult with your veterinarian
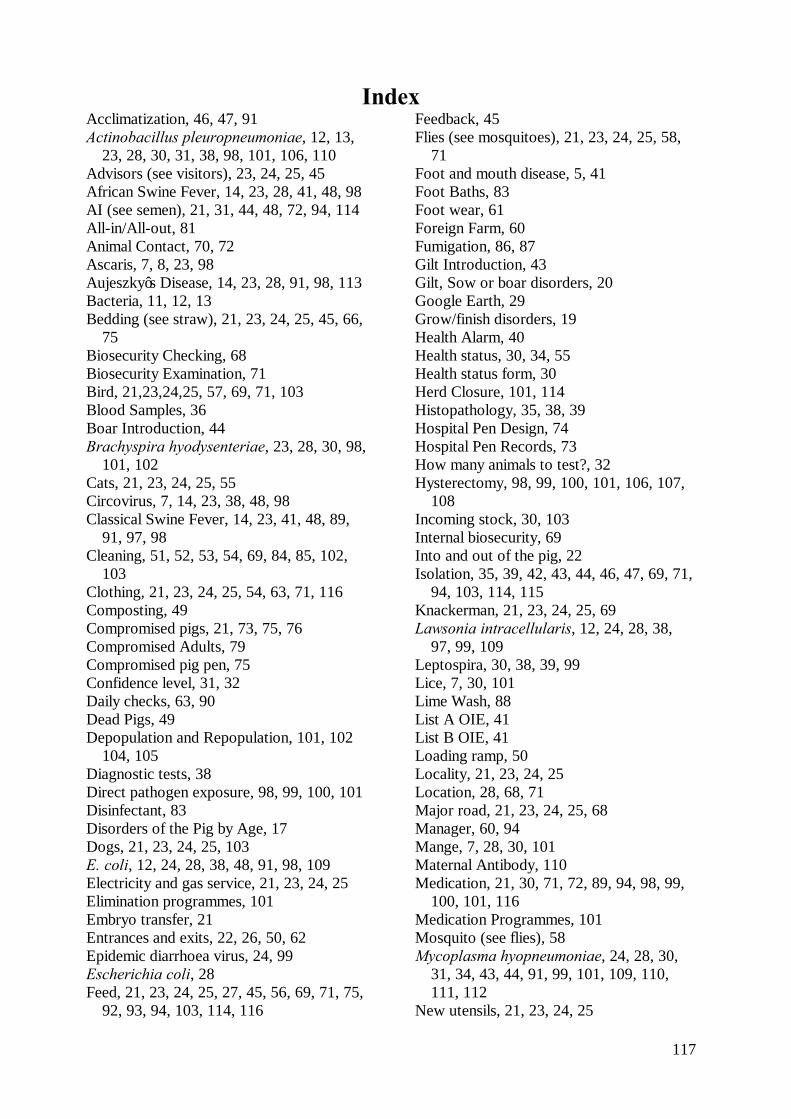
117
Index Acclimatization, 46, 47, 91 Actinobacillus pleuropneumoniae, 12, 13,
23, 28, 30, 31, 38, 98, 101, 106, 110 Advisors (see visitors), 23, 24, 25, 45 African Swine Fever, 14, 23, 28, 41, 48, 98 AI (see semen), 21, 31, 44, 48, 72, 94, 114 All-in/All-out, 81 Animal Contact, 70, 72 Ascaris, 7, 8, 23, 98 Aujeszky’s Disease, 14, 23, 28, 91, 98, 113 Bacteria, 11, 12, 13 Bedding (see straw), 21, 23, 24, 25, 45, 66,
75 Biosecurity Checking, 68 Biosecurity Examination, 71 Bird, 21,23,24,25, 57, 69, 71, 103 Blood Samples, 36 Boar Introduction, 44 Brachyspira hyodysenteriae, 23, 28, 30, 98,
101, 102 Cats, 21, 23, 24, 25, 55 Circovirus, 7, 14, 23, 38, 48, 98 Classical Swine Fever, 14, 23, 41, 48, 89,
91, 97, 98 Cleaning, 51, 52, 53, 54, 69, 84, 85, 102,
103 Clothing, 21, 23, 24, 25, 54, 63, 71, 116 Composting, 49 Compromised pigs, 21, 73, 75, 76 Compromised Adults, 79 Compromised pig pen, 75 Confidence level, 31, 32 Daily checks, 63, 90 Dead Pigs, 49 Depopulation and Repopulation, 101, 102
104, 105 Diagnostic tests, 38 Direct pathogen exposure, 98, 99, 100, 101 Disinfectant, 83 Disorders of the Pig by Age, 17 Dogs, 21, 23, 24, 25, 103 E. coli, 12, 24, 28, 38, 48, 91, 98, 109 Electricity and gas service, 21, 23, 24, 25 Elimination programmes, 101 Embryo transfer, 21 Entrances and exits, 22, 26, 50, 62 Epidemic diarrhoea virus, 24, 99 Escherichia coli, 28 Feed, 21, 23, 24, 25, 27, 45, 56, 69, 71, 75,
92, 93, 94, 103, 114, 116
Feedback, 45 Flies (see mosquitoes), 21, 23, 24, 25, 58,
71 Foot and mouth disease, 5, 41 Foot Baths, 83 Foot wear, 61 Foreign Farm, 60 Fumigation, 86, 87 Gilt Introduction, 43 Gilt, Sow or boar disorders, 20 Google Earth, 29 Grow/finish disorders, 19 Health Alarm, 40 Health status, 30, 34, 55 Health status form, 30 Herd Closure, 101, 114 Histopathology, 35, 38, 39 Hospital Pen Design, 74 Hospital Pen Records, 73 How many animals to test?, 32 Hysterectomy, 98, 99, 100, 101, 106, 107,
108 Incoming stock, 30, 103 Internal biosecurity, 69 Into and out of the pig, 22 Isolation, 35, 39, 42, 43, 44, 46, 47, 69, 71,
94, 103, 114, 115 Knackerman, 21, 23, 24, 25, 69 Lawsonia intracellularis, 12, 24, 28, 38,
97, 99, 109 Leptospira, 30, 38, 39, 99 Lice, 7, 30, 101 Lime Wash, 88 List A OIE, 41 List B OIE, 41 Loading ramp, 50 Locality, 21, 23, 24, 25 Location, 28, 68, 71 Major road, 21, 23, 24, 25, 68 Manager, 60, 94 Mange, 7, 28, 30, 101 Maternal Antibody, 110 Medication, 21, 30, 71, 72, 89, 94, 98, 99,
100, 101, 116 Medication Programmes, 101 Mosquito (see flies), 58 Mycoplasma hyopneumoniae, 24, 28, 30,
31, 34, 43, 44, 91, 99, 101, 109, 110, 111, 112
New utensils, 21, 23, 24, 25
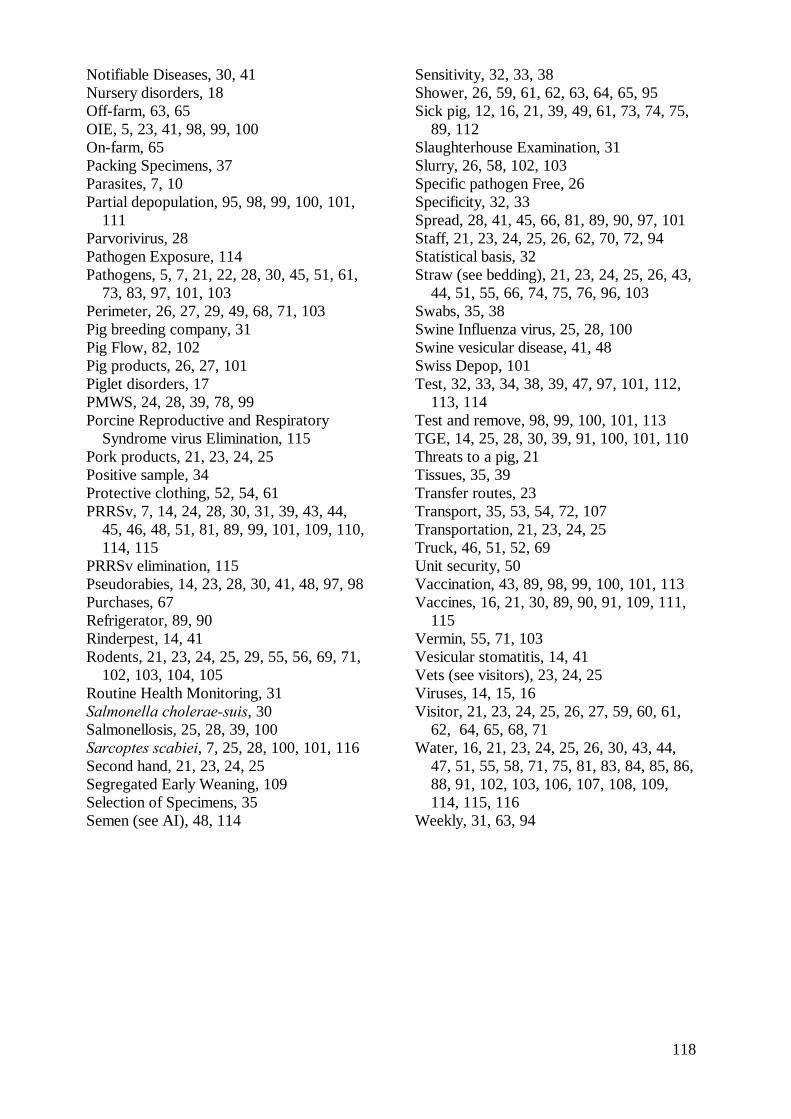
118
Notifiable Diseases, 30, 41 Nursery disorders, 18 Off-farm, 63, 65 OIE, 5, 23, 41, 98, 99, 100 On-farm, 65 Packing Specimens, 37 Parasites, 7, 10 Partial depopulation, 95, 98, 99, 100, 101,
111 Parvorivirus, 28 Pathogen Exposure, 114 Pathogens, 5, 7, 21, 22, 28, 30, 45, 51, 61,
73, 83, 97, 101, 103 Perimeter, 26, 27, 29, 49, 68, 71, 103 Pig breeding company, 31 Pig Flow, 82, 102 Pig products, 26, 27, 101 Piglet disorders, 17 PMWS, 24, 28, 39, 78, 99 Porcine Reproductive and Respiratory
Syndrome virus Elimination, 115 Pork products, 21, 23, 24, 25 Positive sample, 34 Protective clothing, 52, 54, 61 PRRSv, 7, 14, 24, 28, 30, 31, 39, 43, 44,
45, 46, 48, 51, 81, 89, 99, 101, 109, 110, 114, 115
PRRSv elimination, 115 Pseudorabies, 14, 23, 28, 30, 41, 48, 97, 98 Purchases, 67 Refrigerator, 89, 90 Rinderpest, 14, 41 Rodents, 21, 23, 24, 25, 29, 55, 56, 69, 71,
102, 103, 104, 105 Routine Health Monitoring, 31 Salmonella cholerae-suis, 30 Salmonellosis, 25, 28, 39, 100 Sarcoptes scabiei, 7, 25, 28, 100, 101, 116 Second hand, 21, 23, 24, 25 Segregated Early Weaning, 109 Selection of Specimens, 35 Semen (see AI), 48, 114
Sensitivity, 32, 33, 38 Shower, 26, 59, 61, 62, 63, 64, 65, 95 Sick pig, 12, 16, 21, 39, 49, 61, 73, 74, 75,
89, 112 Slaughterhouse Examination, 31 Slurry, 26, 58, 102, 103 Specific pathogen Free, 26 Specificity, 32, 33 Spread, 28, 41, 45, 66, 81, 89, 90, 97, 101 Staff, 21, 23, 24, 25, 26, 62, 70, 72, 94 Statistical basis, 32 Straw (see bedding), 21, 23, 24, 25, 26, 43,
44, 51, 55, 66, 74, 75, 76, 96, 103 Swabs, 35, 38 Swine Influenza virus, 25, 28, 100 Swine vesicular disease, 41, 48 Swiss Depop, 101 Test, 32, 33, 34, 38, 39, 47, 97, 101, 112,
113, 114 Test and remove, 98, 99, 100, 101, 113 TGE, 14, 25, 28, 30, 39, 91, 100, 101, 110 Threats to a pig, 21 Tissues, 35, 39 Transfer routes, 23 Transport, 35, 53, 54, 72, 107 Transportation, 21, 23, 24, 25 Truck, 46, 51, 52, 69 Unit security, 50 Vaccination, 43, 89, 98, 99, 100, 101, 113 Vaccines, 16, 21, 30, 89, 90, 91, 109, 111,
115 Vermin, 55, 71, 103 Vesicular stomatitis, 14, 41 Vets (see visitors), 23, 24, 25 Viruses, 14, 15, 16 Visitor, 21, 23, 24, 25, 26, 27, 59, 60, 61,
62, 64, 65, 68, 71 Water, 16, 21, 23, 24, 25, 26, 30, 43, 44,
47, 51, 55, 58, 71, 75, 81, 83, 84, 85, 86, 88, 91, 102, 103, 106, 107, 108, 109, 114, 115, 116
Weekly, 31, 63, 94

119

120