Embed Size (px)
Citation preview

BILLET ELECTRONIC DISTRIBUTOR INSTALLATION PART No. 121-3560
Please follow all instructions carefully to ensure safe, reliable operation. Removing Your Old Distributor:
1. Remove the existing distributor cap without disconnecting any of the spark plug wires.
2. With the cap off, crank the engine until the rotor is aimed at a fixed point on the engine or boats transom. NOTE this position by making a mark, see (Figure 1)
3. Place the distributor cap back on and note which plug wire the rotor is pointing to. MARK THE SPARK PLUG WIRES and remove the distributor cap.
4. Disconnect the wiring from the distributor.
5. Loosen the distributor hold down clamp and slide the clamp out of the way. 6. Lift the distributor out of the engine. Note that the rotor rotates as you lift the helical cut
gear and should be taken into consideration when installing the new distributor. Distributor Slip Collar Benefits The adjustable distributor slip collar allows you to compensate for variations in machining of the engine block, intake manifold or heads. The adjustable collar will ensure that you obtain the correct distributor to cam gear mesh as well as the oil pump to distributor shaft overlap. Once adjusted, the slip collar needs to be locked securely in place around the distributor housing. Adjusting The Slip Collar
1. Loosen the slip collar and insert the distributor into the engine until it bottoms out agains t the oil pump drive.
2. After it bottoms out, raise the distributor 0.010” – 0.030” then slide the slip collar down into position and tighten it.
Checking Gear Mesh It is recommended to check for proper gear mesh between the cam gear and the distributor. To do this, coat the distributor gear with moly grease and install the distributor. Next, crank the engine and pull the distributor out. The gear pattern will show in the grease. The proper mesh will leave an even pattern in the middle of the gear. Adjust the slip collar to obtain the correct pattern of the gear mesh.
1
2
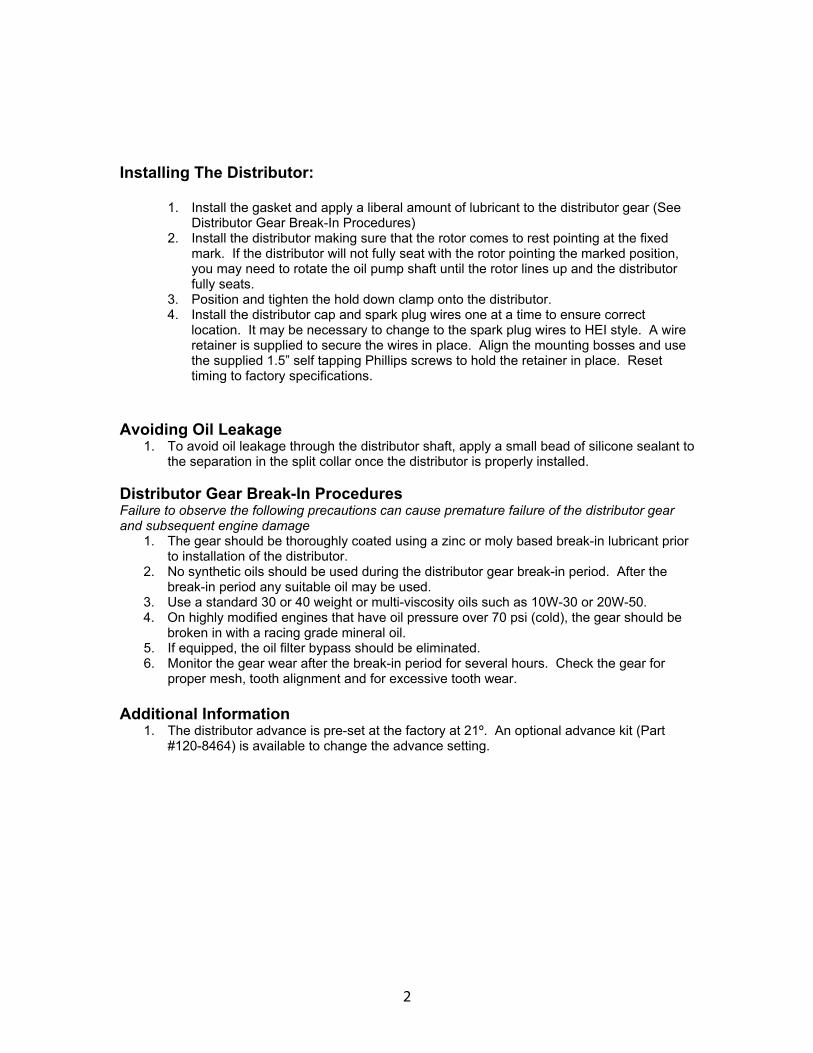
Installing The Distributor:
1. Install the gasket and apply a liberal amount of lubricant to the distributor gear (See Distributor Gear Break-In Procedures)
2. Install the distributor making sure that the rotor comes to rest pointing at the fixed mark. If the distributor will not fully seat with the rotor pointing the marked position, you may need to rotate the oil pump shaft until the rotor lines up and the distributor fully seats.
3. Position and tighten the hold down clamp onto the distributor. 4. Install the distributor cap and spark plug wires one at a time to ensure correct
location. It may be necessary to change to the spark plug wires to HEI style. A wire retainer is supplied to secure the wires in place. Align the mounting bosses and use the supplied 1.5” self tapping Phillips screws to hold the retainer in place. Reset timing to factory specifications.
Avoiding Oil Leakage
1. To avoid oil leakage through the distributor shaft, apply a small bead of silicone sealant to the separation in the split collar once the distributor is properly installed.
Distributor Gear Break-In Procedures Failure to observe the following precautions can cause premature failure of the distributor gear and subsequent engine damage
1. The gear should be thoroughly coated using a zinc or moly based break-in lubricant prior to installation of the distributor.
2. No synthetic oils should be used during the distributor gear break-in period. After the break-in period any suitable oil may be used.
3. Use a standard 30 or 40 weight or multi-viscosity oils such as 10W-30 or 20W-50. 4. On highly modified engines that have oil pressure over 70 psi (cold), the gear should be
broken in with a racing grade mineral oil. 5. If equipped, the oil filter bypass should be eliminated. 6. Monitor the gear wear after the break-in period for several hours. Check the gear for
proper mesh, tooth alignment and for excessive tooth wear. Additional Information
1. The distributor advance is pre-set at the factory at 21º. An optional advance kit (Part #120-8464) is available to change the advance setting.
ADJUSTING THE SLIP COLLAR
1. Loosen the slip collar and insert the distributor into the engine until it bottoms out against the oil pump drive.
2. After it bottoms out, raise the distributor 0.010" - 0.030" then slide the slip collar down into position and tighten it.
CHECKING GEAR MESHIt is recommended to check for proper gear mesh between the cam gear and distributor gear. To do this, coat the distributor gear with moly grease and install the distributor. Next, crank the engine and pull the distributor out. The gear pattern will show on the grease. The proper mesh will leave an even pattern in the middle of the gear. Adjust the slip collar to obtain the correct mesh.
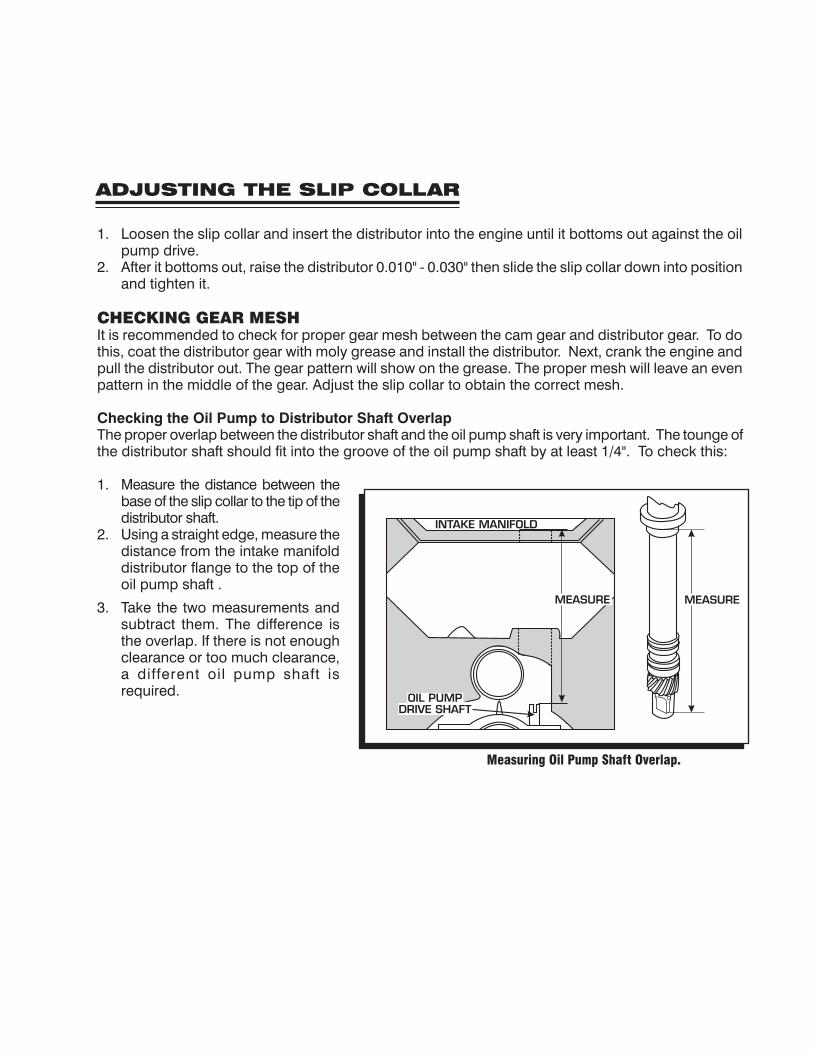
Checking the Oil Pump to Distributor Shaft OverlapThe proper overlap between the distributor shaft and the oil pump shaft is very important. The tounge of the distributor shaft should fit into the groove of the oil pump shaft by at least 1/4". To check this:
1. Measure the distance between the base of the slip collar to the tip of the distributor shaft.
2. Using a straight edge, measure the distance from the intake manifold distributor flange to the top of the oil pump shaft .
3. Take the two measurements and subtract them. The difference is the overlap. If there is not enough clearance or too much clearance, a different oil pump shaft is required.
Measuring Oil Pump Shaft Overlap.
1. Remove the existing distributor cap without disconnecting any of the spark plug wires.
2. With the cap off, crank the engine until the rotor is aimed at a fixed point on the engine or firewall. Note this position by making a mark (Figure 8).
3. Place the distributor cap back on and note which plug wire the rotor is pointing to. MARK THE SPARK PLUG WIRES and remove the distributor cap.
4. Disconnect the wiring from the distributor.5. Loosen the distributor hold down clamp
and slide the clamp out of the way. 6. Lift the distributor out of the engine. Note
that the rotor rotates as you lift the distributor out. This is due to the helical cut gear and should be taken into consideration when installing the new distributor.
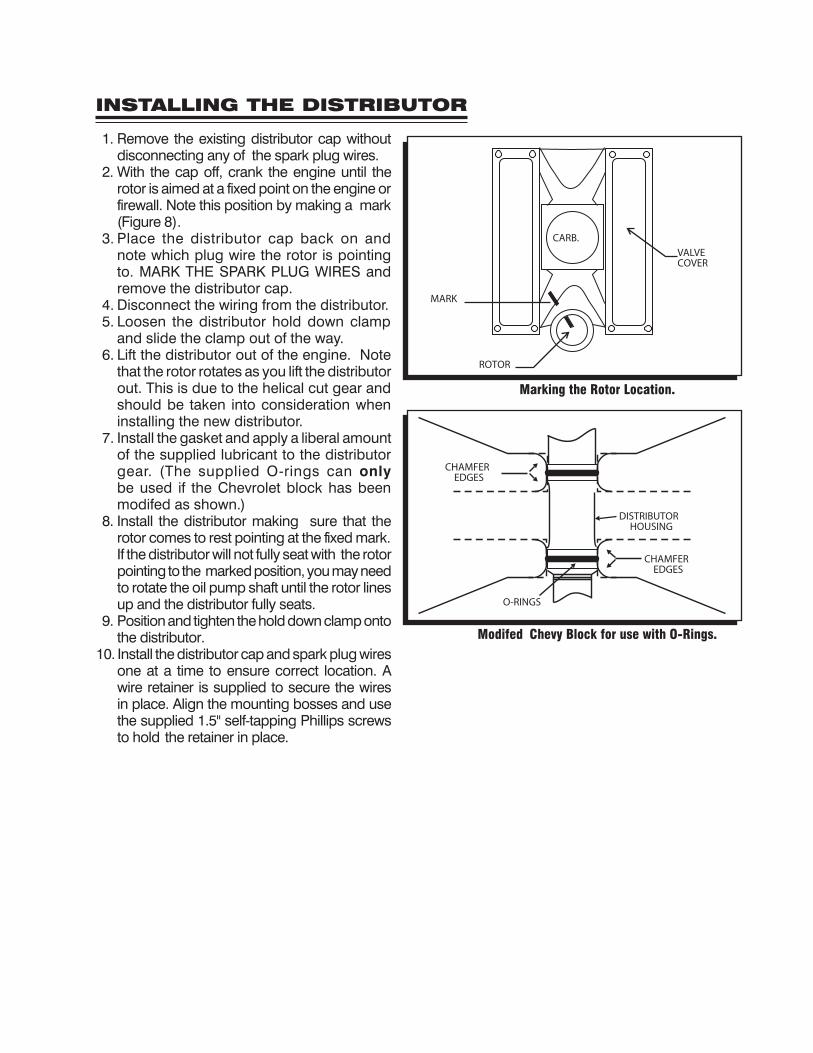
7. Install the gasket and apply a liberal amount of the supplied lubricant to the distributor gear. (The supplied O-rings can only be used if the Chevrolet block has been modifed as shown.)
8. Install the distributor making sure that the rotor comes to rest pointing at the fixed mark. If the distributor will not fully seat with the rotor pointing to the marked position, you may need to rotate the oil pump shaft until the rotor lines up and the distributor fully seats.
9. Position and tighten the hold down clamp onto the distributor.
10. Install the distributor cap and spark plug wires one at a time to ensure correct location. A wire retainer is supplied to secure the wires in place. Align the mounting bosses and use the supplied 1.5" self-tapping Phillips screws to hold the retainer in place.
Marking the Rotor Location.
INSTALLING THE DISTRIBUTOR
Modifed Chevy Block for use with O-Rings.
CHAMFEREDGES
CHAMFEREDGES
DISTRIBUTORHOUSING
O-RINGS
ROTOR
MARK
VALVECOVER
CARB.
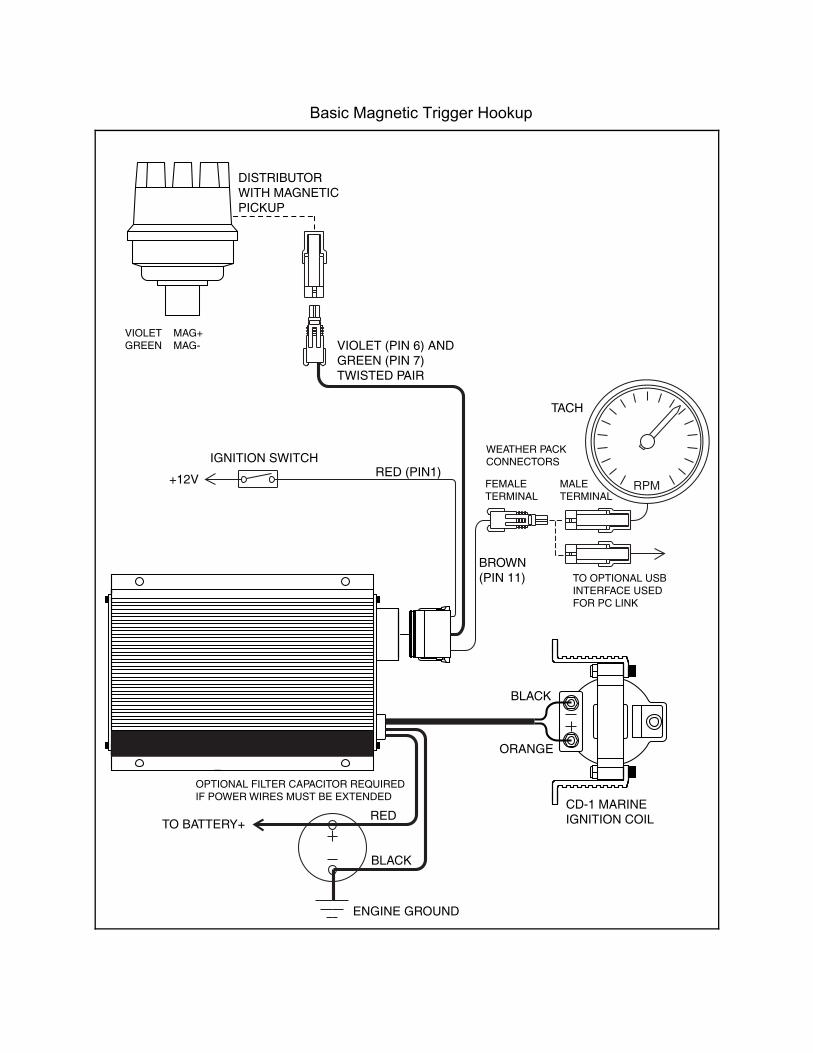
Basic Magnetic Trigger Hookup
1
RPM
DISTRIBUTOR WITH MAGNETICPICKUP
+12V
IGNITION SWITCHRED (PIN1)
VIOLET (PIN 6) ANDGREEN (PIN 7)TWISTED PAIR
BROWN(PIN 11)
FEMALETERMINAL
MALETERMINAL
WEATHER PACKCONNECTORS
TO OPTIONAL USBINTERFACE USEDFOR PC LINK
CD-1 MARINEIGNITION COIL
BLACK
ORANGE
ENGINE GROUND
TO BATTERY+RED
BLACK
OPTIONAL FILTER CAPACITOR REQUIREDIF POWER WIRES MUST BE EXTENDED
TACH
VIOLET MAG+GREEN MAG-

Wiring to an MSD 6M-2 Ignition Control.
WARNING: High voltage is present on the coil terminals. Do not touch the terminals or coil tower when the engine is cranking or running.