Embed Size (px)
Citation preview
BikeStudio Software Manual
Version 1.4
(the manual is always outdated…, click on this version history to see the latest changes)
(also check out the companion HTML 5 app online @ www.allyoucanbike.com using Android, iPhone or browser, to link your rider profile by adding your email in the rider contact email inside BikeStudio)

(c) 2015-2017 Michel Brazeau
2/41
Table of Contents1 What is BikeStudio?.................................................................................................................42 Is it really free?.........................................................................................................................43 Requirements...........................................................................................................................44 Installation................................................................................................................................5
4.1 Installing the software.......................................................................................................54.2 Installing VLC Media Player..............................................................................................54.3 Creating an online account...............................................................................................54.4 Downloading and imported a workout..............................................................................74.5 Downloading and imported a route...................................................................................7
5 Your first BikeStudio ride (without pedaling)............................................................................86 Your first BikeStudio workout (without pedaling)....................................................................117 Working with different interfaces............................................................................................14
7.1 ANT+ USB Receiver Stick..............................................................................................147.2 PowerCurve Sensor........................................................................................................157.3 Computrainer..................................................................................................................167.4 ANT+ Power meters........................................................................................................167.5 ANT+ Speed and Speed/Cadence sensors....................................................................177.6 ANT+ Heart rate – Power Pulse.....................................................................................187.7 Keyboard.........................................................................................................................187.8 Calibration procedure for speed to power sensors.........................................................197.9 Accuracy using virtual speed to power estimation..........................................................19
8 Riding.....................................................................................................................................218.1 The Video or Image View................................................................................................218.2 The Scoreboard..............................................................................................................218.3 The Global Map..............................................................................................................238.4 The Closeup Map............................................................................................................238.5 The Elevation Chart........................................................................................................248.6 Global Ride Settings.......................................................................................................24
8.6.1 Sprint and KOM points............................................................................................248.6.2 Scoreboard options.................................................................................................258.6.3 Drafting....................................................................................................................258.6.4 Display units............................................................................................................26
8.7 Ride Options...................................................................................................................268.7.1 Ride Type.................................................................................................................268.7.2 Road Surface...........................................................................................................278.7.3 Aerodynamic Position..............................................................................................278.7.4 Number of laps and starting point...........................................................................278.7.5 Video mode..............................................................................................................278.7.6 Regroup after sprints...............................................................................................278.7.7 Handicap mode.......................................................................................................288.7.8 Constant grade........................................................................................................288.7.9 Hide maps...............................................................................................................28
8.8 The Physics....................................................................................................................288.9 Password protecting online rides....................................................................................298.10 Ride Summary..............................................................................................................29
9 Workouts................................................................................................................................29
3/41
9.1 The Workout Segment....................................................................................................309.2 Global Workout Settings.................................................................................................31
9.2.1 Number of riders on Internet workouts....................................................................319.2.2 Units.........................................................................................................................319.2.3 Hide Cadence/Heart rate.........................................................................................31
9.3 Password protecting online workouts.............................................................................319.4 Workout Summary..........................................................................................................319.5 Creating your own workouts...........................................................................................329.6 Printing a workout to PDF...............................................................................................35
10 Power Profiles and Personal Bests......................................................................................3511 Data, Data, Data...................................................................................................................37
11.1 Workout Data................................................................................................................3711.2 Ride Data......................................................................................................................40
12 Large group version of BikeStudio.......................................................................................4013 Advance Topics....................................................................................................................40
13.1 Using an existing account setting email in settings......................................................4113.2 Automatic software update...........................................................................................4113.3 Assign ANT USB sticks automatically...........................................................................4113.4 Configuring SMTP server for group and gym version..................................................4113.5 FDTI serial chip set for Computrainer...........................................................................42
14 How to cheat on a ride (NOT!).............................................................................................4215 Submitting a workout to share with others...........................................................................4216 Submitting your video for a route.........................................................................................43
4/41
1 What is BikeStudio?• It is a comprehensive multi-rider training and riding software.
• It's for both serious athletes and for those who just want to make exercise fun.
• It uses a single computer for all riders in the same group! For example, you can have 8or more riders all connected to one computer on one huge screen.
• Riding and training across the Internet with anyone in the world!
2 Is it really free?• Yes, BikeStudio is completely free
3 Requirements• Microsoft Windows XP and higher.
• VLC Media Player for video ride mode, www.videolan.org.
• An Internet connection for online riding and workouts.
• On a Mac – you need Windows "inside your Mac". Boot Camp is preferred but recent Macs with VirtualBox (www.virtualbox.org) can work. For Techies only!
• ANT USB receiver stick. This must be version 2 of the Garmin ANT stick supporting 8 channels per stick. Sticks from Garmin, Suunto, and others will work fine.
• Supported bicycle connections• PowerCurve USB device (www.powercurvesensor.com)• PowerPulse – heart rate to watt estimator using an ANT+ heart rate strap• ANT+ Power meter• ANT+ Speed and Cadence• ANT+ Speed• Computrainer (www.racermateinc.com)
• The full list of stationary trainers that can be used with a PowerCurve Sensor or ANT+ speed sensors is here, www.powercurvesensor.com/cycling-trainer-power-curves.
4 Installation
4.1 Installing the software
BikeStudio is a portable application. BikeStudio will be installed in its folder and it will not store anything outside its folder. To uninstall everything, you simply delete the folder.
To install the program just download and execute the installation program BikeStudioSetup.exe from from www.powercurvesensor.com/bikestudio/
5/41
Do not install it in the “C:\Program Files” folder because on some Windows version the operating system will not allow creating files in the “Program Files” folder.
4.2 Installing VLC Media Player
To use BikeStudio for riding in video mode you need to install VLC media player from www.videolan.org. There is nothing special to configure other than install the 32 bit Windows version of VLC.
Note that you can use BikeStudio in still image mode for riding, but the view of the route will be a sequence of still images. This is a good option for slower computers.
4.3 Downloading and importing a workout
Before you can sweat it out with a BikeStudio workout you will need to download a workout and import it. Another option would be to first create a workout, but that's a later topic.
Simply head over to www.powercurvesensor.com/bikestudio/ and then choose your workout to download. Then from the main BikeStudio page, select Import workout. Then you select thefile with the '.work' extension to import it. Note that workouts may be a compressed in a "zipped" archived so they may need to be extracted first.
Note, a cool feature of BikeStudio that when you join an Internet workout, you do need to download it first, it will automatically be downloaded before you start the workout.
4.4 Downloading and importing a route
Routes for riding must be downloaded and imported before you can hit the road. Simply head over to www.powercurvesensor.com/bikestudio/ and then choose your route to download. Then from the main BikeStudio page, select Import route. Then you select the file with the '.bike' extension that you have downloaded to import it.
Note that some routes are available in low and high resolution. If you don't have too much space on your hard disk, use the low resolution version.
Another experimental option is to import a KML GPS file, and you will be able to use this routewith Google Street View Images. KML files are available from many cycling sites like www.mapmyride.com or from GPS devices.
5 Your first BikeStudio ride (without pedaling)3. The software is installed.2. You have downloaded and imported a route.1. GO. You want to see in action.
With BikeStudio you can use the keyboard mode to control the watts of a rider. This little tutorial will get you on a course quickly without even pedaling.
Here are the steps:
1.Click the Ride button from the main page
6/41
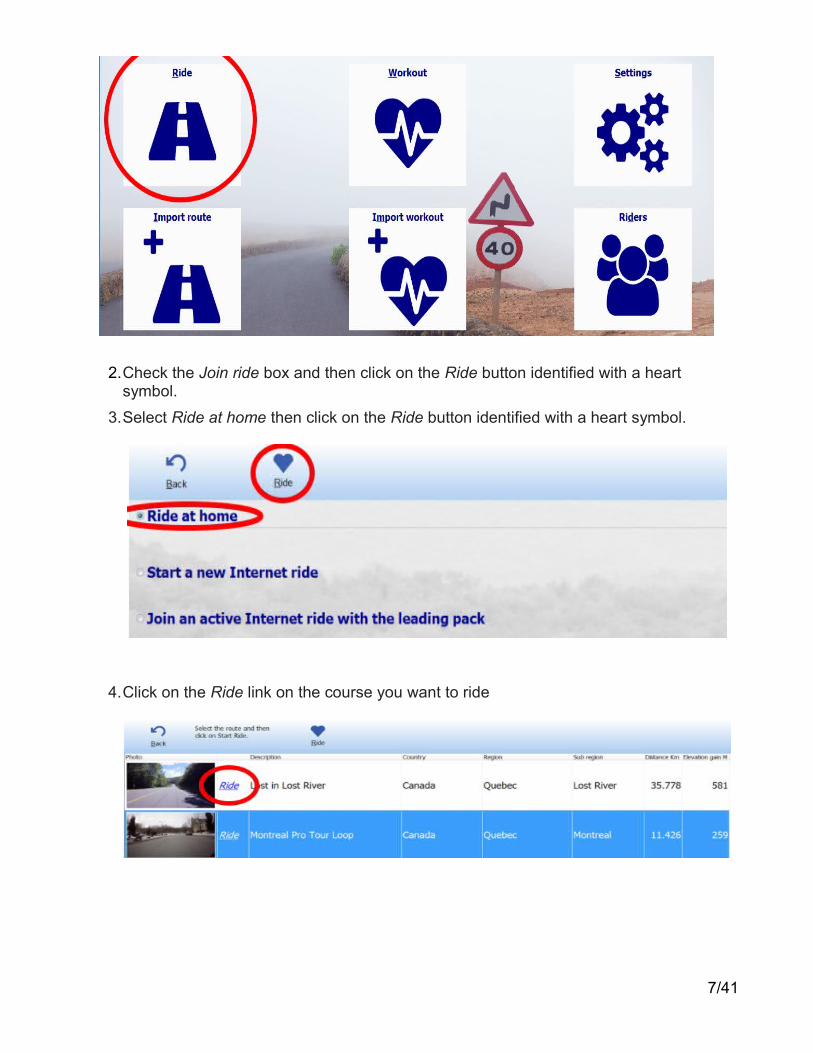
2.Check the Join ride box and then click on the Ride button identified with a heart symbol.
3.Select Ride at home then click on the Ride button identified with a heart symbol.
4.Click on the Ride link on the course you want to ride
7/41
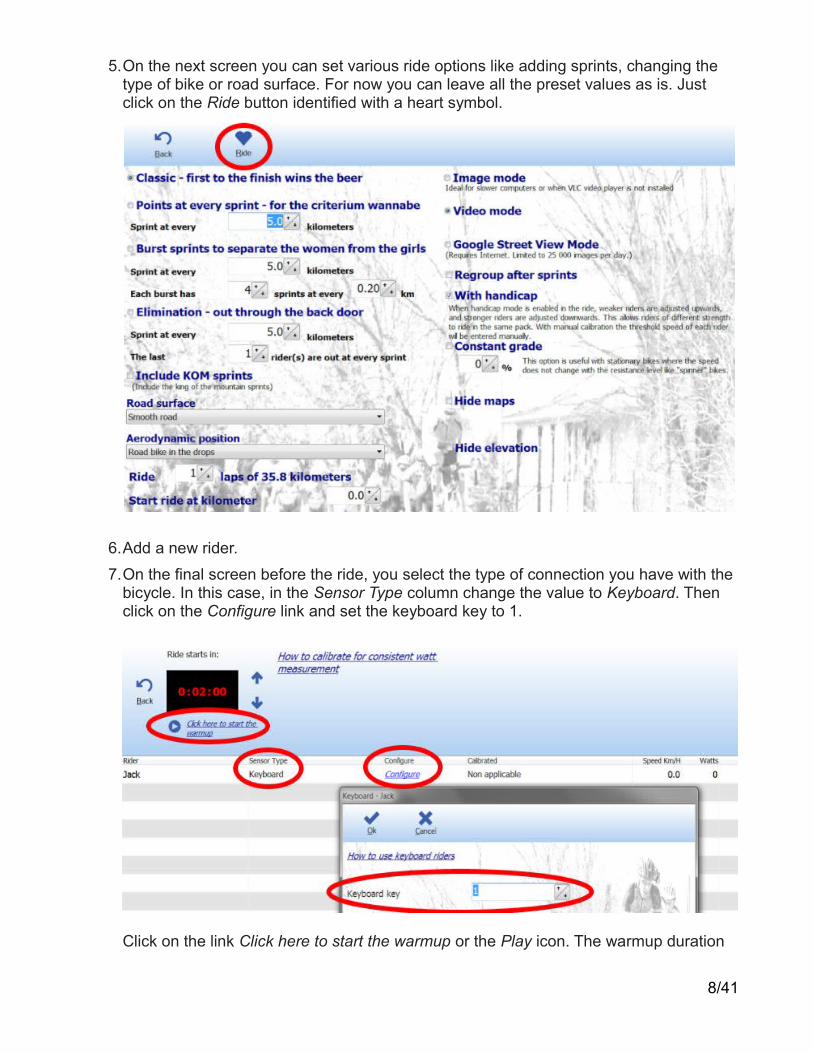
5.On the next screen you can set various ride options like adding sprints, changing the type of bike or road surface. For now you can leave all the preset values as is. Just click on the Ride button identified with a heart symbol.
6.Add a new rider.
7.On the final screen before the ride, you select the type of connection you have with the bicycle. In this case, in the Sensor Type column change the value to Keyboard. Then click on the Configure link and set the keyboard key to 1.
Click on the link Click here to start the warmup or the Play icon. The warmup duration
8/41
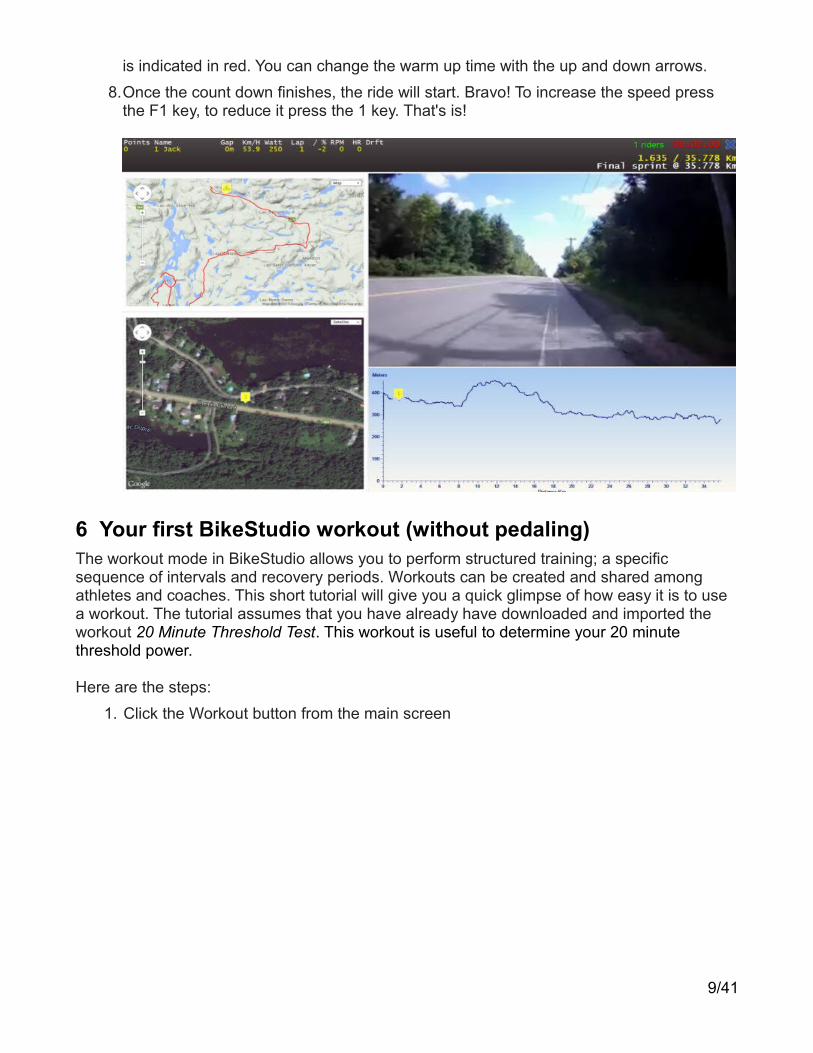
is indicated in red. You can change the warm up time with the up and down arrows.
8.Once the count down finishes, the ride will start. Bravo! To increase the speed press the F1 key, to reduce it press the 1 key. That's is!
6 Your first BikeStudio workout (without pedaling)The workout mode in BikeStudio allows you to perform structured training; a specific sequence of intervals and recovery periods. Workouts can be created and shared among athletes and coaches. This short tutorial will give you a quick glimpse of how easy it is to use a workout. The tutorial assumes that you have already have downloaded and imported the workout 20 Minute Threshold Test. This workout is useful to determine your 20 minute threshold power.
Here are the steps:
1. Click the Workout button from the main screen
9/41
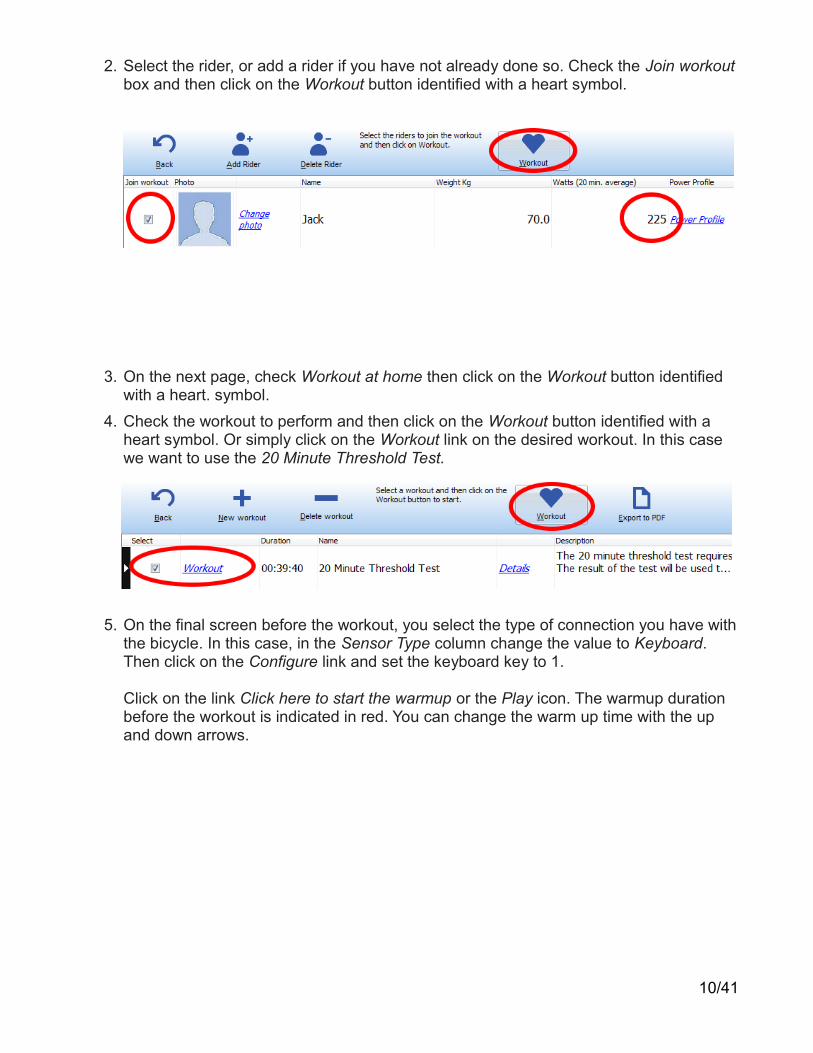
2. Select the rider, or add a rider if you have not already done so. Check the Join workoutbox and then click on the Workout button identified with a heart symbol.
3. On the next page, check Workout at home then click on the Workout button identified with a heart. symbol.
4. Check the workout to perform and then click on the Workout button identified with a heart symbol. Or simply click on the Workout link on the desired workout. In this case we want to use the 20 Minute Threshold Test.
5. On the final screen before the workout, you select the type of connection you have withthe bicycle. In this case, in the Sensor Type column change the value to Keyboard. Then click on the Configure link and set the keyboard key to 1.
Click on the link Click here to start the warmup or the Play icon. The warmup duration before the workout is indicated in red. You can change the warm up time with the up and down arrows.
10/41
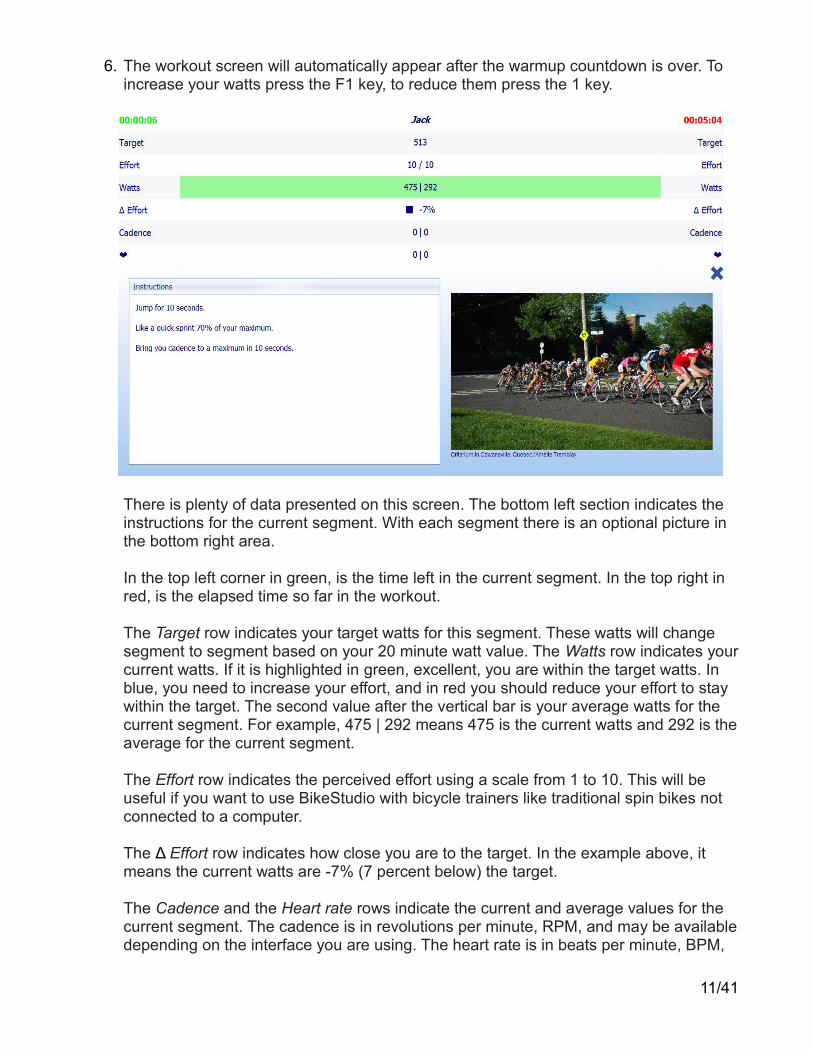
6. The workout screen will automatically appear after the warmup countdown is over. To increase your watts press the F1 key, to reduce them press the 1 key.
There is plenty of data presented on this screen. The bottom left section indicates the instructions for the current segment. With each segment there is an optional picture in the bottom right area.
In the top left corner in green, is the time left in the current segment. In the top right in red, is the elapsed time so far in the workout.
The Target row indicates your target watts for this segment. These watts will change segment to segment based on your 20 minute watt value. The Watts row indicates yourcurrent watts. If it is highlighted in green, excellent, you are within the target watts. In blue, you need to increase your effort, and in red you should reduce your effort to stay within the target. The second value after the vertical bar is your average watts for the current segment. For example, 475 | 292 means 475 is the current watts and 292 is theaverage for the current segment.
The Effort row indicates the perceived effort using a scale from 1 to 10. This will be useful if you want to use BikeStudio with bicycle trainers like traditional spin bikes not connected to a computer.
The Δ Effort row indicates how close you are to the target. In the example above, it means the current watts are -7% (7 percent below) the target.
The Cadence and the Heart rate rows indicate the current and average values for the current segment. The cadence is in revolutions per minute, RPM, and may be availabledepending on the interface you are using. The heart rate is in beats per minute, BPM,
11/41
and is usually obtained from an ANT+ heart rate strap, or directly from a Computrainer device. The current value is on the left of the vertical bar |, and the average for the current segment on on the right of the vertical bar.
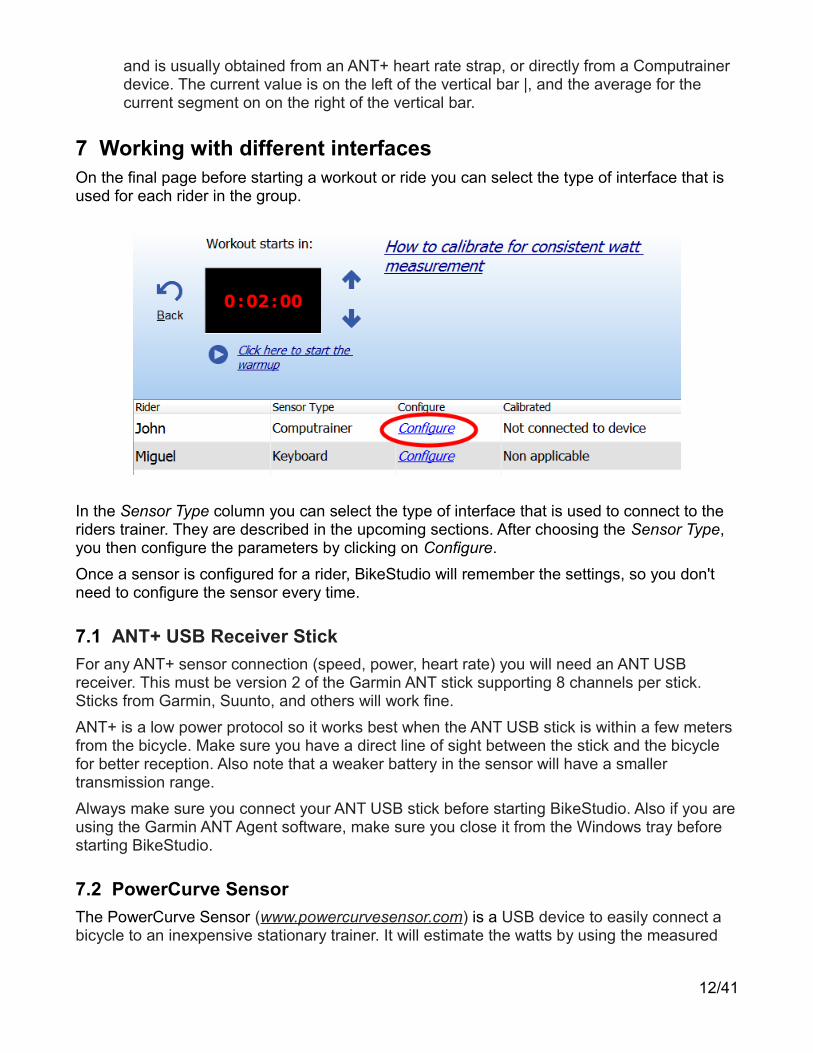
7 Working with different interfacesOn the final page before starting a workout or ride you can select the type of interface that is used for each rider in the group.
In the Sensor Type column you can select the type of interface that is used to connect to the riders trainer. They are described in the upcoming sections. After choosing the Sensor Type, you then configure the parameters by clicking on Configure.
Once a sensor is configured for a rider, BikeStudio will remember the settings, so you don't need to configure the sensor every time.
7.1 ANT+ USB Receiver Stick
For any ANT+ sensor connection (speed, power, heart rate) you will need an ANT USB receiver. This must be version 2 of the Garmin ANT stick supporting 8 channels per stick. Sticks from Garmin, Suunto, and others will work fine.
ANT+ is a low power protocol so it works best when the ANT USB stick is within a few meters from the bicycle. Make sure you have a direct line of sight between the stick and the bicycle for better reception. Also note that a weaker battery in the sensor will have a smaller transmission range.
Always make sure you connect your ANT USB stick before starting BikeStudio. Also if you areusing the Garmin ANT Agent software, make sure you close it from the Windows tray before starting BikeStudio.
7.2 PowerCurve Sensor
The PowerCurve Sensor (www.powercurvesensor.com) is a USB device to easily connect a bicycle to an inexpensive stationary trainer. It will estimate the watts by using the measured
12/41
power curve of the stationary trainer. The advantages are:
• Inexpensive and simple. USB powered, no batteries required, no signal interference.
• Easy to use for non techies.
• Easy to use in multi-rider setups with the 8 bicycle version available.
• Can be used for speed and cadence.
• Supports many different stationary trainers. See this list, www.powercurvesensor.com/cycling-trainer-power-curves
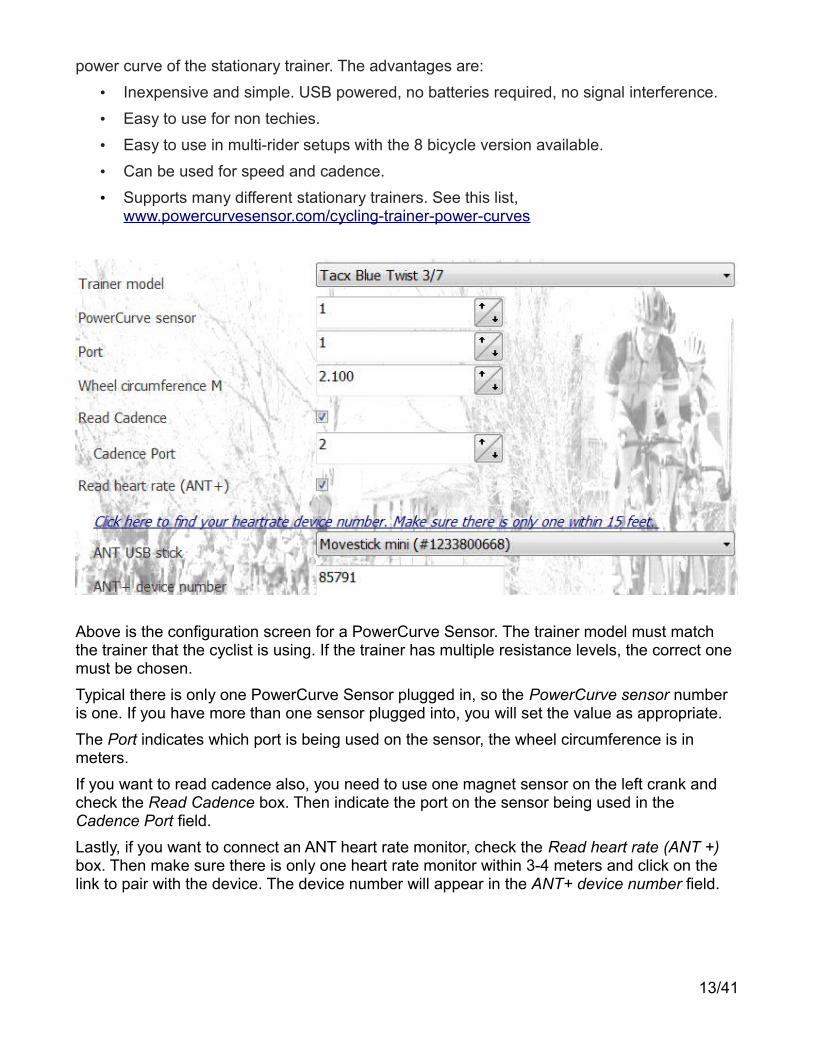
Above is the configuration screen for a PowerCurve Sensor. The trainer model must match the trainer that the cyclist is using. If the trainer has multiple resistance levels, the correct one must be chosen.
Typical there is only one PowerCurve Sensor plugged in, so the PowerCurve sensor number is one. If you have more than one sensor plugged into, you will set the value as appropriate.
The Port indicates which port is being used on the sensor, the wheel circumference is in meters.
If you want to read cadence also, you need to use one magnet sensor on the left crank and check the Read Cadence box. Then indicate the port on the sensor being used in the Cadence Port field.
Lastly, if you want to connect an ANT heart rate monitor, check the Read heart rate (ANT +) box. Then make sure there is only one heart rate monitor within 3-4 meters and click on the link to pair with the device. The device number will appear in the ANT+ device number field.
13/41
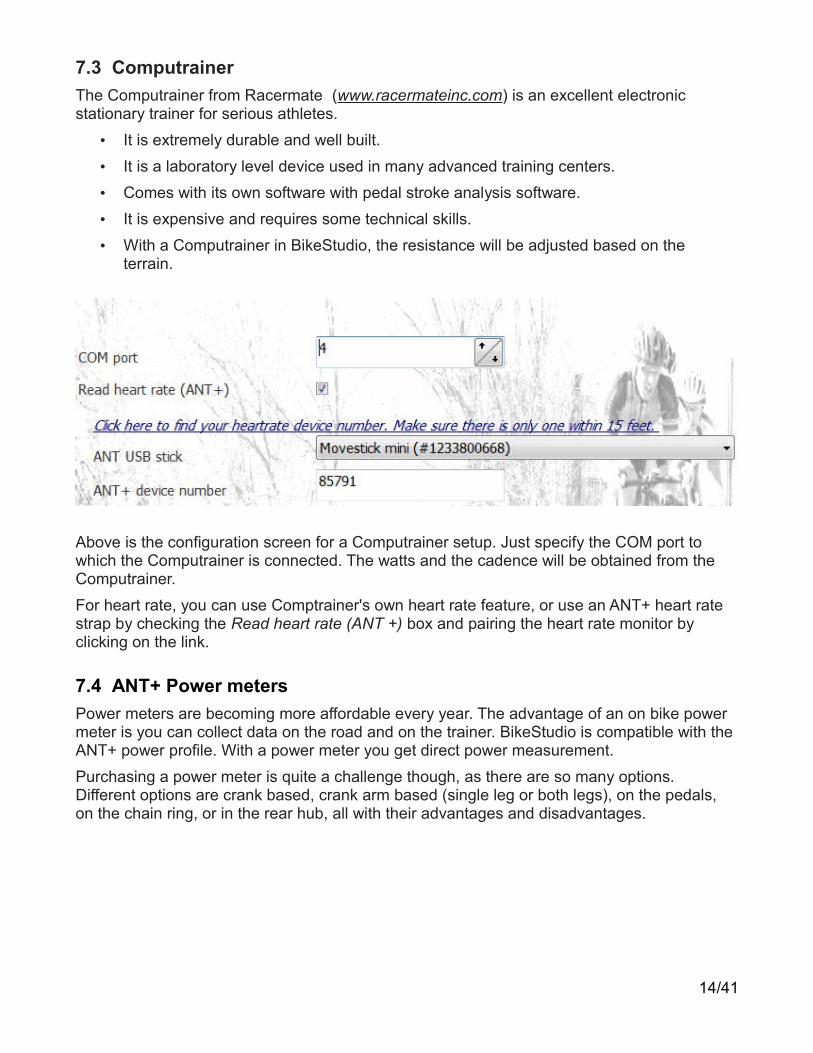
7.3 Computrainer
The Computrainer from Racermate (www.racermateinc.com) is an excellent electronic stationary trainer for serious athletes.
• It is extremely durable and well built.
• It is a laboratory level device used in many advanced training centers.
• Comes with its own software with pedal stroke analysis software.
• It is expensive and requires some technical skills.
• With a Computrainer in BikeStudio, the resistance will be adjusted based on the terrain.
Above is the configuration screen for a Computrainer setup. Just specify the COM port to which the Computrainer is connected. The watts and the cadence will be obtained from the Computrainer.
For heart rate, you can use Comptrainer's own heart rate feature, or use an ANT+ heart rate strap by checking the Read heart rate (ANT +) box and pairing the heart rate monitor by clicking on the link.
7.4 ANT+ Power meters
Power meters are becoming more affordable every year. The advantage of an on bike power meter is you can collect data on the road and on the trainer. BikeStudio is compatible with the ANT+ power profile. With a power meter you get direct power measurement.
Purchasing a power meter is quite a challenge though, as there are so many options. Different options are crank based, crank arm based (single leg or both legs), on the pedals, on the chain ring, or in the rear hub, all with their advantages and disadvantages.
14/41
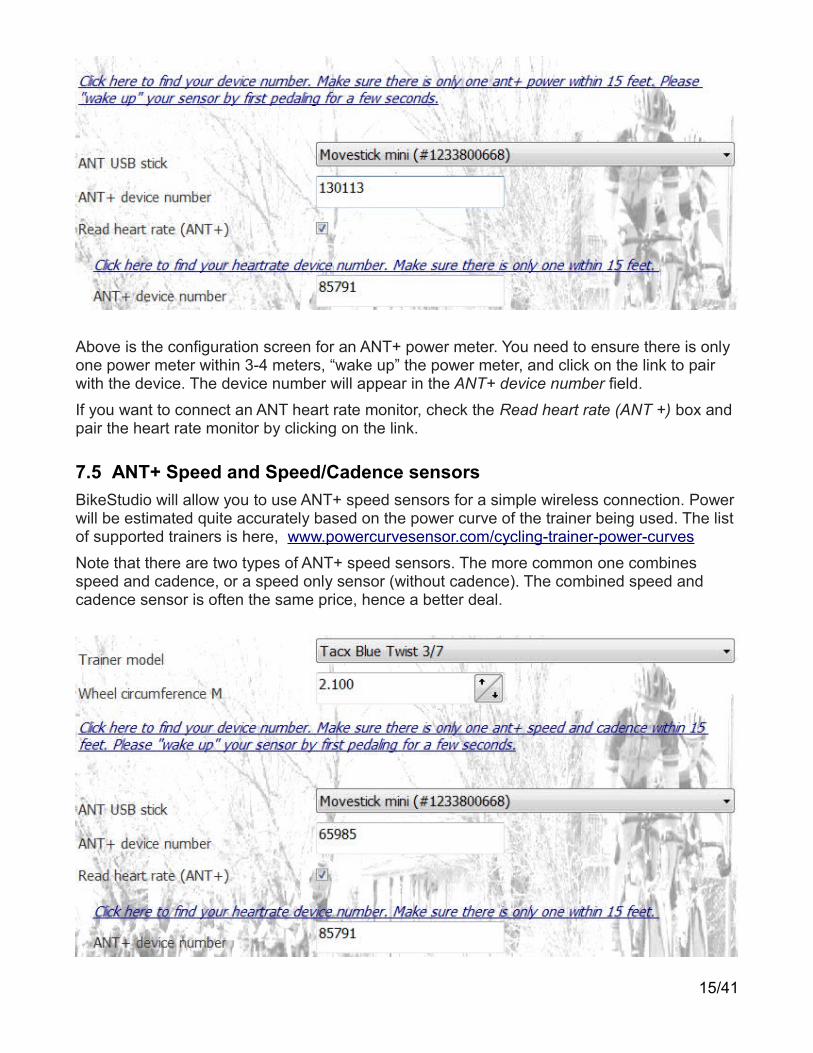
Above is the configuration screen for an ANT+ power meter. You need to ensure there is only one power meter within 3-4 meters, “wake up” the power meter, and click on the link to pair with the device. The device number will appear in the ANT+ device number field.
If you want to connect an ANT heart rate monitor, check the Read heart rate (ANT +) box and pair the heart rate monitor by clicking on the link.
7.5 ANT+ Speed and Speed/Cadence sensors
BikeStudio will allow you to use ANT+ speed sensors for a simple wireless connection. Powerwill be estimated quite accurately based on the power curve of the trainer being used. The listof supported trainers is here, www.powercurvesensor.com/cycling-trainer-power-curves
Note that there are two types of ANT+ speed sensors. The more common one combines speed and cadence, or a speed only sensor (without cadence). The combined speed and cadence sensor is often the same price, hence a better deal.
15/41
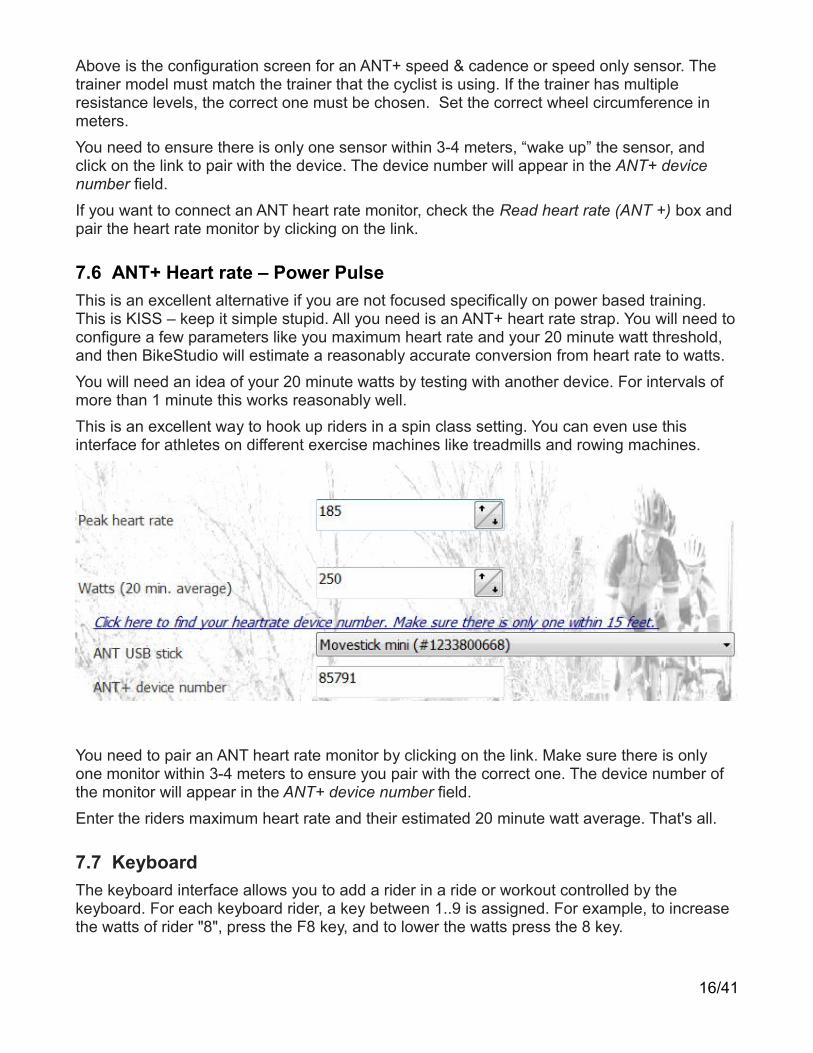
Above is the configuration screen for an ANT+ speed & cadence or speed only sensor. The trainer model must match the trainer that the cyclist is using. If the trainer has multiple resistance levels, the correct one must be chosen. Set the correct wheel circumference in meters.
You need to ensure there is only one sensor within 3-4 meters, “wake up” the sensor, and click on the link to pair with the device. The device number will appear in the ANT+ device number field.
If you want to connect an ANT heart rate monitor, check the Read heart rate (ANT +) box and pair the heart rate monitor by clicking on the link.
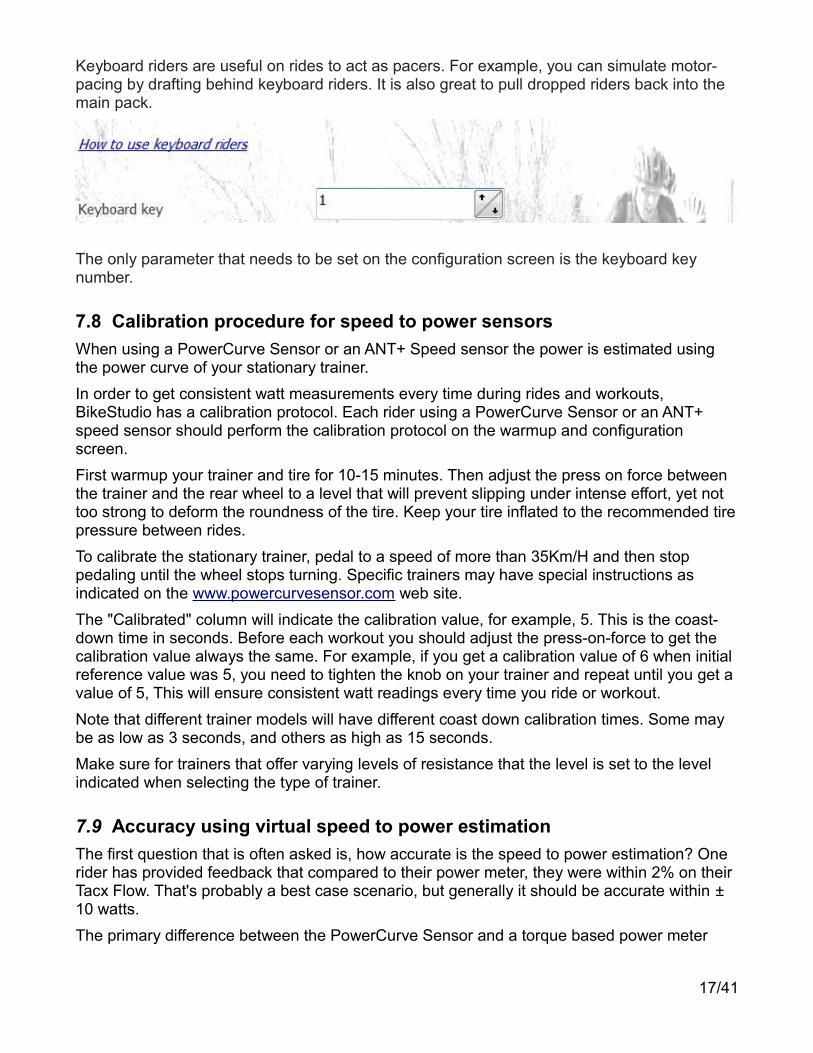
7.6 ANT+ Heart rate – Power Pulse
This is an excellent alternative if you are not focused specifically on power based training. This is KISS – keep it simple stupid. All you need is an ANT+ heart rate strap. You will need toconfigure a few parameters like you maximum heart rate and your 20 minute watt threshold, and then BikeStudio will estimate a reasonably accurate conversion from heart rate to watts.
You will need an idea of your 20 minute watts by testing with another device. For intervals of more than 1 minute this works reasonably well.
This is an excellent way to hook up riders in a spin class setting. You can even use this interface for athletes on different exercise machines like treadmills and rowing machines.
You need to pair an ANT heart rate monitor by clicking on the link. Make sure there is only one monitor within 3-4 meters to ensure you pair with the correct one. The device number of the monitor will appear in the ANT+ device number field.
Enter the riders maximum heart rate and their estimated 20 minute watt average. That's all.
7.7 Keyboard
The keyboard interface allows you to add a rider in a ride or workout controlled by the keyboard. For each keyboard rider, a key between 1..9 is assigned. For example, to increase the watts of rider "8", press the F8 key, and to lower the watts press the 8 key.
16/41
Keyboard riders are useful on rides to act as pacers. For example, you can simulate motor-pacing by drafting behind keyboard riders. It is also great to pull dropped riders back into the main pack.
The only parameter that needs to be set on the configuration screen is the keyboard key number.
7.8 Calibration procedure for speed to power sensors
When using a PowerCurve Sensor or an ANT+ Speed sensor the power is estimated using the power curve of your stationary trainer.
In order to get consistent watt measurements every time during rides and workouts, BikeStudio has a calibration protocol. Each rider using a PowerCurve Sensor or an ANT+ speed sensor should perform the calibration protocol on the warmup and configuration screen.
First warmup your trainer and tire for 10-15 minutes. Then adjust the press on force between the trainer and the rear wheel to a level that will prevent slipping under intense effort, yet not too strong to deform the roundness of the tire. Keep your tire inflated to the recommended tirepressure between rides.
To calibrate the stationary trainer, pedal to a speed of more than 35Km/H and then stop pedaling until the wheel stops turning. Specific trainers may have special instructions as indicated on the www.powercurvesensor.com web site.
The "Calibrated" column will indicate the calibration value, for example, 5. This is the coast-down time in seconds. Before each workout you should adjust the press-on-force to get the calibration value always the same. For example, if you get a calibration value of 6 when initial reference value was 5, you need to tighten the knob on your trainer and repeat until you get a value of 5, This will ensure consistent watt readings every time you ride or workout.
Note that different trainer models will have different coast down calibration times. Some may be as low as 3 seconds, and others as high as 15 seconds.
Make sure for trainers that offer varying levels of resistance that the level is set to the level indicated when selecting the type of trainer.
7.9 Accuracy using virtual speed to power estimation
The first question that is often asked is, how accurate is the speed to power estimation? One rider has provided feedback that compared to their power meter, they were within 2% on their Tacx Flow. That's probably a best case scenario, but generally it should be accurate within ± 10 watts.
The primary difference between the PowerCurve Sensor and a torque based power meter
17/41
(like a PowerTap or cranked based power meters) is that the PowerCurve Sensor determines the power from the speed to power relationship of a specific trainer.
There are a few considerations to be aware with the speed to power relationship (the “power curve”) of a trainer:
• The calibration consistency.
• The “drift” as heat builds up and dissipates.
• The manufacturing differences between trainers of the same model.
• Sudden acceleration and deceleration.
There is really no effective way to determine if the press-on-force you are using is exactly the same as when the trainer was measured. In previous versions of BikeStudio, calibration was done by setting the press-on-force to have an exact coast down time for each trainer. After lots of testing, this proved to not be possible because the weight in different rear wheels, and the difference in rolling resistance in different tires had too much variability. It should be reasonably close and by always using the same calibration coast time time, you will get consistent and repeatable power readings.
The “drift” as heat builds up can change the power curve itself. First, it is important before calibration to warmup the trainer and tire for 10-15 minutes. For wind trainers, resistance is created from the ambient air, so there should be very little heat drift. Magnetic trainers also don’t seem to change their resistance too much with changes in temperature.
Fluid trainers could be affected by drift. First, the oil in the resistance unit will heat up and could make it less dense. Some manufacturers like Kinetic say that their oil is very “stable” at all temperatures. This has been confirmed as the power curve measured for their fluid trainer was extremely close to their published power curve.
Fluid trainers tend to have “fins” to dissipate heat so the temperature should average out during the workout. So secondly, the type of workout, for example, steady state time trial or short sprints could also affect the oil temperature. Your average power too will also affect how much heat is generated.
Tire heat could also affect the resistance with the trainer roller. This stresses the importance again to warmup the tire and trainer before calibration. Different tire compounds will have different characteristics.
Trainers of the same model may have different physical characteristics. For example, who knows if a manufacturer has used the same oil in every production run? There might be slight changes in dimensions, magnet placement, bearings, etc…
Fast changes in speed will affect the watt readings. For example, if you do a 10 second sprint from a standing start, the power will be much lower using a speed to power approach than using a real power meter. That is because the watts are determined from the speed, not the torque. On a 10 second standing start sprint, the maximum speed is not reached at maximumtorque. It’s like having a lag, where the speed lags the torque. On the other hand, if you do anall out sprint from a rolling start at 30Km/H, the watts will be accurate because the maximum watts will occur very close to the maximum speed. During deceleration, the reverse happens, the watts will be higher and lag the speed. The average watts will remain accurate because
18/41
for each acceleration, there will be a deceleration. What goes up must come down.
Even with all these considerations, during tests when comparing with a PowerTap, the discrepancy was usually very small, around 5-10 watts. In summary, don’t forget to warmup the trainer and tire. If the resistance unit generates heat, placing a small fan on the unit could keep things more consistent.
8 RidingYou probably have enjoyed riding a bike since you were a child. BikeStudio aims to make riding a bike on a machine almost as real as the real thing. It adds physical characteristics likeup hills, down hills, drafting, aerodynamics, weight, and rolling resistance, and maybe even wind in the future.
If you have raced bikes before, you may be a prime chaser during criteriums or you like to rack up KOM points. BikeStudio adds that too!
And something you can't do a bike outside without an electric motor, is to give you an extra push to keep up with your friends. BikeStudio has a finely tuned handicap mode that allows weaker and strong riders to effectively ride at the same strength! This is great to ride in a packand have everyone take pulls even if they are of completely different abilities in real life.
The ride screen is made up of multiple sections:
• The Video or Image View
• The Scoreboard
• The Global Map
• The Closeup Map
• The Elevation chart
Those sections can be re-sized by dragging with the mouse on the borders of those sections.
Note that if there is no Internet access available both maps will be hidden.
8.1 The Video or Image View
The video of image view shows the current route from the point of view of the leader. The leader has the camera. The video is played back at the same speed as the leader.
The video was filmed with a live action camera, so of course, when the video has real cyclists,the video will show the point of view of the camera at the time the video was recorded.
When using image mode for slower computers, instead of a smooth video, the course will be displayed as a sequence of images. It certain won't be smooth but it will allow you to use an older single core computer if the video mode is choppy.
8.2 The Scoreboard
The Scoreboard displays live ride information. The riders are listed in order of the current position in the ride. The first rider is displayed in traditional yellow. A rider in green means she is drafting (more on that shortly), and a rider in white is neither drafting nor leading.
19/41
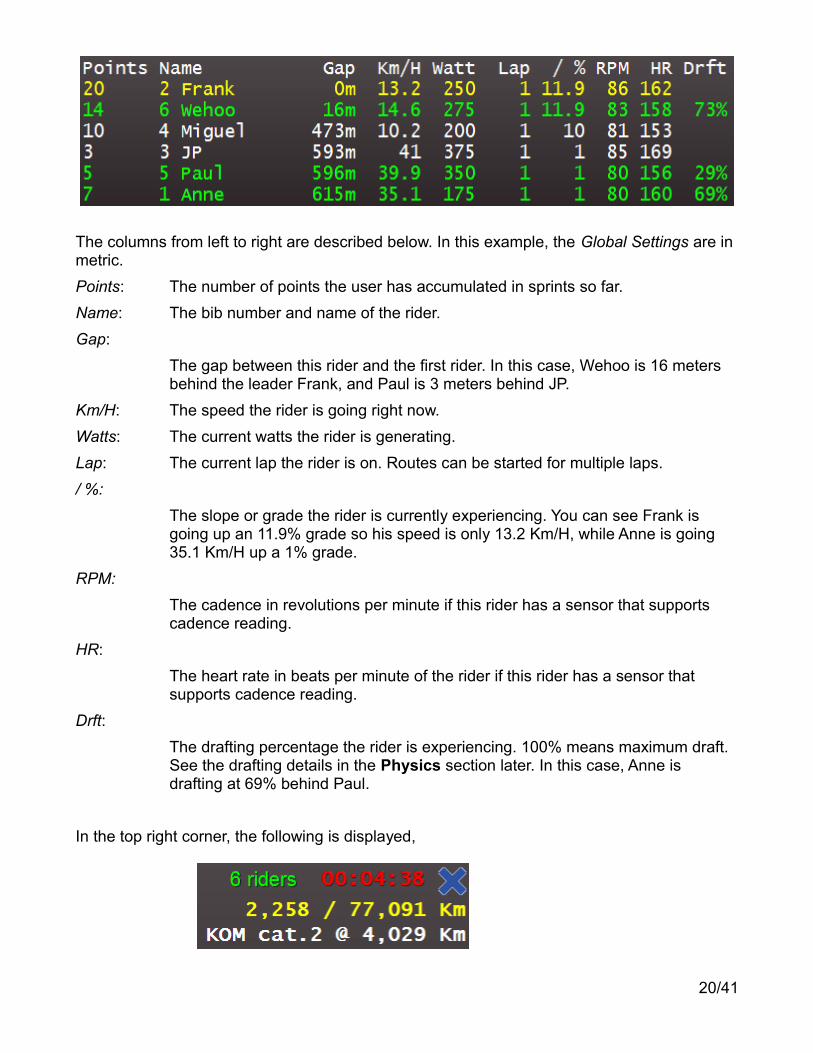
The columns from left to right are described below. In this example, the Global Settings are in metric.
Points: The number of points the user has accumulated in sprints so far.
Name: The bib number and name of the rider.
Gap:
The gap between this rider and the first rider. In this case, Wehoo is 16 meters behind the leader Frank, and Paul is 3 meters behind JP.
Km/H: The speed the rider is going right now.
Watts: The current watts the rider is generating.
Lap: The current lap the rider is on. Routes can be started for multiple laps.
/ %:
The slope or grade the rider is currently experiencing. You can see Frank is going up an 11.9% grade so his speed is only 13.2 Km/H, while Anne is going 35.1 Km/H up a 1% grade.
RPM:
The cadence in revolutions per minute if this rider has a sensor that supports cadence reading.
HR:
The heart rate in beats per minute of the rider if this rider has a sensor that supports cadence reading.
Drft:
The drafting percentage the rider is experiencing. 100% means maximum draft. See the drafting details in the Physics section later. In this case, Anne is drafting at 69% behind Paul.
In the top right corner, the following is displayed,
20/41

indicating there are current 6 riders in the ride. During Internet rides, this will change as riders come and go.
The leading cyclist is at kilometer 2.258 out of a total of 77.091.
And the last line indicates the next sprint – a King of mountain category 2 at kilometer 4,029. Climbs are ranked from category 1-5 with 1 being the hardest.
8.3 The Global Map
The global map shows the leader on the complete map for the route.
8.4 The Closeup Map
21/41

A nice option while riding is to expand this window by dragging its borders to make it bigger and to increase the zoom. This way you can see the leading riders relative to each other.
8.5 The Elevation Chart
The elevation chart shows the route elevation profile and the riders currently riding identified by their bib number. If the ride has been started for more than one lap, only one lap of the elevation profile is displayed.
8.6 Global Ride Settings
On the main Settings page you will find global ride settings. They are described below.
8.6.1 Sprint and KOM points
To make the rides in BikeStudio more engaging, points will be attributed for sprints that can be configured before starting a ride. For each sprint, the winner gets the maximum points allocated and then the following places get a smaller ratio. The next point allocation is 30% of the previous. For example, if the maximum points on the final sprint is 100, the break down will be:
1st 100
2nd 70
3rd 49
4th 34
22/41
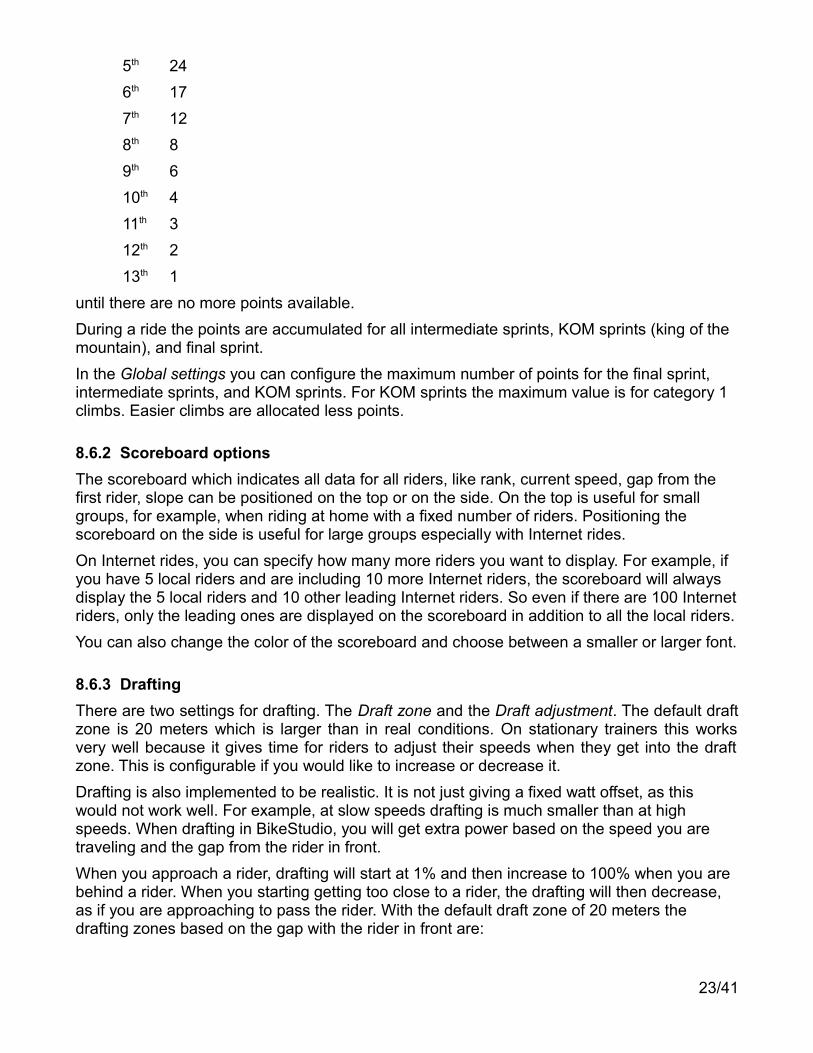
5th 24
6th 17
7th 12
8th 8
9th 6
10th 4
11th 3
12th 2
13th 1
until there are no more points available.
During a ride the points are accumulated for all intermediate sprints, KOM sprints (king of the mountain), and final sprint.
In the Global settings you can configure the maximum number of points for the final sprint, intermediate sprints, and KOM sprints. For KOM sprints the maximum value is for category 1 climbs. Easier climbs are allocated less points.
8.6.2 Scoreboard options
The scoreboard which indicates all data for all riders, like rank, current speed, gap from the first rider, slope can be positioned on the top or on the side. On the top is useful for small groups, for example, when riding at home with a fixed number of riders. Positioning the scoreboard on the side is useful for large groups especially with Internet rides.
On Internet rides, you can specify how many more riders you want to display. For example, if you have 5 local riders and are including 10 more Internet riders, the scoreboard will always display the 5 local riders and 10 other leading Internet riders. So even if there are 100 Internetriders, only the leading ones are displayed on the scoreboard in addition to all the local riders.
You can also change the color of the scoreboard and choose between a smaller or larger font.
8.6.3 Drafting
There are two settings for drafting. The Draft zone and the Draft adjustment. The default draftzone is 20 meters which is larger than in real conditions. On stationary trainers this worksvery well because it gives time for riders to adjust their speeds when they get into the draftzone. This is configurable if you would like to increase or decrease it.
Drafting is also implemented to be realistic. It is not just giving a fixed watt offset, as this would not work well. For example, at slow speeds drafting is much smaller than at high speeds. When drafting in BikeStudio, you will get extra power based on the speed you are traveling and the gap from the rider in front.
When you approach a rider, drafting will start at 1% and then increase to 100% when you are behind a rider. When you starting getting too close to a rider, the drafting will then decrease, as if you are approaching to pass the rider. With the default draft zone of 20 meters the drafting zones based on the gap with the rider in front are:
23/41

• 20 to 15 meters, 0% to 100% draft.
• 15 to 5 meters, 100% draft. That is the sweet spot to get maximum draft.
• 5 to 0 meters, 100% to 0% draft
The Draft adjustment is an option to allow changing the draft level. The choices are, more, normal, or less. For example, if you want to encourage breakaways use the less option. If youwan to make it harder for riders to escape a group use the setting more.
8.6.4 Display units
Most of the world measures speed and distance using metric units, but if you are metric challenged you can switch to imperial units in the Global Settings.
8.7 Ride OptionsEvery time a new ride is started there are many options that can be set for the ride. For convenience, BikeStudio will remember the options that were used in the previous ride. Here is the page that shows the ride options:
8.7.1 Ride Type
There are 4 types of rides/races for the points classification:
• Classic – a single sprint at the end of the ride.• Points race with multiple sprints at every N kilometers.• Burst sprints are multiple groups of sprints. For example, every 16 kilometers, 4 sprints
200 meters apart. These are tough sprints to sustain. This type of race also motivates
24/41
solo breakaways.• Elimination race – sprint at regular intervals and it is the last N riders that are
eliminated at every sprint. Eliminated riders will continue in the ride but will be indicatedas "striked" out. The winner is the rider to finish first on the last sprint when all other riders have been eliminated.
Points for KOM (king of the mountain) sprints can optional be included in any type of ride. Note that KOM sprints are fixed in each ride, and some rides do not have KOM points.
8.7.2 Road Surface
You can choose the type of road surface for the ride. This will apply to the entire ride. The choices include, Track, Smooth road, Rough Pavement, Cobbles, Gravel, and Medium hard soil. The rolling resistance to compute the virtual speed will be based on this road surface. See more information in the Physics section later in this document.
8.7.3 Aerodynamic Position
You can choose the type of bicycle and position that will be applied to the entire ride. The choices include, recumbent, time trial, road bike in drops, road bike hands on top, XC mountain bike, and City bike. Each bike determines a different aerodynamic coefficient that will be used to compute the virtual speed. See more information in the Physics section later in this document.
8.7.4 Number of laps and starting point.
In the Ride Options you will be able to set the number of laps to be ridden. The lap distance for the chosen ride is also indicated.
The starting point of the ride can also be changed.
8.7.5 Video mode
Video mode will give the best riding experience in BikeStudio. This requires the VLC Media Player to be installed. See the earlier installation section for more information. The video will be played back at the speed of the leading rider in the ride. Occasionally if there is a large discrepancy between the rider speed and the speed at which the video was recorded, the video will resynchronized automatically to the proper location on the course.
If the video playback is a choppy on slower computers, Image mode can be used instead. In image mode, the ride will be displayed as a sequence of images.
An experimental feature is the Google Street View Mode. This mode requires an Internet connection. Note that Google has a quota per day for street view images. You can also importGPS KML files to be used with this mode. See more information in the earlier section Downloading and importing a route.
8.7.6 Regroup after sprints
A nice option to keep all riders in a group ride motivated is to regroup all riders after each sprint. When this option is activated, after each sprint all riders will be regrouped together. So you can take it easy or take a bathroom break and know that after the next sprint you will be
25/41

back in the pack.
8.7.7 Handicap mode
When handicap mode is enabled in the ride, weaker riders are adjusted upwards, and stronger riders are adjusted downwards. This allows riders of different strength to ride in the same pack.
The adjustment uses a complex algorithm based on the 20 minute threshold watts entered foreach rider. In handicapped mode, weaker riders will have higher virtual speeds than stronger riders for the same watts.
8.7.8 Constant grade
With this option you can set a constant grade for an entire ride.
8.7.9 Hide maps
There are also options to hide the maps and the elevation profile, if you prefer a simple display with only a scoreboard and a video.
8.8 The Physics
The first thing you may notice in a BikeStudio ride, is that the speed of your rear wheel will notmatch the speed indicated in BikeStudio. That is normal, because BikeStudio will recompute a virtual speed based on the watts you are generating.
For example, if you are climbing a 10% grade, your wheel speed may be 45 Km/H to generate 300 watts, but the virtual speed may be 15 Km/H as it would be on a real hill. When going down a hill, you will notice that you can stop pedaling and you will still be advancing in BikeStudio. Just like when coasting down a hill.
The riding in BikeStudio is a virtual bike simulation based on complex mathematics. The primary factors affecting a riders speed are weight of the rider and bike, the slope, aerodynamics, and rolling resistance.
BikeStudio will consider all those parameters in the equation. For instance, heavier riders will climb slower than lighter riders for the same watts, just like smaller riders will be more aerodynamic then larger riders.
If you are interested in the mathematics, head over to, http://en.wikipedia.org/wiki/Bicycle_performance.
As seen in the Ride Options in a previous section, the aerodynamic position and road surface is configurable.
Currently the following are fixed in BikeStudio when it comes to calculating speed from power:
• The air density is 1.17 kg/m3
• The wind is always 0 Km/H• Drive train efficiency at 95%
Future versions of BikeStudio may get even more elaborate by having different options for theabove, but since those parameters are of lesser importance and affect all riders the same
26/41
way, at the moment they all use the fix values above.
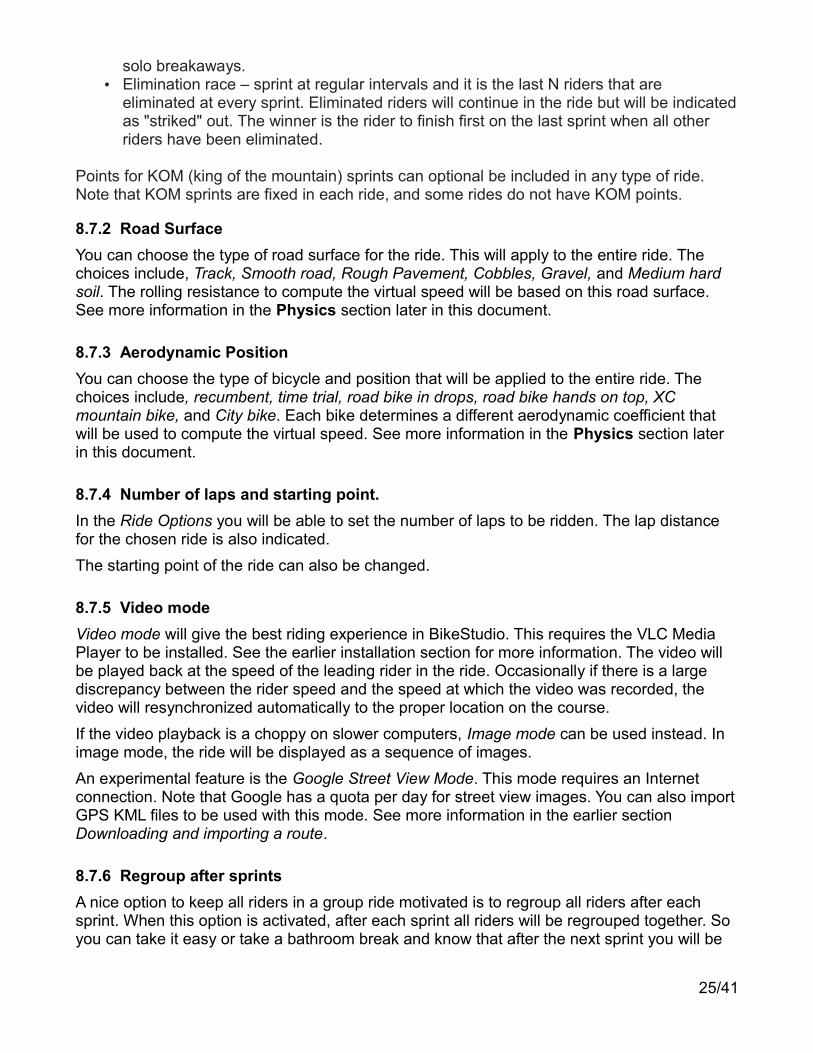
8.9 Password protecting online rides
When you start an Internet ride you can specify a password to make the ride private. Other riders who want to join the ride will require the password. This is handy to create private team or club rides.
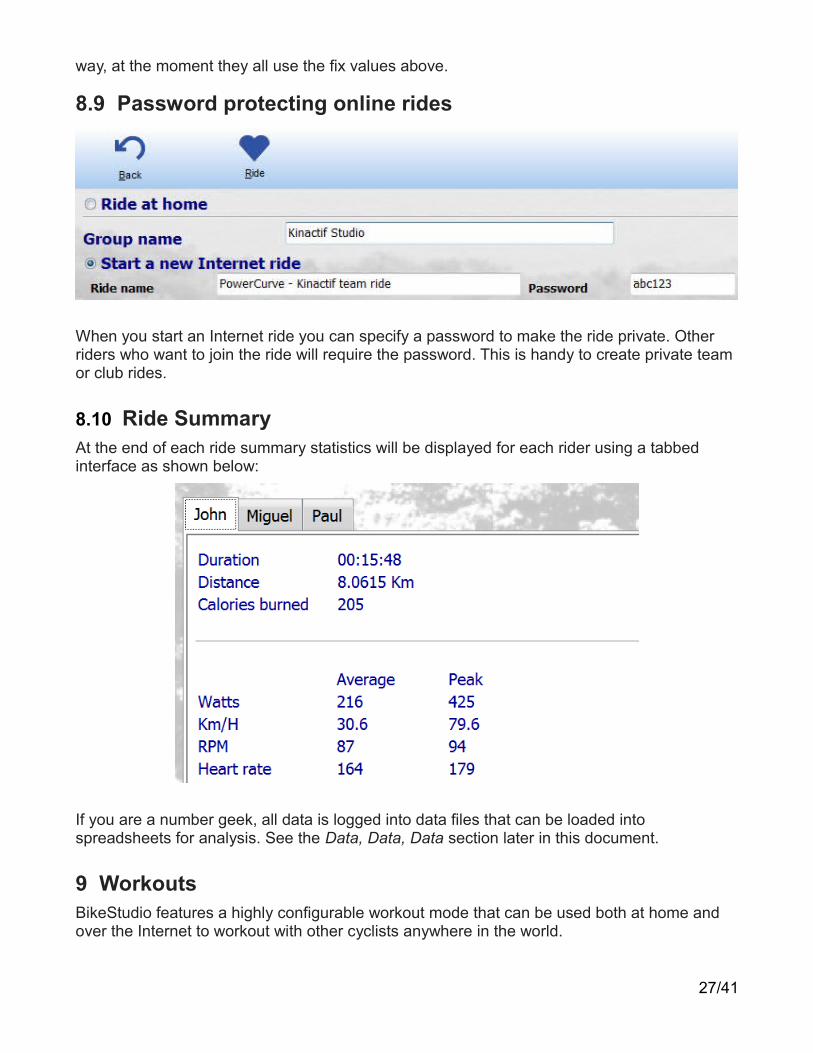
8.10 Ride SummaryAt the end of each ride summary statistics will be displayed for each rider using a tabbed interface as shown below:
If you are a number geek, all data is logged into data files that can be loaded into spreadsheets for analysis. See the Data, Data, Data section later in this document.
9 WorkoutsBikeStudio features a highly configurable workout mode that can be used both at home and over the Internet to workout with other cyclists anywhere in the world.
27/41
A workout in essence is quite simple. It a sequence of segments where the intensity of each segment is predefined in order to develop specific energy production systems in your body. Inother words, interval training with structured intervals.
The workouts in BikeStudio are defined as a percentage of the rider's functional power threshold or FTP. It is defined as “the highest mean average power or pace you can maintain for one hour”. A good protocol to estimate your FTP is to take your 20 minute average and multiple it by 0.95. The "20 Minute Threshold Test" available from www.allyoucanbike.com is a convenient way to determine your FTP.
With BikeStudio you can access a workout using any of the following:
• Download and import a workout. Many workouts are available from www.allyoucanbike.com, but you and also save and share workouts with others.
• Just join an Internet workout. The workout will automatically be downloaded from the server for the duration of the workout.
• Create your own workout from scratch.
If you are serious about improving your cycling it is certainly worth the effort to educate yourself on the fundamentals of cycling training and create workouts that will be adapted to your level, goals, and progression. Working with an experienced coach that explains the purpose and reasoning behind each workout will give you a good grasp if you later want to create your own workouts.
Before you move on, please read the previous section, Your first BikeStudio workout as an introduction to the workout mode.
9.1 The Workout Segment
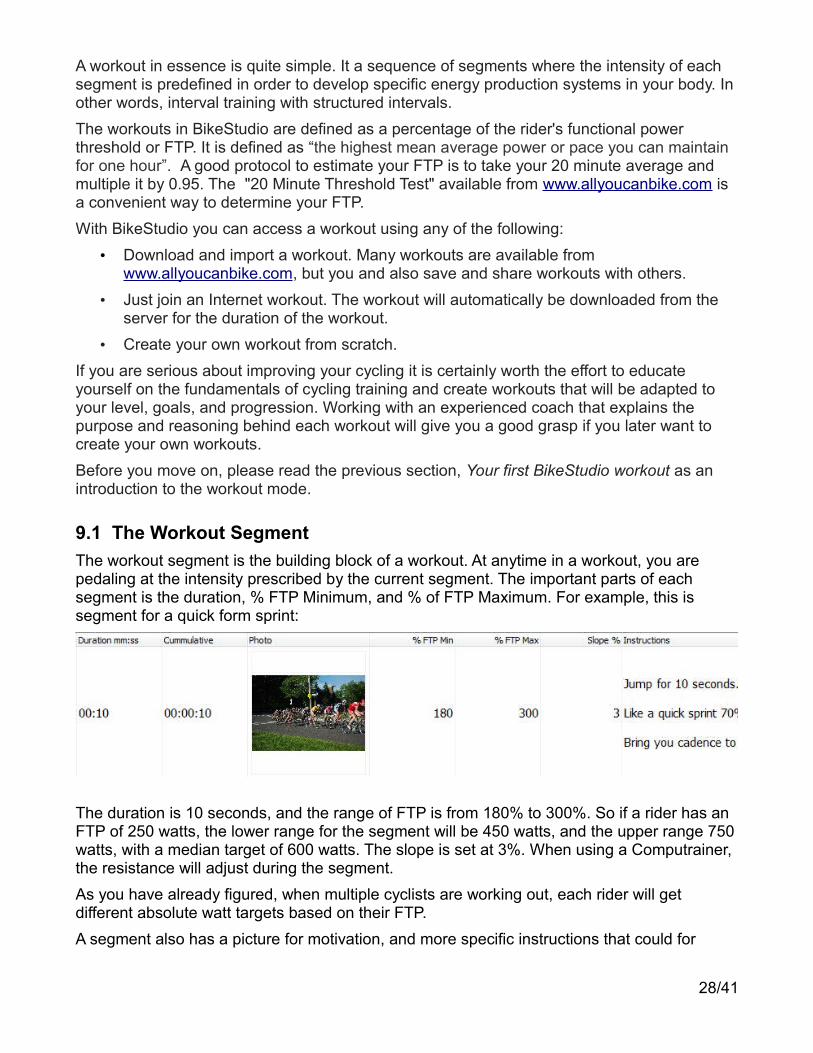
The workout segment is the building block of a workout. At anytime in a workout, you are pedaling at the intensity prescribed by the current segment. The important parts of each segment is the duration, % FTP Minimum, and % of FTP Maximum. For example, this is segment for a quick form sprint:
The duration is 10 seconds, and the range of FTP is from 180% to 300%. So if a rider has an FTP of 250 watts, the lower range for the segment will be 450 watts, and the upper range 750watts, with a median target of 600 watts. The slope is set at 3%. When using a Computrainer, the resistance will adjust during the segment.
As you have already figured, when multiple cyclists are working out, each rider will get different absolute watt targets based on their FTP.
A segment also has a picture for motivation, and more specific instructions that could for
28/41
example, indicate the position on the bike, or pacing guidelines for that segment.
9.2 Global Workout Settings
On the main Settings page you will find global workout settings. They are described below.
9.2.1 Number of riders on Internet workouts
During workouts each rider is displayed in their own column. So depending on the width of your screen, you will want to limit the number of riders being displayed so the data for each rider is visible. You can configure the maximum number of riders during Internet workouts in the Global Settings.
9.2.2 Units
In workout mode and ride mode, the display unit, imperial or metric can be chosen.
9.2.3 Hide Cadence/Heart rate
If you are not working with a device that has cadence you can remove the cadence information from the workout screen. If you do not have a heart rate device, you can also hidethe heart rate information from the workout screen too.
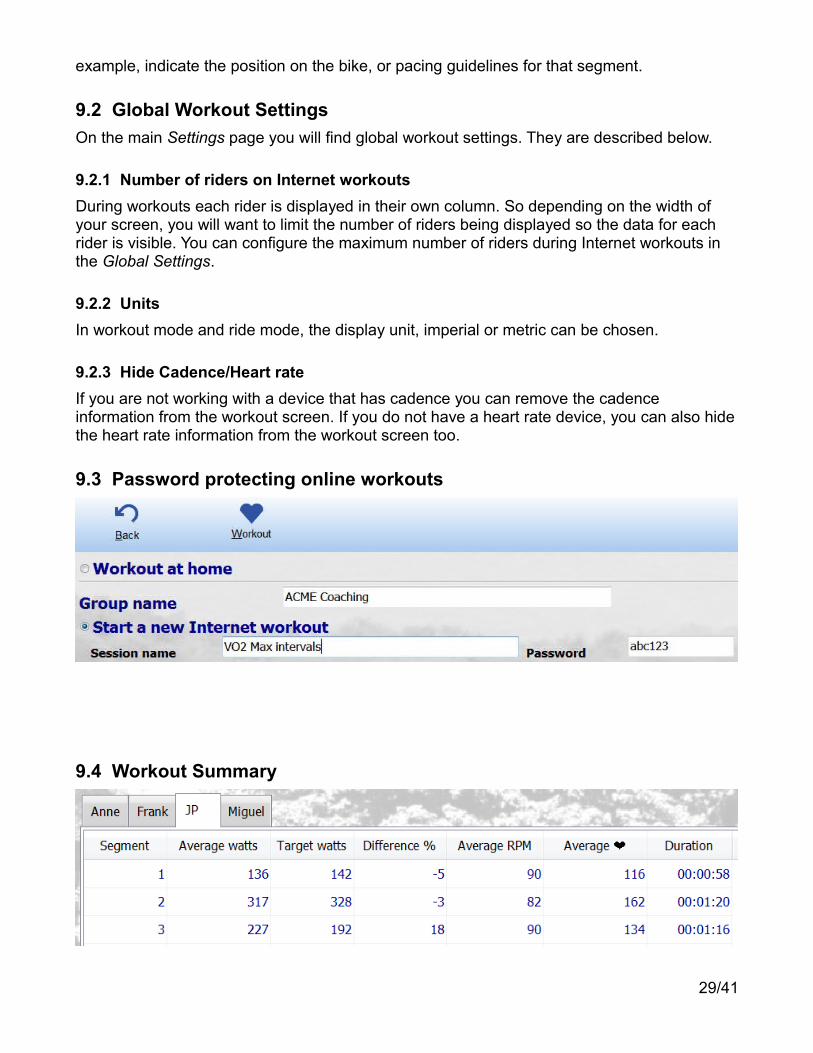
9.3 Password protecting online workouts
9.4 Workout Summary
29/41
After a workout, in a tabbed interface with each rider, a workout summary will be displayed. Inthe simple example above, you can see the statistics for each segment. It shows the cyclist's average watts compared to the target watts for each segment, and the percentage difference between the actual and the target. You can also see the average cadence and heart rate for each segment. Complete statistics that can be analyzed in spreadsheets are also available. More details in a later section.
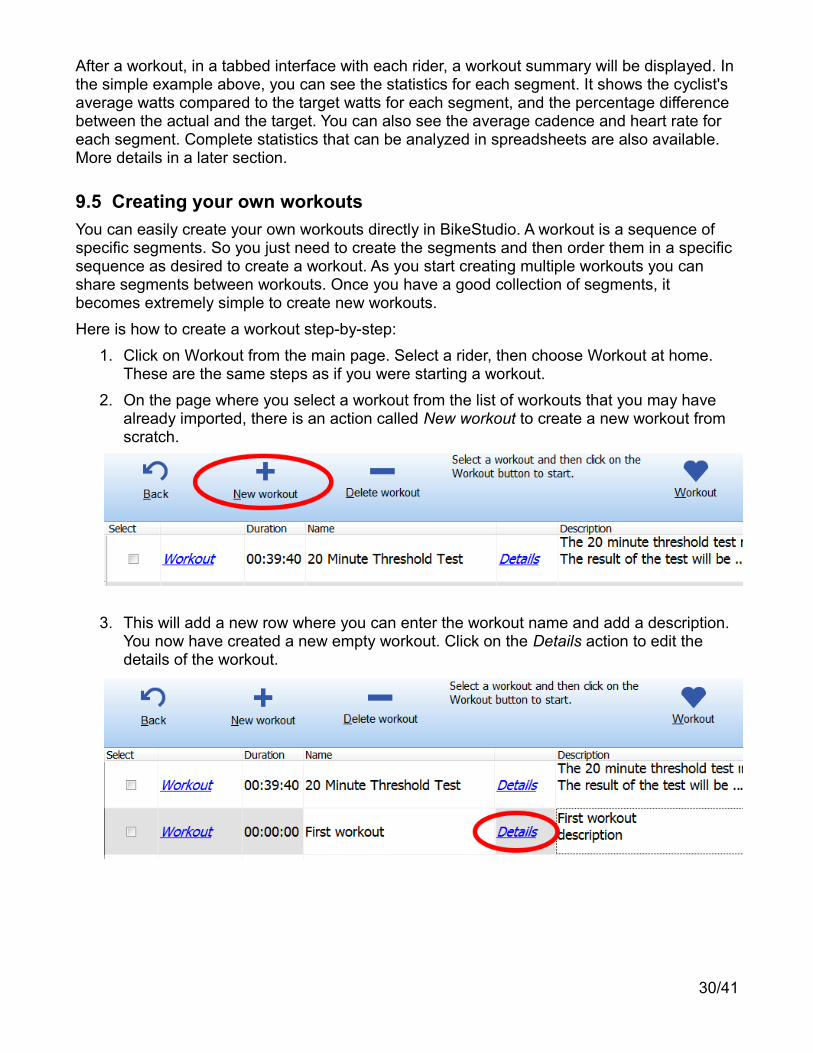
9.5 Creating your own workouts
You can easily create your own workouts directly in BikeStudio. A workout is a sequence of specific segments. So you just need to create the segments and then order them in a specific sequence as desired to create a workout. As you start creating multiple workouts you can share segments between workouts. Once you have a good collection of segments, it becomes extremely simple to create new workouts.
Here is how to create a workout step-by-step:
1. Click on Workout from the main page. Select a rider, then choose Workout at home. These are the same steps as if you were starting a workout.
2. On the page where you select a workout from the list of workouts that you may have already imported, there is an action called New workout to create a new workout from scratch.
3. This will add a new row where you can enter the workout name and add a description. You now have created a new empty workout. Click on the Details action to edit the details of the workout.
30/41
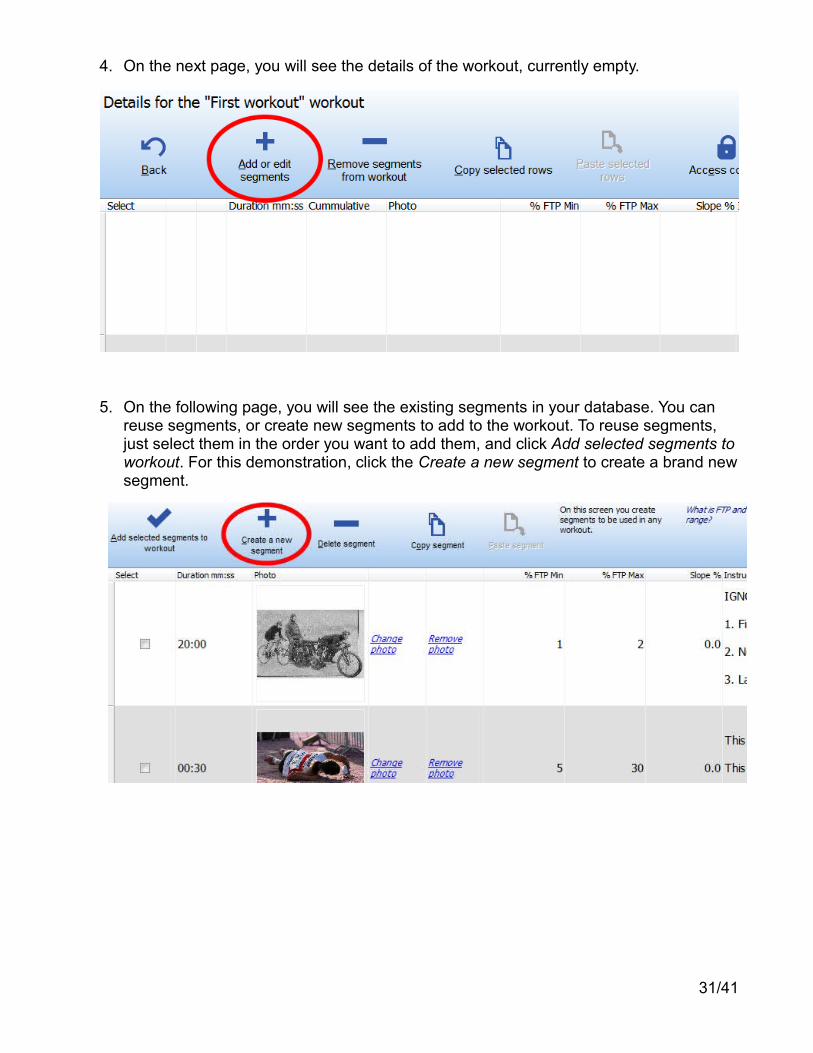
4. On the next page, you will see the details of the workout, currently empty.
5. On the following page, you will see the existing segments in your database. You can reuse segments, or create new segments to add to the workout. To reuse segments, just select them in the order you want to add them, and click Add selected segments toworkout. For this demonstration, click the Create a new segment to create a brand newsegment.
31/41
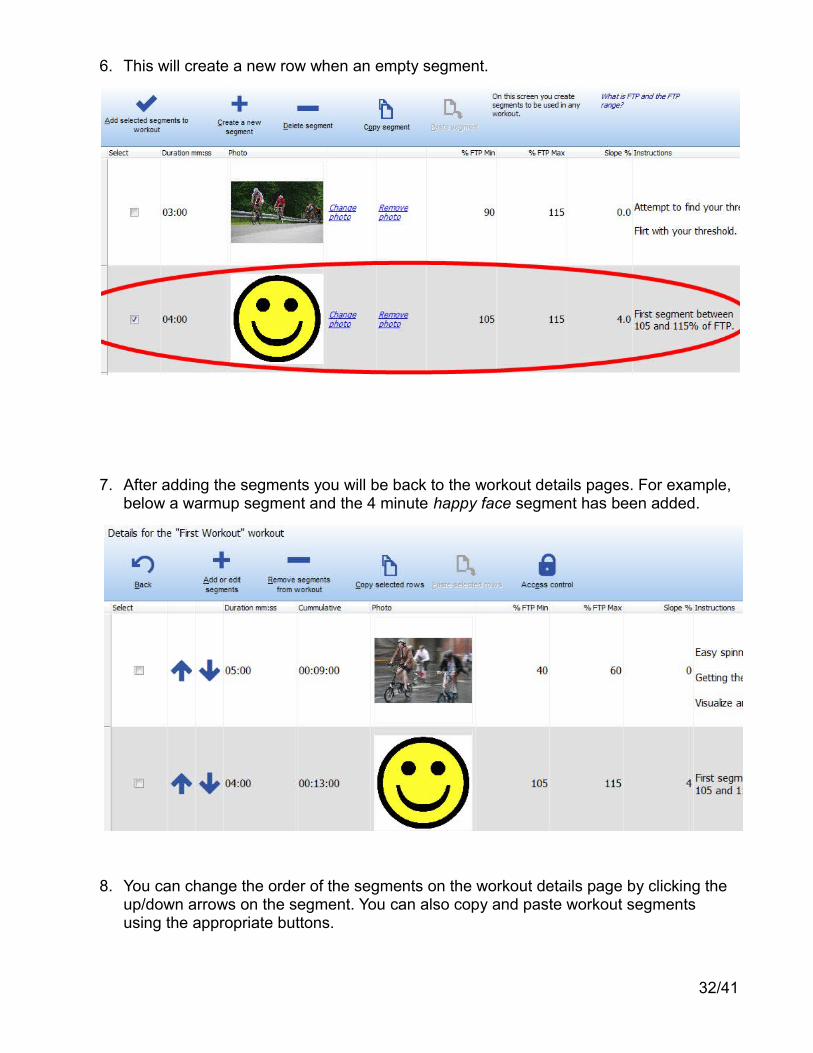
6. This will create a new row when an empty segment.
7. After adding the segments you will be back to the workout details pages. For example, below a warmup segment and the 4 minute happy face segment has been added.
8. You can change the order of the segments on the workout details page by clicking the up/down arrows on the segment. You can also copy and paste workout segments using the appropriate buttons.
32/41
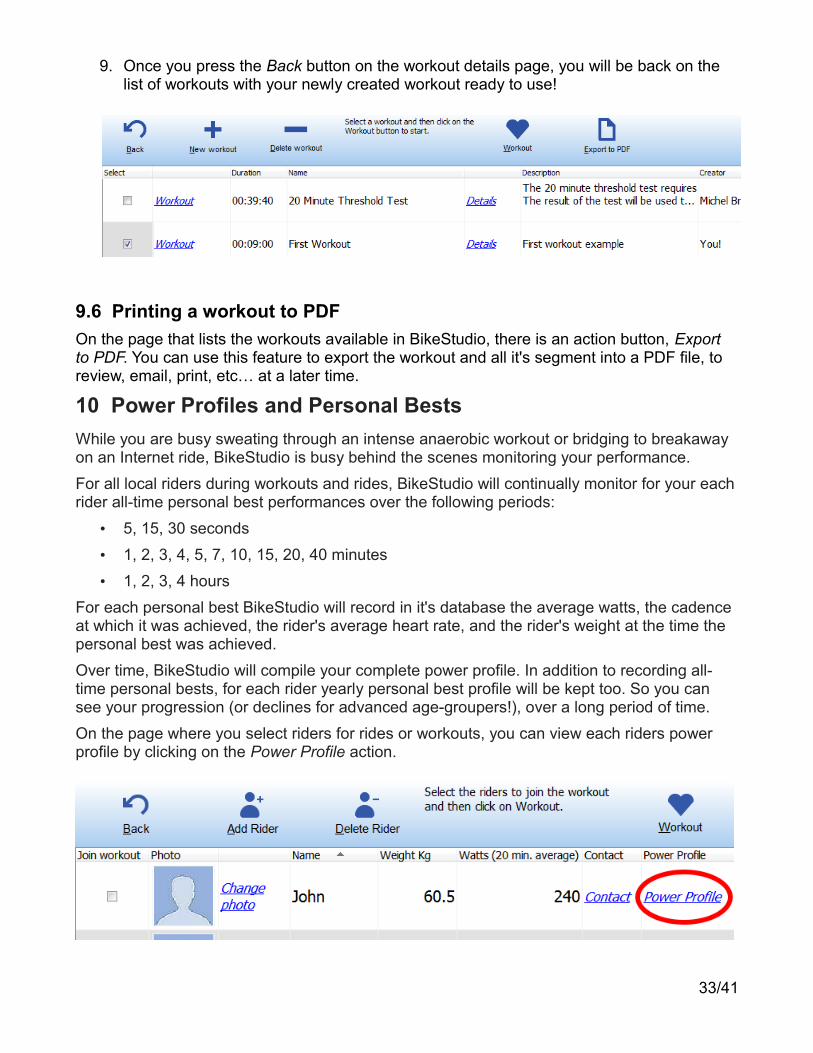
9. Once you press the Back button on the workout details page, you will be back on the list of workouts with your newly created workout ready to use!
9.6 Printing a workout to PDF
On the page that lists the workouts available in BikeStudio, there is an action button, Export to PDF. You can use this feature to export the workout and all it's segment into a PDF file, to review, email, print, etc… at a later time.
10 Power Profiles and Personal Bests
While you are busy sweating through an intense anaerobic workout or bridging to breakaway on an Internet ride, BikeStudio is busy behind the scenes monitoring your performance.
For all local riders during workouts and rides, BikeStudio will continually monitor for your eachrider all-time personal best performances over the following periods:
• 5, 15, 30 seconds
• 1, 2, 3, 4, 5, 7, 10, 15, 20, 40 minutes
• 1, 2, 3, 4 hours
For each personal best BikeStudio will record in it's database the average watts, the cadence at which it was achieved, the rider's average heart rate, and the rider's weight at the time the personal best was achieved.
Over time, BikeStudio will compile your complete power profile. In addition to recording all-time personal bests, for each rider yearly personal best profile will be kept too. So you can see your progression (or declines for advanced age-groupers!), over a long period of time.
On the page where you select riders for rides or workouts, you can view each riders power profile by clicking on the Power Profile action.
33/41
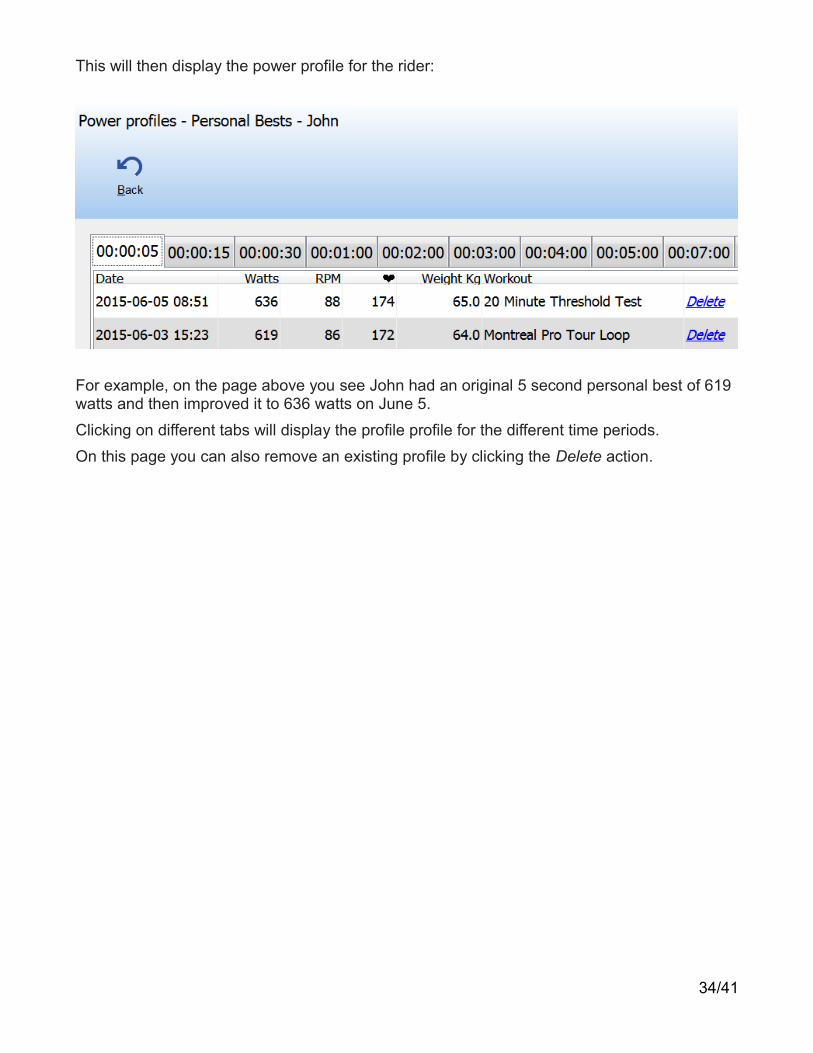
This will then display the power profile for the rider:
For example, on the page above you see John had an original 5 second personal best of 619 watts and then improved it to 636 watts on June 5.
Clicking on different tabs will display the profile profile for the different time periods.
On this page you can also remove an existing profile by clicking the Delete action.
34/41

And for a little pat on the back BikeStudio will flash a certificate while you workout and ride when you achieve a new personal best!
11 Data, Data, Data
As mentioned before, BikeStudio will automatically record all rider's personal bests to create complete power profiles over time.
In addition, detailed ride and workout data will automatically be stored in the sub folder .\Logs where BikeStudio is installed.
11.1 Workout Data
During a workout, for all local riders the following 4 files will be created,
1. "Rider_name YYYY-MM-DD HH:MM Workout_name.PDF"2. "Rider_name YYYY-MM-DD HH:MM Workout_name summary.csv"3. "Rider_name YYYY-MM-DD HH:MM Workout_name.csv"4. "Rider_name YYYY-MM-DD HH:MM Workout_name training peaks.csv"
35/41
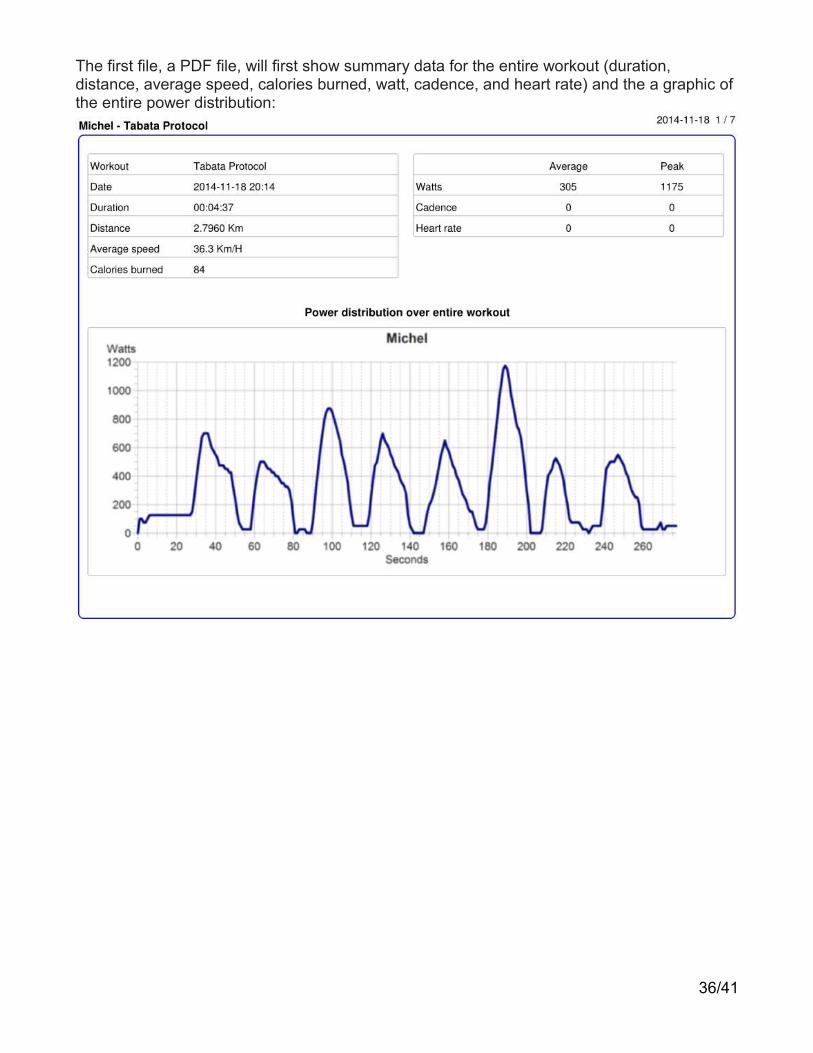
The first file, a PDF file, will first show summary data for the entire workout (duration, distance, average speed, calories burned, watt, cadence, and heart rate) and the a graphic of the entire power distribution:
36/41

Then the following pages will provide segment by segment data along with power distribution for each segment:
37/41
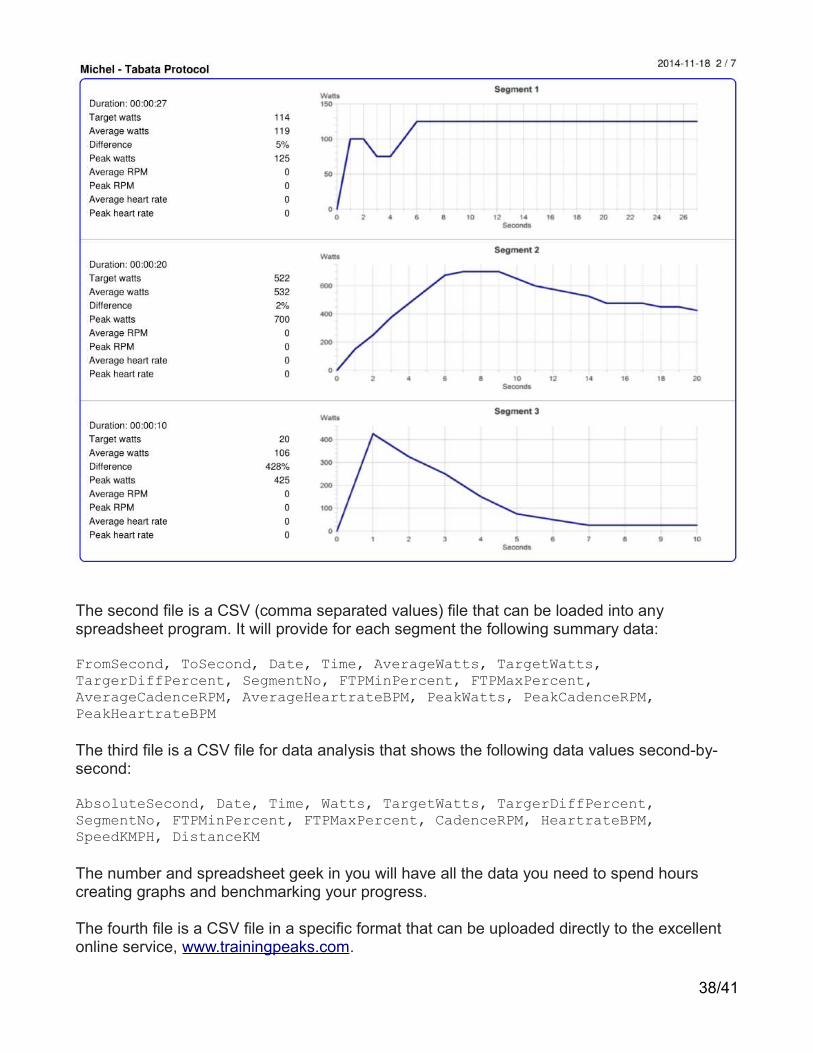
The second file is a CSV (comma separated values) file that can be loaded into any spreadsheet program. It will provide for each segment the following summary data:
FromSecond, ToSecond, Date, Time, AverageWatts, TargetWatts, TargerDiffPercent, SegmentNo, FTPMinPercent, FTPMaxPercent, AverageCadenceRPM, AverageHeartrateBPM, PeakWatts, PeakCadenceRPM, PeakHeartrateBPM
The third file is a CSV file for data analysis that shows the following data values second-by-second:
AbsoluteSecond, Date, Time, Watts, TargetWatts, TargerDiffPercent, SegmentNo, FTPMinPercent, FTPMaxPercent, CadenceRPM, HeartrateBPM, SpeedKMPH, DistanceKM
The number and spreadsheet geek in you will have all the data you need to spend hours creating graphs and benchmarking your progress.
The fourth file is a CSV file in a specific format that can be uploaded directly to the excellent online service, www.trainingpeaks.com.
38/41
11.2 Ride Data
During a ride, for all local riders the following 4 files will be created,
1. "Rider_name YYYY-MM-DD HH:MM Ride_name.PDF"2. "Rider_name YYYY-MM-DD HH:MM Ride_name.csv"3. "Rider_name YYYY-MM-DD HH:MM Ride_name training peaks.csv"
The first PDF file will provide summary data and a graph that shows the power distribution for the entire ride, similar to the first page of the workout PDF file.
The second file is a CSV file for data analysis that shows the following data values second-by-second:
AbsoluteSecond, Date, Time, Watts, CadenceRPM, HeartrateBPM, SpeedKMPH, DistanceKM
Finally, the third CSV file allows importing the ride data to www.trainingpeaks.com.
12 Large group version of BikeStudio
BikeStudio if free for personal home use with up to 4 riders at the same time. It is also available for larger groups. Contact us at www.allyoucanbike.com for more information. This version can be used in cycling studios, bike shops, etc...
When using BikeStudio with the large group version, one additional advanced feature is the ability to automatically email the workout and ride data files to each rider after a workout or ride.
13 Advance Topics
This section will present a few advanced practical and technical aspects of BikeStudio.
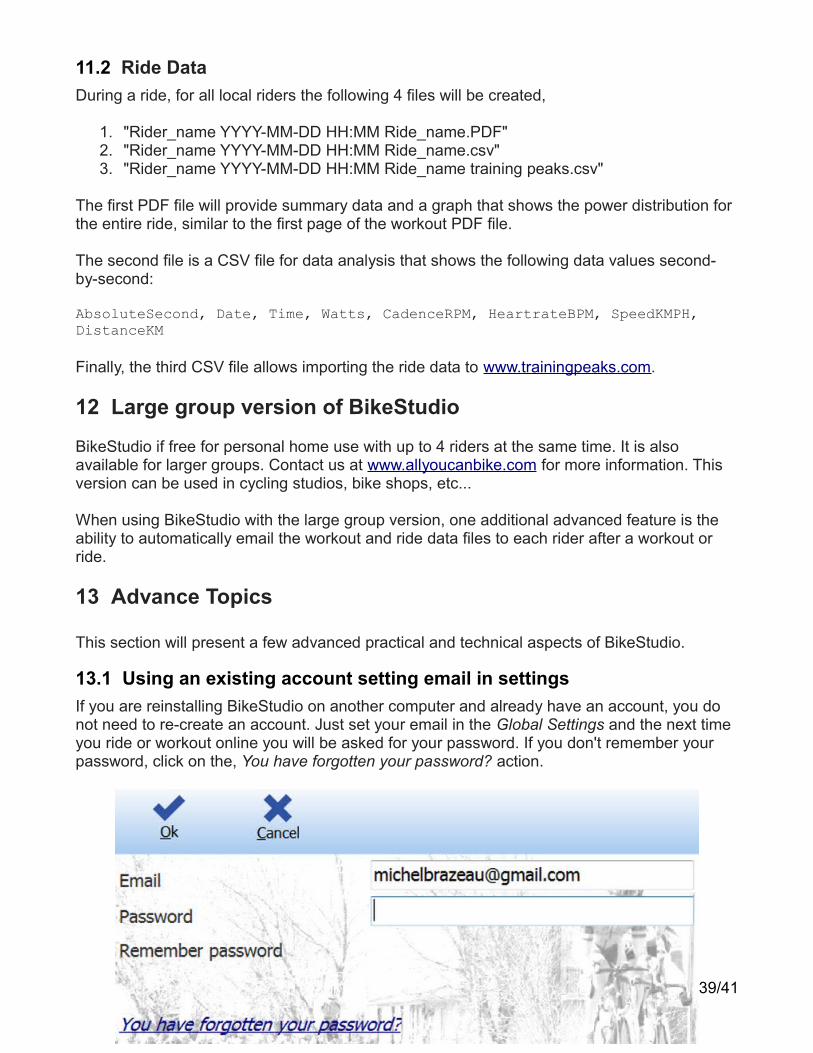
13.1 Using an existing account setting email in settings
If you are reinstalling BikeStudio on another computer and already have an account, you do not need to re-create an account. Just set your email in the Global Settings and the next time you ride or workout online you will be asked for your password. If you don't remember your password, click on the, You have forgotten your password? action.
39/41
13.2 Automatic software update
In the Global Settings you can enable or disable automatic software updates. Keeping your BikeStudio version up-to-date is a good idea, but if you like the phrase, “if it ain't broken don't fix it”, then you can turn off the updates. Note that if you ride or workout online, at some point it may be necessary to update so that the software is always compatible with the central server.
13.3 Assign ANT USB sticks automatically
If you are using the group version and have more than 8 ANT devices to pair, you can specify which devices connects to which ANT USB receiver. This works well when the ANT USB receivers are for example in different areas of a gym. But it makes the management of each ANT receiver very intricate as each receiver has only 8 channels. If you are using more than 1ANT USB receiver, but all the cyclists are within range of the receivers, activating the Assign ANT USB sticks automatically option in the Global Settings will save lots of time in configuration. When this option is checked, ANT devices will be assigned the ANT USB receivers automatically as each receiver is "filled up" to its maximum of 8 channels.
13.4 Configuring SMTP server for group and gym version
If you are using the group version of BikeStudio, for each rider you will be able to specify theiremail address so that BikeStudio can email workout and ride data to each rider. In order to use this function, you need to set the Email server options in the Global Settings. This requires access to what is called an SMTP server to send outgoing emails. If you have a Gmail account, you can use Google's SMTP server. Search on Google, “gmail smtp settings” to get more information.
13.5 FDTI serial chip set for Computrainer
The Computrainer is an excellent cycling trainer that has been time tested. Many Computrainers 10-20 years old are still working perfectly! The only difficulty I have seen over the years especially when operating systems change is the connection via the serial port. If you are using a recent Racermate's USB to serial adapter then everything should be good. But if you are using a “9/25 pin serial to USB adapter”, your computer may have problems detecting your Computrainer. If you are having such connectivity problem, make sure you USB to serial adapter uses an FDTI chip set.
14 How to cheat on a ride (NOT!)Any virtual bike riding software relies on riders to be "honest" about their parameters. Don't believe what you see when riding in software programs like Tour de Giro, NetAthlon, Zwift, Tacx, Elite, BikeStudio, etc... There are many ways to increase your power without illegal drugs. So if you are fed up being dropped during online rides, here are some tips for BikeStudio. Use with moderation : )
1. The "legal" way is to use handicapped rides and set a realistic value for your 20 minutethreshold watts. This works with any type of sensor. If you can't keep up, reduce your
40/41

value; if you drop nearly everyone with ease, increase your value. The appropriate wayis the perform the "20 minute threshold test" workout to obtain you threshold watts.
2. The other easy one that works with any type of sensor, just reduce your weight to your "in your dream" racing weight or use the weight when you were young and reckless at 16 years old. This will make you faster on climbs and flat sections because of a more aerodynamic profile.
3. When using virtual power with a PowerCurve or ANT Speed sensor:
• Using a larger wheel diameter will give you more watts.• Select a different trainer with a weaker power curve. The system will "think" you
are generating many more watts.• On a magnetic trainer with levels, use a level lower than the indicated one.
4. When using a Computrainer• Perform a roll down calibration on the handlebar unit with a lot of press on force,
for example with a value of 4.5, then loosen the knob a few turns. You will get lots of free watts!
5. With a power meter
• Well that's a bit more difficult because watts are coming directly from the meter. Your options are tips 1 and 2 above.
15 Submitting a workout to share with othersIf you have created workouts and would like share them with others from the BikeStudio web site, just contact us from www.allyoucanbike.com.
16 Submitting your video for a routeCourses for the rides are filmed with Contour cameras that have a high resolution video, with recording of speed, GPS coordinates, and altitude. If you have a Contour camera with GPS and have a great course to share, just contact us from www.allyoucanbike.com.
If your camera is not a Contour camera and it does record GPS, speed, and altitude, you can send a small sample video and we will have a look to see if it can be added as a BikeStudio course.
41/41