Embed Size (px)
Citation preview

Before installing the software, Computer Time & Date Setup is needed Before making installation of the software, please check the following : (under windows 2000 system demonstrations, XP and other basic similar)
ut )
1) my computer - > control panel - > region & language options - > region options - > customize - > customize regional options - > time - > time format ( inpHH:mm:ss ) - > time separator ( input :
2) After that, select date Date (input yyyy-MM-dd) - > date separator ( input - )
The Targetmax® Attendance System V2.0 software must match with the above setting, otherwise the software cannot be used.
(I) Connection Setup(Only for RS232/RS485) After installing the software, please change the serial port transmission speed on computer as below :
1) “my computer”→ “attribute”→ “hardware” option→ “equipment supervisor”→ Port (COM and LPT) 1) Select the correct port COM 1 or COM 2 on “the port establishment “
2) Change the Baud Rate default from 9600 to 38400 • The Baud rate must be the same as the PC, otherwise it can not realize communicating

Getting start after software installion Double click the “Attendance System V2.0” icon on the desktop to start the program
The System Use Guide will display as below :
Click Login System (L) Input the User name “admin” and Password “321”, click login to confirm Successfully landing the system and click “Confirm” to start the program

Part One - Personnel information
1. Company information setting 1. Menu:Personnel Info. Company Info. setting Note: Intend for setting and modifying company basic information
Operating steps:
1) Click “Modify” to change company information 2) Click “Save” to keep typed information 2. Company Dept. setting Menu: Personnel Info. Company Dept. setting Note: intend for setting department.
Add: Intended for adding new department and, selecting the super-department belongs to in “Super-dept No.” Adding steps: 1) Click “Add”, type department. No., select super-department No. and so on. 2) Click “Save” to save the typed information. Modifying steps: 1) Click “Modify” and select the 1 information for modifying. 2) Change the information in the relative editing form 3) Click “Save” to store the changed information Print: for printing department information

3. Staff information setting Menu: Personnel Info. Staff Info setting Note: Intended for managing staff information by adding employee one by one or import staff information in mass Adding steps: 1) Select the department for the staff to be added in the left of this window, then click “Add” to show 2) Add staff information in the relative blanks.(the Work No. & Card No. should be same to the ID No.
which is created when you registered your fingerprint to the machine.) 3) Click “Save” to save information and back to “Staff managing” 4) Click “Go on”, the system will save the last information automatically and be ready for the new adding Note: You can input Card No directly or Read cards at last after you have inputted all the staff information else. Machine FP register : Modifying steps 1) Select which staff’s information to be modified 2) Click “Modify” so as to modify the selected staff information 3) Click “Save” to save modified information and back to “Staff managing” status Deleting steps: 1) Select which staff’s information to be deleted 2) Click “Del”. Click “Save” to save modified information and back to “Staff managing” status
Read card: After inputting all the staff information, click “Read card” to read cards and record cards’ No.one by one Stop: Click “Stop” for pause during reading cards or after completing Print: Intended for printing formats of staff information Printing steps: 1) Click “Print” to show:
2) Click “Export” to show
Import: import all the staff information in ECXCEL to the system in mass
1) Click “Import” to show: 2) Click “View file” to select the EXCEL file to be imported 3) Click “Next” to be ready for importing. Select words of Work No,
Department, Name and other necessary items in accord with the EXCEL file

It is required to select relative words name for Work No, Department and Name in EXCEL format prior to enter next in this window. Export: intended for exporting the staff information in EXCEL format
1) Click “Export” to show the staff information 2) Select saving route 3) The system will show “Personnel Info. exported ” to remind
success after its saving
Part Two - Attendance management
1. Attendance rule Menu: Attendance management Attendance rule Note: It is intended for setting attendance rule as per requirement and, view the relative information
Note: the Code can not be modified during setting
Note: Multi Late and Early leave times can be set to be ignored, which is to say, the Late and Early leave times less than the limit times will be ignored. Repeating interval means the same user can not read the same card during this Repeating interval time
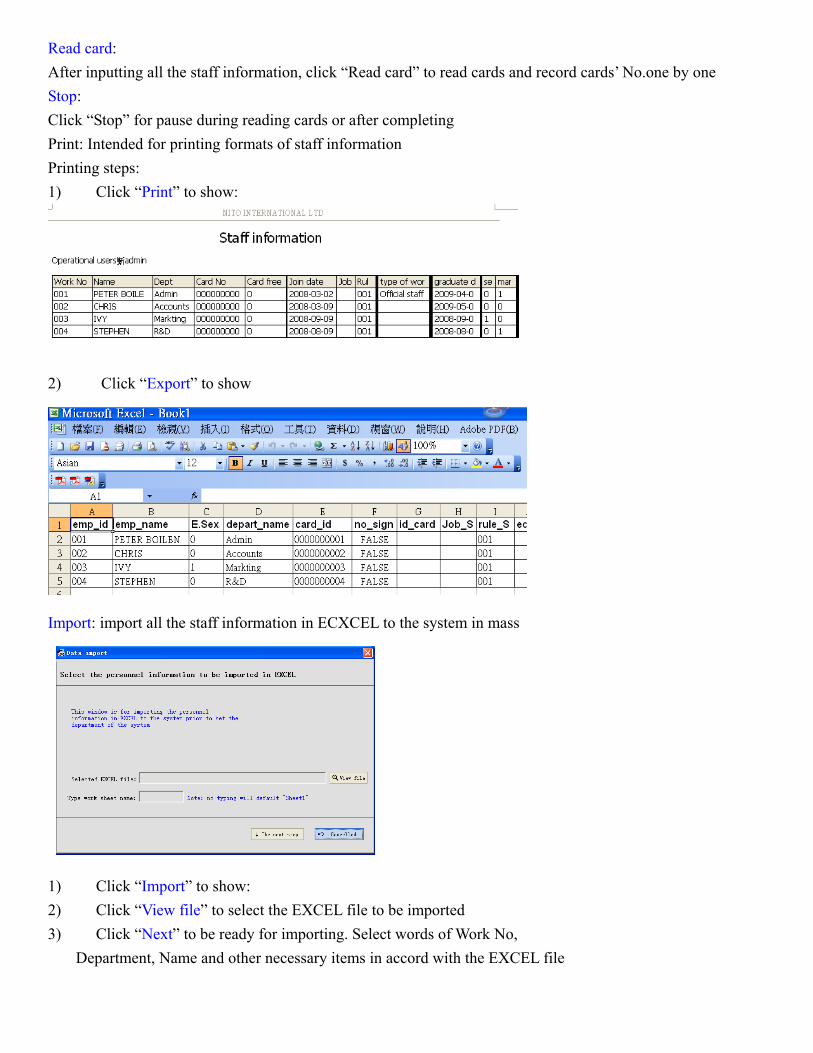
2. Rule setting Menu: Attendance management Rule setting Note: Setting attendance rules for each staff Add: click “Add” and “Select staff” to show: Select the department then, select the staff from “Staff for selecting” to “Staff selected”. Click “Confirm” to “Rules setting” Select the staff expected and choose the rule required, click “Save” to done
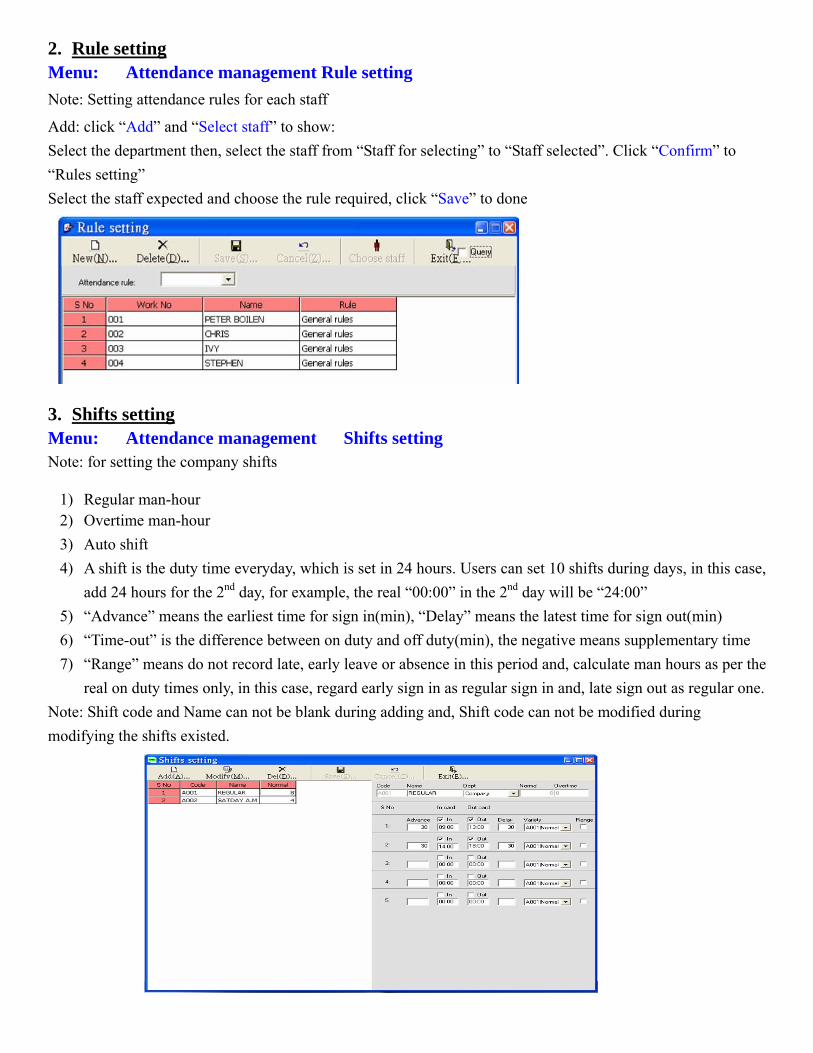
3. Shifts setting Menu: Attendance management Shifts setting Note: for setting the company shifts
1) Regular man-hour 2) Overtime man-hour 3) Auto shift 4) A shift is the duty time everyday, which is set in 24 hours. Users can set 10 shifts during days, in this case,
add 24 hours for the 2nd day, for example, the real “00:00” in the 2nd day will be “24:00” 5) “Advance” means the earliest time for sign in(min), “Delay” means the latest time for sign out(min) 6) “Time-out” is the difference between on duty and off duty(min), the negative means supplementary time 7) “Range” means do not record late, early leave or absence in this period and, calculate man hours as per the
real on duty times only, in this case, regard early sign in as regular sign in and, late sign out as regular one. Note: Shift code and Name can not be blank during adding and, Shift code can not be modified during modifying the shifts existed.
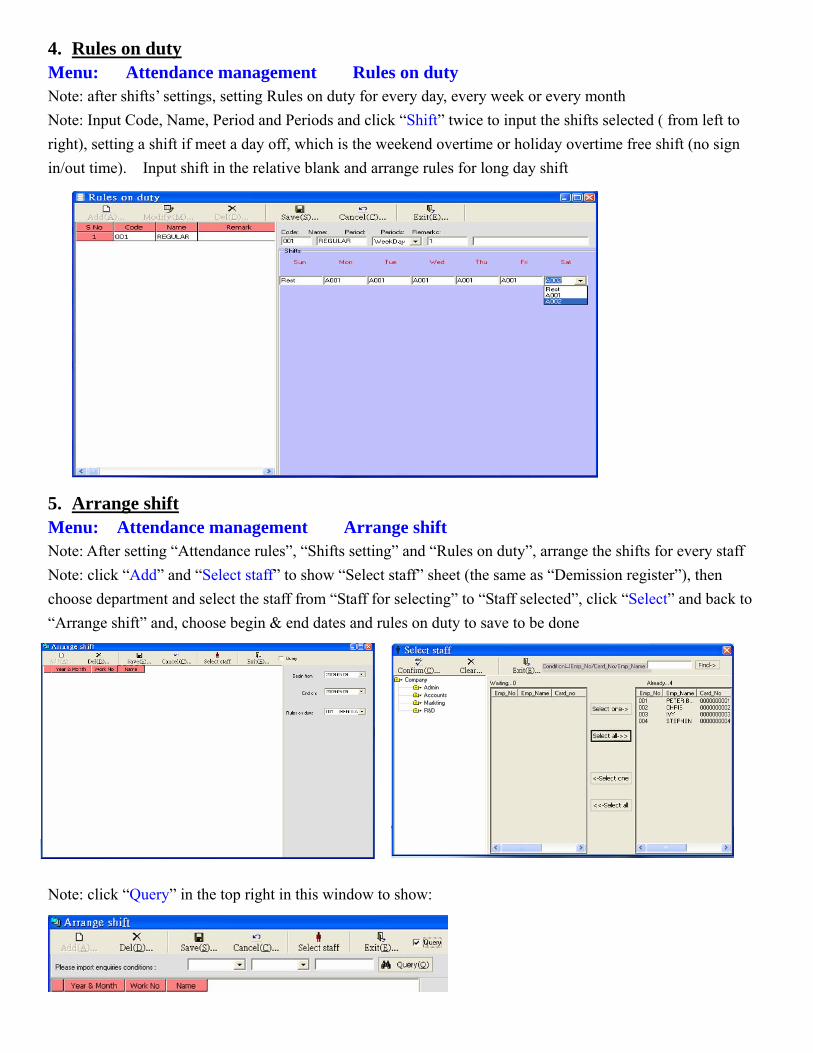
4. Rules on duty Menu: Attendance management Rules on duty Note: after shifts’ settings, setting Rules on duty for every day, every week or every month Note: Input Code, Name, Period and Periods and click “Shift” twice to input the shifts selected ( from left to right), setting a shift if meet a day off, which is the weekend overtime or holiday overtime free shift (no sign in/out time). Input shift in the relative blank and arrange rules for long day shift
5. Arrange shift Menu: Attendance management Arrange shift Note: After setting “Attendance rules”, “Shifts setting” and “Rules on duty”, arrange the shifts for every staff Note: click “Add” and “Select staff” to show “Select staff” sheet (the same as “Demission register”), then choose department and select the staff from “Staff for selecting” to “Staff selected”, click “Select” and back to “Arrange shift” and, choose begin & end dates and rules on duty to save to be done
Note: click “Query” in the top right in this window to show:

6. General shifts
Menu: Attendance management General shifts Note: view all the shifts or modify the shift for certain staff
Part Three – Data collection
1. Communication type: using RS232/RS485
Communication type: RS232/485 Communication code: 1 License: 1263 Port: COM1 Baudrate: 38400 2. Communication type: using TCP/IP Communication type: TCP/IP Communication code: 1 License: 1263 IP Address: xxx.xxx.xxx.xxx
Port: 5005 Password: 0 Time out: 5000 IP Address: The IP address must be same as the machine IP address, please checkfor it.
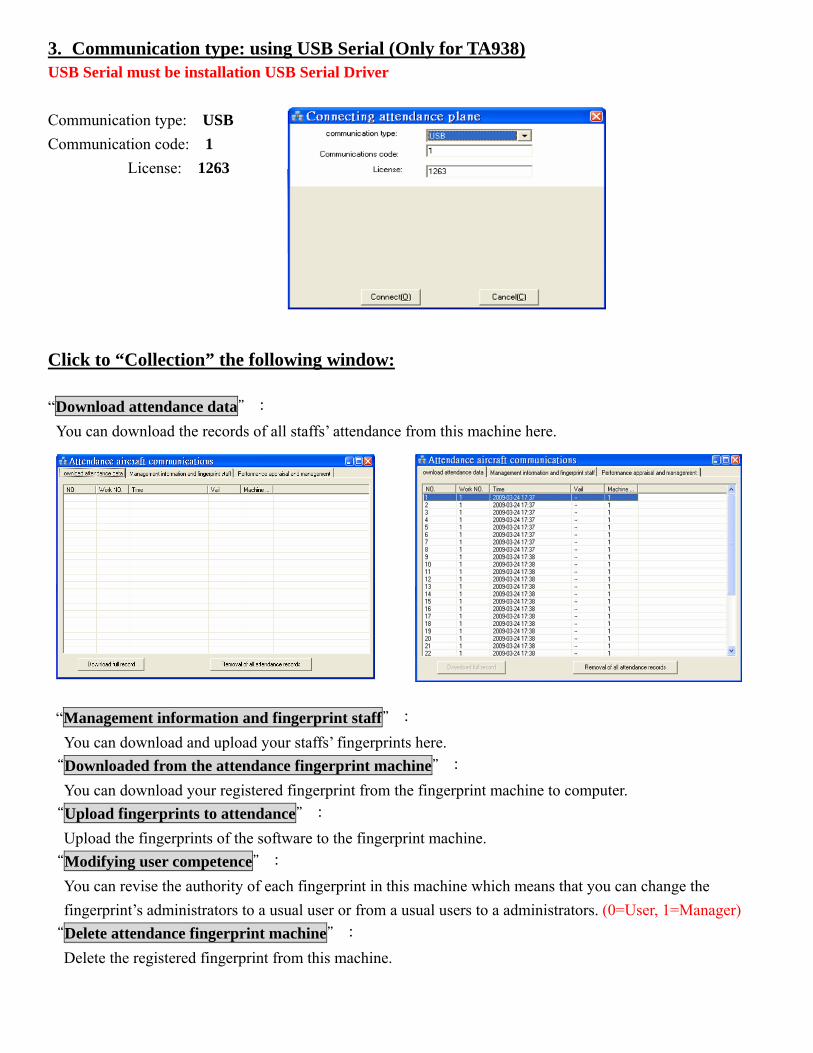
3. Communication type: using USB Serial (Only for TA938)USB Serial must be installation USB Serial Driver Communication type: USB Communication code: 1 License: 1263 Click to “Collection” the following window: “Download attendance data": You can download the records of all staffs’ attendance from this machine here.
“Management information and fingerprint staff": You can download and upload your staffs’ fingerprints here.
“Downloaded from the attendance fingerprint machine": You can download your registered fingerprint from the fingerprint machine to computer.
“Upload fingerprints to attendance": Upload the fingerprints of the software to the fingerprint machine. “Modifying user competence":
You can revise the authority of each fingerprint in this machine which means that you can change the fingerprint’s administrators to a usual user or from a usual users to a administrators. (0=User, 1=Manager)
“Delete attendance fingerprint machine": Delete the registered fingerprint from this machine.
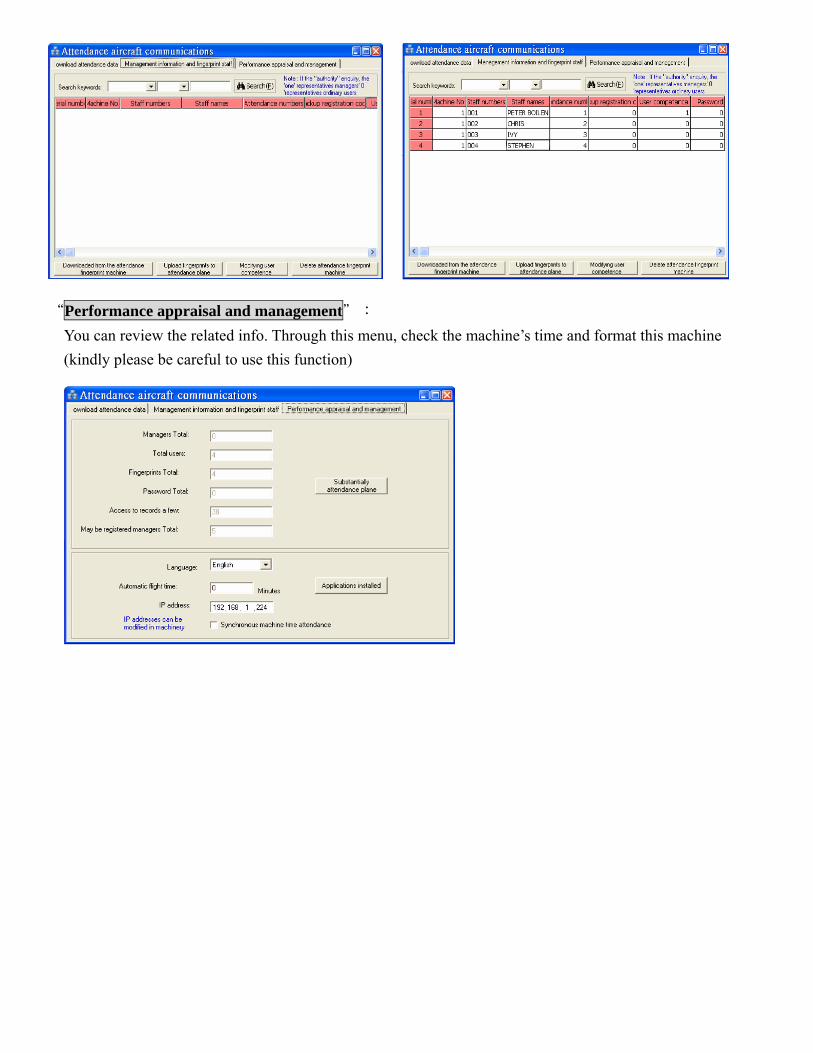
“Performance appraisal and management": You can review the related info. Through this menu, check the machine’s time and format this machine (kindly please be careful to use this function)
USB Flash Disk Data collection
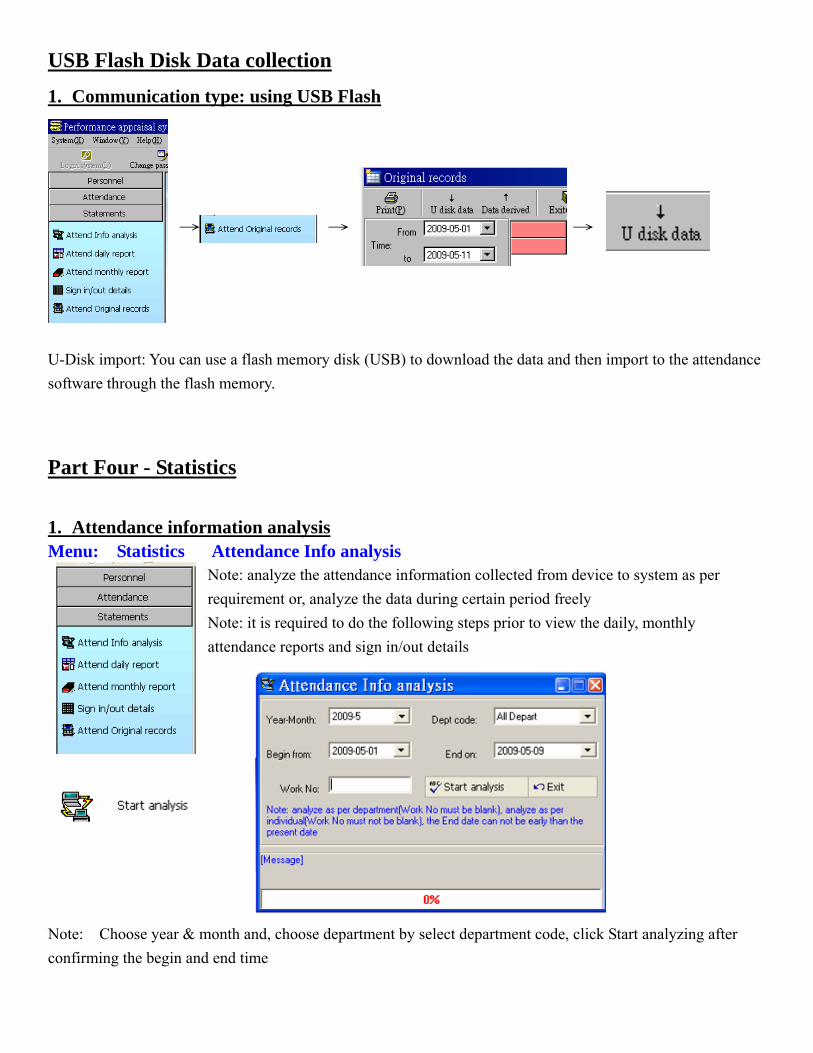
1. Communication type: using USB Flash
→ → →
U-Disk import: You can use a flash memory disk (USB) to download the data and then import to the attendance software through the flash memory.
Part Four - Statistics
1. Attendance information analysis Menu: Statistics Attendance Info analysis
Note: analyze the attendance information collected from device to system as per requirement or, analyze the data during certain period freely Note: it is required to do the following steps prior to view the daily, monthly attendance reports and sign in/out details
Note: Choose year & month and, choose department by select department code, click Start analyzing after confirming the begin and end time
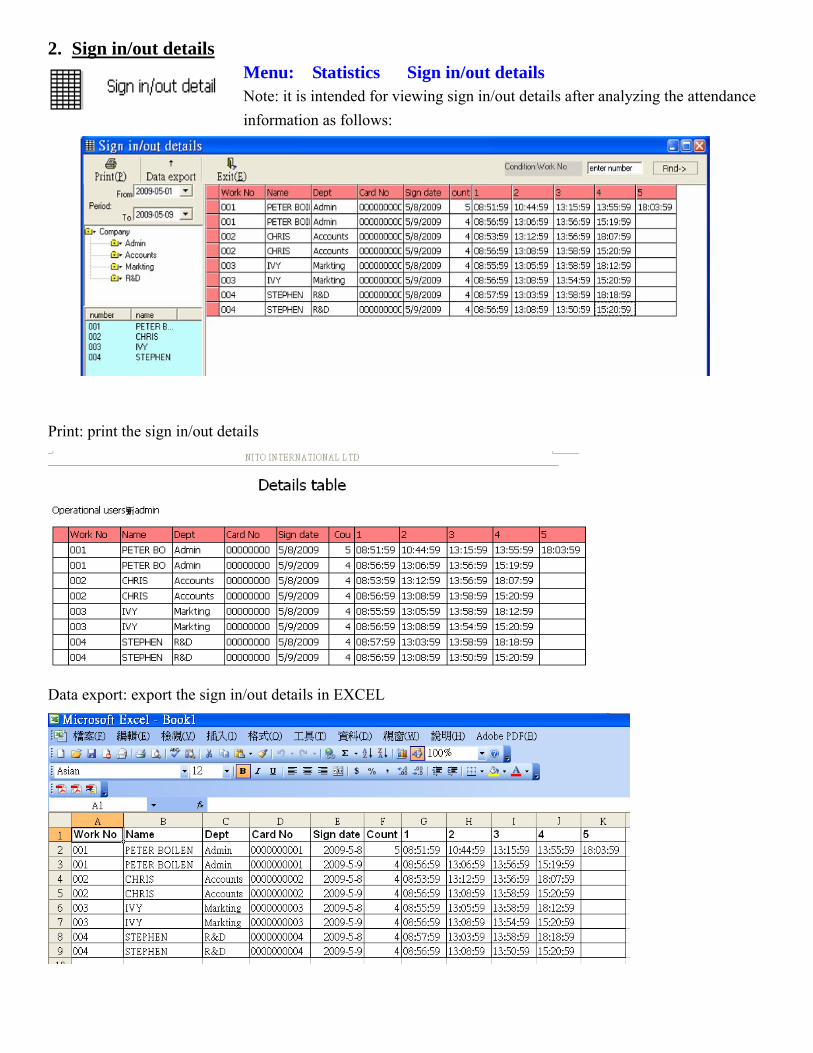
2. Sign in/out details Menu: Statistics Sign in/out details Note: it is intended for viewing sign in/out details after analyzing the attendanceinformation as follows:
Print: print the sign in/out details
Data export: export the sign in/out details in EXCEL

3. Attendance daily report
Menu: Statistics Attendance daily reportNote: it is intended for checking certain attendance daily report after analyzing the attendance information. Users can check the report of exception such as: Leave, Early leave or Late Note: Remark will explain each piece of information in the following illustration. It will show shift code after arranging shift correctly or not show shift code for not join in or day off, which can be viewed from the Remark.
Print: intended for printing the attendance daily report of table format User-defined ata: choose the required information to show
Data export: export the information of attendance daily report in EXCEL format
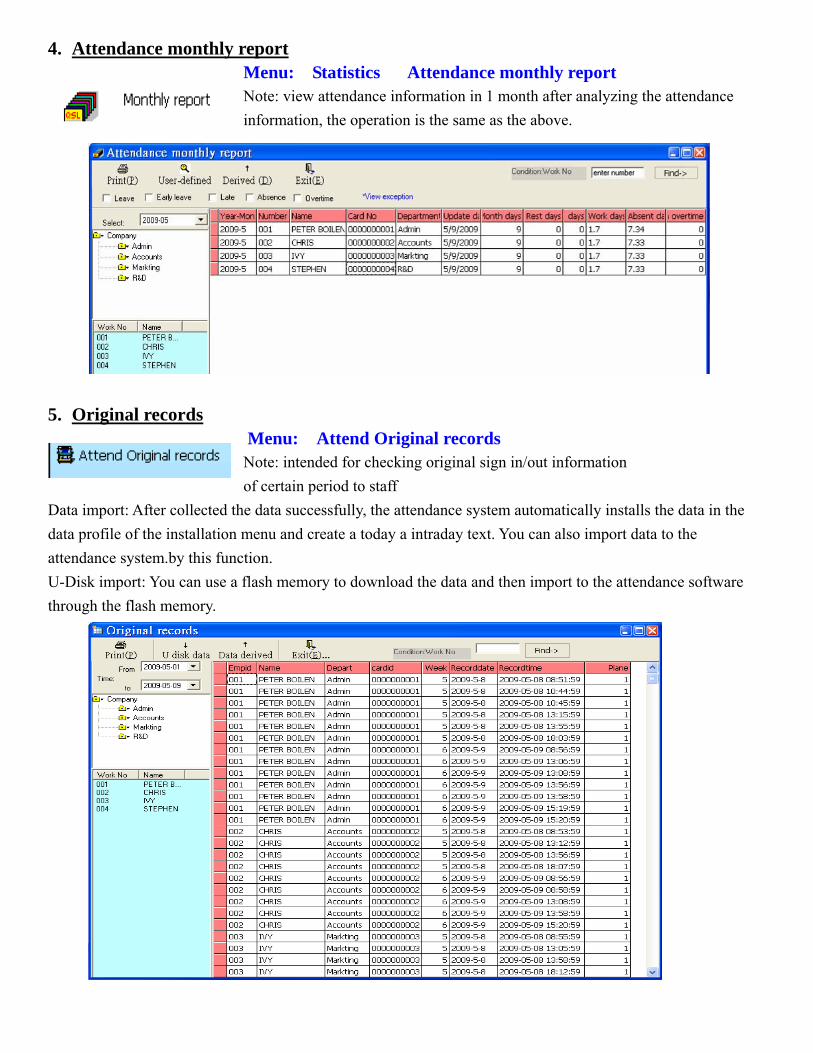
4. Attendance monthly report Menu: Statistics Attendance monthly report Note: view attendance information in 1 month after analyzing the attendance information, the operation is the same as the above.
5. Original records
Menu: Attend Original records Note: intended for checking original sign in/out information
of certain period to staff Data import: After collected the data successfully, the attendance system automatically installs the data in the data profile of the installation menu and create a today a intraday text. You can also import data to the attendance system.by this function. U-Disk import: You can use a flash memory to download the data and then import to the attendance software through the flash memory.

Part Four - System maintenance
1. Users’ management Menu: System maintenance Users’ management Note: intended for adding, modifying and deleting system users
Add: click to show the following window:
Administrator can add users or give authorization limits Lock user: after locking, it will show as follows if the locked user login:
Change password for future login: after selecting this item, it will show as follows when login: