Embed Size (px)
Citation preview
BCeSIS Module
19 Version Number 3.0
Teacher Assistant
AAL Guide Package

Copyright
© 2004 The Province of British Columbia (The Ministry of Education)
All documents and material in this resource are copyright to Her Majesty the Queen in Right of the Province of British Columbia and includes the Ministry of Education.
Permission to copy and use this resource in part, or in its entirety, for non-profit educational administration purposes within British Columbia is granted to British Columbia School Boards and Independent Schools that are signatories to a Memorandum of Understanding or Service Management Agreement with the Ministry of Education for their participation in the Common Systems Initiative (CSI).
BCeSIS™ is a trademark of The Administrative Assistants Ltd.
Warranty Disclaimer
This information is provided as a public service by the Government of British Columbia, Box 9411, Victoria, British Columbia, Canada V8W 9V1.This document and all of the information it contains are provided "as is" without warranty of any kind, whether express or implied. All implied warranties, including, without limitation, implied warranties of merchantability, fitness for a particular purpose, and non-infringement, are hereby expressly disclaimed.
Limitation of Liabilities
Under no circumstances will the Government of British Columbia be liable to any person or business entity for any direct, indirect, special, incidental, consequential, or other damages based on any use of this document or any other document to which this document is linked, including, without limitation, any lost profits, business interruption, or loss of programs or information, even if the Government of British Columbia has been specifically advised of the possibility of such damages.

"Technology has limitations on what it can accomplish. You do not…" Lou Gerstner
CEO IBM
Pre TAM Checklist
Release 8.0

Pre-TAM Checklist – Page 1
Contents
Introduction ...........................................................................................................2
Administrative Setup .............................................................................................3 TAW110.FMX Teacher Assistant Configuration File ...................................3 TCH150.FMX Observation Types ..............................................................4 TAW210.FMX Assessment Types ..............................................................5 SYS198.FMX Textbooks............................................................................6 SYS199.FMX Textbook Conditions............................................................8
Company File Setup ...........................................................................................11 SYS001.FMX Company (Update) File – Letter tab ...................................11 SYS001.FMX Company (Update) File – Reporting tab .............................12 SYS001.FMX Company Update – Attendance tab ......................................13 SYS020.FMX Security Classes.................................................................14
School Level Forms ............................................................................................18 SCH186.FMX School Teacher Assistant Configuration File ........................18
Reporting Periods Setup (SCH100) ....................................................................23 Multiple Calculated Reporting Periods.........................................................27
© The Administrative Assistants Ltd. 2004. All rights reserved. eSIS ® is a registered trademark of The Administrative Assistants, Ltd. 2000 - 2004

Pre-TAM Checklist – Page 2
Introduction The purpose of this document is to assist district and school personnel in
ensuring that all preliminary planning and set up tasks have been completed in
preparation for the roll out and use of the eSIS Teacher Assistant Module.
Some of these preparatory tasks will be completed by district administrative
personnel, some by school administrative personnel, and some by the classroom
teachers themselves. We will review each of them during the course of this
document.
To complete the Pre-TAM Checklist, the following are mandatory set up tasks:
Teacher Assistant System Codes including: - Observation Types - Assessment Types - Textbooks - Textbook Condition
Letter Category System Code Company File settings including:
- Letters tab- Letter Category Set Up - Courses tab– Max Number Marks 1 or 3 - Attendance tab– Teacher Attendance Threshold
User/Security - Security Classes / Roles for Teachers
Teacher Assistant Configuration File – TAW110 School Teacher Assistant Configuration File Set Up – SCH186 School Reporting Periods Set Up
Assumptions – at the School:
Classes have been scheduled and teachers assigned to them Homerooms have been created and teachers assigned to them Teams have been created and teachers assigned to them
Note: If the assumptions have not been completed, please do so prior to
allowing the classroom teacher to use the Teacher Assistant Module.

Pre-TAM Checklist – Page 3
Administrative Setup TAW110.FMX Teacher Assistant Configuration File Path: Administration menu > Navigation Maintenance > query for TAW110 This screen is used to set defaults in the Teacher Assistant Module (how will certain fields be labeled, which Progress Reports will be used, etc). This is an ‘instance wide’ file and will affect every user in the database. This screen is set up and accessed by District level users only.

Pre-TAM Checklist – Page 4
TCH150.FMX Observation Types Menu Path: Administration Menu > System Codes > Teacher Assistant / Co-op
> Observation Types The Observation Types - TCH150 system codes table is used within the Teacher Assistant Module to populate a drop down list in the Basic Demographics / Observations tab.

Pre-TAM Checklist – Page 5
TAW210.FMX Assessment Types Menu Path: Administration Menu > System Codes > Teacher Assistant / Co-op
> Assessment Types Note: The Assessment Types system code table must be set up in order for teachers to set up their Gradebook in the Teacher Assistant Module. Enter any possible assessment type you believe teachers might want to use. Should teachers require additional Assessments, you can modify this list.

Pre-TAM Checklist – Page 6
SYS198.FMX Textbooks Menu Path: Administration Menu > System Codes > Teacher Assistant / Co-op
> Textbook Purpose: The Textbook – SYS198 and Textbook Conditions – SYS199 tables must be entered if the Textbook feature in Teacher Assistant will be used. The Textbook table holds the names of all the textbooks / books a teacher can assign to their students. Note: If yours is a multi-district installation, your table entries will include all the textbook information required for ALL of the Districts. Note: If your District is NOT using Textbooks, please ensure that your Security (Program) Access for User Roles is set to NONE for these forms within Teacher Assistant.

Pre-TAM Checklist – Page 7
The Help button reveals this information:

Pre-TAM Checklist – Page 8
SYS199.FMX Textbook Conditions Path: Administration Menu > System Codes > Teacher Assistant / Co-op Category > Textbook Condition Button The Textbook Condition table lists the various ‘condition’ descriptions that might be attributed to a textbook. For example, a teacher can assign books ‘out’ to a student and record the ‘return’ condition. (The application assumes the books were in good conditions when given to the student. See the Help note below.) The condition also records a ‘charge percentage’ based on the book’s worth so the school can recover the cost of a poorly managed book, i.e. the condition upon return of the book is ‘Damaged’, ‘Cover Missing’, ‘Lost’, etc. This field is a default amount only and may be altered.

Pre-TAM Checklist – Page 9
The Help button reveals the following information:

Pre-TAM Checklist – Page 10
SYS315.FMX Letter Category Path: Administration Menu > System Codes > School Category > Letter
Category In order to use the ‘Letter’ functionality in the Teacher Assistant Module, the Letter Category system codes table must have letter categories entered. This is actually a two-step process. 1. Create a Letter Category Code called ‘Teacher’. 2. Proceed to the Company File and pull this table value into the Letter field
labeled ‘Teachers’.

Pre-TAM Checklist – Page 11
Company File Setup SYS001.FMX Company (Update) File – Letter tab Path: Administration > Company > Letters tab The setting in the Company File > Letters field completes the connection between the Letter Category system code and the Company File field. Once entered here, any letter you subsequently associate with the “Teacher” Letter category will appear in the teacher’s Letters section in the Teacher Assistant Module (Teacher Assistant > Other Features > Letters). You can have multiple letters attached to the Teacher category, e.g. Field Trips, Parent Interviews, etc.
Pre-TAM Checklist – Page 12
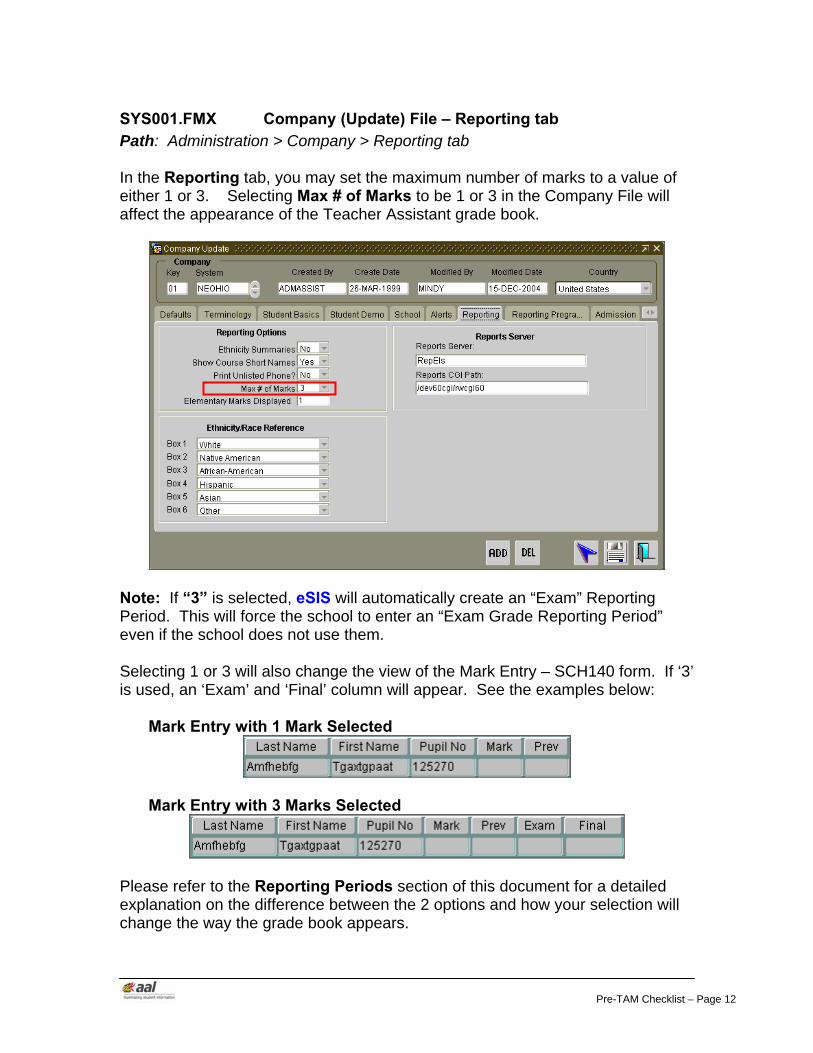
SYS001.FMX Company (Update) File – Reporting tab Path: Administration > Company > Reporting tab In the Reporting tab, you may set the maximum number of marks to a value of either 1 or 3. Selecting Max # of Marks to be 1 or 3 in the Company File will affect the appearance of the Teacher Assistant grade book.
Note: If “3” is selected, eSIS will automatically create an “Exam” Reporting Period. This will force the school to enter an “Exam Grade Reporting Period” even if the school does not use them. Selecting 1 or 3 will also change the view of the Mark Entry – SCH140 form. If ‘3’ is used, an ‘Exam’ and ‘Final’ column will appear. See the examples below:
Mark Entry with 1 Mark Selected
Mark Entry with 3 Marks Selected
Please refer to the Reporting Periods section of this document for a detailed explanation on the difference between the 2 options and how your selection will change the way the grade book appears.

Pre-TAM Checklist – Page 13
SYS001.FMX Company Update – Attendance tab Path: Administration > Company (Update) File > Attendance tab In the Company File - Attendance tab, The Teacher Attendance Threshold will require set up according to the District business rules. Does your district allow teachers to modify / update student attendance records? Does your district have a specified number of days after which teachers cannot modify / update student attendance records?
Note 1: If ‘Disallow Teacher to Update Attendance’ = Yes, then ‘School Days used for threshold’ must be entered. Note 2: If you want to stop teachers from modifying / updating attendance from the previous attendance day (e.g. yesterday), then set the threshold number to ‘1’ to enable them to take attendance today. If you do want to allow changes to attendance from the previous day, then you must set the threshold to ‘2’.

Pre-TAM Checklist – Page 14
SYS020.FMX Security Classes Path: Administration > Users Security > Security Classes Security (access to Forms, Reports, Schools, and Students) in eSIS is determined on a ‘User Security Class’ or ‘security role’ basis. It is important that proper security roles be set up for your teachers. The recommendation when creating Teacher Assistant Module user roles is to set up several different ‘roles’ in the Security Classes. That way, each user (entered in User Maintenance) can be assigned multiple roles depending on their responsibilities and / or expertise. An example of a role set up for a teacher with a basic understanding of TAM follows. Security Class (role) name: TEACHER_BASIC This role would be suitable for ALL teachers. It would be a ‘generic’ teacher role giving access to the programs that teachers commonly use. Program Name Screen Name None Read
Only Full
Update Dependencies
TAW010 Student Hot Print √
TAW020 Class Hot Print √
TAW030 Send Message ? Parent Assistant
TAW040 Read Message ? Parent Assistant
TAW100 Student Demographics √
TAW105 TA Observations History Screen √
TAW150 Student Absences √
TAW170 Student Breakout Activities by Homeroom
√
TAW215 Alerts/Follow ups Observations Screen
√
TAW220 Athletic Eligibility Checklist √
TAWSTART Teacher Assistant Start Screen √
STU713P Teacher Letters √
TCH165 Breakout Activities - Class √
STU175 Notes √
STU176 Notes Detail √
TMW050 Student Textbooks √
STU107 Fees and Assistance ? Student Textbooks
STU552 Student Diploma Screen √
STU554 Career Development √
STU574 Individualized Course Plan √

Pre-TAM Checklist – Page 15
Program Name Screen Name None Read Only
Full Update
Dependencies
STU180 Service Learning Hours Log √
STU165 Equivalent Credits √
STU057 Standardized Testing √
STU056 Standardized Testing Detail √
SCH680 Curriculum Mark Entry by Student
√ No Courses in Use
SCH681 Curriculum Mark Entry by Class √ No Courses in Use
ATT010 Select Attendance Date √
SCH140 Mark Entry ? Courses in Use
SCH139 Mark Entry ? Courses in Use
SCH138 Mark Entry ? Courses in Use
Also attached to this role will be the reports that teachers are allowed to generate / run. Some or all of the reports can be attached to the Security Class (role).
Program Name Screen Name None Read Only
Full Update
Dependencies
STU255P Mailing Labels √
STU275P Emergency Information
√
STU552P Student Diploma Summary
√
TAW910P Progress Report ? Grade Book
TAW925P Missing Assignments ? Grade Book
TAW930P Observations Report √
TAW931P Observations by Homeroom
√
TAW935P Failures Report ? Grade Book
TAW945P Reporting Term Failures Report
? Grade Book
STU415P Class List with Marks √
STU204P Birthday list √
STU230P Medical List √
STU240P Field Trip List √
Client Transcript Client Choice ?
Client Report Client Choice ?

Pre-TAM Checklist – Page 16
Program Name Screen Name None Read Only
Full Update
Dependencies
Card
Client Schedule Client Choice ?
Note: If not already completed, a Report Group called “Teacher Reports” must be added to Navigation Maintenance – SYS005 in order to use the reports listed above. Once created, each of the separate reports must be attached to the new Report Group. Only then can you update the Report Access within Security Classes for TEACHER_BASIC (or any other user role). Security Class (role) name: TEACHER_GRADEBOOK This role consists of the screens needed for the Gradebook area within the Teacher Assistant Module. Setting up a separate ‘role’ for these programs ensures that teachers will not start using the functionality prior to fully understanding it – i.e. receiving training on it. Program Name Screen Name None Read
Only Full
Update Dependencies
TAW050 TA Spread Sheet - Grade Book √
TAW060 Teacher Enter Grade/Comments √
TAW061 TA Missing Marks Screen √
TAW065 TA Report Cycle Marks/Comments √
TAW070 TA Assignments √
TAW075 TA View All Assignments √
TAW080 TA Condensed Grade Entry √
TAW090 TA Reporting Period Marks √
TAW250 Academic Progress Screen √
TAW255 Grade Book Archive Screen √
TAW800 Teacher Preferences √

Pre-TAM Checklist – Page 17
Security Class (role) name: TEACHER_PERIOD_ATTENDANCE This role should be given to teachers requiring access to Period Attendance screens. Program Name Screen Name None Read
Only Full
Update Dependencies
ATT105 Attendance By Period √
TAW900 Attendance by Photo √
TAW905 Seating Plan √
TAW906 Attendance Summary √
ATT140 Team Attendance √ Using Teams
Security Class (role) name: TEACHER_DAILY_ATTENDANCE This role should be given to teachers who are required to take daily attendance. Program Name Screen Name None Read
Only Full
Update Dependencies
TAW900 Attendance by Photo √
TAW905 Seating Plan √
TAW906 Attendance Summary √
ATT025 Home Room Attendance - Daily √ Using Home Rooms
ATT030 Team Attendance - Daily ? Using Teams
ATT005 Daily Attendance-Class Entry... ? Using Classes

Pre-TAM Checklist – Page 18
School Level Forms SCH186.FMX School Teacher Assistant Configuration File Path: School > School Information > School Details > More Info > School TA
Configuration This screen allows you to set up the ‘business rules’ that will govern how teachers will use their grade book. The decisions are made at the school level and therefore can be different for each school in the district. Note: Each school must set up the information on this screen prior to allowing teachers to access the grade book feature within eSIS Teacher Assistant.
Set Up Considerations: 1. Can Teachers Override Report Cycle Weights?
The first decision that must be made is whether your school will allow teachers to change the weights you have allotted for each of your Reporting Periods towards the final mark for any given course. this box to allow them to do so, uncheck it to disallow any changes in weighting.

Pre-TAM Checklist – Page 19
Note: Unchecking will ensure that all teachers have the same final mark weights for their courses.
2. Can Teachers Override School’s Mark Scale?
Check this field on to allow your teachers to change the numeric values of the alpha marks in your school’s Mark Scale Entry – see the example below. Note: Teachers will never be allowed to modify existing or to add new alpha marks to the school’s scale.
Example:
The current Mark Scale Entry for Lincoln HS
Notice that the alpha mark ‘A’ is set with a scale of 90 – 94 – 92. In this Mark Scale, this means that when a student receives an ‘A’ for a Reporting Period, that grade is numerically equivalent to 90 – 94. The alpha mark will convert (when posted to Mark Entry) to a 92. If a teacher is allowed to override this mark scale they can set ‘A’ to a different scale. For instance, Teacher A uses a scale that looks like this:

Pre-TAM Checklist – Page 20
In the example above, when a teacher assigns a grade of A to a student, the posted mark (from the gradebook to Mark Entry) will be converted to 87 which on the School’s mark scale is an ‘A-’. If this field is left disabled (i.e. not ), teachers will be unable to access a Mark Scale of their own. All the teachers in the school will use the School Mark Scale set up. 3. The Default Grade Calculation Method: The ‘Default Grade (Mark) Calculation Method’ will enable a school to select a default for teachers for how grades / marks will be calculated. The available options in the Default Grade (Mark) Calculation Method drop down list are ‘Total Points’ and ‘Weighted Percentages’. The most common selection is “Total Points”. This setting is also recommended for first time users of the gradebook. Note: If this is something that you, at the school administration level, would like
to enforce and standardize, then you must spend additional time considering all the options / restrictions.
IMPORTANT: If teachers are not to be restricted to the default set here (i.e. Enforce Default Grade Calculation Method is not checked, then a teacher may choose his / her calculation when he / she works in their Set Up Options screen within Teacher Assistant. However, it must be noted that the choice of grade calculation will relate to ALL of his / her classes. Once a single assignment is entered into their

Pre-TAM Checklist – Page 21
grade book, the calculation choice field is grayed out and cannot be changed without deleting ALL the assignments in all grade books. After determining a ‘default’ calculation method, it is necessary to decide whether it will be ‘enforced’. If the selected method is enforced, teachers will see only the selected grade (mark) calculation method when they enter the Set Up Options in the grade book and they will be unable to change that setting. If the choice is to ‘not enforce’ the calculation method, your teachers will be able to select either method for their grade book calculations. 4. Cumulative Method Default: The next decision at the school level is applicable only if the ‘Cumulative Reporting Method’ will be used at your school.
5. Calculate Final Mark Method The next decision will affect how you would like the gradebook to calculate the final marks. When a teacher posts their marks to the report card, they actually post 2 columns, “TA” and “Post”:
The “TA” column represents the exact mark a teacher has in their grade book at the time the mark was posted. This column is used as a reference only; it is not updateable and does not display on the student’s report card. The “Post” column represents the mark that will be printed on the student’s report card. The teacher can override the grades in this column. With this option you are deciding for the teacher whether or not you want to calculate the “Final Mark” from the Post or TA column. We recommend that the “Post Column” be used. This will ensure that anytime a teacher changes a posted grade for their students, that this grade be included when the final mark is calculated.

Pre-TAM Checklist – Page 22
6. Use Multiple Calculated Reporting Periods The final decision for this screen is if you wish to use multi calculated report periods.
If you want the system to calculate the interim marks for the students in your school you can use this function to do this. If you do not check the box, you will be using one calculated reporting period only. It will use a combination of all posted grades from the previous Reporting Period. This will be better explained in the next section called “Reporting Periods”

Pre-TAM Checklist – Page 23
Reporting Periods Setup (SCH100) Path: School > School Information > Reporting Periods Single Calculated Report Period Option Max # of Marks = 1 We will be using an example of an 18-week course that reports 3 times throughout the course. In this example, the Max # of Marks is set to 1-
in the company file:
If you choose 1 in the Company File, you are telling eSIS that you would like to create a separate reporting term (report card date) for every mark that you need to report for the student. This means that you must create an entry for exam, (if you are using a separate exam report period). This is shown in the example above. If you do create an extra reporting term for Exam, check off the box called “Exam”. Once you have entered all your reporting periods for the course, you will now need to set up these reporting periods for the Teacher Assistant gradebook. In this example, one reporting term must be equal to Mark Calculation = “Calculated”. This must also be flagged as Final Mark = Yes.

Pre-TAM Checklist – Page 24
You must now tell the system what weights are associated with each report term when calculating the final. To do this, select the button labeled “Report Cycle Weights”
In this example, the student’s final grade consists of 60% from Mid Term grade and 40% from their exam grade. Example of calculation: Mid Term grade = 70%, with a weight of 60 Exam grade = 80%, with a weight of 40 Final grade would be calculated as: = {(70 x 60) / 100 + (80 x 40) /100} = 74%

Pre-TAM Checklist – Page 25
Max # of Marks = 3 We will be using an example of an 18-week course that reports 3 times
throughout the course, with the Max # of Marks set to 3- in the Company File:
If you choose 3 in the Company File, you are telling eSIS that you would like eSIS to automatically create a separate reporting term (report card date) for the Exam. You will notice above that there has been NO reporting term entered called exam. Once you have entered all your reporting periods for the course you will now need to setup these reporting periods for the teacher assistant grade book. In this example, one reporting term must be equal to Mark Calculation = “Calculated”. This must also be flagged as Final Mark = Yes. You must now tell the system what weights are associated with each report term when calculating the final. To do this, select the button labeled “Report Cycle Weights”.

Pre-TAM Checklist – Page 26
You will notice that an additional entry is automatically created in the Report Cycle weights called “Exam Grade”. This is a result of selecting Max # of Marks = 3 in the Company File. In this example, the student’s final grade consists of 40% from 1st Marking Period, 40% from the 2nd Marking Period and 20% from the Exam grade. Example of calculation: 1st Marking Period grade = 70%, with a weight of 40 2nd Marking Period grade = 50%, with a weight of 40 Exam grade = 90%, with a weight of 20 Final grade would be calculated as: = {(70 x 40) / 100 + (50 x 40) /100 + (90 x 20) / 100} = 66 %
Pre-TAM Checklist – Page 27
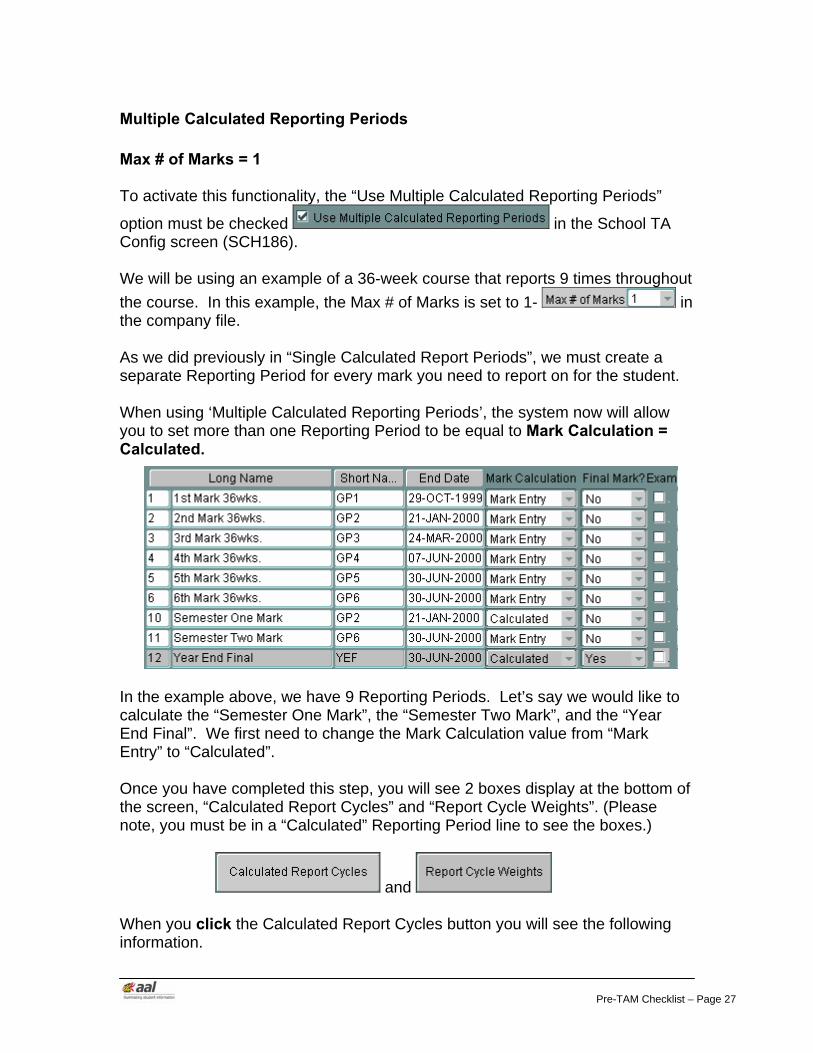
Multiple Calculated Reporting Periods Max # of Marks = 1 To activate this functionality, the “Use Multiple Calculated Reporting Periods”
option must be checked in the School TA Config screen (SCH186). We will be using an example of a 36-week course that reports 9 times throughout the course. In this example, the Max # of Marks is set to 1- in the company file. As we did previously in “Single Calculated Report Periods”, we must create a separate Reporting Period for every mark you need to report on for the student. When using ‘Multiple Calculated Reporting Periods’, the system now will allow you to set more than one Reporting Period to be equal to Mark Calculation = Calculated.
In the example above, we have 9 Reporting Periods. Let’s say we would like to calculate the “Semester One Mark”, the “Semester Two Mark”, and the “Year End Final”. We first need to change the Mark Calculation value from “Mark Entry” to “Calculated”. Once you have completed this step, you will see 2 boxes display at the bottom of the screen, “Calculated Report Cycles” and “Report Cycle Weights”. (Please note, you must be in a “Calculated” Reporting Period line to see the boxes.)
and
When you click the Calculated Report Cycles button you will see the following information.

Pre-TAM Checklist – Page 28
This is what you are telling eSIS: Mark from 1st Mark 36wks + 2nd Mark 36wks + 3rd Mark 36wks/3 = Semester One Mark We will do the same thing for the Semester Two Mark: Mark from 4th Mark 36wks + 5th Mark 36wks + 6th Mark 36wks/3 = Semester Two Mark We will then choose how we will determine the Final Mark: Semester One Mark + Semester Two Mark/2 = Year End Final This is a very generic explanation of how ‘Multiple Calculations’ works. Once you have all this done you need to associate weights with the Reporting Periods.

Pre-TAM Checklist – Page 29
Click the button to display following information when you first enter.
In this area that you will enter the weights to associate with each of the Reporting Periods. Since we are using the Multiple Calculations feature, we will need to set up this scenario as follows: Weigh each of these based on the mark they are calculating. 1st Mark 36wks weight = 20% of the “Semester One Mark” Calculated Grade. 2nd Mark 36wks weight = 40% of the “Semester One Mark” Calculated Grade. 3rd Mark 36wks weight = 0% of the “Semester One Mark” Calculated Grade. This will work out to 100% of the mark for the first semester 4th Mark 36wks weight = 20% of the “Semester Two Mark” Calculated Grade. 5th Mark 36wks weight = 40% of the “Semester Two Mark” Calculated Grade. 6th Mark 36wks weight = 40% of the “Semester Two Mark” Calculated Grade. This will work out to 100% of the mark for the second semester Semester One Mark weight = 50% of the Year End Final Semester Two Mark weight = 50% of the Year End Final This will work out to 100% of the mark for the final mark. You have now completed the Reporting Terms for the school based on the Multiple Calculation choice.

Pre-TAM Checklist – Page 30
Max # of Marks = 3 The Multiple Calculated Reporting Periods option also has the ability to be used with either the 1 or 3 Max # of Marks turned on in the Company File.
This works in the same method as Single Calculated Report Periods, please refer to that section for a detailed explanation. Following is an example of an 18 week course using this example:
In this example, an Exam Report period has not been created.
When viewing the Report Cycle weights, the Exam Grade report period has automatically been added by the system and a weight can be associated to this reporting period. Once you have completed these steps, your teachers will be ready to use the Teacher Assistant Module


"Technology has limitations on what it can accomplish. You do not…" Lou Gerstner
CEO IBM
Teacher Assistant
Release 8.0

Teacher Assistant - Page 2
Contents
Introduction ...........................................................................................................5 Conventions and Procedures used in this guide............................................5
Getting Started......................................................................................................6 Accessing Teacher Assistant.........................................................................6 TAWSTART.FMX Teacher's Assistant Start Screen......................................8 TAW800.FMX Preferences - Seating Plan ..................................................11 Edit User Profile...........................................................................................13
Gradebook Options.............................................................................................14 TAW800.FMX Preferences .............................................................................14
My Options...................................................................................................14 Other Settings..............................................................................................17 My Preps .....................................................................................................18 My Prep - Details .........................................................................................19 My Comments..............................................................................................21 My Grade Scale ...........................................................................................22
Spreadsheet ....................................................................................................23 TAW050.FMX TA Gradebook - MARK SUMMARY SPREADSHEET..........23 TAW915R.FMX TA Gradebook – Mark Summary Report (TA)....................24 TAW070.FMX TA Assignments ...................................................................25 TAW075.FMX TA View All Assignments .....................................................26 Adding Assignments ....................................................................................26 TAW060.FMX Teacher Enter Grade/Comments .........................................28 TAW920R.FMX Mark Entry Report (TA)......................................................29 TAW080.FMX TA Condensed Mark Entry ...................................................30 TAW061.FMX TA Missing Marks Screen ....................................................31 TAW090.FMX TA Reporting Term Marks – Total Points/Weigh % - based .32 TAW065.FMX TA Report Cycle Marks/Comments ......................................33 TAW921R.FMX Report Cycle Marks And Comments (Report)....................33
SCH140.FMX Secondary Mark Entry..............................................................35 TAW250.FMX Academic Progress ..............................................................37 TAW225.FMX Gradebook Archive History ..................................................38 TAW910P.FMX Academic Progress............................................................38
Teacher Assistant Attendance ............................................................................39 Select Attendance Date...................................................................................39 Attendance (List) .............................................................................................39 TAW900.FMX Attendance by Photo................................................................41 TAW906.FMX Attendance Summary ..............................................................42 TAW150.FMX Student Absences....................................................................44
Period by Class............................................................................................44 Period by Date .............................................................................................44
Reports ...............................................................................................................46

Teacher Assistant - Page 3
TAW020.FMX Class Hot Print - Class Reports ...............................................46 TAW405R.REP Class List - Parameter ......................................................47 TAW217R.REP Class Record – Parameter.................................................50 TAW910P.FMX Academic Progress Report - Parameter ............................53 STU204R.REP Birthdays.............................................................................60 STU230P.FMX Medical List.........................................................................60 STU255P.FMX Mailing Labels.....................................................................61 STU275P.FMX Emergency Information.......................................................61 STU240R.REP Field Trip.............................................................................62 TAW925P.FMX Missing Assignment Report (TA) ......................................62 TAW930P.FMX Observation Report (TA) ...................................................63 TAW935P.FMX Failures Report ..................................................................63 TAW945P.FMX Failure Reporting Periods Report.......................................64 STU476P.FMX Student Timetables.............................................................64 STU415P.FMX Class List with Marks ..........................................................65
TAW020.FMX Class Hot Print - Home Room Reports ....................................65 TAW405R.REP Class List ...........................................................................66 TAW217R.REP Class Record .....................................................................67 TAW910P.FMX Academic Progress............................................................67 STU204P.FMX Birthdays.............................................................................68 STU230P.FMX Medical List.........................................................................68 STI275P.FMX Emergency Information ........................................................69 STU240R.REP Field Trip.............................................................................69 TAW930P.FMX Observation Report (TA)....................................................70
TAW020.FMX Class Hot Print - Team Reports ...............................................71 SCH092R.REP Team/Group Membership ..................................................71 TAW910R.REP Academic Progress............................................................72 STU204P.FMX Birthdays.............................................................................72 STU230P.FMX Medical List.........................................................................73 STU255P.FMX Mailing Labels.....................................................................73 STU275P.FMX Emergency Information.......................................................74
My Students ....................................................................................................75 TAW100.FMX Student Demographics.........................................................75 Demographics Tab ......................................................................................75 Parents/Emergency Contacts Tab ...............................................................76 Medical Tab .................................................................................................76 Schedules Tab.............................................................................................77 Observations Tab ........................................................................................78 TAW930P.FMX Observation Report (TA)....................................................79 Teams Tab...................................................................................................79 Programs Tab ..............................................................................................80 Fees/Assistance Tab ...................................................................................80
Other Features ................................................................................................81 Class Changes ............................................................................................81 TAW215.FMX Alerts/Follow-Up Observations .............................................82 STU713P.FMX Teacher Letters...................................................................83

Teacher Assistant - Page 4
TCH165.FMX Student Break-Out Activities .................................................84 TCH165.FMX Student Break-Out Activities .................................................85 STU175C.FMX Personal Student Notes......................................................86 TMW050.FMX Student Textbooks...............................................................87 STU552.FMX Student Diploma Screen .......................................................88 STU057.FMX Student Standardized Testing...............................................90 TAW040.FMX Read Message .....................................................................91 TAW030.FMX Send Message .....................................................................91
Appendices .........................................................................................................92 Appendix A - Navigation..................................................................................92 Appendix B - TA School Setup........................................................................93
Teacher Overrides .......................................................................................93 TAW110.FMX TA Configuration ..................................................................94
Appendix C - Reporting Periods ......................................................................95 Appendix D - Assessment Weighting and Mark Calculation............................97 Appendix E - Programs in Teacher Assistant ................................................107 Appendix F - Substitute Teacher Setup.........................................................110 Appendix G – Establish Teacher Assistant Configuration Options................112
SCH186.FMX School TA Config Screen ...................................................112 TAW120.FMX Teacher Assistant Class Transfer ......................................112

Teacher Assistant - Page 5
Introduction Teacher Assistant is part of a complete, web-enabled, user-friendly, real-time information system for the tracking and management of student data. It can be used to track attendance, manage assessments and access information to most effectively influence positive outcomes for your students. The base of operation in the Teacher Assistant is the Start Screen. Call it the “control panel” if you like; this screen puts you in firm control of teacher-associated activities. As a Teacher, you have easy and ready access to all pertinent information about My Students and My Classes. You can easily customize the program function through the Preferences button. Teacher Assistant was designed with parent access in mind and seamlessly interfaces with A.A.L.’s Parent Assistant.
Conventions and Procedures used in this guide This guide takes you on a walk-through of the Teacher Assistant module. The intent is to help you become familiar with the features of Teacher Assistant and prepare you for further exploration. The objectives of each of the sections of this guide are outlined below Section What it includes Introduction Background Information, Procedures and Basics Getting Started & Basics
Getting familiar with tools and menus. Exploring the teacher functions. Demonstrating ease of access to student information
Gradebook Options Discussing the user control that can be exercised by a teacher. TA Attendance Discusses how to take attendance in Teacher Assistant Reports Shows what reports can be produced in Teacher Assistant Appendices Details and additional information on issues, which were impractical to
discuss in the main body of the guide.

Teacher Assistant - Page 6
Getting Started Teachers will normally have direct access to Teacher Assistant. This means that when a teacher logs on to eSIS s/he is taken directly to the Teacher Assistant Start Screen. Alternatively, the Navigation button may be used. For the purpose of this guide we will assume that all users are accessing the system as teachers. See Appendix A for Navigation Procedure. eSIS facilitates controlled access to Teacher Assistant by Substitute Teachers. The logon procedure is exactly the same. The control is exercised at the school level via the School menu. Access to some or all the functions in Teacher Assistant can be granted for each substitute teacher. So, when a substitute teacher logs on, menu items and/or buttons may disappear reflecting the functions that are not available to this teacher. Prior to setting up Teacher Assistant, see the Appendix G – Configuring Teacher Assistant.
Accessing Teacher Assistant Direct Access
• Teacher is presented with a Login dialog similar to this:
• Enter relevant information as presented to you by your IS department and click Connect or press enter.
Note: Teachers who teach in multiple schools will see a Select Teacher screen where they can identify who they are and select what school they are working in.

Teacher Assistant - Page 7
• At this point a Teacher Alerts and Follow-up box may pop up indicating
that there are active Alerts/Follow ups for you on this date. Click OK to view the Alerts/Follow ups window, or click Cancel to ignore. The Alert will continue to pop up every 30 minutes until the “Complete Date” is entered.
• A Class Change notification also may pop up. This screen displays any additions or withdraws from your class. It displays the class, student and a message that says “Left class” or “New to class”. Check the “Read?” column to indicate that the change has been read. Once checked, that student no longer appears. Check All is available to expedite the process.

Teacher Assistant - Page 8
TAWSTART.FMX Teacher's Assistant Start Screen The Start screen facilitates easy and logical access to some of the basic teacher functions. Only classes, homerooms, teams and students attached to the current teacher are accessible on this screen. Note: Several functions are hidden behind the Setup Options button.
Screen shot with Classes selected
Screen shot with Home Rooms selected
Class List Classes
Home Rooms Students in the selected homeroom

Teacher Assistant - Page 9
Some items of note include: • A Team Teacher has access to the all functions on the Classes s/he is
team teaching but will not be able to set up Preps for the class. The teacher can add Assessments.
• The Lock item utility on the Menu Bar suspends your eSIS session. To resume your session at the exact place where you left simply input your eSIS password.
• The Action > Reports menu calls the Student Hot Print canvas.
• The AC (Attendance Complete) checkbox of the Class area may be used to indicate that attendance has been taken for the class. This allows the teacher to check this box on the Start screen instead of going into the Attendance screen. (This is usually used when all students are present).
• The Alert button provides selected information on the highlighted student.
• There are five option buttons and a check box on the upper left.
• The Classes option displays the Classes the logged-in teacher is scheduled to teach.
• The Home Rooms option causes the display of homerooms to which the teacher is attached. (This is an option more relevant to elementary schools perhaps and defaults if the school is not using courses)
• The Teams option causes the display of teams with which the teacher is associated. This connection is made in the Team/Group Maintenance using the Faculty Assigned field.
• Today’s Classes is checked by default. This causes classes being taught in the current semester, term day and tumble only to be displayed. Removing the check causes all classes for this teacher to be displayed. This check box is available when the Classes option is exercised.
Note: On non-school days, this function displays active classes that are in the semester/term.
• Current Students results in the display of students who are enrolled in the class.
• All Students results in students who have dropped the course being displayed (in red) also.
• The Classes Pane area displays Courses/Classes, Homerooms or Teams relevant to the choices activated above.

Teacher Assistant - Page 10
• The Class List area displays the list of students in the class, homeroom or team chosen in the Classes area.
• Notice that there may be an asterisk to the right of a student’s name indicating that this is a Special Education student. This feature is enabled/disabled according to your District’s business rules (Company File).
• My Classes gives you access to all of the record keeping activities including taking attendance, creating assessments and recording marks for them and producing reports. Setup Options are also part of My Classes but we have already covered these.
• There is a sequence column where a number may be entered to represent the order you wish the student to appear on class lists and reports. The Save Sequence button applies this order. The default name sequence is by last name. You may revert to this order at anytime by
clicking Setup Options > . The idea here is to facilitate any order a teacher may want to have a class list.
• The Navigate button on the lower right of the screen facilitates teachers with Security beyond the standard teacher role to access other functions in eSIS.
• At the bottom right the photo button displays a photograph of the selected student.
• This is the Exit button that takes you out of Teacher Assistant. (Note that you will be taken back to eSIS if you originally navigated to Teacher Assistant).
• Notice the Hot Print button on the lower right of the screen. You have a choice of reports based on the selected student.

Teacher Assistant - Page 11
TAW800.FMX Preferences - Seating Plan Path: Setup Options > Preferences > Seating Plan Setup button The Seating Plan Setup offers a 10X10 matrix within which a classroom’s seating arrangement can be configured. The teacher is located at the front of the class and photos of students can be moved around to suit just about any desired configuration. This plan drives the Attendance (Photo) function.
To start, click the Alpha Seating button. The Alpha Seating button is used to seat students based on last name. Seating begins in the first row using the number of columns entered (3 to 10). Example: 5 = 5 x 5.

Teacher Assistant - Page 12
• To move a student, double click on a picture. Double click several if you want to move more than one. The pictures disappear.
• Double click the new location to get a list box that is loaded with the student(s) you double clicked.
• Select the required student and click OK or simply double click the name. The student is now in the new location.
• To clear the Seating Plan and start a new one, select Alpha Class or Action Clear. This will destroy any previously saved seating plan and load up the list box with all students.
• Use to select other classes that you are teaching. This allows you to set up all of your seating plans.
Some items of note include:
• Students who are new to the class and yet to be assigned a seat, will show in the list that pops up when double-clicking.
• Students assigned to a seating plan who later drop the course or are taken out of the homeroom will show with a yellow background in the Seating Plan screen. They should be removed by double clicking. The Alpha Seating process will automatically remove such students.
• Use the print button to generate the Seating Plan Report. Guide

Teacher Assistant - Page 13
Edit User Profile Path: Setup Options > Preferences > Edit User Profile button This is where a teacher can change his or her password and email address.

Teacher Assistant - Page 14
Gradebook Options
TAW800.FMX Preferences The Preferences button facilitates customization of Teacher Assistant by a teacher. Options on Mark Calculation may be enabled, Course ‘Preps’ may be created and attached to the desired reporting period, a Comment bank may be built and a custom mark scale may be established by a teacher.
My Options Path: Setup Options > Preferences button
The lower three buttons are discussed in other sections of the TA documentation

Teacher Assistant - Page 15
• Select either Report Cycle or Cumulative as the calculation type. If you choose Cumulative then select either Cumulative grade by grouping or Simple Cumulative grade. See the Appendix for further details on these choices.
• This dropdown list provides a choice of the 2 equations, which may be used for Reporting Period mark calculation in the Gradebook. Teacher Assistant Gradebook also offers 2 cumulative calculations. See the appendix at the end for a rigorous discussion of Mark Calculation and the 4 equations.
IMPORTANT: Your choice of mark calculation relates to ALL of your classes. Once a single assignment is entered into your gradebook, the calculation is grayed out and cannot be changed without deleting ALL assignments in all gradebooks.
• Enable View/Use Assignment Weights to activate a field on the Assessment Detail canvas of TAW070.
• Enable Use Assignment Type Weights, Use Category Weights and/or View (Use) Report Cycle Weights to cause a column for each to be displayed on the Prep Details canvas of the above TAW800. Items not enabled have no impact on the calculation of marks.
Note: SAVE your choices before creating your prep.
• Note that the label “View Report Cycle Weights” may change to “Use Report Cycle Weights” based on the School Business Rules. If it reads “View…” the teacher must use the established reporting cycle weights. If it reads “Use…” the teacher can use reporting cycle weights and can change the value of cycle weights. Checking this field, displays this column in Prep Classes Report Cycles on the Prep Details screen.

Teacher Assistant - Page 16
• (Reporting) Term Average. There are 2 calculation methods available for TAVG %. How you set up “TAVG% Include Weight” on/off will affect the way the TAVG% column is calculated.
If this is unchecked, the TAVG% column in the spreadsheet (TAW050) will display the student’s total grade for the Reporting Period selected for all assignments. For example, if you are viewing Reporting Period 2, the TAVG% column will display the student’s overall grade in Reporting Period 2 for all assignments.
When viewing Reporting Terms “All”, a student’s overall grade will be displayed, but this does not take into consideration Report Cycle Weights.
If TAVG% Include Weights is turned on (TAW800), the TAVG% column on TAW050 uses a different calculation method. The TAVG% will show the student’s cumulative grade to date for the selected Reporting Term.
For example, when viewing Reporting Term ‘2’, the TAVG% will show the student’s average of Report Cycle ‘1’ and Report Cycle ‘2’ combined. When viewing Report Cycle ‘3’, this column will display the student’s cumulative grade across Report Cycle 1, 2, and 3. This cumulative grade will include report cycle weights, if they have been applied.
When the system calculates the student’s “cumulative” average grade of for instance, report cycle 2, the application will always look for a posted grade first - for both report cycle 1 and report cycle 2 - to use for the average. If there is no posted grade, it will then use the student’s current grade for the report cycle, as calculated on the spreadsheet (TAW050).
• Determine if assessments will be displayed by Ascending or Descending
order of due date. If due dates are the same, it sorts by alpha. Note: Alpha Sort starts with uppercase then lower case alpha.
• Numeric Score Default Determines what score most of your assessments will be. Defaults to that score when adding new assessments.
• Set the Failure Threshold for assessments. Marks below the threshold are color-coded purple in the GradeBook. This default is also used on some reports.
• Default Display Assessment default how many assessments show on the mark spreadsheet screen.

Teacher Assistant - Page 17
• The Delete Assessments feature is used at Year End. If checked the Year End process will wipe the teacher’s gradebook clear of assessments so they start out fresh. Otherwise, the assessments from last year will remain for the teacher to use again.
• The tab “School Mark Scale” may change to “My Mark Scale” based on the School Business Rules.
• The Help button provides details about mark calculation
Other Settings • A check mark in Allow Shared Access to Student Progress, allows all
teachers teaching a student to be able to view the student’s performance in your class. This is read only and is meant to help teachers get an overall picture of students’ current performance. Used on Academic Progress screen.
• A check mark in Rounding Grades causes the use of standard mathematical rounding to render all ‘officially reported’ marks as whole numbers. If left unchecked, the numbers are truncated. Example 98.99 = 98. Note that rounding does not take place in the GradeBook but is done for marks posted to eSIS.
• A check mark in Count Blank Grades as Zeroes causes the calculation of averages for the student or class to include the blank as a zero mark for the student.

Teacher Assistant - Page 18
My Preps Path: Setup Options > Preferences button > My Preps tab Prep is a set of business rules for a common course/subject. Note: A class can only associate with a prep but you can have many classes in a prep. This is a listing of the areas that you teach, usually by subject area. These are the subjects to which you will attach the specific courses such as grade 10 Phys. Ed. or grade 9 Science. Select an item and click the Details button to view the setup details or click ADD to create a new Prep. Setup Options > Preferences > My Preps tab Guide

Teacher Assistant - Page 19
My Prep - Details Path: Setup Options > Preferences button > My Prep Tab > Details button This is where the structure of your assessment strategy is defined.
• Identify: the Classes to be attached to your prep area.
• Define the Categories (Unit of Study) or strands of your subject area (prep) that you will be assessing.
• Identify the Types of assessment you will be using in your strategy.
Some items of note include: • The prep name at the top of this window is either created on this window
for a new prep or is displayed if selected from the previous canvas to view Details.
• Prep Classes is the critical link and will make this class available for
attachment to an assessment, and then for mark entry in the GradeBook. Use the Select Classes button to select a class from the list of classes you teach. A Class can be attached to one Prep only. Note: Classes already assigned by another teacher will be checked and displayed in a blue font.

Teacher Assistant - Page 20
Use the Delete button to remove a class. Delete is only possible for a class that does not have an assessment assigned to it in the GradeBook. See appendix D for a complete discussion of weights.
• Prep Classes Reporting Cycle: the reporting cycles and associated
weights are displayed for the selected class above. Based on the School’s Business rules you may or may not be able to modify the weights. If the weights column is not displayed the “View/Use Report Cycle Weights“ the checkbox is disabled on the My Options canvas.
• The use of Prep Categories and Prep Assessment Types is a matter of
business practices and the design of your assessment strategy. Teacher Assistant provides you with the flexibility and power to implement any strategy you choose. If you have chosen to Weight, then the weight column is available in each case, and you can enter a weight for each item.
• Prep Categories (Unit of Study) is a sub-group of your Prep. This may be
used to identify strands of your prep for which you specifically want to accumulate marks. Alternatively, some teachers my choose not to use this sub-group, in which case one generic item such as General must be set up for use in the GradeBook.
• Prep Assessment Types is a sub-group of your Prep Categories. This
may be used to identify the nature or mode of assessment such as homework, tests, etc. Choose from a popup list of items defined by the District/Board. If you have no need to track the accumulation of marks by Assessment Types then you need not use this sub-group. Again, one generic item such as Assignments must be setup for use in the GradeBook.
• At Least one Prep Category and one Prep Assessment Type must be
setup because these are required items when setting up an Assessment in the GradeBook.

Teacher Assistant - Page 21
• The Default checkbox causes the associated Assessment Type or
Category to auto-populate the GradeBook when creating new Assessments. Only one checkbox can be enabled but this can change as the teacher decides.
My Comments
Path: Setup Options > Preferences > My Comments tab A teacher may create a bank of comments to be used in the gradebook and with progress reports. The code is for internal use by the computer. Enter your comment in the description area. Use the replacement characters to personalize comments to the selected student.
$ (Preferred Name) takes the student’s preferred name and places it in the comment.
# (His/Her) replaces appropriately based on the gender of the student. @ (He/She) replaces appropriately based on the gender of the student.

Teacher Assistant - Page 22
My Grade Scale Path: Setup Options > Preferences > School Grade Scale tab Note: Teachers can only change the Low/High/Conv. Numbers not the Alpha Marks/Grades. You may identify the non-numeric marks that you plan to use, if the tab reads My Mark Scale. Otherwise you will not be able to override anything. This depends on the School business rules. If Teachers are not allowed to override the school’s mark scale then you will be able to view the Mark Scale for the entire school. Note that while any character or group of characters may be identified as a valid mark, the norm is as indicated on the screen below. This window is also used to identify a mark as Pass or Fail and to set its numeric equivalent.
• Your custom mark scale overrides the schools mark scale.
• Notice that you may easily revert to the school’s mark scale by clicking the button Setup, if available.

Teacher Assistant - Page 23
Spreadsheet The Spreadsheet is the pulse of Teacher Assistant. All assessments relevant to the subject, teacher’s classes and students taught by the teacher can be accessed through the Spreadsheet. Assessments can be created, deleted or updated. Classes can be attached to assessments thereby giving the assessments life, in that the students in an attached class now become available for grading on the attached assessment. A teacher can create a repertoire of assessments to be used over as many years as needed. Assessments from this stock can be attached to and detached from current courses as required by the teacher.
TAW050.FMX TA Gradebook - MARK SUMMARY SPREADSHEET Path: Spreadsheet This window provides access to student marks by class. Filters may be applied to view marks for a specific Reporting Period, Assessment Category or Assessment Type.
An Item of Note includes:
• If you wish to print a hard-copy of your gradebook (spreadsheet), click on the hot print button and a small pop-up with a checkbox to indicate if you wish to print with student names (see example below)

Teacher Assistant - Page 24
TAW915R.FMX TA Gradebook – Mark Summary Report (TA)
An “Assignments Legend” can be found on the final page summarizing the various Assignments /Categories used for the gradebook (spreadsheet).
• The color code on the screen provides information about a mark. Refer to
the Color Legend button for details. Note that Extra Credit Assignments are color-coded. Failure is determined by the threshold set in Preferences.
• Screen Totals (Total, Earned, Avg%) relate to the assignments shown on the screen, and the filtering of Category and Assignment Type whereas TAVG% (see page 13 for details) is for the active Reporting Period.
• The AVG% column displays the student’s average for the specific Reporting Period, Category, and Assignment Types selected from the drop down selections on TAW050. This is useful in determining how students are doing on particular assignment types.

Teacher Assistant - Page 25
As you change your selection within the drop down boxes, the student’s average will re-calculate and display based on what has been selected. Unless you have selected “All” Reporting Terms, when viewing the student’s average, it is for a specific Reporting Term only. For example, if you select Reporting Term ‘2’, you will see the student’s grade they have earned in Reporting Term ‘2’ only.
• Click Reporting Term Grades to review the actual (raw) mark and the Posted mark for all the Reporting Terms.
• To enter comments that will appear when a student receives that mark, click on the Enter Grade/Comments button.
• Click the Add Assignment button to add new assessments.
• Click the View/Change Assignment button to edit assessments.
TAW070.FMX TA Assignments
• Click the View All Assignments button to view all assignments.

Teacher Assistant - Page 26
TAW075.FMX TA View All Assignments
• Click the Remove This Assignment From C… button to delete an assessment. Repeat this for all classes that have the assessment attached then go select the assessment. As long as there are no classes on the right, you will be able to delete it.
Adding Assignments Path: Spreadsheet > Add Assignment button Use this button to create a new assignment. This capability is available from several windows.

Teacher Assistant - Page 27
Some items of note include: • Name: Enter a descriptive name for assignment. When the tab is pressed,
the first five characters of the name appear in the short name and the full description appears in the Narrative.
• Short Name: This is used in other screens and reports where brevity is required. 5 characters auto populates from the Name field but can be changed.
• Score Type: A Hard coded list. Choices here affect Enter Mark/Grade Comments where radio buttons may be displayed instead of numeric entry fields.
• Pass Value and Fail value: These items are relevant to Score Type choices of Pass/Fail and Complete/Incomplete and are available ONLY if one of these two choices is made. The idea is to attempt to ascribe a numeric value to these two score types.
• Score Max: The Maximum score that can be achieved on this assessment. This is used in the calculation of percentage performance.
• Weight: Displays if it was selected in Preferences. Otherwise it will not display. The number entered here can be a whole number or a decimal. This value determines the impact a mark will have on its Assessment Type, Category and ultimately the Final Mark. See Appendix D for a complete discussion of weight
• Check the Use Standardized Test Scores to
• Category: Select from the list that you set up in Preferences. May populate with the default if set.
• Assessment Type: Select from the list that you set up in Preferences. May populate with the default if set.
• Assign Date/ Due Date: This determines the order on the Mark Summary screen and shows on progress reports based on that date (which must be a school date).
• Create Date: A tracking date for the creation of an assessment. Presumably, assessments will be used over a period of several years so this date facilitates tracking.
• Extra Credit: An extra-credit assessment will add points to the individual student’s points but does not impact the total points for the sum of all the assessments. This is added to the total of the assessments.
• Post to Parent Assistant Date: This date is the trigger date for posting assignments to AAL’s cutting edge Parent Assistant.
• Narrative: A text box for entering a description of the assessment. Defaults to the Short Name.

Teacher Assistant - Page 28
• Parent Tip: Text information entered here will be accessible through the Parent Assistant.
• Enter Grade/Comments: Takes you directly to the Mark Single screen.
• Add This Assessment to the Other Class…: Use this button to attach this assessment to classes other than the initial one. Select the class you are assigning the assessment to and check the Assign? Checkbox.
Note: Only classes attached to the same Prep will display.
TAW060.FMX Teacher Enter Grade/Comments Path: Spreadsheet > Enter Grade/Comments This is what it is all about! Enter this screen, make the relevant selections and input the mark attained. If the test was given to other classes then select a different class.

Teacher Assistant - Page 29
An item of note includes:
• You can print a Mark Entry Report with comments by clicking on the Hot Print button located on
TAW920R.FMX Mark Entry Report (TA)
A Class Avg can be found at the bottom of the Mark Entry report. • Select the class Reporting Term/Assessment for mark entry.
• A list of students is displayed. Enter mark in the Mark column. The % is automatically calculated based on the Score Max and the Mark attained.
• Late is a log indicating the student was late for the assessment.
• Exempt excludes this mark from the calculation of averages. New students are auto-exempt from prior assignments and are coded green.
• Condensed Grade Entry calls TAW080 where the class list is displayed in 3 columns along with a mark entry column.
• Mark Comment selected here populates the student’s Academic Progress window.
• Use the Edit comment button to select from the comment bank.

Teacher Assistant - Page 30
• Comments in the My Comments section were setup in the My Preferences area whereas School Comments were setup in the School > Mark Entry area of eSIS. Note that there is a free form area at the bottom.
• You can copy the first mark or comment down. Note: Save your first comment/mark before copying.
TAW080.FMX TA Condensed Mark Entry Path: Spreadsheet > Condensed Mark Entry button Here you have the Class list organized in 3 columns. You may find this compact access useful. Note that comments cannot be entered on this screen. The Enter Grade/Comment button takes you back to TAW060.
Teacher Assistant - Page 31
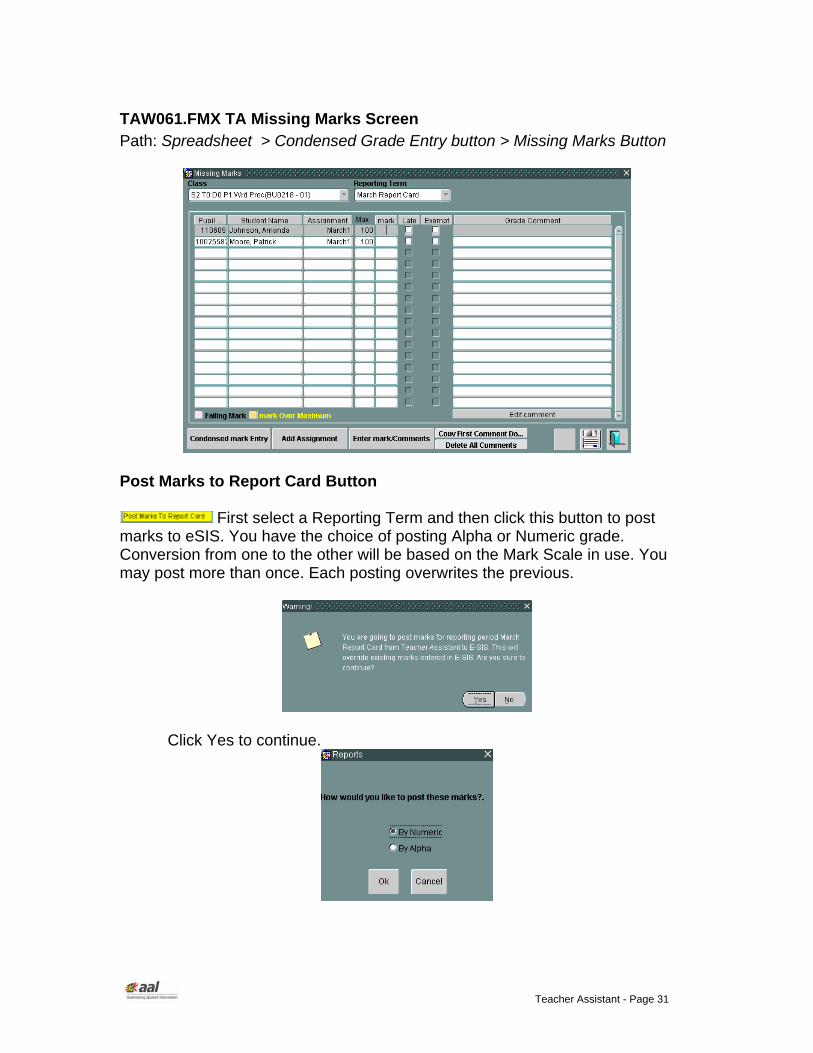
TAW061.FMX TA Missing Marks Screen Path: Spreadsheet > Condensed Grade Entry button > Missing Marks Button
Post Marks to Report Card Button
First select a Reporting Term and then click this button to post marks to eSIS. You have the choice of posting Alpha or Numeric grade. Conversion from one to the other will be based on the Mark Scale in use. You may post more than once. Each posting overwrites the previous.
Click Yes to continue.

Teacher Assistant - Page 32
TAW090.FMX TA Reporting Term Marks – Total Points/Weigh % - based Path: Spreadsheet > Reporting Term Marks button The actual (raw) mark in TA and the Posted mark for all of the Reporting Terms are displayed. There may be a difference if rounding is enabled in Preferences or if the Posted mark was changed. The (raw) TA mark cannot be changed here. The Exam Grade column may not be displayed if ‘# of marks’ is set to one in the Company File. The Final Grade is calculated based on the weighted average of the displayed marks.
Some Items of Interest:
• The Calculate Final button generates the Final Grade and will proceed to posting. Depending on the School Business rules, you will calculate your Final from the TA column or the Post column. All grades in the Post column may be updated. They will be color coded to show that they were manually changed.
• Use the Go To Comments Entry Screen button to access TAW065 where comments may be entered.

Teacher Assistant - Page 33
TAW065.FMX TA Report Cycle Marks/Comments
TAW921R.FMX Report Cycle Marks And Comments (Report)
• The above Report Cycle Marks and Comments Report prints exactly what is shown on the TA Report Cycle Marks/Comments screen through the Hot Print button located on the bottom right-hand side of TAW065.
• The Go To Mark Entry Screen button takes you to SCH140 where both
marks and comments may be entered.

Teacher Assistant - Page 34
Note:
• If a reporting period does not have any marks entered then it is treated as exempt.
• When you click on the Calculate Final Grade button and the system finds a “Posted Mark/Grade” that was manually updated, the following message displays: “You have chosen to recalculate the Final Grade. Do you wish to override the existing posted grades/marks for all students?”
• If you choose NO, the marks are recalculated but any “Posted Mark/Grade” for students for whom you have manually changed the mark are not posted.
• If you choose YES, the marks are recalculated all the “Posted Mark/Grades” are updated as normal.

Teacher Assistant - Page 35
SCH140.FMX Secondary Mark Entry Path: Mark Entry button For teachers who accumulate marks other than by using the GradeBook, marks may be manually entered into eSIS using this Mark Entry facility.
• Select the appropriate Course Length and Reporting Period.
• Select the required class from the Classes displayed.
• Click the Students button. NOTE: If the View Button has an asterisk (*) next to it, it means there are comments from the Gradebook.

Teacher Assistant - Page 36
• Enter mark in the Mark column next to relevant student.
• Use the? LOV to select up to 5 pre-defined Comments.
• Click the Save button and Exit back to the Teacher Assistant. Some items of note include:
• Check the box before saving to indicate that all student marks have been entered. This generates an entry on the Mark Entry Completion Log used for administrative purposes.
• Use the to go back one screen where a different mark Reporting Period and/or Class can be selected.
• The PREV column is populated with marks from the previous reporting period. So when we are performing mark entry for the second period for instance, we will see marks from the first period, if marks were entered for the first period!
• Absences and Lates for this class are displayed for each student for a Period Attendance school. For Daily Attendance schools, information must be manually entered.
• Click the View button to see a concatenation of the chosen comments.

Teacher Assistant - Page 37
TAW250.FMX Academic Progress Path: Start Screen > Academic Progress button This window gives us a good overview of a student’s performance by course and related assessment. This is a read only screen. Items in blue are calculated marks summarized in Assessment Folders. Other items represent actual Assessment Instruments used to measure performance.
Some items of note include:
• Student Classes listing all classes for the student. Selecting a class from this list causes the related assessments to be displayed below. Displays only assessments graded in current year. Note STDP after class name. Affected by TAW800 Preferences.
• list allows the selection of a specific assessment type like Final Exam for example. This list is populated based on Types setup in the My Preferences area.
• Total Late indicates the number of assessments that were handed in late and is accumulated from check marks in late box.
• Total Missing Marks indicate the number of marks that were not entered for the student but were supposed to be entered.
• Total Assessments indicate the number of assessments that were graded for this class.
• All items in the main area of the canvas have been discussed before. Information displayed here is populated from either the Assessment Detail or Mark Spreadsheet canvases of the GradeBook.

Teacher Assistant - Page 38
• The History button calls TAW225, Assessment History showing details of assessments taken by this student in prior years.
TAW225.FMX Gradebook Archive History
• Use to print an Academic Progress report for the selected student. Note that the date range on the parameter form is based on the Assessment Due Dates. Note that the Progress Report displayed, is based on the type of school (elementary, middle or high based on the District decisions).
TAW910P.FMX Academic Progress

Teacher Assistant - Page 39
Teacher Assistant Attendance Select Attendance Date Path: Setup Options > Select Attendance Date button Generally dates are not an issue because you will normally work in Teacher Assistant on the current date. If there is any reason you need to work based on a previous or forthcoming date then this button facilitates access. Simply use the plus sign to access a calendar and choose the required date.
Note: Based on District Business Rules, teachers may not have access to or may have limited access to previous Attendance entries.
Attendance (List) Path: Attendance List button Select the required class from the Teacher Assistant Start screen and click the Attendance List button. Remember, if all your students are present, just click the AC checkbox on the Start screen. This function allows you to take attendance on this class/homeroom/team and to view various bits of relevant information. The screen below assumes that the Classes option is selected. ATT005-Daily Attendance - Class Entry or ATT140 - Team/Club Entry will be called if the Homerooms or Teams options are chosen respectively. If you select the Attendance List button from the Homeroom view of the Start screen:
If you are a Period Attendance school you will see attendance for the homeroom by class.
If you are a Daily Attendance school, you will see attendance for the homeroom for Daily attendance.

Teacher Assistant - Page 40
If positive attendance is being used, the List button calls the positive attendance status of the active student.
Some items of note include:
• A Green Registration Date, Blue Part Time / Full Time status, Yellow Alerts and Grey Date buttons display for the active student. Click the yellow button to see the Alerts. Click the Gray Date button to change the attendance date.
• The attendance date is displayed along with the Tumble, Semester, Term and Day associated with the attendance date.
• Details about the class are displayed and total attendance numbers for the entire class is at the extreme right of this information. The list includes students in both “Parent” and “Child” courses.
• The Reason field is filled in at the school office level for Period schools and is available for Daily Schools.
• A running tally of Abs. and Lts. is kept for each student. Taking attendance simply requires check marking the appropriate box to the left of the student’s name and saving when completed. Check mark the Attendance Complete box before saving to populate a completion log.
• Click the Inactive Students button to view a list of students who dropped this class.
• Note that if you scroll to the left of this window there is a drop date and a re-entry date. If a student drops this course and reenters then these fields populate. If the student drops but does not re-enter then the fields do not populate…the Inactive Students list populates.

Teacher Assistant - Page 41
TAW900.FMX Attendance by Photo Path: Photo button Attendance by photo is a very handy feature. It facilitates easy identification of students by Substitute or other teachers unfamiliar with a group of students. The seating arrangement is setup in Preferences. If no seating plan exists, you will be taken to the setup area in Preferences where you can add or remove students.
Some items of note include: Use to select other classes that you are teaching.

Teacher Assistant - Page 42
TAW906.FMX Attendance Summary Path: Summary button This screen provides a bird’s eye view of students’ attendance for the selected month. The attendance statistics are for the active class. Weekends and non-school days are grayed out.
Some items of note include:
• The relevant class is displayed at the top left. • If 'Show Absent Type' is enabled, this will rebuild the temp tables and
display the following instead of 'A': 'S' if the absence was authorized (i.e. ATTENDANCE_CODES table
AUTHORIZED column value is ‘Y’ for the given reason code) 'E' if the absence was excused (i.e. ATTENDANCE_CODES table
SUB_ALLOCATION_CODE = 'EXAB' for the given reason code) 'U' if the absence was unexcused (i.e. ATTENDANCE_CODES table
SUB_ALLOCATION_CODE 'UNEXAB' for the given reason code) ‘A’ if the reason code is null 'L' will still be displayed for lates. No changes to the way lates are
handled
• You can select either to see attendance for a Month or for a Date Range (Up to 6 weeks). The month can be selected from the drop down “Show Attendance for” list. When the Date option is checked a date range selection becomes available. Note: A report can only be printed when Month is the choice. When “Date” is selected the Print button is disabled.
• For each student, information is displayed for the entire year/semester Tot or month Mth.

Teacher Assistant - Page 43
• As we move across the screen we see attendance information for each day of the selected month.
• Use to select other classes that you are teaching. This allows you to set up all of your seating plans.
• Use the print button to generate Attendance Summary Reports TAW906R or TAW907R, Period and Daily respectively.

Teacher Assistant - Page 44
TAW150.FMX Student Absences Path: Student Absences button This window displays the student attendance detail by class or by date.
Period by Class This canvas displays dates on which a particular class was missed.
Some items of note include:
• An attendance summary broken out by Authorized (school related), Excused (parent sanctioned), and Unexcused (no reason given).
• Select a class on the left pane to display the dates and reasons why the student was absent from this class.
• If attendance is taken at the class level then an entry is displayed in the Class Entry column.
• The Office Reason drives the classification of Authorized, Excused etc. and a blank or reason of unknown causes unauthorized.
Period by Date The Period by Date canvas below, displays the same basic information except we now see the classes that were missed on a particular date. The Grant column allows for specific holidays not available to the entire population but granted to some students based on say, religion. The choice of office reason triggers this field and it is not counted as an absence.

Teacher Assistant - Page 45

Teacher Assistant - Page 46
Reports Path: Reports button IMPORTANT: The Reports button gives you easy access to several reports relevant to the teacher’s Classes, Home Rooms, or Teams. The button is context sensitive to the option chosen at the very top of the Start Screen prior to entering reports button.
TAW020.FMX Class Hot Print - Class Reports • Using this form, you can print several reports relevant to the initial option
of Classes, Home Rooms or Teams.
• The Class Record, for example, is a list of students by class. This blank list facilitates many types of manual class record keeping such as the manual tracking of marks or attendance.
• The other reports are equally useful and informative. Take a look at the others.

Teacher Assistant - Page 47
TAW405R.REP Class List - Parameter The Class List button calls TAW405R.REP Class List. You can select the current class, All classes or a number of classes (if Multiple is selected).
The Select Classes canvas displays when the Multiple Button is selected. To select a class, click the class in the All classes window and click the Add button. To remove a class, select the class from the Selected classes window and click the Remove button.
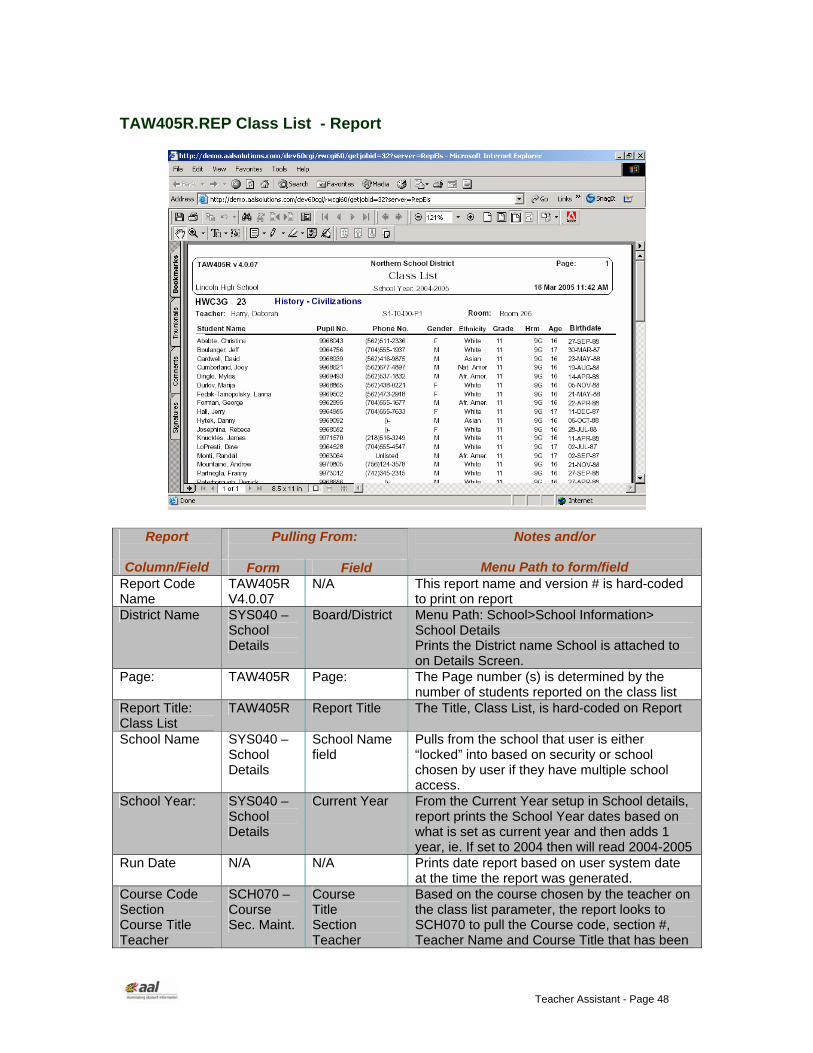
Teacher Assistant - Page 48
TAW405R.REP Class List - Report
Pulling From:
Report
Column/Field Form Field
Notes and/or
Menu Path to form/field Report Code Name
TAW405R V4.0.07
N/A This report name and version # is hard-coded to print on report
District Name SYS040 – School Details
Board/District Menu Path: School>School Information> School Details Prints the District name School is attached to on Details Screen.
Page: TAW405R Page: The Page number (s) is determined by the number of students reported on the class list
Report Title: Class List
TAW405R Report Title The Title, Class List, is hard-coded on Report
School Name SYS040 – School Details
School Name field
Pulls from the school that user is either “locked” into based on security or school chosen by user if they have multiple school access.
School Year: SYS040 – School Details
Current Year From the Current Year setup in School details, report prints the School Year dates based on what is set as current year and then adds 1 year, ie. If set to 2004 then will read 2004-2005
Run Date N/A N/A Prints date report based on user system date at the time the report was generated.
Course Code Section Course Title Teacher
SCH070 – Course Sec. Maint.
Course Title Section Teacher
Based on the course chosen by the teacher on the class list parameter, the report looks to SCH070 to pull the Course code, section #, Teacher Name and Course Title that has been

Teacher Assistant - Page 49
Pulling From:
Report
Column/Field Form Field
Notes and/or
Menu Path to form/field scheduled for the teacher on Course Section Maintenance.
Student Name Pupil No. Phone No. Gender Ethnicity Grade Age Birthdate
STU105 – Basic Student Demo
Legal Last Name and Legal First Name Pupil No. Phone No. Gender Ethnicity Grade Age Birthdate
All of the student demographic information for each of the columns on the class list is pulled from STU105 – Basic Student Demographics. If a telephone number does NOT populate, it is considered “unlisted” as this has been checked on STU105
HRM STU111 – Homeroom & Staff Assignment
Homeroom Dependent upon which semester/term, course is scheduled, report will look to the homeroom assigned at the time the course was scheduled to determine which homeroom to display.
Total Students TAW405R Total # of Students listed
The Total Students count is based on the number of students listed on the report

Teacher Assistant - Page 50
TAW217R.REP Class Record – Parameter Calls TAW217R.REP Class Record. You can select the current class (homeroom), All classes or a number of classes (if Multiple is selected).
Once your selection(s) is made, you click on “continue button” and it takes you to the heading pop-up screen, which allows you to design your own headings for the Class Record Report. You can type up to 15 characters (alpha or numeric) for each heading.
Helpful Suggestions for use:
Headings could be setup for a “visual gradebook” to allow teacher’s to record marks manually as an alternative to using the electronic gradebook or in addition to using the gradebook.
Headings such as special classroom assignments could be utilized, eg. feeding fish, cleaning rabbit cage, wiping blackboards, etc.

Teacher Assistant - Page 51
TAW217R.REP Class Record – Report
Pulling From:
Report
Column/Field Form Field
Notes and/or
Menu Path to form/field Report Code Name
TAW217R V4.0.07
N/A This report name and version # is hard-coded to print on report
District Name SYS040 – School Details
Board/District Menu Path: School>School Information> School Details Prints the District name School is attached to on Details Screen.
Page: TAW217R Page: The Page number (s) is determined by the number of students reported on the class list
Report Title: Class List
TAW405R Report Title The Title, Class List, is hard-coded on Report
School Name SYS040 – School Details
School Name field
Pulls from the school that user is either “locked” into based on security or school chosen by user if they have multiple school access.
School Year: SYS040 – School Details
Current Year From the Current Year setup in School details, report prints the School Year dates based on what is set as current year and then adds 1 year, ie. If set to 2004 then will read 2004-2005
Run Date N/A N/A Prints date report based on user system date at the time the report was generated.

Teacher Assistant - Page 52
Pulling From:
Report
Column/Field Form Field
Notes and/or
Menu Path to form/field Course Code Section Course Title Teacher
SCH070 – Course Sec. Maint.
Course Title Section Teacher
Based on the course chosen by the teacher on the class list parameter, the report looks to SCH070 to pull the Course code, section #, Teacher Name and Course Title that has been scheduled for the teacher on Course Section Maintenance.
Student Name Pupil No. Gender Grade Hrm
STU105 – Basic Student Demo STU111 – Staff & Homeroom Assignments
Legal Last Name and Legal First Name Pupil No. Gender Grade Hrm
All of the student demographic information for each of the columns on the class list is pulled from STU105 – Basic Student Demographics for Student Name, Pupil No. Gen. And Grade. The Homeroom is pulled from STU111 – Staff and Homeroom Assignments and prints the homeroom assigned to student based on the when the Course/Class is scheduled on the student record.
Male Students Female Students Total Students
TAW217R Gen. and No. of students listed
The total Male Students and Female Students is calculated based on the number of students listed on the report and the gender assigned to each student. The Total Students is calculated based on the TOTAL number of student scheduled on the course and listed on report.

Teacher Assistant - Page 53
TAW910P.FMX Academic Progress Report - Parameter This report has many options. Based on selections made, different progress reports are produced. As there are many different reports, please see table below parameter that correlate the selections made to the report that will be produced. The fields are optional. You can put a message (Message to Parent) at the bottom of the report and you can print the report in Landscape or Portrait.
The following chart breaks-down what items checked on parameter screen will produce the various reports that follow. Note: If “nothing” is checked, it will produce TAW913R Parameter Item Description Report Title Title defaults as “Academic Progress Report (TA)” however, this
can be changed by user. Select Classes & Multiple button
If you wish to report a single class, choose from drop-down. If you wish to choose multiple classes to print at once, click on the multiple button and select the classes to be included.
Report Cycle Choose the reporting cycle that corresponds with the desired report period.
Category A user can choose a particular category of the gradebook setup or “All” categories to be included.
Assignment Type A user can choose a particular assignment type in the gradebook setup or “All” types to be included.
Select Student A user can select a single student from the class or multiple students from the class to include when printing the progress report
Assignment From Date & To Date
Choose only those assignments for a specific date range.
Group by Unit of Study If this is checked, Report TAW910R (landscape) or TAW910RP (portrait) will print – see example that follows.
Group by Assessment Type
If this is checked, Report TAW911R (landscape) or TAW911RP (portrait) will print – see example that follows.

Teacher Assistant - Page 54
Parameter Item Description Both Group by Unit of Study AND Group by Assessment Type
If both of these are checked, Reports TAW912R (landscape) or TAW912RP (portrait) will print – see example that follows.
Include Summary by Assessment Type
If this is checked and Group by Unit of Study and/or Group by Assessment Type is NOT checked, Report TAW913R (landscape) or TAW913RP (portrait) will print – see example that follows.
Include Class Average If this is checked and Group by Unit of Study and/or Group by Assessment Type is NOT checked, Report TAW913R (landscape) or TAW913RP (portrait) will print – see example that follows.
Include Assign Date & Due Date
If this is checked and Group by Unit of Study and/or Group by Assessment Type is NOT checked, Report TAW913R (landscape) or TAW913RP (portrait) will print – see example that follows.
Include Signature If this is checked and Group by Unit of Study and/or Group by Assessment Type is NOT checked, Report TAW913R (landscape) or TAW913RP (portrait) will print – see example that follows.
Order by Due Date If this is checked and Group by Unit of Study and/or Group by Assessment Type is NOT checked, Report TAW913R (landscape) or TAW913RP (portrait) will print – see example that follows.
Include Absences from this Class
If this is checked and Group by Unit of Study and/or Group by Assessment Type is NOT checked, Report TAW913R (landscape) or TAW913RP (portrait) will print – see example that follows.
Absences from Date and To Date
If this is checked and Group by Unit of Study and/or Group by Assessment Type is NOT checked, Report TAW913R (landscape) or TAW913RP (portrait) will print – see example that follows.
Message to Parent If this is checked and Group by Unit of Study and/or Group by Assessment Type is NOT checked, Report TAW913R (landscape) or TAW913RP (portrait) will print – see example that follows.
Include Version Number of the Report
If this is checked, it will print the report name and version at the top left-hand of all reports
Landscape or Portrait Defaults automatically to landscape, by can be checked to print portrait style (8 ½ by 11 inches)
• When everything is selected, it produces TAW912R or TAW912RP • When nothing is selected, it produces TAW913R or TAW913RP When
one or more of the following is selected, it produces TAW913R or TAW913RP Include Summary by Assessment Type, Include Class Average, Include Assign Date and Due Date, Include Signature, Include Absences.

Teacher Assistant - Page 55
TAW910R.REP Academic Progress Report
Note: When Group by Unit of Study is checked, TAW910R or TAW910RP (Portrait mode) is produced
Pulling From:
Report
Column/Field Form Field
Notes and/or
Menu Path to form/field Report Code Name TAW910P
V4.0.17 N/A This report name and version # is hard-
coded to print on report District Name SYS040 –
School Details
Board/District Menu Path: School>School Information> School Details Prints the District name School is attached to on Details Screen.
Avg – Average TPP – Total Points Possible TPE – Total Points Earned
TAW910R v 4.0.24
Hard-coded These three definitions are hard-coded based on the TA gradebook definitions
Page: TAW910R V4.0.24
Page: The Page number (s) is determined by the number of students chosen from the class list
School Name SYS040 – School Details
School Name field
Pulls from the school that user is either “locked” into based on security or school chosen by user if they have multiple school access.
Report Title: TAW910P Report Title The Title, Academic Progress Report

Teacher Assistant - Page 56
Pulling From:
Report
Column/Field Form Field
Notes and/or
Menu Path to form/field Academic Progress Report TA
V4.0.17 (TA), is the default set on Report parameter that can be modified by user.
Date/Time: N/A N/A The date/time that prints on report comes from system date/time at the time the report was printed.
Student Name, Pupil Number
TAW910P V4.0.17 STU105 – Basic student demographics
Select Student Legal Last Name Legal First Name Pupil Number
Based on the student selection field on the parameter screen, the Student Name will be pulled from STU105 – Basic demographics screen, Legal Last and First name fields. The Pupil No. is also pulled from STU105.
Class Absences TAW910P V4.0.17
Include Absences from Class is “checked”
If user checks ‘Include Absences from Class, Absences from Date and to Date will appear and a date range is input to be included on the report
Class Period Teacher
SCH070 – Course Section Maintenance
Course Title, Section scheduled, and Teacher Name
Based on the class chosen and Teacher assigned to course/section in SCH070 – Course Section Maintenance, the associated Course Title/section, Period and Teacher name is printed on report.
Reporting Term TAW910P V4.0.17
Report Cycle The report prints what the user chose for the Report Cycle on the parameter screen
Avg TPP TPE
TAW050 Total Earned Avg %
The Avg, TPP and TPE is pulled from TAW050, the TA Gradebook under the columns Total (TPP), Earned (TPE) and Avg % (Avg)
Layout of Report on TAW910R grouped by unit of study
TAW910P V4.0.17 TAW070 – TA Assignments
When Group by Unit of Study is checked look to the Category & Name columns on TA - Assignments
The layout of the Academic Progress Report (TA) for TAW910P (Group by Unit of Study) is determined by the order in which the assignments were created in TAW070 – TA Assignments. The report looks at the Reporting Term, the Category chosen and the list of assignments created. To determine the layout on the report, refer to the user’s TA Assignments, look to the order (sequence) created (by category) and this should match. If “All” categories is chosen, it will print in alphabetical order as assignments were created.
Class Average Assign Date Due Date Summary Message From Teacher Parent Signature
TAW910P v4.0.17 TAW050 – TA Gradebook TAW070 – TA Assignments
Assign Date/Due Date pulled from Add Assignment screen on TAW050, Parent Signature from TAW910P
The class average is calculated by the number of students in the class and the marks associated for each student – Total Mark / # of students = Class Average. The Assign date and Due date and Summary of Assignment Types and Student Avg are all pulled from the “Add Assignment” screen located on TAW050 – TA Gradebook and/or the TAW070 – TA Assignments.

Teacher Assistant - Page 57
TAW911R.REP Academic Progress Report
Important Note: When Group by Assessment Type is checked, TAW911R (landscape) or TAW911RP (Portrait mode) is produced. The report fields/columns and layout are exactly the same as TAW910R (detailed above) except the summary area is located at the “bottom” of the report instead of showing after each Unit of Study.

Teacher Assistant - Page 58
TAW912R.REP Academic Progress Report
Important Note: When Group by Unit of Study AND Group by Assessment Type are both checked, TAW912R (landscape) or TAW912RP (Portrait mode) is produced. The report fields/columns and layout are exactly the same as TAW910R (detailed above) except the report groups first by Unit of Study and THEN by Assessment Types for each area listed.

Teacher Assistant - Page 59
TAW913R.REP Academic Progress Report
Important Note: When none, one or more of the following are checked*:
Include Summary by Assessment Type Include Class Average Include Assign Date and Due Date Include Signature Include Absences
TAW913R (landscape) or TAW913RP (Portrait mode) is produced. The report fields/columns and layout is similar to TAW910R (detailed above), however it only prints the Assignment Name and does not group by either Unit of Study or Assessment types. The report gives you a TOTAL summary to each Assignment Type at the bottom of the report along with the student average for the assignment. * Group by Unit of Study AND Group by Assessment Type are NOT checked for this report

Teacher Assistant - Page 60
STU204R.REP Birthdays The Birthday List button calls STU204R.REP Birthdays. Select the Sort order for the months you want and enter the date you want the ages calculated on. The report gives you a list of students and their birth dates and ages.
STU230P.FMX Medical List The Medical List button calls STU230R.REP Medical List. Select a Sort order. The report gives you a list of your students and any medical details on them.

Teacher Assistant - Page 61
STU255P.FMX Mailing Labels The Mailing Labels button calls STU255R.REP Mailing Labels. Select the options to print Mailing Labels.
STU275P.FMX Emergency Information The Emergency List button calls STU275P.FMX Emergency Information. This report shows the students and their emergency contacts.

Teacher Assistant - Page 62
STU240R.REP Field Trip The Field Trip button calls STU240R.REP Field Trip. Select a Sort order and indicate if you want to see the Parent’s permission on the report.
TAW925P.FMX Missing Assignment Report (TA) Missing Assignment Report button calls TAW925R.REP Missing Assignment Report (TA) Select the criteria you want included in the report, which shows students who have missing assignments. If the Select Classes field or the Select Student fields are left blank, All Classes or All Students will be included. If the Date fields are left blank, the whole year will be included in the report.

Teacher Assistant - Page 63
TAW930P.FMX Observation Report (TA) Observation Report button calls TAW930R.REP Observation Report (TA) This report shows a listing of observations made on your students. Select the appropriate criteria to be included on the report.
TAW935P.FMX Failures Report Failures Report button calls TAW935R.REP Failures Report. This report shows students failing assignments based on the Failure threshold. Select the criteria to be included on the report. If the Select Classes field or the Select Student fields are left blank, All Classes or All Students will be included. If the Date fields are left blank, the whole year will be included in the report.
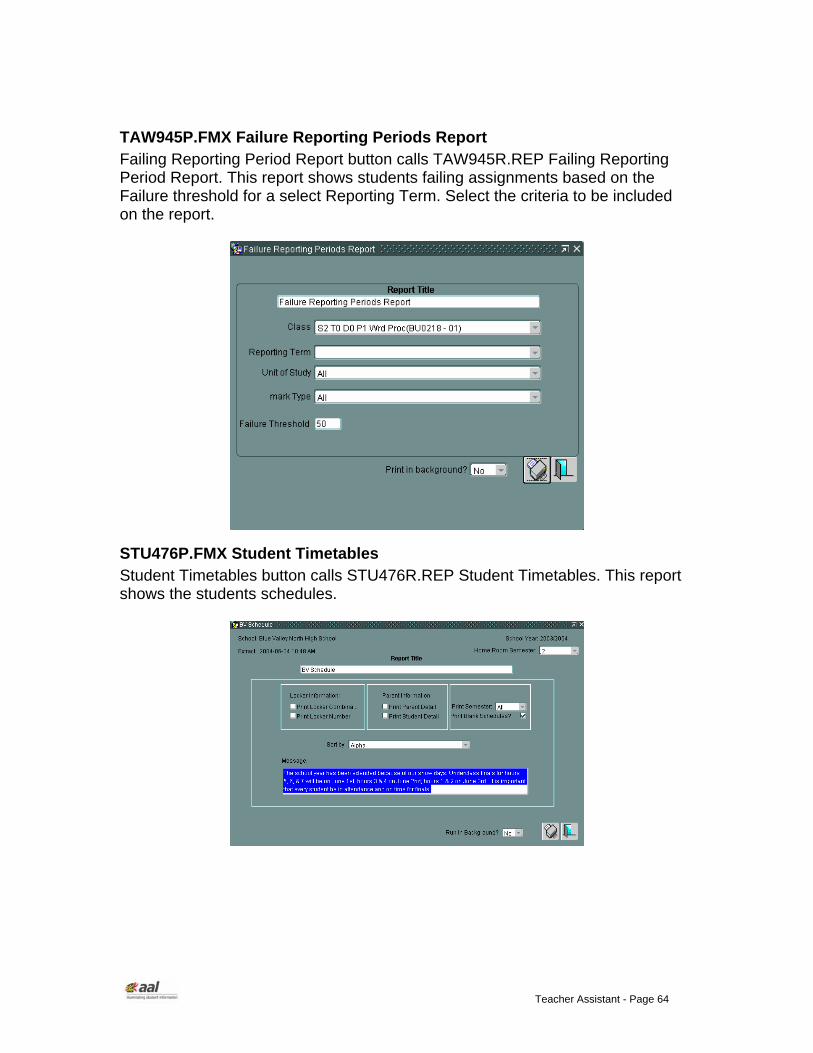
Teacher Assistant - Page 64
TAW945P.FMX Failure Reporting Periods Report Failing Reporting Period Report button calls TAW945R.REP Failing Reporting Period Report. This report shows students failing assignments based on the Failure threshold for a select Reporting Term. Select the criteria to be included on the report.
STU476P.FMX Student Timetables Student Timetables button calls STU476R.REP Student Timetables. This report shows the students schedules.

Teacher Assistant - Page 65
STU415P.FMX Class List with Marks The Marks List Button Calls: (Which report displays depends on the Board/District rules)
STU415R.REP Class List with Marks (1) STU415AR.REP Class List with Marks (1, Specify Extract) STU417R.REP Class List with Marks (3) STU417AR.REP Class List with Marks (3, Specify Extract)
The report shows a listing of students and their marks.
TAW020.FMX Class Hot Print - Home Room Reports

Teacher Assistant - Page 66
TAW405R.REP Class List Home Room List button calls Class List. You can select the current homeroom, All homerooms or a number of homerooms (if Multiple is selected).
The Select Classes canvas displays when the Multiple Button is selected. To select a class, click the class in the All classes window and click the Add button. To remove a class, select the class from the Selected classes window and click the Remove button.
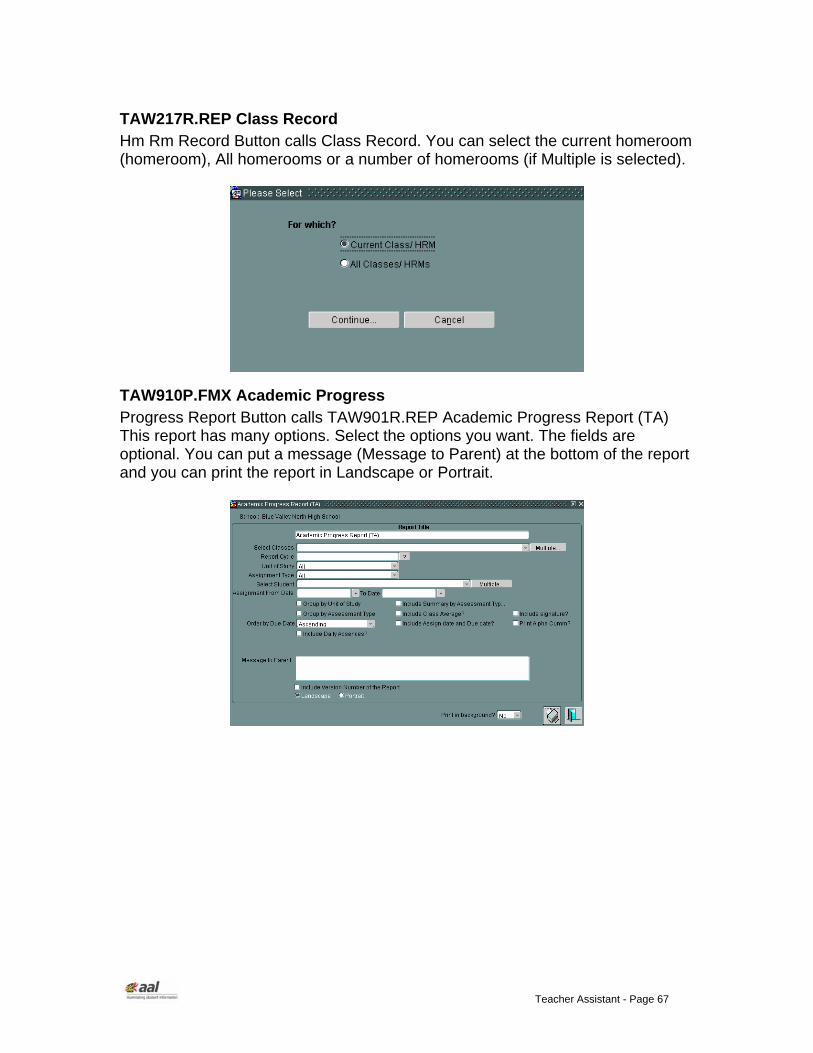
Teacher Assistant - Page 67
TAW217R.REP Class Record Hm Rm Record Button calls Class Record. You can select the current homeroom (homeroom), All homerooms or a number of homerooms (if Multiple is selected).
TAW910P.FMX Academic Progress Progress Report Button calls TAW901R.REP Academic Progress Report (TA) This report has many options. Select the options you want. The fields are optional. You can put a message (Message to Parent) at the bottom of the report and you can print the report in Landscape or Portrait.

Teacher Assistant - Page 68
STU204P.FMX Birthdays Birthday List Button calls Birthdays. Select the Sort order for the months you want and enter the date you want the ages calculated on. The report gives you a list of students and their birth dates and ages.
STU230P.FMX Medical List The Medical List button calls STU230R.REP Medical List. Select a Sort order. The report gives you a list of your students and any medical details on them.

Teacher Assistant - Page 69
STI275P.FMX Emergency Information The Emergency List button calls STU275P.FMX Emergency Information. This report shows the students and their emergency contacts.
STU240R.REP Field Trip The Field Trip button calls STU240R.REP Field Trip. Select a Sort order and indicate if you want to see the Parent’s permission on the report.

Teacher Assistant - Page 70
TAW930P.FMX Observation Report (TA) Observations Button calls Observation Report (TA). This report shows a listing of observations made on your students. Select the appropriate criteria to be included on the report.

Teacher Assistant - Page 71
TAW020.FMX Class Hot Print - Team Reports
SCH092R.REP Team/Group Membership The Teams List button calls the Team/Group Membership report.

Teacher Assistant - Page 72
TAW910R.REP Academic Progress The Progress List button calls TAW910R.REP Academic Progress
STU204P.FMX Birthdays The Birthday List button calls STU204R.REP Birthdays. Select the Sort order for the months you want and enter the date you want the ages calculated on. The report gives you a list of students and their birth dates and ages.

Teacher Assistant - Page 73
STU230P.FMX Medical List The Medical List button calls STU230R.REP Medical List. Select a Sort order. The report gives you a list of your students and any medical details on them.
STU255P.FMX Mailing Labels The Mailing Labels button calls STU255R.REP Mailing Labels. Select the options to print Mailing Labels.
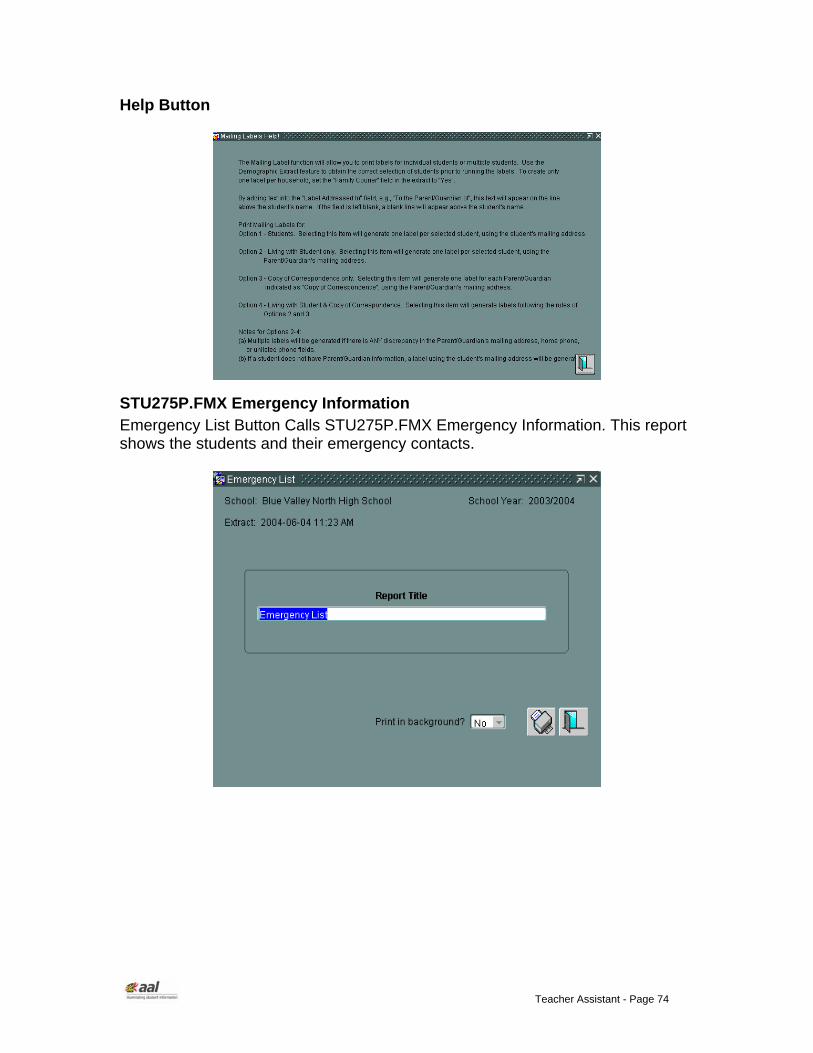
Teacher Assistant - Page 74
Help Button
STU275P.FMX Emergency Information Emergency List Button Calls STU275P.FMX Emergency Information. This report shows the students and their emergency contacts.

Teacher Assistant - Page 75
My Students You have quick access to a litany of information that can help effectively manage a student’s progress in your class and school.
You can access demographic information, performance information on all classes in which the student is enrolled and attendance summary information. When using these functions, look for filter options that will reclassify the displayed information and facilitate varying perspectives on the data.
TAW100.FMX Student Demographics Frequently used and critical information is drawn from numerous screens in eSIS. The information is reorganized and consolidated for quick access through one window with seven tabs or canvases. All canvases are read only except the Observations canvas.
Demographics Tab Path: Basic Demographics button Numerous bits of information are available on this screen including age, address, phone, citizenship, counselor, language and siblings in the system.

Teacher Assistant - Page 76
Parents/Emergency Contacts Tab Every person available for contact, with respect to this student, is listed here and every possible mode of contact is listed, including Email and Voice Mail, Crucial Custody, Living with and Access information is included at the top of the list. G]
Medical Tab Information regarding medical contacts, insurances and life threatening conditions is conveniently available.

Teacher Assistant - Page 77
Schedules Tab This canvas displays current year information about the student including: the Homerooms to which the student is attached, the Special Ed. Requirements that have been identified for the student with the associated interventions / teachers and the student’s Courses schedule. The display of Special Ed. Requirements is a function of the Company File, which is controlled at the District level. Note also, that we can view the student’s Courses planned for next year by selecting the Next Year radio button.

Teacher Assistant - Page 78
Observations Tab Teacher observations about performance or behavior can be entered here. Click in the date field to begin. Defaults to current date but can be changed. Any Observation entered can be designated as an Alert, a Follow up or neither, but not both.
Some items of note include:
• Check the Shared Access box to make your observations available to other teachers otherwise they remain private. This keeps Alerts active for you and other Teachers until the teacher who entered the observation enters a Completion Date.
• Check the Alerts or Follow up box to cause the Observation to populate the Alerts/Follow ups window.
• Use the Activation and Completion Dates to give the Alerts and/or Follow-ups a ‘shelf-life’.
• If there are Alerts or Follow ups you are notified on entering Teacher Assistant and you will be reminded every 30 minutes with a pop up until you have dealt with the items as read.
• The print button calls the Observation Report parameter form (TAW930P) and defaults to print the report for the selected student.

Teacher Assistant - Page 79
TAW930P.FMX Observation Report (TA)
Teams Tab This canvas displays the student’s involvement in various Teams. Available based on District business rules.

Teacher Assistant - Page 80
Programs Tab This canvas displays the student’s participation in various programs. Available based on District business rules.
Fees/Assistance Tab All Fees owed by the student is displayed on the left of this canvas and any Assistance entitlements are displayed on the right. Available based on District business rules.

Teacher Assistant - Page 81
Other Features Other Features include:
Class Changes Path: Other Features button > Class Changes A Teacher will receive notification of changes in his/her class list. If there is a change, the window below pops up when the teacher first enters the Teacher Assistant. A teacher can click the Class Change button to revisit the information anytime later.
Some items of note include:
• The Query button allows looking at change activity for prior days.
• The Message field displays a system generated message describing the change activity.
• Enabling the Read check box cause this message to drop off the list.

Teacher Assistant - Page 82
TAW215.FMX Alerts/Follow-Up Observations Path: Other Features button > Alerts/Follow Ups button Information displayed on this screen was entered in the Observation tab of the Basic Demographic window. Alerts and/or follow-ups for students of this current teacher are displayed for an Activation Date of today and prior. Messages created by the current teacher and those items with shared access are displayed. All data starting with Type and moving left is editable by the initiating teacher. Information beyond the valid date range will drop off the window. Observations without a completion date populate this window perpetually.

Teacher Assistant - Page 83
STU713P.FMX Teacher Letters Path: Other Features button > Letters button You may want to send a letter to a parent. You have direct access to letters, which have been identified as Teacher letters in the Company File. Calls the STU713 parameter form.

Teacher Assistant - Page 84
TCH165.FMX Student Break-Out Activities Path: Other Features button > Break-out Activities button Use this button to accessTCH165 to keep track of the time spent by a student on tasks outside of the classroom. This is useful for tracking both the whereabouts of a student and the time spent on various activities.

Teacher Assistant - Page 85
TCH165.FMX Student Break-Out Activities Path: Other Features button > Athletic Eligibility button Students in your current classes who are involved in team sports populate this list. You should visit this window at least weekly (between Thursday and Wednesday) and update their status to fail if necessary. A report can be run at the School Office level.

Teacher Assistant - Page 86
STU175C.FMX Personal Student Notes Path: Other Features button > Notes button This is a read only list of notes for the selected student. Information populating this screen was entered on STU176, which may be accessed by clicking on either the Detail button or the ADD button. Note: These Notes are accessible to any user who has access to that student’s records.
Some items of note include:
• Notes may be added or deleted by clicking on the appropriate button.
• Select any note from the list and click the detail button to view details of that specific note.
• These notes may be used for any purpose chosen by the school.
• A "follow up" or "call to office" trigger may be added to any note.

Teacher Assistant - Page 87
TMW050.FMX Student Textbooks Path: Other Features button > Student Textbooks etc. button This function allows the teacher to maintain a library of relevant textbooks and to administer the lending and recovery of these books.
Some items of note include:
• When you first enter this screen it will be blank, ensure that the Textbook field is active and query (F8) for all textbooks currently assigned to this class if any.
• Use the rollbar 1 to select any of the currently assigned textbooks.
• Students in this class will populate the main canvas indicating status pertaining to textbook.
• To assign a textbook to a student, type in the Textbook # and enter a date.
• To assign a new textbook to this class, click the Assign New button and select a title from the list that was set up by the district.
• The Update Student List will cause the class list to reflect current enrollment in the class.

Teacher Assistant - Page 88
STU552.FMX Student Diploma Screen Path: Other Features button > Student Diploma button This screen provides a consolidated view of a student's progress towards identified objectives such as Diploma, Standard Tests, Career Paths, Service Hours, etc. There are several related areas, which may be accessed by using the buttons at the bottom of the window.
Some items of note include:
• The values for Custom GPA and Rank are populated based on the last GPA calculation performed that was not an "Official GPA".
• Calls a canvas to capture the following information: • Diploma Met (Date) • Diploma Issued (Date) • Projected Grad Year (Date) • Grade 9 Entry Date • Date of First Entry to State High School • Grade at First Entry to State High School
Guide • Calls STU554 Career Development Modeling where
progress toward the Intended Career Development Program can be monitored and updated.
• Calls a window, which displays the achievement of Standard Tests requirements for the Diploma. If ‘Use Testing Categories’ is enabled in SYS050 for a student’s Diploma Type, a form “Standardized Testing Requirements” displays from the ‘Assessment Met’ or

Teacher Assistant - Page 89
‘Assessment Not Met’ button. The form shows the Standardized Testing Status and includes:
• The names of the Diploma Categories that were selected on SYS050 Diploma Type Maintenance.
• The number of Required tests entered on SYS050 Diploma Type Maintenance - Define Test Requirements.
• The number of tests completed.
• An override button to override the “Student Selected” Diploma Category. A counselor has authority to override the number of “Student Selected” Completed tests by selecting the Override button. A window opens and the counselor will enter the number of Completed Student Selected tests and a reason for the Override. The User and Date will post automatically. The override is then reflected in the Completed column.
• A Standard Tests button calls STU057 Student Standardized Testing. ‘Student Selected’ is included in the Diploma Category list. It is the last item listed and also includes the Required number of tests from the Diploma setup form. If a student has completed more than the required number of tests in any one category, ‘Student Selected’ tests displays as completed.
• If “Use Category Testing” is not enabled the original sub-screen of Test Results displays.
• Displays the current Intended Program, other Career Development Programs Achieved and Career Development Programs Not Achieved.
• Displays GPA calculated for student other than the "Official GPA" which is displayed in the Ranking area.
• Lists courses, which are used as substitutes for diploma categories. These substitutions would have taken place in STU544.
• Calls STU570, Individual Course Plan to view/edit a plan for the courses a student needs or wants to pursue.
• Calls STU180, (Student) Service Learning Hours Log where SSL may be tracked and attached to specific course.
• Lists high school credits earned while student was attending Middle School.
• Calls STU165, which is used to grant credits to a student. It may be because a new student is entering a district or because credit has been earned through extra-curricular work.

Teacher Assistant - Page 90
• These fields are populated after the "Official GPA" and Ranking report are run. Based on the GPA attained, the student is given a Rank out of the number of students included in the GPA calculation. The ‘Unweighted’ numbers are based on calculations, which do not include any "extra point scale" whereas the Weighted numbers do include such.
STU057.FMX Student Standardized Testing Path: Other Features button > Standardized Testing button Use this window to view Standardized Tests, which have been assigned to a student. This is a read only screen and any activity must be performed via the appropriate button.
• The management of Standard Tests may be viewed as hierarchical. Starting at the top, Test Type may be wide categories such as National Tests, State Tests, or District Tests. Test Name is a subset of Test Type and may be categories such as Gr. 9 Math, Gr.9 English, Literacy Tests, etc. Next we have Sub Test Name, which is a subset of Test Name and is the actual testing instrument. All three must exist and are setup at the district level.
• Calls a sub-window, Student Sub Test Score, where marks for the selected test may be entered.
• Calls STU645 where test questions may be loaded (if available) and scored.

Teacher Assistant - Page 91
TAW040.FMX Read Message Path: Other Features button > Read Message button Use this form to manage the list of messages sent to you by parents of your students through Parent Assistant. You may view messages you have not yet read or view all messages. You may also delete a message or send one in response to a selected message.
TAW030.FMX Send Message Path: Other Features button > Send Message button Create messages here and send to parent via the Parent Assistant.
Guide

Teacher Assistant - Page 92
Appendices Appendix A - Navigation If your login does not take you directly to Teacher Assistant, then you will be at the eSIS Start screen.
1. Click the Navigate button to call the Navigate to list box shown below.
2. Select Teacher Assistant 2 and click the Navigate to… button.
3. You are now at the screen where a date can be selected. Change if necessary and click OK.
4. You may have to scroll and select your school district. Instead of scrolling, DO NOT click anywhere. Just begin typing the first few letters of your school district. Click OK.
5. You are now at the teacher selection screen. Find your name and click OK.
6. You are now at the Teacher Assistant Start Screen.

Teacher Assistant - Page 93
Appendix B - TA School Setup Teacher Overrides The Report Cycle Weights and the School Mark Scale overrides shown below provide the school with control of weights and marks in Teacher Assistant. Path: School Menu > School Information > School Details (Current School Year Canvas)
• Override the weights setup for Reporting Periods by the School in SCH100.
• Override the Mark Scale set up by the School in SCH160 and to create a custom Mark Scale. This means that each teach may be able to set up their own Mark Scale.

Teacher Assistant - Page 94
TAW110.FMX TA Configuration Path: Administration > Navigation Maintenance > Teacher Assistant Configuration File Use this window to customize the terminology used in Teacher Assistant and to turn on/off the three listed tabs on the Demographics window of TA.
• The Mark Display Name, for example, can potentially be Mark, Grade, Points or something else. This Label will become the header for the Mark columns in various locations in the GradeBook.
• Similarly, the Assessment Display Name and the Category Display Name may be customized. The label entered is displayed wherever the label Assessment or Category would normally be displayed such as the Preferences area.
• The three checkboxes, when enabled, causes the corresponding Tabs and the relevant information to be displayed on the Demographics window of Teacher Assistant.
• Enter the form number for the Secondary Progress Report, Elementary
Progress Report and Middle/Senior Progress Report cards.

Teacher Assistant - Page 95
Appendix C - Reporting Periods Path: School Menu > School Information > Reporting Periods Course Lengths that have a Reporting Period that is Calculated causes the Report Cycle Weights button to be displayed. Use this button to assign weights to each listed reporting period.
Let’s take a look at two scenarios involving the Company File Reporting Options and Reporting Periods. Scenario 1: Company File Reporting Options = 3 Reporting Periods may be set up as follows:
1. Quarter 1
2. Quarter 2 (set as CALCULATED and FINAL REPORTING PERIOD)
3. The system-generated list item “Exam” is added. This is the same list item that appears in Preferences>Prep Detail.
4. In Mark Summary – the dropdown items for Reporting Terms would be Quarter 1, Quarter2, and Exam.
5. Attach an assessment to the “Exam” reporting period. Notes: The Mark for the Reporting Period is posted to the Mark column of SCH140 and is moved over to the Prev column when a new mark is posted. If the Reporting Period is a Final Reporting Period, then the Exam mark is posted to the Exam column in SCH140.

Teacher Assistant - Page 96
A Final Grade is calculated for a Final Reporting period that is a calculated Reporting Period. This mark is posted to the Final column of SCH140. Scenario 2: Company File Reporting Options = 1 Reporting Periods may be set up as follows:
1. Quarter 1
2. Quarter 2(set as CALCULATED and FINAL REPORTING PERIOD)
3. In Mark Summary – the dropdown items for Reporting Terms would be Quarter 1 and Quarter 2.
In this Scenario, if an Exam mark is required for reporting to SCH140, then a Reporting Period called Exam should be setup and posted. Note that posting of this ‘manual’ exam mark will not automatically occur with the Quarter 2 posting as had occurred in Scenario 1. Guide vi

Teacher Assistant - Page 97
Appendix D - Assessment Weighting and Mark Calculation Let’s start out by saying that there is no way to do this incorrectly. A teacher will select one of two equations available for mark calculation in the New Teacher Assistant. This selection is made in the Preferences area of Setup Options. Though this choice is available, you may have business rules restricting you to one. The selection is locked-in as soon the teacher attaches the first Assessment to a Prep. Teacher Assistant uses the combination of Score Max and Weight and your choice of formula to calculate marks within any of the groups listed in the sidebar. These groups form a hierarchy with marks being calculated at the lower level and fed up to the next higher level. The Max Score for Assessment Types, Categories and Report Cycles is set at 100 whereas that of Assessments varies as set by the teacher. We need to design an assessment strategy within this hierarchy. As teachers we know exactly what this means…we do it all the time. We allocate a part of the Final Mark to each Report Cycle and within each Report Cycle we allocate marks to each Area of Study/Strand/Category and within each Category we allocate marks to each Type of assessment and finally to the individual assessment instruments planned. The first equation is described as Percentages (Eq1). It is so named because each mark in a group is converted to a percentage and then each weight is applied to it as a percentage of total weight.
To get a ‘feel’ for how the above equation works consider the following:
• This is probably the more traditional approach to mark calculation. • The Max Score has no effect on the relative ‘value’ of the mark so 40/50
means exactly the same as 80/100. • If we wanted to make 80/100 of more relative ‘valuable’ then we must
assign a higher weight to this assessment. • So weighting is instrumental is ascribing relative value to an assessment.
The second equation is described as Total Points (Eq2). The focus here is on the actual Marks. Weight is applied directly to the Mark Earned and also to the Max Score and then this is converted to a percentage.

Teacher Assistant - Page 98
Consider the following about the above equation:
• The Max Score can be used to ascribe relative ‘value’ to an assignment. • The actual value of the Mark Earned and the Max Score impacts the
calculation. • Assessments with higher Max Scores have a greater impact on the
calculation. Let’s now take a detailed look at the calculation of marks for an Assessment Type called Assignment with 3 assessment instruments as shown below.
Percentages (Eq1): Using the above numbers and the formula below, the calculation is as follows:
Assignments = [(value of Assign 1 + value Assign 2 + value of Assign 3)]*100 = {[(30/50) * (0.2/1.1)] + [(15/20) * (0.5/1.1)] + [(25/60) * (0.4/1.1)]}*100 = 0.11 + 0.34 + 0.15 = 0.60 …. If no extra credits, then 0.60 x 100 = 60 marks is accumulated for Assignment. Total Marks (Eq2): Using the same numbers above and the formula below, the calculation is as follows:
Assignments = {[(Weighted value of Earned Marks for Assign 1 + Weighted value of Earned Marks for Assign 2 + Weighted value of Earned Marks for of Assign 3) / [(Weighted value of Score Max for Assign 1 + Weighted value of Score Max for Assign 2 + Weighted value of Score Max for of Assign )]}*100 = {[(30 * 0.2) + (15 * 0.5) + (25 * 0.4)] / [(50 * 0.2/) + (20 * 0.5) + (60 * 0.4)]}*100 = [6 + 7.5 + 10] / [10 + 10 + 24] = 23.5/44 = 0.53409 …. If no extra credits, then 0.53409 x 100 = 53.5 marks are accumulated for Assignment.

Teacher Assistant - Page 99
For Assessments that do not use Numeric Marks a numeric equivalent is assigned based on the following:
• Alpha Mark- SCH160 Mark Scale Entry or the Teacher’s Custom Mark Scale is used to obtain a numeric equivalent.
• Complete/Incomplete and Pass/Fail – Both these Score Types use a Pass Value and a Fail value, which must be set when the assessment is created. (see sidebar)

Teacher Assistant - Page 100
Total Points
Quiz 2Weight = 1
95/100
Quiz 3Weight = 1
60/75
QuizWeight = 2
88
Assig. 3Weight = 1
7/10
AssignmentsWeight = 1
70
TheoryWeight = 1
82
Quiz 1Weight = 1
20/25
QuizWeight = 2
80
Assig. 1Weight = 1
3/10
Assig. 2Weight = 1
24/25
AssignmentsWeight = 1
77
PracticalWeight = 4
79
Report Period 1Weight = 1
79
Level 1 - Assignments: Quizzes (Theory) = [(95 x1) + (60 x 1)] / [(100 x1) + (75 x 1)] = 155 / 175 = 88 (Quiz)
Assignments = (7 x1) / (10 x1) = 7/10 = 70 (Assignments)
Quizzes (Practical)
= (20 x1) / (25 x1) = 20 / 25 = 80 (Quiz)
Assignments = [(3 x 1) + (24 x1)] / [(10 x1) + (25 x1)] = 27 / 35 = 77 (Quizzes)
Level 4 Reporting Period
Level 3 Category
Level 2 Assign. Type
Level 1 Assignments

Teacher Assistant - Page 101
Level 2 – Assignment Type = [(88 x 2) + (70 x 1)] / (100 x 3) = 246 / 300 = 82 (Theory)
= [(80 x 2) + (77 x 1)] / (100 x 3) = 237 / 300 = 79 (Practical)
Level 3 – Category = [(82 x 1) + (79 x 4)] / (100 x 5) = 398 / 500 = 79 (Report Period 1)
Please Note: to simplify the example, rounding to whole #’s has been used
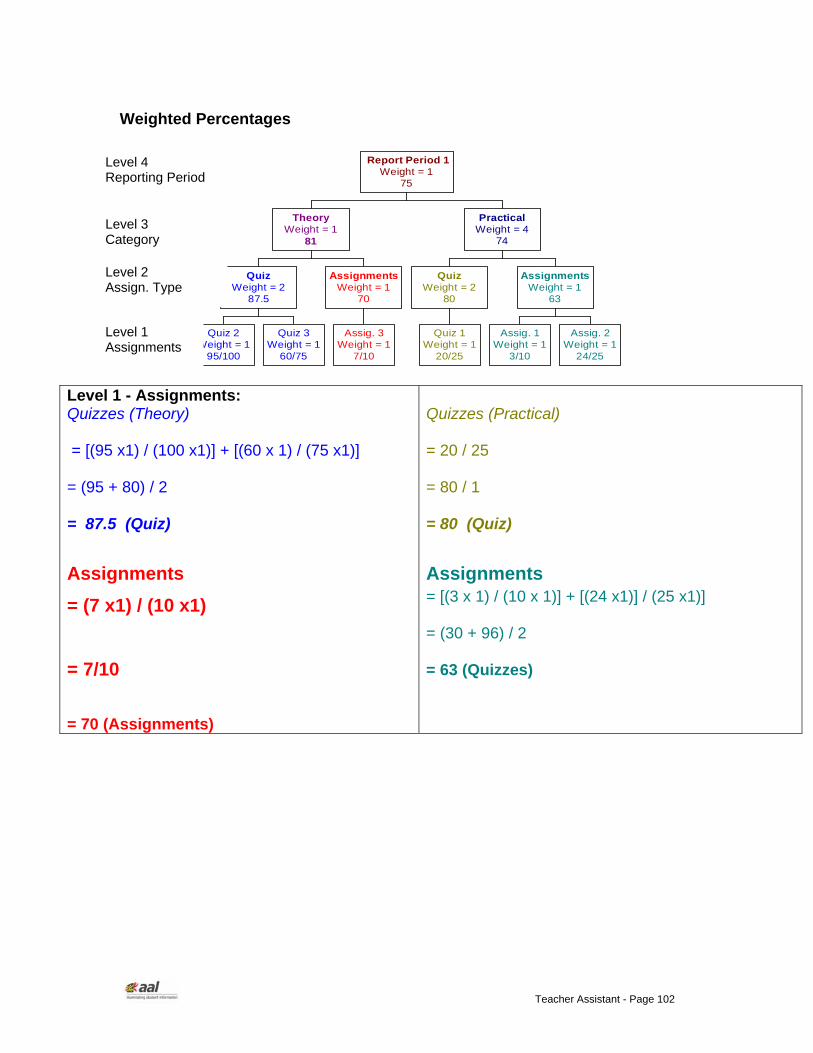
Teacher Assistant - Page 102
Weighted Percentages
Quiz 2Weight = 1
95/100
Quiz 3Weight = 1
60/75
QuizWeight = 2
87.5
Assig. 3Weight = 1
7/10
AssignmentsWeight = 1
70
TheoryWeight = 1
81
Quiz 1Weight = 1
20/25
QuizWeight = 2
80
Assig. 1Weight = 1
3/10
Assig. 2Weight = 1
24/25
AssignmentsWeight = 1
63
PracticalWeight = 4
74
Report Period 1Weight = 1
75
Level 1 - Assignments: Quizzes (Theory) = [(95 x1) / (100 x1)] + [(60 x 1) / (75 x1)] = (95 + 80) / 2 = 87.5 (Quiz)
Assignments = (7 x1) / (10 x1) = 7/10 = 70 (Assignments)
Quizzes (Practical) = 20 / 25 = 80 / 1 = 80 (Quiz)
Assignments = [(3 x 1) / (10 x 1)] + [(24 x1)] / (25 x1)] = (30 + 96) / 2 = 63 (Quizzes)
Level 1 Assignments
Level 2 Assign. Type
Level 3 Category
Level 4 Reporting Period

Teacher Assistant - Page 103
Level 2 – Assignment Type = [(87.5 x 2) + (70 x 1)] / (100 x 3) = 245 / 300 = 81 (Theory)
= [(80 x 2) + (63 x 1)] / (100 x 3) = 223 / 300 = 74 (Practical)
Level 3 – Category = [(81 x 1) + (74 x 4)] / (100 x 5) = 377 / 500 = 75 (Report Period 1)
Please Note: to simplify the example, rounding to whole #’s has been used

Teacher Assistant - Page 104
Posting Type = Report Cycle
Grade Calculation Process In this case Grade Calculation is based upon the Grade Calculation Method selected (For more info about this selection click the Help button on the Preferences screen) and will be based upon selection of the “Use Report Cycle Weights” option and “TAVG% Include Weight” on the Preferences screen.
If using Report Cycle Weights, and “TAVG% Include Weight” is checked Calculation takes into account the Grade obtained in the previous reporting cycles and respective weights and formula in use will be the following.
Student Grade =
(Marking Period 1 Grade * Marking Period 1 Weight) + …Sum (Marking Period nth Grade * Marking Period nth Weight) / (Marking Period 1 Weight +.. Marking Period nth Weight)
If using Report Cycle Weights but “TAVG% Include Weight” is checked
off or If user is not using Report Cycle Weights, Calculated Grade is based upon individual reporting cycle.
During Posting Process In this case Grade Calculation is based upon the Grade Calculation Method Selected for individual reporting cycle only and is not based upon “Use Report Cycle Weights” and “TAVG% Include Weight” option

Teacher Assistant - Page 105
Posting Type = Cumulative Grade Calculation Process. Using this option we have to decide between
Cumulative Grade by Grouping
Simple Cumulative Grade Following is the explanation for these two different methods to calculate cumulative grades.
A. Cumulative Grade by Grouping Cumulative grade is calculated by applying the formula selected for “Grade Calculation Method” (For more info about this selection click the Help button on Preferences screen) to all the assessments created so far, for a particular class across multiple reporting periods by grouping them assessment type first and then grouping them at Category (Area of Study) Level. There are two exceptions to this rule:
First Exception is where the reporting period is “Exam Reporting Period” where the calculation is for this reporting period only and does not take into account any other reporting cycle.
Second Exception is in the case where calculating Semester grade
during posting process or using “Calculate Final” on TAW090 Screen, where the calculation takes into account all the assessments so far, for a particular class across multiple reporting periods (this calculation is cumulative up to final reporting cycle) and Exam Reporting Period (This calculation is only for the exam reporting cycle) Formula to combine these two grades follows: - Grade for Final Reporting Cycle = (Cum grade for final reporting period X (100 – Exam Percent) + Exam Grade for exam reporting period X Exam Percent) / 100
B. Simple Cumulative Grade Cumulative grade is calculated by applying the following formula to all the assessments created so far, for a particular class across multiple reporting periods

Teacher Assistant - Page 106
Cum Grade = Sum (Mark Earned X assessment wt X Category Wt X Assessment Type Wt X Reporting Cycle Wt) / Sum (Max Mark X assessment wt X Category Wt X Assessment Type Wt X Reporting Cycle Wt) During Posting Process In this case Grade Calculation is exactly the same as explained above for “Grade Calculation Process” for Simple Cumulative Grade.

Teacher Assistant - Page 107
Appendix E - Programs in Teacher Assistant Program Name Version Screen Name ATT010 4.0.06 Period /Daily ATT.- Attendance Day Entry. ATT030 4.0.05 Daily Attendance - Team/Group Entry ATT100R 4.0.07 Period Attendance Mass Entry Screen ATT105 4.0.27 Period ATT.-Class Entry ATT140 4.0.10 Period Attendance – Team/Group Entry ATT571R 4.0.18 Attendance Summary SCH092R 4.0.02 Team List SCH138 4.0.08 Mark Entry SCH139 4.0.08 Mark Entry SCH140 4.0.33 Mark Entry SISLOCK 4.0.00 Password Lock STU057 4.0.16 Standardized Testing STU165 Equivalent Credits STU175 4.0.11 Notes List STU180 Service Learning Hours STU204P 4.0.05 Birthday List STU204R 4.0.04 Birthday List STU219P/R 4.0.00 Emergency Information STU230P 4.0.05 Medical List STU230AR 4.0.07 Medical List STU255P 4.0.08 Mailing Labels STU255R 4.0.04 Mailing Labels STU275P/R 4.0.29 Emergency List STU476R 4.0.04 Student Timetables STU552 4.0.29 Student Diploma STU552P/R Student Diploma Report STU570 Individual Course Plan STU713P 4.0.03 Teacher Letters TAW010 4.0.04 Student Hot Print TAW020 4.0.11 Class Hot Print TAW030 4.0.01 Send Messages TAW040 4.0.00 Read Messages TAW050 4.0.00 TA Mark Summary TAW060 4.0.00 Enter Marks/Comments TAW065 4.0.00 Comment Entry Screen TAW070 4.0.00 TA Add Assessments TAW075 4.0.00 All Assessments TAW080 4.0.00 Condensed Grade Entry TAW090 4.0.00 Mark Summary Full Screen TAW100 4.0.24 Student Demographics TAW105 4.0.00 Observation History TAW110 r.0.00 TA Configuration TAW150 4.0.07 Student Absences TAW200 Gradebook (TA)

Teacher Assistant - Page 108
TAW205 Mark Summary Full View (TA) TAW210 Master Assessment Types TAW215 4.0.05 Alerts/Follow-Up Observations TAW215R 4.0.03 Teacher Follow-Up Report. TAW217R 4.0.04 Class Record Report TAW217RB 4.0.03 Home Room Record Report TAW220 4.0.03 Athletic Eligibility TAW220P Athletic Ineligibility Report - Weekly TAW220R Weekly Athletic Ineligibility Report TAW250 4.0.10 Assessment Screen TAW255 4.0.00 Assessment History Screen TAW405R 4.0.06 Class List TAW405RB 4.0.03 Homeroom List TAW800 4.0.18 Preferences TAW900 4.0.17 Attendance by Photo TAW905 4.0.15 Seating Plan TAW905R 4.0.14 Seating Plan Report TAW906 4.0.09 Attendance Summary TAW906R 4.0.09 Attendance Summary Report (Period) TAW907R 4.0.01 Attendance Summary Report (Daily) TAW910P Academic Progress TAW910R Academic Progress TAW910RP 4.0.00 Progress Report Portrait TAW915R 4.0.08 Mark Summary Report TAW920R 4.0.04 Mark Entry Report TAW925P 4.0.02 Missing Assignment Report TAW925R 4.0.04 Missing Assignment Report TAW930P 4.0.02 Observation Report TAW930R 4.0.02 Observation Report TAW935P 4.0.00 Failures TAW935R 4.0.00 Failures Report TAW940P Progress Report TAW940R 4.0.00 Progress TAW945P 4.0.00 Student Failing Report Cycle TAW945R Student Failing Report Cycle Report TAWSTART 4.0.24 Teacher Assistant 2 TCH165 4.0.08 Break Out Activities TMW050 4.0.00 Student Textbooks USR010 4.0.03 Oracle Change Password Note: Three on the TA Configuration screen control, which Progress Report is generated for a school. LEAs have two choices, the Elementary Progress Report (TAW940P) and the Secondary Progress Report (TAW910P). One of the two program names must be entered for all three school levels. It is recommended that high schools use TAW940P and elementary schools use TAW910P. For middle schools, if students are taught by multiple teachers use TAW910P. If

Teacher Assistant - Page 109
students stay with one teacher throughout the day, use TAW940P. The difference between the two reports is that the Elementary version prints multiple course sections per page, when the courses are taught by the same teacher. The Secondary version prints one page per course section. There is no restriction on using the elementary report in a high school or vice versa. The decision is left up to district preference. Note: If the fields are left blank, teachers will be unable to run progress reports.

Teacher Assistant - Page 110
Appendix F - Substitute Teacher Setup A user at the appropriate functional position will setup and manage the Substitute Teacher functionality. Note that while the results of the substitute teacher setup manifest itself in the Teacher Assistant, the primary setup and administration is performed through the School/School Information/Substitute Teacher menu found on the eSIS Start Screen. The discussion that follows is a cursory exploration of how the setup affects the functionality of Teacher Assistant. When a ‘Sub’ logs in to eSIS s/he will be taken to Teacher Assistant based on the conditions exercised on the following screen.
Some items of note include:
• You may ADD/DEL ‘Subs’ and assignments. ‘Subs’ can have ongoing relationships with a school.
• Once in the system, a substitute can be given different assignments.
• Each assignment has a specific date range. A ‘Sub’ will be prohibited from entering eSIS if the system date is beyond the range.
• Each assignment is associated with a specific teacher who is absent. Based on the requirements of the assignment, varying combinations of access to Teacher Assistant functions can be granted.
• An absent teacher may want the substitute to enter grades in which case the substitute must have access to the GradeBook.

Teacher Assistant - Page 111
• Or it may be a school policy that substitute teachers never see students’ grades in which case the GradeBook and Academic Progress buttons will not be available in the Teacher Assistant.
• When a ‘Sub’ logs in s/he is taken to the classes of the teacher for whom s/he is ‘sub-ing’.
• Functions available to a sub are based on the Default role established by the District on SCH263 and the option applied above.

Teacher Assistant - Page 112
Appendix G – Establish Teacher Assistant Configuration Options
SCH186.FMX School TA Config Screen Use this form to establish: Teacher Override Options Default Grade Calculation methods Select the TA Class Transfer button to
TAW120.FMX Teacher Assistant Class Transfer Path: School > School Details > More Info > School TA Configuration > Class Transfer button Use this screen to transfer class preps and/or gradebooks, including assignment grades and assignment and posted teacher comments, from one teacher to another within TA. It can also be used to delete gradebook detail for a class.
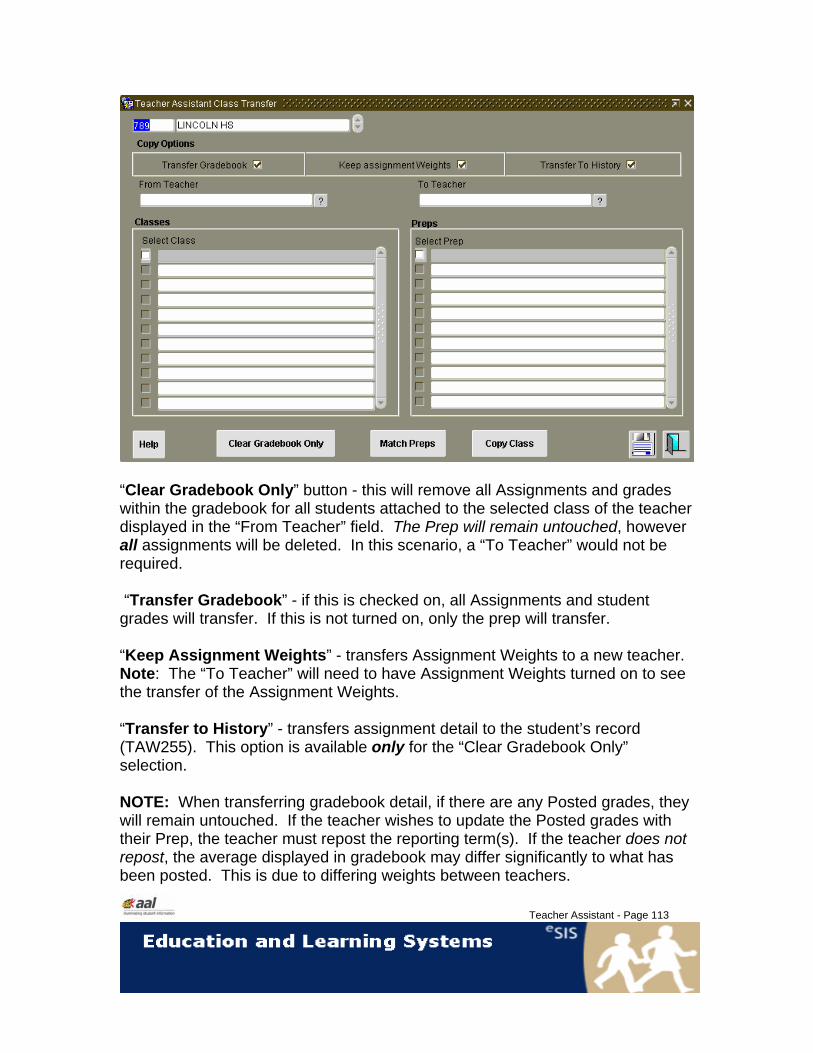
Teacher Assistant - Page 113
“Clear Gradebook Only” button - this will remove all Assignments and grades within the gradebook for all students attached to the selected class of the teacher displayed in the “From Teacher” field. The Prep will remain untouched, however all assignments will be deleted. In this scenario, a “To Teacher” would not be required. “Transfer Gradebook” - if this is checked on, all Assignments and student grades will transfer. If this is not turned on, only the prep will transfer. “Keep Assignment Weights” - transfers Assignment Weights to a new teacher. Note: The “To Teacher” will need to have Assignment Weights turned on to see the transfer of the Assignment Weights. “Transfer to History” - transfers assignment detail to the student’s record (TAW255). This option is available only for the “Clear Gradebook Only” selection. NOTE: When transferring gradebook detail, if there are any Posted grades, they will remain untouched. If the teacher wishes to update the Posted grades with their Prep, the teacher must repost the reporting term(s). If the teacher does not repost, the average displayed in gradebook may differ significantly to what has been posted. This is due to differing weights between teachers.

Teacher Assistant - Page 114

“The man who does things makes many mistakes, but he never makes the biggest mistake of all - doing nothing.”
Benjamin Franklin
Posting Grades to Report Cards
Release 7.1

Posting Grades to Report Cards - Page 2
Contents Introduction ................................................................................................. 3 Office Set Up................................................................................................ 3
Method One (Using Gradebook) .............................................................. 4 Method Two (Not Using Gradebook) ........................................................ 7
© The Administrative Assistants Ltd. 2004. All rights reserved. eSIS® is a registered trademark of The Administrative Assistants, Ltd. 2000 - 2004

Posting Grades to Report Cards - Page 3
Introduction There are 2 methods teachers can use to post grades.
Method one is for teachers who are using the gradebook. Method two allows teachers to post report term grades through teacher
assistant if they are not using the gradebook.
Office Set Up The start and end dates for teachers to posting grades can be controlled by the office. In Reporting Periods (SCH100) a Marking Start Date and a Marking End Date can be entered for each report period, for each applicable course length.
If the current date falls outside of the start and end date entered in SCH100, the teacher will receive a hard stop:
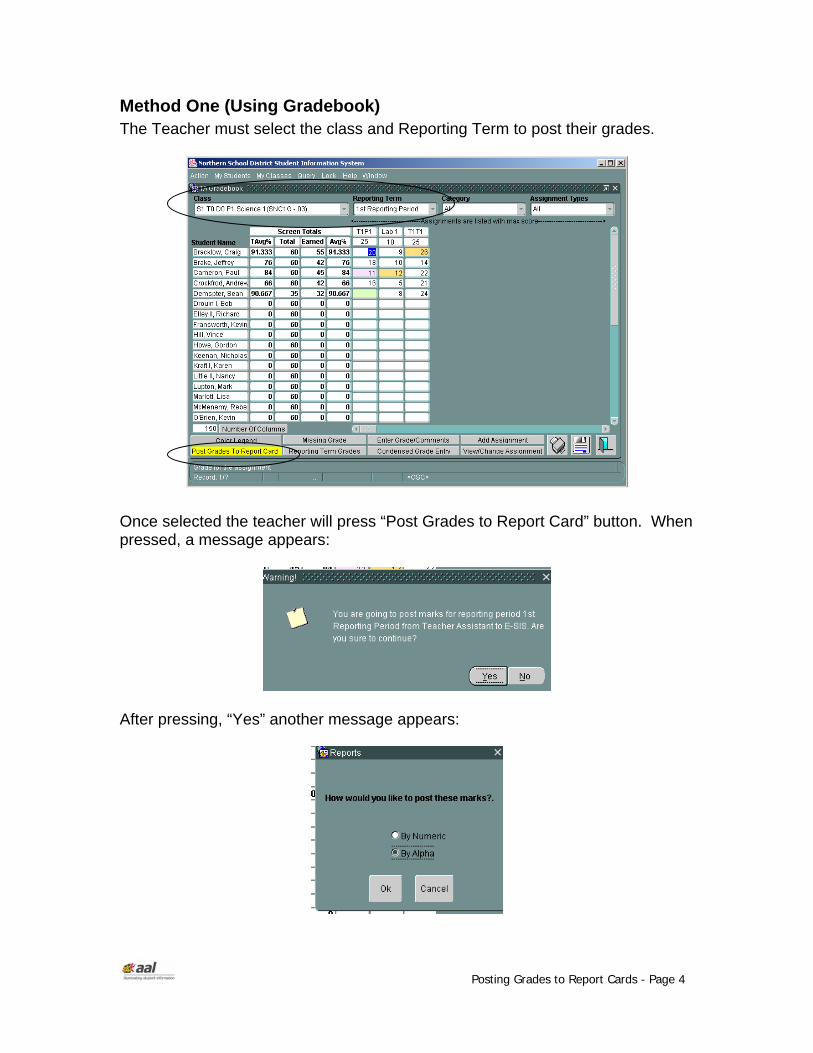
Posting Grades to Report Cards - Page 4
Method One (Using Gradebook) The Teacher must select the class and Reporting Term to post their grades.
Once selected the teacher will press “Post Grades to Report Card” button. When pressed, a message appears:
After pressing, “Yes” another message appears:

Posting Grades to Report Cards - Page 5
When selecting “Numeric” a numeric value will post to the students report card. If selecting “Alpha”, a letter grade will post. When calculating the grade, the system looks to the grade scale for the conversion scale:
Note: This screen will either read as “My Grade Scale” or “School’s Grade Scale” depending on the school set up.
The “T.A.” column is the reporting period grade calculated by the system based on the gradebook assignments and associated weights. The grade in the “TA” column cannot be modified by users.

Posting Grades to Report Cards - Page 6
The “Posted” column is the grade that is going to appear on the report card. The teacher can modify the grades in this column. For example, if the teacher would like to bump up a failing grade of D to a C, the teacher can modify this grade here. Once the grade has been changed and saved, the updated grade will appear in a burgundy color in the Post column to distinguish the updated grades. Note: In our example we are seeing letter grades, as we selected to post in “Alpha”. To enter the report card comments, the teacher must go to “Go to Grade Entry Screen”:
On this screen the teacher will enter in the comments by selecting from the ? selections under Comment, or directly typing in the comment # that corresponds to the comment they wish to add. Please note, there is space for 5 comments however they might not all print on the report card if there is not room available. Once all grades are posted and comments are entered, the teacher must check off “Mark Entry is Complete”. This will let the office know who has finished entering their grades. Once the teacher has finished posting and entering comments, when they exit back to the spreadsheet, the teacher receives a message:

Posting Grades to Report Cards - Page 7
Note: Teachers can re-post their grades as often as they wish, as long as it falls within the applicable date range. When a teacher re-posts it will re-calculate all of the students reporting term grades, including those that have had a manual change by the teacher.
Method Two (Not Using Gradebook) If a teacher is not using the gradebook to track assignments, they can still enter in the reporting term grades to post out to the students report cards. From the TA main menu, they will select “Grade Entry”: On the next screen, all of the teachers classes will display broken down by course length:
The teacher must select the applicable course length and reporting period using the scroll bar on the right side. As they scroll down, the class list will reflect in the “Classes” section of the screen. Once they see the class they want to enter grades for, they must highlight the class and press “Students”.

Posting Grades to Report Cards - Page 8
On this screen, the teacher can enter the student’s final report period grade under the “Mark” column. This is the grade that will appear on the student’s report card. They will also need to enter in the corresponding comment # under the “Comment” section. This can be done by entering in a # which corresponds to the comment, or by pressing the ? for a listing of available comments. Note: There is space for 5 comments however they might not all print on the report card if there is not room available. Once all grades and comments are entered, the teacher must check off “Mark Entry is Complete” to let the office know their grades and comments have been entered for the class.

1
Scenario #1 – Report Cycle/ Total Points
Weighting: Assignment Types
Projects =30 Tests = 70 Exam = 1
Report Cycle 1 (40%) Report Cycle 2 (40%) Exam (20%)
Final Grade
Project 1 = 8 / 10 Test 1 = 5 / 5 Project 2 = 10 / 50 Test 2 = 10 / 15
Project 3 =100 / 100 Test 3 = 1 / 5 Project 4 = 7 / 10 Test 4 = 5 / 10
Exam = 40 / 50
RC 1 = 40% x RC 2 = 40% x Exam = 20%
= [(8/10 + 10/50) x 30] + [(5/5 + 10/15) x 70] = (18/60 x30) + (15/20 x 70) = (30 % x 30) + (75% % x 70) = 9 + 52.5 = 62 %
= [(100/100 + 7/10) x 30] + [(1/5 + 5/10) x 70] = (107/110 x 30) + (6/15 x 70) = (97.3 % x 30) + (40 % x 70) = 29.19 + 28 = 57 %
= 40 /50 = 80%
= 62 % (40) + 57% (40) + 80 % (20) = 24.8 + 22.8 + 16 = 64 % Final Grade

2
Scenario #2 – Report Cycle/ Weighted Percentages
Weighting: Assignment Types
Projects =30 Tests = 70 Exam = 1
Report Cycle 1 (40%) Report Cycle 2 (40%) Exam (20%) Final Grade Project 1 = 8 / 10 Test 1 = 5 / 5 Project 2 = 10 / 50 Test 2 = 10 / 15
Project 3 = 100 / 100 Test 3 = 1 / 5 Project 4 = 7 / 10 Test 4 = 5 / 10
Exam = X / 50
RC 1 = 40% x RC 2 = 40% x Exam = 20%
= [(8/10 + 10/50) x 30] + [(5/5 + 10/15) x 70] = [(80% + 20%) x 30] + [(100%+66.67%) x 70] = (50%x30) + (83.34% x 70) = 15 + 58.34 = 73 %
= [(100/100 + 7/10) x 30] + [(1/5 + 5/10) x 70] = [(100% +70%) x 30] + [(20% + 50%) x70)] = (85% x 30) + (35 % x 70) = 25.5 + 24.5 = 50 %
= 40 /50 = 80%
= 73 % (40) + 50% (40) + 80 % (20) = 29.2 + 20 + 16 = 63 % Final Grade
3
Scenario #3 – Cumulative Grouping / Total Points
Weighting: Assignment Types
Projects =30 Tests = 70 Exam = 1
Report Cycle 1 Report Cycle 2 Exam (20%) Final Grade Project 1 = 8 / 10 Test 1 = 5 / 5 Project 2 = 10 / 50 Test 2 = 10 / 15
Project 1 = 8 / 10 Test 1 = 5 / 5 Project 2 = 10 / 50 Test 2 = 10 / 15 Project 3 = 100 / 100 Test 3 = 1 / 5 Project 4 = 7 / 10 Test 4 = 5 / 10
Exam = 40 / 50
Exam = 20%
= [(8/10 + 10/50) x 30] + [(5/5 + 10/15) x 70] = (18/60 x30) + (15/20 x 70) = (30 % x 30) + (75% % x 70) = 9 + 52.5 = 62 %
= [(8/10 + 10/50 + 100/100 + 7/10) x 30] + [(5/5 + 10/15 + 1/5 + 5/10) x 70] = (125/170 x 30) + (20/35 x 70) = (73.53 % x 30) + (60% x 70) = 22.06 + 40 = 64 %
= 40 /50 = 80%
= [64% x (100-20%) + 80 x20] / 100 = (64 x80) + 80 x 20 / 100 = 5120 + 1600 / 100 = 6720 / 100 = 67 % Final Grade
4
Scenario #4 – Cumulative Grouping / Weighted Percentages Weighting: Assignment Types
Projects =30 Tests = 70 Exam = 1
Report Cycle 1 Report Cycle 2 Exam (20%) Final Grade
Project 1 = 8 / 10 Test 1 = 5 / 5 Project 2 = 10 / 50 Test 2 = 10 / 15
Project 1 = 8 / 10 Test 1 = 5 / 5 Project 2 = 10 / 50 Test 2 = 10 / 15 Project 3 = 100 / 100 Test 3 = 1 / 5 Project 4 = 7 / 10 Test 4 = 5 / 10
Exam = 40 / 50
Exam = 20%
= [(8/10 + 10/50) x 30] + [(5/5 + 10/15) x 70] = [(80% + 20%) x 30] + [(100%+66.67%) x 70] = (50%x30) + (83.34% x 70) = 15 + 58.34 = 73%
= [(8/10 + 10/50 + 100/100 + 7/10) x 30] + [(5/5 + 10/15+ 1/5 + 5/10) x 70] = (80% + 20% + 100% + 70%) x 30 + (100% + 66.67% + 20% + 50%) x 70 = (270/400 x 30) + (236.67/400 x 70) = (67.5 x 30%) + (59.17 x 70) = 20.25 + 41.42 = 62%
= 40 /50 = 80%
= [62 x (100-20%) + 80 x20] / 100 = [(62x80) + 80 x 20] / 100 = [4960 + 80x20] / 100 = 6560/100 = 66 % Final Grade

5
Scenario #5 – Cumulative Simple
Weighting: Assignment Types
Projects =30 Tests = 70 Exam = 1
Report Cycle 1
Project 1 = 8 / 10 Test 1 = 5 / 5 Project 2 = 10 / 50 Test 2 = 10 / 15 = [(8x1x30x1x40) + (10x1x30x1x40) + (5x1x70x40) + (10x1x70x40) / (10x1x30x1x40) + (50x1x30x1x40) + (5x1x70x40) + (15x1x70x40) = 9600 + 12000 + 14000 + 28000 + / 12000 + 60000 + 14000 + 42000 = 21600 + 42000 / 72000 + 56000 = 63600 / 128000 = 50%
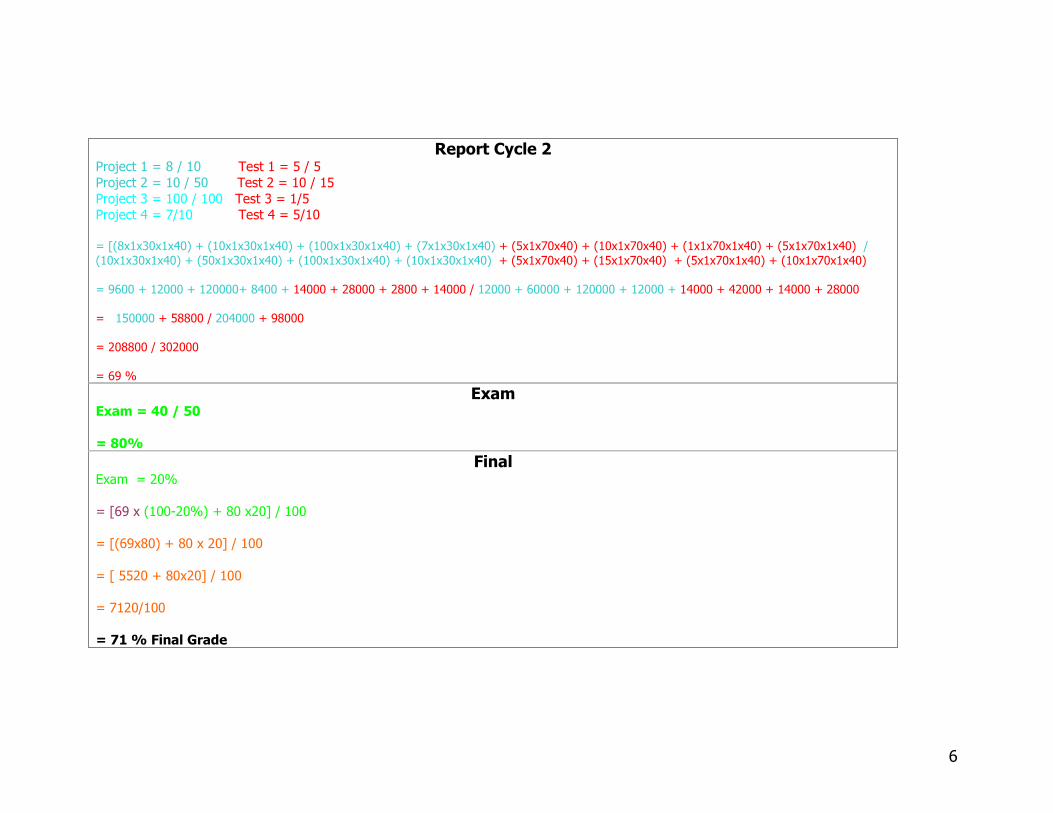
6
Report Cycle 2
Project 1 = 8 / 10 Test 1 = 5 / 5 Project 2 = 10 / 50 Test 2 = 10 / 15 Project 3 = 100 / 100 Test 3 = 1/5 Project 4 = 7/10 Test 4 = 5/10 = [(8x1x30x1x40) + (10x1x30x1x40) + (100x1x30x1x40) + (7x1x30x1x40) + (5x1x70x40) + (10x1x70x40) + (1x1x70x1x40) + (5x1x70x1x40) / (10x1x30x1x40) + (50x1x30x1x40) + (100x1x30x1x40) + (10x1x30x1x40) + (5x1x70x40) + (15x1x70x40) + (5x1x70x1x40) + (10x1x70x1x40) = 9600 + 12000 + 120000+ 8400 + 14000 + 28000 + 2800 + 14000 / 12000 + 60000 + 120000 + 12000 + 14000 + 42000 + 14000 + 28000 = 150000 + 58800 / 204000 + 98000 = 208800 / 302000 = 69 %
Exam Exam = 40 / 50 = 80%
Final Exam = 20% = [69 x (100-20%) + 80 x20] / 100 = [(69x80) + 80 x 20] / 100 = [ 5520 + 80x20] / 100 = 7120/100 = 71 % Final Grade

7
Scenario #6 – Multiple Calculated Report Cycle / Total Points
Weighting: Assignment Types
Projects =30 Tests = 70 Exam = 1
Report Cycle 1 (60%) Report Cycle 2 (40%) RC Semester 1
Project 1 = 8 / 10 Test 1 = 5 / 5 Project 2 = 10 / 50 Test 2 = 10 / 15
Project 3 = 100 / 100 Test 3 = 1 / 5 Project 4 = 7 / 10 Test 4 = 5 / 10
= [(8/10 + 10/50) x 30] + [(5/5 + 10/15) x 70] = [(18/60) x 30] + [(15/20) x 70] = (30%x30) + (75% x 70) = 9 + 52.5 = 62%
= [(100/100 + 7/10) x 30] + [(1/5 + 5/10) x 70] = (107/110) x 30 + (6/15) x 70 = (97.27% x 30) + (40% x 70) = 29.18 + 28 = 57%
= (62% x 60) + (57% x 40) = 37.2 + 22.96 = 60%

8
Report Cycle 3 (60%) Report Cycle 4 (40%) RC Semester 2
Project 5 = 16 / 20 Test 5 = 10 / 10 Project 6 = 60 / 100 Test 6 = 10 / 25
Project 7 = 70 / 100 Test 7 = 4 / 5 Project 8 = 10 / 10 Test 8 = 45 / 50
= [(16/20 + 60/100) x 30] + [(10/10 + 10/25) x 70] = [(76/120) x 30] + [(20/35) x 70] = (63.33%x30) + (57.14% x 70) = 18.99 + 39.99 = 59%
= [(70/100 + 10/10) x 30] + [(4/5 + 45/50) x 70] = (80/110) x 30 + (49/55) x 70 = (72.73% x 30) + (89.09% x 70) = 21.82 + 62.36 = 84%
= (59% x 60) + (84% x 40) = 35.4 + 33.6 = 69%
Final Report Term Weight Grade Semester 1 40% 60% Semester 2 40% 69% Exam 20% 92% = (60% x40) + (69% x 40) + (92% x 20) = 24 + 27.6 + 18.4 = 70 %

9
Scenario #7 – Multiple Calculated Report Cycle / Weighted Percentages
Weighting: Assignment Types
Projects =30 Tests = 70 Exam = 1
Report Cycle 1 (60%) Report Cycle 2 (40%) RC Semester 1
Project 1 = 8 / 10 Test 1 = 5 / 5 Project 2 = 10 / 50 Test 2 = 10 / 15
Project 3 = 100 / 100 Test 3 = 1 / 5 Project 4 = 7 / 10 Test 4 = 5 / 10
= [(8/10 + 10/50) x 30] + [(5/5 + 10/15) x 70] = [(80% + 20%) x 30] + [(100% + 66.67%) x 70] = (50%x30) + (83.31% x 70) = 15 + 58.34 = 73%
= [(100/100 + 7/10) x 30] + [(1/5 + 5/10) x 70] = (100% + 70%) x 30 + (20% + 50%) x 70 = (85% x 30) + (35% x 70) = 25.5 + 24.5 = 50%
= (68% x 60) + (50% x 40) = 40.8 + 20 = 61%

10
Report Cycle 3 (60%) Report Cycle 4 (40%) RC Semester 2
Project 5 = 16 / 20 Test 5 = 10 / 10 Project 6 = 60 / 100 Test 6 = 10 / 25
Project 7 = 70 / 100 Test 7 = 4 / 5 Project 8 = 10 / 10 Test 8 = 45 / 50
= [(16/20 + 60/100) x 30] + [(10/10 + 10/25) x 70] = [(80% + 60%) x 30] + [(100% + 40%) x 70] = (70%x30) + (70% x 70) = 21 + 49 = 70%
= [(70/100 + 10/10) x 30] + [(4/5 + 45/50) x 70] = (70% + 100%) x 30 + (80% + 90%) x 70 = (85% x 30) + (85% x 70) = 25.5 + 59.5 = 85%
= (70% x 60) + (85% x 40) = 42 + 34 = 76%
Final Report Term Weight Grade Semester 1 40% 61% Semester 2 40% 76% Exam 20% 92% = (61% x40) + (76% x 40) + (92% x 20) = 24.4 + 30.4 + 18.4 = 73.2 %