Embed Size (px)
Citation preview

Thermomix TM 31Instruction Manual

Instruction Manual Thermomix TM 31
Table of contents
Notes for your safety
Technical data
Introduction/Customer service
Your Thermomix TM 31
Accessories
Before you start
Initial test
How to insert the mixing bowl correctly
Cleaning
How to insert the mixing blade
Accessories
Mixing bowl, mixing bowl base
Mixing bowl lid, measuring cup
Simmering basket
Spatula
Stirring attachment (butterfly)
Working with the Thermomix TM 31
Starting the Thermomix TM 31
Explanation of symbols
Multi-function display
Weighing and adding with the tare button
Other important information
Timer buttons and timer display
Adjustment of pre-set time
Temperature buttons and illuminated temperature indicators
Indicator for remaining heat
4
6
7
8
9
10
10
11
12
14
14
15
16
17
18
19
19
20
21
21
22
23
24
24
24
2

3Instruction Manual Thermomix TM 31
Soft start
Gentle stir setting, soft heating setting
Varoma temperature level
Speed selector
Stirring
Mixing/puree making
Clockwise/counter-clockwise operation
Turbo button
Dough mode
Things to remember
Sleep mode
Electronic motor protection
Smells
Cleaning
Notes for your safety - VAROMA
Technical data - VAROMA
Your VAROMA, cleaning your VAROMA
Possible combinations of VAROMA
Inserting the VAROMA correctly
Cooking with the VAROMA
Practical work with the VAROMA
Notes for your own recipes
Troubleshooting
25
25
25
26
26
26
26
27
27
28
28
28
28
28
29
29
30
31
32
32 / 33
34
35
36

Notes for your safety
4 Instruction Manual Thermomix TM 31
The Thermomix TM 31 complies with the mostadvanced safety standards. For your ownsafety, please read these operating instructionscarefully before using your appliance for thefirst time and be sure to take particular note ofthe following:
The parts which you are using may behot, sharp or both. Please take the usualcare when handling household appliancesof this type.
Always keep the appliance out of chil-dren's reach and warn your children thatthe mixing bowl will heat up.
Place your Thermomix TM 31 on a solidand even surface so that it cannot slip.Keep a sufficient distance from the edgeof this surface and leave enough spaceabove. When preparing dough or chopping food,an imbalance can develop in the mixingbowl which, under certain circumstances,may cause the whole appliance to move.Do not, therefore, leave the applianceunattended while it is operating as itmight fall from the work top.
Keep a sufficient distance between theappliance and external heat sources suchas radiators, hot plates etc.
Always use the spatula provided with yourappliance together with its safety disk forstirring. Do not use other items such asspoons, cooking spoons etc. for stirring.These might get caught by the rotatingmixing blade, possibly resulting in injury.Always put on and lock the lid first beforeinserting the spatula.
Always ensure that the sealing ring of thelid has been correctly fitted. This is impor-tant to avoid splashing.
If you use the turbo button while opera-ting the appliance at medium and higherspeed levels to chop food please hold themeasuring cup firmly.
Never heat up the mixing bowl when it isempty.
When processing food that has not beenheated in the Thermomix TM 31 do notuse the turbo button as there is a dangerof scalding from splashing food.
The maximum filling quantity of 2 litresmust not be exceeded.An overfilled mixing bowl may lead toburns during and even after operation ashot food may splash from the bowl. Foryour own safety, please always observethe quantities indicated in the recipes.
1
2
3
4
5
6
7
8
9
10

5Instruction Manual Thermomix TM 31
Disconnect the appliance from mainspower supply before cleaning.
Do not immerse the Thermomix TM 31 inwater or use a lot of water when cleaning.No water must be allowed to enter thehousing.
Inspect your appliance and its accessoriesincluding the mixing bowl regularly forpossible damage. Damaged parts canimpair safety. If damage does occur, donot use the appliance and contact our customer service.
The Thermomix TM 31 may only be repaired by the responsible Vorwerkcustomer service. This also applies in thecase of damage to the connecting cablewhich may only be replaced with a speci-fic cable by the Vorwerk after-sales-ser-vice. Improper repair works or inexperthandling may result in serious risks for theuser. Only use original spare parts sinceotherwise your warranty is renederedvoid.
Please take care not to cut yourself whenremoving or re-inserting the blade.
11
12
13
14
15

6 Instruction Manual Thermomix TM 31
Technical Data
Symbol of conformity/Mark of conformity
Motor
Heating system
Integrated scales
Housing
Mixing bowl
Connected load
Dimensions and weight(excl. Varoma)
Maintenance-free Vorwerk reluctance motor 500 Wrated powerSpeed continuously adjustable from 100 to 10,200revolutions per minute (Gentle stir 40 rpm)Special speed setting (alternating mode) for dough pre-paration.Electronic motor protection to prevent overload.
1,000 W power consumptionProtected against overheating.
Measuring range from 5 to 100 g in 5 g increments; 100to 2000 g in 10 g increments (to max. 6 kg)
High-quality plastic material
Stainless steel, with heating system and temperaturesensor integrated
Maximum capacity 2 litres
Only for 230 V alternating voltage Maximum power consumption 1,500 W Pull-out connecting cable, 1 m long
height 30 cmwidth 28.5 cmdepth 28.5 cmweight 6.3 kg

7Instruction Manual Thermomix TM 31
Customer serviceIntroduction
If you have any questions or difficulties pleasedo not hesitate to contact:
Your Thermomix TM 31 advisor:
Telephone
Fax
Thermomix TM 31 Service Centre:
Customer Service Regional Headquarters:
Operating instructions giving guidance how tomake best use of the appliance!
During a Thermomix TM 31 demonstration, youhad the opportunity to have a closer look at whatwe call "the revolution in your kitchen", ourThermomix TM 31. An experienced Thermomixadvisor presented you with all the options offered by this appliance, and you couldsee that the handling of the Thermomix TM 31is quick and easy.
Now you are surely looking forward to finallyusing it yourself, to see how your new and faith-ful partner makes your kitchen work faster,easier and safer.
And because we want to keep our promise weprepared these operating instructions to familia-rise you step by step with your new ThermomixTM 31. With each step you will also see that indesigning this high quality product we havefocused on the interests and needs of our cus-tomers, from the very first stages of develop-ment to final production.
Use the Thermomix TM 31 recipe book for yourfirst attempts on your own. We recommend,however, that you work with your ThermomixTM 31 to master all the recipes you, your familyand your guests like best.
Our operating instructions are designed to helpyou handling your appliance safely and correct-ly. Please read them carefully to become famili-ar with your new kitchen partner.

8 Instruction Manual Thermomix TM 31
Your Thermomix TM 31
After opening the packaging please check that all Thermomix TM 31 components are included.These are:
- Thermomix TM 31 including mixing bowl and lid- Simmering basket- Stirring attachement (butterfly)- Measuring cup- Spatula- Recipe book- Operating instructions- VAROMA (p. 29)
1. main VAROMA unit2. Inner tray3. Lid

9Instruction Manual Thermomix TM 31
Accessories
Mixing bowlMixing bowl baseSealing ring for mixing blade unitCutting/Mixing blade unitSimmering basketSpatula with safety diskMeasuring cupLidLid sealing ringStirring attachment (butterfly)
1
2
3
4
5
6
7
8
9
10
1
2
3
4
5
6
7
8
9
10
10 Instruction Manual Thermomix TM 31
Before you startCongratulations on having bought the Thermomix TM 31!
Before using your Thermomix TM 31 for thefirst time you should attend a demonstrationwith a qualified Thermomix advisor.
Before you startKeep your Thermomix TM 31 in a permanentposition in your kitchen, so that you can opera-te it easily.
Initial testBefore using your Thermomix TM 31 for thefirst time you should find out how it works.
How to insert the mixing bowl correctlyBefore inserting the mixing bowl please alwaysensure that the speed selector has been set to
. Insert the mixing bowl with the hand-le pointing to the front and push it gently intoposition .
The mixing bowl has been inserted correctly ifits handle is at the front, as shown in the illu-stration, and if the bowl itself is securely fixed inthe appliance .
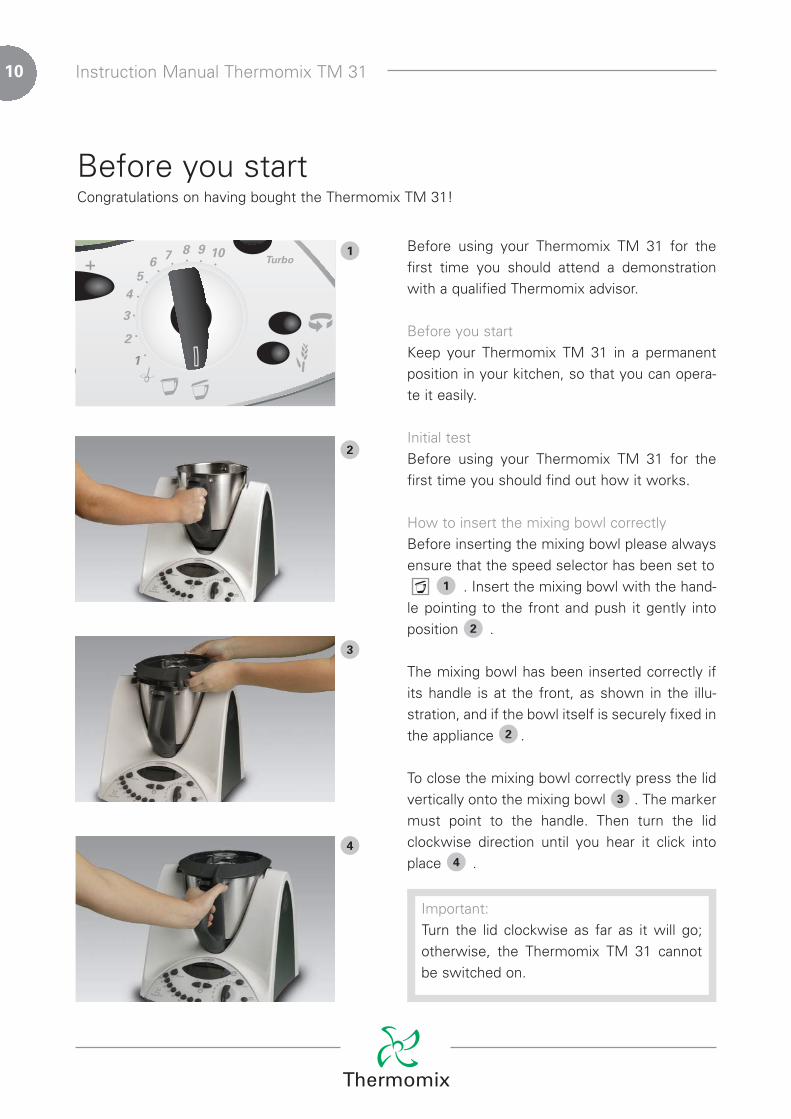
To close the mixing bowl correctly press the lidvertically onto the mixing bowl . The markermust point to the handle. Then turn the lidclockwise direction until you hear it click intoplace .
2
3
4
Important:Turn the lid clockwise as far as it will go;otherwise, the Thermomix TM 31 cannotbe switched on.
1
2
3
4
1
2
2
3
4

11Instruction Manual Thermomix TM 31
CleaningAs with all new appliances or tableware youshould clean your Thermomix TM 31 - especi-ally the mixing blade, the lid, the mixing bowland the simmering basket - thoroughly beforeusing it for the first time.
To remove the mixing blade: Turn the bot-tom of the mixing bowl anti-clockwise 30degrees and pull it off downwards.
Remove the mixing blade together withits sealing ring.
Now, clean the inside and outside of the mixingbowl (without the mixing knife), either in hotwater or in the dishwasher; the spatula, butter-fly, simmering basket, measuring cup, lid andVAROMA can be cleaned in the same way.
Please ensure that the contact pins at the bot-tom of the mixing bowl are not dripping wet. Ifnecessary wipe them off.
We recommend that you dismantle the mixingbowl for cleaning.
For your safety
Please take care not to cut yourself whenremoving or re-inserting the blade.
Important:Take precautions to prevent the blade fromfalling out accidentally.
Important:Never put the mixing bowl in thedishwasher without first removingthe mixing blade.
1
2
1
2

12 Instruction Manual Thermomix TM 31
The main appliance can be wiped with a dampcloth. Use water sparingly to prevent moisturefrom entering the appliance.
To clean the mixing blade always hold it underrunning water with the blade pointing upwards.In order to facilitate the cleaning use a brush.
How to insert the mixing bladeTo re-insert the mixing blade, follow the 'remo-val' steps in the reverse order.
Put the mixing blade back into the mixingbowl by pushing it through the opening inthe bottom of the bowl. Take care not tocut yourself!
Important:Never use pointed or sharp objects forcleaning as this may damage functionalparts or affect the safety of the appliance.
Important:Never immerse the mixing blade in wateror put it in a dishwasher as this may dama-ge the gasket system of the knife bearing.
Important:When inserting the mixing blade pleaseensure that the sealing ring is fitted to theblade bearing. If there is no sealing ring thefood to be mixed or cooked may leak outand damage the appliance.
1

13Instruction Manual Thermomix TM 31
Now re-fit the bottom of the mixing bowlfrom below onto the mixing blade. Turnclockwise 30 degrees to lock.
Important:All components - except for the mixingblade - are dishwasher-proof. Put plasticparts, in particular the lid of the mixingbowl, into the top rack of the washer inorder to avoid deformation resulting fromexposure to higher temperatures. Somefoodstuffs such as curry, carrot juice, andthose with a citric acid content may causestaining. Wipe such substances off the lid,the spatula and the simmering basket asquickly as possible. Any residual stainingwill disappear in time.
2

14 Instruction Manual Thermomix TM 31
Accessories
Before you start using your Thermomix TM 31we would like to present its accessories inmore detail.They are proof of a well thought out design.Every part has been designed intelligently andserves several purposes.
Mixing bowlThe mixing bowl has a capacity of 2 litres. Neverexceed this maximum level because the food tobe cooked may boil over or spurt.
On the inside and on the outside of the mixingbowl there are marks indicating the filling level,which is a very helpful feature for everyday use.Each mark corresponds to 500 ml.
Mixing bowl baseThe mixing bowl base is used to fasten and loo-sen the mixing blade within the mixing bowl.The mixing bowl may be placed on any workingsurface. There is no need to place a mat underthe bowl.
For your safety
The maximum capacity is 2 litres. Neverexceed this quantity otherwise the ingre-dients may splash out of the bowl (Danger ofscalding!).
Important:The mixing bowl base must be turned asfar as it will go and locked. Failure to fit thebottom correctly may result in damage toother parts.

15Instruction Manual Thermomix TM 31
Mixing bowl lidThe lid of the mixing bowl is used to close themixing bowl. For safety reasons yourThermomix TM 31 will not start working unlessthe lid has been positioned and locked correctly.Never try to force the lid open when the appli-ance is locked. The appliance reacts with“OPEn” (see page 36).Take care to insert the sealing ring for the lidcorrectly. Put the lid upside down on your worksurface and position the ring onto the lid by pus-hing it into the three hinges whereupon you canhear a "click". The sealing ring prevents liquid orfood to be cooked from escaping between themixing bowl and the lid.
When cleaning the lid it is advisable occasio-nally to clean the sealing gasket separately.
Measuring cupThe measuring cup is a multi-purpose item: it isa closing cap for the opening in the lid to avoidheat loss and it prevents food to be mixed orcooked from escaping.The measuring cup can be used to measureingredients.
A measuring cup filled to the brim holds 100 ml,and a half-filled measuring cup (middle notch)50 ml.Always place the measuring cup into the opening in the lid with its opening showingupwards (Only when using the butterfly: positi-on the measuring cup with the opening pointingdownwards). If you wish to add some liquidthere is no need to remove the measuring cup.Simply pour the liquid onto the lid. It will gra-dually trickle into the mixing bowl. To add ingredients through the opening in thelid lift the measuring cup and add them into themixing bowl.
For your safety
Always ensure that the sealing ring of the lidhas been correctly fitted, otherwise liquidmay escape resulting in the danger of burns.Do not operate the appliance without thesealing ring!

16 Instruction Manual Thermomix TM 31
Simmering basketThe simmering basket for the Thermomix TM 31 is made of high-quality plastic. Like themeasuring cup, the basket is a multi-purposeitem:
Filtering of fruit and vegetable juices. Chopand make a puree in the Thermomix TM31, then insert the simmering basket intothe mixing bowl and use it as a filter whenpouring the juice out. When pouring thejuice use the spatula to hold the simme-ring basket.
Delicate food such as meatballs orfishballs that are not suited to be preparedin the mixing bowl as a whole should beput into the simmering basket. Here theycan be stewed.
For cooking side dishes (e.g. rice).
Removing the simmering basket is effortless:place the spatula into the notch of the simme-ring basket and lift the basket. The spatula canbe removed at any time.The feet at the bottom of the simmering basketallow juice to drip off the food in the basket.
1
2
3

17Instruction Manual Thermomix TM 31
SpatulaThe spatula is another example for the intelli-gent design of the Thermomix.
The spatula has a specially shaped safetydisk to make sure that it does not roll offthe work top.
The Thermomix TM 31 spatula is the onlyinstrument you may use to mix or stir theingredients in the mixing bowl. Push itfrom above into the bowl through theopening in the lid. The safety disk ensuresthat the spatula is not caught by the bla-des. This means that you can use the spa-tula during cooking, simmering or chop-ping.
The spatula can also be used to scrape allingredients from the mixing bowl. The tipof the spatula is shaped to fit exactly bet-ween the blade assembly and the wall ofthe mixing bowl.
We have already described one of its pos-sible uses: when filtering fruit or vegeta-ble juices use it to hold the simmeringbasket in place.
For your safety
Only use the spatula provided with your appli-ance for stirring. Do not use other items suchas spoons, cooking spoons etc. for stirring.These might get caught by the rotatingmixing blade, possibly resulting in injury.Always put on and lock the lid first beforeinserting the spatula.
1
2
3
4

18 Instruction Manual Thermomix TM 31
Stirring attachment (butterfly)This accessory will help you to achievebest results when whipping cream or bea-ting egg whites. It is also the perfect uten-sil for the preparation of creamy puddingsor cream mixtures.
When boiling milk or preparing puddingsor sauces the butterfly allows a constantmovement of ingredients. This will pre-vent the food from sticking.
It is easy to insert the butterfly:Insert the butterfly as shown in the picture.Its ball-shaped end ensures that it can be remo-ved easily.
Important:Only switch on speed after the butter-fly has been locked into place.
Do not select a speed higher thanlevel 4 when the butterfly is fitted.
Never use the spatula when thebutterfly is fitted.
Do not add ingredients that mightdamage or block the butterfly whenthe machine is running and the butter-fly is fitted.
1
2
3
4
1
2

19Instruction Manual Thermomix TM 31
Working with the Thermomix TM 31
Find a permanent place in your kitchen for yourThermomix TM 31 right from the start so that itis ready at hand whenever you need it.
Starting the Thermomix TM 31Pull the electric cable lightly from the housingand connect it to the mains supply (230 V). Youcan choose whatever length of cable you need,up to 1 m. If you do not need the whole lengthof the cable the remaining length is kept insidethe Thermomix TM 31 avoiding any tiresome"spaghetti" of cables! Please avoid removing orre-inserting the cable frequently as this mayresult in cable rupture. Make sure that there isno strain on the cable so that the scales workproperly. Do not place the appliance on thecable. If you do, the appliance will not sit firmlyon the surface and the scales will not weighaccurately.Now the appliance is operable. Please turn theappliance on with the button. The displayshows:
Before you start using your Thermomix TM 31consider the following tips to make your workeasier:
A safety device is provided which pre-vents the Thermomix TM 31 from opera-ting if the mixing bowl has not been inser-ted properly and the lid has not been cor-rectly locked (speed selector is blocked).Likewise, a safety device prevents the lidfrom opening while the appliance is opera-ting.
The electronic scales work within a tem-perature range between -20°C and +50°C(4°F and +122°F). If the appliance hasbeen transported in winter and the tempe-rature falls below -20°C (-4°F) wait untilthe Thermomix TM 31 has reached roomtemperature again. In this way, the inte-grated scales will work perfectly.
If you do not need your Thermomix TM 31for a prolonged period of time please dis-connect it from mains supply as you dowith most electric appliances (economi-zing on power consumption / see also:"Sleep mode")
For your safety
Before operating your Thermomix TM 31ensure that it is standing securely on an evenworking top, not too near to the edge andobserving a sufficient distance from hangingcupboards, shelves etc.
3
1
2
20 Instruction Manual Thermomix TM 31
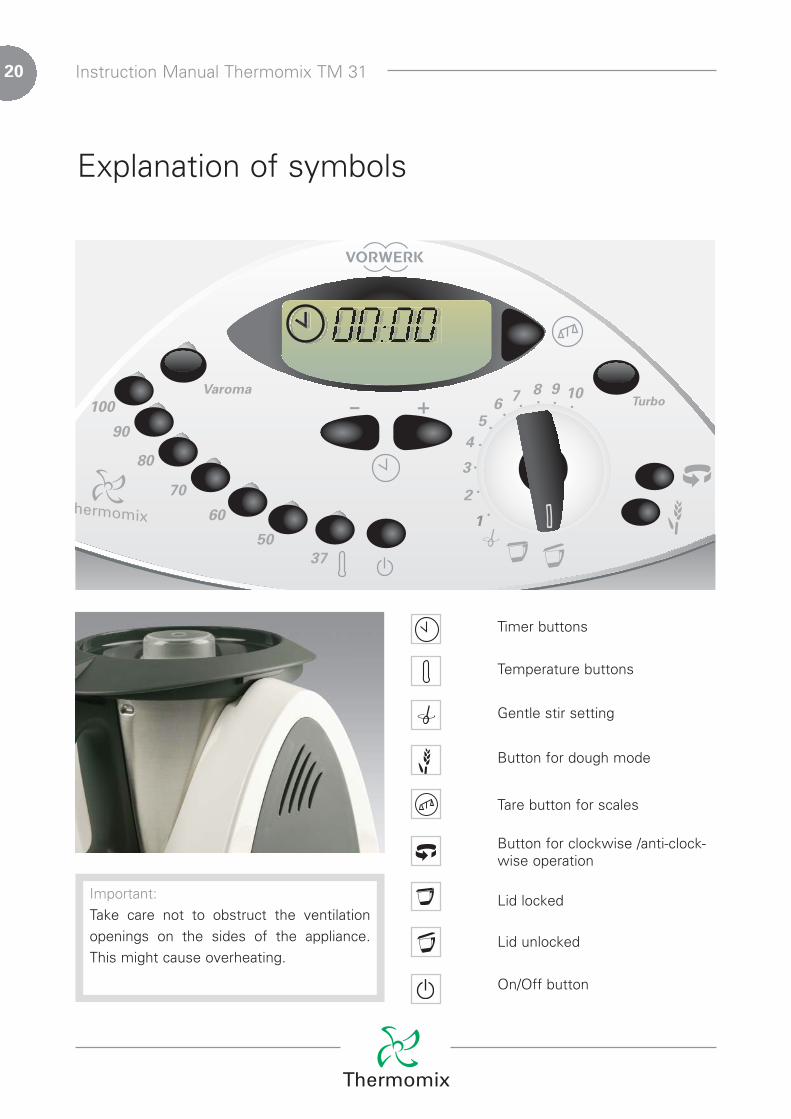
Explanation of symbols
2
3
4
Important:Take care not to obstruct the ventilationopenings on the sides of the appliance.This might cause overheating.
Timer buttons
Temperature buttons
Gentle stir setting
Button for dough mode
Tare button for scales
Button for clockwise /anti-clock-wise operation
Lid locked
Lid unlocked
On/Off button

21Instruction Manual Thermomix TM 31
Multi-function displayIn the centre at the top of the control panelthere is a digital display.This display provides the following information:
Timer modeWeighing mode
The symbols and are displayed to indi-cate if the device is in weighing or timer mode.
Thermomix in dough modeAnti-clockwise operation has been cho-sen.
The latter two operating modes as well are indi-cated by their respective symbols ( or ).
Weighing and adding with the tare buttonThe integrated scales allow you to weigh out allingredients directly in the mixing bowl and inthe VAROMA. Please observe the followingsequence of steps:
Insert mixing bowl. The scales display willshow:
Press tare button. The scales display willshow:
Put in the first ingredient (2.0 kg max.)and check the quantity on the scales dis-play.
If you wish to add more ingredients pushthe tare button again and add the nextingredient.
Repeat these steps as often as required to themaximum weight (6 kg). The variation for up to2 kg +/- 30 g.
3
4
1
2
3
4
1
2

22 Instruction Manual Thermomix TM 31
Other important informationThe tare function works from 5 g to 6.0 kg.When weighing and adding ingredients with thehelp of the tare function always add ingredientsslowly because two to three seconds are nee-ded before the scales show the correct weight.If you remove an ingredient from the mixingbowl after you have pressed the tare button,the following error message will appear on thescales display:
When adding ingredients with the help of thetare function do not add more than 2.0 kg at atime. If you add more than 2.0 kg at a time thescales display will start flashing, indicating anoverload:
Always press the tare button first before weig-hing or using the tare function. This will increa-se the accuracy of the scales. Please be carefulnot to move the appliance during the weighingprocess.
The display provides you with valuable informa-tion when weighing or adding ingredients.Remember to observe the maximum of 2.0 kgper adding process.

23Instruction Manual Thermomix TM 31
Timer buttons and timer displayObserve the following sequence of steps if youwish to heat or cook food in your ThermomixTM 31:
Before setting the temperature, select a time.
Since the appliance only heats when the tempe-rature has been selected.
Use the timer buttons to pre-set an operatingtime of up to 60 minutes.
Press the "+" to increase time and the "-" buttonto reduce it. To change time gradually, press thebutton briefly. Press and hold the "+" button toincrement the timer display rapidly.
0-1 minute in increments of 1 second1-10 minutes in increments of 30 seconds10-60 minutes in increments of 1 minute
When the display is in the zero setting you canpreset the time directly to 1 minute by shortlyactuating the - button; herewith you do not haveto count up in increments of 1 second.Subsequently proceed as indicated above.
Press both buttons simultaneously to set thedisplayed time to “0”.
Time pre-setting can also be used in cold mixingmode. After the appliance has been switchedon, the pre-set time is counted backwards insteps of one second, until "0" is reached.
When the appliance is in cold mixing mode themixing speed switches off after the pre-settime has expired. A buzzer will sound to indica-te that the job has been completed.
When the appliance is in heating or cookingmode the mixing blade will continue to rotate inthe gentle stir setting after the pre-set time hasexpired. To switch off the buzzer turn the speedselector back to / .
Heating and cooking are only possible if a timeperiod has been pre-set.

24 Instruction Manual Thermomix TM 31
Adjustment of pre-set timeThe pre-set time can be changed at any timeduring preparation. Press the "-" button to redu-ce the time, press the "+" button to increase it.If the speed selector gets turned to /before the pre-set time has expired, for exam-ple in order to add another ingredient, the dis-play will flash, indicating the current time, untilthe appliance is switched on again. Food prepa-ration can thus be continued without difficulty.If you wish to stop the mixing procedure alto-gether before the pre-set time has expired,press both timer buttons simultaneously. Thiswill stop the display flashing and you may resetthe time. If no time has been pre-set the timerwill automatically be set to a maximum of 60minutes when the speed selector is activated.After this time, a buzzer will sound.
Temperature buttons and illuminated tempera-ture indicatorsThe temperature buttons can be used to set atemperature between 37°C and 100°C (99°Fand 212°F). Each button has a coloured indica-tor lamp which will flash after the respectivebutton has been pressed:
37°C (99°F) = green50°C and 60°C (122°F and 140°F) = yellow70°C and 80°C (158°F and 176°F) = orange90°C, 100°C and VAROMA (194°F and 212°F) = redThe illuminated temperature indicators arepoints of reference.Always ensure that none of the coloured indica-tor lights is flashing if you do not wish to heat orcook food. Otherwise, switch off the heating
function by pressing the button. This willprevent unwanted heating of ingredients in themixing bowl if a time has been pre-set.When the pre-set temperature has been rea-ched during cooking the indicator lamp stopsflashing and changes to continuous mode.The illuminated indicators show the temperatu-re that has been reached during the heating pro-cess. For example, if a temperature of 90°C(194°F) is set the related light will start flashing.As the Thermomix heats up the lights for 37°C,50°C, 60°C, 70°C and 80°C (99, 122, 140, 158and 176°F, respectively) light up one after theother until 90°C (194°F) is reached. At this pointthis light changes from flashing to continuousmode. The illuminated temperature indicatorsare only orientation values.
Indicator for remaining heatIf the mixing bowl is re-inserted into the applian-ce while it is still warm the relevant light willshow its remaining temperature (only 1 lamp /continous mode).No temperature for cooking and simmering canbe set unless a time has been pre-set. Therefore please always proceed as follows:Always start by setting a time, then choose thetemperature, followed by speed selection.
2
3
4

25Instruction Manual Thermomix TM 31
Soft start (above 60°C/140°F)If the turbo button is pressed or the speedselector actuated while the temperature in themixing bowl is above 60°C (140°F), the electro-nic system prevents the food from escaping bydelaying the speed increase. This soft start onlyworks if the food has been heated up in theThermomix TM 31.
Gentle stir settingThe gentle stir setting can be selected using thespeed selector. At this setting, the food is stir-red slowly in the same way as if you periodical-ly stirred some food in a saucepan. If the settingis selected, the food is not chopped and largechunks remain.
Soft heating settingSpeed 3 is designed as Soft heating setting.When this speed is selected the on-time of theheating energy per timing device is reducedand increased accordingly. This leads to a slo-wer rise in temperature of the food being coo-ked.
Varoma temperature settingIf the Varoma temperature setting is selectedtemperatures of more than 100°C (212°F) maybe reached depending on what ingredients youare using. Only use the Varoma temperaturesetting for recipes with Varoma, since the hea-ting is especially drawn up for steaming.
For your safety
Never heat up the mixing bowl when empty.
For your safety
Soft start only works if the food to be mixedor cooked has been heated up and preparedin the Thermomix TM 31. If you wish to usethe Thermomix TM 31 to process food thathas not been heated in the appliance (e.g.preparing a gravy from meat juices) youshould only increase the speed slowly andgradually. Do not use the turbo button, danger of scal-ding!
2
3
4
2
3
4

26 Instruction Manual Thermomix TM 31
Speed selectorPress the speed selector to start theThermomix TM 31. The following speeds areavailable.
Designation Level Rev./min.Gentle stir 40Stirring 1 - 3 100-500Mixing/puree making 4 - 9 1,100-7,600Turbo mixing 10 10,200
Stirring Use the lower speeds 1 - 3 for gentle mild stir-ring. This lower speed range is ideally suited fordelicious stews!
Mixing/puree makingUse the speed range from 4 to 10 for coarse,fine and very fine chopping, mixing and pureemaking.Always be sure to put the speed selector slowlyto its desired position with the measuring cupinserted. This will prevent the food to be chop-ped from escaping.
Clockwise/counter-clockwise operationPress the button on the control panel toreverse the rotating direction of the mixingblade from clockwise to counter-clockwise.There is no need to return the speed selector to
from its actual position.Counter-clockwise operation is indicated by theappropriate symbol on the display.Counter-clockwise operation is intended forgently stirring delicate food which is not to bechopped.
2
3
4
2
3
4
For your safety
If you operate the appliance at medium andhigher speed levels and press the turbo but-ton, please hold the measuring cup firmlywith your hand.

27Instruction Manual Thermomix TM 31
Turbo buttonUse the turbo button to operate the ThermomixTM 31 at maximum speed. The turbo functiononly works as long as this button is pressed andheld. It is also useful for the "alternating" mode.If, for example, you wish to coarsely chop alarge quantity of food, press the turbo button 3or 4 times (repeat as necessary). In this way,the food will be chopped evenly. The turbofunction is available when the selector is set to
or to level "5" or above. When the selectoris set to the timer is activated. Turbo functi-on is not available if the dough mode is activat-ed.
Dough mode Use this mode to make heavy yeast dough orbread dough.To activate the dough mode put the speedselector to and press the appropriate but-ton on the control panel.This will start the alternating operation to pro-cess the dough evenly in the mixing bowl. Thisis an imitation of a special kneading procedureused in the baking trade to achieve a high-quali-ty dough.Dough mode is only available if the mixing bowlhas cooled down after cooking to a temperatu-re below 60°C (140°F). If the temperature is hig-her, a buzzer will sound. To prevent accidentalheating of bread dough the electronic systemblocks the heating system when dough modehas been selected.
The appliance may move around during doughpreparation. Do not leave it unattended.
2
3
4
2
3
4
For your safety
Soft start only works if the food to be mixedor cooked has been heated up in theThermomix TM 31. This is the only way thetemperature sensor can measure the actualtemperature correctly and control soft startaccordingly. Therefore, never use the turbobutton with food that has not been heated inthe Thermomix TM 31. Food might escapefrom the lid causing a danger of scalding!

28 Instruction Manual Thermomix TM 31
Things to remember
Sleep modeIf the Thermomix TM 31 is connected to mainssupply but not used it will automatically switchto standby (sleep mode) after approx. 15 minu-tes. The display will be blank. To re-activate theappliance press any key on the control panel. Toswitch the Thermomix TM 31 to sleep modepress and hold the button for approx. 2seconds until "OFF" appears. The appliance cannow be re-activated only by a short press on the
button. In sleep mode, power consumptionof the Thermomix TM 31 is less than 1 W.
Electronic motor protectionAll recipes contained in the Thermomix TM 31recipe book have been developed in such a waythat the motor protection will not respond if alldirections are observed.But even if quantities are exceeded, the motoris protected by an automatic switch-off functi-on. In such cases, the display will show theerror message "E.r 29". If the motor has turnedoff:- put the speed selector to - remove the mixing bowl from the appli-
ance,- reduce the quantity contained in the bowl
and/or add some liquid,- wait for approx. 5 minutes (cooling down
time),- re-insert the mixing bowl,- re-start the Thermomix TM 31 by means
of the speed selector.- If the error message "E.r 29" is still displayedafter the cooling time please call our customerservice.
SmellsWhen the appliance is used for the first time itmay smell. If the motor is subjected to a highload during food preparation, the motor mayoverheat and start smelling, in addition to thepossibility of an automatic switch-off of theappliance. This is completely harmless and afterthe cooling-down time indicated above, theappliance will again be in perfect working order.
CleaningDisconnect the appliance from mains powersupply before cleaning. Do not immerse theThermomix TM 31 in water or use a lot of waterwhen cleaning. No water must enter the hou-sing. Wipe the housing with a damp soft clothand a gentle cleansing agent.All components - except for the mixing blade -are dishwasher-proof. Some of the plastic partsmay become slightly discoloured.Clean the mixing blade with a sponge or a brushunder running water. Never leave it in dishwateror clean it in the dishwasher.Be careful when re-assembling the ThermomixTM 31 (see section on first cleaning and assem-bly). If the mixing bowl or the other componentsare only slightly soiled it is sufficient to performa short mixing operation with water and a fewdrops of cleansing agent, followed by rinsing. Iffood is sticking use a special cleansing agent forstainless steel.To improve ventilation during storage, do notclose the mixing bowl with the measuring cup.If you do not use the Thermomix TM 31 for aprolonged period of time we recommend thatyou disconnect it from mains supply.

29Instruction Manual Thermomix TM 31
Notes for your safety - VAROMA
Parts of the appliance become hot duringuse and hot steam escapes from thesides and from the top of the lid of theVAROMA during operation.
Take care to place your Thermomix TM 31safely and securely on a flat work surface,especially when using your VAROMA withit.
When you use the appliance, ensure thatthere is sufficient clearance at the top(suspended cupboards, shelving) andaround the sides. Please make sure thatyou do not place the appliance too closeto the edge of your work surface.
For safety reasons, you should keep chil-dren away from the appliance when wor-king with your VAROMA, and warn themabout the dangers of the steam and thehot condensation that can escape fromthe VAROMA.
Always use oven gloves to pick up theVAROMA when hot, and never use it wit-hout the lid. When you take off the lid,hold it in such a way that the rising steamor hot dripping liquid cannot come intocontact with you. Please remember thatwhen you remove the entire VAROMAunit, hot steam will continue to rise up outof the opening in the lid of the mixingbowl.
Always ensure that the steam openings inthe lid remain free, otherwise there maybe an uncontrolled escape of steam.
Use low speed settings when cookingwith your VAROMA. Higher settings maycause the liquid to froth up (danger ofscalding!).
In the event that any repairs are needed,they should only be performed by authori-zed Vorwerk service technicians.Unauthorised repairs or incorrect use canput the user at considerable risk and ren-der the warranty void.
Technical Data - VAROMAMaterial: stainless steel.Handles, inner tray and lid: high-quality food-compatible plastics.
Dimensions and weight:Length 38.5 cmWidth 27.5 cmDepth 10 cmWeight 1135 gVolume ca. 3 litres
1
2
3
4
5
6
7
8

30 Instruction Manual Thermomix TM 31
Your VAROMAThe VAROMA consists out of three parts:
The actual VAROMA unit made of top-quality stainless steel
An inner VAROMA tray and
A lid, both made from top-quality, food-compatible plastic.
Cleaning your VAROMA... is easy and uncomplicated.
Before using your VAROMA for the first time,you should wash all parts carefully in warm,soapy water or in the dishwasher.
You can preserve the beautiful shine on thestainless steel unit by periodically using a liquidstainless steel cleaner. Avoid using sharp objects or metal scouringpads, as these are likely to cause scratches. You will not need to use anything more thanyour usual detergents and cleaning materials forthe lid and the inner tray.
All VAROMA parts are dishwasher-proof. Placethe plastic parts only in the top rack.
1
2
3

31Instruction Manual Thermomix TM 31
How to combine your VAROMA partsYou can use your VAROMA in either of the fol-lowing combinations:
Combination 1:Stainless steel unit plus lid.This is the best combination for cooking largeamounts of the same food, e.g. vegetables,potatoes or large pieces of meat or sausages.
Combination 2:Stainless steel unit, plus inner tray, plus lid.Thisis the best combination for cooking differentfoods, e.g. vegetables with meat or fish.
Important:Whichever combination you use, alwaysuse the lid. If the lid is not positioned pro-perly, the steam will escape and the foodinside the unit will not cook properly.

32 Instruction Manual Thermomix TM 31
Inserting the VAROMA correctlyYour VAROMA is an accessory designed for theThermomix TM 31.It can only be used with a Thermomix TM 31.You will therefore need to set up yourThermomix TM 31 correctly before you can usethe VAROMA:
Step 1: The Thermomix TM 31Fill the Thermomix TM 31 mixing bowl with atleast 0.5 litres of water. Position the bowl asusual, put on the lid and lock it in place. Doeverything up to this point in exactly the sameway as you would normally.
Step 2: Filling the VAROMAThe true value of a product is shown not only byeffective use, but by well thought-out design.
The best way to use your VAROMAPut the lid upside down on your work sur-face and position the stainless steel uniton top - it will fit precisely into the groove.
Now fill the stainless steel unit with food.The lid underneath the unit will stop theliquid from washed vegetables, ripe fruit,raw meat or fish from wetting your worksurface.
For a flavoursome variation you can use a water-wine mix or vegetable broth instead of water.
The working steps with the VAROMA are co-ordinated perfectly.
As you fill your VAROMA, put food requiring lon-ger cooking at the bottom, and food requiringshorter cooking at the top.
a
b

33Instruction Manual Thermomix TM 31
If necessary, you can use the inner trayand put food on top of that.
Having filled your VAROMA, position itupright on your locked Thermomix TM 31and put on the lid. All you have to do now is program thecooking time and select the VAROMAheat setting on your Thermomix TM 31.
Step 3: Cooking with your VAROMAThe cooking process begins when you start thetimer and select the heat setting. The water orother liquid in the mixing bowl heats up to over100°C and hot steam develops and risesthrough the opening in the lid of the ThermomixTM 31 into the VAROMA unit. The food is coo-ked slowly and gently in the hot steam.
It is very important that the stainless steel unitand the lid of the VAROMA fit "snugly".If these two elements are not positioned pro-perly, not enough steam will rise up into theVAROMA. This will slow down the cooking pro-cess and there may be a considerable risk ofscalding from steam escaping in an uncontrol-led way.
In order to open the VAROMA slightly inclinethe lid to the front so that the steam can esca-pe on the back. Take care to let the condensati-on water drip into the VAROMA by holding thelid centrally above the VAROMA.
Never leave the measuring cup in the mixingbowl lid when using the VAROMA.
c
d

34 Instruction Manual Thermomix TM 31
Practical work with the VAROMAThe description shows clearly how easy it is touse the VAROMA.
Please remember a few basic rules if you useyour own recipes:
Put enough water in the mixing bowl. ½ litreof water is likely to evaporate during longcooking times.
The bottom of the stainless steel unit and theinner tray are both designed with an evenpattern of small slots to guarantee an evendistribution of steam in the VAROMA. Thefood should always be positioned so that asmany slots as possible remain "free". Layingthe food in "loosely" is usually enough toensure this.
You can cook foods of different consistencyand hardness at the same time. Put the foodrequiring longer cooking at the bottom, andthe food requiring less cooking at the top.
Do not thicken your sauces and soups untilafter they are cooked. Thickeners may stopsteam from forming evenly in the mixingbowl and slow down the overall cooking pro-cess.
-
Important:Use at least ½ litre of water for cookingtimes up to 30 minutes and ½ litre to 1 litrefor cooking times over 30 minutes.
For your safety
Use low speed settings when cooking withyour VAROMA. Higher settings may causethe liquid to froth up (danger of scalding!).
-
-
-

35Instruction Manual Thermomix TM 31
Notes for your own recipes
Order of ingredientsWhen preparing food according to your ownrecipes consider the order of the necessarysteps.
Weighing the ingredientsBefore weighing the first ingredient put the sca-les to "0,000" by pressing the tare button.
Order of pre-settingsYou will achieve best results by observing thefollowing order of settings:Example: 5 Min./100°C(212°F)/Speed 1Settings:
set timer to "5" minutes
press "100°C" (212°F) temperature button
put speed selector to "1"
Heating timesHeating time is dependent on the following:
starting temperature of the ingredients tobe heated
quantity, weight and volume of ingre-dients
heating conductibility of the food to beprepared
heating level
speed
use of accessories(with/without simmering basket)
a
b
c
a
b
c
d
e
f

36 Instruction Manual Thermomix TM 31
Troubleshooting
Error:The appliance cannot be switched on
The appliance does not heat
The appliance stops during operation
Error display:As a special feature the Thermomix TM 31 willshow the cause for the error on the display. Ifthe display shows "E.r" followed by a two-digitfigure please contact the responsible Vorwerkcustomer service indicating the error message(e.g. E.r 53 = temperature sensor failure) if it isnot possible to solve the problem by pulling themains plug and re-starting the appliance. With respect to "E.r 29" please refer to the noteson page 28.
Action:Check if the connecting cable has been properlyplugged in and if the lid has been locked correct-ly. Check if the appliance is still in "sleep mode".
Check if a heating time and temperature havebeen pre-set.
See section entitled "Electronic motor protecti-on" on page 28.
Error messages of the appliance can be reset asfollows:
By pulling the mains plug:E.r 23, 24, 28, 32, 38, 39, 70
By turning the speed selector to andthen to :E.r 22, 25, 26, 27, 29, 30, 31, 34, 35, 36,37, 51-69, OPEn
Only by the customer service:E.r 71, 72
For your safety
The Thermomix TM 31 may only be repairedby the responsible Vorwerk customer ser-vice. Only original spare parts may be used.
1
2
3