Embed Size (px)
Citation preview


BFD 03 construction Title_01441:BFD 03 construction Title_01441 6/15/09 12:09 PM Page 1
BASICS
CONSTRUCTION03
FASHION DESIGN Anette Fischer
BFD 03 construction Title_01441:BFD 03 construction Title_01441 6/15/09 12:09 PM Page 1

(AVA): Basic Fashion DesignCD0708-086 / 4237 ~ 1st Proof
SIF AVABF3 Chpt1 11.06_.qxd 7/24/08 3:40 PM Page 2
An AVA BookPublished by AVA Publishing SARue des Fontenailles 16Case Postale1000 Lausanne 6Switzerland Tel: +41 786 005 109Email: [email protected]
Distributed by Thames & Hudson (ex-North America)181a High HolbornLondon WC1V 7QXUnited KingdomTel: +44 20 7845 5000Fax: +44 20 7845 5055Email: [email protected]
Distributed in the USA & Canada by:Ingram Publisher Services Inc.1 Ingram Blvd.La Vergne, TN 37086USATel: +1 866 400 5351Fax: +1 800 838 1149Email: [email protected]
English Language Support OfficeAVA Publishing (UK) Ltd. Tel: +44 1903 204 455Email: [email protected]
Copyright © AVA Publishing SA 2009
All rights reserved. No part of this publication may be reproduced, stored in a retrieval system or transmitted in any form or by any means, electronic, mechanical, photocopying, recording or otherwise, withoutpermission of the copyright holder.
ISBN 978-2-940373-75-8
10 9 8 7 6 5 4 3 2
Design by Sifer Design
Production by AVA Book Production Pte. Ltd., SingaporeTel: +65 6334 8173Fax: +65 6259 9830Email: [email protected]
All reasonable attempts have been made to trace, clear and credit thecopyright holders of the images reproduced in this book. However, if any credits have been inadvertently omitted, the publisher will endeavour to incorporate amendments in future editions.
BFD Construction_Imprint page.qxd:BFD Construction_Imprint page 6/9/09 4:56 PM Page 1
2 / 3
(AVA): Basic Fashion DesignCD0808-038 / 4237 ~ 2nd Proof
SIF AVABF3 Chpt1 11.06_.qxd 8/13/08 2:07 PM Page 3
TEXTBLACK
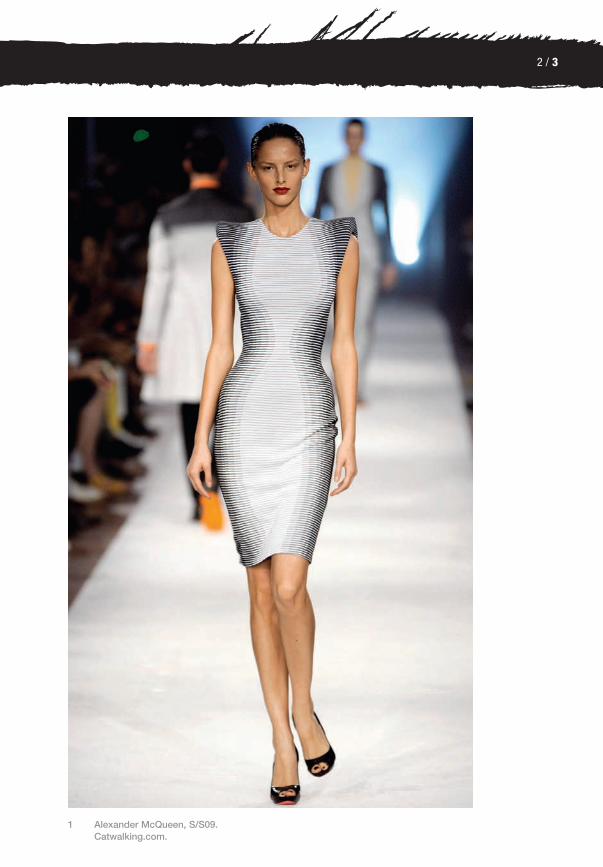
1 Alexander McQueen, S/S09. Catwalking.com.
(AVA): Basic Fashion DesignCD0908-096 / 4272 ~ 3rd Proof
SIF AVABF3 Chpt1 11.06_.qxd 9/20/08 7:49 AM Page 3
(AVA): Basic Fashion DesignCD0808-038 / 4237 ~ 2nd Proof
SIF AVABF3 Chpt1 11.06_.qxd 8/13/08 2:16 PM Page 4
TEXTBLACK
Introduction 6
How to get the most out of this book 8
Getting started 10
Pattern cutting tools and equipment 12Silhouettes 14Sizing and grading 16Blocks and patterns 20
Pattern cutting 24
How to read a design drawing 26Dart manipulation 30Slash and spread 32Sleeves 34Collars 44Pockets 54Bias cut 56Fitting the toile 58Laying a pattern on to fabric 64
Garment construction 70
Tools for the technique 72Seams 78Seam finishes 82Hand sewing techniques 84
Surface-specific techniques 90
Felted fabrics 92Lace 94Leather 96Fur 98Knits and stretch-woven fabrics 100Sequinned and beaded fabrics 102Velvet 104Transparent fabrics 106
Contents
Co
nstr
ucti
on
(AVA): Basic Fashion DesignCD0708-086 / 4237 ~ 1st Proof
SIF AVABF3 Chpt1 11.06_.qxd 7/24/08 3:41 PM Page 4
4 / 5
(AVA): Basic Fashion DesignCD0708-086 / 4237 ~ 1st Proof
SIF AVABF3 Chpt1 11.06_.qxd 7/24/08 3:40 PM Page 5
TEXTBLACK
Draping on the mannequin 120
Modelling tools and equipment 122Grain line and draping 124Draping style 126Geometric shapes 130Inspired designers 132
Conclusion 176
Glossary 178
Bibliography 182
Useful resources 184
Canon 190
Acknowledgements and picture credits 192
Haute couture and tailoring 108
Haute couture 110Designing haute couture 112Tailoring 114Tailoring techniques 116
Support and structure 136
History of supported and structured garments 138Supporting materials 140Interlining/fusing 148Corsetry 152Creating volume 156
Finishes 164
Linings 166Facings 168Fastenings 169Haberdashery 172
(AVA): Basic Fashion DesignCD0908-096 / 4272 ~ 3rd Proof
SIF AVABF3 Chpt1 11.06_.qxd 9/20/08 8:21 AM Page 5

(AVA): Basic Fashion DesignCD0808-038 / 4237 ~ 2nd Proof
SIF AVABF3 Chpt1 11.06_.qxd 8/13/08 2:17 PM Page 6
TEXTBLACK
(AVA): Basic Fashion DesignCD0708-086 / 4237 ~ 1st Proof
SIF AVABF3 Chpt1 11.06_.qxd 7/24/08 3:41 PM Page 6

6 / 7
(AVA): Basic Fashion DesignCD0908-21 / 3173 ~ 3rd Proof
SIF AVABF3 Chpt1 11.06_.qxd 9/5/08 7:07 PM Page 7
TEXTBLACK
Introduction
1 Sleeveless dress designed by David Bradley.
Intr
od
ucti
on
1
‘Do not quench your inspiration and your imagination; do not become the slave of your model.’
Vincent Van Gogh
Construction is the foundation of clothing and of fashion design;it is vital that fashion designers know and understand thetechniques involved in creating a three-dimensional garmentfrom a two-dimensional design or pattern in order to create abeautiful shape and fit on a moving body. Garment constructioninvolves both technical and design issues; the designer canchoose where to construct lines, pockets, collars, how tofinish edges and how to produce volume and structure inorder to create a unique look and experience for the wearer.
From basic block cutting to the smallest finishing details on a constructed garment, Basics Fashion Design:Construction leads you through the essential stages ofgarment construction and offers you a starting point fromwhich knowledge can be extended. It introduces you to theworld of pattern cutting, draping on the mannequin andshows you some techniques for breathing life into a flatdesign drawing in order to achieve a three-dimensionalgarment. Basic sewing techniques are introduced and you are shown how to use darts, sleeves, collars, pockets and the cut of the fabric to add variation to your designs. Thebreadth of the subject is illustrated with a history of garmentconstruction, techniques used in the haute couture and tailoringcrafts and an introduction to supporting and structuringmaterials. The book concludes with finishing techniques and a selection of resources for those wishing to delvedeeper into the world of construction for fashion.
With its inspirational photography and easy-to-followdiagrams, Construction offers a clear introduction to thefundamental skills, knowledge and historical backgroundneeded for successful garment construction. I hope it willawaken your interest and inspire you to create the perfectsilhouette and a beautiful, final piece.
(AVA): Basic Fashion DesignCD0808-038 / 4237 ~ 2nd Proof
SIF AVABF3 Chpt1 11.06_.qxd 8/13/08 2:23 PM Page 7

94 / 95
(AVA): Basic Fashion DesignCD0808-038 / 4237 ~ 2nd Proof
SIF AVABF3 Chpt1 11.06_.qxd 8/14/08 1:47 PM Page 8
Felt
ed f
abri
cs >
Lac
e >
Leat
her
Appliqué seams are used on lace
garments to ensure that none of
the side or centre back seams
are visible.
• Cut the pattern as usual.
• Place the pattern right-side
up on to the lace. Lay out the
pieces, leaving space between
them, aligning the pattern
design of the fabric from front
side seam to back side seam.
• Be careful with the centre front
and centre back when placing
the pieces for a central
pattern.
• First thread mark the original
side seams of the pattern on
to the lace fabric.
• Then thread mark the
overlapping pattern on
to the front panel.
• Cut the overlapping piece
(front piece) following the
pattern and add some
allowance (this can be
cut off later).
• Then cut the back piece (this
is the corresponding under
layer) with a 1cm allowance.
• Put the overlapping layer on
top (right-side up) and pin the
thread-marked front and back
side seam lines together.
• Baste the new side seam
and check the fit for small
alterations, before sewing the
pieces permanently together.
• Appliqué around the lace
pattern with a small zigzag
stitch, either by hand or with
the sewing machine.
• Trim all excess allowances
off each layer and press the
seams carefully at a low
temperature.
Appliquéd lace edging and set-in lace piecesWhen integrating lace pieces
into a garment or finishing,
such as on lace-trimmed
necklines or hemlines, great
care has to be applied to
make the fabric and lace look
like a single piece. Lace
application should not look
like an afterthought, but as
though it is part of the fabric.
Appliqué seams
Sur
face
-sp
ecifi
c te
chni
que
s
Surface-specific techniques
Lace
Lace is a decorative fabric with an open structure. It is made byhand or machine using knitting, braiding, looping and knottingtechniques. Lace is used for trimming on lingerie, collars and cuffs oras appliqué, traditionally on bridal or evening wear. It can be fine- toheavyweight, in different fibres such as linen, wool, cotton, polyesteror nylon and has more stretch in the width than in the length. Lace isfragile and needs to be handled with care. It is also expensive. Youwill require more fabric when cutting out because most lace fabricshave a horizontal or vertical pattern that should be matched up, bothfor garment construction and for trimmings.
1 Christian Lacroix, hautecouture, S/S08.Catwalking.com
2 Technical drawing showinghow to cut lace fabric andcreate an appliqué seam.
1
TEXTBLACK
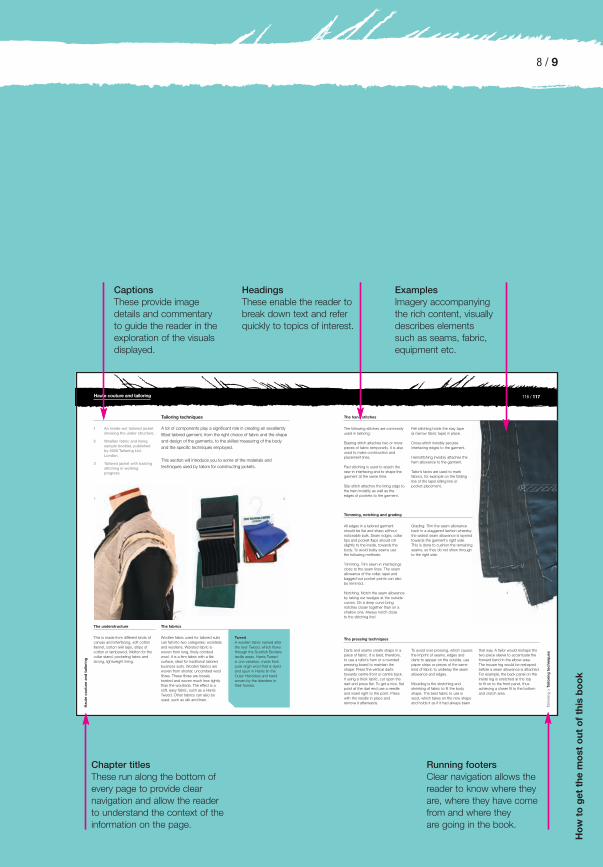
How to get the most out of this book
This book introduces different aspects of garment construction via dedicated chapters for each topic. Each chapter providesnumerous examples of work by leading designers, annotated to explain the reasons behind the choices made.
Key construction and design principles are isolated so that the reader can see how they are applied in practice.
IntroductionsSpecial section introductionsoutline basic concepts thatwill be discussed.
Clear navigationEach chapter has a clearheading to allow readersto quickly locate areas ofinterest.
Additional informationBox-outs elaborate onsubjects discussed in the main text.
(AVA): Basic Fashion DesignCD0808-038 / 4237 ~ 2nd Proof
SIF AVABF3 Chpt1 11.06_.qxd 8/14/08 1:48 PM Page 8
(AVA): Basic Fashion DesignCD0808-038 / 4237 ~ 2nd Proof
SIF AVABF3 Chpt1 11.06_.qxd 8/14/08 1:47 PM Page 8
116 / 117
8 / 9
(AVA): Basic Fashion DesignCD0808-038 / 4237 ~ 2nd Proof
SIF AVABF3 Chpt1 11.06_.qxd 8/14/08 1:48 PM Page 9
Ha
ute
co
utu
re a
nd
ta
ilo
rin
g
Haute couture and tailoring
A lot of components play a significant role in creating an excellently
fitted tailored garment, from the right choice of fabric and the shape
and design of the garments, to the skilled measuring of the body
and the specific techniques employed.
This section will introduce you to some of the materials and
techniques used by tailors for constructing jackets.
Tailoring techniques
1 An inside-out tailored jacket
showing the under structure.
2 Woollen fabric and lining
sample booklet, published
by 2000 Tailoring Ltd.
London.
3 Tailored jacket with basting
stitching in working
progress.
The understructure
This is made from different kinds of
canvas and interfacing, soft cotton
flannel, cotton twill tape, strips of
cotton or lambswool, Melton for the
collar stand, pocketing fabric and
strong, lightweight lining.
Woollen fabric used for tailored suits
can fall into two categories: worsteds
and woollens. Worsted fabric is
woven from long, finely combed
wool. It is a firm fabric with a flat
surface, ideal for traditional tailored
business suits. Woollen fabrics are
woven from shorter, uncombed wool
fibres. These fibres are loosely
twisted and woven much less tightly
than the worsteds. The effect is a
soft, easy fabric, such as a Harris
Tweed. Other fabrics can also be
used, such as silk and linen.
Tweed
A woollen fabric named after
the river Tweed, which flows
through the Scottish Borders
textile areas. Harris Tweed
is one variation, made from
pure virgin wool that is dyed
and spun in Harris (in the
Outer Hebrides) and hand
woven by the islanders in
their homes.
The fabrics
1 2
Ta
ilo
rin
g >
Ta
ilo
rin
g t
ec
hn
iqu
es
The following stitches are commonly
used in tailoring:
Basting stitch attaches two or more
pieces of fabric temporarily. It is also
used to make construction and
placement lines.
Pad stitching is used to attach the
sew-in interfacing and to shape the
garment at the same time.
Slip-stitch attaches the lining edge to
the hem invisibly as well as the
edges of pockets to the garment.
Fell stitching holds the stay tape
(a narrow fabric tape) in place.
Cross-stitch invisibly secures
interfacing edges to the garment.
Hemstitching invisibly attaches the
hem allowance to the garment.
Tailor’s tacks are used to mark
fabrics, for example on the folding
line of the lapel rolling line or
pocket placement.
The hand stitches
Trimming, notching and grading
All edges in a tailored garment
should be flat and sharp without
noticeable bulk. Seam edges, collar
tips and pocket flaps should roll
slightly to the inside, towards the
body. To avoid bulky seams use
the following methods:
Trimming. Trim sewn-in interfacings
close to the seam lines. The seam
allowance of the collar, lapel and
bagged-out pocket points can also
be trimmed.
Notching. Notch the seam allowance
by taking out wedges at the outside
curves. On a deep curve bring
notches closer together than on a
shallow one. Always notch close
to the stitching line!
Grading. Trim the seam allowance
back in a staggered fashion whereby
the widest seam allowance is layered
towards the garment’s right side.
This is done to cushion the remaining
seams, so they do not show through
to the right side.
The pressing techniques
Darts and seams create shape in a
piece of fabric. It is best, therefore,
to use a tailor’s ham or a rounded
pressing board to maintain the
shape. Press the vertical darts
towards centre front or centre back.
If using a thick fabric, cut open the
dart and press flat. To get a nice, flat
point at the dart end use a needle
and insert right to the point. Press
with the needle in place and
remove it afterwards.
To avoid over pressing, which causes
the imprint of seams, edges and
darts to appear on the outside, use
paper strips or pieces of the same
kind of fabric to underlay the seam
allowance and edges.
Moulding is the stretching and
shrinking of fabric to fit the body
shape. The best fabric to use is
wool, which takes on the new shape
and holds it as if it had always been
that way. A tailor would reshape the
two-piece sleeve to accentuate the
forward bend in the elbow area.
The trouser leg would be reshaped
before a seam allowance is attached.
For example, the back panel on the
inside leg is stretched at the top
to fit on to the front panel, thus
achieving a closer fit to the bottom
and crotch area.
3
TEXTBLACK
Ho
w t
o g
et t
he m
ost
out
of
this
bo
ok
ExamplesImagery accompanyingthe rich content, visuallydescribes elementssuch as seams, fabric,equipment etc.
Running footersClear navigation allows thereader to know where theyare, where they have comefrom and where they are going in the book.
HeadingsThese enable the reader tobreak down text and referquickly to topics of interest.
CaptionsThese provide imagedetails and commentaryto guide the reader in theexploration of the visualsdisplayed.
Chapter titlesThese run along the bottom ofevery page to provide clear navigation and allow the reader to understand the context of theinformation on the page.
(AVA): Basic Fashion DesignCD0808-038 / 4237 ~ 2nd Proof
SIF AVABF3 Chpt1 11.06_.qxd 8/14/08 1:48 PM Page 9
6070_009 Addition tx.indd 36070_009 Addition tx.indd 3 4/7/09 9:48:09 AM4/7/09 9:48:09 AM

(AVA): Basic Fashion DesignCD0708-086 / 4237 ~ 1st Proof
SIF AVABF3 Chpt1 11.06_.qxd 7/24/08 3:40 PM Page 10
TEXTBLACK
(AVA): Basic Fashion DesignCD0708-086 / 4237 ~ 1st Proof
SIF AVABF3 Chpt1 11.06_.qxd 7/24/08 3:41 PM Page 10

10 / 11
(AVA): Basic Fashion DesignCD0708-086 / 4237 ~ 1st Proof
SIF AVABF3 Chpt1 11.06_.qxd 7/24/08 3:40 PM Page 11
TEXTBLACK
It is important for designers to understand as early as possiblehow a garment grows from a two-dimensional concept into athree-dimensional object. A pattern is a flat paper or card template,from which the parts of the garment are transferred to fabric,before being cut out and assembled.
A good understanding of body shape and how bodymeasurements transfer to the pattern piece is essential. The pattern cutter must work accurately in order to ensurethat, once constructed, the parts of fabric fit together properlyand precisely.
This chapter is an introduction to pattern cutting, starting with the tools and equipment needed. Then it takes a look at the processes involved: the importance of silhouettes and proportion; sizing and grading and how to take bodymeasurements. Finally it introduces the basic block and patternshapes and how the body measurements relate to these.
Getting started
1 Jean Paul Gaultier, A/W07.Catwalking.com.
1
‘Fashion is architecture. It is a matter of proportions.’
Coco Chanel
Get
ting
sta
rted
>P
atte
rn c
utti
ng
(AVA): Basic Fashion DesignCD0908-096 / 4272 ~ 2nd Proof
SIF AVABF3 Chpt1 11.06_.qxd 9/20/08 8:24 AM Page 11

1
4
5
6
3
2
(AVA): Basic Fashion DesignCD0708-086 / 4237 ~ 1st Proof
SIF AVABF3 Chpt1 11.06_.qxd 7/24/08 3:40 PM Page 12
TEXTBLACK
Getting started
Pattern cutting tools and equipment
Working with the right tools will make block and pattern constructioneasier. These are just some of the key pieces of equipment required.
Tailor’s chalk (1)Using tailor’s chalk is one way ofmarking lines or transferring a pattern on to cloth.
Set of three French curves (2)These are used for drawing narrowercurves, such as those found oncollars and pockets.
43cm set square (3)This is a right-angled triangular plateused for drawing lines, particularly at90 degrees and 45 degrees.
Wooden awl (4)This is used for marking any pointswithin the pattern piece by punchingthrough the pattern to leave a smallmark on the fabric.
Pins (5)These are used to temporarily fixpieces of paper or cloth together.
Tape measure (6)An indispensable item, this is usedfor taking measurements of the bodyand its flexibility allows curved linesto be measured too.
Pattern drill (7)This is used for marking things such as darts, pockets and any other marking points within thepattern piece. The pattern drill willpunch a hole of 2–4mm into thepattern. The position of the punchhole can then be marked with chalkor thread on to the fabric.
Get
ting
sta
rted
(AVA): Basic Fashion DesignCD0708-086 / 4237 ~ 1st Proof
SIF AVABF3 Chpt1 11.06_.qxd 7/24/08 3:41 PM Page 12

12 / 13
7
8
9
11
10
(AVA): Basic Fashion DesignCD0708-086 / 4237 ~ 1st Proof
SIF AVABF3 Chpt1 11.06_.qxd 7/24/08 3:40 PM Page 13
TEXTBLACK
Pat
tern
cut
ting
to
ols
and
eq
uip
men
t >
Silh
oue
ttes
Pattern notcher (8)This is used for marking the edge of the pattern pieces by taking out asmall square for each balance point.This should only be used on patternpaper – thin sheets of plastic or card– not on fabric.
Paper scissors (9)These are – as their name suggests– only used for paper, in order tokeep the blades sharp.
Tracing wheel (10)This is used to trace a line from one piece of paper or pattern on to another directly underneath it.
Pattern master (11)This is used to create lines andcurves and to check angles.
Aluminium metre ruler (not shown)This is essential for drawing andconnecting longer, straight lines.
(AVA): Basic Fashion DesignCD0708-086 / 4237 ~ 1st Proof
SIF AVABF3 Chpt1 11.06_.qxd 7/24/08 3:41 PM Page 13
(AVA): Basic Fashion DesignCD0708-086 / 4237 ~ 1st Proof
SIF AVABF3 Chpt1 11.06_.qxd 7/24/08 3:40 PM Page 14
Get
ting
sta
rted
TEXTBLACK
Getting started
Silhouettes
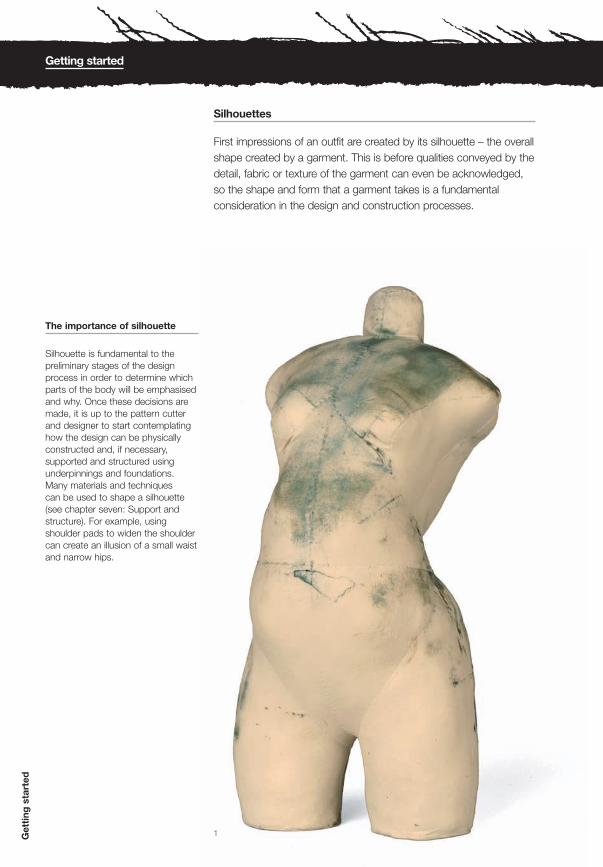
First impressions of an outfit are created by its silhouette – the overallshape created by a garment. This is before qualities conveyed by thedetail, fabric or texture of the garment can even be acknowledged,so the shape and form that a garment takes is a fundamentalconsideration in the design and construction processes.
Silhouette is fundamental to thepreliminary stages of the designprocess in order to determine whichparts of the body will be emphasisedand why. Once these decisions aremade, it is up to the pattern cutterand designer to start contemplatinghow the design can be physicallyconstructed and, if necessary,supported and structured usingunderpinnings and foundations.Many materials and techniques can be used to shape a silhouette(see chapter seven: Support andstructure). For example, usingshoulder pads to widen the shouldercan create an illusion of a small waistand narrow hips.
The importance of silhouette
1
(AVA): Basic Fashion DesignCD0808-038 / 4237 ~ 2nd Proof
SIF AVABF3 Chpt1 11.06_.qxd 8/13/08 2:45 PM Page 14
14 / 15
(AVA): Basic Fashion DesignCD0808-038 / 4237 ~ 2nd Proof
SIF AVABF3 Chpt1 11.06_.qxd 8/13/08 2:45 PM Page 15
2
TEXTBLACK
Pat
tern
cut
ting
to
ols
and
eq
uip
men
t >
Silh
oue
ttes
> S
izin
g a
nd g
rad
ing
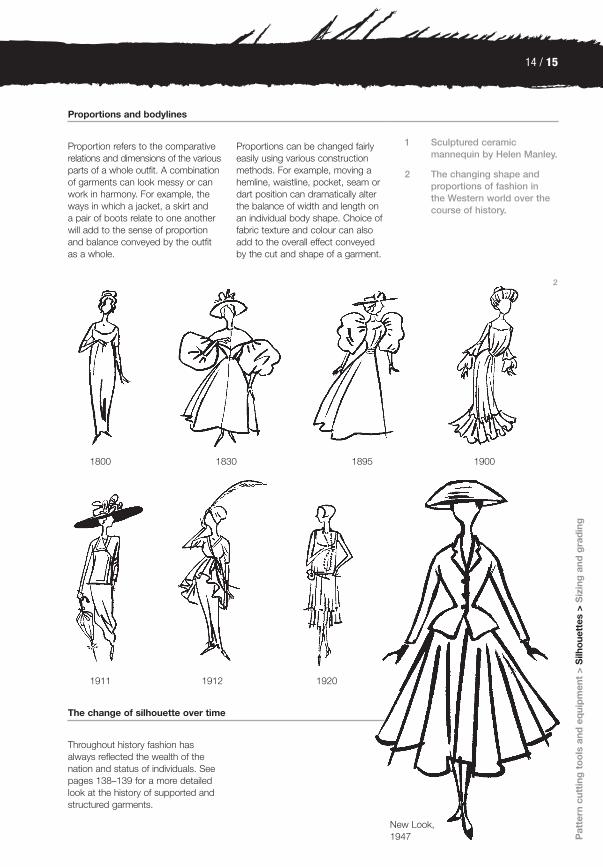
Proportion refers to the comparativerelations and dimensions of the variousparts of a whole outfit. A combinationof garments can look messy or canwork in harmony. For example, theways in which a jacket, a skirt and a pair of boots relate to one anotherwill add to the sense of proportionand balance conveyed by the outfitas a whole.
Proportions can be changed fairlyeasily using various constructionmethods. For example, moving ahemline, waistline, pocket, seam ordart position can dramatically alterthe balance of width and length onan individual body shape. Choice of fabric texture and colour can alsoadd to the overall effect conveyed by the cut and shape of a garment.
Throughout history fashion hasalways reflected the wealth of thenation and status of individuals. Seepages 138–139 for a more detailedlook at the history of supported andstructured garments.
Proportions and bodylines
The change of silhouette over time
1 Sculptured ceramicmannequin by Helen Manley.
2 The changing shape andproportions of fashion in the Western world over thecourse of history.
1800 1830 1895 1900
1911 1912 1920
New Look,1947
(AVA): Basic Fashion DesignCD0808-109 / 4237 ~ 3rd Proof
SIF AVABF3 Chpt1 11.06_.qxd 8/25/08 1:29 PM Page 15
(AVA): Basic Fashion DesignCD0708-086 / 4237 ~ 1st Proof
SIF AVABF3 Chpt1 11.06_.qxd 7/24/08 3:40 PM Page 16
Get
ting
sta
rted
TEXTBLACK
Getting started
Sizing and grading
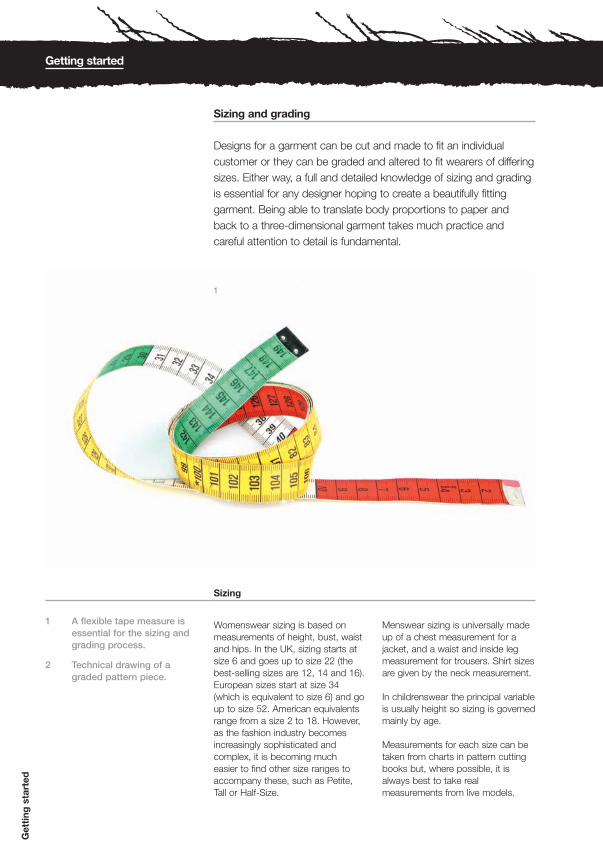
Designs for a garment can be cut and made to fit an individualcustomer or they can be graded and altered to fit wearers of differingsizes. Either way, a full and detailed knowledge of sizing and gradingis essential for any designer hoping to create a beautifully fittinggarment. Being able to translate body proportions to paper and back to a three-dimensional garment takes much practice andcareful attention to detail is fundamental.
Womenswear sizing is based onmeasurements of height, bust, waistand hips. In the UK, sizing starts atsize 6 and goes up to size 22 (thebest-selling sizes are 12, 14 and 16).European sizes start at size 34(which is equivalent to size 6) and goup to size 52. American equivalentsrange from a size 2 to 18. However,as the fashion industry becomesincreasingly sophisticated andcomplex, it is becoming much easier to find other size ranges toaccompany these, such as Petite,Tall or Half-Size.
Menswear sizing is universally madeup of a chest measurement for ajacket, and a waist and inside legmeasurement for trousers. Shirt sizesare given by the neck measurement.
In childrenswear the principal variableis usually height so sizing is governedmainly by age.
Measurements for each size can betaken from charts in pattern cuttingbooks but, where possible, it isalways best to take realmeasurements from live models.
Sizing
1 A flexible tape measure is essential for the sizing and grading process.
2 Technical drawing of a graded pattern piece.
1
(AVA): Basic Fashion DesignCD0708-086 / 4237 ~ 1st Proof
SIF AVABF3 Chpt1 11.06_.qxd 7/24/08 3:41 PM Page 16

16 / 17
(AVA): Basic Fashion DesignCD0808-038 / 4272 ~ 2nd Proof
SIF AVABF3 Chpt1 11.06_.qxd 8/14/08 5:20 PM Page 17
TEXTBLACK
Silh
oue
ttes
>S
izin
g a
nd g
rad
ing
> B
lock
s an
d p
atte
rns
Grading is the process of scaling a pattern to a different size byincrementing important points of thepattern according to a set of givenmeasurements, such as the BritishStandard sizing chart. Grading is avery specialised area in patterncutting that not many professionalsmaster. The secret is to know wherethe pattern needs changing to fit thedecrease and increase in body size.Such increments can vary from 3 to5cm (1.5–2in), depending on thegarment range.
Many manufacturers use the BritishStandard sizing chart, which was first established in the 1950s and has changed over the years toaccommodate changes in lifestyle.The United States has its own sizingchart and many other nations haveworked out standard sizing for theirown needs. Factors such as cultureand diet have great influence on acountry’s average body shape. Forexample, northern European bodyshapes are generally tall and largewhereas the average body shape inthe Far East is shorter in height andslimmer in stature. For these reasons,a design house must always carefullyconsider the market it wants to sell to.
When grading a pattern, make sure that all corresponding seams,notches and punch marks matchbefore starting the grading process.Grading can be done by hand with a metric grader’s set square, patternmaster or an L-square ruler, as wellas by computer using a specificprogram, such as Lectra or Asys.
Grading
2
(AVA): Basic Fashion DesignCD0808-038 / 4272 ~ 2nd Proof
SIF AVABF3 Chpt1 11.06_.qxd 8/14/08 5:20 PM Page 17
1
3
4
5
6
7
8
109
2
(AVA): Basic Fashion DesignCD0808-038 / 4272 ~ 2nd Proof
SIF AVABF3 Chpt1 11.06_.qxd 8/13/08 5:31 PM Page 18
Get
ting
sta
rted
TEXTBLACK
Getting started
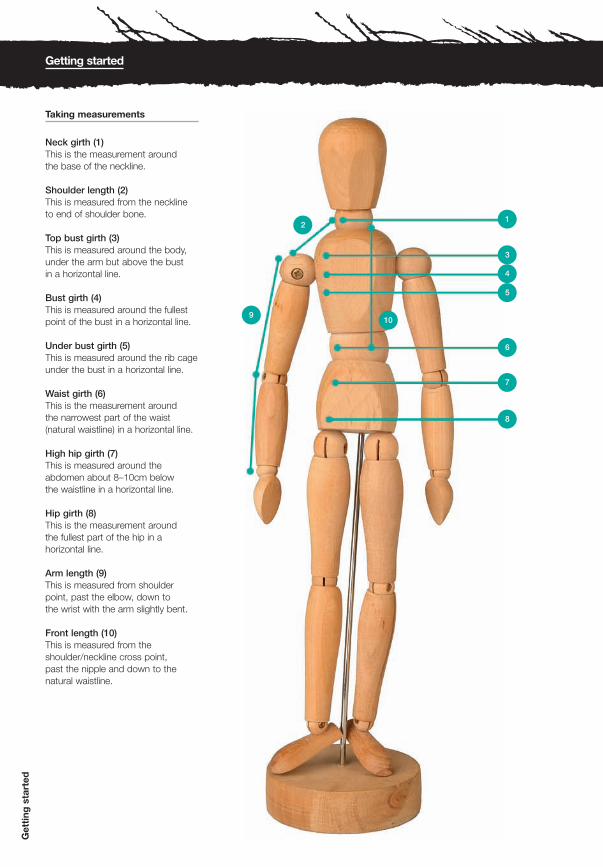
Neck girth (1)This is the measurement around the base of the neckline.
Shoulder length (2)This is measured from the neckline to end of shoulder bone.
Top bust girth (3)This is measured around the body,under the arm but above the bust in a horizontal line.
Bust girth (4)This is measured around the fullestpoint of the bust in a horizontal line.
Under bust girth (5)This is measured around the rib cageunder the bust in a horizontal line.
Waist girth (6)This is the measurement around the narrowest part of the waist(natural waistline) in a horizontal line.
High hip girth (7)This is measured around theabdomen about 8–10cm below the waistline in a horizontal line.
Hip girth (8)This is the measurement around the fullest part of the hip in ahorizontal line.
Arm length (9)This is measured from shoulderpoint, past the elbow, down to the wrist with the arm slightly bent.
Front length (10)This is measured from theshoulder/neckline cross point, past the nipple and down to thenatural waistline.
Taking measurements
(AVA): Basic Fashion DesignCD0708-086 / 4237 ~ 1st Proof
SIF AVABF3 Chpt1 11.06_.qxd 7/24/08 3:41 PM Page 18
18 / 19
16
17
18
13
11
12
14 15
(AVA): Basic Fashion DesignCD0808-038 / 4272 ~ 2nd Proof
SIF AVABF3 Chpt1 11.06_.qxd 8/13/08 5:31 PM Page 19
TEXTBLACK
Silh
oue
ttes
>S
izin
g a
nd g
rad
ing
> B
lock
s an
d p
atte
rns
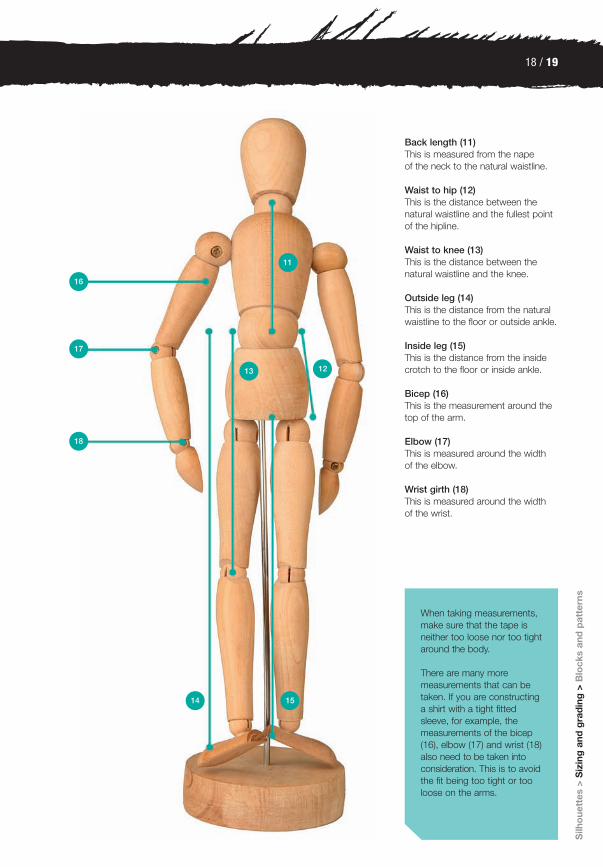
Back length (11)This is measured from the nape of the neck to the natural waistline.
Waist to hip (12)This is the distance between thenatural waistline and the fullest point of the hipline.
Waist to knee (13)This is the distance between thenatural waistline and the knee.
Outside leg (14)This is the distance from the naturalwaistline to the floor or outside ankle.
Inside leg (15)This is the distance from the insidecrotch to the floor or inside ankle.
Bicep (16)This is the measurement around thetop of the arm.
Elbow (17)This is measured around the width of the elbow.
Wrist girth (18)This is measured around the width of the wrist.
When taking measurements,make sure that the tape isneither too loose nor too tightaround the body.
There are many moremeasurements that can betaken. If you are constructinga shirt with a tight fittedsleeve, for example, themeasurements of the bicep(16), elbow (17) and wrist (18)also need to be taken intoconsideration. This is to avoidthe fit being too tight or tooloose on the arms.
(AVA): Basic Fashion DesignCD0708-086 / 4237 ~ 1st Proof
SIF AVABF3 Chpt1 11.06_.qxd 7/24/08 3:41 PM Page 19

(AVA): Basic Fashion DesignCD0808-038 / 4272 ~ 2nd Proof
SIF AVABF3 Chpt1 11.06_.qxd 8/13/08 5:35 PM Page 20
Get
ting
sta
rted
TEXTBLACK
Getting started
Blocks and patterns
Blocks and patterns enable the designer to render something flat(paper or fabric) into something three-dimensional. They are laid onto fabric, cut out and assembled together using seams. In order tocreate well-made garments, it is essential that the designer fullyunderstands the techniques used in order to make pattern cutting as straightforward and accurate as possible.
A block (also known as a sloper) is a two-dimensional template for abasic garment form (for example, a bodice shape or fitted skirt) thatcan be modified into a moreelaborate design. Blocks areconstructed using measurementstaken from a size chart or a livemodel, and do not show any stylelines or seam allowance.
Blocks must, however, include basicamounts of allowance for ease andcomfort; for instance, a tight-fittingbodice block would not have asmuch allowance added into theconstruction as a block for anouterwear garment might. A fittedbodice block would also have dartsadded into the draft to shape thegarment to the waist and bust,whereas a block for a loose-fittingovercoat would not need these.
The block
1
(AVA): Basic Fashion DesignCD0708-086 / 4237 ~ 1st Proof
SIF AVABF3 Chpt1 11.06_.qxd 7/24/08 3:41 PM Page 20
20 / 21
(AVA): Basic Fashion DesignCD0708-086 / 4237 ~ 1st Proof
SIF AVABF3 Chpt1 11.06_.qxd 7/24/08 3:40 PM Page 21
TEXTBLACK
Siz
ing
and
gra
din
g >
Blo
cks
and
pat
tern
s
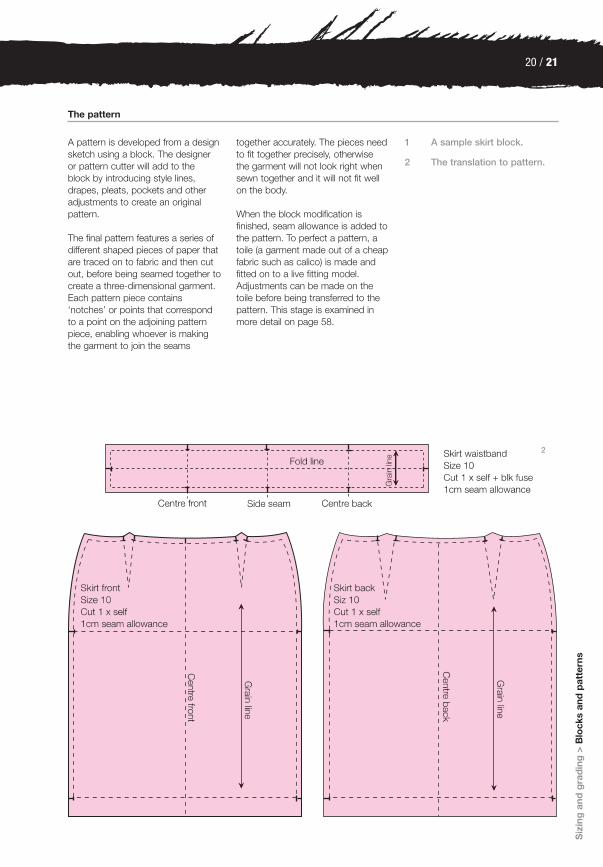
A pattern is developed from a designsketch using a block. The designeror pattern cutter will add to the block by introducing style lines,drapes, pleats, pockets and otheradjustments to create an originalpattern.
The final pattern features a series ofdifferent shaped pieces of paper thatare traced on to fabric and then cutout, before being seamed together tocreate a three-dimensional garment.Each pattern piece contains‘notches’ or points that correspondto a point on the adjoining patternpiece, enabling whoever is makingthe garment to join the seams
together accurately. The pieces needto fit together precisely, otherwise the garment will not look right whensewn together and it will not fit wellon the body.
When the block modification isfinished, seam allowance is added tothe pattern. To perfect a pattern, atoile (a garment made out of a cheapfabric such as calico) is made andfitted on to a live fitting model.Adjustments can be made on thetoile before being transferred to thepattern. This stage is examined inmore detail on page 58.
The pattern
1 A sample skirt block.
2 The translation to pattern.
2
(AVA): Basic Fashion DesignCD0808-038 / 4272 ~ 2nd Proof
SIF AVABF3 Chpt1 11.06_.qxd 8/13/08 5:55 PM Page 21

(AVA): Basic Fashion DesignCD0808-038 / 4272 ~ 2nd Proof
SIF AVABF3 Chpt1 11.06_.qxd 8/13/08 5:34 PM Page 22
Get
ting
sta
rted
TEXTBLACK
Getting started
Whether taking individual measurementsor using a size chart, the mainmeasurements (bust girth, waistgirth, waist-to-hip length and hipgirth) will give a good indication ofthe body shape the design isintended to fit.
Secondary measurements may also be taken from an individual or from a size chart. This may be the length of skirt, for example, when drafting a skirt block.
Darts can be used to control excessfabric and to create shape on agarment when stitched together.Curves are added to create shapedepending on the nature andpurpose of the block.
SamplesA sample is the first versionof a garment made in realfabric. It is this garment thatgoes on the catwalk or into a press/showroom. Samplesare produced for womenswearin sizes 8–10 to fit the models.Once the sale book is closed,the samples are stored in thecompany’s archive. Somesamples of past collectionsare taken out by designers forphoto shoots, events such aspremieres and for referenceor possible inspiration forfuture collections.
How the measurements relate to the block
1 The block and itscorrespondingmeasurements.
1
(AVA): Basic Fashion DesignCD0708-086 / 4237 ~ 1st Proof
SIF AVABF3 Chpt1 11.06_.qxd 7/24/08 3:41 PM Page 22

22 / 23
(AVA): Basic Fashion DesignCD0708-086 / 4237 ~ 1st Proof
SIF AVABF3 Chpt1 11.06_.qxd 7/24/08 3:40 PM Page 23
TEXTBLACK
Siz
ing
and
gra
din
g >
Blo
cks
and
pat
tern
s How to start a set ofblocksA set of blocks can be cutfor one individual in order tocreate bespoke/couturegarments. Design houses willoften create their own set ofblocks to complement theirspecial ethos and designphilosophy. When starting aset of blocks, it may help toask the following questions:
Who is my target group:women, children or men?
What will be the smallest andthe largest size in my sizechart?
What is my sample size?
What is my collection range:lingerie, tailoring, streetwear?
The answers to thesequestions will make it mucheasier to cut the right blocksfrom which to create originalpatterns for each collection.
bust
waist
hip
(AVA): Basic Fashion DesignCD0708-086 / 4237 ~ 1st Proof
SIF AVABF3 Chpt1 11.06_.qxd 7/24/08 3:41 PM Page 23

(AVA): Basic Fashion DesignCD0708-086 / 4237 ~ 1st Proof
SIF AVABF3 Chpt2 13.07RN_.qxd 7/26/08 1:02 PM Page 24
TEXTBLACK
(AVA): Basic Fashion DesignCD0708-086 / 4237 ~ 1st Proof
SIF AVABF3 Chpt2 13.07RN_.qxd 7/26/08 1:13 PM Page 24
24 / 25
(AVA): Basic Fashion DesignCD0708-086 / 4237 ~ 1st Proof
SIF AVABF3 Chpt2 13.07RN_.qxd 7/26/08 1:02 PM Page 25
TEXTBLACK
Like all craft skills, pattern cutting can at first seem difficult and intimidating. But with a basic understanding of the rules to be followed (and broken!) the aspiring designer will soonlearn interesting, challenging and creative approaches to patterncutting. To draw the right style line in the correct position on agarment takes experience and practice. Designers who havebeen cutting patterns for twenty years can still learn somethingnew – the process of learning never stops. This makes creativepattern cutting a fascinating process.
In this chapter we introduce the meaning of a drafted block andhow to turn it into a pattern from a design drawing. We take alook at dart manipulation as well as pocket, collar and sleeveconstruction. You will be introduced to cutting techniques andbias-cut garments. You will also learn about the fitting process:how to fit the toile and alter the pattern accordingly. Finally wetake a look at the different ways of laying and cutting patternsfrom fabric.
Pattern cutting
1 Meadham & KirchhoffA/W07. Catwalking.com.
1
‘I use the same approach to clothes as I did when Idesigned buildings. It is basic geometry: you take a flat form and revolve it in space.’
Gianfranco Ferre
Get
ting
sta
rted
>P
atte
rn c
utti
ng >
Gar
men
t co
nstr
ucti
on
(AVA): Basic Fashion DesignCD0908-096 / 4272 ~ 3rd Proof
SIF AVABF3 Chpt2 13.07RN_.qxd 9/20/08 8:26 AM Page 25

(AVA): Basic Fashion DesignCD0808-038 / 4272 ~ 2nd Proof
SIF AVABF3 Chpt2 13.07RN_.qxd 8/13/08 8:32 PM Page 26
TEXTBLACK
Pattern cutting
How to read a design drawing
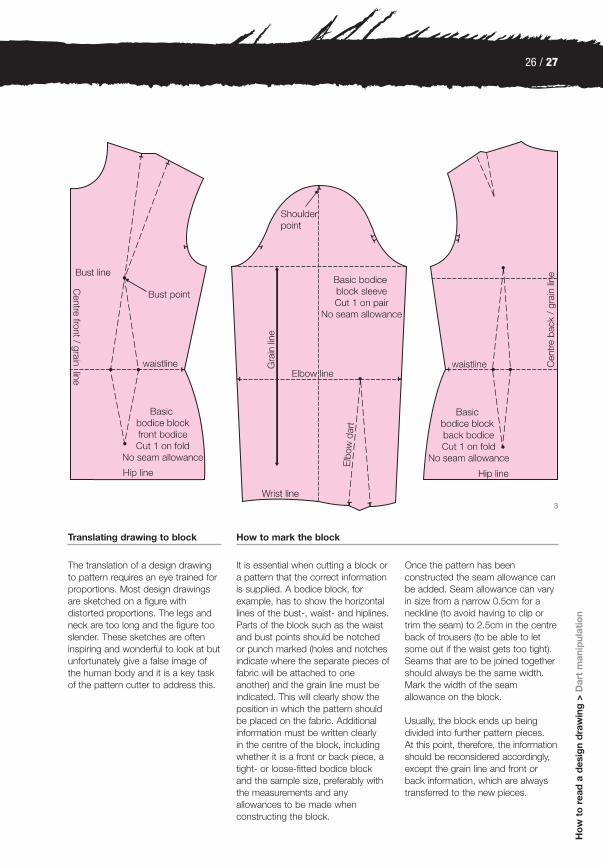
This is the point at which pattern cutting becomes much morecreative and exciting. Once the design has been completed, theprocess of breathing life into a flat design drawing in order to achieve an actual garment can begin. To be able to achieve abeautiful garment shape takes time and experience. Remembernothing ever happens without practising your skills – don’t bedisheartened if it doesn’t work first time round. All outstanding fashion designers and creative pattern cutters have worked for years to perfect their skills.
Pat
tern
cut
ting
1/2 Photograph and illustrationof design by KarinGardkvist.
3 A basic bodice block.
1
2
(AVA): Basic Fashion DesignCD0708-086 / 4237 ~ 1st Proof
SIF AVABF3 Chpt2 13.07RN_.qxd 7/26/08 1:13 PM Page 26
26 / 27
(AVA): Basic Fashion DesignCD0708-086 / 4272 ~ 1st Proof
SIF AVABF3 Chpt2 13.07RN_.qxd 7/26/08 1:02 PM Page 27
TEXTBLACK
The translation of a design drawingto pattern requires an eye trained forproportions. Most design drawingsare sketched on a figure withdistorted proportions. The legs andneck are too long and the figure tooslender. These sketches are ofteninspiring and wonderful to look at butunfortunately give a false image ofthe human body and it is a key taskof the pattern cutter to address this.
Ho
w t
o r
ead
a d
esig
n d
raw
ing
> D
art
man
ipul
atio
n
Translating drawing to block
It is essential when cutting a block ora pattern that the correct informationis supplied. A bodice block, forexample, has to show the horizontallines of the bust-, waist- and hiplines.Parts of the block such as the waistand bust points should be notchedor punch marked (holes and notchesindicate where the separate pieces offabric will be attached to oneanother) and the grain line must beindicated. This will clearly show theposition in which the pattern shouldbe placed on the fabric. Additionalinformation must be written clearly in the centre of the block, includingwhether it is a front or back piece, atight- or loose-fitted bodice blockand the sample size, preferably withthe measurements and anyallowances to be made whenconstructing the block.
Once the pattern has beenconstructed the seam allowance canbe added. Seam allowance can varyin size from a narrow 0.5cm for aneckline (to avoid having to clip ortrim the seam) to 2.5cm in the centreback of trousers (to be able to letsome out if the waist gets too tight).Seams that are to be joined togethershould always be the same width.Mark the width of the seamallowance on the block.
Usually, the block ends up beingdivided into further pattern pieces. At this point, therefore, the informationshould be reconsidered accordingly,except the grain line and front orback information, which are alwaystransferred to the new pieces.
How to mark the block
3
(AVA): Basic Fashion DesignCD0808-038 / 4272 ~ 2nd Proof
SIF AVABF3 Chpt2 13.07RN_.qxd 8/13/08 8:38 PM Page 27

(AVA): Basic Fashion DesignCD0808-038 / 4272 ~ 2nd Proof
SIF AVABF3 Chpt2 13.07RN_.qxd 8/13/08 8:54 PM Page 28
Pat
tern
cut
ting
TEXTBLACK
Marking symbols on a pattern
1 2
4
3
Pattern cutting
(AVA): Basic Fashion DesignCD0708-086 / 4272 ~ 1st Proof
SIF AVABF3 Chpt2 13.07RN_.qxd 7/26/08 1:13 PM Page 28
28 / 29
(AVA): Basic Fashion DesignCD0708-086 / 4272 ~ 1st Proof
SIF AVABF3 Chpt2 13.07RN_.qxd 7/26/08 1:02 PM Page 29
TEXTBLACK
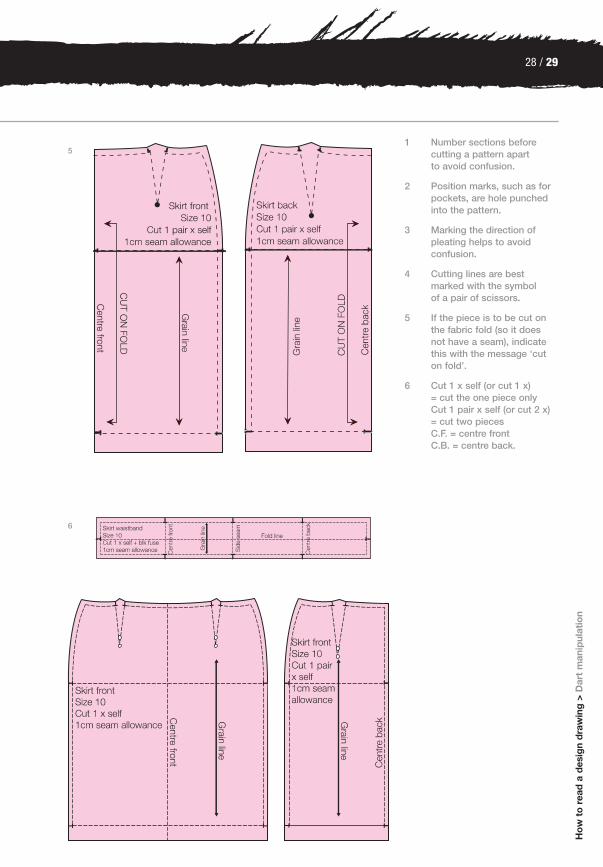
6
51 Number sections before
cutting a pattern apart to avoid confusion.
2 Position marks, such as forpockets, are hole punchedinto the pattern.
3 Marking the direction ofpleating helps to avoidconfusion.
4 Cutting lines are bestmarked with the symbol of a pair of scissors.
5 If the piece is to be cut onthe fabric fold (so it does not have a seam), indicatethis with the message ‘cuton fold’.
6 Cut 1 x self (or cut 1 x) = cut the one piece only Cut 1 pair x self (or cut 2 x) = cut two pieces C.F. = centre front C.B. = centre back.
Ho
w t
o r
ead
a d
esig
n d
raw
ing
> D
art
man
ipul
atio
n
(AVA): Basic Fashion DesignCD0808-038 / 4272 ~ 2nd Proof
SIF AVABF3 Chpt2 13.07RN_.qxd 8/13/08 8:56 PM Page 29

(AVA): Basic Fashion DesignCD0808-038 / 4272 ~ 2nd Proof
SIF AVABF3 Chpt2 13.07RN_.qxd 8/13/08 8:58 PM Page 30
TEXTBLACK
Pattern cutting
Dart manipulation
Darts control excess fabric to create shape on a garment. They canbe stitched together end to end or to a zero point also known as thepivotal point (such as the bust point). Dart manipulation is the mostcreative and flexible part of pattern cutting. The possibilities are endlessand the designer’s imagination is the only limitation. Darts can beturned into pleats, gathers or style lines. Their positioning on the bodyis very important; not only do these techniques create fit, shape andvolume, they also change the style and design of the garment.
Design analysis: asymmetrical design with intersecting darts coming from the waist and ending at the bust point.
Example of dart manipulation on a bodice block
1 An asymmetrical design withintersecting darts.
2 Gianni Versace, A/W07.Catwalking.com.
1. Trace bodice block on fold.When copying the left side ofthe front block, transfer thecomplete waist and bust dartinto the armhole. Then copy theright side of the front block on tothe left front block (centre frontattached to centre front) andtransfer the complete waist andbust dart into the armhole.
3. Cut along the slash lines, up to the bust point (pivotal point),Close up the darts and tapethem down.
2. Draw in the slashing linesaccording to your design.
4. Add seam allowances and mark the dart ends with a holepunch as well as notching theposition of the left dart, centrefront and seam allowances.Mark the gain line (in this case the centre front) and add information such as ‘front, right-side-up, cut 1 x’.
5. If required, the armholes andneckline can be altered for morecomfort. A back pattern can becut to fit the front design.
6. The pattern is now ready to be cut out of calico and madeinto a toile for a fitting.
1
(AVA): Basic Fashion DesignCD0908-096 / 4272 ~ 3rd Proof
SIF AVABF3 Chpt2 13.07RN_.qxd 9/20/08 8:28 AM Page 30

2
(AVA): Basic Fashion DesignCD0808-038 / 4272 ~ 2nd Proof
SIF AVABF3 Chpt2 13.07RN_.qxd 8/13/08 8:59 PM Page 31
TEXTBLACK
(AVA): Basic Fashion DesignCD0708-086 / 4237 ~ 1st Proof
SIF AVABF3 Chpt2 13.07RN_.qxd 7/26/08 1:13 PM Page 31
(AVA): Basic Fashion DesignCD0808-038 / 4272 ~ 2nd Proof
SIF AVABF3 Chpt2 13.07RN_.qxd 8/13/08 9:02 PM Page 32
Pat
tern
cut
ting
TEXTBLACK
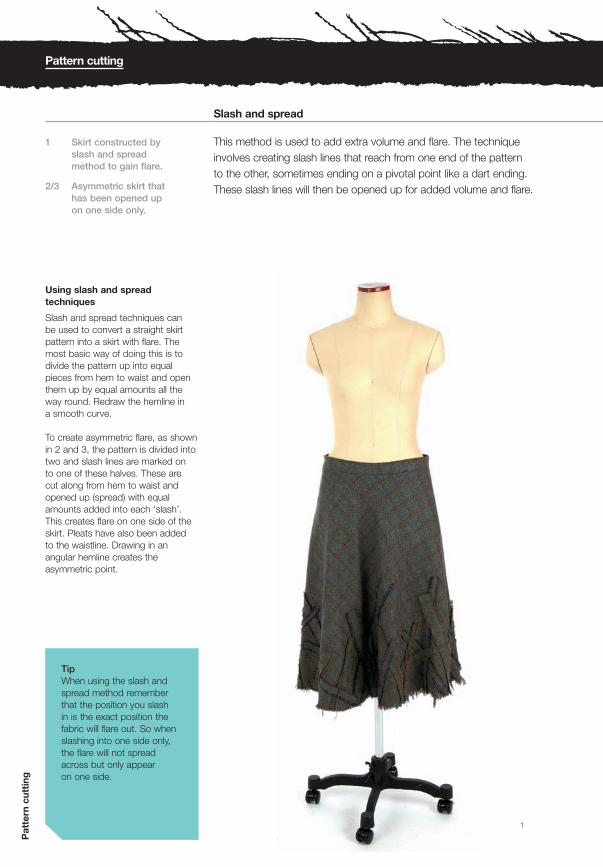
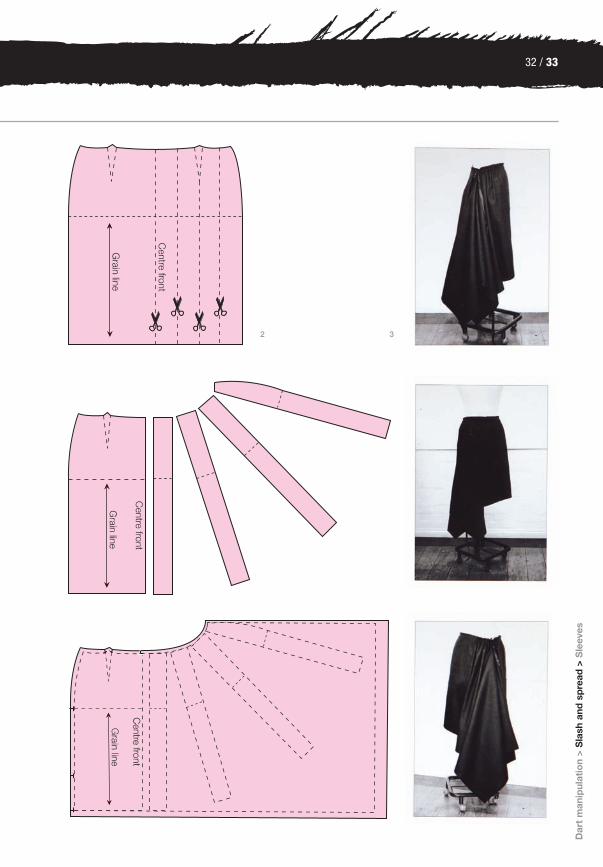
TipWhen using the slash andspread method rememberthat the position you slash in is the exact position thefabric will flare out. So whenslashing into one side only,the flare will not spreadacross but only appear on one side.
Slash and spread
This method is used to add extra volume and flare. The technique involves creating slash lines that reach from one end of the pattern to the other, sometimes ending on a pivotal point like a dart ending.These slash lines will then be opened up for added volume and flare.
1
1 Skirt constructed by slash and spread method to gain flare.
2/3 Asymmetric skirt that has been opened up on one side only.
Pattern cutting
Slash and spread techniques can be used to convert a straight skirtpattern into a skirt with flare. Themost basic way of doing this is todivide the pattern up into equalpieces from hem to waist and openthem up by equal amounts all theway round. Redraw the hemline in a smooth curve.
To create asymmetric flare, as shownin 2 and 3, the pattern is divided intotwo and slash lines are marked on to one of these halves. These are cut along from hem to waist andopened up (spread) with equalamounts added into each ‘slash’.This creates flare on one side of theskirt. Pleats have also been added to the waistline. Drawing in anangular hemline creates theasymmetric point.
Using slash and spreadtechniques
(AVA): Basic Fashion DesignCD0808-038 / 4272 ~ 2nd Proof
SIF AVABF3 Chpt2 13.07RN_.qxd 8/13/08 9:02 PM Page 32
32 / 33
(AVA): Basic Fashion DesignCD0808-038 / 4272 ~ 2nd Proof
SIF AVABF3 Chpt2 13.07RN_.qxd 8/13/08 9:10 PM Page 33
TEXTBLACK
2
Dar
t m
anip
ulat
ion
>S
lash
and
sp
read
> S
leev
es
3
(AVA): Basic Fashion DesignCD0708-086 / 4237 ~ 1st Proof
SIF AVABF3 Chpt2 13.07RN_.qxd 7/26/08 1:13 PM Page 33

1
(AVA): Basic Fashion DesignCD0708-086 / 4237 ~ 1st Proof
SIF AVABF3 Chpt2 13.07RN_.qxd 7/26/08 1:02 PM Page 34
Pat
tern
cut
ting
TEXTBLACK
Pattern cutting
Sleeves
Sleeve construction is a very special part of pattern cutting. Sleeves can be part of the bodice (laid-on sleeve) or set into anarmhole (set-in sleeve). Without any other design features added, a garment can look outstanding by simply creating an interestingsleeve design. The most basic sleeve block is the one-piece (set-in)sleeve, which can be varied as shown in 3a–f (facing page). Differentsleeve blocks can be developed from the one-piece block, such asthe two-piece sleeve and laid-on sleeves, including raglan,kimono/batwing and dolman designs.
1 Christian Dior, hautecouture, S/S07.Catwalking.com.
2 A sleeve block for a set-insleeve, showing the partwhere the sleeve can beeased into the armhole.
3 Variations on the one-piece set-in sleeve:
a Peak sleeve.
b Cap sleeve.
c Leg o’ mutton sleeve.
d Juliet sleeve.
e Trumpet sleeve.
f Bishop sleeve.
(AVA): Basic Fashion DesignCD0908-096 / 4272 ~ 2nd Proof
SIF AVABF3 Chpt2 13.07RN_.qxd 9/20/08 9:54 AM Page 34

34 / 35
(AVA): Basic Fashion DesignCD0808-038 / 4272 ~ 2nd Proof
SIF AVABF3 Chpt2 13.07RN_.qxd 8/13/08 9:19 PM Page 35
TEXTBLACK
Sla
sh a
nd s
pre
ad >
Sle
eves
> C
olla
rs
When constructing a set-in sleeve,the measurement of the armhole isessential. Therefore, the bodice frontand back are constructed first andonce the measurement of thearmhole is established, ease isadded according to the type of block(jacket block, fitted bodice block andso on). Ease is added to a pattern toallow for extra comfort or movement.As well as allowing the sleeve to sitcomfortably in the armhole, ease willalso affect the fit and silhouette of agarment. Ease is distributed betweenthe front notch and the double backnotch of the sleeve (see technicaldrawing above). In some set-insleeve designs, the ease is takenacross the shoulder to achieve around appearance over the shoulderpoint. A sleeve is sitting comfortablyin the armhole when it aligns exactlywith, or is set slightly in front of, theside seam of the bodice.
3a
3e
3b2
3c
3f
Constructing sleeves
3d
(AVA): Basic Fashion DesignCD0708-086 / 4237 ~ 1st Proof
SIF AVABF3 Chpt2 13.07RN_.qxd 7/26/08 1:13 PM Page 35

(AVA): Basic Fashion DesignCD0708-086 / 4237 ~ 1st Proof
SIF AVABF3 Chpt2 13.07RN_.qxd 7/26/08 1:02 PM Page 36
Pat
tern
cut
ting
TEXTBLACK
The laid-on sleeve is part of thebodice. Once constructed, either apart of the armhole remains or thereis no armhole at all.
A laid-on sleeve is most commonlyconstructed by separating the one-piece sleeve through theshoulder notch straight down to thewristline to gain a front piece and aback piece (see technical drawingbelow). The next step is to align thefront piece of the sleeve with thebodice’s front shoulder and the back sleeve with the bodice’s back shoulder. From this pointonwards several styles can be developed, such as batwing orkimono, raglan, gusset and dolmansleeves. The sleeve can be laid on at variant angles – the greater theangle, the more excess fabric andtherefore a greater range of armmovement.
Laid-on sleeve
There are differences between one-piece and two-piece sleeves,the major one being the amount ofseams that are used. A one-piecesleeve has only one seam placedunder the arm at the side seamposition. Therefore, the seam cannotbe seen when the arm is relaxed.The two-piece sleeve has twoseams; one is placed at the back,running from the position of the backdouble notch down to the wrist, pastthe elbow. The second seam ismoved a little to the front, from under
the arm side seam position (still notvisible from the front). The look of atwo-piece sleeve is more shapelyand it has a slight bend to the front.As such, it is possible to get a closerfit with a two-piece sleeve becauseof its extra seam. One-piece sleevesare used for a more casual look,whereas two-piece sleeves aremostly seen on garments such astailored jackets or coats.
One-piece and two-piece sleeves
1 2
Pattern cutting
3
(AVA): Basic Fashion DesignCD0708-086 / 4237 ~ 1st Proof
SIF AVABF3 Chpt2 13.07RN_.qxd 7/26/08 1:13 PM Page 36

36 / 37
5
(AVA): Basic Fashion DesignCD0708-086 / 4237 ~ 1st Proof
SIF AVABF3 Chpt2 13.07RN_.qxd 7/26/08 1:46 PM Page 37
TEXTBLACK
1 Basic one-piece sleeve.
2 Basic two-piece sleeve.
3 Basic split sleeve.
4 Gusset sleeve construction.
5 Christian Lacroix, A/W07.Catwalking.com.
Sla
sh a
nd s
pre
ad >
Sle
eves
> C
olla
rs
To extend the lift (a technical term for moveability of the arm) in a sleevea gusset can be added. A gusset istraditionally a diamond-shaped piece,which is inserted into a slit in theunderarm section of the sleeve.
Gusset sleeves
4
(AVA): Basic Fashion DesignCD0908-096 / 4272 ~ 2nd Proof
SIF AVABF3 Chpt2 13.07RN_.qxd 9/20/08 8:30 AM Page 37

1
(AVA): Basic Fashion DesignCD0708-086 / 4237 ~ 1st Proof
SIF AVABF3 Chpt2 13.07RN_.qxd 7/26/08 1:02 PM Page 38
Pat
tern
cut
ting
TEXTBLACK
Pattern cutting
1 Alexander McQueen, S/S08.Catwalking.com.
2/3/4 Preparation for a kimonosleeve construction.
Like a Japanese sleeve, the kimonosleeve is cut in one with the bodice.The seams can run from the outer- or underarm.
Kimono sleeves
(AVA): Basic Fashion DesignCD0708-086 / 4237 ~ 1st Proof
SIF AVABF3 Chpt2 13.07RN_.qxd 7/26/08 1:13 PM Page 38

38 / 39
(AVA): Basic Fashion DesignCD0708-086 / 4237 ~ 1st Proof
SIF AVABF3 Chpt2 13.07RN_.qxd 7/26/08 1:02 PM Page 39
TEXTBLACK
Sla
sh a
nd s
pre
ad >
Sle
eves
> C
olla
rs
2
3
4
(AVA): Basic Fashion DesignCD0808-038 / 4272 ~ 2nd Proof
SIF AVABF3 Chpt2 13.07RN_.qxd 8/13/08 9:22 PM Page 39

(AVA): Basic Fashion DesignCD0808-038 / 4272 ~ 2nd Proof
SIF AVABF3 Chpt2 13.07RN_.qxd 8/13/08 9:48 PM Page 40
Pat
tern
cut
ting
TEXTBLACK
The raglan sleeve has a droppedshoulder design. It is constructed to have a seam running from theneckline on a slant into the underarm on front and back.
Lord RaglanLord Raglan was acommander of the Britishtroops during the CrimeanWar. His right arm wasinjured at the Battle ofWaterloo and had to beamputated. As a result hegot himself a coat designedwith a special sleeve – theraglan sleeve.
2
1
Pattern cutting
1 Trench coat with raglansleeve.
2 Raglan sleeve construction.
3 Example of a dolman sleeve.
4/5/6 Dolman sleeve construction.
Raglan sleeves
(AVA): Basic Fashion DesignCD0808-038 / 4272 ~ 2nd Proof
SIF AVABF3 Chpt2 13.07RN_.qxd 8/13/08 9:48 PM Page 40

40 / 41
(AVA): Basic Fashion DesignCD0808-038 / 4272 ~ 2nd Proof
SIF AVABF3 Chpt2 13.07RN_.qxd 8/13/08 9:52 PM Page 41
TEXTBLACK
Sla
sh a
nd s
pre
ad >
Sle
eves
> C
olla
rs
Originally named after the 1870scoat/wrap that looks like a cape fromthe back with lowered armholes andset-in sleeves in the front. The dolmansleeve today has lots of fabric underthe arms and can be fitted to thewrist, still looking like a cape from the back. The sleeve construction is illustrated in 4–6. The original backbodice construction (4) shows thelaid-on sleeve. The final patternpieces show the front bodice thathas been extended underarm (5) and the back bodice with the laid-on sleeve (6).
Dolman sleeves
4
5
6
3
(AVA): Basic Fashion DesignCD0808-038 / 4272 ~ 2nd Proof
SIF AVABF3 Chpt2 13.07RN_.qxd 8/13/08 9:52 PM Page 41

(AVA): Basic Fashion DesignCD0708-086 / 4237 ~ 1st Proof
SIF AVABF3 Chpt2 13.07RN_.qxd 7/26/08 1:02 PM Page 42
Pat
tern
cut
ting
TEXTBLACK
The one-piece sleeve block can beadapted in countless ways. Thesepatterns illustrate how the sleeveblock can be altered to createpuffed, pleated and darted sleeves.
Pleated, darted and gathered sleeves
Pattern cutting
1 2
3
(AVA): Basic Fashion DesignCD0708-086 / 4237 ~ 1st Proof
SIF AVABF3 Chpt2 13.07RN_.qxd 7/26/08 1:13 PM Page 42

42 / 43
(AVA): Basic Fashion DesignCD0708-086 / 4237 ~ 1st Proof
SIF AVABF3 Chpt2 13.07RN_.qxd 7/26/08 1:02 PM Page 43
TEXTBLACK
Sla
sh a
nd s
pre
ad >
Sle
eves
> C
olla
rs
1 Pattern construction of a darted sleeve head.
2 Pattern for a puff sleeveconstruction with gathers on the sleeve head andsmall cuff.
3 Jacket with a darted set-in sleeve by Hugo Boss,S/S 08.
4 Preparations for a pleatedsleeve head construction.
5 Pattern construction of a pleated sleeve head.
4
5
(AVA): Basic Fashion DesignCD0808-038 / 4272 ~ 2nd Proof
SIF AVABF3 Chpt2 13.07RN_.qxd 8/13/08 10:02 PM Page 43

(AVA): Basic Fashion DesignCD0708-086 / 4237 ~ 1st Proof
SIF AVABF3 Chpt2 13.07RN_.qxd 7/26/08 1:02 PM Page 44
Pat
tern
cut
ting
TEXTBLACK
Pattern cutting
Collars
The collar is a versatile design feature that will enhance the style of a garment. It is attached to the neckline of the garment and allows the size and shape of the neckline to vary. Collars come in all shapesand sizes and the most common are the stand-up/mandarin, shirt,flat, sailor and lapel collar constructions.
Collars can be constructed in threebasic ways. The first method is aright-angle construction, used forstand-up collars, shirt collars andsmall flat collars such as Peter Panand Eton collars.
Secondly by joining the shoulders ofthe front and back bodice togetherto construct the collar directly on topof the bodice block. This technique isused to construct sailor collars andbigger versions of flat collars. Theadvantage of using this method is that the correct outer length of thecollar construction results automatically,however large the collar or necklineextension is.
Finally, the lapel construction, whichis extended from the centre front,from the breaking point toward theshoulder. By extending the break/rollline a collar construction can beadded. A version of this is the shawlcollar, where the collar extends fromthe fabric of the garment on to thelapel without being sewn on.
Drafting variations
1
1 Technical drawing showing the key elements of a basic collar construction.
2 A right-angle collar.
3 Flat collar on a pea coat.
(AVA): Basic Fashion DesignCD0808-038 / 4272 ~ 2nd Proof
SIF AVABF3 Chpt2 13.07RN_.qxd 8/13/08 10:19 PM Page 44
44 / 45
(AVA): Basic Fashion DesignCD0808-038 / 4272 ~ 2nd Proof
SIF AVABF3 Chpt2 13.07RN_.qxd 8/14/08 5:29 PM Page 45
TEXTBLACK
3
Sle
eves
> C
olla
rs >
Po
cket
s
2
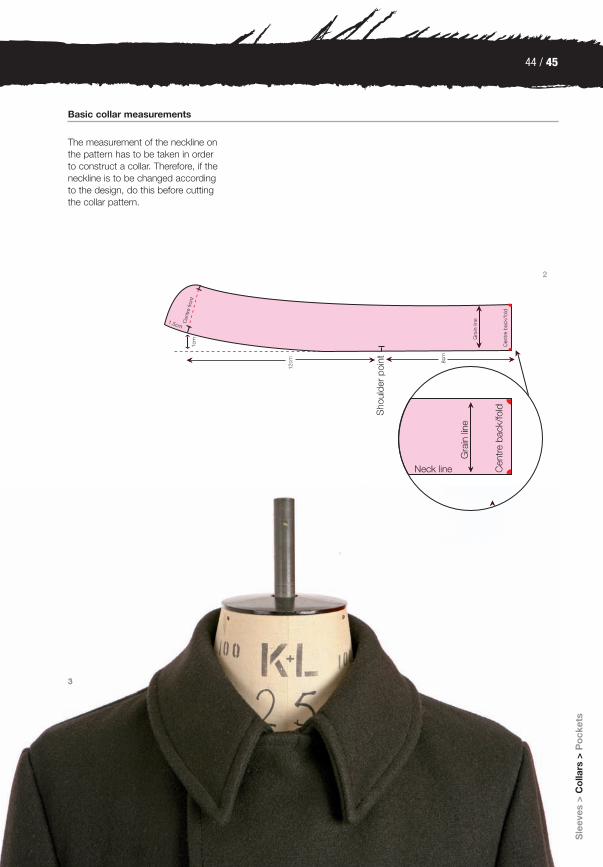
The measurement of the neckline onthe pattern has to be taken in orderto construct a collar. Therefore, if theneckline is to be changed accordingto the design, do this before cuttingthe collar pattern.
Basic collar measurements
3
(AVA): Basic Fashion DesignCD0808-038 / 4272 ~ 2nd Proof
SIF AVABF3 Chpt2 13.07RN_.qxd 8/14/08 5:30 PM Page 45

(AVA): Basic Fashion DesignCD0708-086 / 4237 ~ 1st Proof
SIF AVABF3 Chpt2 13.07RN_.qxd 7/26/08 1:02 PM Page 46
Pat
tern
cut
ting
TEXTBLACK
Right-angle collars are constructedby drawing the centre back line andthe neckline at a right-angle to eachother and adding all measurements.Variations of this basic constructioninclude mandarin or stand-up collarsand shirt collars, which can haveeither integrated or separate stands.
Right-angle construction collars
If the centre front of the collar isconstructed higher than the necklineand the centre back point, the collarwill sit close to the neck. If the centreback of the collar is constructedhigher than the neckline and thecentre front point, the collar will sitaway from the neck.
Stand-up/mandarin collars
1
2
Pattern cutting
(AVA): Basic Fashion DesignCD0808-038 / 4272 ~ 2nd Proof
SIF AVABF3 Chpt2 13.07RN_.qxd 8/13/08 11:11 PM Page 46

46 / 47
(AVA): Basic Fashion DesignCD0708-086 / 4272 ~ 1st Proof
SIF AVABF3 Chpt2 13.07RN_.qxd 7/26/08 1:02 PM Page 47
TEXTBLACK
A flat collar, with or without a standconstruction included, traditionallymeets in the centre front without anover- and under-wrap (the over- andunder-wrap is an extension from the
centre front to create space for thebutton and buttonhole). The collarhas a small stand height (generallybetween 0.5 and 1.5 cm) and liescomfortably along the shoulder.
Flat collars
3
1 Stand-up collar. The shorter the top edge of the collar, the closer the fit.
2 Menswear jacket with astand-up collar by CourtneyMcWilliams.
3 Peter Pan collar pattern.
4 Eton collar pattern.
Sle
eves
> C
olla
rs >
Po
cket
s
4
(AVA): Basic Fashion DesignCD0908-096 / 4272 ~ 2nd Proof
SIF AVABF3 Chpt2 13.07RN_.qxd 9/20/08 10:30 AM Page 47
(AVA): Basic Fashion DesignCD0708-086 / 4272 ~ 1st Proof
SIF AVABF3 Chpt2 13.07RN_.qxd 7/26/08 1:54 PM Page 48
Pat
tern
cut
ting
TEXTBLACK
Pattern cutting
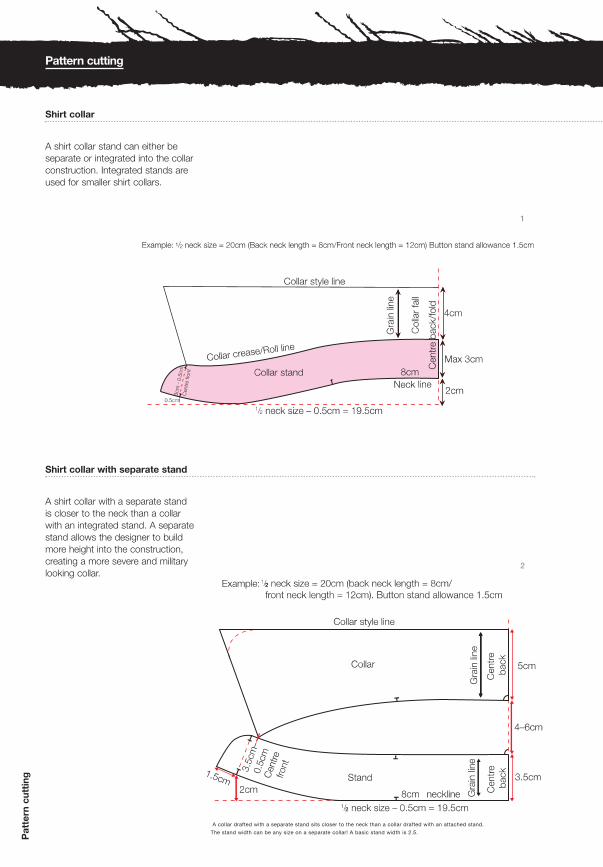
A shirt collar with a separate stand is closer to the neck than a collarwith an integrated stand. A separatestand allows the designer to buildmore height into the construction,creating a more severe and militarylooking collar.
Shirt collar with separate stand
A shirt collar stand can either beseparate or integrated into the collarconstruction. Integrated stands areused for smaller shirt collars.
Shirt collar
2
1
A collar drafted with a separate stand sits closer to the neck than a collar drafted with an attached stand.
The stand width can be any size on a separate collar! A basic stand width is 2.5.
(AVA): Basic Fashion DesignCD0808-109 / 4237 ~ 3rd Proof
SIF AVABF3 Chpt2 13.07RN_.qxd 8/25/08 1:33 PM Page 48
48 / 49
(AVA): Basic Fashion DesignCD0708-086 / 4237 ~ 1st Proof
SIF AVABF3 Chpt2 13.07RN_.qxd 7/26/08 1:02 PM Page 49
TEXTBLACK
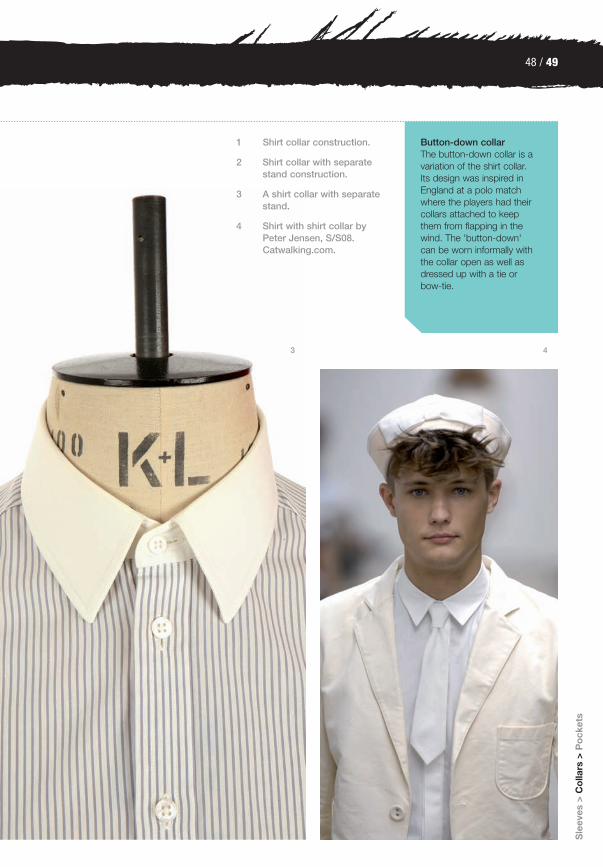
1 Shirt collar construction.
2 Shirt collar with separatestand construction.
3 A shirt collar with separatestand.
4 Shirt with shirt collar byPeter Jensen, S/S08.Catwalking.com.
Sle
eves
> C
olla
rs >
Po
cket
s
3 4
Button-down collarThe button-down collar is avariation of the shirt collar. Its design was inspired inEngland at a polo matchwhere the players had theircollars attached to keepthem from flapping in thewind. The 'button-down' can be worn informally withthe collar open as well asdressed up with a tie or bow-tie.
(AVA): Basic Fashion DesignCD0908-096 / 4272 ~ 3rd Proof
SIF AVABF3 Chpt2 13.07RN_.qxd 9/20/08 8:33 AM Page 49

(AVA): Basic Fashion DesignCD0708-086 / 4237 ~ 1st Proof
SIF AVABF3 Chpt2 13.07RN_.qxd 7/26/08 1:02 PM Page 50
Pat
tern
cut
ting
TEXTBLACK
This shape of collar was originallycopied from the naval uniform. The look is traditionally a V-shapedneckline in the front and a longsquare panel that lies flat down theback. The sailor collar constructionis used not only to cut the sailor style but also for other big collarshapes.
Collars joined at the shoulder
1
3 4
2
1/2/3/4 Sailor collarconstruction.
5 Donna Karan, SS/08.Catwalking.com.
Pattern cutting
(AVA): Basic Fashion DesignCD0808-038 / 4272 ~ 2nd Proof
SIF AVABF3 Chpt2 13.07RN_.qxd 8/13/08 11:26 PM Page 50
5
(AVA): Basic Fashion DesignCD0708-086 / 4237 ~ 1st Proof
SIF AVABF3 Chpt2 13.07RN_.qxd 7/26/08 1:02 PM Page 51
TEXTBLACK
(AVA): Basic Fashion DesignCD0708-086 / 4237 ~ 1st Proof
SIF AVABF3 Chpt2 13.07RN_.qxd 7/26/08 1:14 PM Page 51
(AVA): Basic Fashion DesignCD0708-086 / 4237 ~ 1st Proof
SIF AVABF3 Chpt2 13.07RN_.qxd 7/26/08 1:02 PM Page 52
Pat
tern
cut
ting
TEXTBLACK
Pattern cutting
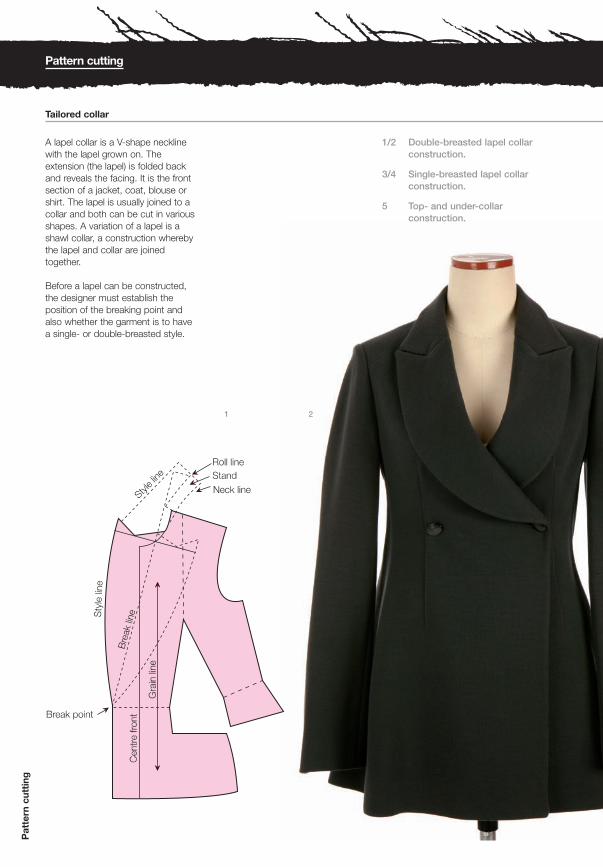
A lapel collar is a V-shape necklinewith the lapel grown on. Theextension (the lapel) is folded backand reveals the facing. It is the frontsection of a jacket, coat, blouse orshirt. The lapel is usually joined to acollar and both can be cut in variousshapes. A variation of a lapel is ashawl collar, a construction wherebythe lapel and collar are joinedtogether.
Before a lapel can be constructed,the designer must establish theposition of the breaking point andalso whether the garment is to havea single- or double-breasted style.
Tailored collar
1 2
1/2 Double-breasted lapel collarconstruction.
3/4 Single-breasted lapel collarconstruction.
5 Top- and under-collarconstruction.
(AVA): Basic Fashion DesignCD0708-086 / 4237 ~ 1st Proof
SIF AVABF3 Chpt2 13.07RN_.qxd 7/26/08 1:14 PM Page 52
52 / 53
(AVA): Basic Fashion DesignCD0708-086 / 4237 ~ 1st Proof
SIF AVABF3 Chpt2 13.07RN_.qxd 7/26/08 1:02 PM Page 53
TEXTBLACK
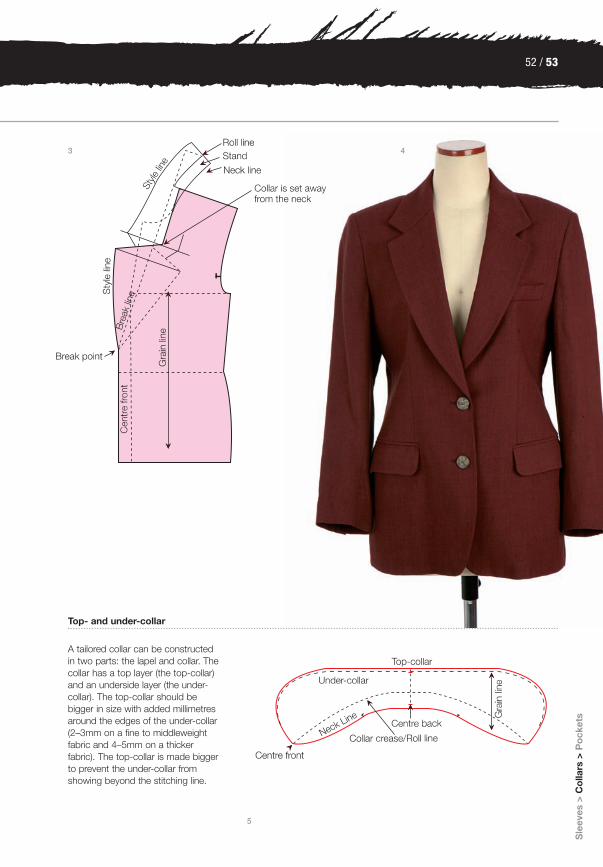
A tailored collar can be constructedin two parts: the lapel and collar. Thecollar has a top layer (the top-collar)and an underside layer (the under-collar). The top-collar should bebigger in size with added millimetresaround the edges of the under-collar(2–3mm on a fine to middleweightfabric and 4–5mm on a thickerfabric). The top-collar is made biggerto prevent the under-collar fromshowing beyond the stitching line.
3
5
Sle
eves
> C
olla
rs >
Po
cket
s
4
Top- and under-collar
(AVA): Basic Fashion DesignCD0808-038 / 4272 ~ 2nd Proof
SIF AVABF3 Chpt2 13.07RN_.qxd 8/13/08 11:36 PM Page 53
(AVA): Basic Fashion DesignCD0808-038 / 4272 ~ 2nd Proof
SIF AVABF3 Chpt2 13.07RN_.qxd 8/13/08 11:49 PM Page 54
Pat
tern
cut
ting
TEXTBLACK
Pattern cutting
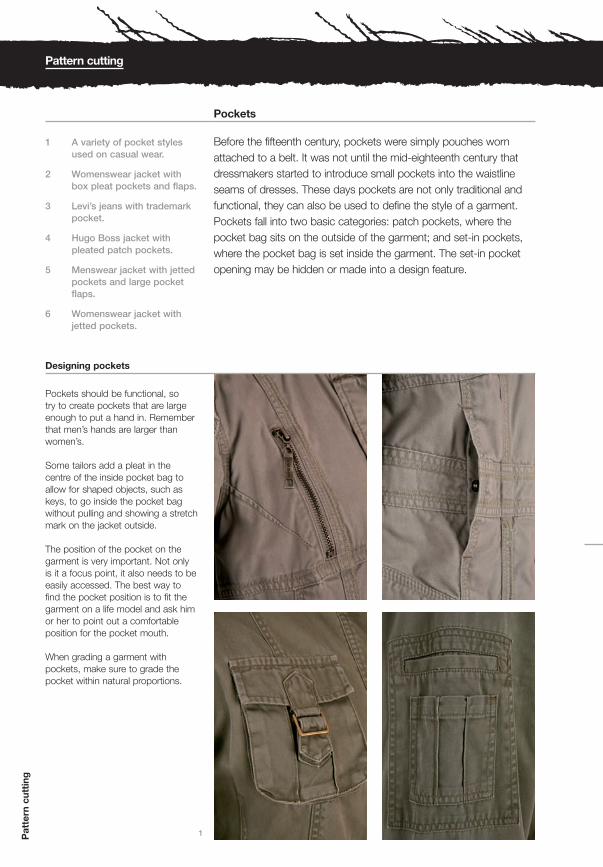
Pockets
Before the fifteenth century, pockets were simply pouches wornattached to a belt. It was not until the mid-eighteenth century thatdressmakers started to introduce small pockets into the waistlineseams of dresses. These days pockets are not only traditional andfunctional, they can also be used to define the style of a garment.Pockets fall into two basic categories: patch pockets, where thepocket bag sits on the outside of the garment; and set-in pockets,where the pocket bag is set inside the garment. The set-in pocketopening may be hidden or made into a design feature.
Pockets should be functional, so try to create pockets that are largeenough to put a hand in. Rememberthat men’s hands are larger thanwomen’s.
Some tailors add a pleat in thecentre of the inside pocket bag toallow for shaped objects, such askeys, to go inside the pocket bagwithout pulling and showing a stretchmark on the jacket outside.
The position of the pocket on thegarment is very important. Not only is it a focus point, it also needs to beeasily accessed. The best way to find the pocket position is to fit thegarment on a life model and ask himor her to point out a comfortableposition for the pocket mouth.
When grading a garment withpockets, make sure to grade thepocket within natural proportions.
1 A variety of pocket styles used on casual wear.
2 Womenswear jacket with box pleat pockets and flaps.
3 Levi’s jeans with trademarkpocket.
4 Hugo Boss jacket with pleated patch pockets.
5 Menswear jacket with jettedpockets and large pocketflaps.
6 Womenswear jacket withjetted pockets.
Designing pockets
1
(AVA): Basic Fashion DesignCD0708-086 / 4237 ~ 1st Proof
SIF AVABF3 Chpt2 13.07RN_.qxd 7/26/08 1:14 PM Page 54

54 / 55
(AVA): Basic Fashion DesignCD0808-038 / 4272 ~ 2nd Proof
SIF AVABF3 Chpt2 13.07RN_.qxd 8/13/08 11:49 PM Page 55
TEXTBLACK
Co
llars
>P
ock
ets>
Bia
s cu
t
5
6
4
2
When using slant, continental or sideseam pockets in trousers, make sureto continue the pocket bag into thecentre front zip fly. This method willkeep the pocket bags in place andcreate a nice finish in the inside ofthe garment.
When constructing welt or jettedpockets in the back of trousers orskirts, sew the pocket bag into thewaistband for stability.
The pocket mouth (this is the partwhere the pocket is worked in)should always be secured throughan interlining.
Inside pockets sometimes havebuttons to enable the pocket bag tobe closed. Cover the button up witha triangular piece of lining, to avoid the button leaving marks ongarments worn under the jacket. Italso prevents the button from beingcaught in the garment underneath.
Go around twice when you stitch up the pocket bag and use a smallstitch (2–2.5mm) for extra strength.
3
(AVA): Basic Fashion DesignCD0708-086 / 4237 ~ 1st Proof
SIF AVABF3 Chpt2 13.07RN_.qxd 7/26/08 1:14 PM Page 55
(AVA): Basic Fashion DesignCD0708-086 / 4237 ~ 1st Proof
SIF AVABF3 Chpt2 13.07RN_.qxd 7/26/08 1:02 PM Page 56
Pat
tern
cut
ting
TEXTBLACK
Pattern cutting
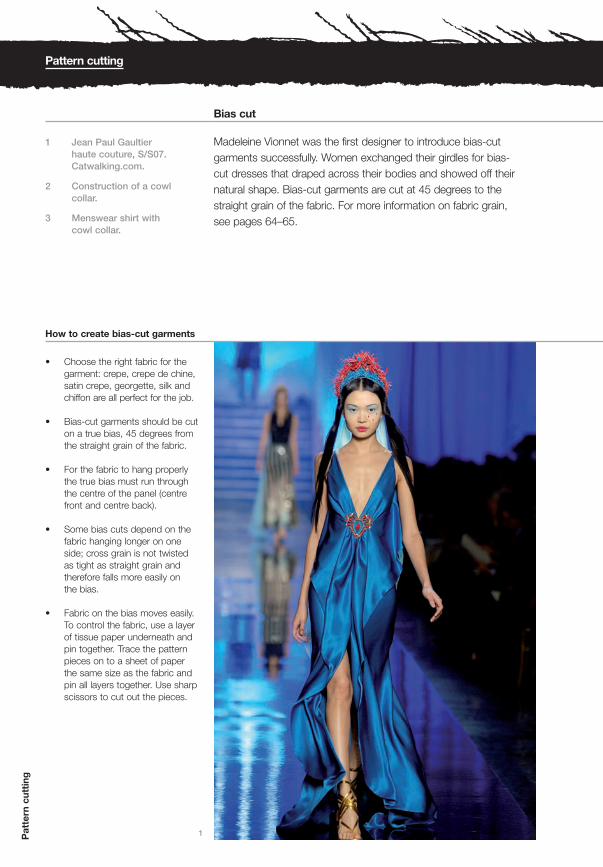
Bias cut
Madeleine Vionnet was the first designer to introduce bias-cutgarments successfully. Women exchanged their girdles for bias-cut dresses that draped across their bodies and showed off their natural shape. Bias-cut garments are cut at 45 degrees to thestraight grain of the fabric. For more information on fabric grain, see pages 64–65.
• Choose the right fabric for thegarment: crepe, crepe de chine,satin crepe, georgette, silk andchiffon are all perfect for the job.
• Bias-cut garments should be cuton a true bias, 45 degrees fromthe straight grain of the fabric.
• For the fabric to hang properlythe true bias must run throughthe centre of the panel (centrefront and centre back).
• Some bias cuts depend on thefabric hanging longer on oneside; cross grain is not twistedas tight as straight grain andtherefore falls more easily on the bias.
• Fabric on the bias moves easily.To control the fabric, use a layerof tissue paper underneath andpin together. Trace the patternpieces on to a sheet of paperthe same size as the fabric andpin all layers together. Use sharpscissors to cut out the pieces.
1 Jean Paul Gaultier haute couture, S/S07.Catwalking.com.
2 Construction of a cowl collar.
3 Menswear shirt with cowl collar.
1
How to create bias-cut garments
(AVA): Basic Fashion DesignCD0908-096 / 4272 ~ 3rd Proof
SIF AVABF3 Chpt2 13.07RN_.qxd 9/20/08 8:37 AM Page 56

56 / 57
(AVA): Basic Fashion DesignCD0808-038 / 4272 ~ 2nd Proof
SIF AVABF3 Chpt2 13.07RN_.qxd 8/13/08 11:53 PM Page 57
TEXTBLACK
Po
cket
s >
Bia
s cu
t >
Fitt
ing
the
to
ile
• Always do some test stitching to find the right machine andstitching type. An overlockingseam works well as it will allowthe seam to stretch.
• All garments cut on the bias create fitting problems, therefore it is important to havefittings in order to reduce excessfabric created by the stretch of the bias. A combination ofdrafting and draping is essentialwhen working on the bias.
• The best way to fasten a bias-cut garment is with a zip. Use a tape and hand tackthe zip first before using thesewing machine.
• It is often best to cut the facingsfor bias-cut garments on the straight grain and to tape necklines, armhole andshoulders.
• A pin hem is a nice hem finish.However, if you would prefer arougher look use a raw edge.
Cowls are drapes that fall in softfolds off the shoulder point anddrape along the front neckline orback. The folds are created using atrue bias cut and the pattern can beconstructed on the flat or by drapingon a mannequin. Some cowls aredesigned with pleats or gathers withvarying numbers of folds. Cowls caneither be cut in one piece with thegarment or as a separate piece.
The cowl collar
2
3
(AVA): Basic Fashion DesignCD0808-038 / 4272 ~ 2nd Proof
SIF AVABF3 Chpt2 13.07RN_.qxd 8/13/08 11:53 PM Page 57
(AVA): Basic Fashion DesignCD0708-086 / 4237 ~ 1st Proof
SIF AVABF3 Chpt2 13.07RN_.qxd 7/26/08 1:02 PM Page 58
TEXTBLACK
Pat
tern
cut
ting
Pattern cutting
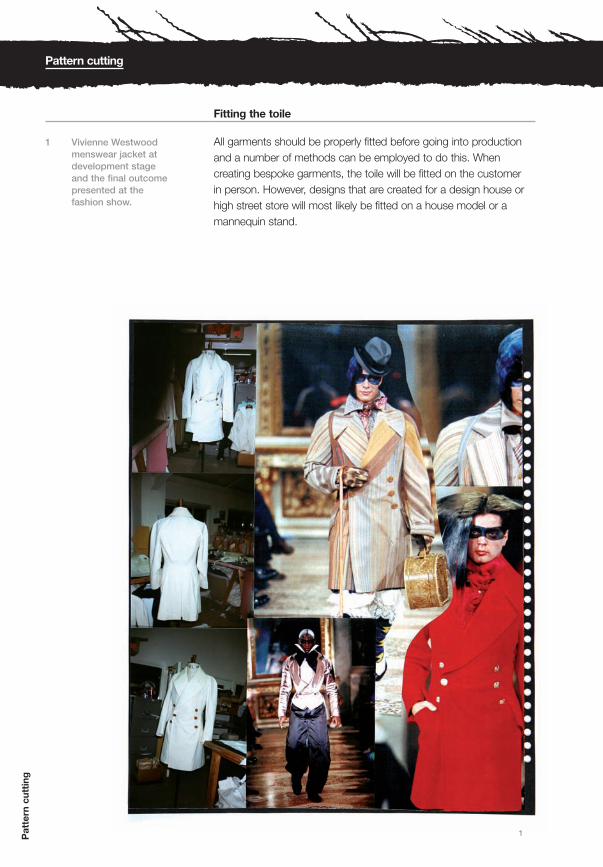
Fitting the toile
All garments should be properly fitted before going into productionand a number of methods can be employed to do this. Whencreating bespoke garments, the toile will be fitted on the customer in person. However, designs that are created for a design house orhigh street store will most likely be fitted on a house model or amannequin stand.
1 Vivienne Westwoodmenswear jacket atdevelopment stage and the final outcome presented at the fashion show.
1
(AVA): Basic Fashion DesignCD0708-086 / 4237 ~ 1st Proof
SIF AVABF3 Chpt2 13.07RN_.qxd 7/26/08 1:14 PM Page 58

58 / 59
(AVA): Basic Fashion DesignCD0708-086 / 4237 ~ 1st Proof
SIF AVABF3 Chpt2 13.07RN_.qxd 7/26/08 1:02 PM Page 59
TEXTBLACK
Bia
s cu
t >
Fitt
ing
the
to
ile >
Layi
ng a
pat
tern
on
to f
abri
c
A designer will produce a ‘toile’ for the first fitting. This is a garmentmade out of a cheaper fabric close in weight and behaviour to the finalfabric, such as calico. Calico is acheap cotton fabric and comes indifferent weights: lightweight forblouses and shirts; medium forjackets and trousers and heavy forcoats or sculptured pieces. A toilehas no finished seams, no fastenings,nor any lining or facings.
At the first fitting the designer looksat the proportions and fit of thegarment. Only once the overall shapehas been established does theattention turn to the details. Suchdetails might include the position ofpockets, belt loops, collar size andother detailing. These will usually bemarked with a tape, marker pen orpinned-on fabric pieces.
A well-fitted garment shouldcomplement the design and thebody shape. As such, it is best to fiton a live model so that it is possibleto see the movement of the garment.The most difficult areas of the bodyto fit are the armhole and sleeve, thetrouser crotch and around the bust
area. Before starting with the patternconstruction make sure that you use a well-fitting block to avoidunnecessary fitting problems andalways construct your pattern on the large side. It is easier to fit a toileby adjusting the shape to the bodythan it is to start opening up seamsand patching in sample fabric tomake it bigger.
The choice of fabric is important as itneeds to reflect the quality of the finalfabric used. If working on a wovenstyle, use a calico in the right weight.Again, for jersey/knitwear garments,use a jersey of the right weight.When cutting out the toile make sureto cut in the right grain line; if thegarment is meant to be cut on thebias then the toile needs to be cut onthe bias too. The different grain linesmake the garment drape differentlyon the body. The toile should alwaysbe made out of an unpatterned,light-coloured fabric as this shows off the seams and details of thegarment in the best possible way.
Carrying out a fitting
Tips for the first fittingWhen preparing for a toilefitting some parts of thegarment can be hand sewn,for example, the sleeve intothe armhole. The rest of thetoile should be sewn togetherwith a bigger machine stitch(3–4mm), as it is easier tounpick the toile after thefitting if necessary.
Mark all the lines necessaryfor a fitting, for examplecentre front and back, waistand hip line, elbow line.These lines can be markedwith a pen or thread.
If using shoulder pads, use the same pair as for the finalgarment. The same appliesto any underpinnings such asunderskirts and corsetry.
The collar can be fitted withoutan under-collar attached inthe first fitting, as it makes iteasier to fit for a bettershape.
Pocket positions can be drawnon in the fitting. It is easier tofind the right position with thelive model as they can attemptto put his or her hands intothe pocket. If pocket flaps orpatch pockets are used, cutout shapes of the samplefabric ready to be pinned on in the fitting.
If the final fabric has apattern, draft parts of it ontothe toile to show off detailing.
All seams or darts on thetoile need to be pressed outreally well and in the sameorder as on the final garment.
(AVA): Basic Fashion DesignCD0808-038 / 4272 ~ 2nd Proof
SIF AVABF3 Chpt2 13.07RN_.qxd 8/13/08 11:55 PM Page 59
(AVA): Basic Fashion DesignCD0708-086 / 4237 ~ 1st Proof
SIF AVABF3 Chpt2 13.07RN_.qxd 7/26/08 1:02 PM Page 60
TEXTBLACK
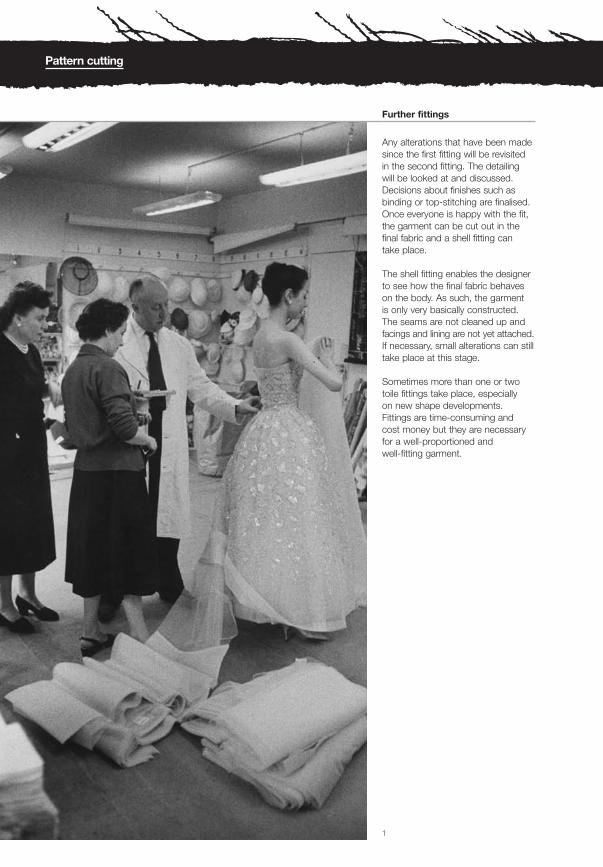
Any alterations that have been madesince the first fitting will be revisited in the second fitting. The detailing will be looked at and discussed.Decisions about finishes such asbinding or top-stitching are finalised.Once everyone is happy with the fit,the garment can be cut out in thefinal fabric and a shell fitting can take place.
The shell fitting enables the designerto see how the final fabric behaveson the body. As such, the garment is only very basically constructed.The seams are not cleaned up andfacings and lining are not yet attached.If necessary, small alterations can stilltake place at this stage.
Sometimes more than one or twotoile fittings take place, especially on new shape developments. Fittings are time-consuming and cost money but they are necessaryfor a well-proportioned and well-fitting garment.
Further fittings
1
Pattern cutting
(AVA): Basic Fashion DesignCD0808-038 / 4272 ~ 2nd Proof
SIF AVABF3 Chpt2 13.07RN_.qxd 8/13/08 11:58 PM Page 60

60 / 61
(AVA): Basic Fashion DesignCD0708-086 / 4237 ~ 1st Proof
SIF AVABF3 Chpt2 13.07RN_.qxd 7/26/08 1:02 PM Page 61
TEXTBLACK
Alterations are tricky and cannot beignored, as a badly fitted garment willnot sell. Whether we are tall, short,small or big the high street is offeringa more diverse collection to choosefrom and customers will not accept a badly fitting outfit.
Altering the pattern
2 3
1 Christian Dior fitting a housemodel.
Fitting example of a set-in one-piece sleeve
2 The look: the sleeve showshorizontal lines that pullacross the sleeve head,which look like a pleat.
3 The correction: the head ofthe sleeve (also called thescye) is too long. Pin acrossthe sleeve head where thepleat is showing or pin awaythe extra fabric on the top ofthe sleeve head/scye. Thencorrect on the pattern byfolding away the paper inthe same way that the fabricsleeve was pinned. Re-cutthe sleeve and fit it again on a model.
Bia
s cu
t >
Fitt
ing
the
to
ile >
Layi
ng a
pat
tern
on
to f
abri
c
(AVA): Basic Fashion DesignCD0808-038 / 4272 ~ 2nd Proof
SIF AVABF3 Chpt2 13.07RN_.qxd 8/13/08 11:58 PM Page 61
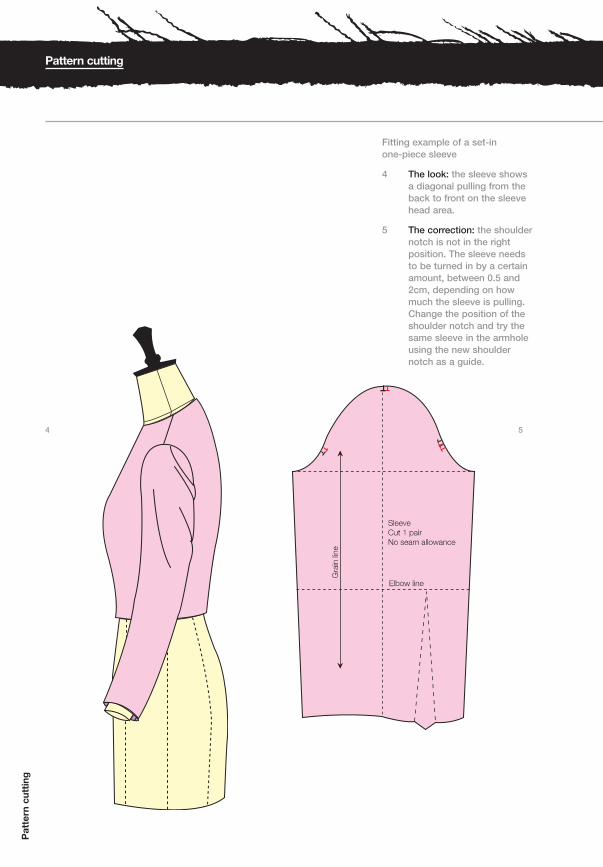
(AVA): Basic Fashion DesignCD0708-086 / 4237 ~ 1st Proof
SIF AVABF3 Chpt2 13.07RN_.qxd 7/26/08 1:02 PM Page 62
TEXTBLACK
Pat
tern
cut
ting
Pattern cutting
4 5
Fitting example of a set-in one-piece sleeve
4 The look: the sleeve showsa diagonal pulling from theback to front on the sleevehead area.
5 The correction: the shouldernotch is not in the rightposition. The sleeve needsto be turned in by a certainamount, between 0.5 and2cm, depending on howmuch the sleeve is pulling.Change the position of theshoulder notch and try thesame sleeve in the armholeusing the new shouldernotch as a guide.
(AVA): Basic Fashion DesignCD0708-086 / 4237 ~ 1st Proof
SIF AVABF3 Chpt2 13.07RN_.qxd 7/26/08 1:14 PM Page 62
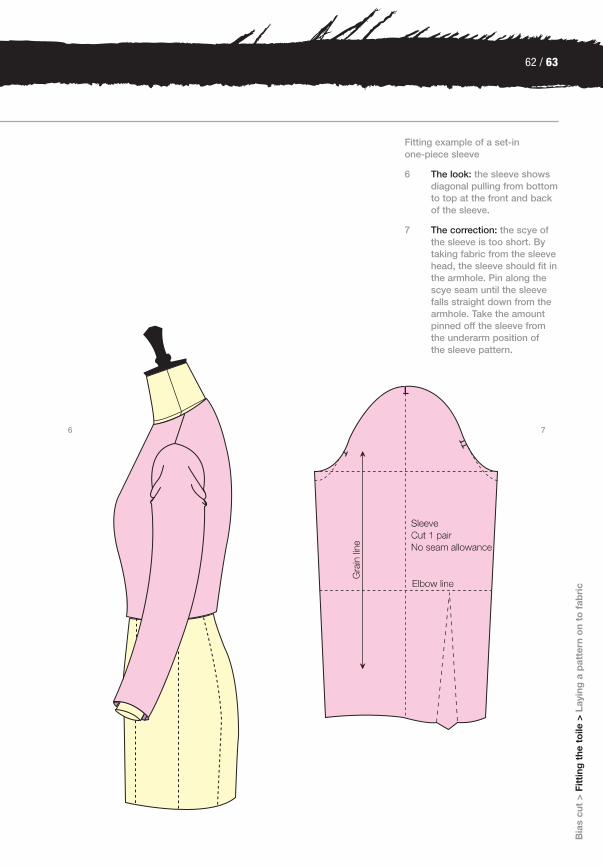
62 / 63
(AVA): Basic Fashion DesignCD0708-086 / 4237 ~ 1st Proof
SIF AVABF3 Chpt2 13.07RN_.qxd 7/26/08 1:02 PM Page 63
TEXTBLACK
Bia
s cu
t >
Fitt
ing
the
to
ile >
Layi
ng a
pat
tern
on
to f
abri
c
Fitting example of a set-in one-piece sleeve
6 The look: the sleeve showsdiagonal pulling from bottomto top at the front and backof the sleeve.
7 The correction: the scye ofthe sleeve is too short. Bytaking fabric from the sleevehead, the sleeve should fit inthe armhole. Pin along thescye seam until the sleevefalls straight down from thearmhole. Take the amountpinned off the sleeve fromthe underarm position of the sleeve pattern.
6 7
(AVA): Basic Fashion DesignCD0708-086 / 4237 ~ 1st Proof
SIF AVABF3 Chpt2 13.07RN_.qxd 7/26/08 1:14 PM Page 63

(AVA): Basic Fashion DesignCD0708-086 / 4237 ~ 1st Proof
SIF AVABF3 Chpt2 13.07RN_.qxd 7/26/08 1:02 PM Page 64
TEXTBLACK
Pat
tern
cut
ting
Pattern cutting
Laying a pattern on to fabric
It takes time and patience to cut out a pattern in fabric. Taking timeto prepare for cutting and marking the fabric pieces guarantees abetter result when putting the garment together. It is also helpful tohave a firm understanding of fabrics and weaving techniques. Formore information on the specific qualities of various fabrics seeBasics Fashion Design: Textiles and Fashion.
1 The cut of a garment inrelation to the direction ofthe grain line can stronglyaffect how the fabric hangson the body.
A material is woven using a yarngoing lengthways (the warp) andcrossways (the weft). The lengthwaysedge of the fabric is called theselvedge. The cut of a garment inrelation to the direction of the grainline will strongly affect how the fabrichangs on the body. There are threeways of cutting the grain:
Straight grain – this is the mostcommon method, whereby the grain line of the pattern pieces isparallel to the selvedge. The yarnused lengthways (warp) is a stronger yarn than the one used crossways (weft).
Cross grain – this method usespattern pieces that are cut at a 90-degree angle to the selvedge.Pieces that are cut crossways aremost likely to be decorative, forexample cuffs, yokes, collars and complex shapes, such as a whole circle skirt.
Bias – for a true bias cut, patternpieces are cut at 45-degree angle to the selvedge and cross grain.Garments cut on the bias are livelyand drape beautifully around thebody but will take up a lot morefabric.
What is a grain line?
(AVA): Basic Fashion DesignCD0708-086 / 4237 ~ 1st Proof
SIF AVABF3 Chpt2 13.07RN_.qxd 7/26/08 1:14 PM Page 64
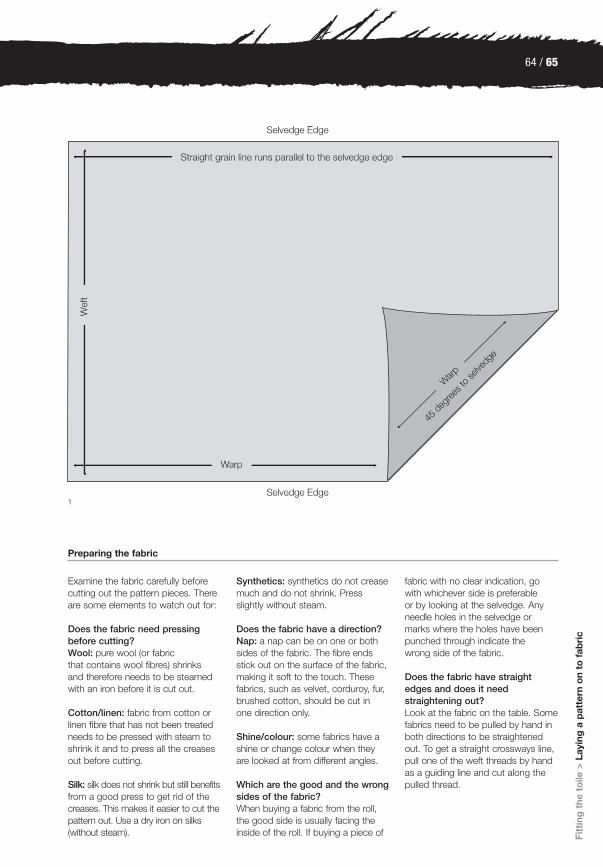
64 / 65
(AVA): Basic Fashion DesignCD0708-086 / 4272 ~ 1st Proof
SIF AVABF3 Chpt2 13.07RN_.qxd 8/14/08 12:09 AM Page 65
TEXTBLACK
Fitt
ing
the
to
ile >
Layi
ng a
pat
tern
on
to f
abri
c Examine the fabric carefully beforecutting out the pattern pieces. Thereare some elements to watch out for:
Does the fabric need pressingbefore cutting?Wool: pure wool (or fabric that contains wool fibres) shrinks and therefore needs to be steamedwith an iron before it is cut out.
Cotton/linen: fabric from cotton orlinen fibre that has not been treatedneeds to be pressed with steam toshrink it and to press all the creasesout before cutting.
Silk: silk does not shrink but still benefitsfrom a good press to get rid of thecreases. This makes it easier to cut thepattern out. Use a dry iron on silks(without steam).
Synthetics: synthetics do not creasemuch and do not shrink. Pressslightly without steam.
Does the fabric have a direction?Nap: a nap can be on one or bothsides of the fabric. The fibre endsstick out on the surface of the fabric,making it soft to the touch. Thesefabrics, such as velvet, corduroy, fur,brushed cotton, should be cut in one direction only.
Shine/colour: some fabrics have ashine or change colour when theyare looked at from different angles.
Which are the good and the wrongsides of the fabric?When buying a fabric from the roll,the good side is usually facing theinside of the roll. If buying a piece of
fabric with no clear indication, gowith whichever side is preferable or by looking at the selvedge. Anyneedle holes in the selvedge ormarks where the holes have beenpunched through indicate the wrong side of the fabric.
Does the fabric have straightedges and does it needstraightening out?Look at the fabric on the table. Somefabrics need to be pulled by hand inboth directions to be straightenedout. To get a straight crossways line,pull one of the weft threads by handas a guiding line and cut along the pulled thread.
Preparing the fabric
1
(AVA): Basic Fashion DesignCD0708-086 / 4272 ~ 1st Proof
SIF AVABF3 Chpt2 13.07RN_.qxd 8/14/08 12:10 AM Page 65

1 2 3 4 5 6 7 8
1 2 3 4 5 6 7 8
(AVA): Basic Fashion DesignCD0808-038 / 4272 ~ 2nd Proof
SIF AVABF3 Chpt2 13.07RN_.qxd 8/14/08 12:21 AM Page 66
TEXTBLACK
Pat
tern
cut
ting
Pattern cutting
Laying the pattern pieces on thecorrect grain lineTo place the pattern pieces correctlyon to the fabric, use the grain lineinformation on your pattern (the longarrow through the pattern). Once youhave decided which direction toplace the pattern, make sure that the grain line is parallel to theselvedge on the fabric. To ensurethat the pattern piece is laid correctly,measure from both ends of thearrow/grain line out to the selvedge.
Layout of the pattern – cutting plans
Double layoutThis is the easiest cutting plan of all.The pattern is constructed one sideonly (one front piece, one sleeve, oneback piece, etc) and indicated withthe message ‘cut 2 x’ or ‘cut a pair’.Some pattern pieces are half of apattern with a folding line and thecutting instruction ‘cut on fold’ (halfof collar, half of yoke). The fabric isfolded exactly in half by placing oneside of the selvedge on to the otherside throughout its length. Thepattern is then laid on to the fabric as economically as possible. Thepieces can be laid in any direction ifthe fabric has no shine or nap.
Single layoutFor this layout the pattern has to becopied open (the whole of the frontor back) and indicated with thecutting instruction ‘cut 1 x or cut 1self’. This cutting plan is used when the pattern pieces are asymmetric or the fabric has a pattern design.The fabric is placed openly with the selvedge to the right and the leftrunning down lengthways. Thepattern pieces should be laid in one direction if there is a one-waydesign on the fabric.
(AVA): Basic Fashion DesignCD0808-038 / 4272 ~ 2nd Proof
SIF AVABF3 Chpt2 13.07RN_.qxd 8/14/08 12:22 AM Page 66

66 / 67
(AVA): Basic Fashion DesignCD0708-086 / 4272 ~ 1st Proof
SIF AVABF3 Chpt2 13.07RN_.qxd 7/26/08 1:02 PM Page 67
TEXTBLACK
Fitt
ing
the
to
ile >
Layi
ng a
pat
tern
on
to f
abri
c
Layout for fabric with a nap or one-way designThis can be cut out as a single ordouble layout. Decide on thedirection of the nap or design of the fabric and mark the top of the fabric. Then place all the patternpieces in one direction, running from the top downwards along the selvedge.
Crossway layoutThis method is used when thepattern pieces are complex shapesand do not fit any other way, forexample a whole circle skirt. Insteadof folding the fabric along the longside, the fabric is folded crosswayswith the selvedge on each sidetouching. A fabric with nap needs to be cut along its folding line intotwo pieces. Turn one layer around –wrong side facing wrong side of thefabric – so that the nap runs in thesame direction.
Cutting out checks and stripesBefore cutting the fabric ascertainwhether or not the check or stripepattern is symmetrical. You can usethe double layout or the single layoutwhen the pattern is symmetrical. When using the double layout makesure you match up by pinning thechecks or stripes together every10cm. This will avoid mismatch ofthe check or stripe pattern onsymmetric pieces such as sleevesand front pieces. It is important thatthe adjoining pattern pieces matchup with the pattern on the fabric.Therefore mark the dominatingbars/stripes on to the pattern and thenmatch up on to the adjoining patternpiece. The parts to watch out for arethe side seams, centre front andback, armhole and sleeve, pockets,facings, cuffs, yoke and collar.
(AVA): Basic Fashion DesignCD0708-086 / 4272 ~ 1st Proof
SIF AVABF3 Chpt2 13.07RN_.qxd 7/26/08 1:14 PM Page 67

(AVA): Basic Fashion DesignCD0808-038 / 4272 ~ 2nd Proof
SIF AVABF3 Chpt2 13.07RN_.qxd 8/14/08 12:29 AM Page 68
TEXTBLACK
Pat
tern
cut
ting
Pattern cutting
The pattern can be marked on to thefabric once you have decided whichcutting plan to use. First the patternpieces are weighed down and/orpinned on to the fabric and alignedwith the grain line. It is best practiceto mark around the paper patternbefore lifting it off. This helps to avoidcutting into the paper pattern whencutting the fabric. However, it isessential to transfer all informationnecessary for constructing thegarment on to the fabric pieces.There are different ways to do this:
Marking the pattern on to the fabric
Chalk marksUsing a tailor’s chalk to mark certainpositions such as dart endings andpocket position is easy and not verytime consuming, but be careful thatthe chalk mark cannot be seen onthe good side of the fabric.
1 Chalk marks.
2 Transferring the pattern to fabric.
3 Thread marks.
1
2
(AVA): Basic Fashion DesignCD0708-086 / 4237 ~ 1st Proof
SIF AVABF3 Chpt2 13.07RN_.qxd 7/26/08 1:14 PM Page 68

68 / 69
(AVA): Basic Fashion DesignCD0808-038 / 4272 ~ 2nd Proof
SIF AVABF3 Chpt2 13.07RN_.qxd 8/14/08 7:21 AM Page 69
TEXTBLACK
Fitt
ing
the
to
ile >
Layi
ng a
pat
tern
on
to f
abri
c
Thread marksDouble the thread in the sewingneedle and sew into the fabric tomark the points. This method is usedon fabrics that are very thin, delicateor where the tailor’s chalk would notshow up on the fabric. A thread markis also a very good way to showpositions on the good and wrongside of the fabric at once (chalkmarks can only be seen on one sideof the fabric). Also, thread marks canbe taken out without leaving a trace.
Laser and hole-punch markingThis method is common in theindustry to meet the needs of mass production. For example, the end of a dart position is markedwith a hole set half a centimetreinside the dart. In this way the holewill not show on the good side of thegarment. Punching a needle throughlayers of fabric or using a laser beamcreates a hole-punch effect.
3
(AVA): Basic Fashion DesignCD0808-038 / 4272 ~ 2nd Proof
SIF AVABF3 Chpt2 13.07RN_.qxd 8/14/08 7:22 AM Page 69

(AVA): Basic Fashion DesignCD0708-086 / 4272 ~ 1st Proof
BF3 Chpt3 14.07RN_70-89_.qxd 7/25/08 7:20 AM Page 70
TEXTBLACK
(AVA): Basic Fashion DesignCD0708-086 / 4272 ~ 1st Proof
BF3 Chpt3 14.07RN_70-89_.qxd 7/25/08 7:23 AM Page 70

70 / 71
(AVA): Basic Fashion DesignCD0908-21 / 3173 ~ 3rd Proof
BF3 Chpt3 14.07RN_70-89_.qxd 9/5/08 5:42 PM Page 71
This chapter introduces the different tools and machinery usedto construct a garment. It will look at the numerous techniquesavailable to hand sew or machine stitch a range of fabrics, andwill take a closer look at the history of haute couture and thetailoring crafts.
Garment construction can be divided into different specialisedareas. At the top of the manufacturing chain are haute coutureand the tailoring crafts, which involve working with individualcustomers. At the lower end of the manufacturing chain areindustrially produced garments. In contrast to tailoring andhaute couture, garments produced in this way are much quicker to manufacture. A lot of the work is mass produced by machinery and time-efficient construction methods.
This chapter looks at the various tools and materials used to construct garments and provides an introduction to hand sewing and machine sewing techniques.
Garment construction
1 A student at work.
1
‘What I do is restricted by the cloth and the human body.My job is to make that cloth give expression to the body.’
Vivienne Westwood
Pat
tern
cut
ting
> G
arm
ent
cons
truc
tio
n >
Sur
face
-sp
ecifi
c te
chni
que
s
TEXTBLACK
(AVA): Basic Fashion DesignCD0808-038 / 4272 ~ 2nd Proof
BF3 Chpt3 14.07RN_70-89_.qxd 8/14/08 1:00 AM Page 71
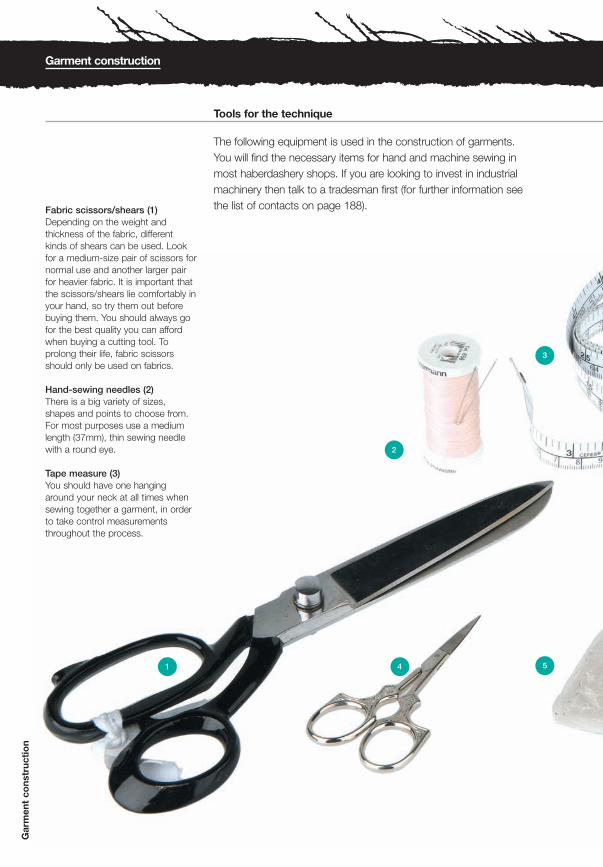
41
3
5
2
(AVA): Basic Fashion DesignCD0708-086 / 4272 ~ 1st Proof
BF3 Chpt3 14.07RN_70-89_.qxd 7/24/08 6:01 PM Page 72
Garment construction
Tools for the technique
The following equipment is used in the construction of garments.You will find the necessary items for hand and machine sewing in most haberdashery shops. If you are looking to invest in industrialmachinery then talk to a tradesman first (for further information seethe list of contacts on page 188).
Gar
men
t co
nstr
ucti
on
Fabric scissors/shears (1)Depending on the weight andthickness of the fabric, different kinds of shears can be used. Lookfor a medium-size pair of scissors fornormal use and another larger pairfor heavier fabric. It is important thatthe scissors/shears lie comfortably inyour hand, so try them out beforebuying them. You should always gofor the best quality you can affordwhen buying a cutting tool. Toprolong their life, fabric scissorsshould only be used on fabrics.
Hand-sewing needles (2)There is a big variety of sizes, shapes and points to choose from.For most purposes use a mediumlength (37mm), thin sewing needlewith a round eye.
Tape measure (3)You should have one hanging around your neck at all times whensewing together a garment, in orderto take control measurementsthroughout the process.
TEXTBLACK
(AVA): Basic Fashion DesignCD0708-086 / 4272 ~ 1st Proof
BF3 Chpt3 14.07RN_70-89_.qxd 7/24/08 6:01 PM Page 72

6
7
8
72 / 73
(AVA): Basic Fashion DesignCD0708-086 / 4272 ~ 1st Proof
BF3 Chpt3 14.07RN_70-89_.qxd 7/24/08 6:01 PM Page 73
Too
ls f
or
the
tech
niq
ue >
Sea
ms
Embroidery scissors (4)These scissors are small and sharpwith pointed blades. They are goodto use for small detail cutting or tosnip threads.
Tailor’s chalk (5)This chalk comes in several coloursand can be brushed off afterapplication. There are alsowax/synthetic chalks available inwhite and black. These come offwhen pressed over by a hot iron.
Pins (6)Pins come in different sizes and materials. Stainless steel, 35mmdressmaking pins are pleasant tohandle. When working with knitwear,use safety pins – normal pins willdisappear into the garment.
Machine sewing needles (7)You will need these in a variety oftypes and sizes.
Thimble (8)A metal thimble made out of metal is best to protect your fingertip.
TEXTBLACK
(AVA): Basic Fashion DesignCD0708-086 / 4272 ~ 1st Proof
BF3 Chpt3 14.07RN_70-89_.qxd 7/24/08 6:01 PM Page 73
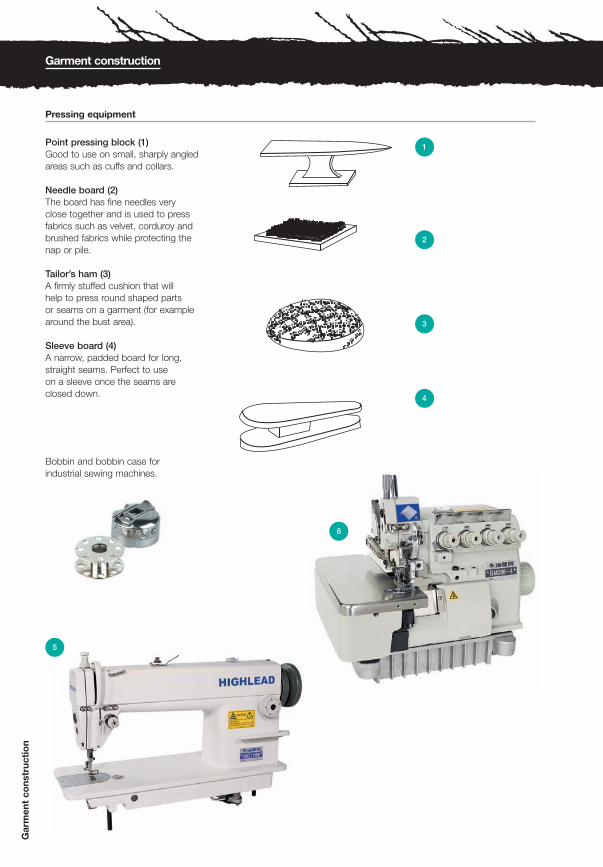
1
2
3
4
5
6
(AVA): Basic Fashion DesignCD0808-038 / 4272 ~ 2nd Proof
BF3 Chpt3 14.07RN_70-89_.qxd 8/14/08 1:11 AM Page 74
Gar
men
t co
nstr
ucti
on
Garment construction
Pressing equipment
Point pressing block (1)Good to use on small, sharply angledareas such as cuffs and collars.
Needle board (2)The board has fine needles veryclose together and is used to pressfabrics such as velvet, corduroy andbrushed fabrics while protecting thenap or pile.
Tailor’s ham (3)A firmly stuffed cushion that will help to press round shaped parts or seams on a garment (for examplearound the bust area).
Sleeve board (4)A narrow, padded board for long,straight seams. Perfect to use on a sleeve once the seams areclosed down.
Bobbin and bobbin case forindustrial sewing machines.
TEXTBLACK
(AVA): Basic Fashion DesignCD0808-038 / 4272 ~ 2nd Proof
BF3 Chpt3 14.07RN_70-89_.qxd 8/14/08 1:11 AM Page 74

7 8
74 / 75
(AVA): Basic Fashion DesignCD0708-086 / 4272 ~ 1st Proof
BF3 Chpt3 14.07RN_70-89_.qxd 7/24/08 6:01 PM Page 75
Too
ls f
or
the
tech
niq
ue >
Sea
ms
Machinery
Teflon foot anduniversal sewingmachine foot.
Zip foot forconcealed andone/both-sidedzips.
Industrial flat bed machine (5)This machine can sew any type offabric using a basic straight stitch.
Overlocker (6)Overlocking stitches are used toprotect the edges of a fabric. Theycan be made up of three, four or five threads and the type of fabricdictates which to use. An overlockingstitch is a series of threads thatcombine to lock the fabric along itsedge. A blade runs along the edge of the fabric chopping off excessmaterial and threads.
Coverstitch (not shown)A coverstitch machine is used in theconstruction and finishing of jerseyfabrics and for lingerie. Twin needlescreate two rows of stitching on theright side of the fabric and anoverlocking stitch on the wrong side.A variation of this stitch creates anoverlocking stitch on both sides ofthe fabric. Unlike an overlocking
machine, this machine does not cutoff excess fabric.
Buttonhole machine (not shown)This machine creates two kinds ofbuttonhole: a ‘keyhole’ and a ‘shirt’buttonhole. Shirt buttonholes are the most common type. Keyholebuttonholes are mainly used ontailored garments, such as coats and suit jackets.
Industrial iron and vacuum table (7) An industrial iron is heavier and moredurable than a domestic iron and thesteam has a higher pressure. It canbe used with a vacuum table, whichis shaped like an ironing board andoften has a smaller board for ironingsleeves. A pedal underneath themachine allows the user to create a vacuum while ironing; the air andsteam are sucked through the fabricinto the bed of the machine. Thisreduces the steam in the atmosphere
and also holds the fabric to theironing board, allowing for easierpressing.
Pressing is essential to a garment;fabric will crease and rumple as it ishandled and manipulated under amachine. Unpressed seams do notlie flat and the garment will lookunfinished if it is not ironed.
Fusing press (8)A fusing press is the industrialmachine used to attach (melt) iron-on interfacing to fabric. It is more efficient and durable than an industrial iron.
TEXTBLACK
(AVA): Basic Fashion DesignCD0708-086 / 4272 ~ 1st Proof
BF3 Chpt3 14.07RN_70-89_.qxd 7/24/08 6:01 PM Page 75
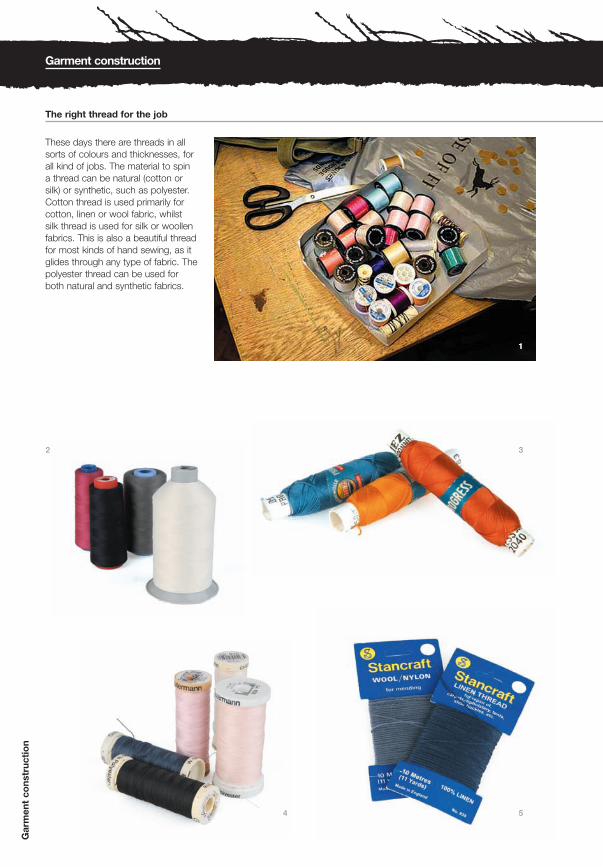
(AVA): Basic Fashion DesignCD0808-038 / 4272 ~ 2nd Proof
BF3 Chpt3 14.07RN_70-89_.qxd 8/14/08 1:15 AM Page 76
1
TEXTBLACK
(AVA): Basic Fashion DesignCD0808-038 / 4272 ~ 2nd Proof
BF3 Chpt3 14.07RN_70-89_.qxd 8/14/08 1:16 AM Page 76
Gar
men
t co
nstr
ucti
on
Garment construction
These days there are threads in allsorts of colours and thicknesses, forall kind of jobs. The material to spin a thread can be natural (cotton orsilk) or synthetic, such as polyester.Cotton thread is used primarily forcotton, linen or wool fabric, whilst silk thread is used for silk or woollenfabrics. This is also a beautiful threadfor most kinds of hand sewing, as itglides through any type of fabric. Thepolyester thread can be used forboth natural and synthetic fabrics.
The right thread for the job
1
2 3
4 5
TEXTBLACK
(AVA): Basic Fashion DesignCD0808-038 / 4272 ~ 2nd Proof
BF3 Chpt3 14.07RN_70-89_.qxd 8/14/08 1:16 AM Page 76

76 / 77
(AVA): Basic Fashion DesignCD0808-038 / 4272 ~ 2nd Proof
BF3 Chpt3 14.07RN_70-89_.qxd 8/14/08 1:15 AM Page 77
6
TEXTBLACK
(AVA): Basic Fashion DesignCD0808-038 / 4272 ~ 2nd Proof
BF3 Chpt3 14.07RN_70-89_.qxd 8/14/08 1:16 AM Page 77
Too
ls f
or
the
tech
niq
ue >
Sea
ms
Tacking thread is a looselytwisted cotton thread thatbreaks easily. It is used forbasting stitch, a temporarystitch that can be removedwhen it is no longer needed.
1 A selection of threads.
2 Thread on cones.
3 Silk thread on spools.
4 Cotton thread.
5 Wool and linen yarn on card.
6 Tacking thread and basting stitch.
7 Metallic thread.
8 Decorative yarn in bundles.
9 Top-stitching yarn.
10 Nylon thread.
6
7
9
8 10
TEXTBLACK
(AVA): Basic Fashion DesignCD0808-038 / 4272 ~ 2nd Proof
BF3 Chpt3 14.07RN_70-89_.qxd 8/14/08 1:16 AM Page 77
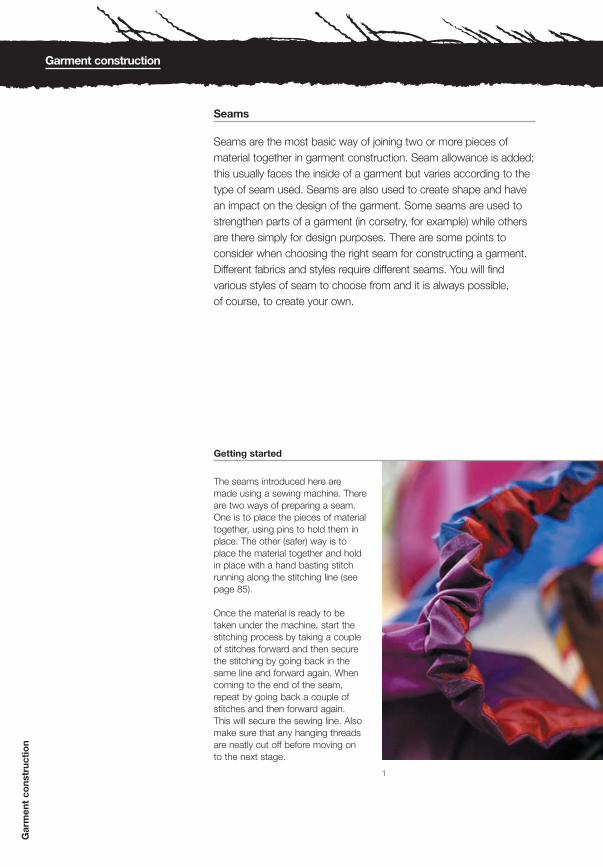
(AVA): Basic Fashion DesignCD0708-086 / 4272 ~ 1st Proof
BF3 Chpt3 14.07RN_70-89_.qxd 7/24/08 6:16 PM Page 78
Gar
men
t co
nstr
ucti
on
Garment construction
Seams are the most basic way of joining two or more pieces ofmaterial together in garment construction. Seam allowance is added;this usually faces the inside of a garment but varies according to thetype of seam used. Seams are also used to create shape and havean impact on the design of the garment. Some seams are used tostrengthen parts of a garment (in corsetry, for example) while othersare there simply for design purposes. There are some points toconsider when choosing the right seam for constructing a garment.Different fabrics and styles require different seams. You will findvarious styles of seam to choose from and it is always possible, of course, to create your own.
Seams
The seams introduced here aremade using a sewing machine. Thereare two ways of preparing a seam.One is to place the pieces of materialtogether, using pins to hold them inplace. The other (safer) way is toplace the material together and holdin place with a hand basting stitchrunning along the stitching line (seepage 85).
Once the material is ready to betaken under the machine, start thestitching process by taking a coupleof stitches forward and then securethe stitching by going back in thesame line and forward again. Whencoming to the end of the seam,repeat by going back a couple ofstitches and then forward again. This will secure the sewing line. Alsomake sure that any hanging threadsare neatly cut off before moving on to the next stage.
1
Getting started
TEXTBLACK
(AVA): Basic Fashion DesignCD0708-086 / 4272 ~ 1st Proof
BF3 Chpt3 14.07RN_70-89_.qxd 7/24/08 6:01 PM Page 78
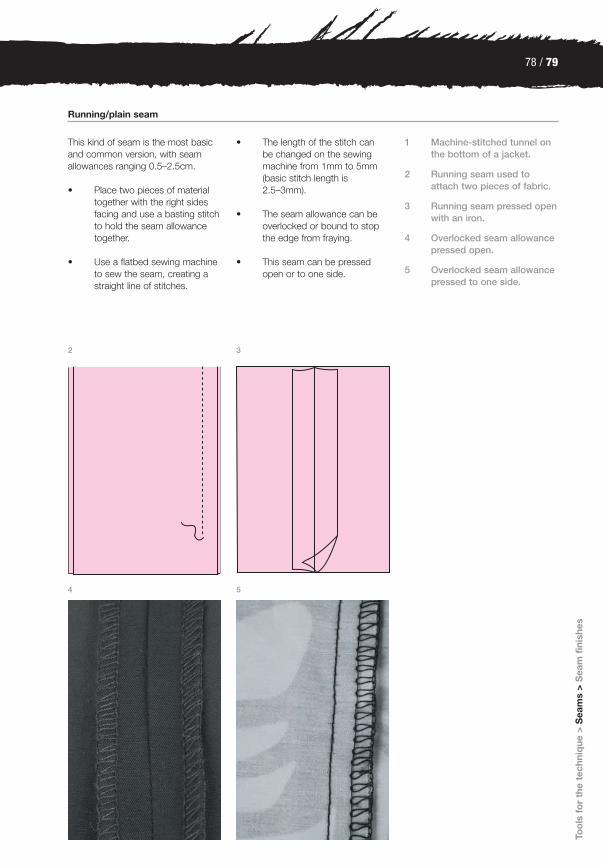
78 / 79
(AVA): Basic Fashion DesignCD0808-038 / 4272 ~ 2nd Proof
BF3 Chpt3 14.07RN_70-89_.qxd 8/14/08 1:44 AM Page 79
Too
ls f
or
the
tech
niq
ue >
Sea
ms
>S
eam
fin
ishe
s
1 Machine-stitched tunnel onthe bottom of a jacket.
2 Running seam used toattach two pieces of fabric.
3 Running seam pressed openwith an iron.
4 Overlocked seam allowancepressed open.
5 Overlocked seam allowance pressed to one side.
Running/plain seam
This kind of seam is the most basicand common version, with seamallowances ranging 0.5–2.5cm.
• Place two pieces of materialtogether with the right sidesfacing and use a basting stitchto hold the seam allowancetogether.
• Use a flatbed sewing machineto sew the seam, creating astraight line of stitches.
• The length of the stitch can be changed on the sewingmachine from 1mm to 5mm(basic stitch length is2.5–3mm).
• The seam allowance can beoverlocked or bound to stopthe edge from fraying.
• This seam can be pressedopen or to one side.
2 3
4 5
TEXTBLACK
(AVA): Basic Fashion DesignCD0708-086 / 4272 ~ 1st Proof
BF3 Chpt3 14.07RN_70-89_.qxd 7/24/08 6:01 PM Page 79
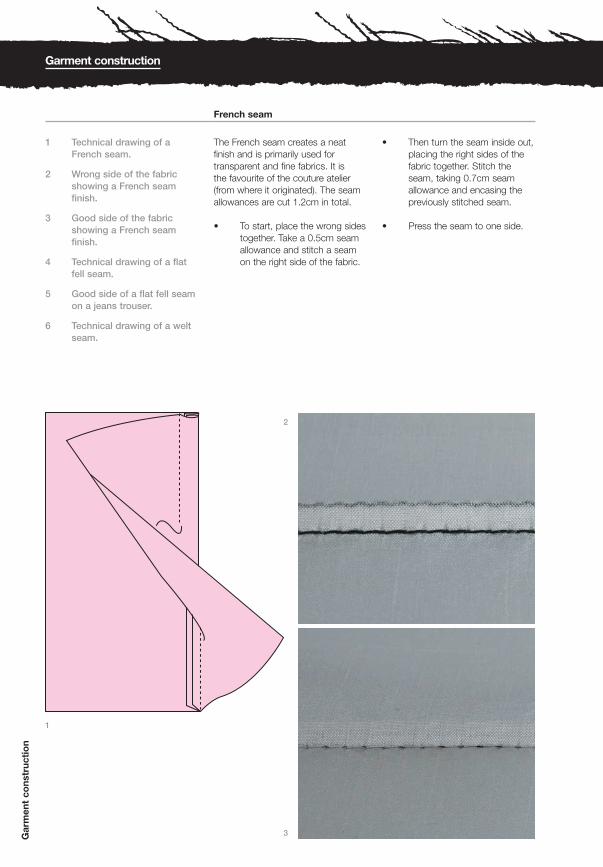
(AVA): Basic Fashion DesignCD0708-086 / 4272 ~ 1st Proof
BF3 Chpt3 14.07RN_70-89_.qxd 7/24/08 6:01 PM Page 80
Gar
men
t co
nstr
ucti
on
Garment construction
French seam
The French seam creates a neatfinish and is primarily used fortransparent and fine fabrics. It is the favourite of the couture atelier(from where it originated). The seamallowances are cut 1.2cm in total.
• To start, place the wrong sidestogether. Take a 0.5cm seamallowance and stitch a seamon the right side of the fabric.
• Then turn the seam inside out,placing the right sides of thefabric together. Stitch theseam, taking 0.7cm seamallowance and encasing thepreviously stitched seam.
• Press the seam to one side.
1 Technical drawing of aFrench seam.
2 Wrong side of the fabricshowing a French seamfinish.
3 Good side of the fabricshowing a French seamfinish.
4 Technical drawing of a flatfell seam.
5 Good side of a flat fell seamon a jeans trouser.
6 Technical drawing of a weltseam.
1
2
3
TEXTBLACK
(AVA): Basic Fashion DesignCD0808-038 / 4272 ~ 2nd Proof
BF3 Chpt3 14.07RN_70-89_.qxd 8/14/08 1:34 AM Page 80
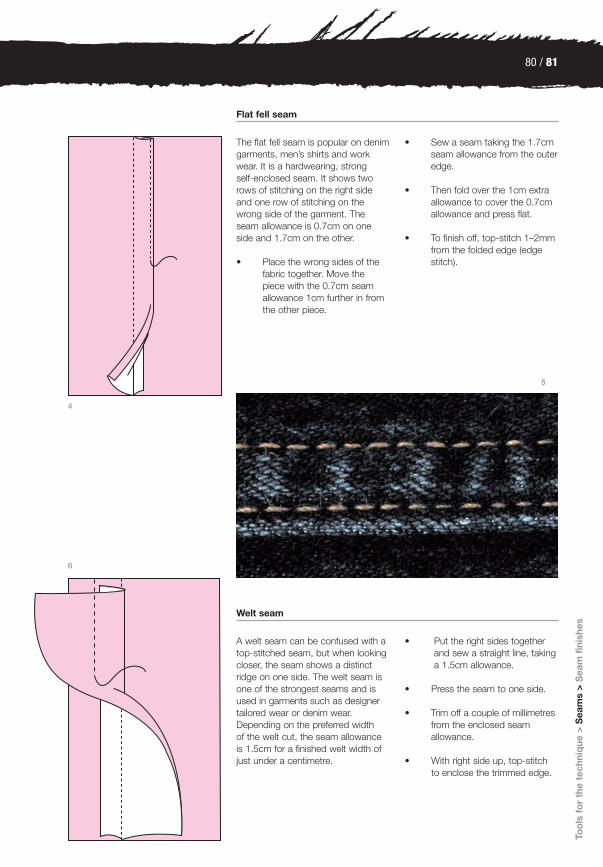
80 / 81
(AVA): Basic Fashion DesignCD0708-086 / 4272 ~ 1st Proof
BF3 Chpt3 14.07RN_70-89_.qxd 7/24/08 6:01 PM Page 81
Too
ls f
or
the
tech
niq
ue >
Sea
ms
>S
eam
fin
ishe
s
Flat fell seam
The flat fell seam is popular on denimgarments, men’s shirts and workwear. It is a hardwearing, strong self-enclosed seam. It shows tworows of stitching on the right sideand one row of stitching on thewrong side of the garment. Theseam allowance is 0.7cm on oneside and 1.7cm on the other.
• Place the wrong sides of thefabric together. Move the piece with the 0.7cm seamallowance 1cm further in fromthe other piece.
• Sew a seam taking the 1.7cmseam allowance from the outeredge.
• Then fold over the 1cm extraallowance to cover the 0.7cmallowance and press flat.
• To finish off, top-stitch 1–2mmfrom the folded edge (edgestitch).
Welt seam
A welt seam can be confused with atop-stitched seam, but when lookingcloser, the seam shows a distinctridge on one side. The welt seam isone of the strongest seams and isused in garments such as designertailored wear or denim wear.Depending on the preferred width of the welt cut, the seam allowanceis 1.5cm for a finished welt width ofjust under a centimetre.
• Put the right sides togetherand sew a straight line, takinga 1.5cm allowance.
• Press the seam to one side.
• Trim off a couple of millimetresfrom the enclosed seamallowance.
• With right side up, top-stitch to enclose the trimmed edge.
4
5
6
TEXTBLACK
(AVA): Basic Fashion DesignCD0808-038 / 4272 ~ 2nd Proof
BF3 Chpt3 14.07RN_70-89_.qxd 8/14/08 1:45 AM Page 81

(AVA): Basic Fashion DesignCD0708-086 / 4272 ~ 1st Proof
BF3 Chpt3 14.07RN_70-89_.qxd 7/24/08 6:01 PM Page 82
Gar
men
t co
nstr
ucti
on
Seam finishes
The raw edge of a seam allowance usually needs treating to stop thefabric from fraying. The technique used to finish a seam allowancedepends on the style of garment and the budget. Here are someoptions to choose from:
The easiest and cheapest way to clean up an edge is to overlock theedges using a three or four-thread coverstitch machine.
French seams are a seam and seam finish in one. They are moretime consuming and therefore more expensive, but provide a cleanway to finish off fine and transparent fabrics.
Bound seam allowances are popular on half-lined jackets or jacketswithout a lining and on trouser seams.
1 Overlocked seam.
2 French seam.
3 Centre back seam with abound seam finish.
4 Prada dress with boundedges on collar, front and sleeve, S/S08.Catwalking.com.
5 Technical drawing of anopen pressed seamallowance with boundedges.
1
2
3
Garment construction
TEXTBLACK
(AVA): Basic Fashion DesignCD0908-096 / 4272 ~ 3rd Proof
BF3 Chpt3 14.07RN_70-89_.qxd 9/20/08 8:44 AM Page 82

82 / 83
(AVA): Basic Fashion DesignCD0808-038 / 4272 ~ 2nd Proof
BF3 Chpt3 14.07RN_70-89_.qxd 8/14/08 1:48 AM Page 83
Any raw edge such as a hem,neckline or seam allowance can befinished with a binding. Bindings arestrips of fabric that can be cut to anywidth. When using a woven fabric asa binding, cut the fabric on the truebias grain line. Bindings are visible onboth sides of the garment.
• Prepare the edge by cutting offthe allowance (except if youare binding seam allowances).
• Cut a strip off the chosenfabric four times the width ofthe finished binding.
• Press the binding striplengthways in half, with thewrong sides together.
• Open the strip up and foldboth long sides in to meet thepressed centre line and pressagain.
• Now take the raw seam edgeand wrap the binding striparound it and pin in place. The centre pressing line of thebinding is now aligned withthe raw edge of the garment.
• Put under the sewing machineand top-stitch the bindingdown at the right side of thegarment, through all layerswith an edge stitch, catchingboth binding edges at thesame time.
Sea
ms
> S
eam
fin
ishe
s >
Han
d s
ewin
g t
echn
ique
s
Edge and seam finish with a binding
5
4
TEXTBLACK
(AVA): Basic Fashion DesignCD0808-038 / 4272 ~ 2nd Proof
BF3 Chpt3 14.07RN_70-89_.qxd 8/14/08 1:49 AM Page 83
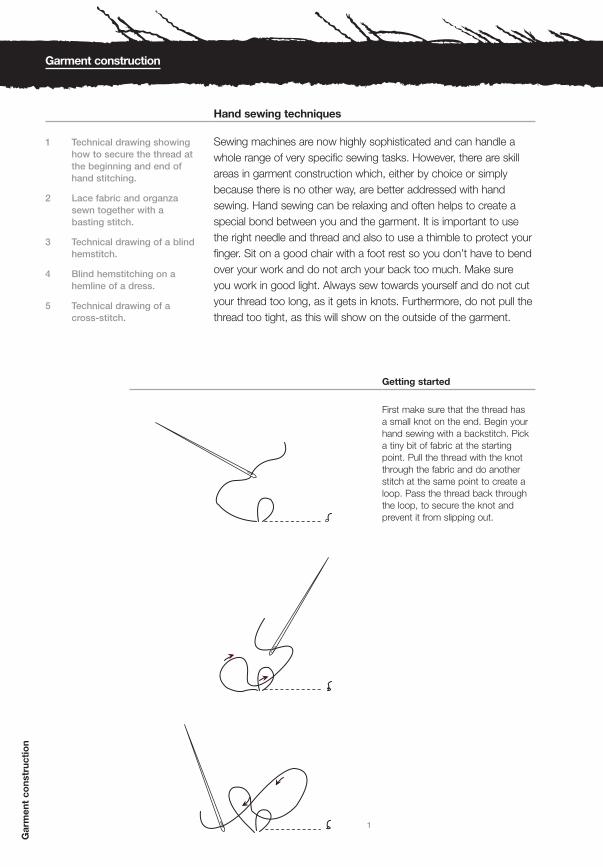
(AVA): Basic Fashion DesignCD0708-086 / 4272 ~ 1st Proof
BF3 Chpt3 14.07RN_70-89_.qxd 7/24/08 6:01 PM Page 84
Gar
men
t co
nstr
ucti
on
Garment construction
Sewing machines are now highly sophisticated and can handle awhole range of very specific sewing tasks. However, there are skillareas in garment construction which, either by choice or simplybecause there is no other way, are better addressed with handsewing. Hand sewing can be relaxing and often helps to create aspecial bond between you and the garment. It is important to usethe right needle and thread and also to use a thimble to protect yourfinger. Sit on a good chair with a foot rest so you don’t have to bendover your work and do not arch your back too much. Make sure you work in good light. Always sew towards yourself and do not cutyour thread too long, as it gets in knots. Furthermore, do not pull thethread too tight, as this will show on the outside of the garment.
First make sure that the thread has a small knot on the end. Begin yourhand sewing with a backstitch. Picka tiny bit of fabric at the startingpoint. Pull the thread with the knotthrough the fabric and do anotherstitch at the same point to create aloop. Pass the thread back throughthe loop, to secure the knot andprevent it from slipping out.
Getting started
1 Technical drawing showinghow to secure the thread atthe beginning and end ofhand stitching.
2 Lace fabric and organza sewn together with a basting stitch.
3 Technical drawing of a blindhemstitch.
4 Blind hemstitching on ahemline of a dress.
5 Technical drawing of across-stitch.
1
Hand sewing techniques
TEXTBLACK
(AVA): Basic Fashion DesignCD0808-038 / 4272 ~ 2nd Proof
BF3 Chpt3 14.07RN_70-89_.qxd 8/14/08 2:01 AM Page 84
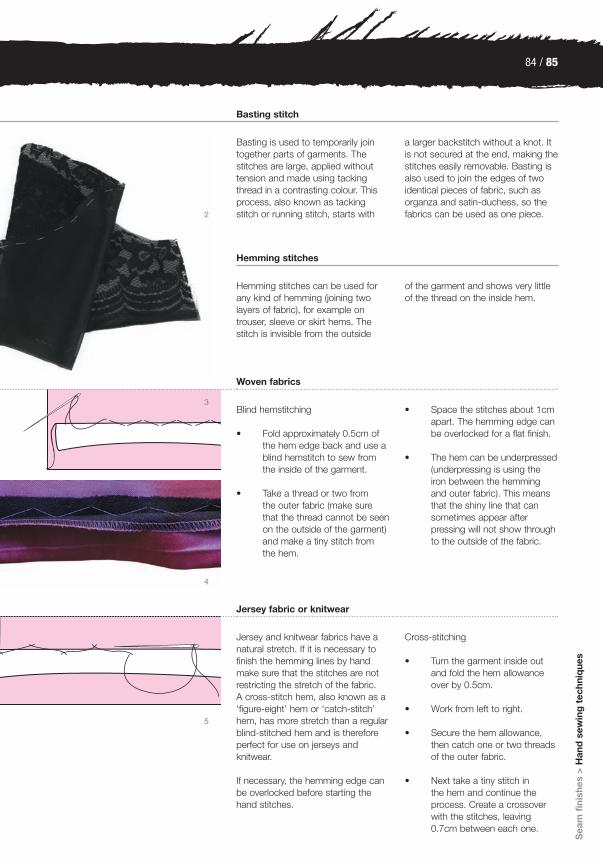
84 / 85
(AVA): Basic Fashion DesignCD0808-038 / 4272 ~ 2nd Proof
BF3 Chpt3 14.07RN_70-89_.qxd 8/14/08 2:01 AM Page 85
3
Sea
m f
inis
hes
> H
and
sew
ing
tec
hniq
ues
Woven fabrics
Blind hemstitching
• Fold approximately 0.5cm ofthe hem edge back and use ablind hemstitch to sew fromthe inside of the garment.
• Take a thread or two from the outer fabric (make surethat the thread cannot be seenon the outside of the garment)and make a tiny stitch fromthe hem.
• Space the stitches about 1cmapart. The hemming edge canbe overlocked for a flat finish.
• The hem can be underpressed(underpressing is using theiron between the hemmingand outer fabric). This meansthat the shiny line that cansometimes appear afterpressing will not show throughto the outside of the fabric.
Jersey fabric or knitwear
Jersey and knitwear fabrics have anatural stretch. If it is necessary tofinish the hemming lines by handmake sure that the stitches are notrestricting the stretch of the fabric. A cross-stitch hem, also known as a‘figure-eight’ hem or ‘catch-stitch’hem, has more stretch than a regularblind-stitched hem and is thereforeperfect for use on jerseys andknitwear.
If necessary, the hemming edge canbe overlocked before starting thehand stitches.
Cross-stitching
• Turn the garment inside outand fold the hem allowanceover by 0.5cm.
• Work from left to right.
• Secure the hem allowance,then catch one or two threadsof the outer fabric.
• Next take a tiny stitch in the hem and continue theprocess. Create a crossoverwith the stitches, leaving0.7cm between each one.
Hemming stitches
Hemming stitches can be used forany kind of hemming (joining twolayers of fabric), for example ontrouser, sleeve or skirt hems. Thestitch is invisible from the outside
of the garment and shows very littleof the thread on the inside hem.
4
Basting stitch
Basting is used to temporarily jointogether parts of garments. Thestitches are large, applied withouttension and made using tackingthread in a contrasting colour. Thisprocess, also known as tackingstitch or running stitch, starts with
a larger backstitch without a knot. Itis not secured at the end, making thestitches easily removable. Basting isalso used to join the edges of twoidentical pieces of fabric, such asorganza and satin-duchess, so thefabrics can be used as one piece. 2
5
TEXTBLACK
(AVA): Basic Fashion DesignCD0808-038 / 4272 ~ 2nd Proof
BF3 Chpt3 14.07RN_70-89_.qxd 8/14/08 2:01 AM Page 85

(AVA): Basic Fashion DesignCD0808-038 / 4272 ~ 2nd Proof
BF3 Chpt3 14.07RN_70-89_.qxd 8/14/08 2:04 AM Page 86
Gar
men
t co
nstr
ucti
on
Garment construction
Transparent fabrics and silks
To achieve an invisible hem finish, usea roll hem and slip-stitch technique.This kind of hand stitch is commonon silk scarves and the cuff openingson blouses made of delicate fabricsbut it can be used on anything thatrequires a fine edge finish.
• Secure the thread with a knotand a backstitch at thestarting point.
• Then turn the edge under byrolling the fabric inwards to the inside (wrong side) of thegarment. You will create a tinyroll by doing so.
• Pick a thread from the outerfabric, making sure the threadis not seen on the outside ofthe garment.
• Then slip the needle directlyabove it into the turned/rollededge and through the roll by a couple of millimetres.
• Come out of the roll and takeanother thread directly belowfrom the outer fabric. Nowrepeat the process and makesure that no thread is visiblefrom the outside or inside ofthe garment.
• When rolling the edge over,make sure not to take toomuch fabric in, as it is arefined finishing method. Using a thin needle and finethread will make the job easier.
1 Technical drawing of a slip-stitch.
2 Silk scarf with roll hem andslip-stitch finish.
3 Use a slip-stitch to attach alining to a hem.
4 Lining attached to a hemlineof a jacket.
5 Technical drawing of a prick-stitch.
6 A zip sewn into a dressusing prick-stitching.
1
2
TEXTBLACK
(AVA): Basic Fashion DesignCD0808-038 / 4272 ~ 2nd Proof
BF3 Chpt3 14.07RN_70-89_.qxd 8/14/08 2:04 AM Page 86
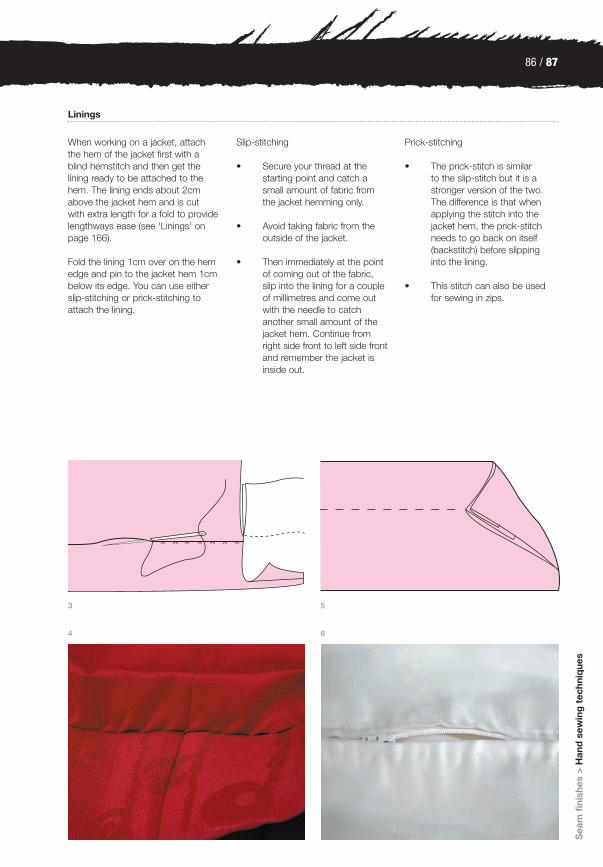
86 / 87
(AVA): Basic Fashion DesignCD0708-086 / 4272 ~ 1st Proof
BF3 Chpt3 14.07RN_70-89_.qxd 7/24/08 6:01 PM Page 87
Sea
m f
inis
hes
> H
and
sew
ing
tec
hniq
ues
Linings
When working on a jacket, attach the hem of the jacket first with ablind hemstitch and then get thelining ready to be attached to thehem. The lining ends about 2cmabove the jacket hem and is cut with extra length for a fold to providelengthways ease (see ‘Linings’ onpage 166).
Fold the lining 1cm over on the hemedge and pin to the jacket hem 1cmbelow its edge. You can use eitherslip-stitching or prick-stitching toattach the lining.
Slip-stitching
• Secure your thread at thestarting point and catch asmall amount of fabric fromthe jacket hemming only.
• Avoid taking fabric from theoutside of the jacket.
• Then immediately at the pointof coming out of the fabric,slip into the lining for a coupleof millimetres and come outwith the needle to catchanother small amount of thejacket hem. Continue fromright side front to left side frontand remember the jacket isinside out.
Prick-stitching
• The prick-stitch is similar to the slip-stitch but it is astronger version of the two.The difference is that whenapplying the stitch into thejacket hem, the prick-stitchneeds to go back on itself(backstitch) before slipping into the lining.
• This stitch can also be usedfor sewing in zips.
3 5
4 6
TEXTBLACK
(AVA): Basic Fashion DesignCD0808-038 / 4272 ~ 2nd Proof
BF3 Chpt3 14.07RN_70-89_.qxd 8/14/08 2:04 AM Page 87
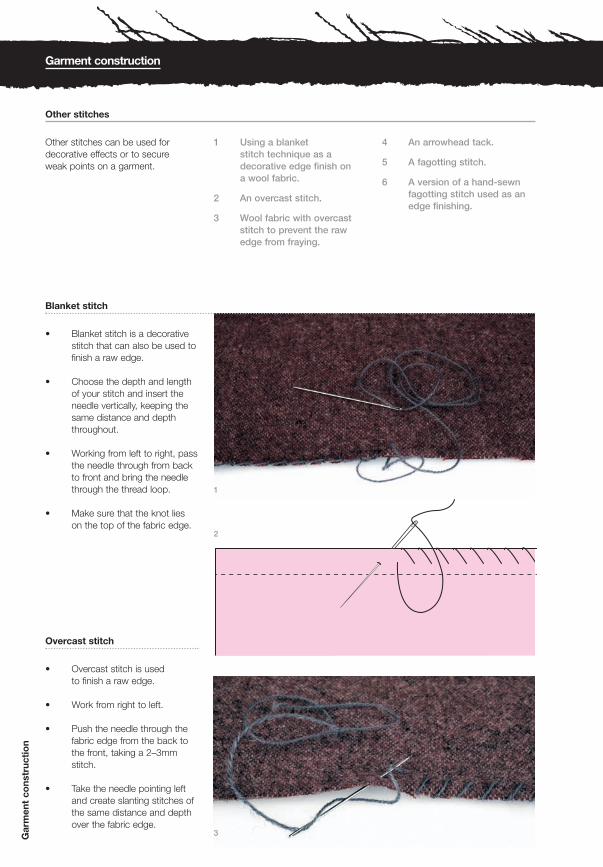
(AVA): Basic Fashion DesignCD0808-038 / 4237 ~ 2nd Proof
BF3 Chpt3 14.07RN_70-89_.qxd 8/14/08 7:43 AM Page 88
Gar
men
t co
nstr
ucti
on
Garment construction
Other stitches
Other stitches can be used fordecorative effects or to secure weak points on a garment.
• Blanket stitch is a decorative stitch that can also be used tofinish a raw edge.
• Choose the depth and lengthof your stitch and insert theneedle vertically, keeping thesame distance and depththroughout.
• Working from left to right, passthe needle through from backto front and bring the needlethrough the thread loop.
• Make sure that the knot lies on the top of the fabric edge.
1 Using a blanket stitch technique as a decorative edge finish on a wool fabric.
2 An overcast stitch.
3 Wool fabric with overcaststitch to prevent the rawedge from fraying.
4 An arrowhead tack.
5 A fagotting stitch.
6 A version of a hand-sewnfagotting stitch used as anedge finishing.
1
2
3
Blanket stitch
Overcast stitch
• Overcast stitch is used to finish a raw edge.
• Work from right to left.
• Push the needle through thefabric edge from the back tothe front, taking a 2–3mmstitch.
• Take the needle pointing leftand create slanting stitches ofthe same distance and depthover the fabric edge.
TEXTBLACK
(AVA): Basic Fashion DesignCD0808-038 / 4237 ~ 2nd Proof
BF3 Chpt3 14.07RN_70-89_.qxd 8/14/08 7:43 AM Page 88
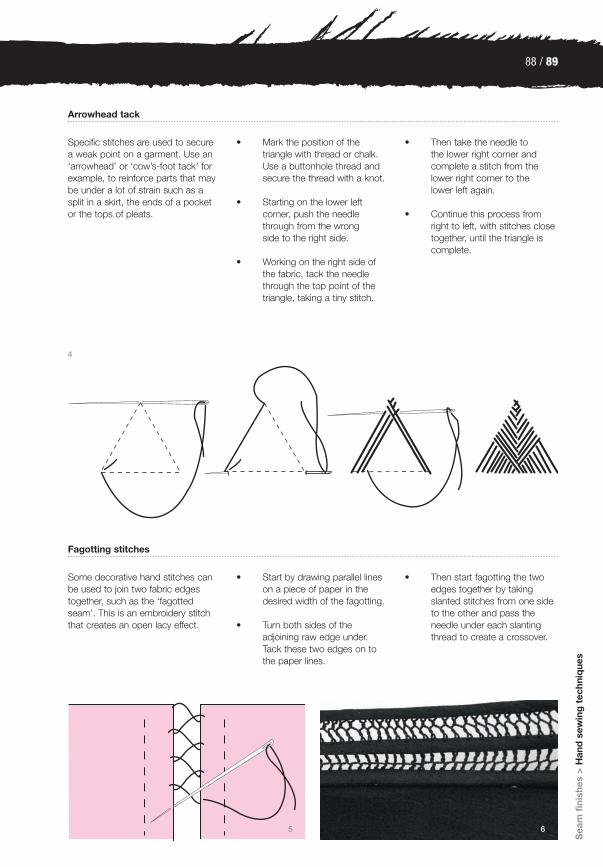
88 / 89
5 6
(AVA): Basic Fashion DesignCD0708-086 / 4272 ~ 1st Proof
BF3 Chpt3 14.07RN_70-89_.qxd 7/24/08 6:01 PM Page 89
Sea
m f
inis
hes
> H
and
sew
ing
tec
hniq
ues
Arrowhead tack
Specific stitches are used to securea weak point on a garment. Use an‘arrowhead’ or ‘cow’s-foot tack’ forexample, to reinforce parts that maybe under a lot of strain such as asplit in a skirt, the ends of a pocketor the tops of pleats.
• Mark the position of thetriangle with thread or chalk.Use a buttonhole thread andsecure the thread with a knot.
• Starting on the lower leftcorner, push the needlethrough from the wrong side to the right side.
• Working on the right side ofthe fabric, tack the needlethrough the top point of thetriangle, taking a tiny stitch.
• Then take the needle to the lower right corner andcomplete a stitch from thelower right corner to the lower left again.
• Continue this process fromright to left, with stitches closetogether, until the triangle iscomplete.
Fagotting stitches
Some decorative hand stitches canbe used to join two fabric edgestogether, such as the ‘fagottedseam’. This is an embroidery stitchthat creates an open lacy effect.
• Start by drawing parallel lineson a piece of paper in thedesired width of the fagotting.
• Turn both sides of theadjoining raw edge under.Tack these two edges on tothe paper lines.
• Then start fagotting the twoedges together by takingslanted stitches from one sideto the other and pass theneedle under each slantingthread to create a crossover.
4
TEXTBLACK
(AVA): Basic Fashion DesignCD0708-086 / 4272 ~ 1st Proof
BF3 Chpt3 14.07RN_70-89_.qxd 7/24/08 6:01 PM Page 89

(AVA): Basic Fashion DesignCD0708-086 / 4272 ~ 1st Proof
BF3 Chpt4 15.07.RN_90-107.qxd 7/25/08 12:35 PM Page 90
TEXTBLACK
(AVA): Basic Fashion DesignCD0708-086 / 4272 ~ 1st Proof
BF3 Chpt4 15.07.RN_90-107.qxd 7/25/08 12:36 PM Page 90

90 / 91
(AVA): Basic Fashion DesignCD0908-21 / 3173 ~ 3rd Proof
BF3 Chpt4 15.07.RN_90-107_.qxd 9/5/08 5:49 PM Page 91
TEXTBLACK
This chapter deals specifically with the range of techniquesused for specialist fabrics and materials. Finishes andtreatments that are added to a fabric at any stage of itsprocess can make the material difficult to cut, sew or finish.These include felted wools, lace, sequinned and beadedfabrics, knits and fabrics that have a nap, such as velvet. Amaterial such as fur or leather, whether it is real or synthetic,also requires specialist knowledge in its construction.
Surface-specific techniques
1 Fur jacket by JulienMacdonald, A/W08.
1
‘I love to take things that are everyday and comforting andmake them into the most luxurious things in the world.’
Marc Jacobs
Gar
men
t co
nstr
ucti
on
> S
urfa
ce-s
pec
ific
tech
niq
ues
> H
aute
co
utur
e an
d t
ailo
ring
(AVA): Basic Fashion DesignCD0908-096 / 4272 ~ 4th Proof
BF3 Chpt4 15.07.RN_90-107_.qxd 9/20/08 10:33 AM Page 91
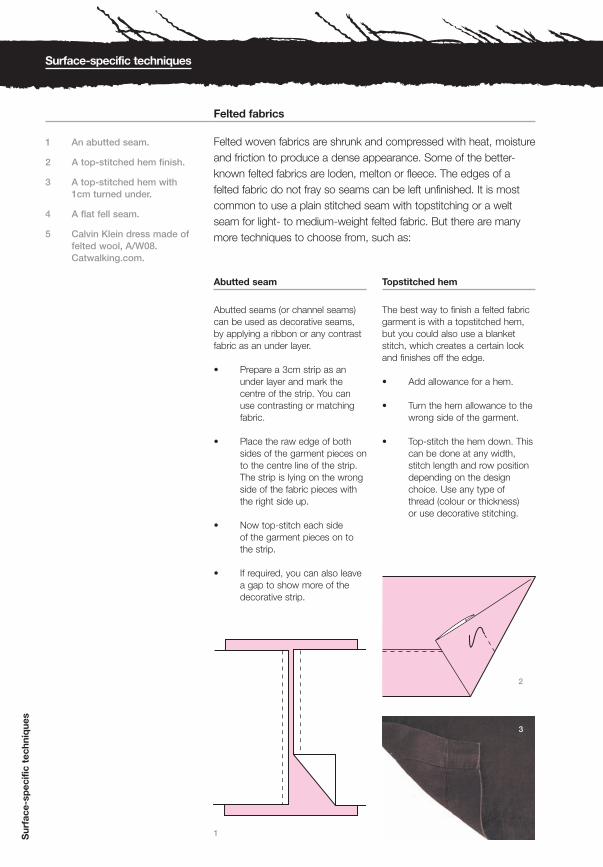
3
(AVA): Basic Fashion DesignCD0708-086 / 4272 ~ 1st Proof
BF3 Chpt4 15.07.RN_90-107.qxd 7/25/08 12:35 PM Page 92
TEXTBLACK
Surface-specific techniques
Felted fabrics
Felted woven fabrics are shrunk and compressed with heat, moistureand friction to produce a dense appearance. Some of the better-known felted fabrics are loden, melton or fleece. The edges of afelted fabric do not fray so seams can be left unfinished. It is mostcommon to use a plain stitched seam with topstitching or a weltseam for light- to medium-weight felted fabric. But there are manymore techniques to choose from, such as:
Sur
face
-sp
ecifi
c te
chni
que
s
Abutted seam
Abutted seams (or channel seams)can be used as decorative seams,by applying a ribbon or any contrastfabric as an under layer.
• Prepare a 3cm strip as anunder layer and mark thecentre of the strip. You canuse contrasting or matchingfabric.
• Place the raw edge of bothsides of the garment pieces onto the centre line of the strip.The strip is lying on the wrongside of the fabric pieces withthe right side up.
• Now top-stitch each side of the garment pieces on tothe strip.
• If required, you can also leavea gap to show more of thedecorative strip.
1 An abutted seam.
2 A top-stitched hem finish.
3 A top-stitched hem with1cm turned under.
4 A flat fell seam.
5 Calvin Klein dress made offelted wool, A/W08.Catwalking.com.
Topstitched hem
The best way to finish a felted fabricgarment is with a topstitched hem,but you could also use a blanketstitch, which creates a certain lookand finishes off the edge.
• Add allowance for a hem.
• Turn the hem allowance to thewrong side of the garment.
• Top-stitch the hem down. Thiscan be done at any width,stitch length and row positiondepending on the designchoice. Use any type of thread (colour or thickness) or use decorative stitching.
1
2
(AVA): Basic Fashion DesignCD0908-096 / 4272 ~ 3rd Proof
BF3 Chpt4 15.07.RN_90-107_.qxd 9/20/08 10:26 AM Page 92
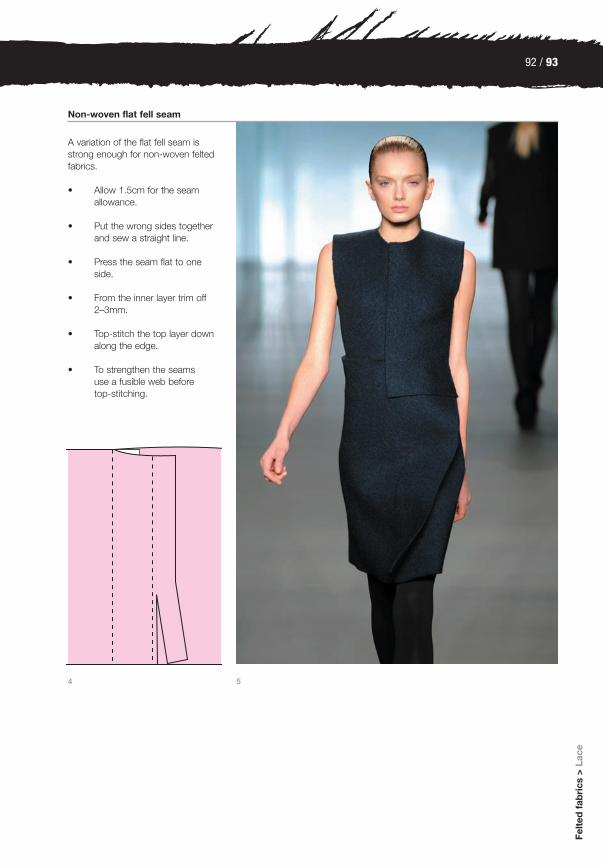
92 / 93
(AVA): Basic Fashion DesignCD0708-086 / 4272 ~ 1st Proof
BF3 Chpt4 15.07.RN_90-107.qxd 7/25/08 12:35 PM Page 93
TEXTBLACK
Felt
ed f
abri
cs >
Lac
e
A variation of the flat fell seam isstrong enough for non-woven feltedfabrics.
• Allow 1.5cm for the seamallowance.
• Put the wrong sides togetherand sew a straight line.
• Press the seam flat to oneside.
• From the inner layer trim off2–3mm.
• Top-stitch the top layer downalong the edge.
• To strengthen the seams use a fusible web before top-stitching.
4 5
Non-woven flat fell seam
(AVA): Basic Fashion DesignCD0808-038 / 4237 ~ 2nd Proof
BF3 Chpt4 15.07.RN_90-107_.qxd 8/14/08 7:33 AM Page 93

(AVA): Basic Fashion DesignCD0808-038 / 4237 ~ 2nd Proof
BF3 Chpt4 15.07.RN_90-107_.qxd 8/14/08 7:36 AM Page 94
TEXTBLACK
Sur
face
-sp
ecifi
c te
chni
que
s
Surface-specific techniques
Lace
Lace is a decorative fabric with an open structure. It is made byhand or machine using knitting, braiding, looping and knottingtechniques. Lace is used for trimming on lingerie, collars and cuffs oras appliqué, traditionally on bridal or evening wear. It can be fine- toheavyweight, in different fibres such as linen, wool, cotton, polyesteror nylon and has more stretch in the width than in the length. Lace isfragile and needs to be handled with care. It is also expensive. Youwill require more fabric when cutting out because most lace fabricshave a horizontal or vertical pattern that should be matched up, bothfor garment construction and for trimmings.
1 Christian Lacroix, hautecouture, S/S08.Catwalking.com.
2 Technical drawing showinghow to cut lace fabric andcreate an appliqué seam.
1
(AVA): Basic Fashion DesignCD0908-096 / 4272 ~ 3rd Proof
BF3 Chpt4 15.07.RN_90-107_.qxd 9/20/08 8:58 AM Page 94
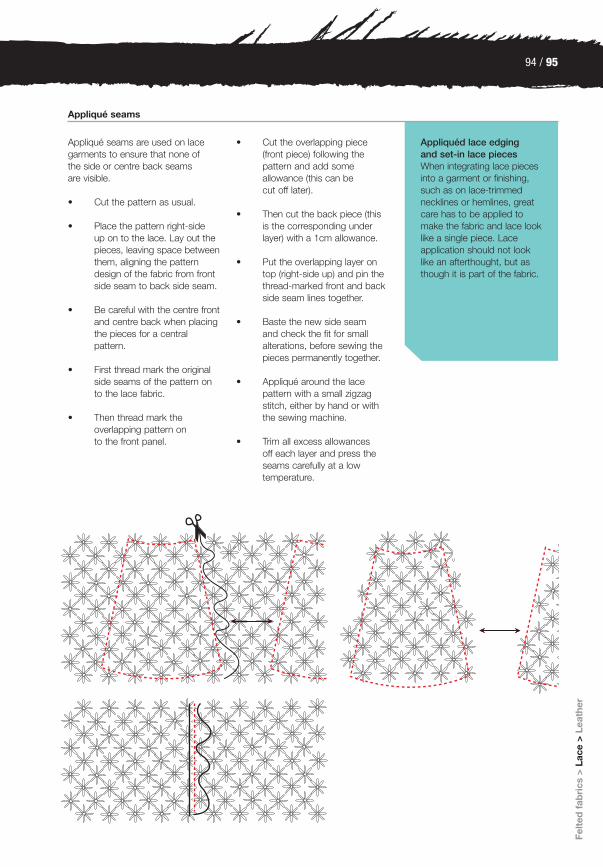
94 / 95
(AVA): Basic Fashion DesignCD0708-086 / 4272 ~ 1st Proof
BF3 Chpt4 15.07.RN_90-107.qxd 7/25/08 12:35 PM Page 95
TEXTBLACK
Felt
ed f
abri
cs >
Lac
e >
Leat
her
Appliqué seams are used on lacegarments to ensure that none of the side or centre back seams are visible.
• Cut the pattern as usual.
• Place the pattern right-side up on to the lace. Lay out thepieces, leaving space betweenthem, aligning the patterndesign of the fabric from frontside seam to back side seam.
• Be careful with the centre frontand centre back when placingthe pieces for a centralpattern.
• First thread mark the originalside seams of the pattern onto the lace fabric.
• Then thread mark theoverlapping pattern on to the front panel.
• Cut the overlapping piece(front piece) following thepattern and add someallowance (this can be cut off later).
• Then cut the back piece (thisis the corresponding underlayer) with a 1cm allowance.
• Put the overlapping layer ontop (right-side up) and pin thethread-marked front and backside seam lines together.
• Baste the new side seam and check the fit for smallalterations, before sewing thepieces permanently together.
• Appliqué around the lacepattern with a small zigzagstitch, either by hand or withthe sewing machine.
• Trim all excess allowances off each layer and press theseams carefully at a lowtemperature.
Appliquéd lace edging and set-in lace piecesWhen integrating lace piecesinto a garment or finishing,such as on lace-trimmednecklines or hemlines, greatcare has to be applied tomake the fabric and lace looklike a single piece. Laceapplication should not looklike an afterthought, but asthough it is part of the fabric.
Appliqué seams
(AVA): Basic Fashion DesignCD0708-086 / 4272 ~ 1st Proof
BF3 Chpt4 15.07.RN_90-107.qxd 7/25/08 12:36 PM Page 95
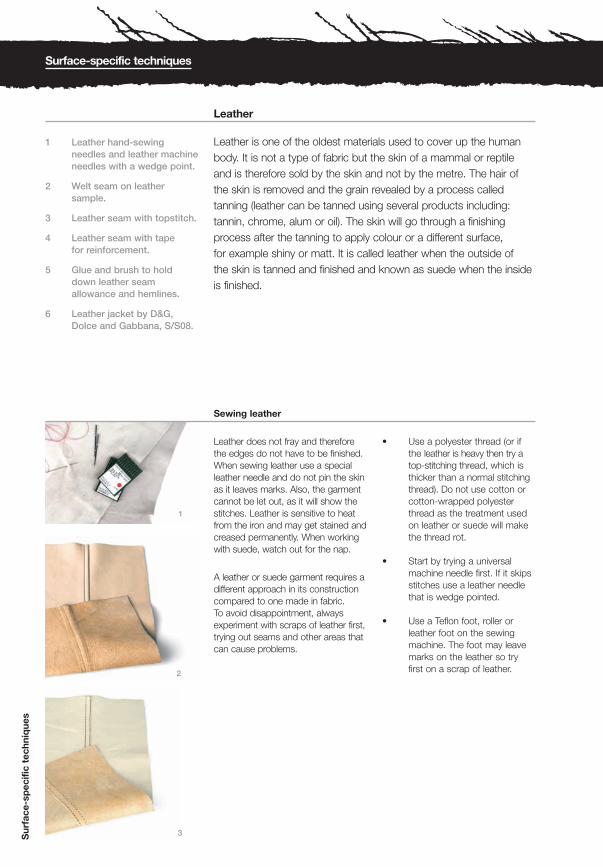
(AVA): Basic Fashion DesignCD0808-038 / 4237 ~ 2nd Proof
BF3 Chpt4 15.07.RN_90-107_.qxd 8/14/08 7:49 AM Page 96
TEXTBLACK
Sur
face
-sp
ecifi
c te
chni
que
s
Surface-specific techniques
Leather
Leather is one of the oldest materials used to cover up the humanbody. It is not a type of fabric but the skin of a mammal or reptile and is therefore sold by the skin and not by the metre. The hair ofthe skin is removed and the grain revealed by a process calledtanning (leather can be tanned using several products including:tannin, chrome, alum or oil). The skin will go through a finishingprocess after the tanning to apply colour or a different surface, for example shiny or matt. It is called leather when the outside of the skin is tanned and finished and known as suede when the inside is finished.
1 Leather hand-sewingneedles and leather machineneedles with a wedge point.
2 Welt seam on leathersample.
3 Leather seam with topstitch.
4 Leather seam with tape for reinforcement.
5 Glue and brush to holddown leather seamallowance and hemlines.
6 Leather jacket by D&G,Dolce and Gabbana, S/S08.
1
2
3
Sewing leather
Leather does not fray and thereforethe edges do not have to be finished.When sewing leather use a specialleather needle and do not pin the skinas it leaves marks. Also, the garmentcannot be let out, as it will show thestitches. Leather is sensitive to heatfrom the iron and may get stained andcreased permanently. When workingwith suede, watch out for the nap.
A leather or suede garment requires adifferent approach in its constructioncompared to one made in fabric. To avoid disappointment, alwaysexperiment with scraps of leather first,trying out seams and other areas thatcan cause problems.
• Use a polyester thread (or ifthe leather is heavy then try atop-stitching thread, which isthicker than a normal stitchingthread). Do not use cotton orcotton-wrapped polyesterthread as the treatment usedon leather or suede will makethe thread rot.
• Start by trying a universalmachine needle first. If it skipsstitches use a leather needlethat is wedge pointed.
• Use a Teflon foot, roller orleather foot on the sewingmachine. The foot may leavemarks on the leather so tryfirst on a scrap of leather.
(AVA): Basic Fashion DesignCD0808-038 / 4237 ~ 2nd Proof
BF3 Chpt4 15.07.RN_90-107_.qxd 8/14/08 7:50 AM Page 96

96 / 97
(AVA): Basic Fashion DesignCD0708-086 / 4272 ~ 1st Proof
BF3 Chpt4 15.07.RN_90-107.qxd 7/25/08 12:35 PM Page 97
TEXTBLACK
Lace
> L
eath
er >
Fur
Seams for leather
Always consider the weight and styleof garment when choosing the seamtype. A plain seam works for all thin-to medium-weight leathers. For theheavier range of leathers use alapped seam, as it will create lessbulk. Other types of seams are theplain leather seam, slot seam, weltseam or for extra stability andreinforcement, the taped seam.
• Instead of ironing the seams,these are pressed down orpounded with a cloth-coveredhammer.
• Glue (use leather glue, which is more flexible) or top-stitchthe seams down to keep themflat. Skive the edges off theseams to avoid bulk.
• Darts are stitched to the dartpoint, than slashed open andglued or top-stitched down.
Hems for leather
To achieve a flat hem on curvededges, cut out triangular notches.
• Hemlines can be glued or top-stitched. Pound thehemline first to get a fold line,then glue or top-stitch close tothe fold lines. This is especiallyimportant when applying alining so that the hem edge is left free, allowing you tomachine stitch the lining to it.
• For heavier leather use the raw edge facing. If the leatheris nice inside, why not finish off the hemming by turning the hem inside out (wrong-side-out hem).
Fastenings for leather
Suitable fastenings for leathergarments are zips of all kinds andbound, slash-stitched buttonholes or buttons with loops. Hook-and-loop fastenings and lacings can alsowork well. When sewing on thebuttons and hooks use a leatherneedle and a waxed thread. Apply a small button as a stay button onthe facing side.
4
5
6
(AVA): Basic Fashion DesignCD0808-038 / 4237 ~ 2nd Proof
BF3 Chpt4 15.07.RN_90-107_.qxd 8/14/08 7:50 AM Page 97
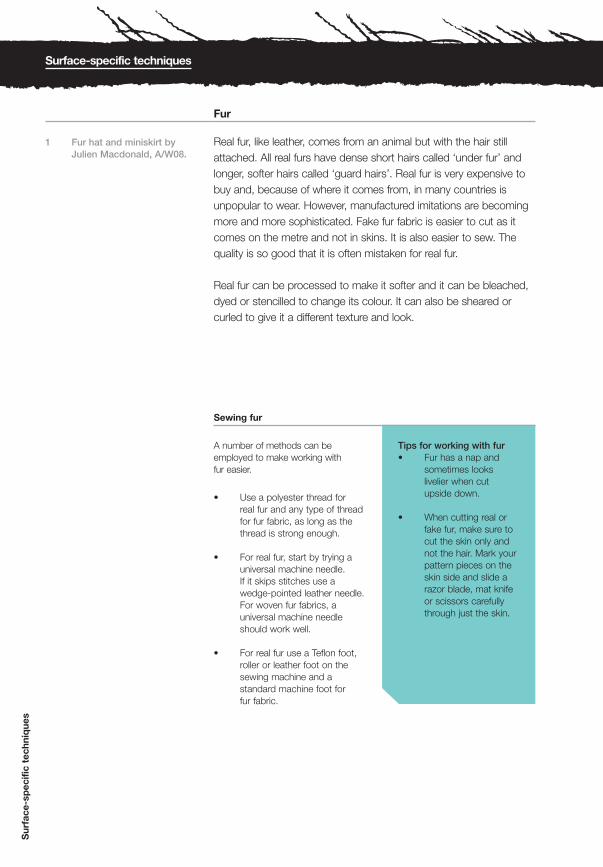
(AVA): Basic Fashion DesignCD0708-086 / 4272 ~ 1st Proof
BF3 Chpt4 15.07.RN_90-107.qxd 7/25/08 12:40 PM Page 98
Sur
face
-sp
ecifi
c te
chni
que
s
Surface-specific techniques
Fur
Real fur, like leather, comes from an animal but with the hair stillattached. All real furs have dense short hairs called ‘under fur’ andlonger, softer hairs called ‘guard hairs’. Real fur is very expensive tobuy and, because of where it comes from, in many countries isunpopular to wear. However, manufactured imitations are becomingmore and more sophisticated. Fake fur fabric is easier to cut as itcomes on the metre and not in skins. It is also easier to sew. Thequality is so good that it is often mistaken for real fur.
Real fur can be processed to make it softer and it can be bleached,dyed or stencilled to change its colour. It can also be sheared orcurled to give it a different texture and look.
1 Fur hat and miniskirt byJulien Macdonald, A/W08.
A number of methods can beemployed to make working with fur easier.
• Use a polyester thread for real fur and any type of threadfor fur fabric, as long as thethread is strong enough.
• For real fur, start by trying auniversal machine needle. If it skips stitches use awedge-pointed leather needle.For woven fur fabrics, auniversal machine needleshould work well.
• For real fur use a Teflon foot,roller or leather foot on thesewing machine and astandard machine foot for fur fabric.
Tips for working with fur• Fur has a nap and
sometimes lookslivelier when cut upside down.
• When cutting real orfake fur, make sure tocut the skin only andnot the hair. Mark yourpattern pieces on theskin side and slide arazor blade, mat knifeor scissors carefullythrough just the skin.
Sewing fur
TEXTBLACK
(AVA): Basic Fashion DesignCD0808-038 / 4237 ~ 2nd Proof
BF3 Chpt4 15.07.RN_90-107_.qxd 8/14/08 7:54 AM Page 98
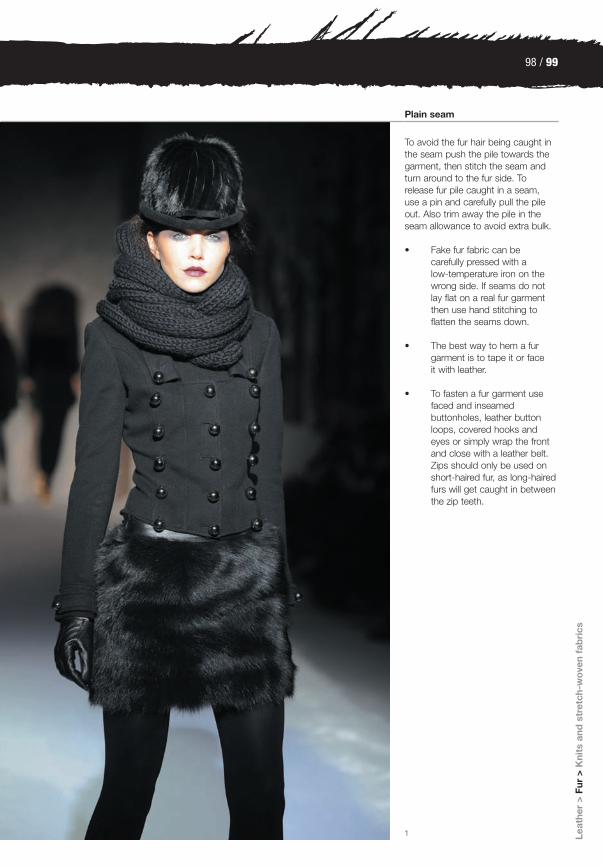
98 / 99
(AVA): Basic Fashion DesignCD0708-086 / 4272 ~ 1st Proof
BF3 Chpt4 15.07.RN_90-107.qxd 7/25/08 12:35 PM Page 99
Leat
her
>Fu
r >
Kni
ts a
nd s
tret
ch-w
ove
n fa
bri
cs
Plain seam
To avoid the fur hair being caught inthe seam push the pile towards thegarment, then stitch the seam andturn around to the fur side. Torelease fur pile caught in a seam, use a pin and carefully pull the pileout. Also trim away the pile in theseam allowance to avoid extra bulk.
• Fake fur fabric can be carefully pressed with a low-temperature iron on thewrong side. If seams do notlay flat on a real fur garmentthen use hand stitching toflatten the seams down.
• The best way to hem a furgarment is to tape it or face it with leather.
• To fasten a fur garment usefaced and inseamedbuttonholes, leather buttonloops, covered hooks andeyes or simply wrap the frontand close with a leather belt.Zips should only be used onshort-haired fur, as long-hairedfurs will get caught in betweenthe zip teeth.
1
TEXTBLACK
(AVA): Basic Fashion DesignCD0708-086 / 4272 ~ 1st Proof
BF3 Chpt4 15.07.RN_90-107.qxd 7/25/08 12:36 PM Page 99
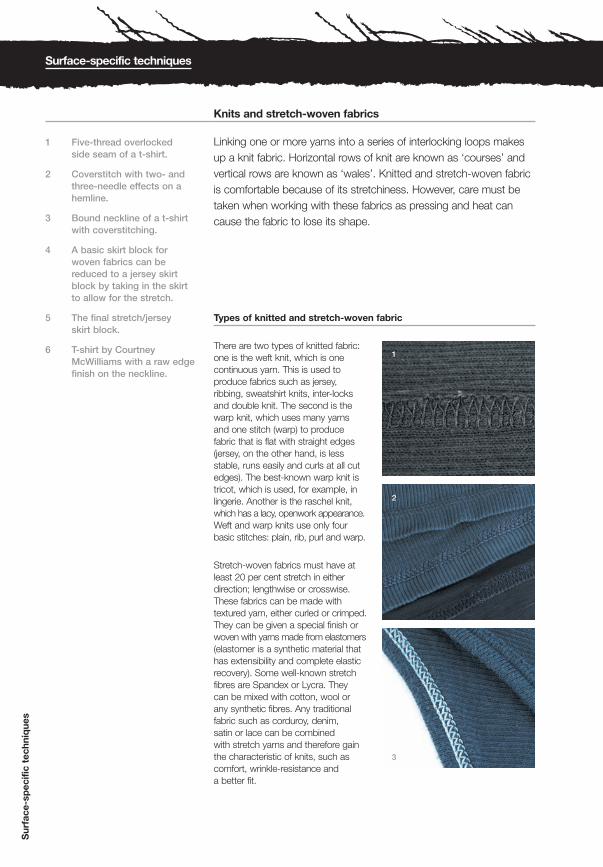
1
2
3
(AVA): Basic Fashion DesignCD0808-038 / 4237 ~ 2nd Proof
BF3 Chpt4 15.07.RN_90-107_.qxd 8/14/08 8:02 AM Page 100
Sur
face
-sp
ecifi
c te
chni
que
s
Surface-specific techniques
Knits and stretch-woven fabrics
Linking one or more yarns into a series of interlocking loops makesup a knit fabric. Horizontal rows of knit are known as ‘courses’ andvertical rows are known as ‘wales’. Knitted and stretch-woven fabricis comfortable because of its stretchiness. However, care must betaken when working with these fabrics as pressing and heat cancause the fabric to lose its shape.
1 Five-thread overlocked side seam of a t-shirt.
2 Coverstitch with two- andthree-needle effects on ahemline.
3 Bound neckline of a t-shirtwith coverstitching.
4 A basic skirt block forwoven fabrics can bereduced to a jersey skirtblock by taking in the skirtto allow for the stretch.
5 The final stretch/jersey skirt block.
6 T-shirt by CourtneyMcWilliams with a raw edgefinish on the neckline.
Types of knitted and stretch-woven fabric
There are two types of knitted fabric:one is the weft knit, which is onecontinuous yarn. This is used toproduce fabrics such as jersey,ribbing, sweatshirt knits, inter-locksand double knit. The second is thewarp knit, which uses many yarnsand one stitch (warp) to producefabric that is flat with straight edges(jersey, on the other hand, is lessstable, runs easily and curls at all cutedges). The best-known warp knit istricot, which is used, for example, inlingerie. Another is the raschel knit,which has a lacy, openwork appearance.Weft and warp knits use only fourbasic stitches: plain, rib, purl and warp.
Stretch-woven fabrics must have atleast 20 per cent stretch in eitherdirection; lengthwise or crosswise.These fabrics can be made withtextured yarn, either curled or crimped.They can be given a special finish orwoven with yarns made from elastomers(elastomer is a synthetic material thathas extensibility and complete elasticrecovery). Some well-known stretchfibres are Spandex or Lycra. They can be mixed with cotton, wool orany synthetic fibres. Any traditionalfabric such as corduroy, denim, satin or lace can be combined with stretch yarns and therefore gainthe characteristic of knits, such ascomfort, wrinkle-resistance and a better fit.
TEXTBLACK
(AVA): Basic Fashion DesignCD0708-086 / 4272 ~ 1st Proof
BF3 Chpt4 15.07.RN_90-107.qxd 7/25/08 12:36 PM Page 100
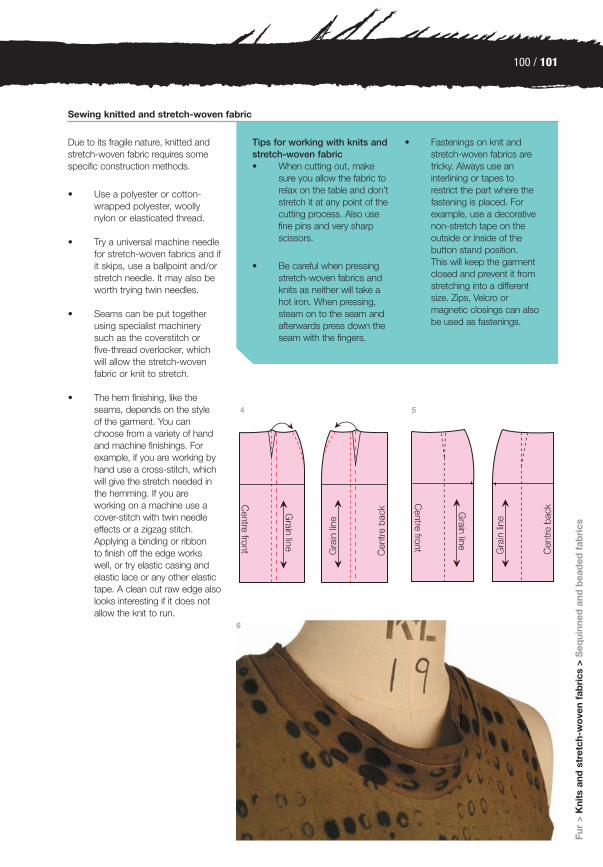
100 / 101
(AVA): Basic Fashion DesignCD0708-086 / 4272 ~ 1st Proof
BF3 Chpt4 15.07.RN_90-107.qxd 7/25/08 12:35 PM Page 101
Fur
>K
nits
and
str
etch
-wo
ven
fab
rics
> S
equi
nned
and
bea
ded
fab
rics
6
4 5
Due to its fragile nature, knitted andstretch-woven fabric requires somespecific construction methods.
• Use a polyester or cotton-wrapped polyester, woollynylon or elasticated thread.
• Try a universal machine needlefor stretch-woven fabrics and ifit skips, use a ballpoint and/orstretch needle. It may also beworth trying twin needles.
• Seams can be put togetherusing specialist machinerysuch as the coverstitch or five-thread overlocker, whichwill allow the stretch-wovenfabric or knit to stretch.
• The hem finishing, like theseams, depends on the style of the garment. You canchoose from a variety of handand machine finishings. Forexample, if you are working byhand use a cross-stitch, whichwill give the stretch needed inthe hemming. If you areworking on a machine use acover-stitch with twin needleeffects or a zigzag stitch.Applying a binding or ribbon to finish off the edge workswell, or try elastic casing andelastic lace or any other elastictape. A clean cut raw edge alsolooks interesting if it does notallow the knit to run.
Tips for working with knits andstretch-woven fabric• When cutting out, make
sure you allow the fabric torelax on the table and don’tstretch it at any point of thecutting process. Also usefine pins and very sharpscissors.
• Be careful when pressingstretch-woven fabrics andknits as neither will take ahot iron. When pressing,steam on to the seam andafterwards press down theseam with the fingers.
• Fastenings on knit andstretch-woven fabrics aretricky. Always use aninterlining or tapes torestrict the part where thefastening is placed. Forexample, use a decorativenon-stretch tape on theoutside or inside of thebutton stand position. This will keep the garmentclosed and prevent it fromstretching into a differentsize. Zips, Velcro ormagnetic closings can alsobe used as fastenings.
Sewing knitted and stretch-woven fabric
TEXTBLACK
(AVA): Basic Fashion DesignCD0808-038 / 4237 ~ 2nd Proof
BF3 Chpt4 15.07.RN_90-107_.qxd 8/14/08 8:03 AM Page 101

(AVA): Basic Fashion DesignCD0708-086 / 4272 ~ 1st Proof
BF3 Chpt4 15.07.RN_90-107.qxd 7/25/08 12:41 PM Page 102
Sur
face
-sp
ecifi
c te
chni
que
s
Surface-specific techniques
Sequinned and beaded fabrics
Sequinned and beaded fabrics are glamorous and in the past havebeen used mainly for eveningwear and special occasions. It is nowmuch more common to use these fabrics for daywear. Sequins,beads and other sparkling stones are sewn or glued on to anunderlayer of fabric such as chiffon, satin, taffeta or knits.
These fabrics are not easy to handleand extra time and care needs to beconsidered when using them.
• Beads and sequins are appliedto the fabric with repeatedchain stitch. This means that if pulled from one side, it willunravel badly.
• The best thread to use ispolyester or cotton-wrappedpolyester for both hand andmachine sewing.
• Use a universal machineneedle and a hand-sewingbeading needle. When usingthe sewing machine tack thestitch size down to 2.5mm.
• If required, you can also leavea gap to show more of thedecorative strip.
Tips for working withsequinned and beadedfabric• Sequinned fabrics can
be uncomfortable onbare skin, therefore thegarment should be lined.
• Some sequinned andbeaded fabrics canhave a pattern and will therefore needmatching up. Thefabrics usually have a nap/direction andshould be cut from asingle layer. Make sureto use old but sharpscissors as the fabricdulls scissor blades.
• Avoid darts and addflare through slash andspread rather thangathers and pleats.Simple sleeve solutionslike the kimono orraglan show off thefabric better than a set-in sleeve. Try not tobreak up the fabricdesign unnecessarily.
• Before purchasing asequinned fabric checkthe width, becausemost are very narrow(114cm/45in).
Sewing sequinned and beaded fabric
TEXTBLACK
(AVA): Basic Fashion DesignCD0708-086 / 4272 ~ 1st Proof
BF3 Chpt4 15.07.RN_90-107.qxd 7/25/08 12:36 PM Page 102

1
102 / 103
(AVA): Basic Fashion DesignCD0708-086 / 4272 ~ 1st Proof
BF3 Chpt4 15.07.RN_90-107.qxd 7/25/08 12:35 PM Page 103
Kni
ts a
nd s
tret
ch-w
ove
n fa
bri
cs >
Seq
uinn
ed a
nd b
ead
ed f
abri
cs >
Vel
vet
1 Sequinned trouser byAlexander McQueen, A/W08.Catwalking.com.
Assembling sequinned and beaded fabric garments
These fabrics are used to their bestadvantage by employing a simplestyle with a minimum of seams.
• The seams to use are a plainseam; a double-stitched seam(two close rows of straightstitch lines); a hairline seam (two close rows of straightstitch and zigzag stitch lines) or you can used a taped seamfor reinforcement.
• When the garment pieces arecut, take away the sequinsalong the seams. Only sew theunderlayer of fabric together, donot sew through sequins.
• Once the seams are closedadd the missing sequins alongthe seam line by hand (this willmake the seam disappear) andalso secure the loose onesaround the seam. The same
procedure should be used witha beaded fabric.
• Facing and hemming can bedone by using tapes, bands,bindings, ribbing or anyfabric/lining facings.
• Another way of finishinghemlines is to superlock theedges. Superlock is a very fineand tight overlocking stitch.
• Depending on the style ofgarment use a light zip, hookand eye or loops and buttonsto fasten.
TEXTBLACK
(AVA): Basic Fashion DesignCD0908-096 / 4272 ~ 3rd Proof
BF3 Chpt4 15.07.RN_90-107_.qxd 9/20/08 8:59 AM Page 103

(AVA): Basic Fashion DesignCD0708-086 / 4272 ~ 1st Proof
BF3 Chpt4 15.07.RN_90-107.qxd 7/25/08 12:44 PM Page 104
Sur
face
-sp
ecifi
c te
chni
que
s
Surface-specific techniques
Napped or pile fabrics go through a process called ‘napping’,whereby fibre ends are raised to the surface to be either clipped,brushed flat or left standing up. This process can be applied on oneor both sides of woven or knitted fabrics.
Pile fabrics are woven with an extra set of yarn. Velvet is a popularfabric of the napped or pile family. Originally velvet was made fromsilk yarns. Today velvets range from light- to heavyweight and can be woven from cotton, rayon or polyester. Velvet has an extra set ofwarp yarns and is woven as two layers of fabric. The pile, which joinsthe layers together, is cut after the fabric is woven. The result is amuch denser pile, giving the fabric a rich texture.
1 Velvet suit by JulienMacdonald, A/W05.
Sewing velvet
Care needs to be taken with velvetonce it has been cut as the pile fraysbadly at its raw edges. Ironing andpressing velvet can also damage thefabric by flattening the pile so try topress on the inside of the garment oruse a velvet board to avoid using toomuch pressure. Some other tips forsewing velvet include:
• Use a universal machine needleand take the pressure off thesewing foot. Try using a roller or even-feed machine foot or a zipper foot.
• When sewing seams, makesure you hand tack the seamstogether as velvet creeps badlyand sometimes puckers duringthe sewing process. You canuse a plain seam or tape yourseams for extra stability.
• Hemming can be sewn byhand with blind hemstitching or faced with a lighter fabric by machine.
• Clean up frayed edges onseams by binding or overlockingthe seam allowance.
Velvet
TEXTBLACK
(AVA): Basic Fashion DesignCD0708-086 / 4272 ~ 1st Proof
BF3 Chpt4 15.07.RN_90-107.qxd 7/25/08 12:36 PM Page 104
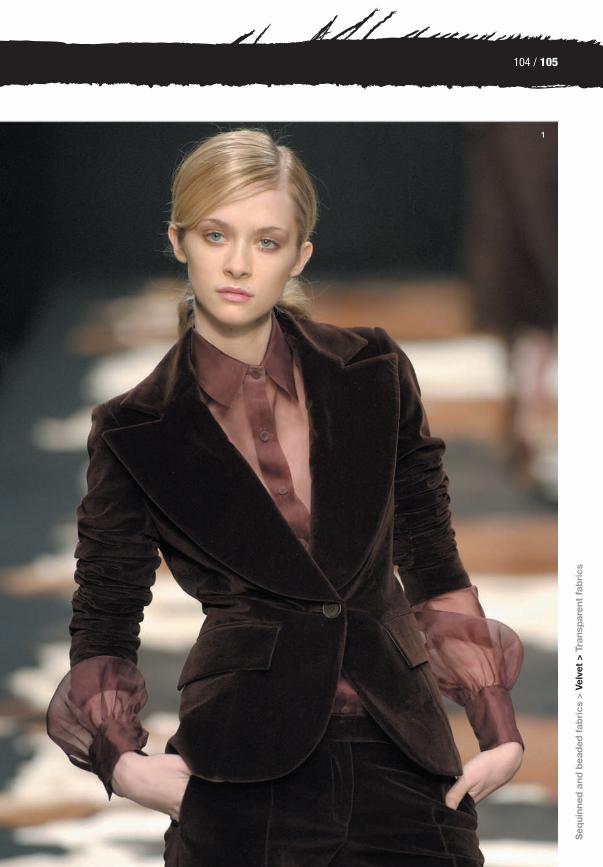
1
104 / 105
(AVA): Basic Fashion DesignCD0708-086 / 4272 ~ 1st Proof
BF3 Chpt4 15.07.RN_90-107.qxd 7/25/08 12:35 PM Page 105
Seq
uinn
ed a
nd b
ead
ed f
abri
cs >
Vel
vet
> Tr
ansp
aren
t fa
bri
cs
TEXTBLACK
(AVA): Basic Fashion DesignCD0708-086 / 4272 ~ 1st Proof
BF3 Chpt4 15.07.RN_90-107.qxd 7/25/08 12:36 PM Page 105
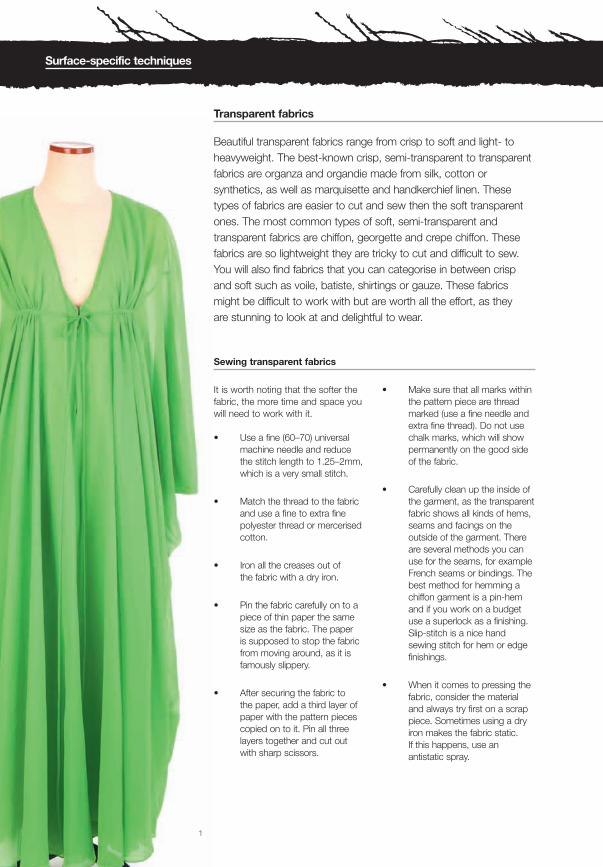
(AVA): Basic Fashion DesignCD0708-086 / 4272 ~ 1st Proof
BF3 Chpt4 15.07.RN_90-107.qxd 7/25/08 12:35 PM Page 106
Surface-specific techniques
Beautiful transparent fabrics range from crisp to soft and light- toheavyweight. The best-known crisp, semi-transparent to transparentfabrics are organza and organdie made from silk, cotton orsynthetics, as well as marquisette and handkerchief linen. Thesetypes of fabrics are easier to cut and sew then the soft transparentones. The most common types of soft, semi-transparent andtransparent fabrics are chiffon, georgette and crepe chiffon. Thesefabrics are so lightweight they are tricky to cut and difficult to sew.You will also find fabrics that you can categorise in between crispand soft such as voile, batiste, shirtings or gauze. These fabricsmight be difficult to work with but are worth all the effort, as they are stunning to look at and delightful to wear.
Transparent fabrics
1
Sewing transparent fabrics
It is worth noting that the softer thefabric, the more time and space youwill need to work with it.
• Use a fine (60–70) universalmachine needle and reduce the stitch length to 1.25–2mm,which is a very small stitch.
• Match the thread to the fabricand use a fine to extra finepolyester thread or mercerisedcotton.
• Iron all the creases out of the fabric with a dry iron.
• Pin the fabric carefully on to apiece of thin paper the samesize as the fabric. The paper is supposed to stop the fabricfrom moving around, as it isfamously slippery.
• After securing the fabric to the paper, add a third layer ofpaper with the pattern piecescopied on to it. Pin all threelayers together and cut out with sharp scissors.
• Make sure that all marks withinthe pattern piece are threadmarked (use a fine needle andextra fine thread). Do not usechalk marks, which will showpermanently on the good sideof the fabric.
• Carefully clean up the inside ofthe garment, as the transparentfabric shows all kinds of hems,seams and facings on theoutside of the garment. Thereare several methods you canuse for the seams, for exampleFrench seams or bindings. Thebest method for hemming achiffon garment is a pin-hemand if you work on a budgetuse a superlock as a finishing.Slip-stitch is a nice handsewing stitch for hem or edgefinishings.
• When it comes to pressing thefabric, consider the materialand always try first on a scrappiece. Sometimes using a dryiron makes the fabric static. If this happens, use anantistatic spray.
TEXTBLACK
(AVA): Basic Fashion DesignCD0808-038 / 4237 ~ 2nd Proof
BF3 Chpt4 15.07.RN_90-107_.qxd 8/14/08 8:14 AM Page 106

106 / 107
(AVA): Basic Fashion DesignCD0808-038 / 4237 ~ 2nd Proof
BF3 Chpt4 15.07.RN_90-107_.qxd 8/14/08 8:14 AM Page 107
Velv
et >
Tra
nsp
aren
t fa
bri
cs
1 Chiffon dress by Yuki withFrench seam finish and a pin hem.
2 Example of a layout forcutting fine fabrics.
3 Example of a pin hem finishon a sleeve hemline.
4 Sample of a superlockfinish.
5 Close-up of the French seam finish on the dress by Yuki.
3
4
2
5
TEXTBLACK
(AVA): Basic Fashion DesignCD0808-038 / 4237 ~ 2nd Proof
BF3 Chpt4 15.07.RN_90-107_.qxd 8/14/08 8:14 AM Page 107

(AVA): Basic Fashion Design
CD0708-086 / 3173 ~ 1st Proof
SIF AVABF3 Chpt5 16.07RN_108-119.qxd 7/25/08 10:00 AM Page 108
TEXTBLACK
(AVA): Basic Fashion Design
CD0708-086 / 3173 ~ 1st Proof
SIF AVABF3 Chpt5 16.07RN_108-119.qxd 7/25/08 10:01 AM Page 108

108 / 109
(AVA): Basic Fashion Design
CD0708-086 / 3173 ~ 1st Proof
SIF AVABF3 Chpt5 16.07RN_108-119.qxd 7/25/08 10:42 AM Page 109
At the top of the garment manufacturing chain are hautecouture and the tailoring crafts, which involve working withindividual customers. The garments are constructed usingtraditional methods such as hand sewing and intricate cuts.The fabric and finishing can often heavily influence thedesigning process and the designs will often work to ensurethat they are displayed to their best advantage on the body.
A lot of time, consideration and energy is put into a couture or tailored garment. The result is a garment that fits flawlessly,using the finest luxury fabrics, put together with skillful handsby dressmakers and tailors who are proud of their work andthe name they work for. To be working as a tailor on SavileRow, for example, or in an atelier for an haute couture houseconveys the feeling of exclusivity through history and tradition.
Haute couture and tailoring
1 Backstage image atChristophe Josse’s hautecouture A/W06 show.Catwalking.com.
1
‘I created flower women with gentle shoulders andgenerous bosoms, with tiny waists like stems and skirts belling out like petals.’
Christian Dior
Sur
face
-sp
ecifi
c te
chni
que
s >
Hau
te c
out
ure
and
tai
lori
ng >
Dra
pin
g o
n th
e m
anne
qui
n
TEXTBLACK
(AVA): Basic Fashion Design
CD0908-096 / 4272 ~ 3rd Proof
SIF AVABF3 Chpt5 16.07RN_108-119_.qxd 9/20/08 10:36 AM Page 109
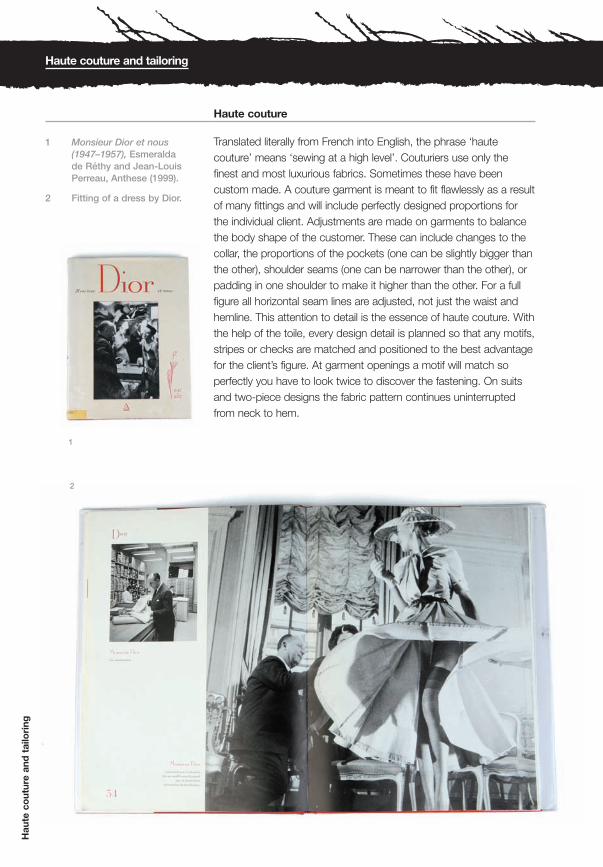
(AVA): Basic Fashion Design
CD0808-038 / 4237 ~ 2nd Proof
SIF AVABF3 Chpt5 16.07RN_108-119_.qxd 8/14/08 8:39 AM Page 110
Haute couture and tailoring
Haute couture
Translated literally from French into English, the phrase ‘hautecouture’ means ‘sewing at a high level’. Couturiers use only thefinest and most luxurious fabrics. Sometimes these have beencustom made. A couture garment is meant to fit flawlessly as a resultof many fittings and will include perfectly designed proportions forthe individual client. Adjustments are made on garments to balancethe body shape of the customer. These can include changes to thecollar, the proportions of the pockets (one can be slightly bigger thanthe other), shoulder seams (one can be narrower than the other), orpadding in one shoulder to make it higher than the other. For a fullfigure all horizontal seam lines are adjusted, not just the waist andhemline. This attention to detail is the essence of haute couture. Withthe help of the toile, every design detail is planned so that any motifs,stripes or checks are matched and positioned to the best advantagefor the client’s figure. At garment openings a motif will match soperfectly you have to look twice to discover the fastening. On suitsand two-piece designs the fabric pattern continues uninterruptedfrom neck to hem.
Hau
te c
out
ure
and
tai
lori
ng
1 Monsieur Dior et nous(1947–1957), Esmeralda de Réthy and Jean-LouisPerreau, Anthese (1999).
2 Fitting of a dress by Dior.
2
1
TEXTBLACK
(AVA): Basic Fashion Design
CD0808-038 / 4237 ~ 2nd Proof
SIF AVABF3 Chpt5 16.07RN_108-119_.qxd 8/14/08 8:39 AM Page 110

110 / 111
(AVA): Basic Fashion Design
CD0708-086 / 3173 ~ 1st Proof
SIF AVABF3 Chpt5 16.07RN_108-119.qxd 7/25/08 10:26 AM Page 111
Hau
te c
out
ure
> D
esig
ning
hau
te c
out
ure
The history
The origins of haute couture lie in the eighteenth century, with manyattributing its birth to the couturier,Rose Bertin (the milliner to MarieAntoinette) and Charles FrederickWorth. Prior to this, clothing wouldhave been made by the couturier tothe specifications of the customer. It was not until the mid-nineteenthcentury that Charles Frederick Worth,who was originally from England, firstintroduced his customers to garmentsmade up from his own ideas. Heshowed his collection of finisheddesigns on live models – a novelexercise at the time. He achievedcolossal success and opened up anew direction in fashion. Once thecustomer had selected an outfit fromthe portfolio (today called a look-book)and specified the colour and fabric,the outfit would be made to measurein the atelier (workshop). This is stillcommon practice.
In France, haute couture is aprotected name and can only be usedby companies that work to a certainstandard, as defined by the ‘Chambre
de commerce et d’industrie de Paris’.The rules that define those designhouses allowed to become an hautecouture label were established in1945 but have since been updated.To become a member of the‘Chambre syndicale de la hautecouture’ and to be able to use theterm ‘haute couture’ in its label andadvertising or in any other way, adesign house must follow three mainregulations: to provide an atelier inParis that employs at least 15 peoplefull-time; to present a collection withat least 35 outfits including day- andeveningwear to the Paris press; andto provide a service to private clientswith bespoke designed garments.
Across Europe the term couture has been used loosely to describetailor-made and high fashiongarments, which can lead toconfusion for customers. A collectionof garments produced more thanonce and to a size range is calledprêt-à-porter, the French term for‘ready to wear’. As they struggle withtheir vast costs, these days couture
houses also produce prêt-a-portercollections. The purpose of a coutureshow is to enhance the prestige of the house.
In 1946 there were 106 official hautecouture houses. Over the course ofthe twentieth century this numberdropped dramatically to 18 and todaythere may be as few as ten: AdelineAndre, Chanel, Christian Lacroix, Dior,Dominique Sirop, Emanuel Ungaro,Frank Sorbier, Givenchy, Jean PaulGaultier and Jean-Louis Scherrer.There are also three correspondent or foreign member houses: Elie Saab,Giorgio Armani and Valentino.
TEXTBLACK
(AVA): Basic Fashion Design
CD0808-038 / 4237 ~ 2nd Proof
SIF AVABF3 Chpt5 16.07RN_108-119_.qxd 8/14/08 8:40 AM Page 111

(AVA): Basic Fashion Design
CD0708-086 / 3173 ~ 1st Proof
SIF AVABF3 Chpt5 16.07RN_108-119.qxd 7/25/08 10:27 AM Page 112
Hau
te c
out
ure
and
tai
lori
ng
Haute couture and tailoring
1 Paul Poiret fashion memoir,Francois Baudot, Thamesand Hudson (1997). Sketch of an evening cloakby Georges Lepape (1911) and a dressing gown with apattern designed by Dufy(1923).
2 Balenciaga fashion memoir, Marie-AndreeJouve, Thames and Hudson(1997). Black coat with whitemink cape (1967) and ‘Four-sided’ cocktail dress.
3 Charles James fashionmemoir, Richard Martin,Thames and Hudson (1997).James’s ‘Four-leaf Clover’evening dress (1953) and adrawing of the inside by BillWilkinson (1982).
Designing haute couture
The construction of a couturegarment may look effortless, but ittakes many hours to produce thateffortless look. Equipped with a thorough understanding of thehuman body and knowledge of fibresand fabrics, the couturier may beginwith either the fabric or the silhouette.
When the fabric arrives the couturierdrapes unfolded lengths of eachfabric over a mannequin or a housemodel to see how the material hangson the lengthwise-, cross- and bias-grain lines. Using this information as a guide he or she starts the designprocess by drawing sketches for thecollection. The design sketches aredistributed to the atelier. Dependingon the type of garment, the sketcheswill go to the tailoring workroom(atelier de tailleur) or the dressmakingworkroom (atelier de flou). Then theappropriate weight of muslin/calico isselected and the toile is draped onthe mannequins to duplicate thedesign sketch. This drape providesthe basic pattern from which thegarment will be sewn.
The toile will be made with all thenecessary underpinnings and puttogether with the same care as thefinal garment. This toile is then fittedon the house model and reworked.Sometimes toiles are made in the finalfabric straight away, allowing thecouturier to appreciate the garment to its full potential.
Once the toile is approved it iscarefully taken apart and pressed sothat it can serve as a pattern. Afterthe fabric is cut and thread markedthe prototype is ready to be fitted onthe house model once again. Thisprocess will be repeated until thedesigner is satisfied. Finally,accessories are selected by thecouturier for the press show and thedesign is entered in the Livre defabrication (production or look-book).
TEXTBLACK
(AVA): Basic Fashion Design
CD0808-038 / 4237 ~ 2nd Proof
SIF AVABF3 Chpt5 16.07RN_108-119_.qxd 8/14/08 8:43 AM Page 112
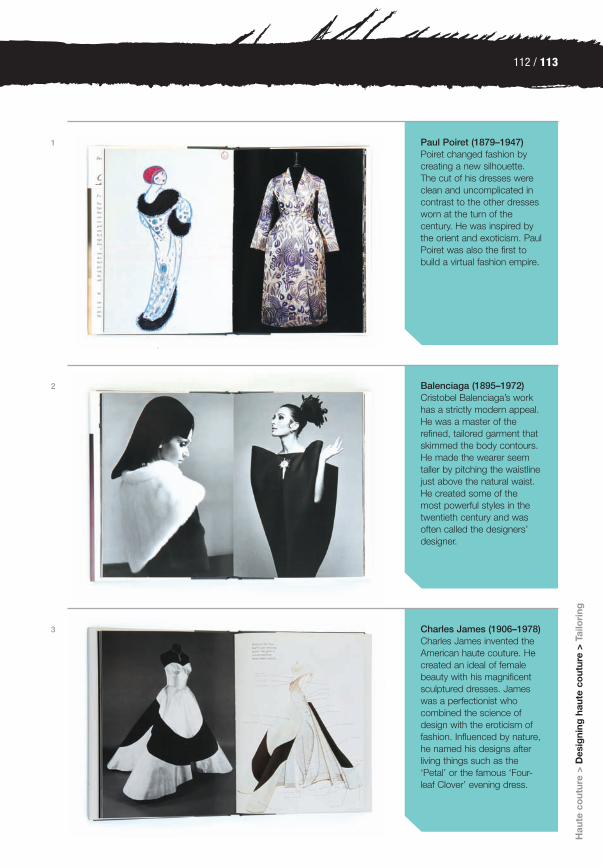
112 / 113
(AVA): Basic Fashion Design
CD0708-086 / 3173 ~ 1st Proof
SIF AVABF3 Chpt5 16.07RN_108-119.qxd 7/25/08 10:01 AM Page 113
Hau
te c
out
ure
> D
esig
ning
hau
te c
out
ure
> Ta
ilori
ng
Paul Poiret (1879–1947)Poiret changed fashion bycreating a new silhouette. The cut of his dresses wereclean and uncomplicated incontrast to the other dressesworn at the turn of thecentury. He was inspired bythe orient and exoticism. PaulPoiret was also the first tobuild a virtual fashion empire.
Balenciaga (1895–1972)Cristobel Balenciaga’s workhas a strictly modern appeal.He was a master of therefined, tailored garment thatskimmed the body contours.He made the wearer seemtaller by pitching the waistlinejust above the natural waist.He created some of the most powerful styles in thetwentieth century and wasoften called the designers’designer.
Charles James (1906–1978)Charles James invented theAmerican haute couture. Hecreated an ideal of femalebeauty with his magnificentsculptured dresses. Jameswas a perfectionist whocombined the science ofdesign with the eroticism offashion. Influenced by nature,he named his designs afterliving things such as the‘Petal’ or the famous ‘Four-leaf Clover’ evening dress.
1
2
3
TEXTBLACK
(AVA): Basic Fashion Design
CD0808-038 / 4237 ~ 2nd Proof
SIF AVABF3 Chpt5 16.07RN_108-119_.qxd 8/14/08 8:43 AM Page 113
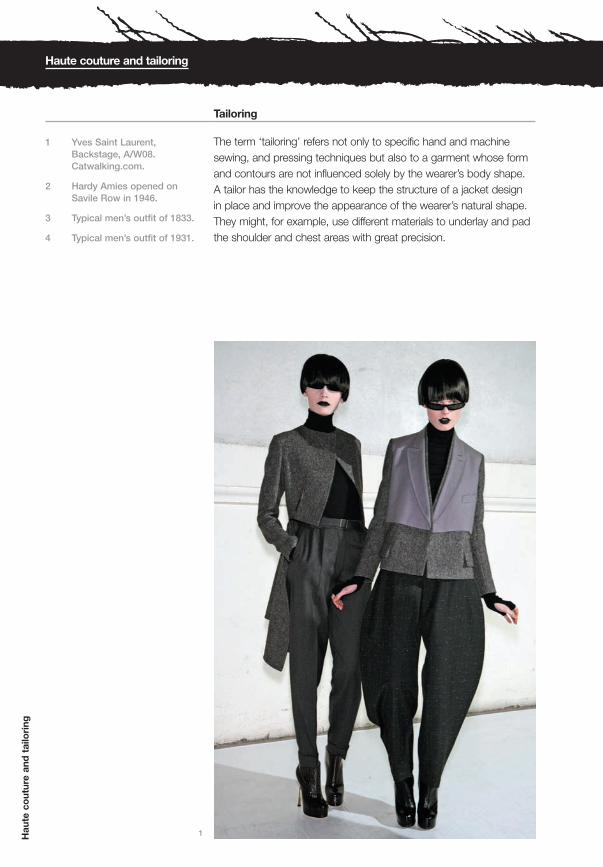
(AVA): Basic Fashion Design
CD0708-086 / 3173 ~ 1st Proof
SIF AVABF3 Chpt5 16.07RN_108-119.qxd 7/25/08 10:01 AM Page 114
Hau
te c
out
ure
and
tai
lori
ng
Haute couture and tailoring
The term ‘tailoring’ refers not only to specific hand and machinesewing, and pressing techniques but also to a garment whose formand contours are not influenced solely by the wearer’s body shape.A tailor has the knowledge to keep the structure of a jacket design in place and improve the appearance of the wearer’s natural shape.They might, for example, use different materials to underlay and padthe shoulder and chest areas with great precision.
Tailoring
1 Yves Saint Laurent,Backstage, A/W08.Catwalking.com.
2 Hardy Amies opened on Savile Row in 1946.
3 Typical men’s outfit of 1833.
4 Typical men’s outfit of 1931.
1
TEXTBLACK
(AVA): Basic Fashion Design
CD0808-038 / 4237 ~ 2nd Proof
SIF AVABF3 Chpt5 16.07RN_108-119_.qxd 8/14/08 8:49 AM Page 114

114 / 115
(AVA): Basic Fashion Design
CD0708-086 / 3173 ~ 1st Proof
SIF AVABF3 Chpt5 16.07RN_108-119.qxd 7/25/08 10:01 AM Page 115
Des
igni
ng h
aute
co
utur
e >
Tailo
ring
> T
ailo
ring
tec
hniq
ues
A history of tailoring
It is generally agreed that theaccepted style in menswear in the early nineteenth century hasremained recognisably similar to thepresent day. There has naturally beensome re-proportioning of length andsilhouette, either more defined orlooser, but the components of atailored suit – the coat, vest andtrouser – have a direct line ofdescent from the end of theNapoleonic wars.
What is most surprising is that thecolour palette of these early yearshas remained virtually unchanged.The use of dark, neutrally colouredwool juxtaposed with white linen orcotton reflected a new mood insociety. A growing awareness of theimportance of hygiene made thewearing of fresh linen an obviousdemonstration that cleanliness wasindeed next to godliness. George‘Beau’ Brummell, 1778–1840, anearly practitioner of this new conceptof dress, was fastidious in hiscleanliness, discarding severalcravats at one dressing as not being suitably washed, pressed and finished. He awakened a moregeneral interest in neat dressing and gave a great example of a well-dressed man himself.
Since the first tailor’s establishmentopened in 1785, London’s SavileRow has become world renownedfor custom-tailored suiting (alsocalled ‘bespoke’ tailoring, becausecloth reserved for a customer was‘spoken for’ by him).
In 1969, Tommy Nutter and EdwardSexton opened their shop Nutters.They pioneered shop window displayand revolutionised Savile Row. Today,Ozwald Boateng, Richard James andTimothy Everest are among a newwave of master tailors who cater forthose requiring a perfectly fitted suitof outstanding quality andcraftsmanship.
Tailoring is a time-honoured skill that is complex and specialised in itstechnical knowledge. Manyprofessionals in the fashion industryworship the tailor’s craft and wouldnot attempt to undertake tailoredapparel. Organised in guilds andbrotherhoods, the tailoring trade hasbeen protected by the people workingin it, who pass on and safeguardknowledge very carefully.
Over time, new machinery and fusingmaterials have been introduced to thetailor’s market. However, many are notconvinced and prefer to use onlyhand sewing methods to ensure theprecise shaping of the fabric. Asewing machine is only used to close up seams and darts.
Today, tailoring can be split into twocategories: traditional custom-tailorswho continue to practise their craftmore or less as it was a century ago, and industrial tailors, who usespeedier and therefore less expensivealternative and construct their jacketsand coats to an industrial tailoredfinish. This means that the chestpieces, pockets, collar and shouldersare reinforced by an iron-on interliningand prefabricated pieces. Padstitching (pad stitch is used to join twolayers of materials together using adiagonal stitch which is staggeredfrom one row to the next) is replacedby a machine stitch that replicates thestitching pattern. The shoulder roll ismachine stitched into the sleeve headinstead of being hand sewn and cantherefore be carefully placed to theindividual requirements of thecustomer. The industrial tailored suitcan be manufactured to a very highstandard, but will never deliver theindividual fit and exclusive feel of acustom-tailored suit.
2 43
TEXTBLACK
(AVA): Basic Fashion Design
CD0808-038 / 4237 ~ 2nd Proof
SIF AVABF3 Chpt5 16.07RN_108-119_.qxd 8/14/08 8:49 AM Page 115

(AVA): Basic Fashion Design
CD0708-086 / 3173 ~ 1st Proof
SIF AVABF3 Chpt5 16.07RN_108-119.qxd 7/25/08 10:01 AM Page 116
Hau
te c
out
ure
and
tai
lori
ng
Haute couture and tailoring
A lot of components play a significant role in creating an excellentlyfitted tailored garment, from the right choice of fabric and the shapeand design of the garments, to the skilled measuring of the bodyand the specific techniques employed.
This section will introduce you to some of the materials andtechniques used by tailors for constructing jackets.
Tailoring techniques
1 An inside-out tailored jacketshowing the under structure.
2 Woollen fabric and liningsample booklet, publishedby 2000 Tailoring Ltd.London.
3 Tailored jacket with bastingstitching in workingprogress.
The understructure
This is made from different kinds ofcanvas and interfacing, soft cottonflannel, cotton twill tape, strips ofcotton or lambswool, Melton for thecollar stand, pocketing fabric andstrong, lightweight lining.
Woollen fabric used for tailored suitscan fall into two categories: worstedsand woollens. Worsted fabric iswoven from long, finely combedwool. It is a firm fabric with a flatsurface, ideal for traditional tailoredbusiness suits. Woollen fabrics arewoven from shorter, uncombed woolfibres. These fibres are looselytwisted and woven much less tightlythan the worsteds. The effect is asoft, easy fabric, such as a HarrisTweed. Other fabrics can also beused, such as silk and linen.
Tweed A woollen fabric named afterthe river Tweed, which flowsthrough the Scottish Borderstextile areas. Harris Tweed is one variation, made frompure virgin wool that is dyedand spun in Harris (in theOuter Hebrides) and handwoven by the islanders intheir homes.
The fabrics
1 2
TEXTBLACK
(AVA): Basic Fashion Design
CD0808-038 / 4237 ~ 2nd Proof
SIF AVABF3 Chpt5 16.07RN_108-119_.qxd 8/14/08 8:53 AM Page 116
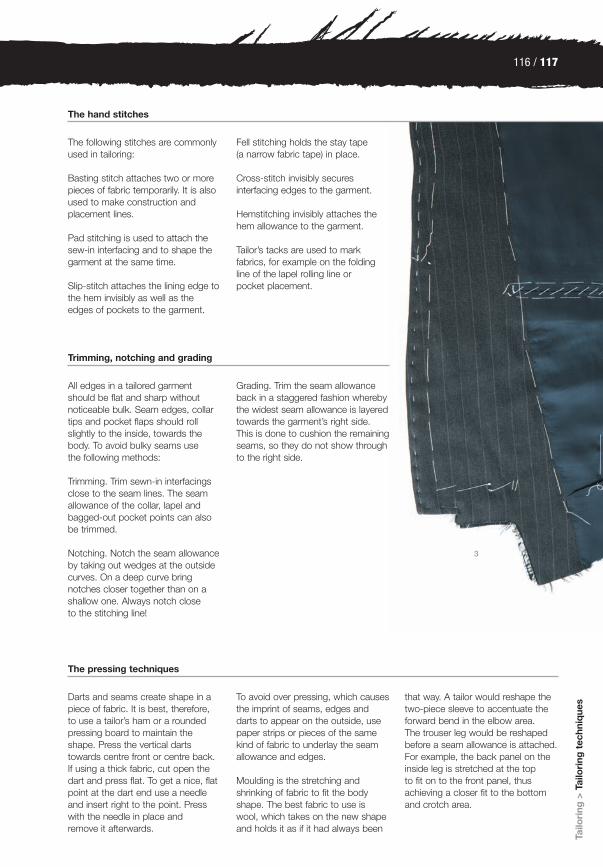
116 / 117
(AVA): Basic Fashion Design
CD0808-038 / 4237 ~ 2nd Proof
SIF AVABF3 Chpt5 16.07RN_108-119_.qxd 8/14/08 8:52 AM Page 117
Tailo
ring
>Ta
ilori
ng t
echn
ique
s
The following stitches are commonlyused in tailoring:
Basting stitch attaches two or morepieces of fabric temporarily. It is alsoused to make construction andplacement lines.
Pad stitching is used to attach thesew-in interfacing and to shape thegarment at the same time.
Slip-stitch attaches the lining edge tothe hem invisibly as well as theedges of pockets to the garment.
Fell stitching holds the stay tape (a narrow fabric tape) in place.
Cross-stitch invisibly securesinterfacing edges to the garment.
Hemstitching invisibly attaches thehem allowance to the garment.
Tailor’s tacks are used to markfabrics, for example on the foldingline of the lapel rolling line or pocket placement.
The hand stitches
Trimming, notching and grading
All edges in a tailored garmentshould be flat and sharp withoutnoticeable bulk. Seam edges, collartips and pocket flaps should rollslightly to the inside, towards thebody. To avoid bulky seams use the following methods:
Trimming. Trim sewn-in interfacingsclose to the seam lines. The seamallowance of the collar, lapel andbagged-out pocket points can alsobe trimmed.
Notching. Notch the seam allowanceby taking out wedges at the outsidecurves. On a deep curve bringnotches closer together than on ashallow one. Always notch close to the stitching line!
Grading. Trim the seam allowanceback in a staggered fashion wherebythe widest seam allowance is layeredtowards the garment’s right side.This is done to cushion the remainingseams, so they do not show throughto the right side.
The pressing techniques
Darts and seams create shape in apiece of fabric. It is best, therefore, to use a tailor’s ham or a roundedpressing board to maintain theshape. Press the vertical dartstowards centre front or centre back.If using a thick fabric, cut open thedart and press flat. To get a nice, flatpoint at the dart end use a needleand insert right to the point. Presswith the needle in place and remove it afterwards.
To avoid over pressing, which causesthe imprint of seams, edges anddarts to appear on the outside, usepaper strips or pieces of the samekind of fabric to underlay the seamallowance and edges.
Moulding is the stretching andshrinking of fabric to fit the bodyshape. The best fabric to use iswool, which takes on the new shapeand holds it as if it had always been
that way. A tailor would reshape thetwo-piece sleeve to accentuate theforward bend in the elbow area. The trouser leg would be reshapedbefore a seam allowance is attached.For example, the back panel on theinside leg is stretched at the top to fit on to the front panel, thusachieving a closer fit to the bottomand crotch area.
3
TEXTBLACK
(AVA): Basic Fashion Design
CD0808-038 / 4237 ~ 2nd Proof
SIF AVABF3 Chpt5 16.07RN_108-119_.qxd 8/14/08 8:53 AM Page 117

(AVA): Basic Fashion Design
CD0708-086 / 3173 ~ 1st Proof
SIF AVABF3 Chpt5 16.07RN_108-119.qxd 7/25/08 10:01 AM Page 118
Hau
te c
out
ure
and
tai
lori
ng
Haute couture and tailoring
On a jacket certain areas need to be taped with cotton twill tape. Thisavoids stretching during constructionand strengthens the edges to preventthe jacket losing its shape when worn.
The areas to tape are:necklinearmholethe fold in the lapelthe edges of the lapel all the waydown to the hemline (some tailorscontinue along the edge of the front hemline)
When taping an edge, take themeasurement from the pattern forthe tape length. You will find that thefabric edge has already stretched abit and that you have to ease thefabric on to the tape.
The taping
Collars and lapels can change shapewith fashion or can keep a traditionallook. The line where collar and lapelmeet is called a gorge line.
There are different shapes of lapelused in tailoring:cloverleaf lapelfish mouth lapelL-shaped lapelnotched lapelpeaked lapelshawl collar
1 Inside the front piece of ajacket showing the tapedfolding line and taped edgesof the lapel.
2 Student’s research book ontailoring showing a ‘peakedlapel’.
3 Student’s research on atailored collar.
4 Hugo Boss, S/S08, tailoredjacket with a welt pocket(chest position) and jettedpocket with flap (hipposition).
5 Single-breasted jacketclosing with one button.
6 Double-breasted jacket withsix buttons, fastening at thesecond button.
7 Vent with button andbuttonhole fastening
8 A keyhole buttonhole.
1
2
3
The collar and lapel
TEXTBLACK
(AVA): Basic Fashion Design
CD0808-038 / 4237 ~ 2nd Proof
SIF AVABF3 Chpt5 16.07RN_108-119_.qxd 8/14/08 8:58 AM Page 118

118 / 119
87
(AVA): Basic Fashion Design
CD0808-038 / 4237 ~ 2nd Proof
SIF AVABF3 Chpt5 16.07RN_108-119_.qxd 8/14/08 8:57 AM Page 119
Tailo
ring
>Ta
ilori
ng t
echn
ique
s
The pocket shapes
The most popular pocket shapes are:welt pocketjetted pocket/piping pocketjetted pocket/piping pocket with flappatch pocketlining/inside pocket
The fastenings
The placement of buttons is crucial,always place a button half an inchbelow the natural waistline.
A hand-sewn keyhole buttonholewith inserted gimp is the tailor’schoice of fastening on a jacket.
Single-breasted jackets should have one or three buttons; double-breasted jackets should have four orsix buttons, fastened at the secondor third.
Sleeve fastenings are traditionallyvents, with a button and buttonhole,which sit at the back of the sleeve.The vent can also be opened with azip, or without any fastenings at all.
4 5
6
TEXTBLACK
(AVA): Basic Fashion Design
CD0808-038 / 4237 ~ 2nd Proof
SIF AVABF3 Chpt5 16.07RN_108-119_.qxd 8/14/08 8:58 AM Page 119

(AVA): Basic Fashion Design
CD0908-091 / 3173 ~ 2nd Proof
SIF AVABF3 Chpt6 16.07_120-135.RN_.qxd 9/18/08 4:38 PM Page 120
TEXTBLACK
(AVA): Basic Fashion Design
CD0708-086 / 3173 ~ 1st Proof
SIF AVABF3 Chpt6 16.07_120-135.RNqxd 7/25/08 12:29 PM Page 120
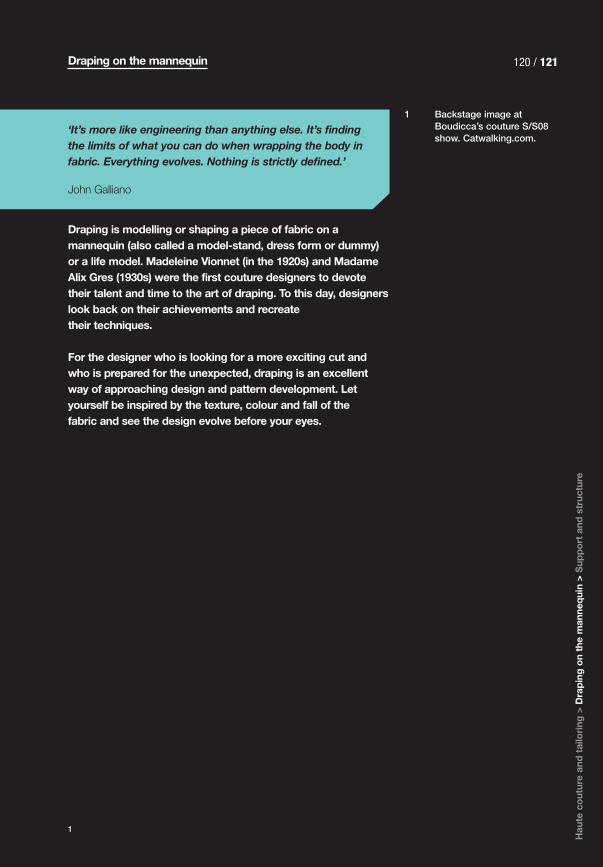
120 / 121
(AVA): Basic Fashion Design
CD0908-091 / 3173 ~ 3rd Proof
SIF AVABF3 Chpt6 16.07_120-135.RN_.qxd 9/18/08 4:39 PM Page 121
TEXTBLACK
Draping is modelling or shaping a piece of fabric on amannequin (also called a model-stand, dress form or dummy)or a life model. Madeleine Vionnet (in the 1920s) and MadameAlix Gres (1930s) were the first couture designers to devotetheir talent and time to the art of draping. To this day, designerslook back on their achievements and recreate their techniques.
For the designer who is looking for a more exciting cut andwho is prepared for the unexpected, draping is an excellentway of approaching design and pattern development. Letyourself be inspired by the texture, colour and fall of the fabric and see the design evolve before your eyes.
Draping on the mannequin
1 Backstage image atBoudicca’s couture S/S08show. Catwalking.com.
1
‘It’s more like engineering than anything else. It’s findingthe limits of what you can do when wrapping the body infabric. Everything evolves. Nothing is strictly defined.’
John Galliano
Hau
te c
out
ure
and
tai
lori
ng >
Dra
pin
g o
n th
e m
anne
qui
n >
Sup
po
rt a
nd s
truc
ture
(AVA): Basic Fashion Design
CD0908-096 / 4272 ~ 4th Proof
SIF AVABF3 Chpt6 16.07_120-135.RN_.qxd 9/20/08 10:37 AM Page 121

8
31
5
2
4
(AVA): Basic Fashion Design
CD0708-086 / 3173 ~ 1st Proof
SIF AVABF3 Chpt6 16.07_120-135.RNqxd 7/25/08 12:29 PM Page 122
Draping on the mannequin
Dra
pin
g o
n th
e m
anne
qui
n
Marker pen (1)To mark permanent lines on thegarment.
Scissors and shears (2)Good quality scissors are important.You will need a small pair of scissors(approximately 8–14cm) for trimmingand notching the fabric and a largerpair of shears (approximately14–20cm) to reshape the fabric.
Tailor’s chalk (3)To mark temporary lines on thegarment.
Camera (4)It is very useful to have a camera tohand to document all the stages,especially the end result of eachdrape. To recreate a drape withoutany points of reference is time-consuming and often leads todisappointment.
Fine pins (5)Use sharp, fine, non-rusting pins tofix the fabric pieces together and toanchor the fabric to the mannequin.
TEXTBLACK
(AVA): Basic Fashion Design
CD0808-038 / 4237 ~ 2nd Proof
SIF AVABF3 Chpt6 16.07_120-135.RN_.qxd 8/14/08 9:12 AM Page 122

6
7
122 / 123
(AVA): Basic Fashion Design
CD0708-086 / 3173 ~ 1st Proof
SIF AVABF3 Chpt6 16.07_120-135.RNqxd 7/25/08 12:29 PM Page 123
Modelling tools and equipment
There is a vast range of mannequins available. It is vital beforestarting with the drape to have a close look at the model stand youare working on. Take measurements and analyse the general shapeof the stand to work out if it covers the look and size you are after. In addition, you should have the following tools and equipment tohand before starting to drape.
Mo
del
ling
to
ols
and
eq
uip
men
t >
Gra
in li
ne a
nd d
rap
ing
Tape measure (6)Use a 150cm/60in tape measure.
Style tape (7)Use a narrow (fabric or sticky) tapeto mark style lines as well as thebust-, waist- and hiplines.
Material for draping (8)The best option is to drape in thefinal fabric, but this is also the mostexpensive way. The next best thing is to drape with a material closest inweight, fall and texture to the finalfabric. Popular choices are calico,muslin or jersey. These fabrics areinexpensive and the grain line is easyto recognise. Knitwear and jerseygarments should always be drapedin fabric of a similar character, forexample inexpensive knit or jersey.
TEXTBLACK
(AVA): Basic Fashion Design
CD0808-038 / 4237 ~ 2nd Proof
SIF AVABF3 Chpt6 16.07_120-135.RN_.qxd 8/14/08 9:13 AM Page 123

(AVA): Basic Fashion Design
CD0708-086 / 3173 ~ 1st Proof
SIF AVABF3 Chpt6 16.07_120-135.RNqxd 7/25/08 12:29 PM Page 124
GR
AINLIN
E
GRAIN LINE
GR
AIN
LINE
Dra
pin
g o
n th
e m
anne
qui
n
Draping on the mannequin
Grain line and draping
The direction of the grain line will strongly affect how the fabric hangs on the body. The grain line can be used in three different ways.
You can start draping the fabric on to the mannequin using thestraight grain/lengthwise grain (warp), which runs parallel to theselvedge. This grain line can be used if you want to work close tothe body or for garment styles that do not require any stretch.
When using the crosswise grain (weft), hold the fabric on to themannequin so that the selvedge runs parallel to the bust-, waist- orhiplines. The fabric has a little more give/stretch used on the crossthan with the straight grain. Fabric on the cross might be used forwider pieces or because of the fabric’s pattern/motif or shine.
To gain shape without darts and achieve beautiful soft drapes, use a bias grain. Fold one corner of the fabric in a diagonal to theselvedge, creating a 45-degree fold line. This fold line is the true bias.
Experimenting with all three grain lines to start with will give you agood idea about the fall of a fabric. Also take the time to drapedifferent kinds of fabric, such as woven fabrics and jerseys, on to themannequin and you will instantly see the difference in the drapingeffect. It is essential to understand the qualities of certain fabrics tobe able to use them in the right way and therefore to master the artof draping. A little passion goes a long way.
1 Length grain.
2 Cross grain.
3 Bias grain.
4 Mannequin with drape andmarked information ondrape.
321
TEXTBLACK
(AVA): Basic Fashion Design
CD0808-038 / 4237 ~ 2nd Proof
SIF AVABF3 Chpt6 16.07_120-135.RN_.qxd 8/14/08 9:17 AM Page 124

124 / 125
(AVA): Basic Fashion Design
CD0708-086 / 3173 ~ 1st Proof
SIF AVABF3 Chpt6 16.07_120-135.RNqxd 7/25/08 12:29 PM Page 125
Mo
del
ling
to
ols
and
eq
uip
men
t >
Gra
in li
ne a
nd d
rap
ing
> D
rap
ing
sty
le
Balancing the pattern of a drapedgarment ensures that the garmentwill sit comfortably on the bodywithout swinging to the front, back or either side. Therefore, the sideseam of a garment will hang straightup and down and lie correctly on thebody. A good way to maintain thebalance is by keeping the centrefront and centre back on a perfectgrain, using the length grain runningfrom top to bottom and the crossgrain aligned with the bust line. Tosustain a correct balance betweenthe front and back, make sure thatthe straight grain and the cross grainare positioned at an angle to the side seam.
Before you take your drape off themannequin, make sure that you markall information on to the garment,such as centre front and back, sideseam position, bustline, waistline hipline and so on.
A balanced pattern
BUST LINE
WAIST LINE
CENTRE FRONT
HEM LINE
4
TEXTBLACK
(AVA): Basic Fashion Design
CD0808-038 / 4237 ~ 2nd Proof
SIF AVABF3 Chpt6 16.07_120-135.RN_.qxd 8/14/08 9:17 AM Page 125

(AVA): Basic Fashion Design
CD0708-086 / 3173 ~ 1st Proof
SIF AVABF3 Chpt6 16.07_120-135.RNqxd 7/25/08 12:29 PM Page 126
Dra
pin
g o
n th
e m
anne
qui
n
Draping on the mannequin
Draping style
Garments can be draped on to the mannequin, close to the bodycontour or as an actual shape, structured away from the body.Another approach is loose draping whereby the fabric is anchoredon certain parts of the body, such as the shoulder. The fabric hangsloose and drapes fluently from these points.
1 Body contour methoddeveloped by Tim Williams,shown on the mannequin.
2/3 Transferring the pattern topaper.
TEXTBLACK
1
(AVA): Basic Fashion Design
CD0808-038 / 4237 ~ 2nd Proof
SIF AVABF3 Chpt6 16.07_120-135.RN_.qxd 8/14/08 9:20 AM Page 126

126 / 127
(AVA): Basic Fashion Design
CD0708-086 / 3173 ~ 1st Proof
SIF AVABF3 Chpt6 16.07_120-135.RNqxd 7/25/08 12:29 PM Page 127
Gra
in li
ne a
nd d
rap
ing
> D
rap
ing
sty
le >
Geo
met
ric
shap
es
During the late 1990s Tim Williamsoriginated lingerie and swimwearfor, amongst others, AgentProvocateur and Luella Bartley. Hedeveloped a method that enabledhim to ‘draw’ the seams andedges on the mannequin and fromthis, to quickly and accuratelycreate a pattern. Here he explainshis body contour technique:
‘For the body contour method youare essentially using the dress standas your basic block. The methodvery accurately follows the silhouetteof the dummy you are using, makingcontours around the body to enablea close fitting shape that is thencreated by the seams. I have usedthis method on body suits for the filmindustry, lingerie, swimwear andsportswear. I like working this waybecause you are ‘drawing’ yourseams and working in threedimensions from the start.
After you have generated a patternthat fits the stand, you then usepattern manipulation techniques tograde the pattern up and down
and increase or decrease anyparticular parts of the pattern.Remember that creating a pattern to fit a dummy is relatively easy. Thenext stage, fitting to a person andensuring comfort and movement, isthe most critical application of thistechnique.
When teaching this method I alwaysask the students to make up asample toile as early as possible from the first pattern so that they cangive themselves feedback on howthe dummy shape relates to theirmodel’s shape.
The equipment needed is primarilyyour dress stand. If you wish, youcan use a shop window stand(symmetrical ones only) but you mustfirst cover it in a tight stretch jersey to enable you to place pins. You willalso use a selection of colouredbiros, some paper, non-woveninterfacing and black 6mm stay tape.
The principle is simple: you mark onthe stand where the seams willgenerate the shape. Like drawing,
this simple process relies on the skillof knowing where to place the lines,aesthetically as well as technically.
Always approach this method with aclear idea of what you want in termsof design. Use a swatch of the finalfabric so that you can lay it on thesurface of the dummy to check howmuch shaping you need to make.For example, a very rigid fabric withlittle or no stretch will need a lot ofseams or darts to follow the contourof the dummy/body. A stretch jersey,with Lycra for recovery, will form overthe body more and so will needfewer seams to allow shape on the garment.’
Body contour
TEXTBLACK
3
2
(AVA): Basic Fashion Design
CD0808-038 / 4237 ~ 2nd Proof
SIF AVABF3 Chpt6 16.07_120-135.RN_.qxd 8/14/08 9:20 AM Page 127

(AVA): Basic Fashion Design
CD0708-086 / 3173 ~ 1st Proof
SIF AVABF3 Chpt6 16.07_120-135.RNqxd 7/25/08 12:29 PM Page 128
Dra
pin
g o
n th
e m
anne
qui
n
Draping on the mannequin
The other method for draping on the stand is loose draping. Lengthsof muslin draped loosely on amannequin create shapes by the fallof the fabric. Some loose drapes usean understructure, for instance acorset to which the drape can beattached.
All loosely draped garments need ananchor point, such as the neckline,shoulder, armhole, bust, waist or hip,from which the fabric will drape. It isimportant to get the grain line justright, as it influences the drape of the fabric.
Loose draping
1 Loosely draped t-shirt byAlexander McQueen, S/S05.Catwalking.com.
2/3 Research work and calicosample of a corset dress byEdina Ozary.
1
TEXTBLACK
(AVA): Basic Fashion Design
CD0908-096 / 4272 ~ 3rd Proof
SIF AVABF3 Chpt6 16.07_120-135.RN_.qxd 9/20/08 9:13 AM Page 128
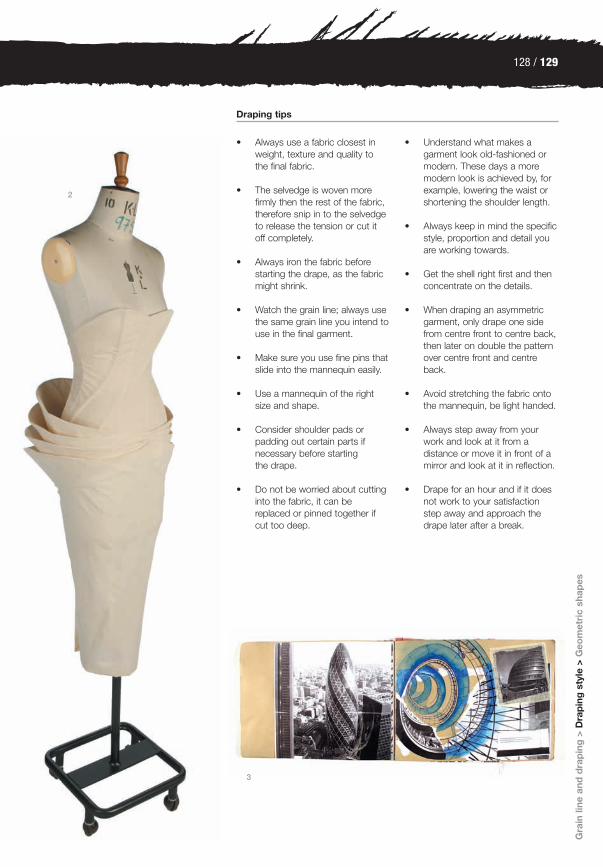
128 / 129
(AVA): Basic Fashion Design
CD0708-086 / 3173 ~ 1st Proof
SIF AVABF3 Chpt6 16.07_120-135.RNqxd 7/25/08 12:29 PM Page 129
Gra
in li
ne a
nd d
rap
ing
> D
rap
ing
sty
le >
Geo
met
ric
shap
es
• Always use a fabric closest inweight, texture and quality to the final fabric.
• The selvedge is woven morefirmly then the rest of the fabric,therefore snip in to the selvedgeto release the tension or cut itoff completely.
• Always iron the fabric beforestarting the drape, as the fabricmight shrink.
• Watch the grain line; always usethe same grain line you intend touse in the final garment.
• Make sure you use fine pins thatslide into the mannequin easily.
• Use a mannequin of the rightsize and shape.
• Consider shoulder pads orpadding out certain parts ifnecessary before starting the drape.
• Do not be worried about cuttinginto the fabric, it can bereplaced or pinned together ifcut too deep.
• Understand what makes agarment look old-fashioned ormodern. These days a moremodern look is achieved by, forexample, lowering the waist orshortening the shoulder length.
• Always keep in mind the specificstyle, proportion and detail youare working towards.
• Get the shell right first and thenconcentrate on the details.
• When draping an asymmetricgarment, only drape one sidefrom centre front to centre back,then later on double the patternover centre front and centreback.
• Avoid stretching the fabric ontothe mannequin, be light handed.
• Always step away from yourwork and look at it from adistance or move it in front of amirror and look at it in reflection.
• Drape for an hour and if it doesnot work to your satisfactionstep away and approach thedrape later after a break.
Draping tips
3
2
TEXTBLACK
(AVA): Basic Fashion Design
CD0808-038 / 4237 ~ 2nd Proof
SIF AVABF3 Chpt6 16.07_120-135.RN_.qxd 8/14/08 9:26 AM Page 129

(AVA): Basic Fashion Design
CD0808-038 / 4237 ~ 2nd Proof
SIF AVABF3 Chpt6 16.07_120-135.RN_.qxd 8/14/08 9:30 AM Page 130
Dra
pin
g o
n th
e m
anne
qui
n
Draping on the mannequin
Geometric shapes
Using simple geometric shapes can be an exciting way of designingon the mannequin. Cut different sized shapes from circles tosquares. They can be draped on their own or stitched together for a different result. Try it out; here are some examples pinned to amannequin.
1 A skirt constructed from asquare.
2 Circle pattern with armholes.
3 Triangle and rectanglepattern cut on the bias.
4 A pattern of two trianglesand one strip of rectanglecut on the bias.
1
2 3 4
TEXTBLACK
(AVA): Basic Fashion Design
CD0808-038 / 4237 ~ 2nd Proof
SIF AVABF3 Chpt6 16.07_120-135.RN_.qxd 8/14/08 9:30 AM Page 130

130 / 131
(AVA): Basic Fashion Design
CD0808-038 / 4237 ~ 2nd Proof
SIF AVABF3 Chpt6 16.07_120-135.RN_.qxd 8/14/08 9:30 AM Page 131
Dra
pin
g s
tyle
>G
eom
etri
c sh
apes
> In
spir
ed d
esig
ners
5 Two versions of PatternMagic, Nakamichi Tomoko,Vol.1 (2005) and Vol.2 (2007).
6 The Art of Fashion Draping,Connie Amaden-Crawford,Fairchild Books (2005).
7 A taster of Pattern Magic.
8 From left to right: PierreCardin: Fifty Years ofFashion and Design,Elisabeth Langle, Thamesand Hudson (2005); RobertoCapucci al teatro farnese,Roberto Capucci, Progrettimuseali (1996); Yeohlee:Work Material Architecture,John S. Major and YeohleeTeng, Peleus Press (2003).
9 Image from Yeohlee: WorkMaterial Architecture.
Books to exploreSome designers like to starttheir ideas with a simpleshape and then build upon it.A lot of well-known designersnow work with geometricalshapes and so did many oftheir famous predecessors.Here are some book ideasfor you to explore.
6
5
8
7
9
TEXTBLACK
(AVA): Basic Fashion Design
CD0808-038 / 4237 ~ 2nd Proof
SIF AVABF3 Chpt6 16.07_120-135.RN_.qxd 8/14/08 9:31 AM Page 131

(AVA): Basic Fashion Design
CD0708-086 / 3173 ~ 1st Proof
SIF AVABF3 Chpt6 16.07_120-135.RNqxd 7/25/08 12:29 PM Page 132
Dra
pin
g o
n th
e m
anne
qui
n
Draping on the mannequin
Peter Pilotto and Christopher DeVos are the designers behind thePeter Pilotto label.
Pilotto was born in 1977 in Austriaand De Vos was born in 1980 inLibya. The design duo met whilestudying at the Royal Academy ofFine Arts in Antwerp, Belgium.
How much designing do you doby using a 3D approach?
Actually very much. We always makesketches first, of how the linesshould run, but the most importantpart happens on the doll and duringthe numerous fittings.
How important is pattern cuttingand garment construction in theway you design?
Pattern cutting is very important forour design. We work a lot with printand it is part of our signature.However the printed pieces haveinteresting pattern constructions too. Both support each other.
How much of your time is spenton the garment development?
In terms of the proportion of timespent on development and designingon paper then I would say 85%actual pattern/garment developmentand 15% illustration of those designson paper.
Inspired designers
1 Top by Peter Pilotto, A/W08.
2 Detail of a top by PeterPilotto, A/W08.
3 Dress by Peter Pilotto,A/W08.
1 2
TEXTBLACK
(AVA): Basic Fashion Design
CD0808-038 / 4237 ~ 2nd Proof
SIF AVABF3 Chpt6 16.07_120-135.RN_.qxd 8/14/08 9:35 AM Page 132

132 / 133
(AVA): Basic Fashion Design
CD0708-086 / 3173 ~ 1st Proof
SIF AVABF3 Chpt6 16.07_120-135.RNqxd 7/25/08 12:29 PM Page 133
GGeeoo
mmeett
rriicc
sshhaapp
eess >>
IInnsspp
iirreedd
ddeess
iiggnnee
rrss
3
TEXTBLACK
(AVA): Basic Fashion Design
CD0808-038 / 4237 ~ 2nd Proof
SIF AVABF3 Chpt6 16.07_120-135.RN_.qxd 8/14/08 9:46 AM Page 133
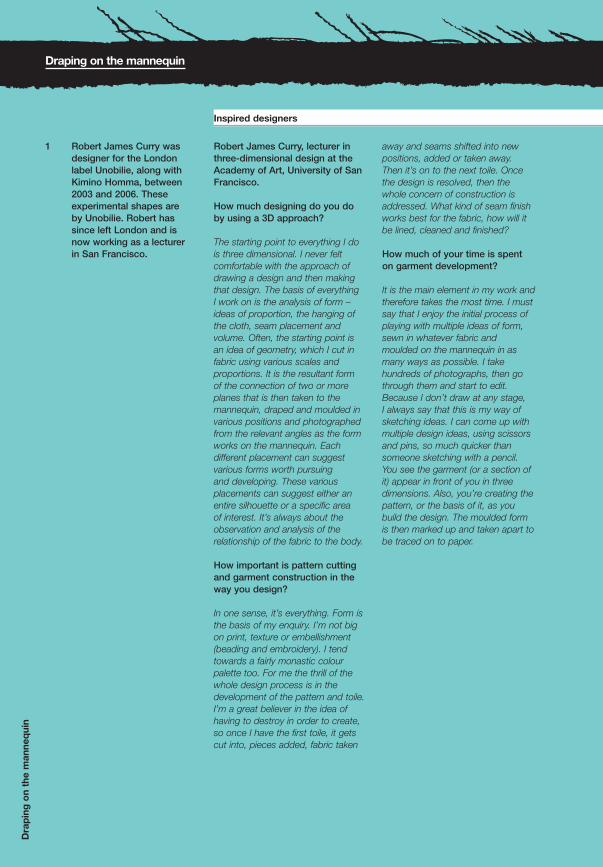
(AVA): Basic Fashion Design
CD0708-086 / 3173 ~ 1st Proof
SIF AVABF3 Chpt6 16.07_120-135.RNqxd 7/25/08 12:29 PM Page 134
Dra
pin
g o
n th
e m
anne
qui
n
Draping on the mannequin
Robert James Curry, lecturer inthree-dimensional design at theAcademy of Art, University of SanFrancisco.
How much designing do you doby using a 3D approach?
The starting point to everything I dois three dimensional. I never feltcomfortable with the approach ofdrawing a design and then makingthat design. The basis of everything I work on is the analysis of form –ideas of proportion, the hanging ofthe cloth, seam placement andvolume. Often, the starting point isan idea of geometry, which I cut infabric using various scales andproportions. It is the resultant form of the connection of two or moreplanes that is then taken to themannequin, draped and moulded invarious positions and photographedfrom the relevant angles as the formworks on the mannequin. Eachdifferent placement can suggestvarious forms worth pursuing and developing. These variousplacements can suggest either anentire silhouette or a specific area of interest. It’s always about theobservation and analysis of therelationship of the fabric to the body.
How important is pattern cuttingand garment construction in theway you design?
In one sense, it’s everything. Form isthe basis of my enquiry. I’m not bigon print, texture or embellishment(beading and embroidery). I tendtowards a fairly monastic colourpalette too. For me the thrill of thewhole design process is in thedevelopment of the pattern and toile.I’m a great believer in the idea ofhaving to destroy in order to create,so once I have the first toile, it getscut into, pieces added, fabric taken
away and seams shifted into newpositions, added or taken away. Then it’s on to the next toile. Oncethe design is resolved, then thewhole concern of construction isaddressed. What kind of seam finishworks best for the fabric, how will itbe lined, cleaned and finished?
How much of your time is spenton garment development?
It is the main element in my work andtherefore takes the most time. I mustsay that I enjoy the initial process ofplaying with multiple ideas of form,sewn in whatever fabric andmoulded on the mannequin in asmany ways as possible. I takehundreds of photographs, then gothrough them and start to edit.Because I don’t draw at any stage, I always say that this is my way ofsketching ideas. I can come up withmultiple design ideas, using scissorsand pins, so much quicker thansomeone sketching with a pencil.You see the garment (or a section ofit) appear in front of you in threedimensions. Also, you’re creating thepattern, or the basis of it, as youbuild the design. The moulded formis then marked up and taken apart tobe traced on to paper.
Inspired designers
1 Robert James Curry wasdesigner for the Londonlabel Unobilie, along withKimino Homma, between2003 and 2006. Theseexperimental shapes are by Unobilie. Robert hassince left London and is now working as a lecturer in San Francisco.
TEXTBLACK
(AVA): Basic Fashion Design
CD0808-038 / 4237 ~ 2nd Proof
SIF AVABF3 Chpt6 16.07_120-135.RN_.qxd 8/14/08 9:38 AM Page 134

134 / 135
(AVA): Basic Fashion Design
CD0808-038 / 4237 ~ 2nd Proof
SIF AVABF3 Chpt6 16.07_120-135.RN_.qxd 8/14/08 9:38 AM Page 135
Geo
met
ric
shap
es >
Insp
ired
des
igne
rs
1
TEXTBLACK
(AVA): Basic Fashion Design
CD0808-038 / 4237 ~ 2nd Proof
SIF AVABF3 Chpt6 16.07_120-135.RN_.qxd 8/14/08 9:47 AM Page 135

(AVA): Basic Fashion DesignCD0808-038 / 4237 ~ 2nd Proof
BF3 Chpt7 16.07RN_136-163_.qxd 8/14/08 10:01 AM Page 136
TEXTBLACK
(AVA): Basic Fashion DesignCD0708-086 / 4272 ~ 1st Proof
BF3 Chpt7 16.07RN_136-163_.qxd 7/25/08 5:24 PM Page 136
136 / 137
(AVA): Basic Fashion DesignCD0908-21 / 3173 ~ 3rd Proof
BF3 Chpt7 16.07RN_136-163_.qxd 9/5/08 5:56 PM Page 137
This chapter offers a brief overview of the history of structuredgarments and introduces you to the materials and techniquesthat can be used to achieve support.
Naturally a fabric will always hang downwards and, dependingon the weight, thickness, sheerness, drape and stretch, willalign to the body shape. In order to obtain a certain structuredlook it is necessary to provide support through other materialsand techniques. Over the years many designers havecomplemented or deformed the body shape with the use of clever cutting and structured foundations.
To get the right structure under a garment is one of the most challenging, but most enjoyable, aspects of garmentconstruction. It is important to look into the historicaldevelopment of dress underpinnings and tailored foundations.There is a lot to learn from the old masters and it is up to thecreative people of today to use their legacy to help createtoday’s and tomorrow’s fashion.
Support and structure
1 Iron pair of stays from theearly seventeenth century.
1
‘The dress must follow the body of a woman, not the body following the shape of the dress.’
Hubert de Givenchy
Dra
pin
g o
n th
e m
anne
qui
n >
Sup
po
rt a
nd s
truc
ture
>Fi
nish
es
TEXTBLACK
(AVA): Basic Fashion DesignCD0908-96 / 4272 ~ 4th Proof
BF3 Chpt7 16.07RN_136-163_.qxd 9/20/08 10:45 AM Page 137

(AVA): Basic Fashion DesignCD0808-038 / 4237 ~ 2nd Proof
BF3 Chpt7 16.07RN_136-163_.qxd 8/14/08 10:17 AM Page 138
TEXTBLACK
Support and structure
History of supported and structured garments
Throughout history, dressmakers and tailors have been working hardto achieve a certain body shape in fashion. Since humans first beganto cover their bodies, supportive and structured garments have beenused and modified. At first these garments would have been purelyfor shelter and protection. As time went on however, clothing beganto be associated with social and/or economic status and the interestin structured garments that would accentuate certain parts of thebody grew and grew.
By 1860 Britain was approaching the peak of its prosperity as themost highly industrialised nation of the world and between the 1860s and the 1880s the Victorian woman’s dress was at its mostcomplex. Dresses were supported with increasingly heavy bonedcorsetry, two or three petticoats, hoops and a bustle.
The crinoline (a stiff petticoat or skirt structure) was out of fashion by1865 and replaced by a more substantial bustle. This was solidlybuilt from horse hair, steel bones and calico.
The social roles of men and women were distinct and thenineteenth-century female was constrained in her lifestyle choices –she was a dutiful wife or daughter. She was assumed to be weak,fragile and light-headed, something that was not difficult to achieve,as the heavy boned corset would physically weaken women. It wasconsidered bad taste for women not to wear a corset and thereforethey would persist in wearing tightly laced corsets, sometimes tosuch an extent that they could not breathe properly.
By the end of the nineteenth century fashion changed and simplelines began to be regarded as more beautiful. Women still wore tightcorsets but the heavy draped bustle was abandoned.
Edwardian women were characterised by an S-bend figure and alarge bosom. A corset had to be worn as the Edwardians valued a full ‘hourglass’ figure.
The Edwardian silhouette was soon questioned by Paul Poiret, thefirst designer to build a fashion empire. He replaced the strongboned corset with a softer version and created flowing forms thatutilised the ‘empire’ line.
Sup
po
rt a
nd s
truc
ture
1800
1830
1855
1870
1895
(AVA): Basic Fashion DesignCD0808-038 / 4237 ~ 2nd Proof
BF3 Chpt7 16.07RN_136-163_.qxd 8/14/08 10:18 AM Page 138
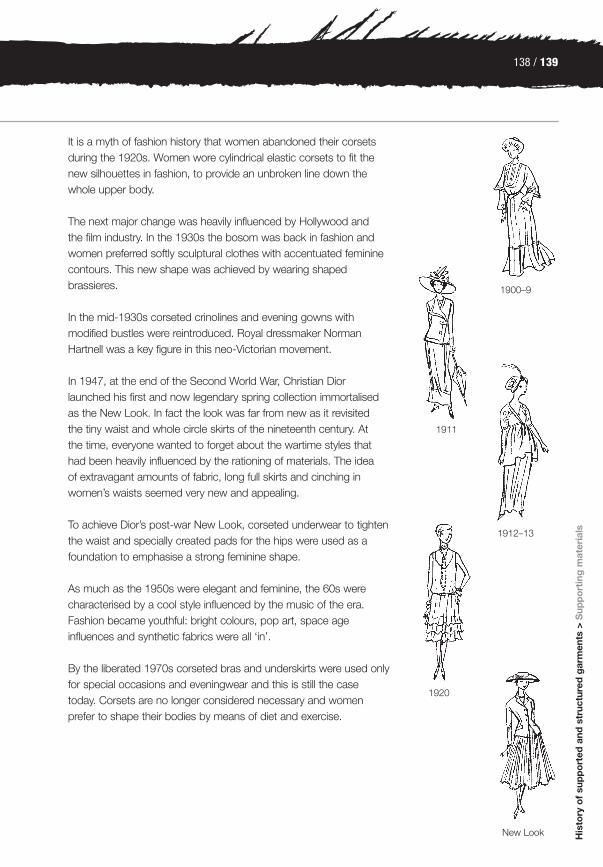
138 / 139
(AVA): Basic Fashion DesignCD0808-038 / 4237 ~ 2nd Proof
BF3 Chpt7 16.07RN_136-163_.qxd 8/14/08 10:18 AM Page 139
TEXTBLACK
His
tory
of
sup
po
rted
and
str
uctu
red
gar
men
ts >
Sup
po
rtin
g m
ater
ials
It is a myth of fashion history that women abandoned their corsetsduring the 1920s. Women wore cylindrical elastic corsets to fit thenew silhouettes in fashion, to provide an unbroken line down thewhole upper body.
The next major change was heavily influenced by Hollywood and the film industry. In the 1930s the bosom was back in fashion andwomen preferred softly sculptural clothes with accentuated femininecontours. This new shape was achieved by wearing shapedbrassieres.
In the mid-1930s corseted crinolines and evening gowns withmodified bustles were reintroduced. Royal dressmaker NormanHartnell was a key figure in this neo-Victorian movement.
In 1947, at the end of the Second World War, Christian Diorlaunched his first and now legendary spring collection immortalisedas the New Look. In fact the look was far from new as it revisited the tiny waist and whole circle skirts of the nineteenth century. At the time, everyone wanted to forget about the wartime styles thathad been heavily influenced by the rationing of materials. The idea of extravagant amounts of fabric, long full skirts and cinching inwomen’s waists seemed very new and appealing.
To achieve Dior’s post-war New Look, corseted underwear to tightenthe waist and specially created pads for the hips were used as afoundation to emphasise a strong feminine shape.
As much as the 1950s were elegant and feminine, the 60s werecharacterised by a cool style influenced by the music of the era.Fashion became youthful: bright colours, pop art, space ageinfluences and synthetic fabrics were all ‘in’.
By the liberated 1970s corseted bras and underskirts were used onlyfor special occasions and eveningwear and this is still the casetoday. Corsets are no longer considered necessary and womenprefer to shape their bodies by means of diet and exercise.
1900–9
1911
1912–13
1920
New Look
(AVA): Basic Fashion DesignCD0808-038 / 4237 ~ 2nd Proof
BF3 Chpt7 16.07RN_136-163_.qxd 8/14/08 10:19 AM Page 139
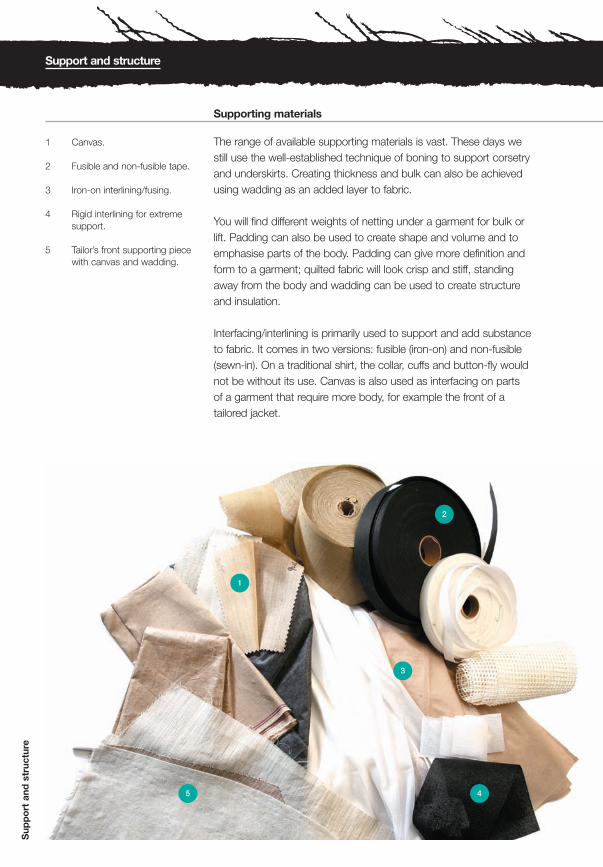
1
2
3
5 4
(AVA): Basic Fashion DesignCD0708-086 / 4272 ~ 1st Proof
BF3 Chpt7 16.07RN_136-163_.qxd 7/25/08 5:23 PM Page 140
TEXTBLACK
Sup
po
rt a
nd s
truc
ture
Support and structure
The range of available supporting materials is vast. These days westill use the well-established technique of boning to support corsetryand underskirts. Creating thickness and bulk can also be achievedusing wadding as an added layer to fabric.
You will find different weights of netting under a garment for bulk orlift. Padding can also be used to create shape and volume and toemphasise parts of the body. Padding can give more definition andform to a garment; quilted fabric will look crisp and stiff, standingaway from the body and wadding can be used to create structureand insulation.
Interfacing/interlining is primarily used to support and add substanceto fabric. It comes in two versions: fusible (iron-on) and non-fusible(sewn-in). On a traditional shirt, the collar, cuffs and button-fly wouldnot be without its use. Canvas is also used as interfacing on parts of a garment that require more body, for example the front of atailored jacket.
Supporting materials
1 Canvas.
2 Fusible and non-fusible tape.
3 Iron-on interlining/fusing.
4 Rigid interlining for extremesupport.
5 Tailor’s front supporting piece with canvas and wadding.
(AVA): Basic Fashion DesignCD0808-038 / 4237 ~ 2nd Proof
BF3 Chpt7 16.07RN_136-163_.qxd 8/14/08 10:26 AM Page 140

6
7
11
8
9
10
140 / 141
(AVA): Basic Fashion DesignCD0808-038 / 4237 ~ 2nd Proof
BF3 Chpt7 16.07RN_136-163_.qxd 8/14/08 11:05 AM Page 141
TEXTBLACK
His
tory
of
sup
po
rted
and
str
uctu
red
gar
men
ts >
Sup
po
rtin
g m
ater
ials
>In
terl
inin
g/f
usin
g
Fabrics such as organza, organdie and cotton muslin all work verywell as backings for other fabrics that require body and stability.
Crinoline and rigid interlining stiffen and add solid support to sculpted garments.
It is interesting to research upholstery and curtain making to getsome ideas of different materials and techniques. Books onequestrian wear, shoe or bag making also have lots of great ideas for inspiration when designing supported and structured garments.
6 Tailored shoulder pads.
7 Shoulder roll.
8 Crinoline.
9 Boning, plastic and metal with plastic coating.
10 Wadding.
11 Raglan shoulder pads.
(AVA): Basic Fashion DesignCD0908-096 / 4272 ~ 3rd Proof
BF3 Chpt7 16.07RN_136-163_.qxd 9/22/08 5:42 PM Page 141

(AVA): Basic Fashion DesignCD0808-038 / 4237 ~ 2nd Proof
BF3 Chpt7 16.07RN_136-163_.qxd 8/14/08 10:30 AM Page 142
TEXTBLACK
Sup
po
rt a
nd s
truc
ture
Support and structure
Net is an open-mesh, transparentfabric. It is one of the oldest fabricsknown, available in a variety ofnatural and man-made fibres, suchas silk, cotton, rayon, polyester andnylon. It can range from very sheer tostiff and heavy. The finer version ofnetting is called tulle and shows ahexagonal pattern.
Netting is mainly used as asupporting material. It can be madeinto a petticoat or underskirt bygathering the netting into one ormore layers of multi-tiered net. The amount used depends on the volume required. Netting can be used as an interfacing andunderlining as it adds crispnesswithout weight. It is also suitable as a base for lace appliqués. Net is notonly used for the inside of garments– some variations give great effectswhen used for the final garment too.
Net has no grain line and has moregive in the width than in the length.Remember this when cutting thefabric in order to get the best use out of it. Care must be taken whenworking with net as it has a tendencyto rip easily. It does not fray, but araw edge may irritate the wearer’sskin. To prevent this, it can befinished with a binding, or a lace or net facing.
1 Givenchy haute couture,A/W03.
2 Design inspiration andillustration of a dress innetting for Givenchy hautecouture, A/W03.
3 Dress made from differentweight netting for Givenchyhaute couture A/W03.
4 Different types of netting.
5 Christian Dior skirt withnetting inlay attached formore volume.
1
2
3
Netting
(AVA): Basic Fashion DesignCD0708-086 / 4272 ~ 1st Proof
BF3 Chpt7 16.07RN_136-163_.qxd 7/25/08 5:24 PM Page 142

142 / 143
(AVA): Basic Fashion DesignCD0808-038 / 4237 ~ 2nd Proof
BF3 Chpt7 16.07RN_136-163_.qxd 8/14/08 10:31 AM Page 143
TEXTBLACK
His
tory
of
sup
po
rted
and
str
uctu
red
gar
men
ts >
Sup
po
rtin
g m
ater
ials
>In
terl
inin
g/f
usin
g
Netting varietiesIllusion is one of the finestnets and is often used asdecoration on garments suchas bridal veils.
Maline is a fine netting withhexagonal patterned holes. Itis used mainly for millinery.
Point d’esprit is a fine netwith dots on a repeatedinterval; it is mostly used fordecoration.
Tulle is also a fine netting andcan be used as is or it canbe starched – such as forballet tutus.4
5
(AVA): Basic Fashion DesignCD0708-086 / 4272 ~ 1st Proof
BF3 Chpt7 16.07RN_136-163_.qxd 7/25/08 5:24 PM Page 143

(AVA): Basic Fashion DesignCD0708-086 / 4272 ~ 1st Proof
BF3 Chpt7 16.07RN_136-163_.qxd 7/25/08 5:23 PM Page 144
TEXTBLACK
Sup
po
rt a
nd s
truc
ture
Support and structure
Quilted fabrics are available in two-layered and three-layeredversions. The two-layered versionhas a top or face layer made ofdecorative fabric. The second layer is wadding, which is made out ofcotton or synthetic fibre batting.Traditionally, both layers are stitched together in a series of seamdiagonals to form a diamond pattern.Two-layered quilting is mostly usedfor lining to insulate a garment.
A three-layered quilted fabric can be single-faced or double-faced.When single-faced the top or facelayer is usually a decorative fabricover a lightweight tricot, lining orgauze backing. In between is a layerof wadding and all three layers aremachine quilted together. Thedouble-faced quilted fabric has two top or face layers and a layer ofwadding sandwiched in between, allof which are machine quilted together.
Some quilting fabrics are thicker thanothers, depending on the separatelayers and thickness of wadding. Aquilted material appears stiff and crispand stands away from the body. Somedesigners create their own quiltedfabrics and stitching technique for aunique, decorative effect.
Quilt is also used as a means ofprotection, such as on motorcyclinggear and other sports garments.
Quilting
1 Marios Schwab, A/W07.
(AVA): Basic Fashion DesignCD0708-086 / 4272 ~ 1st Proof
BF3 Chpt7 16.07RN_136-163_.qxd 7/25/08 5:24 PM Page 144
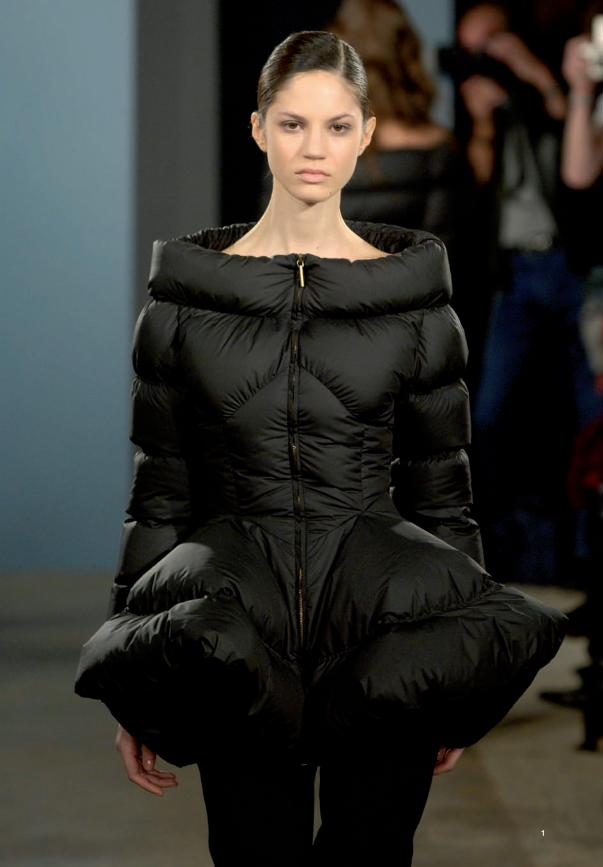
1
(AVA): Basic Fashion DesignCD0708-086 / 4272 ~ 1st Proof
BF3 Chpt7 16.07RN_136-163_.qxd 7/25/08 5:23 PM Page 145
TEXTBLACK
(AVA): Basic Fashion DesignCD0708-086 / 4272 ~ 1st Proof
BF3 Chpt7 16.07RN_136-163_.qxd 7/25/08 5:24 PM Page 145

(AVA): Basic Fashion DesignCD0708-086 / 4272 ~ 1st Proof
BF3 Chpt7 16.07RN_136-163_.qxd 7/25/08 5:23 PM Page 146
TEXTBLACK
Sup
po
rt a
nd s
truc
ture
Padding a garment helps toemphasise parts of the body, to add shape and support or it cansimply make a fashion statement.Padding involves creating a tunnel or shape, which then can be stuffedwith lambswool, polyester fleece,cotton batting or armo wool. Oneearly example of an exceptional useof padding is an evening dress byElsa Schiaparelli (1890–1973), adesigner with a strong interest insurrealism. The dress is a blackskeleton evening gown, with apadded representation of humanbones.
Christian Dior also createdexceptional padded designs with hisNew Look collection. Here, hecreated pads to emphasise the hip
for a stronger feminine look. Moderndesigners Victor & Rolf showed anexperimental way of using paddedsculptured pieces with garmentsdraped on top in their 1998/1999Autumn/Winter collection. Thebeauty of the concept was that allthe clothes could be worn with orwithout the padded pieces.
Padding can also be used inhemlines, to soften and add weight and body to a hem. Theadvantage of a well-padded hem is that it provides protection fromoverpressing and keeps its softnessfor the lifetime of the garment.
Padding
1
Support and structure
1 Evening dress by ElsaSchiaparelli (1890–1973).
2 A tailored shoulder pad (left)and a raglan shoulder pad(right).
3 Raglan and tailored shoulderpads in different shapes andsizes.
(AVA): Basic Fashion DesignCD0708-086 / 4272 ~ 1st Proof
BF3 Chpt7 16.07RN_136-163_.qxd 7/25/08 5:24 PM Page 146

146 / 147
(AVA): Basic Fashion DesignCD0708-086 / 4272 ~ 1st Proof
BF3 Chpt7 16.07RN_136-163_.qxd 7/25/08 5:23 PM Page 147
TEXTBLACK
Feminine tailoringAt the beginning of the1980s a new clothing stylewas born. Famous women inUS television programmes,such as Dallas and Dynasty,as well as influential womenin politics and business madethis style successful. It soonbecame popularly known as‘power dressing’. This isinstantly recognisable by theuse of expensive materialssuch as silk and a powerful,masculine cut. Both men and women wore suits andthe style was intended toconvey an impression ofcompetence and authority.
A shoulder pad is used to define theshoulder area and create a smoothappearance over the shoulder andcollarbone. Pads are used betweenthe garment fabric and the lining, orcovered pads can be used inside thegarment on the shoulder.
Shoulder pads come in differentsizes and shapes. Depending on the sleeve design, there are severalshapes available. For example, thetailored pad is triangular and madefrom layers of wadding sandwichedbetween felt, which is then looselystitched together. The tailored padsused in women’s and men’s jacketsor coats are approximately 1–1.5cmhigh over the shoulder point. Theheight can be customised and layerscan be added to accommodate adifferent look.
Pads are also available for raglansleeves – a raglan sleeve has a muchsofter appearance and therefore thepad is an oval shape. The tailoredpad used in a set-in sleeve is cut offat the end of the shoulder to create astrong and square appearancewhereas the raglan shoulder padruns along the shoulder and into thesleeve for a softer look.
Regular pads can be bought ready-made in haberdashery shops or, for a better result, can be created fromscratch using the pattern of thegarment so that the fit and form are perfect. Designers have toconsider the extra costs when using a bespoke shoulder pad but such costs are likely to becounterbalanced by the creation of a better, perhaps more excitingsilhouette.
During the 1980s and early 1990sshoulder pads were especiallypopular with fashion designers.Garments such as blouses andjersey pieces were available withdetachable pads. Growing up in the 1980s, women would fill theiraccessory drawers with differentsizes and shapes of shoulder padsthat could then be added under allkinds of outfits.
Shoulder pads
2
3
His
tory
of
sup
po
rted
and
str
uctu
red
gar
men
ts >
Sup
po
rtin
g m
ater
ials
>In
terl
inin
g/f
usin
g
(AVA): Basic Fashion DesignCD0808-038 / 4237 ~ 2nd Proof
BF3 Chpt7 16.07RN_136-163_.qxd 8/14/08 10:33 AM Page 147
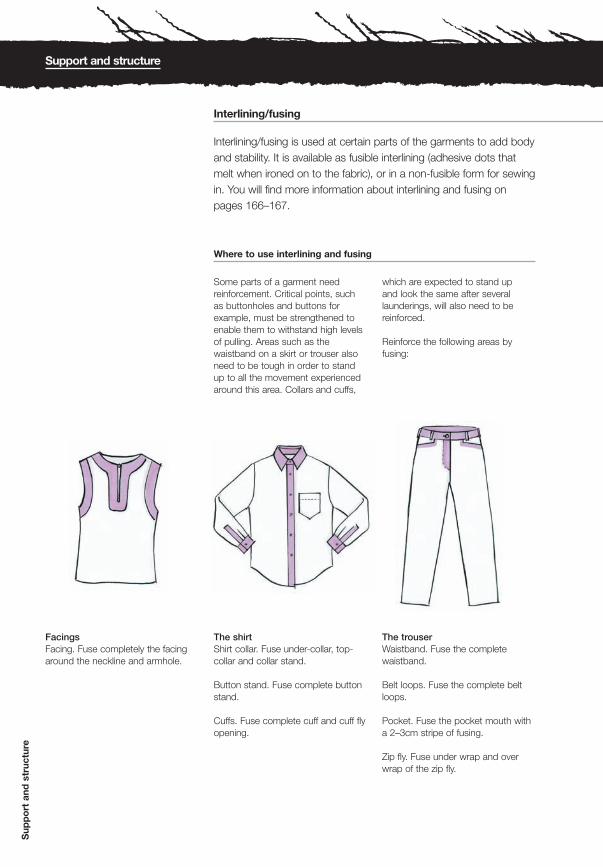
(AVA): Basic Fashion DesignCD0808-038 / 4237 ~ 2nd Proof
BF3 Chpt7 16.07RN_136-163_.qxd 8/14/08 10:55 AM Page 148
TEXTBLACK
Interlining/fusing is used at certain parts of the garments to add bodyand stability. It is available as fusible interlining (adhesive dots thatmelt when ironed on to the fabric), or in a non-fusible form for sewingin. You will find more information about interlining and fusing onpages 166–167.
The trouserWaistband. Fuse the completewaistband.
Belt loops. Fuse the complete beltloops.
Pocket. Fuse the pocket mouth witha 2–3cm stripe of fusing.
Zip fly. Fuse under wrap and overwrap of the zip fly.
Sup
po
rt a
nd s
truc
ture
Support and structure
Interlining/fusing
Some parts of a garment needreinforcement. Critical points, suchas buttonholes and buttons forexample, must be strengthened toenable them to withstand high levelsof pulling. Areas such as thewaistband on a skirt or trouser alsoneed to be tough in order to standup to all the movement experiencedaround this area. Collars and cuffs,
which are expected to stand up and look the same after severallaunderings, will also need to bereinforced.
Reinforce the following areas byfusing:
Where to use interlining and fusing
The shirt Shirt collar. Fuse under-collar, top-collar and collar stand.
Button stand. Fuse complete buttonstand.
Cuffs. Fuse complete cuff and cuff flyopening.
Facings Facing. Fuse completely the facingaround the neckline and armhole.
(AVA): Basic Fashion DesignCD0808-038 / 4237 ~ 2nd Proof
BF3 Chpt7 16.07RN_136-163_.qxd 8/14/08 10:56 AM Page 148
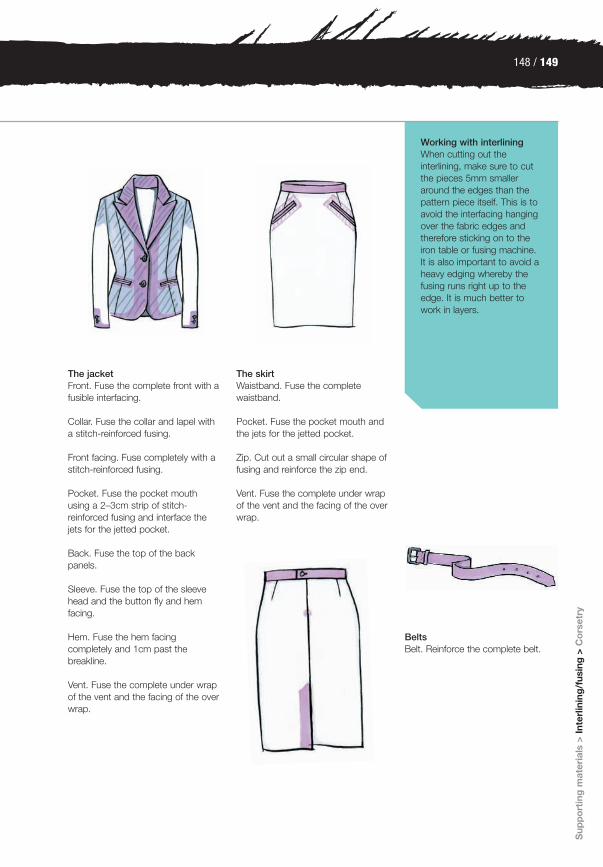
148 / 149
(AVA): Basic Fashion DesignCD0808-038 / 4237 ~ 2nd Proof
BF3 Chpt7 16.07RN_136-163_.qxd 8/14/08 10:56 AM Page 149
TEXTBLACK
The skirt Waistband. Fuse the completewaistband.
Pocket. Fuse the pocket mouth andthe jets for the jetted pocket.
Zip. Cut out a small circular shape offusing and reinforce the zip end.
Vent. Fuse the complete under wrapof the vent and the facing of the overwrap.
Sup
po
rtin
g m
ater
ials
>In
terl
inin
g/f
usin
g >
Co
rset
ry
The jacket Front. Fuse the complete front with afusible interfacing.
Collar. Fuse the collar and lapel witha stitch-reinforced fusing.
Front facing. Fuse completely with astitch-reinforced fusing.
Pocket. Fuse the pocket mouthusing a 2–3cm strip of stitch-reinforced fusing and interface thejets for the jetted pocket.
Back. Fuse the top of the backpanels.
Sleeve. Fuse the top of the sleevehead and the button fly and hemfacing.
Hem. Fuse the hem facingcompletely and 1cm past the breakline.
Vent. Fuse the complete under wrapof the vent and the facing of the overwrap.
Belts Belt. Reinforce the complete belt.
Working with interliningWhen cutting out theinterlining, make sure to cutthe pieces 5mm smalleraround the edges than thepattern piece itself. This is toavoid the interfacing hangingover the fabric edges andtherefore sticking on to theiron table or fusing machine.It is also important to avoid aheavy edging whereby thefusing runs right up to theedge. It is much better towork in layers.
(AVA): Basic Fashion DesignCD0808-038 / 4237 ~ 2nd Proof
BF3 Chpt7 16.07RN_136-163_.qxd 8/14/08 10:56 AM Page 149

(AVA): Basic Fashion DesignCD0808-038 / 4237 ~ 2nd Proof
BF3 Chpt7 16.07RN_136-163_.qxd 8/14/08 10:59 AM Page 150
TEXTBLACK
Sup
po
rt a
nd s
truc
ture
There are three steps to note whenusing a fusible (iron-on) interlining.
Heat. The heat of the iron or fusingmachine has to be compatible withthe adhesive used on the interliningand the fabric.
Pressure. The fusing may notbecome attached to the fabric if thepressure is too low.
Time. Depending on the meltingpoint of the adhesive and thepressure applied to the lining andfabric, the time has to be set right. Iftoo little time is allowed the adhesivemight not melt to the fabric.
Fusible interlinings are available in avariety of types to suit all kinds offabrics. Some have adhesive dotsclose together for more body coverand less movement in the fabric,which adds stability. Some haveadhesive dots further apart, whichcreates softer and more lightweightfusing in order to allow more flexibilityin the fabric.
Thread reinforced interlining is alsoavailable in two versions. The first ishorizontally and vertically reinforcedinterlining, which contains verticalthreads for a high level of stabilityand horizontal threads for additionalflexibility. The other kind of interliningcontains only vertical threads,creating vertical stability. Bothversions have a grain line followingthe thread so this must beconsidered when cutting out.
A range of specialised interlinings isalso available. For example, leatherand fur are sensitive to heat andshould therefore be fused with aninterlining that has an adhesive with alow melting point. Stretch fabrics,jersey and knitwear can be stabilisedin every direction with a jersey fusing.Jersey fusing is also suitable forinterlining loose-woven fabrics inorder to retain the softness andmovement of the fabric.
Fusible interlining
Non-fusible, sewn-in interliningachieves similar effects to the fusiblevariety. For a better result, somefabrics should be underlaid withmaterials such as muslin, organza,organdie or crinoline. For example, afull skirt on an evening gown madefrom silk duchess would benefit froman underlayer of silk organza, whichadds support and permanent shapeto the garment. Similarly, the use ofan open-weave woollen or cottonfabric between the lining and outerfabric in a winter coat would createextra warmth.
Classic shirts make extensive use ofinterlining to support the collar, cuffsand button stand. On a trouser orskirt the waistband, facing, pocketmouth, zip-fly and sometimes thehem are often interlined. The collar,lapel, facing, pocket mouth,fastening, vent and hemline of ajacket or coat would also besupported in this way.
Non-fusible interlining
1
2
3
Support and structure
(AVA): Basic Fashion DesignCD0708-086 / 4272 ~ 1st Proof
BF3 Chpt7 16.07RN_136-163_.qxd 7/25/08 5:24 PM Page 150
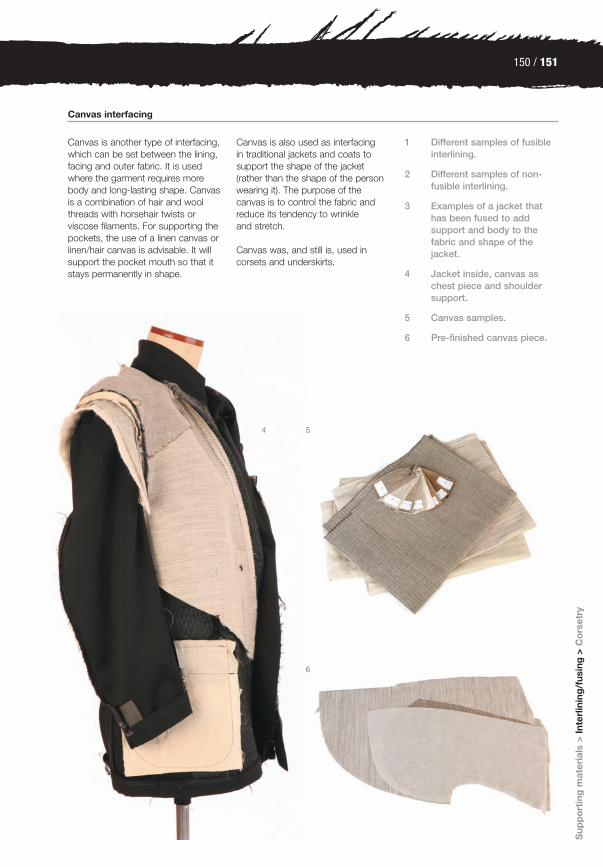
150 / 151
(AVA): Basic Fashion DesignCD0708-086 / 4272 ~ 1st Proof
BF3 Chpt7 16.07RN_136-163_.qxd 7/25/08 5:23 PM Page 151
TEXTBLACK
Canvas is another type of interfacing,which can be set between the lining,facing and outer fabric. It is usedwhere the garment requires morebody and long-lasting shape. Canvasis a combination of hair and woolthreads with horsehair twists orviscose filaments. For supporting thepockets, the use of a linen canvas orlinen/hair canvas is advisable. It willsupport the pocket mouth so that itstays permanently in shape.
Canvas is also used as interfacing in traditional jackets and coats tosupport the shape of the jacket(rather than the shape of the personwearing it). The purpose of thecanvas is to control the fabric andreduce its tendency to wrinkle and stretch.
Canvas was, and still is, used incorsets and underskirts.
Canvas interfacing
1 Different samples of fusibleinterlining.
2 Different samples of non-fusible interlining.
3 Examples of a jacket thathas been fused to addsupport and body to thefabric and shape of thejacket.
4 Jacket inside, canvas aschest piece and shouldersupport.
5 Canvas samples.
6 Pre-finished canvas piece.
54
6
Sup
po
rtin
g m
ater
ials
>In
terl
inin
g/f
usin
g >
Co
rset
ry
(AVA): Basic Fashion DesignCD0808-038 / 4237 ~ 2nd Proof
BF3 Chpt7 16.07RN_136-163_.qxd 8/14/08 10:59 AM Page 151

(AVA): Basic Fashion DesignCD0808-038 / 4237 ~ 2nd Proof
BF3 Chpt7 16.07RN_136-163_.qxd 8/14/08 11:08 AM Page 152
TEXTBLACK
Sup
po
rt a
nd s
truc
ture
Support and structure
A corset is a close-fitting bodice, stiffened with boning. The role of the corset is to shape the body and to impose a fashionablesilhouette upon it. The word was used during the seventeenth andeighteenth centuries but became more common in the nineteenthcentury, replacing the word ‘corps’. Over time, corsetry would beused to control and shape three main areas of a body: the bust,waist and hips. Corsetry often worked against nature and thereforecreated an illusion.
Corsetry
1/2 1940s/50s bras with waistsupport.
3 1930s girdle with support forwaist to hip by elastic fabric.
31
2
(AVA): Basic Fashion DesignCD0708-086 / 4272 ~ 1st Proof
BF3 Chpt7 16.07RN_136-163_.qxd 7/25/08 5:24 PM Page 152
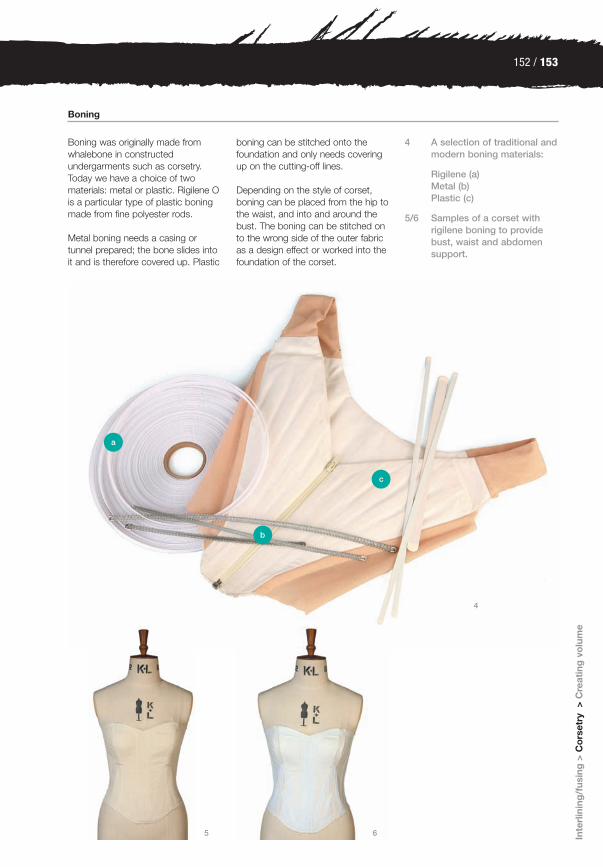
a
b
c
152 / 153
(AVA): Basic Fashion DesignCD0708-086 / 4272 ~ 1st Proof
BF3 Chpt7 16.07RN_136-163_.qxd 7/25/08 5:23 PM Page 153
TEXTBLACK
Inte
rlin
ing
/fus
ing
> C
ors
etry
>
Cre
atin
g v
olu
me
Boning was originally made fromwhalebone in constructedundergarments such as corsetry.Today we have a choice of twomaterials: metal or plastic. Rigilene Ois a particular type of plastic boningmade from fine polyester rods.
Metal boning needs a casing ortunnel prepared; the bone slides intoit and is therefore covered up. Plastic
boning can be stitched onto thefoundation and only needs coveringup on the cutting-off lines.
Depending on the style of corset,boning can be placed from the hip tothe waist, and into and around thebust. The boning can be stitched onto the wrong side of the outer fabricas a design effect or worked into thefoundation of the corset.
4 A selection of traditional andmodern boning materials:
Rigilene (a)Metal (b)Plastic (c)
5/6 Samples of a corset withrigilene boning to providebust, waist and abdomensupport.
5 6
4
Boning
(AVA): Basic Fashion DesignCD0908-096 / 4272 ~ 2nd Proof
BF3 Chpt7 16.07RN_136-163_.qxd 9/20/08 9:34 AM Page 153
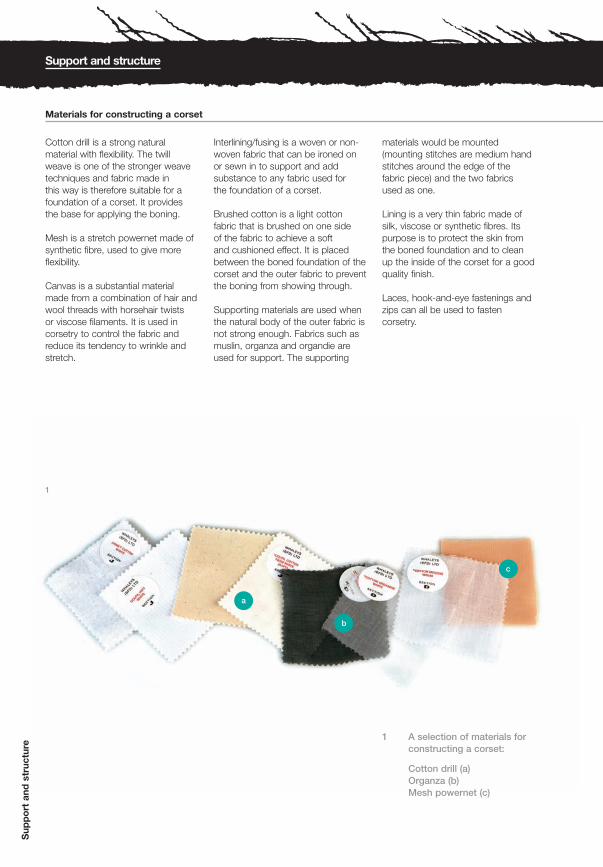
a
b
c
(AVA): Basic Fashion DesignCD0808-038 / 4237 ~ 2nd Proof
BF3 Chpt7 16.07RN_136-163_.qxd 8/14/08 11:11 AM Page 154
TEXTBLACK
Sup
po
rt a
nd s
truc
ture
Support and structure
Cotton drill is a strong naturalmaterial with flexibility. The twillweave is one of the stronger weavetechniques and fabric made in this way is therefore suitable for afoundation of a corset. It provides the base for applying the boning.
Mesh is a stretch powernet made ofsynthetic fibre, used to give moreflexibility.
Canvas is a substantial materialmade from a combination of hair andwool threads with horsehair twists or viscose filaments. It is used incorsetry to control the fabric andreduce its tendency to wrinkle andstretch.
Interlining/fusing is a woven or non-woven fabric that can be ironed onor sewn in to support and addsubstance to any fabric used for the foundation of a corset.
Brushed cotton is a light cottonfabric that is brushed on one side of the fabric to achieve a soft and cushioned effect. It is placedbetween the boned foundation of thecorset and the outer fabric to preventthe boning from showing through.
Supporting materials are used whenthe natural body of the outer fabric isnot strong enough. Fabrics such asmuslin, organza and organdie areused for support. The supporting
materials would be mounted(mounting stitches are medium handstitches around the edge of thefabric piece) and the two fabricsused as one.
Lining is a very thin fabric made ofsilk, viscose or synthetic fibres. Itspurpose is to protect the skin fromthe boned foundation and to cleanup the inside of the corset for a goodquality finish.
Laces, hook-and-eye fastenings andzips can all be used to fastencorsetry.
Materials for constructing a corset
1
1 A selection of materials forconstructing a corset:
Cotton drill (a)Organza (b)Mesh powernet (c)
(AVA): Basic Fashion DesignCD0908-096 / 4272 ~ 3rd Proof
BF3 Chpt7 16.07RN_136-163_.qxd 9/20/08 9:37 AM Page 154

154 / 155
(AVA): Basic Fashion DesignCD0808-038 / 4237 ~ 2nd Proof
BF3 Chpt7 16.07RN_136-163_.qxd 8/14/08 11:11 AM Page 155
TEXTBLACK
Inte
rlin
ing
/fus
ing
> C
ors
etry
>
Cre
atin
g v
olu
me
2 One-piece strapless corsetwith lace fastening in theback and hook-and-eye inthe centre front.
3 Corselet foundation withboning, powernet and innerbelt, fasten by hook-and-eyeunderneath the zip andgarters.
4 The inside of a black velvet corset by VivienneWestwood, with boning inthe centre front and centreback, powernet as sidepanels and straps and a zip fastening.
2
3
4
(AVA): Basic Fashion DesignCD0708-086 / 4272 ~ 1st Proof
BF3 Chpt7 16.07RN_136-163_.qxd 7/25/08 5:24 PM Page 155

1
(AVA): Basic Fashion DesignCD0708-086 / 4272 ~ 1st Proof
BF3 Chpt7 16.07RN_136-163_.qxd 7/25/08 5:24 PM Page 156
TEXTBLACK
Sup
po
rt a
nd s
truc
ture
Support and structure
Adding volume to a garment means changing the dimensions tocreate a larger silhouette. This can be done by adding volumethrough seams and darts or gathers, pleats and drapes, as well as by adding flare. The right fabrics can also help to increase thevolume on a garment.
Creating volume
1 Haute couture dress byChristian Lacroix, S/S08.Catwalking.com.
2 Dress by Julien Macdonald.
Draping techniques can be used toachieve a soft look with addedvolume. A drape is excess fabricfalling down (draping) from oneanchor point or between two ormore anchor points. The cowl drapeis one of the more controlled drapesand works well on tops, sleeves orskirts. Irregular and uncontrolleddrapes can also be created. Theseare done on the mannequin and notas a flat pattern construction.
Volume through drapes
A flared garment is fitted at onepoint, such as the waist, andgradually widens to the other end ofthe garment, such as the hemline ofa skirt. Flare in a garment is usuallyloose swinging and not controlledthrough pleats or gathers. Themethod used to add flare to agarment can be slash and spread orby simply adding on flare to theseams, such as the side seam, andignoring darts such as the waist dart.
Volume through flare
Using the right fabric for a garmentthat has been designed to come offthe body shape is important. If thegarment achieves more volumethrough drapes, gathers or pleats,more fabric needs to be provided.On the other hand, if volume isadded by cut and construction, suchas for a sculptured piece, the rightweight, texture and density of thefabric is essential.
Volume through fabric
(AVA): Basic Fashion DesignCD0908-096 / 4272 ~ 3rd Proof
BF3 Chpt7 16.07RN_136-163_.qxd 9/20/08 9:40 AM Page 156
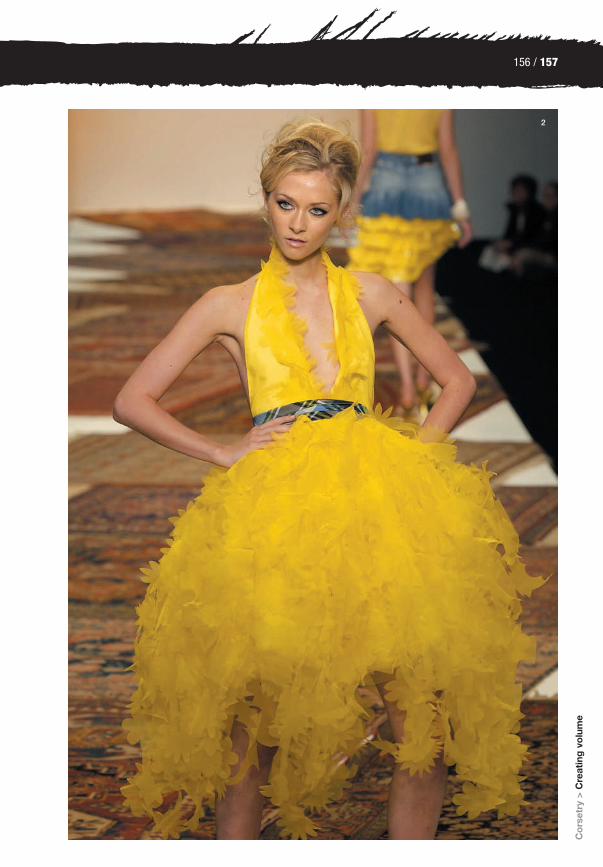
156 / 157
2
(AVA): Basic Fashion DesignCD0808-038 / 4237 ~ 2nd Proof
BF3 Chpt7 16.07RN_136-163_.qxd 8/14/08 11:14 AM Page 157
TEXTBLACK
Co
rset
ry >
Cre
atin
g v
olu
me
(AVA): Basic Fashion DesignCD0808-038 / 4237 ~ 2nd Proof
BF3 Chpt7 16.07RN_136-163_.qxd 8/14/08 11:15 AM Page 157

(AVA): Basic Fashion DesignCD0708-086 / 4272 ~ 1st Proof
BF3 Chpt7 16.07RN_136-163_.qxd 7/25/08 5:24 PM Page 158
TEXTBLACK
Sup
po
rt a
nd s
truc
ture
Support and structure
1
1 Circle-shaped godet.
2 Cutting line on garment.
3 Straighten out the cuttingline to insert the godet.
4 Good side of the garment.
5 Wrong side of the garment.
6 Dress with godets by Julien Macdonald.
Seams and darts are not only usedfor shaping a garment to the body,but also for expanding shape awayfrom the body. Seams can be usedto add in extra pieces of fabric formore volume, such as godets.
A godet is traditionally a triangular-shaped piece of fabric set into aseam or a cut line. Godets are usedto add extra fullness as much asbeing a design feature. The shape ofa godet varies – it can be pointed,round or even squared on the topand constructed as a half-, three-quarter- or full-circle.
The most common use of godets isin skirts, but they can also be addedinto sleeves, trouser bottoms,bodices and so on.
When stitching in a pointed godet,extra care needs to be taken with thetop point. Seam allowance can belimited and the top point can teareasily and fray. It is thereforeadvisable to strengthen the top pointwith interlining before sewing in thegodet. To achieve a pointed top, firststitch one side of the godet from thehemline to the top point and secure,then take it out of the sewingmachine and start again on the otherside, from hemline to the top point.Try this first on a sample piece offabric before attempting to sew thefinal garment.
Creating volume with godets
2
3
4 5
1
(AVA): Basic Fashion DesignCD0808-038 / 4237 ~ 2nd Proof
BF3 Chpt7 16.07RN_136-163_.qxd 8/14/08 11:22 AM Page 158
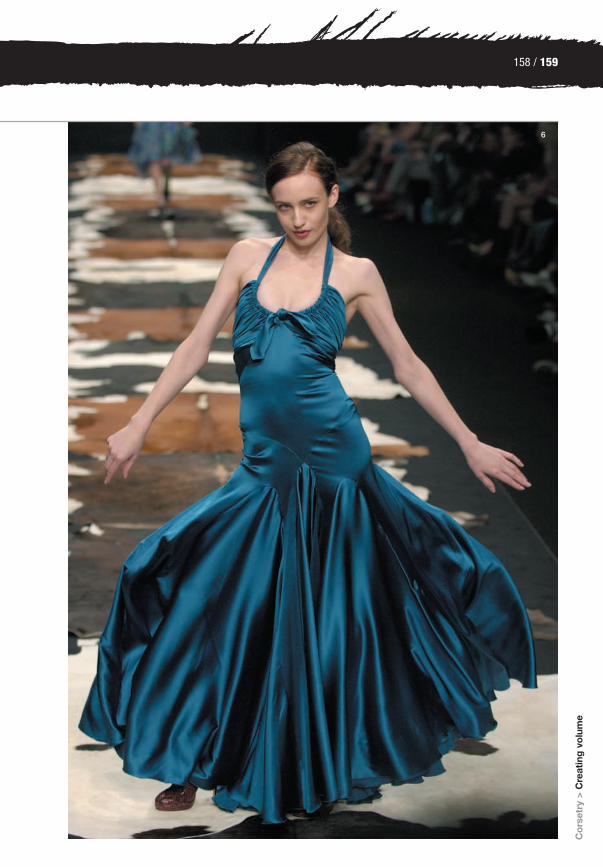
158 / 159
6
(AVA): Basic Fashion DesignCD0708-086 / 4272 ~ 1st Proof
BF3 Chpt7 16.07RN_136-163_.qxd 7/25/08 5:24 PM Page 159
TEXTBLACK
Co
rset
ry >
Cre
atin
g v
olu
me
(AVA): Basic Fashion DesignCD0808-038 / 4237 ~ 2nd Proof
BF3 Chpt7 16.07RN_136-163_.qxd 8/14/08 11:22 AM Page 159

2
(AVA): Basic Fashion DesignCD0808-038 / 4237 ~ 2nd Proof
BF3 Chpt7 16.07RN_136-163_.qxd 8/14/08 11:24 AM Page 160
TEXTBLACK
Sup
po
rt a
nd s
truc
ture
Support and structure
1 Pattern pieces for a six-piece gore skirt.
2 Skirt with gore panels byJulien Macdonald, A/W05.
3 Childrenswear dress by AFI,Anette Fischer with gatherson sleeve head and sidepart of lower waist.
4 Section of pleated skirt byBoudicca haute couture,S/S08. Catwalking.com.
Creating volume with gore panels
The gore skirt has a similar look tothe godet skirt except that there areno inserts. The skirt is wide at thehem and shaped to the waist. A goreskirt can start with four gores, whichhave seams at the sides, centre frontand centre back and there can be asmany as 24 gores in a skirt.Depending on the look, the gores areequally spaced or random. The skirtmay hang straight from the hip orany point below, be flared or pleatedor have an uneven hemline.
1
(AVA): Basic Fashion DesignCD0908-096 / 4272 ~ 3rd Proof
BF3 Chpt7 16.07RN_136-163_.qxd 9/20/08 9:41 AM Page 160
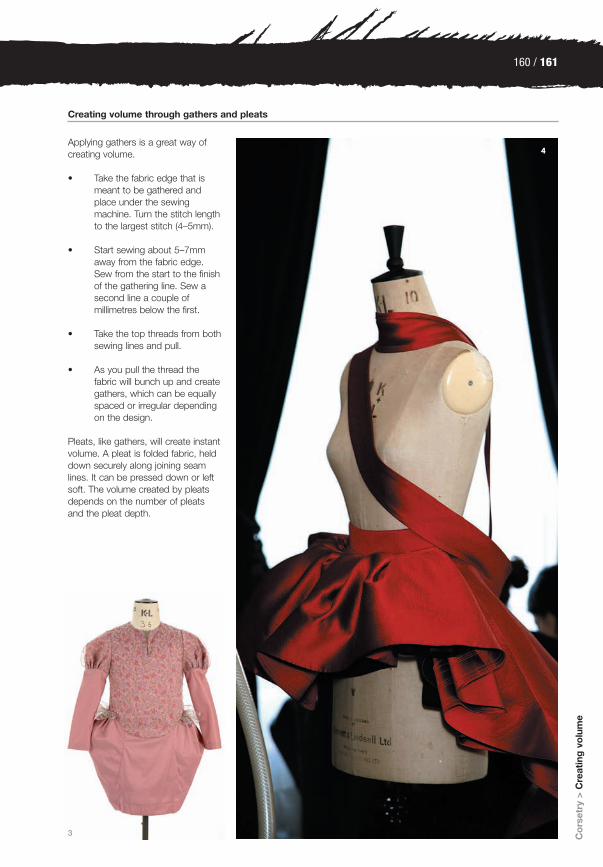
160 / 161
(AVA): Basic Fashion DesignCD0808-038 / 4237 ~ 2nd Proof
BF3 Chpt7 16.07RN_136-163_.qxd 8/14/08 11:25 AM Page 161
TEXTBLACK
4
(AVA): Basic Fashion DesignCD0808-038 / 4237 ~ 2nd Proof
BF3 Chpt7 16.07RN_136-163_.qxd 8/14/08 11:25 AM Page 161
TEXTBLACK
Co
rset
ry >
Cre
atin
g v
olu
me
4Applying gathers is a great way ofcreating volume.
• Take the fabric edge that ismeant to be gathered andplace under the sewingmachine. Turn the stitch lengthto the largest stitch (4–5mm).
• Start sewing about 5–7mmaway from the fabric edge.Sew from the start to the finishof the gathering line. Sew asecond line a couple ofmillimetres below the first.
• Take the top threads from bothsewing lines and pull.
• As you pull the thread thefabric will bunch up and creategathers, which can be equallyspaced or irregular dependingon the design.
Pleats, like gathers, will create instantvolume. A pleat is folded fabric, helddown securely along joining seamlines. It can be pressed down or leftsoft. The volume created by pleatsdepends on the number of pleatsand the pleat depth.
Creating volume through gathers and pleats
3
(AVA): Basic Fashion DesignCD0808-038 / 4237 ~ 2nd Proof
BF3 Chpt7 16.07RN_136-163_.qxd 8/14/08 11:25 AM Page 161
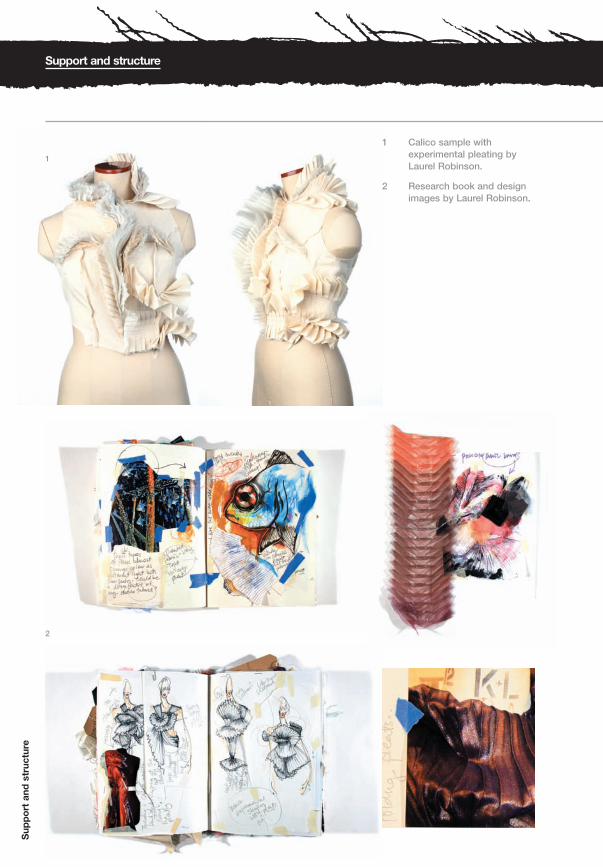
(AVA): Basic Fashion DesignCD0708-086 / 4272 ~ 1st Proof
BF3 Chpt7 16.07RN_136-163_.qxd 7/25/08 5:24 PM Page 162
TEXTBLACK
Sup
po
rt a
nd s
truc
ture
Support and structure
1 Calico sample withexperimental pleating byLaurel Robinson.
2 Research book and designimages by Laurel Robinson.
1
2
(AVA): Basic Fashion DesignCD0708-086 / 4272 ~ 1st Proof
BF3 Chpt7 16.07RN_136-163_.qxd 7/25/08 5:24 PM Page 162

162 / 163
(AVA): Basic Fashion DesignCD0708-086 / 4272 ~ 1st Proof
BF3 Chpt7 16.07RN_136-163_.qxd 7/25/08 5:24 PM Page 163
TEXTBLACK
Co
rset
ry >
Cre
atin
g v
olu
me
1 2
3
4
5
6
7
1 Dress by Puccini withsunray pleated detail under the arm.
2 Crystal pleats.
3 Tree bark pleats.
4 Sunray pleats.
5 Box pleats.
6 Plain knife pleats.
7 Accordian pleats.
(AVA): Basic Fashion DesignCD0808-038 / 4237 ~ 2nd Proof
BF3 Chpt7 16.07RN_136-163_.qxd 8/14/08 11:26 AM Page 163

(AVA): Basic Fashion DesignCD0708-086 / 4272 ~ 1st Proof
BF3 Chpt8 16.07RN_164-175_.qxd 7/25/08 7:04 PM Page 164
TEXTBLACK
(AVA): Basic Fashion DesignCD0708-086 / 4272 ~ 1st Proof
BF3 Chpt8 16.07RN_164-175_.qxd 7/25/08 7:04 PM Page 164

164 / 165
(AVA): Basic Fashion DesignCD0908-21 / 3173 ~ 3rd Proof
BF3 Chpt8 16.07RN_164-175_.qxd 9/5/08 6:02 PM Page 165
TEXTBLACK
This chapter will look at the ‘finishing touch’. A garment can befaced, bound or left with a raw edge. The look and feel of thefinishes can make or break a garment. Good knowledge offastenings, linings, fabric behaviour, traditional techniques andspecific fabric finishings is always necessary. Some designershave created their own finishing techniques to give a uniquelook to their creations. For example, Levi’s uses its back pocketstitching as a trademark.
Finishes
1 Buttons can be used to great decorative effect.
1
‘I'm a very restless person. I'm always doing something.The creative process never stops.’
Oscar de la Renta
Sup
po
rt a
nd s
truc
ture
>Fi
nish
es
(AVA): Basic Fashion DesignCD0808-038 / 4237 ~ 2nd Proof
BF3 Chpt8 16.07RN_164-175_.qxd 8/14/08 12:24 PM Page 165

(AVA): Basic Fashion DesignCD0808-038 / 4237 ~ 2nd Proof
BF3 Chpt8 16.07RN_164-175_.qxd 8/14/08 12:32 PM Page 166
TEXTBLACK
FFiinnii
sshheess
Finishes
Linings
A lining can be added to a garment as an extra layer for severaldifferent purposes – to ensure that the shape of the garment isretained, for warmth or for design and comfort. It will also hide all theinternal construction details. A lining can be worked in and can eithercover the whole of the garment or act as a half lining. It can also bedetachable as a zip-in or button-in version. Usually, jackets, coats,skirts and trousers are lined. The lining fabric can vary from silk andcotton to fur.
It is just as important to design the inside of a garment as theoutside. Attention to detail is vital!
1 Back view of a women’sjacket by Ted Baker (S/S08),shown inside out to exposethe centre back pleat in thelining for comfort.
2 Women’s jacket by TedBaker (S/S08), shown insideout, to expose a lovelyfinish. Lining and frontfacing are sewn togetherwith a pink binding inbetween. The inside chestpocket uses jets and a pinklining triangle to cover upthe button (which fastensthe inside pocket). Thisprevents the button fromrubbing on the garment anddamaging it.
3 Men’s jacket by Ted Baker(S/S08), shown inside out. A men’s jacket offers moreinside pockets than thewomen’s. This particularjacket has a pocket for smallchange with a concealed zipon the bottom right sidebetween the lining andfacing. It also has a chestpocket for a wallet, a pocketfor a mobile phone andadditional spare pockets.
4 Women’s trousers by TedBaker (S/S08), shown insideout to display the half liningfrom waist to knee.
1
3 4
2
(AVA): Basic Fashion DesignCD0808-038 / 4237 ~ 2nd Proof
BF3 Chpt8 16.07RN_164-175_.qxd 8/14/08 12:33 PM Page 166

166 / 167
(AVA): Basic Fashion DesignCD0808-038 / 4237 ~ 2nd Proof
BF3 Chpt8 16.07RN_164-175_.qxd 8/14/08 12:32 PM Page 167
TEXTBLACK
5 Casual jacket by Joseph(S/S08).
6 Joseph jacket shown insideout. It is half lined in thefront, from shoulder to chestlevel. The sleeves are linedfor comfort and this alsomakes it easier to slip intothe jacket. The seams in thefront and the pocket arebound for a neat finish.
7 The back of the Josephjacket is completely lined.
8 This skirt lining hem hasbeen finished with a lacetrimming, showing attentionto detail.
How to pattern cut a jacketliningIn most cases, linings have thesame shape as the garment.
• When cutting the patternfor a jacket, the facings ofthe front are taken off thelining pattern.
• Some tailors add a smallpleat at mid-armhole levelon the lining frontpiece, toaccommodate the forcethat the lining pocketcreates.
• At the hemline of the liningpattern, 1cm is added tothe finished hemline of thegarment in order to createa pleat for extra comfort.
• The ease provided in thesleeve head is taken into apleat or dart in the liningsleeve as the lining fabriccannot be eased into thearmhole as easily as theouter garment fabric.
• The lining needs to coverthe bulk of the seamallowance inside agarment, so 1cm is addedto the side seams of thebody and sleeve.
• A pleat is added forcomfort in the centre backof the lining pattern.
• Sometimes a tough qualityof lining is used for thesleeve (twill weave, forexample), as there is a lotof movement and frictionaround the elbow area.
5 6
7
8
LLiinnii
nnggss
>> Fa
cing
s
(AVA): Basic Fashion DesignCD0808-038 / 4237 ~ 2nd Proof
BF3 Chpt8 16.07RN_164-175_.qxd 8/14/08 12:33 PM Page 167

(AVA): Basic Fashion DesignCD0808-038 / 4237 ~ 2nd Proof
BF3 Chpt8 16.07RN_164-175_.qxd 8/14/08 12:38 PM Page 168
TEXTBLACK
Fini
shes
Finishes
Facings
A facing is used to finish a raw edge on a garment. It is mostly usedwhen the edge is shaped, such as on a neckline. The facing is cut tothe same shape as the edge line, stitched on and folded to the innerside. Facings are commonly added to areas such as the neckline,the armhole on a sleeveless garment, openings at the front and back or a hemline. Usually the facing is cut in the same fabric as the garment and then lightly fused, but it can also be cut in acontrasting fabric or colour to the garment.
1 Dress by Joseph, S/S08,shown inside out to displaya faced neckline andarmhole.
2 The gathered centre part in the front neckline of theJoseph dress is turned intosmall darts at the facing.
2
1
(AVA): Basic Fashion DesignCD0708-086 / 4272 ~ 1st Proof
BF3 Chpt8 16.07RN_164-175_.qxd 7/25/08 7:04 PM Page 168

1 2
3 4
5
8
6
97
168 / 169
(AVA): Basic Fashion DesignCD0808-038 / 4237 ~ 2nd Proof
BF3 Chpt8 16.07RN_164-175_.qxd 8/14/08 12:38 PM Page 169
TEXTBLACK
LLiinnii
nnggss
>>FFaa
cciinngg
ss >>
FFaasstt
eenniinn
ggss
Fastenings
Fastenings are functional items that will keep a garment closed. They can be hidden or made into a focal point. The family offastenings is diverse, ranging from buttons, press studs, Velcro andmagnets to buckles, hook-and-eye fastenings and zips. The choiceof fastenings will dramatically influence the style of a garment. Avoidsettling for your first idea and have a good look at what the markethas to offer.
1 Dress detail by Dolce &Gabbana (S/S08), fastenedin the centre front with ahook-and-eye tape.
2 Hook-and-eye fastening onthe neckline of a dress. It isplaced at the end of the zipto hold the neckline in place.
3 Jacket and dress by Dolce & Gabbana (S/S08). Thejacket is fastened with large poppers.
4 Silk dress by Ted Baker(S/S08), fastened with arouleau loop and button, as well as a concealed zip in the left side seam.
5 Silk top by Hugo Boss(S/S08), fastened in thecentre front by rouleau loops and covered buttons.
6 A dress with a concealed zip in the centre back.
7 A printed top by Ted Baker(S/S08), fastened on theneckline with a stitchedtunnel and a decorativesatin tie.
8 Jacket by Hugo Boss(S/S08), fastened in thecentre front with boundbuttonholes and coveredbuttons.
9 Detail shot of a boundbuttonhole.
(AVA): Basic Fashion DesignCD0808-038 / 4237 ~ 2nd Proof
BF3 Chpt8 16.07RN_164-175_.qxd 8/14/08 12:38 PM Page 169

(AVA): Basic Fashion DesignCD0808-038 / 4237 ~ 2nd Proof
BF3 Chpt8 16.07RN_164-175_.qxd 8/14/08 12:41 PM Page 170
TEXTBLACK
Fini
shes
Finishes
The shirt
Traditionally, a shirt is closed by smallbuttons and buttonholes, althoughthe buttons can come in differentsizes. The buttonhole stand can beworked with visible or concealedbuttonholes. Cuffs are also closedwith a button and buttonhole.
Trousers
For a casual look, use an elasticatedwaistband or a tunnel and cord. Fora tailored solution use a waistbandwith an underwrap, closing with ahook fastening or a button andbuttonhole. The zip can be placedeither in the centre front or the sideseam up to the waistband and iscovered from one side. Trouserwaistbands are usually finished withbelt loops to accommodate a belt.
1
2
(AVA): Basic Fashion DesignCD0808-038 / 4237 ~ 2nd Proof
BF3 Chpt8 16.07RN_164-175_.qxd 8/14/08 12:42 PM Page 170
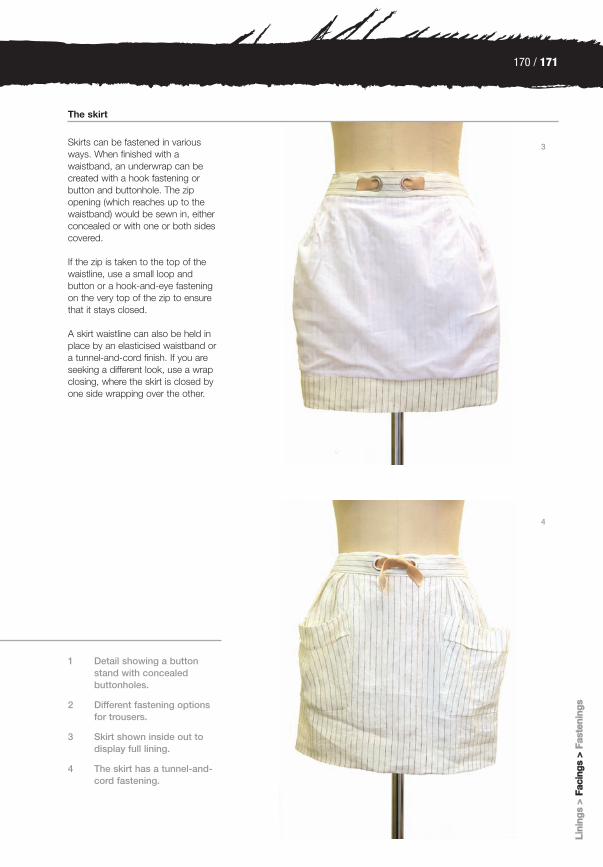
170 / 171
(AVA): Basic Fashion DesignCD0808-038 / 4237 ~ 2nd Proof
BF3 Chpt8 16.07RN_164-175_.qxd 8/14/08 12:41 PM Page 171
TEXTBLACK
The skirt
Skirts can be fastened in variousways. When finished with awaistband, an underwrap can becreated with a hook fastening orbutton and buttonhole. The zipopening (which reaches up to thewaistband) would be sewn in, eitherconcealed or with one or both sidescovered.
If the zip is taken to the top of thewaistline, use a small loop andbutton or a hook-and-eye fasteningon the very top of the zip to ensurethat it stays closed.
A skirt waistline can also be held inplace by an elasticised waistband ora tunnel-and-cord finish. If you areseeking a different look, use a wrapclosing, where the skirt is closed byone side wrapping over the other.
1 Detail showing a buttonstand with concealedbuttonholes.
2 Different fastening optionsfor trousers.
3 Skirt shown inside out todisplay full lining.
4 The skirt has a tunnel-and-cord fastening.
3
4
LLiinnii
nnggss
>>FFaa
cciinngg
ss >>
FFaasstt
eenniinn
ggss
(AVA): Basic Fashion DesignCD0808-038 / 4237 ~ 2nd Proof
BF3 Chpt8 16.07RN_164-175_.qxd 8/14/08 12:42 PM Page 171

1
5
2
6
4
7
3
(AVA): Basic Fashion DesignCD0808-038 / 4237 ~ 2nd Proof
BF3 Chpt8 16.07RN_164-175_.qxd 8/14/08 12:49 PM Page 172
TEXTBLACK
Fini
shes
Finishes
Haberdashery
1 Non-sew poppers or snapfasteners.
2 Skirt hook. This must besewn on by hand.
3 Popper or snap-fastenertape. This can be sewn onby machine.
4 Clips for braces.
5 Popper or snap fastener.This must be sewn on byhand.
6 Buckles and clips.
7 Brace clips.
8 Hook-and-eye fastenings.These must be sewn on by hand.
Fastenings and trimmings such as buttons, zips, elastics, studs and rivets are only some of the endless list of haberdashery.Haberdashery can be functional and/or decorative and will changewith fashion. It can also make or spoil an outfit and control the fit of the garment.
Zips
It is important to choose the right zipfor the garment being constructed.You can get zips with metal teeth),which are on a cotton or synthetictape. These zips are strong and canbe used for medium- to heavyweightfabrics. A lighter option is a syntheticpolyester or nylon zip with plasticteeth, attached to a woven tape. Anopen-ended zip with either metal orplastic teeth can be used for jacketsand coats. Concealed zips haveplastic teeth and are easy to attachto garments.
(AVA): Basic Fashion DesignCD0908-096 / 4272 ~ 3rd Proof
BF3 Chpt8 16.07RN_164-175_.qxd 9/20/08 9:47 AM Page 172

15
8
9
14
13
11
12
10
172 / 173
(AVA): Basic Fashion DesignCD0708-086 / 4272 ~ 1st Proof
BF3 Chpt8 16.07RN_164-175_.qxd 8/14/08 12:50 PM Page 173
TEXTBLACK
172 / 173
9 Pre-finished frog fastenings,one with a Chinese buttonand the other with a hookand loop attached.
10 Decorative zip puller to hookon to the zip head.
11 Hook-and-eye tape. Thiscan be sewn on by machine.
12 Basic buckle that can becovered with fabric.
13 Sew-on leather coat hangers
14 Non-sew hook and bar forskirt and trousers.
15 A selection of zips.
Buttons and closures
Buttons are available in all kinds ofmaterials such as glass, plastic,metal, leather, mother-of-pearl orcovered with fabric. When sewing ona flat button with two to four holes,make sure to include the threadshank. It will be needed on mostfabrics to give space for the
underwrap (buttonhole layer) to lieflat beneath the fastened button.Closures, such as poppers andhooks, can be used as well asbuttons. Here is just a selection of the variety of closures.
(AVA): Basic Fashion DesignCD0708-086 / 4272 ~ 1st Proof
BF3 Chpt8 16.07RN_164-175_.qxd 7/25/08 7:04 PM Page 173

1
(AVA): Basic Fashion DesignCD0808-038 / 4237 ~ 2nd Proof
BF3 Chpt8 16.07RN_164-175_.qxd 8/14/08 12:54 PM Page 174
TEXTBLACK
Fini
shes
Finishes
Decorations and trimmings
Decorations such as beads, sequins,rosettes, bows and trimmings comein and out of fashion. Finding theright balance is not easy andsometimes less is more.
Ready-made decorations can behand sewn or machine stitched on tothe garment. Most of them are greatfun for children’s wear.
Trimmings for all kind of finishes areavailable in haberdashery shops.Some trimmings are elastic and canbe used in lingerie and swimwear oras waistbands and cuffs on casualwear. Others are non-stretch likepetersham ribbon, woven jacquardribbon, silken braids and piping.
Lace trimmings can be exposed orused in the underlayers of an outfit,for example on lingerie. The lacetrimming can be manufactured indifferent ways.
Embroidery can be used todecorate a garment. It is timeconsuming but worthwhile. Manydesigners have the work doneabroad, in order to keep the costsdown. There is a vast choice ofbeads, sequins, pearls and buglebeads on the market, but do notforget that your creative eye mightidentify other materials that can beembroidered on to a garment.
1 Different kinds of decorationand trimmings, ready forapplication.
2 A selection of bugle beads,sequins, pearls and beads indifferent sizes.
3 A box of pearl beads, nylon thread and wire forattaching the beads. Whenembroidering, use a slimhand sewing needle to makesure the needle fits throughthe hole of the bead.
(AVA): Basic Fashion DesignCD0908-096 / 4272 ~ 3rd Proof
BF3 Chpt8 16.07RN_164-175_.qxd 9/20/08 9:49 AM Page 174
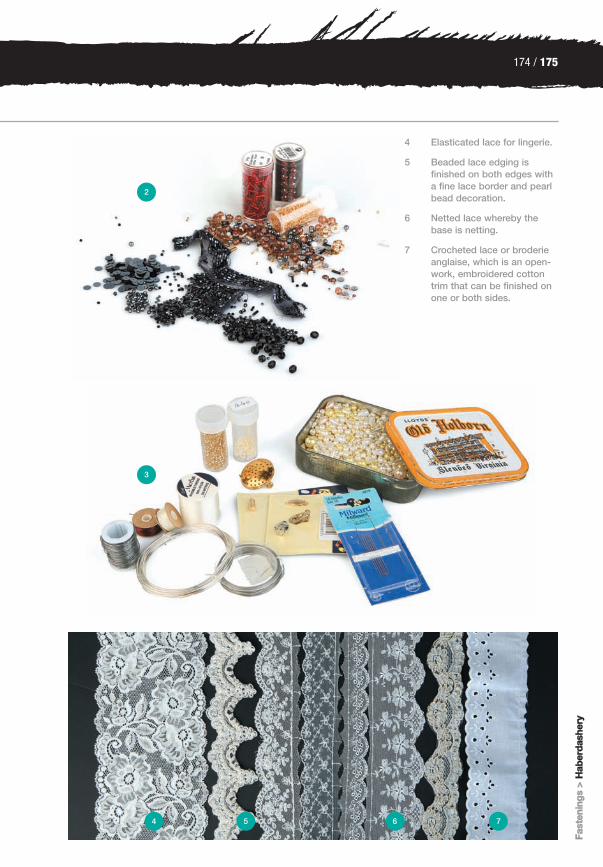
4 5 6 7
2
3
174 / 175
(AVA): Basic Fashion DesignCD0808-038 / 4237 ~ 2nd Proof
BF3 Chpt8 16.07RN_164-175_.qxd 8/14/08 12:54 PM Page 175
TEXTBLACK
4 Elasticated lace for lingerie.
5 Beaded lace edging isfinished on both edges witha fine lace border and pearlbead decoration.
6 Netted lace whereby thebase is netting.
7 Crocheted lace or broderieanglaise, which is an open-work, embroidered cottontrim that can be finished onone or both sides.
FFaasstt
eenniinn
ggss
>> HH
aabbeerr
ddaass
hheerryy
(AVA): Basic Fashion DesignCD0808-038 / 4237 ~ 2nd Proof
BF3 Chpt8 16.07RN_164-175_.qxd 8/14/08 12:55 PM Page 175

(AVA): Basic Fashion Design
CD0708-086 / 3173 ~ 1st Proof
SIF AVABF3 EndMatter 17.07RN_176-192.qxd 7/25/08 2:38 PM Page 176
Co
nstr
ucti
on
Conclusion
This book has taken a journey through all the most importantareas of garment construction, starting with the challengingskill of pattern cutting and moving on to the specialist areasof couture, tailoring and industrial methods, through todraping on the mannequin and a detailed examination of the various tools and techniques that can be employed. Ihope that this will awaken your interest and encourage you to try out some exciting shapes on the pattern table andmannequin stand.
If you intend to develop your garment construction skills, it isa good idea to start a sample box for collecting all kinds ofsamples, such as interlinings, shoulder pads, tapes and soon. Make sure that you label your samples so that you knowwhich shop you found them in. This will be very helpful andshould, in the long run, save you time running around.
It is hoped that this book will encourage you to become morecurious about garment construction and inspire you to startyour own investigations. However, please remember onething: learn the basics first and then start experimenting.Always question what you are doing and why you are doing it.
1
TEXTBLACK
(AVA): Basic Fashion Design
CD0908-096 / 4272 ~ 2nd Proof
SIF AVABF3 EndMatter 17.07RN_176-192_.qxd 9/20/08 10:49 AM Page 176
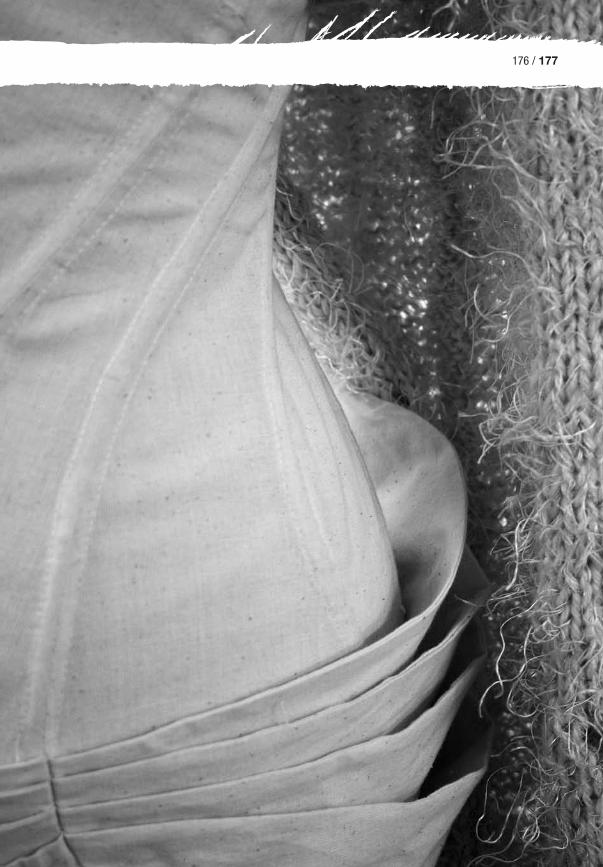
176 / 177
(AVA): Basic Fashion Design
CD0808-038 / 4237 ~ 2nd Proof
SIF AVABF3 EndMatter 17.07RN_176-192_.qxd 8/14/08 1:07 PM Page 177
TEXTBLACK
(AVA): Basic Fashion Design
CD0808-038 / 4237 ~ 2nd Proof
SIF AVABF3 EndMatter 17.07RN_176-192_.qxd 8/14/08 1:08 PM Page 177

(AVA): Basic Fashion Design
CD0708-086 / 3173 ~ 1st Proof
SIF AVABF3 EndMatter 17.07RN_176-192.qxd 7/25/08 2:38 PM Page 178
Co
nstr
ucti
on
Glossary
BattingTangled fibre sheets used in quiltingand stuffing.
BespokeCustom-made, one-off tailoredgarments.
Block (also known as a sloper)A 2D template, constructed usingmeasurements taken from a sizechart or an individual model. It hasno style lines or seam allowance.
BoningMethod for stiffening foundationgarments, like bodices for dresses.The metal or plastic strips calledbones were originally made fromwhalebone.
BrassiereAn undergarment worn by womento mould and support the breasts.Now known as the bra.
BreaklineThe folding line of a collar.
BreechesTrousers worn by men until the latenineteenth century.
BustleNineteenth-century undergarmentthat supported back fullness inskirts, using pads, cushions orarrangement of steel springsattached below the waist at theback of a woman's dress.
CanvasA combination of hair and woolthreads with horsehair twists orviscose filaments. Canvas is usedfor creating body and long-lastingshape in a garment.
CalicoA cheap cotton fabric, available indifferent weights, used for makingtoiles.
ClassicA garment that has a widespreadacceptance over a period of timeand is well known by name (such asthe little black dress, for example).
CourseThe horizontal (crosswise) ridge of aknitted fabric.
CrinolineStiff underskirt from the 1840s and1850s. Stiffness was achieved usingcrinoline fabric, often combined withhorsehair for extra rigidity.
DartsDarts control excess fabric to createshape on a garment when stitchedtogether to a zero or pivotal point.
EaseAn allowance added to a pattern inorder to allow for extra comfort ormovement.
ElastomersA synthetic material that hasextensibility with complete elasticrecovery.
FacingUsed to finish a raw edge of agarment. Facings are mostly usedwhen the edge is shaped, forexample on a neckline.
FeltingThe knotting together of fibres (usingheat or friction and chemicals) toproduce a matted material.
TEXTBLACK
(AVA): Basic Fashion Design
CD0908-096 / 4272 ~ 2nd Proof
SIF AVABF3 EndMatter 17.07RN_176-192_.qxd 9/20/08 11:00 AM Page 178

178 / 179
(AVA): Basic Fashion Design
CD0708-086 / 3173 ~ 1st Proof
SIF AVABF3 EndMatter 17.07RN_176-192_.qxd 8/14/08 1:09 PM Page 179
FinishesProcesses and techniques that are used to manipulate theappearance, characteristics,performance or handle of a fabric.Also the way a garment is neatenedduring construction, for examplewith seams and hems.
GatheringTwo parallel loosely stitched rowsthat are pulled up to create fullnessand a decorative, ruffled effect.
Grain lineA grain line indicates the direction inwhich a pattern piece is laid ontofabric before being cut out.
GirdleLadies’ undergarment created in the1930s in order to shape and holdthe lower part of the female body,occasionally including the legs.
GauzeLoose-woven fabric made of looselytwisted cotton yarns. Garments areoften given a crinkled finish and areworn unpressed.
GradingThe increase or decrease of apattern size.
GodetPanel of fabric inserted into agarment, such as a skirt or dress, to create flare.
GoreFabric panels used in garmentconstruction to add structure and flare.
Haute coutureGarments made to measure for aspecific customer.
Holes and notchesThese indicate where the separatepieces of fabric will be attached toone another.
House modelA male or female model with thebody shape that a designer workstowards.
HoopsA hoop-shaped structure made upof a series of round or oval circles(whalebone, wire, or cane) graduallyincreasing in size from top tobottom.
HorsehairLong, very coarse hair from themane and tail of a horse, used instructural fabrics and wadding.
‘Hourglass’ figureA body shape or garment with a fullbust, pinched-in waist and full,curving hips, representing the shape of an hourglass.
Interlining/fusingThis is a woven or non-woven fabricthat is used between the lining andthe outer fabric of a garment. It iseither fusible (iron-on) or non-fusible(to be sewn-in).
Knife pleatsPressed pleats that go in onedirection.
LapelThe decorative rever of a tailoredjacket.
TEXTBLACK
GGlloo
ssssaarr
yy
(AVA): Basic Fashion Design
CD0908-096 / 4272 ~ 2nd Proof
SIF AVABF3 EndMatter 17.07RN_176-192_.qxd 9/20/08 11:00 AM Page 179

(AVA): Basic Fashion Design
CD0708-086 / 3173 ~ 1st Proof
SIF AVABF3 EndMatter 17.07RN_176-192.qxd 7/25/08 2:38 PM Page 180
Co
nstr
ucti
on
Glossary
LiningFabric used on the inside of agarment to hide the construction. Itextends the garment’s life as it helpsto retain the shape. It also makes thegarment more comfortable to wear.
NapFibre ends that stick out on thesurface of the fabric, making it soft tothe touch. These fabrics, such asvelvet, corduroy, fur and brushedcotton, must be cut in one directiononly.
NettingNet is an open-mesh, transparentfabric. It can range from very sheerto stiff and heavy.
OverlockingQuick and efficient way of stitching,trimming and edging fabrics in asingle action to neaten seams.
Pad stitchingA pad stitch is used to join two layers of materials together, using a diagonal stitch that is staggeredfrom one row to the next.
PaddingExtra bulk in a garment used toemphasise parts of the body as wellas adding shape and support.
PatternInitially developed from a designsketch using a block. A designer orpattern cutter adapts the block tocreate a pattern that includes stylelines, drapes, pleats, pockets andother adjustments.
PetticoatLadies’ undergarment, firstly wornunder the skirt (between thesixteenth and seventeenth centuries)and later worn visibly as an outergarment (between the seventeenthand eighteenth centuries).
Pret-à-porterFrench term used in fashion designto describe ready-to-wear.
QuiltingTraditionally, quilting is made up oflayers that are stitched together in a series of seam diagonals to form a diamond pattern. Quilting fabricsare available in two-layered andthree-layered variations. The two-
layered version has a top or facelayer made of decorative fabric. Thesecond layer is wadding, made outof cotton or synthetic fibre batting.
SampleThe first version of a garment madein the main fabric.
ScyeTechnical name for the sleeve head.
Seam allowanceSeam allowance is added to seamsto allow for stitching. Theseallowances vary depending on thekind of seam used and are usuallyfacing the inside of a garment.
Slash and spreadA method used to add extra volumeand flare.
StandA dressmaking mannequin ordummy.
Superlock A very fine and tight overlockingstitch used on knit and jersey fabrics.It creates a wavy edge.
TEXTBLACK
(AVA): Basic Fashion Design
CD0908-096 / 4272 ~ 3rd Proof
SIF AVABF3 EndMatter 17.07RN_176-192_.qxd 9/20/08 11:00 AM Page 180

180 / 181
(AVA): Basic Fashion Design
CD0808-038 / 4237 ~ 2nd Proof
SIF AVABF3 EndMatter 17.07RN_176-192_.qxd 8/14/08 1:12 PM Page 181
Tanning A process for treating leather byremoving the hair of the skin andrevealing the grain.
Tier Originating from the word attire, a tieris headwear made of gold and gemsworn on pomp occasions since thefifteenth century.
ToileThe fabric sample used for fitting agarment. A toile has no finishedseams, no fastenings such asbuttonholes and buttons and nolining or facings.
Top-stitch To stitch on the right side of thegarment.
TricotWrap-knit fabric made with twodifferent yarns. It has fine wales on the front and crosswise ribs onthe back.
Trunk hoseA short puffy trouser worn by men,with a pair of dense tights in the mid-sixteenth century.
UnderpressingThe action whereby the iron isslipped between the hemming andouter fabric.
WalesThe vertical ridges in a knitted fabric.
WeltThe reinforced or decorative borderof a garment or pocket.
TEXTBLACK
GGlloo
ssssaarr
yy
(AVA): Basic Fashion Design
CD0908-096 / 4272 ~ 3rd Proof
SIF AVABF3 EndMatter 17.07RN_176-192_.qxd 9/20/08 11:00 AM Page 181
(AVA): Basic Fashion Design
CD0708-086 / 3173 ~ 1st Proof
SIF AVABF3 EndMatter 17.07RN_176-192.qxd 7/25/08 2:38 PM Page 182
Co
nstr
ucti
on
Bibliography
Aldrich W (2004)Metric Pattern CuttingWileyBlackwell
Amaden-Crawford C (2005)The Art of Fashion DrapingFairchild Publications, Inc.
Arnold J (1977)Patterns of Fashion:Englishwomen’s Dresses & Their Construction Drama Publishers
Barbier M and Hanif-Boucher S(2005)The Story of LingerieParkstone Press Ltd
Baudot F (1997) Paul PoiretThames and Hudson
Burda (1988)Burda perfekt selbstschneidern(Broschiert)Burda Medien Vertrieb
Cabrera R and Flaherty Meyers P(1983)Classic Tailoring Techniques: A Construction Guide for Men’s WearFairchild Books
Cabrera R and Flaherty Meyers P(1984)Classic Tailoring Techniques: A Construction Guide forWomen’s WearFairchild Books
Capucci R (1996)Roberto Capucci al teatro farneseProgretti museali
Cicolini A (2007)The New English DandyThames and Hudson
Cloake D (2000)Lingerie Design on the Stand:Designs for Underwear &NightwearBatsford
Coates C (1997)Designer Fact FileBritish Fashion Council
Creative Publ. Intl. (2005)Tailoring: A Step-by-step Guide to Creating Beautiful CustomisedGarmentsApple Press
de Rethy E and Perreau J (1999)Monsieur Dior et nous: 1947–1957Anthese
Doyle R (1997)Waisted Efforts: An IllustratedGuide to Corset MakingSartorial Press Publications
Hawkins D (1986)Creative Cutting, Easy Ways toDesign and Make Stylish ClothesEveryman Ltd
Hunnisett J (1991)Period Costume for Stage andScreen: Patterns for Women’sDress: 1500–1800Players Press
Jefferys C (2003)The Complete Book of SewingDK Publishing
TEXTBLACK
(AVA): Basic Fashion Design
CD0908-096 / 4272 ~ 3rd Proof
SIF AVABF3 EndMatter 17.07RN_176-192_.qxd 9/20/08 11:00 AM Page 182

182 / 183
(AVA): Basic Fashion Design
CD0808-038 / 4237 ~ 2nd Proof
SIF AVABF3 EndMatter 17.07RN_176-192_.qxd 8/14/08 1:15 PM Page 183
Jenkyn Jones S (2005)Fashion DesignLaurence King Publishing
Joseph-Armstrong H (2005)Pattern Making for FashionDesignPearson Education
Jouve M-A (1997)BalenciagaThames and Hudson
Kennett F (1985)Secrets of the CouturiersOrbis
Kirke B (1997) Madeleine VionnetChronicle Books
Langle E (2005) Pierre Cardin: Fifty Years ofFashion and DesignThames and Hudson
Major J and Teng Y (2003) Yeohlee: Work, Material,ArchitecturePeleus Press
Mankey C and Tortora P (2003)Fairchild’s Dictionary of FashionFairchild Books
Martin R (1997)Charles JamesThames and Hudson
Mendes V (2004)Black in FashionV&A Publications
Shaeffer C (2001)Couture Sewing TechniquesTaunton Press Inc.
Shaeffer C (2008)Fabric Sewing Guide Krause Publications
Taylor P and Shoben M (2004)Grading for the Fashion Industry:The Theory and PracticeShoben Fashion Media
Tomoko N (2005) Pattern Magic Vol. 1
Tomoko N (2007) Pattern Magic Vol. 2
Sorger R and Udale J (2006)The Fundamentals of FashionDesignAVA Publishing
Wolff C (1996)The Art of Manipulating Fabric KP Books
TEXTBLACK
BBiibb
lliioogg
rraapp
hhyy
(AVA): Basic Fashion Design
CD0908-096 / 4272 ~ 3rd Proof
SIF AVABF3 EndMatter 17.07RN_176-192_.qxd 9/20/08 11:00 AM Page 183
(AVA): Basic Fashion Design
CD0708-086 / 3173 ~ 1st Proof
SIF AVABF3 EndMatter 17.07RN_176-192.qxd 7/25/08 2:38 PM Page 184
Co
nstr
ucti
on
Useful resources
Bata Shoe Museum327 Bloor Street WestTorontoOntarioCanada M5S 1W7
www.batashoemuseum.ca
Costume GalleryLos Angeles County Museum of Art5905 Wilshire BoulevardLos Angeles CA 90036USA
www.lacma.org
Costume InstituteMetropolitan Museum of Art1000 5th Avenue at 82nd StreetNew YorkNY 10028-0198USA
www.metmuseum.org
Galeria del costumeAmici di palazzo pittiPiazza Pitti 150125 FirenzeItaly
www.polomuseale.firenze.it
Kobe Fashion MuseumRokko IslandKobe Japan
www.fashionmuseum.or.jp
Kyoto Costume Institute103, Shichi-joGoshonouchi MinamimachiKyoto 600-8864Japan
www.kci.or.jp
MoMuAntwerp Fashion ModemuseumNationalestraat 282000 AntwerpenBelgium
www.momu.be
Musée de la mode et du costume10 avenue Pierre 1 er de serbie75116 ParisFrance
Musée des Arts decoratifsMusee des Arts de la mode et dutextile107 rue de rivoli75001 ParisFrance
www.ucad.fr
Musée des tissus et des artsdecoratifs de Lyon34 rue de la chariteF-69002 LyonFrance
www.musee-des-tissus.com
Museum at the Fashion Instituteof Technology7th Avenue at 27th StreetNew YorkNY 10001-5992USA
www.fitnyc.edu/museum
TEXTBLACK
(AVA): Basic Fashion Design
CD0908-096 / 4272 ~ 2nd Proof
SIF AVABF3 EndMatter 17.07RN_176-192_.qxd 9/20/08 11:00 AM Page 184

184 / 185
(AVA): Basic Fashion Design
CD0708-086 / 3173 ~ 1st Proof
SIF AVABF3 EndMatter 17.07RN_176-192_.qxd 8/14/08 1:22 PM Page 185
Museum fuer Kunst undGewerbe HamburgSteintorplatz20099 HamburgGermany
www.mkg-hamburg.de
Museum of CostumeAssembly RoomsBennett Street Bath, BA1 2QHUK
www.museumofcostume.co.uk
Museum of Fine Arts, BostonAvenue of the Arts465 Huntington AvenueBostonMassachusetts 02115-5523USA
www.mfa.org
Museum Salvatore FerragamoPalazzo Spini FeroniVia Tornabuoni 2Florence 50123Italy
www.salvatoreferragamo.it
Victoria and Albert Museum (V&A)Cromwell RoadSouth KensingtonLondon SW7 2RLUK
www.vam.ac.uk
Wien MuseumFashion collection with public library(view by appointment)A-1120 ViennaHetzendorferStrasse 79Austria
www.wienmuseum.at
TEXTBLACK
UUssee
ffuull rr
eessoo
uurrccee
ss
(AVA): Basic Fashion Design
CD0908-096 / 4272 ~ 2nd Proof
SIF AVABF3 EndMatter 17.07RN_176-192_.qxd 9/20/08 11:00 AM Page 185
(AVA): Basic Fashion Design
CD0708-086 / 3173 ~ 1st Proof
SIF AVABF3 EndMatter 17.07RN_176-192.qxd 7/25/08 2:38 PM Page 186
Co
nstr
ucti
on
Useful resources
PUBLICATIONS AND MAGAZINES
10
Another Magazine
Arena Homme
Bloom
Collezioni
Dazed and Confused
Drapers Record
Elle
Elle Decoration
ID
In Style
International Textiles
Marie Claire
Marmalade
Numero Magazine
Oyster
Pop
Selvedge
Tank
Textile View
View on Colour
Viewpoint
Visionaire
Vogue
W
WWD Women's Wear Daily
WEBSITES
www.costumes.org
www.fashionoffice.org
www.promostyl.com
www.fashion.about.com
www.style.com
www.fashion-era.com
www.wgsn-edu.com
www.londonfashionweek.co.uk
www.premierevision.fr
www.hintmag.com
www.infomat.com
www.catwalking.com
www.showstudio.com
TEXTBLACK
(AVA): Basic Fashion Design
CD0908-096 / 4272 ~ 3rd Proof
SIF AVABF3 EndMatter 17.07RN_176-192_.qxd 9/20/08 11:00 AM Page 186

186 / 187
(AVA): Basic Fashion Design
CD0708-086 / 3173 ~ 1st Proof
SIF AVABF3 EndMatter 17.07RN_176-192_.qxd 8/14/08 1:25 PM Page 187
FASHION FORECASTING
www.londonapparel.com
www.itbd.co.uk
www.modeinfo.com
www.wgsn-edu.com
www.peclersparis.com
www.edelkoort.com
FASHION TRADE SHOWS
www.premierevision.fr
www.indigosalon.com
www.pittimmagine.com
www.purewomenswear.co.uk
www.magiconline.com
FASHION EMPLOYMENTAGENCIES
www.denza.co.uk
www.smithandpye.com
TEXTBLACK
UUssee
ffuull rr
eessoo
uurrccee
ss
(AVA): Basic Fashion Design
CD0908-096 / 4272 ~ 2nd Proof
SIF AVABF3 EndMatter 17.07RN_176-192_.qxd 9/20/08 11:00 AM Page 187
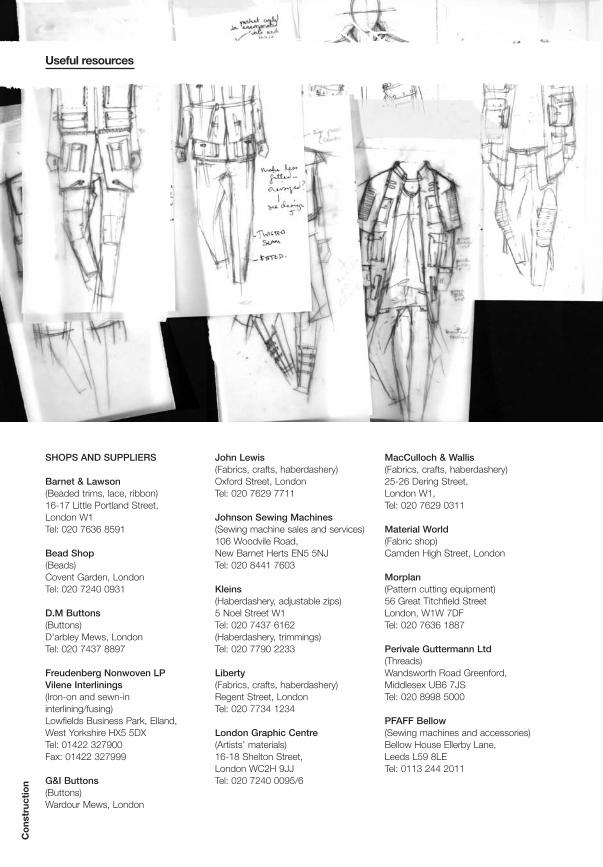
(AVA): Basic Fashion Design
CD0708-086 / 3173 ~ 1st Proof
SIF AVABF3 EndMatter 17.07RN_176-192.qxd 7/25/08 2:38 PM Page 188
Co
nstr
ucti
on
Useful resources
SHOPS AND SUPPLIERS
Barnet & Lawson(Beaded trims, lace, ribbon)16-17 Little Portland Street, London W1Tel: 020 7636 8591
Bead Shop(Beads)Covent Garden, LondonTel: 020 7240 0931
D.M Buttons(Buttons)D'arbley Mews, LondonTel: 020 7437 8897
Freudenberg Nonwoven LPVilene Interlinings(Iron-on and sewn-ininterlining/fusing)Lowfields Business Park, Elland, West Yorkshire HX5 5DXTel: 01422 327900Fax: 01422 327999
G&I Buttons(Buttons)Wardour Mews, London
John Lewis(Fabrics, crafts, haberdashery)Oxford Street, LondonTel: 020 7629 7711
Johnson Sewing Machines(Sewing machine sales and services)106 Woodvile Road,New Barnet Herts EN5 5NJTel: 020 8441 7603
Kleins(Haberdashery, adjustable zips)5 Noel Street W1Tel: 020 7437 6162(Haberdashery, trimmings)Tel: 020 7790 2233
Liberty(Fabrics, crafts, haberdashery)Regent Street, LondonTel: 020 7734 1234
London Graphic Centre(Artists’ materials)16-18 Shelton Street,London WC2H 9JJTel: 020 7240 0095/6
MacCulloch & Wallis(Fabrics, crafts, haberdashery)25-26 Dering Street,London W1,Tel: 020 7629 0311
Material World(Fabric shop)Camden High Street, London
Morplan(Pattern cutting equipment)56 Great Titchfield StreetLondon, W1W 7DFTel: 020 7636 1887
Perivale Guttermann Ltd(Threads)Wandsworth Road Greenford,Middlesex UB6 7JSTel: 020 8998 5000
PFAFF Bellow(Sewing machines and accessories)Bellow House Ellerby Lane,Leeds L59 8LETel: 0113 244 2011
TEXTBLACK
(AVA): Basic Fashion Design
CD0908-096 / 4272 ~ 2nd Proof
SIF AVABF3 EndMatter 17.07RN_176-192_.qxd 9/20/08 11:00 AM Page 188

(AVA): Basic Fashion Design
CD0708-086 / 3173 ~ 1st Proof
SIF AVABF3 EndMatter 17.07RN_176-192.qxd 7/25/08 2:38 PM Page 189
Pongees Ltd(Silks)28 Hoxton Square,London EC1Tel: 020 7739 9130
Riri Swiss(Zips and runners)E.L. Watson 48 Elm GroveOrpington Kent BR6 0ADTel: 01689 836471
R.D. Franks Ltd(Fashion books and magazines)5 Winsley StreetLondon W1W 8HGTel: 020 7636 1244
Soho Silks(Fabrics)24 Berwick Street, London W1Tel: 020 7434 3305
Textile Kings(Fabrics)81 Berwick Street,London W1Tel: 020 7437 7372
The Button Queen(Buttons, buckles, fastenings)19 Marylebone Lane, LondonTel: 020 7935 1505
The Cloth House(Fabrics)98 Berwick Street,London W1Tel: 020 7287 1555
The Dover Book Shop(Fashion books)18 Erlham Street,London WC2H 9LNTel: 020 7836 2111
V.M. Mason(Zips, eyelets, studs, fastenings,jeans buttons)49 Lawrence Road,Tottenham N15 4EJTel: 020 8802 4227
Whaleys Ltd(Fabrics, samples available)Harris Court Gt Horton,Bradford West Yorks BD7 4EQTel: 01274 576718
William Gee(Haberdashery, trimmings)520 Kingsland Road,London E8 4AJ
2000 Tailoring Ltd(Buttonholes, zips in any length,canvas, tailoring tools [call first])51 Lexington Street, London W1R 3LGTel: 020 7439 1633
TEXTBLACK
UUssee
ffuull rr
eessoo
uurrccee
ss
(AVA): Basic Fashion Design
CD0908-096 / 4272 ~ 2nd Proof
SIF AVABF3 EndMatter 17.07RN_176-192_.qxd 9/20/08 11:00 AM Page 189

(AVA): Basic Fashion Design
CD0708-086 / 3173 ~ 1st Proof
SIF AVABF3 EndMatter 17.07RN_176-192.qxd 7/25/08 2:38 PM Page 190
Co
nstr
ucti
on
Canon
Christian Dior
Marios Schwab
Givenchy
Elsa Schiaparelli
Peter Pilotto and Christopher De Vos
Julien Macdonald
Versace
Meadhamkirchhoff
Jean Paul Gaultier
YUKI
Peter Jensen
Donna Karan
Calvin Klein
Prada
Alexander McQueen
Christian Lacroix
Boudicca
Christophe Josse
Yves Saint Laurent
Unobilie
Puccini
Vivienne Westwood
Ted Baker
Paul Smith
Dolce & Gabbana
Hugo Boss
Joseph
Karin Gardkvist
David Bradley
Hanna Jordan
Gary Kaye
Robert James Curry and KiminoHomma
TEXTBLACK
(AVA): Basic Fashion Design
CD0908-096 / 4272 ~ 3rd Proof
SIF AVABF3 EndMatter 17.07RN_176-192_.qxd 9/20/08 11:00 AM Page 190

190 / 191
(AVA): Basic Fashion Design
CD0708-086 / 3173 ~ 1st Proof
SIF AVABF3 EndMatter 17.07RN_176-192_.qxd 8/14/08 1:27 PM Page 191
Tim Williams
Helen Manley
Courtney McWilliams
Edina Ozary
Chloe Belle Rees
Laurel Robinson
Valentina Elizabeth
Anette Fischer
TEXTBLACK
CCaann
oonn
(AVA): Basic Fashion Design
CD0908-096 / 4272 ~ 2nd Proof
SIF AVABF3 EndMatter 17.07RN_176-192_.qxd 9/20/08 11:00 AM Page 191

(AVA): Basic Fashion Design
CD0808-038 / 4272 ~ 2nd Proof
SIF AVABF3 EndMatter 17.07RN_176-192_.qxd 8/22/08 12:52 PM Page 192
TEXTBLACK
Co
nstr
ucti
on
This book is a team effort. A big ‘thank you’ to everyone who shared theirknowledge, talent and time with me: the students of University College for theCreative Arts at Epsom and the students of Middlesex University; the technicalteam of the fashion department in Epsom, in particular Moira Owusu andValentina Elizabeth; the fashion team at Epsom who had to put up with mywork while I was writing this book and especially John Maclachlan for hisencouragement and advice on tailoring.
I was very lucky to have had the help of Peter Close who proofread for me.He was always ready to help at a moment’s notice and Peter, I am trulygrateful for your advice and help, thank you. This book makes a lot moresense due to the technical drawings of Hannah Jordan, who is a trueprofessional and always in good spirit. Many thanks to you for sharing yourtalent and time with me. A huge thank you to Gary Kaye, who supplied theillustrations. His work is perfect for my book and delightful to look at. I amglad I had the cheek to ask him to do some work for me; he is a star. Mostimages have been taken by the talented photographer James Stevens. Thankyou for your patience and good humour. It was a pleasure working with you.
‘Vielen Dank’ Elena Logara-Panteli, you are a busy woman and still youoffered your help, thank you for being there for me. Richard Sorger, you gotme into this in the first place, thank you for believing in me. I would also like tothank the directors of Robert Ashworth Clothing for Men and Women inReigate, Surrey; Elizabeth Long and Richard Clews for letting me use theircollection for a photo shoot.
A big thank you to Martin Edwards, Robert James Curry, Tim Williams, MariosSchwab, Gemma Ainsworth, Linda Gorbeck, Peter Pilotto, Helen Manley,Clover Stones, Courtney McWilliams, Edina Ozary, Laurel Robinson, ChloeBelle Rees, Karin Gardkvist, Andrew Baker, Adrien Perry Roberts, CalumMackenzie, Robert Nicolaas de Niet, Vincenza Galati, Sifer Design and theteam at AVA Publishing, including Rachel Netherwood, Leafy Robinson andBrian Morris.
Apologies to my family and friends who had to do without me for some time!
Liebe Mama und Papa, danke dass Ihr mich bei meinem Treiben immerunterstuetzt habt. Ohne euch waere das alles nicht moeglich gawesen. Ichhab euch lieb.
My lovely Andrew you are simply my rock and you make great cups of tea, Ilove you lots.
Picture credits
Cover image courtesy of Rebekah Train; p 3 courtesy of Catwalking.com; p 6 courtesy of David Bradley; p 10 courtesy of Catwalking.com; p 24 courtesy of Catwalking.com; p 26 courtesy of Karin Gardkvist; p 31 courtesy of Catwalking.com; p 34 courtesy of Catwalking.com; p 37 courtesy of Catwalking.com; p 38 courtesy of Catwalking.com; p 46 courtesy of Courtney McWilliams; p 48 courtesy ofCatwalking.com; p 51 courtesy of Catwalking.com; p 56 courtesy of Catwalking.com; p 58 courtesy of Vivienne Westwood; p 60 courtesy of Getty; p 70 courtesy of Clover Stones; p 74 (1–4) courtesy of Andrew Baker; pp 74–75 (5–8) copyright J. Braithwaite & Co. (SewingMachines Ltd); p 76 courtesy of Martin Edwards; p 78 courtesy of Martin Edwards; p 83 courtesy of Catwalking.com; p 90 courtesy of JulienMacdonald; p 93 courtesy of Catwalking.com; p 94 courtesy of Catwalking.com; pp 96–97 courtesy of Valentina Elizabeth; p 99 courtesy ofJulien Macdonald; p 101 courtesy of Courtney McWilliams; p 103 courtesy of Catwalking.com; p 104 courtesy of Julien Macdonald; p 106courtesy of Yuki; p 108 courtesy of Catwalking.com; p 114 courtesy of Catwalking.com; p 120 courtesy of Catwalking.com; pp 126–127courtesy of Tim Williams; p 128 courtesy of Catwalking.com; p 129 courtesy of Edina Ozary; pp 132–133 courtesy of Peter Pilotto; pp 134–135 courtesy of Robert James Curry and Kimino Homma; p 136 courtesy of Rex Features; p 142 courtesy of Givenchy; p 145 courtesy of Marios Schwab; p 146 courtesy of V&A Images/Victoria & Albert Museum; p 152 courtesy of Caroline Gilbey; p 156 courtesy ofCatwalking.com; p 157 courtesy of Julien Macdonald; p 159 courtesy of Julien Macdonald; p 160 Julien Macdonald; p 161 (4) courtesy ofCatwalking.com; p 162 courtesy of Laurel Robinson; p 163 courtesy of Puccini; pp 166–167 courtesy of Robert Ashworth Collection; pp168–169 courtesy of Robert Ashworth Collection; pp 170–171 courtesy of Robert Ashworth Collection; p 177 courtesy of Edina Ozary; p 182courtesy of Clover Stones; p 186 courtesy of Clover Stones; p 189 courtesy of Clover Stones; pp 12–13, 14, 16, 18–19, 22, 30, 32–33,40–41, 42, 45, 46, 49, 52–53, 54–55, 57, 68–69, 72–73, 74–75, 77, 79, 80–81, 82, 85, 86, 87, 88, 89, 92, 100–101,106–107, 110, 113,115, 116, 117, 118, 119, 122–123, 124, 125, 129, 130, 131, 140, 141, 142, 143, 147, 150, 151, 152, 153, 154, 155, 161 (3), 166, 167,168, 169, 170, 171, 172–173, 174, 175, 187, 188 and 191 courtesy of James Stevens; pp 15, 35,115, 138–139, 148–149, 163 illustrationsby Gary Kaye; pp 17, 20–21, 23, 27, 28–29, 30, 33, 35, 36–37, 39, 40–41, 42–43, 44–45, 46–47, 48, 50, 52–53, 61, 62–63, 66–67, 79,80–81, 83, 84–85, 86–87, 88–89, 92–93, 95, 96, 101, 107, 158, 160 technical drawings by Hanna Jordan and Amy Morgan.
Acknowledgements and picture credits
(AVA): Basic Fashion Design
CD0908-096 / 4272 ~ 4th Proof
SIF AVABF3 EndMatter 17.07RN_176-192_.qxd 9/20/08 11:00 AM Page 192
1st Proof Title: BFD:Developing A Collection Job No: D609-126/4220
SIF AVABK4 Ethics_ 6/29/09 3:07 PM Page 1
BASICS
Working with ethics
FASHION DESIGN
The subject of ethics is not new, yet its consideration within the appliedvisual arts is perhaps not as prevalentas it might be. Our aim here is to help anew generation of students, educatorsand practitioners find a methodology for structuring their thoughts andreflections in this vital area.
AVA Publishing hopes that theseWorking with ethics pages provide a platform for consideration and a flexible method for incorporatingethical concerns in the work ofeducators, students and professionals.Our approach consists of four parts:
The introduction is intended to be an accessible snapshot of theethical landscape, both in terms ofhistorical development and currentdominant themes.
The framework positions ethicalconsideration into four areas and poses questions about the practicalimplications that might occur. Marking your response to each of these questions on the scale shown will allow your reactions to be furtherexplored by comparison.
The case study sets out a real project and then poses some ethicalquestions for further consideration. This is a focus point for a debate ratherthan a critical analysis so there are nopredetermined right or wrong answers.
A selection of further reading
for you to consider areas of particularinterest in more detail.
Develo
pin
g a
Collecti
on
Elinor Renfrew
Colin Renfrew
Publisher’s note
PMS 32721st Proof Title: BFD:Developing A Collection Job No: D609-126/4220
SIF AVABK4 Ethics_ 6/30/09 9:44 AM Page 1

1st Proof Title: BFD:Developing A Collection Job No: D609-126/4220
SIF AVABK4 Ethics_ 6/29/09 3:07 PM Page 2
Ethics is a complex subject thatinterlaces the idea of responsibilities to society with a wide range ofconsiderations relevant to the characterand happiness of the individual. Itconcerns virtues of compassion, loyaltyand strength, but also of confidence,imagination, humour and optimism. As introduced in ancient Greekphilosophy, the fundamental ethicalquestion is what should I do? How we might pursue a ‘good’ life not only raises moral concerns about the effects of our actions on others, but also personal concerns about our own integrity.
In modern times the most importantand controversial questions in ethicshave been the moral ones. Withgrowing populations and improvementsin mobility and communications, it is not surprising that considerationsabout how to structure our livestogether on the planet should come to the forefront. For visual artists and communicators it should be nosurprise that these considerations willenter into the creative process.
Some ethical considerations are already enshrined in government lawsand regulations or in professional codesof conduct. For example, plagiarismand breaches of confidentiality can be punishable offences. Legislation invarious nations makes it unlawful toexclude people with disabilities fromaccessing information or spaces. Thetrade of ivory as a material has beenbanned in many countries. In thesecases, a clear line has been drawnunder what is unacceptable.
Introduction
PMS 32721st Proof Title: BFD:Developing A Collection Job No: D609-126/4220
SIF AVABK4 Ethics_ 6/30/09 9:44 AM Page 2

2nd Proof Title: BFD:Developing A Collection Job No: CD709-03/4220
SIF AVABK4 Ethics_ 7/2/09 10:56 AM Page 171
But most ethical matters remain open to debate, among experts and lay-people alike, and in the end we have to make our own choices on the basis of our own guiding principles or values. Is it more ethical to work for a charity than for a commercialcompany? Is it unethical to createsomething that others find ugly oroffensive?
Specific questions such as these may lead to other questions that aremore abstract. For example, is it onlyeffects on humans (and what they care about) that are important, or might effects on the natural worldrequire attention too?
Is promoting ethical consequencesjustified even when it requires ethicalsacrifices along the way? Must there be a single unifying theory of ethics(such as the Utilitarian thesis that the right course of action is always the one that leads to the greatesthappiness of the greatest number), or might there always be many differentethical values that pull a person invarious directions?
As we enter into ethical debate and engage with these dilemmas on a personal and professional level, we may change our views or change our view of others. The real test thoughis whether, as we reflect on thesematters, we change the way we act aswell as the way we think. Socrates, the‘father’ of philosophy, proposed thatpeople will naturally do ‘good’ if theyknow what is right. But this point mightonly lead us to yet another question:how do we know what is right?
Develo
pin
g a
Collecti
on
PMS 32722nd Proof Title: BFD:Developing A Collection Job No: CD709-03/4220
SIF AVABK4 Ethics_ 7/2/09 10:56 AM Page 171

1st Proof Title: BFD:Developing A Collection Job No: D609-126/4220
SIF AVABK4 Ethics_ 6/29/09 3:07 PM Page 4
A framework for ethics
Your client
What are your terms?
Working relationships are central to whether ethics can be embeddedinto a project and your conduct on a day-to-day basis is a demonstrationof your professional ethics. Thedecision with the biggest impact iswhom you choose to work with in the first place. Cigarette companies orarms traders are often-cited exampleswhen talking about where a line mightbe drawn, but rarely are real situationsso extreme. At what point might youturn down a project on ethical groundsand how much does the reality ofhaving to earn a living effect your ability to choose?
Using the scale, where would you place a project? How does thiscompare to your personal ethical level?
You
What are your ethical beliefs?
Central to everything you do will be your attitude to people and issuesaround you. For some people theirethics are an active part of thedecisions they make everyday as aconsumer, a voter or a workingprofessional. Others may think aboutethics very little and yet this does notautomatically make them unethical.Personal beliefs, lifestyle, politics,nationality, religion, gender, class or education can all influence yourethical viewpoint.
Using the scale, where would you place yourself? What do you take into account to make your decision?Compare results with your friends or colleagues.
01 02 03 04 05 06 07 08 09 10 01 02 03 04 05 06 07 08 09 10
PMS 32721st Proof Title: BFD:Developing A Collection Job No: D609-126/4220
SIF AVABK4 Ethics_ 6/30/09 9:44 AM Page 4
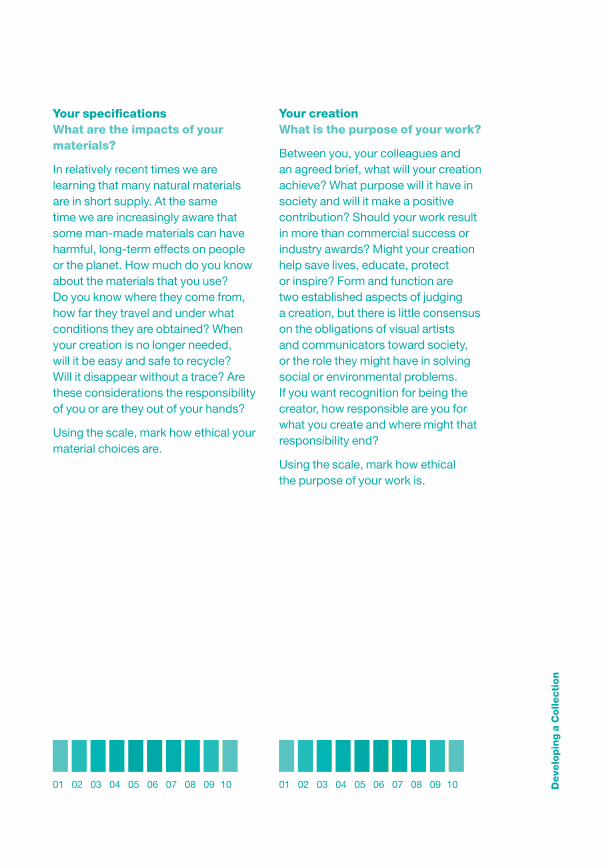
2nd Proof Title: BFD:Developing A Collection Job No: CD709-03/4220
SIF AVABK4 Ethics_ 7/2/09 10:57 AM Page 173
Develo
pin
g a
Collecti
on
Your specifications
What are the impacts of your
materials?
In relatively recent times we are learning that many natural materials are in short supply. At the same time we are increasingly aware thatsome man-made materials can haveharmful, long-term effects on people or the planet. How much do you knowabout the materials that you use? Do you know where they come from,how far they travel and under whatconditions they are obtained? Whenyour creation is no longer needed, will it be easy and safe to recycle? Will it disappear without a trace? Arethese considerations the responsibilityof you or are they out of your hands?
Using the scale, mark how ethical yourmaterial choices are.
Your creation
What is the purpose of your work?
Between you, your colleagues and an agreed brief, what will your creationachieve? What purpose will it have insociety and will it make a positivecontribution? Should your work result in more than commercial success orindustry awards? Might your creationhelp save lives, educate, protect or inspire? Form and function are two established aspects of judging a creation, but there is little consensuson the obligations of visual artists and communicators toward society, or the role they might have in solvingsocial or environmental problems. If you want recognition for being thecreator, how responsible are you forwhat you create and where might thatresponsibility end?
Using the scale, mark how ethical the purpose of your work is.
01 02 03 04 05 06 07 08 09 10 01 02 03 04 05 06 07 08 09 10
PMS 32722nd Proof Title: BFD:Developing A Collection Job No: CD709-03/4220
SIF AVABK4 Ethics_ 7/2/09 10:56 AM Page 173

1st Proof Title: BFD:Developing A Collection Job No: D609-126/4220
SIF AVABK4 Ethics_ 6/29/09 3:07 PM Page 6
Traditional Hawaiian feather capes(called ̀ Ahu’ula) were made fromthousands of tiny bird feathers and were an essential part of aristocraticregalia worn by men. Initially they werered (`Ahu’ula literally means ‘red garment’)but yellow feathers, being especiallyrare, became more highly prized andwere introduced to the patterning.
The significance of the patterns, as well as their exact age or place of manufacture is largely unknown,despite great interest in theirprovenance in more recent times.Hawaii was visited in 1778 by Englishexplorer Captain James Cook andfeather capes were amongst theobjects taken back to Britain.
The basic patterns are thought to reflect gods or ancestral spirits, familyconnections and an individual’s rank orposition in society. No two ̀ Ahu’ula arealike (except for late nineteenth-centuryreplicas). Most capes were designed forspecific individuals and it is said that noevil thoughts should cross the person'smind when making the capes; insteadtheir focus should be on the future love,long life, good health, honour and successof the wearer that the cape is for.
The base layer for these garments is afibre net, with the surface made up ofbundles of feathers tied to the net inoverlapping rows. Red feathers camefrom the 'i'iwi or the 'apapane. Yellowfeathers came from a black bird withyellow tufts under each wing called'oo'oo, or a mamo with yellow feathers above and below the tail.
One aspect of fashion design thatraises an ethical dilemma is the way that clothes production has changed in terms of the speed of delivery ofproducts and the now internationalchain of suppliers. 'Fast fashion' givesshoppers the latest styles sometimesjust weeks after they first appeared onthe catwalk, at prices that mean theycan wear an outfit once or twice andthen replace it. Due to lower labourcosts in poorer countries, the vastmajority of Western clothes are made in Asia, Africa, South America or Eastern Europe in potentially hostileand sometimes inhumane workingconditions. It can be common for onepiece of clothing to be made up ofcomponents from five or morecountries, often thousands of milesaway, before they end up in the highstreet store. How much responsibilityshould a fashion designer have in thissituation if manufacture is controlled by retailers and demand is driven byconsumers? Even if designers wish tominimise the social impact of fashion,what might they most usefully do?
Case study Feather Capes
PMS 32721st Proof Title: BFD:Developing A Collection Job No: D609-126/4220
SIF AVABK4 Ethics_ 6/30/09 9:44 AM Page 6

2nd Proof Title: BFD:Developing A Collection Job No: CD709-03/4220
SIF AVABK4 Ethics_ 7/2/09 10:57 AM Page 175
“Fashion is a form of ugliness
so intolerable that we have to
alter it every six months.”
Oscar Wilde
Thousands of feathers were used to make a single cape for a high chief(the feather cape of King Kamehamehathe Great is said to have been madefrom the feathers of around 80,000birds). Only the highest ranking chiefshad the resources to acquire enoughfeathers for a full length cape, whereasmost chiefs wore shorter ones whichcame to the elbow.
The demand for specific feathers was so great that they acquiredcommercial value and provided a full time job for professional feather-hunters. These fowlers studied the birds and caught them with nets or with bird-lime smeared on branches. As both the 'i'iwi and apapane werecovered with red feathers, the birdswere killed and skinned. Other birdswere captured at the beginning of themoulting season, when the yellowdisplay feathers were loose and easilyremoved without damaging the birds.
The royal family of Hawaii eventuallyabandoned the feather cape as theregalia of rank in favour of military andnaval uniforms decorated with braidand gold. Feather capes were givenaway or sold for other items. The 'oo'oo
and the mamo became extinct throughthe destruction of their forest feeding-grounds and imported bird-diseases.Silver and gold displaced red andyellow feathers as traded currency and the manufacture of feather capesbecame a largely forgotten art.
Develo
pin
g a
Collecti
on
Is it more ethical to create
clothing for the masses rather
than for a few high-ranking
individuals?
Is it unethical to kill animals
to make garments?
Would you design and make
a feather cape?
PMS 32722nd Proof Title: BFD:Developing A Collection Job No: CD709-03/4220
SIF AVABK4 Ethics_ 7/2/09 10:56 AM Page 175
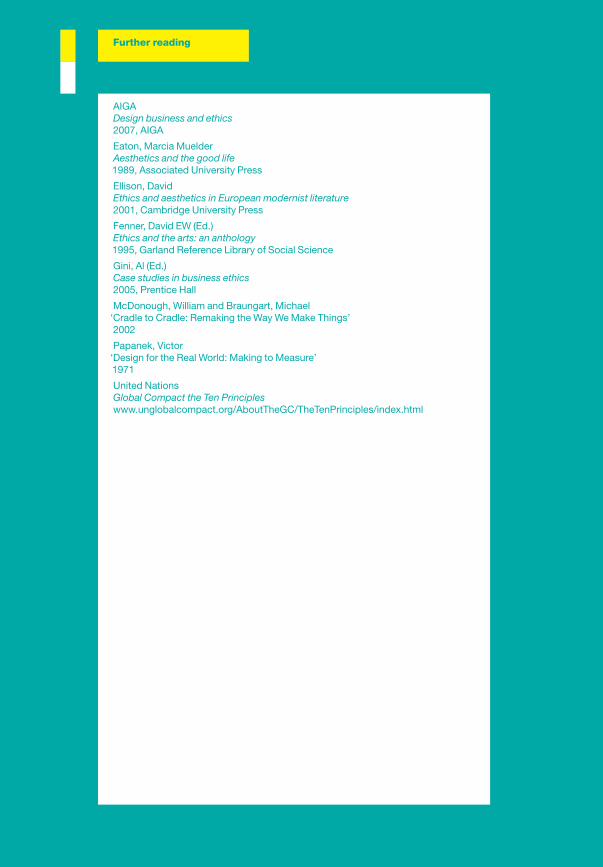
1st Proof Title: BFD:Developing A Collection Job No: D609-126/4220
SIF AVABK4 Ethics_ 6/29/09 3:07 PM Page 8
Further reading
AIGA Design business and ethics
2007, AIGA
Eaton, Marcia MuelderAesthetics and the good life
1989, Associated University Press
Ellison, David Ethics and aesthetics in European modernist literature
2001, Cambridge University Press
Fenner, David EW (Ed.) Ethics and the arts: an anthology
1995, Garland Reference Library of Social Science
Gini, Al (Ed.) Case studies in business ethics
2005, Prentice Hall
McDonough, William and Braungart, Michael ‘Cradle to Cradle: Remaking the Way We Make Things’ 2002
Papanek, Victor ‘Design for the Real World: Making to Measure’1971
United Nations Global Compact the Ten Principles
www.unglobalcompact.org/AboutTheGC/TheTenPrinciples/index.html
PMS 32721st Proof Title: BFD:Developing A Collection Job No: D609-126/4220
SIF AVABK4 Ethics_ 6/30/09 9:44 AM Page 8