Embed Size (px)
Citation preview

Vex Robotics and ProgrammingBasic Programming Name_____________________
Basic Tasks to complete
1. Joysticks – Use each joystick on the handset to control each of two motors. Use both the A, B, C and D axis. Left motor controlled by A and C, Right motor controlled by B and D.
2. Buttons – Use all the buttons on the handset to turn motors on or when held down E up=Left full speed forwardE down = left half speed forwardF up = right full speed forwardF down = right half speed forwardR up=Left full speed reverseR down = left half speed reverseL up = right full speed reverseL down = right half speed reverse
3. Display – Print your name across the front of the display
4. Variable 1– Print a number on the display that increase once each second
5. BumperSwitch 1 – Turn motor on and when bumper switch is pushed motor is turned off
6. Variable 2 – Turn motor on by pushing and releasing the bumper switch, turn motor back off by pushing and releasing the bumper switch again.
7. Touch LED 1 – Use the touch LED and turn colors when it is pushed
8. Touch LED 2 –Push the bumper switch to change the colors on the touch LED
9. Colors 1 – Use the controller buttons to change the colors on the touch LED as follows
E up=DarkYellowE down = RedVioletF up = GreenF down = DarkOrangeR up=VioletR down = RedL up = BlueL down = Orange
10. Music – Play tune for Beethoven’s fifth symphony or Jaws theme through the speaker
1
Vex Robotics and ProgrammingBasic Programming Name_____________________
11. Driving 1 – Basic robot code to drive as followsLeft joystick= left motor forward and backRight joystick = right motor forward and back
Advanced tasks to attempt
12. Driving 2 – More advanced robot driving code
Left joystick A = Both motors forward and reverse at same speedLeft joystick B = Robot turns, when pushed to right, robot turns right, left wheel forward, and right wheel reverse, when pushed left, robot turns left, right wheel forward, and left wheel reverse.
13. Distance Sensor – Use the distance sensor to control both motors speed. Greater distance is greater speed, closer distance is slower speed.
14. Display Sensors – Display the output of the distance sensor on the brain
15. Display Conversion – Display the output of the distance sensor in inches on the brain
16. E-Stop – Add an emergency stop to the driving program from task 11 so when the button E up is pushed all motors stop running
17. Colors 2 – Use the color sensor to detect a color placed in front of it, and turn the touch LED to the same color.
18. Gyro 1 – Display the output of the gyro sensor on the brain display
19. Gyro 2 – Display the output of the gyro sensor in degrees on the brain display
20. Function 1 – Write a function to hold the driving controls for each wheel. Use the joysticks as in number 12 above for each wheel, but in only one function
21. Function 2 – Detect color in a function, and output the color, from the function into the main program and display the color on the screen.
2
Vex Robotics and ProgrammingBasic Programming Name_____________________
Programming Station
Each of five different programming stations will be built with the following characteristics.
Port Connection
1 Motor – LEFT
2 Motor – RIGHT
3 Bumper Switch
4 Touch LED
5 Color Sensor
6 Distance Sensor
7 Gyro
3

Programming Resources
Programming ResourcesThere are a few key components to every program in RobotC: setting up and
initializing the hardware, defining supplementary variables and functions, and the main task.
Hardware SetupBefore we can tell our robot to do anything, we need to initialize the
hardware. But don’t worry; as scary as this sounds, RobotC makes it rather trivial. Just open up the “Motors and Sensors Setup” dialog, accessible from the “Robot” menu.
From here, you can define the motors and sensors that will be connected to your robot. You can also give names to these motors and sensors so you can refer to them in the code. Once finished, click OK and RobotC will magically insert a few lines of code at the top of your file. You may always change the setup using the same dialog later on, and RobotC will update these lines of code to reflect those changes.
Main Task The main task is what your robot will do when you run the program. Think of it as the main list of instructions in a how-to guide; after
everything’s set up and you have all the required materials, it’s the step-by-step guide that tells the robot exactly what to do.
Here’s how to define it in your code:task main {
...put the code in here...}
Motors
4

Programming Resources
To activate a motor, use the following format:motor[motorA] = 100;
o Substitute motorA with whatever name you gave to the motor you wish to run.
o The value 100 can be substituted with any value from -100 to 100. It is the percentage of power to run the motor at, with negative values causing the motor to go in reverse direction.
Keep in mind, when you set the value of a motor, you are turning it on. The motor will continue to run until you specifically tell it to turn off.
To stop applying power to a motor, use the following line, once again replacing motorA with the name you gave the motor:
motor[motorA] = 0;
The Wait Function Often, you will need your program to wait a specified measure of time before
doing something. A common example is running a motor for a pre-measured length of time before stopping, such as when you want to go a certain distance.
There are two forms of the wait function:o wait1Msec(1000);
This waits for one millisecond times the value in the parentheses.o wait10Msec(1000);
This waits for ten milliseconds times the value in the parentheses.Therefore, wait1Msec(1000); and wait10Msec(100); do the same thing: wait for 1 second.
Here is an example of the wait function being used in conjunction with motors:
motor[motorA] = 100;wait1Msec(5000);motor[motorA] = 0;
This code will run the motor in port A at full power for 5 seconds before turning it off again.
Time to Get Fancy.Now that we have introduced you to the basics of RobotC and controlling the
robot, it’s time to learn how to do more complex things.
CommentsComments are used to annotate your code. They can be incredibly useful in
providing information (explanations, todos, bugs, goals, etc.) about your code to yourself or other programmers. This is especially applicable when multiple people are working on the same project -- notes can be left for the other programmer to read. Comments can also be useful in reminding yourself about information -- it can be tricky to remember all of the idiosyncrasies of the program when there are hundreds of lines of code.
5
Programming Resources
Comments are denoted in two different fashions:motor[motorA] = 100; //this is a commentwait1Msec(1024); /* this is a magical
multiline comment*/ Here is an example of comments being put to practical use:
motor[motorA] = 100; //robot arm moveswait1Msec(102400000000); /*Phil, I think there is a bug here, the rest of the program will not run*/motor[motorA] = 0;
Variables Variables store data. There are different types of variables used for storing different types of data.
The most common ones are:o int -- integer. Examples: 5; -3; 0; 40028;o float -- supports decimal values. Examples: 5.023; -99.2; 4; 3.141592;o string -- text. Examples: “Hello, world!”; “what’s your name?”;
“qwerty is inferior”; “I am 9982883048723 years young!”o bool -- true/false values. Examples: true; false;
There are three primary actions you perform concerning variables:o Defining is when you first pop the variable into existence. In this
step, you give it a name and a type, as such:int x;Here, we define an integer whose name shall be x.
o Setting is when you assign a value to a variable, like this:x = 5;From now on in the program, x’s value will be five (unless we change it again later on).
o Getting a variable returns its current value. This action is not its own line, but is an expression which you can put into another line. To get the value of a variable, simply type its name in place of a normal value:motor[motorA] = x;You can even set one variable to the current value of another:y = x;In this case, the program will read the current value of x and set that as the value of y.
Control StructuresControl structures are blocks you can use when you need to introduce logic or
repetition into your code. They’re pretty straightforward:
The if else statement is the most basic way if introducing logic-based execution in your code. Use them like this:
if (y < 5) {motors[motorA] = 100;
} else {motors[motorB] = 100;
6
Programming Resources
}The code inside the parentheses after if must evaluate to a bool value. If it is true, the first block of code will execute; if it is false, the block after else will execute. The else block may be omitted if you don’t need to do anything when the value is false.
The while statement is used for repeating a block of code until the given bool expression evaluates to false. Observe:
while (5 == 4 + 1) {motors[motorA] = 100;wait1Msec(1000);motors[motorA] = 0;wait1Msec(1000);
}The program, upon encountering the while block, while proceed as follows:
1. Check if the given expression evaluates to true or false.2. If true, run the code inside the block, then go back to Step 1.3. If false, exit this while block and continue with the rest of the program.
The while block can also be used to wait until a given expression is no longer true by omitting the block part of it. For example:
while (numberOfMagicalCookies == 0);Here, the program will constantly re-evaluate the expression until it returns false before continuing. You will see later why this can be rather useful.
The do while statement is very similar to the while statement. The only difference is the order in which it performs its logic and the syntax:
do {motors[motorA] = 100;wait1Msec(1000);motors[motorA] = 0;wait1Msec(1000);
} while (y < 5);As opposed to the normal while block, the do while block executes in this
order:1. Run the code inside the block.2. Check if the given expression evaluates to true or false.3. If true, go back to Step 1.4. If false, exit this while block and continue with the rest of the program.
The do while block runs the code before it bothers checking if the expression evaluates to true. The use of this is that even if the expression evaluates false from the very start, you can still be sure the contained code will execute at least once before the program moves on.
The for statement is a very useful control structure which makes use of variables. The first part of it looks like this:for (int x = 0; x < 5; x++) {Pay special attention the the stuff in the parentheses. There are three parts, divided from each other by semicolons.
o The first part (int x = 0) is run once at the very beginning of the for statement. In this case, we define a variable x and set it to 0.
o The middle part (x < 5) is an expression run after every time the code block is executed to determine whether or not to continue -- just like a while statement.
7
Programming Resources
o The last part (x++) is also run after every time the code block is executed. It is generally meant to update the variable, in this case, by incrementing it.
In this case, the for loop will run a total of five times. Also, inside the code block, by getting x, our code can figure out which of those five times it is running.Example://this will increment the power of motorA in 10% increments over 10 seconds.for (int x = 1; x <= 10; x++) {
motors[motorA] = x * 10;wait1Msec(1000);
}
Functions Functions are handy, magical, crumbly, unbelievably tasty bits of code
that you can create once and reuse as many times as you want. Often, you will hear these being referred to as functions and methods interchangeably. This is because some programming languages call them functions, and others, methods. In reality, it’s all the same thing (well, not really, but we don’t need to worry about that.)
Remember wait1Msec(1000)? That’s a function. Let’s dissect what is taking place in this line of code:
o wait1Msec() is the function itself.o 1000 is the value being passed to the function. When a value (or
variable) is being passed to a function it is called an argument. In this case, wait1Msec() is using that argument to determine the amount of time to wait.
Functions can also return values, for example:motor[motorA] = myFuncWhichReturnsAnInt();
In this case, that function with the rather unwieldy name returns an int. We then set the power of motorA to that int which it returns.
Functions that don’t return anything are referred to as void functions. These functions just do stuff -- they don’t return any values that can be used for other things. wait1Msec(); is a void function.
Writing functions/methods is where all the fun is. Here’s how to do it:int tricyclesRule(int x, int y) {
int z = x*y;return z;
}Okay, don’t panic! Instead, let’s all take a five minute pie break. While enjoying our pie, let’s walk through the above code. In the first line, int says that our function will return an int. If it was a void function, we would write void there. Next, we have the method name. Inside the parentheses, we define our parameters. “But you said they were arguments!” The actual variable or value that is passed to the function when it is called is called the argument. The variable(s) found in the method declaration are called parameters. This first line of code is called the method declaration.
8

Programming Resources
Next we have the code which will execute when our function is called. Notice at the very end “return z;”. This is called the return statement. When the program is running and it encounters this, it will exit the method and return the given value (in this case, z). It is important to understand the fact that the program leaves when encountering this statement -- even if there was more code after it, in which case it will skip that code. If the method is a void, you can just type return; -- you don’t need to type any value after return, as the method won’t be returning any value. Once your function is written, you can call it in much the same way as wait1Msec(); -- tricyclesRule(5, 9); (passing these arguments will get a return value, z, of 45). Do you see now, how the pie is very crumbly and tasty, just like the code?
PragmasA pragma, or pre-processor directive, gives the compiler instructions on how
and what extra stuff to compile. Pragmas have two main uses in RobotC: Include statements are used for importing libraries (and even other files
you wrote yourself) into your program. A common example is importing the drivers for using the joysticks or for using third-party sensors.#include “JoystickDriver.c”Inside the quotes, put the name of the file you wish to import. Just remember that the file must be in the same folder as your source file for the compiler to properly find it.
Hardware setup pragmas tell the program to initialize hardware connected to the robot. The code that magically appeared at the top of the file after the hardware set up contained pragmas. Specifically, it told the compiler what names to accept for motors and sensors, as well as other things. While these lines of code are very important, you will not need to edit them. Any changes you wish to make pertaining to hardware can be done through the procedures outlined earlier in this guide.
SensorsSensors, such as the touch sensor, provide information to the robot. While
there are many different types of sensors, here is an example of a practical way to use the touch sensor:
Say, for instance, that you need your robot to travel forward until it hits a wall, stop, and turn. The touch sensor is a very useful tool for the job. Using the sensor and a while statement, you can command the robot to move forward until it hits a wall (depressing the touch sensor), stop, and turn.
To access a sensor, use the following syntax:SensorValue[sTouch]where sTouch is the name of the sensor.
The code would look something like this:motor[motorA] = 100; //turn on both motors to go forwardmotor[motorB] = 100;//wait until the touch sensor is pressedwhile (SensorValue[touchSensor] != 1);
9
Programming Resources
motor[motorA] = 0; //stop motorA but allow motorB to continue, so that
//we turn
10
Programming Resources
Using the LCD Display The LCD measures 46 x 128 pixels (i.e. 0<= x <= 127, 0<= y <=45 )
You may display data during execution: displayTextLine(1, "Hello "); displayTextLine(3,Ū%d. %sŪ, 10, ũStorming RobotsŪ)
You should look up all the display functions from the Function explorers.
Using Sound Play a sound to signal a certain stage of execution can also be very informative too if you use wisely.
playSound(TSounds);
where Tsounds can be in many values such as soundTada, soundSiren2, etc.. Right click on the function in the IDE, the IDE will open RobotCIntrinsic.c where you will find the sounds available.
You can play with playSoundfile(…) and playNote(…), but these usually are not very useful in real time debugging.
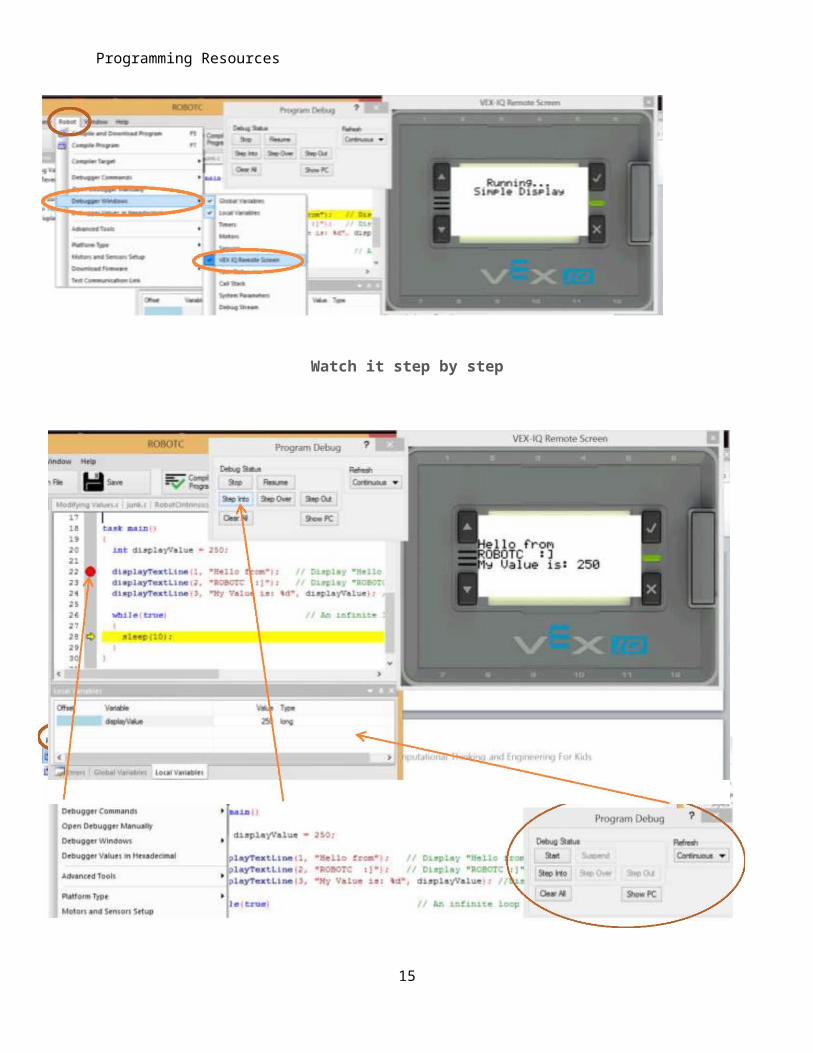
Using the Debugger
RobotC comes with probably most powerful debugger available for microcontroller. You program must be compiled with no errors and downloaded to the controller in order to watch the screen debugger:
11

Programming Resources
Watch it step by step
Set breakpoint Step into each expressions. Watch the change of the variable here.
12
Your get your answer when:
| M (current) – M (previous) | < M *

Programming Resources
Motors
Type : sensorVexIQ_Motor
You may set the ports to many other type of devices. Look into the TMotorTypes.h at your RobotC installation directory.
Instead of using the configuration setup wizard, you may do inside your code, e.g.: SensorType[motor9] = sensorVexIQ_Motor
Note: In the configuration wizard, if you should check the “reversed” box for your a motor port, it will be in a mirrored position on your chassis. Depending on how your mount your motors, this may avoid confusion by ensuring that both motors drive in a forward direction when positive speed values are passed to them and vice versa.
There are other options such as set up for motor feedback control. This is outside the scope of this tutorial.
3.2) Most Commonly Used Functions
ROBOTC for VEX Robotics 4.0 allows for direct control of the VEX IQ's motors using Natural Language commands. These commands can be used to control multiple motors, individual motors, set motor targets, stop motors, and more. Try to be resourceful and use the function window on the left of the screen, which will give you the parameters needed for each function. There are two common parameters used in the motor control commands; the motorPort and speed parameters.
motorPort values can be assigned by the port number (motor1) or by the name assigned to it in the Motors and Sensors Setup window (ex. Leftmotor). *Default value is motor1. speed values range from -100 to +100. -100 is full power reverse, +100 is full power forward, and 0 is stopped. Default value is +50.
13
Programming Resources
4.1) Bumper Sensor
Type : sensorVexIQ_Touch
Before you can use your sensors, you must configure them. Using the Motors and Sensors Setup window is a quick and easy way to do so. Create a name for each of
your sensors and identify their respective port locations. However, remember: all “pragma” statements must be at the top of your file.
Instead of using the configuration setup wizard, you may do inside your code, e.g.: SensorType[ port3 ] = sensorVexIQ_Touch
4.2) Most Commonly Used Functions
14
Programming Resources
4.3 ) Code Example Segment //This code will make the robot run forward at a speed of 50 //until the 'bumperSensor' is pressed //Repeat the loop until the
Bumper Switch is pressed (returns 1)
repeatUntil(getBumperValue(port8) == 1) { //Set both left and right motors to run at 50% speed
(continuously) setMotorSpeed(motor1, 50); setMotorSpeed(motor6, 50);
} //Stop the motors after the movement is complete setMotorSpeed(motor1, 0);
15
Bool getBumperValue (nDeviceIndex)Parameter Explanation Data TypeReturn 1= pressed 0 = released bool
nDeviceIndex Port number that the sensor is plugged into tSensors
Note: Watch out for “Denouncing” Effect. To count # of pressed, your code must code for the delay or capture a sequence of press and release as a single “pressed”.
Programming Resources
setMotorSpeed(motor6, 0);
This sensor serves not so much as a sensor but output device. This is more for fun elements. The samples from RobotC has already well identified how to use it. Therefore, we will skip this topic .
Type: sensorVexIQ_LED
bool getTouchLEDValue(tSensors port1...port12); void setTouchLEDColor(tSensors port1...port12, TSimpleColors color ); void setTouchLEDHue(tSensors port1...port12, const unsigned short HueValue); void setTouchLEDRGB(tSensors port1...port12, red, green, blue); Unsigned short setTouchLEDRGB (nDeviceIndex);
16
Touch LED Sensor
Programming Resources
6.1) Color Sensor
The color sensor is an input device that can measure colors in a variety of ways. It can measure simple colors (Red, Blue, Orange, etc), overall color hue, independent red, blue and green channels, ambient light, and even the proximity of objects. The values returned by the sensor depend on which command is being used to control it (below). The default port for the color sensor is port #9.
Values returned will vary depending on the surface being detected, ambient light, and other environmental factors (example: brighter ambient light may cause the sensor to return higher values than average.)
For those familiar with the NXT light sensor, the methodology is very similar. You must take the sensor readings over dark and light, then average those two numbers to get your threshold.
Types: sensorVexIQ_ColorNotActive sensorVexIQ_ColorGrayscale sensorVexIQ_ColorHue
sensorVexIQ_Color12Color
To configure to Grayscale -sensorVexIQ_ColorGrayscale
Configures the color sensor to return the grayscale value of a detected object.
1.3 . . . 359 Darkest Brightest
Actual values returned will vary depending on the surface being detected, ambient
17
Programming Resources
light, and other environmental factors (example: brighter ambient light may cause the sensor to return higher average values than normal.) *Note that due to the nature of our typical robotics challenges, we will normally focus on using Color Greyscale mode.
18

Programming Resources
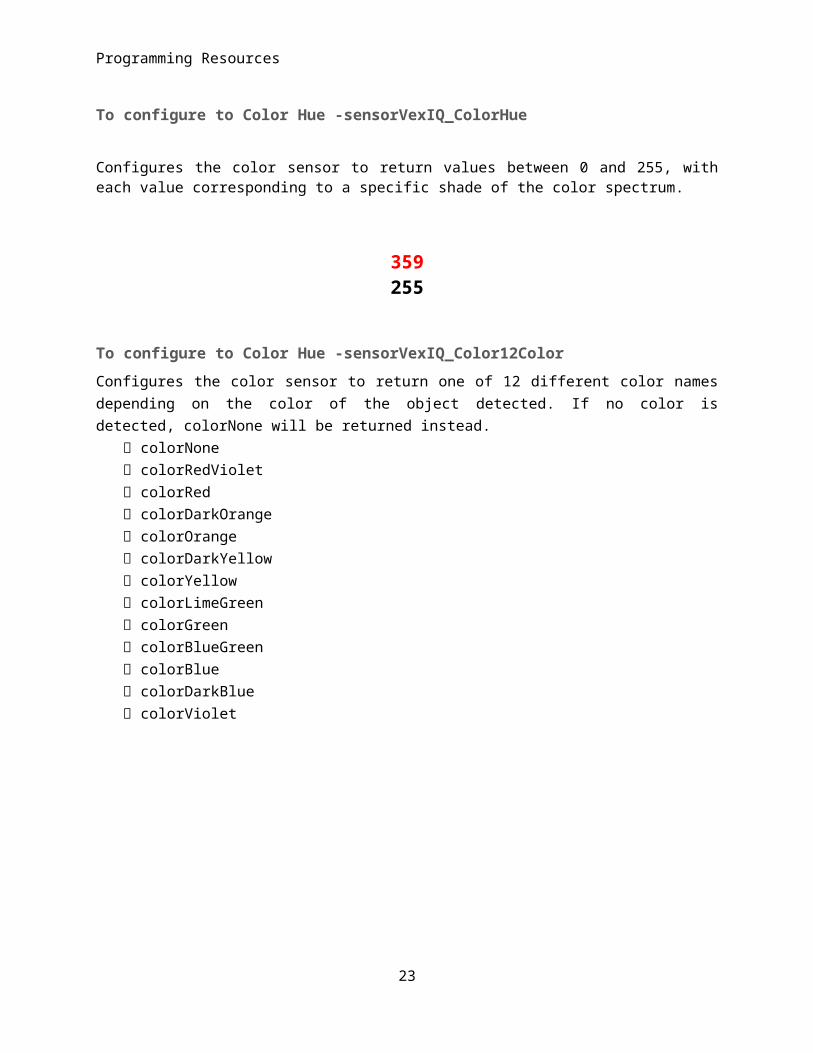
To configure to Color Hue -sensorVexIQ_ColorHue
Configures the color sensor to return values between 0 and 255, with each value corresponding to a specific shade of the color spectrum.
359 255
To configure to Color Hue -sensorVexIQ_Color12Color Configures the color sensor to return one of 12 different color names depending on the color of the object detected. If no color is detected, colorNone will be returned instead.
colorNone colorRedViolet colorRed colorDarkOrange colorOrange colorDarkYellow colorYellow colorLimeGreen colorGreen colorBlueGreen colorBlue colorDarkBlue colorViolet
19
Programming Resources
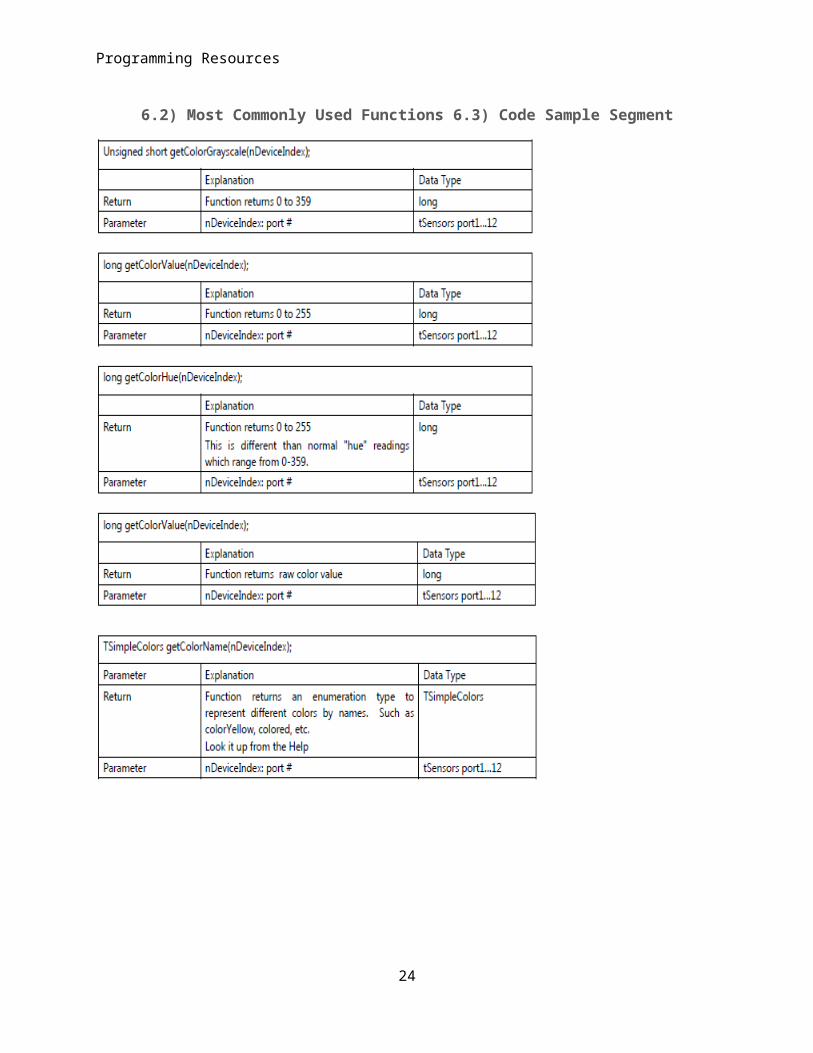
6.2) Most Commonly Used Functions 6.3) Code Sample Segment
20
Programming Resources
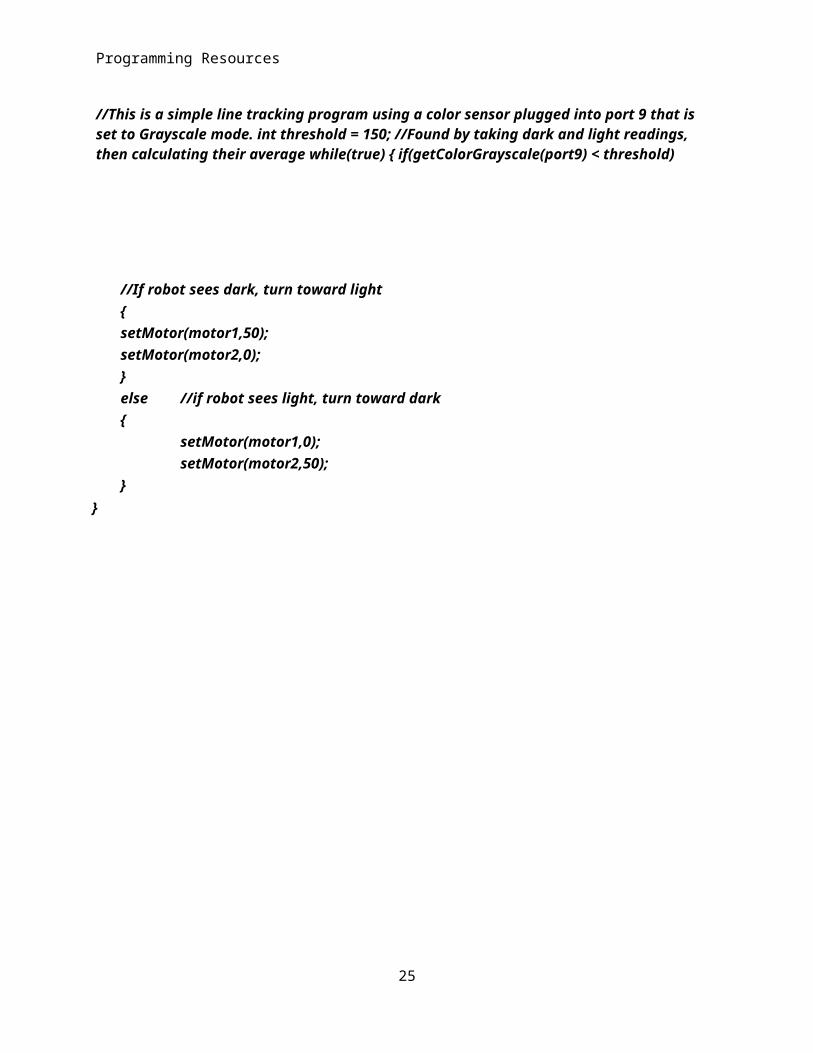
//This is a simple line tracking program using a color sensor plugged into port 9 that is set to Grayscale mode. int threshold = 150; //Found by taking dark and light readings, then calculating their average while(true) { if(getColorGrayscale(port9) < threshold)
21
//If robot sees dark, turn toward light{setMotor(motor1,50);setMotor(motor2,0);}else //if robot sees light, turn toward dark{
setMotor(motor1,0);setMotor(motor2,50);
}}

Programming Resources
7.1) Distance Sensor
Type : sensorVexIQ_Distance The distance sensor measures its distance from an
object by sending out high frequency sound waves. It
getDistanceSecondStrongest command can be used to get the distance of the second closest object to the sensor, and the largest object can be detected with the getDistanceMostReflected command. Note that the distance sensor returns all values in millimeters for maximum precision. The default port for the distance sensor is port #7.
May set your sensor type: SensorType[ port# ] = sensorVexIQ_Distance
22
measures the amount of time a sonar wave takes to reflect off of an object and return to the sensor.
The
distance sensor also has the ability to detect three different object distances at
Programming Resources
7.2) Most Commonly Used Functions
23
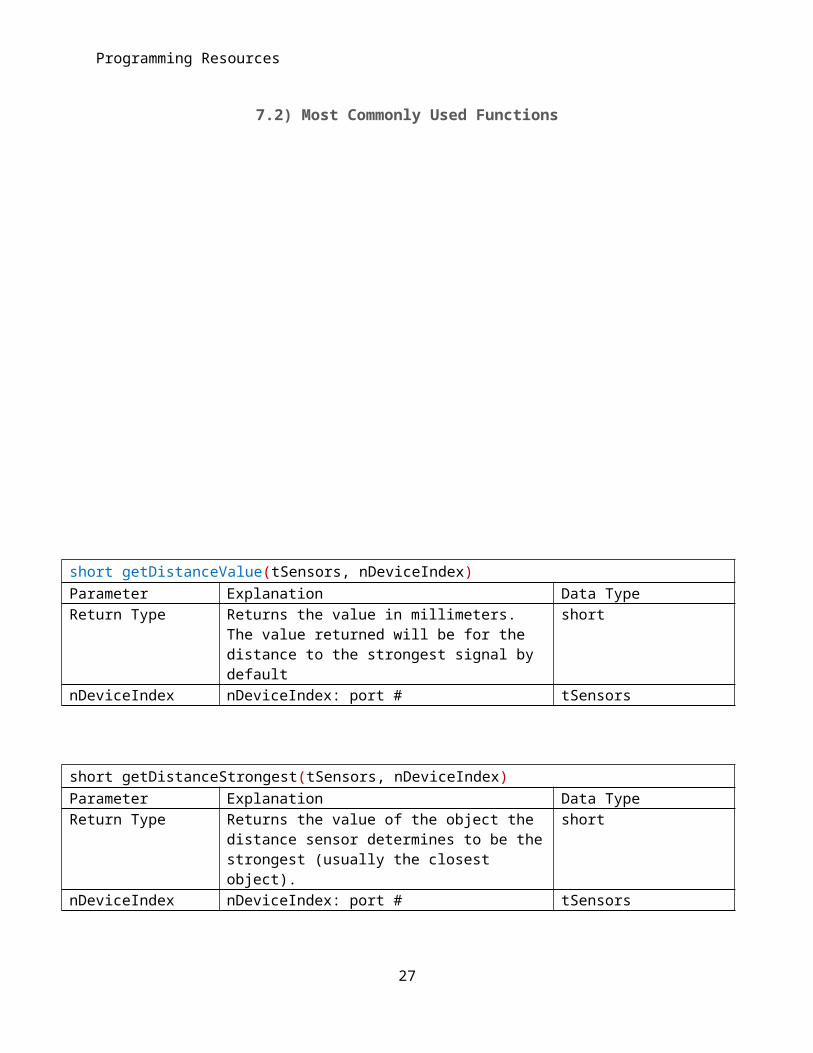
short getDistanceValue(tSensors, nDeviceIndex)Parameter Explanation Data TypeReturn Type Returns the value in millimeters. The value
returned will be for the distance to the strongest signal by default
short
nDeviceIndex nDeviceIndex: port # tSensors
short getDistanceStrongest(tSensors, nDeviceIndex)Parameter Explanation Data TypeReturn Type Returns the value of the object the
distance sensor determines to be the strongest (usually the closest object).
short
nDeviceIndex nDeviceIndex: port # tSensors
Programming Resources
From VexIQ Manual
24
short getDistanceSecondStrongest(tSensors, nDeviceIndex)Parameter Explanation Data TypeReturn Type Returns the value of the object that the
distance sensor determines to be the second strongest (typically the second closest object).
short
nDeviceIndex nDeviceIndex: port # tSensors
short getDistanceMostReflective(tSensors, nDeviceIndex)Parameter Explanation Data TypeReturn Type Returns the value of the object that the
distance sensor determines to be the most reflective (usually the largest object).
short
nDeviceIndex nDeviceIndex: port # tSensors
Programming Resources
7.3) Code Sample Segment while(getDistanceStrongest(port10) > 100)
7.4) Other APIs
Although the following functions are not commonly used, I found them to be indeed very useful. However, you will need to do some experiments to polish the usage.
unsigned short getDistanceStrongest( tSensors port1...port12) unsigned short getDistanceSecondStrongest( tSensors port1...port12)
void setDistanceBrightnessThreshold( tSensors port1...port12, const unsigned short nBrightnessValue) void setDistanceFilterFactor( tSensors port1...port12, const unsigned short nFilterFactor) void setDistanceTransmitPower( tSensors port1...port12, const unsigned short nTransmitPower) void setDistanceMinRange( tSensors port1...port12, const unsigned short nMinDistanceInMM) void setDistanceMaxRange( tSensors port1...port12, const unsigned short nMaxDistanceInMM) void setDistanceObjectFilterMode( tSensors port1...port12, TDistanceFilterMode nFilterMode) void setDistanceSNRThreshold( tSensors port1...port12, const unsigned short nSNRValue)
typedef enum { strongestSignal = 0, secondStrongestSignal = 1, mostReflective = 2 } TDistanceFilterMode;
25
{setMotor(motor1,50); //robot will drive forward until it sees an
objectwithin 100 mm
setMotor(motor2,50);}stopAllMotors();
unsigned short getDistanceMostReflective( tSensors port1...port12)unsigned short getDistanceMinRange( tSensors port1...port12)
Programming Resources
8.1 Gyro The Gyro Sensor measures the rotational angle of the robot. It constantly keeps track of the robot's angular position and its direction. For simplification, it only tracks rotation in one axis based off of a “zero” point. With the VEX IQ Gyro, counter-clockwise rotation will increase (+) the Gyro's value in degrees. Clockwise rotation will decrease (-) the Gyro's value. In order to read the Gyro's value the getGyroDegrees command is used. This command returns the current rotational value of the sensor in units of degrees.
Type: sensorVexIQ_Gyro
26
Programming Resources
8.2) Most Commonly Used Functions 8.3) Gyro Sensor Code Sample
27

Programming Resources
//This program will reset the gyro's heading and then turn the robot 90 degrees from its current position //Resets the gyro on port 4 to 0 degrees resetGyro(port4); //Keep looping until the gyro sensor reads greater than 90 degrees from its current position repeatUntil(getGyroDegrees(port4) > 90) { //Point turn to the left setMotorSpeed(motor1, -50); setMotorSpeed(motor6, 50); } //Stop the motors at the end of the turn setMotorSpeed(motor1, 0); setMotorSpeed(motor6, 0);
28

![Design and Control for Differential Drive Mobile Robot · directions, the robot turns about the midpoint of the two driving wheels[6] [2]. The aim of this research paper is to design,](https://img.pdfslide.us/doc/110x75/5e800769f53faf37cb1e1a51/design-and-control-for-differential-drive-mobile-robot-directions-the-robot-turns.jpg)