Embed Size (px)
Citation preview
Basic Shooting SkillsPrinciples of Marksmanship
By: Shannon Carlton
Agenda• Introduction• Principles of Coaching• 5 Principles of Marksmanship• Developing a Routine• Making Sight Adjustments• Sequences
Principles of Coaching• The basic principles and fundamentals of
marksmanship never change• Create an atmosphere where athletes can be
confident in their abilities• Be patient• Analyze performance, paying more attention
to good shots over poor ones• The coach is there to benefit the athlete not
vise versa

Marksmanship is 98% Mental, 2% Physical
5 Principles of Marksmanship
1. Sight Picture
2. Natural Alignment
3. Breathing
4. Trigger Control
5. Follow Through
Sight Picture
• Sight Alignment is the most critical aspect of aiming
• It is the alignment of the eye, rear sight and front sight
• Athlete must have proper sight alignment while centering the target to obtain a proper sight picture
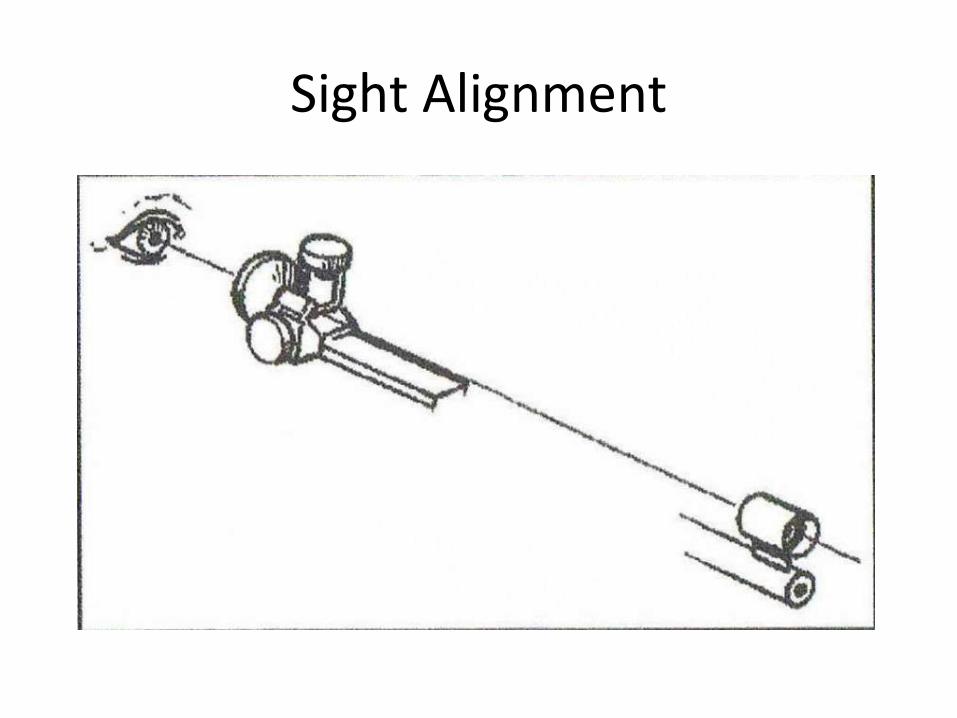
Sight Alignment
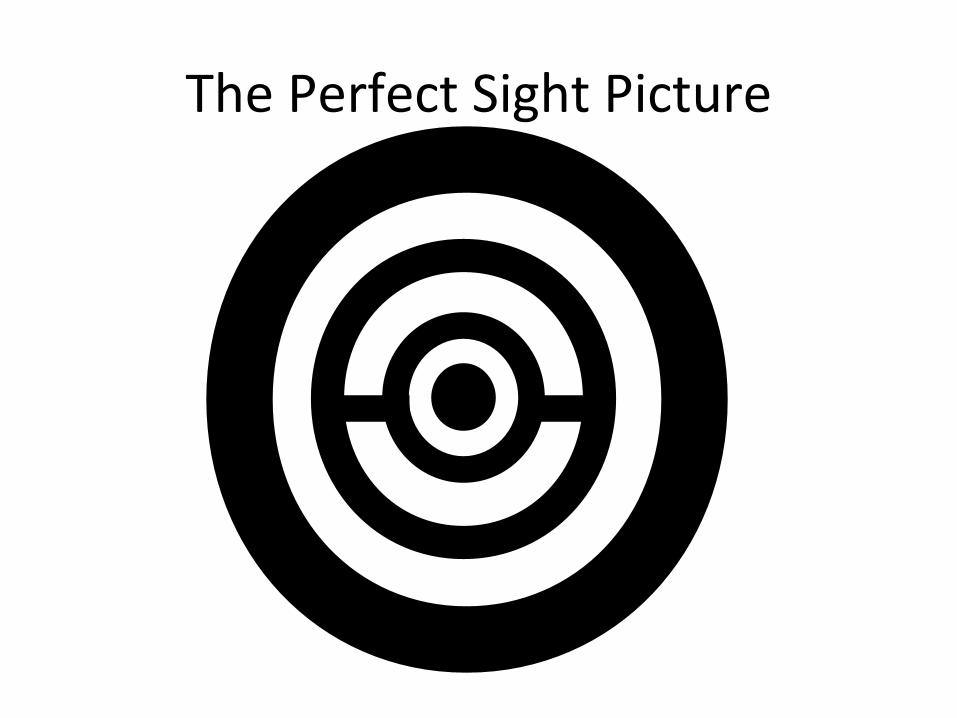
The Perfect Sight Picture
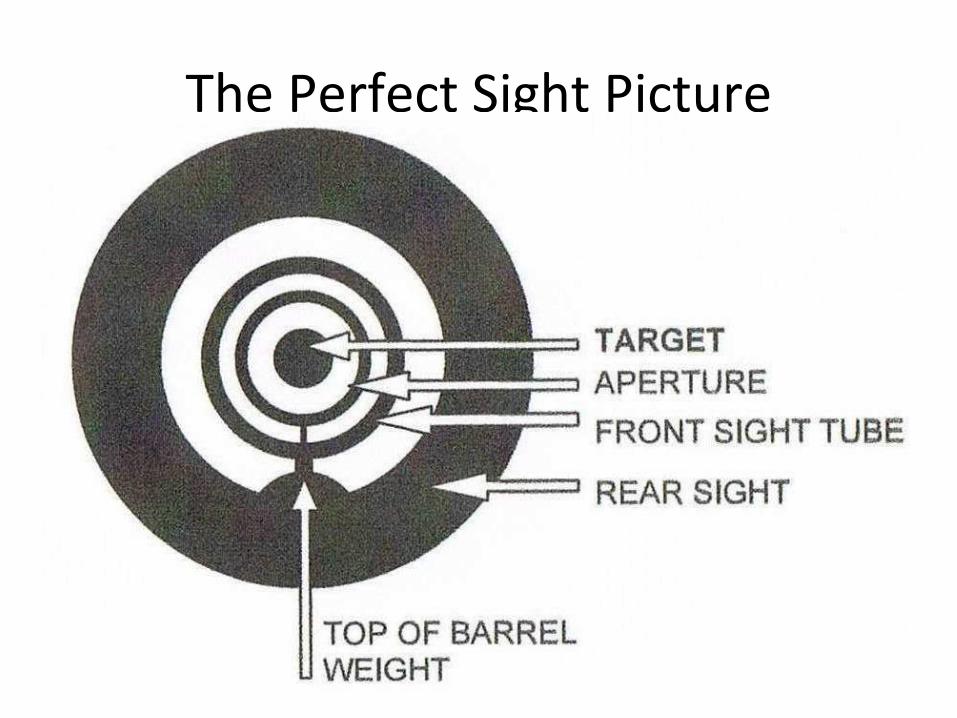
The Perfect Sight Picture
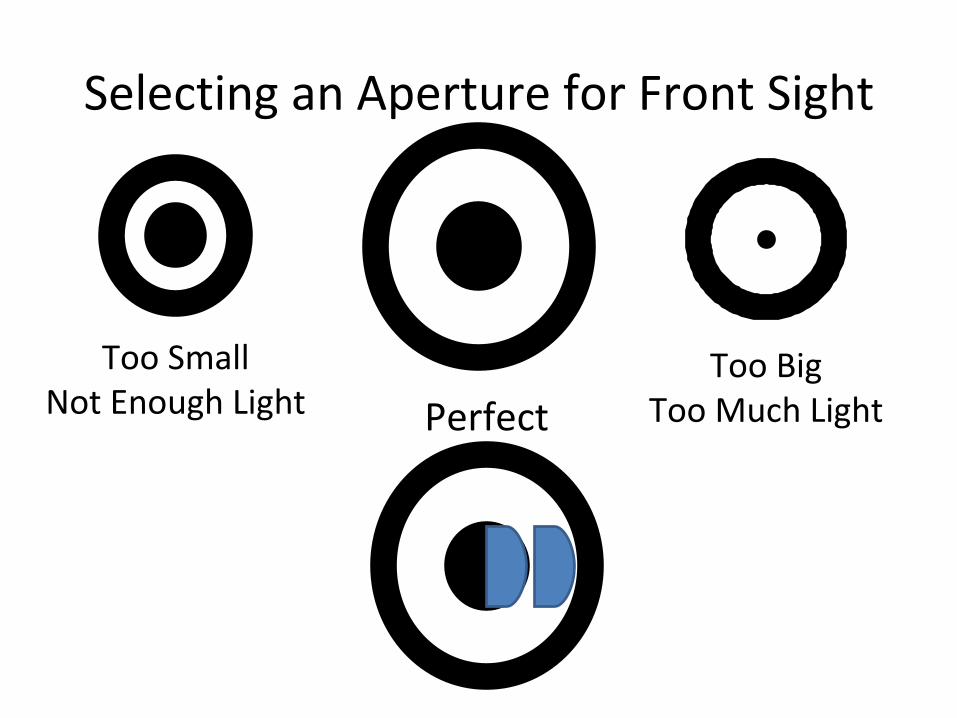
Selecting an Aperture for Front Sight
Too SmallNot Enough Light
Too BigToo Much LightPerfect

The Eye
• The eye can only focus on one thing at a time, the main focal point should be the front sight
• The athlete should move their focus in the sight alignment process– From front sight to target– Back to front sight– To rear sight and – Back to front sight to squeeze the trigger
Light
• Light plays an important roll in sight picture–Makes it easier to align the sights and target
• Blinders– Allows facial muscles to relax– Allows both eyes to be open
• Sunglasses are great for on the trail but should not be used while shooting– They should be removed prior to entering the
range, allowing pupils to adjust to light
Sight Picture - Tips
• Begin with bench resting rifle– Athletes focus on sight picture, not holding rifle– It allows for a positive first experience with
shooting– Instills good habits Only shooting perfect shots
• Further in exercise have athletes focus on target, rear sight and front sight when squeezing trigger– Get feedback and explain
Sight Picture - Tips
• Watch an athletes head – Head rests on cheek piece the same each time– Some newer athletes look down/up into the sights
• Watch the athletes eyes when they are in position– They should be focused on the sight picture– Looking around and moving the eyes elsewhere
will effect their sight picture and where the shot lands

Questions?

Natural Alignment
• Natural alignment is obtained when the rifle can be perfectly aimed at the target without using muscles
• To acquire proper natural alignment, follow these steps:
1.Look through the sights and acquire a proper sight picture
2.Close eyes, take a normal breath and relax into a comfortable position
Natural Alignment
4. If directly centred with the target, the athlete will need to re-orient their position slightly. To do this, they will need to pivot their body on their left elbow – see next slide
5. If they move their position they must check their natural alignment again until it is perfect
Changing Natural Alignment PRONE
If they are aiming;
1. Left, move the lower body slightly left
2. Right, move the lower body slightly right
3. Low, move the lower body slightly back (if this does not work, they can tighten the sling)
4. High, move the lower body slightly forward (if this does not work, they can loosen the sling)
Changing Natural Alignment STANDING
• If they are aiming;
1.Left, move the back foot slightly back
2.Right, move the back foot slightly forward
3.High, change hand position and/or hips
4.Low, change hand position and/or hips
Natural AlignmentSTANDING
• If the athlete is consistently aiming high or low, the butt should be moved higher or lower– Changes the placement where hook rests on
shoulder/in armpit• Overall: adjusts rifle, making it easier to align sights
Natural Alignment
• The left elbow (stability elbow) NEVER moves! The body pivots around the elbow
• The shooter only moves their entire position if they find themselves in a poor spot on the firing line
• As athletes gain more experience this process gets easier
Natural Alignment - Tips
• Have athletes bench rest and move their hips, take shots changing targets
• Have athletes practice getting in and out of position and fixing their Natural Point of Aim
• Have athletes place several targets up at different angles apart from one another – shoot one shot in each diagram, 5 round groups
Natural Alignment - Tips
• Watch their hips when switching targets– Some Athletes only move their elbows, causing
tension in the muscles in their body
• Watch their hand, head, and overall body movement–When changing natural alignment, newer athletes
forget to relax their muscles inbetween shots

Questions?
Breathing
• Important to supply energy to the muscles and refresh the muscles in the eyes
• Inbetween breaths athletes can make sure they are on the appropriate target
• For maximum stability athletes must stop breathing when taking the shot (called the HOLD)
Breathing
• Beginner athletes have a harder time calming down for the first shot
• Follow this routine for each bout in the range:
1.Take 5 deep breaths before getting into position
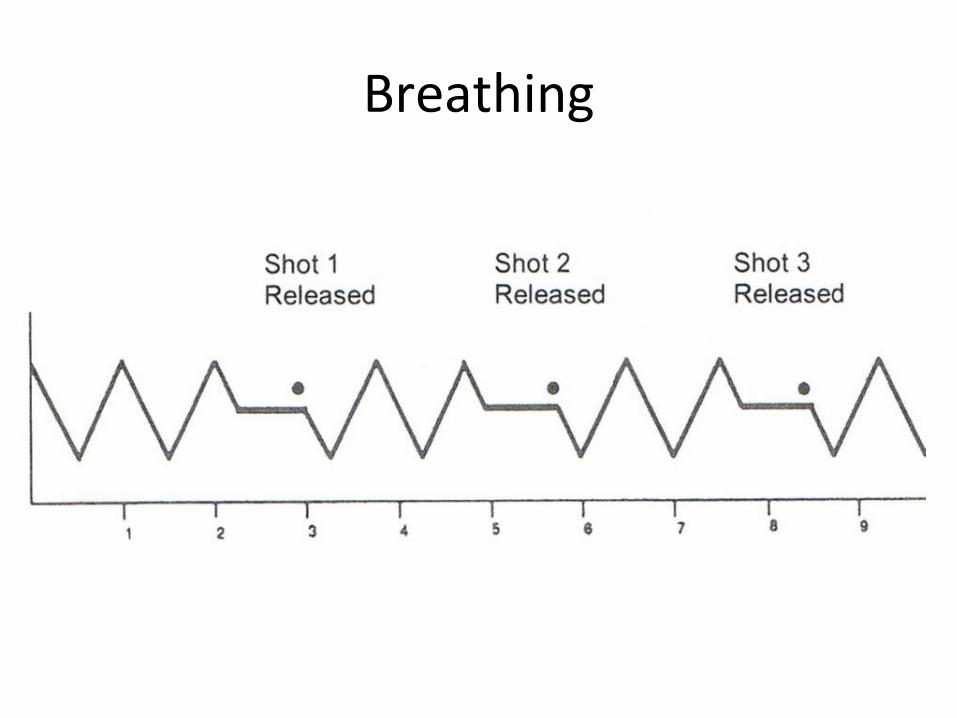
2.Take two breaths for each shot
Breathing• First breath– Check Natural Alignment– Muscles relaxed, sights moving vertically
• Breathe all the way out– See a perfect sight picture
• Second breath– Relax, get ready to commit to shot
• Breathe out– See a perfect sight picture
• HOLD

Breathing – 2 BreathsCheck Natural
AlignmentSee Perfect Sight Picture
Shot Release
HOLD
2-3 secNO more than 5
Breathing
• After the shot is released:– Breathe the rest of the air in the lungs out
• Breathe in and continue cycle• HOLD is critical between breathing and
releasing shot– Sights MUST be perfectly still– The most focus is required at this point
HOLD
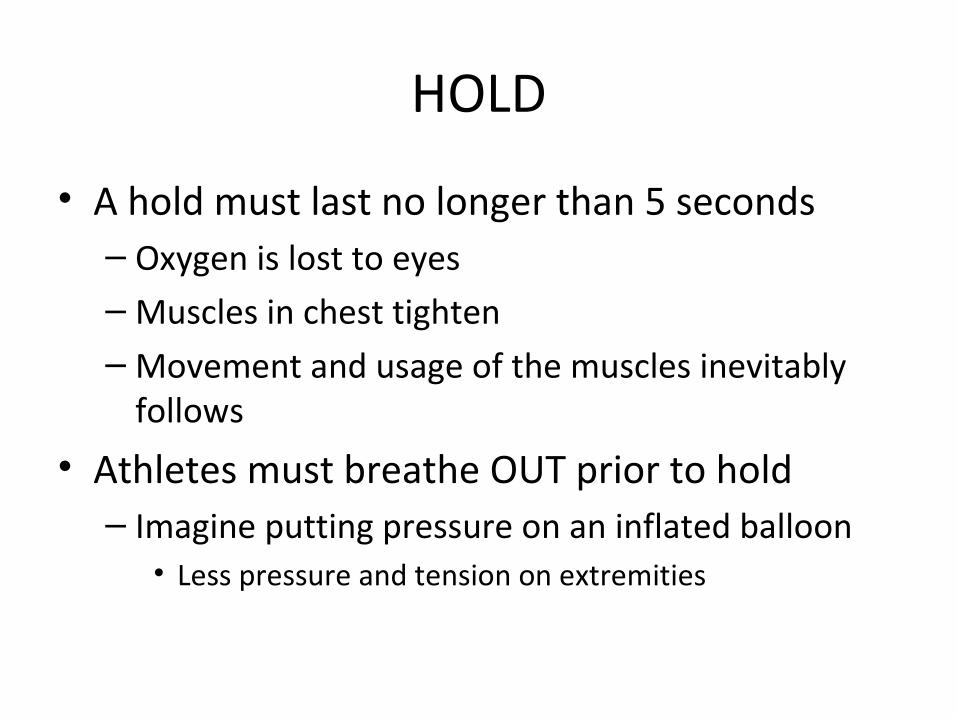
• A hold must last no longer than 5 seconds– Oxygen is lost to eyes–Muscles in chest tighten–Movement and usage of the muscles inevitably
follows
• Athletes must breathe OUT prior to hold– Imagine putting pressure on an inflated balloon• Less pressure and tension on extremities
Breathing
Breathing - Tips
• Have athletes bench rest rifle– Focus on breathing in and out– Seeing a perfect sight picture between breaths– NO movement in sight picture when squeezing
trigger
• Have athletes take shots holding breath in, then breathing out– Get feedback from athletes and explain
Breathing Tips
• Your most vital tool as a coach: WATCH THE FRONT SIGHT– You can see any movement in the sights
• You can also watch their back• New athletes tend to take more breaths,
encourage them to follow a specific breathing sequence– Have them write it down and bring it on the firing
point
Breathing – Tips
• The HOLD– There should be NO movement in sights– Bench resting will instill good habits for beginners
• Holding too long often occurs, encourage athletes to:– Restart the breathing sequence• It relaxes the muscles and helps them refocus
– Commit to the shot• Take it when they see it, it can’t be too perfect

Questions?
Trigger Control
• Squeezing the trigger is:– Constant– Controlled– Slow– Deliberate
• It should be done without any movement in the foresight
• The slowest movement in biathlon
Finger Position
Trigger Control
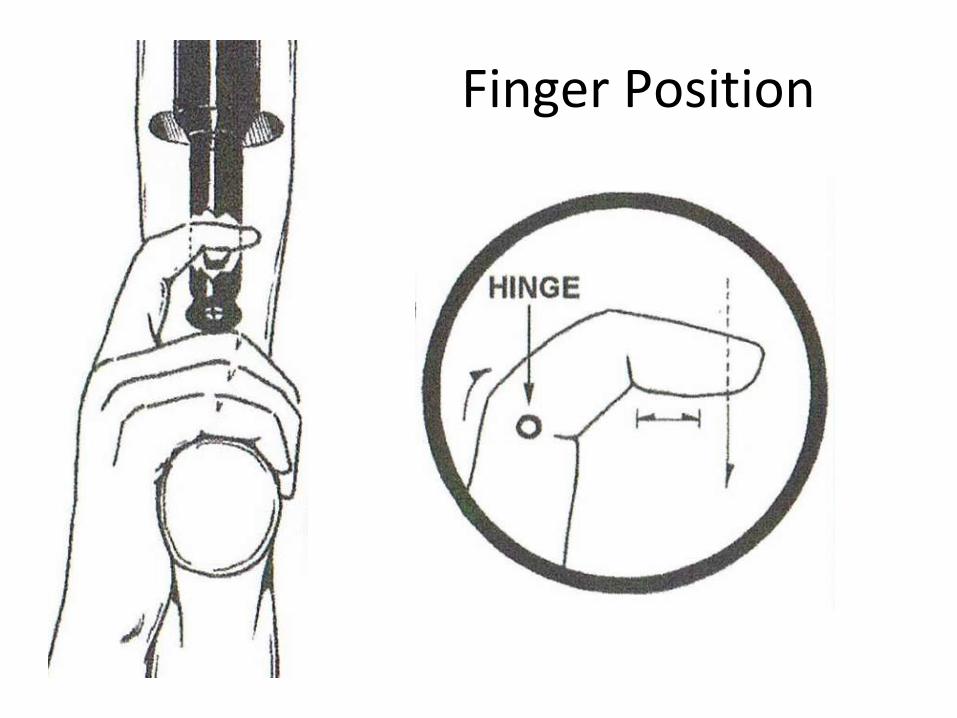
• The trigger goes in front of the first joint–More feeling at this point
• The squeeze takes place at the second joint, like a hinge– Allows the trigger to come straight backwards• The first joint would wrap around the trigger, causing
movement
Trigger Control
• The athlete should have a firm grip on the hand grip– Not too soft or too hard
• Allow the finger to bend naturally when placed on the trigger– As the athlete squeezes back the finger
straightens out if using the second hinge properly

Trigger Control• The amount of pressure when squeezing the
trigger should be equal to the pressure on the hand grip
• One Stage Triggers– One fluid, controlled motion– Slow, approx 3 seconds to squeeze through
• Two Stage Triggers– Squeeze through the first stage, last breath– Squeeze through the second stage, 2 seconds
Trigger Control – Tips• Have the athlete dry fire without a target to
feel the trigger• Bench rest the rifle– Instills good habits the sight picture does NOT
move while squeezing the trigger– Count the seconds out loud for the athletes as
they squeeze, 2-3 seconds• 1st second = beginning of hold, see a perfect sight
picture• 2nd – 4th seconds = squeezing the trigger
Trigger Control - Tips
• Watch the muzzle to see any movements as they squeeze
• Watch the eyes to ensure they stay open as the athlete squeezes the trigger
• Look at the right hand to make sure it is comfortably resting on the hand grip– hand points straight towards target
Trigger Control - Tips
• Watch trigger hand– Firm grip on pistol grip• Too hard, will cause movement after trigger squeeze
– Finger is placed naturally on trigger
• Watch trigger finger– Stand on stability elbow side of athlete• Easier to tell if athlete is wrapping around, rather than
squeezing straight back
Follow Through
• Staying in the aim after the shot has been released
• Helps– Develop a proper HOLD–Maintain stability– Ensure no movement of the rifle as the shot has
been fired– Calling shots
• Mentally and Physically demanding
Follow Through
• It allows athletes and coaches to correct faults/mistakes– Improves consistency in routine– Stable Position = sight picture returns to target
after shot–Muscling/Unstable Position/Poor Release =
movement in sight picture
Follow Through
• As athletes gain more experience it is easier to see any movement (call the shot)
• Follow through does not take long – It will decrease errors for athletes who attempt to
switch diagrams too early – Or leave the range too quickly before shot
released
Follow Through
• The athlete should:1. Squeeze the trigger, releasing the shot2. Keep the trigger squeezed back3. Exhale the rest of the oxygen out4. Breathe in5. Breathe out6. See a perfect sight picture7. Change diagrams

Questions?
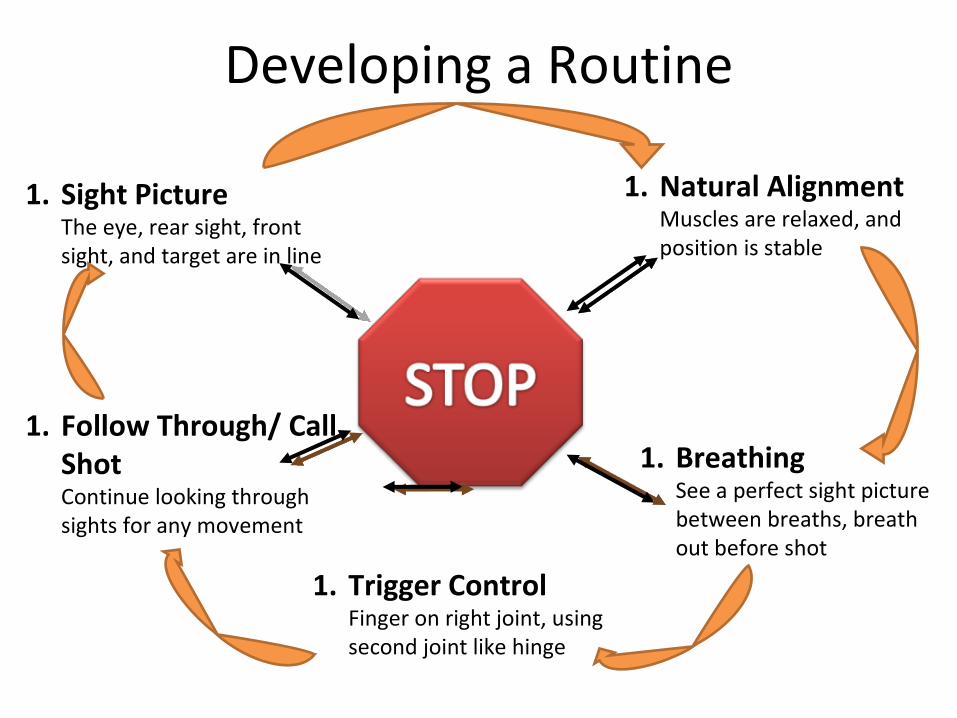
Developing a Routine
1. Sight PictureThe eye, rear sight, front sight, and target are in line
1. Natural AlignmentMuscles are relaxed, and position is stable
1. BreathingSee a perfect sight picture between breaths, breath out before shot
1. Trigger ControlFinger on right joint, using second joint like hinge
1. Follow Through/ Call ShotContinue looking through sights for any movement

Questions?
Making Sight Adjustments
• A part of Coaching is being able to center an athletes group– Understanding group formations– Know which athletes have different sights• Some are 16 clicks, some are 8 clicks
• ALWAYS wait for a group to form before changing the sights–Minimum of 2 shots• Changing after each shot results in “chasing shots”
Sight Adjustments for Anschutz .22
• To Move:– Elevation – top screw• UP: Counter Clockwise• DOWN: Clockwise
–Windage – side screw• LEFT: Forward/Clockwise• RIGHT: Backwards/Counter Clockwise
• Daisy Air Rifle is opposite to this
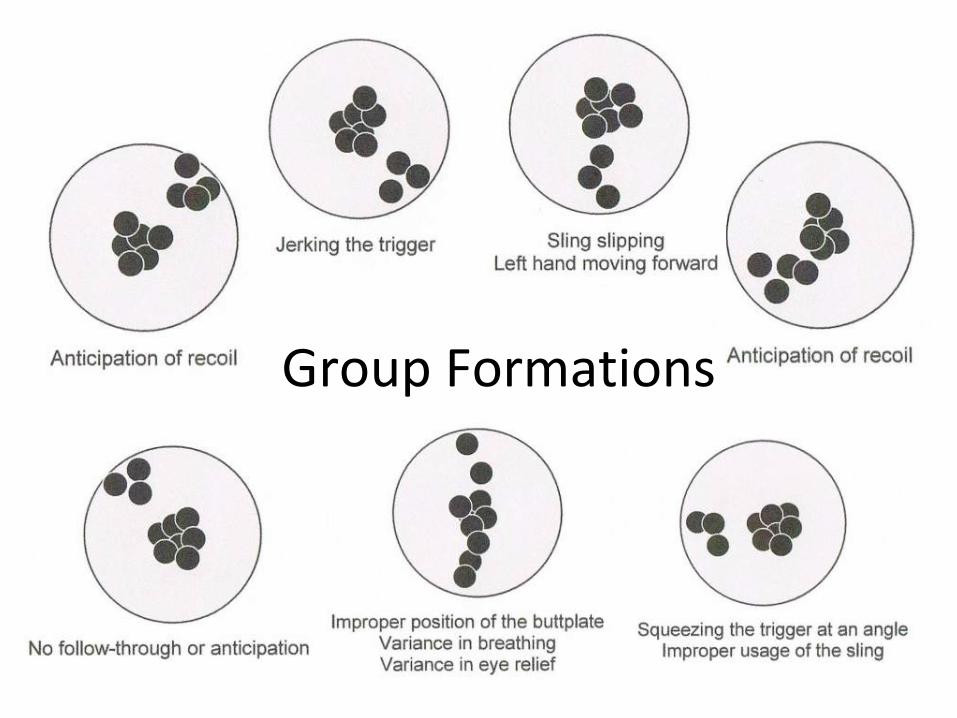
Group Formations
Self Coaching
• Better for more experienced athletes– Coaching themselves too early, they are unable to
focus on each individual task of the routine• They’re more focused on the outcome• Focused on seeing the shot as soon as they take it• Anger and frustration
• If there is a problem an athlete needs to fix they can see it themselves
Self Zero
• Have the athlete get into position• Place the scope beside the athlete– They should not have to move their position to
look through the scope• Angled scopes are best for this
• After each shot they look through the scope• Do not change sights until a group forms– Bad shots do not count in a group
Progression of the Athlete• First few (2-3) shooting practices have
athletes bench rest– Develop principles of marksmanship individually– Develop a routine after they understand
• Once their groupings get smaller and the coach feels that they understand the concepts remove the bench rest
• Develop a stable position with sling and begin again focusing on the principles of marksmanship, then developing a routine.
ONE SHOT MATCHES
• Each individual shot is it’s own match• Focus on each sequence in the routine for
each shot– Thinking ahead, athletes lose focus on the task
and the outcome will not happen
• Focus on the good shots– Can not do anything about poor shots, they’re in
the past–Make the next shot count
Sequences
• Entering the Range– Prone– Non Carry– Carry
• Removing the Rifle From Back• Placing Rifle onto Back

# Sequence of Events For Entering Range (Non Carry) - Prone
1 100m from range, slow down breathing (deeper breathes), calm heart rate
2 Entering Range (10m from target – depends on what end of range): Look ahead to target,
3 10m Begin removing poles, legs only, slow down heart rate/breathing
4 Stop in front of target, center body with CHARLIE
5 Place poles just off centre of body, drop to knees
6 Place STABILIZER ELBOW and check skis are in box.
7 Check snow covers open, place rifle in Stabilizer hand with opposite hand
8 Place magazine in rifle
9 Push hand up against hand stop, hook sling to prone cuff
10 Place rifle in shoulder AND CHECK TARGET NUMBER
11 Close eyes, checking natural alignment, begin firing sequence.
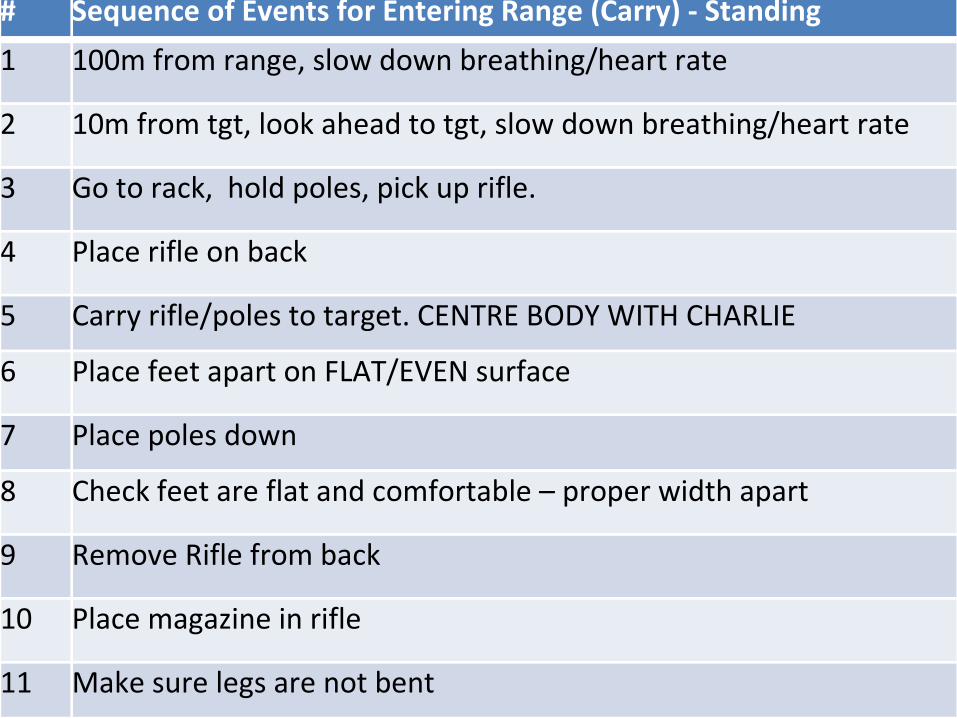
# Sequence of Events for Entering Range (Carry) - Standing
1 100m from range, slow down breathing/heart rate
2 10m from tgt, look ahead to tgt, slow down breathing/heart rate
3 Go to rack, hold poles, pick up rifle.
4 Place rifle on back
5 Carry rifle/poles to target. CENTRE BODY WITH CHARLIE
6 Place feet apart on FLAT/EVEN surface
7 Place poles down
8 Check feet are flat and comfortable – proper width apart
9 Remove Rifle from back
10 Place magazine in rifle
11 Make sure legs are not bent
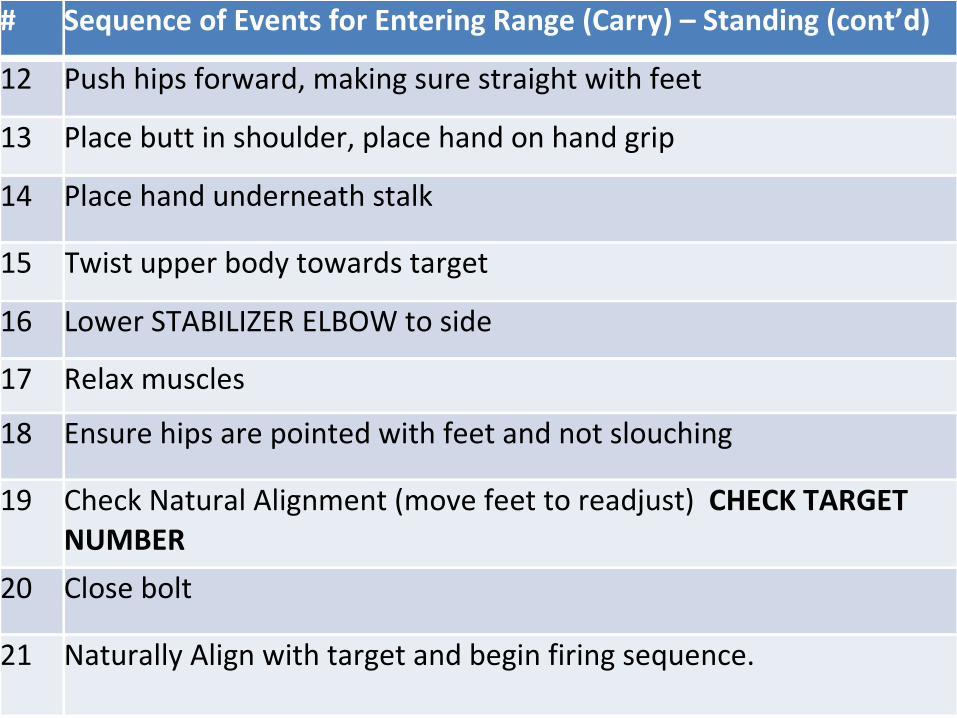
# Sequence of Events for Entering Range (Carry) – Standing (cont’d)
12 Push hips forward, making sure straight with feet
13 Place butt in shoulder, place hand on hand grip
14 Place hand underneath stalk
15 Twist upper body towards target
16 Lower STABILIZER ELBOW to side
17 Relax muscles
18 Ensure hips are pointed with feet and not slouching
19 Check Natural Alignment (move feet to readjust) CHECK TARGET NUMBER
20 Close bolt
21 Naturally Align with target and begin firing sequence.
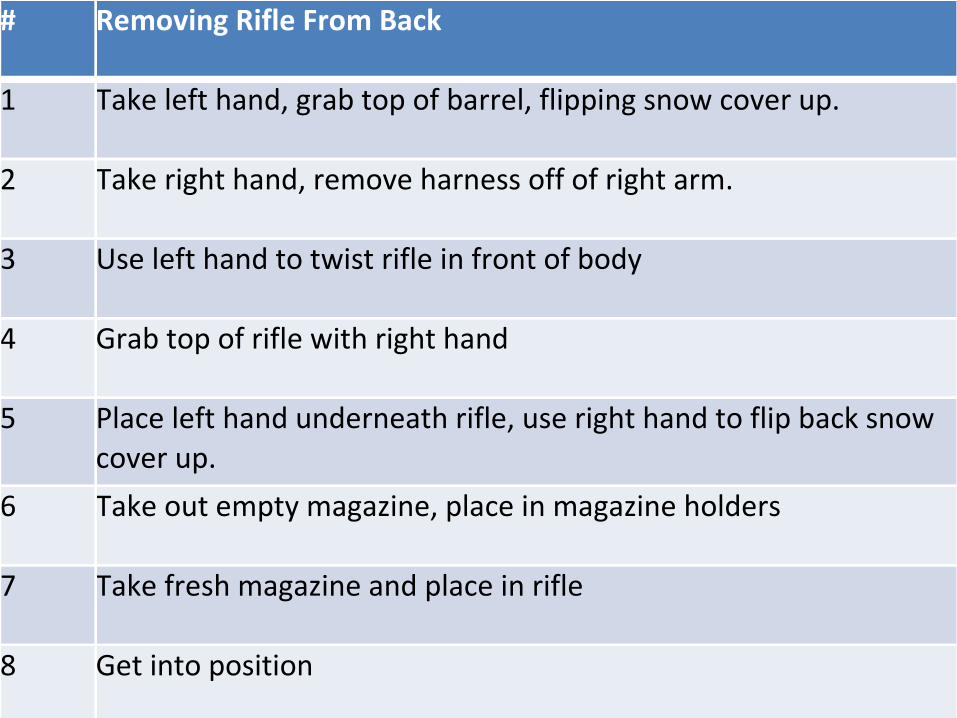
# Removing Rifle From Back
1 Take left hand, grab top of barrel, flipping snow cover up.
2 Take right hand, remove harness off of right arm.
3 Use left hand to twist rifle in front of body
4 Grab top of rifle with right hand
5 Place left hand underneath rifle, use right hand to flip back snow cover up.
6 Take out empty magazine, place in magazine holders
7 Take fresh magazine and place in rifle
8 Get into position
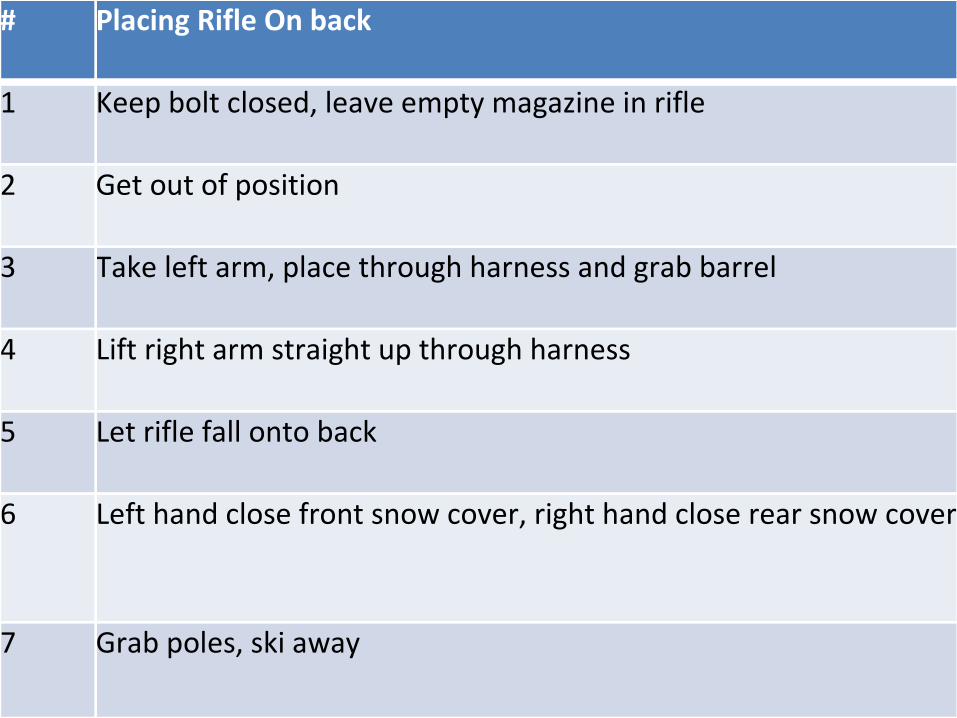
# Placing Rifle On back
1 Keep bolt closed, leave empty magazine in rifle
2 Get out of position
3 Take left arm, place through harness and grab barrel
4 Lift right arm straight up through harness
5 Let rifle fall onto back
6 Left hand close front snow cover, right hand close rear snow cover
7 Grab poles, ski away