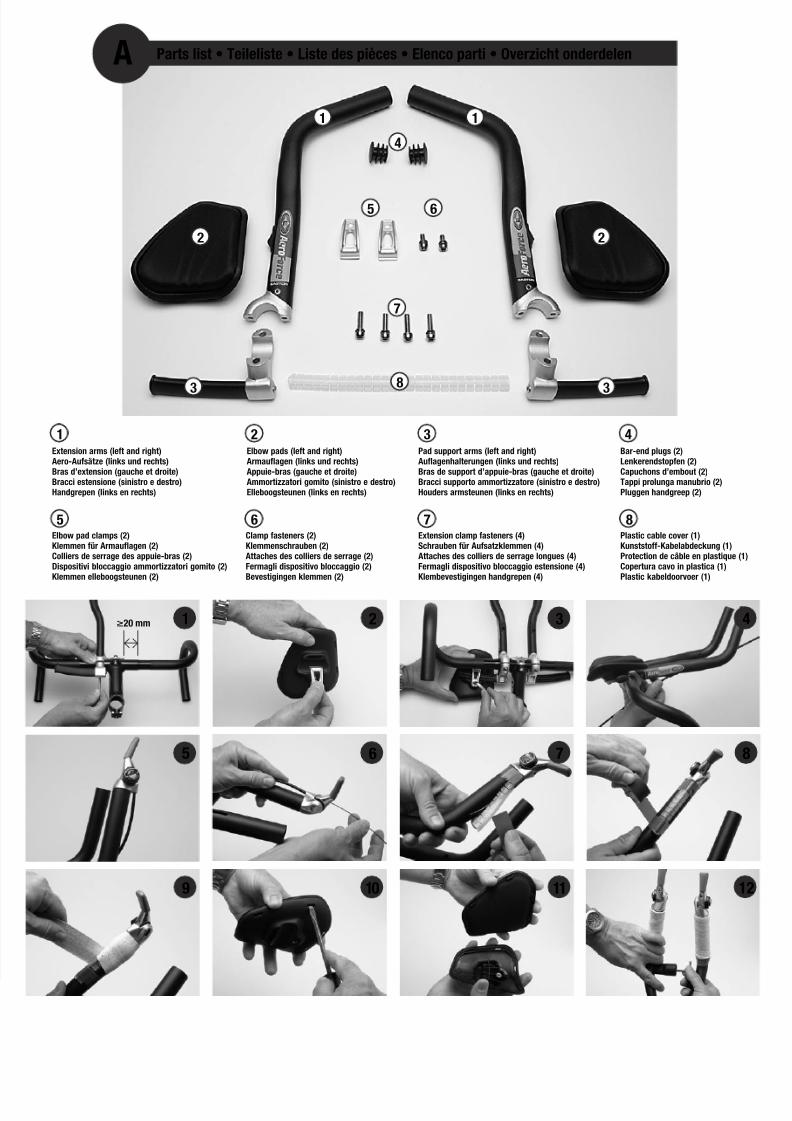
www.eastonbike.com C ongratulations on your purchase of an Easton AeroForce Clip-On Handlebar. T o ensure the best performance and longest service life from your AeroForce, please read and carefully follow these installation instructions. CAUTION! All Easton products should be installed by a qualified bicycle mechanic using appropriate professional tools. Easton assumes no liability for products which are improperly installed. WARNING! Failure to follow these instructions can result in component failure. Compon ent failure can lead to loss of control of the bicycle and result in serious personal injury or death. WARNING! Clip-On bars can require riding positions that are new or unfamilia r to many riders. We recommend that you practice using these bars in a low traffic area to become accustomed to any changes in the steering or handling characteristics of the bike. Please exercise caution when using Clip-On bars for the first time. Also, make sure that you continue to keep your head up and look forward when riding. 1. Before you start WARNING! Easton AeroForce Clip-Ons are approved for use with all Easton aluminum 26.0 mm Diameter Road Handlebars (EA70, EA50, etc.). They are NOT approved for use with Easton Carbon EC90 Road Bars. Use of the AeroForce with unapproved handlebars can result in component failure. • Confirm that the AeroForce Handlebar clamp surface diameter is the same as the handlebar clamp diameter. Easton AeroForce Handlebars can only be mounted on handlebars with a 26.0 mm diameter. • Check that all required parts are included in the box (Figure A). • Confirm that the larger-diameter (26 mm) center section of the handlebar is wide enough on each side of the stem for the AeroForce Clamps to contact along their entire width (Figure 1). Incorrect mating of the handlebar and clamps can cause Clip- On or handlebar failure. • If there is a clip-on bar installed on your bicycle, re move it. • Inspect the handlebar for nicks, dents, dings or scratches. If there is any damage, have your handlebar inspected and/or replaced by a qualified mechanic or shop before installing the new AeroForce Clip-Ons. Nicks, dings, dents, scratche s and sharp edges can create stress risers on the handlebar, whi ch could result in handlebar failure. 2. Installation of the AeroForce Clip-Ons CAUTION! When installing Easton components in conjunction with another manufacturer’s components, always follow that manufacturer’s instructions for proper installation procedure. EASTON ASSUMES NO LIABILITY FOR DAMAGE CAUSED BY INSTALLI NG OTHER MANUFACTURER S PRODUCTS. • Remove and lightly grease all bolt threads. • Thoroughly clean the clamping surfaces of both the AeroForce Clip-On and the handlebar . Do not lubricate the clamping surfaces. • Note that there is a right and a left Clip-On extension (Figure A). • Install each Easton AeroForce Clip-On on the handlebar; position it as desired (most riders will find the best fit with the clamp located right next to the stem); then secure it into position by lightly tightening the bolts (Figure 1 ). Once desired position and angle is determined, tighten bolts to 60 in-lbs. NOTE: Tighten bolts gradually, alternating between bolts and making sure that there is an equal gap between the top and bottom halves of the clamps. • Remove pad assemblies from packaging; grease all bolt threads; then install pad assemblies loosely on the aluminum pad support arms with included clamp and fastener (Figures 2 and 3). NOTE: There are left and right specific pad assemblies; the taller side of the pad is outboard (Figure A). • Adjust width of pads to desired position and tighten fasteners to 15 in-lbs. NOTE: There is an adjustment scale on the bottom of the pad support arm that can be used for width-positional reference. 3. Shifter Installation and Cable Routing Easton AeroForce Handlebars are compatible with Shimano and Campagnolo Bar End Shifters. In addition, the AeroForce is designed for internal routing of the shifter cables if desired. CAUTION! If Bar End Shifters are not used, the open end of each Aero Extension must be plugged with the provided Bar-End Plugs. NOTE: The ends of the Aero Extensions where the shifters mount can be cut down to fit smaller hands if desired. If this is done, make sure cut is straight and perpendicular to bar axis. After cutting, remove any burrs or sharp edges with 320/400 grit sandpaper. • Trim cable housing to length and insert through plastic grommet on the bottom of the Aero Extension until it comes out slot on front of handlebar (Figure 4). • Install Bar End Shifter in end of bar following the shifter manufacturer’s instructions (Figure 5). NOTE: To run cables internally the shifter needs to be installed so that it pulls cable from the front of the AeroForce Handlebar (the side where the slot is cut). • Insert shifter cable through shifter and into cable housing (Figure 6). Attach to derailleur and adjust per manufacturer’s instructions. • Trim provided plastic cable cover to a length that will cover exposed cable, and secure in place with a few pieces of electrical tape (Figures 7 and 8). • Wrap end of handlebar with handlebar tape as desired (Figure 9). • Repeat for other shifter . 4. Pad Replacement • Using a screwdriver, unc lip the snaps that hold the Pad Ring to the Pad Holder. Work around the pad until all snaps are released (Figure 10). • Lift Off Pad Ring and remove old pad (Figure 11). • Place new pad on Pad Holder and snap Pad Ring in place, making sure to completely sandwich lip of pad. Make sure all snaps are secure. NOTE: Some slight trimming of Pad Lip with scissors may be required to obtain optimal fit. When trimming, be careful not to cut into Lycra covering surrounding main pad. CAUTION: Whenever an AeroForce Handlebar equipped bike is placed on a roof rack or mounted externally on a vehicle for transport, remove the armrest pads. Easton Warranty does not cover pads lost during transport. 5. Computer Mount AssemblyA Custom Computer Mount is available as an additional accessory. This is installed as follows: NOTE: The Computer Mount can be mounted on either the left or right Aero Extension. • Decide if you want the Computer Mount on the left or the right extension. • Grease the computer mount clamp bolt threads and install the mount (Figure 12). NOTE: The mount is plastic and the bolt is aluminum to reduce weight, so care must be taken not to over-torque the bolt. Use just enough torque to keep mount tight, but do not exceed 20 in-lbs. • Install Computer on Mount following computer manufacturer’ s instructions. 6. Maintenance AeroForce Clip-On Handlebars must be inspected frequently and carefully maintained. In particular: • Inspect for dents, bends, deep scratches, cracks or gouges before each ride. If any are visible, do not use the bicycle until the handlebar has been replaced. Handlebars may be severely weakened even if no damage is visible. After a major impact or accident, even if no damage is visible, have a dealer inspect the handlebar before using the bicycle. Do not a ttempt to straighten a bent handlebar. It must be replaced. • Before clamping any item to the handlebar, make sure the clamp is free of any burrs or sharp edges. Do not use a rotating motion to mount any clamped item on the bars. Scratches can cause stress concentrations that can significantly shorten the life of the handlebar. • Replace your handlebars periodically . Consult your dealer as to the appropriate frequency of replacement. Replace a scratched or damaged handlebar immediately. Destroy any handlebar which you have replaced for safety reasons. WARRANTYEaston products are warranted to be free of defects in materials and workmanship. Easton aluminum handlebars are warranted for five years from date of purchase. Warrant y is for the original owner only and proof of purchase is required. This warranty is in lieu of all other warranties. ANY IMPLIED W ARRANTIES OF FITNESS FOR A PARTICULAR PURPOSE OR WARRANTIES OF MERCHANTABIL ITY ARE LIMITED TO THE DURATION OF THE EXPRESSED WARRANTY . Depending on individual state laws, the above exclusion may not apply to you. This warranty gives you specific rights. You may have other legal rights depending on the state in which you reside. Please consult the Contact Us page of the Easton web site <www.east onbike.com> for warranty contact information. Select U.S. Dealers or International Distributors depending on your location. Easton AeroForce Clip-On Bar